

sitrex RP/4, RP/5, RP/6, RP/8, RP/10 Operator's Manual & Spare Parts List
...
S.p.A
OPERATOR'S MANUAL
SPARE PARTS LIST
RP/4-RP/5-RP/6-RP/8-RP/10-RP/12


TABLE OF CONTENT
1
MOUNTED SIDE-DELIVERY RAKES: RP/4-RP/5-RP/6-RP/8-RP/10-RP/12. ...................................... 2
1.1 INTRODUCTION .................................................................................................................................. 2
1.2 WARRANTEE ...................................................................................................................................... 2
1.3 CAUTION FOR USE ............................................................................................................................ 3
1.4 ASSEMBLY SOLUTION ...................................................................................................................... 3
1.5 SPECIFICATIONS ............................................................................................................................... 3
1.6 RP/4-RP/5 AND RP/6 RAKE ASSEMBLY INSTRUCTIONS ............................................................... 4
1.7 ASSEMBLING ...................................................................................................................................... 4
1.8 MOUNTING OF RP/4 AND RP/5 RAKE TO TRACTOR ..................................................................... 7
2
RP/8-RP/10 AND RP/12 V-RAKE ASSEMBLY INSTRUCTIONS.......................................................... 7
2.1 ASSEMBLING ...................................................................................................................................... 8
3
ON THE FIELD WITH RP/4-RP/5 AND RP/6 ......................................................................................... 9
3.1 RAKING..............................................................................................................................................10
3.2 SPREADING ......................................................................................................................................10
3.3 TURNING ...........................................................................................................................................10
4
ON THE FIELD WITH RP/8-RP/10 AND RP/12 V-RAKES ..................................................................11
5
FEATURES............................................................................................................................................12
6
MAINTENANCE ....................................................................................................................................12
7
Machine identification data and conformity declaration .................................................................12
8
SPARE PARTS LIST ........................................................................ Errore. Il segnalibro non è definito.
1

OPERATOR'S MANUAL
1
MOUNTED SIDE-DELIVERY RAKES:
RP/4-RP/5-RP/6-RP/8-RP/10-RP/12.
1.1 INTRODUCTION
This manual includes full instructions for a correct use and maintenance of the machinery, and the recommended spare parts list.
In order to prevent any possible damage of the machine and/or the operator(s) you are kindly requested to
go through this manual for a proper knowledge of the assembly of the implements, their use on the field, and
their maintenance. If any doubt, please contact your local dealer or distributor.
Should the machine be re-sold, you are kindly requested to supply this manual along with the machine to the
new purchaser.
1.2 WARRANTEE
The manufacturer warrants new machinery at the time of delivery to the original purchaser to be free from
defects in material and workmanship if properly set up and operated in accordance with this Operator's Manual.
The manufacturer undertakes to repair or replace free of charge any defective part which should be returned
by the purchaser (freight prepaid) and found to be defective by inspection authorized by the manufacturer
during the warranty period.
This warranty will be valid for 12 (twelve) months from the delivery of goods to the original purchaser.
In case the customer is not in a position to return the defectice part to the facturer, the manufacturer cannot
be held responsible for any cost due for repair or replacement of any part of the machine, he will only supply
the part(s) required for the repair and/or replacement.
The warranty is null and void when it is evident that the machine has been improperly used or repaired or
however repaired without authorization.
The manufacturer undertakes no responsibility for any obligation or agreement reached by any manufacturer
employers, agents or dealers, which are not in compliance with the above warranty. The manufacturer cannot be held responsible for the consequent damages. This warranty substitutes any other warranty, express
or implied, and any other manufacturer's obligation.
2

OPERATOR'S MANUAL
1.3 CAUTION FOR USE
It could be dangerous for people who are not familiar with this type of machine to use the rakes particularly
when kids are there during the assembly or operation on field. We therefore recommend the use of the only
to those people who are very familiar with the machine and the safety precautions.
1.4 ASSEMBLY SOLUTION
Our rakes are easily convertible into different sizes, as almost all parts are standard and interchangeable on
all sizes (wheel arms, wheels - etc.). With a special frame it is possible to attach together two RP/4-RP/5RP/6 rakes - R.H. and L.H. - and convert them into a V-rake.
Here are the advantages
1) Having a R.H. RP/4 rake or a R.H. RP/5 rake or a R.H. RP/6 rake you can convert them into a L.H.
RP/4 or L.H. RP/5 or L.H. RP/6 rake by replacing all wheel arms marked RIGHT with those marked
LEFT.
2) Having a R.H. RP/4 rake you can convert it into a RP/8 V-rake by attaching a L.H. RP/4 rake and the
relevant frame. To get one RP/10 V-rake from two RP/5 rake the procedure is still the same. To get
one RP/12 V-rake from two RP/6 rake the procedure is still the same.
3) You could also use your V-rake as two single ones, L.H. or R.H. rake, according to your requirements.
1.5 SPECIFICATIONS
MODELS
RP/4 RP/5 RP/6 RP/8 RP/10 RP/12
Weight
Number of wheels 4 5 6 8 10 12
Number of tines on each wheel 40 40 40 40 40 40
Wheel diam.
Raking working width
Turning and spreading working width
Transport width
Working speed
KW/HP required min.
180 Kg 200 Kg 250 Kg 460 Kg 520 Kg 620 Kg
396 lbs 440 lbs 551 lbs 1013 lbs 1146 lbs 1366 lbs
1,4 m 1,4 m 1,4 m 1,4 m 1,4 m 1,4 m
55" 55" 55" 55" 55" 55"
2,6 m 3,5 m 4,1 m 5,5 m 7,5 m 8,7 m
8' 6" 11" 6" 13' 6" 18' 1" 24' 7" 28' 6"
2,9 m 3,9 m 4,4 m 6,1 m 8,7 m 10 m
9' 6" 12' 10" 14' 5" 20' 28' 7" 32' 10"
2,2 m 2,3 m 2,3 m 3,6 m 4,7 m 4,7 m
7' 3" 7' 6" 7' 6" 11' 10" 15' 5" 15' 5"
22 kmh 22 kmh 22 kmh 22 kmh 22 kmh 22 kmh
14 mph 14 mph 14 mph 14 mph 14 mph 14 mph
22 Kw 22 Kw 22Kw 30 Kw 30Kw 30Kw
30 HP 30 HP 30HP 40HP 40HP 40HP
3
OPERATOR'S MANUAL
1.1
1.2
1.6 RP/4-RP/5 AND RP/6 RAKE ASSEMBLY INSTRUCTIONS
To room in the container we supply the partly knocked down. Here be-assembly instructions. For refer to
the enclosed breakdown.
1.7 ASSEMBLING
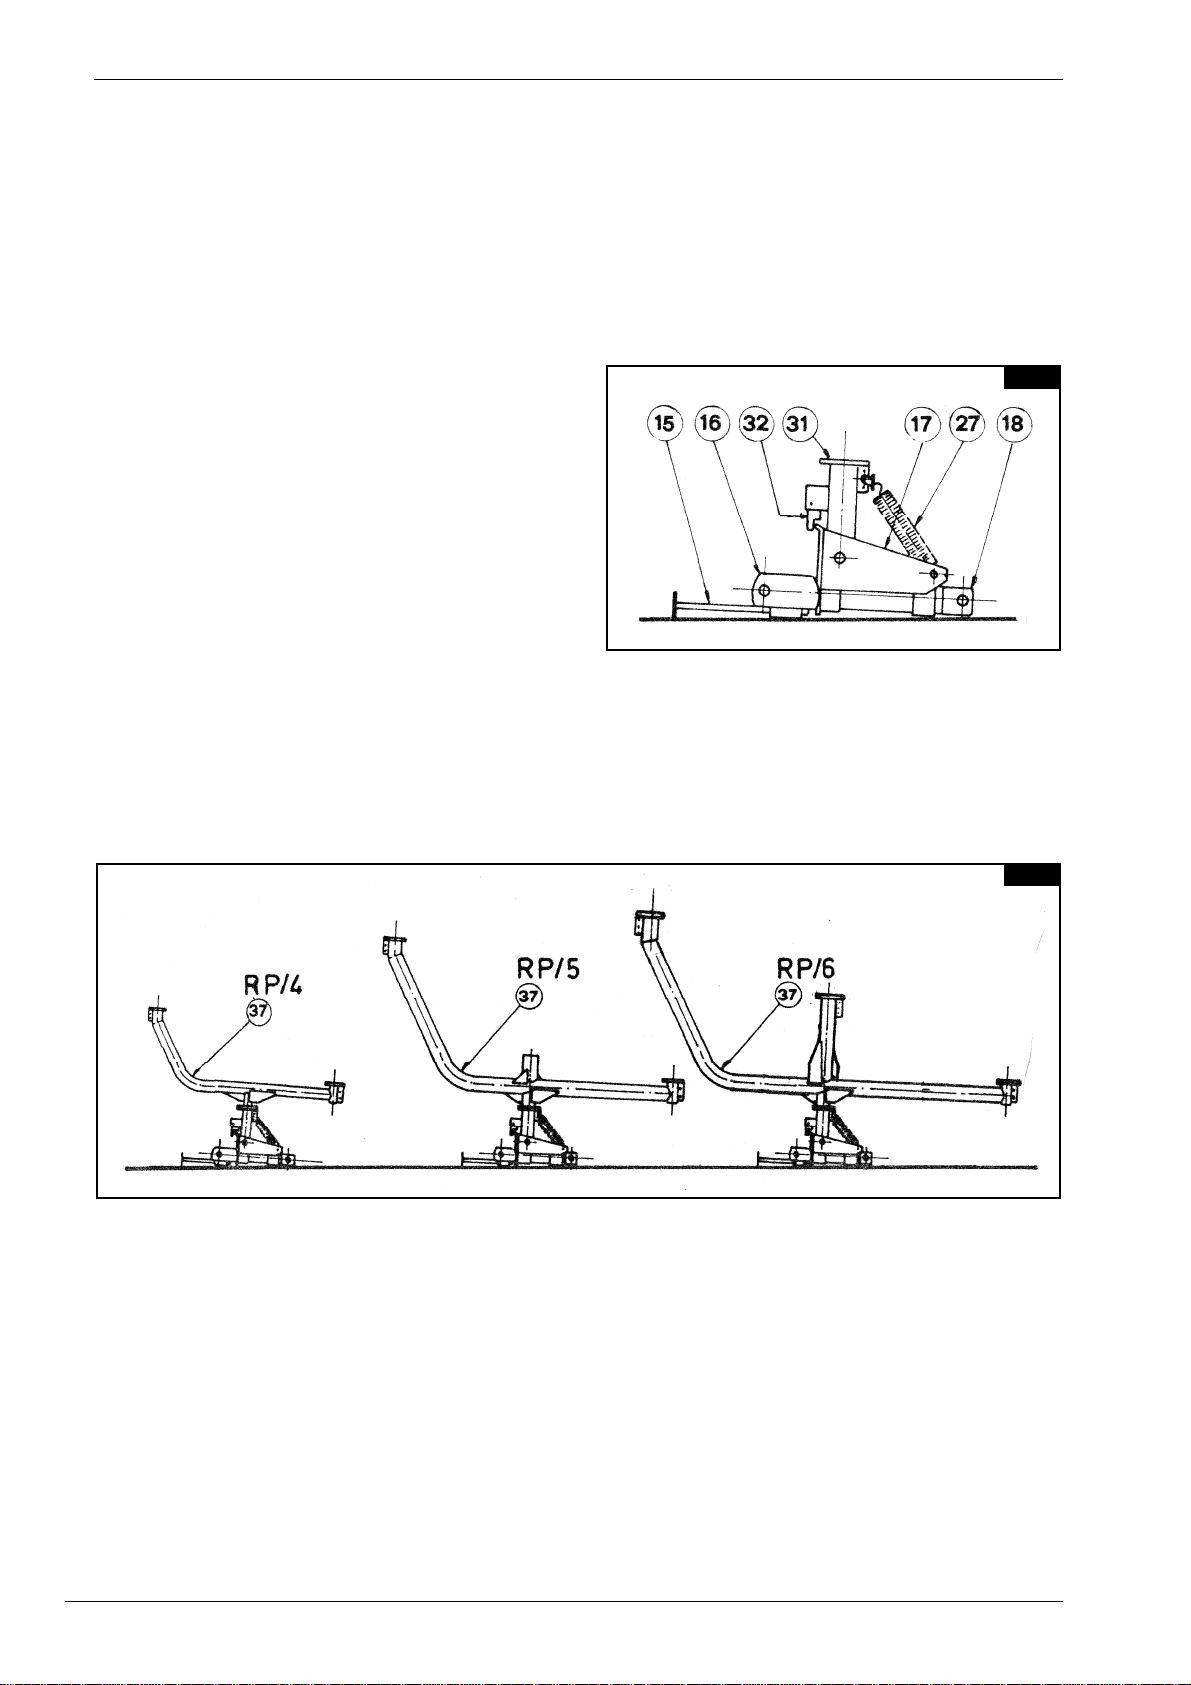
1.7.1
Position the parking stand (15) in its housing and
lock it with the pin (13), Next, lay the primary structure assembled) on the ground with the pipe (31)
upwards (pict 1.1).
1.7.2
Slide the pipe (37) into the swinging pipe (31) and retain with the supplied lever (33) and pin (36), so that it is
on axe with the three point hitch (pict. 1.2).
4
OPERATOR'S MANUAL
1.3
1.4
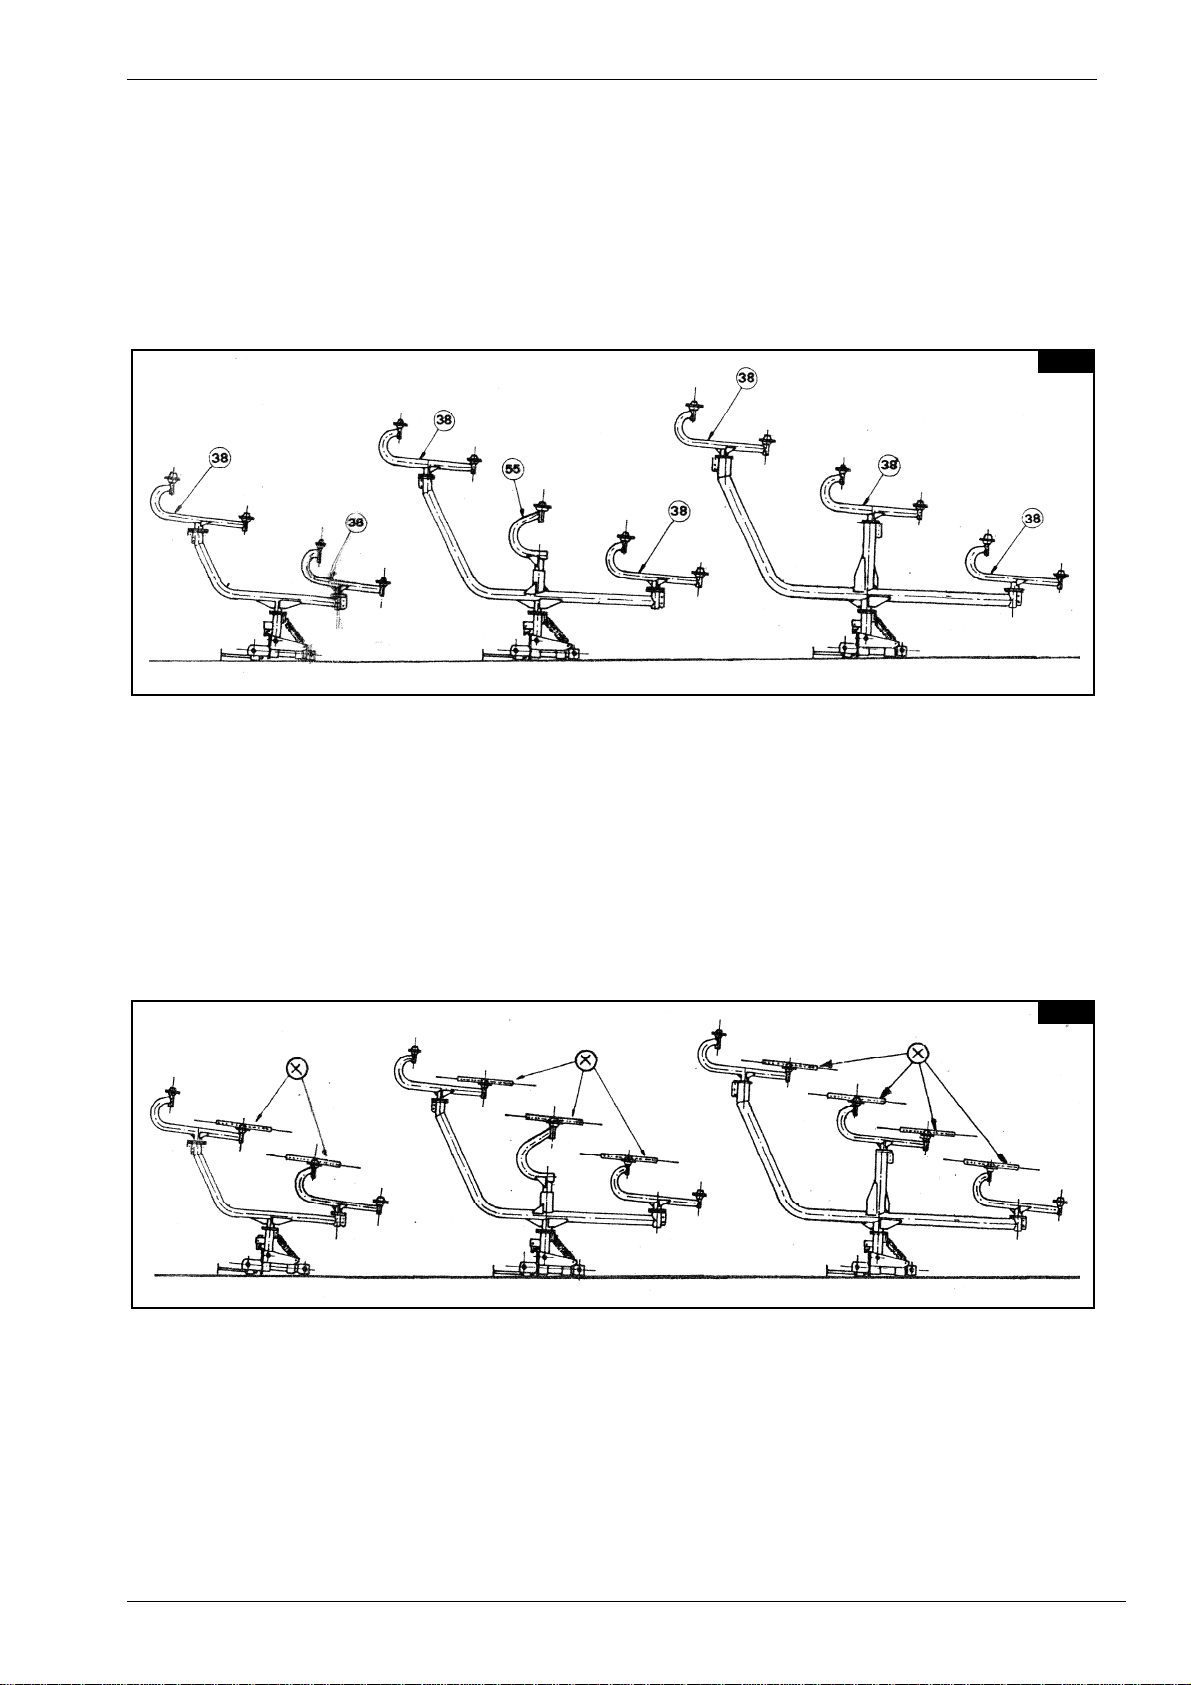
1.7.3
Attach the wheel arms (38) and lock them to the main pipe (37) with pins (36), so that they are on axe with
the main pipe (37). For the RP/5 rake, attach also the central arm (55) to the main pipe (37) and retain with
bolts (53-54-30) (pict. 1.3)
1.7.4
Attach the two central wheels (RP/4) or the three central wheels (RP/5) or the four central wheels (RP/6) to
the supplied arm flanges (38-55) and both them with the supplied bolts (pict. 1.4). when bolting the wheels
(x) check that the tine clamps (48) are turned toward the hub.
5

OPERATOR'S MANUAL
1.5
1.6
1.7.5
Lift the wheels (x) from the ground until they are in the working position (pict. 1.5).
1.7.6
Unlock the primary structure with the supplied lever (33) and pin (36), turn it by 90 degrees and lock it again
with the same pin. Now the is properly positioned on the ground and you only have to attach the remaining
wheels as explained above.
The rake is now fully assembled and ready to be mounted to the tractor (pict. 1.6)
IMPORTANT !
Above are the infractions for the R.H. rake assembly. Please refer to the above
instructions also for the L.H. rake assembly. Most parts are interchangeable for
both rakes, only the specific parts are marked RIGHT or LEFT
6
 Loading...