

Site Technology TWC6ML User Manual
TWC6ML – For use with Li-Ion or LiPo batteries only. www.sitecharger.com
1
Introduction
Thank you for purchasing the SITE•TECH TWC6ML, six unit rapid charger. This high quality product is designed for use with rechargeable
lithium ion (Li-Ion) or lithium polymer (LiPo) two-way radio batteries. Do not charge NiCd or NiMH batteries with TWC6ML. Batteries may
be charged while off or attached to the radio.
Important Safety Information
Caution
1. Never charge alkaline or dry cell batteries with this charger. The battery may burst and cause personal injury. Also, do not charge NiCd or NiMH batteries
with this charger.
2. Do not charge Li-Ion or LiPo batteries unless they are designed with overcharge protection.
3. Do not attempt to charge a battery without rst conrming that the appropriate charging pod is installed.
4. Disconnect charger from the power supply before installing, adjusting, removing, or cleaning the charging pod.
5. Use only charging pods and the power supply designed for the TWC6ML charger. Using similar parts available from other manufacturers may damage
the charger or batteries.
6. Make sure the contacts in the charging pod and on the battery are clean, otherwise the battery may not fully charge.
7. Do not allow wire or metal objects to touch contacts in the charging pod or any internal part of the charger.
8. Do not remove the charger’s housing or make any modication to the charger.
9. Turn charger off when not in use. The power on / off switch is located on the right side of the charger.
10. Position the charger away from TVs, radios, or other receivers to prevent the charger from interfering with these types of products.
11. Always charge new batteries completely before initial use. Do not charge batteries that have been exposed to excessive heat.
12. Recycle batteries when they can no longer be used. Do not discard unwanted batteries in the trash or incinerate. Batteries exposed to re or excessive
heat may explode.
The lightning ash and arrowhead within the
triangle is a warming sign alerting you
of ‘dangerous voltage’ inside the product.
CAUTION: TO REDUCE THE RISK OF THE ELECTRIC
SHOCK, DO NOT REMOVE COVER. NO USER SERVICABLE PARTS ARE INSIDE. REFER ANY SERVIC-
ING TO QUALIFIED SERVICE PERSONNEL.
The exclamation point within the triangle
is a warming sign alerting you of important
instructions accompanying the product.
1. Read and follow these instructions. Heed all warnings. Keep this
user manual for future reference.
2. Do not operate this charger near water or where moisture is pres-
ent. Do not operate this charger where it could be exposed to
dripping, splashing, or spray from water or other liquids. Do not
place containers with liquids, such as soft drinks or ower vases,
on or near the charger. Clean with a dry cloth.
3. Follow all installation guidelines. Do not block any ventilation
openings on the charger. Do not place near any heat sources such
as radiators, heat registers, stoves, ampliers, or other devices
that produce heat.
4. Only use the power supply provided with this charger. For safety
reasons, do not modify the grounding type plug on the power
cord. The grounding type plug has two blades and a third grounding prong. If this plug does not t into your outlet, consult a
qualied electrician for replacement of the outlet.
5. Protect the power supply and cords from being walked on. Do not
allow the power cord to be pinched or bent at a sharp angle, particularly near the wall outlet or where it connects to the charger.
6. Only use attachments / accessories supplied with this charger or
specied by SITE•TECH.
7. Unplug this charger during lightning storms or when not used for
an extended period of time.
8. Refer all repairs for servicing to qualied service personnel. Servicing is required when the charger has been damaged in any
way. This includes dropping the charger, spilling liquids on the
charger, causing objects to fall into the charger, excessive wear to
the power cord or plug, exposing the charger to rain or moisture,
or when the charger fails to operate in a normal manner.
TWC6ML – For use with Li-Ion or LiPo batteries only. www.sitecharger.com
2
2
1
3
4
5
6
Replacing A Charging Pod
The charging pod is made from quality materials and designed to
provide years of service when properly used. In most cases, the charging
pod will only be replaced when you want to use the charger with a different battery.
Follow these steps to change the charging pod:
1. Obtain a charging pod made specically for the TWC6ML. Conrm that the charging pod is compatible with the battery you want to charge.
2. If connected, unplug the power supply from TWC6ML.
3. Turn the locking screw on the bottom of the charging pod counter-clockwise several rotations. Lift the charging pod and the screw from the charging base.
4. Before placing the replacement pod in the charger, make sure the contacts on the bottom of the pod are aligned with the contacts in the charger. After the
replacement pod is inserted into the charger base, secure with the locking screw. Do not over tighten the screw.
5. Inspect the charging contacts in the pod to ensure they are clean and unobstructed.
6. Connect the small end of the power supply cable to TWC6ML and plug the other end into a wall outlet. You are now ready to charge a battery compatible
with the charging pod.
Charging A Battery
1. Conrm that the charging pod and battery are compatible.
2. Connect the small end of the power supply cable to TWC6ML and plug the other end into a wall outlet.
3. Place battery to be charged in the charging pod. The battery may be charged while attached to the radio. Note: If the battery is attached to the radio,
charging time will be reduced if the radio is powered off.
4. When a battery is placed in the charging pod, the charge status LED will illuminate ORANGE for a short period while the charger performs a battery
diagnostic. Once completed, the charge status LED will change to RED. This indicates the battery is charging.
5. While a battery is charging, the charge status LED will illuminate RED with no ashing. If the charge status LED is red and ashes, a fault has been
detected. The ash pattern represents a specic fault condition. See section on Fault Conditions for details.
6. When the battery is charged to 80% of capacity, the charge status LED will change to GREEN and begin to ash. It is recommended that the battery
be charged to at least 80% capacity before use.
7. The charge status LED will illuminate GREEN with no ashing when the battery is fully charged.
8. When a fully charged battery is removed, the status LED may remain illuminated for a few seconds. Allow the charge status LED to go off before placing another battery in the charging pod.
9. The TWC6ML is designed to operate at room temperatures between 15°C and 30°C. Charging batteries at temperatures outside this range may result
in under charging of batteries.
Fault Conditions
When the charge status LED ashes RED, a fault condition exists. There are three different ash patterns, each indicating a specic type of fault. The ash
patterns and fault conditions are as follows:
Flash Pattern Fault Type
Flashes 1 Time Indicates charging complete, but battery is under charged. Battery voltage is below minimum level required. This warning is
provided after the rapid charging stage is complete.
Flashes 2 Times Indicates battery contact is “open” and current is not passing through the (+) and (-) contacts on the battery. This warning is
provided after the initial diagnostic stage is complete. Check charging pod to conrm compatibility with battery.
Flashes 3 Times Indicates over-current condition caused by battery short circuit. Have the battery checked by a qualied technician. Do not at-
tempt charging the battery if a short circuit exists.
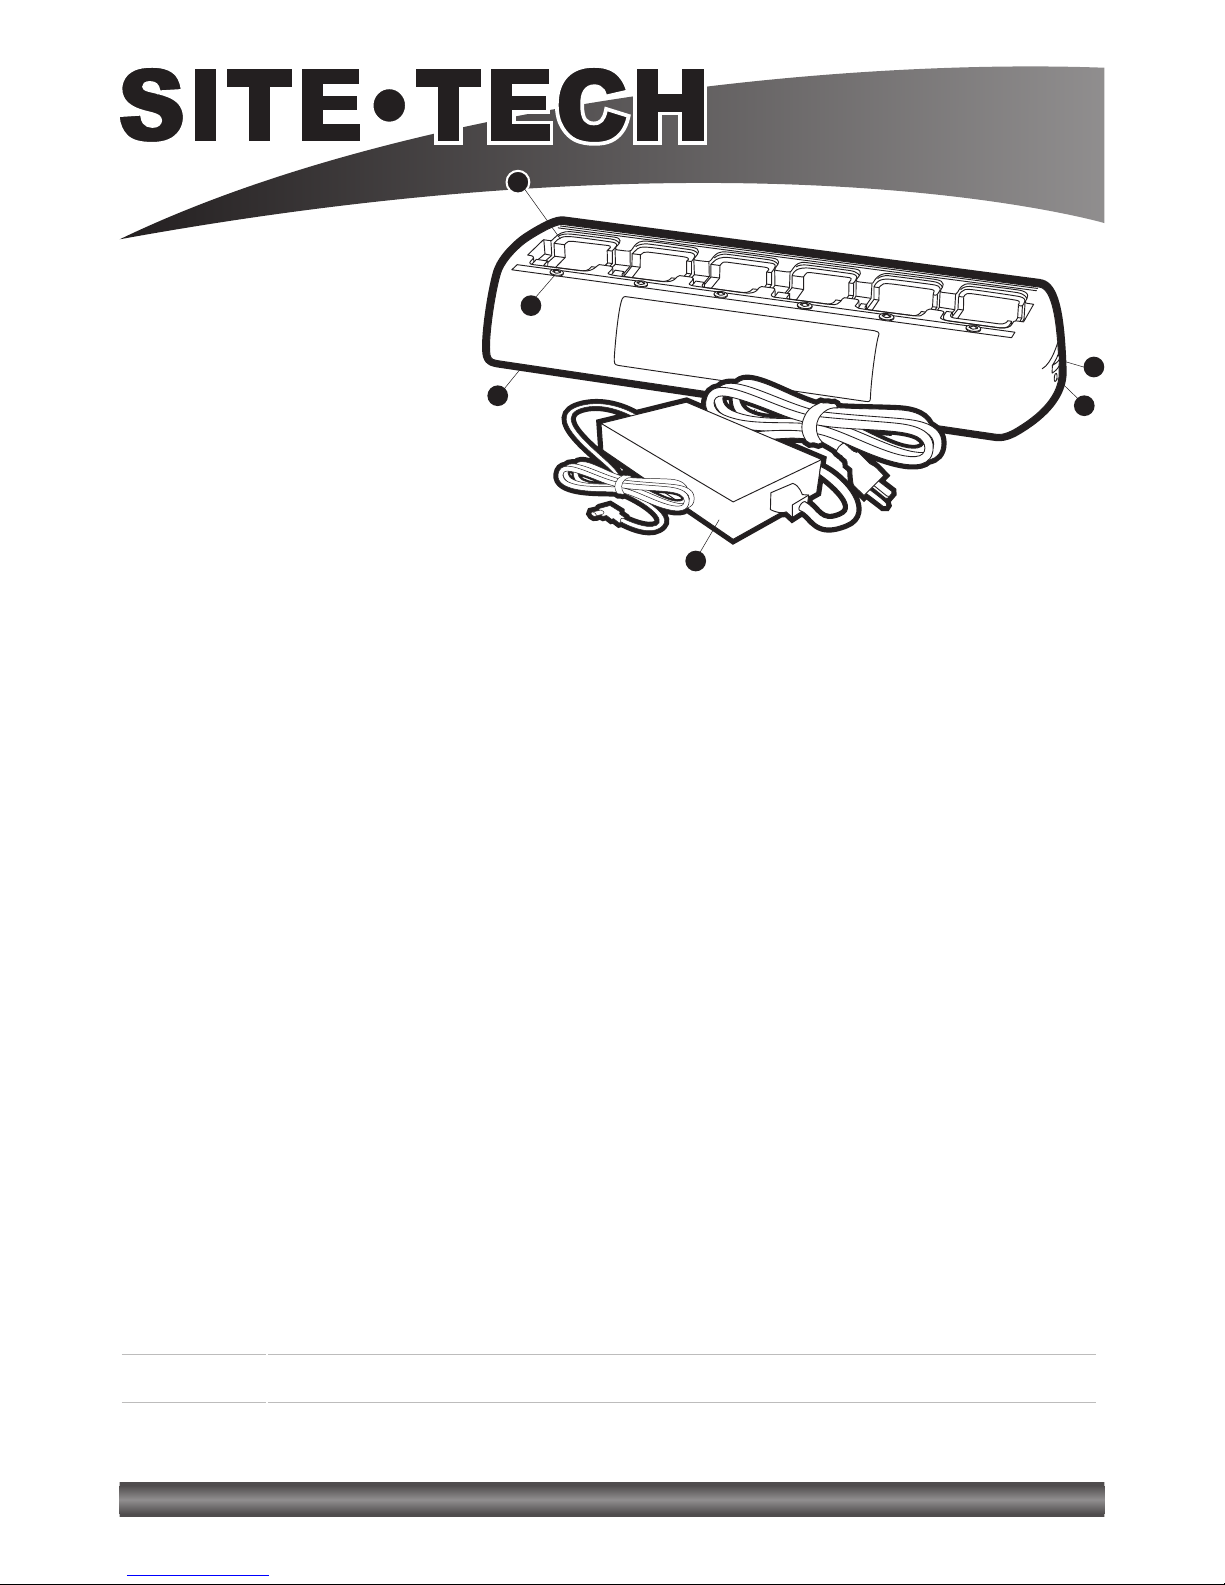
TWC6ML Features
1. Power supply (TWC6M-PS)
2. TWC6ML – six unit rapid charger
3. Removable charging pod (shown for rst
position only)
4. Charge status LED (shown for rst position
only)
5. Power on / off switch
6. Connection point for power.
Note: Quick reference information
for charge status LED is located on
front of charger.
 Loading...