

Page 1
Document NO.:RD-528A-39-001 Version: E 20170920
- 1 -
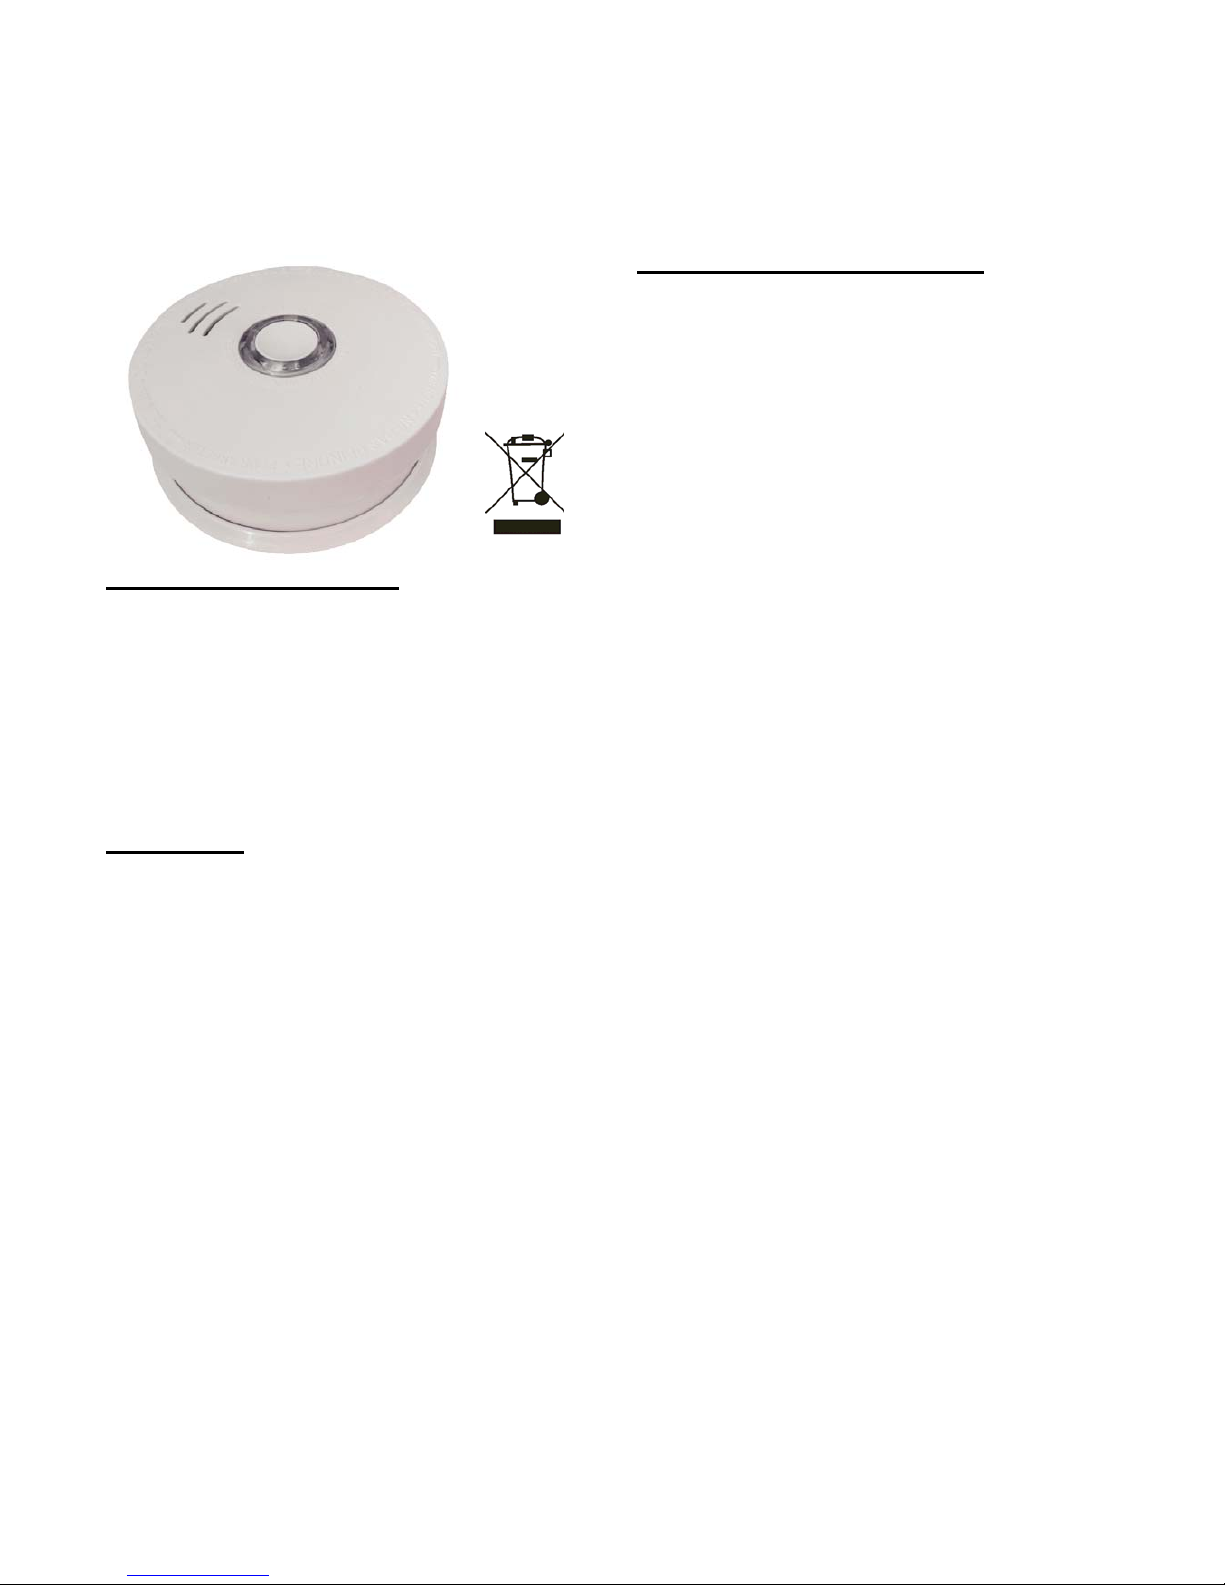
Smoke Alarm User Manual
Model number: GS528A Ref:ST528A
Thank you for purchasing our smoke alarm. Please take a few
minutes to read the user’s manual thoroughly and familiarize
yourself and your family with its operation. And save it for
future reference.
Product Specifications:
POWER: DC 9V battery
OPERATION CURRENT: <11uA(standby), <30mA
(alarm)
ALARM VOLUME: >85dB(A) at 3 meters.
Low battery warning: 6.5-7.8V
ALARM SENSITIVITY: 1.51-2.64%/ft OBS
COMPLY WITH: UL217 &CAN/ULC-S531
Description:
This unit is a photoelectric smoke alarm. The photoelectric
technology, it is more sensitive in detecting slow smoldering
fires which generate light smoke, little heat and may smolder
for hours before bursting into flames. This smoke alarm does
not contain any radioactive material. Smoke alarms should be
installed in every room (except the bathroom and kitchen),
finished attics and basements, making sure the people in the
home will be able to hear and respond to the alarm sound. For
minimum protection, you should install an alarm on every
level of the home particularly outside sleeping rooms. Each
alarm should be placed in the middle of the ceiling of each
room to be protected. Typical single storey dwelling
installation recommendations: Install a smoke alarm on the
ceiling or wall inside each bedroom and in the hallway outside
each separate sleeping area. If a bedroom area
hallway is more than 30 feet long, install a smoke alarm at
each end. If there is a basement: install a smoke alarm on the
basement ceiling at the bottom of the stairwell. Typical
multi-storey dwelling installation recommendations: Install a
minimum of one smoke alarm on each occupiable level of the
home. Install a smoke alarm on the ceiling or wall inside each
bedroom and in the hallway outside each separate sleeping
area. If a bedroom area hallway is more than 30 feet long,
install a smoke alarm at each end install a smoke alarm at the
top of a first – to- second floor stairwell.
Important Safety Information:
1. The test button accurately tests smoke alarm functions. Do
not use any other test method. Test smoke alarm weekly to
ensure proper operation.
2. If you're sure it isn't a really alarm, open windows or fan the
air around smoke alarm to test and silence it.
3. User to install this product needs to comply with all local
and national electrical installation and building codes.
4. This smoke alarm is designed to be used inside a single
family home only. In multifamily buildings, each individual
living unit should have its own smoke alarms. Do not install
in non-residential buildings as this smoke alarm is not a
substitute for a complete alarm system.
5. Install a smoke alarm in every room and on every level of
the home. Smoke may not reach the smoke alarm for many
reasons. For example, if a fire starts in a remote part of the
home, on another level, in a chimney, wall, roof, or on the
other side of a closed door, smoke may not reach the smoke
alarm in time to alert household members. A smoke alarm
will not promptly detect a fire except in the area or room in
which it is installed.
6. Smoke alarm may not alert every household member every
time. The alarm horn is loud in order to alert individuals to a
potential danger. However, there may be some
circumstances where a household member may not hear the
alarm (i.e. outdoor or indoor noise, sound sleepers, drug or
alcohol usage, the hard of hearing, etc.). If you suspect that
this smoke alarm may not alert a household member, install
and maintain specialty smoke alarms. Household member
must hear the alarm’s warning sound and quickly respond to
it to reduce the risk of injury, or death that may result from
fire, if a household member is hard of hearing, install
special smoke alarms with lights or vibrating devices to
alert occupants.
7. Smoke alarms can only sound their alarms when they detect
smoke or detect combustion particles in the air. They
do not sense heat, flame, or gas. This smoke alarm is
designed to give audible warning of a developing fire.
However, many fires are fast - burning, explosive, or
intentional, and others are caused by carelessness or safety
Page 2
Document NO.:RD-528A-39-001 Version: E 20170920
- 2 -
hazards. In such circumstances, Smoke may not reach the
alarm QUICKLY ENOUGH to ensure safe escape.
Therefore the installation of smoke alarms is not a substitute
for practicing fire safety in the home.
8. Smoke alarms have limitations. This smoke alarm is not
foolproof and is not warranted to protect lives or property
from fire. Smoke alarms are not a substitute for insurance.
Homeowners and renters should have adequate insure to
protect their lives and property. In addition, it is possible for
the smoke alarm to fail at any time. For this reason, you
must test the smoke alarm weekly and replace them every
10 years.
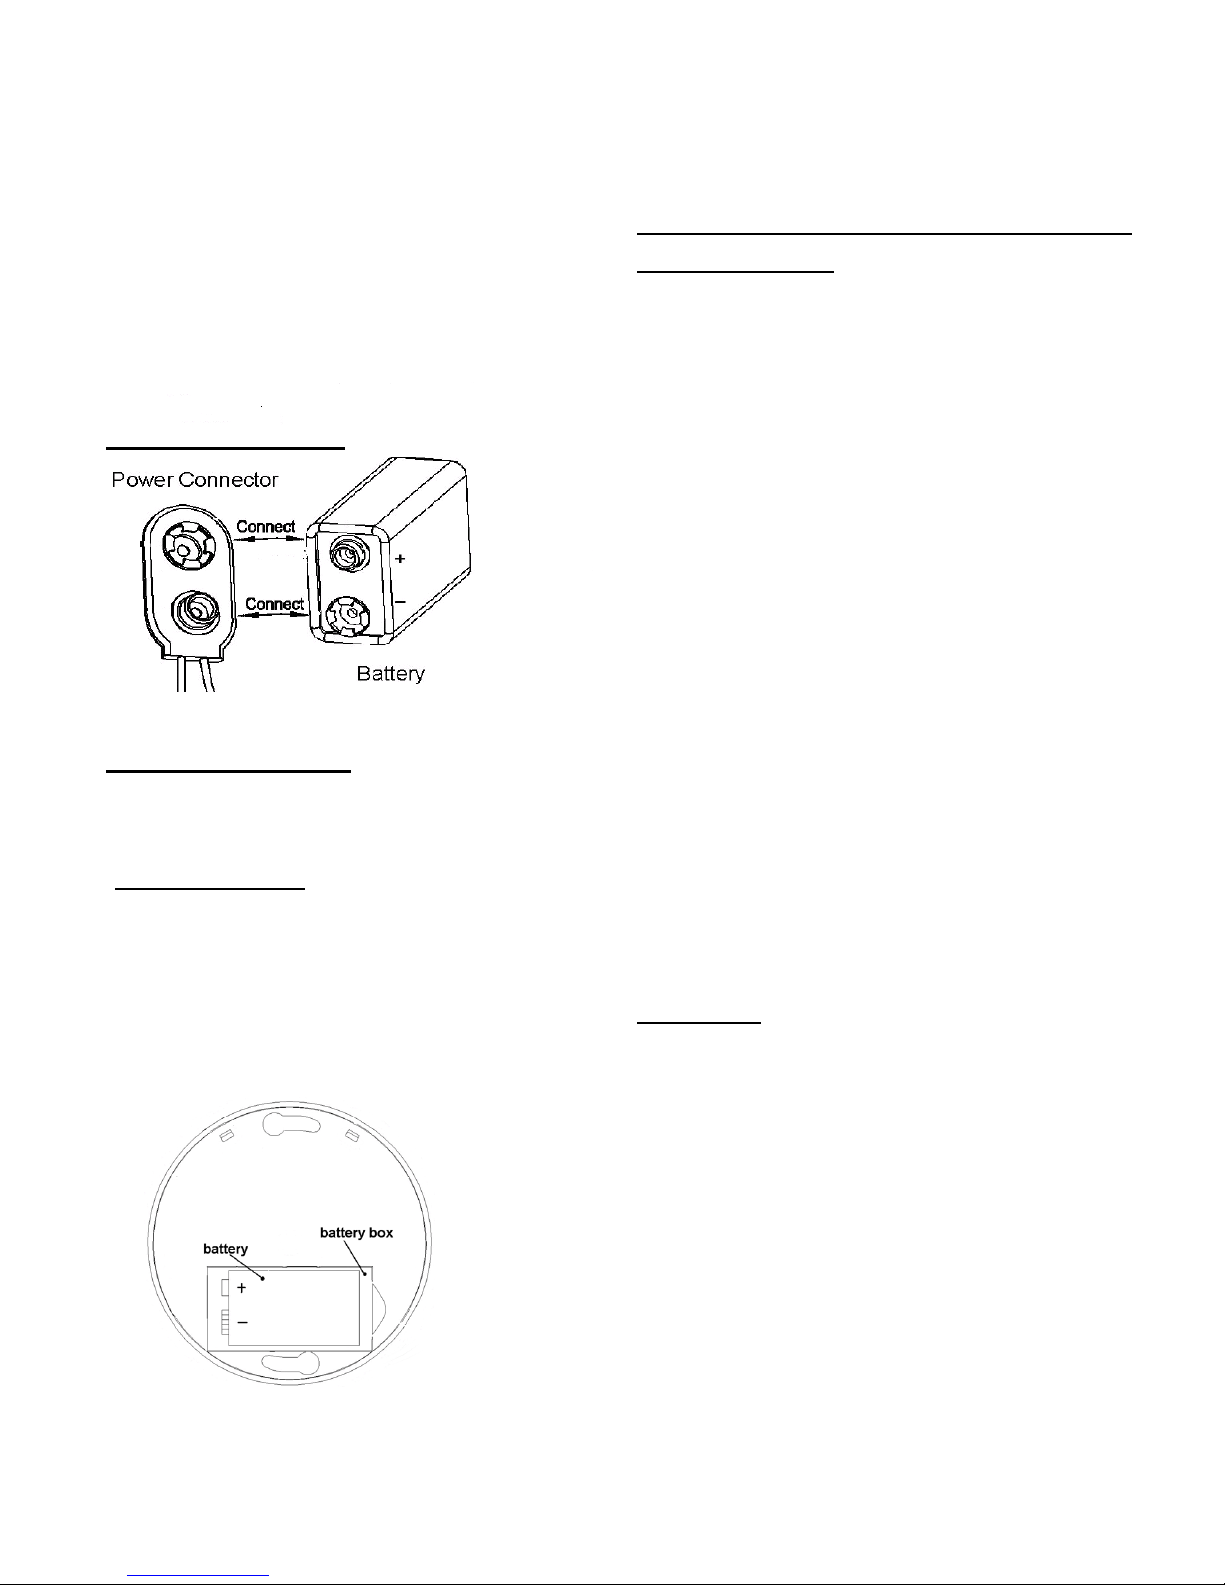
Battery Connections:
Diagram 1
Battery Specification:
Voltage: DC 9V (Alkaline. Carbon Zinc, Lithium battery)
Gold Peak: 1604P
Replace Battery:
1: Turn the alarm body counterclockwise and take out the
alarm body from the bracket .
2: Take out the old battery and connect the new battery to
power connector according to Diagram 1.
3: Fix the battery into battery box, fit alarm body on bracket
and turn the alarm body clockwise (see Diagram 2).
Diagram 2
4: Test smoke alarm using test button. The sound pattern is 3
short beeps-pause 1.5 seconds, repeat it. If there’s no
sound output, it means that the smoke alarm is faulty or
the installing operation is wrong, and you can get helps
from the section: “trouble shooting”.
Do Not Install Smoke Alarms in the
Following Places:
• In the garage. Products of combustion are present when you
start your automobile.
• Less than4" (10cm) from the peak of an “A” frame type
ceiling.
• In an area where the temperature may fall below 40ºF or
rise above 100ºF, such as garages and unfinished attics.
• In dusty areas. Dust particles may cause nuisance alarm or
failure to alarm.
• In very humid areas (greater than 85% R.H.). Moisture or
steam can cause nuisance alarms.
• In insect-infested areas.
• Smoke alarms should not be installed within 3 ft (.9m) of
the following: the door to a kitchen, the door to a bathroom
containing a tub or shower, forced air supply ducts used for
heating or cooling, ceiling or whole house ventilating fans,
or other high air flow areas.
• Kitchens. Normal cooking may cause nuisance alarms. If a
kitchen alarm is desired, it should have an alarm silence
feature or be a photoelectric type.
• Near fluorescent lights. Electronic “noise” may cause
nuisance alarms.
• Smoke alarms are not to be used with detector guards
• Unless the combination (alarm and guard) has been
evaluated and found suitable for that purpose.
Operation:
Testing
Test weekly by pushing the test button on the cover and
holding it down for a minimum of 5 seconds. this will sound
the alarm if the electronic circuitry, horn, and battery are
working properly. If no alarm sounds, the battery may be
depleted or another problem, refer to “Trouble shooting”
section for a solution.
DO NOT use an open flame to test your alarm, you could
damage the alarm or ignite combustible materials and start a
structure fire.
Page 3

Document NO.:RD-528A-39-001 Version: E 20170920
- 3 -
CAUTION: Due to the loudness (85 decibels) of the alarm,
Always stand an arms-length away from the unit when testing.
Test the alarm weekly to ensure proper operation. Erratic or
low sound coming from your alarm may indicate a defective
alarm. Refer to “Trouble shooting” section for a solution.
NOTE: WEEKLY TESTING IS REQUIRED
LED indicators
This smoke alarm is equipped with red LED indicators.
Standby Condition: The red LED will flash every 32 seconds
to indicate that the smoke alarm is operating properly.
Alarm Condition: When the alarm senses products of
combustion and goes into alarm, the red LED will flash
rapidly (one flash per second).The rapid flashing LED and
pulsating alarm will continue until the air is cleared or the test
button is released.
Low battery trouble indication: An intermittent “chirp”
accompanied by a red LED flash every 32 seconds indicates a
low battery.
Fault indication: This chirp will occur between the flashes of
the red LED indicator light.
SMOKE SENSING CHAMBER OPERATION: This alarm
will “chirp” if any of the components in the smoke sensing
chamber fail. This chirp will occur between the flashes of the
red LED indicator light. (If the chirp occurs at the same time
as the red LED flash, indicating a low battery information).
NOTE: WEEKLY TESTING IS REQUIERED.
DANGER: If the alarm sounds, and it is not being tested, it
means the unit is sensing smoke,
THE SOUND OF THE
ALARM REQUIRES YOUR IMMEDIATE ATTENTION AND
ACTION.
Repair:
Caution: Do not attempt to repair the alarm. This will void
your warranty. If the alarm is not operating properly, and is
still under warranty, return it to the original place of purchase.
Pack it in a well-padded carton, and ship to the original place
you buy. If the alarm is no longer under warranty, have a
licensed electrician replace it immediately with a comparable
alarm.
DEVELOP AND PRACTICE A PLAN OF
ESCAPE
• Install and maintain fire extinguishers on every level of the
home and in the kitchen, basement and garage. Know how
to use a fire extinguisher prior to an emergency.
• Make a floor plan indicating all doors and windows and at
least two (2) escape routes from each room. Second story
windows may need a rope or chain ladder.
• Have a family meeting and discuss your escape plan,
showing everyone what to do in case of fire.
• Determine a place outside your home where you all can
meet if a fire occurs.
• Familiarize everyone with the sound of the smoke alarm and
train them to leave your home when they hear it.
• Practice a fire drill at least every six months, including fire
drills at night. Ensure that small children hear the alarm and
wake when it sounds. They must wake up in order to
execute the escape plan. Practice allows all occupants to test
your plan before an emergency. You may not be able to
reach your children. It is important they know what to do.
• Current studies have shown smoke alarms may not awaken
all sleeping individuals, and that it is the responsibility of
individuals in the household that are capable of assisting
others to provide assistance to those who may not be
awakened by the alarm sound, or to those who may be
incapable of safely evacuating the area unassisted.
WHA T TO DO WHEN THE ALARM SOUNDS
1. Alert small children in the home to quickly follow the
family escape plan.
2. Leave immediately by your escape plan. Every second
counts, so don’t waste time getting dressed or picking up
valuables.
3. In leaving, don’t open any inside door without first feeling
its surface. If hot, or if you see smoke seeping through
cracks, don’t open that door! Instead, use your alternate exit.
If the inside of the door is cool, place your shoulder ag ainst
it, open it slightly and be ready to slam it shut if heat and
smoke rush in.
4. Stay close to the floor if the air is smoky. Breathe shallowly
through a cloth, wet if possible.
5. Once outside, go to your selected meeting place and make
sure everyone is there.
6. Call the fire department from your neighbor’s home -not
from yours!
7. Don’t return to your home until the fire officials say that it
is all right to do so. There are situations where a smoke
alarm may not be effective to protect against fire as stated in
the NFPA Standard 72.
8. For instance:
a) Smoking in bed
b) Leaving children home alone
c) Cleaning with flammable liquids, such as gasoline
Note: These guidelines will assist you in the event of a fire,
Page 4

Document NO.:RD-528A-39-001 Version: E 20170920
- 4 -
however, to reduce the chance that fires will start, practice fire
safety rules and prevent hazardous situations.
Trouble shooting:
DO NOT disconnect battery to quiet an unwanted alarm. This
will remove your protection. Fan the air or open a window to
remove smoke or dust.
Problem Cause and Remedy
Smoke alarm does not
sound when tested.
NOTE: Push test button
for at least five seconds
while testing!
1.Activate alarm before
installation.
2.Clean smoke alarm. Please refer
to the “maintenance and cleaning”
section.
3.If problems persist and the unit
is still under warranty, you can
return to your retailer.
4. if the unit is out of warranty,
please replace another new alarm
An intermittent “chirp”
accompanied by a red
LED flash every 32
seconds
This indicates a low battery.
please replace battery according to
“replace battery” section.
The alarm chirp occurs
every 32 seconds only.
(alarm goes into fault
mode).
1. Clean smoke alarm. Please refer
to the “maintenance and
cleaning” section.
2. Purchase and change another
smoke alarm if the problem
persists.
Smoke alarm sounds
unwanted alarms
intermittently or when
residents are cooking,
taking showers, etc.
1. Clean smoke alarm. Please refer
to the “maintenance and
cleaning” section.
2. Move smoke alarm to a new
location.
The alarm sounds
different from it is used
to. It starts and stops.
1. Clean smoke alarm. Please refer
to the “maintenance and cleaning”
section.
2. if the problem persists during
warranty, you can return to your
retailer.
3. if the unit is out of warranty,
please replace another new
alarm.
Maintenance and Cleaning:
In addition to weekly testing, the alarm requires yearly battery
replacement and periodic cleaning to remove dust, dirt, and
debris. Clean the alarm at least once a year to remove dust,
dirt, or debris. Use a vacuum cleaner with a soft brush,
vacuum all sides and covers of smoke alarm. Be sure all the
vents are free of debris. Use a damp cloth to clean the alarm’s
cover.
This smoke alarm uses a 9 volt battery. a fresh battery should
last for one year under normal operate conditions.
This alarm has a low battery monitor which will cause the
alarm to “chirp” and at the same time as the red LED flash
approx every 32 seconds for a minimum of 7 days when the
battery gets low. Replace the battery when this condition
occurs. Please refer to “REPLACE BATTERY”.
IMPORTANT: Do not attempt to remove the cover to clean
inside. This will void the warranty.
RECOMMENDED LOCATIONS FOR
ALARMS
• Locate the first alarm in the immediate area of the bedrooms.
Try to monitor the exit path as the bedrooms are usually
farthest from the exit. If more than one sleeping area exists,
locate additional alarms in each sleeping area.
• Locate additional alarms to monitor any stairway as
stairways act like chimneys for smoke and heat.
• Locate at least one alarm on every floor level.
• Locate an alarm in every bedroom.
• Locate an alarm in every room where electrical appliances
are operated (i.e. portable heaters or humidifiers).
• Locate an alarm in every room where someone sleeps with
the door closed. The closed door may prevent an alarm not
located in that room from waking the sleeper.
• Smoke, heat, and combustion products rise to the ceiling
• and spread horizontally. Mounting the smoke alarm on the
ceiling in the center of the room places it closest to all
points in the room. Ceiling mounting is preferred in
ordinary residential construction.
• For mobile home installation, select locations carefully to
avoid thermal barriers that may form at the ceiling. For
more details, see
MOBILE HOME INSTALLATION below.
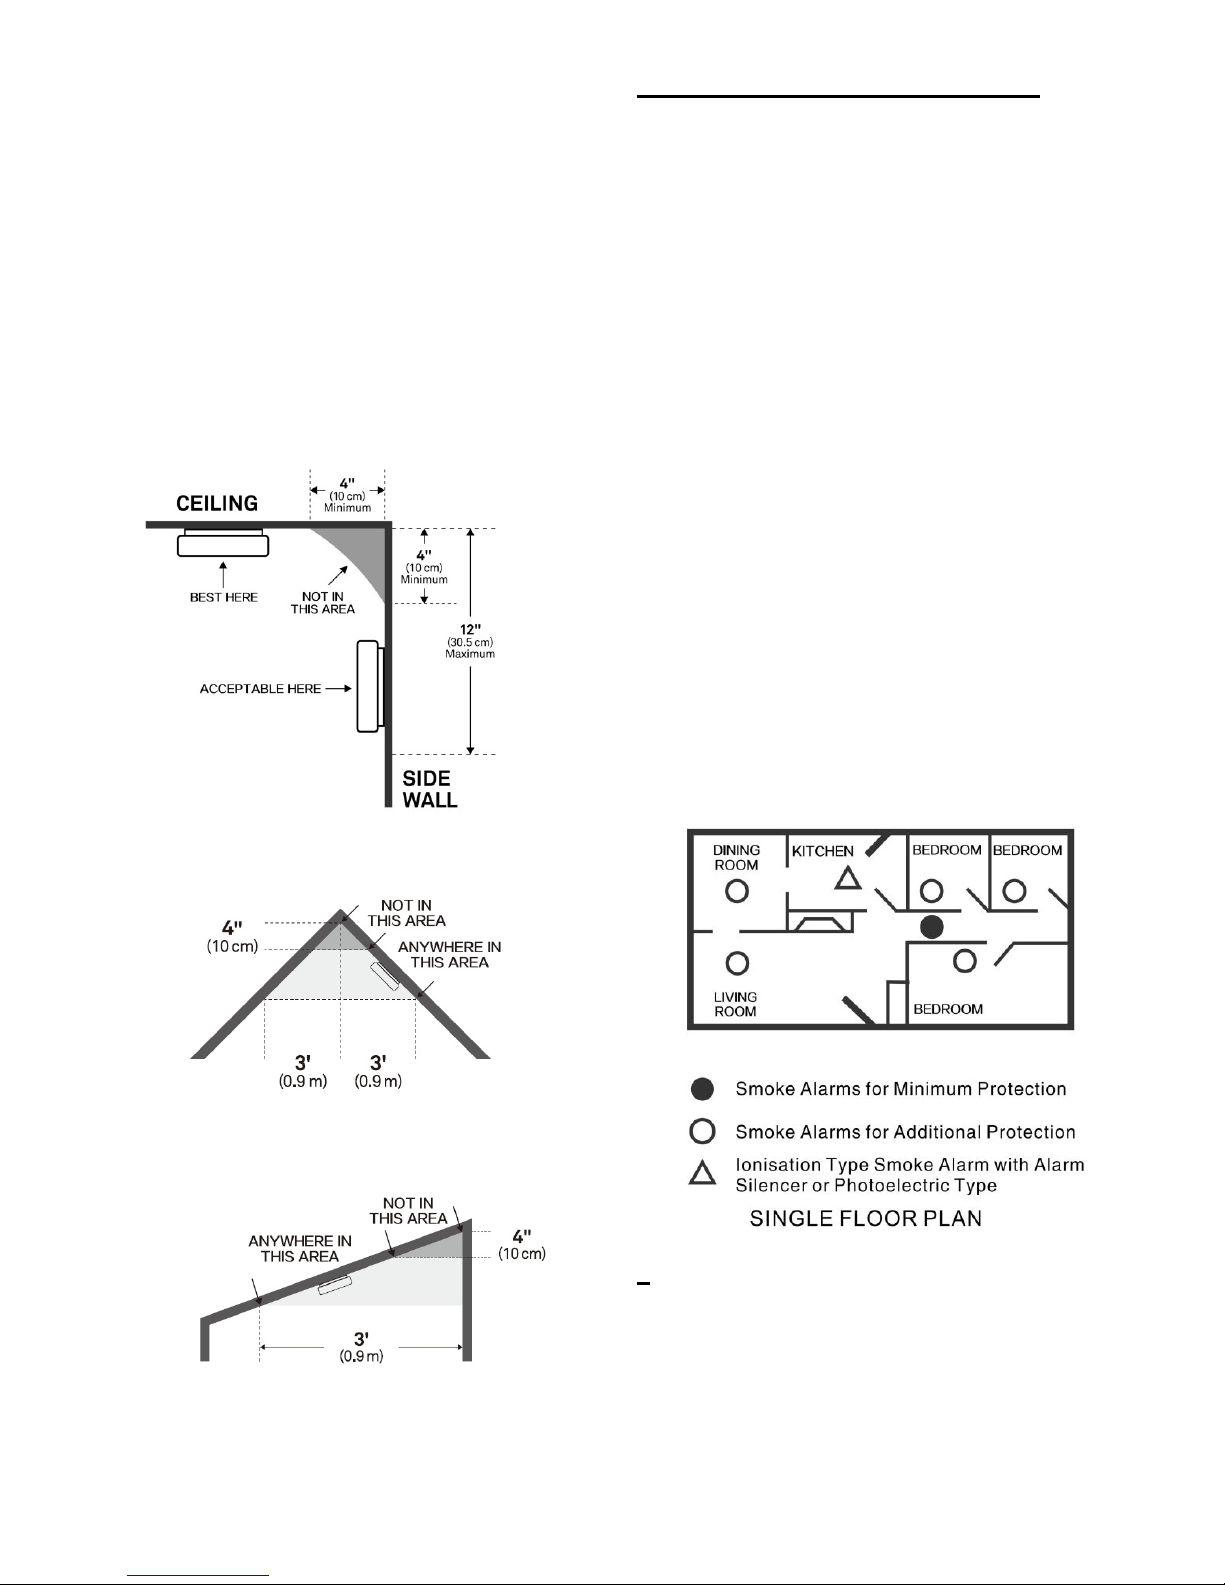
• When mounting an alarm on the ceiling, locate it at a
minimum of 4" (10cm) from the side wall (Refer to
Diagram 3).
• When mounting the alarm on the wall, use an inside wall
Page 5
Document NO.:RD-528A-39-001 Version: E 20170920
- 5 -
with the top edge of the alarm at a minimum of 4" (10cm)
and a maximum of 12" (30.5cm) below the ceiling (Refer to
Diagram3).
• Put smoke alarms at both ends of a bedroom hallway or
large room if the hallway or room is more than 30 ft (9.1 m)
long.
• Install Smoke Alarms on sloped, peaked or cathedral
ceilings at or within 3 ft (0.9m) of the highest point
(measured horizontally). NFPA 72 states: “Smoke alarms in
rooms with ceiling slopes greater than 1 ft in 8 ft (.3m in
2.4m) horizontally shall be located on the high side of the
room.” NFPA 72 states: “A row of alarms shall be spaced
and located within 3 ft (0.9m) of the peak of the ceiling
measured horizontally” (Refer to Diagram 4).
Diagram 3
Diagram 4
MOBILE HOME INSTALLATION
• Modern mobile homes have been designed and built to be
energy efficient. Install smoke alarms as recommended
above (refer to RECOMMENDED LOCATIONS and
diagram 3 and 4).
• In older mobile homes that are not well insulated compared
to present standards, extreme heat or cold can be transferred
from the outside to the inside through poorly insulated walls
and roof. This may create a thermal barrier which can
prevent the smoke from reaching an alarm mounted on the
ceiling. In such units, install the smoke alarm on an inside
wall with the top edge of the alarm at a minimum of 4"
(10cm) and a maximum of 12" (30.5cm) below the ceiling
(see Diagram 3 ).
• If you are not sure about the insulation in your mobile home,
or if you notice that the outer walls and ceiling are either hot
or cold, install the alarm on an inside wall. For minimum
protection, install at least one alarm close to the bedrooms.
For additional protection, see SINGLE FLOOR PLAN in
Diagram 5 and MULTIPLE FLOOR PLAN in Diagram 6.
• WARNING: TEST YOUR SMOKE ALARM OPERATION
AFTER RV OR MOBILE HOME VEHICLE HAS BEEN IN
STORAGE, BEFORE EACH TRIP AND AT LEAST ONCE A
WEEK DURING USE.
Diagram 5
Page 6
Document NO.:RD-528A-39-001 Version: E 20170920
- 6 -
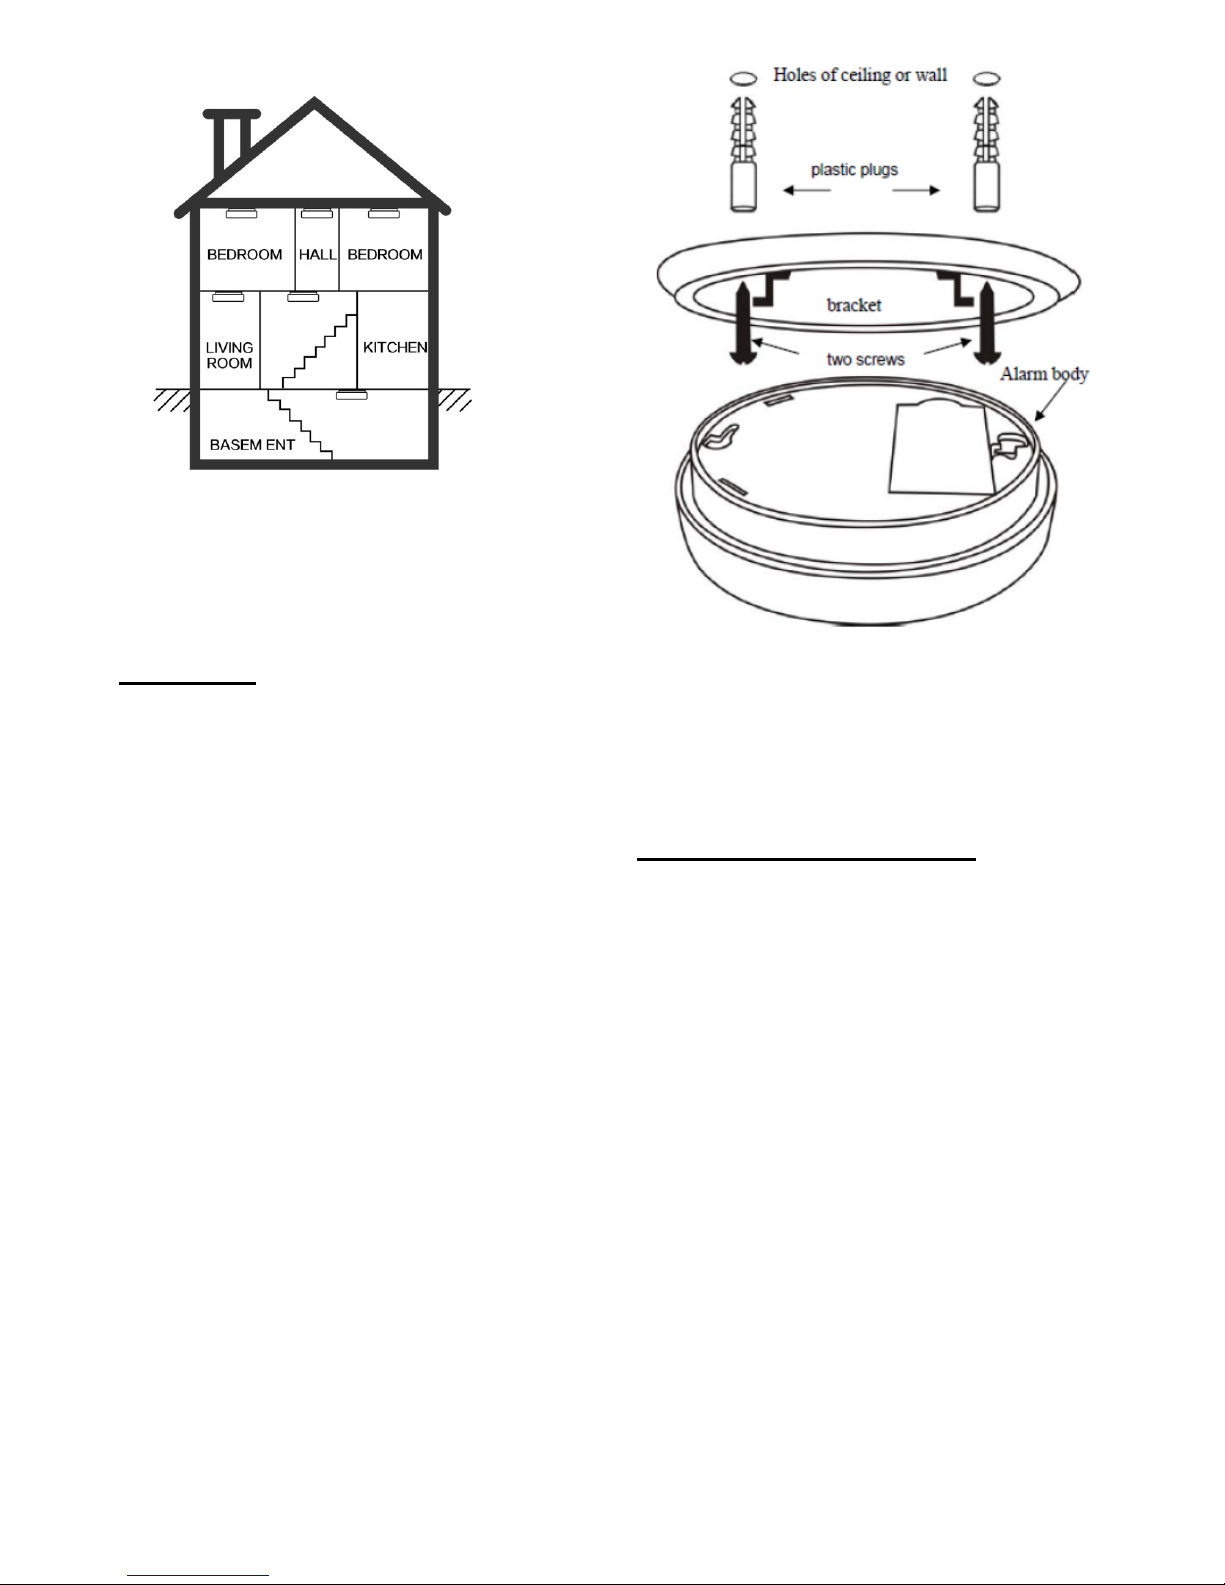
MULTIPLE FLOOR PLAN
Diagram 6
Installation:
Turn the alarm body counterclockwise and take off the
bracket.
Hold the bracket in the installation position as specified in
the Recommended Locations, mark installation holes of the
bracket with pencil.
Drill the two marked installation holes with a 3/16 inch
(5mm) drill bit. Tap the two plastic grommets into holes
with hammer .
Mount the bracket to the ceiling by inserting and tightening
the supplied screws into plastic grommets. (Refer to
Diagram 7).
Connect the battery to power connector.
Fix the battery into battery box.
Fit the alarm on the bracket and turn the alarm body
clockwise, until fully inserted on the bracket.
Press the button to test the unit. The alarm should then sounds
3 beeps – 1.5 seconds pause, and will repeat until the button
is released, if no sound, it indicates a defective alarm, refer to
the ”Trouble shooting” section for a solution or return to you r
retailer during warranty.
Diagram 7
WARNING:
To prevent injury, this unit must be securely attached to the
wall or ceiling in accordance with the installation instructions.
SERVICE AND WARRANTY
Company warrants to the original consumer. Purchase each
new smoke alarm to be free from defects in material and
workmanship under normal use and service for a period of 3
years from the date of purchase. This warranty does not cover
damage resulting from accident, misuse or abuse or lack of
reasonable care of the product. In no case shall company be
liable for any incidental or consequential damages for breach
of this or any other warranty express or implied,whatsoever.
The bad product can be mailed to the following address with a
detail explanation of problem.
If after reviewing this manual you feel that your smoke alarm
is defective in any way, do not tamper with the unit. Return it
for servicing to:
SITERWELL ELECTRONICS CO., LIMITED
ADDRESS:
NO.76 HAICHUAN ROAD CHUANGYE
ZONE B, JIANGBEI,NINGBO,CHINA
TEL:0086-574-87729581
FAX:0086-574-87729581
E-MAIL:[email protected]
 Loading...