

Siterwell GS412B User Manual

Document No.: RD-412B-039-001
Version: A
- 1 -
Heat Alarm User Manual
Model number: GS412B Class: A2
Thank you for purchasing our heat alarm with Z-Wave
protocol connection. Please take a few minutes to read the
user’s manual thoroughly and familiarize yourself and your
family with its operation. And save it for future reference.
17
Diagram 1
Product Specifications:
Power: DC2*1.5V Alkaline AA battery
(
Golden Peak Group: GN15A).
Operation current: <30uA(standby), <110mA (alarm).
Alarm volume: >85dB(A) at 3 meters.
Heat sensitivity: 54-70℃.
Silence time: approx. 10 minutes.
Do not disturb time: approx.8-10 hours.
Wireless frequency: 868.4MHz EU.
Radio Protocol: Z-Wave.
Security: S2_UNAUTHENTICATED.
Wireless distance: >50 meters in a clear line of sight.
Heat alarm sound pattern:
BI 0.5s - pause 0.5s – BI 0.5s – pause 0.5s – BI 0.5s –
pause 1.5s, with the red LED flash, repeat this alarm
pattern.
Comply with: BS5446-2:2003 and Z-Wave Alliance.
Introduction:
Heat alarm is an alarm device that can give off warning under
the condition that the environmental temperature between 54℃
-70℃—the abnormal temperature may caused by an actual fire,
in order to alert the dwelling of the dangerous situation and
notice them to evacuate right away. At the same time in this
alarm state if the alarms have been matched Smart home or
other Z-Wave system, they will send a warning message to the
main controller in this network group. The heat alarm can be
included and operated in any Z-Wave network with other
Z-Wave certified devices from other manufacturers under the
same radio frequency. It is the point that only under same radio
frequency the heat alarm can be included and operated. All
non-battery operated alarms within the network will act as
repeaters, as to increase reliability of the network. In the
Z-Wave network communication, the heat alarm can
communicate with other devices associated. Through the
Z-Wave network controller, you can get the status of the alarm,
such as battery level.
Technical Information:
Type of alarm:
Siterwell heat alarm can rapidly detect incremental
temperature and absolutely meet heat level.
Heat alarm signal:
The heat alarm has a visible and acoustic signal. In the standby,
the LED will flash every 32 seconds to indicate normal
operation. If the alarm matches other Z-Wave system, in the
alarm status, they will send a warning message to the main
controller, at the same time the frequency of LED flashing
speeds up, and the heat alarm will give off a loud sound to alert
occupants.
Status indicator:
1: When the alarm is running normally, the red LED will flash
once per 32 seconds.
2: When the battery fails or low battery is detected, the alarm
will “chirp” once and with a corresponding red LED flashing
once per 32 seconds.
3: When the unit goes wrong , the alarm will “chirp” once per
32 seconds.
Note: When the unit chirps once per 32 seconds, press the
test button, it will pause this warning tone for approx.8-10
hours. It can still normally detect air temperature during this
period, but only remove the warning tone.
4: When the unit is running in the silence mode, the red LED
will flash once every 8 seconds.
Note: When the unit is in the alarm status, press the test button,
it will pause for approx. 10 minutes, and remove the warning
tone during the period.
Testing:
Test the heat alarm to ensure proper operation once per week
by pressing the test button, the heat alarm should give off a
loud alarm tone.
Alarm silence mode:
During the unit’s alarming, push the test button, it will pause
Document No.: RD-412B-039-001
Version: A
- 2 -
the unit alarming for approx 10 minutes. The red LED will
flash once every 8 seconds, which in dicates that the heat alar m
is running into the silence mode. The heat alarm will
automatically reset after approximately 10 minutes. If after this
period, the air temperature is still within the heat sensitivity
range, the alarm will sound again. The alarm silence mode can
be repeated.
Note: Before using the alarm silence, be sure there must be a
safe condition.
Battery Specification:
Rating voltage: DC 1.5V
Package: AA alkaline battery
Recommend battery:
Gold Peak Group: GN15A
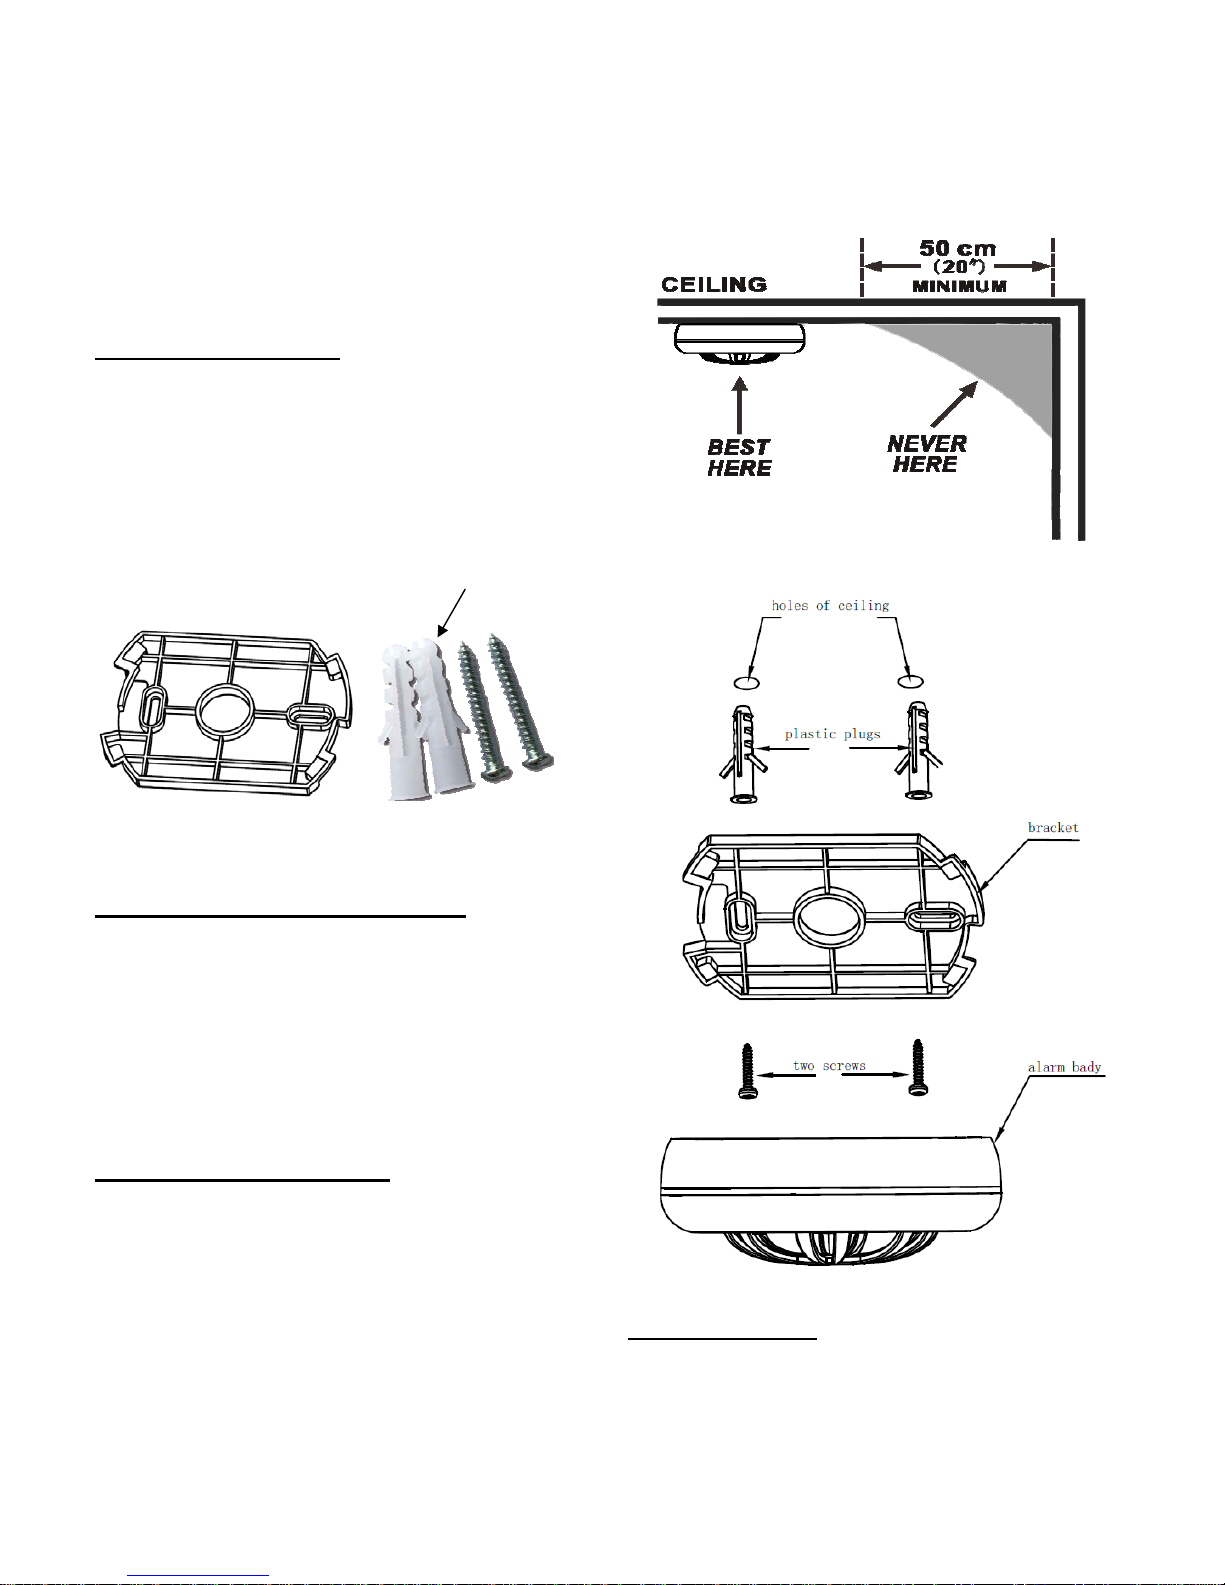
Placement:
Designed for placement on the ceiling. The heat alarm should
be at least 50cm from the nearest wall.
Diagram 2
Where is the best place to install:
Place a heat alarm near possible fire source such as:
-Kitchen area
-Generator room
-Living room with wooden stove burner
-Garage area
-Washing and drying area
Additional heat alarms increase your security
Installation of heat alarm:
1. Press the bracket on the installation position, mark
installation hole of bracket with pencil.
2. Bore two installation holes on the sign with electric drill;
Make two 5mm diameter holes; Strike the two plastic plugs
into holes with hammer.
3. Attach the bracket to the plastic plugs and fix tightly the
screws into the plastic plugs (refer to Diagram 4).
4. Fit the alarm on the bracket and turn the alarm body
clockwise, until matching well on the bracket. After mounting,
test this heat alarm by pushing test button on the top and
hearing alarm signal.
Note: The label in the product cannot be removed as it shows
important information about the product.
Diagram 3
Diagram 4
Replace Battery:
1: Turn the alarm body counterclockwise and take out the
alarm body from the bracket.
2: Take out the old batteries from the battery box.
Use the enclosed
screws and plugs
for installation.
 Loading...