

Page 1

N300 Wi-Fi Outdoor Range Extender
User Manual
WLX-2100
Page 2

WLX-2100 | User Manual
Introduction
Congratulations on your purchase of the N300 Wi-Fi Range Extender Outdoor. With this range extemder
you can easily extend the signal of a Wi-Fi hotspot and enjoy a stable Internet connection for all your
devices. Ideal for camping grounds and harbors, you can use a single code or voucher to login to the Wi-Fi
network and share Internet with friends and family. The range extender supports fast Wi-Fi speeds of up to
300 Mbps. Enjoy the things you do at home also while you’re on vacation and listen to your Spotify playlists
or watch the latest episode of your favorite Netflix show without lag or buffering. With two extra powerful
5dBi antennas, you can enjoy ultimate Wi-Fi coverage anywhere.
Weatherproof design
The N300 Wi-Fi Outdoor Range Extender is rated IP65. This means that it is protected against the ingress of
dust and water and can be used in any weather and any climate. Even harsh environments do not impact
the performance.
Easy installation
The N300 Wi-Fi Outdoor Range Extender supports Power over Ethernet (PoE) which means that you can
use the included 5m network cable and the included PoE-injector to power it. This gives you more freedom
to place the range extender further away from a power socket and have it anywhere in and around your
boat, tent or vehicle.
Compatibility and security
The N300 Wi-Fi Outdoor Range Extender is compatible with wireless-n extenders and is also backwards
compatible with older wireless technologies. The range extender also supports all existing security
standards (64/128-bit WEP, WPA, and WPA2).
Extensive 10-year warranty
The N300 Wi-Fi Outdoor Range Extender comes with an extensive 10-year warranty. Simply activate the
long-term warranty by registering your product within 3 weeks of purchase.
2
Page 3

WLX-2100 | User Manual
Table of Contents
Introduction .................................................................................................................. 2
Table of Contents .......................................................................................................... 3
Get to know your range extender .................................................................................... 5
Features ......................................................................................................................................................... 5
Technical Specifications ................................................................................................................................. 6
What you get ................................................................................................................................................. 8
What you need .............................................................................................................................................. 9
Safety precautions ....................................................................................................................................... 10
Product layout ............................................................................................................................................. 11
Network Detail Flyer .................................................................................................................................... 12
Install your range extender ........................................................................................... 13
Choose a position for your range extender ................................................................................................. 13
Prepare your range extender ...................................................................................................................... 13
Prepare your computer ............................................................................................................................... 16
Prepare your Phone / Tablet ....................................................................................................................... 18
Login to the range extender ........................................................................................................................ 19
Install the range extender with the wizard ................................................................................................. 20
Get to know the range extender’s user interface .............................................................. 22
Status ........................................................................................................................................................... 22
Save/Reload ............................................................................................................................................. 22
Main ......................................................................................................................................................... 22
Wireless Client List................................................................................................................................... 23
DHCP Client Table .................................................................................................................................... 23
Connection Status .................................................................................................................................... 24
System Log ............................................................................................................................................... 25
Settings ........................................................................................................................................................ 26
Operation Mode (System properties) ..................................................................................................... 26
Wan settings ............................................................................................................................................ 27
LAN settings ............................................................................................................................................. 32
VPN Pass-through .................................................................................................................................... 33
Port Forwarding ....................................................................................................................................... 34
DMZ ......................................................................................................................................................... 36
Wireless Settings ..................................................................................................................................... 37
3
Page 4

WLX-2100 | User Manual
Wireless Advanced Settings .................................................................................................................... 40
Administration ......................................................................................................................................... 42
SNMP ....................................................................................................................................................... 44
Backup/Restore Settings ......................................................................................................................... 46
Auto Reboot SettingS .............................................................................................................................. 47
Firmware Upgrade ................................................................................................................................... 48
Time Settings ........................................................................................................................................... 49
CLI Settings .............................................................................................................................................. 50
Log ........................................................................................................................................................... 51
Diagnostics ............................................................................................................................................... 52
Device Discovery ...................................................................................................................................... 54
Denial of Service Protection .................................................................................................................... 55
Addendum A: GNU GPL ................................................................................................ 56
Addendum B: Declaration of Conformity ......................................................................... 57
Revision 1.0
© Sitecom Europe BV 2016
Note: All the information contained in this manual was correct at the time of publication.
However, as our engineers are always updating and improving the product, your device’s software may
have a slightly different appearance or modified functionality than presented in this manual.
4
Page 5

WLX-2100 | User Manual
Get to know your range extender
Features
• Extend the signal of a Wi-Fi hotspot
• Ideal for camping grounds & harbours
• Use a single login account & share internet access
• Wi-Fi speeds: 300 Mbps (2.4 GHz)*
• Two extra powerful 5 dBI antennas
• IP65-rated weatherproof housing
• Powered by PoE (Power over Ethernet)
• Compatible with 802.11b/g/n wireless networks
• Compatible with 64/128-bit WEP, WPA, and WPA2 wireless data encryption
• Supports DHCP server function
• Easy to use web-based GUI (Graphical User Interface)
• Two Fast Ethernet ports with one PoE (Power over Ethernet) input
* Theoretical wireless signal rate based on IEEE standard of 802.11a, b, g, n chipset used. Actual throughput
may vary. Network conditions and environmental factors lower actual throughput rate. All specifications
are subject to change without notice.
5
Page 6

WLX-2100 | User Manual
Technical Specifications
Hardware Specification
Physical Interface:
• 2 x RJ-45 for 10/100 Fast Ethernet; one port is compatible with PoE
• 1 x Reset button
• 2x detachable 5 dBI antennas with SMA connector
Power Requirements:
• Active ethernet (Power over Ethernet)
• Proprietary PoE design
• Power Adapter 24V / 0.6A
Temperature Range:
• Operating -20°C~70°C
• Storage -30°C to 80°C
Humidity (non-condensing):
• 0%~90% typical
Dimensions:
• With antenna: W100 x D37.5 x H205 mm
• Without antenna: W100 x D37.5 x H189 mm
Weight:
• With antenna: 275 g
• Without antenna: 242 g
Software Specification
Operation Mode:
• Client Bridge, Access Point, Client Router, WDS AP, WDS Bridge, WDS Station
Wireless Specifications:
• Wireless standard: 802.11n, backward compatible with 802.11b/g
• Data rate: 300 Mbps
• Frequency Band: 2.4 GHz
Note: The maximum power of the radio frequency band may be different depending on local regulations.
Wireless / Network Features:
• Auto Channel Selection (Setting varies by Regular Domains)
• Obey Regulatory Power
• Distance Control (802.1x ACK (acknowledgement)
• timeout)
6
Page 7

WLX-2100 | User Manual
• CLI Supported
• 802.1x Supplicant (CB Mode)
• 4 SSIDs
• WDS AP / WDS Bridge / WDS Station
• Multicast Supported
• RADIUS Accounting
• VLAN Tag / VLAN Pass-through
• Auto Reboot
• Wi-Fi Scheduling
Wireless Security:
• WEP Encryption-64/128/152 bit
• WPA/WPA2 Personal (WPA-PSK using TKIP or AES)
• WPA/WPA2 Enterprise (WPA-EAP using TKIP)
• Hide SSID in beacons
• MAC address filtering, up to 50 field
• Wireless STA (Client) connected list
QoS:
• WMM
7
Page 8
WLX-2100 | User Manual
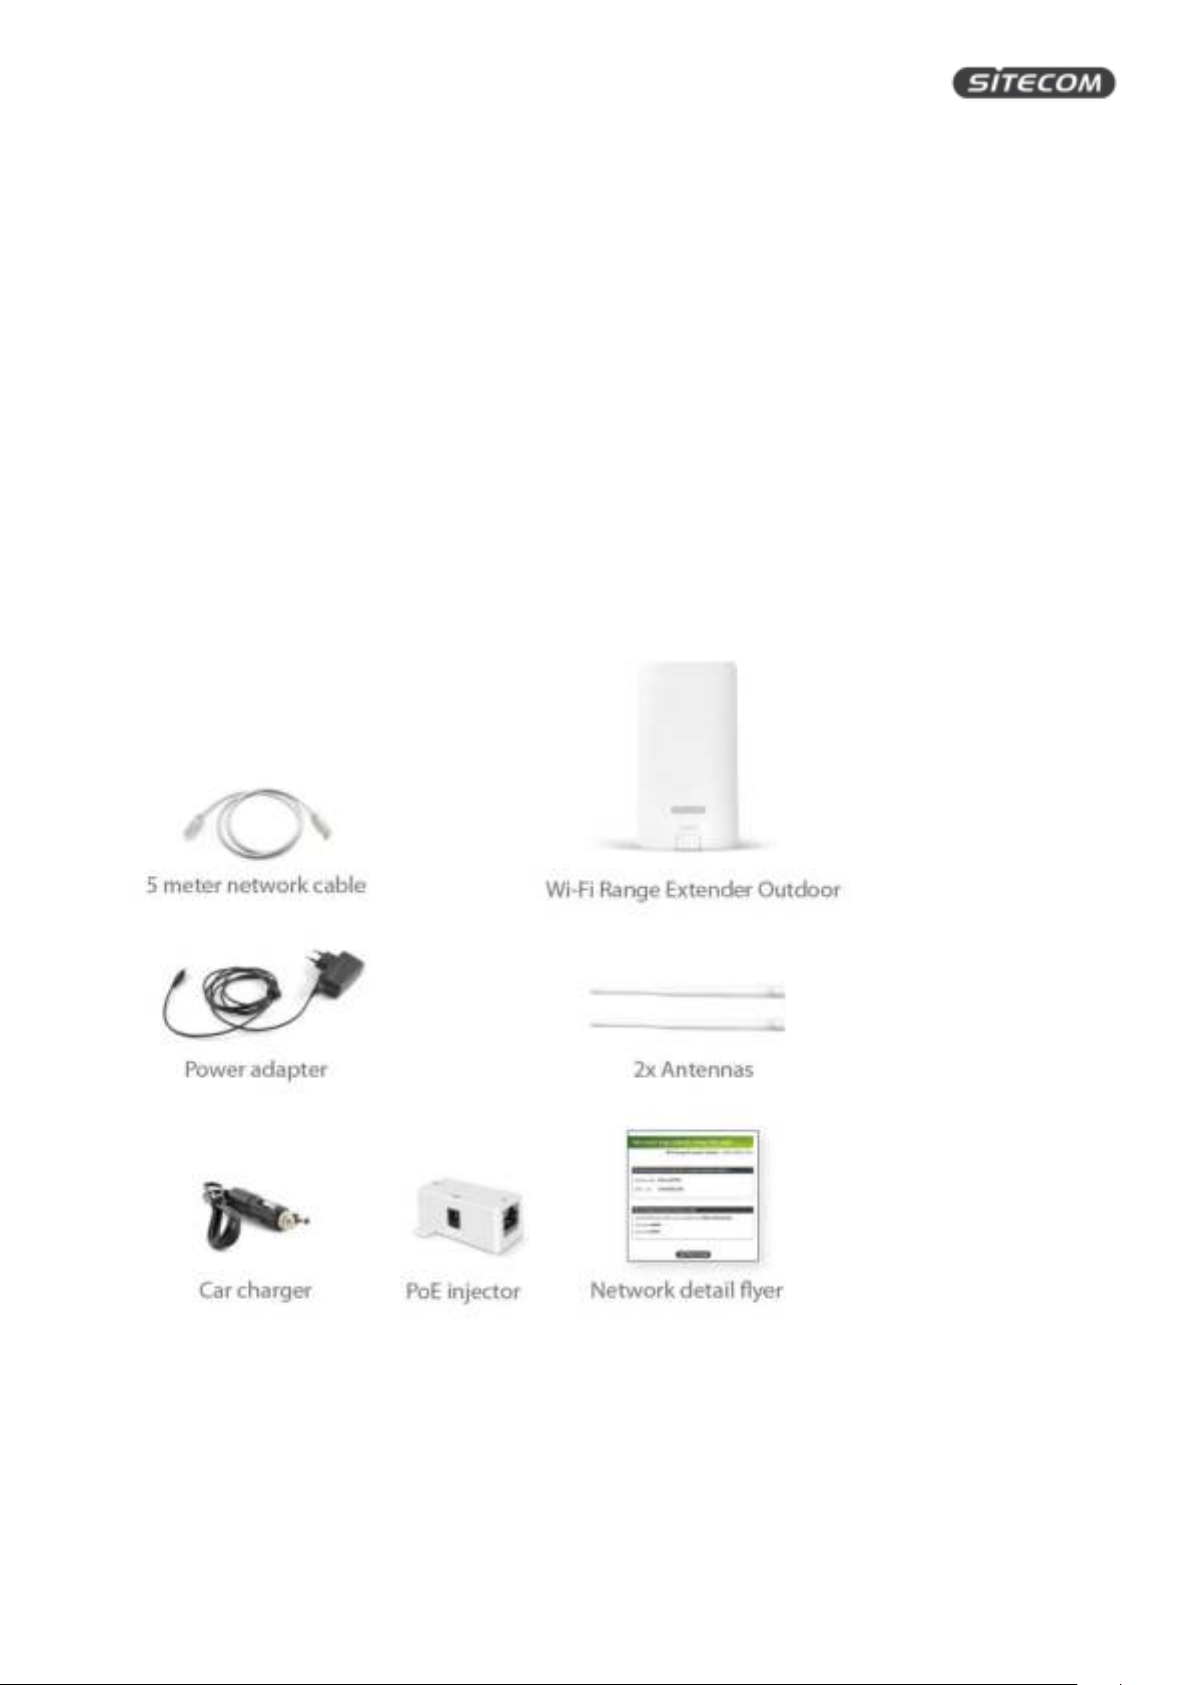
What you get
Open the package carefully, and make sure that none of the items listed below are missing. Do not discard
the packing materials, in case of return; the unit must be shipped back in its original package.
• WLX-2100 N300 Wi-Fi Range Extender Outdoor
• 5m network cable
• PoE Injector (24 V)
• 2x 2.4 GHz 5dBi antenna
• Power adapter 24 V / 0.6 A
• Car charger 12 V
• Wall mounting kit (screw set & adhesive label)
• Pole mounting kit (2x cable tie + 2x hose clamp)
• Installation guide
• Network detail flyer
8
Page 9

WLX-2100 | User Manual
What you need
To use this range extender, you will need the following things:
• A Wi-Fi network or a wired Internet connection
• A device with a web browser (Internet Explorer, Safari, Firefox, Opera)
9
Page 10

WLX-2100 | User Manual
Safety precautions
The range extender is designed and manufactured with your safety in mind. In order to safely and
effectively use the range extender, please read the following before usage.
Usage Cautions
• The range extender can operate in temperatures ranging from -20°C to 70°C. It can be stored in
temperatures ranging from -30°C to 80°C.
• Do not disassemble, repair or change the range extender; any damage done will not be included in
the warranty / repair policy.
• The range extender is IP65 rated. This mean it can remain outdoors where it will be subject to rain.
However, do not submerge it into water.
• Make sure to follow the installation guide correctly so that water cannot get into the range
extender.
• Do not shake or hit the range extender, do not press the buttons too hard and stay away from
magnetic fields.
• If during electrostatic discharge or a strong electromagnetic field the product will malfunction,
unplug the power cable. The product will return to normal performance the next time it is powered
on.
Power
The range extender’s power voltage is DC 24 V 0.6 A. To use the range extender, please connect the
supplied AC adapter or car charger to the range extender’s PoE connector.
• When placing the cable, make sure it can’t get damaged or be subject to pressure.
• To reduce the risk of electric shock, unplug the adapter first before cleaning it.
• Never connect the adapter to the range extender in a humid or dusty area.
• Do not replace the adapter or cable’s wire or connector.
Repair
If you experience any problems with your range extender, please take it to the shop where you bought it or
a qualified repair centre. Never repair the range extender yourself, you might damage the range extender
or endanger yourself.
Disposing of the Wi-Fi Home Cam
When you dispose the range extender, be sure to dispose it appropriately. Some countries may regulate
disposal of an electrical device, please consult with your local authority.
10
Page 11
WLX-2100 | User Manual
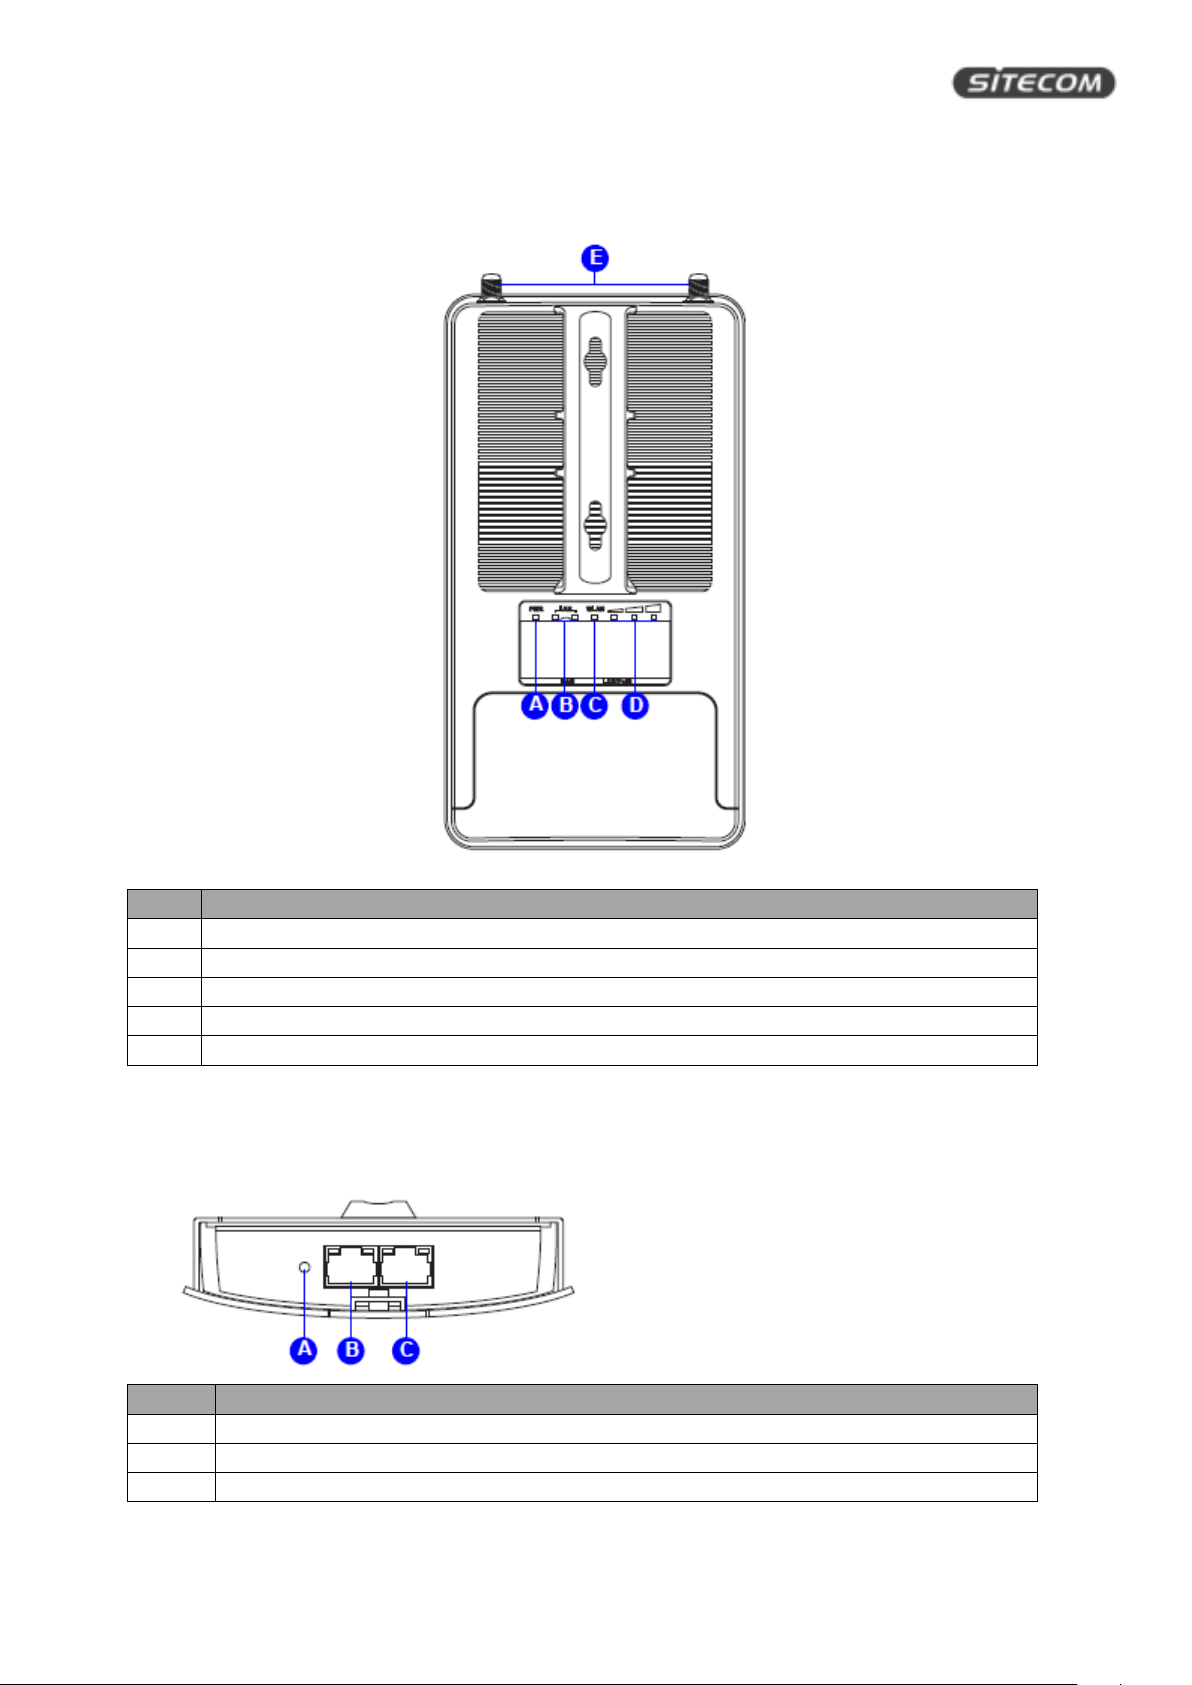
Letter
Description
A
Power LED: Shows the device is turned on.
B
LAN LED: Shows that a network cable is connected.
C
WLAN LED: Shows WLAN activity of the extender.
D
Signal LED: This LED shows the quality of the signal it receives from the existing network.
E
Antennas: Screws for the two antennas
Letter
Description
A
Reset button: While the device is on, use a pin to press the button for 15 seconds.
B
Network port: Additional network port to connect a wired device (e.g. Notebook).
C
Network PoE (power) port: Use this port to connect the PoE injector to power the device.
Product layout
Back
Bottom
11
Page 12
WLX-2100 | User Manual
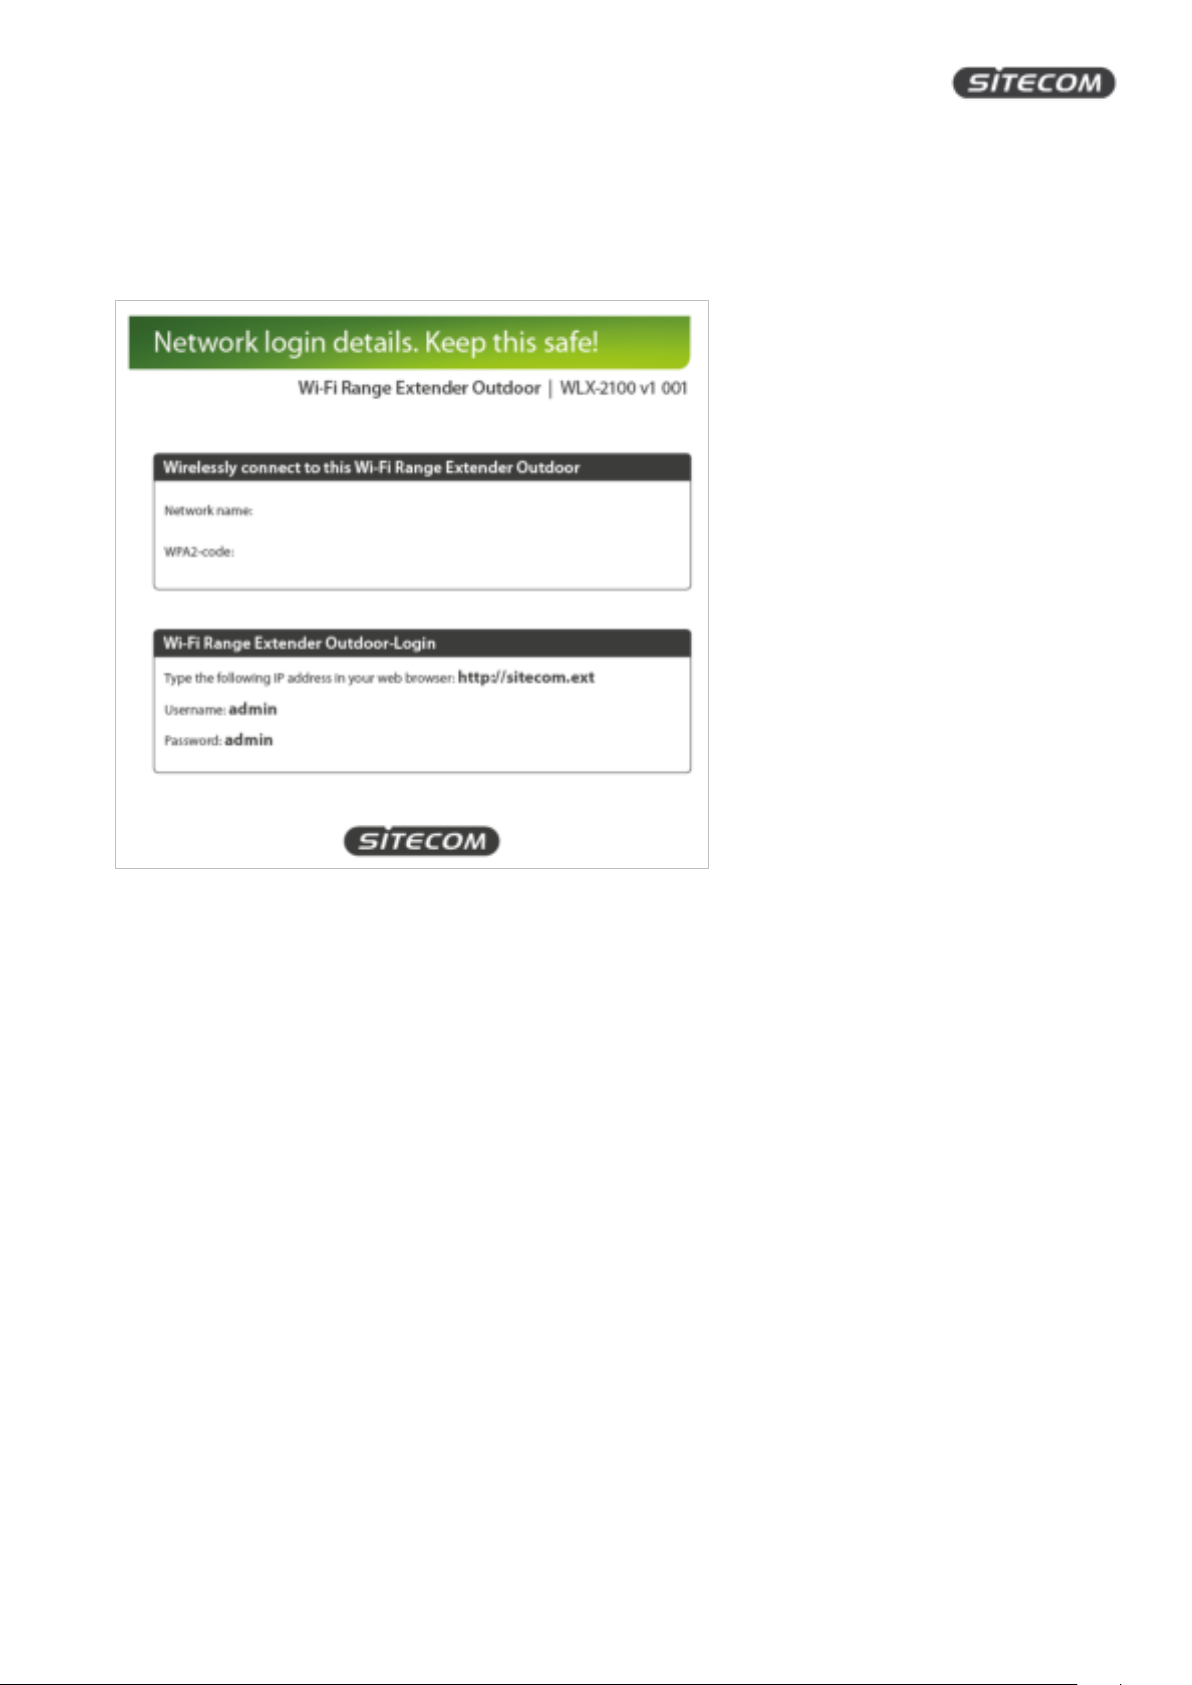
Network Detail Flyer
On the Network Detail Flyer, you can find all the information about your network such as network name
and Wi-Fi password and how to reach the user interface of the range extender.
12
Page 13
WLX-2100 | User Manual
Install your range extender
Choose a position for your range extender
For optimal performance, place your Range Extender in a location that is away from any potential source of
interference. This location must be within a good signal range from the existing network, preferably above
50% signal strength.
Prepare your range extender
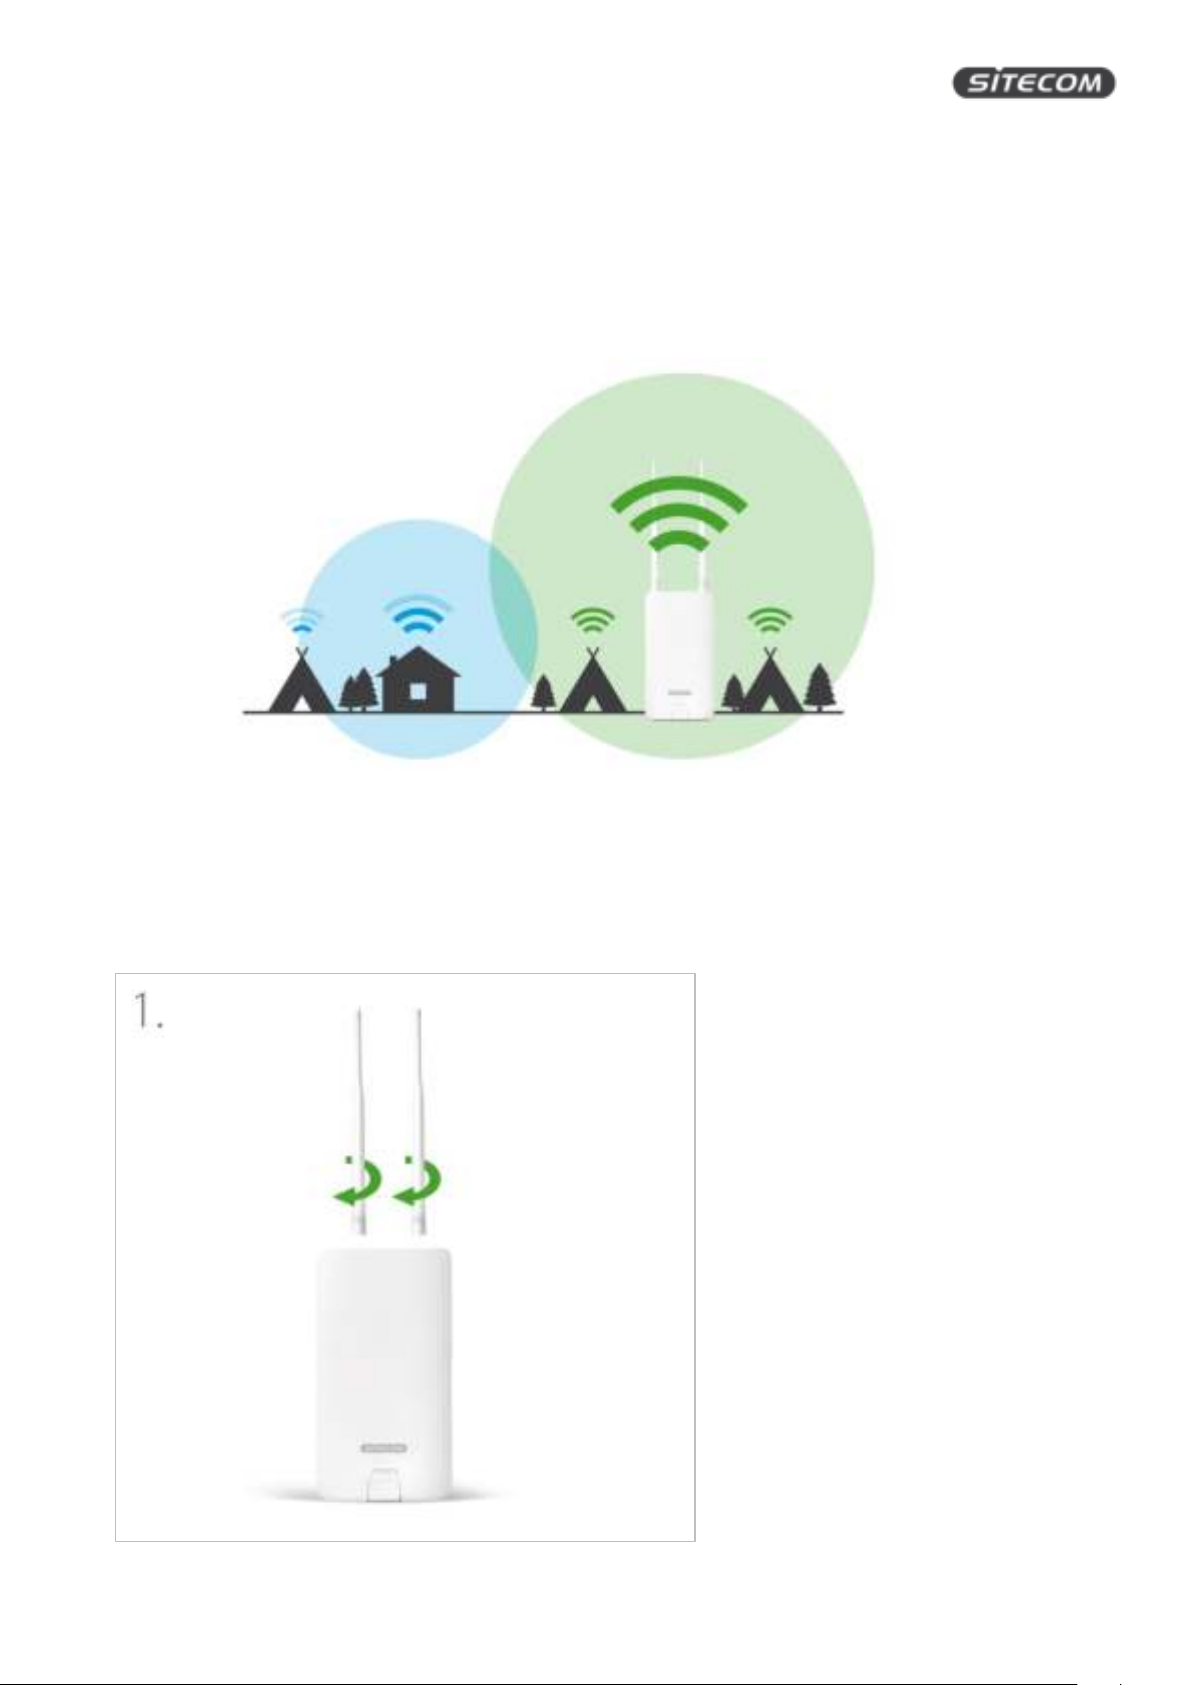
Step 1: Screw the antennas onto the SMA connectors of the range extender
13
Page 14
WLX-2100 | User Manual
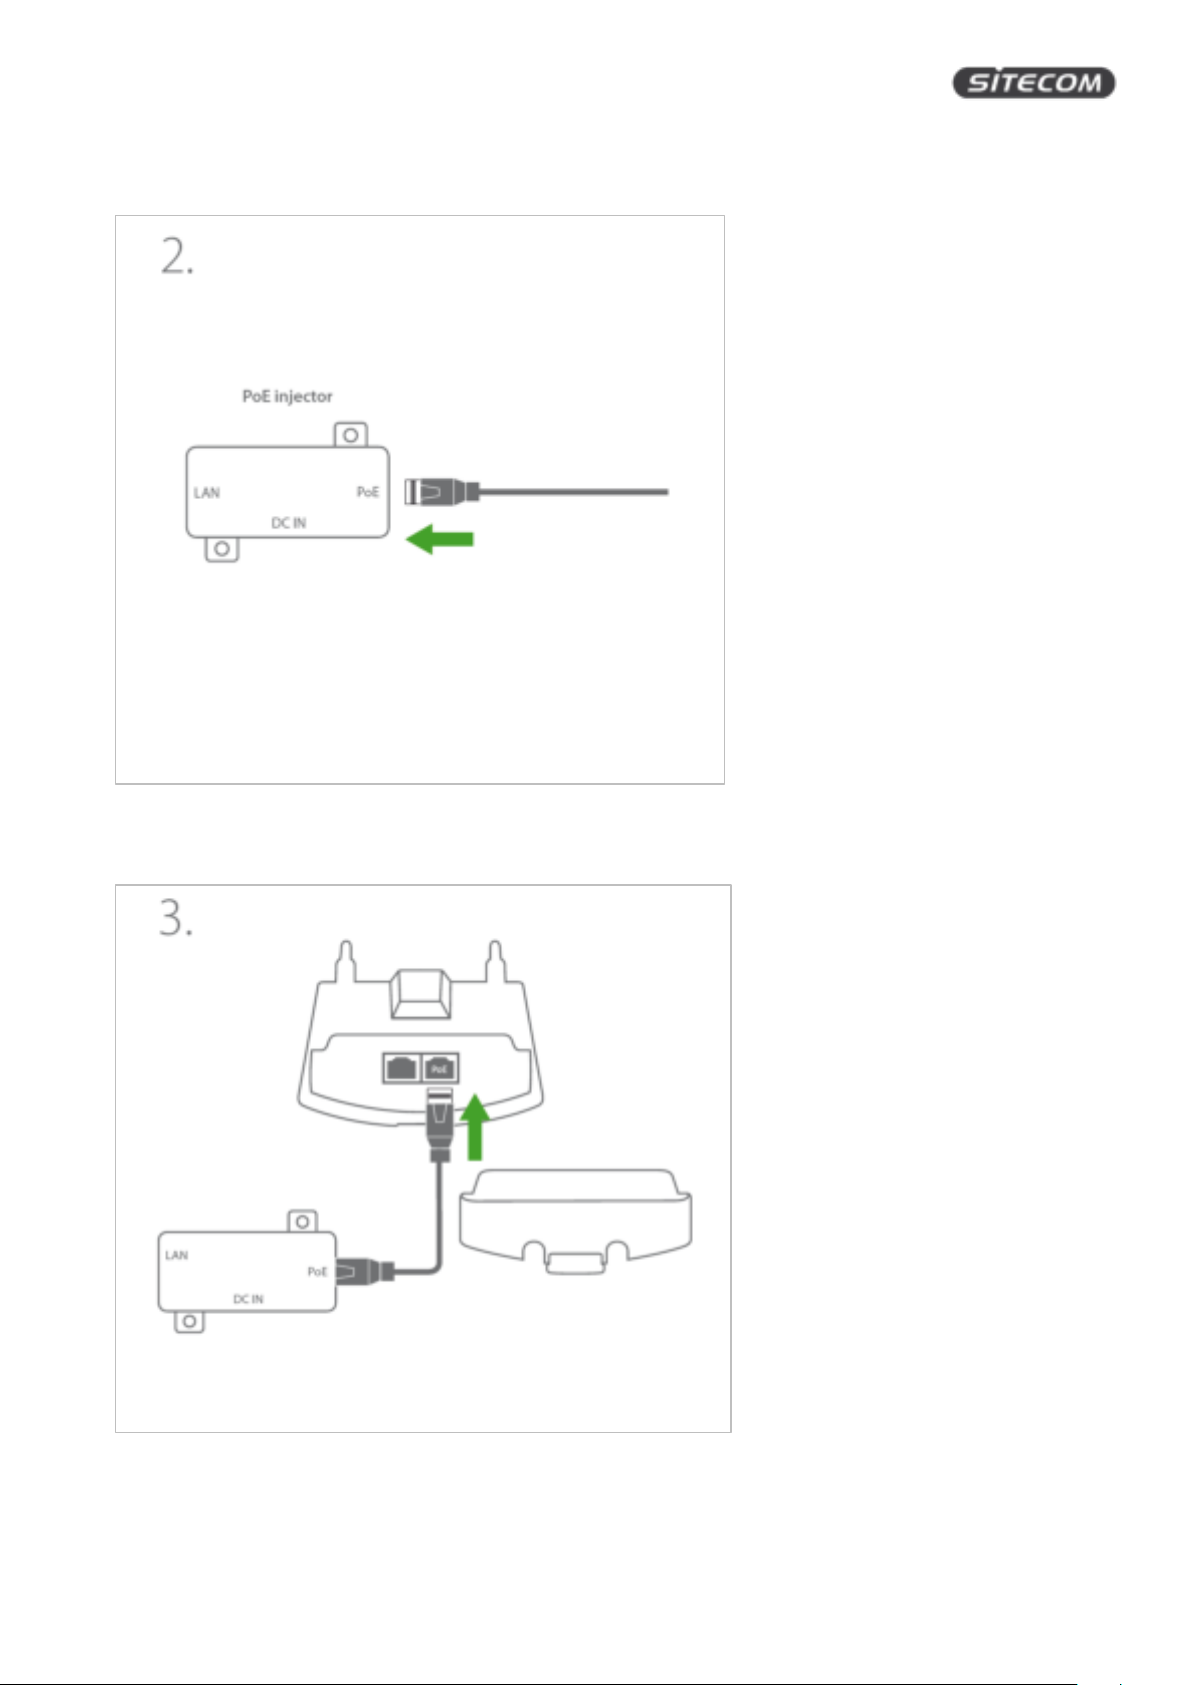
Step 2: Plug the network cable into the PoE injector
Step 3: Plug the other end of the network cable into the PoE port of the range extender
14
Page 15
WLX-2100 | User Manual
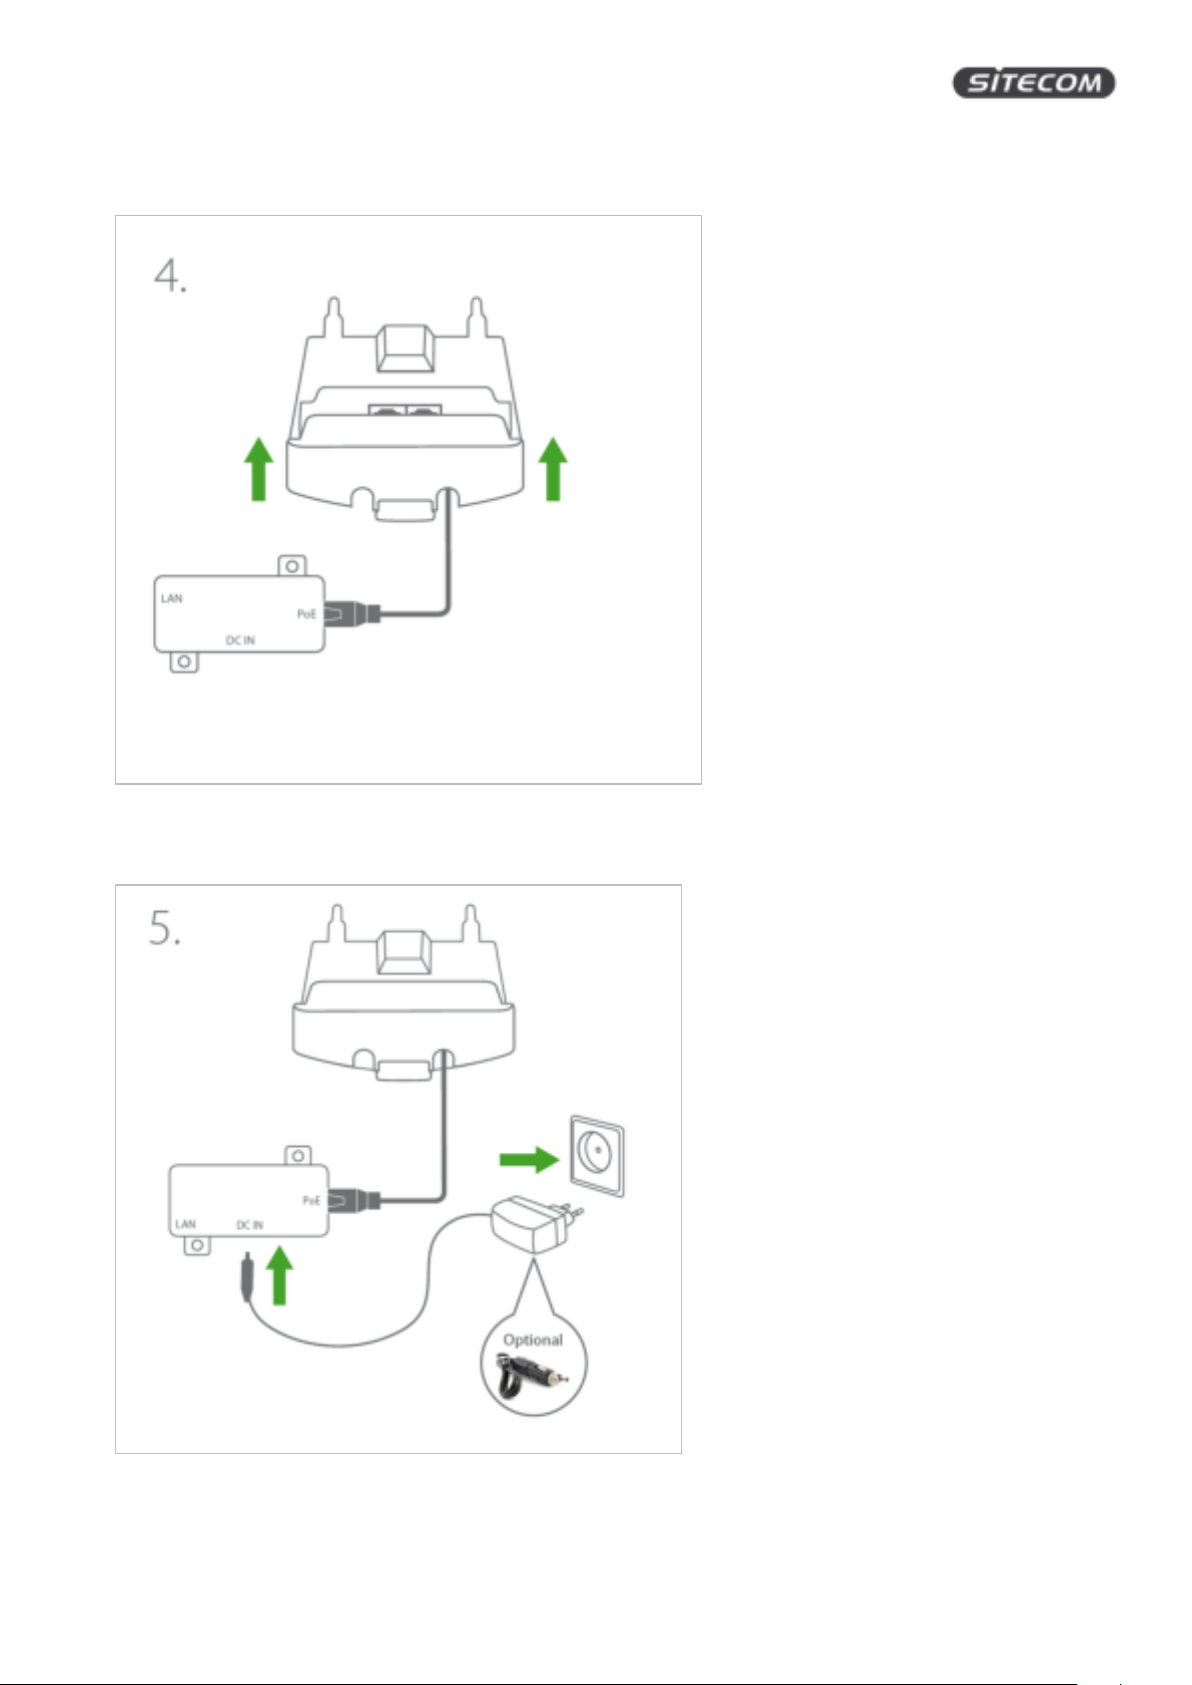
Step 4: Place the cover back onto the range extender
Step 5: Connect the power cable to the PoE injector and a wall socket.
15
Page 16
WLX-2100 | User Manual
Prepare your computer
Windows
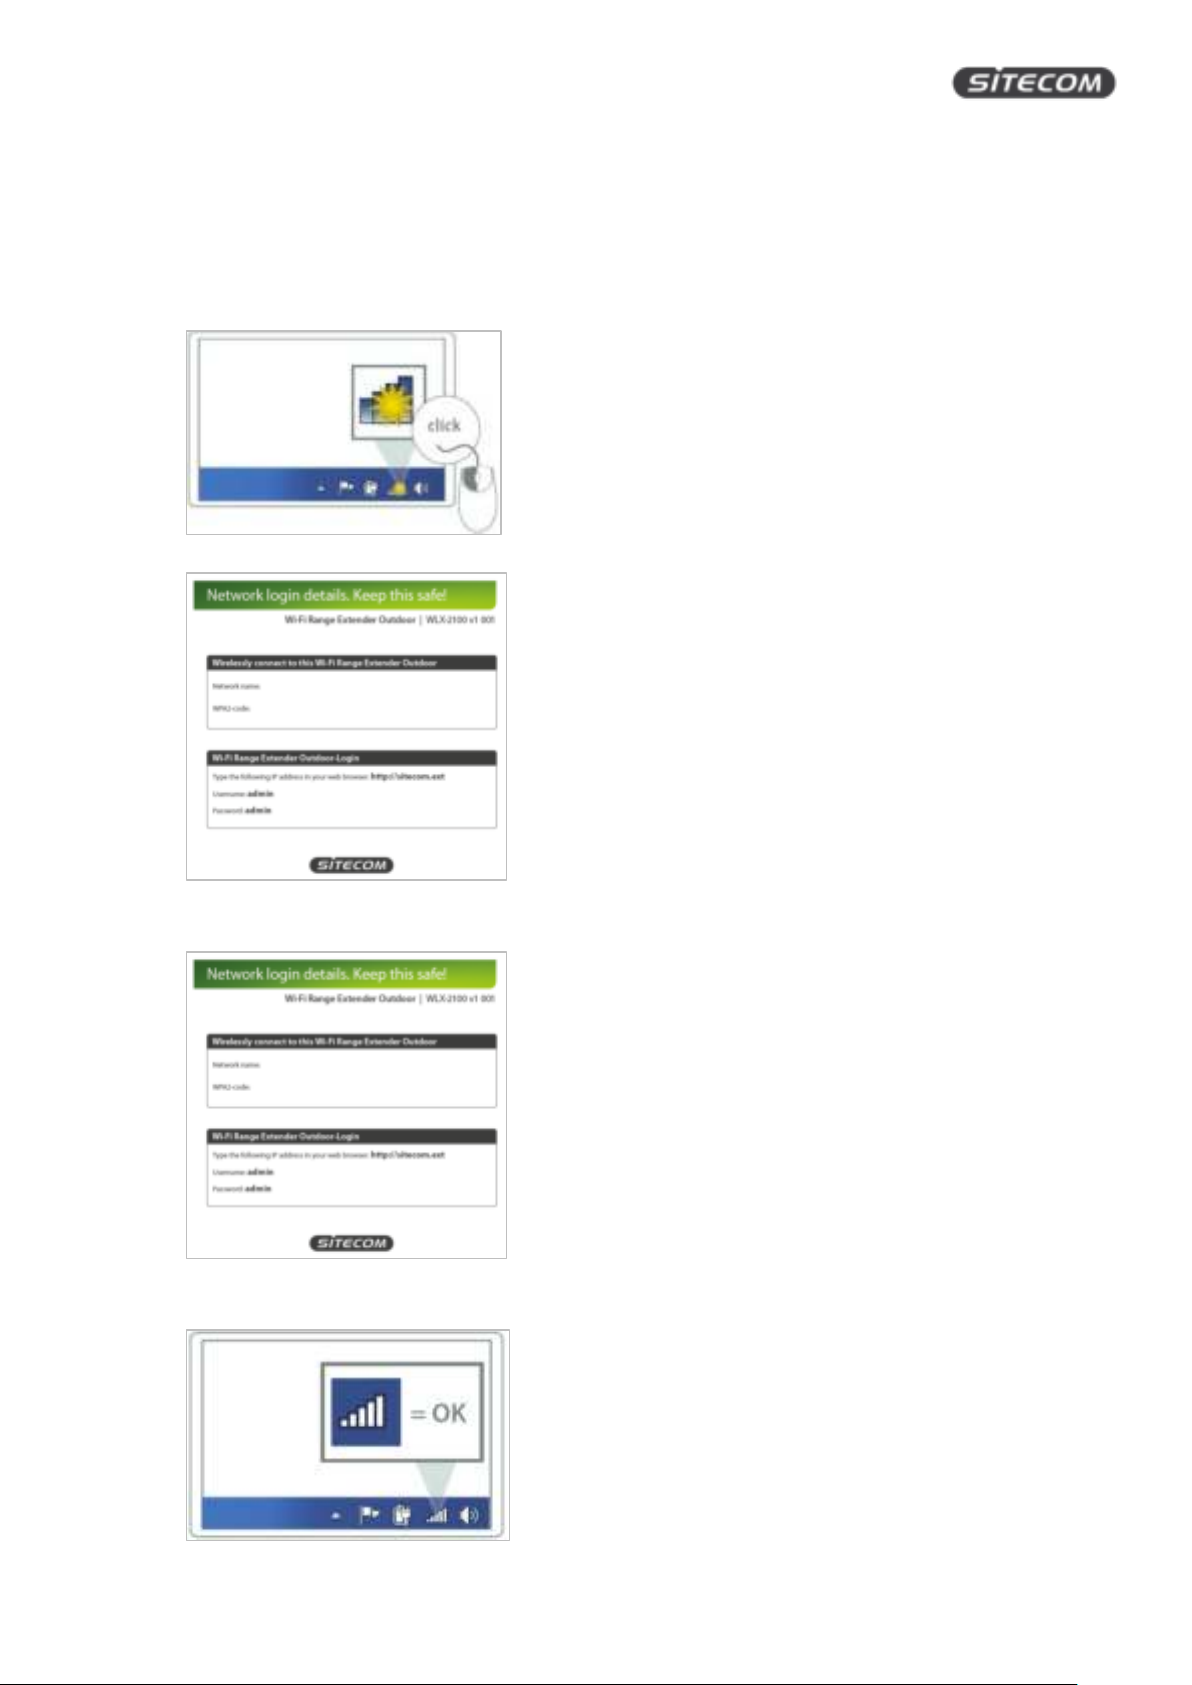
• Click on the icon for wireless connectivity. This is usually located in the System Tray, next to the
clock.
• Select the Sitecom network. The correct network name can be found in the Network Detail Flyer.
Fill in the password for the wireless network. The correct password can be found in the Network
Detail Flyer.
• Wait for the icon to display that it’s connected to the network.
16
Page 17
WLX-2100 | User Manual
Mac OSX
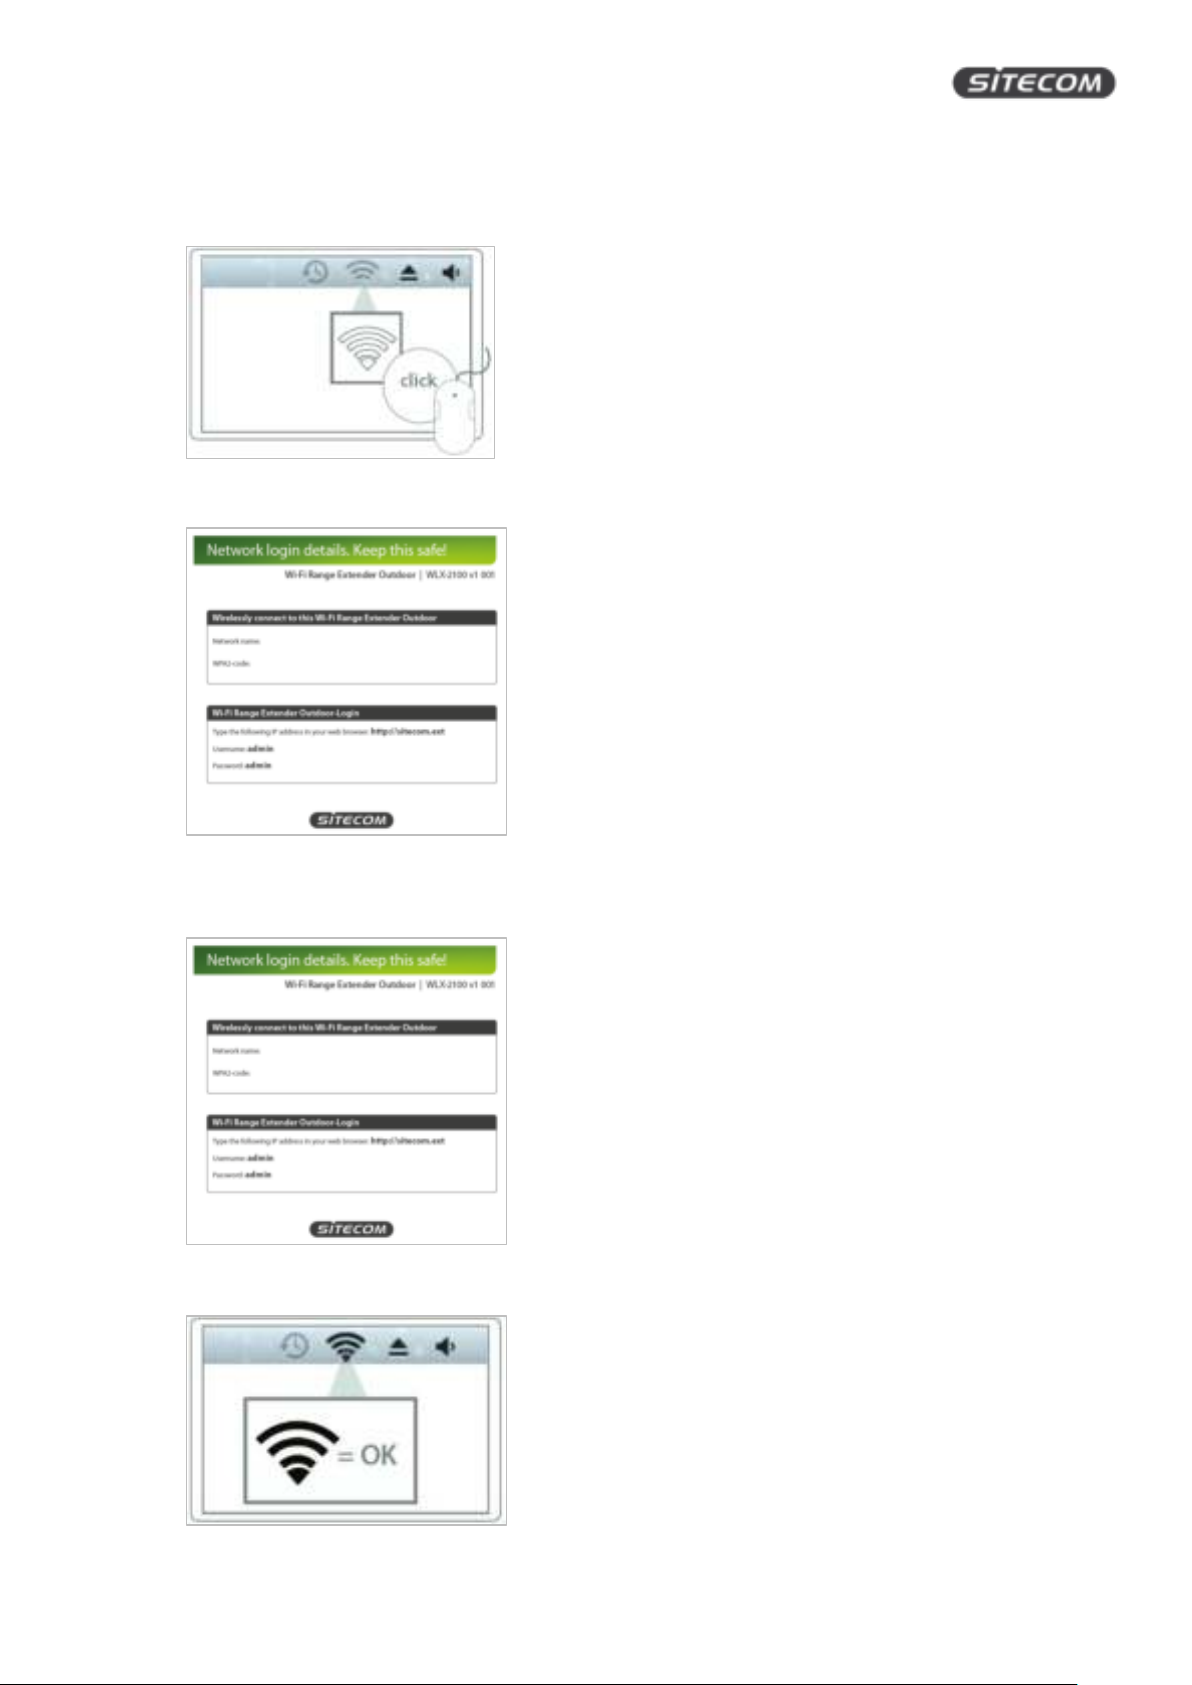
• Click on the icon for wireless connectivity. This is usually located in the System Tray, next to the
clock.
• Select the Sitecom network. The correct network name can be found in the Network Detail Flyer.
Fill in the password for the wireless network. The correct password can be found in the Network
Detail Flyer.
• Wait for the icon to display that it’s connected to the network.
17
Page 18
WLX-2100 | User Manual
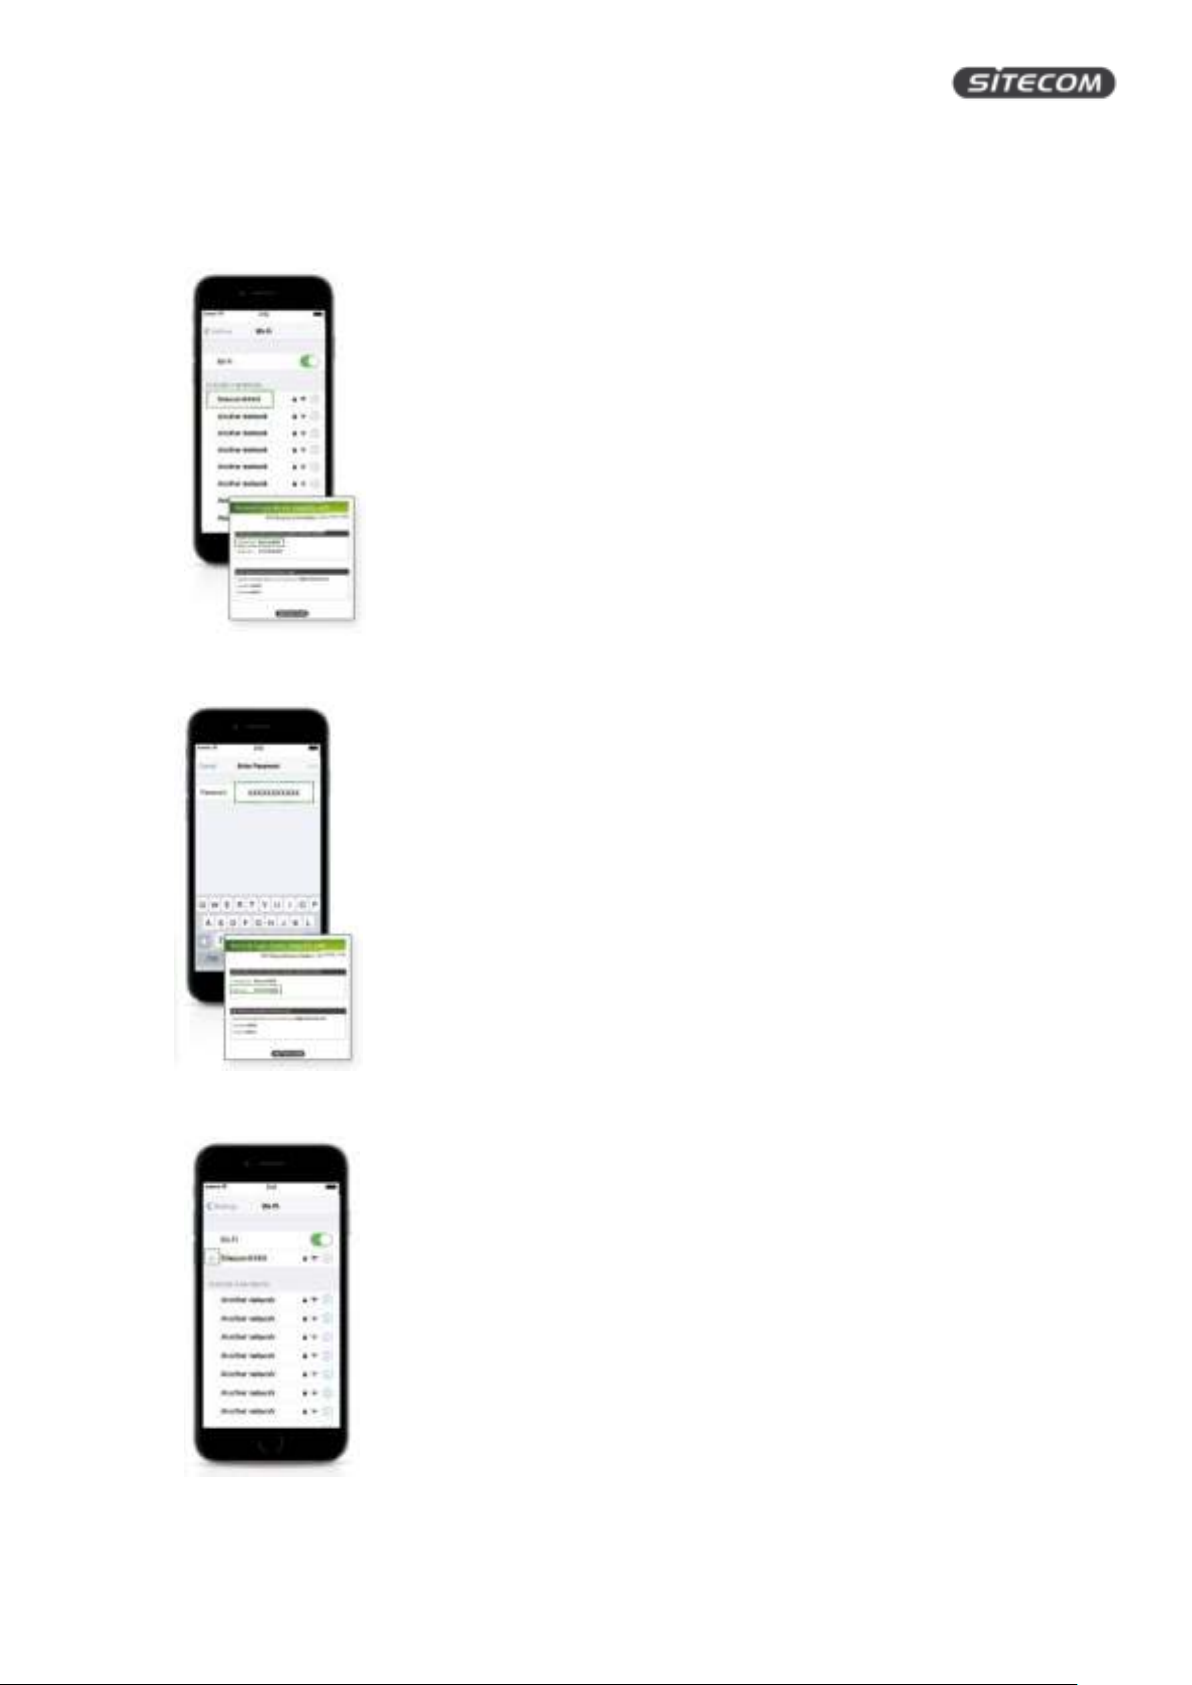
Prepare your Phone / Tablet
• Go to your Wi-Fi settings and turn Wi-Fi on.
• Select the Sitecom network. The correct network name can be found in the Network Detail Flyer.
• Fill in the password for the wireless network. The correct password can be found in the Network
Detail Flyer.
• Wait for the icon to display that it’s connected to the network.
18
Page 19

WLX-2100 | User Manual
Login to the range extender
• Open your web browser (e.g. Internet Explorer, Safari, Google Chrome or Firefox).
• Type http://sitecom.ext in the address bar and press [Enter].
• Type the user name and password. Both are “admin”.
• Click “Login”.
19
Page 20

WLX-2100 | User Manual
Install the range extender with the wizard
• After login, you will see the user interface of your range extender
• Select “Wizard” in the bottom left corner. Your range extender will start to scan the wireless
networks in the area.
20
Page 21

WLX-2100 | User Manual
• Select the Wi-Fi network you wish to extend and make sure the signal strength is at least 50% or
more.
Tip: If you are on a camp ground, vacation park or similar, it is possible, that you see several Wi-Fi
networks with the same name, this is a so called “Multi-Access Point-Network”. Make sure to
always select the network with the strongest signal.
• Fill in the required password of the Wi-Fi network. If you do not have the password yet, please
contact the provider of the Wi-Fi network (e.g. campground, vacation park)
21
Page 22

WLX-2100 | User Manual
Get to know the range extender’s user interface
Status
SAVE/RELOAD
On this screen you can save and apply the settings shown in the “Unsaved changes list”, or cancel the
unsaved changes and revert to the previous settings that were in effect.
MAIN
On this screen, you can view the summary of the current system status including system information
(hardware/software version, date/time), wired network settings (LAN) and wireless network (WLAN)
settings.
22
Page 23

WLX-2100 | User Manual
WIRELESS CLIENT LIST
On this screen, you can see a list of wireless devices (clients) connected to the range extender along with
the MAC addresses and signal strength for each client.
• To remove a wireless device from the list and terminate their connection to the range extender,
click the button in the “Kick and Ban” column.
• To refresh the list, click the “Refresh” button below the table.
DHCP CLIENT TABLE
On this screen, you can see a list of wireless devices (clients) that are connected to the range extender
through DHCP.
• The MAC addresses, IP addresses and expiry times period for each client are shown in separate
rows.
• To refresh the list, click the “Refresh” button below the table.
23
Page 24

WLX-2100 | User Manual
CONNECTION STATUS
On this screen, you can see the current status of the network.
Wireless:
• The information shown includes network type, Wi-Fi network names (SSID & BSSID), connection
status, wireless mode, current channel, security, data-rate, noise level, and signal strength.
WAN:
• The information shown includes the MAC address, connection type, connection status, IP address,
IP subnet mask, primary DNS and secondary DNS.
• Click the Refresh button to update connections status.
24
Page 25

WLX-2100 | User Manual
SYSTEM LOG
On this screen, you can see the events that the range extender logged to the internal memory.
Note: The oldest events are deleted from the log when memory is full.
Click the “Save” button to save the log information to a text file, click the “Refresh” button to update the
client list or the “Clear” button to remove all events.
25
Page 26

WLX-2100 | User Manual
Settings
OPERATION MODE (SYSTEM PROPERTIES)
On this screen, you can set the primary function of the device. The function that is selected affects which
items are available in the main menu.
Device Name
• Enter a name for the range extender. This name appears in SNMP management, it is not the Wi-Fi
network name (SSID) and is not broadcasted to other devices.
Green
• Uncheck the green mode to enable the TX power function in “Wireless Advanced Settings”.
Country/Region
• Select a Country/Region to conform to local regulations.
Operation Mode
• Use the radio button to select an operating-mode. You can switch between “Access point” and
“Client router”.
Click Save & Apply to save changes or Cancel to terminate.
26
Page 27

WLX-2100 | User Manual
WAN SETTINGS
On this screen, you can configure the WAN settings for the range extender. Click on the drop down menu
under “Internet Connection Type” and select dynamic IP (DHCP), static IP, PPPoE or PPTP.
Configuring Dynamic IP (DHCP)
Dynamic IP addressing assigns a different IP address each time a device connects to an ISP service provider.
The service is most commonly used by cable Internet providers.
Account Name
• Enter the account name provided by your Internet Service Provider (ISP).
Domain Name
• Enter the domain name provided by your Internet Service Provider (ISP).
MTU
• The maximum transmission unit (MTU) specifies the largest packet size permitted for an internet
transmission. The factory default MTU size for static IP is 1500. The MTU size can be set between
512 and 1500.
Get Automatically From ISP
• Click the radio button to obtain the DNS automatically from the DHCP server.
Use These DNS Servers
• Click the radio button to set up the Primary DNS and Secondary DNS servers manually.
Discard Ping on WAN
• Keep it checked to recognize pings on the WLX-2100 WAN interface
• Disable to block pings on the WLX-2100 WAN interface
Tip: Pinging IP addresses is a common method used by hackers to test whether the IP address is
valid. Blocking pings provides some extra security from hackers.
27
Page 28

WLX-2100 | User Manual
• Click Accept to save the settings or Cancel to discard the changes.
Configuring Static IP
Setting a static IP address allows an administrator to set a specific IP address for the range extender.
Options:
Account Name
• Enter the account name provided by your Internet Service Provider (ISP).
Domain Name
• Enter the domain name provided by your Internet Service Provider (ISP).
MTU
• The maximum transmission unit (MTU) specifies the largest packet size permitted for an internet
transmission. The factory default MTU size for static IP is 1500. The MTU size can be set between
512 and 1500.
IP Address
• Enter the range extender’s WAN IP address.
Subnet Mask
• Enter the range extender’s WAN subnet mask.
Default Gateway
• Enter the WAN gateway address.
Primary DNS
• Enter the primary DNS server address.
Secondary DNS
• Enter the secondary DNS server address.
Discard Ping on WAN
• Keep it checked to recognize pings on the WLX-2100 WAN interface
• Disable to block pings on the WLX-2100 WAN interface
Tip: Pinging IP addresses is a common method used by hackers to test whether the IP address is
valid. Blocking pings provides some extra security from hackers.
• Click Accept to save the settings or Cancel to discard the changes.
28
Page 29

WLX-2100 | User Manual
Configuring Point-to-Point Protocol over Ethernet (PPPoE)
• Point-to-Point Protocol over Ethernet (PPPoE) is used mainly by ISPs that provide DSL modems to
connect to the Internet.
MTU
• Enter the maximum transmission unit (MTU).The MTU specifies the largest packet size permitted
for an internet transmission (PPPoE default: 1492). The MTU size can be set between 512 and 1492.
Login
• Enter the username assigned by your Internet Service Provider (ISP).
Password
• Enter the password assigned by your Internet Service Provider (ISP).
Service Name
• Enter the service name of an ISP (optional).
Connect on Demand
• Select the radio button to specify the maximum idle time. Internet connection will disconnect when
it reaches the maximum idle time, but it will automatically connect when user tries to access the
network.
Keep Alive
• Select whether to keep the Internet connection always on, or enter a redial period once the
internet loses connection.
Get Automatically From ISP
• Click the radio button to obtain the DNS automatically from the DHCP server.
Use These DNS Servers
• Click the radio button to set up the Primary DNS and Secondary DNS servers manually.
Discard Ping on WAN
• Keep it checked to recognize pings on the WLX-2100 WAN interface
• Disable to block pings on the WLX-2100 WAN interface
Tip: Pinging IP addresses is a common method used by hackers to test whether the IP address is
valid. Blocking pings provides some extra security from hackers.
Click Accept to save the settings or Cancel to discard the changes.
29
Page 30

WLX-2100 | User Manual
Configuring Point-to-Point Tunneling Protocol (PPTP)
The point-to-point tunneling protocol (PPTP) is used in association with virtual private networks (VPNs).
There a two parts to a PPTP connection: the WAN interface settings and the PPTP settings.
MTU
• Enter the maximum transmission unit (MTU). The MTU specifies the largest packet size permitted
for an internet transmission (PPPoE default: 1492). The MTU size can be set between 512 and 1492.
IP Address
• Enter the router’s WAN IP address.
Subnet Mask
• Enter the router’s WAN subnet IP address.
Default Gateway
• Enter the router’s WAN gateway IP address.
PPTP Server
• Enter the IP address of the PPTP server.
Username
• Enter the username provided by your ISP.
Password
• Enter the password provided by your ISP.
Connect on Demand
• If you want the WLX-2100 to end the Internet connection after it has been inactive for a period of
time, select this option and enter the number of minutes you want that period of inactivity to last.
Keep Alive
• If you want the WLX-2100 to periodically check your Internet connection, select this option. Then
specify how often you want the WLX-2100 to check the Internet connection. If the connection is
down, the WLX-2100 automatically re-establishes your connection.
Get Automatically From ISP
• Obtains the DNS automatically from the DHCP server.
Use These DNS Servers
• Click the radio button to set up the Primary DNS and Secondary DNS servers manually.
Discard Ping on WAN
• Keep it checked to recognize pings on the WLX-2100 WAN interface
• Disable to block pings on the WLX-2100 WAN interface
30
Page 31

WLX-2100 | User Manual
Tip: Pinging IP addresses is a common method used by hackers to test whether the IP address is
valid. Blocking pings provides some extra security from hackers.
Click Accept to save the settings or Cancel to discard the changes.
31
Page 32

WLX-2100 | User Manual
LAN SETTINGS
IP Address
• Enter the LAN IP address.
IP Subnet Mask
• Enter the LAN IP subnet mask.
Use Router as DHCP Server
• Check this option to enable the WLX-2100 internal DHCP server.
Starting IP Address
• Specify the starting IP address range for the pool of allocated for private IP addresses. The starting
IP address must be on the same subnet as the ending IP address; that is the first three octets
specified here must be the same as the first three octets in End IP Address.
Ending IP Address
• Specify the ending IP address range for the pool of allocated for private IP addresses. The ending IP
address must be on the same subnet as the starting IP address; that is the first three octets
specified here must be the same as the first three octets in Start IP Address.
WINS Server IP
• Enter the IP address of the WINS server. Click Accept to confirm the changes or Cancel to cancel
and return previous settings.
32
Page 33

WLX-2100 | User Manual
VPN PASS-THROUGH
VPN Pass-through allows a secure virtual private network (VPN) connection between two computers.
Enabling the options on this page opens a VPN port and enables connections to pass through the WLX-2100
without interruption.
PPTP Pass-through
• Check this option to enable PPTP pass-through mode.
L2TP Pass-through
• Check this option to enable L2TP pass-through mode.
IPsec Pass-through
• Check this option to enable IPsec pass-through mode. Click Accept to confirm the changes or Cancel
to cancel and return previous settings.
33
Page 34

WLX-2100 | User Manual
PORT FORWARDING
On this screen, you can configure port forwarding. Port forwarding enables multiple server applications on
a LAN to serve clients on a WAN over a single WAN IP address. The router accepts incoming client packets,
filters them based on the destination WAN, or public, port and protocol and forwards the packets to the
appropriate LAN, or local, port. Unlike the DMZ feature, port forwarding protects LAN devices behind the
firewall.
Overview of port forwarding rules
NO.
• Displays the sequence number of the forwarded port.
Name
• Displays the name of the forwarded port.
Protocol
• Displays the protocol to use for mapping from the following: TCP, UDP or Both.
Start Port
• Displays the LAN port number that WAN client packets will be forward to.
End Port
• Displays the port number that the WAN client packets are received.
Server IP
• Displays the IP address of the server for the forwarded port.
Enable
• Click to enable or disable the forwarded port profile.
Modify
• Click to modify the forwarded port profile.
34
Page 35

WLX-2100 | User Manual
Delete
• Click to delete the forwarded port profile.
Adding port-forwarding rules
• Click Add Entry to add port forwarding rules.
• Click Accept to confirm the changes.
Service Name
• Enter a name for the port forwarding rule.
Protocol
• Select a protocol for the application: Choices are Both, TCP, and UDP.
Starting Port
• Enter a starting port number.
Ending Port
• Enter an ending port number. All ports numbers between the starting and ending ports will forward
users to the IP address specified in the IP Address field.
IP Address
• Enter the IP address of the server computer on the LAN network where users will be redirected.
Click Save to apply the changes or Cancel to return previous settings.
35
Page 36

WLX-2100 | User Manual
DMZ
On this screen, you can configure a DMZ. Configuring a device on the LAN as a demilitarized zone (DMZ)
host allows unrestricted two-way Internet access for Internet applications, such as online video games, to
run from behind the NAT firewall. The DMZ function allows the router to redirect all packets going to the
WAN port IP address to a particular IP address on the LAN. The difference between the virtual server and
the DMZ function is that a virtual server redirects a particular service or Internet application, such as FTP, to
a particular LAN client or server, whereas a DMZ redirects all packets, regardless of the service, going to the
WAN IP address to a particular LAN client or server.
DMZ Hosting
• Select Enable DMZ to activate DMZ functionality.
DMZ Address
• Enter an IP address of a device on the LAN. Click Accept to confirm the changes or Cancel to cancel
and return previous settings.
WARNING!
The PC defined as a DMZ host is not protected by the firewall and is vulnerable to malicious network
attacks. Do not store or manage sensitive information on the DMZ host.
36
Page 37

WLX-2100 | User Manual
WIRELESS SETTINGS
On this screen, you can configure the wireless and security settings for the range extender.
Hotspot Client Network
Wireless Mode
• Wireless mode supports 802.11b/g/n mixed modes.
Hotspot SSID
• Specify the SSID (network-name) of the network you are connecting the range extender with.
Site Survey
• Initiates a network scan of the surrounding access points where the device is able to connect with,
select the network you wish to connect the range extender with.
Preferred BSSID
• Enter the MAC address if known. If you select an Access Point in the Site Survey, this field is
completed automatically.
Wireless Security Settings
The Wireless Security Settings section lets you configure the range extender’s security modes: WEP, WPAPSK, WPA2-PSK, WPA-PSK Mixed, WPA, WPA2, and WPA Mixed. We strongly recommend you use WPA2PSK.
Wired Equivalent Privacy (WEP)
Security Mode
• Select WEP from the drop-down list to begin the configuration.
Auth Type
37
Page 38

WLX-2100 | User Manual
• Select Open System or Shared.
Input Type
• Select an input type of Hex or ASCII.
Key Length
• Level of WEP encryption applied to all WEP keys. Select a 64/128/152-bit password lengths.
Default Key
• Specify which of the four WEP keys the RANGE EXTENDER uses as its default.
Key1 - Key4
• Specify a password for the security key index. For security, each typed character is masked by a dot.
Click Save to save the changes or Cancel to cancel and return previous settings.
Note: 802.11n does not allow WEP/WPA-PSK TKIP/WPA2-PSK TKIP security mode. The connection mode will
change from 802.11n to 802.11g.
Wi-Fi Protected Access Pre-Shared Key (WPA-PSK)
Security Mode
• Select WPA-PSK from the drop-down list to begin the configuration.
Encryption
• Select TKIP or AES as the encryption type.
TKIP = automatic encryption with WPA-PSK; requires passphrase.
AES = automatic encryption with WPA-PSK; requires passphrase.
Passphrase
• Specify the security password. For security, each typed character is masked by a dot.
Note: 802.11n does not allow WEP/WPA-PSK TKIP/WPA2-PSK TKIP security mode. The connection mode will
change from 802.11n to 802.11g.
Wi-Fi Protected Access 2 Pre-Shared Key (WPA2-PSK)
Security Mode
• Select WPA2-PSK from the drop-down list to begin the configuration.
Encryption
• Select TKIP, AES as the encryption type.
TKIP = automatic encryption with WPA-PSK; requires passphrase.
AES = automatic encryption with WPA2-PSK; requires passphrase.
38
Page 39

WLX-2100 | User Manual
Passphrase
• Specify the security password. For security, each typed character is masked by a dot.
Note: 802.11n does not allow WEP/WPA-PSK TKIP/WPA2-PSK TKIP security mode. The connection mode will
change from 802.11n to 802.11g.
Extender Network
Enable / Disable the extender network, if you disable this feature you will not be able to connect wirelessly
with the device.
Security
• Select Edit to configure the appropriate wireless security settings for the device, this menu works
the same as the security option described above.
39
Page 40

WLX-2100 | User Manual
WIRELESS ADVANCED SETTINGS
On this screen, you can configure the advanced wireless settings for your access point using the screens in
this section. Leave these settings to their default values if you are not sure what values to enter.
Data Rate
• Select a data rate from the drop-down list. The data rate affects throughput.
• If you select a low data rate value, for example, the throughput is reduced but the transmission
distance increases.
Transmit Power
• Let’s you increase or decrease transmit power.
• Higher transmit power may prevent connections to the network while the lower transmit power
can prevent clients from connecting to the device.
RTS/CTS Threshold
• Specify the threshold package size for RTC/CTS.
• A small number causes RTS/CTS packets to be sent more often and consumes more bandwidth.
Distance
• Specify the distance between Access Points and clients.
• Longer distances may drop high-speed connections.
Aggregation
• Merges data packets into one packet.
• This option reduces the number of packets, but increases packet sizes.
Traffic Shaping
• Check this option to enable wireless traffic shaping.
• It regulates the flow of packets leaving an interface to deliver improved Quality of Service.
Client Limit
40
Page 41

WLX-2100 | User Manual
• Defines the maximum number of devices which are able to connect (default value 64)
41
Page 42

WLX-2100 | User Manual
ADMINISTRATION
Login Settings
New Name
• Enter a new username for logging in to this User Interface.
New Password
• Enter a new password for logging in to this User Interface.
Confirm Password
• Re-enter the new password for confirmation.
• Click Save/Apply to apply the changes or Cancel to return previous settings.
Remote Access
Remote Management
• Enable or disable remote management.
Remote Management Port
• If remote management is enabled, enter the port number to be used for remote management.
• For example: If you specify the port number 8080, enter http://<IPaddress>:8080 to access the
WLX-2100 Web Configurator.
• Click Accept to apply the changes or Cancel to return previous settings.
Configuring Management VLAN
• Click the Management VLAN link under the Management menu to assign a VLAN tag to the packets.
• A VLAN is a group of computers on a network whose software has been configured so that they
behave as if they were on a separate Local Area Network (LAN).
• Computers on VLAN do not have to be physically located next to one another on the LAN.
Management VLAN ID
42
Page 43

WLX-2100 | User Manual
• If your network includes VLANs and if tagged packets need to pass through the Access Point, enter
the VLAN ID. Otherwise, click No VLAN tag.
• Click Accept to confirm the changes or Cancel to cancel and return previous settings.
Note: If you reconfigure the Management VLAN ID, you may lose your connection to the WLX-2100. Verify
that the DHCP server supports the reconfigured VLAN ID and then reconnect to the WLX-2100 using the new
IP address.
43
Page 44

WLX-2100 | User Manual
SNMP
SNMP is used in network management systems to monitor network-attached devices for conditions that
warrant administrative attention.
SNMP
• Enable or disable the WLX-2100 SNMP function.
Contact
• Enter the contact details of the device.
Location
• Enter the location of the device.
Community Name (Read Only)
• Enter the password for accessing the SNMP community for read-only access.
Community Name (Read/Write)
• Enter the password for accessing the SNMP community for read and write access.
Trap Destination Address
• Enter the IP address where SNMP traps are to be sent.
Trap Destination Community Name
• Enter the password of the SNMP trap community.
SNMPv3
• Enable or Disable the SNMPv3 feature.
User Name
• Specify the username for SNMPv3.
44
Page 45

WLX-2100 | User Manual
Auth Protocol
• Select the authentication protocol type: MD5 or SHA.
Auth Key (8-32 Characters)
• Specify the authentication key for authentication.
Priv Protocol
• Select the privacy protocol type: DES.
Priv Key (8-32 Characters)
• Specify the privacy key for privacy.
Engine ID
• Specify the engine ID for SNMPv3.
Click “Save/Apply” to apply the changes or “Cancel” to return to previous settings.
45
Page 46

WLX-2100 | User Manual
BACKUP/RESTORE SETTINGS
On this page, you can backup and restore settings. Click the Backup/Restore Setting link under the
Management menu to save the WLX-2100’s current settings in a file on your local disk or load settings onto
the device from a local disk.
This feature is particularly convenient administrators who have several WLX-2100 devices that need to be
configured with the same settings.
This page also lets you return the WLX-2100 to its factory default settings. If you perform this procedure,
any changes made to the WLX-2100 settings will be lost.
Save a Copy of Current Settings
• Click Backup to save the current configured settings.
Restore Saved Settings from A File
• To restore settings that have been previously backed up, click Browse, select the file, and click
Restore.
Revert to Factory Default Settings
• Click Factory Default to restore the WLX-2100 to its factory default settings.
46
Page 47

WLX-2100 | User Manual
AUTO REBOOT SETTINGS
On this page, you can configure the auto reboot function. It allows you to reboot the device automatically
based on a specific time setting.
Click “Save/Apply” to apply the changes or “Cancel” to return to previous settings.
47
Page 48

WLX-2100 | User Manual
FIRMWARE UPGRADE
On this page, you can upgrade the firmware of the range extender. Firmware is system software that
operates and allows the administrator to interact with the range extender.
To update the firmware version, follow these steps:
1. Download the firmware from
2. Click “Choose File”.
3. Browse the file system and select the firmware file.
4. Click “Upload”.
5. The WLX-2100 restarts automatically after the upgrade completes.
WARNING!
Upgrading firmware through a wireless connection is not recommended. Firmware upgrading must be
performed while connected to an Ethernet (LAN port) with all other clients disconnected. The firmware
upgrade procedure can take several minutes. Do not power off the WLX-2100 during the firmware upgrade,
as it can cause the device to crash or become unusable.
www.sitecom.com and save it to your local hard drive.
48
Page 49

WLX-2100 | User Manual
TIME SETTINGS
On this page, you can change the system time of the WLX-2100 by manually entering the information,
synchronizing the device with a PC, or setup automatic updates through a network time (NTP) protocol
server.
Manually Set Date and Time
• Enter the date and time values in the date and time fields or click the Synchronize with PC button
to get the date and time values from the administrator’s PC.
Automatically Get Date and Time
• Select a time zone from the drop-down list and check whether you want to enter the IP address of
an NTP server or use the default NTP server.
Enable Daylight Saving
• Click to enable or disable daylight savings time.
• Select the start and stop times from the Start Time and Stop Time dropdown lists.
Click “Save/Apply” to apply the changes or “Cancel” to return to previous settings.
49
Page 50

WLX-2100 | User Manual
CLI SETTINGS
On this page, you can configure the WLX-2100 through the command line interface (CLI). The CLI can be
access through a command console, modem or Telnet connection.
CLI
• Select to enable or disable the ability to modify the WLX-2100 via a command line interface (CLI).
Click “Save/Apply” to apply the changes or “Cancel” to return to previous settings.
50
Page 51

WLX-2100 | User Manual
LOG
On this page, you can display a list of events that are triggered on the WLX-2100 Ethernet and wireless
interfaces. You can consult this log if an unknown error occurs on the system or when a report needs to be
sent to the technical support department for debugging purposes.
Syslog
• Enable or disable the WLX-2100 syslog function.
Log Server IP Address
• Enter the IP address of the log server.
Local Log
• Enable or disable the local log service.
Click “Save/Apply” to apply the changes or “Cancel” to return to previous settings.
51
Page 52

WLX-2100 | User Manual
DIAGNOSTICS
On this page, you can access the diagnostics feature. It allows the administrator to verify that another
device is available on the network and is accepting request packets. If the ping result returns alive, it means
a device is on line. This feature does not work if the target device is behind a firewall or has security
software installed.
Target IP / Domain Name
• Enter the IP address you would like to search.
Ping Packet Size
• Enter the packet size of each ping.
Number of Pings
• Enter the number of times you want to ping.
Start Ping
• Click Start Ping to begin pinging.
Trace route target
• Enter an IP address or domain name you want to trace.
Start Traceroute
• Click Start Traceroute to begin the traceroute operation.
Target Address
• Enter the IP address of the target PC.
Time period
• Enter time period for the speed test.
Check Interval
52
Page 53

WLX-2100 | User Manual
• Enter the interval for the speed test.
Start Speed Test
• Click Start Speed Test to begin the speed test operation.
IPv4 Port
• Displays the IPv4 port number of the WLX-2100.
53
Page 54

WLX-2100 | User Manual
DEVICE DISCOVERY
On this page, you can view other devices connected to the network.
Device Name
• Displays the name of the devices connected to the network.
Operation Mode
• Displays the operation mode of other WLX-2100’s connected to the network.
IP Address
• Displays the IP address of other WLX-2100’s connected to the network.
System MAC Address
• Displays the system MAC address of the devices connected to the network.
Firmware Version
• Displays the firmware version of the devices connected to the network.
54
Page 55

WLX-2100 | User Manual
DENIAL OF SERVICE PROTECTION
On this page, you can configure the DOS protection. A denial-of-service (DoS) attack is an attempt to make
a machine or network resource unavailable to its intended users, such as to temporarily or indefinitely
interrupt or suspend services of a host connected to the internet.
Use TCP SYN Cookies Protection
• Click to enable TCP SYN cookies protection.
SYN Flood Attack Protection
• Click to enable or disable SYN Flood Attack Protection.
Match Interval per Second
• Enter the allowed number of packets per second.
Limit Packets
• Enter the maximum number of packets allowed per request.
UDP Flood Attack Protection
• Click to enable or disable UDP Flood Attack Protection.
Match Interval per Second
• Enter the allowed number of packets per second.
Limit Packets
• Enter the maximum number of packets allowed per request.
Ping Attack Protection
• Click to enable or disable ping attack protection.
Click “Save/Apply” to apply the changes or “Cancel” to return previous settings.
55
Page 56

WLX-2100 | User Manual
#
Package
name
Source
version
GPL
version
1
busybox
http://www.busybox.net/
1.19.4
GPLv2
2
uboot
http://www.denx.de/wiki/U-Boot
1.1.4
GPL V2
3
gcc
http://gcc.gnu.org/
4.3.3
GPL V2
4
dnsmasq
ftp://ftp.suse.com/pub/people/ug/
2.52
GPL V2
5
iptables
http://www.netfilter.org/projects/iptables/index.html
1.4.0
GPL V2
6
ethtool
http://sourceforge.net/projects/gkernel/
2.6.34
GPL V2
7
hotplug2
http://code.google.com/p/hotplug2/
1.0
GPL V2
8
ntpclient
http://doolittle.icarus.com/ntpclient/
2007_365
GPL V2
9
ppp
http://ppp.samba.org
2.4.4
GPL V2
10
iproute2
ftp://ftp.inr.ac.ru/ip-routing/
2.6.29
GPL V2
11
libdaemon
http://0pointer.de/lennart/projects/libdaemon
0.14
GPL V2.1
12
linuxigd
http://www.sourceforge.net/projects/upnp
1.0
GPL V2
13
libupnp
http://pupnp.sourceforge.net/
1.6.6
GPL V2
14
libuClibc
http://www.uclibc.org
0.9.30.1
GPL V2.1
15
Addendum A: GNU GPL
Parts of the firmware of the WLX-2100 v1-001 are subject to the
GNU general public license.
Licensing Information
This product includes third-party software licensed under the terms of the
can modify or redistribute this free software under the terms of the GNU General Public License. Please see
Appendix B for the exact terms and conditions of this license.
Specifically, the following part of this product is subject to the GNU GPL:
GNU General Public License. You
56
Page 57

WLX-2100 | User Manual
Addendum B: Declaration of Conformity
57
 Loading...