

Page 1
MD-300
PC on TV
Full Manual
Page 2

Table of Contents
1 Introduction ....................................................................................................... 3
2 Cautions ............................................................................................................ 4
3 Package content ................................................................................................. 5
4 Setup Possibilities ............................................................................................... 6
5 Quick start ......................................................................................................... 8
6 Using PConTV software user interface...................................................................10
7 Controlling your computers .................................................................................17
8 Web management..............................................................................................19
9 Frequently asked questions .................................................................................25
10 Certifications ...................................................................................................28
Revision 1.0
© Sitecom Europe BV 2011
Note: All the information contained in this manual was correct at the time of publication.
However, as our engineers are always updating and improving the product, your device’s
software may have a slightly different appearance or modified functionality than
presented in this manual.
Page 3

1 Introduction
Thank you for purchasing the MD-300 PConTV. The MD-300 PConTV is the first device
that can show all content of your Windows as well as Mac computers on your TV
wirelessly. You can easily control up to 8 computers with your mouse and/or keyboard.
You can share any content from your computers with your friends and family in your
living room.
Page 4

2 Cautions
This device’s design and manufacturer has your safety in mind. In order to safely and
effectively use this device, please read the following before usage.
Usage Cautions
The user should not modify this device. The environmental temperature should be within
+0 ~ +40 degrees Celsius.
Power
The device’s power voltage is DC 5V 2.5A.
When using this device, please connect the supplied AC adapter or AC adapter cable to
the device’s power jack. When placing the adapter cable, make sure it can not get
damaged or be subject to pressure. To reduce the risk of electric shock, unplug the
adapter first before cleaning it. Never connect the adapter to the device in a humid or
dusty area. Do not replace the adapter or cable’s wire or connector.
Repair
If the device has a problem, you should take it to an appointed repair centre and let the
specialists do the device. Never repair the device yourself, you might damage the device
or endanger yourself.
Disposing of the device
When you dispose of the device, be sure to dispose it appropriately. Some countries may
regulate disposal of an electrical device, please consult with your local authority.
Others
When using this device, please do not let it come into contact with water or other liquids.
If water is accidentally spilled on the device, please use a dry cloth to absorb the spillage.
Electronic products are vulnerable, when using please avoid shaking or hitting the device,
and do not press the buttons too hard.
- Do not let the device come into contact with water or other liquid.
- Do not disassemble the device, repair the device or change the design of the device,
any damage done will not be included in the repair policy.
- Avoid hitting the device with a hard object, avoid shaking the device and stay away
from magnetic fields.
- If during electrostatic discharge or a strong electromagnetic field the device will
malfunction, unplug the power cable. The device will return to normal performance the
next time it is powered on.
Page 5
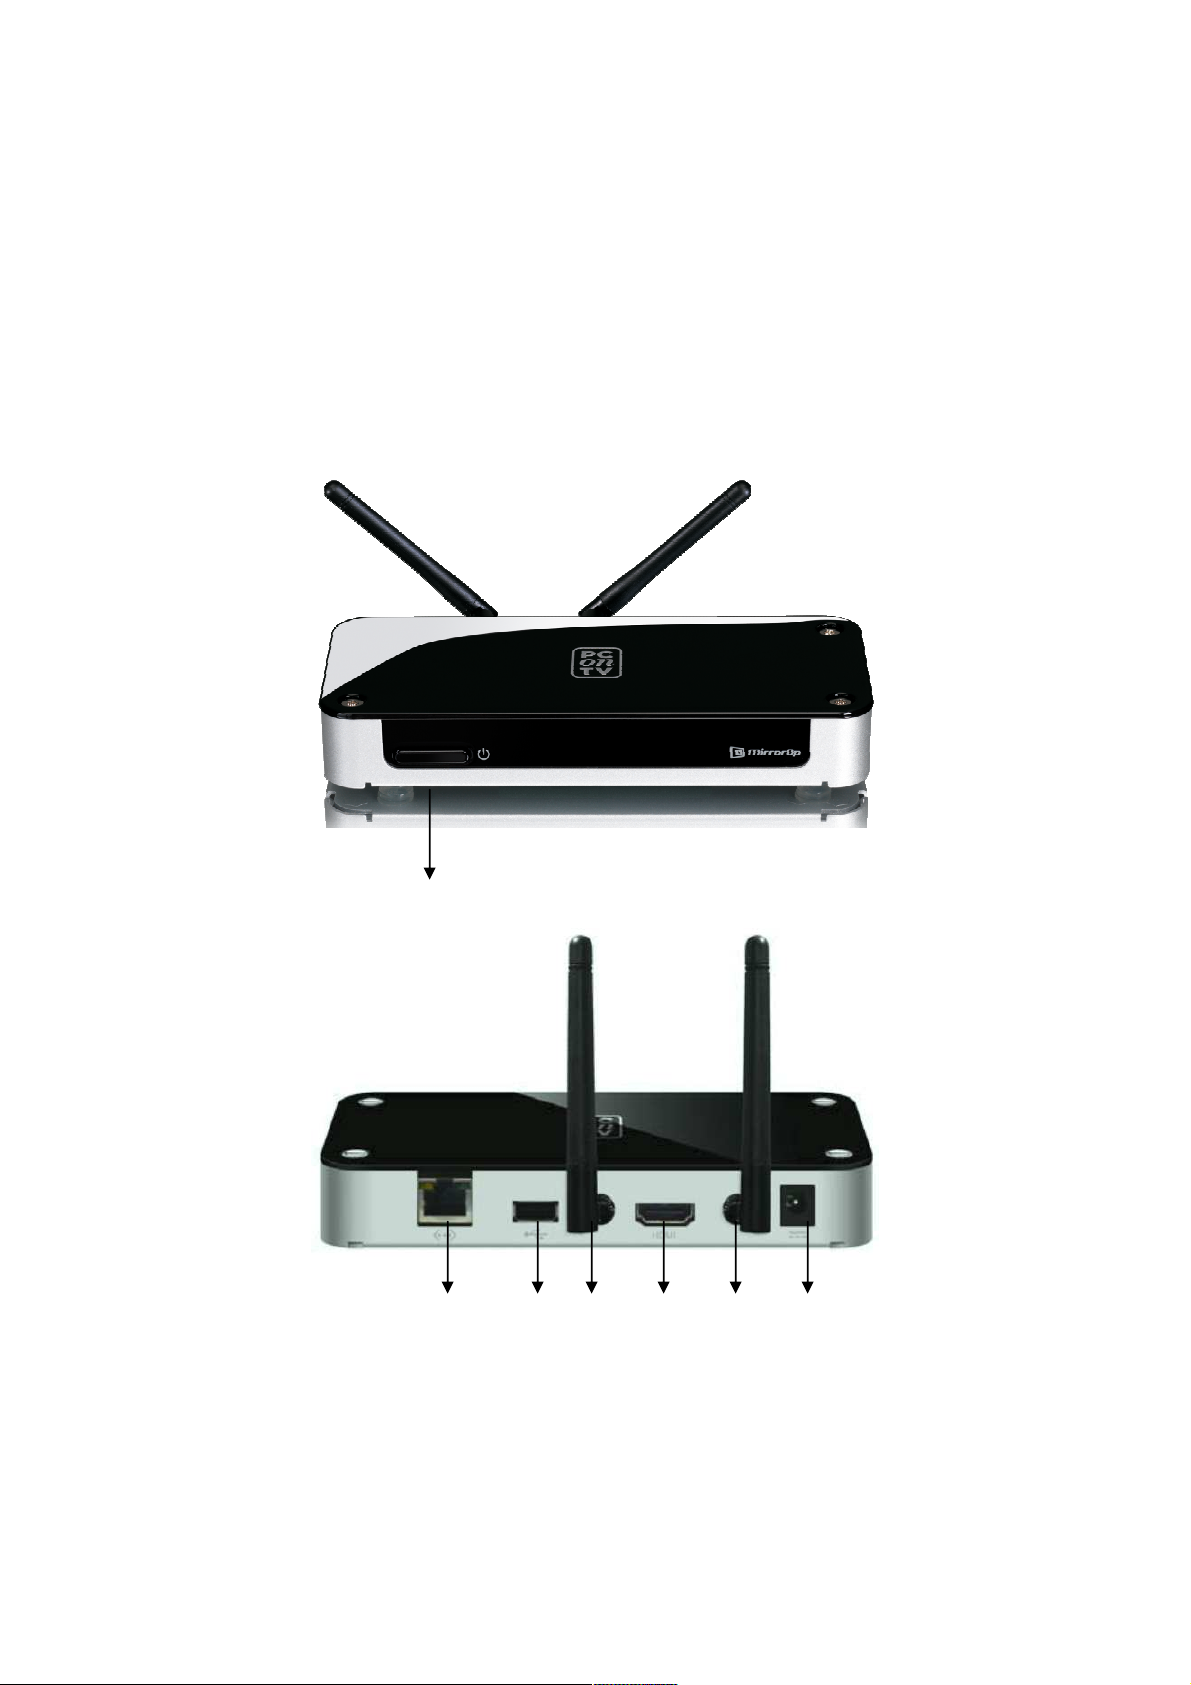
On/Off button
Ethernet
USB
Antenna
HDMI
Antenna
Power
3 Package content
The following items are included in your PConTV package:
• PConTV device
• Quick Installation Guide
• 2 WiFi antennae
• Universal power adaptor
• Installation CD
• User’s Manual (on CD)
• Warranty Card
Page 6

4 Setup Possibilities
1. Ethernet setup (recommended): Optimal performance
Local client PC’s and PConTV in full Ethernet setup.
2. Homeplug power-line modem Setup: Optimal performance
Local client PC’s and PConTV in Home Plug** setup.
Page 7
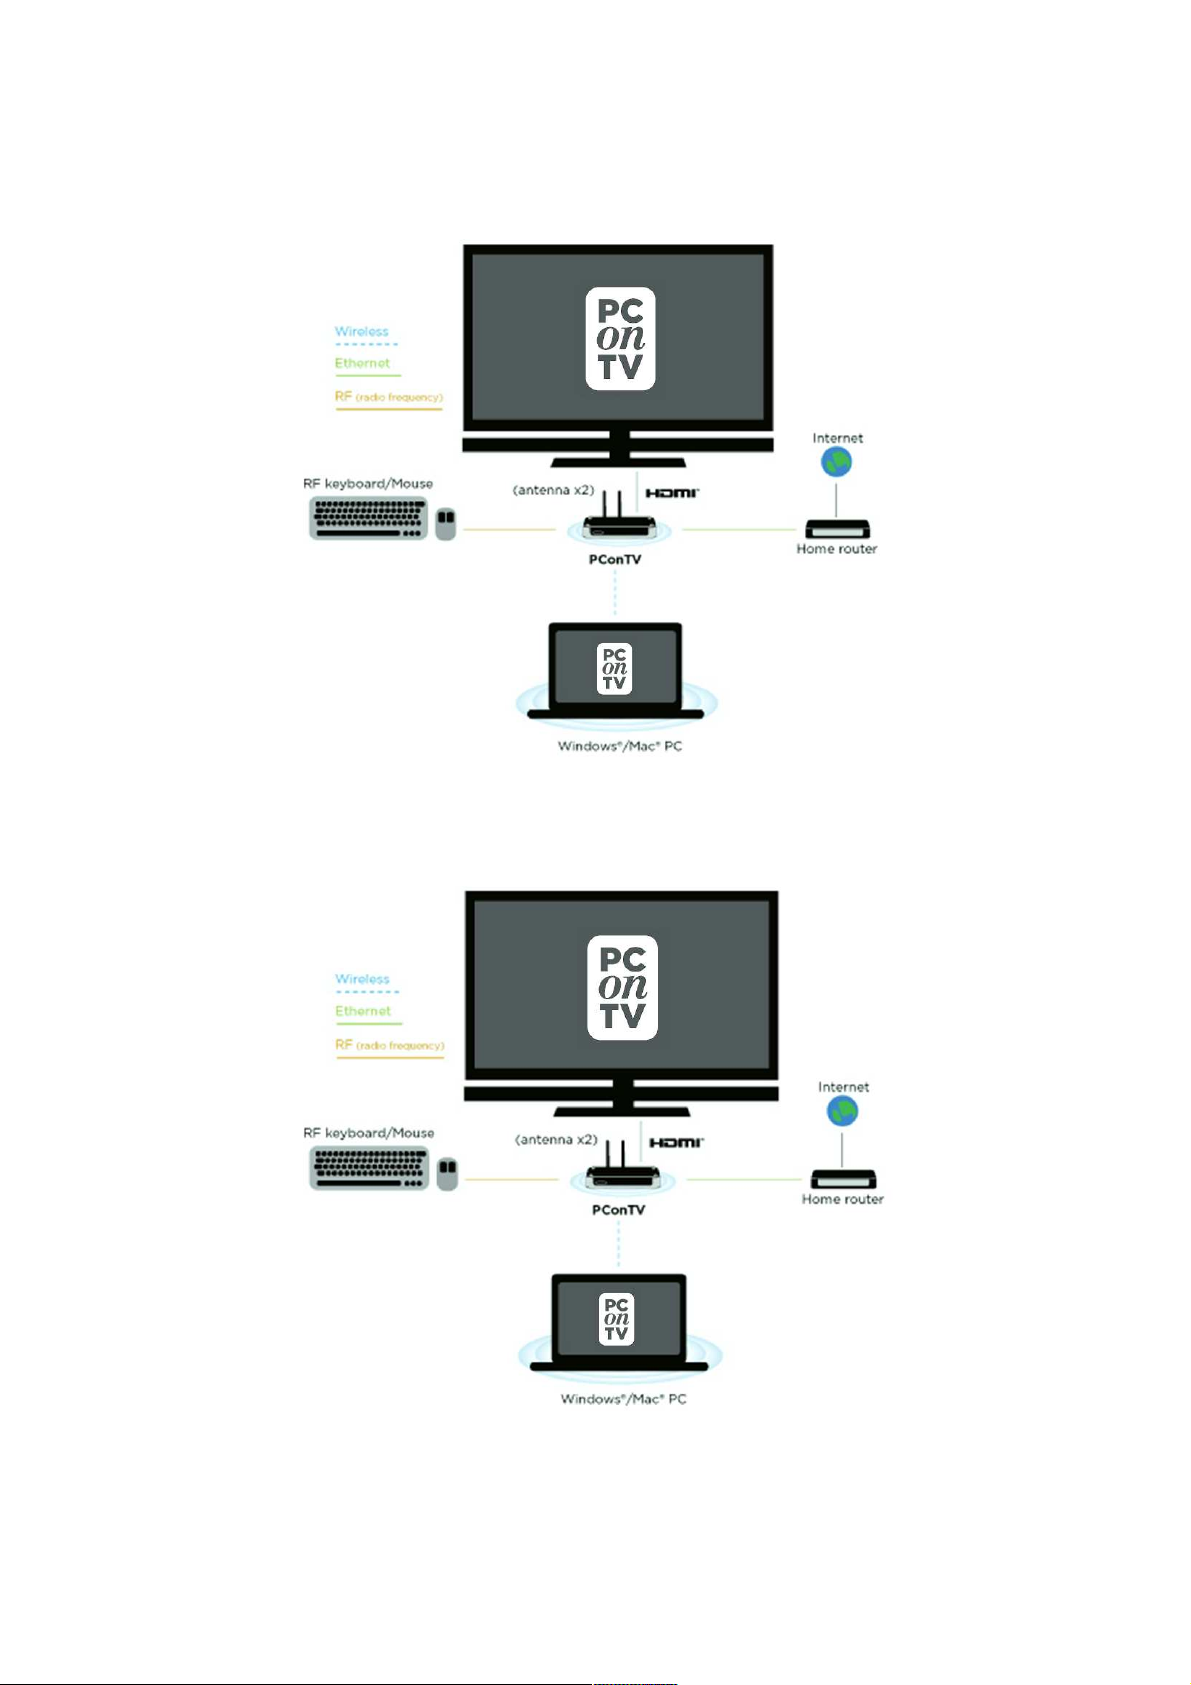
3. Partly wireless, Partly Ethernet Setup
Local client PC’s wireless* and PConTV in Ethernet setup.
4. Wireless Setup
Local client PC’s and PConTV in full wireless setup.*
* Performance depends on wireless performance of home ADSL or cable router.
** HomePlug devices sold separately.
Page 8

5 Quick start
1. Connect a HDMI cable to the PConTV, connect it to your HDMI input on your TV and
turn on your TV.
2. Connect the power adaptor to your PConTV, and plug it into a power outlet.
3. Press the Power button on the PConTV to turn on the device.
4. The PConTV will be powered ON. The main menu shown below will be presented on
your TV screen when the system is ready.
5. The PConTV receives an IP address from your home router (See ethernet
setup/wireless setup). This may take 30-40 seconds. The default IP address when the
PConTV is not connected to a network is: 192.168.100.10.
6. Insert the PConTV installation CD into your Windows or Mac Computer and follow the
on-screen instructions to install the software.
7. Find the PConTV icon (as shown below) in your ‘Programs\PConTV’ folder (on
Windows) or ‘Applications\PConTV’ folder (on Mac) to launch the PConTV Software
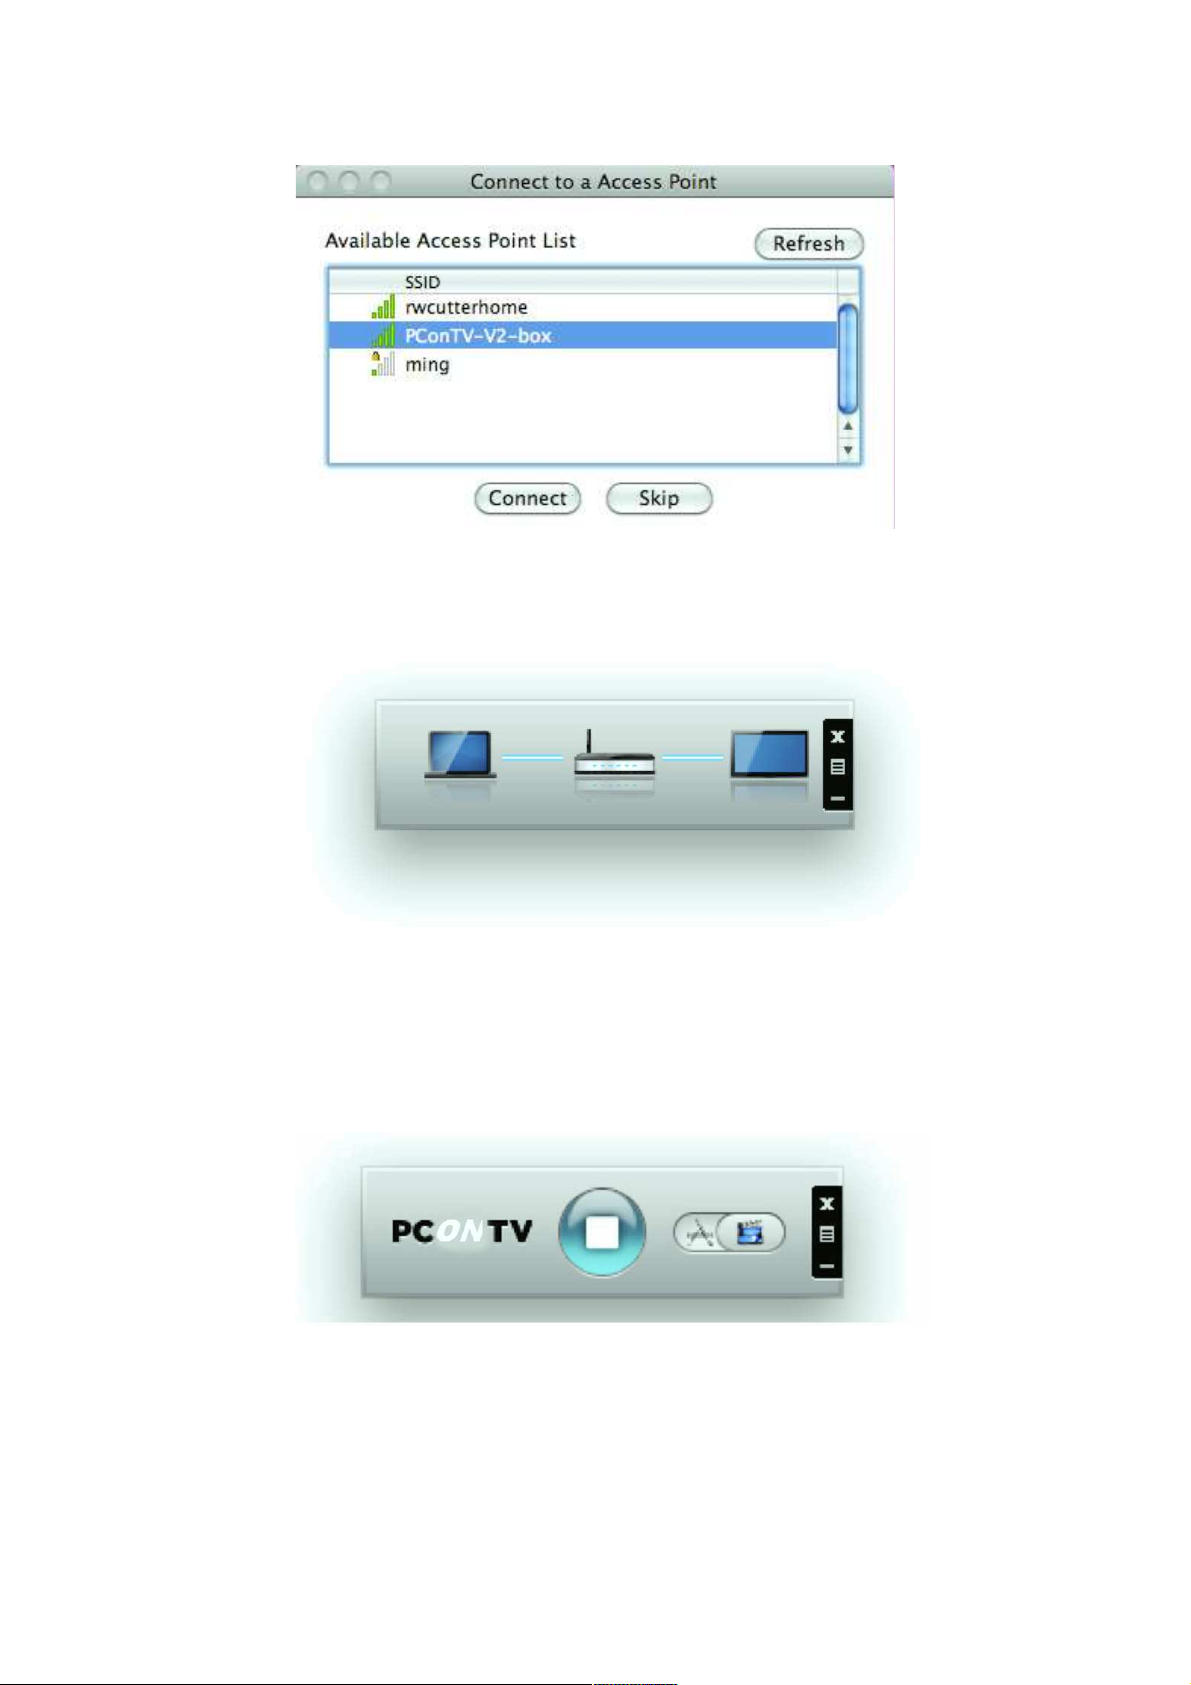
8. Searching WiFi Access Point. Select your PConTV (default SSID is PConTV) from the
list and click the Connect button.
Page 9
9. Connect to selected access point.
10. Connecting to PConTV server. If only one server is found, it will automatically
connect to the server.
11. The application will temporarily adjust your Windows or Mac resolution for best
projection result, and then project your screen to TV. You should see your Windows
or Mac PC Desktop on the TV screen now.
12. To quit a projection, click the <Stop/Play> button on the PConTV software user
interface (as shown below). Your screen resolution will be restored to the original
one.
13. To begin a projection again, click the Play button again.
Page 10

6 Using PConTV software user interface
After you have installed the PConTV software application from the installation CD to your
PC (‘s) you can run the PConTV software user interface to connect to the PConTV. If
there is more than one PConTV active in the same network, the software will list the
devices for you to choose.
Software activation
The first time you launch the PConTV Software user interface, you will see the activation
reminder:
Select "Activate" or select "Remind me later" to postpone activation. In the activation
dialog (as shown on the next page), enter your serial number and optional your email
address and click "Activate now".
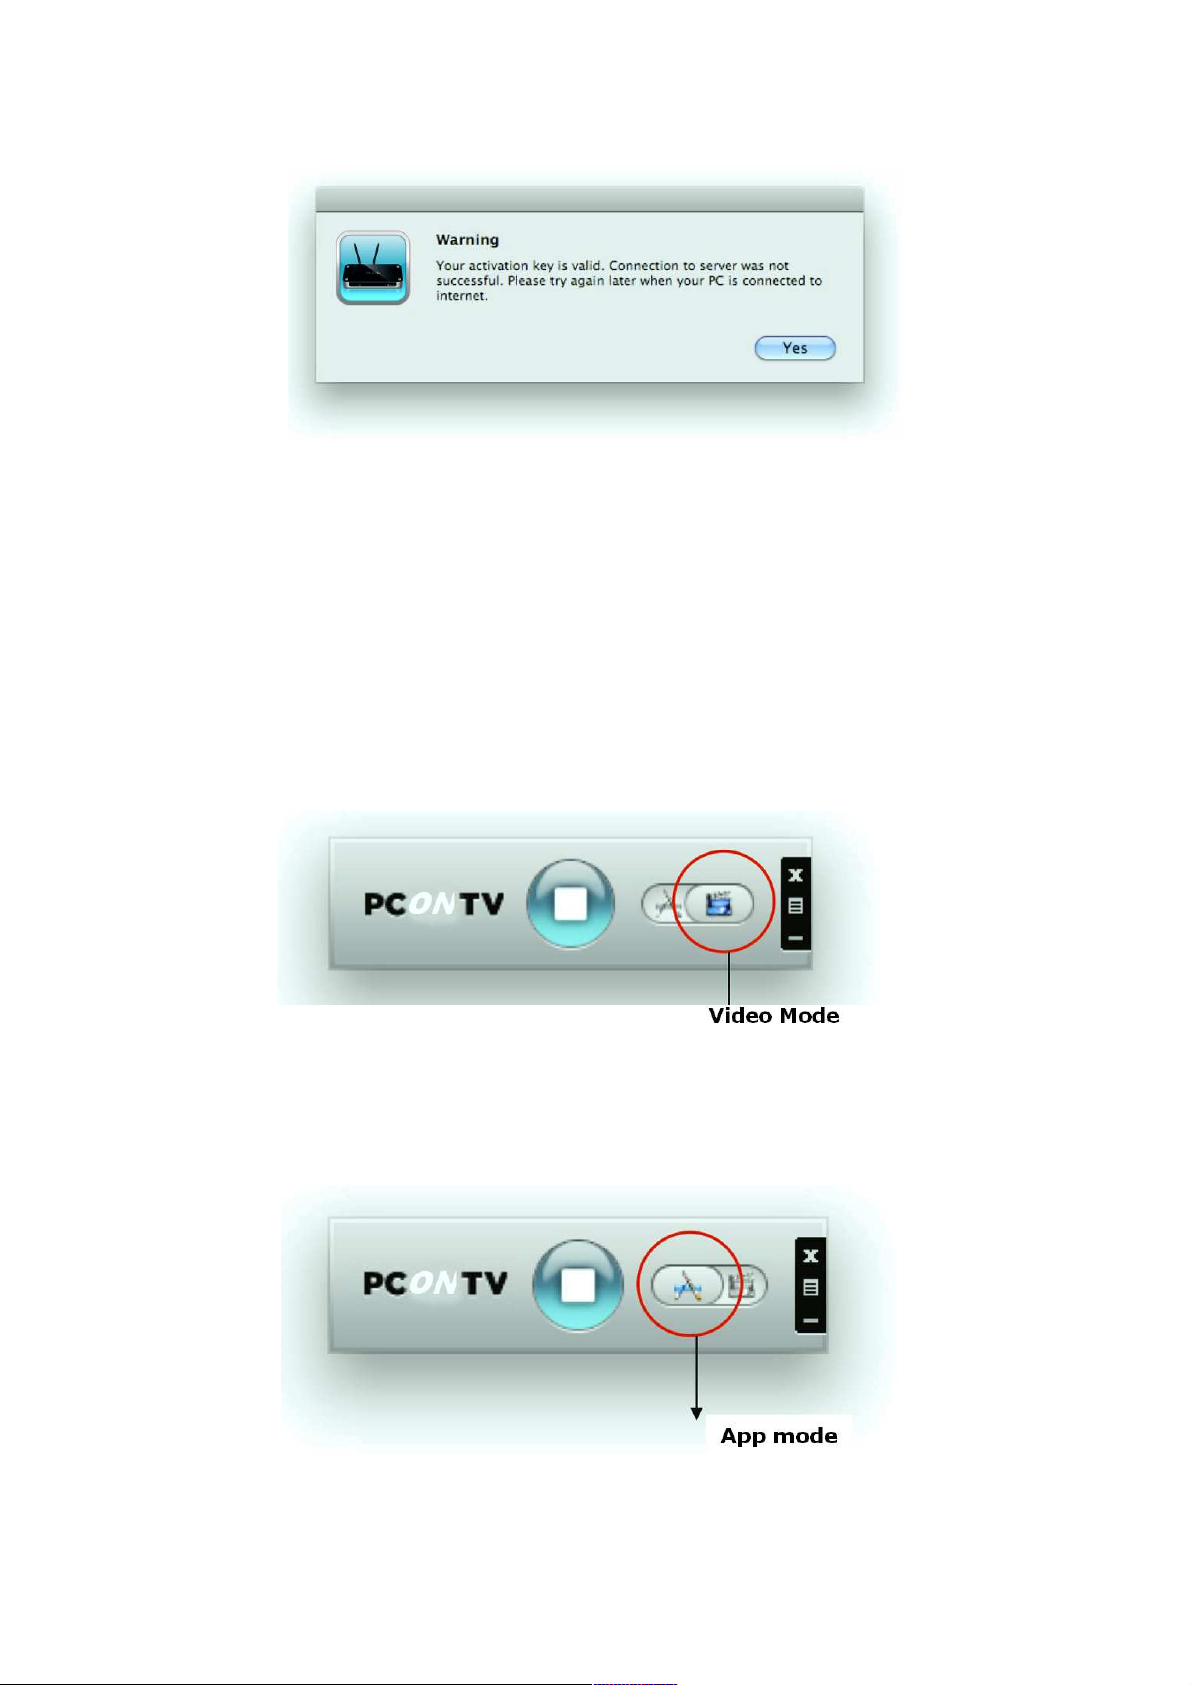
The software will connect to the activation server to validate the software. When
connection to the server is successful a message will appear which says that your
software is activated, otherwise the message below will be shown. In this case connect
your PC to the internet and try again.
Page 11
Each activation key can be used to register on eight different PCs. If you have trouble
activating your software, please contact customer service for assistance.
Video Mode vs. App Mode
On the PConTV software user interface you can find a switch button to operate two
modes: Video Mode and App Mode.
Video Mode is designed to guarantee smooth video experiences. By default this mode
performs with little latency between your Windows or Mac PC and the TV. However, if
you move your mouse connected to the PConTV, it will automatically shorten the latency
for better remote control. This mode is set as default which should work for most users
and gives the best performance for showing video content from your PC on TV.
If you carried out the optimal cabled network connection setup (as shown in chapter 2,
setup 1) and prefer to use no latency mode (real-time mode) at all times, you can
choose to drag the switch to App Mode.
Page 12

Main Menu Bar (Task bar):
Click <About> to show version information of this program.
Click <Check for Updates> to check for updates.
Page 13

Using the PConTV software user interface pop-up Menu
When the PConTV software is running, you can move your mouse cursor to the Menu
button (to be found on the right edge of the PConTV software user interface).
Click on the Menu (as shown above) button to show the menu items.
Click <Remote Box Management> to connect to the PConTV administration web
page.
For more information on the web management, please refer to chapter 7 of this user
manual.
Page 14

Click <Search Remote Box> to connect to another PConTV. The last PConTV you
connected is remembered. To connect to another PConTV in your network, Click on
<Rescan>.
Click <Projection quality> to adjust projection image quality in quality requires higher
bandwidth. Default is Normal.
Page 15
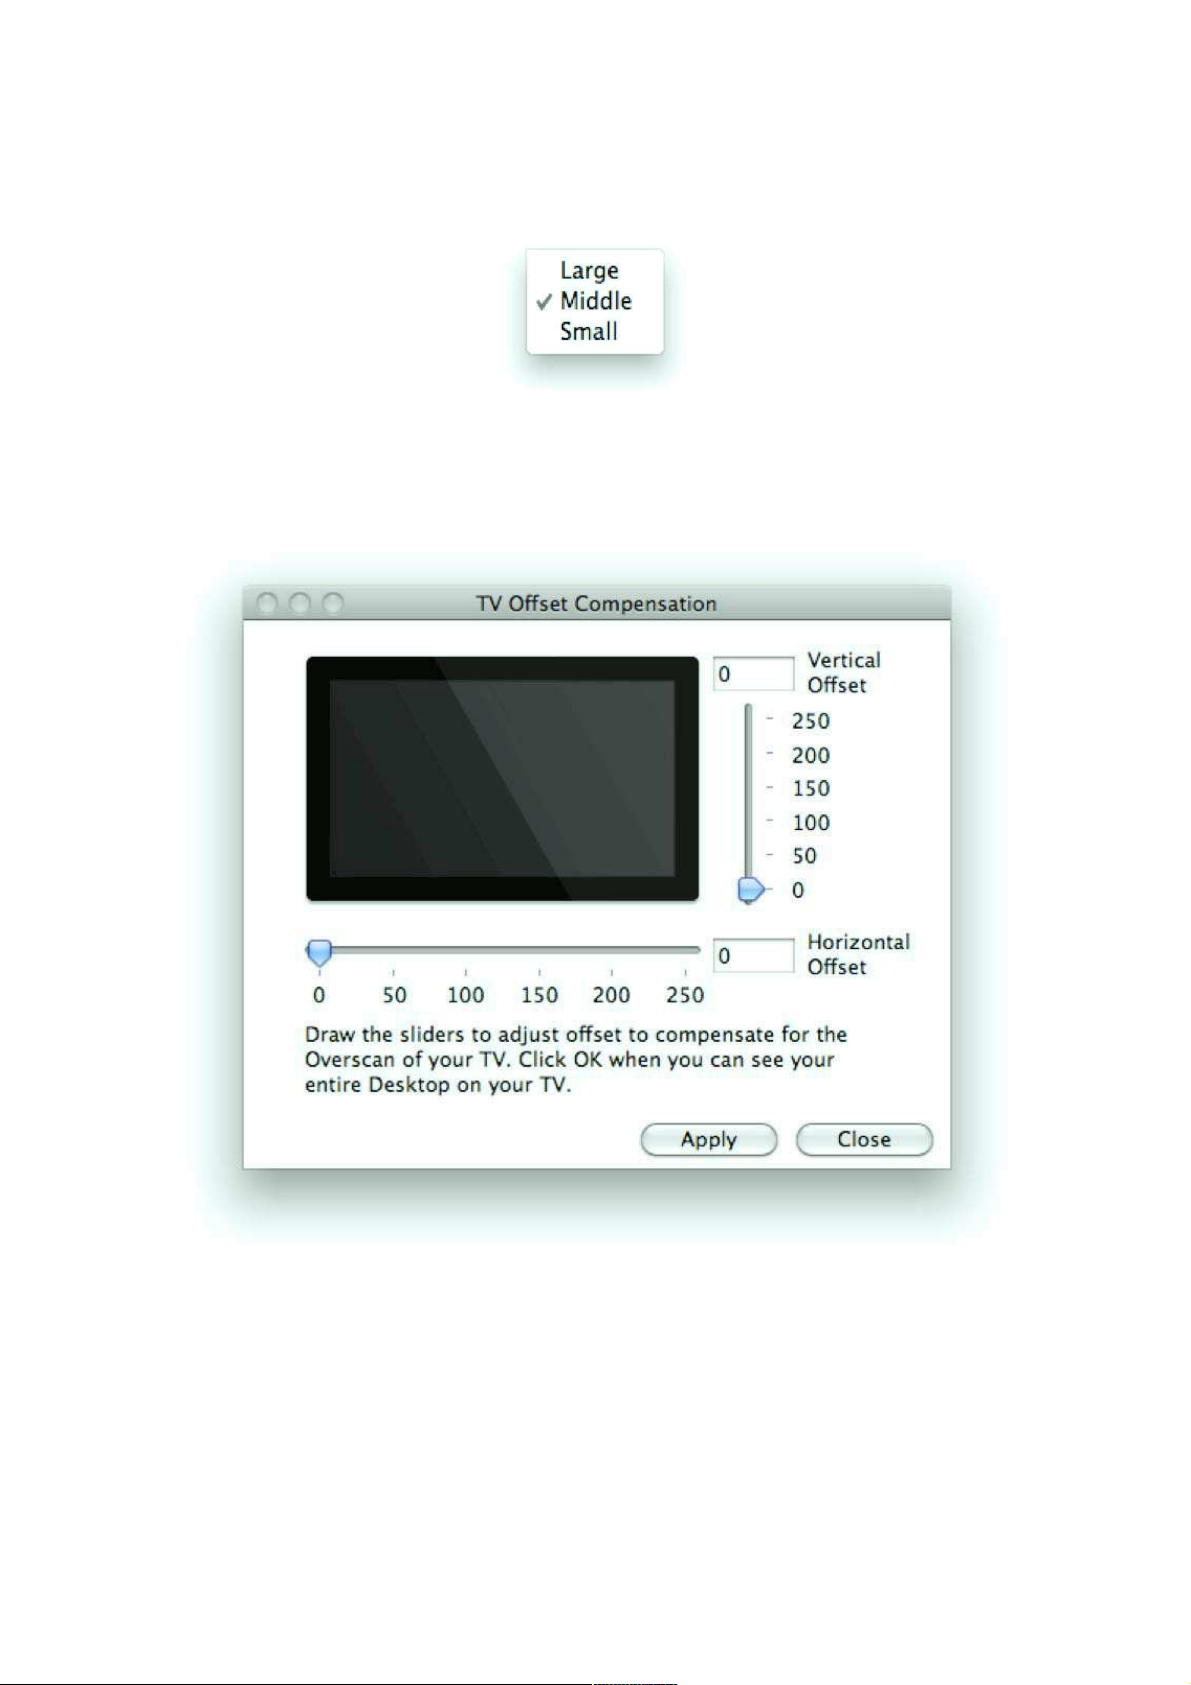
Click <PC Screen Resolution> to adjust projection image quality. Larger resolution
requires higher bandwidth. Default is Middle.
Click <TV Offset Compensation> Many TV’s have an overscan design which will cut the
edges of the PC Desktop shown on the TV screen. If you cannot turn off overscan from
your TV menu, please use the <TV Offset Compensation> to fit the projected screen
into your TV screen.
Drag the sliders to set the offset value. Click <Apply> to update the TV projection.
Check the TV screen. When the desktop of your PC fits to the TV screen size, click
<Close>. Otherwise repeat the steps above and make adjustments until the screen fits
into the TV screen exactly. Check <Auto WiFi Connection> to let the PConTV search
and connect to access points, or turn it off to use your original WiFi manager to connect
to access points manually.
Click <WiFi AP-Client Configuration> to setup the PConTV in a wireless connection
with an existing home WiFi router, you can use the AP-Client mode. The quality of the
Page 16
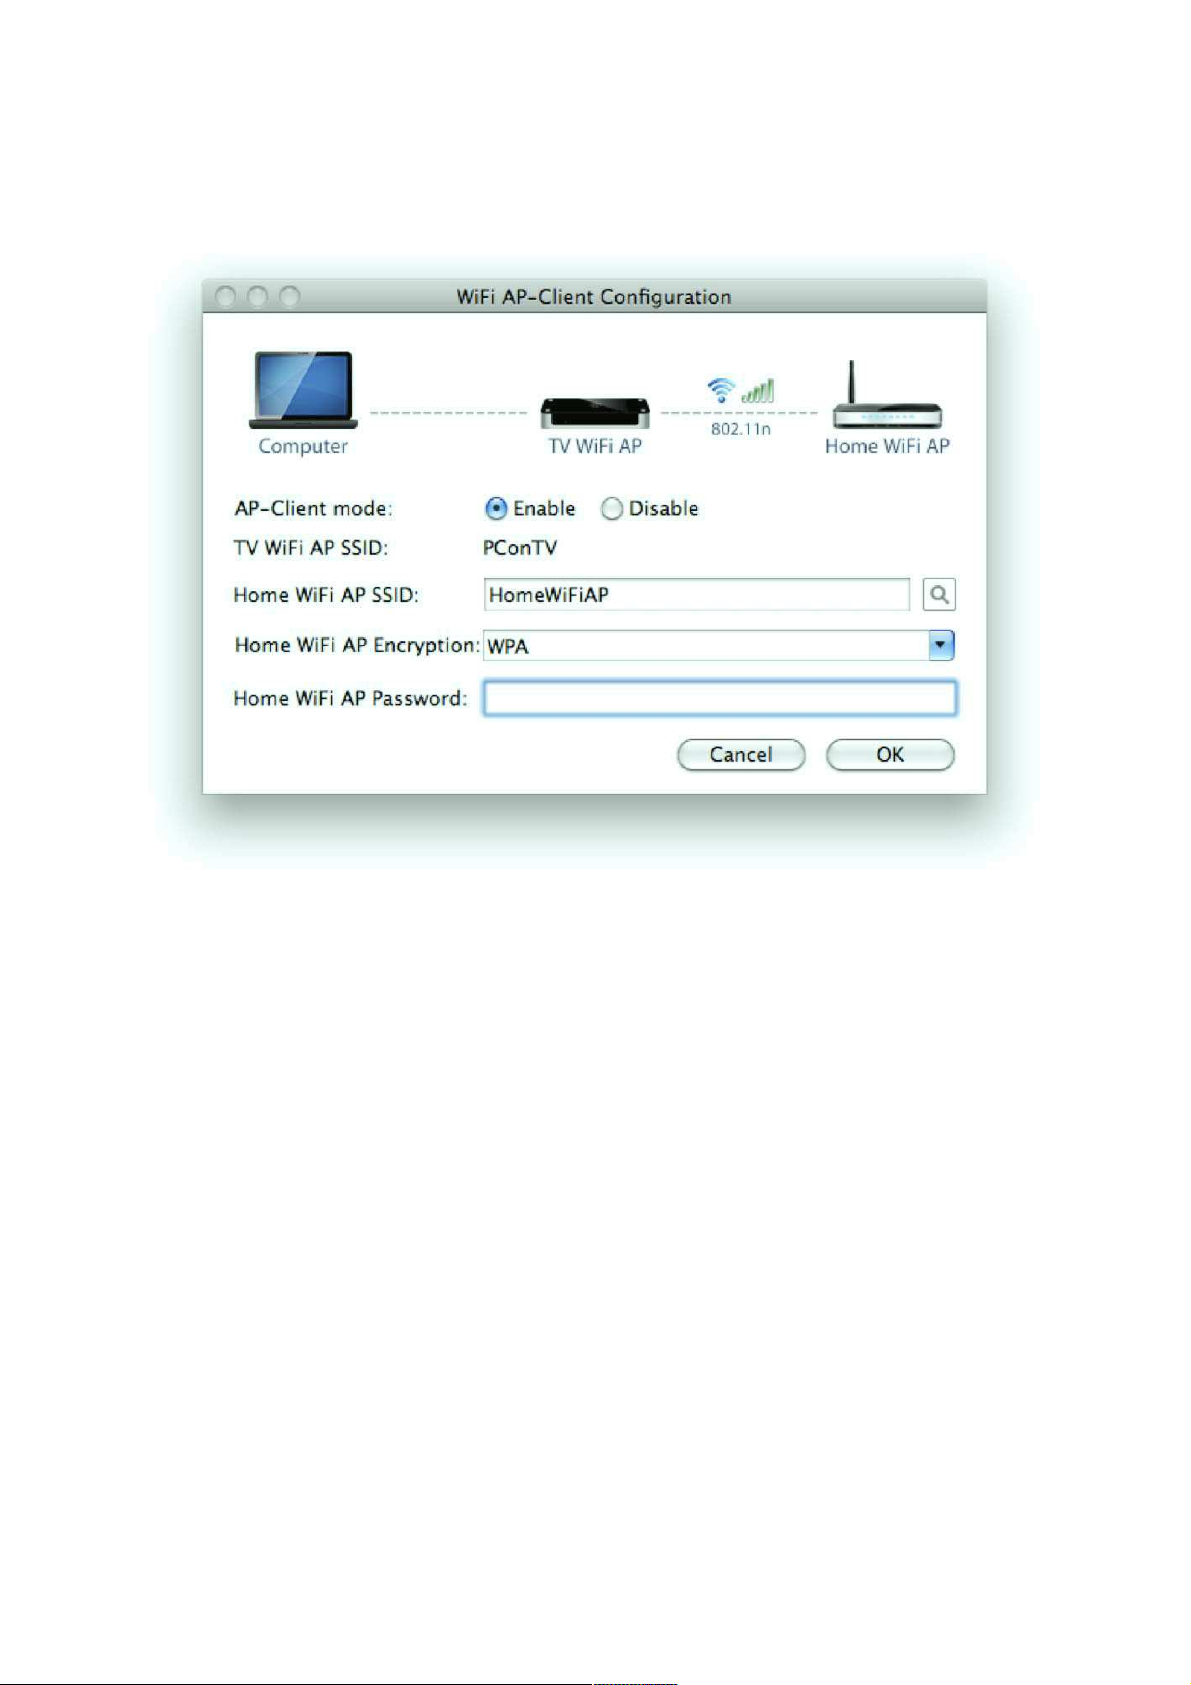
wireless performance will be depending on the strength of your Wireless module in your
home router. Please make sure that the signal between your home router (N-type router
recommended) and the PConTV device is good to ensure good performance.
Check the <Enable> button to activate AP-Client mode. Click on the magnifier glass to
search for your home router SSID. Click OK to save the settings.The PConTV will reboot
and connect to your home WiFi router (It may take 30-40 seconds for the PConTV to
retrieve an IP address from your home router. Your home router needs to be able to
deliver IP addresses to clients in DHCP mode (most routers are in DHCP mode by
default).
When your router is set to only work with Static IP addresses you can configure the
PConTV with a static IP address through the device management webpage under the tab
Network Setup. When there is no IP addresses delivered to the PConTV (as presented in
the lower left corner on the TV startup screen) the quality of signal of your home router
may be too low. In this case try to setup the PConTV in a wired setup (using Ethernet
cable or power line modem to connect to your home router). When the PConTV is
wirelessly connected to your home router successfully you need to reconnect to the
PConTV from the PConTV Software user interface using the same password as your
home WiFi router when asked for a password.
Page 17
7 Controlling your computers
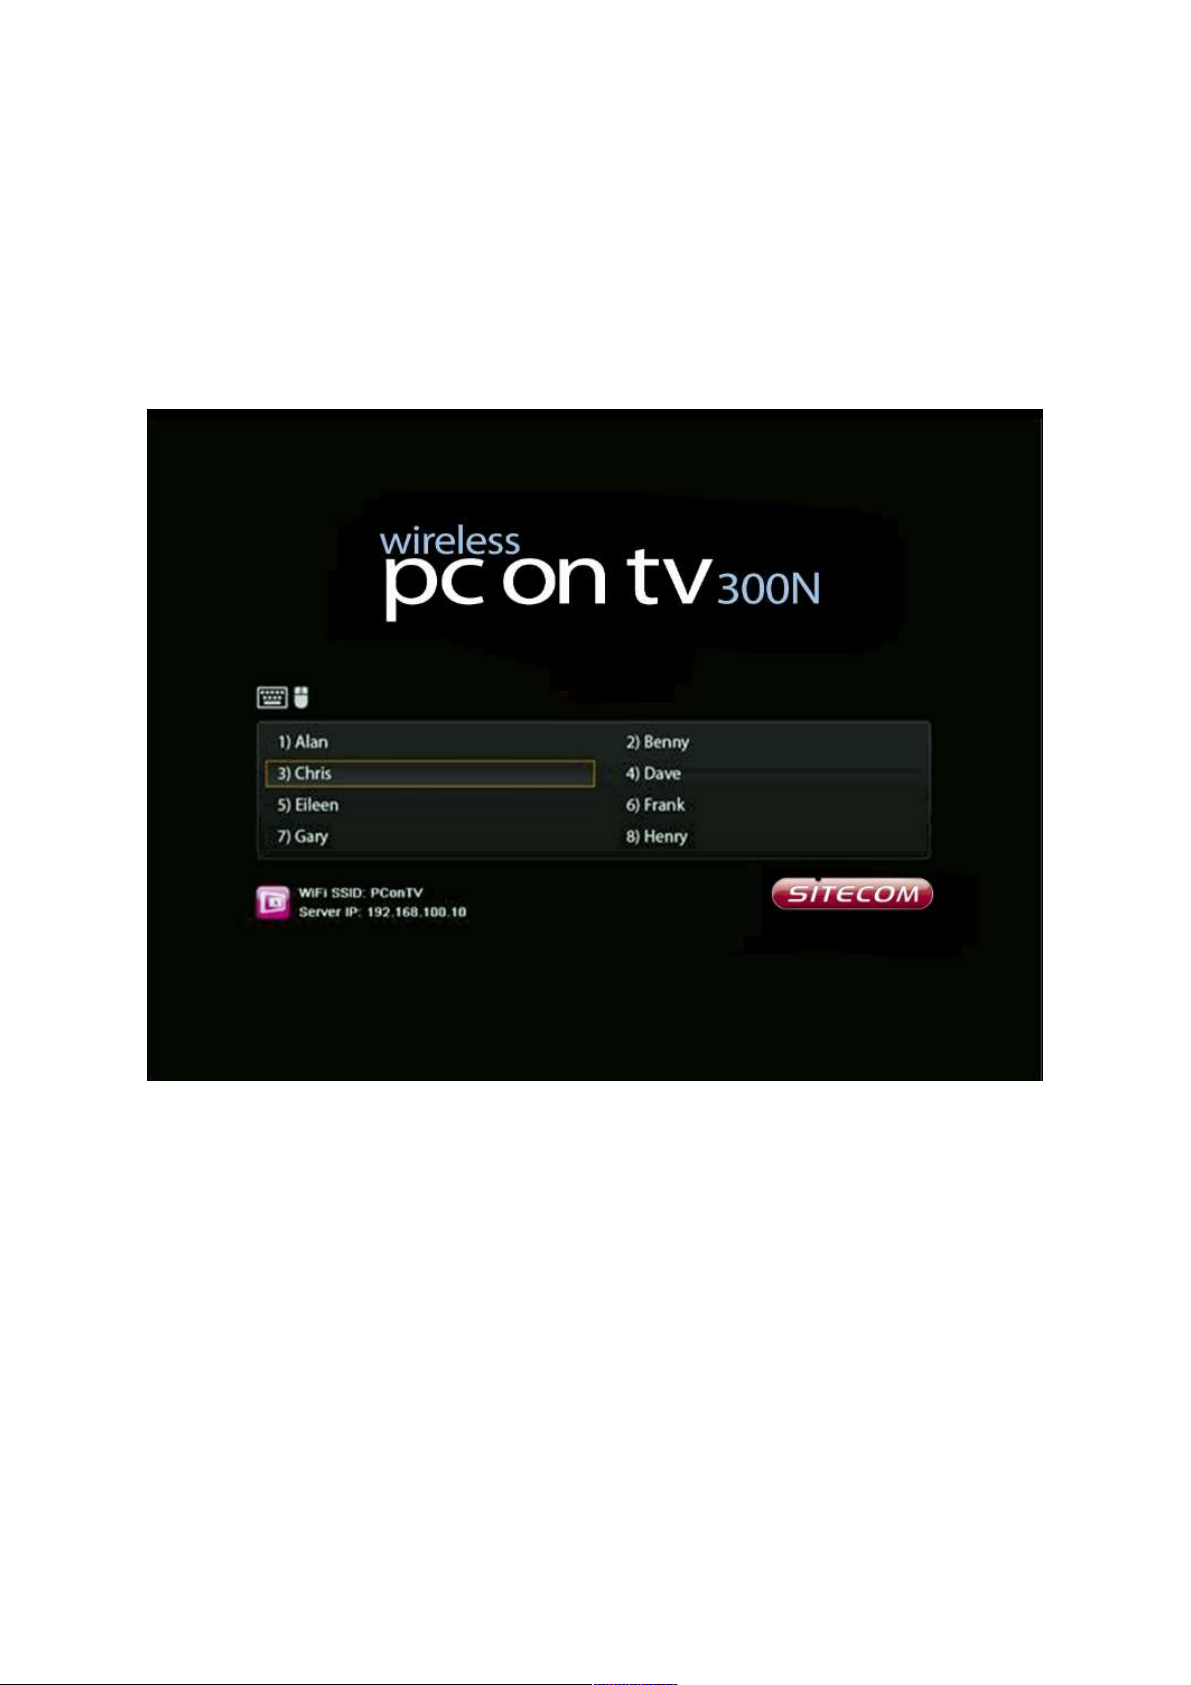
Working with multiple computers
You can use the PConTV with more than one Windows or Mac computer. Just install the
software on every computer you want to use, and then run the software on each
computer. Connected computer names will be shown in the standby screen as shown in
the following picture:
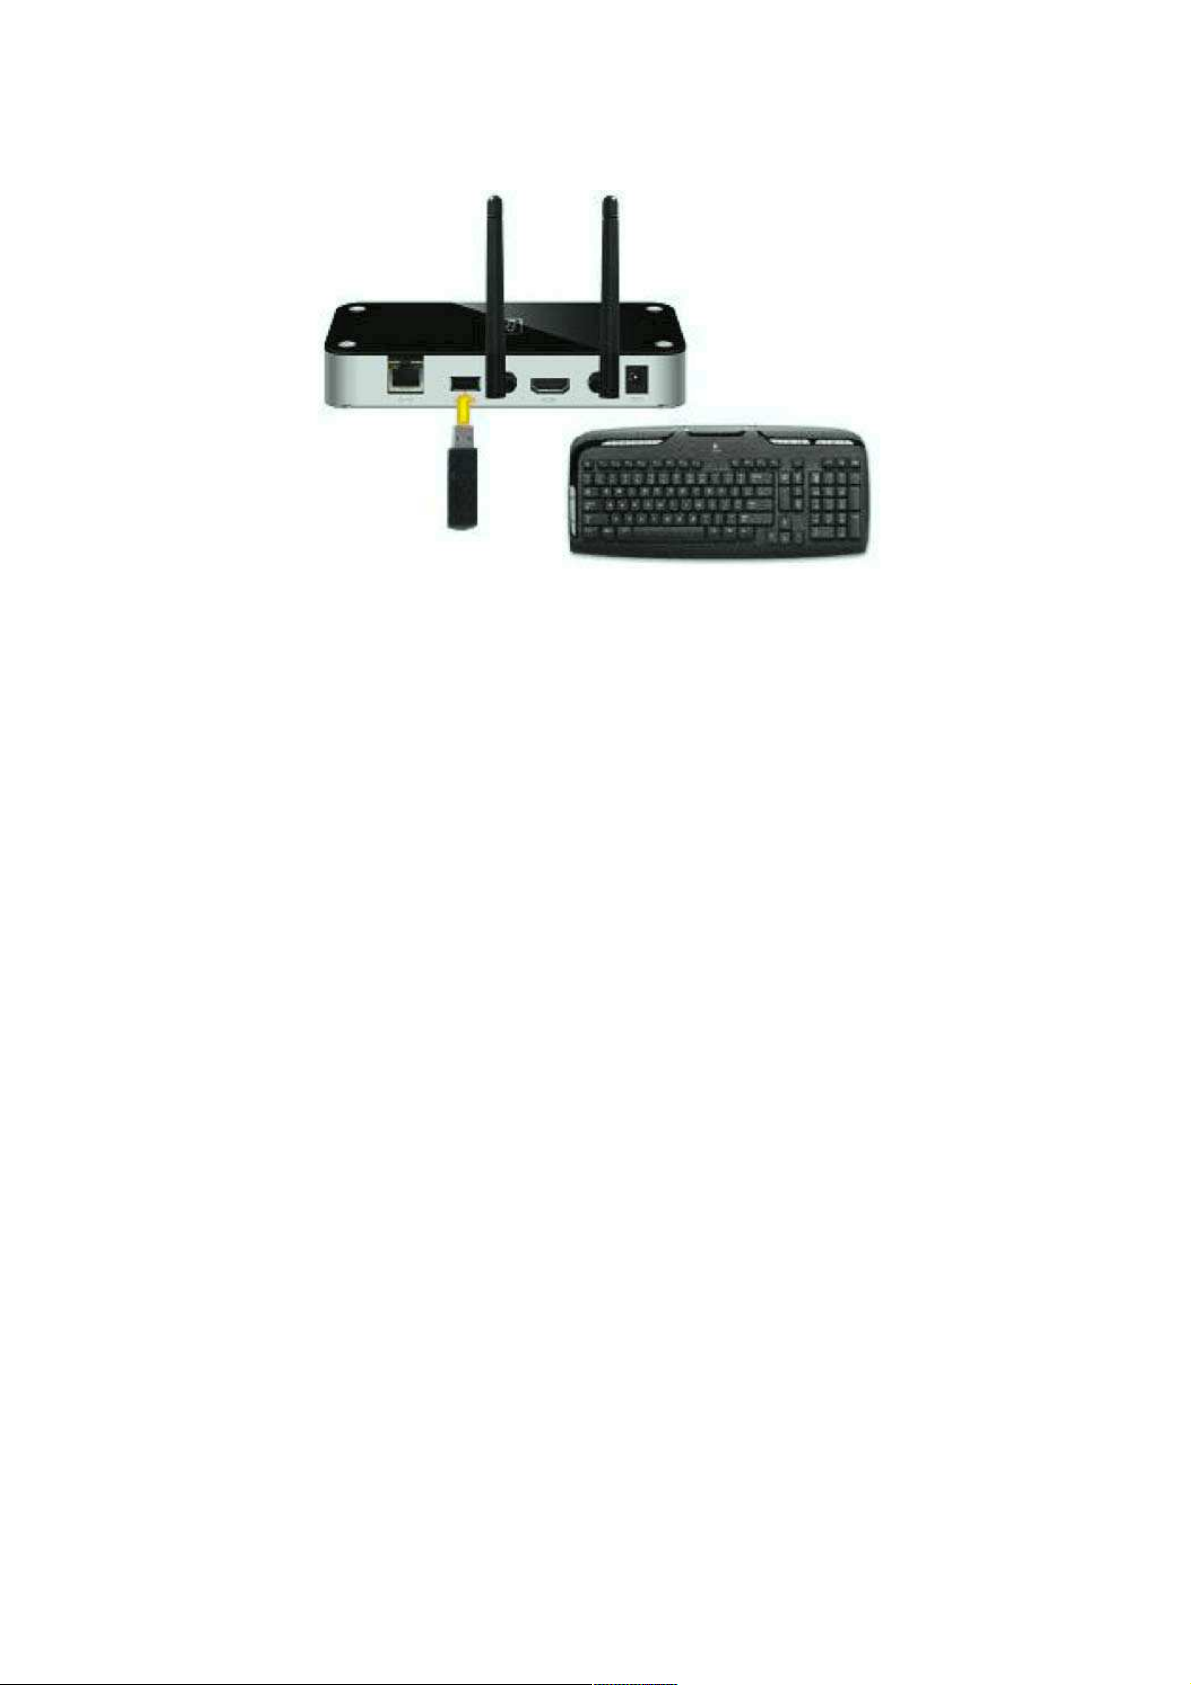
Use a standard USB mouse or keyboard connected to the USB port on the PConTV to
select which computer you want to control on TV.
Controlling your PC with USB mouse or keyboard
You can connect standard USB mouse or keyboard, to the USB port on the PConTV
device, and then remotely operate your PC.
Page 18
Once connected, the mouse or keyboard can be used to select a PC from the PC list
above, and also to operate every PC when its screen is shown on TV. If you want to use a
game controller for gaming, attach your controller directly to your laptop or PC.
Controlling your PC with Air Mouse Controller via iPhone®, iPod® Touch, iPad®
or other touch gestured mobile device.
Search for an Air Mouse application in the App Store. Download a suitable program of
your choice. Attach your mobile device using WiFi to the same network your PC and the
PConTV are on and you can control your mouse or keyboard on TV using your mobile
device.
Page 19

8 Web management
Home page
Make sure your Windows or Mac PC is connected to the PConTV successfully.
Open your browser, and enter the IP address of your PConTV. (You can find the
PConTV IP address on the TV screen when the PConTV is powered on and is presenting
the startup screen in the lower left corner of this startup screen). The screen below will
be shown in your browser. Choose your language in the upper right corner and click
<Admin>.
Log in web admin
Page 20
Click [Admin] and then enter the password to login to the web page. The default
password is “admin”.
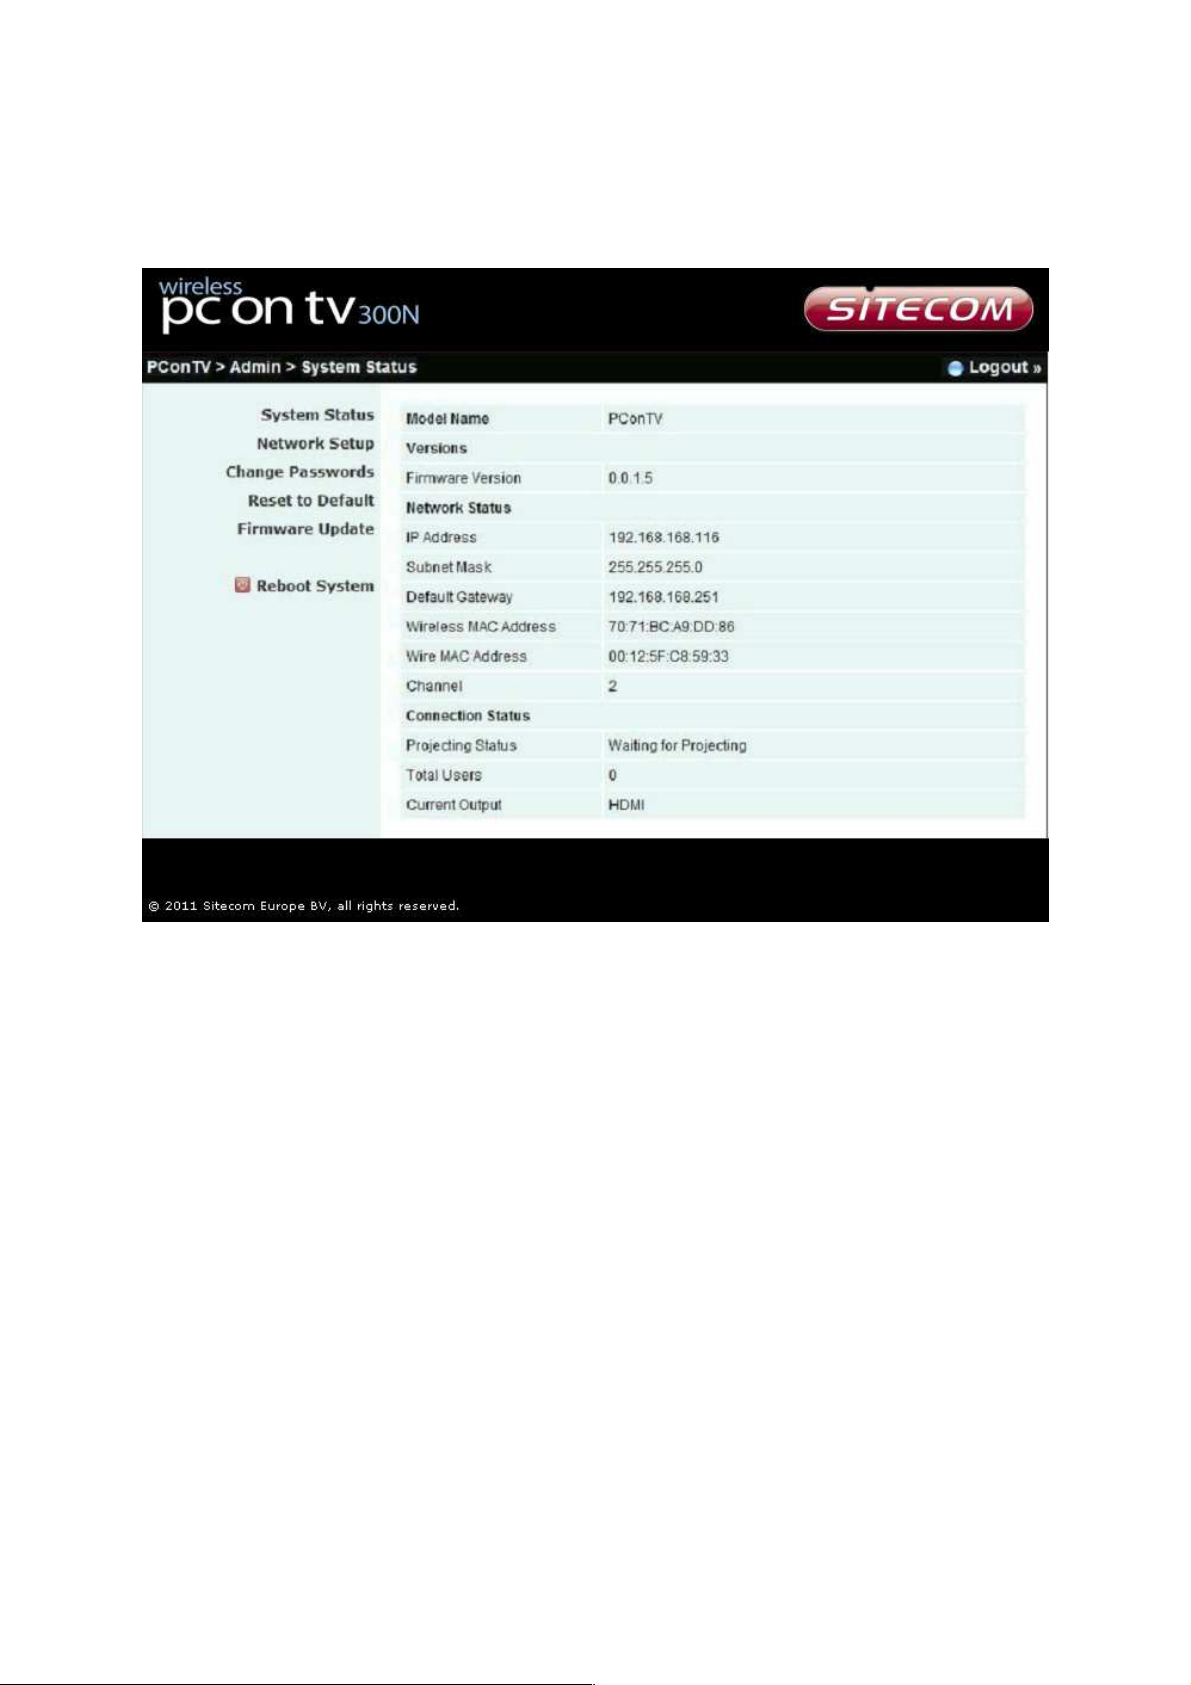
System status
*** Click [System Status] to show current system status.
Model Name: Product model name
Versions:
♦ Firmware version: Product firmware version number.
Network Status:
♦ IP address: IP address of the PConTV device.
♦ Subnet Mask: subnet mask
♦ Default Gateway: default gateway
♦ Wire MAC address: wired network MAC address
Page 21
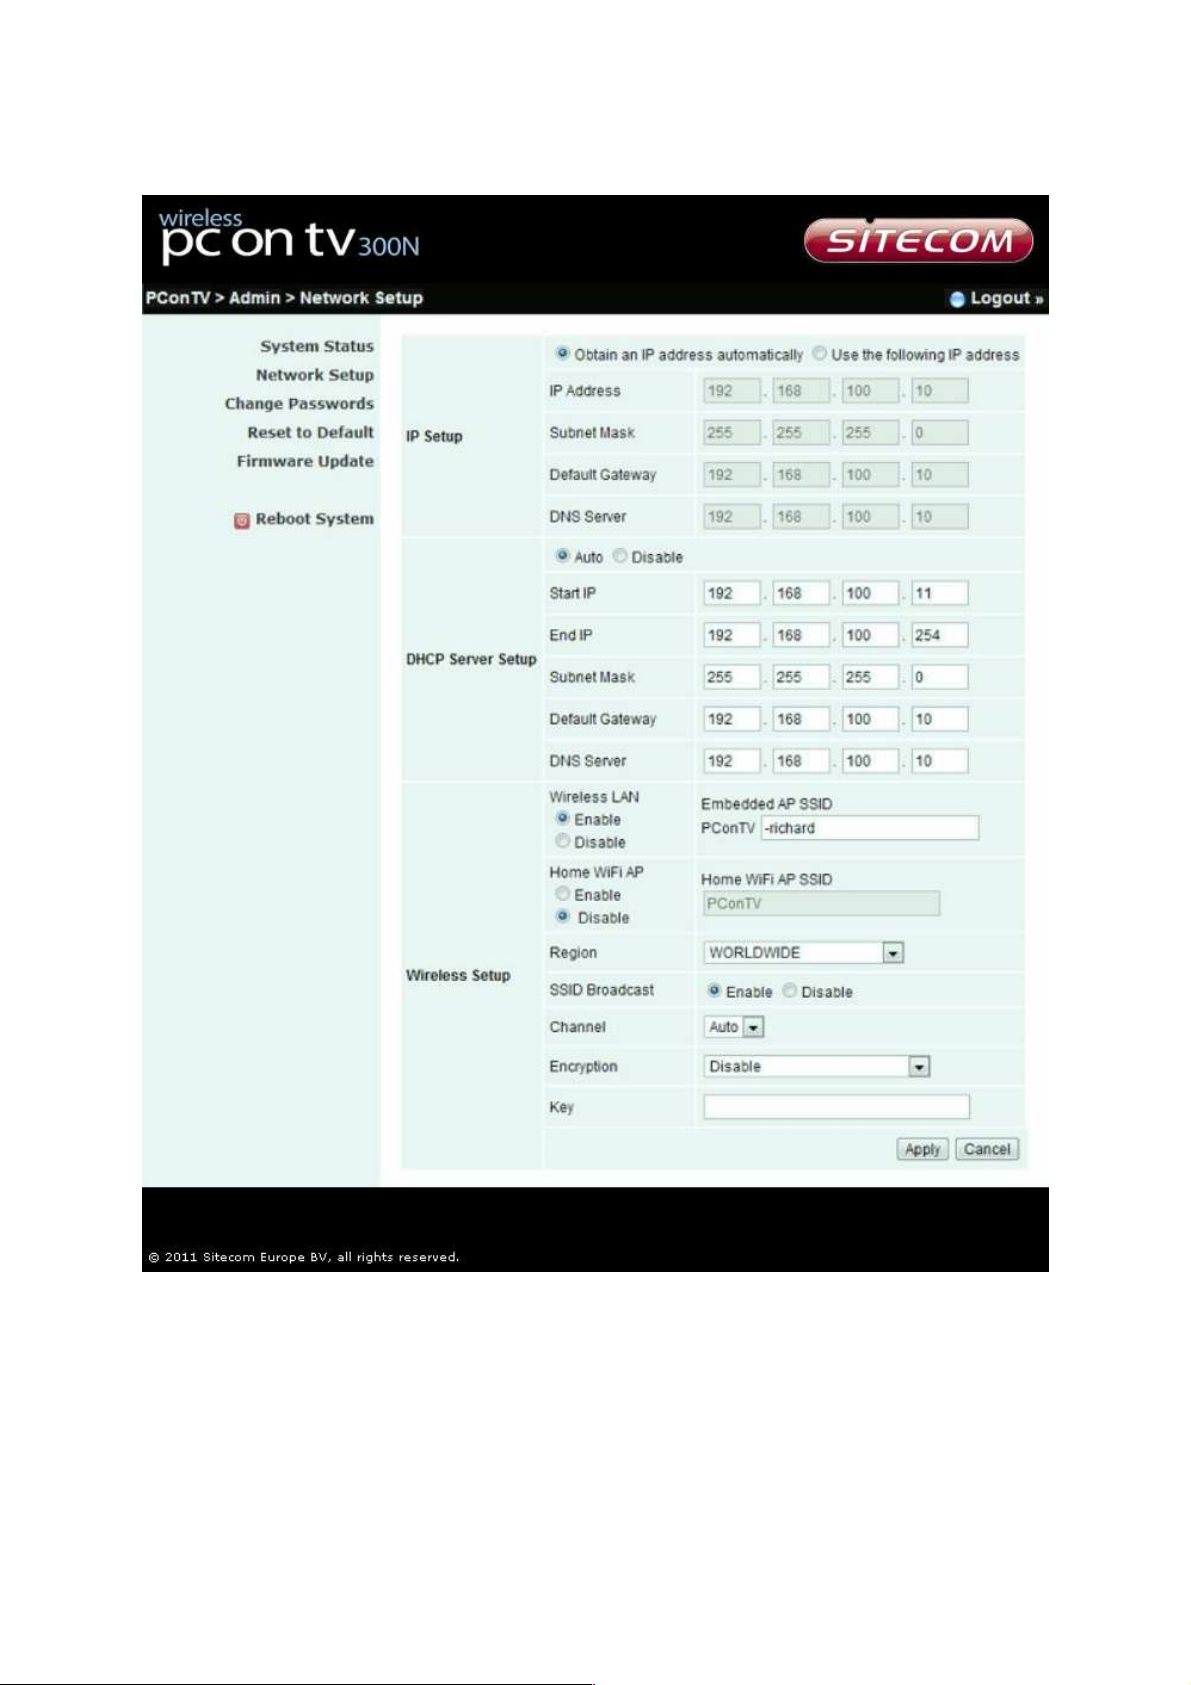
Network setup
<IP Setup>
You can select “obtain IP address automatically” or “Use the following IP address”
♦ IP Address: The default value is 192.168.100.10 (not connected to any network).
♦ Subnet Mask: The default value is 255.255.255.0
♦ Default Gateway: The default value is 192.168.100.10
Page 22
<DHCP Server Setup>
You can select “Auto” or “Disable”. When “Auto” is selected, it will automatically disable
DHCP on the PConTV when another DHCP server is detected, otherwise it will enable its
DHCP service.
♦ Start IP: The start IP address of DHCP Server.
♦ End IP: The end IP address of DHCP Server.
<Wireless Setup>
♦ Wireless LAN: you can select “Enable” or “Disable”
♦ Region: default value is “Worldwide”.
♦ SSID: SSID string, max. Length is 32 bytes.
♦ SSID Broadcast: you can select “Enable” or “Disable”
♦ Channel: to set fixed channel or Auto.
♦ Security: Open/WEP/WPA/WPA2
♦ Key: Security key of your choice.
<Apply>: press this button to select this mode
<Cancel>: press this button to abort action.
<Back>: back to Operating mode main menu
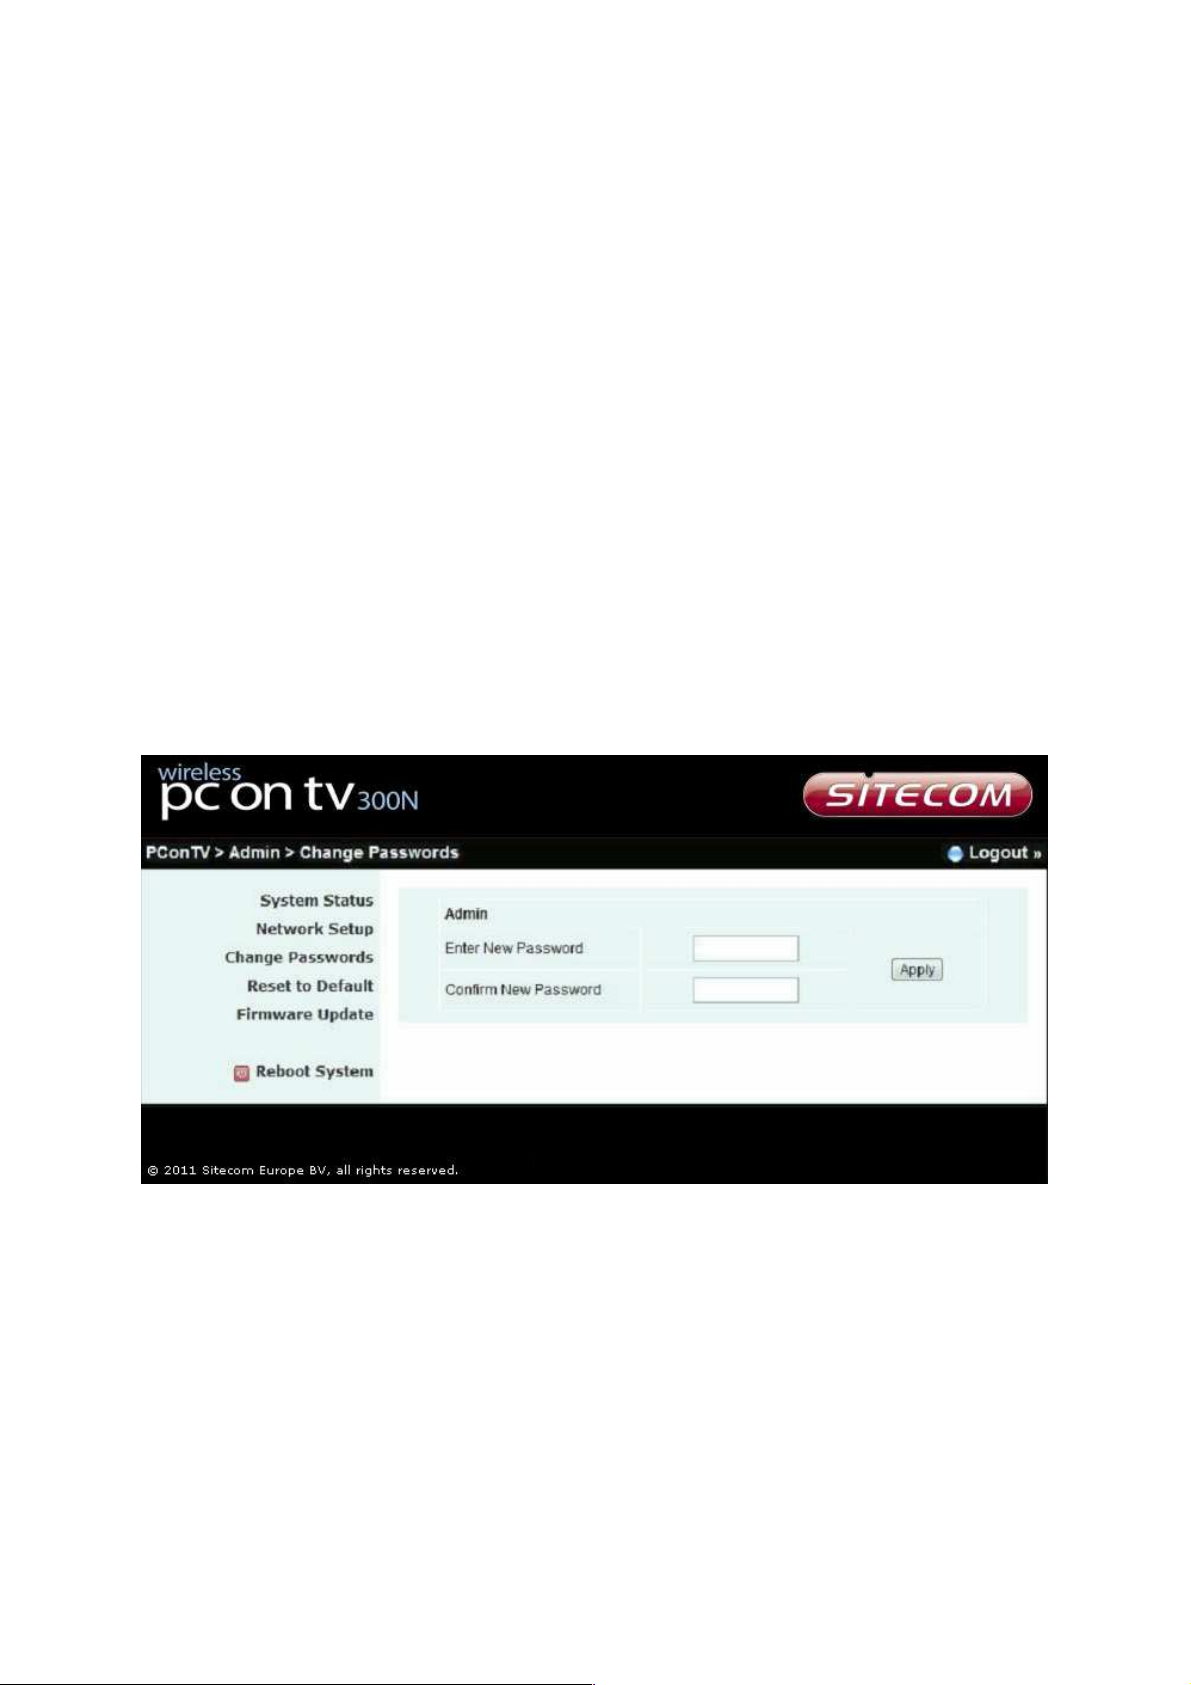
Change passwords
*** Click [Change Password] button to change password value.
<Enter New Password>: enter a new password of your choice
<Confirm New Password>: double confirm new password.
<Apply>: Confirmation and Save modifications.
Page 23

Reset to default
*** Click [Reset to Default] button to restore the factory default settings.
<Apply>: Confirmation and action.
Firmware update
*** Click [Firmware Update] button to upgrade firmware.
♦ Get the latest firmware.
♦ Click <Choose File> to specify file name you want to upgrade.
♦ Click <Update> to start.
The upgrade process will take about 5 minutes to complete. The PConTV device will
reboot automatically when the process is completed.
Page 24
!!!! Warning: Don’t power off PConTV while the firmware upgrade is in progress,
otherwise the PConTV device may be damaged and have to be returned to your
vendor for repair!!!!!
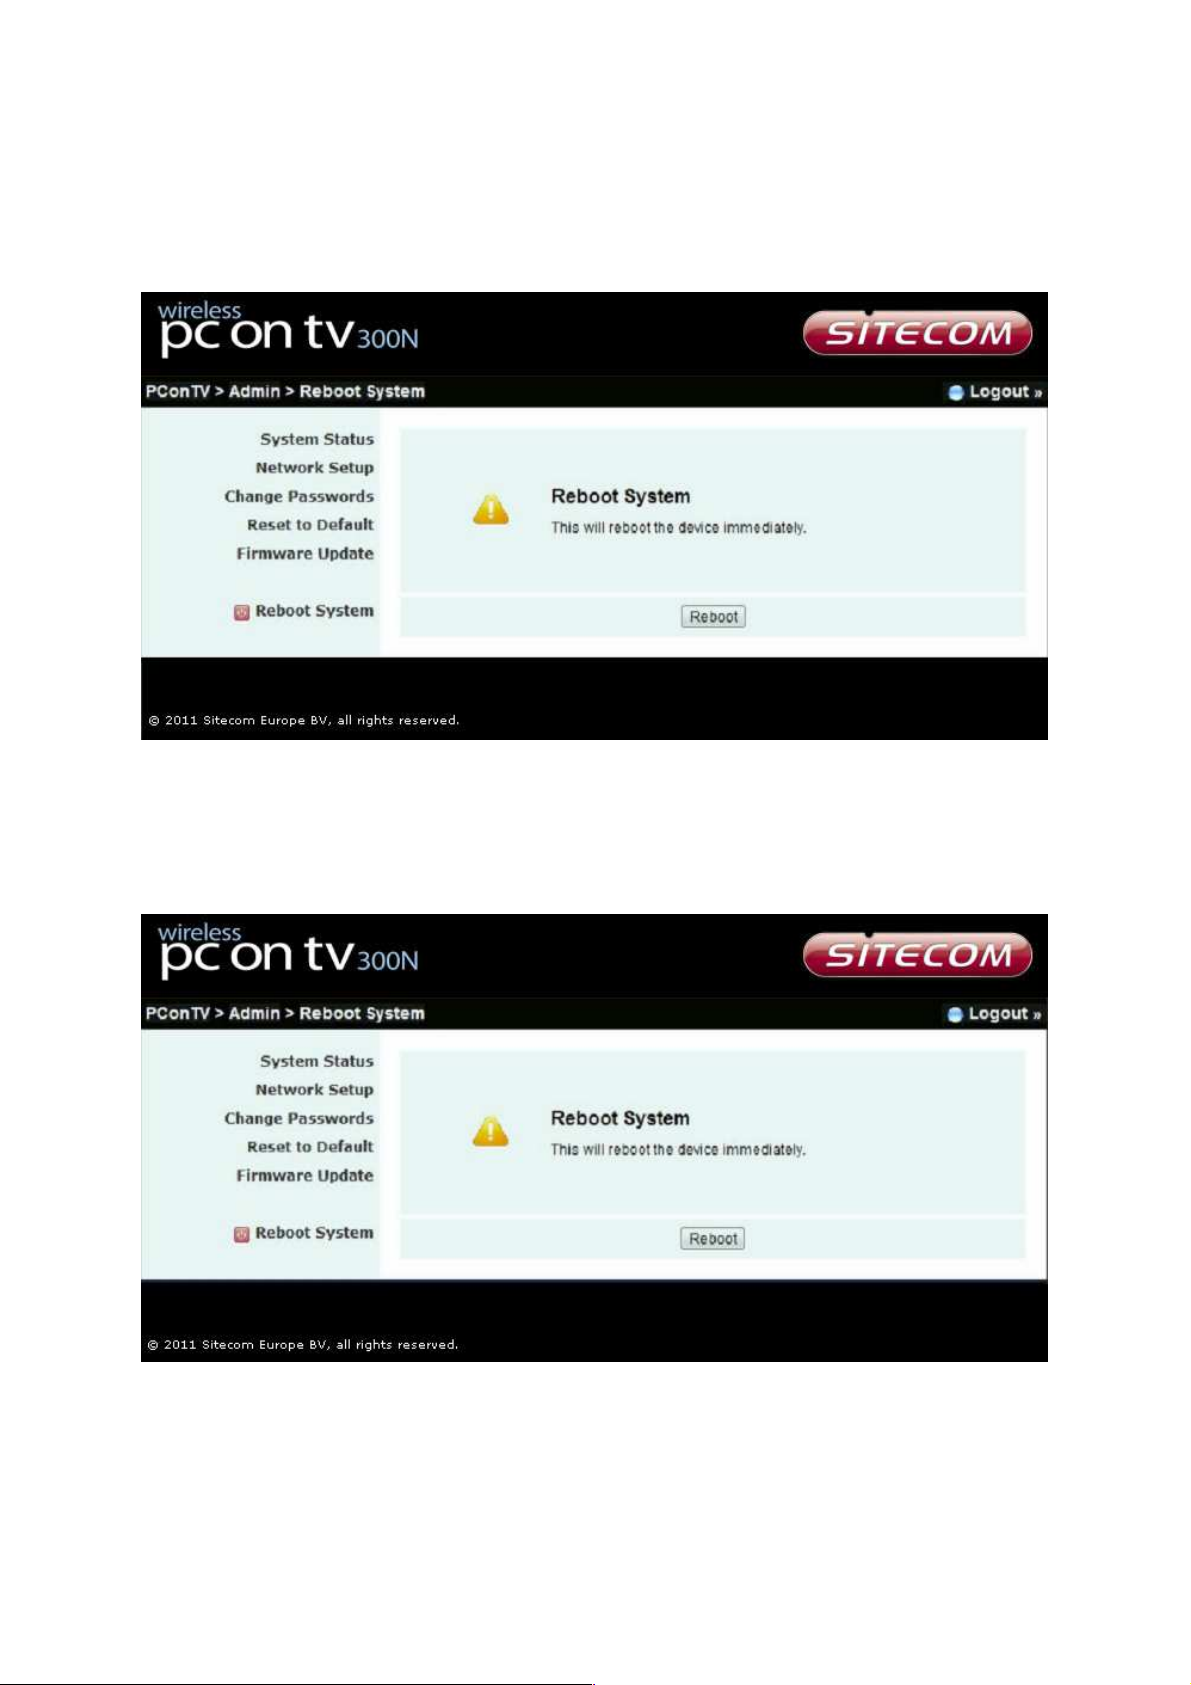
Reboot system
*** Click on [Reboot System] button to restart system.
<Reboot>: reboot system automatically.
Log out
*** Click on [Logout] button to return to home page.
Page 25

9 Frequently asked questions
Q. My PC cannot connect to PConTV. What can I do?
A. Check the status shown on the projection panel.
1. If the left line is not connected, then your PC is not connected to any network.
Please check your network connection.
2. If the left line is connected but the right line is disconnected, then no PConTV is
found in the network you are connected to. The IP of your Windows or Mac PC
should be in the same subnet as your PConTV device. The IP of PConTV can be
found on the lower-left corner of TV screen (default IP is 192.168.100.10 if not
connected to a network).
Q. My connection is broken during projection. What can I do?
A. There are several possible reasons to check:
1. Connection blocked by firewall or anti-virus software. Please add PConTV to the
allowed programs (white list) of your anti-virus program and firewall.
2. Power saving policy decreased performance of wireless network. Please set your
power saving to lowest and set performance to highest when performing
projection to TV.
Q. My audio is broken on TV. What can I do?
A. There are several possible reasons to check:
1. System is too busy. Close all other programs and try again.
2. Network not fast enough. Check connection speed.
Q. I have no sound on my TV. What can I do?
A. There are several possible reasons to check:
1. Volume too low. Turn the volume of your Windows or Mac PC to maximum value
for remote watching, or use your TV remote to turn volume on.
2. Your Mac player set audio output to another device. Check the audio output
setting of your player to use default audio device or soundflower (2ch).
Q. My movie is not running smooth (frame rate too low). What is the reason?
A. There are several possible reasons to check:
1. System not powerful enough. For Mac PC, a MacBook Pro or MacBook with dual
core 2GHz CPU or above is required for video projection. For Windows PC, the
Page 26

benchmark score measured during installation should be 4 stars or above for
video projection.
2. System too busy. Close all other programs and try again.
3. Network not fast enough. Check connection speed. You may try lower screen
resolution or projection quality to save bandwidth.
Q. The PC desktop edges are cut off my TV screen. What can I do?
A. Most TV’s present overscan. The result will deliver a cut PC desktop to your TV screen.
Please check for menu options on your TV such as scaling, fit-to-screen or aspect ratio to
change overscan behavior, or use the TV Offset Compensation in PConTV Software user
interface menu to compensate the overscan behavior.
Q. The aspect ratio on the TV is distorted. What can is the reason?
A. The projected image is identical to the screen of your Windows or Mac PC. However,
due to different aspect ratio in different resolution settings on PC (4:3 or 16:9), the
aspect ratio may be altered by the TV to fit to screen. Please look for options on your TV
such as scaling, fit-to-screen or aspect ratio to change how the PC signal is fitted to TV,
or change your PC resolution to the same aspect ratio as your TV screen (mostly 16:9 on
new flat TVs). For example, select 1280 x 720 on your PC for original aspect ratio on a
16:9 flat TV.
Q. The AP Client configuration is delivering no IP address to PConTV. What can I
do?
A. There are several possible reasons to check:
1. Check the strength of your wireless home router (N-Type router recommended).
When the quality of the wireless signal of your home router is too low it will not be
able to deliver an IP address to PConTV.
2. Check if your home router is set to deliver automatically an IP address to any
other client (DHCP mode)
3. If your home router is set-up to deliver static IP addresses only, you need to
configure the PConTV to use a static IP address out of your network IP range.
Open the PConTV web device management page and give the PConTV device a
Static IP address which is part of your static home IP address range.
If the answers above do not work in your situation, try to setup the PConTV using
Ethernet cables or HomePlug (sold separately) environment as show in chapter 3: Setup
Possibilities.
Page 27

Q. Which video player can be used best on my PC to work with PConTV?
A. The recommended video player we suggest you to use is VLC player. This player is
capable to play al popular video formats. It is free to use and offers multi-platform
software.
Q. Can I use a NAS (Network Attached Storage Device) in combination with
PConTV?
A. Yes, you need at least one of your PC’s projecting to PConTV. Through this PC you
need to get connected to your NAS to be able to use your files on the NAS in order to
project them on the TV.
Page 28

10 Certifications
Safety European Union
EN60950-1 (CE-LVD)
EMI European Union (CE mark)
EN55022 Class B
EN61000-3-2
EN61000-3-3
North America
FCC Part 15 (Class B)
EMC European Union (CE mark)
EN55024
• Electrostatic Discharge
EN61000-4-2
• Radiated RF immunity
EN61000-4-3
• EFT/ Burst
EN61000-4-4
• Surge
EN61000-4-5
• Conducted Susceptibility
EN61000-4-6
• Voltage Dips/Interruption
EN61000-4-11
Wi-Fi WPA2
Power adapter European
ErP (2009/125/EC)
North America
Energy Start V
www.sitecom.com
Disclaimer:
• Apple®, iPod®, iPhone®, iPad®, Microsoft®, Windows®, Mac®, Intel®,
AMD®,ATI®, VLC®, and nVidia® are registered marks of their respective
company. None of these companies is related to this product not do they endorse
the performance or compatibility of this product with their products.
• “HDMI, the HDMI Logo, and High-Definition Multimedia Interface are trademarks
or registered trademarks of HDMI Licensing LLC in the United States and other
countries."
 Loading...