

Page 1
Page 2

Table of contents
Introduction ................................................................................................. 3
Features ......................................................................................................4
Package contents ..........................................................................................4
Product layout.............................................................................................. 5
System requirements ....................................................................................6
Preparing the home storage center .............................................................. 7
Easy installation ........................................................................................... 8
Configuring the Home Storage Center .............................................................8
AutoSave Installation ..................................................................................15
Using the Home Storage Center.................................................................... 18
Web configuration ...................................................................................... 19
Status .......................................................................................................20
Setup ........................................................................................................22
System settings ......................................................................................22
Network settings .....................................................................................23
Disk settings ...........................................................................................24
User settings ..............................................................................................27
User management ...................................................................................28
BitTorrent ...............................................................................................32
ITunes server..........................................................................................34
Toolbox .....................................................................................................37
Reboot ...................................................................................................37
Firmware update.........................................................................................38
Intranet Upgrade.....................................................................................38
Internet Upgrade .....................................................................................38
USB Backup ................................................................................................ 39
Addendum: Choosing a storage scheme ..................................................... 40
Page 3

Introduction
The Sitecom MD-253 Home Storage Center makes it easy to share your documents,
music and videos across your network or even on to the internet. The device can
hold up to two 3”5 SATA drives of any capacity, supporting JBOD, RAID 0 and RAID
1, offering flexibility and security.
The MD-253 allows to easily share data over the internet through the built-in FTP
server. User management makes it possible to share data unrestricted to the
internet or to restrict access to certain users which then can be assigned to folders
and given read and/or write permissions.
Backup your USB storage by means of pressing a button.
The home storage center also doubles as a download station as it supports FTP
downloading and a Bit Torrent download client.
In addition the home storage center can stream music, video or photos to any UPnP
AV compatible Media Player.
The included CD contains:
- The Sitecom Installer to easily setup the Home storage center for first time
use and map drives to your computer.
- Backup software to easily set up an automated backup task for your files.
Page 4

Features
Two HDD bays for 3”5 SATA Hard drives of any capacity.
One USB port for extra storage options.
High performance Gigabit LAN.
Supports JBOD, RAID 0 and RAID 1.
Simplified installation by a step by step utility.
Easy automated backup with included backup software.
User and folder management.
One touch USB backup
ITunes server.
Built-in FTP server and client.
Bit Torrent client.
UPnP AV server for streaming music to any compatible media-player.
Package contents
MD-253 Home Storage Center
CD-ROM with utilities and documentation
Quick Installation Guide
Power adapter 12V – 4A
Cat 5e cable
Page 5

HDD 1
Power
Reset
HDD 2
LAN
Product layout
Power button
USB port
Ethernet port
Backup button
Power receptacle
Page 6

System requirements
- Computer with: 1GHz processor/20 MB available space/CD-ROM drive.
- At least one 3”5 SATA HDD.
- Windows XP (with Service Pack 2), Vista or Windows 7.
- Mac OSX 10.4 or higher (You can use the network functionality. The installation
and backup software is windows only).
Page 7
Preparing the home storage center
Page 8
Easy installation
Configuring the Home Storage Center
Insert the CD-Rom to your CD-Rom drive. The CD will start and present you an
option menu. Select ‘Launch Home Storage Center Utility’
The Sitecom Home Storage Center Installer offers an easy step by step
installation flow. This makes it possible for even the least experienced user to
have the home storage server up and running in a few clicks.
Note:
Microsoft .Net framework is required for the installer to run. If .Net framework
is not installed on your computer the installation CD will install .Net framework
3.5 now
Page 9
1. Select your language from the drop down box. Press Start to continue.
2. The installer is now detecting the ‘Home Storage Center’. Wait till the progress
bar is completely filled.
Page 10
as McAfee,
ecom
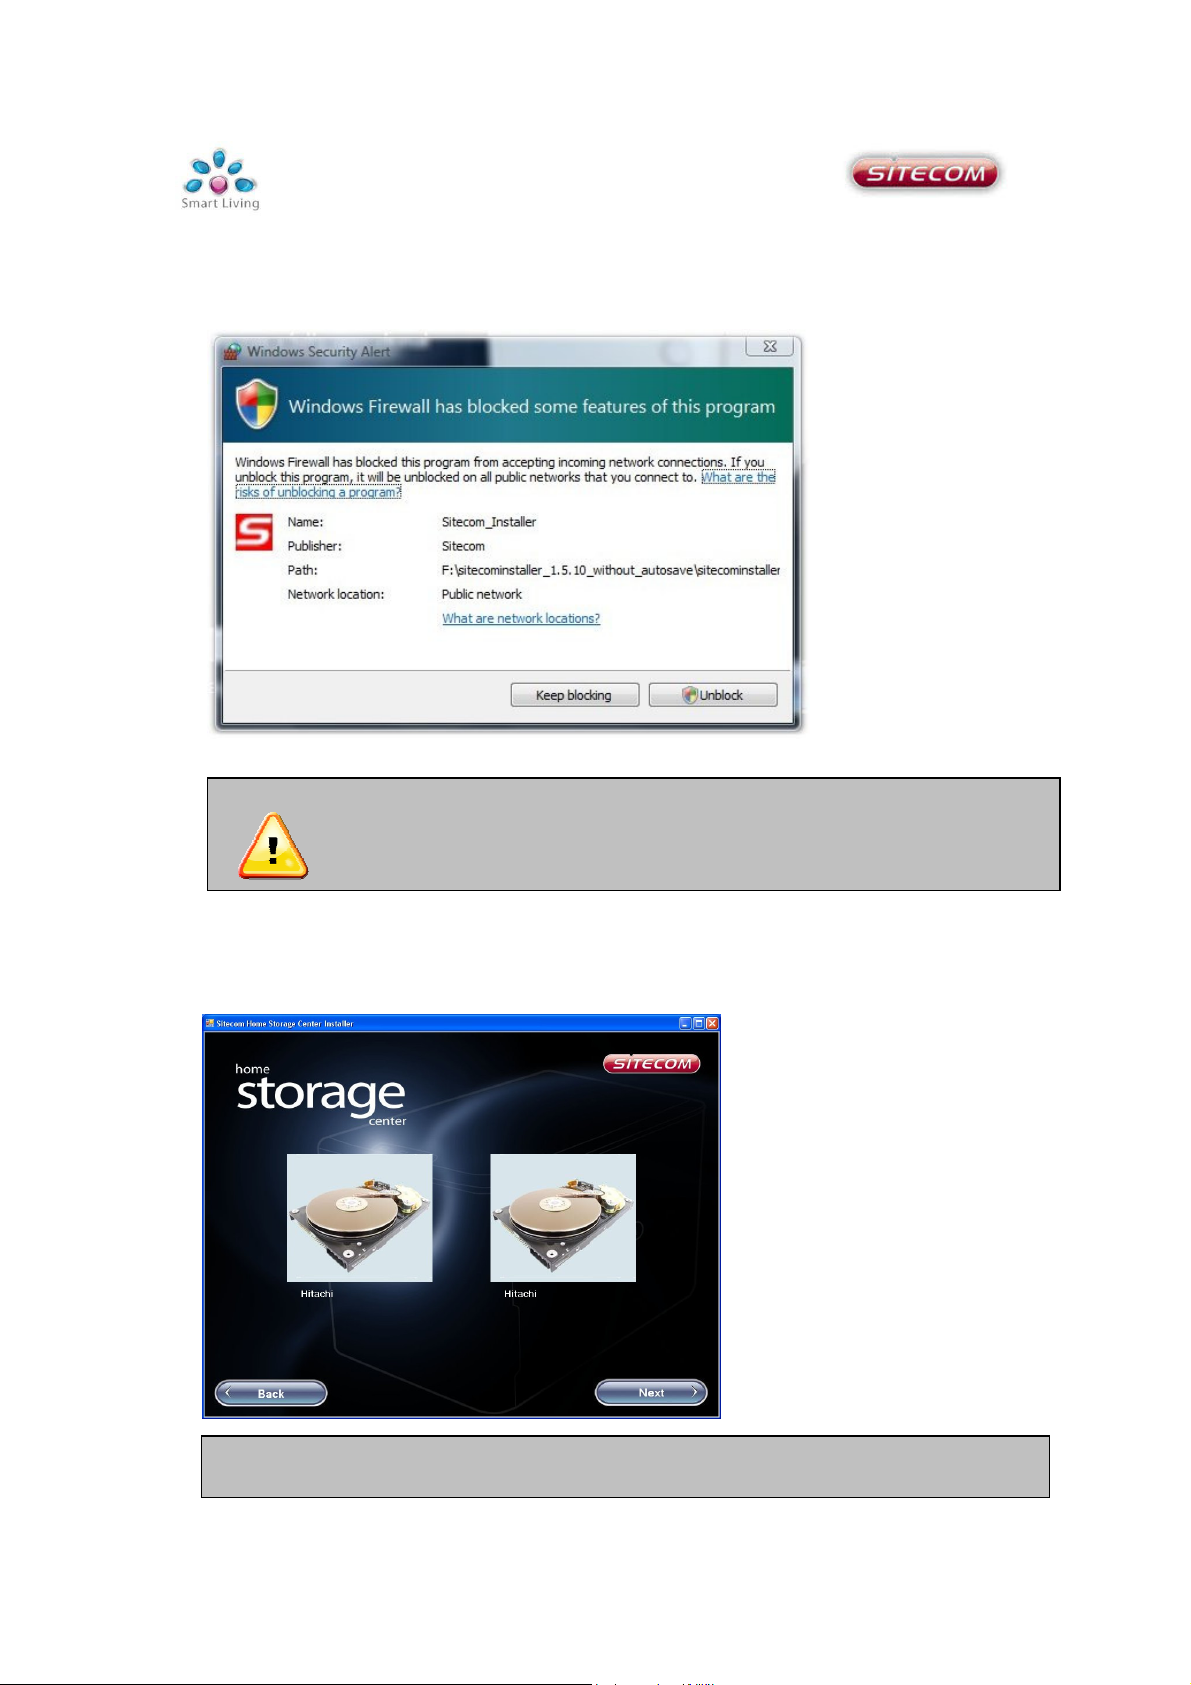
3. You may be required to unblock the installer in the windows firewall. Windows
will automatically request this action, select Unblock to allow the Sitecom Installer
to scan your network for the ‘Home storage center’.
Warning: If there are is any additional firewall software installed, such
Please refer to the documentation of your firewall software.
Norton, Panda e.g. you may be required to unblock the Sit
installer in this software.
4. After the detection is finished the installer will show the detected hard drives.
Click Next to continue the installation.
If any of the inserted Hard drives is not detected:
Unplug the power receptacle and check the connection of the hard drive.
Page 11
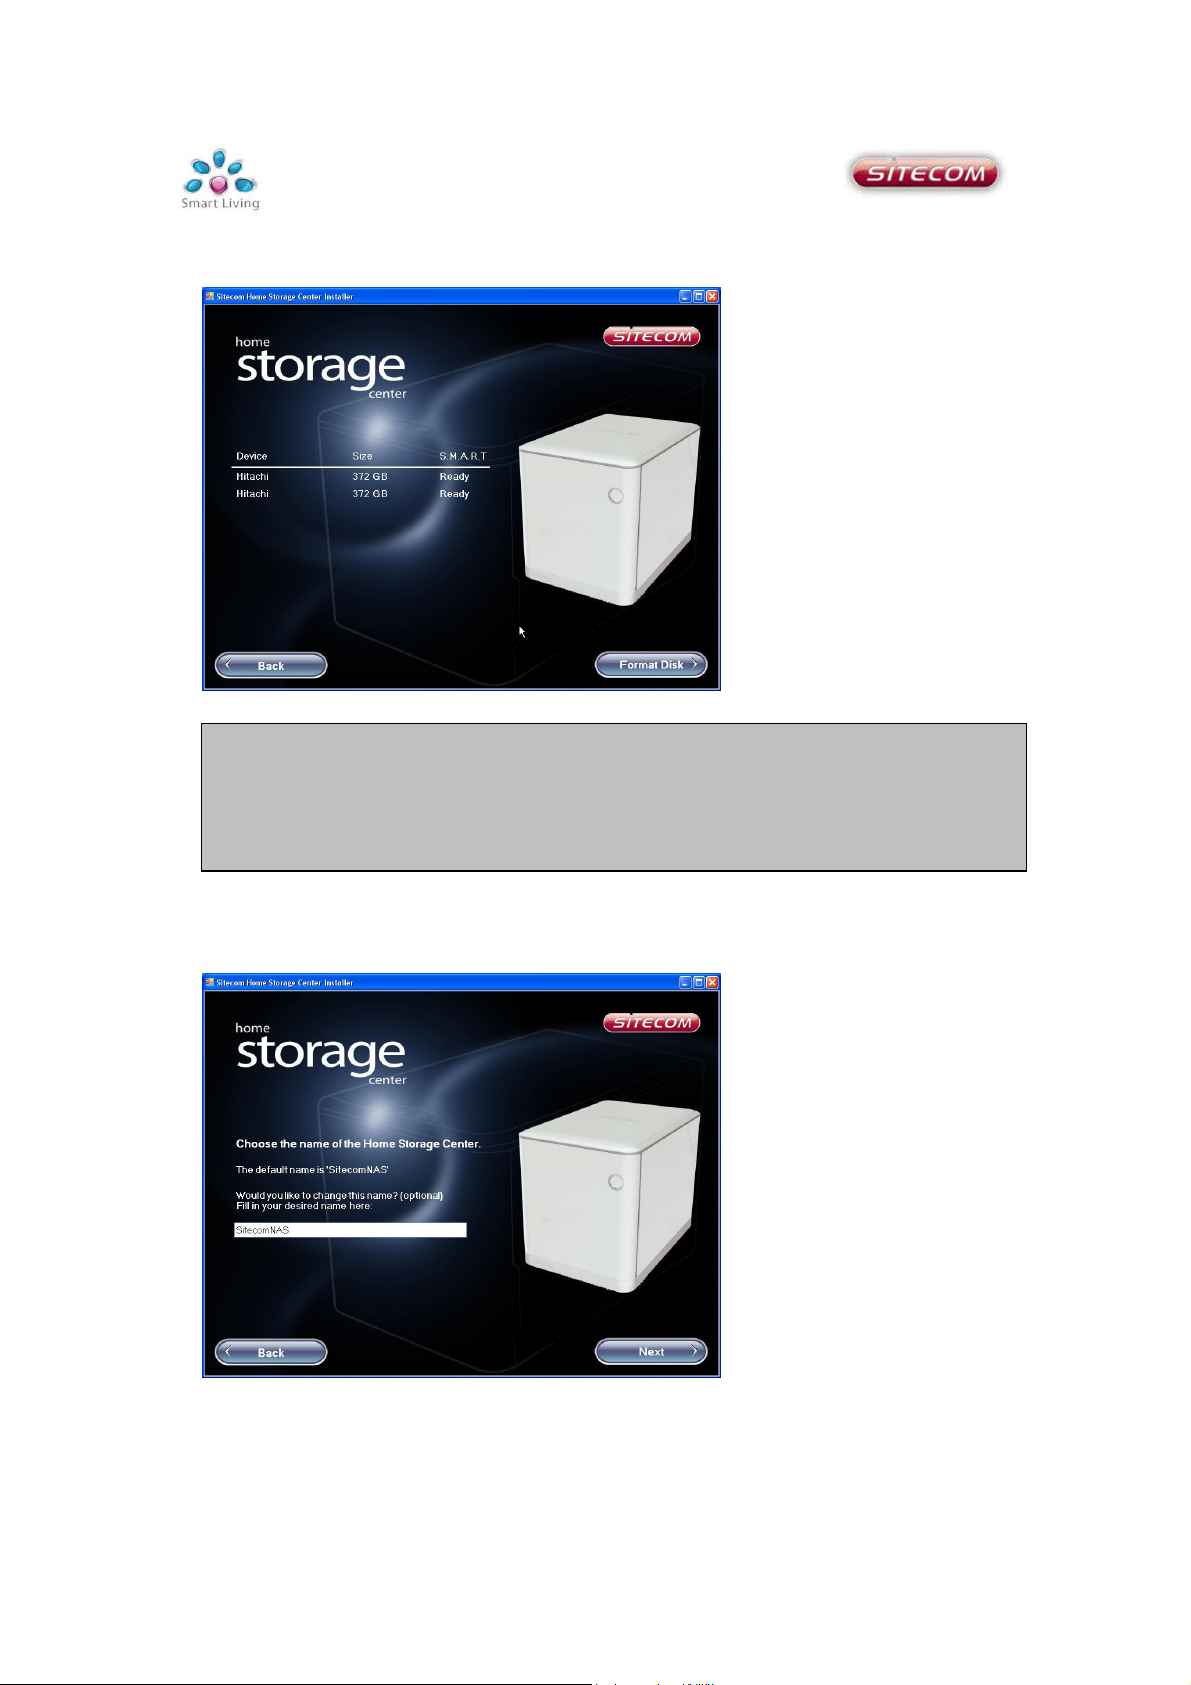
5. The installer now shows the name of the detected hard drive(s), the size and
S.M.A.R.T. status. To continue click Format Disk.
Note: When 2 hard drives are inserted the installer will automatically format the
drives using RAID 1 for data reliability. (See addendum for more information on
storage schemes.)
To change the ‘Home storage center’ to a different storage scheme, see chapter
web configuration->Setup->Disk Settings.
6. Choose a name for your ‘Home storage center’. This is how the storage center
will be recognized within your network. Press Next to continue.
Page 12
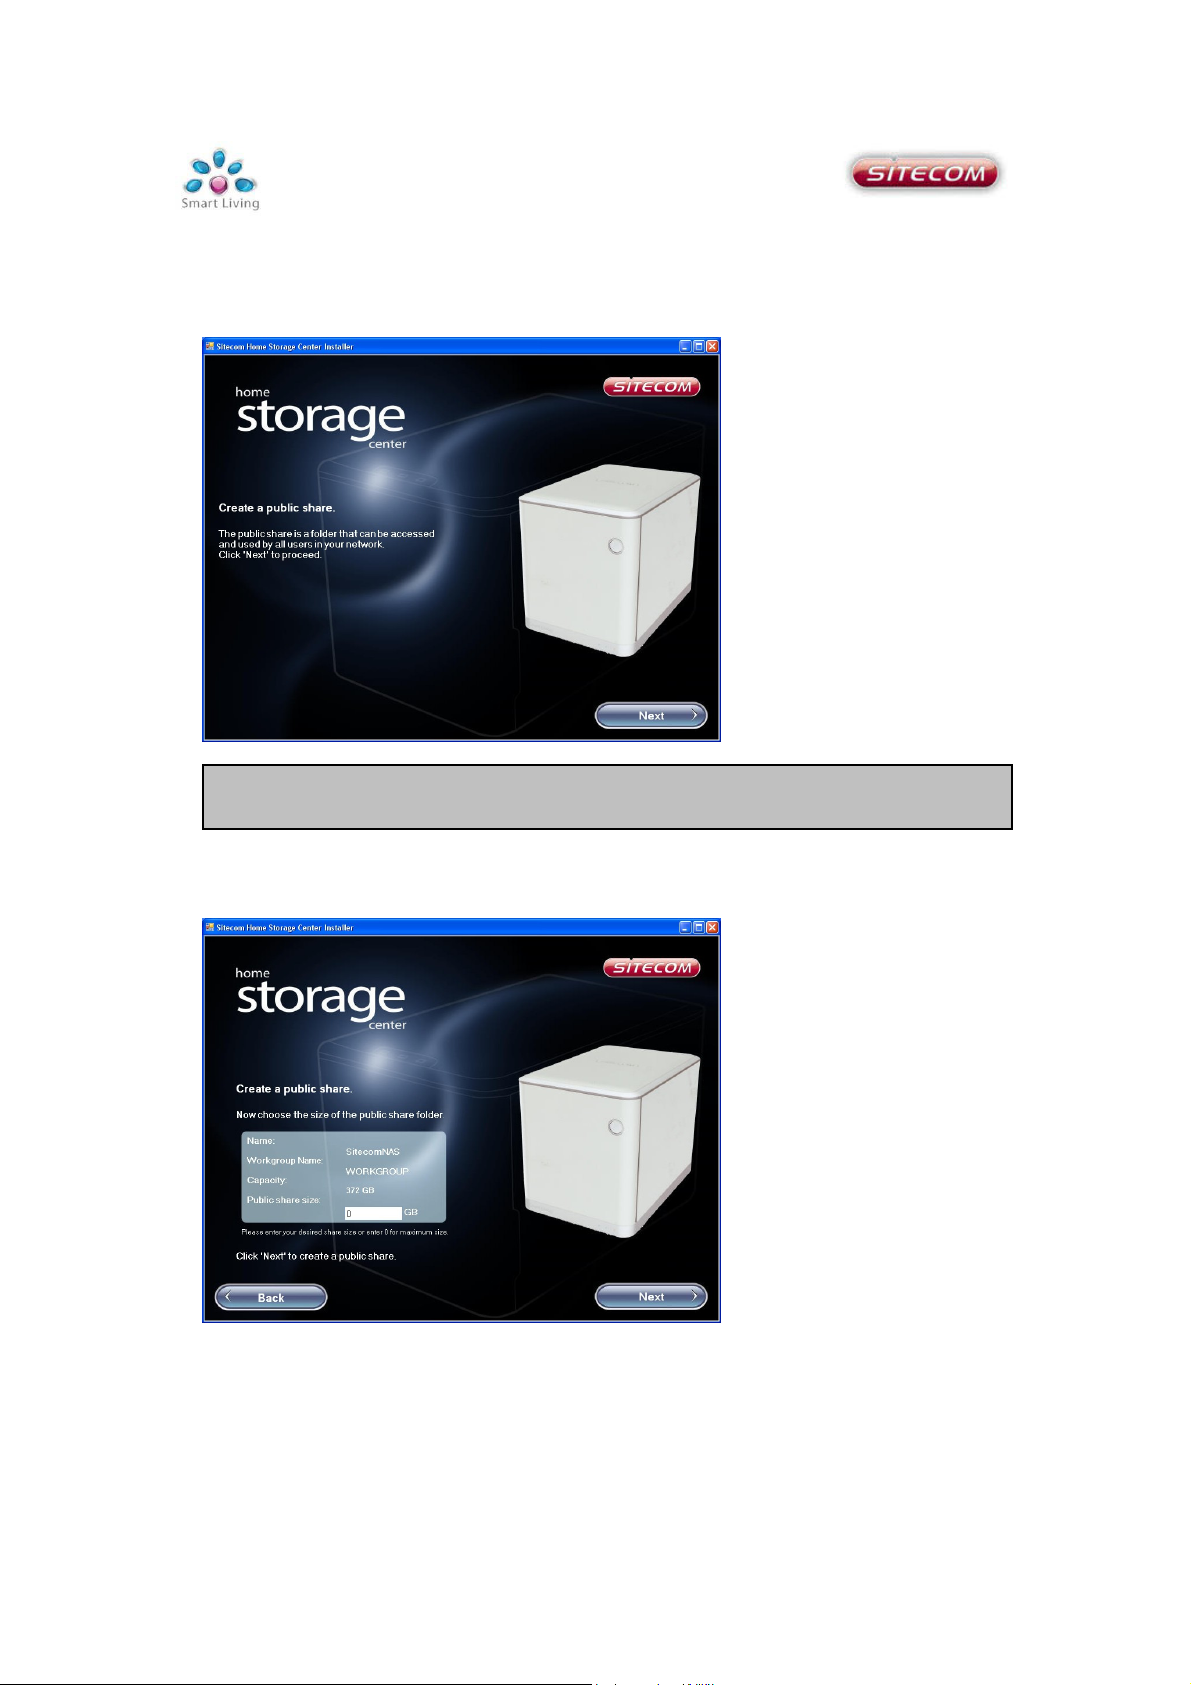
7. Now we will create a public share. This folder is for general usage and allows
anonymous access. (See Web configuration->User management -> shared folder
management.)
Note: to change the properties of this folder See Web configuration->User
management -> shared folder management.
8. Choose the maximum size for the public folder. Enter ‘0’ for maximum. Click
Next to continue.
Page 13

9. The share can now be mapped to a drive letter. Choose a desired drive letter
Note:
A
personal folder is a secur
ed share, only accessible with a username and password to
from the drop down box. This is how the share will appear in ‘My computer’. Click
Next to continue.
10. Your ‘Home storage center’ is now ready for use. And the public folder has
been created and mapped to a drive letter. Select Finish to stop the installer, or
click Next to create a personal folder.
change the properties of this folder See Web configuration->User management -> shared
Here a personal share is created. Enter a folder name for the
folder management.
personal share.
Page 14

11. Enter a user name and password; these credentials will be required to access
the personal folder. Choose a desired drive letter from the drop down box. Click
Next to continue.
12. The personal folder has been created and mapped. Click Finish. The backup
software installation will now be started.
Page 15

AutoSave Installation
After the Installer is finished, it will automatically start the installation for your
free backup software, AutoSave.
Autosave will automatically backup your photos, music and documents the Home
Storage Center.
1. Click Next to start the installation
2. Select ‘I accept the terms in the license agreement’ and click Next.
Page 16

3. Fill in an optional name and organization and click Next.
4. Click Next to install AutoSave to the default location on your computer.
Page 17
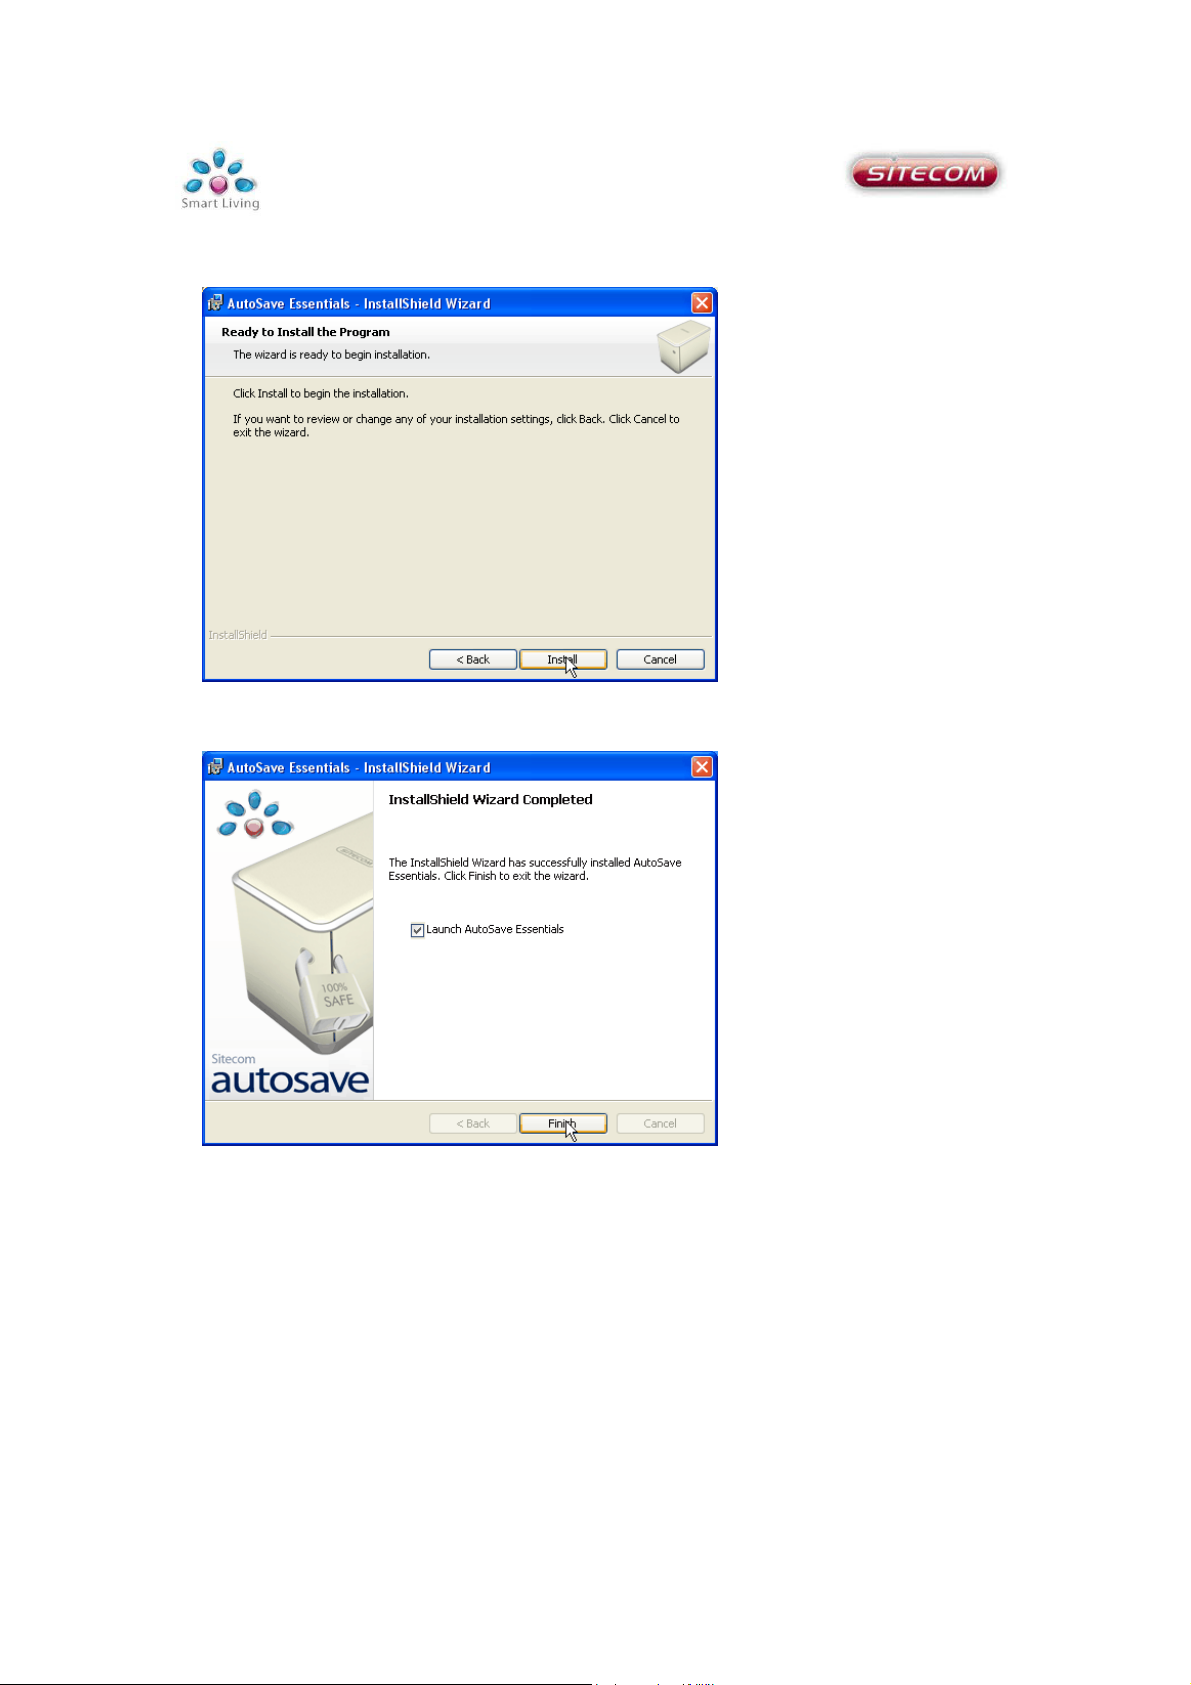
5. Click Next to begin the Installation.
6. Click finish to end the installation and launch AutoSave
Page 18

re, AutoSave will backup
AutoSave will warn you and gives you the opportunity to
Note : AutoSave will backup the files from your computer to your personal
share. If you have not configured a personal sha
to the public share.
In this situation
stop the backup process.
If you want to change the backup location, files or schedule, please see the
AutoSave manual on CD-Rom for detailed instructions.
Using the Home Storage Center
After this installation is finished you’ll have at least a new ‘Public on SitecomNAS’
network drive in you're my Computer environment. If you have made a personal
share you’ll also find it in the same location.
You can drag and drop files to and from these networks drive just like you would
do on your normal C drive.
Page 19

Username
: admin
Web configuration
Open your web browser (Firefox, Internet explorer, Chrome or any other web
browser).
Enter the hostname you have set in the installer software in the previous chapter
(default: SitecomNas) in the address bar.
You will be prompted for a username and password.
Fill in the username and password. The default credentials are:
After logging in you will see the graphical user interface (GUI) of the device.
Password : admin
Page 20
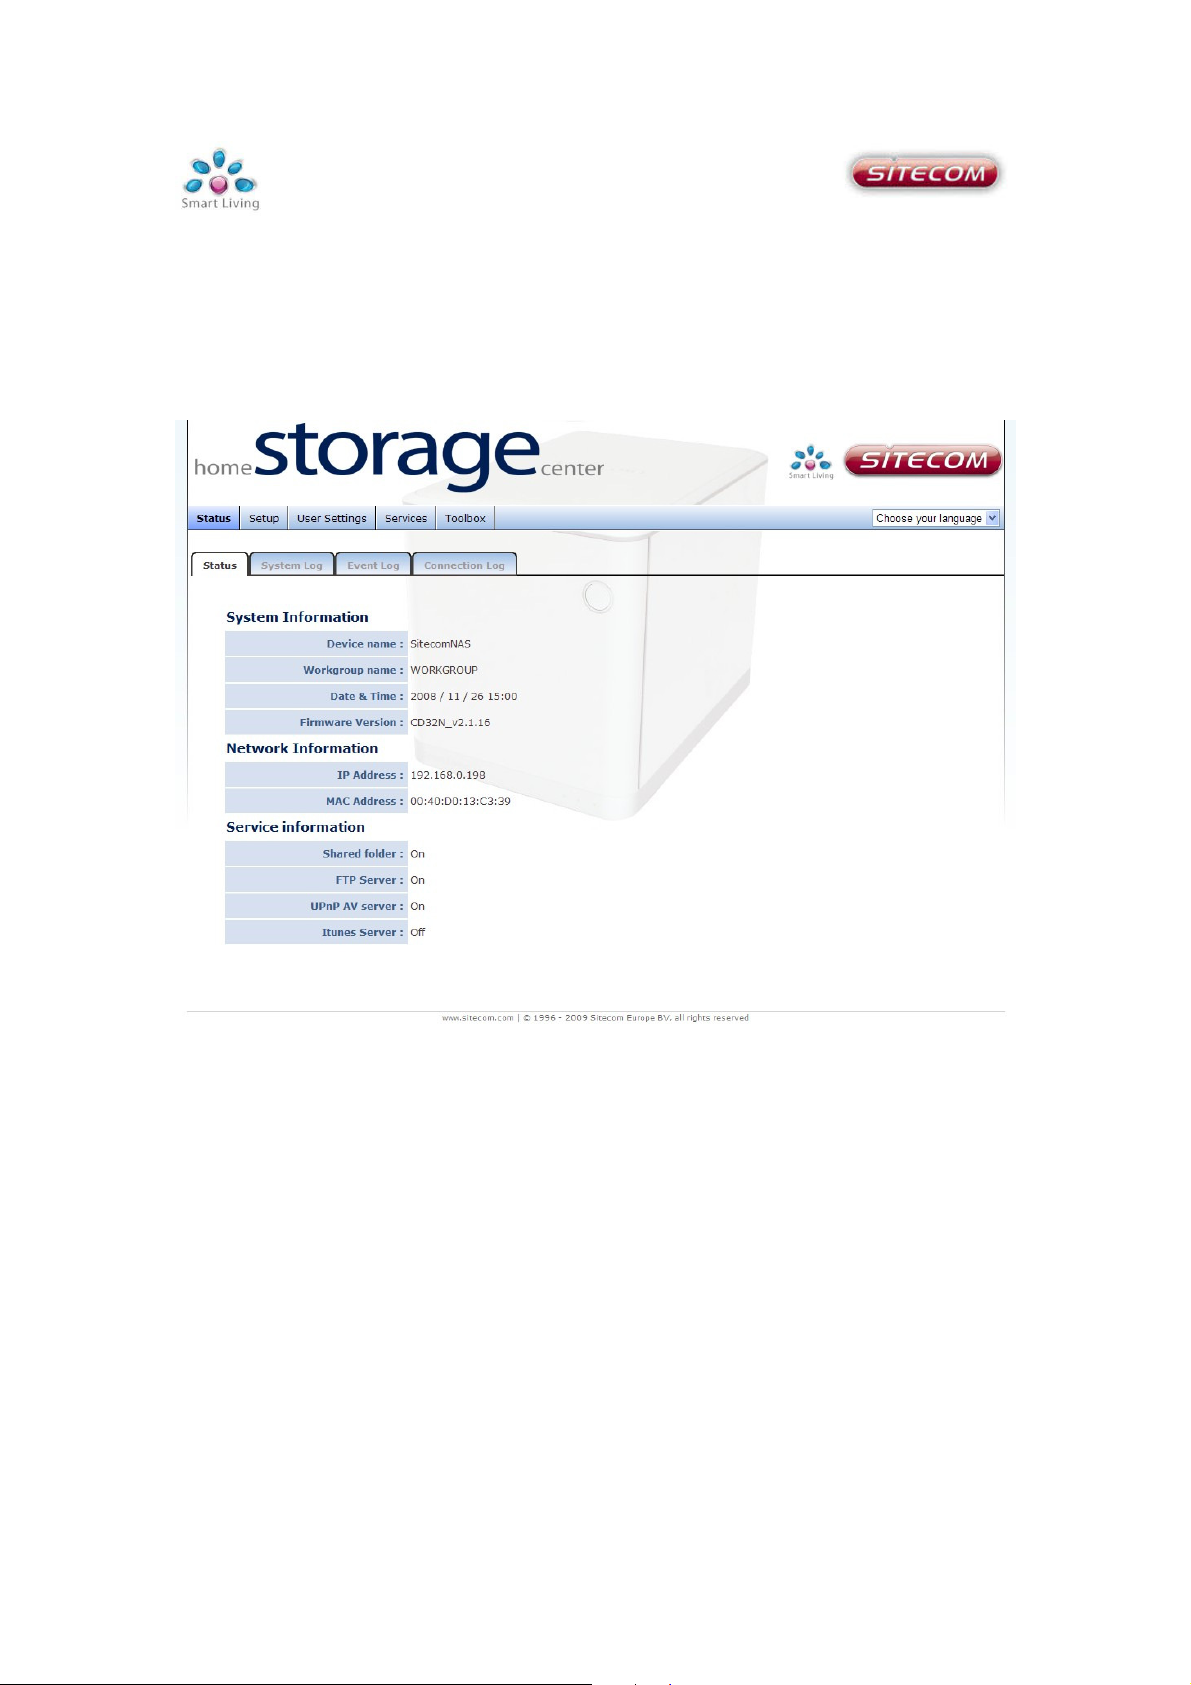
Status
All information regarding the current configuration settings can be found here. The
system, event and connection log pages log all latest events allowing good insight
in the security and stability of the setup.
This page gives an overview of the current network settings and which services are
activated.
Page 21

System/Event/Connection log
The logs give an overview of all latest logged system events. If there is not enough
internal memory for all events, logs of older events are deleted, but logs of the latest
events are retained.
Page 22

Default:
Admin
Setup
Here you can configure the Home Storage Center.
Tip: These settings are also included in the Sitecom installer which offers a
much easier installation flow.
System settings
Device name: Enter a desired name for your Home Storage Center. This will be the
name of the device within your network.
Workgroup: Choose the name of the Workgroup the Home Storage Center has to
be added to.
Note: Can only be used if ‘Microsoft Network’ is enabled.
Password: Allows you to change the default password of the storage center.
Click ‘Apply’ for any of the changes to take effect.
Page 23

Network settings
Here the local network settings are configured.
Type: Select either Dynamic IP to automatically acquire network setting from a
DHCP server within the network (i.e. router) or choose Static to set the
network parameters manually.
IP address: Enter the desired IP address for this device.
Subnet mask: Specify the subnet mask for the IP address.
Default gateway: Specify the IP address of the upstream router.
Primary/Secondary DNS: Specify the IP address of the DNS server.
Jumbo Frame: Here you can choose to enable or disable Jumbo frames.
Note: enabling Jumbo frames will only have effect when all other peripherals
Click ‘Apply’ for any of the changes to take effect.
within the network also support Jumbo frames.)
Page 24

Warning:
this will delete all data from the drive.
Disk settings
RAID function: Choose JBOD, RAID 0 or RAID 1.
Note: for more information about these data storage schemes please see
Addendum.
Scan Disk: Scan the connected hard drives for errors.
Format: Formats the disk drive.
Refresh: This will reload the page.
Page 25

Date and time settings
Time zone: Select your time zone from the drop-down list.
Manual setting: Select the corresponding radio button to manually set current date
and time.
Click to manually select
the correct date.
Page 26

NTP time server: Place a check in the corresponding radio button and select a time
server if you would like to synchronize the device’s clock to a
Network Time Server over the internet.
Manage NTP time servers: Add or delete a NTP timeserver address from the list.
Click ‘Apply’ for any of the changes to take effect.
Page 27

User settings
In the User settings menu, access to the storage center and users are managed.
In the User management section you can create, delete or modify users and assign
quotas to these users.
Shared folder management allows configuring all folders on the storage center.
Set permissions, limitations and assign users to the folders.
Page 28

User management
Create a user
Username: Enter a desired username.
Password: Enter a password for the username.
Quota settings: Enter a value to restrict the user to a maximum capacity or enter 0
for unlimited.
Click ‘Apply’ for any of the changes to take effect.
Page 29

Modify a user
Click on the username to modify the user.
Click ‘Delete’ to remove the user.
Enter the desired settings and click ‘apply’.
Page 30
(
Note
: disabling Samba will disable local sharing)
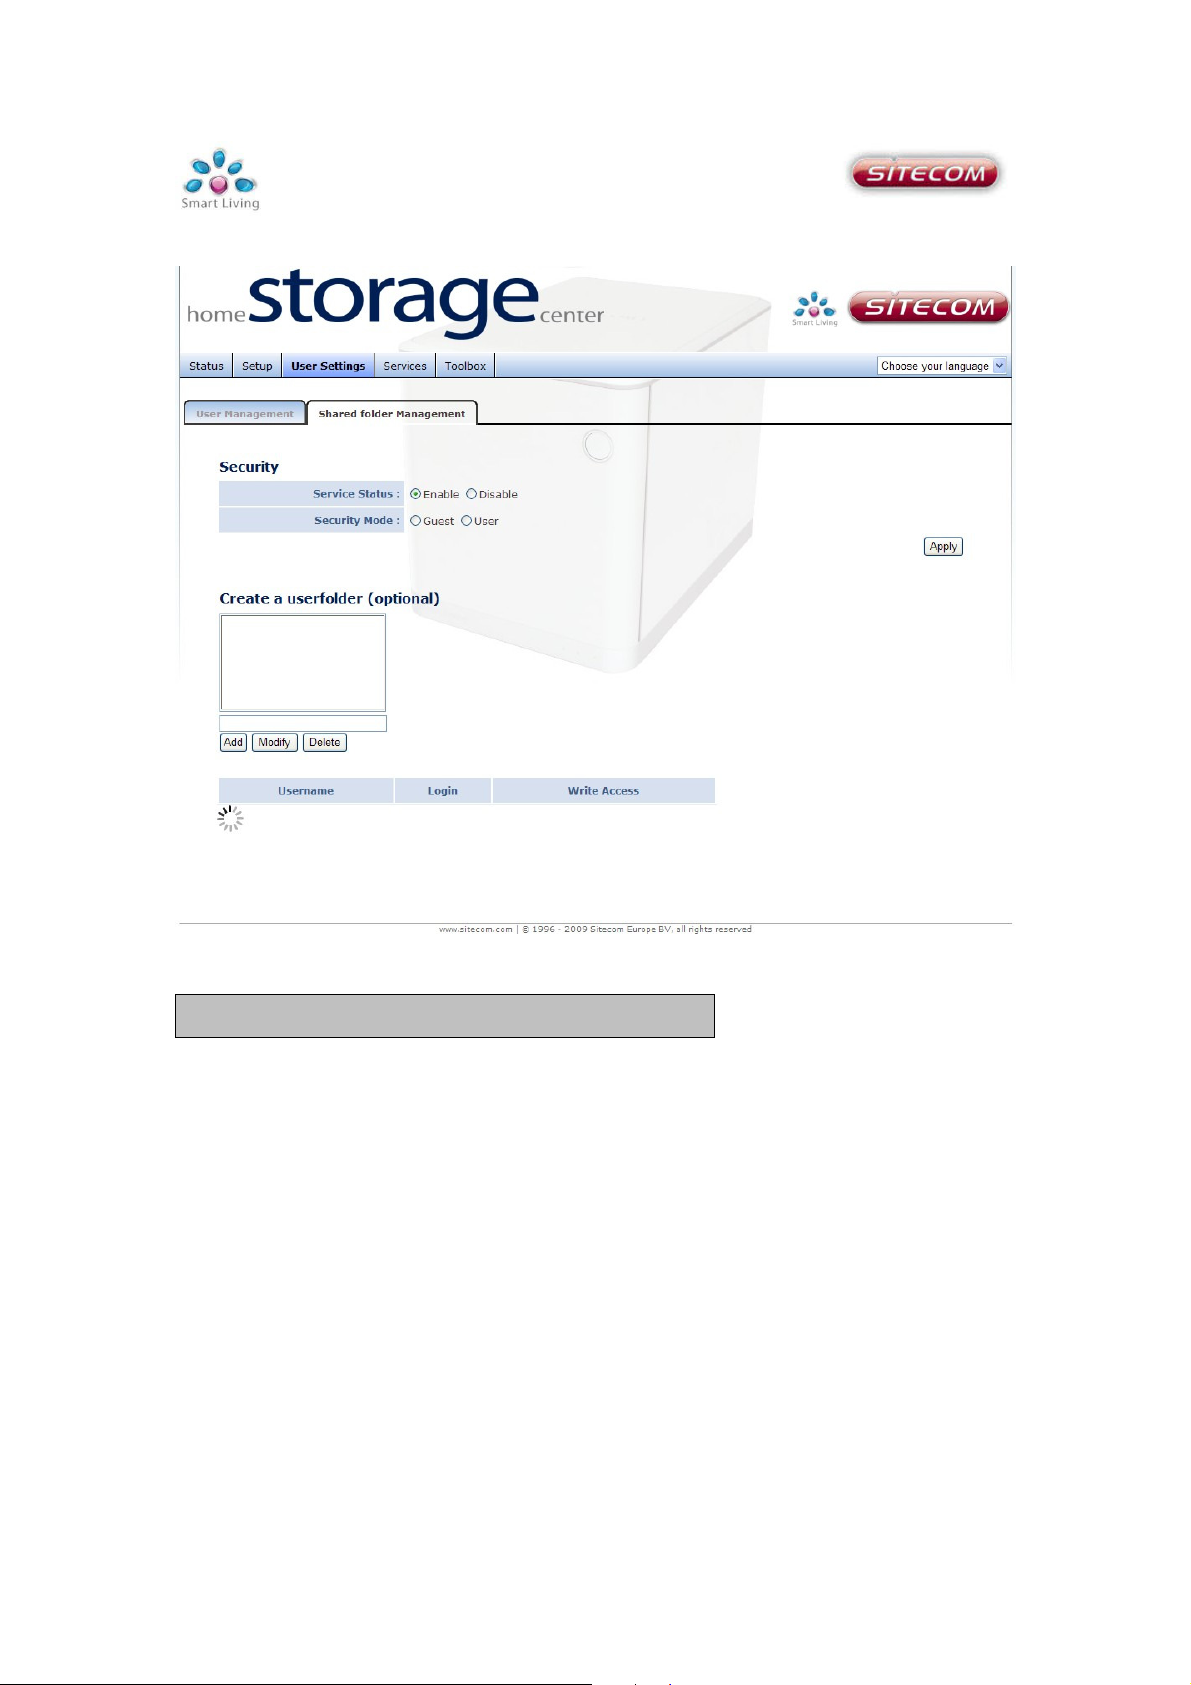
Shared folder management
Service status: Enable or Disable Samba.
Security mode: ‘Guest’ will allow restricted access for anonymous users. ‘User’ will
only allow access to users created in user management.
Click ‘Apply’ for any of the changes to take effect.
Page 31

Create a user folder: Click ‘add’. A popup window will appear.
Fill in a Folder Name and Security Mode. If ‘Personal’ is chosen, users have to be
added to the folder in the next step.
Highlight the new folder. If it is an ‘Anonymous’ folder the table below will show the
Anonymous settings which always allows login and write access.
If the selected folder is a Personal folder the table below will show the User settings
for this folder for all users you have created.
Page 32

router.
P
lease refer to the documentation of your
router.
Services
BitTorrent
The downloaded files are stored in the BitTorrent folder, which by default is not
mapped to your computer. You can access it via Network -> [Home Storage Center
Name] -> Bittorrent on any Windows computer.
Service status: Enable or disable the BitTorrent server.
Port number: Enter a port number for BitTorrent.
Note: Depending on your network it may be required to open the port in your
Limit upload speed: Enter a maximum upload speed or enter 0 for unlimited.
Limit download speed: Enter a maximum download speed or enter 0 for unlimited.
Maximum connections: Maximum total simultaneous connections the Home
Storage Center can make.
Page 33

Add a BitTorrent: Click browse and select a .torrent file to upload. Once confirmed
with ‘Apply’ the download progress is shown in current downloads.
Click ‘Apply’ for any of the changes to take effect.
Current downloads: Here current progress of the torrents is shown. To Delete,
Start or Stop a download, click the corresponding radiobutton and select an action.
Click on the Torrent name
for more details.
Page 34
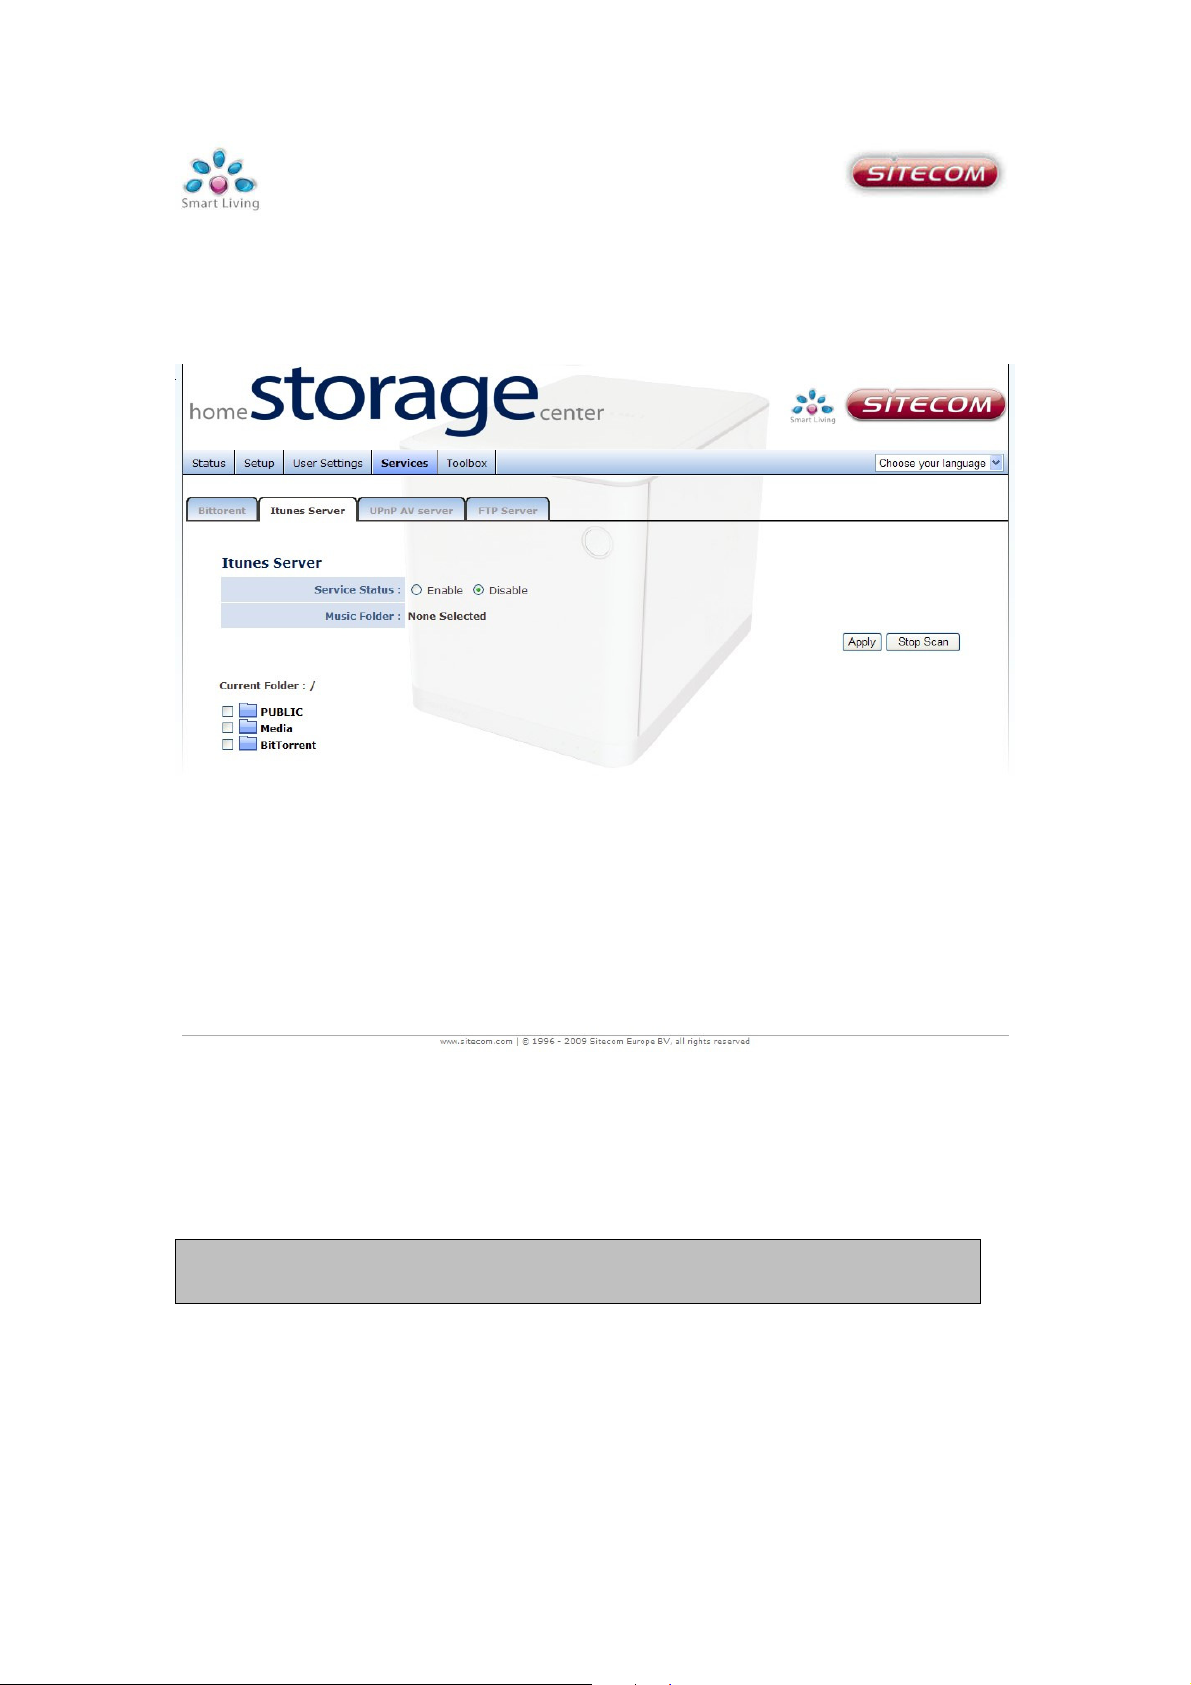
ITunes server
The iTunes server makes it easy to share your music files with other iTunes
applications within your network.
Service status: Enable or disable the iTunes server. If enable is chosen a music
folder must be selected.
Music folder: To select and share a music folder. Select a folder using the
corresponding check box and click apply.
Click ‘Apply’ for any of the changes to take effect.
Note: If the service is enabled you will see a shared server within your iTunes
application.
Page 35

UPnP AV server
The Twonky media server turns your ‘Home storage center’ into a DLNA certified
multimedia server. Easily watch your pictures or stream music and video over other
devices such as media players, PS3 and many other DLNA compatible devices.
Twonky will automatically serve the files stored in the ‘Media’ folder, located in the
Public Share on the Home Storage Center, to any UPnP AV/DLNA certified device to
play.
For more features, see the Twonky manual on CD-Rom.
Page 36

FTP server
The FTP server makes it possible to easily share files on the internet.
On this page FTP access can be managed and the server parameters configured.
Service status: Enable or disable the FTP server.
PASV Mode Port Range: Enter the port range you would like to use for passive FTP
server mode.
Allow anonymous login: Choose here to allow anonymous users to access the
storage center by FTP.
Note: if you want to login to the FTP server as an anonymous user. The
username is ‘anonymous’ and an email address must be entered in the
password field.
Anonymous Access: Here the permissions can be set for the anonymous user to
either 'Read only' or 'Allow Read and Write'.
Page 37

Note:
This will erase all current settings.
Toolbox
Reboot
When the storage center shows abnormal behavior it may be required to restart the
device. Click ‘Reboot’ to restart the device.
To undo all current settings click ‘Restore’.
Page 38

Firmware update
This tool allows you to upgrade the firmware.
Intranet Upgrade
To upgrade the firmware, you need to download the firmware file to your local hard
disk, and enter that file name and path in the appropriate field on this page. You can
also use the Browse button to find the firmware file on your PC.
Once you’ve selected the new firmware file, click <Apply> to start the upgrade
process.
Internet Upgrade
Click ‘Check’ to check which version is only.
If the online version is newer as the current version, please click ‘download’ to
upgrade to the new version.
Page 39

Backup button
USB Backup
You can use the USB port on the back of the Home Storage Center to make a
complete backup of the content on any USB Mass Storage device, such as a
removable hard drive or USB stick.
Insert the USB device into the USB port, and press the Backup button for 5
seconds. The complete content of the USB device will be copied into a folder on
the Public share.
Note: The content will be publicly available on your network. Move the
content to a private share if you wish to secure it.
USB port
Page 40

Addendum: Choosing a storage scheme
The MD-253 Home Storage Center supports 3 different storage schemes. The
following will outline the benefits and disadvantages of each of these schemes.
JBOD (Just a Bunch Of Disks)
Advantages: Minimum of 1 hard drive is allowed. Total storage capacity is total of
all hard drives together.
Disadvantages: If a hard drive fails all data on that drive is lost.
Raid 0 (Striping)
Advantages: Faster read and write speeds.
Disadvantages: Minimum of 2 hard drives. If one drive fails all data is lost. The
smallest drive in the array determines the total capacity, example:
HDD1 is 500GB
HDD2 is 500GB
-------------------------+
Total Capacity 1000GB
Raid 1 (Mirroring)
Advantages: If one drive fails no data will be lost.
Disadvantages: The total storage capacity is equal to the largest hard drive.
 Loading...