

Page 1

USB2.0
Harddisk Case
MD-206
Manual
Page 2

Introduction
This hard disk case provides a fast and easy way to add more storage space to your PC.
This product can be easily connected to your PC or Notebook using a USB interface, it
can even be disconnected and re-connected while the computer is running. USB 2.0
provides performance enhancements over USB 1.1 and offers forward and backward
compatibility with USB 1.1 devices.
1. Package Contents
• External Hi-Speed USB2.0 Harddisk Case
• USB2.0 A-B Cable
• CD-ROM
• Power adapter
• Quick Installation Guide
2. Specifications
2.1 System Requirements
• PC with Pentium 233MHz or faster CPU
• Windows ME, 2000, XP or Vista
• MAC OS 10 or higher
• Macintosh OS 10.x or higher
• 64MB RAM
• Available USB1.1 or USB2.0 port*
• 3.5” SATA hard disk.
* When using a USB1.1 port the drive will operate at 12 Mbps
2.2 Features
• Complies with USB Specification 1.1 & 2.0
• Supports high (full)-speed transfer mode
• Supports every standard SATA HDD.
• Lightweight compact case
2.3 Specifications
• USB Version 2.0 Compliant
• High Speed (480 Mbps) And Full Speed (12 Mbps) Support
• USB Mass Storage Class Bulk-Only Specification Compliant (Version 1.0)
Page 3
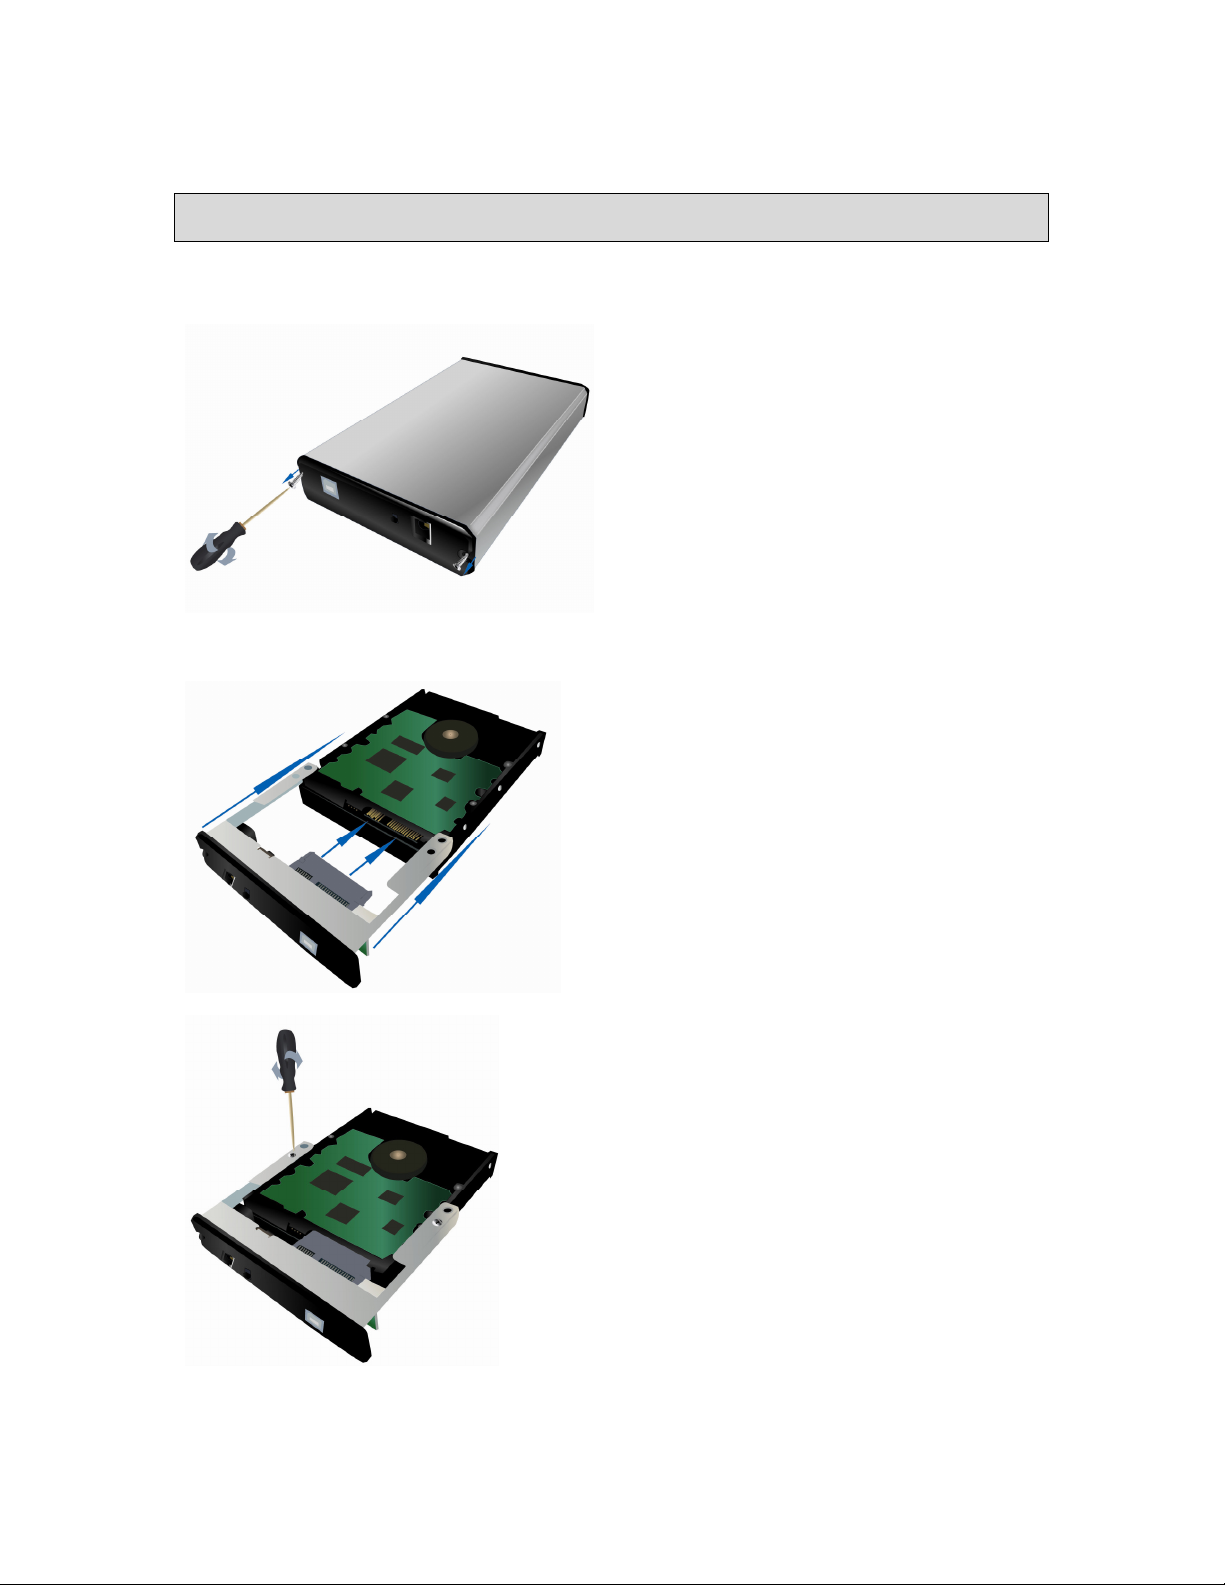
3. Hardware Assembly
Note: If you have purchased this product with a built-in hard disk continue to chapter 4.
• Open the hard disk's housing by removing the two screws on the rear.
• Connect the SATA connector and the power supply connector to the SATA hard
disk.
• Use the screws provided to attach the metal plate to the hard disk.
Page 4
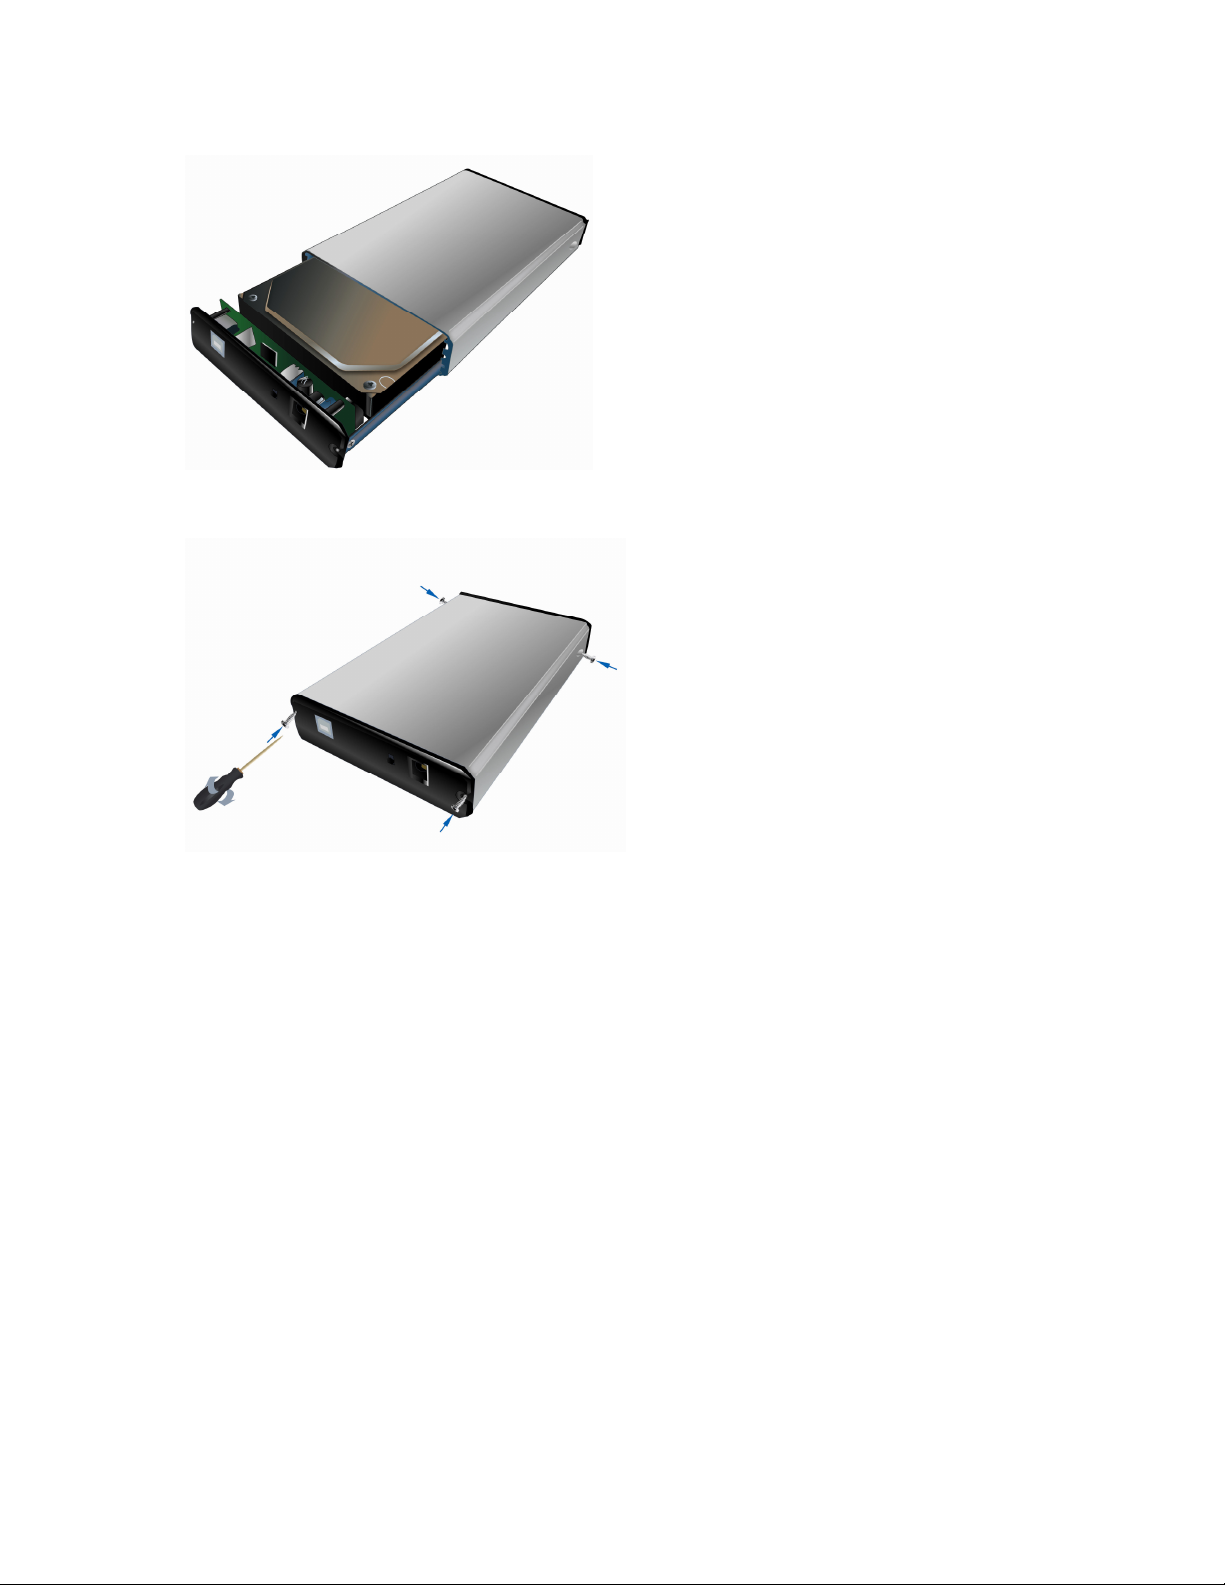
• Push the hard disk and the rear of the housing back into place.
• Secure the rear of the hard disk's housing in position and then fit the screws in
the side of the housing.
Page 5
4. Software Installation
4.1 Hardware Installation
Regardless of which operating system your computer is running, follow the install
procedure below in order to properly connect the USB A-mini -B cable, the AC adapter
and the power cord.
• Shut down your pc.
• Plug the B-type connector of the USB2.0 A-B cable, into the Sitecom Hard Disk
Case and plug the A-type connector of the USB A-mini -B cable into the USB2.0
port of your PC.
• Start your pc and proceed to chapter 4.2 for Windows ME, 2000 or XP or chapter
4.3 for Macintosh.
4.2 Software Installation Windows ME/2000/XP/Vista
Windows ME, 2000, XP & Windows Vista do not require software installation. Native
Windows drivers are used.
• Windows ME, 2000, XP and Vista will recognize and install the Sitecom Hard Disk
Case automatically. No additional drivers are necessary.
• Check ‘My Computer’ or ‘Explorer’, there should be a new icon and drive letter for
the Sitecom Hard Disk Case (if the hard disk is formatted).
• If the hard disk placed in the hard disk case has not been formatted, continue to
chapter 5.
4.3 Software Installation Macintosh OS X
Mac OS X does not require software installation. Native drivers are used.
• Mac OS will recognize and install the Sitecom Hard Disk Case automatically. No
additional drivers are necessary.
• On the desktop should be a new icon. Click the icon to access the Hard Disk Case
• If this icon does not appear, you have to ‘mount’ the drive. Click ‘Go’, select
‘Utilities’. A new menu appears, select ‘disk utilities’ to mount or un-mount the
disk.
Page 6

• To check the properties of the disk, click ‘Go’, ‘Utilities’. A new menu appears,
select ‘System Profile’ to view the properties of the MD-206.
• If the hard disk placed in the hard disk case has not been formatted, continue to
chapter 5.3.
Page 7

5. Initializing a New Hard Disk
5.1 Windows Vista
• Click on the ‘Start’ menu, then click ‘Control Panel’.
• Open the ‘System and Maintenance’ section.
• Go to the ‘Administrative Tools’ section.
• Click on ‘Create and Format hard disk partitions’.
• Depending on your Windows UAC settings, you might need to give permission to
execute this command.
• The USB Hard Drive will be listed without a drive letter, and show as ‘unallocated’.
• To create a partition, right mouse click once on the unallocated area of the USB
Hard Drive and choose ‘New Simple Volume’.
Note: Selecting the wrong area at this stage may cause you to lose valuable data.
Page 8

• The ‘New Simple Volume Wizard’ will appear. Click ‘Next’ to continue.
• Enter the amount of disk space to be used (the partition size), then click ‘Next’.
The default is the maximum available disk space.
• Assign a drive letter or path, then click ‘Next’.
Page 9

• Select a file system to format the disk (FAT32, or NTFS), then click ‘Next’.
• Click ‘Finish’ to begin formatting the USB Hard Drive.
• When formatting has finished, the USB Hard Drive will display the volume name,
the drive letter, the size of the partition (in GB), the file system used (FAT32, or
NTFS), and a Healthy status.
• The USB Hard Drive is now available to use.
Page 10

5.2 Windows XP & 2000
• Click on the ‘Start’ menu, then click ‘Settings’, and then click ‘Control Panel’, and
double-click on ‘Administrative Tools’ .
• Double-click on ‘Computer Management’.
• In the Storage sub-directory, click on ‘Disk Management’. The USB Hard Drive will
be listed without a drive letter, and show as ‘unallocated’.
• To create a partition, right mouse click once on the unallocated area of the USB
Hard Drive and choose ‘Create partition’.
Note: Selecting the wrong area at this stage may cause you to lose valuable data.
• The ‘Create Partition wizard’ will appear. Click ‘Next’ to continue.
Page 11

• Choose Primary or Extended Partition, and then click ‘Next’ (Primary Partition is
recommended).
• Enter the amount of disk space to be used (the partition size), then click ‘Next’.
The default is the maximum available disk space.
• Assign a drive letter or path, then click ‘Next’.
Page 12

• Select a file system to format the disk (FAT, FAT32, or NTFS), then click ‘Next’
(The FAT file system is only available if the partition size is less than 2GB).
• Click ‘Finish’ to begin formatting the USB Hard Drive.
• When formatting has finished, the USB Hard Drive will display the volume name,
the drive letter, the size of the partition (in GB), the file system used (FAT, FAT32,
or NTFS), and a Healthy status.
Page 13

• The USB Hard Drive is now available to use.
5.3 Windows 98/ME
• Click ‘Start’ and then type ‘Run’ in the command prompt. Type ‘fdisk’ and click
‘OK’ button.
• Press the letter ‘Y’ and hit ‘Enter’.
• You will see a menu with 5 options. You should type ‘5’ to select
the ‘Change current fixed disk drive’ option then hit the ‘Enter’ key.
Page 14

• You should see a list of hard drives. Your main internal hard drive will be Disk 1.
Any other hard drives will be listed as 2, 3, etc. If you have only one hard drive in
your computer then drive 2 will be the USB Hard Drive. You can also verify which
drive on the list is the USB hard drive by the size under Mbytes. The number
should be approximately equal to the size marked on the front label of your hard
drive. Choose the number that represents the USB hard drive and type it then hit
the Enter key.
Note: Selecting the wrong disk at this stage may cause you to lose valuable data.
• You now are presented with the original menu of 5 items. This time, you must
choose option 1, ‘Create DOS partition or Logical DOS drive’ and hit ‘Enter’.
• You are presented with another menu of 3 items. . You must choose option 1,
‘Create Primary DOS Partition’. Verify that you are partitioning the correct disk
number before proceeding. Then hit the ‘Enter’ key. This may take about a
Page 15

minute.
• You will now see the question ‘Do you wish to use the maximum available size for
a Primary DOS partition?’ Answer ‘yes’ or just hit the ‘Enter’ key. This may take a
minute.
• When the partitioning is complete hit the ‘Esc’ button twice. You will see a
message that you must restart your PC. You can ignore this message. Hit the
‘Esc’ button once more to exit the fdisk program.
• Double click the ‘My Computer’ icon. Unplug the USB hard drive and then
reconnect it to your PC. An icon with a drive letter will show up in the ‘My
Computer’ window. When you try to access the drive you will get a dialog box
with the message that the drive is not accessible. Click ‘Cancel’ button.
• You now need to format your USB hard drive. In the ‘My Computer’ window, point
your cursor to the icon that represents the USB hard drive and click the right
mouse button. Select ‘Format’.
Note: Selecting the wrong disk at this stage may cause you to lose valuable data.
• In the ‘Format window’ select format type ‘Full’ and type a label name (10
characters or less), click the ‘Start’ button to start formatting.
Page 16

• You will see a warning that all files will be destroyed. Click the ‘OK’ button to
proceed.
• Once the format is complete please click ‘Close’.
• Windows will ask you to run Scandisk before using the disk. You can ignore this
message, click ‘OK’.
• Close the ‘Windows Help’ window. The USB disk is now ready to be used.
5.3 Macintosh OS X and higher
• Please go to ‘Utilities/Disk Utility’ to partition the disk.
• Select the hard disk and choose to partition.
Page 17

6. Using the Hard Disk Case
• Open ‘My Computer’ or ‘File Explorer’.
• Double-click on the correct Disk icon.
• Access images and files on your Hard Disk Case the same way you open, copy,
move, or delete images and files on your normal hard disk drive.
Saving files to your computer from the Hard Disk Case
• Locate or create a destination folder you wish to transfer the files to on your
computer. (i.e. create a new folder on the desktop)
• Open 'My Computer' or 'File Explorer', open the folder containing the files on
the Hard Disk Case. Go to the edit menu and choose Select all.
• Go to the edit menu and choose Copy.
• Go to the destination folder.
• Go to the edit menu and choose Paste.
• The files will be copied to the destination folder.
Mac OS X
You can use the disk the same way as the normal Harddisk
Page 18

7. Turning off the Hard Disk Case
Mounting/Dismounting
When a device, such as a Hard Disk Case, is mounted on a computer, it means the
computer ‘sees’ the device and is able to communicate with it. When you dismount a
device the computer no longer sees it. The device may still be running but the computer
cannot access it, as though the device no longer exists.
Before you turn off a Hard Disk Case with the computer running, you must dismount the
drive. If you turn off the drive without dismounting it first, data on the drive may be lost
or damaged.
If you turn off your computer before you turn off your Sitecom Hard Disk Case, no
dismounting is needed. Always make sure the drive is turned off before disconnecting the
AC adapter or the USB cable.
• Locate the System Tray and the unplug icon. Left-click the unplug icon.
• Windows ME
A rectangle will appear with the name of the drive followed by the drive letter.
Windows 2000/XP/Vista
You will receive the alert message ‘Safely Remove…’ or ‘Stop…’ followed by the
drive letter for the device.
• Left-click the appropriate device (with the drive letter matching the one used by
the Sitecom Hard Disk Case). After a few seconds, Windows will show a message
that it is safe to remove the device.
• Click ‘OK’ and the Hard Disk Case will dismount. You can now safely turn the Hard
Disk Case off.
Mac OS X
Drag the hard disk icon on the desktop to the trashcan icon to dismount the hard disk.
 Loading...