

Page 1
LN-505/506/507/508/509
LN-515/516/517/518
Homeplug
User Manual
Version 1.0
Page 2

Index
Index..............................................................................................................2
1. Safety instructions .....................................................................................3
2. CE Conformity...........................................................................................4
3. Introduction..............................................................................................5
3.1 What exactly is Homeplug?.......................................................................5
Cost factor and transmission quality ............................................................5
Data security and radiation ......................................................................... 5
3.2 The packages contains ........................................................................5
3.3 About this manual ...............................................................................5
4. Introduction of the hardware .........................................................................6
4.1 LN-505/LN-515 .......................................................................................6
4.2 LN-506/LN-516 .......................................................................................6
4.3 LN-507/LN-517 .......................................................................................7
4.4 LN-508/LN-518 .......................................................................................7
4.5 LN-509 .................................................................................................. 8
5. Install the hardware...................................................................................... 9
5.1 Install the Master Homeplug .....................................................................9
5.2 Install the Slave Homeplug ..................................................................... 10
6. Install the software .................................................................................. 12
7. Configure the network.............................................................................. 17
8. Setting security with the push button method ............................................. 20
8.1 Create a network................................................................................... 20
8.2 Add an extra Homeplug.......................................................................... 20
Appendix A: Add an extra Homeplug to an existing network ................................ 21
1. Install the Hardware ............................................................................. 21
2. Add a Slave Homeplug to a secured network .............................................. 22
3. Configure your secured network................................................................ 24
Full manual Sitecom LN-505/515/506/516/507/517/508/518/509 Homeplug
2
Page 3

1. Safety instructions
All safety and operating instructions should be read and understood before using
the device, and should be kept for future reference.
• Never open the Homeplug adapter. There are no user-serviceable parts
inside the Homeplug adapter.
• Do not try to service this product yourself! Contact qualified technicians
each and every time your device needs maintenance. There is a risk of
electric shock!
• Use the Homeplug adapter in a dry location only.
• Do not insert any objects into the openings of the Homeplug adapter.
• To disconnect the Homeplug adapter from the power supply grid, pull the
power plug.
• Do not keep the Homeplug adapter in direct sunlight.
• Slots and openings on the case serve as ventilation. Never block or cover
them.
• Never set up the Homeplug adapter near a heater or radiator.
• The Homeplug adapter should be located only where sufficient ventilation
according to the instructions of the manufacturer can be ensured.
• Disconnect the Homeplug adapter from the power supply grid before
cleaning. Use a moist towel to clean the device. Never use water, paint
thinner, benzene, alcohol or other strong cleaning agents when cleaning
the device, as these could damage the case.
• Never use the Homeplug adapter with a power supply that does not meet
the specifications provided on the rating plate. If you do not know what
type of power supply you have at home, contact your dealer or energy
supplier.
• In the event of damage, disconnect the Homeplug adapter from the power
supply grid and contact customer service. This applies, for example
o if the power cable or plug is damaged
o liquid has been spilled on the Homeplug adapter or objects have
fallen into the device.
o the Homeplug adapter has been exposed to rain or water.
o the Homeplug adapter does not work, even though the operating
instructions have been followed properly.
o the Homeplug adapter’s case is damaged.
Full manual Sitecom LN-505/515/506/516/507/517/508/518/509 Homeplug
3
Page 4

2. CE Conformity
This product complies with the technical requirements of the 1999/5/EC Directive
(R&TTE) and 2006/95/EC (LVD), and it is designed for use in the EU and
Switzerland.
The product is class II equipment. This equipment may cause interference with
radio waves in home use; if this occurs the operator may be required to take corrective action.
Full manual Sitecom LN-505/515/506/516/507/517/508/518/509 Homeplug
4
Page 5

3. Introduction
In this chapter, we will provide an overview of the Homeplug technology and
introduce it briefly.
3.1 What exactly is Homeplug?
Homeplug is home and office networking using the electric wiring already
installed in the building.
Cost factor and transmission quality
Homeplug is an economical and easy-to-use networking technology. You don't
need to lay cables and you can connect to the home network at every power
point.
The Homeplug standard modulates and demodulates additional frequencies on
the power lines. Modulation and demodulation is a well-known and proven
method of data transmission, which has been in use in other applications for a
number of years. Now it is used to set up Internet and network accesses in the
home or office. Depending on the damping factor, distances of at least 200
meters can be covered.
With a maximum data rate up to 500 Mbps and symmetrical upload and
download speeds, Homeplug is comparable to traditional Ethernet network
solutions.
Data security and radiation
128-bit AES encryption is used, which guarantees secure data transfer within the
network.
3.2 The packages contains
• A Master and Slave Homeplug
• A CD containing manuals and utility
• A quick installation guide
• Two CAT 5e Ethernet cables (1.5 meter)
3.3 About this manual
The images in this manual are based on the LN-515 Homeplug, but are also
applicable to the other models. In case it is not applicable this will be clearly
noticed.
Full manual Sitecom LN-505/515/506/516/507/517/508/518/509 Homeplug
5
Page 6
4. Introduction of the hardware
Security button. See chapter 8.
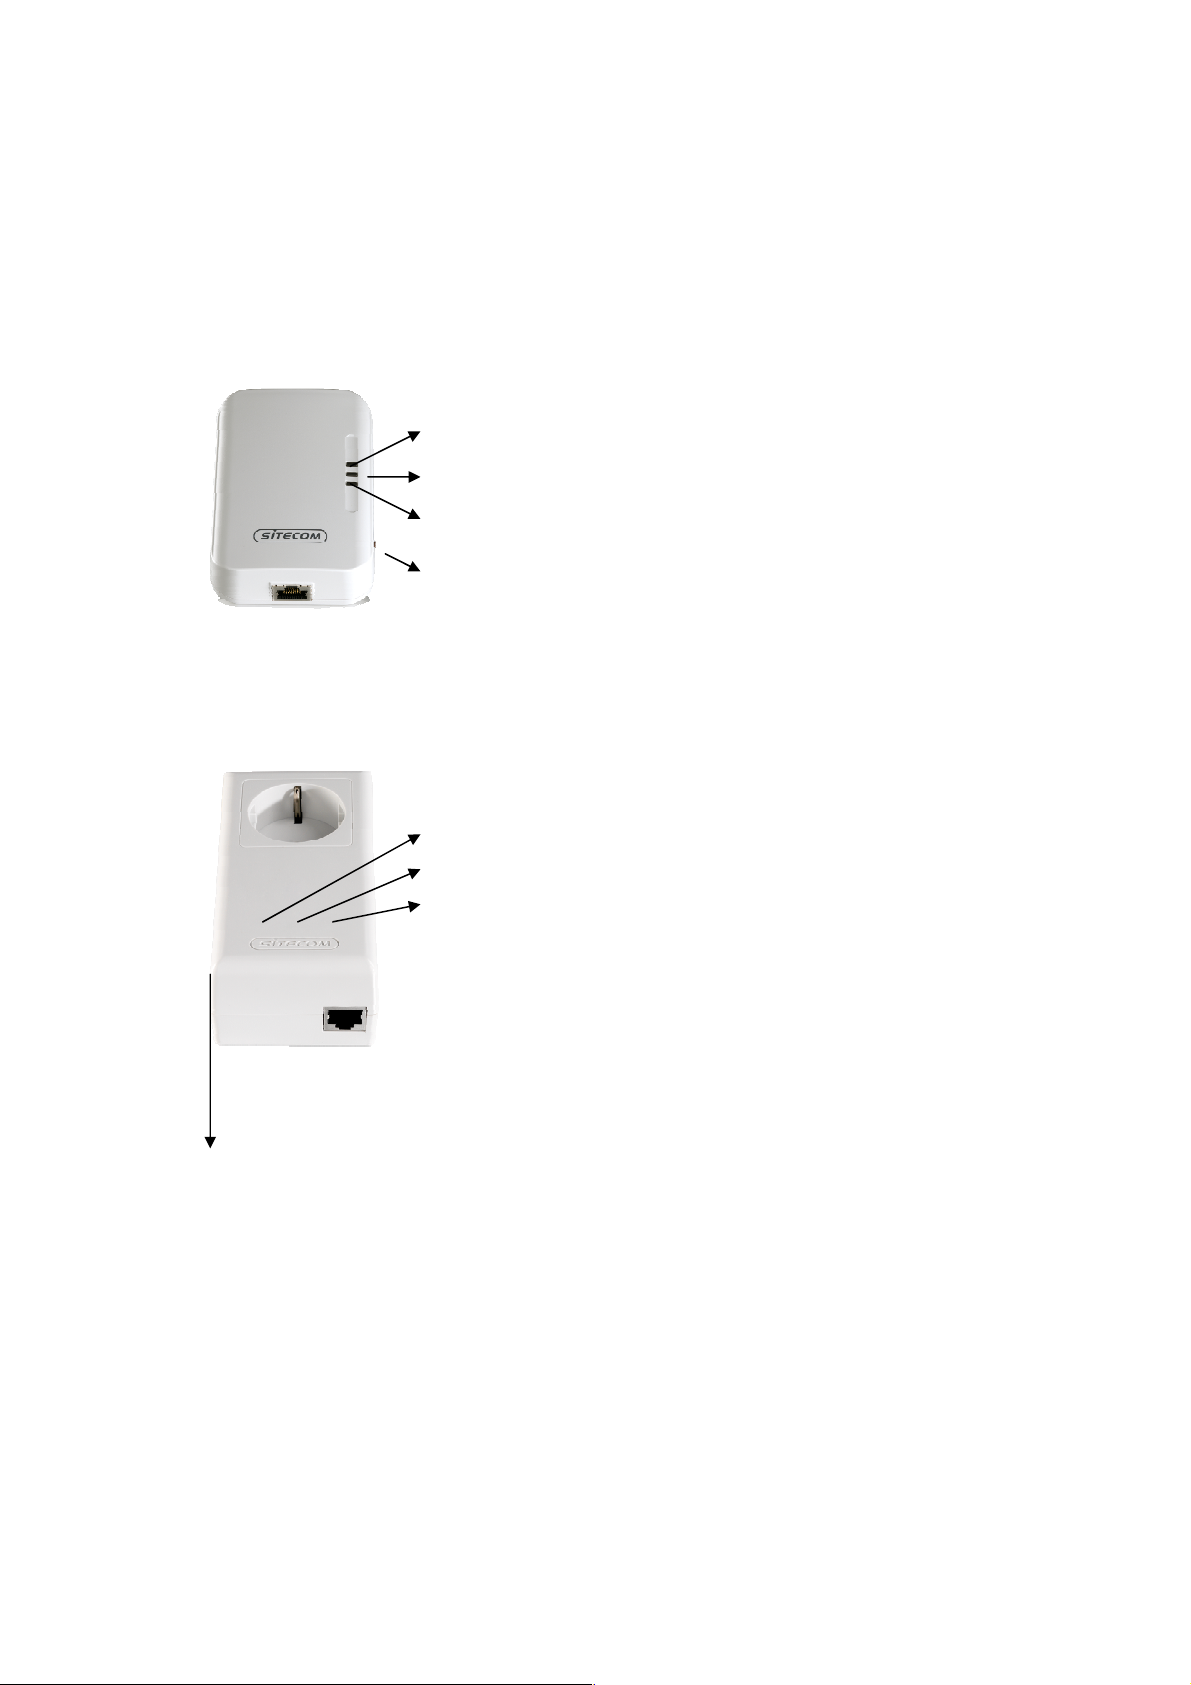
4.1 LN-505/LN-515
Power indication
Indicates an active connection and data transfer between Homeplugs
Indicates an active connection and data transfer between the Homeplug and
connected device
Reset button. Press and hold for 20 seconds to reset to factory defaults
4.2 LN-506/LN-516
Power indication
Indicates an active connection and data transfer between Homeplugs
Indicates an active connection and data transfer between the Homeplug and
connected device
Full manual Sitecom LN-505/515/506/516/507/517/508/518/509 Homeplug
Reset button. Press and hold for 3-5 seconds to reset to factory defaults
NMK button. See chapter 8.
6
Page 7
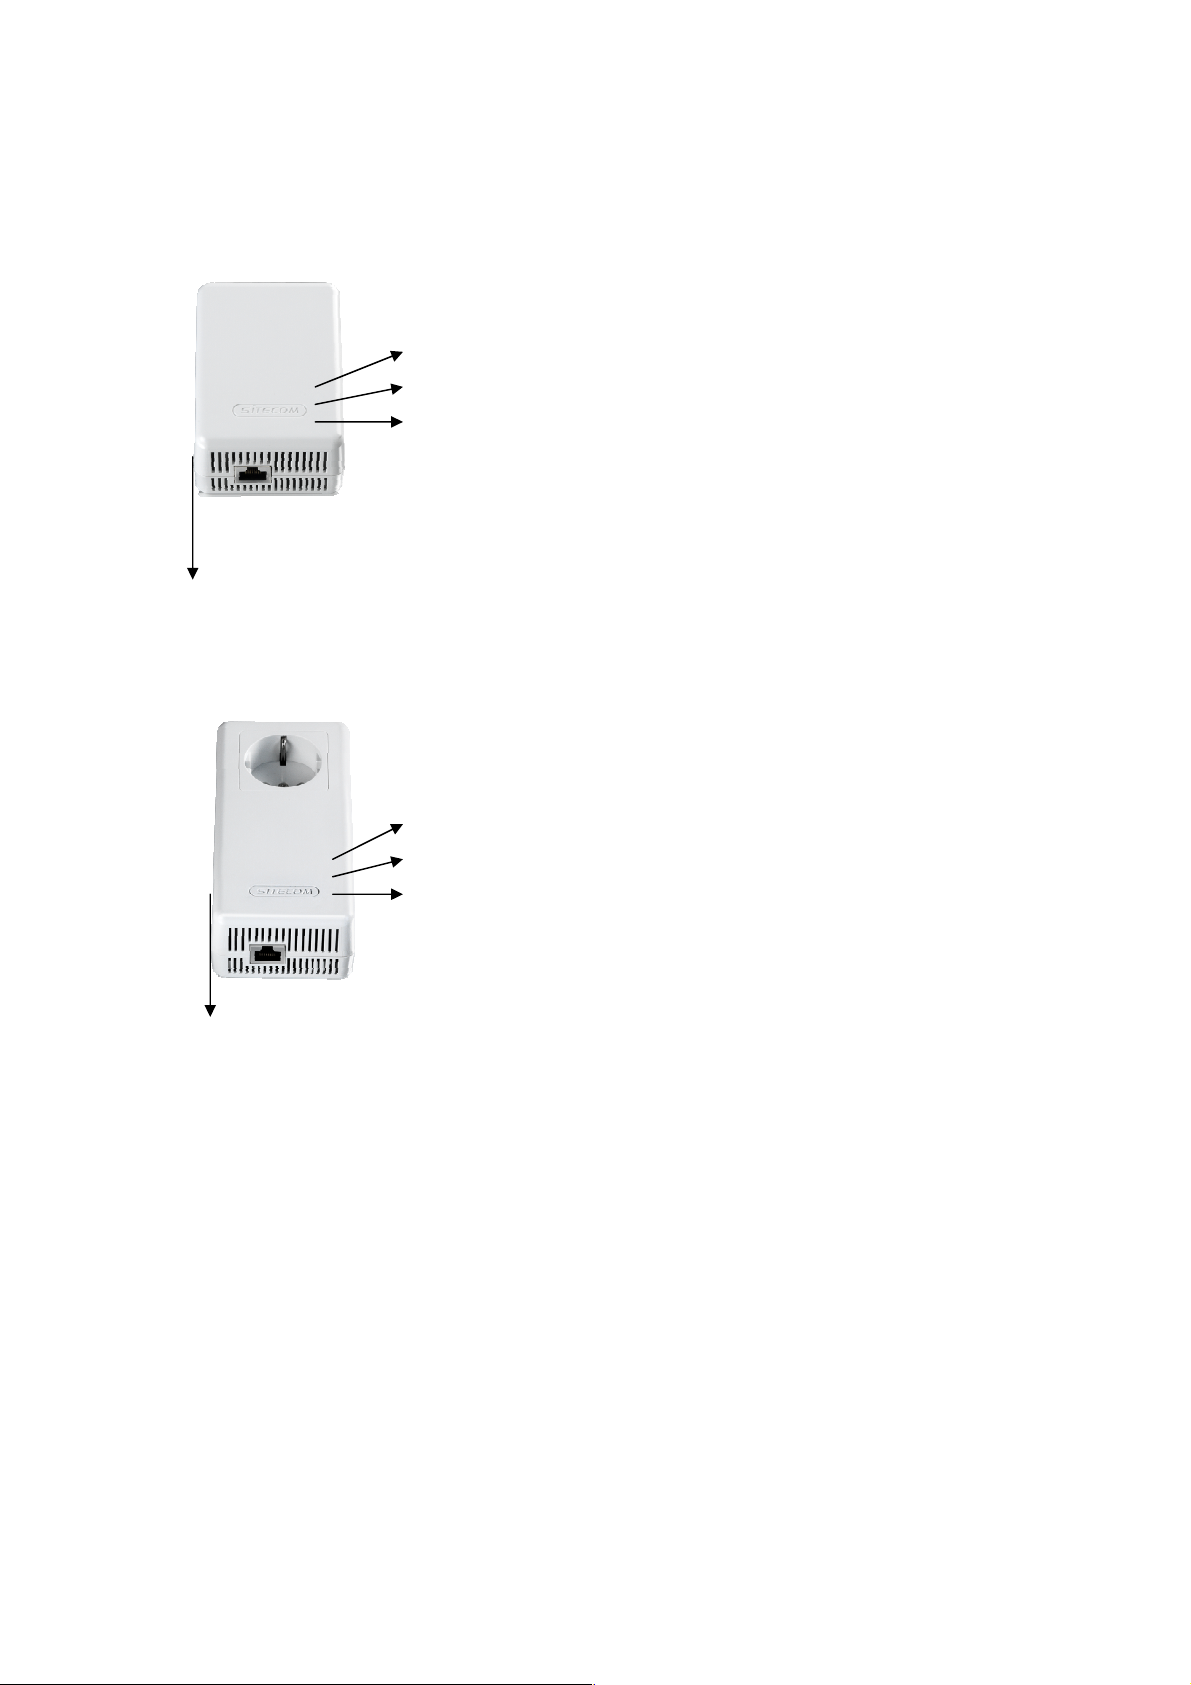
4.3 LN-507/LN-517
Power indication
Indicates an active connection and data transfer between Homeplugs
Indicates an active connection and data transfer between the Homeplug and
connected device
Reset button. Press and hold for 3-5 seconds to reset to factory defaults
NMK button. See chapter 8.
4.4 LN-508/LN-518
Power indication
Indicates an active connection and data transfer between Homeplugs
Indicates an active connection and data transfer between the Homeplug and
connected device
Reset button. Press and hold for 3-5 seconds to reset to factory defaults
NMK button. See chapter 8.
Full manual Sitecom LN-505/515/506/516/507/517/508/518/509 Homeplug
7
Page 8

4.5 LN-509
Power indication
Indicates an active connection and data transfer between Homeplugs
Indicates an active connection and data transfer between the Homeplug and
connected device
Reset button. Press and hold for 3-5 seconds to reset to factory defaults
NMK button. See chapter 8.
Full manual Sitecom LN-505/515/506/516/507/517/508/518/509 Homeplug
8
Page 9

5. Install the hardware
5.1 Install the Master Homeplug
Start with the Homeplug which is labeled as ‘Master’. You’ll see this on the
backside of the Homeplug.
Plug the Ethernet cable in the Ethernet port on the master Homeplug.
Connect the master Homeplug to your computer and plug it into the socket.
Full manual Sitecom LN-505/515/506/516/507/517/508/518/509 Homeplug
9
Page 10

5.2 Install the Slave Homeplug
Take the Homeplug which is labeled as ‘Slave’. You’ll see this on the backside of
the Homeplug.
Plug the Ethernet cable in the Ethernet port on the slave Homeplug.
Connect the slave Homeplug to your Internet router and plug it into the socket.
Full manual Sitecom LN-505/515/506/516/507/517/508/518/509 Homeplug
10
Page 11

With the LN-509 you have the possibility to connect 3 devices simultaneously.
Your network is now fully functional. Follow the next steps to secure your
network.
Full manual Sitecom LN-505/515/506/516/507/517/508/518/509 Homeplug
11
Page 12

Install the software
Note: If you use this manual to add a single Homeplug to an already existing
Homeplug network, please follow the steps as described in Appendix A.
Install the software only on the PC which is connected to the Master Homeplug.
Insert the CD in the computer.
Windows 7/Vista will prompt you to run CDMenu4.exe.
The CD menu will start choose ‘Install utility’.
Full manual Sitecom LN-505/515/506/516/507/517/508/518/509 Homeplug
12
Page 13

Windows Vista/7 will ask permission to start the installation which looks similar to
this image.
Choose your language for installation.
The WinPcap Installer will start, click Next.
Click Next.
Full manual Sitecom LN-505/515/506/516/507/517/508/518/509 Homeplug
13
Page 14

Click, I agree.
Click Install.
Click Finish.
Full manual Sitecom LN-505/515/506/516/507/517/508/518/509 Homeplug
14
Page 15

The Homeplug Utility setup will start, click Next.
Choose an installation folder or keep the default folder (recommended) and click
Next.
Click Next.
Full manual Sitecom LN-505/515/506/516/507/517/508/518/509 Homeplug
15
Page 16

The software will be installed on your computer.
Click Close to finish the installation.
Full manual Sitecom LN-505/515/506/516/507/517/508/518/509 Homeplug
16
Page 17

6. Configure the network
Start the software on the PC connected to the Master Homeplug by double
clicking the Sitecom icon.
Select the Homeplug in the ‘Powerline devices detected’ list and click ‘Enter
Password’.
Full manual Sitecom LN-505/515/506/516/507/517/508/518/509 Homeplug
17
Page 18

A popup window appears. Please fill in the DAK code from the slave label in the
password field and click ‘OK’.
Select the ‘Privacy’ tab in the Homeplug utility. Fill in a chosen network name in
the ‘Private Network Name’ field. Click ‘Set all devices’.
Full manual Sitecom LN-505/515/506/516/507/517/508/518/509 Homeplug
18
Page 19

A popup appears to inform you the network name has been changed.
Your network type now has changed to ‘private’. Click ‘Close’
Full manual Sitecom LN-505/515/506/516/507/517/508/518/509 Homeplug
19
Page 20

7. Setting security with the push button method
Instead of using the utility, you might also set security via the ‘Security’ (LN505/515) or ‘NMK’ (LN-506/507/508/516/517/518/509) button on the Homeplug.
This method is not recommended. We strongly advise you to use the supplied
software to secure your network.
8.1 Create a network
1. Press the pushbutton on the ‘Master’ for 5~8 seconds.
2. Within 1 minute, press the pushbutton on the ‘Slave’ for 5~8 seconds.
3. Wait for the connection to complete.
8.2 Add an extra Homeplug
If you have 2 Sitecom Homeplugs in an already secured network and you want a
new device (“Slave”) to join the network, please following these steps below:
1. Press the pushbutton on the ‘Slave’ for 5~8 seconds.
2. Within 1 minute, press the pushbutton on any network device for 5~8 seconds,
making it the ‘Master’.
3. Wait for the connection to complete.
Full manual Sitecom LN-505/515/506/516/507/517/508/518/509 Homeplug
20
Page 21

Appendix A: Add an extra Homeplug to an existing
network
1. Install the Hardware
Plug the Ethernet cable in the Ethernet port.
Plug the cable into the device you want to connect to your network.
Your network is now fully functional. Follow the next steps to secure your
network.
Full manual Sitecom LN-505/515/506/516/507/517/508/518/509 Homeplug
21
Page 22

2. Add a Slave Homeplug to a secured network
Start the software on the PC connected to the Master Homeplug.
Click ‘Add remote’
Full manual Sitecom LN-505/515/506/516/507/517/508/518/509 Homeplug
22
Page 23

A popup window appears. Please fill in the DAK code from the slave label in the
password field and click ‘OK’.
Fill in the password from your
existing network. If you do not
remember this password you can
find it under the privacy tab.
Full manual Sitecom LN-505/515/506/516/507/517/508/518/509 Homeplug
23
Page 24

3. Configure your secured network
Select the Homeplug you have added in the previous step from the ‘Powerline
devices detected’ list and click ‘Enter Password’.
Full manual Sitecom LN-505/515/506/516/507/517/508/518/509 Homeplug
24
Page 25

A popup window appears. Please fill in the DAK code from the slave label in the
password field and click ‘OK’.
Select the ‘Privacy’ tab in the Homeplug utility. Fill in a chosen network name in
the ‘Private Network Name’ field. Click ‘Set all devices’.
Full manual Sitecom LN-505/515/506/516/507/517/508/518/509 Homeplug
25
Page 26

A popup appears to inform you the network name has been changed.
Your network type now has changed to ‘private’. Click ‘Close’
Revision 1.0
© Sitecom Europe BV 2011
Note: All the information contained in this manual was correct at the time of
publication.
However, as our engineers are always updating and improving the product, your
device may have a slightly different appearance or modified functionality than
presented in this manual.
Full manual Sitecom LN-505/515/506/516/507/517/508/518/509 Homeplug
26
 Loading...