

Page 1

IT’S EASY
INTERNET
TO GO ON
Quick Installation Guide
Broadband Router DC-202v4
Page 2

his guide only covers the most common situations. See the complete User’s Manual on the CD -ROM for
advanced con guration
Requirements
• Cable modem or DSL/ADSL modem.
• Standard 10/100BaseT (UTP) network cables with R J45 connectors.
• PC with an installed net work adapter.
• OS with TCP/IP net work protocol support.
1 Setting up the broadband router
1.1 Physical installation
1 For the installation of the Broadband router it is assumed that you have at least one PC with a working
broadband Internet connection. It is also assumed that the modem is con gured in accordance with the
requirements of your ISP and of the modem manufacturer. If not, consult your ISP support literature.
2 Before you be gin, ensure that the power lead is not connected to either the broadband router or the cable
modem/DSL modem. Leave your cable modem/DSL modem plugged in (telephone line or cable input).
Installation - DC-202
3 Connect the L AN cables: For the DC -202, use standard LAN cables to connect the PCs to the LAN ports
(hub) on the broadband router. If necessary connect the “Uplink” por t to a standard port on another hub.
You must use a standard LAN cable for this.
Note: If you use the “Uplink” port, then port 4 CANNOT be used.
4 Connect your cable modem/DSL modem to the WAN -port on the broadband router. Use the cable
supplied with your cable modem/DSL modem. If no cable was supplied with your modem, use a standard
network cable.
5 Switch on the cable modem/DSL modem.
6 Connect the power supply adapter to the broadband router. Use only the adapter supplied with the router.
7 Check the LEDs
• The Power LED must b e ON.
• The WAN LED must be ON.
• For each active LAN connection, the associated LAN Link/Act LED must be ON.
2
Page 3
2 PC Setup
2.1 TCP/IP Setup
2.1.1a Windows 98/ME
• Right click the Network Neighbourhood icon on the desktop and click Properties. The following window
will be displayed:
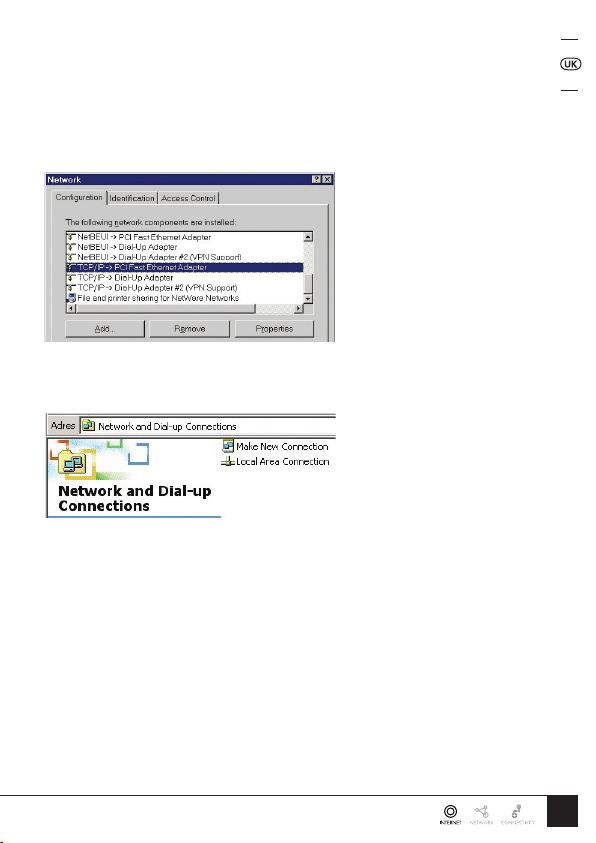
2.1.1b Windows 2000/XP
• Right click the My Network Places icon on the desktop and click Properties. The following window will be
displayed:
• Right click the Local Area Connection of the correct net work card, and then choose Properties.
2.1.2 Install TCP/IP
If the list that appears on screen does not include a line such as the one that has been selected above (“TCP/IP
-> network card” ), then follow the steps indicated below to add this line:
• Click on the button “Add”
• Double -click on “Protocol”
• Select “Microsoft ” and thereafter “TCP/IP”
• Click on “OK”
• Wait a few seconds, so that TCP/IP can be added. Thereafter, click “OK” to leave the network properties
screen. Restart your PC.
3
Page 4

2.1.3 Congure TCP/IP
Select the line “TCP/IP -> Network card” as shown above. Click on the button Properties to obtain a window
similar to the following:
Check whether the setting “Obtain an IP address automatically” has been selected, as is illustrated above. The
DHCP ser ver in the broadband router will now assign an IP address to the PC.
Restart your PC, even if you have not made any changes.
2.2 Congure Internet access method
• Windows 98/ME/2000
• In the Taskbar, click on the Star t button and select Settings - Control Panel - Internet options.
• Select the tab Connections and click on the button Settings.
• Select “I want to congure my Internet connection manually” or “I want to make a connection via a LAN
network” and click on “Next >”.
• Select “I want to connect via a LAN network” and click on “Next >”.
• Check carefully that all of the checkboxes in the screen Internet conguration for a LAN have not been
checked.
• Continue with the steps in the wizard, until the task is completed.
• Windows XP
• In the Taskbar, click on the Star t button and select - Settings - Control Panel - Internet options.
• Select the tab Connections and click the Setup... button.
• When the New Connection Wizard starts, click on Next.
• Select Connect to internet and click on Next.
• Select Set up my connection manually and click on Next.
• Select Connect using a broadband connection that is always on and click on Next.
• Click on Finish to close the Wizard.
• In the Taskbar, click on the Star t button and select - Settings - Control Panel - Internet options.
• Select the Connections tab and click on the L AN Settings button.
• Check carefully that none of the boxes in the Local Area Net work (LAN) Settings window are checked.
4
Page 5

2.3 Software rewalls
Before conguring your router please take note that sof tware rewalls such as Norton Personal Firewall (tm),
ZoneLabs’ ZoneAlarm(tm), etc. can make it very dif cult (if not impossible) to set up your router if the rewall
is congured incorrectly.
Please make sure that the router’s subnet (IP- range: 192.168.2.x, subnetmask: 255.255.255.0) is a trusted
network and no restrictions are applied to it. If you are unsure how to congure your rewall either contact the
rewall manufacturer or (temporarily) remove the rewall from your system(s).
Note: Shutting down or disabling your rewall is not advisable because some rewall programs will still
block network trafc even though they are disabled.
Please continue to chapter 3.
5
Page 6

3 Broadband router setup
1 Ensure that you have followed the steps for setting up on your PC as described in chapter 2.
Do not forge t to restart your PC afte r you have nishe d.
2 Now start your web browser and open the following page: http://192.168.2.1
3 The router Status window will now be displayed.
4 Click Setup. You will be prompted to enter your password (if you have set one, other wise leave this eld
empty). Click Submit to continue.
5 The Setup wizard will now be displayed; check that the modem is connected and click Next.
6
Page 7

6 Select your country from the Country list.
7 Select your internet provider from the Service menu. If your provider does not app ear in the list, consult the
full manual located on the CD -ROM to nd out how to congure the router for your connection. Click Next.
8 Depending on the chosen provider, you may need to enter your user name and password and MAC
address or hostname in the following window. Click Next.
7
Page 8

9 Click Finish to complete the conguration. The router will now restart and tr y to connect to the Internet.
Please wait 25 seconds to allow the router to restart. You will be automatically transferred to the status
window.
10. The conguration is now completed.
8
 Loading...