

Page 1
使用說明書
INSTRUCTION BOOK
D007S
Page 2

Page 3

Introduction
索引
使用前安全注意事項 SAFETY INSTRUCTIONS 1
各部位名稱
規格 SPECIFICATION 6
安裝 INSTALLATION 8
潤滑 LUBRICATION 9
穿線方法 WAY OF THREADING 12
控線調整 ADJUST THREAD 13
各部位調整說明 ILLUSTRATION OF ADJUSTING EACH PARTS 18
換針方法 WAY OF CHANGING NEEDLE 24
規格件的更換及調節 REPLACEMENT AND ADJUSTMENT OF THE PARTS 25
桌板圖 TABLE CUT-OUT 35
INDEX
NAME OF EACH PARTS
頁 /PAGE
5
Page 4

使用前安全注意事項 SAFETY INSTRUCTIONS
1. 為了使用的安全
為了工業用縫紉機以及裝置使用上的安
全,請注意下列事項。
1-1 用途與目的
此工業用縫紉機是為了提昇縫製作業的生
產性為目的而設計,請勿使用在其它的用
途與目的。而所安裝的驅動裝置的安全措
施,未獲得確認確實執行之前,請勿使用
此針車。
1-2 在使用之前
在使用針車之前,應熟讀各相關使用說明
書,按照使用說明書來正確使用,並且也
應熟讀裝配的驅動裝置的使用說明書。
1-3 使用環境
在下列的環境之下請勿使用:
˙
對於針車的性能會有不良影響的環境
溫度與濕度的不良場所。
˙
屋外或受到日光直射的場所。
˙
在粉塵與腐蝕性氣體與可燃性氣體等
的環境中。
˙
電壓變動而不穩定,或是在超過規格
電壓的 ±10% 的場所。
˙
在不能達到使用的馬達的規格之必要
電源容量的場所。
˙
在會受到輸出功率較大的高周波發信
機或是高周波熔接機的周邊等,發生
強力電波及磁場的場所。
1.For your safety
To ensure your safety while using industrial
sewing machine and devices, please follow
the safety instructions below.
1-1 Usage and purpose
The sewing machine is designed to improve
productive efciency of sewing work. Do not
use for other usage and purpose. Do not
use the sewing machine before the installed
drive device’s safety measures have been
conrmed being conducted.
1-2 Before use
Before using the machine, you should read
the instruction manuals thoroughly and
follow it. Hence, read the installed drive
device instruction thoroughly, too.
1-3 Working environment
Do not work in the following environment:
˙
The environment which its temperature
and humidity will cause bad inuence to
the machine.
˙
Outdoors or the place which the machine
may exposed to sunlight directly.
˙
Environment contains dust, corrosive
gases or ammable gases, etc.
˙
Place which voltage uctuation causes
unstable, or voltage exceeds ±10% of
specication.
˙
Place where power capacity necessary for
the used motor specications cannot be
secured.
˙
Place where strong electric or magnetic
eld are generated such as surrounding at
large-output high frequency transmitters
or high frequency welding machines.
1-4 開箱與搬運
(1
) 由上開始按照順序開箱。
(2) 把針車機頭從襯墊材料搬出的時候,
絕對不要拉抬車針附近或過線相關零
件。
(3) 搬運針車頭部的時候,應和助手兩人
共同作業。
(4) 搬運車台移動的時候,注意不要有過
度的撞擊或震動。
P1
1-4 Unpacking and transportation
(1)Unpacking boxes from top and follows
the sequences.
(2)Never pull or lift the parts near the
needle or threading parts while
removing machine head from the
washer.
(3)Find an assistant when carrying
machine head.
(4)Be careful do not have overly impact or
shock while moving the machine.
Page 5

Introduction
2. 安裝與準備
2-1 教育與訓練
裝置針車的操作人員,以及從事指導保全
維修的幹部,必須要有正確知識和操作的
技能。管理階層應在事前對於作業人員以
及幹部的教育與訓練計畫,做好完整的籌
劃以及執行。
2-2 教育與訓練
(1) 採用能夠承受針車的自重,以及運轉
時的反彈應力強度的檯板與腳架。
(2) 應充分考量配置針車及作業區域的照
明,以供能夠順利的從事作業的環境。
(3) 配置裝置的針車在配裝控制箱以及相
關件的時候,要注意到與作業人員作
業姿勢的關係。
(4) 安裝馬達時,應依照馬達廠商所提供
的使用說明書正確安裝。
2.Installation and preparation
2-1 Instruction and training
Operators who assemble the sewing
machine and instructors who responsible
for repair and maintenance, need to have
correct knowledge and operation skills.
The managers should prepare and execute
the instructions and training plan for the
operators and supervisors beforehand.
2-2 Sewing table and motor
(1)Apply the table and foot stool which can
withstand machine’s weight and intensity
of rebound stress while operating.
(2)Should consider sewing machine working
area’s lighting to provide the environment
which operators could work smoothly.
(3)When installing the control box and the
related parts of the sewing machine, pay
attention the posture about the workers.
(4)Please follow the instruction from motor
manufacturer to install the motor.
2-3 電路配線
(1) 在裝設電路完成之前,請勿接上電源
接頭。
(2) 連接針車頭部和馬達以及電器裝置的
電線接頭,務必確實固定。
(3) 對於連接的電線電纜,勿施加超負荷
的壓力。
(4) 在會有動作的機械部份之附近,對於
電線電纜的配置,應考安全距離,不
可使其接觸或磨擦。
(5) 在針車的頭部指定部位確實接妥接地
線。
2-4 在針車運轉
之前的注意事項
(1) 在注入潤滑油、矽油、黃油的時候,
注意不要接觸到眼睛皮膚等。在保管
方面,要避開幼童所能取到的位置。
(2) 針車務必先行注油之後才運轉。
(3) 要切入電源的時候,勿把手伸入車針
下方附近及有動作的機械部位。
2-3 Wiring
(1)Before circuit assembly finished, do not
connect the plug for power supply.
(2)Must fix the wire of sewing machine
head, motor, and electric device
securely.
(3)For connected electric cable, do not put
excessive force on it.
(4)For electric cord equipment, should
keep the safe distance away from
moveable mechanic parts to avoid
connect or friction.
(5)Connect the ground wire on assigned
position of sewing machine head
securely.
2-4 Instructions before operation
(1)When pour into lubricant, silicone oil,
and grease, be careful do not attach
on your eyes and skin. And keep these
where children cannot reach.
(2)Before operation, the sewing machine
must be lubricated.
(3)Do not put your hand under the needle
or near the moving parts of the machine
when turn the power on.
P2
Page 6

(4) 起初開始運轉針車的時候,需要確認
針車飛輪的旋轉方向,和飛輪的迴轉
標示是否一致。
(4)When start to operate the sewing
machine at first, make sure the rotating
direction of pulley tallies with rotatingdirection mark.
2-5 針車運轉中的注意事項
(1) 務必在裝妥馬達蓋、護指、護目等的
安全保護狀態下運轉針車。
(2) 針車運轉中,在車針下方附近以及有
動作的機械部位附近,勿使手、頭髮
接近,更不可把物品放置在旁。
(3) 附有切刀裝置的針車,在針車運轉中
絕不可把手指伸入切刀部位。
(4) 在不使用針車或作業人員離開針車時,
務必關閉電源。
(5) 在使用中發現錯誤動作、異常的聲音
或異味的時候,應即刻關閉電源。
2-6 拆卸
(1) 拆卸任何零件或更換的時候,以及進
行調整作業的時候,務必先關閉電源。
(2) 要拔掉插頭的時候,不可直接拉扯電
線、電纜。
(3) 控制箱內配有高壓負荷,所以在關閉
電源之後要等待 5 分鐘以上才可以開
蓋。
2-5 Instructions while operating
(1)Be sure to operate the sewing machine
with the safeguards such as motor
cover, finger guard, and eyes guard,
etc.
(2)During operation, do not let your hands
or hair near the machine; moreover, put
an object beside under the needle or
near the moving parts of machine.
(3)Never puts your hand close to the
knives part during operation which
sewing machine has trimming device.
(4)Must turn off the power without
operators or using the sewing machine.
(5)If the machine malfunctions, make
abnormal sound or smelling unusual,
turn off power immediately.
2-6 Removal
(1)Must turn off power first if disassembling
or removing any parts, or doing
adjustment.
(2)To pull the plug, do not pull or drag its
cable or wire.
(3)A high voltage is applied inside the
control box, do not open the cover until
wait for five minutes.
2-7 保全、檢查與維修
(1) 保全、檢查修理作業的時候,應依照
使用說明書來作業。
(2) 執行保全、檢查及維修的作業,應由
經過特別訓練的人員來操
(3) 在執行保全、檢查及維修的作業時,
務必先關閉電源,在確認針車與馬達
完全停止的時候才開始作業。
(4) 請客戶勿根據獨自判斷來自行改造針
車。
(5) 避免用指定以外的保全維修零件。
P3
作。
2-7 Maintenance, inspection, and repair
(1)Follow the instruction manual to do
maintenance, inspection, and repair.
(2)Entrust the specially trained workers to
do maintenance, inspection, and repair.
(3)Must turn off the power first and make
sure the motor and sewing machine
are completely stop, then do the
maintenance, inspection, and repair
work.
(4)Do not transform the sewing machine
by customer’s judgment.
(5)Use original parts for maintenance and
repair.
Page 7
Introduction
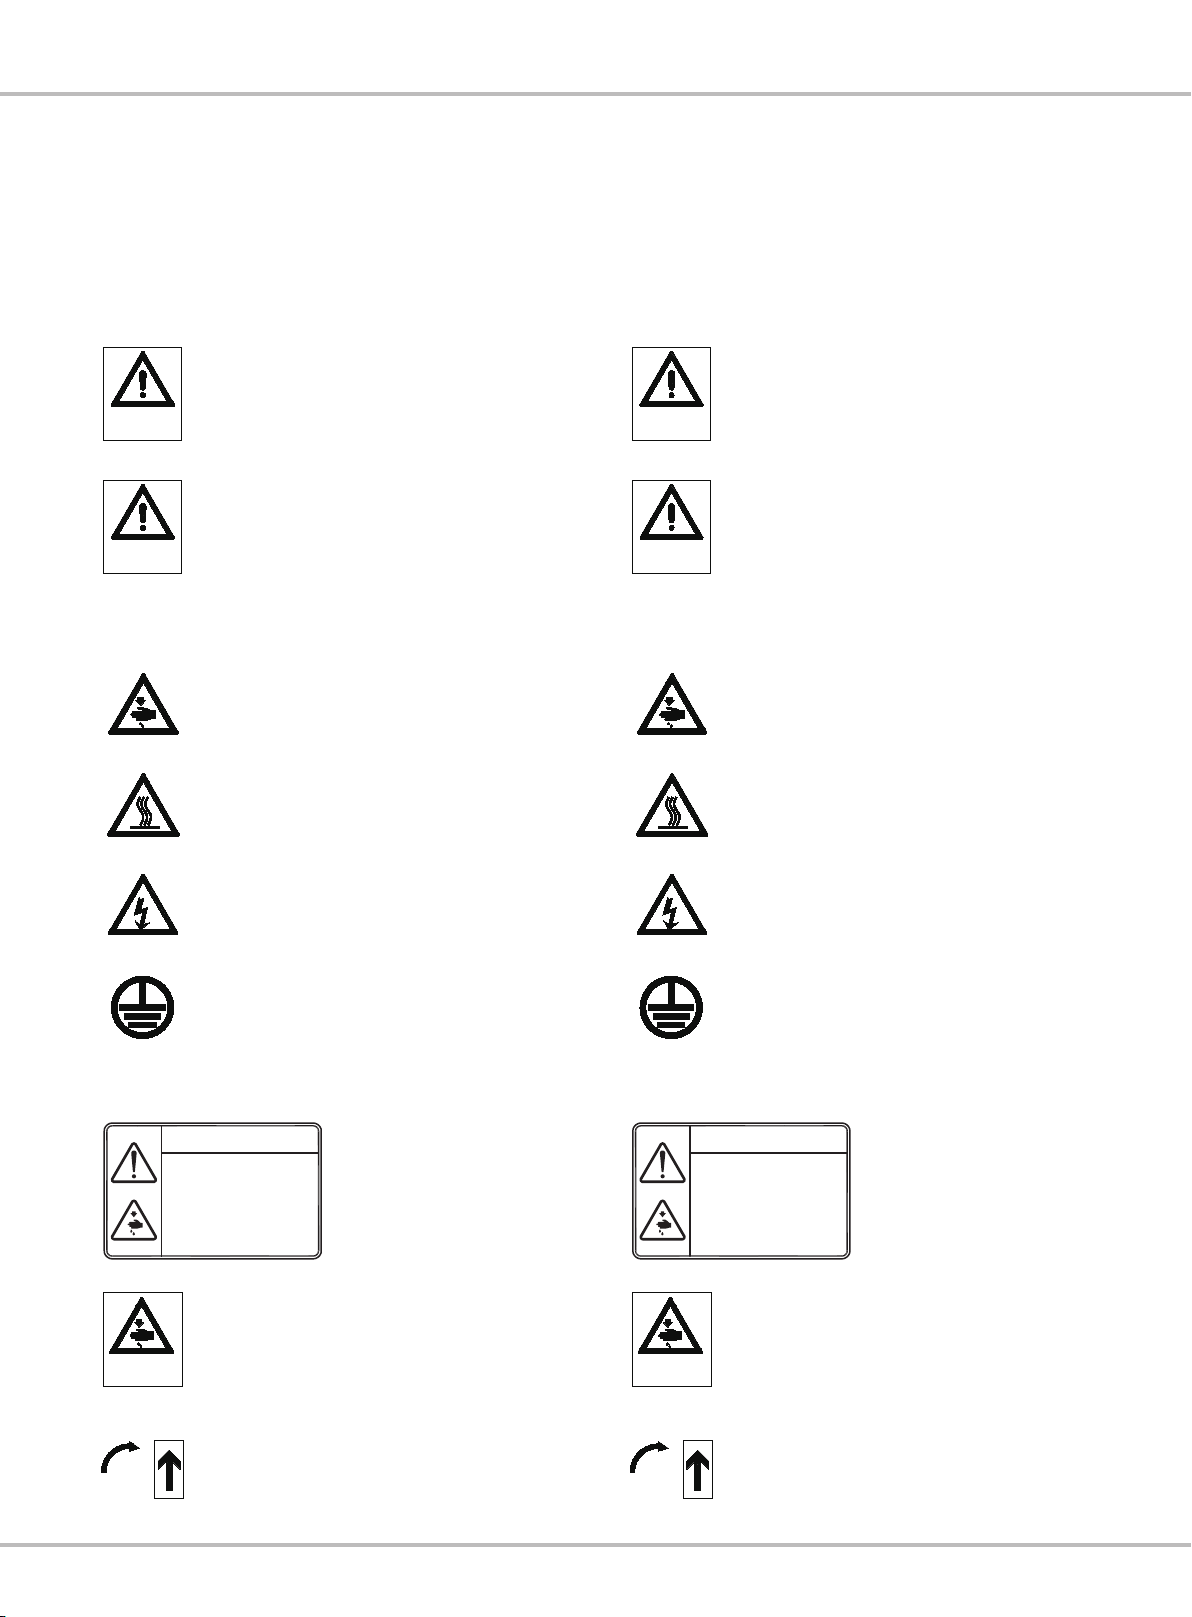
3. 警告標誌及警告圖示
為了防止對用戶造成危害,本使用說明書
上,記載有下列的警告標誌及圖示。
3-1 危險水準的說明
如果忽視此標記而運行了錯誤的機
械操作,保養時肯定會引起當事者
危險
Dangerous
或第三者人員重傷或死亡。
如果忽視此標記而運行了錯誤的機
械操作,保養時有可能會引起當事
注意
Caution
者或第三者人員受傷及造成設備損
壞。
3-2 警告圖案及標誌的說明
運動部位,謹防工傷事故。
3.Caution signs and alert pictorial
markings
In order to prevent any danger to
customers, this instruction manual
contains following alert pictorial markings.
3-1 Illustration of caution signs
It must cause serious injury or
death to operator or others, if do
危險
Dangerous
not pay attention to the sign and do
the wrong operation.
It must cause injury to operator or
others or machine damage, if do
注意
Caution
3-2 Illustration of alert pictorial markings
not pay attention to the sign and do
the wrong operation.
Moving part. In case of industrial
accident.
高溫部位,謹防燙傷事故。
高壓部位,謹防觸電事故。
地線的接線表示。
3-3 貼附在針車的警告標示
CAUTION
機械作動部份請注意裝上
保護裝置
穿線、換線、 調整、清潔
時請注意關閉電源.
Moving parts may cause in jury.
Operate with safety devices.
Turn off main switch before
threading, changing bobbin and
needle, cleaning etc.
表示禁止 拆卸安全 護
具,和禁 止在 投入 電
源中,另 做縫 製以 外
的作業。
貼附在安全護具,但是為了作業性
的考量,護指和護目並沒有貼附,
注意傷害
CAUTION
但是必要在指定的部位安裝護具備
用。
High-temperature part. In case of
burn accident.
High-voltage part. In case of
electric shock.
Indicated earth wire wiring.
3-3 Warning label on sewing machine
CAUTION
機械作動部份請注意裝上
保護裝置
穿線、換線、 調整、清潔
時請注意關閉電源.
Moving parts may cause in jury.
Operate with safety devices.
Turn off main switch before
threading, changing bobbin and
needle, cleaning etc.
Forbid to remove
safeguards, and
works except for
sewing works while
power switch on.
The label is affixed on safeguards.
Considering the operation, it is not
注意傷害
CAUTION
affixed on the finger guard and
eyes guard.
請確認針車飛輪的迴轉方向和標示
指向要一致。
Make sure pulley of sewing
machine rotating direction is the
same as the sign.
P4
Page 8
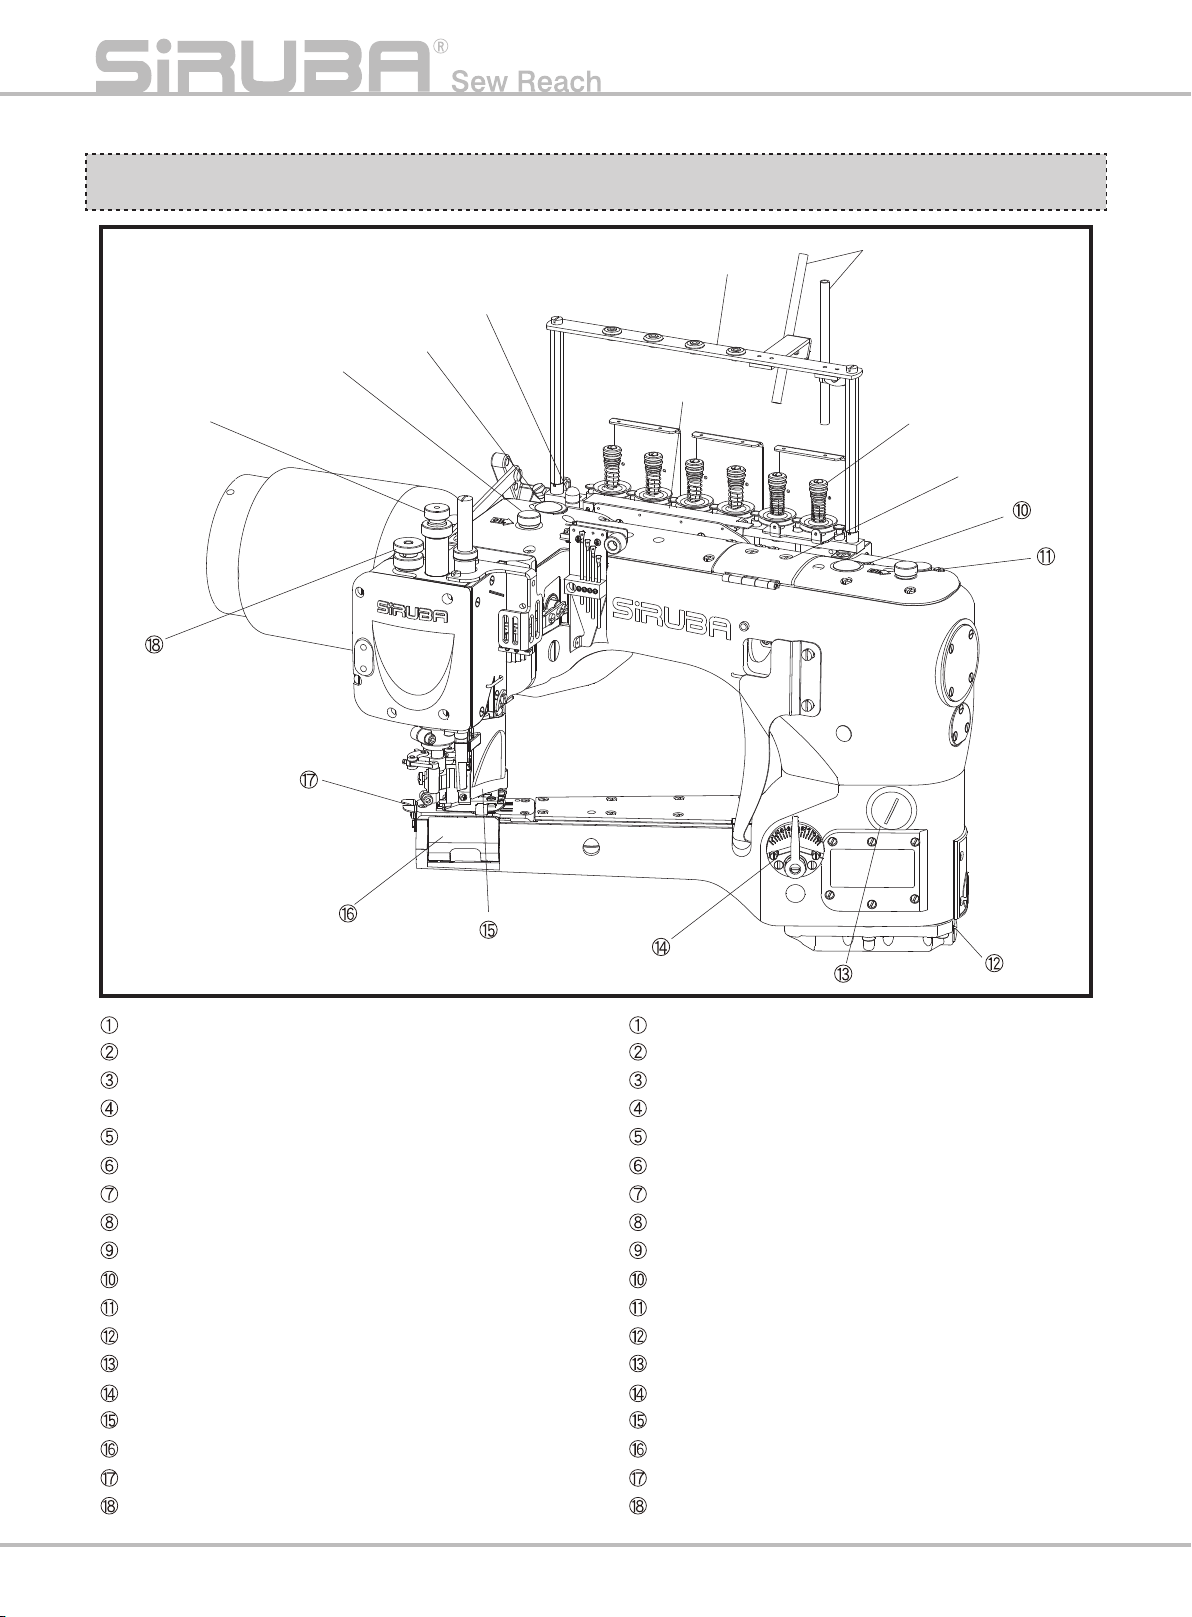
各部位名稱 NAME OF EACH PARTS
①
⑥
⑦
④
③
②
⑤
⑧
⑨
調節螺絲(抬壓腳)
栓螺絲(潤滑)
上油鏡
油錶
矽油壺
線架板
過線架
螺帽(張力調整)
上蓋(中)
上油鏡
栓螺絲(潤滑)
排油螺絲
栓螺絲(調節差動勾齒)
差動送料具操作桿
切角防護片
下勾針蓋
割刀固定片
調節螺帽 ( 壓腳 )
P5
Adjust screw(Presser foot lift)
Plug screw(lubrication)
Oil sight top window
Oil sight gauge
SP device
Thread guide plate
Thread pipe
Nut(Thread tension)
Top cover(middle)
Oil sight top window
Plug screw(lubrication)
Drain hole screw
Plug screw(Adjust differential feed dog)
Differential feed operating lever
Chip guard
Looper cover
Chain-off cutting knife
Adjust nut(Presser foot)
Page 9
規格 SPECIFICATION
Introduction
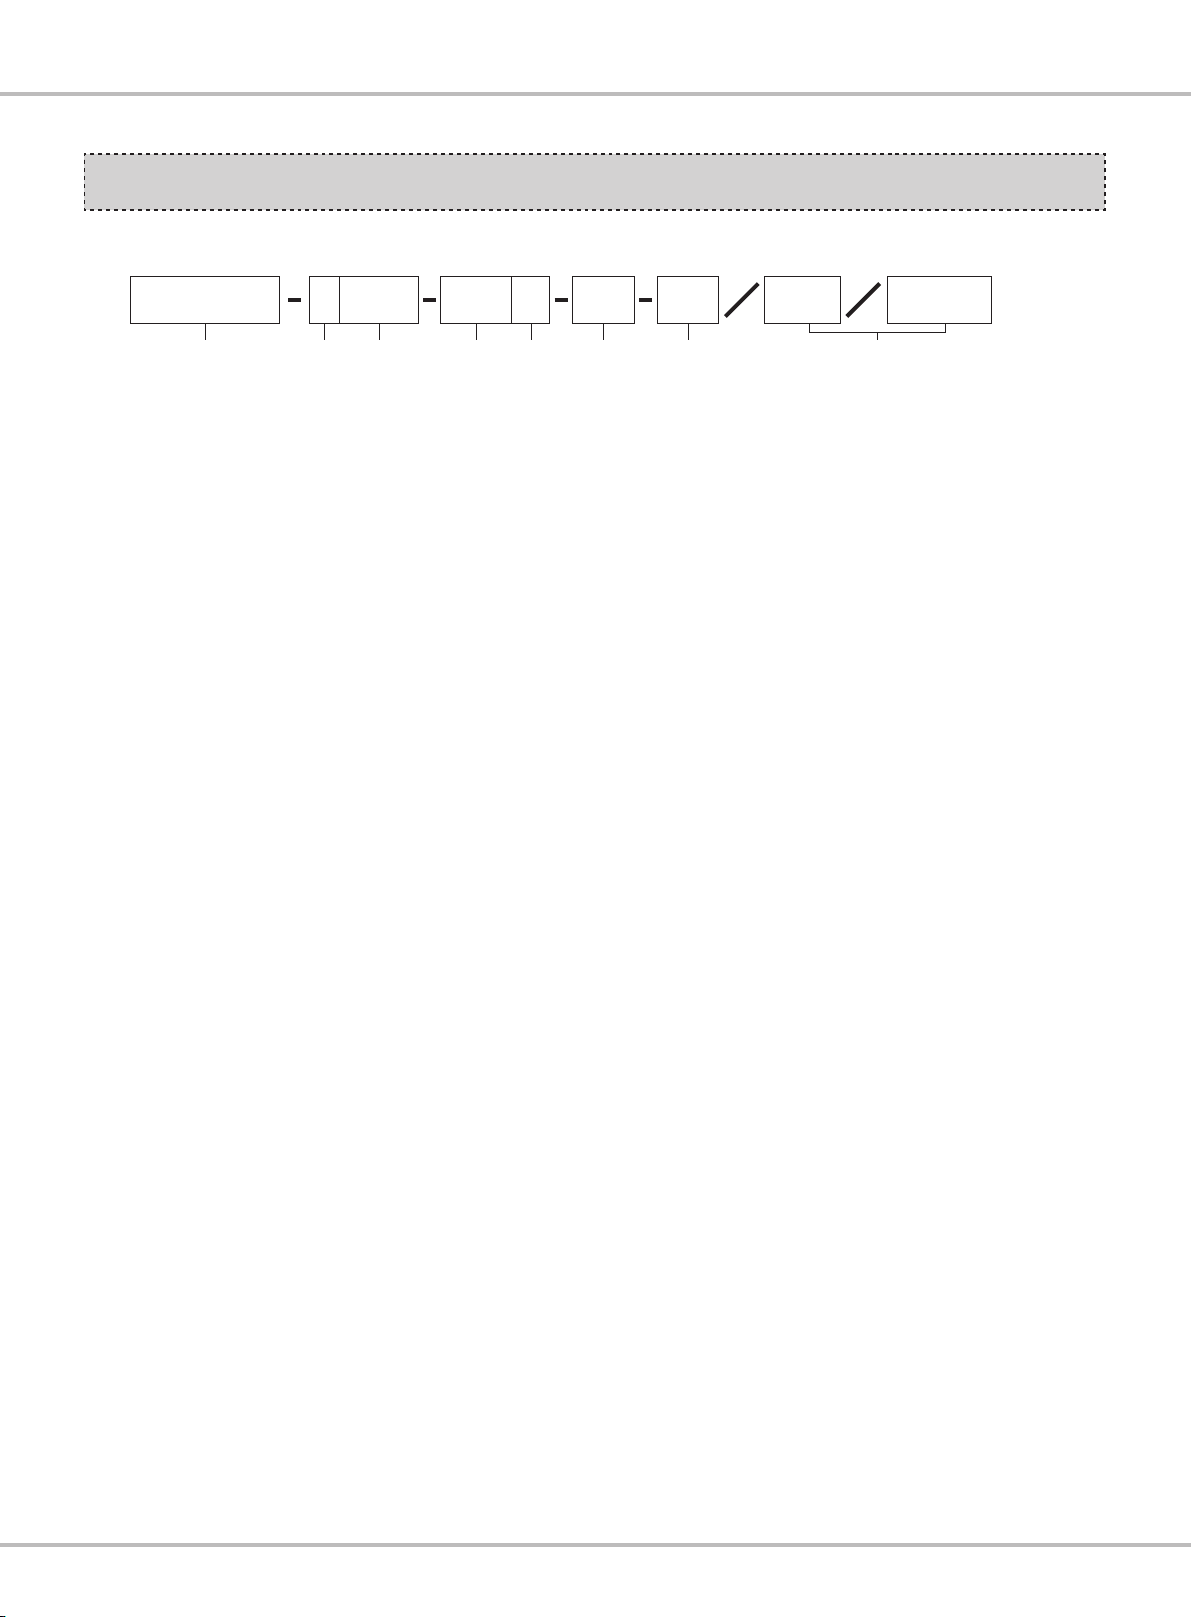
1. 型號分類表示 :
1.Model classication
D007S 524 R02 T1 ET
(1) (3)(2) (4) (5) (6) (7)
(1) D007S:表示曲臂式鏈縫機
(2) 針數: 4:4 針、5:5 針
(3) 針距:
48:4.8 ㎜、52:5.2 ㎜
60:6.0 ㎜、64:6.4 ㎜
70:7.0 ㎜、80:8.0 ㎜
(4) 切刀:
01:單切、02:雙切
(5) 特殊規格:
R:弧狀車縫
H:厚類車縫(包縫、過目車縫)
RH:弧狀厚類車縫
註:R(弧狀車縫)、H(厚類車縫)皆不
適用於褲襪、潛水衣、織帶系列
(6) 車縫功能:
S:褲襪
DS:潛水衣
T1:織帶(女用內衣褲)
T2:貼條(男用內衣褲)
4L10:四溝槽厚類包縫過骨
( 長壓腳 / 壓腳段差 1mm)
4L15:四溝槽厚類包縫過骨
( 長壓腳 / 壓腳段差
4L20:四溝槽厚類包縫過骨
( 長壓腳 / 壓腳段差 2mm)
(7) ET:電動抬壓腳 AT:氣動抬壓腳
(8) 選配件
TT:送帶機
AW1:外接式吸布屑組
AW2:密封式吸布屑組
AK:氣動切線裝置
AW7:吸布屑組
1.5mm)
(1)D007S:Feed-off the arm chainstitch
(2)Number of needles: 4 needles、5 needles
(3)Needle gauge:
48:4.8 ㎜、52:5.2 ㎜
60:6.0 ㎜、64:6.4 ㎜
70:7.0 ㎜、80:8.0 ㎜
(4)Trimmer:
(5)Special specification:
(6)Seaming function:
:
TT AW1
(8)
sewing machine
One side trimming、Both side trimming
R:
Curved seaming
H:Heavy-weight material seaming.
(overlock seam, crotch seam with
folded/ bound tape)
RH:Curved seaming for heavy-weight
material
Note: Both R (Curved seaming) and H
(Heavy-weight material seaming)
can’t apply to panty hose, diving suit
and woven tape series.
S:For panty hose
DS:For diving suit
T1:For attaching woven tape
(Women underwear)
T2:For attaching folded tape
(Men underwear)
4L10:Four-grooved seam of heavy-weight
fabrics covering (long presser foot/
presser foot lag 1mm)
4L15:four-grooved seam of heavy-weight
fabrics covering (long presser foot/
presser foot lag 1.5mm)
4L20:four-grooved seam of heavy-weight
fabrics covering (long presser foot/
presser foot lag 2mm)
(7)ET:Electric Lifter AT:Pneumatic Lifter
(8)Attachment:
TT:Tape feeding devic
AW1:The external waste suction set
AW2:The sealed waste suction set
AK:Pneumatic trimming device
AW7:Waste suction set
e
P6
Page 10
規格說明:( 表 1)
Illustration of specication:(
Table1
)
體積
Dimension
圓週
Circumference
工作空間
Working space
重量
Weight
車縫速度
Sewing speed
縫距
Sewing distance
針型
Needle type
抬壓腳
Presser foot lift
長 420mm x 寬 300mm x 高 410mm
Length 420mm x width 300mm x height 410mm
針棒下線最小圓週 148mm
Needle drop minimum circumference148mm
圓週 210mm
Circumference 210mm
23 公斤(頭部)
23kg(Head)
最高 4200 R.P.M. ; 普通 2800 R.P.M.
Highest 4200 R.P.M. ; Normal 2800 R.P.M.
1.6-2.5mm 每英吋 10-16 針;每 30mm 12-19 針
1.6-2.5mm Each inches 10-16 stitches;30mm 12-19 s
車 針:Organ FLX118GCS ; Groz-Beckert UY118GKS
定位針:Organ FLG-1 , FLF-8;Groz-Beckert 36211 , 36211A
Sewing needle:Organ FLX118GCS ;Groz-Beckert UY118GKS
Retainer needle:Organ FLG-1 , FLF-8;Groz-Beckert 36211 , 36211A
單切:最大 8mm ; 雙切:最大 6mm
Cut one piece:Max. 8mm ;Cut two pieces:Max. 6mm
titches
送料方式
Feed way
差動比
Ratio
差動送料規則
Differential feed
regulation
切布刀
Knife
潤滑
Lubrication
潤滑油
Lubricant
油槽容量
Capacity of oil reservoir
桿槓原理
Law of the lever
一般差動比 Normal ratio:1.0:1.5
反差動比 Reserve ratio
Normal ratio:1.0:1.5
Reserve ratio:1.0:0.7
轉盤
By dial
特殊鋼材製造
Made of special steel
自動齒輪幫浦
Automatic by gear pump
TELLUS 32
框:約 100cc ; 筒:約 100cc
Flame:About 100cc;Cylinder:About 100cc
:1.0:0.7
P7
表 1 / Table1
Page 11
安裝 INSTALLATION
Introduction
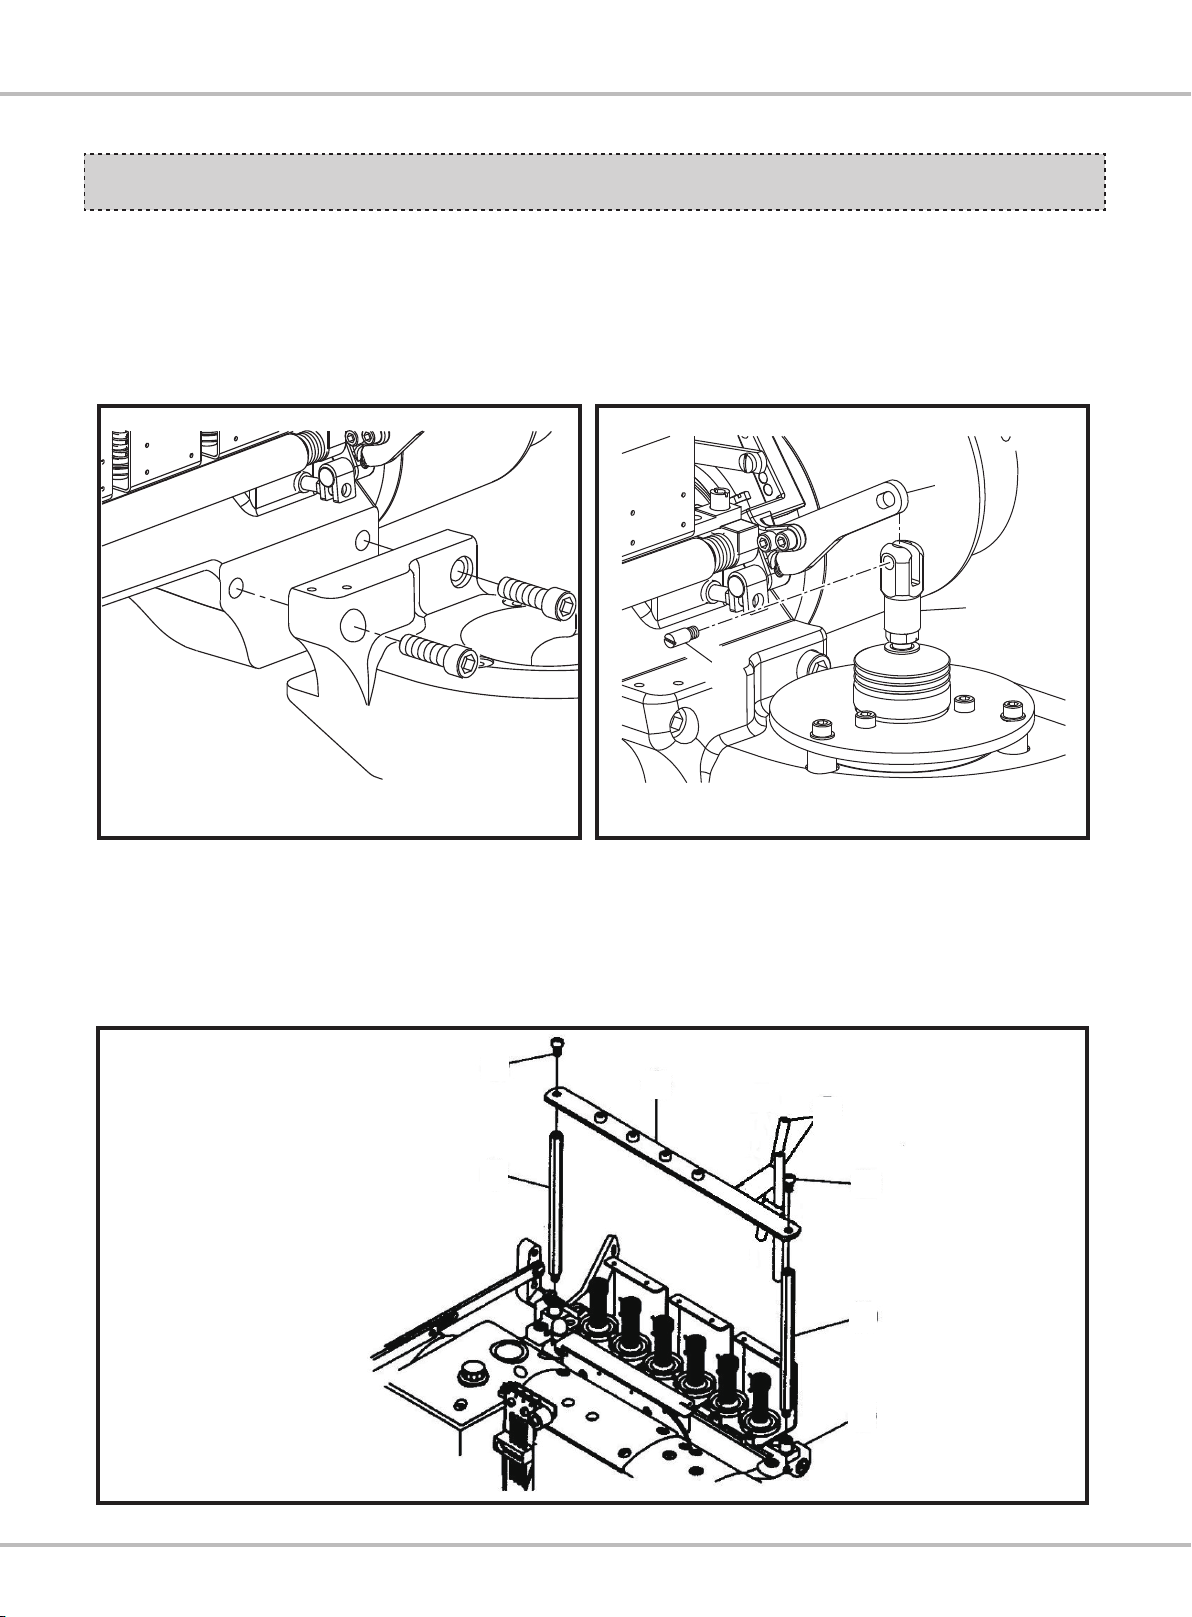
1. 安裝機器須用兩個螺絲將機器固定於支架
上。(圖 1)
2. 將抬壓腳連桿①以螺絲②固定於抬壓腳驅動
裝置的 Y 接頭③上。(圖 2)
圖 1/ Fig.1 圖 2/ Fig.2
1.To install the machine, you need to use two
screws to let the machine fixed on the holder.
(Fig. 1 )
2.Use screw ② to let presser foot lift lever ①
fixed on the Y joint ③ of presser foot lift drive
device.(Fig. 2 )
1
①
3
③
2
②
3. 將線架支柱③裝在線架固定座⑦,再將過線
架④用螺絲⑤鎖在線架支柱③,調整過線桿
⑥,使穿線平順,不致於線會糾結在一起。
(圖 3)
⑤
③
3.Let thread guide holder ③ fix on the thread
gu
ide seat ⑦, then use screw ⑤ to fix thread
guide plate ④ on thread guide holder ③.
Adjust thread pipe ⑥ to let thread through
smoothly, without intertwining. (Fig. 3 )
④
⑥
⑤
③
⑦
圖 3/ Fig.3
P8
Page 12
潤滑 LUBRICATION
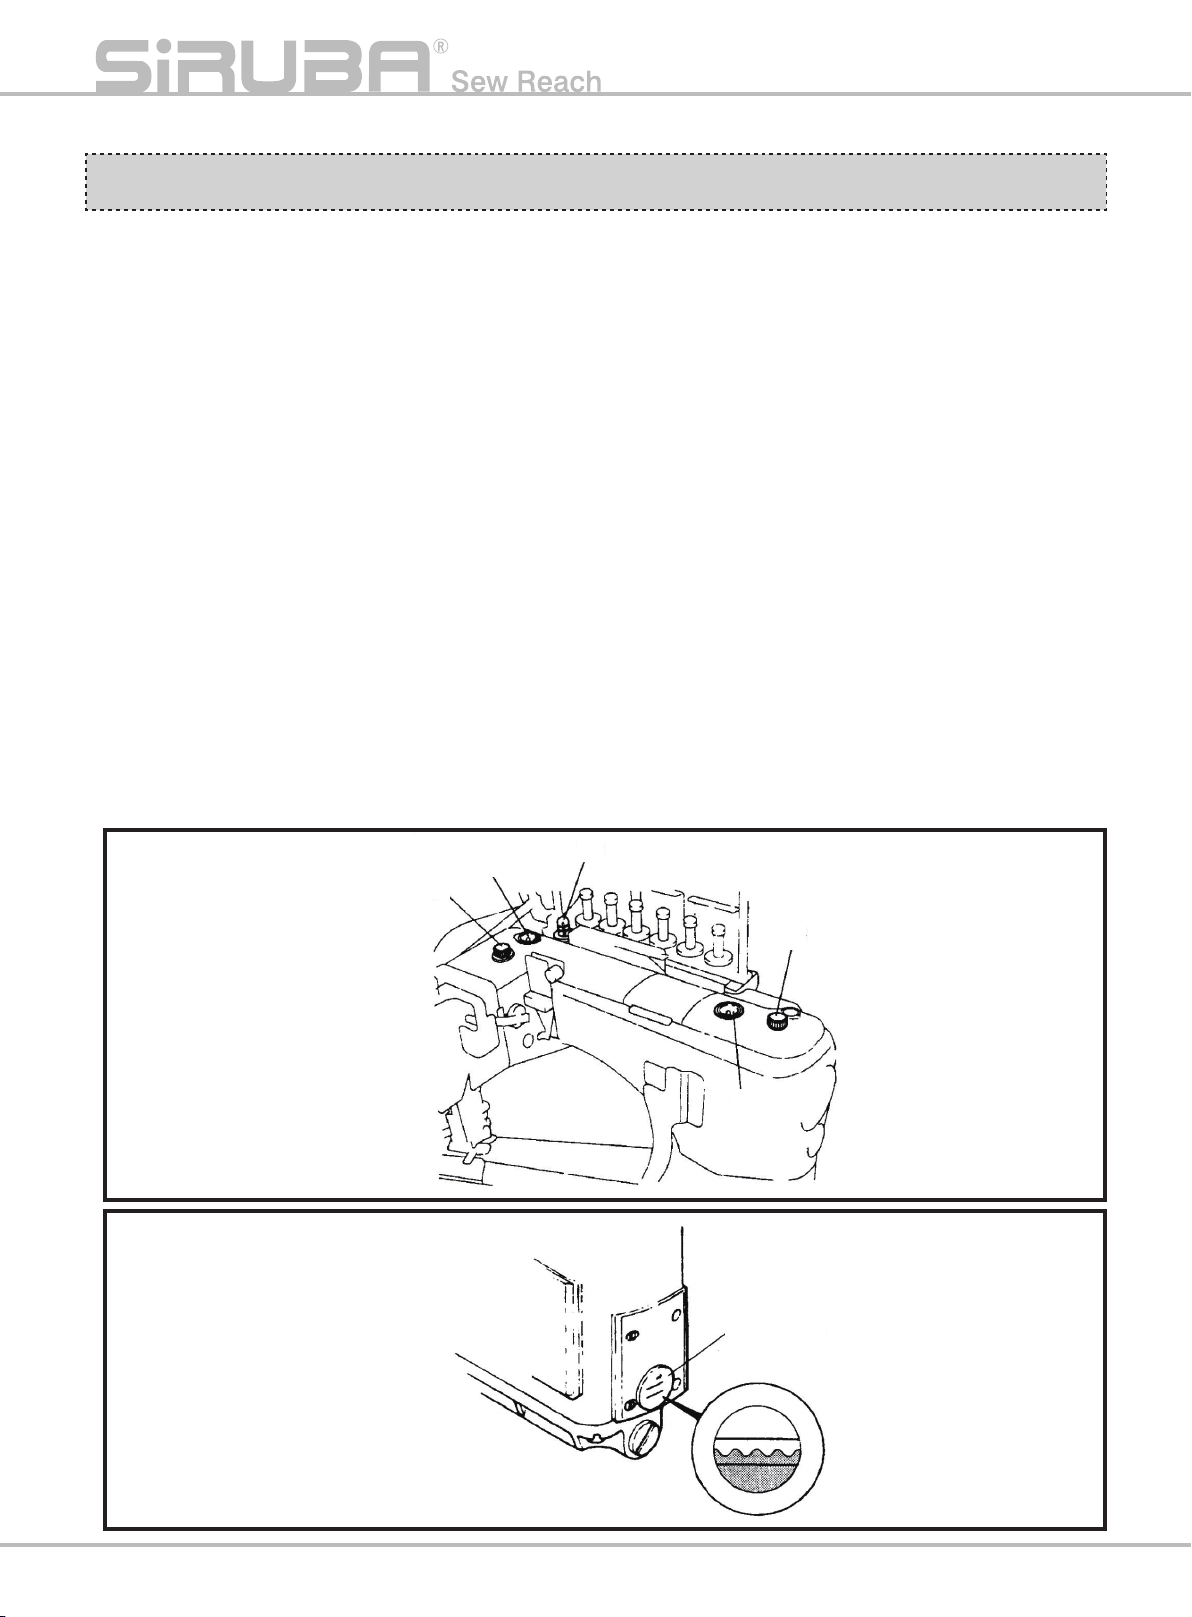
1. 潤滑油
絕對不要在油內加入任何添加物(劑),否
則將惡化油的品質,並損害機器。
2. 潤滑系統
(1) 旋開油塞螺絲①和②然後加油。(圖 4)
(2) 從油孔①加油直到油量到③最上方的紅
線,從油孔②加油直到油量到④最上面
的紅線。(圖 5)
(3) 使用機器前檢查油水平。如果沒到水平線
要加油。
(4) 當機器在使用中時,從油鏡⑤和⑥檢查油
有無供應。
注意:
太多或太少的油會造成機器漏油和機器故障。
維持油的水平在 2 條紅線之間。
1.Lubricant
Never add additives into the oil, otherwise,
it would deteriorate the quality of oil and
machine damage.
2.Lubrication system
(1)Remove plug screw①, ②, and lubricate.
(Fig. 4 )
(2)From plug s
reach the upper red line③, from plug
screw ② supply oil until it reach the upper
red line ④.(Fig. 5 )
(3)Check the oil level before using the
machine. Supply oil if didn’t reach the
level.
(4)Check whether oil have supplied or not
through oil sight top window ⑤, ⑥ during
machine operating.
Caution:
Too much oil or not enough oil may cause oil
leakage and machine malfunctio
oil level between two red lines.
crew ①, supply oil until it
n. Keep the
①
⑤
③
②
⑥
圖 4/ Fig.4
④
P9
圖 5/ Fig.5
Page 13

Introduction
3. 啟動注油
裝新機器或使用久未使用的機器,如果油沒
有循環完整,需移除幫浦上的油塞螺絲①,
注入油後裝回螺絲再使用機器。(圖 6)
4. 補充油
在箭頭處需滴一些油潤滑。如果油漏在壓腳
和上刀周圍會導致沾汙布,要確實的把油擦
乾淨。(圖 7、圖 8、圖 9)
①
3.Priming oil
Prime oil by removing plug screw ①, if oil
does not circulate completely when installing
a new machine or running a machine which
has not been used for a while. Use the
machine after priming oil.(Fig. 6 )
圖 6/ Fig.6
4.Replenishing oil
Replenish drops of oil at the arrow direction
to lubricate. If oil leaks around the presser
foot or upper knife, it can cause oil stain on
the material. Be sure to wipe it completely.
(Fig. 7、8、9)
圖 7/ Fig.7 圖 8/ Fig.8
圖 9/ Fig.9
P10
Page 14

5. 更換油
5.1 換油時機
新機使用 200 小時(約使用一個月)後,要
更換新油,之後每年換新油 1-2 次。
5.Changing oil
5.1 Timing
Chang oil after running new machine for
200 hours. (About a month) After, change oil
once or twice each year.
5.2 換油程序
(1) 拆下螺絲①和②後油會自行流出。
(圖 10、圖 11)
(2) 裝回螺①和②。
(3) 注入新油。
①
1
5.2 Procedure
(1)After removing screws ①,②, the oil will
drain automatically.(Fig. 10、11)
(2)Reset screws ①,②.
(3)Change the oil.
圖 10/ Fig.10
P11
②
圖 11/ Fig.11
Page 15

Introduction
穿線方法 WAY OF THREADING
先用易穿的線從 ABCDEF 孔穿至針鎦前,然後
結上要用的線拉到針前,把結剪掉。
線正確位置:(圖 12)
A、 B、C、D:針線
E:上飾線
F:下勾針線
提醒:
當抬起壓腳時,線架組會平穩的放開,此時可
輕鬆的將線拉過。
穿下鉤針線時不須把針板拆掉。
注意:
穿線前一定要先把電源關掉,並確定馬達完全
停止。
Use the thread which easy to get through the
needle eyes ABCDEF, then knots the threads
and pull the threads in front of needle. Cut off
the knots.
Correct position of the thread:(Fig. 12 )
A , B , C , D:Needle thread
E:Top cover thread
F:L
ower looper thread
Note:
When raising presser foot, thread guide plate
will loose steadily, and could pull out the
thread easily.
Do not need to take off needle plate to thread
lower looper thread.
Caution:
Before threading, must turn off the power and
make sure the motor is stop completely.
E
A
C D
B
F
圖 12 / Fig. 12
P12
Page 16

控線調整 ADJUST THREAD
1. 調整線架上的鬆緊度是靠螺母① ~ ⑥取決於
布線寬度和其它狀況。(圖 13)
① ~ ④:針的線(①:右針,④:左針)
⑤:上飾線
⑥:下勾針線
˙
如果調緊線時,以順時間方向調下① ~ ⑥
螺絲。
˙
如果調鬆線時,以逆時間方向調上① ~ ⑥
螺絲。
①
1.To adjust the tension thread guide plate
depends on nuts ①~⑥, fabric width, thread
width, and other situation.(Fig. 13)
①~④:Needle threads(①:Right needle
,④:Left needle)
⑤:Top cover thread
⑥:Lower looper thread
˙
To tighten thread tension, turn the nuts
①~⑥ clockwise.
˙
To loosen thread tension
counter- clockwise.
, turn the nuts
②
③
④
⑤
⑥
2. 當機器在高速運轉或使用特殊線或特殊纖維
時,矽油壺組是標準配備,以防止斷線跳
針。(圖 14)當使用機器時,將毛氈①放
入矽油壺②內。
˙
使用乙烷矽油。
˙
打開油壼蓋③,檢查油量。如果不夠,
添加油於油壼②。
注意:
(1) 當不使用矽油壺組時,要取出毛氈①。不
然可能在車縫時發生不正常情況。
(2) 當矽油沾到其他零件時,可能引起機器損
傷,故要將油擦乾淨。
圖 13 / Fig. 13
2.When machine is operating in high speed,
or using synthetic thread or synthetic fabric,
SP device is standard equipment to prevent
from thread breaking and skipping stitch.(
Fig.14)When using the machine, puts felts
① into SP device ②.
˙
Use dimethyl silicone oil.
˙
Open SP device’s cover ③, check amount
of oil. If it’s not enough, add oil into SP
tank ②.
Caution:
(1)If using SP device improperly, take
①, or it may cause machine malfunction
while sewing.
(2)If silicone oil tainted with other parts, it may
cause machine damage. Be sure to wipe it
away.
of felts
P13
Page 17

Introduction
③
3.4 支針各有自己的過線片可調整線環的鬆緊。
(1) 抬線架①轉到最低位置。(圖 15)
(2) 第一片②要跟右邊第四針的線平齊。
(圖 16)
(3) 設定第四片③距第一片②的高度為
3.2mm。
(4) 設定第三片④距第一片②的高度為
1.6mm。
(5) 設定第二片⑤距第一片②的高度為
0.8mm。
(6) 對準後鎖緊螺絲⑥。
註:檢查最上面那片的水平。
˙
要把線環變大就把過線片往上移“L"。
˙
要把線環變小就把過線片往下移“S"。
②
①
圖 14 / Fig. 14
3.Four needles have its own thread guide to
adjust thread tension respectively.
(1)Turn the needle thread take-up ① to
lowest po
(2)Set the top of pin ② aligned with the
fourth right needle thread.(Fig. 16)
(3)Set the fourth pin ③, higher 3.2mm than
pin ②.
(4)Set the third pin ④, higher 1.6mm than
pin ②.
(5)Set the second pin ⑤, higher 0.8mm than
pin ②.
(6)Tighten the screw ⑥ after.
Note:Check the top of the pin is horizontally.
˙
To make the loop larger, move the
the direction “L."
˙
To make the loop smaller, move the pins in
the direction “S."
int.(Fig. 15)
pins in
②
⑤
④
③
3.2mm
1.6mm
①
圖 15/ Fig.15 圖 16/ Fig.16
⑥
P14
Page 18

4. 針線孔調整
(1) 右邊最高的過線孔①要跟線孔③成一直
線。(圖 17、圖 18)
(2) 設定過線孔④比①低 5mm。
(3) 設定過線孔⑤比①低 9mm。
(4) 設定過線孔⑥比①低 15mm。
˙
過線片往下移,線就會變緊。
˙
過線片往上移,線就會變鬆。
4.Needle thread eyelet adjustment
(1)The highest right needle thread eyelet ①
has to align with needle thread eyelet ③.
(Fig. 17、18)
(2)Set the eyelet ④ lower 5mm than ①.
(3)Set the eyelet ⑤ lower 9mm than ①.
(4)Set the eyelet
˙
Thread will be tighten if move down the
⑥ lower 15mm than ①.
eyelet.
˙
Thread will be loose if move up the eyelet.
③
②
圖 17/ Fig.17 圖 18/ Fig.18
5. 下底線
(1) 底線導板①和支撐②要成一直線。
(2) 底線收緊時機:
正確的凸輪④位置是當針桿③最高的位
置下移 2.8mm 時,線通過 A 點。放鬆⑤
去調整。
˙
增加底線的鬆度,把時程調快。
˙
減少底線的鬆度,把時程調慢。
註:當調整凸輪④時,面向凸輪④凸出的地方
和上線抬起時不用調整前後位置。
注意:
如果時程調超過會造成跳針。
③
④
⑤
⑥
②
①
⑦
15mm
9mm
5.Lower thread
(1)Align the lower thre
eyelet supporting plate ②.
(2)Timing of lower thread tighten up:
The correct position of cam ④ is when
the thread make through point A, and
the needle bar ③ lowered 2.8mm from
highest point. Adjust for loosen ⑤.
˙
To increase the looseness of lower
thread, hasten the timing.
˙
To decrease the looseness of lower
thread, delay the timing.
Note:When adjusting cam ④, face the raised
place of cam ④ and when lifted the top
cover thread without adjusting frontand-rear position.
Caution:
If the timing of the lower thread exceeds, it
may occur skip stitches.
5mm
ad guide ① with the
P15
Page 19

Introduction
A
①
⑤
2.8mm
③
②
④
圖 19 / Fig. 19 圖 20/ Fig. 20
(3) 底線過線片⑥和⑦標準位置為最右邊。放鬆
螺絲⑧和⑨左右移動去調整。(圖 22)
•增加底線的量,將過線片往“L"的方向移動。
•減少底線的量,將過線片往“S"的方向移動。
⑧
圖 21 / Fig. 21
(3)The standard position of lower thread
eyelet ⑥ and ⑦ are extreme right. Loosen
screws ⑧ and ⑨ move left and right to
adjust.(Fig. 22)
•Increase amount of lower thread, and move
the eyelet to the direction “L."
•Decrease amount of lower thread, and move
the eyelet to the direction “S."
⑥
⑨
⑦
圖 22 / Fig. 22
P16
Page 20

6. 上網線
(1) 線孔位置
支撐板②和過線片①的標準距離是
4.4mm。放鬆螺絲③再上下調整移動線
孔。(圖 23)
˙
增加線量時,將過線片①往下移。
˙
減少線量時,將過線片①往上移。
(2) 調整上網線的時機
當大的上勾針④勾到小勾針上的線時(圖
24),網線和凸輪的尖端距離為 0-1.0mm
之間,調整凸輪⑤時鬆開螺絲⑥。
(圖 23)
註:調整好凸輪⑤時,勾線時間和凸輪⑤時間
正確後,不必再前後調整。
6.Top cover thread
(1)Position of eyelet
The standard distance of eyelet
supporting plate
② and eyelet ① are
4.4mm. Loosen screw③then adjust
eyelet up and down.(Fig. 23)
˙
Move down the eyelet ① when increase
the amount of thread.
˙
Move upward the eyelet ① when
decrease the amount of thread.
(2)Timing of adjusting top cover thread
When the bigger upper looper ④ hooked
the thread of little looper,(Fig. 24)
,the cover thread is held at the point
0-1.0mm apart from the top of cam.
Loosen scr
ew ⑥ when adjusting cam ⑤
(Fig. 23)
Note:After finish adjusting cam ⑤, if the
timing of the thread take-up and cam
⑤ are correct, do not need to adjust
front-and-rear.
4.4 mm
⑥
0-1.0mm
線
Thread
③
②
①
⑤
圖 23 / Fig. 23
P17
④
圖 24 / Fig. 24
Page 21

Introduction
各部位調整說明
1. 當壓腳緊貼在針板上時,在抬壓腳連接軸①
跟壓腳連接托架②留 1mm 的間隙。
(圖 25、圖 26)
②
1mm
①
圖 25 / Fig. 25 圖 26 / Fig. 26
ILLUSTRATION OF ADJUSTING
EACH PARTS
1. When presser foot closely touch needle
plate, retain 1mm distance between
presser foot lifter lever ① and presser foot
connecting bracket ②.(Fig. 25、26)
②
2
①
1
調整:
(1) 移除前蓋③才可以檢查間隙。(圖 27)
(2) 放鬆壓腳連接桿螺絲⑤。(圖 28)
(3) 移開壓腳連接桿(短)⑥右邊或左邊去調整
間隙。
注意:
在調整抬壓條連接軸①之後,調整抬壓腳在壓
腳的最低位置,如果沒有調整,會導致上網線
勾損壞。
Adjustment:
(1) Remove the front co
clearance.(Fig. 27)
(2) Loosen screw of presser foot connecting
bracket ⑤.(Fig.28)
(3) Remove presser foot connecting bracket
(short) ⑥, move left and right to adjust the
clearance.
Caution:
After adjust presser foot lifter lever ①, make
the presser foot at lowest position, if did not, it
may cause top cover thread damage.
ver ③ then check the
⑤
3
③
圖 27 / Fig. 27
⑥
圖 28 / Fig. 28
P18
Page 22

2. 當針柱在最低位置和壓腳完全抬舉時,針鎦
①和上網線勾②需留間隙 0.3mm。
(圖 29)
調整:
(1) 放鬆螺母③。(圖 30)
(2) 移動抬壓腳停止插銷④或再調整外面間隙。
①
0.3mm
②
圖 29/ Fig.29 圖 30/ Fig.30
2. Needle clamp ① and top cover thread hook
② need to retain 0.3mm clearance, adjust
when needle bar is at the lowest point and
presser foot completely lifted.
(Fig.29)
Adjustment:
(1) Loosen screw nut ③.(Fig.30)
(2) Move the presser foot lifter stop plunger ④
or adjust the clearance.
③④
3. 不踩踏板時鬆線器①和鬆線器座③之間要有
0.5mm 的間隙。(圖 31)
當踩下踏板時,六個鬆線器①會向上推,之
後上夾線片②開始離開下夾線片。
調整:
(1) 放開提昇擺臂的螺絲④。(圖 32)
(2) 翻轉鬆線器座③用螺絲起子。(圖 31)
註:
順時針旋轉,減少間隙。
逆時針旋轉,增加間隙。
1
①
0.5mm
2
②
3.Tension release devices ① and tension
release device seat ③ need to have 0.5mm
clearance while without stepping presser
foot pedal.(Fig.31)
While stepping the pedal, six tension
release devices ① will push up, then, the
upper thread clamp
thread clamp.
Adjustment:
(1) Loosen screw ④.(Fig.32)
(2) Turn the tension release device seat ③ with
a screwdriver.(Fig.31)
Note:
Turn it clockwise to decrease clearance.
Turn it counterclockwise to increase clearance.
② will leaving lower
④
P19
③
3
③
3
圖 31/ Fig.31 圖 32/ Fig.32
Page 23

Introduction
4. 調整壓腳壓力
放鬆螺母⑦然後用壓腳柱螺帽⑧來調壓力。
(圖 33)
˙
增加壓腳壓力時,順時間調整螺帽⑧。
˙
減少壓腳壓力時,逆時間調整螺帽⑧。
提醒:
儘可能保持壓腳壓力在最鬆的狀態,使布在針
板上更加平穩。
減少
Decrease
8
⑧
⑦
7
4.Adjust pressure of presser foot
Loosen screw nut ⑦, then use presser foot
screw nut ⑧ to adjust pressure.(Fig.33)
˙
Ad
just screw nut ⑧ clockwise while
increase presser foot pressure.
˙
Adjust screw nut ⑧ counterclockwise
while decrease presser foot pressure.
Alert:
Keep the pressure as low as possible for
stable stitches.
增加
增加減少
Increase
5. 調整壓腳高低
輕微的調高或降低壓腳都會有明顯的成效。
˙
預防勾齒抓痕。
˙
改善壓腳彈片的耐久度。
˙
增減壓腳彈片的壓力度。
˙
減少噪音和振動。
˙
可細微的調整針織的寬度。
調整:
(1) 針在最底點的位置。
(2) 鬆開螺絲①,然後逆時間旋轉調整螺母②抬
起壓腳。(圖 34)
1
①
圖 33 / Fig. 33
5. Adjust up-and –down position of presser
foot
Following effective points will be obtained
by slightly raising or lowing presser foot.
˙
Prevention of feed scratch mark.
˙
Improvement of durabilit
spring plate.
˙
Increase/decrease pressure of presser
foot spring plate.
˙
Reduction of vibration and noise.
˙
Slightly adjust width of stitches.
Adjustment:
(1) Needle is at the lowest point position.
(2) Loosen screw ①, then turn
counterclockwise to adjust screw nut ②.
Lifted presser foot.(Fig.34)
y of presser foot
2
②
圖 34 / Fig. 34
P20
Page 24

(3) 在壓腳④和壓腳彈片③之間調整出 0.3-
0.5mm 的間隙。(圖 35)
(4) 把螺母①鎖回去。
④
③
(3) Adjust 0.3-0.5mm clearance between
presser foot ④ and presser foot spring
plate.(Fig.35)
(4) Tighten the screw nut ①.
0.3-0.5mm
圖 35
/ Fig. 35
6. 調整差動
(1) 移動調整桿向右或左去調整差動桿⑤在刻
度“4"和刻度“5"之間是相同的動作和
差動。即主牙和差動牙的運作相同。
(圖 36)
(2) 螺絲⑥是用來固定調整桿⑤和保持差動的
多或少。
˙
一般差動比:調整桿⑤調到刻度“9"的
位置。
˙
反差動比:調整桿⑤調到刻度“1"的位
置。
反差動比
Reverse differential ratio
6.Adjusting differential feed dog
(1) Move adjusting lever left and right
to adjust adjusting lever ⑤ between
graduations“4" and“5," ma
equal movement and differential.
(Fig.36)
(2) Screw⑥ is used for fixed adjusting lever
⑤ and keep the differential ratio.
˙
Normal differential ratio:Move the lever
⑤ to“9."
˙
Reverse differential ratio:Move the lever
⑤ to“1."
kes the
一般差動比
Normal differential ratio
7. 調整針距
粗細針的範圍標準為 1.6-2.5mm,但可調整
更大。
調整:
(1) 放鬆螺絲①,移動針檔②(後)到最後面。
然後輕微鎖緊。減少針寬時可以省略。
(圖 37)
P21
⑥
⑤
7.Adjusting stitch length
Stitch length ranges 1.6-2.5mm as standard,
and it could adjust more.
Adjustment:
(1) Loosen screw ①, and move needle guard
②(rear)to the most rearward, then
tighten it slightly. It could skip if decrease
stitch length.(Fig.37)
⑥
圖 36 / Fig. 36
Page 25

Introduction
(2) 退掉油塞螺絲③。(圖 38)
(3) 放鬆螺絲④去調整粗細針。
(4) 鎖緊螺絲④和重新裝上油塞螺絲①。
˙
增加針距時,將螺絲④向上調整。
˙
減少針距時,將螺絲④向下調整。
表格二為針距大小使每英吋或每 30mm 的距離
有幾針。
注意:
˙
調整針距必須注意後針檔的位置。
˙
每次在更換不同的狗齒之後,都要調整粗細
針。
針距 (mm)
Stitch length(mm)
2.5 10 12
2.1 12 14
1.8 14 16.5
1.6 16 19
Stitch numbers(per inch)
1 英吋針數
(2) Remove plug screw ③.(Picture 38)
(3) Loosen screw ④ to adjust stitch length.
(4) Tighten screw ④ and reset plug screw ①.
˙
Adjust screw ④ upward if stitch length
increase.
˙
Adjust screw ④ downward if stitch length de
crease.
Table 2 shows the stitch length of per inch or
stitch numbers of length 30mm.
Caution:
˙
Be careful
adjusting stitch length.
˙
Adjust stitch length each time when
replacing different feed dogs.
the position of rear guard while
30mm 針數
Stitch numbers (30mm)
1.2 21 25
1 25 30
表 2 / Table 2
①
②
③
圖 37/ Fig. 37
④
增加
Increase
減少
Decrease
圖 38/ Fig. 38
P22
Page 26

8. 調整切布刀
(1) 底刀①的標準位置要留距離在底刀①尖
端和鎖底刀座②之間 0-0.5mm。
(圖 39)
(2) 當上刀③在最左邊時,上刀③和底刀①
要有 0.5mm 的重疊。
(3) 放鬆螺絲④和⑤去調整上刀和底刀。
(圖 40、圖 41)
8.Adjust knife
(1) For the standard position of lower knife
①, make the distance between lower
knife ① tip and the lower knife clamp ②
to 0-0.5mm distance. (Fig.39)
(2) When upper knife ③ is at the extreme left
p
osition, upper knife ③ and lower knife ①
have to be overlapped about 0.5mm.
(3) Loosen screws ④,⑤ to adjust upper knife
and lower knife.(Fig.40、41)
③
圖 40/ Fig. 40 圖 41/ Fig.41
④
9. 導布器調整
(1) 鬆開螺絲④調整位置,視刀的邊緣和刀
齒去輕微的調整使導布器上的 A 點跟 4
支針的中間成一直線。(圖 42)
(2) 前後的標準位罝,設定滑塊②的停止位
置在針板③前,視刀厚去輕微的調整位
置。(圖 43)
①
③
0.5mm
①
⑤
②
9.Adjustment of fabric guide
(1) Loosen screw ④ to adjust position,
depend of the edge of the knife and knife
teeth and fine adjust point A from the
fabric guide and aligned point A with 4
needles in the middle.(Fig.42)
(2) The fore-and-rear standard position,
set slide block ② to stop in front o
needle plate ③, fine adjust the position by
the thickness of knife.(Fig.43)
圖 39/ Fig. 39
0-0.5mm
f the
P23
A
③
①
②
圖 42 / Fig. 42 圖 43 / Fig. 43
④
Page 27

Introduction
換針方法 WAY OF CHANGING NEEDLE
1. 車針系列
(1) 縫紉機用針
格洛茲貝克牌 UY118GKS
風琴牌 FLX118GCS
日本規格 Japanese Standard 8 9 10 11 12 14
公制規格 Metric Standard 60 65 70 75 80 90
表 3 / Table 3
(2) 定位針
(四支針配合一支定位針。)
格洛茲貝克牌 36211 , 36211A
風琴牌 FLG-1 , FLG-8
日本規格 Japanese Standard 8 9 10 11 12
公制規格 Metric Standard 60 65 70 75 80
表 4 / Table 4
提醒:
請選用適合的針給不同的材料。有些尺寸並沒
有販售,請從目錄上確認尺寸。
2. 針的安裝
(1) 旋轉轉輪將針抬到最高點。
(2) 放鬆螺絲①。(圖 44)
(3) 平面擺在前方將新針放入針鎦內最頂端,
然後鎖緊螺絲①。
注意:
安裝針之前一定要先把馬達關掉,並確定馬達
不會轉動。
1.Sewing needle series
(1)Needle of sewing machine
Groz-Beckert UY118GKS
Organ
(2) Retainer needle
(four sewing needle match one retainer
needle.)
Groz-Beckert 36211 , 36211A
Organ FLG-1 , FLG-8
Caution:
Please choose proper needle for different
material. Please make sure the size from
catalogue since some size of needles do not
be sold.
2.Needle installation
(1) Rotate the wheel to raise the needle at the
highest point.
(2) Loosen screw
(3) Place it flat in front and put the new needle
into the top of the needle clamp, them
loosen screw ①.
Alert:
Must turn of the motor and make sure the
motor are totally stopped before installing
needle.
FLX118GCS
①。(Fig.44)
①
定位針
Retainer needle
圖 44 / Fig. 44
P24
Page 28

規格件的更換及調節
REPLACEMENT AND
ADJUSTMENT OF THE PARTS
1. 針位高度
第四支針跟針板的距離為“N"的高度,但
針距大小不同,高度就不同,如表格五所示。
針距
Needle distance
R : 5.2mm 13.5mm
S : 6.0mm 12.7mm
1.Height of needle
The distance of forth needle and needle plate
equal height “N,"however, if the needle
distance difference, height will be difference,
too. As table 5 below:
高度 (N)
Height(N)
表 5 / Table 5
P25
N
圖 45 / Fig. 45
Page 29

Introduction
調整高度:
(1) 移開外蓋①。
(2) 鬆開螺絲②。
(3) 上下移動針柱③去調整,針與針孔須保持平
行。
(4) 鎖緊螺絲②。
(5) 鎖回外蓋①。
①
3
Height adjustment:
(1)Remove cover ①.
(2)Loosen screw ②.
(3)Move needle bar up and down ③ to do
adjustment. Needle and needle eye need to
keep parallel.
(4)Tighten screw ②.
(5)Reset screw ①.
③
圖 46 / Fig. 46
②
圖 47 / Fig. 47
圖 48 / Fig. 48
P26
Page 30

2. 上勾針
(1) 上網線的時間點:
調整上勾針的位置形成線圈,使第一針
和第二針插入線圈內,放鬆螺絲⑤調整
上勾針①。
(2) 當大上勾針②和小上勾針①最接近時的間
隙為 0.4-0.7mm。
(3) 當大上勾針②停在最右邊時,和定位針③
要有 0.5mm 的間隙。
(4) 放鬆螺絲⑥去調整。
註:要調整時不要抬壓腳的上下。
③
2.Upper looper
(1) The timing of top cover thread:
Adjust the position of upper looper into
a circle, and make the first and second
needle go through into the circle. Loosen
screw ⑤, adjust upper
(2) The closest clearance between big upper
looper②and little upper looper ① is 0.4-
0.7mm.
(3) When the big upper looper ② stopped
at the extreme right, it should be 0.5mm
clearance between retainer needle ③.
(4) Loosen screw ⑥ to adjust.
Note:Do not move the presser foot lifter up
and down when does the adjustment.
looper ①.
⑥
①
②
⑤
圖 49 / Fig. 49
0.4-0.7mm
0.5mm
②
圖 50 / Fig.50
③
P27
②
⑤
圖 51 / Fig. 51 圖 52 / Fig.52
Page 31

Introduction
3. 下勾針
(1) 高度:
裝下勾針①到下勾針座上⑥然後鎖緊螺
②。
(2) 角度:
下勾針固定座平面 A 要和下勾針柱③成
90 度。放鬆螺絲②去調整下勾針。
(3) 下勾針和針的距離:
當下勾針在最左邊的時候,下勾針和針
的標準距離為 4.2-4.8mm。可放鬆螺絲
④去調整。
(4) 下勾針的前後位置:
當下勾針①移動從左到右,會在針的後
面。調整其位置使下勾針更接近針,其
間隙 0-0.05mm,但不能碰到針,當下勾
針的尖端在左針的中間時,放鬆螺絲④
轉動螺絲⑤調整前後位置。調整之後檢
查間隙和鎖緊螺絲④。
•順時間旋轉螺絲⑤會往前。
•逆時間旋轉螺絲⑤會後後。
3.Lower looper
(1) Height:
Install lower looper ① on lower looper
seat ⑥, then tighten screw ②.
(2) Angle:
Fix the surface A of the looper at 90to
the looper ③. Loosen screw ② to adjust
lower looper.
(3) The distance between lower looper and
needle:
When lower looper is at the extreme left,
the standard distance between lower
looper and needle is 4.2-4.8mm. Loosen
screw ④ to do adjustme
(4) The front-and-rear position of lower
looper:
When lower looper ① moves from theleft
to the right, it passes behind the needle.
Adjust its position to make lower looper
closer to the needle with the clearance
of 0-0.05mm but without touching them
when the lower looper tip comes at the
center of the left needle. Loosen screw
④ and turn screw ⑤ to adjust front-andrear position. After adjust
clearance and tighten screw ④.
•To move forward, turn the screw ⑤ clockwise.
•To move backward, turn the screw ⑤
counterclockw
nt.
ment, check the
①
0-0.05mm
①
D
A
③
②
④
⑥
前 Front
圖 53 / Fig. 53
①
Rear 後
⑥
④
圖 54 / Fig. 54 圖 55 / Fig. 55
⑤
P28
Page 32

4. 前護針片
當勾針③在左針中間時,推前護針片①,使
針和下勾針的間隙為 0mm。放鬆螺絲②去
調整它。當下勾針左移到右時,檢查下勾針
③有無碰到針的後面,看針有無左右移動。
③
4.Front needle guard
Push the front needle guard ① so that
the clearance between the needle and the
looper is 0mm when the looper ③ comes at
the center of the left needle. Loosen screw
② to adjust it.Check whether lower looper
③
touch the back of the needle and needle
have moved left and right, while lower looper
move left from the right.
③
①
②
①
圖 56 / Fig. 56 圖 57 / Fig.57
5. 後護針片
當後護針片④和針最靠近的時候,要有
0.05-0.1mm 的間隙。由螺絲⑤去調整。
當下勾針從左移到右時,後護針片不能碰到
針。
注意:
當有調整針距時,注意後護針片要重新整調。
④
③
①
空隙 Clearance: 0 mm
5.Rear needle guard
Make the clearance between the rear needle
guard④ and the needle to 0.05-0.1mm when
they meet most closely. Use screw ⑤ to
adjust.
The rear needle guard shall not touch the
needle when the lower looper move from the
left to right.
Caution:
Be careful to readjust the rear
when adjust the distance of needle.
needle guard
③
P29
⑤
0.05-0.1 mm
①
圖 58 / Fig. 58
Page 33

Introduction
6. 送布齒
(1) 安裝:
固定差動的送布齒和主要送布齒③用螺絲
②和④固定後,護針片⑤在主送布齒上調
整時,鬆開螺絲⑥。
(2) 高度:
當送布齒在最高點時,主送布齒③和針板
的高度為 1.2-1.5mm,前後送布齒必須保
持一樣的高度。
(3) 高度微調:
送布齒的高度後調要旋轉偏心銷⑧來控
制。放鬆螺絲⑦然後調整偏心銷⑧的高
低。
˙
順時針旋轉偏心銷⑧調高送布齒。
˙
逆時針旋轉偏心銷⑧降低送布齒。
6. Feed dog
(1) Installation:
Use screws ②④ to fixed differential feed
dog and main feed dog ③. Loosen screw
⑥, when needle guard ⑤ adjust on the
main feed dog.
(2)Height:
The main feed dog ③ and needle plate at
the height 1.2-1.5m, when the feed dog is
at the highest point. Align the differential
feed dog with main feed dog at the same
height.
(3) Fine adjustment of height:
Turn the pin ⑧
feed dog. Loosen screw ⑦, then adjust
the height of the pin ⑧.
˙
To raise the feed dog, turn the pin ⑧
clockwise.
˙
To lower the feed dog, turn the pin ⑧
counterclockwise.
to adjust the height of the
1.2-1.5mm
①
③
A
④
⑥
⑤
②
圖 59 / Fig. 59
⑦
A
圖 60 / Fig. 60
⑧
Lower 降低 調高 Higher
圖 61 / Fig. 61
P30
Page 34

7. 壓腳
拆除方法:
(1) 移開前蓋①和所有的針。
(2) 放鬆調整螺帽②然後才鬆開螺絲③。
(3) 鬆開刀台的螺絲④讓整組刀架鬆開。
(4) 鬆開刀座連桿⑥的兩螺絲⑦,移除上刀座
⑤和上刀。
(5) 放鬆壓腳螺絲⑧。
(6) 將針轉到最高點,然後移除調整螺帽②和
抽出壓腳柱⑨和壓腳彈簧⑩。
(7) 推開上勾針驅動片
從帶動桿 脫離。
(8) 向左轉,拆下整組壓腳穿過左邊壓腳檔
。
7.Presser foot
Way to remove:
(1) Remove cover ① and all of the needles.
(2) Loosen screw nut ②, then loosen screw
③.
(3) Loosen screw ④ of knife holder, to free
the complete of knife set.
(4) Loosen two screws ⑦ from knife holder
bracket ⑥, remove upper knife ⑤ and
upper knife.
(5) Loos
en presser foot screw ⑧.
(6) Turn the needle to the highest point, then
remove adjusting screw nut ② and take
off presser foot bar ⑨ and presser foot
spring ⑩.
(7) Remove upper looper driving segment
from lever .
(8) Turn it left, and remove the whole set of
presser foot through the left presser foot
guide
.
組裝方法:
(1) 拆掉全部的針重新裝上壓腳在左右壓腳檔
之間,向右旋轉,放正壓腳。
(2) 重新裝上上勾針驅動片
到帶動桿 裡
面。
(3) 安裝壓腳柱插入上勾針驅動片
後鎖上壓
腳後面的螺絲⑧。
(4) 檢查壓腳是否順暢沒有左右晃動,如果有
卡住,鬆開左壓腳檔
的螺絲 去調整。
(5) 重新裝上刀台⑤固定在刀座⑥支撐架上。
(6) 調整刀台和上刀的位置,當針在最低點的
時候。
(7) 當壓腳緊貼在針上和針在最低點時,重新
裝上壓腳彈簧⑩及調整螺帽②,然後輕
輕的壓下螺絲③並鎖上。
(8) 鎖上外蓋①並裝回所有的針。
Way of assembling:
(1) Remove all of the needles and reset the
presser foot in the middle of the left and
right presser foot guard. Turn it right and
put the right presser foot.
(2) Reset the upper looper driving segment
inside to the lever .
(3) Insert the presser foot bar into the upper
looper driving segment
, then tighten
the screw ⑧ behind the presser foot.
(4) Check whether presser foot move
smoothly without shaking, if it stuck,
loosen screw
of left presser foot guard
to adjust.
(5) Reset the knife holder ⑤ and fixed on the
knife holder bracket ⑥.
(6) Adjust position of knife holder and upper
knife, while the needle at the lowest point.
(7) When the needle is at the lowest point
and the presser foot closely touch the
needle, reset the presser foot spring ⑩
and adjust the screw nut ②, then slightly
presser the screw ③ and tighten it.
(8) Reset the cover ①
and all of the needles.
P31
Page 35

3
③
2
②
①
1
Introduction
⑤
④
圖 62 / Fig. 62 圖 63 / Fig. 63
⑧
⑤
⑥
⑦
圖 64 / Fig. 64 圖 65 / Fig. 65
10
⑩
⑨
⑧
圖 66 / Fig. 66
圖 67 / Fig. 67
P32
Page 36

8. 壓腳彈簧片
拆除方法:
(1) 拆掉螺絲①。
(2) 拆掉壓腳彈片②。
(3) 移開彈簧片勾③才能拿掉彈簧片②。
組裝方法:
(1) 重新裝上壓腳彈片②和壓腳彈片勾③。
(2) 每片彈簧片②要對齊壓腳座。
(3) 鎖上螺絲①。
8.Presser foot spring plate
Way to remove:
(1) Remove screw ①.
(2) Remove presser foot spring plate ②.
(3) Remove spring pla
remove the spring plate ②.
Way of assembling:
(1) Reset spring plate ② and spring plate
holder ③.
(2) Each spring plates ② have to align with
presser foot seat.
(3) Tighten screw ①.
te holder ③, then
①
③
9. 切刀
上切刀的壓力調整:
(1) 當針在最高點,上切刀在左邊時壓腳要
貼著針板上,上切刀①刀刃要貼合下切
刀②的刀刃。
(2) 刀座③和壓力彈簧軸環④之間的標準間
隙為 1.0mm。
(3) 鬆開螺絲⑤和移動軸環④調整壓力。
˙
增加壓力往上移動彈簧軸環④。
˙
減少壓力往下移動彈簧軸環④。
註:
上刀①和下刀②前方成一直線時,上刀不能碰
到壓壁,正確後固定彈簧軸環。
②
9.Knife
Adjustment of upper knife pressure:
(1) When the needle is at the highest point,
presser foot needs to touch on the needle
plate when the upper knife is at the left.
The blade of upper knife ① has t
closely with the blade of lower knife ②.
(2) The standard clearance between the
knife seat ③ and the knife holder guide
collar ④ is 1.0mm.
(3) Loosen screw ⑤ and move the knife
holder guide collar ④ to adjust the
pressure.
˙
To increase the pressure, move the collar
④ upward.
˙To decrease the pressure, move the
collar ④ downward.
Note:
Align the front side of the upper knife ① and
lower knife
knife with the presser foot. After, fixed the knife
holder guide collar.
②, without touching the upper
圖 68 / Fig. 68
o touch
P33
Page 37

③
Introduction
⑤
④
1mm
①
②
刀片前方 Front of the knife
拆除方法:
(1) 放鬆螺絲⑤和⑥才能拆掉上切刀①。
(2) 放鬆螺絲⑦才能拆掉下切刀②。
組裝方法:
(1) 重新安裝下切刀②要鎖緊螺絲⑦。
(2) 重新安裝上切刀①要鎖緊螺絲⑥。
上切刀角度之調整:
(1) 拆掉① - ⑤的部份,以螺絲⑥去調整刀的角
度。
(2) 重新安裝時要注意插銷⑦有無對準刀座⑧上
的孔。
⑥
圖 69 / Fig. 69
①
圖 70 / Fig. 70
Way to remove:
(1) Loosen screws ⑤⑥, then remove upper
knife ①.
(2) Loosen screws⑦then remove lower knife②.
Way of assembling:
(1) Reset lower knife ②, tighten screw ⑦.
(2) Reset upper knife ①, tighten screw ⑥.
Adjustment of upper knife angle:
(1) Remove parts ①-⑤, use screw ⑥ to adjust
angle of the knife.
(2) Be careful whether the screw ⑦ have insert
correctly into the hole of knife seat
⑧.
②
⑥
⑧
⑦
⑤
④
②
⑦
圖 71 / Fig. 71 圖 72 / Fig. 72
①
③
P34
Page 38

P35
Page 39

Page 40

由於對產品的改良及更新,本產品使用說明書中之產品及外觀的修改恕不事先通知 !
The specification and/or the equipment and appearances described in the instruction
book are subject to change because of modification which will without previous notice.
D007S.MAR.2015
 Loading...