

Page 1
使用說明書與零件圖
INSTRUCTION BOOK & PARTS LIST
ABF
Page 2

Page 3
誌
Page 4

Page 5

Introduction
規格
各部件名稱
安裝電器箱
安裝廢油槽和支撐桿
搬運機頭與送釦機
安裝送紐機組與操作盒
電源開關的安裝與連接
過濾調壓器與空壓管之安裝
與調整
安裝安全開關
SPEC I FICAT ION
NAMES OF PARTS 3
INSTALLATION OF ELECTRIC EQUIPMENT 4
INSTALLATION OF WASTE OIL TANK 4
AND THE SUPPORT BAR
REMOVE THE MACHINE HEAD AND THE FEEDING 5
BUTTION MACHINE
INSTALLATION THE FEEDING BUTTON MACHINE AND 6
THE OPERATOR PANEL
INSTALLATION&CONNECTION OF POWER SWITCH 7
INSTALLATION AND ADJUSTMENT OF THE FILTER 9
REGULAR AND THE TUBE
INSTALL THE SAFETY SWITCH 10
1
安裝線架
變頻控制器操作說明
傾放與扳回機頭
鈕扣夾爪的位置
調整布壓腳底板
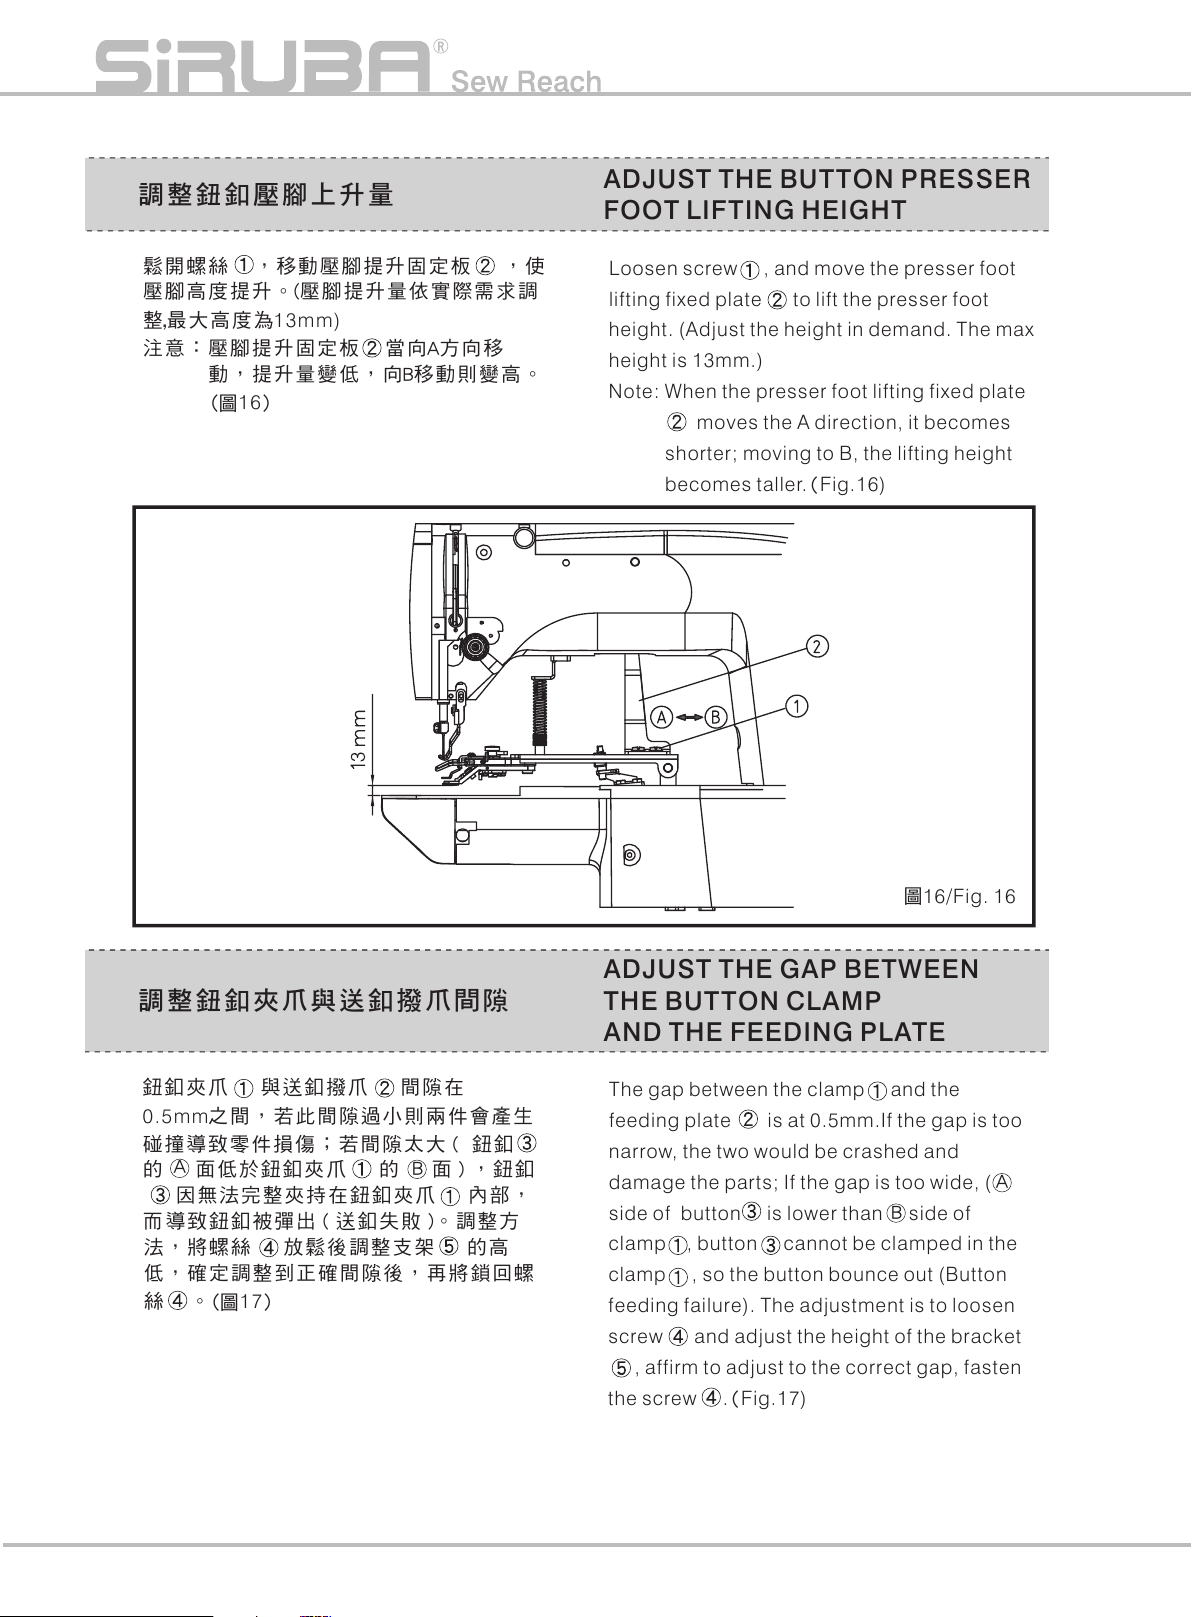
調整鈕扣壓腳上升量
調整鈕扣夾爪與送扣
撥爪間細
更換保險絲
更換鈕扣需要注意的步驟
振動盤組細部調整
更換送紐撥爪
INSTALL THE THREAD FRAME 10
OPERATION OF THE INVERT
LEAN&RECOVER THE MACHINE HEAD 13
POSITION OF BUTTON CLAMP 14
ADJUST THE FABRIC PRES SER FOOT BOTTOM PLATE 15
ADJUST THE BUTTON PRESSER FOOT LIF TING 16
HEIGHT
ADJUST THE GAP BETWEEN THE BUTTON CLAMP 16
AND THE FEEDING CLAMP
SUBSTITUTE FUSE 17
THE REMARKABLE STEPS OF SUBSTITUTE BUTTONS 19
ADJUST THE DETAILS IN THE VIBRATION PLATE COM 23
SUBSTITUTE THE FEEDING PLATE 25
ER CONTROLLER 11
Page 6

更換旋轉軸的橡膠座
SUBSTITUTE THE RUBBER PLATE ON THE TURNING 26
BAR
送扣夾爪規格
控制系統架構
硬體設備
簡易操作流程
簡易維修流程圖
異常檢修與解決對策
桌板圖
報廢流程
規格件表
零件圖
縫製程序表
SPECIFICATION OF BUT TON PLATE 27
CONTROL SYSTEM STRUCTURE 28
HARD WARE 29
SIMPLE OPERATION STEPS 36
BLOCK DIAGRAM OF SIMPLE REPAIR 44
TROUBLESHOOTING 48
TABLE CUT-OUT 50
DEMOLITION PROCEDURE 51
CONVERSION CHART 52
PARTS LIST 53
SEWING PROCEDURE CHART 67
Page 7
Introduction
m
規格
本 說 明 書 僅 以BT29 0-ABF說 明,其 餘 部 份
請 參 考BT29 0-DX/ BT290 -A
1.產 品 規 格(表1 )
機種 別
Machine Type
縫製 方式
Sewing Way
縫製 範圍
Sewing Area
使用 鈕釦
Button
鈕釦 厚度
Thickness of Button
X (左右)方 向 : 0 ~ 3.6 mm Y (前後)方 向 : 0 ~3.6 mm
X (Left-Right) : 0 ~ 3.6 mm Y (Forward-Backward) : 0 ~3.6 m
SPECIF ICATIO NS
Only describe BT290-ABF in this manual,
please refer to BT290-DX/BT290-A1 for
others.
1.Procuct Specification(Table1)
BT290-ABF
單針 鎖縫
Single Needle Lockstitch
種類 : 圓 形平釦
Type : Circle Flat Button
尺寸: ∮8 ~25mm
Size: ∮8~25mm
1.5~3.5mm
最高 縫製速度
Maximum Sewing Speed
縫 距(P)
Stitch Length(P)
送布 機構
Feeding Machine
針棒 行程
Needle Stroke
天平 行程
Thread Take-Up Lever
Stroke
縫 針
Needle
抬壓 腳方式
Presser Foot
工作 夾具提升量
Rising Amount of Clamp
標準 花樣
Standard Pattern
2700rpm
2.2 / 2.4 / 2.8 / 3.2 / 3.6 標準配備
2.2 / 2.4 / 2.8 / 3.2 / 3.6 Standard Equipment
間接 送布(步進馬達兩軸驅動方式)
Indirectly Feeding (Stepping Motor Two Shafts Drive)
41mm
69mm
DPx17#11
步進 馬達
Stepping Motor
最大: 13mm
Maximum:13mm
適用 花樣26種(內建花樣
Applicable pattern 26 kinds(Build-in patterns:38 Kinds )
共38種)
P1
Page 8
機種 別
Machine Type
BT290-ABF
送釦 速度
Feeding Speed
電源 電壓
Power Voltage
使 用 油
Utilized Oil
適用 鈕釦的形狀
Available Shape of Button
0.5 sec/pc
單相220V定格±20% 50/60Hz
Single Phase220V Rated±20% 50/60Hz
縫紉 機專用油白礦油#10
Sewing Machine Oil White Mineral Oil #10
表1/Table1
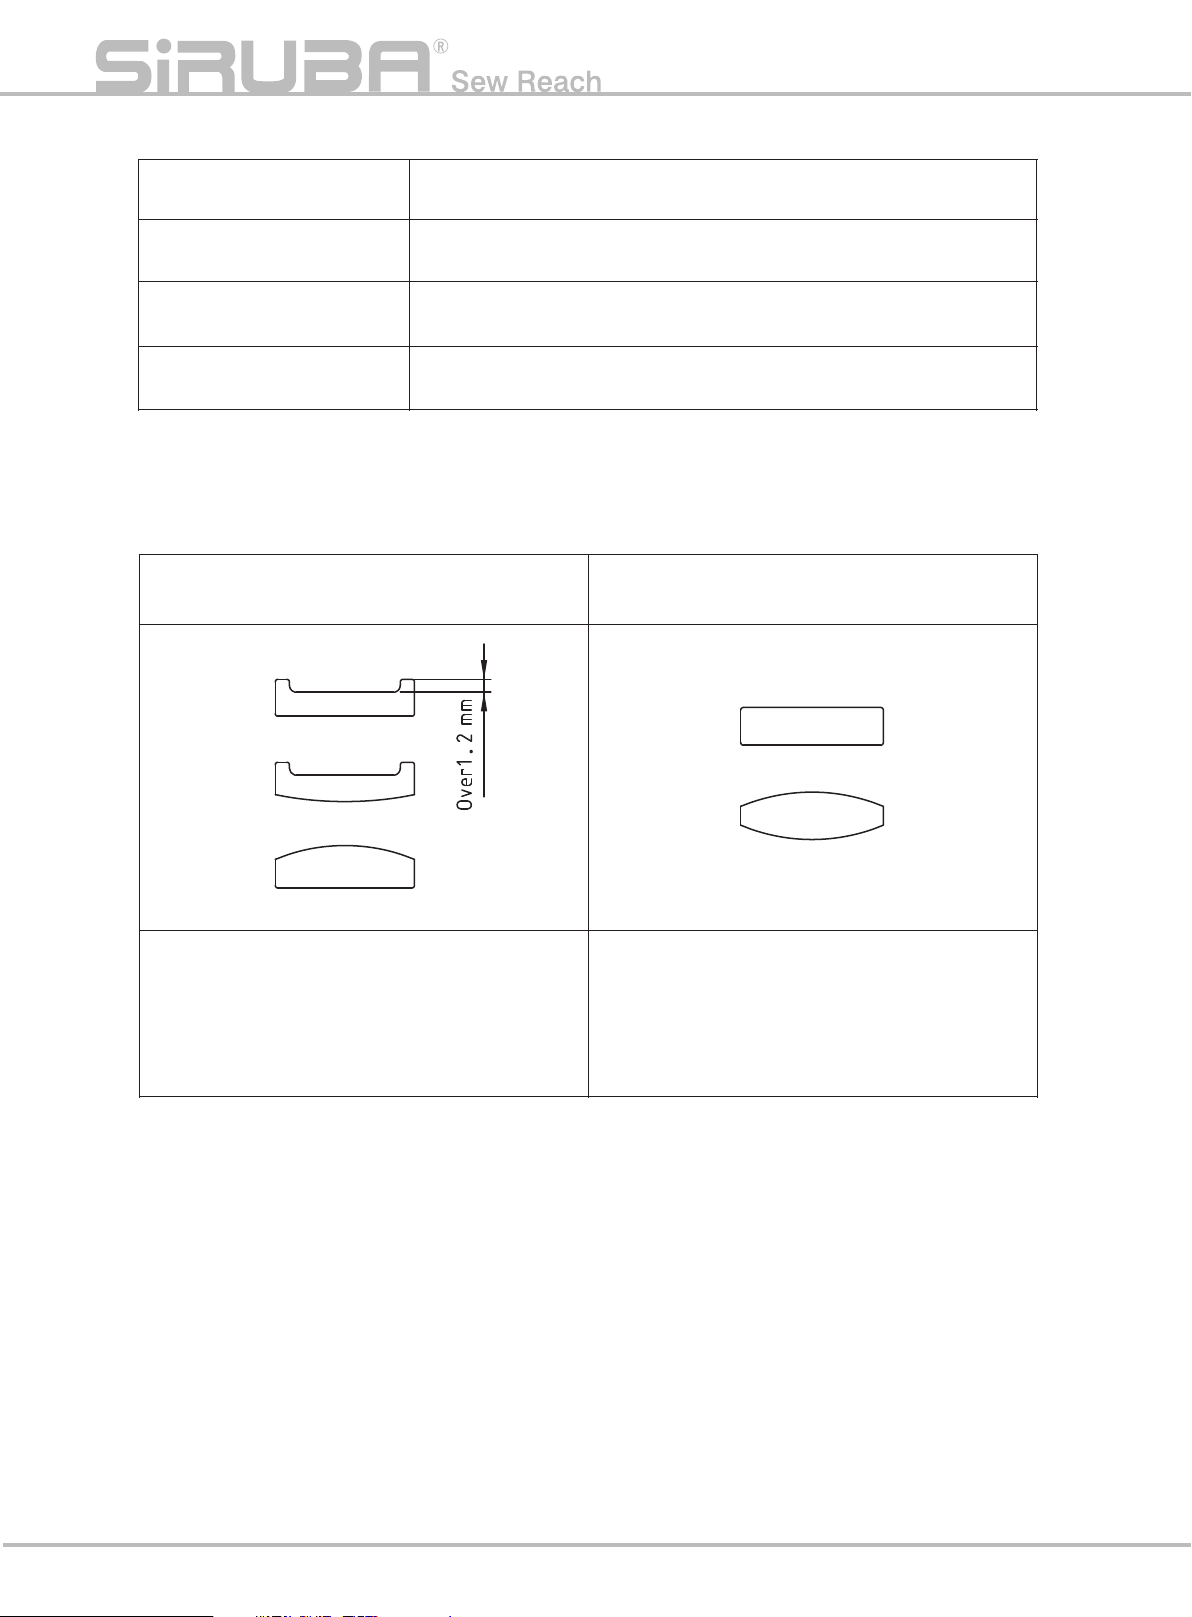
2.Button Shape(Chart1)2.鈕釦形狀(圖表1)
不適 用鈕釦的形狀
Unavailable Shape of Button
兩面 須有明顯區別(落差),凹或凸須在1.2mm差距
以上 ,以順利判定正反面。
Two sides must be obviously different
(Dissimilarity)For determining the positive or
negative side, the convex or concave must
above 1.2mm gap.
圖表1/Chart1
兩面 皆相同之鈕釦,機器無法判別。
Sides must be the same or can not be
determined.
P2
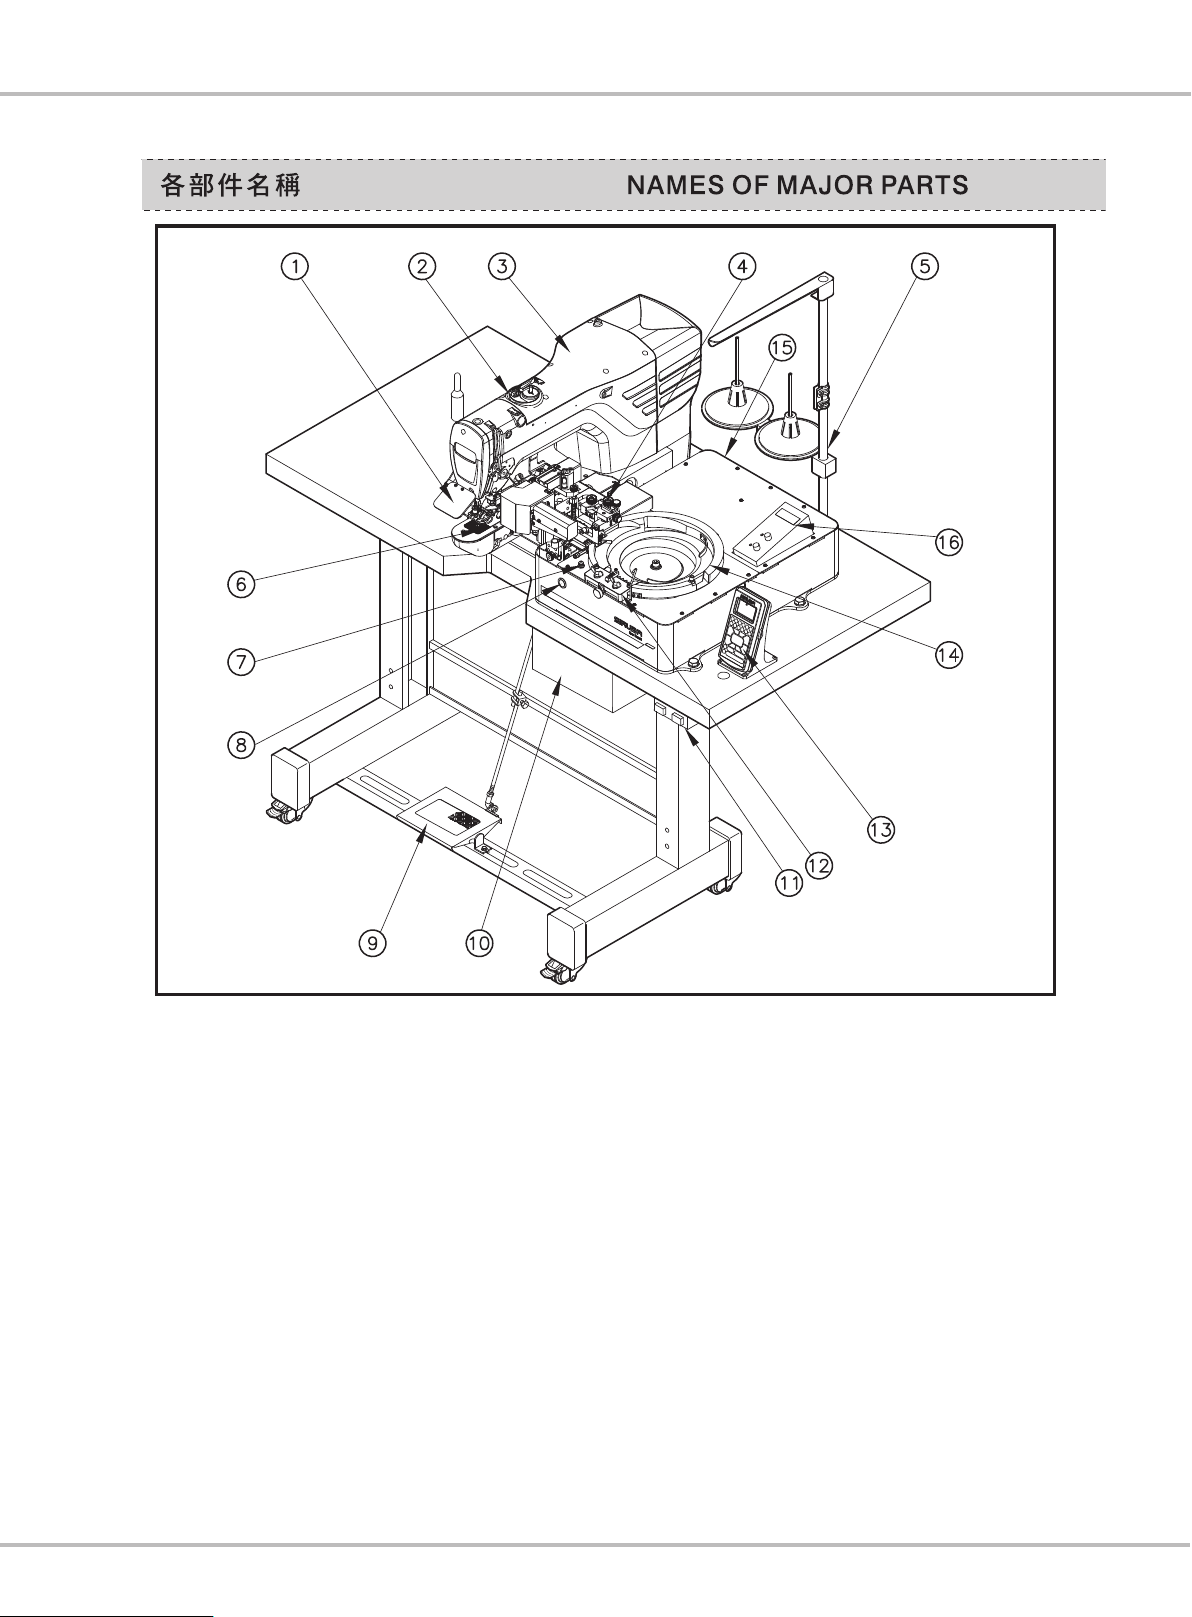
Page 9
Introduction
(1)護目鏡
(2)捲線器
(3)縫紉機機頭
(4)鈕釦規格測量區
(5)線架
(6)送釦鈀
(7)退釦按鈕
(8)手動送釦按鈕
(9)啟動踏板
(10)控 制 箱
(11)電 源 開 關
(12)鈕 釦 大 小 調 整 組
(13)操 作 盒
(14)振 動 盤
(15)電 源 開 關
(16)變 頻 控 制 盒
圖1/Fig. 1
(1)Goggle
(2)Reel
(3)Machine Head
(4)Measurement Zone of Button
(5)Thread Frame
(6)Button Seat
(7)Retrieve Button
(8)Manual Feeding Button
(9)Padel
(10)Operation Box
(11)Power Switch
(12)Adjustment Set of Button Size
(13)Operation Padel
(14)Vibration Plate
(15)Power Switch
(16)Inverter Control Box
P3
Page 10
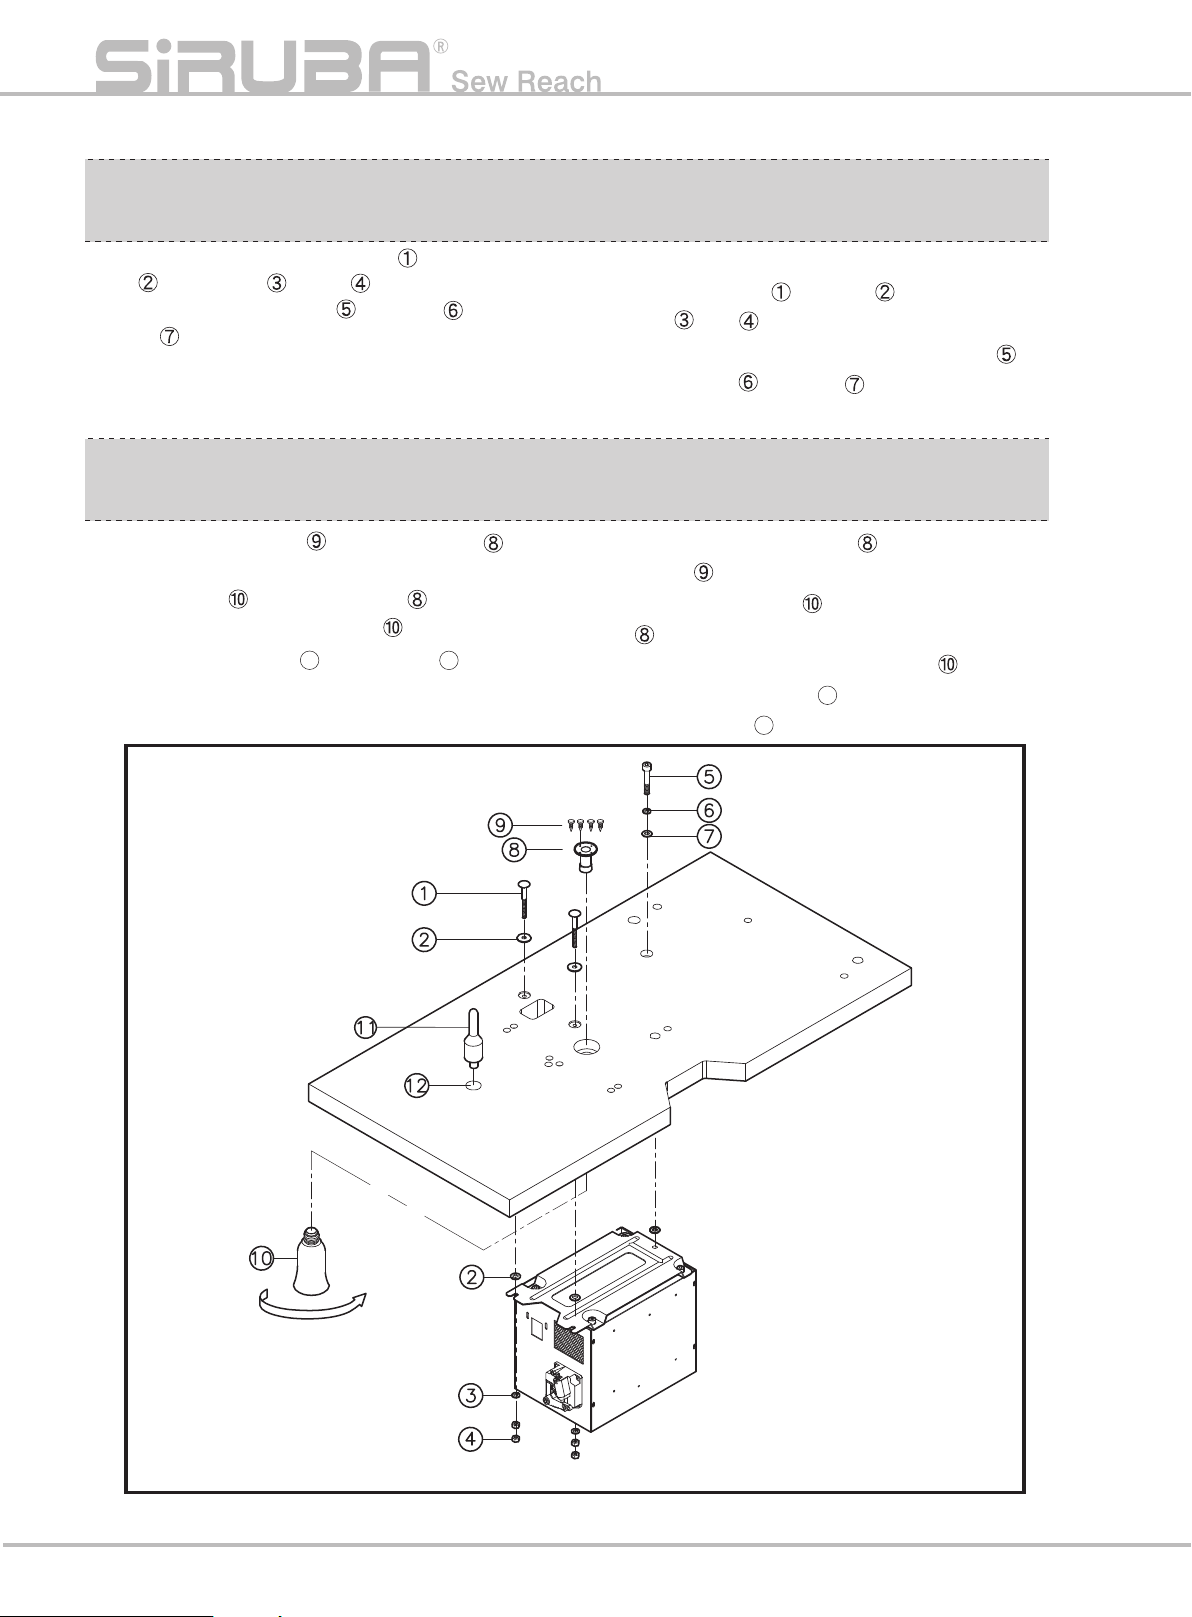
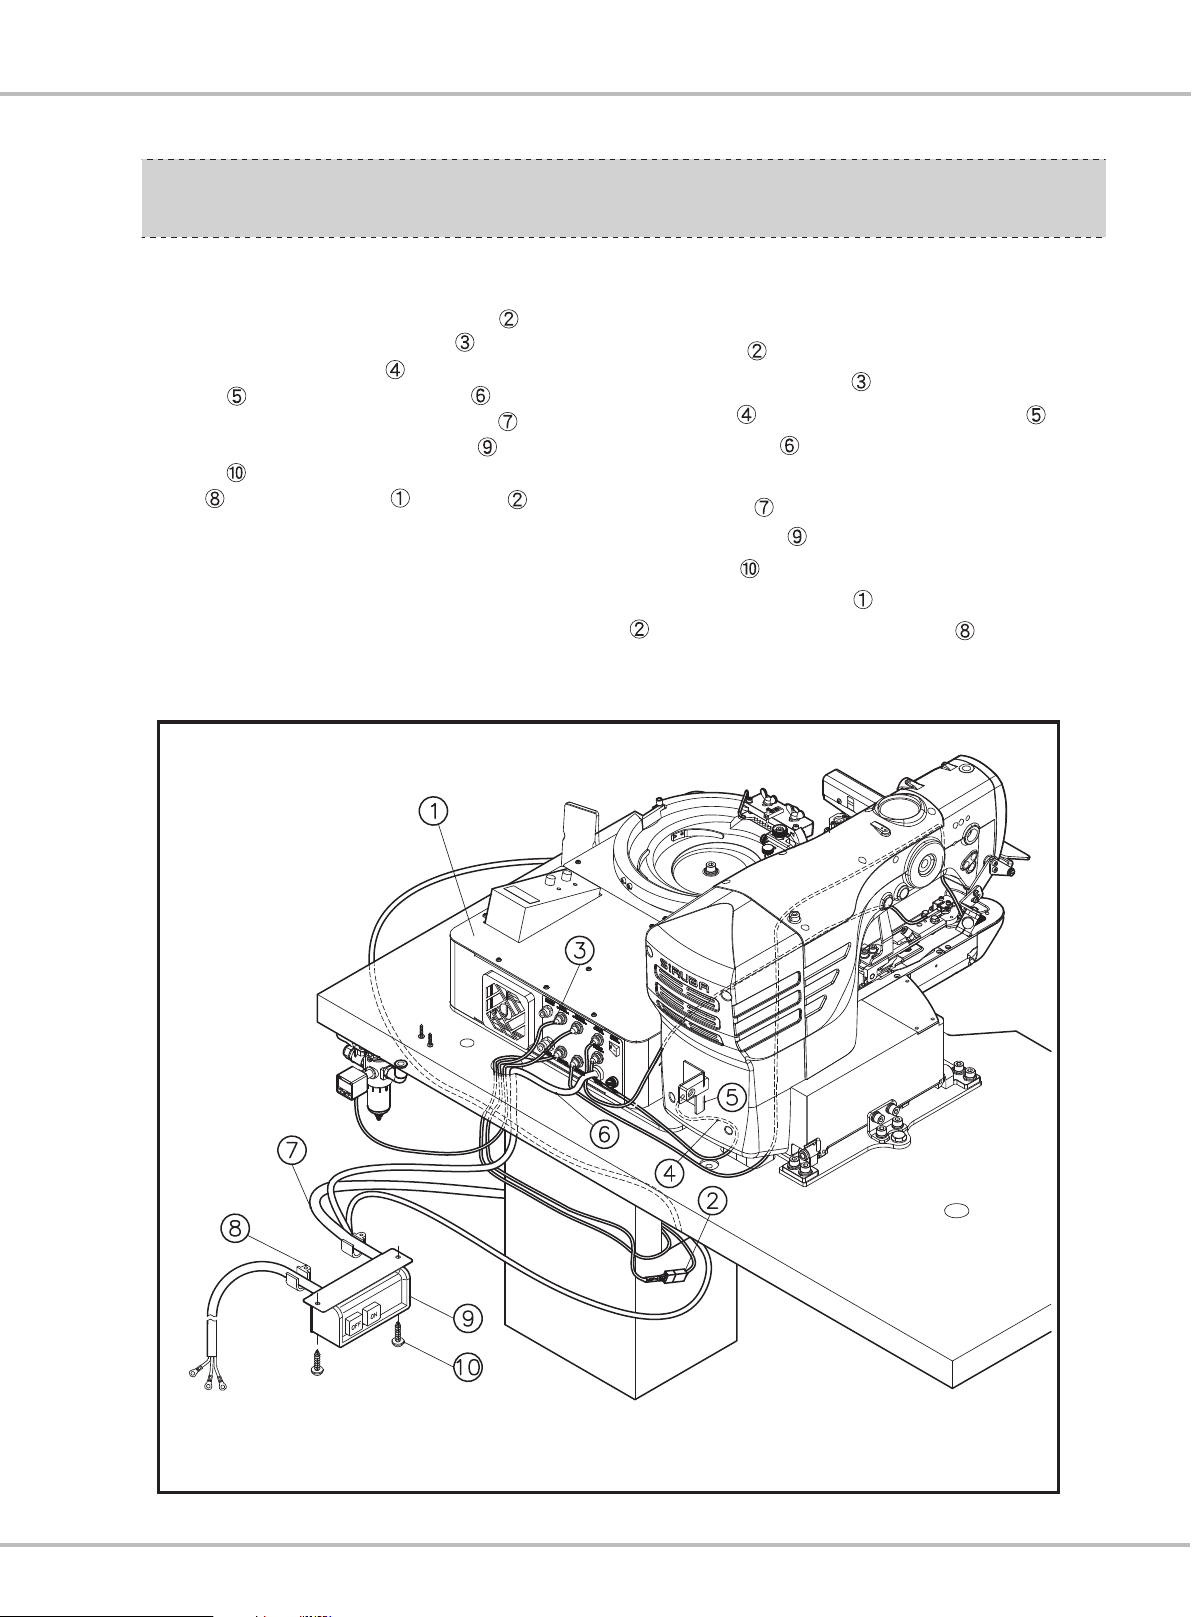
安裝 電 控箱
INSTALLATI ON THE
ELECTRIC BOX
電控包裝箱中附有圓頭螺絲 、平墊片
、彈簧墊片 、螺母 按照圖示的位置
安裝好,再把六角螺栓 、彈簧墊 、平墊
片 按照圖示的位置安裝於桌板。(圖2)
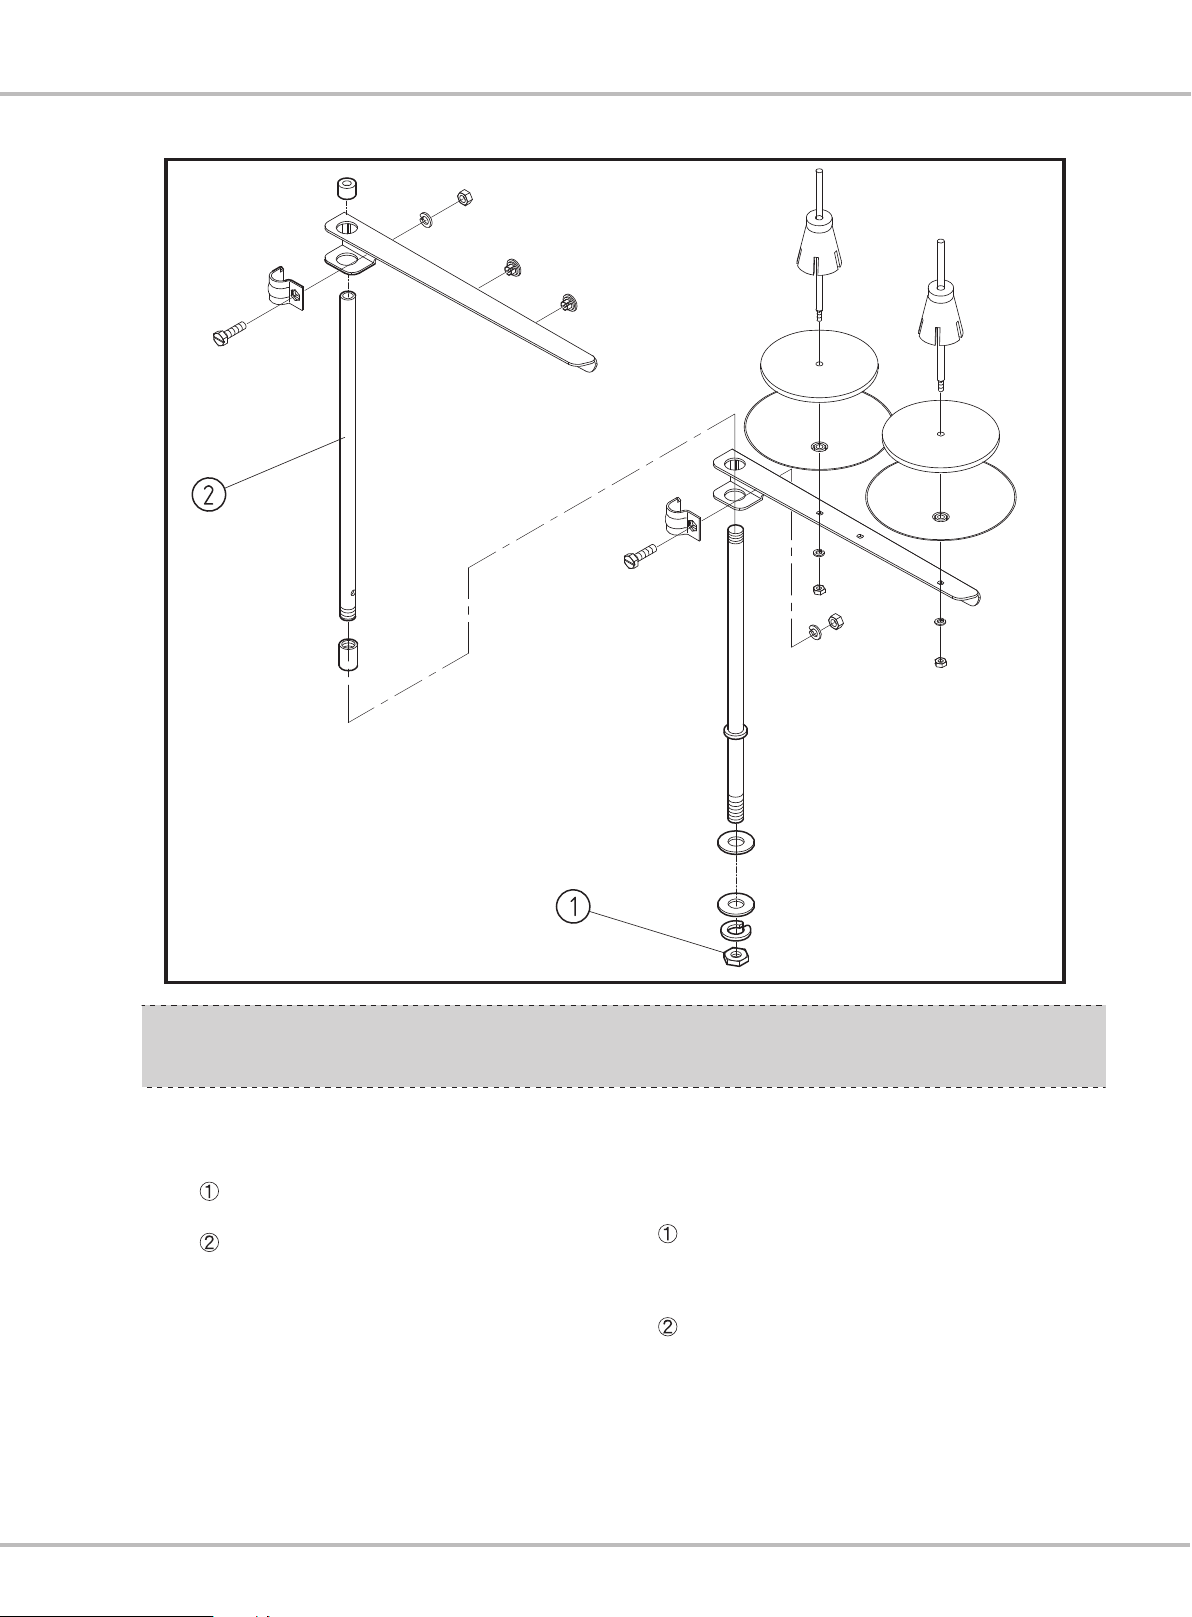
安裝 廢 油槽 和支 撐 桿
(1)用4個固定螺絲 ,把油壺固定座 固
定到桌板的安裝孔上。
(2)將油壺 鎖入油壺固定座 中。
(3)把縫紉機油管插到油壺 裡。
(4)把機頭支撐桿 放入桌板孔 裡。
(圖2)
11
12
The electric package box accessorize with
round head screw , washer , spring
washer , nut , installed in the positions as
the figure. Then, install the hexagonal bolt ,
spring washer , washer in the table as the
figure. (Fig.2)
INSTALL TH E WAS TE OIL TAN K
AND THE SU PPOR T BAR
(1) Fix the oil pot fixed seat with 4 fixed
screw to the holes on the table.
(2) Fasten the oil pot to the oil pot fixed seat
.
(3) Insert the oil pipe into the oil pot .
(4) Put the support bar of the machine head
into the hole of table .( Fig.2)
12
11
P4
圖2/Fig. 2
Page 11
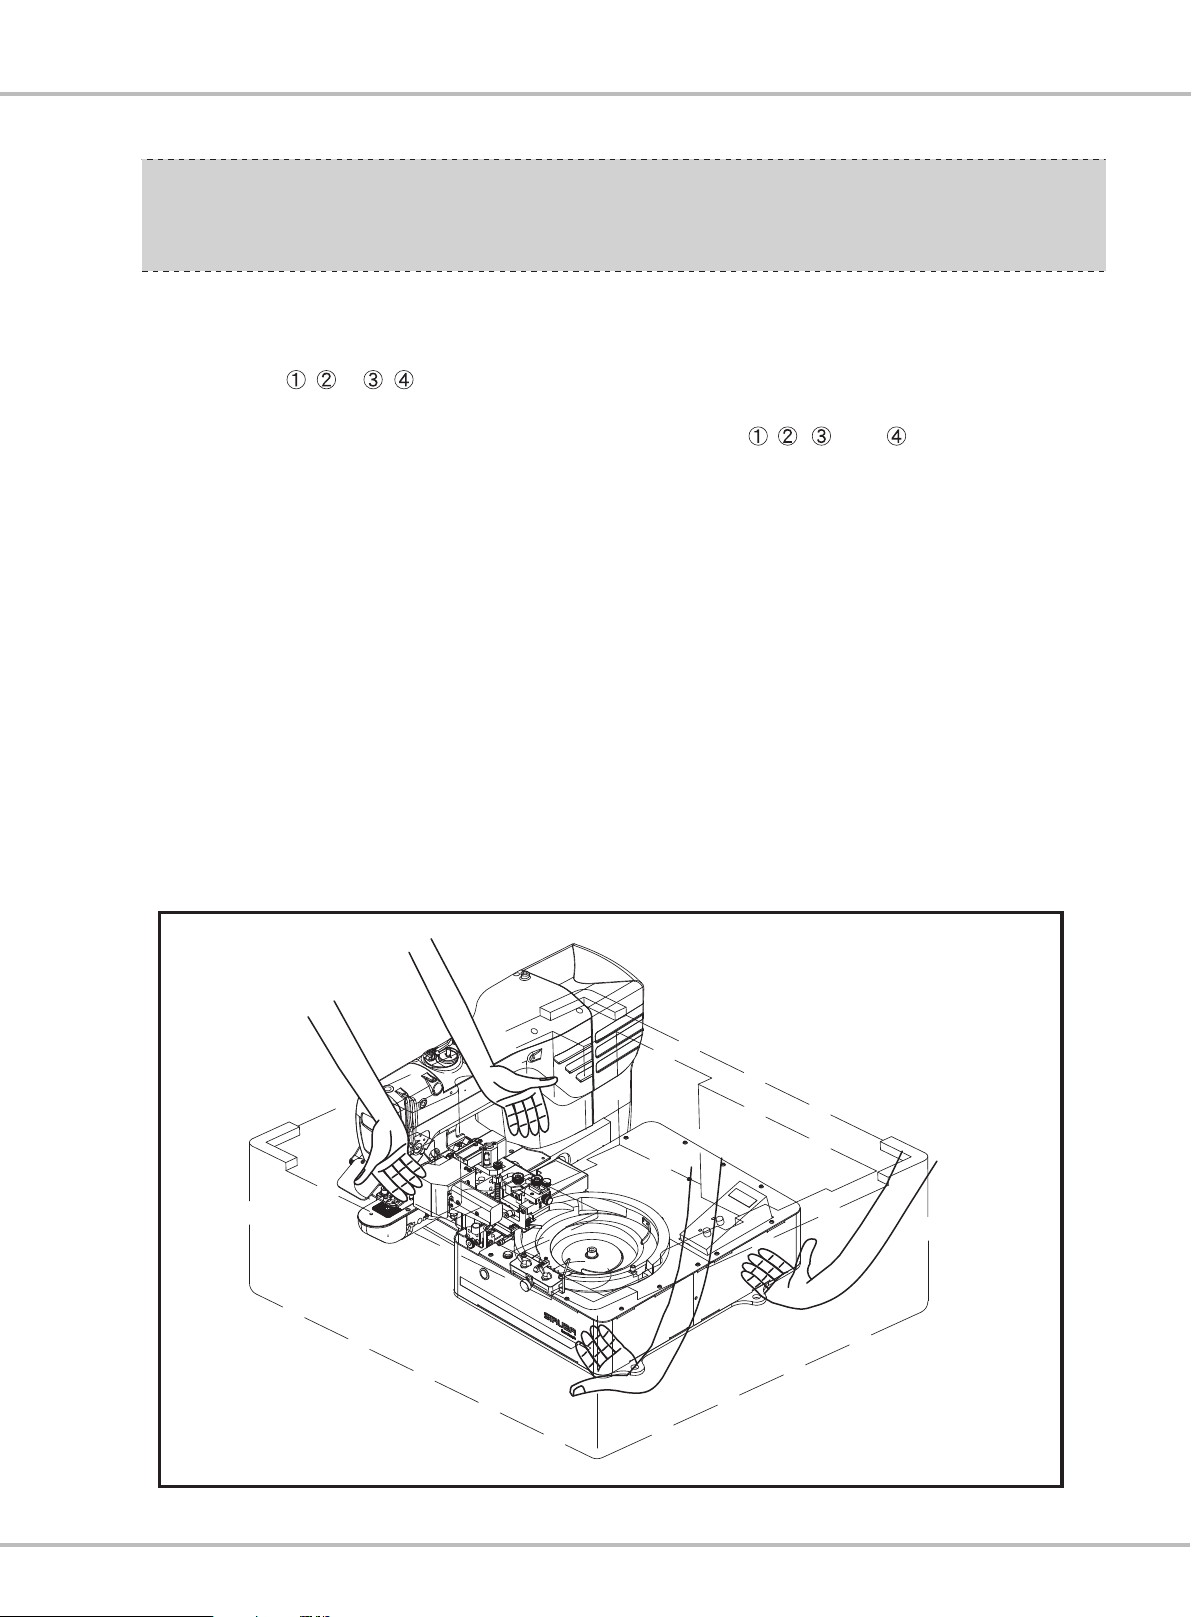
搬運 機 頭與 送釦 機
( 1 將 保 護 機 台 的 上 方 保 麗 龍 取 出 ,
)
當 要 取 出 機 台 時 須 由 二 至 三 人 協
助 搬 運 , 兩 人 將 雙 手 分 別 伸 入 機
台 的 底 部 、 與 、 , 兩 手 出
力 需 平 衡 , 身 體 與 膝 蓋 彎 曲 , 確
認 提 起 沒 問 題 後 , 再 慢 慢 起 身 ,
若 中 途 發 現 雙 手 無 法 支 撐 重 量
時 , 請 由 第 三 者 協 助 搬 運 或 輕 輕
放 至 穩 定 平 台 , 並 小 心 手 指 不 要
被 壓 傷 ; 請 更 換 適 當 人 員 , 絕 對
不 可 強 行 搬 運 , 以 免 發 生 身 體 傷
害 之 危 險 。
( 2 )搬 運 全 程 , 請 穿 著 安 全 鞋 。
3 4
) (圖 )
(圖
Introduction
REMOVE THE MAC HINE H EAD
AND THE FE EDIN G
BUT TON MACHIN E
1) Take out the polystyrene above the
(
machine. It is needed 2 to 3 people to
move out the machine together. Two
people stretch both hands into the
bottom , , , and of the bottom
of the machine with the balanced
strength. The knees and bodies
should be bent. After assuring the
state,move up the machine slowly. It
is necessary to ask for help if you
cannot stand the weight. Slowly pu
on the flat table and be careful not to
hurt your fingers. Ask for assistance if
you need. Do note remove with force
for avoiding danger.
(2) Please put on safety shoes during the
moving.
(Fig.3)(Fig.4)
t
圖3/Fig. 3
P5
Page 12
安裝 送 釦機 組與 操 作盒
圖4/Fig. 4
INSTALL TH E FEED ING BU T TON
MACHINE AND
THE OPERATOR PANEL
(1) 將 送 釦 機 組 上4個 孔 , 對 準 桌 板 上
的4個 孔 後 , 取 螺 絲 和 平 墊 片
從 送 釦 機 組 的 下 底 板 穿 入 桌 板 , 在 套
入 平 墊 片 和 彈 簧 墊 片 , 最 後 將 螺
帽 鎖 固 , 即 可 將 送 釦 機 組 安 裝 完
成 。
(2)把 木 螺 絲 把 操 作 盒 支 架 固 定 到 桌
板 上 , 把 電 纜 線
B
作 面 板 盒 吸 附 於 操 作 盒 支 架 上 。
(圖5)
A
穿 過 桌 板 孔 , 將 操
(1)Have the four holes on the feeding
button machine align to the four holes on the
table. P ut the screw and the washer
through the table form the bottom plate of the
machine.Then, cap with the washer and the
spring washer . Last, fasten the nut to
finish the installation.
(2)Fasten the operation panel bracket to the
table with the wood screw . Make the cable
through the hole on the table, and then fix
the operation panel box to the bracket
.( Fig.5)
A
B
P6
圖5/Fig. 5
Page 13
Introduction
電源 開 關的 安裝 、 連接
1.電 源 開 關 的 安 裝
依 照 指 示 圖(圖6)安 裝 相 關 電 纜 與 控 制
線 。 操 作 盒 的 電 纜 線 其 中 一 端 子 接
上 送 釦 機 組 上 的 通 訊 控 制 線 ; 送 釦
機 組 上 的 切 線 控 制 線 安 裝 在 機 頭 固
定 座 ; 將 送 釦 機 組 的 電 纜 線 和 電 控
箱 的 電 纜 線 同 時 安 裝 於 電 源 開 關
內 , 並 將 外 蓋 鎖 回 ; 電 源 開 關 用 木
螺 絲 固 定 到 桌 板 下 面 。 用 附 屬 的 卡
扣 固 定 好 送 釦 機 組 和 電 控 箱 的
電 纜 線 。(圖6)(圖7)
INSTALLATI ON & CON NECT ION
OF POWER S WITC H
1.Installation of Power Switch
Follow the direction graph (Fig6) to install the
related cable and the control wire. Connect
one terminal of the cable of the operation
panel to the control wire . Fix the trimming
sensor wire to the fixed seat machine set ;
fasten the cable of the feeding button
machine and the wire of the control box to the
power switch , and fasten to cover. Fasten
the power switch under the table with the
wood screw . Finally fasten the cables of the
feeding button machine and the control box
with the attached wire fasteners .(Fig.6)
(Fig.7)
圖6/Fig. 6
P7
Page 14
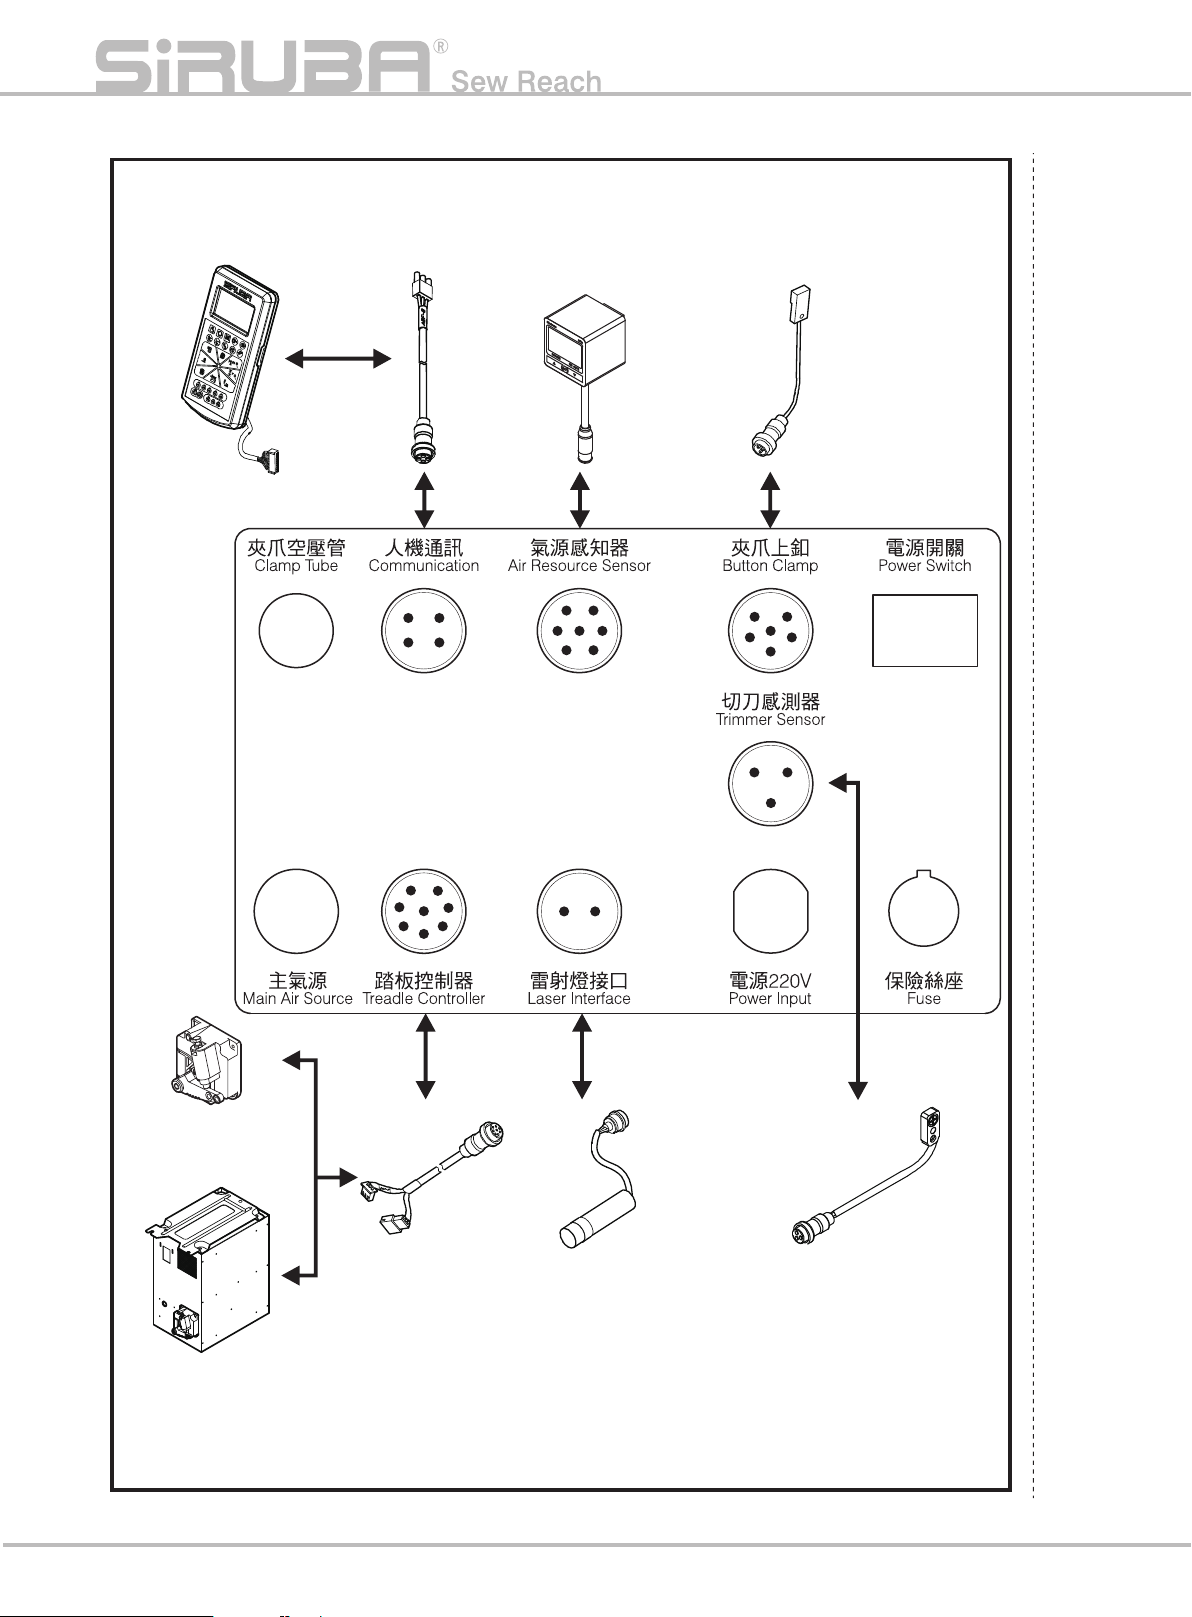
操作 盒
Operation Box
通訊 連接線
Communication
wire
電子 式壓力表
Electronic
Pressure
Gauge
夾爪 上釦感測器
Button Clamp
Sensor
ABF後方外
部連 接接頭
ABF Rear
External
Connecting
Joint
控速 器
Sp eed Controller
4P
8P
7P
2P
6P
3P
BT 290控 制箱
控速 器連接點
BT 290 Control Box Speed
Controller Contact
P8
踏板 控制線
Pedal Control
Wire
雷射 標定燈
Laser Indicator
切刀 感測器
Trimmer Sensor
圖7/Fig. 7
Page 15
Introduction
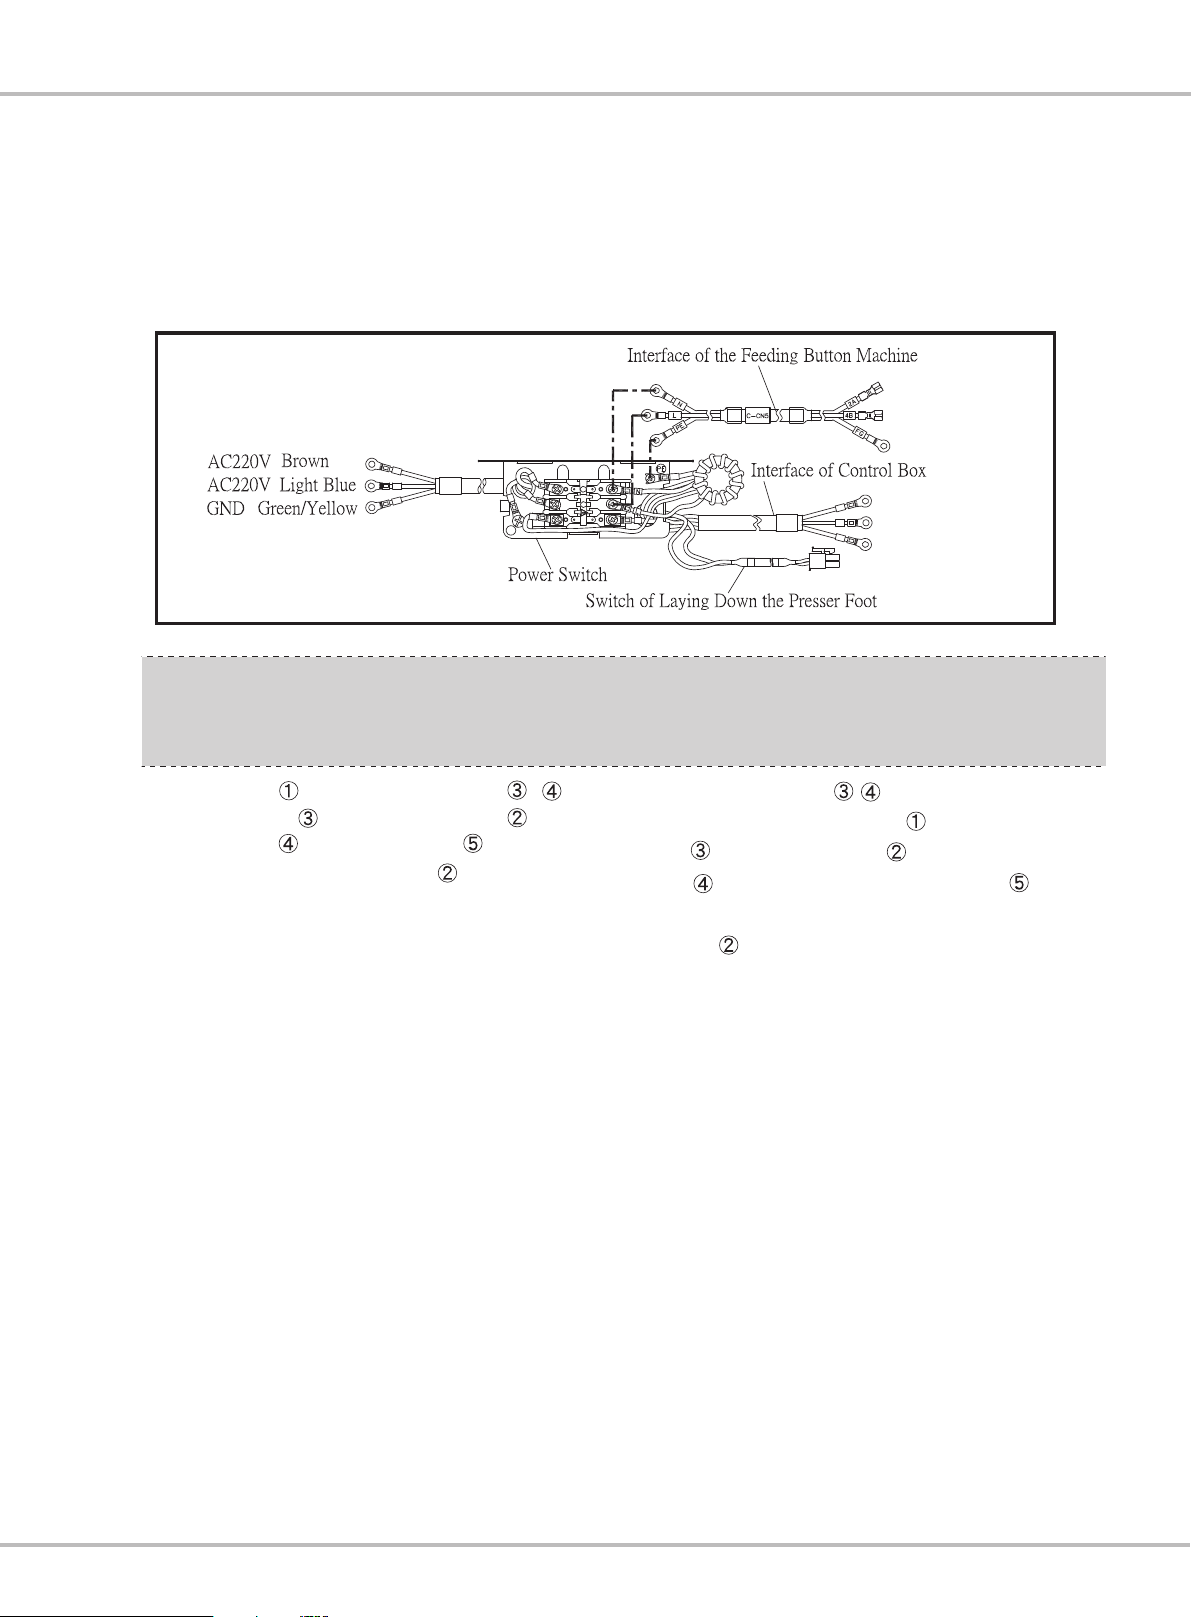
2.電 源 線 的 連 接 (圖8)
在 電 壓 標 籤 上 寫 有 電 壓 規 格 。 請 根 據 規
格 選 擇 電 壓 , 並 依 送 扣 機 組 電 纜 線 上 文
字 套 管 做 連 接 。
過濾 調 壓器 與空 壓 管之 安裝 與 調整
2.Connect the Power Wire (Fig. 8)
The voltage specification is on the voltage
label. Please choose the voltage by it,and
connect the wires bosed on the
descriptions on the tubes.
圖8/Fig. 8
INSTALLATI ON AND
ADJUST MENT O F THE FILTE R
REGULAR AND TH E TUBE
1.送 釦 機 組 的 後 方 有 兩 個 空 壓 管 、
, 將 空 壓 管 連 接 至 過 濾 調 壓 器 ;
將 空 壓 管 連 接 至 壓 腳 機 構 上 。
2.在 氣 壓 源 接 至 過 濾 調 壓 器 , 並 將 壓
力 錶 壓 力 調 至 4.5 ~4 .8 kgf/ cm 。
注 意 :
( 1 )工 作 場 所 使 用 的 空 壓 機 設 備 , 必 須 安
裝 濾 水 元 件 , 以 防 止 水 氣 進 入 機 台 而
引 發 觸 電 , 導 致 人 員 嚴 重 傷 害 或 死 亡
之 可 能 性 。
( 2 )當 過 濾 調 壓 器 的 壓 力 低 於4 kgf/c m 或
超 過5 kgf/c m, 可 能 會 導 致 送 釦 動 作 失
敗 。(圖9 )
1.There are two tubes , behind the
feeding button machine set . Connect the
tube to the filter regular . Connect the
tube to the presser foot mechanism .
2.Connect the pneumatic source to the filter
regular and adjust the presser to 4.5 ~4.8
kgf/cm.
Remark:
(1)The air compressor used in the work place
should be equipped with a filter element,
protecting the mechanism from water to
cause an electric shock to operators
seriously injured or even death.
(2)When the presser of the filter regula
lower than 4kgf/cm, or higher than 5 kgf/cm,
it might cause the button feeding
failure.(Fig. 9)
r is
P9
Page 16
圖10/Fig. 10
安裝 安 全開 關
INSTALL TH E SAFE TY SWI TCH
Take off the tape of the fixed safety switch
.(Fig. 10)
Note:
1. The sewing machine would work with
leaning down the machine and without
taking off the tape . But it is very
dangerous.
2. After the installation, if it happen the
abnormal E37 when the sewing machine
works. Please fasten the screw of the
safety switch; adjust the position of safety
switch under the sewing machine.
取 下 固 定 安 全 開 關 的 撥 桿 部 膠 帶 。
(圖10)
注 意:
1.在 不 取 下 膠 帶 而 使 用 的 話 , 當 放 倒
縫 紉 機 的 狀 態 下 縫 紉 機 也 會 運 作 , 這 是
非 常 危 險 。
2.安 裝 後 , 縫 紉 機 動 作 時 如 果 發 生 異 常
E 3 7, 請 用 螺 絲 起 子 鎖 緊 安 全 開 關 安 裝
螺 絲 , 向 縫 紉 機 的 下 方 調 整 安 全 開 關
的 位 置 。
安裝 線 架
INSTALL TH E THRE AD FRA ME
1.Install the thread frame to the holes of the
table.
2.Fasten the thread frame with the nut .
3.When wiring the upper thread, please insert
the power cord through the thread stand rod
.(Fig. 11)
1.把線架安裝到桌板孔上。
2.用固定螺帽 固定線架。
3.頂線配線時,請把電源線從線架桿 中
穿過。(圖11)
圖9/Fig. 9
P10
Page 17
Introduction
變頻 控 制器 操作 說 明
鈕 釦 的 運 送 方 式 是 經 由 振 動 變 頻 器 , 鈕
釦 依 循 振 動 盤 的 蝸 形 軌 道 運 送 至 送 扣
機 , 變 頻 器 面 板 功 能 說 明 如 下 。(圖12)
顯 示 面 板
顯 示 設 定 的 電 壓 及 目 前 振 動 頻 率 。
振 動(電 壓 、 頻 率)調 整 鈕
將 旋 鈕 順 時 針 轉 動 時 ,(電 壓 、 頻
率)漸 大 。
將 旋 鈕 逆 時 針 轉 動 時 ,(電 壓 、 頻
率)漸 小 。
圖11/Fig. 11
OPERATIO N OF THE I NVER TER
CONTROLLER
The way to send buttons is via the vibration
inverter. Buttons are sent by the vortex track to
the feeding button machine. The description of
function of the inverter panel as below: (Fig12)
Display Panel
Display the setting voltage and the
present vibration frequency.
Vibrating(Voltage,Frequency)adjusting
knob strengthen(Voltage,Frequency)by
turning the knob clockwise.
Weaken(Voltage,Frequency)by turning
the knob counterclockwise.
P11
Page 18
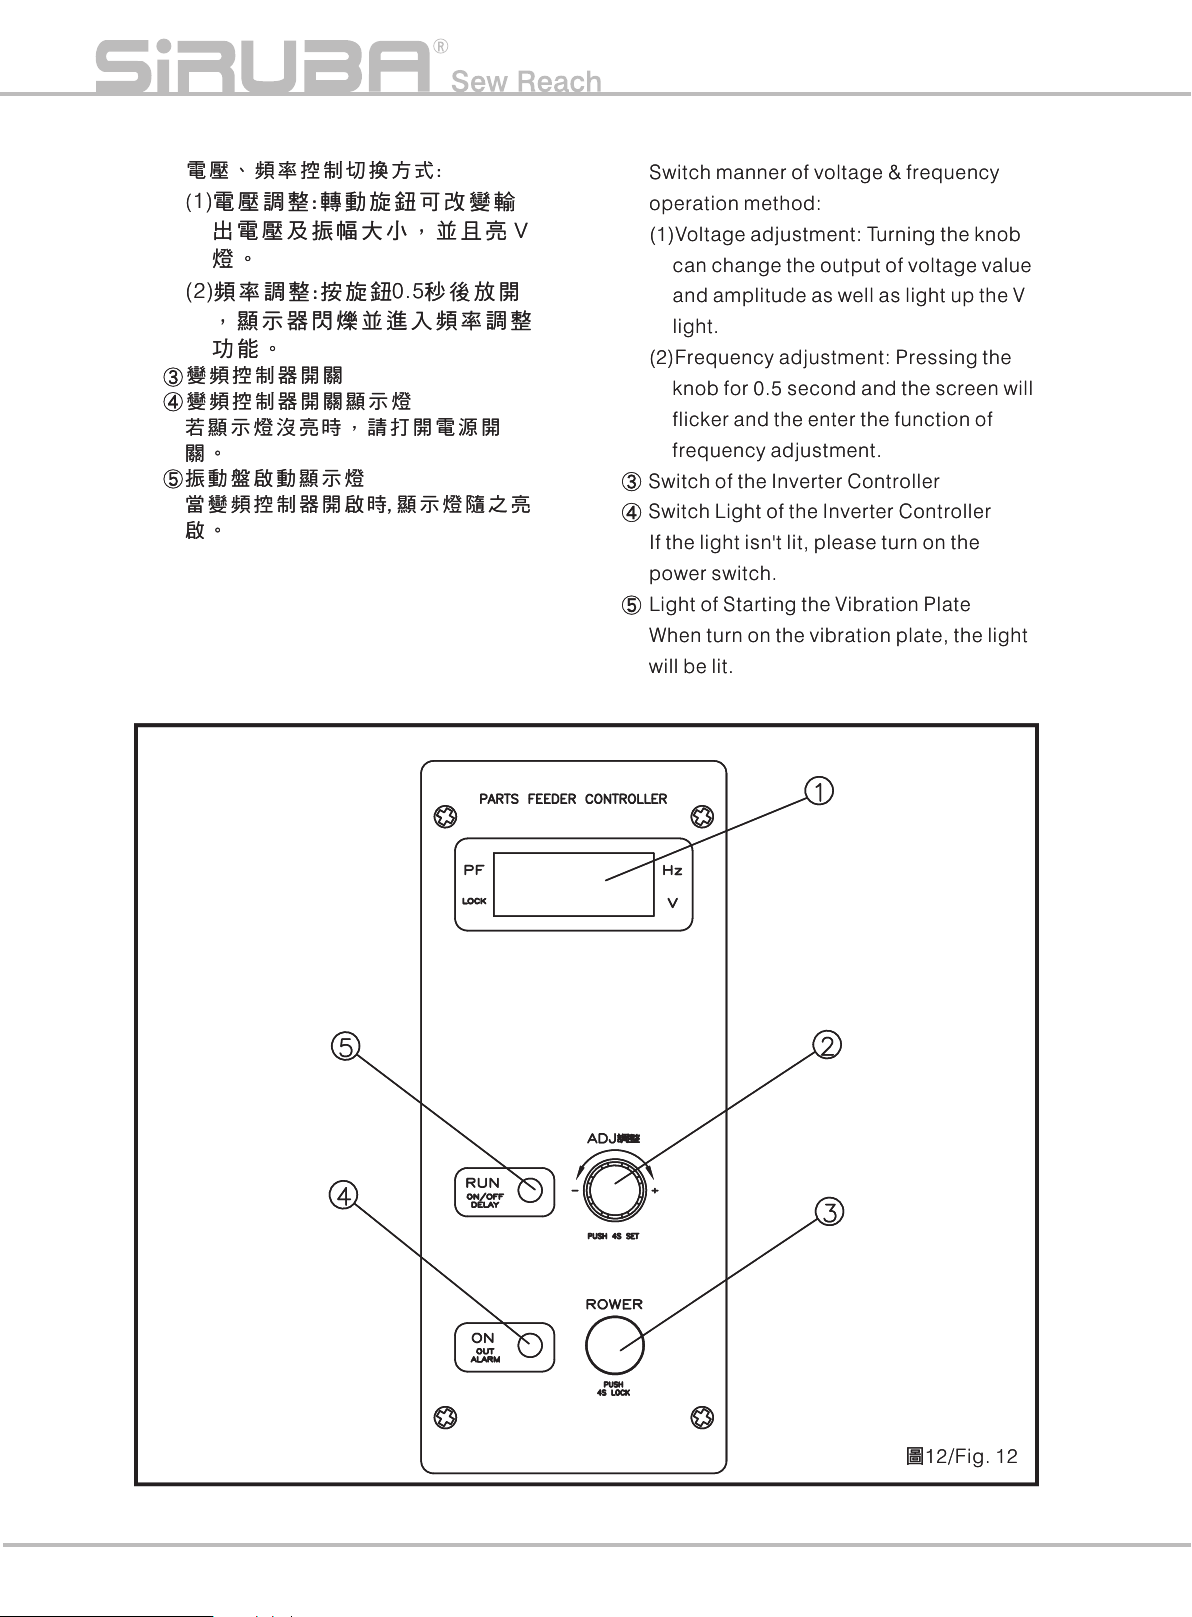
圖12/Fig. 12
(
1)電 壓 調 整:轉 動 旋 鈕 可 改 變 輸
出 電 壓 及 振 幅 大 小 , 並 且 亮 V
燈 。
(2)頻 率 調 整:按 旋 鈕0 .5秒 後 放 開
, 顯 示 器 閃 爍 並 進 入 頻 率 調 整
功 能 。
變 頻 控 制 器 開 關
變 頻 控 制 器 開 關 顯 示 燈
若 顯 示 燈 沒 亮 時 , 請 打 開 電 源 開
關 。
振 動 盤 啟 動 顯 示 燈
當 變 頻 控 制 器 開 啟 時,顯 示 燈 隨 之 亮
啟 。
電 壓 、 頻 率 控 制 切 換 方 式:
Switch manner of voltage & frequency
operation method:
(1)Voltage adjustment: Turning the knob
can change the output of voltage value
and amplitude as well as light up the V
light.
(2)Frequency adjustment: Pressing the
knob for 0.5 second and the screen will
flicker and the enter the function of
frequency adjustment.
Switch of the Inverter Controller
Switch Light of the Inverter Controller
If the light isn't lit, please turn on the
power switch.
Light of Starting the Vibration Plate
When turn on the vibration plate, the light
will be lit.
P12
Page 19
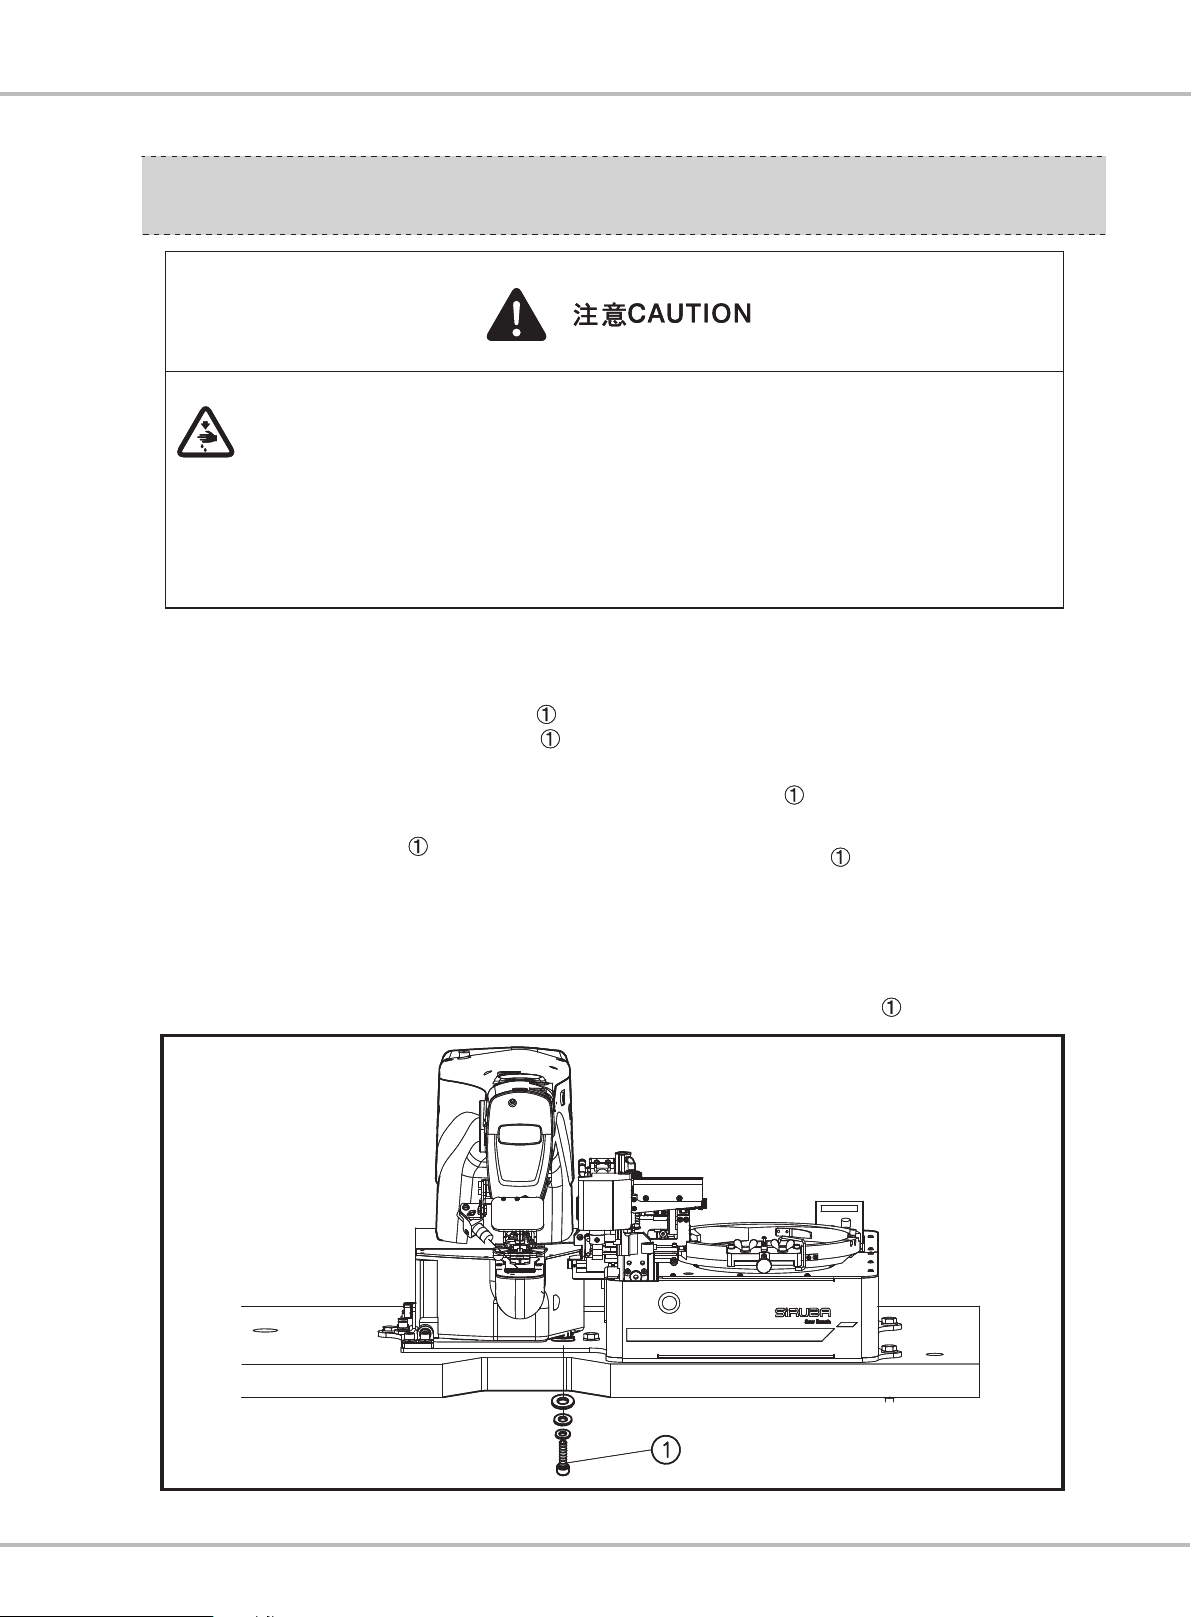
傾放 與 扳回 機頭
傾放 與 扳回 機頭
進 行 維 修 或 調 整 時 , 為 了 避 免 突 發 狀 況 發 生 而 導 致 意 外 , 請 務 必 先 關 閉 電 源 再
進 行 維 修 或 調 整 時 , 為 了 避 免 突 發 狀 況 發 生 而 導 致 意 外 , 請 務 必 先 關 閉 電 源 再
進 行 操 作 ; 需 要 將 機 台 傾 放 縫 紉 機 , 請 注 意 手 指 被 縫 紉 機 或 送 釦 機 給 夾 傷 , 尤
進 行 操 作 ; 需 要 將 機 台 傾 放 縫 紉 機 , 請 注 意 手 指 被 縫 紉 機 或 送 釦 機 給 夾 傷 , 尤
其 是 扳 回 機 頭 時 。
其 是 扳 回 機 頭 時 。
For avoiding the emergency or accidence, please make sure to turn off the power to
For avoiding the emergency or accidence, please make sure to turn off the power to
operate when doing maintenance or the adjustment. It is needed to lean he sewing
operate when doing maintenance or the adjustment. It is needed to lean he sewing
machine, and please pay attention your fingers not to be pinched , especially when
machine, and please pay attention your fingers not to be pinched , especially when
recovering the machine.
recovering the machine.
縫 紉 機 與 送 釦 機 是 固 定 在 同 一 板 子 上 ,
縫 紉 機 與 送 釦 機 是 固 定 在 同 一 板 子 上 ,
不 需 擔 心 兩 者 配 合 問 題 , 使 用 者 僅 需 固
不 需 擔 心 兩 者 配 合 問 題 , 使 用 者 僅 需 固
定 於 桌 板 , 即 可 準 備 車 縫 鈕 釦 。 為 求 機
定 於 桌 板 , 即 可 準 備 車 縫 鈕 釦 。 為 求 機
頭 的 穩 定 度 , 在 板 子 底 部 裝 有 一 螺 絲
頭 的 穩 定 度 , 在 板 子 底 部 裝 有 一 螺 絲
固 定 。 因 此 若 要 將 機 頭 傾 倒,需 將 螺 絲
固 定 。 因 此 若 要 將 機 頭 傾 倒,需 將 螺 絲
鬆 開 。 需 將 機 頭 歸 位 時 , 要 注 意 機 頭 輕
鬆 開 。 需 將 機 頭 歸 位 時 , 要 注 意 機 頭 輕
輕 扳 回 , 且 小 心 手 指 被 壓 傷 ; 也 不 可 過
輕 扳 回 , 且 小 心 手 指 被 壓 傷 ; 也 不 可 過
猛 扳 回 , 以 免 損 壞 機 座 及 基 準 變 動 。 當
猛 扳 回 , 以 免 損 壞 機 座 及 基 準 變 動 。 當
縫 紉 機 定 位 後,再 將 螺
縫 紉 機 定 位 後,再 將 螺
絲 鎖 回 。(圖 )13
絲 鎖 回 。(圖 )13
Introduction
LEAN & RECOVER
LEAN & RECOVER
THE MACHINE HE AD
THE MACHINE HE AD
Due to the sewing machine and the feeding
Due to the sewing machine and the feeding
button machine are fixed on the same board,
button machine are fixed on the same board,
there is no worry about the combination.
there is no worry about the combination.
Users merely fix the machines on the table and
Users merely fix the machines on the table and
then it can start the task. Keeping the stability,
then it can start the task. Keeping the stability,
there is a screw under the board to fix the
there is a screw under the board to fix the
machine. Thus, if leaning the machine head,
machine. Thus, if leaning the machine head,
loosening the screw first. When recovering
loosening the screw first. When recovering
the machine head, pay attention to put it gently
the machine head, pay attention to put it gently
and be careful of fingers from being hurt. Not
and be careful of fingers from being hurt. Not
to move back forcefully, it is easy to damage
to move back forcefully, it is easy to damage
the bottom and the benchmark. After fixing the
the bottom and the benchmark. After fixing the
machine, fasten the screw .(Fig.13)
machine, fasten the screw .(Fig.13)
圖13/Fig. 13
圖13/Fig. 13
P13
Page 20
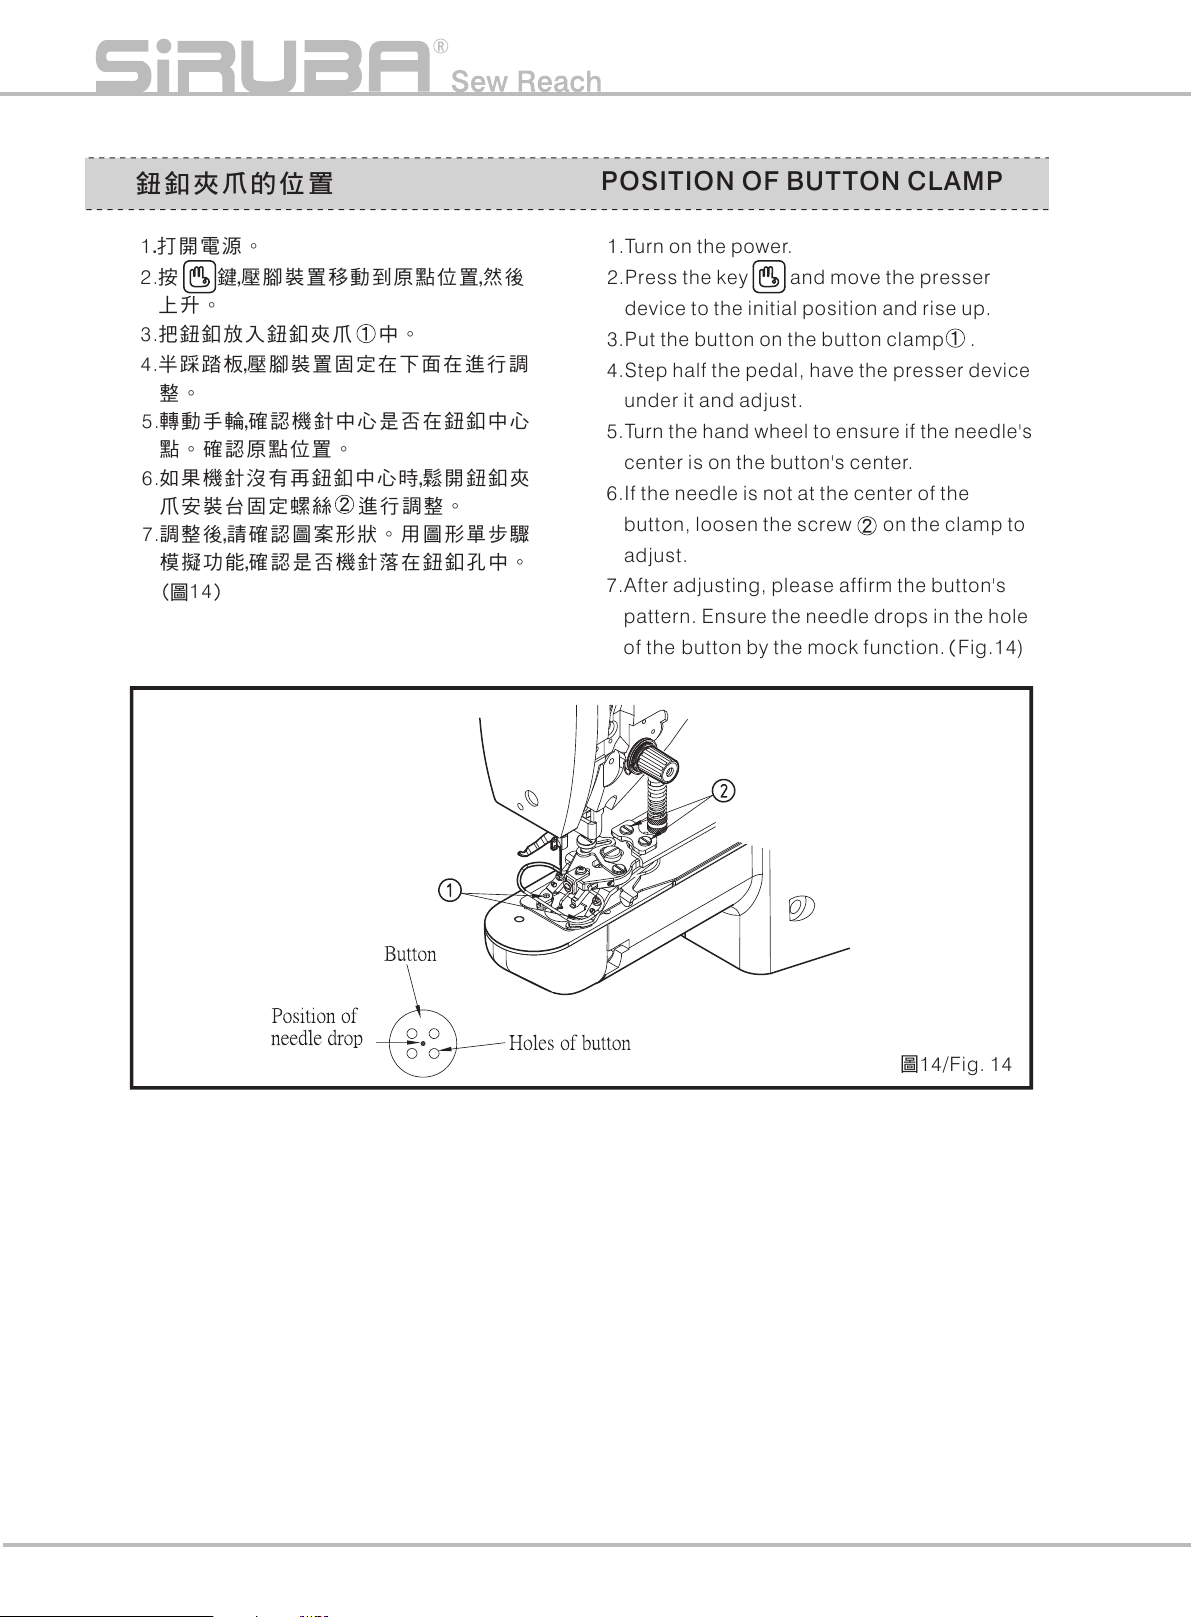
1.Turn on the power.
2.Press the key and move the presser
device to the initial position and rise up.
3.Put the button on the button clamp .
4.Step half the pedal, have the presser device
under it and adjust.
5.Turn the hand wheel to ensure if the needle's
center is on the button's center.
6.If the needle is not at the center of the
button, loosen the screw on the clamp to
adjust.
7.After adjusting, please affirm the button's
pattern. Ensure the needle drops in the hole
of the button by the mock function.(Fig.14)
1.打開電源。
2.按 鍵,壓腳裝置移動到原點位置,然後
上升。
3.把鈕釦放入鈕釦夾爪 中。
4.半踩踏板,壓腳裝置固定在下面在進行調
整。
5.轉動手輪,確認機針中心是否在鈕釦中心
點。確認原點位置。
6.如果機針沒有再鈕釦中心時,鬆開鈕釦夾
爪安裝台固定螺絲 進行調整。
7.調整後,請確認圖案形狀。用圖形單步驟
模擬功能,確認是否機針落在鈕釦孔中。
(圖 )14
圖14/Fig. 14
鈕釦 夾 爪的 位置
POSITI ON OF BU T TON CLAMP
P14
Page 21

Introduction
調整 布 壓腳 底板
注意:若不小心踩到踏板,壓腳裝置會上下
移動,以及當二次踩時送釦機會有
動作。為了避免突發狀況發生而導
致意外,請務必先關閉電源再行調
整。變更了鈕釦形狀、圖案,或調
整
X、Y長寬度範圍功能變更了縫紉
寬度之後,請一定要確認落針位置
為鈕釦中心點。如果不壓腳與針孔
導板相碰,會發生斷針危險。
1.打開電源。
2.按 鍵,壓腳裝置移動到原點位置,然後
上升。
3.調整布壓腳底板 ,使針孔導板正好在
布壓腳底板 的中心 。(圖15)
ADJUST T HE FABRIC PRES SER
FOOT BOT TO M PLATE
Note: If step on the pedal accidentally, the
presser device will move up and down;
step on it again the feeding button
machine will start work. Avoiding the
emergency and accidents, please make
sure to turn off the power and then do
the adjustment. As long as the sewing
width is changed by changing the
button shape, patterns or adjusting X, Y
length and width range, please confirm
the dropper position is the center of the
button. If the fabric presser foot collides
with needle hole guide will cause the
needle broken.
1.Turn on the power.
2.Press key. The presser foot device move
to ori
ginal position and then lifting.
3.Adjust the cloth presser foot bottom plate
to make the needle hole guide plate at the
central part of the fabric presser foot
bottom plate .( Fig.15)
圖15/Fig. 15
P15
Page 22
Loosen screw , and move the presser foot
lifting fixed plate to lift the presser foot
height. (Adjust the height in demand. The max
height is 13mm.)
Note: When the presser foot lifting fixed plate
moves the A direction, it becomes
shorter; moving to B, the lifting height
becomes taller.(Fig.16)
鬆開螺絲 ,移動壓腳提升固定板 ,使
壓腳高度提升。(壓腳提升量依實際需求調
整,最大高度為13m m)
注意:壓腳提升固定板 當向A方向移
動,提升量變低,向B移動則變高。
(圖 )16
圖16/Fig. 16
調整 鈕 釦壓 腳上 升 量
ADJUST T HE BUT T ON PRE SSER
FOOT LIF T ING HE IGHT
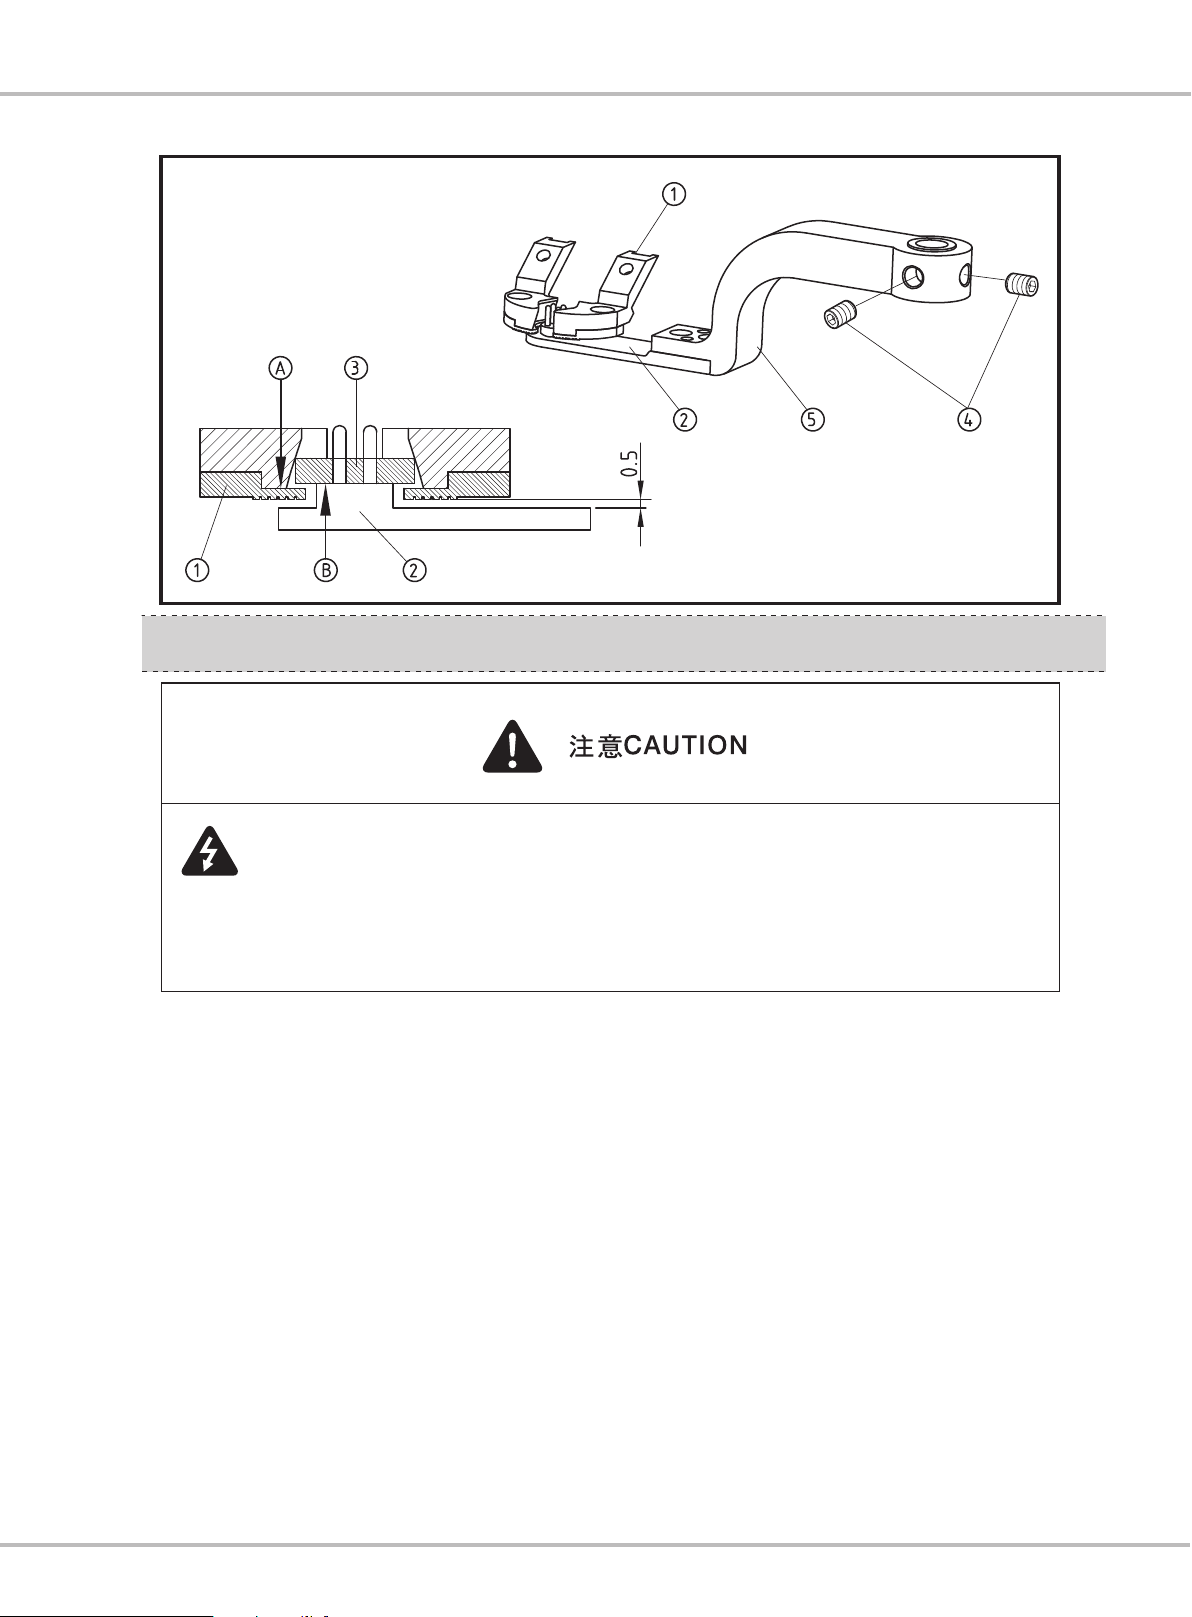
調整 鈕 釦夾 爪與 送 釦撥 爪間 隙
ADJUST T HE GAP B ETWE EN
THE BUTTON CLAM P
AND THE FE EDIN G PLATE
The gap between the clamp and the
feeding plate is at 0.5mm.If the gap is too
narrow, the two would be crashed and
damage the parts; If the gap is too wide, (
side of button is lower than side of
clamp , button cannot be clamped in the
clamp , so the button bounce out (Button
feeding failure). The adjustment is to loosen
screw and adjust the height of the bracket
, affirm to adjust to the correct gap, fasten
the screw .(Fig.17)
鈕釦夾爪 與送釦撥爪 間隙在
0.5 mm之間,若此間隙過小則兩件會產生
碰撞導致零件損傷;若間隙太大 ( 鈕釦
的 面低於鈕釦夾爪 的 面 ) ,鈕釦
因無法完整夾持在鈕釦夾爪 內部,
而
導致鈕釦被彈出 ( 送釦失敗 )。調整方
法,將螺絲 放鬆後調整支架 的高
低,確定調整到正確間隙後,再將鎖回螺
絲 。(圖 )17
A
B
B
A
P16
Page 23
Introduction
圖17/Fig. 17
更換 保 險絲
為 了 防 止 觸 電 事 故,請 關 掉 電 源 過5分 鐘 後 再 打 開 控 制 箱 、 送 釦 機 蓋 子 , 更 換 保
險 絲 需 依 規 定 容 量 , 規 格 如 下 說 明 。
Preventing from electric shock, please turn off the power for 5minutes, and then
open the control box, and cover of the feeding button machine. Must follow the
regulation to substitute the fuse; the specification as below:
1.電源濾波板(F1 :電源輸入保險絲。
2.伺服板(F2 ):DC48V電 路 高 壓 端 保 險
(F4): 輸 入 感 應 器 電 源 及 風 扇
3.步進板(F1 ): 下 夾 線 步 進 馬 達 電 路 。
(F2):X軸 步 進 馬 達 電 路 。
(F3):Y軸 步 進 馬 達 電 路 。
(F4): 四 合 一 步 進 馬 達 電 路 。
4.送釦
主機板(F5): 電 源 輸 入 保 險 絲 。
)
絲。
DC2 4V保險絲。
(圖18) (圖1 9)
SUBSTI TUTE F USE
1.Emi Filter ( F1 ):Power input fuse.
2.Servo Board ( F2 ):DC48V High voltage
circuit fuse.
( F4 ):Input sensor power and
fan DC24V fuse.
3.Stepping Board ( F1 ):Lower thread grip
stepping motor
circuit.
( F2 ):X axis stepping
motor circuit.
( F3 ):Y axis stepping
motor circuit.
( F4 ):Four in one stepping
motor circuit.
4.Feeding button motherboard ( F5 ):Power
input fuse. (Fig 18)(Fig 19)
P17
Page 24

圖18/Fig. 18
圖19/Fig. 19
P18
Page 25

Introduction
更換 鈕 釦需 要注 意 的步 驟
1.重 新 偵 測 鈕 釦 大 小(圖20)
取 一 新 鈕 釦 放 置 在 鈕 釦 調 整 組 平 台
上 , 姆 指 將 靠 邊 器 向 外 推 動 , 食 指
同 時 將 活 動 壓 板 往 上 拉 , 即 可 將 新
鈕 釦 放 入 。 當 手 指 放 開 後 , 靠 邊 器
與 活 動 壓 板 , 將 會 自 動 歸 至 定 位 。
2.調 整 鈕 釦 高 度 間 隙(圖20)
在 振 動 盤 運 作 當 中 , 若 發 現 鈕 釦 高 度 間
隙 太 大 或 不 足 , 可 依 需 要 調 整 適 當 高
度 , 調 整 鈕 向 順 時 針 或 逆 時 針 方 向
旋 轉 至 所 需 要 的 高 度 。 當 調 整
時 , 調 整 桿 會 上 下 動 作 , 帶 動 控 制
鈕 釦 間 隙 的 射 釦 塊 作 上 下 動 作 。
注 意 : 變 更 鈕 釦 的 厚 度 需 要 特 別 注 意 ,
當 鈕 釦 間 隙 太 小 , 會 影 響 鈕 釦 無
法 進 入 送 釦 軌 道 ; 若 鈕 釦 間 隙 太
大 , 會 發 生 鈕 釦 重 疊 問 題 , 導 致
送 釦 失 敗 , 無 法 車 縫 。
鈕 旋 轉
THE REMARKAB LE STE PS
OF SUBST ITUT E BUTTO NS
1. Detect the size of button again (Fig 20)
Put the new button on the adjusting plate
, thumb push aside device outward; at
the same time, index finger pull the
movable plate up, and then the new
button can be put in. After the fingers
release, the aside device and movable
plate will be positioned automatically.
2.Adjust the gap of the button height (Fig 20)
If find the gap of the button height is too
large or insufficient during the vibration
working, it can adjusted in demand. Adjust
knob clockwise or counterclockwise to
t
he height in demand. When turning the
adjusting knob, the adjusting bar will
move up and down and then, it has the
feeding block act.
Note: Pay attention to the thickness of
different buttons, if the gap of buttons is
too small, it will cause the feeding
failure; if the gap is too large, it will
cause the problem of buttons
overloading and the failure of feeding.
圖20/Fig. 20
P19
Page 26

圖21/Fig. 21
3
.Adjust the adjusting buttons device (Fig21)
Due to the difference of buttons, adjust the
serrated plate on the adjusting buttons
device to button’s 0.7 ~ 0.8 times. Please
refer to (Adjust the details in vibration plate
com.) for the adjusting method.
3 調 整 選 釦 器(圖2 1 )
因鈕釦大小有差異,需將選釦器 上篩
選鈕釦正反面的鋸齒板 調整到鈕釦的
0.7~ 0 .8倍 左 右 。 調 整 的 方 法 請 參 閱 (振
動盤組細部調整)。
.
(2) The small button serrated plate is set on
the machine while manufacturing; thus,
when sewing big buttons,please change to
the big button serrated plate . The
changing manner is as below: Loosen the
tw
o knobs on the adjusting buttons
device for one circle. Turn the turning
knob counterclockwise until the two
screws on the small button serrated plate
showed completely. Then, remove the
two screws with the slotted screwdriver .
(2) 出廠為小鈕釦鋸齒板 ,需使用大鈕
釦時,請更換成大鈕釦鋸齒板
,更改
方式為:先將選釦器
上的兩顆手鈕
旋開一圈,旋轉鈕 逆時針旋轉至小鈕
釦鋸齒板
上兩顆螺絲 至 完全顯現,
並使用一字起子
,將兩顆螺絲 卸
除,並取出大鈕釦鋸齒板
做更換,並
將螺絲
鎖回並鎖緊;旋轉鈕 順時針
旋轉,調整到可以全部篩選至正面為
止,並將兩顆手鈕
和旋轉鈕 同時鎖
緊。
4. Adjust the stopper on the vibration plate
(Fig 22)
(1) Suggestion of selecting the serrated
plate
:(Table 2)
4.更換大、小鈕釦鋸齒板(圖22)
(1)
大、小鈕釦鋸齒板選用建議:(表2)
使用 鈕釦
Using Buttons
尺寸: ∮8 ~16mm
Size: ∮8 ~16mm
尺寸: ∮16 ~25mm
Size: ∮16 ~25mm
小鈕 釦鋸齒板
The small button serrated plate
大鈕 釦鋸齒板
The big button serrated plate
表2/Table2
11
13
12
14
14
12
12
11
11
14
12
14
13
14
P20
Page 27

Introduction
5.調整振動盤面的撥釦板 (圖23 )
撥釦靶共有三件。將撥釦板 調整在鈕
釦的1.3倍 左 右 , 不 可 調 太 高 , 以 免 造 成
鈕釦重疊而無法正常送釦。調整的方法
請參閱。(振動盤組細部調整)
6.換釦注意事項 (圖23 )
振動盤內 若有先前使用的鈕釦,要清
除乾淨,以免混淆導致車縫問題,除了
盤面上的鈕釦外,軌道內的鈕釦取出;
請按下退釦鈕 ,鈕釦就會從軌道全部
吹出來。
16
17
15
Substitute with the big button serrated plate
and fasten with the screws . Turn the
turning knob clockwise, and adjust it until
all the positive sides of buttons could be
chosen. Finally fasten the two knobs and
the turning knob .
5
.Adjust the stopper on the vibration plate
(Fig 23)
There are three stoppers. Adjust the
stopper about the button's 1.3 times, and
not too high, for avoiding the button
overloading and feeding failure. Please
refer to (Adjust the details in vibration plate
com.) for the adjusting method.
6
.The remarks of substitute the buttons
(Fig 23)
If there a
it is needed to be cleaned. Not only take out
all the buttons on the plate, but take out all
the buttons on the track. Please press the
button ,and all the button will be blown
out from the track.
12
12
15
re buttons in the vibration plate ,
17
14
11
16
圖22/Fig. 22
P21
Page 28

圖23/Fig. 23
7.電控啟動新釦軌道之寬度 (圖24 )
電腦會依所放的鈕釦讀出數據顯示在面
板上 ,操作如下說明:使用操作盒,
按準備鍵 兩次,就會進入顯示鈕釦尺
寸 畫面(本畫面顯示鈕釦為12. 8mm)。
再按一次準備鍵 時,送釦機將會開始
運作,自動調整送釦軌道,該軌道寬度
即為目前使用鈕釦所需的寬度。(調整細
節在後章節說明)
7
.Electric start the width for the new button
(Fig 24)
Computer will display the data on the panel
according to the button put on. The
operation is as below: Operation panel,
press twice and enter the panel of
display the button size (The panel shows
the button is 12.8mm). Press again, the
feeding button machine will start work, and
auto adjust the feeding track. The wid
th of
the track is the width of the button in
demand.(The adjusting details will be
described in the following chapter.)
18
19
18
19
P22
Page 29

Introduction
振動 盤 組細 部調 整
1. 振動盤面僅用一顆固定螺絲 固鎖,若
發現振動盤面有異聲時
絲是否有鬆脫,且振動盤面不可與送釦
機台面直接接觸,兩者間隙為1mm。
2. 撥釦板調整。鈕釦頂部與撥釦板 、 、
的適當間隙為鈕釦的1.3倍 左 右 , 調 整 時
需將螺絲 、 鬆開,上或下的移動撥
釦板,完成後鎖回螺絲。(圖25)
,應先檢查此螺
圖24/Fig. 24
ADJUST T HE DETAI LS IN
THE VIBRATION PL AT E COM
1.There is only one fixed screw fastened on
the vibration plate. If there is weird sound
from the vibration plate, please check if the
screw is loosening or not. The vibration plate
cannot touch the feeding machine directly.
There should be 1mm gap between them.
2. Adjust the stopper: The gap between the top
of button and the stopper , is 1.3 times
of the height of the button. Before adjusting,
loosen screw and ; move the stoppers
up and down. After adjusting, fasten the
screw. (Fig 25)
P23
Page 30

3.選釦器調整。選釦器 的功能是篩選鈕
釦的正反面與排除鈕釦堆疊的發生。只
有翻正的鈕釦可以通過;沒有翻正的鈕
釦就會掉落至盤底而重新篩選。調整選
釦器 的方法:鬆開兩顆手鈕 ,旋轉
鈕 向右時逆時針旋轉,鋸齒板 向往
前移動;反之向移動。調整到可以全部
篩選至正面為止。完成後將兩顆螺絲
鎖緊,並將旋轉鈕 也鎖緊,若旋轉鈕
沒有完成鎖緊,則振動盤組會發出刺
耳異聲(共振)。原則上限高器 調整的
時機是在較薄或較厚的鈕釦,調整限高
器 的方法:將螺絲 放鬆,螺絲 向
上或向下調整高度,確定後再將螺絲
鎖回。(圖25)
4.鈕扣放置數量建議:
小鈕釦(8mm ~16mm ):1000顆
大鈕釦(16m m~25m m):150顆
3
.Adjust the button selection device: The
function of device is to select the side of
button and avoid overloading. Only the
positive side can pass; those negative
sides of buttons wil
l fall down to the bottom
and restart selecting. Adjust the button
selection device : Loosen two knobs ,
turn the knob counter clock wise, and
move the serrated plate forward. Adjust it
until it can select all the positive sides of
buttons. Then, fasten two screw and
fasten the knob . If the knob isn't
fastened completely, the vibration plate will
sound piercingly (Resonance). Basically,
the timing of adjusting the limit device is
when selecting the thinner or thicker
buttons. The way to adjust the limit device
: Loosen screw , adjust screw up or
down. After completion, f
asten the screw .
(Fig.25)
4.Suggestion of buttons on the plate:
Small buttons :1000 pics
Big buttons :150 pics
(8mm~16mm)
(16mm~25mm)
11
12
圖25/Fig.25
12
12
11
12
P24
Page 31

Introduction
更換 送 鈕撥 爪
鈕釦的規格眾多,鈕釦大小、孔數、孔距
均不同,因此當更換鈕釦時,同時也必須
需更換送釦撥爪 ,更換的方式為:使用
操作盒,按參數設定鍵 ,按項目選擇鍵
,當出現畫面 ,按準備鍵
進入設定,按項目選擇鍵 ,此時送鈕撥
爪會送出,這時就可以更換撥爪〈除機頭
外,配件盒共有10種送釦撥爪〉,將2顆螺
絲 鬆開,更換送鈕撥爪後,再將螺絲
鎖固即可。(圖26)
SUBSTI TUTE T HE
FEEDIN G PLATE
There are many different specifications of
buttons, including the size, hole and the
distance of holes. Thus, when changing the
buttons, there is necessary to change the
feeding plate at the same time. The steps
are as following: Use the operation panel,
press , and press the item selection key
.When display , press to the
setting. Press the item selection key , and
the feeding plate will and the feeding plate will
move out and can be changed. (Except the
machine head, there are 10 kinds of feeding
plate in the accessories.) Loosen t
, change the feeding plate, and then fasten
screw .( Fig.26)
wo screws
圖26/Fig. 26
P25
Page 32

更換 旋 轉軸 的橡 膠 座
SUBSTI TUTE T HE RUBBER
PLATE ON THE T URNI NG BAR
Because the rubber plate touches the
feeding plate all the time, it will be worn-out.
The timing of changing it is relying on the time
of using. If the damage is slight, it still can be
used. The way to substitute: Use the
operation panel press the , press the item
selection key . When display ,
press key to the setting. Press the item
selection key and the rubber plate will
be sent and can be changed. Take it out with
the two attached wrenches, one for the axis
center of the cylinder ; the other is for the
hexagonal nut on the rubber pl
ate of the
cylinder . Fix it with the wrench , and
move the wrench counterclockwise. Then,
take off the rubber plate .Follow the above
steps to change the new rubber plate . After
completion, it is needed to be back to the
initial. Press the key twice on the operation
panel to back to the main window. (Fig.27)
橡 膠 座 因 每 次 須 與 送 釦 撥 爪 接 觸 , 經
多 次 運 轉 後 , 會 有 磨 損 發 生 , 而 更 換 時
間 需 依 實 際 磨 耗 決 定 ; 若 只 是 輕 微 磨 損
則 可 繼 續 使 用 。 更 換 方 式 為 : 使 用 操 作
盒 , 按 參 數 設 定 鍵 , 按 項 目 選 擇 鍵
, 當 出 現 畫 面 , 按 準 備 鍵 進 入
設 定 , 按 項 目 選 擇 鍵 , 橡 膠 座 送 出 ,
此 時 可 更 換 橡 膠 座 ; 將 隨 機 所 附 的 兩 支
板 手 取 出 , 一 支 鈑 手 卡 住 氣 缸 的 軸
心 上 , 另 一 鈑 手 卡 住 氣 缸 上 橡 膠 座
的 六 角 螺 帽 , 以 鈑 手 固 定 不 動 , 鈑
手 向 逆 時 針 方 向 扳 轉 , 即 可 將 橡 膠 座
取 下 。
要 安 裝 新 橡 膠 座 , 請 依 循 上
述 動 作 即 可 。 更 換 完 成 後 需 要 回 復 原
點 , 則 在 操 作 盒 按 鍵2次 回 主 畫 面 。
(圖27)
A
B
A
A
B
A
B
B
圖27/Fig. 27
P26
Page 33

Introduction
送釦 夾 爪規 格
如 下 說 明(圖28) (表3)
零件 編碼
Codes of P arts
ABF118 2.2 1.0 4
ABF119 2.2 1.0 2
ABF120 2.4 1.2 4
ABF121 2.4 1.2 2
ABF122 2.8 1.2 4
ABF123 2.8 1.2 2
ABF124 3.2 1.2 4
X
SPECIF ICATIO N OF BUT T ON
PLATE
Description as below (Fig28) (Table3)
D
鈕釦 孔數
Button Holes
ABF125 3.2 1.2 2
ABF126 3.6 1.2 4
ABF127 3.6 1.2 2
表3/Table3
圖28/Fig. 28
P27
Page 34

控制 系 統架 構
CONTROL SYST EM STR UCTURE
1.ABF Mainframe1.A BF主機
高電 壓保護機板
High Voltage
電源AV220V
Power AC220V
DV24V電源供應器
DV24V Power
Supplier
變頻 控制器
Variable Frequency
Controller
振動 盤
Vibration
Plate
ABF控制板
ABF Control Board
RS232通訊
Rs232
Communication
馬達 控制
Motor
Control
電阻 尺輸入
Potentiometer
Input
輸出 控制
Output
Control
ABF I/O板
ABF I/O
Board
雷射 燈輸出
Laser
Output
輸入
Input
機板 連接線
Board
Connecting
Wire
電源DC24V
Power DC24V
變頻 控制輸出
Variable
Frequency
Control Output
電源AV220V
Power AC220V
步進 馬達
Stepper Motor
電阻 尺
Potentiometer
電磁 閥組及其他控
制開 關
Solenoid Set and
Other Switches
Control
ABF內部感測元件
ABF Internal
Sensor
ABF外部
感測 元件
ABF
External
Sensor
雷射 燈
Laser
控制 盒
Control Box
盤內 Inside
盤外 O utside
輸入
Input
P28
Page 35

Introduction
硬體 設 備
1.ABF控制板(圖29)
CN6
CN4
CN1 CN2
HARD WARE
1.ABF control panel (Fig.29)
CN5
CN9
圖29/Fig. 29
CN1 輸出控制 Output control
PIN 符號 Symbol
1 OUT 1
2 OUT 2
3 OUT 3
4 OUT 4
5 OUT 5
6 OUT 6
7 OUT 7
8 OUT 8
9 OUT 9
10 OUT A
11 OUT B
12 OUT C
電磁 閥1出口門擋 Solenoid 1 Outside stopper
電磁 閥2旋臂送出 Solenoid 2 Rotary arm
電磁 閥3鈕扣夾爪 Solenoid 3 Clamp
電磁 閥4旋臂上下 Solenoid4 Arm up/down
電磁 閥5壓扣上下 Solenoid 5 Button fixed
電磁 閥9壓扣旋轉 Solenoid 9 Rotation
電磁 閥10射扣吹氣 Solenoid 10 Blowing
振動 盤開關 Vibration plate switch
踏板 聯動開關 Pedal linkage switch
說 明 Description
13 24V
14 24V
DC24V 電源輸出 Power Output
DC24V 電源輸出 Power Outp
ut
P29
Page 36

Cn2 I/O portI/O
板連接埠
PIN 符號 Symbol
說 明 Description
1 5V
5V輸出 5V output
2 YL
雷射 燈輸出點 Output point of laser
3 NC
4 NC
5 NC
6 NC
7 DC24V
DC24V 電源輸出 DC24V Power output
8 DC24V
9 DC 0V
10 DC 0V
11 IN 1
軌道 開度設定感應器 Sensor setting of the width of the track
12 IN 2
氣源 偵測感應器 Sensor of detecting air
13 IN 3
旋臂 原點位置感應器 Sensor of the rotary arm's origin position
14 IN 4
手動 補釦按鈕 Manual switch
15 IN 5 切刀原點位置 Sensor of the trimmer感應 器
16 IN 6 夾爪上釦 Sensor of the clamp 感應 器
17 IN 7 軌道開度極限 Sensor of the limit width of the track.感應 器
18 IN 8
19 IN 9
20 IN 10
P30
Page 37

CN 4 步進馬達 Stepping motor
Introduction
PIN 符號 Symbol
A
1 CA
2 CB
3 A
4 /A
5 B
6 /B
CN 5 RS232通 信接口1 RS232 inform. Interface 1
PIN 符號 Symbol
1 TXD
2 RXD
3 GND
相中心點 Center of A phase
相中心點 Center of B phase
B
相 A phase
A
相 /A phase
/A
相 B phase
B
/B相 / B phase
RS232信號輸出 RS232 signal output
RS232信號輸入 RS 232 signal input
說 明 Description 線色 Color
白 white
黃 yellow
紅 red
藍 blue
綠 green
黑 black
說 明 Description
CN 6 DC24V 輸 入 DC24V input
PIN 符號 Symbol
1 24V
DC24V 電源輸入 DC24V power input
2 0V
3 FG
CN 9 電阻尺信號輸入 Potentiometer signal input
PIN 符號 Symbol
1 5V
2 GND
3 RIN
4 NC
外殼接地 Earth
說 明 Description 線色 Color
5V電源輸出 5V power output
GND
電阻尺信號輸 入 Potentiometer signal input
說 明 Description
紅 red
黑 black
藍 blue
P31
Page 38

2.ABF I/O bard(Fig.30)2.A BF I/O板(圖 30 )
圖30/Fig. 30
CN1
ENC
IN 1
IN 1~IN 10 輸入信號 Input signal
PIN 符號 Symbol
說 明 Description
IN(X)_Pin1 P24 此接點 為輸出24v Output 24V
IN(X)_Pin3 N20
此接 點為輸出 GND Output GND
IN 1_Pin2 IN 1 軌道開度設定感應器 Sensor setting of the width of the track
IN 2_Pin2 IN 2 氣源偵測感應器 Sensor of detecting air
IN 3_Pin2 IN 3 旋臂原點位置感應器 Sensor of the rotary arm's origin position
IN 4_Pin2 IN 4 手動補釦按鈕 Manual switch
IN 5_Pin2 IN 5 切刀原點位置感應器 Sensor of the trimmer
IN 6_Pin2 IN 6 夾爪上釦感應器 Sensor of the clamp
IN 7_Pin2 IN 7 軌道開度極限感應器 Sensor of the limit width of the track.
IN 8_Pin2 IN 8
IN 9_Pin2 IN 9
IN 10_Pi
n2 IN 10
IN 2
IN 3
IN 4
IN 5
IN 6
IN 7
IN 8
IN 9
IN 10
P32
Page 39

CN 1 ABF控 制板連 接埠 ABF control panel port
Introduction
PIN 符號 Symbol
1 5V 5V輸出 5V output
2 YL
3 NC
4 NC
5 NC
6 NC
7 DC24V
8 DC24V
9 DC 0V
10 DC 0V
11 IN 1 軌道開度設定感應器 Sensor setting of the width of the track
12 IN 2 氣源偵測感應器 Sensor of detecting air
13 IN 3 旋臂原點位置感應器 Sensor of the rotary arm's origin position
雷射 燈輸出 Laser output
DV24V 電源輸出 DC 24V power output
說 明 Description
14 IN 4 手動補釦按鈕 Manual switch
15 IN 5 切刀原點位置感應器 Sensor of the trimmer
16 IN 6 夾爪上釦感應器Sensor of the clamp
17 IN 7 軌道開度極限感應器Sensor of the limit width of the track.
18 IN 8
19 IN 9
20 IN 10
ENC 雷射燈輸出
PIN 符號 Symbol
1 NC
2 YL
3 5V
4 NC
雷射 燈輸出 Laser output
5V輸出 5V output
說 明 Description
5 NC
P33
Page 40

CON 1 AC220V 輸入 AC220V Input
符號 Symbol
說 明 Description
AC_L
AC220V輸 出 AC220V output
AC_N
3.ABF high-voltage defender (Fig.31)3.A BF 高 電 壓 保 護 板 (圖31)
CON 2 DC24V ABF系統電 源 DC24V ABF system power
PIN 符號 Symbol
說 明 Description
1 L AC220V輸出 AC220V output
2
3 N
AC220V輸 出 AC220V output
CON 3 DC24V 振動盤電源 DC24V vibration plate power
PIN 符號 Symbol
說 明 Description
1 L AC220V輸出 AC220V output
2
3
4 N
AC220V輸 出 AC220V output
圖31/Fig. 31
CON2
CON3
CON1
P34
Page 41

DC24V電源供 應器(圖32)
4.
CN5
Introduction
4.DC24V Power Supplier(Fig.32)
CN1
圖32/Fig. 32
CN 1 AC110/220V電源輸 入 AC110/220V Power input
PIN 符號 Symbol
1 L AC220V輸出 AC220V output
2
3 N
CN 5 DC電源輸出 DC Power output
PIN 符號 Symbol
1
2
3
4 DC24V
5 0V GND輸 出 GND output
6
AC220V輸 出 AC220V output
DC24V輸出 DC24V output
說 明 Description
說 明 Description
7
8
P35
Page 42

簡易 操 作流 程
SIMPLE O PERATI ON STE PS
1.Sewing procedure
1.縫製流程
按 及 鍵選
擇Y軸: 中心距大小
Press and
Key to Select Y-axis
Length Range.
按項 目選擇鍵選
擇圖 形
Press Item
Selection Key
按 及 鍵選
擇X軸: 中心距 大小
Press and
Key to Select X-axis
Length Range.
按準 備鍵進
入縫 製模式
Press Ready
Key
to enter the
sewing
mode.
按 及 鍵選 擇鈕
扣直 徑範圍(或使用編碼
器自 動檢測鈕扣直徑範
圍)
Press and Key
to Select Pitch Range(Or
use the auto encoder th
detect the diameter or
the buttons.)
按 及 鍵選
取縫 紉轉速
Press and
Key to Select
Sewing Rotational
Speed.
按準 備鍵
Press Ready Key
(1)A01 Set the Speed of Feeding Buttons. (1)A01送 鈕速度 設定
按準 備鍵儲存
Press ready key
to save
此時 畫面出現
A01
The panel
displays A01.
按參 數設定鍵
Press the
parameter
setting key.
按M鍵回 主畫面
Press the M key to be
back the main window.
設定 在2 : 一般
(無法 變更)
Setting in 2:Normal
(Can not be changed)
按準 備鍵
Press Ready Key
2.Parameter setting procedure
2.參數設定流程
A參數
A Parameter
按參 數設定鍵進入
Press Parameter-Setting Button.
U參數
U Parameter
按M鍵進 入U參數
Enter the parameter U by pressing the M key.
H參數
H Parameter
按M鍵5秒進 入H參數
Press the M key for 5 sec to enter the parameter H.
P36
Page 43

Introduction
(2)A02 Examine the Sensor Signal (2)A02傳 感器訊 號檢驗
按參 數設定鍵
Press the
parameter
setting key.
手動 檢測各訊號該數字點
有閃 滅表示sensor正常
Manually detect each
signal. If the points of
numbers glitter, it
indicates the sensor is
normal.
(3)A03送 鈕撥爪 定位校 正(啟動此參數,請
先將BT290作home ,否則會有誤動作撞
機的 情況產生)
按項 目選擇鍵
Press the Item
Selection Key.
1:送釦軌道定位開關
1: Sensor of Positioning The Feeding Track
2 氣源偵測感測器
2: Air detecting sensor
3 旋臂原點位置開關
3: Sensor of The Rotary Arm
4 手動按鈕訊號
4: Manual Button Signal
5 切刀原點位置開關
5: Sensor of The Trimmer Initial Position
6 夾爪上釦開關
6: Buttons on the clamp
7 軌道開度極限開關
7: Sensor of The Track Width
:
:
:
:
:
:
此時 畫面出現
A02
The panel
displays A02.
(3)A03 Adjust the position of the feeding plate.
(Activate this parameter. Please set BT290
as HOME, or it is easy to cause the error.)
按準 備鍵進入設定
Press ready key for
setting
按M鍵2次回 主畫面
Press the M key
twice to be back
the main window..
按參 數設定鍵
Press the
parameter
setting key.
按項 目選擇鍵 ,此時送鈕撥
爪送 出,請轉動手轉軸對正送
Press the item selection key
and sending the feeding
plate. Please turn the turning
bar to locate to the center of
the feeding clamp.
注意 :送鈕撥爪中心點需與機針同心,如有
偏差 容易造成斷針或鈕扣破裂。
按項 目選擇鍵
Press the Item
Selection Key.
鈕撥 爪正中心
此時 畫面出現
A03
The panel
displays A03.
按項 目選擇鍵 ,此時送
鈕撥 爪回復原點
Press the item selection
key and the feeding
plate back to the initial
position.
Note:The central point of the feeding plate
按準 備鍵進入設定
Press ready key for
should be aligned to the needle;
otherwise, it is easy to cause the broken
needle or the buttons damaged.
setting
按M鍵2次回 主畫面
Press the M key
twice to be back
the main window..
P37
Page 44

(4)A04 Change the rubber plate.
(Not applicable for this machine type)
(4)A04更 換橡膠 座(此機種 不適用)
按參 數設定鍵
Press the
parameter
setting key.
按項 目選擇鍵
Press the Item
Selection Key.
按準 備鍵進入設定
Press ready key for
setting
此時 畫面出現
A04
The panel
displays A04.
按M鍵2次回 主畫面
Press the M key
twice to be back
the main window..
按項 目選擇鍵 ,橡膠座送出
此時 可更換橡膠座
Press the item selection key
, and send the rubber plate.
Meanwhile, change the
rubber plate.
按項 目選擇鍵 橡膠座回
復原 點
Press the item selection
key , and the rubber
plate back the initial
point.
(5)A05 Turn on the Feeding Test Mode.(5)A05送 鈕測試 模式開 放
按參 數設定鍵
Press the
parameter
setting key.
按項 目選擇鍵
Press the Item
Selection Key.
按準 備鍵進入設定
Press ready key for
setting
此時 畫面出現
A05
The panel
displays A05.
按M鍵1次回 主畫面
Press the M key
once to be back
the main window..
按項 目選擇鍵 選擇0關閉
或1開放 手動送鈕測試模式
Press the Item Selection Key
to 0 turn off or 1 turn on
the manual feeding test
mode.
按準 備鍵儲存
Press the Ready
Key to save.
Note: Be sure of the parameter A05 before
sewing. It is necessary to be set at 0;
otherwise, it couldn't start sewing.
注意 :車縫前需確定A05參數,需設定 在零
否則 無法進行車縫。
P38
Page 45

Introduction
(6)Mode of the motor’s single motion (6)A06馬達單步移動模式
按參 數設定鍵
Press the
parameter
setting key.
按項 目選擇鍵 此時鈕釦通
Press the item selection key
and the button track will
open at the same time.
注意 :使用A06模式後,車縫時需重新設定
鈕扣 尺寸,否則會產生錯誤動作。
(7)A07各 氣缸單 步模式(啟 動此參 數,請先
將BT290作home)
按項 目選擇鍵
Press the Item
Selection Key.
道會 打開
此時 畫面出現
A06
The panel
displays A06.
按項 目選擇鍵 此時鈕釦
通道 會關閉
Press the item selection
key and the button track
will close at the same time.
Note: Using the mode of A06, it is needed to
(7)A07 Cylinder Single Step Mode (For starting
this parameter, please have BT290 be
home.)
按準 備鍵進入設定
Press ready key for
set the size of buttons when sewing; or, it
is easy to cause the mistake action.
setting
按M鍵2次回 主畫面
Press the M key
twice to be back
the main window..
按參 數設定鍵
Press the
parameter
setting key.
Cylinder1
Cylinder2
Cylinder3
Cylinder4
Cylinder5
按項 目選擇鍵
Press the Item
Selection Key.
氣缸1
氣缸2
氣缸3
氣缸4
氣缸5
此時 畫面出現
displays A05.
外門 檔
Outside stopper
旋臂 送出
Rotary arm
夾抓
Clamp
旋臂 上下
Arm up/ down
上下 壓釦
Button fixed
A07
The panel
按準 備鍵進入
設定
Press ready
key for setting
氣缸6
Cylinder6
氣缸7
Cylinder7
氣缸8
Cylinder8
氣缸9
Cylinder9
氣缸10
Cylinder10
按M鍵2次回 主畫面
Press the M key
twice to be back
the main window..
壓扣 旋轉
Rotation
進釦 吹氣
Blowing
P39
Page 46

按參 數設定
鍵
Press the
parameter
setting key.
按項 目選擇鍵
Press the
Item
Selection
Key.
按準 備鍵進
入設 定
Press ready
key for
setting
A09設定畫面
A09 parameter
(8)A09 Adjustment of the potentiometer (8)A09電 阻尺調 校
A0 9
按項 目選擇鍵
設定 最大值
Set the max value
by pressing the
item seleetion .
按準 備鍵
儲存
Press the
Ready
Key to
save.
按準 備鍵進
入設 定
Press ready
key for
setting
進入 設定最大值畫面
此時 畫面閃爍.
Enter the pane of setting
the biggest value.
At this moment, the
panel is flickering.
A0 9
進入 設定最小值畫面
此時 畫面閃爍.
Enter the panel of setting
the smallest value.
At this moment, the
panel is flickering.
A0 9
將鈕 釦量測機
構開 至最大
Open the
button
detecting
device to the
largest.
將鈕 釦量測機
構關 至最小
Close the
button
detecting
device the
smallest
按準 備鍵儲存
Press ready
key for save.
A0 9
A0 9
完成 設定.此時設定
最小 值畫面不閃爍.
Finish the setting
and the panel of
setting the smallest
value is flickering.
完成 設定.此時設定
最大 值畫面不閃爍.
Finish the setting
and the panel of
setting the biggest
value is flickering.
按M鍵回
A09設定畫面
Press M
button back
to A09
parameter..
選擇A09
Select A09
A0 9
按準 備鍵進
入設 定
Press ready
key for
setting
按M鍵3次回
主畫 面
Press the M
key thrice to
be back the
main window.
按項 目選擇鍵
設定 最小值
Set the min
value by
pressing the
item seleetion .
進入 設定最大值畫面
此時 畫面閃爍.
Enter the pane of setting
the biggest value.
At this moment, the
panel is flickering.
A0 9
進入 設定最小值畫面
此時 畫面閃爍.
Enter the panel of setting
the smallest value.
At this moment, the
panel is flickering.
A0 9
P40
Page 47

XX
Introduction
(9)U27 Adjust the light of the laser(9)U27雷 射燈亮 度調整
U2 7
按M鍵進 入U參數
Enter the parameter
U by pressing the M
U2 7雷射燈亮度調整
U27 Adjust the light of
the laser
key.
XX
U2 7
+
-
按項 目選擇鍵 選擇 0 ~ 15:
0 :關閉
1 :最暗
15:最亮
Press the item selection button
to choose 0~15
0 : Shut down
1 : the darkest
15 : the brightest
注意 :參數配合出機械夾具規格設定,請勿
任意 變更設變,避免產生誤動作。
+
-
按準 備鍵進入設定
Press ready key for
setting
按準 備鍵儲存
Press the Ready
Key to save.
按M鍵1次回 主畫面
Press the M key
once to be back
the main window.
Note: The parameter coordinates with the
default specification setting of the
mechanical clamp. Please do not
change the setting for avoid the error.
按M鍵進 入U參數
Enter the parameter
U by pressing the M
key.
按項 目選擇鍵 選擇
0 ~ 2000(ms): (每次增 減100)
0 :不延遲
2000:延遲2000(ms)
Press the item selection button
to choose
0 : No delay
2000 : delay for 2000(ms)
U2 8
XX X
U2 8
U28延遲送釦設定
U28 Setting of
delaying feeding-
buttons
XX X
(10)U28 Setting of delaying feeding-buttonser(10)U28延遲送釦設定
按準 備鍵儲存
Press the Ready
Key to save.
按準 備鍵進入設定
Press ready key for
setting
按M鍵2次回 主畫面
Press the M key
twice to be back
the main window.
P41
Page 48

Note: The parameter coordinates with the
default specification setting of the
mechanical clamp. Please do not
change the setting for avoid the error.
(11)H39 Select big/small buttons(11)H39大/小鈕釦選擇
按M鍵5秒進 入H參數
Press the M key for
5 sec to enter the
parameter H.
按準 備鍵進入設定
Press ready key for
setting
H39選擇鈕釦大小機型
The panel H39 is for
selecting the button’s
size.
H3 9
0
H3 9
1
按項 目選擇鍵 選擇
0:為 小鈕釦ø8-ø 16
1:為 大鈕釦ø16- ø25
Press the Item Selection Key
to choose.
0 :It is for small buttonsø 8-ø 16
1:It is for large buttonsø1 6-ø 25.
按M鍵2次回 主畫面
Press the M key
twice to be back
the main window.
注意 :參數配合出機械夾具規格設定,請勿
任意 變更設變,避免產生誤動作。
按準 備鍵儲存
Press the Ready
Key to save.
(12)H40 parameter setting single/on-line
machine
(12)H40單機/聯機設定
按M鍵5秒進 入H參數
Press the M key for
5 sec to enter the
parameter H.
按準 備鍵進入設定
Press ready key for
setting
此時 畫面出現
H40
The panel
displays H40.
按項 目選擇鍵 選擇自動模式
Press the Item Selection Key
to choose the automatic mode.
H4 0
H4 0 H4 0
按準 備鍵儲存
Press the Ready
Key to save.
按M鍵2次回 主畫面
Press the M key twice
to be back the main
window.
按項 目選擇鍵 選擇手動模式
Press the Item Selection Key
to choose the manual mode.
Note: The normal default setting is the
automatic button feeding.
注意 :正常出廠時使用自動送釦設定。
P42
Page 49

H4 1
Introduction
(13)H41 parameter setting of air detecting(13)H41氣源偵 測設定
按M鍵5秒進 入H參數
Press the M key for
選擇H41
Select H41
5 sec to enter the
parameter H.
H4 1 H4 1
按項 目選擇鍵 選擇氣源偵測開
Press the Item Selection Key
to choose the air-resource
detection ON.
按準 備鍵儲存
Press the Ready
Key to save.
按M鍵2次回 主畫面
Press the M key twice
to be back the main
按準 備鍵進入設定
Press ready key for
setting
按項 目選擇鍵 選擇氣源偵測關
Press the Item Selection Key
to choose the air-resource
detection OFF.
window.
(14)H42 Setting of buttons on the clamp(14)H42 夾爪上釦設定
de t-
H4 2
ON
OR
按M鍵5秒進 入H參數
Press the M key for
5 sec to enter the
parameter H.
H4 2
進入 畫面H42
Enter the panel
de tOF F
H42.
de t-
H4 2
OF F
按項 目選擇鍵 選擇夾爪上釦
偵測 功能關
Press the item selection button
to deactivate the button
detection function.
注意 :當H42設為ON時,若縫製 模式下,夾 爪
上無 鈕釦,則出現E48警示.需在夾爪上
放上 鈕釦才可繼續縫製
按準 備鍵進入設定
Press ready key for
setting
按準 備鍵儲存
Press the Ready
Key to save.
Note: When setting H42 as ON, with the
sewing mode, if there is no button on the
clamp, it will display the warning E48 .
The sewing won’t continue until putting a
button on the clamp.
de t-
H4 2
ON
按項 目選擇鍵 選擇夾爪上釦
偵測 功能開
Press the item selection button
to activate the button
detection function or the clamp.
按M鍵2次回 主畫面
Press the M key twice
to be back the main
window.
P43
Page 50

簡易 維 修流 程圖
BLOCK DIAG RAM OF
SIMPLE R EPAIR
1.出現錯誤代碼E20 : 操 作 盒 與A BF機台控
制基板通訊異常
1.Display the error code E20
:
The communication between the operation
and the control board of ABF machine is
abnormal.
ABF主機電源已
開啟 ?
Is the power
supply in the
ABF machine
turned on?
YES
檢查ABF主機與BT290主機
訊號 線是否連接?
Check if the signal wire
between the ABF machine
and the BT290 is
connected.
YES
檢查ABF控制基板
是否 有DC24V電
壓?
Check if the
DC24V voltage is
in the ABF
control board.
NO
檢查ABF主機與
BT290主機訊號線
是否 連接?
Check if the signal
wire between the
ABF machine and
the BT290 is
connected.
NO
NO
YES
開啟 電源?
Turn on the
power supply
重新 接妥信號線並檢查有無
接觸 不良的問題
Reconnect the signal wire
appropriately and check if
there is a problem of the
connection.
更換ABF內主機板
Substitute
another ABF
motherboard
2.出現錯誤代碼E4 1 : 送 鈕 扣 機 馬 達 原 點
檢索錯誤
2.Display the error code E41
:The detection
error of the feeding button motor origin.
檢查I/O板上
IN1感測器連接
器有 無鬆脫?
If the IN1
sensor
connector on
the I/O board is
loose?
YES
接妥 後重新測
試?
Connect
appropriately
and test again.
NO
進入 參數A02檢查感測器是
否有 亮滅反應或以一字起子
接觸 感測器上LED有無亮滅
反應 ?
Enter the parameter A02
detector to check if it can
work; check if the LED on
the sensor can be lit or
extinguish by touching it
with a slotted screwdriver.
YES
檢查 步進馬達
STEP1連接器是否
鬆脫 ?
If the STEP1
connector on the
stepping motor is
loose.
NO
更換ABF內之電源
供應 器後重新再測
一次
Substitute another
ABF switch power
and test again.
NO
YES
更換 感測器
Replace with another
sensor.
重新 接妥訊號線
並檢 查有無接觸
不良 問題
Reconnect the
signal wire and
test if there is a
problem of
connection
更換ABF機台內控
制基 板
Replace with
another control
board in the ABF
machine
NO
P44
Page 51

Introduction
3.出現錯誤代碼E4 2: 送 鈕 機 構 故 障
檢查 磁簧開關安
裝位 置是否正
確?
If the
installation of
the reef switch
is correct?
NO
調整 磁簧開關
Adjust the reef
switch.
進入 參數A02檢查感測器是
否有 亮滅反應或以一字起子
NO
接觸 感測器上LED有無亮滅
反應 ?
Enter the parameter A02
detector to check if it can
work; check if the LED on
the sensor can be lit or
extinguish by touching it
with a slotted screwdriver.
檢查I/O板上IN3位置訊號線
鬆脫 ?
Check If the IN3 position
signal wire on the I/O board
is loose?
NO
YES
3.Display the error code E42
of the feeding button mechanism
檢查ABF控制基板
是否 有DC24V電
YES
壓?
Check if the
DC24V voltage is
in the ABF
control board.
更換ABF機台內控
制基 板
Replace with
another control
board in the ABF
machine
YES
檢查 連接至主機之
訊號 線或更換I/O板
NO
後重 新再測一次?
wire connected to
the motherboard or
substitute the I/O
:The breakdown
Check the signal
panel and test
again.
接妥 訊號線重新測試
Connect the signal wire
appropriately and test
again.
4.出現錯誤代碼E4 3 : 最 大 尺 寸 安 全 保 護
開關異常
檢查 安全開關位
置是 否正確?
Is the position
of the safety
switch is
accurate?
NO
調整 安全開關到
正確 位置
Adiust the
safety switch to
the accurate
position
檢查I/O板上IN7位置訊號線
YES
Check If the IN7 position
signal wire on the I/O board
重新 接妥訊號線並檢查有無
Reconnect the signal wire
and check if there is a
problem of connection
鬆脫 ?
is loose?
YES
接觸 不良問題
4.Display the error code E43
size of safety protection switch is abmormal.
檢查I/O板是否有
DC24V電壓?
NO
Check if the
DC24V voltage is
in the I/O board.
YES
更換ABF機台內
控制 基板
Replace with
another control
board in the ABF
machine
:The maximum
更換I/O板
後重 新再測一次?
NO
Substitute another
I/O panel and test
again.
P45
Page 52

5.出現錯誤代碼E4 5 : 旋 臂 逾 時 未 回 原 點
5.Display the error code E45
:The rotary arm
isn’t back to the initial
檢查 磁簧開關安
裝位 置是否正
確?
If the
installation of
the reef switch
is correct?
NO
調整 磁簧開關
Adjust the reef
switch.
NO
進入 參數A02檢查感測器是
否有 亮滅反應或旋轉旋臂測
試感 測器上LED有無亮滅反
應?
Enter the parameter A02
detector to check if it can
work; check if the LED on
the sensor can be lit or
extinguished by test the
arm.
YES
檢查ABF控制基板
是否 有DC24V電
壓?
Check if the
DC24V voltage is
in the ABF
control board.
NO
檢查 連接至主機之
訊號 線或更換I/O板
後重 新再測一次.
Check the signal
wire connected to
the motherboard or
substitute the I/O
panel and test
again.
NO
YES
檢查I/O板上IN3位置訊號線
鬆脫 ?
Check If the IN3 position
signal wire on the I/O board
is loose?
更換ABF機台內控
制基 板
Replace with
another control
board in the ABF
machine
YES
接妥 訊號線重新測試
Connect the signal wire
appropriately and test
again.
6.出現錯誤代碼E4 6 :ABF通訊故障
6.Display the error code E46
:The
communication of ABF is broken.
檢查ABF控制基板是否有DC24V電壓?
Check if the DC24V voltage is in the ABF
control board.
NO
NO
重新 啟動再測一次
test again.
YES
更換ABF內主機板
Substitute another ABF
motherboard
更換ABF內之電源供應器後重新再測一次
Substitute another ABF switch power
and test again.
7.出現錯誤代碼E4 7 : 鈕 扣 尺 寸 不 符
7.Display the error code E47
:The size of
button is not applicable
確認 人機面板上,鈕
扣的 直徑尺寸
Confirmation of the
buttons diameter on
the operation panel
NO
確認H39參數, 是否符合目前鈕扣尺寸:
0:為小鈕釦Φ8-Φ16
1:為大鈕釦Φ16-Φ25
Confirm the H39 parameter:
0:for small buttons Φ8-Φ16
1:for large buttons Φ16-Φ25
YES
將鈕 扣取出,重新量測
鈕扣 尺寸後,再測一次
Remove the buttons,
re-measure the buttons
size, and test again
調整H39參數
Adjust the H39 parameter
P46
Page 53

Introduction
8.出現錯誤代碼E4 8 : 夾 爪 上 釦 異 常
檢查 夾爪上,是否
有鈕 釦
Check if there is
any button on the
clamp.
NO
以手 動補釦或按下
手動 補釦鈕補釦
Put the button
manually or by
press the manual
switch
9.出現錯誤代碼E4 9 : 氣 源 偵 測 異 常
檢查I/O板上IN6位置訊
YES
重新 接妥訊號線並檢查有
wire and check if there is
a problem of connection
號線 鬆脫?
Check If the IN6
position signal wire on
the I/O board is loose?
無接 觸不良問題
Reconnect the signal
YES
8.Display the error code E48
clamp is abnormal.
檢查I/O板是否有
DC24V電壓?
NO
Check if the
DC24V voltage is
in the I/O board.
YES
更換ABF機台內
控制 基板
Replace with
another control
board in the ABF
machine
9.Display the error code E49
us detected abnormal
NO
:The button
更換I/O板
後重 新再測一次?
Substitute another
I/O panel and test
again.
:The air supply
確認 目前進氣總氣
源表 是否為電子式
錶頭
Confirm the
pressure gauge is
electronic table.
NO
機械 錶頭無法加入
IN 2的氣源壓力判
斷, 故將H41參數設
定為0後 ,重新測試
If the mechanical is
unable to detect the
IN2 signal, set the
parameter H41 as
0and then test
again.
檢查 壓力開關的設定值
YES
調整 壓力開關設定值到正
是否 正確?
Check the pressure
switch settings are
correct?
NO
確位 置
Adjust the pressure
switch to the accurate
position.
檢查I/O板上IN2位
置訊 號線鬆脫?
YES
Check If the IN2
position signal
wire on the I/O
board is loose?
檢查I/O板是否有
DC24V電壓?
Check if the
DC24V voltage is
in the I/O board.
更換ABF機台內
控制 基板
Replace with
another control
board in the ABF
machine
NO
YES
重新 接妥訊號線並
檢查 有無接觸不良
YES
後重 新再測一次?
NO
Substitute another
I/O panel and test
問題
Reconnect the
signal wire and
check if there is a
problem of
connection.
更換I/O板
again.
P47
Page 54

異常 檢 修與 解決 對 策
TROUBL ESHO OTIN G
Description as below (Table4)如 下 說 明(表4)
問題
Problem
原因
Reason
解決 對策
Solution
1.開始車縫時脫線或
在車 縫中途才開
始車 縫。
1.Thread slips off
when or the
machine starts
sewing on the
halfway.
●上 線的殘餘線過短。
●The upper thread is too
short after trimming.
●切 布粘在一起。
●Cloth is stuck together.
●挑 線桿沒有壓到線。
●The thread take-up lever
doesn't press the thread.
●開 始車縫時縫紉機速度
快。
● The speed is too fast
during the sewing.
●第1線 張力器調弱。
●Decrease the tension of the first stitch.
●調 整第2線張力器盤的拉起量。
●Adjust the rising amount of th
e second
thread.
●使 用較高的針孔導引器。
●Use the higher needle hole guide.
●調 整撥線彈簧。
●Adjust the wiper spring.
●增 加存儲器開關的針數。
●Add the numbers of the switch of the
saving.
2.常斷針
2.Needle broken
●針 碰到鈕釦眼。
●Needle touches the hole
of button.
●針 孔導引器凸部和布壓腳
相撞 。
●The guide touches the
cloth presser foot.
●針 過細。
●The needle is too thin.
●調 整夾爪的位置,讓針落到針眼中。
● Adjust the clamp, have the needle drops
to the needle center.
●調 整布壓腳底位置,使之不與針孔導引器
凸部 相碰,縫紉鈕釦尺寸大時,請使用中
鈕釦 或大鈕釦用的布壓腳底板。
●Adjust the position of the presser foot, not
to touch the convex of the guide
. If the
size of button is too large, please use the
suitable presser foot for the size.
●換 成適合於縫的布料或鈕眼的機針。
●Change the another suitable needle.
3.縫紉背面收線非常
不好 。
3.The back of
sewing is neatly.
●上 線殘線留太長。
●The waste of upper
thread is too long.
●撥 線桿抓線過緊。
●The lever is to tight.
●底 面為圓形的鈕扣時,車
縫成 球狀。
●Sewing becomes a mess
when the bottom of
button is round.
●增 強第1線張力器。
●Strengthen the first thread tension.
●調 整第2線張力器拉起時間。
●Adjust the rising time of the second thread
tension.
●減 弱撥線桿彈簧。
●Decrease the wiper spring tension.
●更 換為鈕釦夾爪 (大鈕釦用)。
●
Change the clamp. (For big button)
P48
Page 55

Introduction
問題
Problem
4.釘釦品質不佳。
4.The quality of
button stitch is
not good.
原因
Reason
●鈕 釦挾持力弱。
●The clamp is weak.
●夾 爪彈力過強。
●The clamp is too strong.
●底 面為圓形的鈕扣時,鈕
釦下 面和針孔導引器凸部
上面 有線進入,鈕釦不能
活動 。
●The button cannot move
button or in the convexif
there is thread in the of
the guide; the bottom of
the button is round.
表4/Table4
解決 對策
Solution
●糾 正夾爪的動作。
●Correct the clamp.
●調 整鈕釦夾爪彈簧,加強鈕釦夾持力。
●Adjust the spring of the clamp, strengthen
it.
●調 整鈕釦夾爪彈簧,減弱彈力。
●Adjust the spring of the clamp, decrease
the strength.
●更 換為鈕釦夾爪 (大鈕釦用)。
●Change the button clamp. (For b
ig button)
P49
Page 56

P50
Page 57

Introduction
P51
Page 58

P52
Page 59

P53
Page 60

P54
Page 61

P55
Page 62

P56
Page 63

P57
Page 64

P58
Page 65

P59
Page 66

P60
Page 67

P61
Page 68

P62
Page 69

P63
Page 70

P64
Page 71

P65
Page 72

P66
Page 73

No.
42
‧
(75)
43
‧
(76)
圖形
Pattern
縫線數
Stitch
Number
6-6
8-8
長
Length
縫製程序表
Sewing procedure chart
寬
Width
針數
Needle
Number
19
No.
60
‧
(86)
23
61
圖形
Pattern
縫線數
Stitch
Number
8
10
長
Length
2.8
寬
Width
0
針數
Needle
Number
14
16
44
45
50
‧
(79)
51
‧
(80)
52
53
‧
(81)
54
‧
(82)
10-10
12-12
6-6
8-8
10-10
6-6
8-8
2.8
2.8
27
31
19
23
27
20
24
62
63
12
16
18
20
55
67
‧
(88)
68
59
‧
(85)
10-10
6-6
10-10
6
28
19
27
0
12
P67
Page 74

由於對產品的改良及更新 , 本產品使用說明書中與零件圖之產品及外觀的修改恕不事先通知 !
The specification and/or the equipment described in the instruction book and parts list
are subject to change because of modification with out previous notice
ABF.JAN.2014
 Loading...