

Page 1
Page 2

- 1 -
Warning
against injuries and
material damages:
According to legislation, you as the user of an
electrical appliance are responsible for preventing
possible accidents through safety-conscious
behaviour:
• Keep your work space tidy. An untidy workplace
can lead to accidents.
• Provide adequate lighting when working!
• Do not wear loose clothing or jewellery, as these
can be caught in the moving parts. You should also
wear a hair net if you have long hair.
• Avoid abnormal posture. Remain steady and in a
well-balanced position at all times.
• Be alert! Pay attention to what you are doing.
Always take a rational approach to your work.
Never work with the sewing machine if you are
unable to concentrate or if you are feeling unwell!
If accidents occur as a result of handling the
machine with insufficient care, or failure to follow the
safety instructions in this manual, then the
manufacturer cannot accept liability.
Please use for your sewing machine the ZHEJIANG
FOUNDER presser foot, type FC-
9001.
Protection Class: II.
The sound pressure level under normal operating
conditions is 78dB (A).
If the supply cord that fixed with foot controller is
damaged, it must be replaced by the manufacturer
or its service agent or a similar qualified person in
order to avoid a hazard.
Do not dispose of electrical appliances as unsorted
municipal waste, use separate collection facilities.
Contact your local government for information
regarding the collection systems available.
If electrical appliances are disposed of in landfills or
dumps, hazardous substances can leak into the
groundwater and get into the food chain, damaging
your health and well-being.
When replacing old appliances with new once,
the retailer is legally obligated to take back
your old appliance for disposal at least for
free of charge.
Page 3

- 2 -
CONTENTS
Principal parts of the machine .............................................................................................................................3
Accessories ......................................................................................................................................................... 4
Power, switch ...................................................................................................................................................... 5
Removing extension table ................................................................................................................................... 5
Accessory box ..................................................................................................................................................... 5
Levelling the machine.......................................................................................................................................... 6
Replacing needle................................................................................................................................................. 6
How to remove and attach the shank.................................................................................................................. 7
Replacing presser foot ........................................................................................................................................ 7
Winding the bobbin........................................................................................................................................... 8-9
Inserting and remove the bobbin................................................................................................................... 10-11
Threading upper thread ...................................................................................................................................... 12
Automatic needle threader ................................................................................................................................. 13
Drawing up bobbin thread .................................................................................................................................. 14
Adjusting thread tension ..................................................................................................................................... 15
Bobbin thread adjustment ..................................................................................................................................16
Adjusting tension for zigzag and embroidery ..................................................................................................... 16
Fabric -Thread - Needle - Table ......................................................................................................................... 17
Sewing (pattern selector) and operation table .............................................................................................. 18-20
Operation buttons ............................................................................................................................................... 21
Reverse button ................................................................................................................................................... 22
Pattern operation instruction ..............................................................................................................................22
Twin needle operation instruction....................................................................................................................... 22
Zigzag non-section operation instruction ........................................................................................................... 23
Stitch length non-section operation instruction .................................................................................................. 24
Display the zigzag width operation instruction ................................................................................................... 25
Display the stitch length operation instruction.................................................................................................... 25
Start to sewing.................................................................................................................................................... 26
Error correction................................................................................................................................................... 26
Straight stitches .................................................................................................................................................. 27
Zig-zag stitch ...................................................................................................................................................... 27
Free arm sewing................................................................................................................................................. 27
Seam finishing .................................................................................................................................................... 27
Transfer sewing direction ................................................................................................................................... 28
Stitch balance dial .............................................................................................................................................. 28
Overcasting sewing ............................................................................................................................................ 29
Straight stretch stitch .......................................................................................................................................... 29
Three step zig-zag stitch .................................................................................................................................... 29
Blind stitch ...........................................................................................................................................................30
Buttonhole sewing ...............................................................................................................................................31
Zipper sewing ......................................................................................................................................................32
Hemming .............................................................................................................................................................33
Quilter guide ........................................................................................................................................................33
Button sewing ......................................................................................................................................................33
Cleaning and oiling ..............................................................................................................................................34
Oil inside of the face cover..................................................................................................................................35
Removing and replacing the bulb........................................................................................................................35
Fault finding chart ...........................................................................................................................................36-37
Page 4
- 3 -
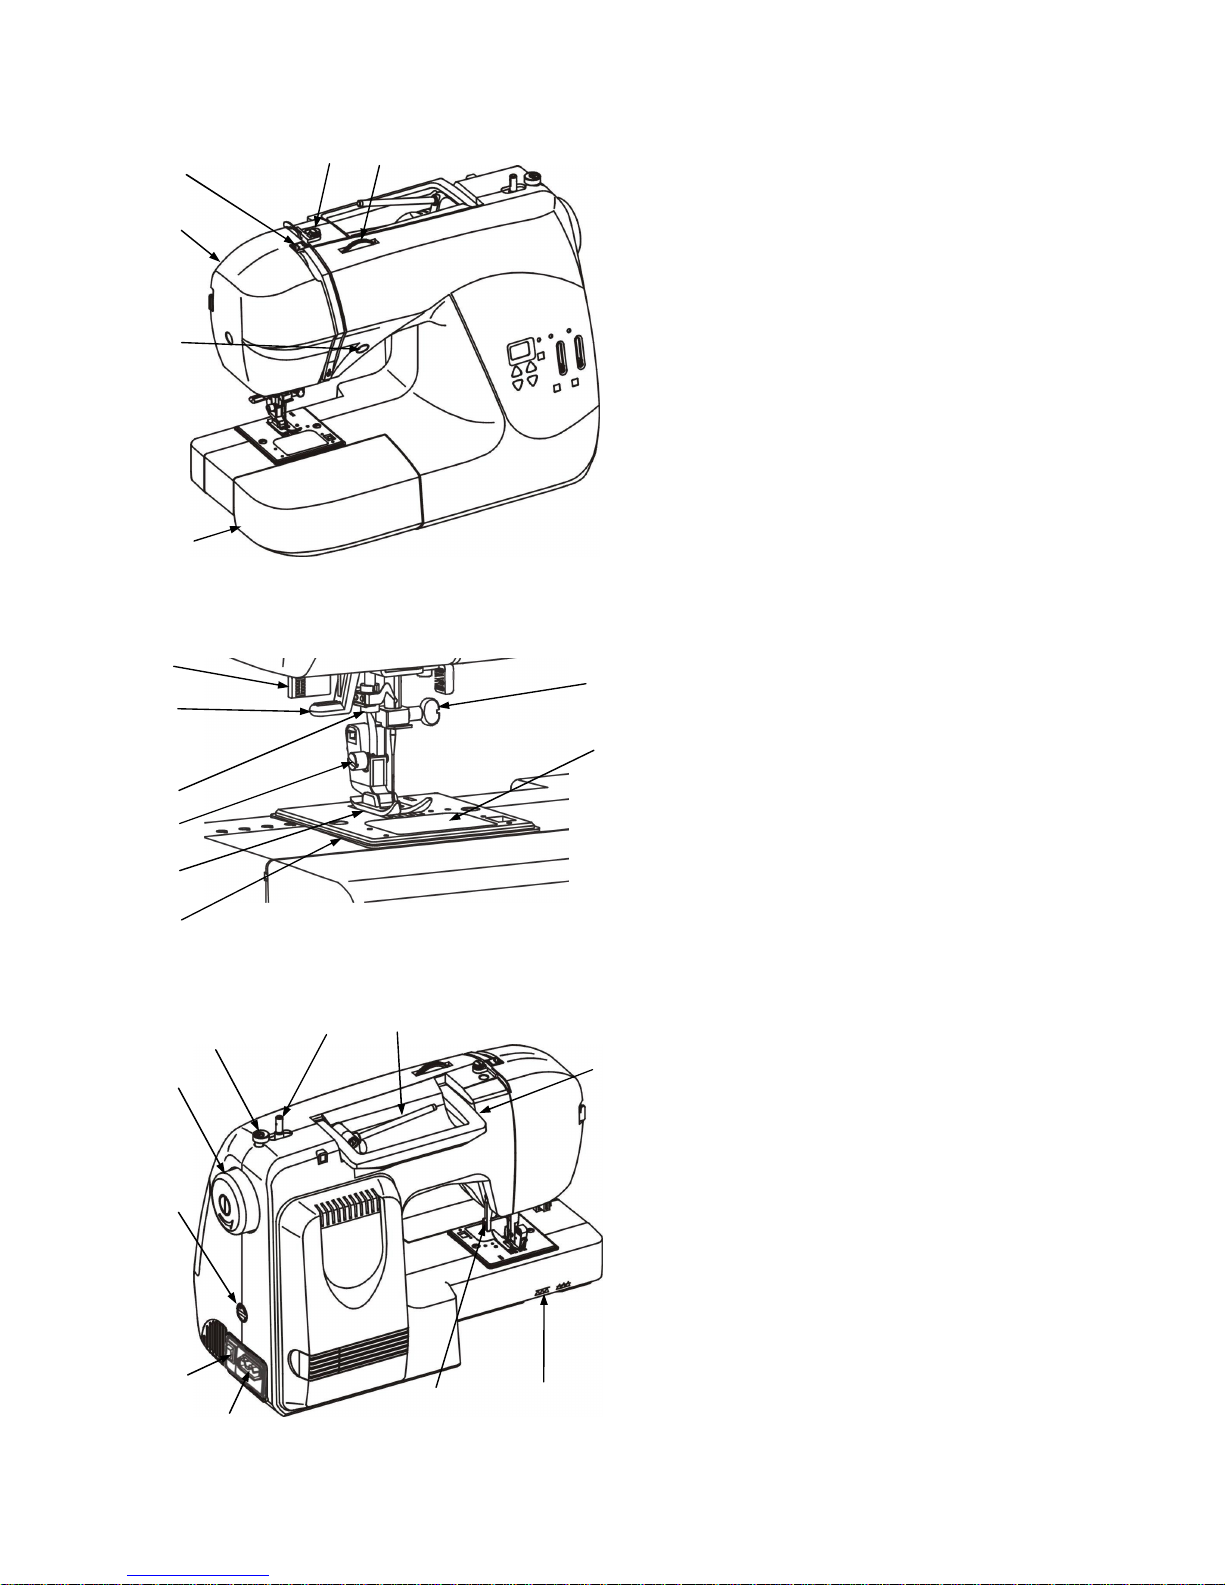
PRINCIPAL PARTS OF THE
MACHINE
1. Tension dial
2. Upper thread guide
3. Take up lever
4. Face cover
5. Reverse button
6. Extension table
7. Needle clamp screw
8. Bobbin & shuttle cover
9. Buttonhole lever
10. Threading lever
11. Needle threader
12. Presser foot holder screw
13. Presser foot
14. Needle plate
15. Bobbin winder stopper
16. Bobbin winder spindle
17. Horizontal spool pin
18. Handle
19. Hand wheel
20. Stitch balance dial
21. Power switch
22. Foot controller connector
23. Presser foot lever
24. Feed dog height lever
4
5
6
7
8
9
10
11
12
13
14
15
16
17
18
19
20
21
22
23
24
2
1
3
Page 5
- 4 -
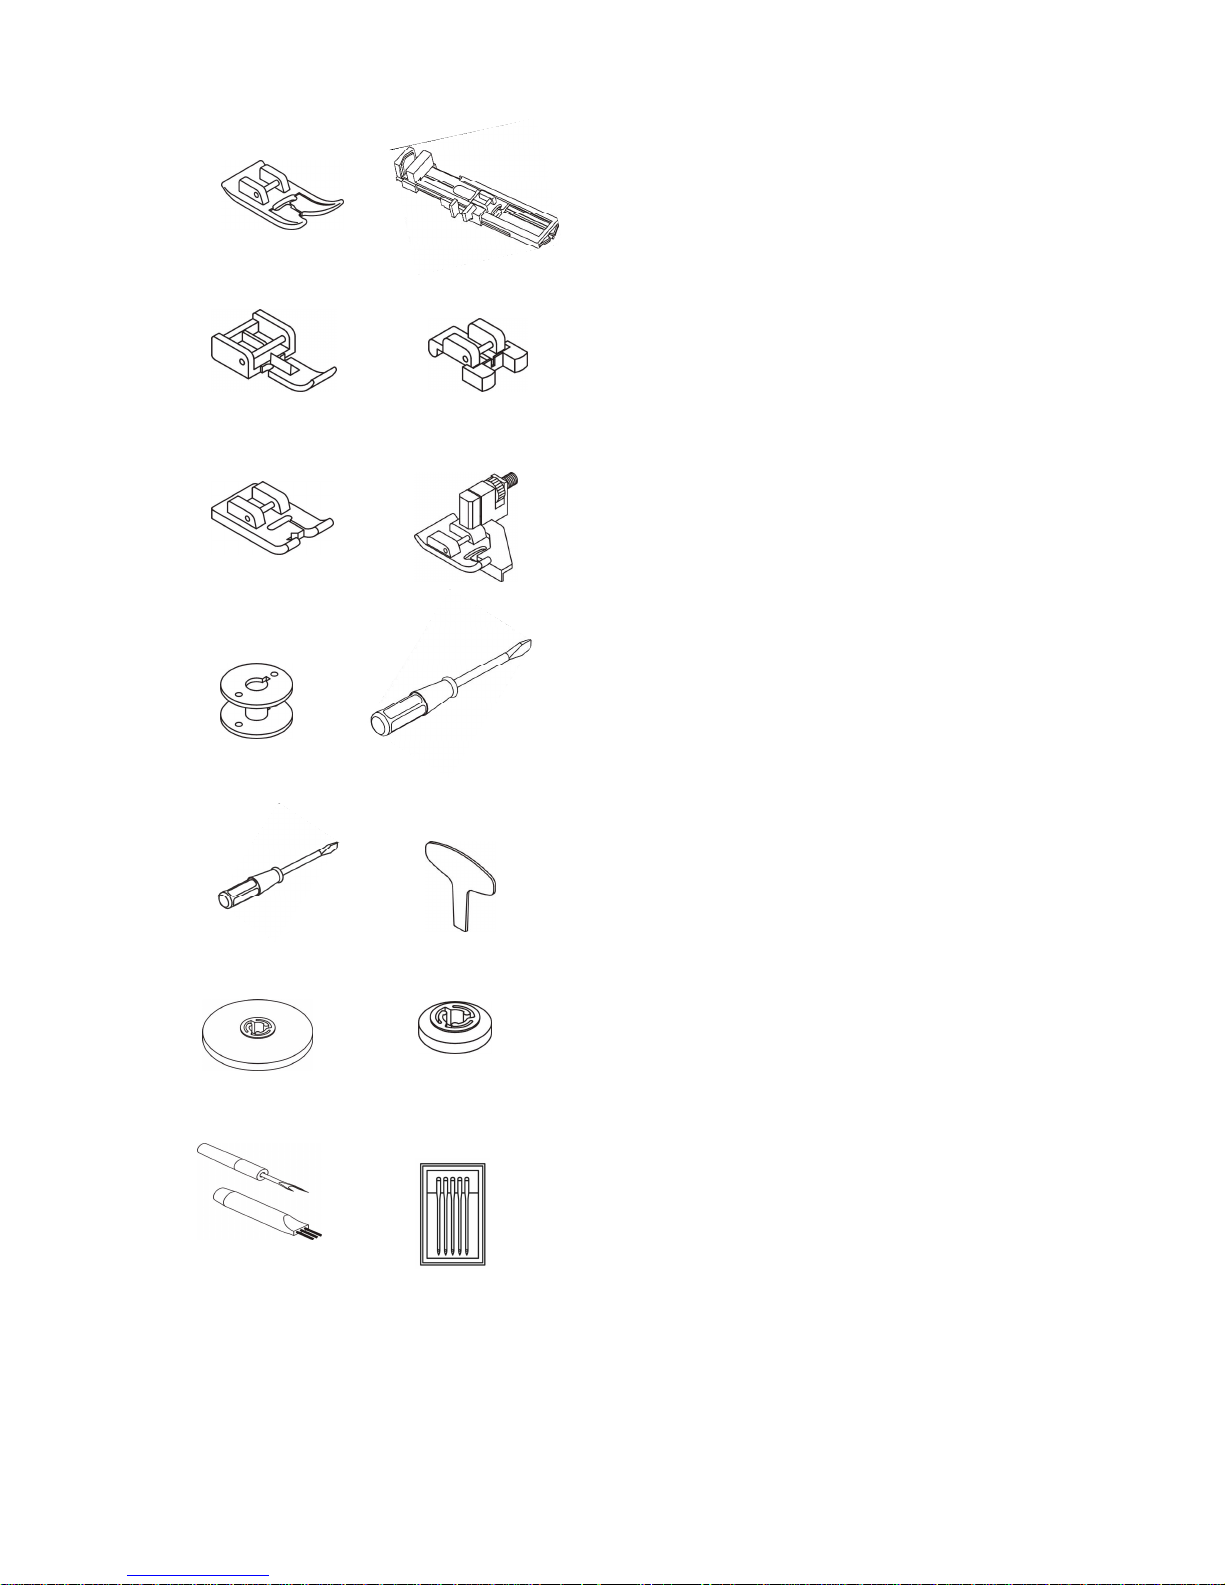
ACCESSORIES
1 2
3 4
5 6
7 8
9 10
11 12
13 14
A. All purpose foot (On machine)
B. Buttonhole foot
C. Zipper foot
D. Button foot
E. Gathering foot
F. Blind hem foot
G. Bobbin
H. Screw driver (Large)
I. Screw driver (Small)
J. Needle plate screw driver
K. Spool cap (Large)
L. Spool cap (Small)
M. Buttonhole cutter
N. Needles
Page 6
- 5 -
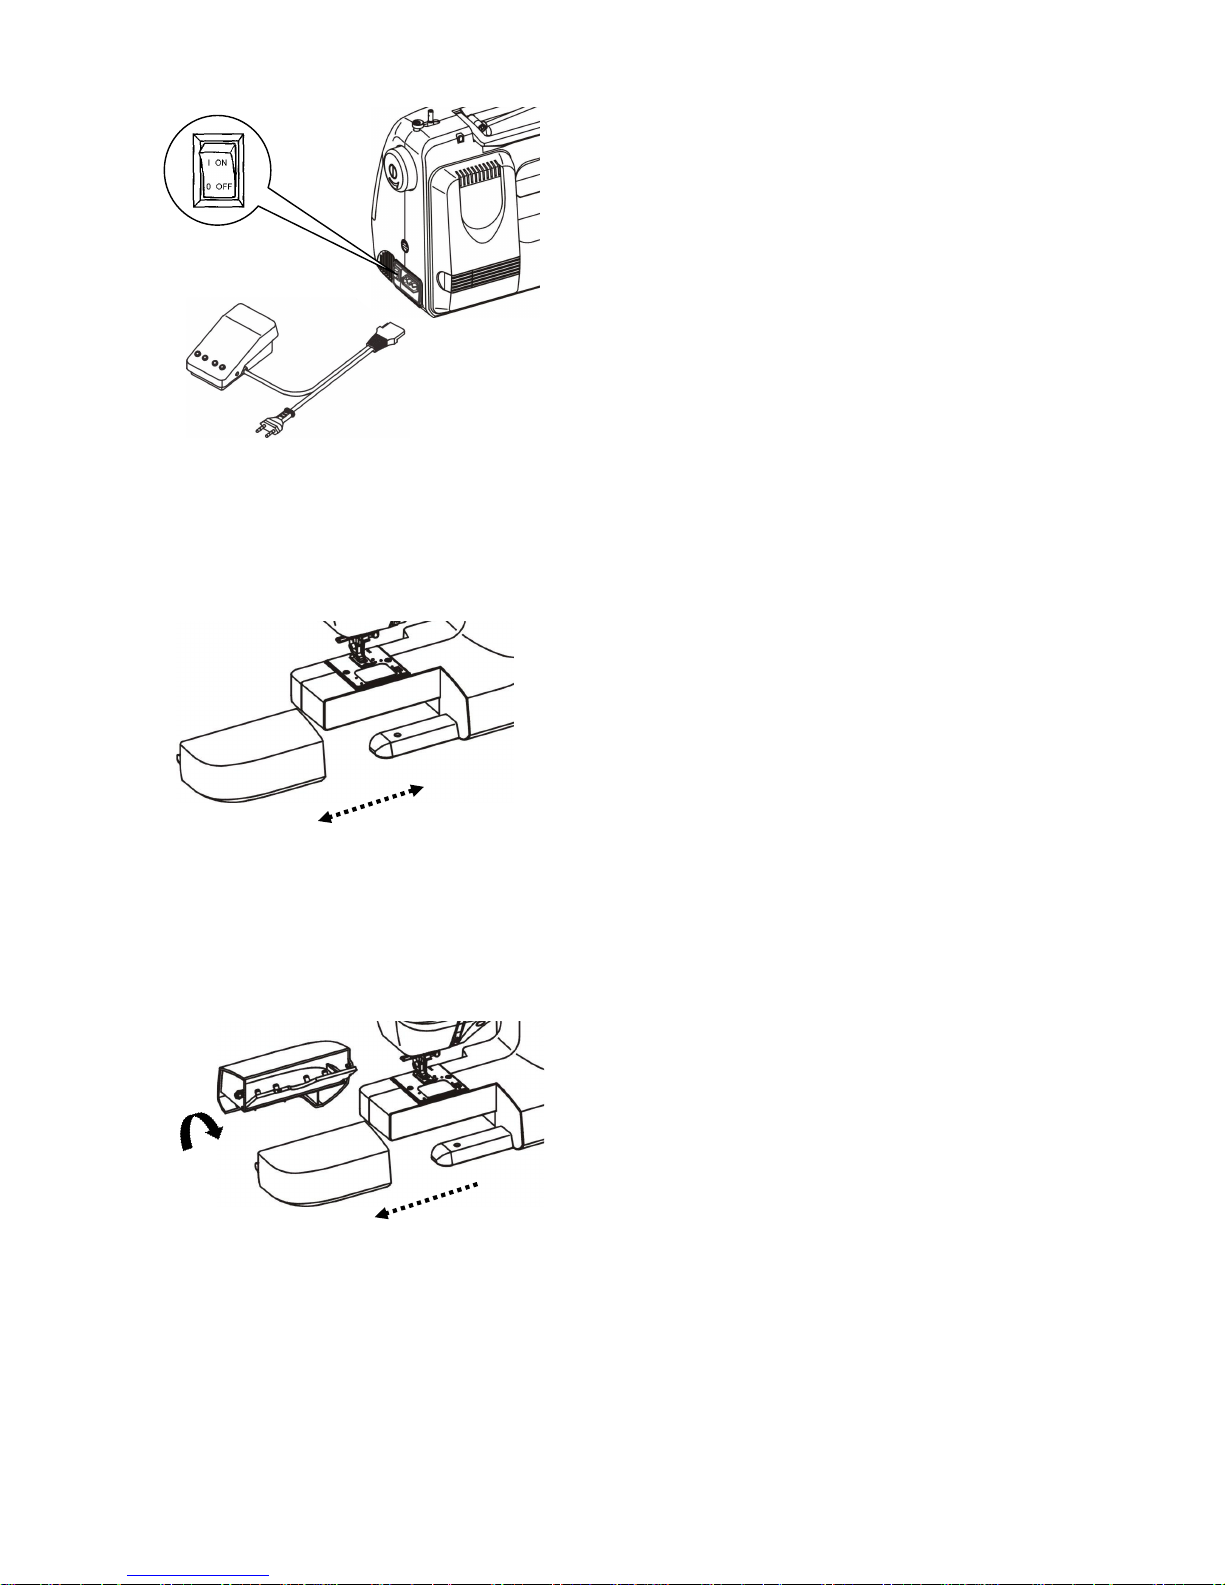
POWER, SWITCH
1. Input power : 220V, 60Hz.
2. Insert the foot control plug into the sewing
machine. Then plug the machine to the power
supply.
2. Turn switch to "ON" position.
3. Sewing speed can be varied by the speed
controller.
Separate the machine from the powersystem if you
leave it unsupervised.
Use only ZHEJIANG FOUNDER model FC-9001
foot controller with sewing machine.
REMOVING EXTENSION TABLE
Hold the left end of the table and pull it out in
direction of the arrow.
ACCESSORY BOX
1. The extension table can be open and accessories
taken out by following the arrow direction.
2. After taken accessories close by reverse side.
Page 7

- 6 -
Needle clamp screw
Needle clamp
Loose
Tight
REPLACING NEEDLE
1. Turn off power.
2. Raise needle to its highest position.
3. Loosen needle clamp screw, remove the old needle.
4. If any
needle is deformed, bent or damaged, replace
with a new needle.
5. With the flat side of the needle facing away from
you, insert needle as far up as it will go.
6. Tighten the needle clamp screw securely.
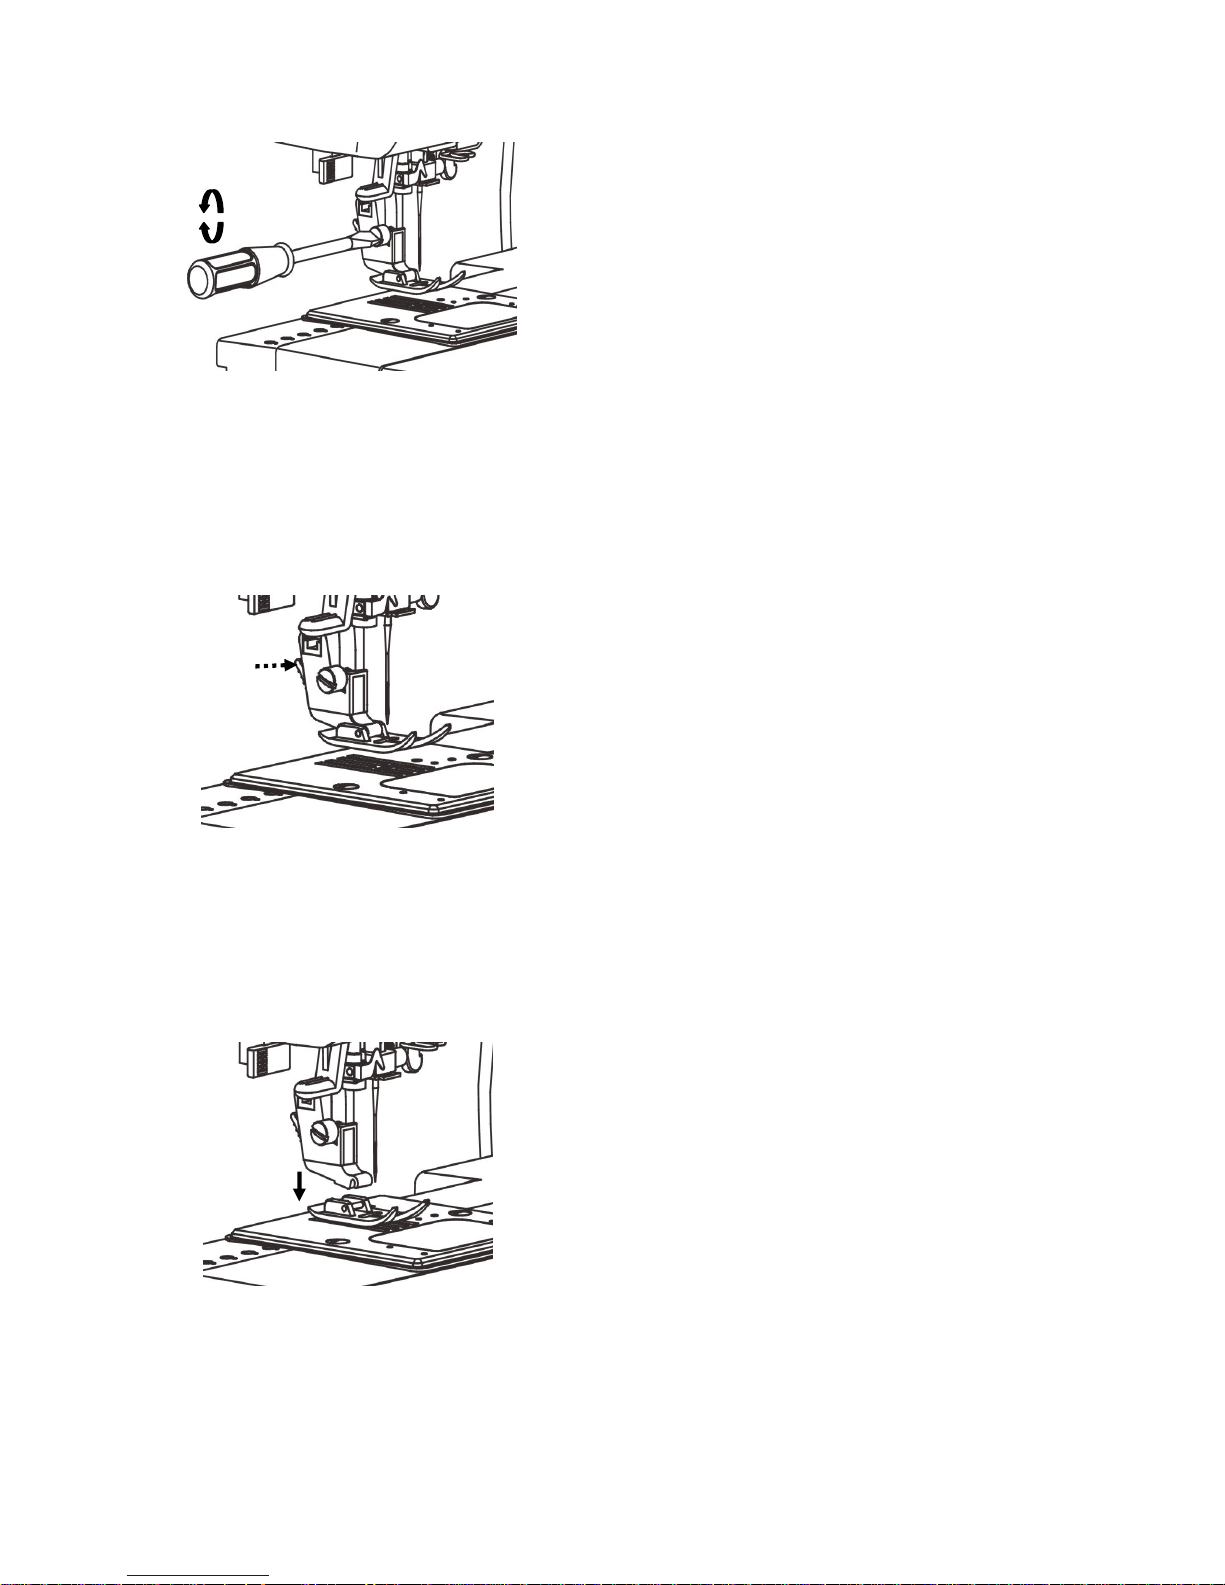
LEVELLING THE MACHINE
If the sewing machine is not level, remove the
sewing table and adjust the levelling by turning the
foot as illustrated.
Flat face side away
from you
To determine if the needle is bad, place the flat side of
the needle on something flat (a needle plate, piece of
glass, etc.). The gap between the needle and the flat
surface should be even.
Never use a bent or broken needle. It may cause
skipped stitches or thread breakage. Bad needles can
ruin the fabric.
Always purchase good quality needles. Change needle
often.
Down
Up
Page 8
- 7 -
REPLACING PRESSER FOOT
1. Turn off power.
2. Raise needle bar to its highest position and raise
the presser foot.
3. Press release lever as shown, remove presser
foot.
1. Place the presser foot pin right under the groove
of the foot holder.
2. Lower the presser lever.
3. Press the presser lever, the lever bar will attach
the foot.
HOW TO REMOVE AND ATTACH
THE SHANK
Raise the presser foot.
Turn the screw counterclockwise with the screwdriver
to remove the shank.
When attaching, place shank on presser bar. Lower
the presser foot lever. Turn screw clockwise to tighten.
Page 9
- 8 -
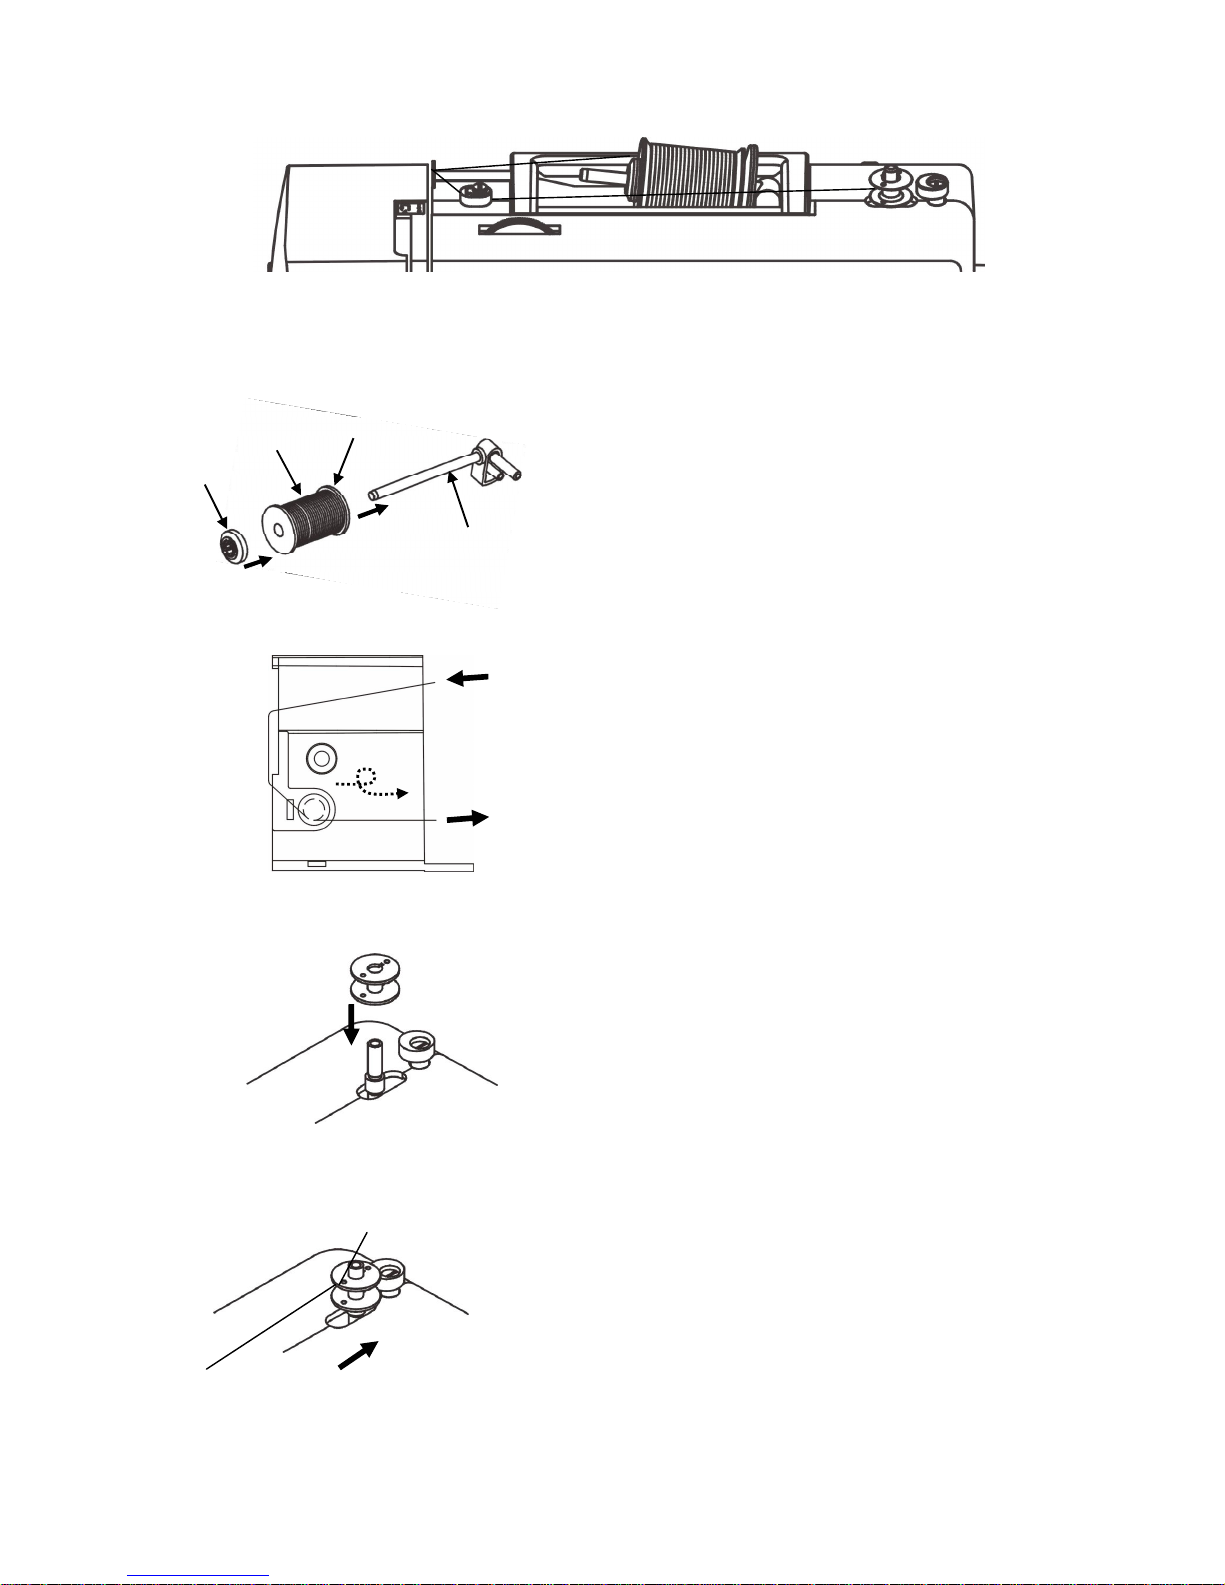
1﹒Place thread spool and spool cap onto spool
pin.(Make sure the cut at right side before
setup)
2﹒Follow the arrow direction, thread as diagram.
3﹒Thread through inside of the opening on the
bobbin edge, then place empty bobbin onto
spindle.
4﹒Push bobbin winder to the right, hold the end of
thread. Slowly press the foot control to start
winding.
WINDING THE BOBBIN
Spool
Gap
Spool pin
Spool cap
Page 10
- 9 -
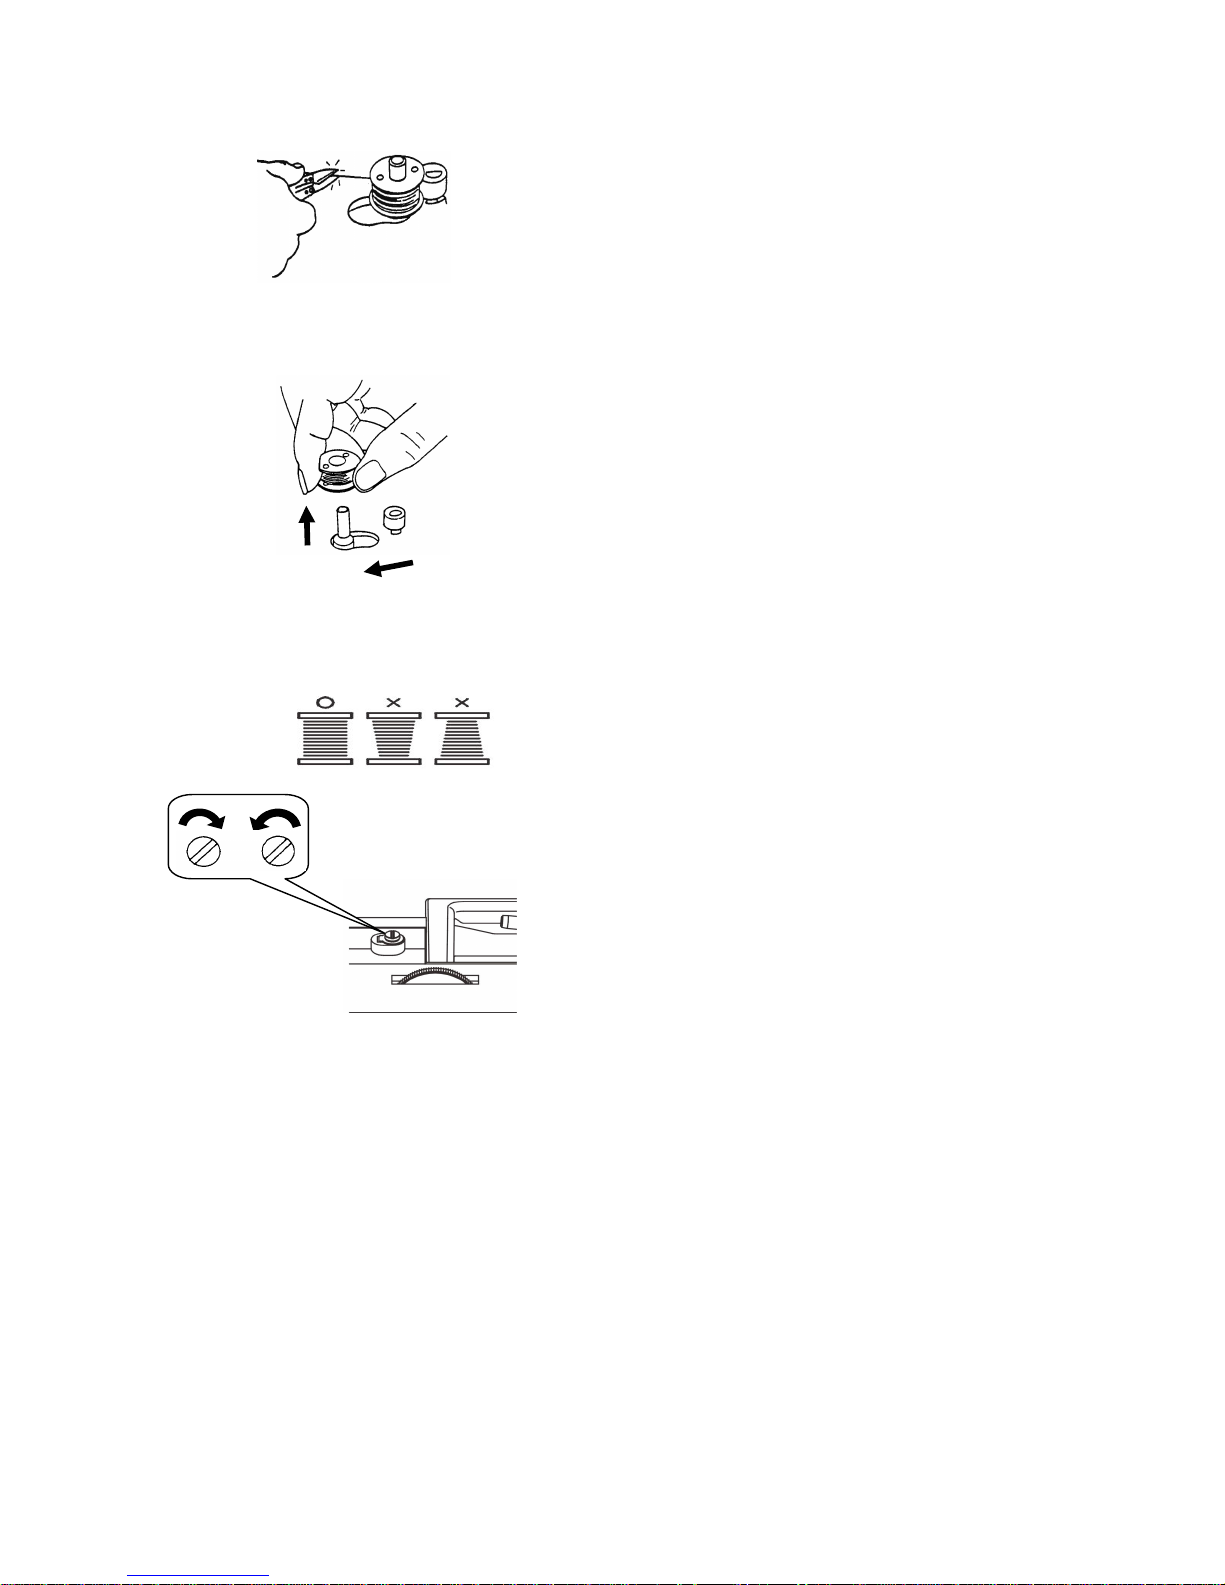
5﹒When bobbin winder is completed, release the
foot control to stop machine then cut the thread.
6﹒
Return winder spindle to left and remove wound
bobbin.
If winding not even, make adjustments: Turn screw
colockwise: position down.
Turn screw counter clockwise: position up.
Until winding is even in bobbin.
Page 11
- 10 -
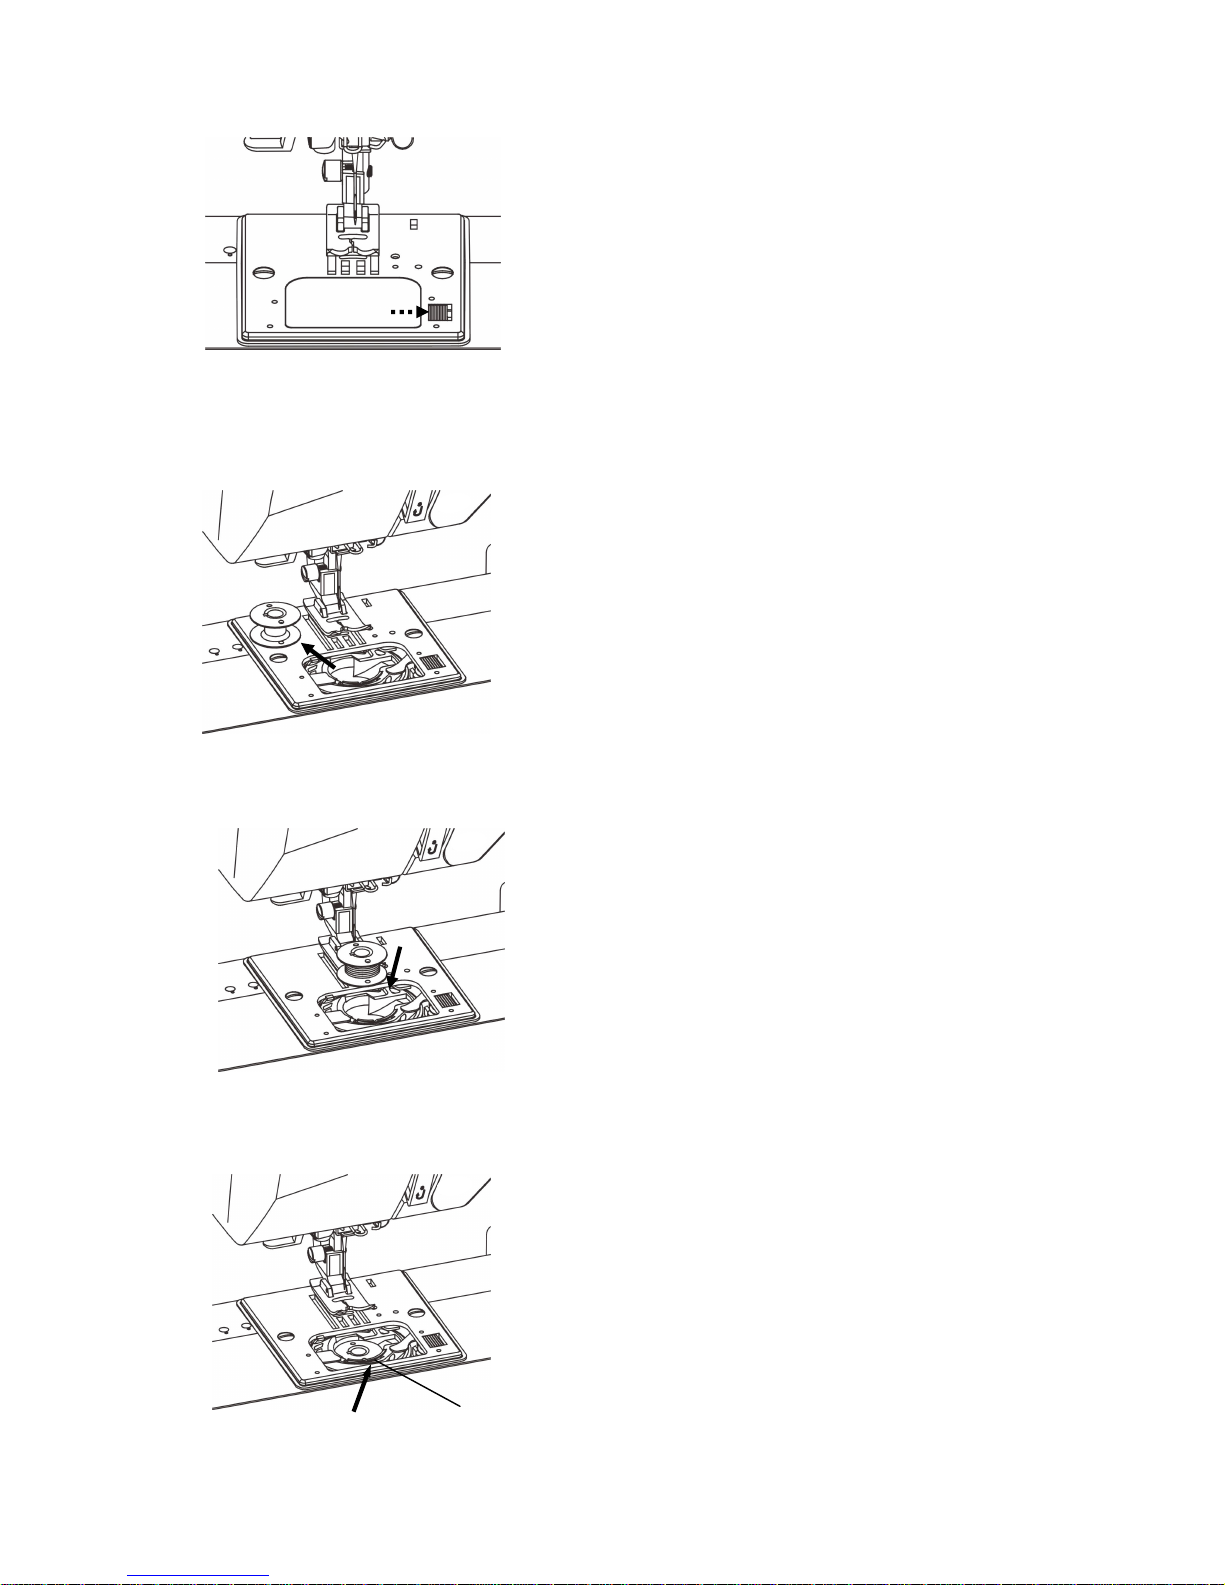
INSERTING AND REMOVE THE
BOBBIN
1. Release the lock of bobbin cover plate (push to
right) and remove the bobbin cover.
2. Remove the bobbin.
3. With newly wound bobbin draw thread on
bobbin out approx 10 cm, then put the bobbin
in bobbin case.
4. Whilst gently pulling the bobbin thread allow this
to pass into indentation on bobbin case (A), and
pull it towards to left.
(A)
Page 12
- 11 -
7. Attach bobbin cover, follow step A and B.
Note: Bobbin will rotate in anti-clockwise direction.
6. Pull the thread as arrow direction.
5. Next, pull thread into notch (B).
(A)
○
B
○
A
(B)
Page 13

- 12 -
THREADING UPPER THREAD
Turn the hand wheel toward you to raise the needle to its highest position.
Raise the presser foot.
1. Pull the thread under the thread guide and slide it up over the hook.
2. Puts in among two iron sheets.
3. Guide the thread down the right side slot and up the left side slot.
4. Firmly pull the thread from right to left, over the take-up lever and down into the take-up lever eye.
5. Puts in inside the wire.
6. Slide the thread to the left behind the needle bar thread guide.
7. Thread the needle from front to back.
Pass the thread from front to rear through needle and pull approx. 10 cm of thread through eye of needle.
(For Auto threaded system see page 13)
1
2
3
4
5
6
7
Page 14

- 13 -
AUTOMATIC NEEDLE THREADER
NOTE: * Needle must be in its highest position and
remove presser foot when using needle
threader.
*
Needle threader cannot be used with a twin
needle.
1. Raise the needle to its highest position.
Lower the needle threader lever as far as it will go.
2. Hook A will automatically insert itself into the
needle eye. Bring the thread around Guide B and
under Hook A.
3. Releas
e the lever and let the needle threader return
to its original position. Pull the thread loop to the
back to finish bringing the thread through the
needle eye.
Note: * Do not turn the hand wheel when using the
needle threader.
* Do not touch threader lever whilst sewing as
needle threader will be damaged. We advise
you to switch off power when using the
threader unit.
A
B
Page 15

- 14 -
DRAWING UP BOBBIN THREAD
1. Hold the upper thread with your left hand and turn
hand wheel slowly and towards you.
2. Gently pull the upper thread, and the lower thread
will come up in a loop.
3. Pull both threads together taking them backwards
and through presser foot to the rear of machine.
Page 16

- 15 -
4
ADJUSTING THREAD TENSION
In straight seams, the needle thread and the bobbin
thread should lock together in the center of the two
layers of fabric.
If you look at the top and bottom of the stitch, you will
notice that there are no gaps; each stitch is smooth
and even.
When adjusting needle thread tension, the higher the
number, the tighter the needle thread.
Here are some reasons you may change the thread
tension dial:
1. The fabric is stiff or heavy.
2. You are sewing more than two layers of fabric.
3. The stitch you are using needs the threads not to
lock together in the center of the fabric.
Tension is too tight.
The needle thread shows through on the topside of th
e
fabric and it will feel bumpy.
Turn the dial to a lower number to loosen the needle
thread tension.
Tension is too loose.
The needle thread shows through on the underside of
the fabric and it will feel bumpy.
Turn the dial to a higher number to tighten the needle
thread tension.
Weak
Strong
Weak
Strong
4
4
Page 17

- 16 -
Decrease
BOBBIN THREAD ADJUSTMENT
1.
Through the hole provided turn the screw to left to
decrease the tension.
2. The lower thread tension has already been
adjusted, do not adjust it if it is necessary.
ADJUSTING TENSION FOR ZIGZAG
AND EMBROIDERY
The upper thread tension should be slightly weaker
when sewing a zigzag or a satin stitch. The upper
thread should appear slightly on the underside of the
fabric.
Increase
Page 18

- 17 -
FABRIC–THREAD–NEEDLE –TABLE
Please pay attention to the following list as a guide for sewing different types of fabric.
There are many kinds of fabrics, threads and needles. It is important to use the correct ones together.
Always purchase good quality thread. It should be strong, smooth and even in thickness. Use the same thread for
needle and bobbin. Always test thread and needle size on a scrap piece of fabric.
In general, fine threads and needles are used for sewing lightweight fabrics and heavier threads and larger
needles are used for sewing heavyweight fabrics. There are many specialty needles available from your sewing
machine dealer.
A denim needle with a sharp tip is used to sew heavy fabrics such as denim and canvas. For topstitching, a special
topstitching needle with a larger eye must be used for heavier weight thread. Leather needles punch small holes in
leather and suede allowing the thread to follow through the hole. When sewing stretch, very fine or synthetic
fabrics, use a stretch needle. The stretch needle prevents skipped stitches.
Check your needles frequently for rough or blunt tips. Snags and runs in knits, fine silks and silk-like fabrics are
permanent and are often caused by damaged needles.
Fabric
Threads
Needles
Light Weight
Crepe de chine,
Voile, Lawn,
Georgette,
Organdy, Tricot
Fine Silk
Fine Cotton
or Polyester
Thread
10/70 or
11/75 or
12/80
Medium Weight
Linen, Cotton,
Woolens,
Double Knits
Medium Weight
Cotton
Polyester
Thread
11/75 or
12/80 or
14/90
Heavy Weight
Denim, Tweed,
Gabardine,
Coating, Drapery,
and Upholstery
Fabric
Heavier Cotton
or Polyester
Thread
12/80 or
14/90
Page 19

- 18 -
SEWING (PATTERN SELECTOR) AND OPERATION TABLE
Pattern list Zigzag width Stitch length
No. Pattern Stand Min Mix Stand Min Mix Presser foot Twin needle
00 3.5 0.5 6.5 2.5 0.5 4 A Y
01 6 0 6 2 0 3 A Y
02 3.5 0.5 6.5 2.5 1.5 3 A Y
03 3.5 0.5 6.5 2.5 1.5 3 E Y
04 3.5 2 6 1.5 1 3 D Y
05 6 4 7 1.5 1 3 A Y
06 3.5 2 6.5 1.5 1.0 3 E Y
07 6 3 6 2.5 1.5 3 E Y
08 6 3 6 2.5 1.5 3 E Y
09 6 3 7 2.5 1.5 3 E Y
10 5.5 4 6 0.4 0.3 0.7 B N
11 5.5 4 6 0.4 0.3 0.7 B N
12 5.5 4 6 0.4 0.3 0.7 B N
13 7 7 7 0.4 0.3 0.7 B N
14 7 7 7 0.4 0.3 0.7 B N
15 5.5 4 6 1.5 1 2 B N
16 5.5 4 6 1.5 1 2 B N
17 5.5 4 6 1.5 1.5 2 B N
18 6 3 7 0.5 0.3 1.5 E Y
19 6 3 7 0.5 0.3 1.5 E Y
20 6 3 7 0.5 0.3 1.5 E Y
21 6 3 7 0.5 0.3 1.5 E Y
22 6 3 7 0.5 0.3 1.5 E Y
23 6 3 7 0.5 0.3 1.5 E Y
24 6 3 7 0.5 0.3 1.5 E Y
25 6 3 7 0.5 0.3 1.5 E Y
26 6 3 7 0.5 0.3 1.5 E Y
27 6 3 7 0.5 0.3 1.5 E Y
28 6 3 7 0.5 0.3 1.5 E Y
29 6 3 7 0.5 0.3 1.5 E Y
30 6 2 6 1.5 1 3 E Y
31 3.5 2 6 1.5 1 3 E Y
32 3.5 2 6.5 1.5 1 3 E Y
33 6 3 7 2.5 1.5 3 E Y
34
6 3 6 2.5 1.5 3 E Y
Page 20

- 19 -
SEWING (PATTERN SELECTOR) AND OPERATION TABLE
Pattern list Zigzag width Stitch length
No. Pattern Stand Min Mix Stand Min Mix Presser foot Twin needle
35 6 3 6 2.5 1.5 3 E Y
36 6 3 6 2.5 1.5 3 E Y
37 6 3 6 2.5 1.5 3 E Y
38 6 3 7 2.5 1.5 3 E Y
39 6 5 7 2 1.5 2.5 E N
40 6 3 6 1.5 1.5 1.5 E Y
41 6 3 6 1.5 1.5 1.5 E Y
42 6 4 7 2.5 1.5 3 E Y
43 6 4 7 2.5 1.5 3 E Y
44 6 4 7 2.5 1.5 3 E Y
45 6 4 7 1.5 1.5 1.5 E N
46 6 4 7 1.5 1.5 1.5 E N
47 6 4 7 1.5 1.5 1.5 E N
48 6 4 7 1.5 1.5 1.5 E N
49 6 3 7 2.5 1.5 3 E Y
50 6 5 7 1.5 1.5 1.5 E N
51 6 5 7 1.5 1.5 1.5 E N
52 6 5 7 1.5 1.5 1.5 E N
53 6 5 7 1.5 1.5 1.5 E N
54 6 5 7 1.5 1.5 1.5 E N
55 6 5 7 1.5 1.5 1.5 E N
56 6 5 7 1.5 1.5 1.5 E N
57 6 5 7 1.5 1.5 1.5 E N
58 6 4 7 2.5 1.5 3 E Y
59 6 4 7 2 1.5 2.5 E Y
60 6 4 7 1.5 1.5 1.5 E N
61 6 4 7 1.5 1.5 1.5 E N
62 6 5 7 1.5 1.5 1.5 E N
63 6 5 7 1.5 1.5 1.5 E N
64 6 5 7 1.5 1.5 1.5 E N
65 6 5 7 1.5 1.5 1.5 E N
66 6 5 7 1.5 1.5 1.5 E N
67 6 5 7 1.5 1.5 1.5 E N
68 6 5 7 1.5 1.5 1.5 E N
69 6 5 7 1.5 1.5 1.5 E N
Page 21

- 20 -
SEWING (PATTERN SELECTOR) AND OPERATION TABLE
Pattern list Zigzag width Stitch length
No. Pattern Stand Min Mix Stand Min Mix Presser foot Twin needle
70 6 3 7 0.5 0.3 1.5 E Y
71 6 3 7 0.5 0.3 1.5 E Y
72 6 3 7 0.5 0.3 1.5 E Y
73 6 3 7 0.5 0.3 1.5 E Y
74 6 3 7 0.5 0.3 1.5 E Y
75 6 3 7 0.5 0.3 1.5 E Y
76 6 3 7 0.5 0.3 1.5 E Y
77 6 3 7 0.5 0.3 1.5 E Y
78 6 3 7 0.5 0.3 1.5 E Y
79 6 3 7 0.5 0.3 1.5 E Y
80 6 3 7 0.5 0.3 1.5 E Y
81 6 3 7 0.5 0.3 1.5 E Y
82 6 3 7 0.5 0.3 1.5 E Y
83 6 3 7 0.5 0.3 1.5 E Y
84 6 4 6 1.5 1.5 1.5 E Y
85 6 4 7 1.5 1.5 1.5 E Y
86 6 4 7 1.5 1.5 1.5 E Y
87 6 4 7 1.5 1.5 1.5 E Y
88 6 3 6 2.5 2.5 3 E Y
89 6 3 6 2.5 1.5 3 E Y
90 6 3 6 2.5 1.5 3 E Y
91 6 4 7 2.5 1.5 3 E Y
92 6 4 7 2.5 1.5 3 E Y
93 6 3 6 2.5 1.5 3 E Y
94 6 3 6 2.5 1.5 3 E Y
95 6 3 6 2.5 1.5 3 E Y
96 6 3 7 2.5 1.5 3 E Y
97 6 3 7 2.5 1.5 3 E Y
98 6 6 7 1.5 1.5 1.5 E N
99 6 6 7 1.5 1.5 1.5 E N
Page 22

- 21 -
OPERATION BUTTONS
1. LED screen
2. Twin needle light
3. Zigzag width light
4. Stitch length light
5. Twin needle set button
6. Stitch length VR button
7. Stitch length indication button
8. Zigzag width VR button
9. Zigzag width indication button
10. Single digit pattern button (+)
11. Single digit pattern button ( - )
12. Ten digit pattern button ( - )
13. Ten digit pattern button (+)
14. Reverse button
1
2
3
13
4
5
6
7
8
9
10
11
12
14
Page 23

- 22 -
REVERSE BUTTON
During sewing or before sewing. Machine will sew
reverse when press reverse button.
(Only for pattern 00~01)
○○○○
10
○○○○
11
○○○○
13
○○○○
12
○○○○
1
PATTERN OPERATION
INSTRUCTION
LED numbers display .
Press single digit pattern button , the digit is
from 0 to 9.
Press single digit pattern button , the digit is
from 9 to 0.
Press ten digit pattern button , the digit is from
0 to 9.
Press ten digit pattern button , the digit is from
9 to 0.
○○○○
1
○○○○
10
○○○○
11
○○○○
13
○○○○
12
○○○○
5
TWIN NEEDLE OPERATION
INSTRUCTION
Non-effective twin needle operation:
When press twin needle set button , and there
are three warning voices caused from buzzer, this is
shown no twin needle and when light is red, it could
not operate this pattern in order to avoid any danager
dued to broken twin needle.
Effective twin needle operation:
When press twin needle set button , without any
voice from buzzer and the twin needle light is green,
you can set twin needle for sewing.
PS: Effective twin needle operation indicate on
pattern list.
○○○○
5
○○○○
5
Page 24

- 23 -
○○○○
8
ZIGZAG NON-SECTION
OPERATION INSTRUCTION
The buzzer can make the sound, when you adjust the
button .
Zigzag width light-off:
When you move zigzag width VR
button
to the
bottom as
(Diagram 1).
Zigzag width light-red:
When you move zigzag width VR
button
to the min.
value as
(Diagram 2).
Zigzag width light-green:
The VR value can adjust between the min. value and max.
value, when you move zigzag width VR
button
as
(Diagram 3).
Zigzag width light-red:
When you move the zigzag width VR
button
to the
max. value as
(Diagram 4).
Exception: When the max. value is 7 and move to the max
value, the zigzag width light is green.
PS: Please refer the zigzag width value by the pattern list.
○○○○
8
○○○○
8
○○○○
8
○○○○
8
○○○○
8
(Diagram 1)
(Diagram 2)
(Diagram 4)
(Diagram 3)
Light off
Red light
Green light
Red light
Page 25

- 24 -
○○○○
6
STITCH LENGTH NON-SECTION
OPERATION INSTRUCTION
The buzzer can make the sound, when you adjust the
button
.
Zigzag width light-off:
When you move stitch length VR
button
to the
bottom as
(Diagram 1).
Stitch length light-red:
When you move stitch length VR
button
to the min.
value as
(Diagram 2).
Stitch length light-green:
The VR value can adjust between the min. value and
max. value, when you move stitch length VR
button
as
(Diagram 3).
Stitch length light-red:
hen you move the stitch length VR
button
to the
max. value as
(Diagram 4).
Exception: When the max. value is 4 and move to the
max value, the stitch length light is green.
PS: Please refer the stitch length value by the pattern list
○○○○
6
○○○○
6
○○○○
6
○○○○
6
○○○○
6
(Diagram 1)
(Diagram 2)
(Diagram 4)
(Diagram 3)
Light off
Red light
Green light
Red light
Page 26

- 25 -
DISPLAY THE ZIGZAG WIDTH
OPERATION INSTRUCTION
Press the zigzag width indication button until to
display the zigzag width value by number on LED
screen.
Release the zigzag width indication button , the
screen is restored previous display.
DISPLAY THE STITCH LENGTH
OPERATION INSTRUCTION
Press the stitch length indication button until to
display the stitch length value by number on LED
screen.
Release the stitch length indication button , the
screen is restored previous display.
○○○○
9
○○○○
9
○○○○
9
○○○○
7
○○○○
7
○○○○
7
Page 27

- 26 -
ERROR CORRECTION
During sewing, LED show out “ ” and stop. Turn
hand wheel to solve torque problem.
START TO SEWING (PREPARATION)
After has been familiar with sewing machine each regulator and the appendix function, and then may start sewing.
The following several points which are before stitch should pay attention, so it may cause sewing to be smoothly.
1. Inspects the needle to have straight, incisively and correctly installs.
2. Before start sewing and after completes sewing, raise the needle to the top.
3. Before sewing, first gently pull on the upper and down threads about approx 10 centimeters
(4 inches.) and pull both threads pass through under the presser foot.
4. Try to sewing on the some rags, to decide the suitable stitch length and the thread tension.
5. The seam cloth puts underneath presser foot.
6. Use foot speed controller. Slowly depress the foot controller to sewing.
7. Each suture line start and the ending must reverse sew a short distance to prevents off-line. (But reverse
sewing is only suitable in straight stitch)
8. Gently guide by the hand in front of the needle to deliver the cloth, do not hold on the cloth, otherwise can
affect sewing machine itself to deliver the cloth.
9. When turn the hand wheel, turn to front (counter-clockwise).
10. To avoid the sewing machine needle pulling curving or breaks off, after sew completes, before move away the
cloth, the needle-tip certainly must leave the cloth, rises to the top, and then move cloth by the needle back.
11. Separate the machine from the power system if you leave it unsupervised.
12. When turn on the machine and press the foot controller, the stepping motor & zigzag width motor will
functioning for “Neutralization the mechanism”, there will be some noise occurred, that’s a normal functioning
sound, don’t worry about such sound. After such “neutralizing” function, then you can start to enjoy the sewing.
Page 28

- 27 -
STRAIGHT STITCHES
1. This stitching is one of most commonly used
pattern.
2. The zigzag presser foot also can use in the
straight stitches and the zigzag stitches
3. To sewing thinner cloth may use smaller stitch
length.
ZIG-ZAG STITCH
Zig-zag stitch is a useful pattern. Setting the stitch
length to (0.3) the satin stitch (pattern 01) can be
used for embroidery, applique, etc. When you use
this kind of stitch to sew a thin fabric, please loosen
upper tension a little and place a piece of paper
under the fabric or lining cloth to avoid wrinkling.
(Use Zig-zag pattern, please turn the upper tension
dial in between 1-3).
Pattern selector position.
FREE ARM SEWING
1. Free arm sewing is useful for sewing sleeves,
trousers etc.
2. Your sewing machine can be used as a flat bed
machine but easily c
onvert to free arm machine by
removing the extension table.
SEAM FINISHING
When sewing to edge of cloth, push the reverse
button and sew in reverse for approx 2 centimeters.
Then raise needle to highest position, raise presser
foot and take the fabric to rear of machine. The
threads can be cut with thread cutter location in rear
face plate. (Arrow place)
Cutting thread slot
01
00
Page 29

- 28 -
TRANSFER SEWING DIRECTION
1.
Stop the sewing machine when you reach a corner.
Then lower the needle into fabric.
2. Raise presser foot and use the needle as a pivot.
Turn the fabric around the needle in the desired
direction.
3. Lower presser foot and resume sewing.
STITCH BALANCE DIAL
1﹒Arrow place is the pattern balance dial. “+”﹒“-”
2﹒Use L screwdriver to adjust.
3﹒
When you doing balance adjustment, please by
a spot adjustment, adjusts excessively many be
more and more.
1﹒When you sew out the pattern is overlaps (A).
Turn adjust dial “+” (Along clockwise).
2﹒
If sew out the pattern is separates (C). Turn adjust
dial to “-” (Counter clockwise).
Page 30

- 29 -
STRAIGHT STRETCH STITCH
Use this stitch with knitted, tricot or other stretchy
fabric. As general straight sewing, the machine will
feed forward and backward making a triple stitch not
easily broken offering strength on stretchy fabrics.
THREE STEP ZIG-ZAG STITCH
You can use this stitch for many sewing tasks.
Suitable for sewing toweling and patchwork.
OVERCASTING SEWING (Optional)
. Use these stitches for sewing an unfinished fabric
edges, seam and applique.
09 07 36
02
38 05
Page 31

- 30 -
BLIND STITCH
Set up position:
1. Fit blind stitch presser foot.
2. Pattern selection “04”.
3. Stitch length dial at between “1.5-2.5”
4. Needle width dial at “3-5”
5. Loosen upper tension slightly.
1. Fold the material as shown. Make the fold as wide
as you want the finished seam to be: the bottom
fold should be about 5 mm away.
2. Use the blind hem foot. While sewing, check the
seam width and needle setting, to ensure that the
seam remains uniform.
3. Sew the blind seam on the underside of the
material, so that only the peak of the zigzag stitch
pierces the out-side of the material. When you have
finished sewing, push the left of the
material over to
the right and smooth out. The seam is almost
invisible!
The table below shows the suggested settings for the
various values, depending on the material used.
04
Page 32

- 31 -
BUTTONHOLE SEWING
1. Exchange to buttonhole presser foot.
2. Pulls out upper and bobbin threads approx. 10cm,
and then lay aside under presser foot. (Diagram 1)
3. Set needle width dial at between 4-5. (Diagram 2)
4. Set stitch length dial at 0.3-0.5. (Diagram 3)
5. Make buttonhole locations on fabric. (Diagram 4)
6. Place fabric under presser foot.
As (Diagram 5) arrow place, put in the button.
7. Lower down presser foot.
8. Press the Buttonhole lever.
9. Set BH stitch pattern (10、11、12、13、14、15、16、
17), choose the pattern and raise the needle to
peak.
10. Start sewing slowly until it reaches bartacks of the
start line and then stop sewing.
11. Raise presser foot and take out fabric.
Buttonhole
locations
(Marks)
Bartacks
(Diagram 1)
(Diagram 2)
(Diagram 3)
(Diagram 4)
(Diagram 5)
Button adjuster
Button slot
Remake:
Buttonhole patterns are one time stitches.
Page 33

- 32 -
ZIPPER SEWING
Utilise the foot of closing zipper.
Select straight stitch.
1. Zipper foot is designed to sew close to a raised
edge, thus preventing sewing on zipper.
2. Place zipper foot in position and attach firmly.
3. Fold the fabric about 2 cm and place the fabric
under foot.
1. To sew the left side of the zipper, set the zipper on
the right side of the needle.
2. To sew the right side of the zipper, set it on the left
side of the needle.
Sew as illustrated.
Page 34

- 33 -
HEMMING (Optional)
1. Raise the presser foot and the needle to its highest
position.
2. Fold over the fabric edge about 3mm and place it
under the foot.
3. Insert the fabric fold into the spiral opening of
hemmer foot.
4. Lower the presser foot.
5. During the sewing, left hand holds on the fabric
edge and folds to the left a little. Right hand holds
on the fabric front end and leans to left about 10
degrees. Then start to sewing.
Only suitable materials can be used and some
practice may be necessary to achieve best result.
QUILTER GUIDE (Optional)
1. Slide quilter guide arm through hole on top of
presser foot holder.
2. Move the quilter guide to required stitch distance.
3. Sew one line to test the machine stitches, then
adjust the quilter position you wish to use.
Quilter guide is not included in the standard
accessories. It’s an option part.
BUTTON SEWING
1. Press the “feet dog height lever” to lower the feet
dog.
2. Use button sewing foot and attach firmly.
3. Place the button between presser foot and fabric
and lower presser foot.
4. Manually turn hand wheel toward you and test
carefully that the needle goes through the centre
of first one hole and then the other.
5. By median speed sew 5-6 stitches.
Match
01
Page 35

- 34 -
CLEANING AND OILING
Note: Pull stehts net-put for the machine if it out of
operation are, if the lamp replaced or if them
are cleaned.
Pull out power supply plug before clearing. In order to
maintain it’s to effective functions and pro-long
working life. This machine must be properly
maintained and cleaned and oiled after use.
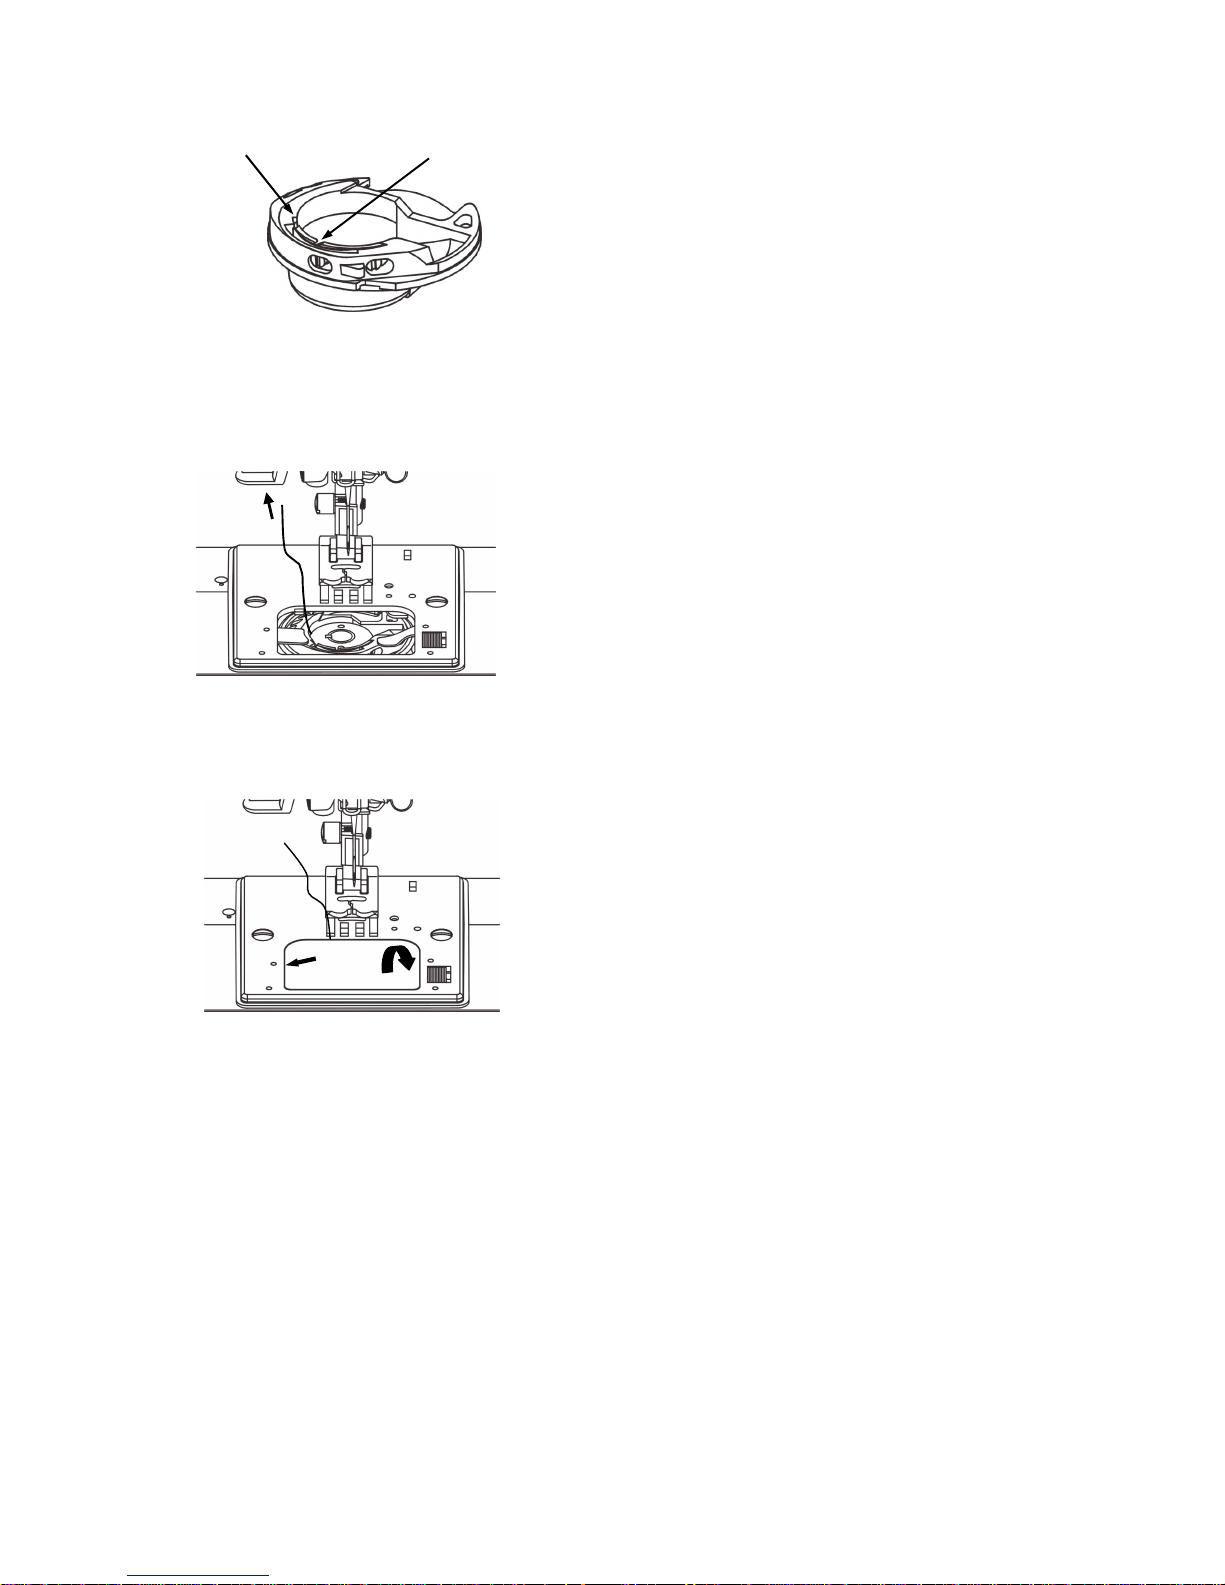
1. Take off the needle plate by loosening the screws
on both sides.
2. Turn the hand wheel until the thread take-up lever
reaches the highest point.
3. Take out the bobbin case. Brush away fluff and lint
around feet dog, bobbin case and shuttle race.
4. Assembling the bobbin case. The “fixed point”
should be on the left side of “stop point”, as
illustrate.
Take up lever
Screw
Screw
Clean the feed dog
Clean shuttle race saddle
Clean the shuttle race
Fixed point
Stop point
Page 36

- 35 -
Oiling place
Oiling place
Oiling place
Anchor screw
OIL INSIDE OF THE FACE COVER
Note: Pull stehts net-put for the machine if it out of
operation are, if the lamp replaced or if them
are cleaned.
.
Open the face cover w
ith the screw driver and places
one drop of oil on moving points only.
REMOVING AND REPLACING THE
BULB
1. Remove the power supply plug and open the face
cover.
2. Wait bulb cools about 3~5 minutes.
3. Remove the bulb in downward directin as
illustrate. Fit a new one and push in upward
direction.
4. Use 12V ~ 5W bulb.
Note::::
When loads the bulb, the light bulb two side has
pillar must put in bulb holder.
Page 37

- 36 -
FAULT FINDING CHART
Suspected
problem
Probable cause Possible easy correction
Threads kink
together under
the fabric.
- Upper thread improper threading.
- Upper tension dial at O position.
- Re-thread. See page 12
- Increase upper thread tension. See page 15
Irregular
stitches
- Incorrect size needle.
- Improper threading.
- Loosen top thread tension
- Pulling fabric.
- Loose presser foot.
- Unevenly wound bobbin
- Nicks or burrs at needle plate.
- Needle plate broken
- Choose correct size needle.
- Re-thread. See page 12
- Tighten top tension. See page 15
- Gently pull the fabric.
- Re-set presser foot.
- Re-wind bobbin. See page 8、、、、9
- Cleaning bobbin case and base. See page 34
- Change needle plate.
Breaking needle
- Wrong needles size for the fabric.
- The needle has not installed. The needle
is curving.
- Pulling fabric.
- The needle clamp screw is loose.
- Rotate the pattern dial when needle
insert the fabric.
- Loose presser foot.
- Choose a needle to suit the thread and fabric.
- Re-set needle. See page 6
- Gently pull the fabric.
- Truly locks the needle clamp screw.
- When choice pattern, the needle must above
the fabric.
- Re-set presser foot.
Bunching of
thread
- Upper and lower threads not drawn back
under presser foot before starting seam.
- Pull both threads under and back of presser
foot, then rotates the hand wheel with right
hand.
Puckering
- Incorrect thread tension.
- Upper thread improper threading.
- Using two different sizes or type thread.
- Bent or blunt needle.
- Loosen presser foot
- Fabric too sheer or too soft.
- Re-set thread tension. See page 15
- Re-thread. See page 12
- Use same size and type threads.
- Insert new needle.
- Re-set presser foot.
- Use underlay or tissue paper.
Skipping
stitches
- Incorrect size needle.
- Bent or blunt needle.
- Incorrect setting of needle.
- Improper threading.
- Choose correct size needle for thread and
fabric. See page 17
- Insert new needle.
- Re-set needle. See page 6
- Re-thread. See page 12
Page 38

- 37 -
Breaking upper
thread
- Starting to stitch too fast.
- Improper threading.
- Top thread tension too high.
- Incorrect setting of needle.
- Wrong needles and thread for the fabric.
- Set thread pool and the position
indentation at left side.
- Incorrect setting of bobbin case.
- Needle eye is sharp.
- Burrs on bobbin.
- Burrs on needle hole.
- Start to stitch at a medium speed.
- Re-thread. See page 12
- Adjust top thread tension. See page 15
- Re-set needle. See page 6
- Choose correct needle and thread to suit the
fabric. See page 17
- Adjust position of the indentation to right side.
See page 8、、、、9
- Re-set bobbin case. See page 34
- Replace new needle.
- Sand or change bobbin case.
- Sand or change needle plate.
Breaking bobbin
thread
- Down thread improper threading.
- Down thread tension too high.
- Lint in bobbin or shuttle.
- Re-thread. See page 10、、、、11
- Adjust down thread tension. See page 15
- Clean bobbin case and shuttle. See page 34
Fabric not
moving
- Stitch length in “O” position.
- Scraps seize-up with feet-dog
- Sewing thread integral convexity
- Didn’t use the special-purpose bobbin.
- Adjust stitch length.
- Clean feed dog. See page 34
- Pull back upper and down threads under of
presser foot.
- Replace special-purpose bobbin.
Machine
jamming
knocking noise
- Thread caught in shuttle.
- Remove and clean shuttle. See page 34
Sewing machine
doesn’t operate
- The machine is not plugged in.
- Machine is not turned on.
- See page 5
- See page 5
Down thread is
pulled above the
cloth.
- Top thread tension too high.
- Upper thread improper threading.
- Down thread improper threading.
- Adjust top thread tension. See page 15
- Re-thread. See page 12
- Re-thread. See page 10、、、、11
Page 39

- 38 -
Page 40

 Loading...