

Page 1
ASP-EBJ100S
使用說明書與零件圖
INSTRUCTION BOOK & PARTS LIST
Page 2

Page 3

重要安全聲明
SAFETY INSTRUCTIONS
•
感謝客戶您購買本公司產品
為安全且正確地使用本產品 ASP-EBJ100,請
詳細閱讀以下注意事項後再實施操作。
1. 在使用本機器前,請先詳讀說明書內容,必
須遵守說明書的指示與規定。
2. 此設備的使用,由經過適當訓練的操作人員
實行。
3. 在使用本機器時,若發現異常或故障,應立
即停止使用,並切除電源,以進行妥善修理。
4. 嚴格禁止對本機器進行改造和變更。本公司
對改造或變更過的機器不予保固,若因此造
成危害,本公司將不負任何賠償責任。
•
危險
為杜絕觸電事故必須遵守以下安全措施。
1. 安裝本機器時,必須確實做好接地動作。
2. 對本機器的電氣做定檢與維修,都必須由具
有資格的電氣技術人員執行,或專家的監督
指導下進行。
•
警告
為了杜絕觸電、火災、燒損或對人的傷害,必
須遵守以下安全措施。
1. 本機器在有電壓的狀態下,絕對禁止人員接
觸通電之機件。
2. 本機器若需要做零件更換或進行維修時,應
將電源切換至 OFF
狀態。
•
Thank you for purchasing our company’s
products.
For your safety and using our product ASPEBJ100 properly, please read the instructions
below deliberately, then start operating the
machine.
1.Before using the machine, you must follow
the instructions and rules.
2.The operators must been well trained.
3.If you found some abnormal phenomena
or the machine malfunction, you should
stop using the machine at the moment and
cut the power off, in order to do the proper
repair.
4.Strictly forbid to do the extra transformation
or alteration. We do not have the warranty
to the machine which had been transformed
or altered. Therefore, our company will be
irresponsible for any compensation if the
machine has caused any danger.
•
Hazards
In order to prevent from the electric shock, you
must to obey the safety measure below.
1. While install the machine, make sure you
have do the grounding.
2. The electric routine inspection and
maintenance of the machine have to be
done by the electric technical personnel who
qualied or under the expert’s supervision.
•
Alert
You must to obey the safety measure below,
in order to prevent from the electric shock, fire
accident, burning loss, or human body injured.
1. Absolute forbid workers to touch the
machine
’s
parts while the machine is in a
voltage state.
2. If the machine
’s
parts need to be changed
or do the maintenance, you should switch
the power off.
Introduction
Page 4

3. 當本機器不能正確工作時,應立即停止操作
機器。該機器有必要進行修理、電氣或機器
方面的調整時,需要和本公司的代理商或直
接與本公司聯繫商談,採取合適的解決措
施。
4. 本機器的的維修、調整須經由適當訓練的技
術員或專業人員進行。維修時,需使用本公
司所指定的更換零件。
5. 一般的保修檢查,要由經過適當訓練的人來
進行。
6. 在維修或保養各式氣缸或氣壓相關連動機構
時,務必將供應氣源的接頭拔下,在氣壓完
全切斷的狀態方可進行。不過,只限於受過
適當訓練的技術人員或專業人員進行調整和
運行確認時例外。
7. 該機器準備啟動前,所有的保護蓋必須安裝
定位至機器上。
8. 本機器的內部裝置和控制箱裡不能殘積金屬
粉末和灰塵,要定期打掃。
9. 本機器在運行當中,所有可動部分都絕對不
可用手觸碰,或身體(包括頭髮、衣服類)
靠近。
3. While the machine cannot operate properly,
you should
stop operating it immediately. If
the machine has the necessity to repair, or
do the electric and machine adjustment, you
should contact with our factors, or contact
us directly, then take the proper resolution.
4.The machine’s maintenance and adjustment
need to be done by well- trained technician
or professional. You need to use the specific
parts from our company while under
maintenance.
5. The
repair within the warranty need to be
repair by the worker who well trained.
6. While doing the repair or maintain variety
of cylinders and pneumatic actuator
associated, you must unplug the supply air
source connector before you do the repair
and maintenance. However, it could be
only done by the well- trained technician or
professional.
7. Before ready to start the machine, all of the
protective
covers need to be on the position
of the machine.
8. The inner device and the control box of the
machine need to be regularly cleaned, in
case of any dust or metal filings remains in
the machine.
9. While operating the machine, do not use
your hands to touch or let your body to close
(including hair or clothes) all of the movable
parts.
10.Do not use the wet hands to operate the
machine, it mig
ht cause electric shock or
other major injured.
11.Please be sure to follow the alert pictorial
markings by next page.
10. 絕對不可用濕手操作,可能造成觸電等重
大傷害發生。
11. 警告提示如次頁圖案,請務必遵守。
Page 5
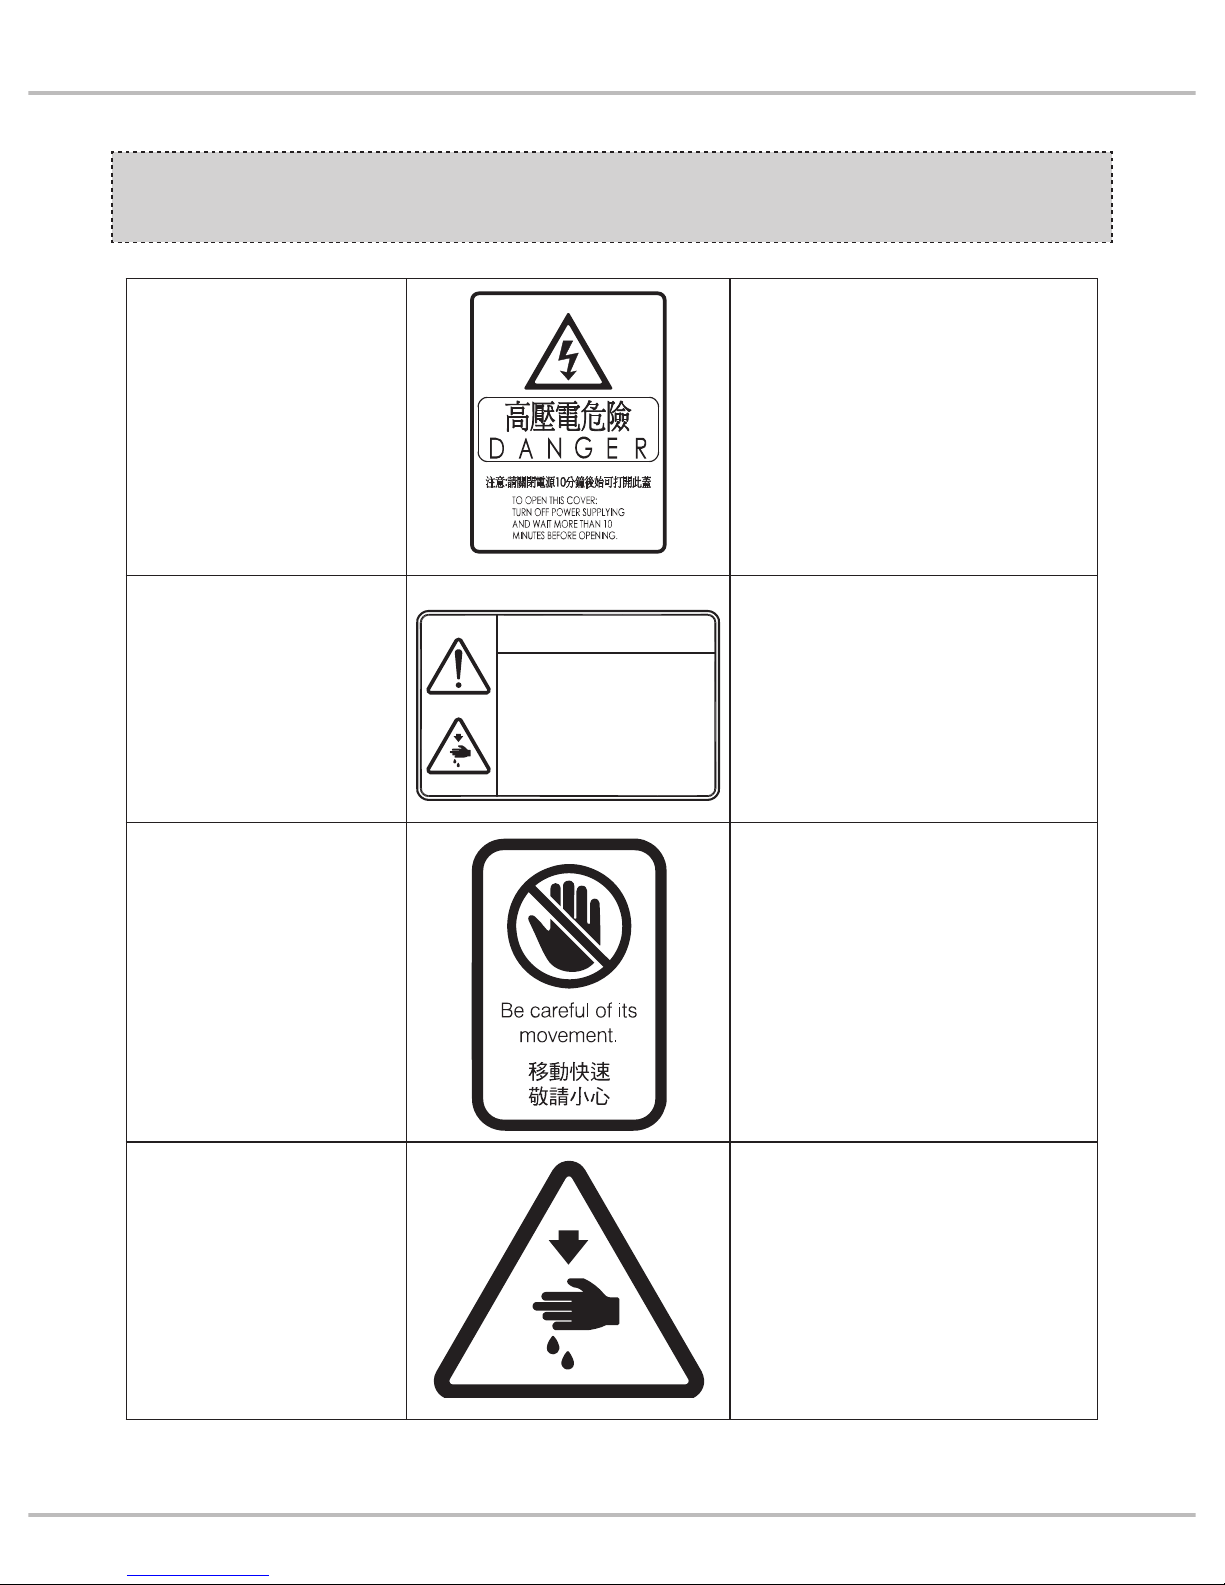
警告圖案表示
INDICATED THE ALERT
PICTORIAL MARKINGS
Introduction
高壓部位
HIGH-VOLTAGE POSITION
務必關閉電源 10 分鐘後始打開電控
箱蓋子
Be sure to turn off the power and wait
till 10 minutes before opening the
control box’s cover.
高速運動部位
HIGH SPEED MOTION
POSITION
謹防工傷事故
In case of industrial accident
高速運動部位
HIGH SPEED MOTION
POSITION
謹防工傷事故
In case of industrial accident
高速運動部位
HIGH SPEED MOTION
POSITION
謹防工傷事故
In case of industrial accident
CAUTION
機械作動部份請注意裝上
保護裝置
穿線、換線、 調整、清潔
時請注意關閉電源.
Moving parts may cause in jury.
Operate with safety devices.
Turn off main switch before
threading, changing bobbin and
needle, cleaning etc.
Page 6
安全注意事項
SAFETY INSTRUCTIONS
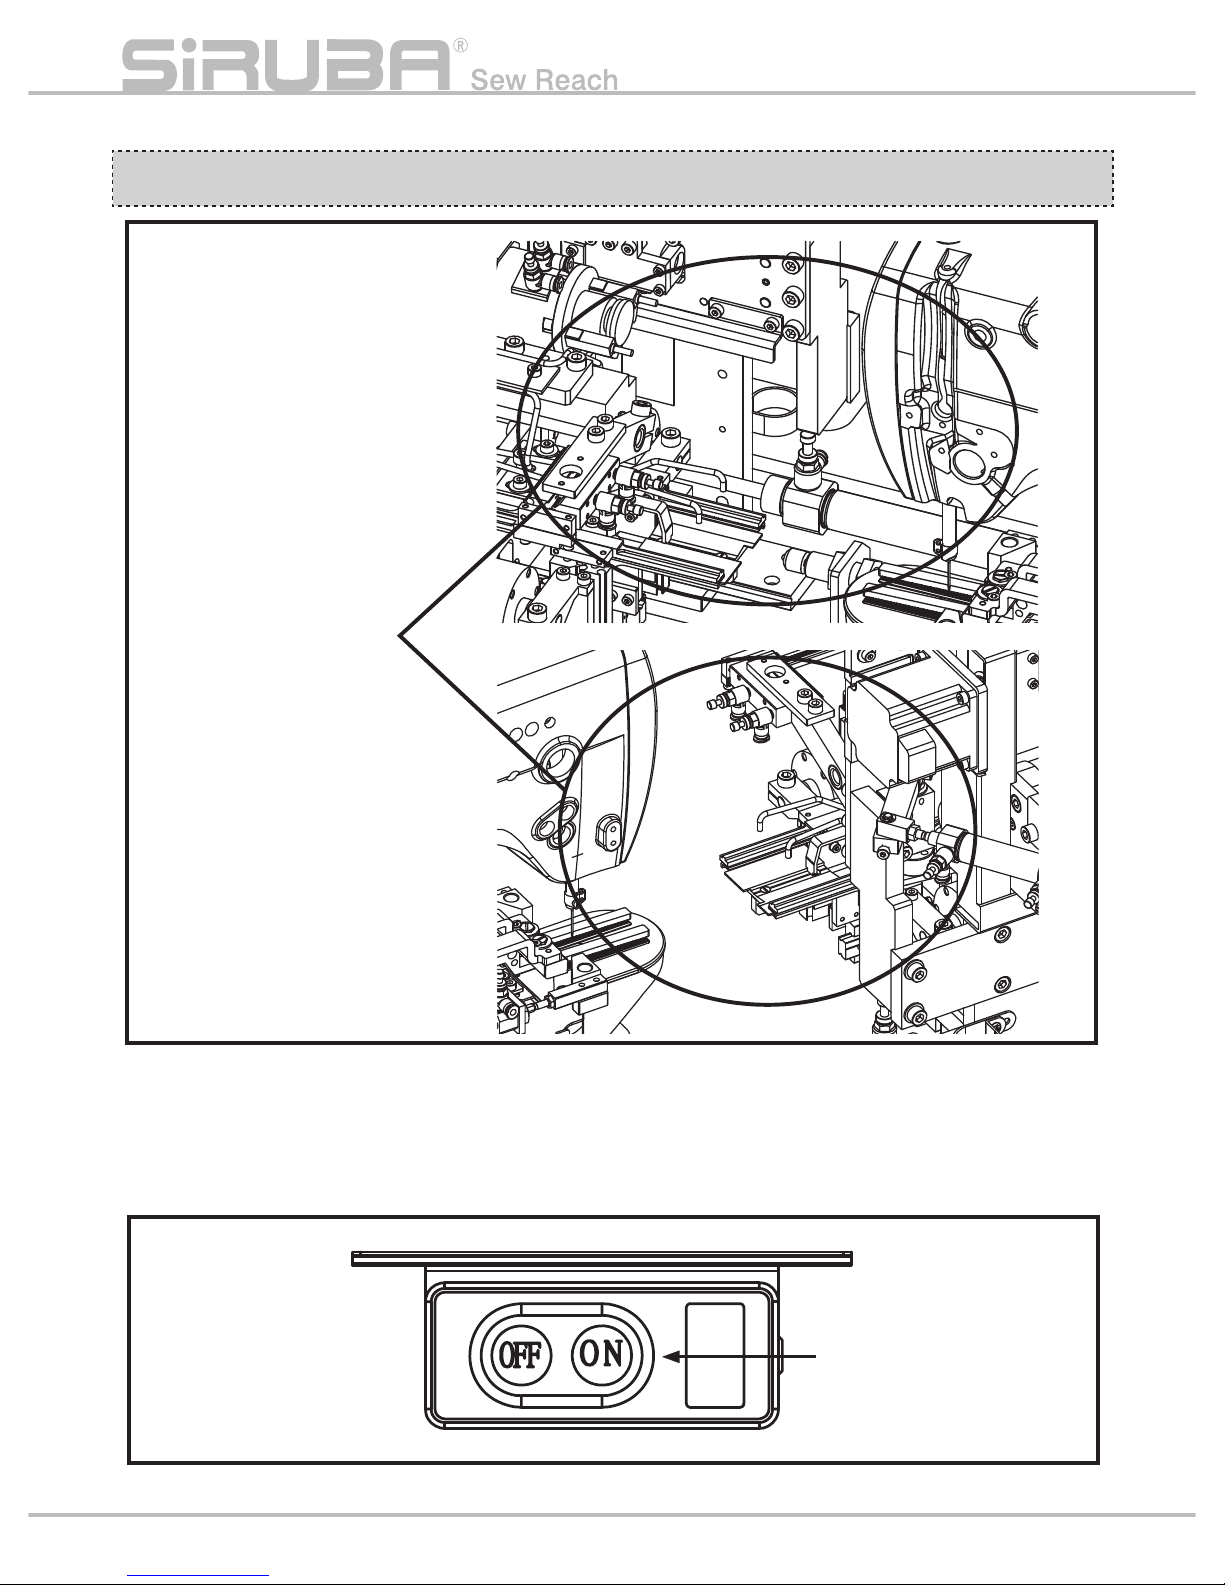
機器動作範圍 ( 區域 )
Area with moving parts
1. 機器在運轉時,不可將手指等放入該區域
內。
2. 為了保修、檢修卸掉罩蓋時,必須將電源切
到 OFF。
1. Do not put your fingers into the area while
machine is operating.
2. Must switch off the power before take down
the cover for repair and maintenance.
電源開關
Power switch
Page 7
Introduction
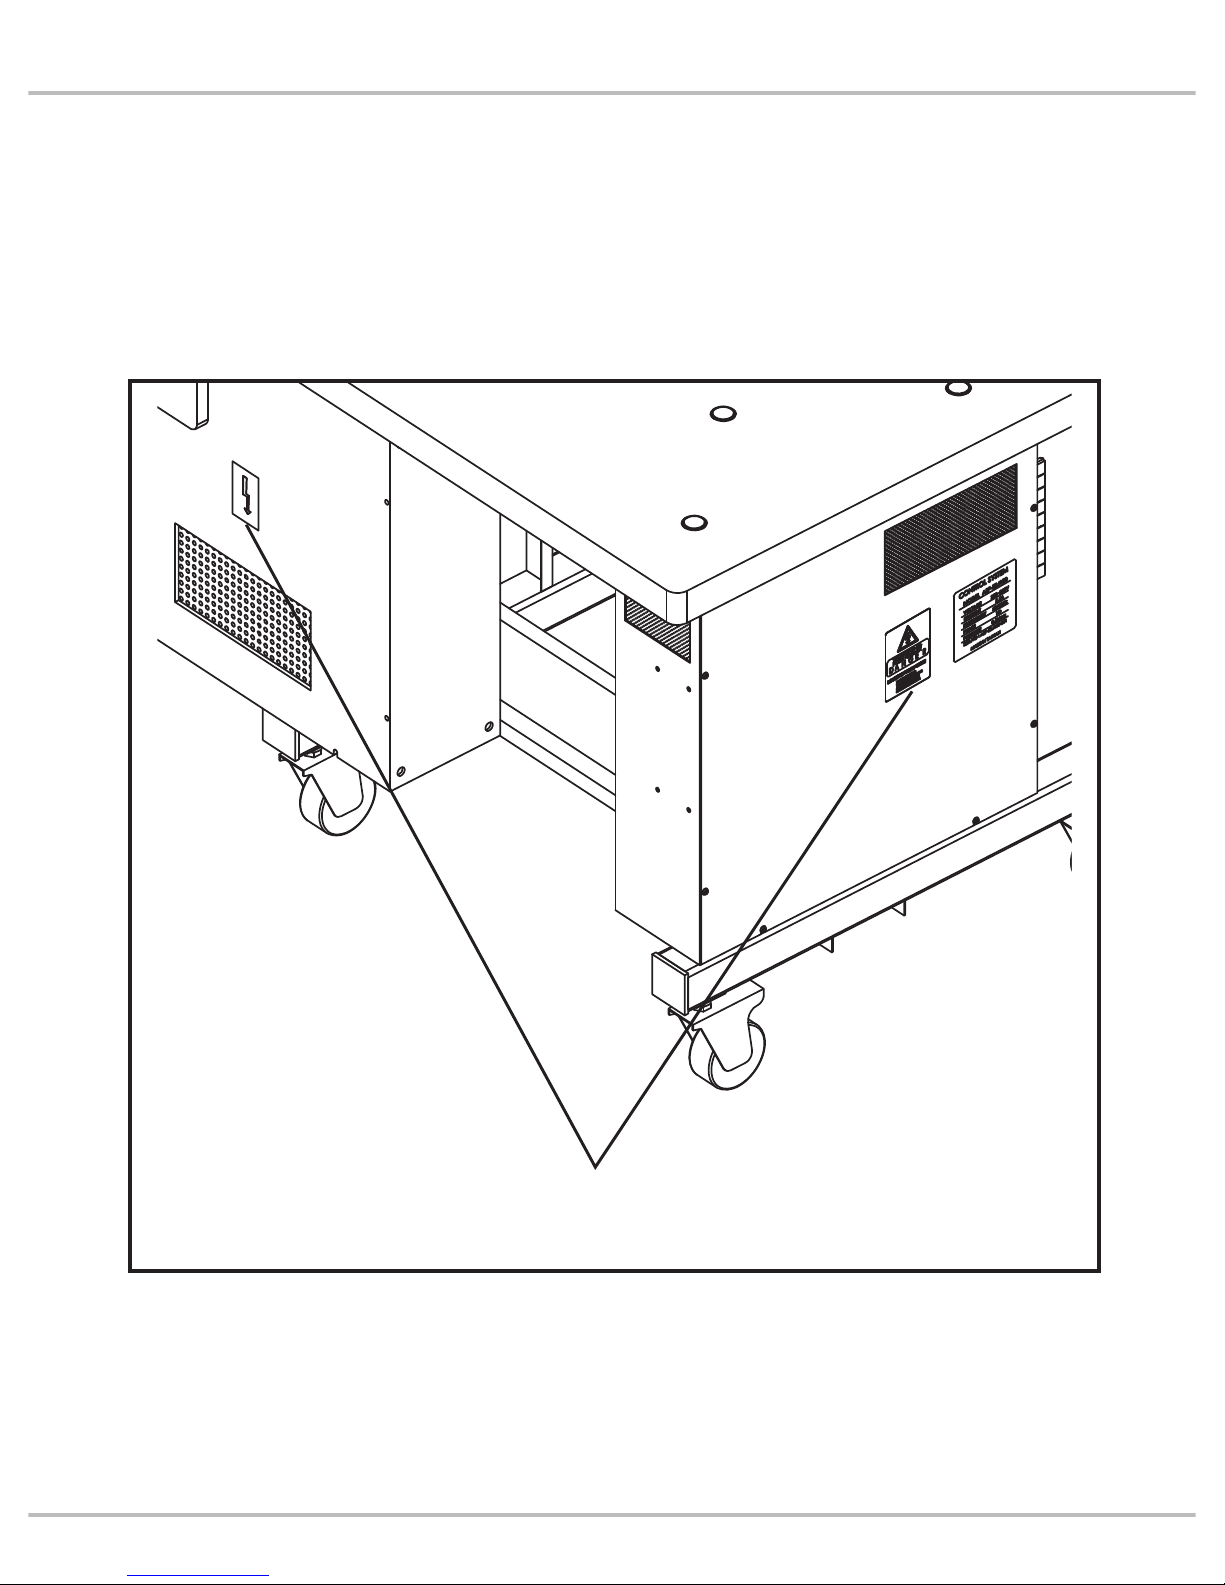
3. 在有危及人體的高壓電處,貼有觸電危險警
告標記。在貼有本警告的電器控制部位而需
要保修、檢修時,打開罩蓋僅能由專業的電
氣技術人員進行。
3. Stick the electric shock alert pictorial
marking at high voltage place which may
cause human danger. Therefore, only the
professional and electric technician could
open the cover, while the electric place
which have sticked on the alert pictorial
marking need to be repair and maintenance.
觸電危險警告標記
Electric shock alert pictorial
marking
Page 8
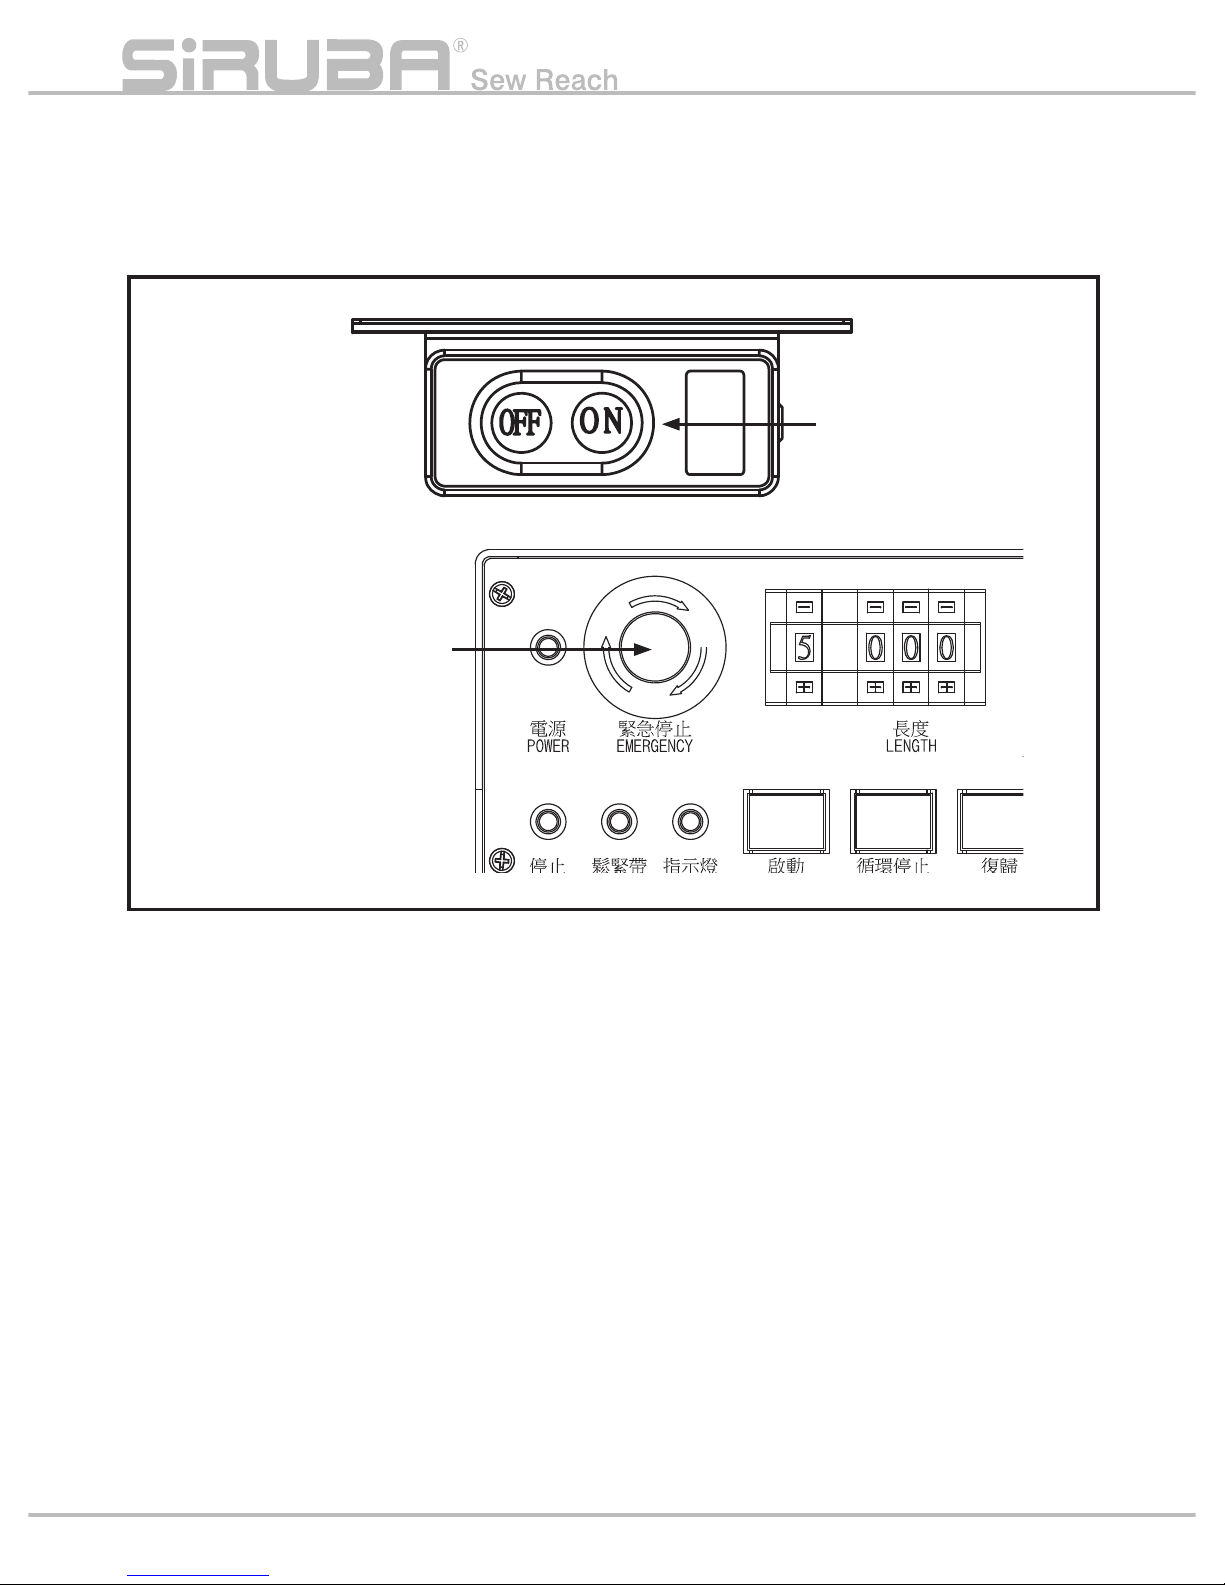
4. 機器運轉時,有必要馬上停止機器的時候,
可以按下緊急停機開關。並將(電源開關)
切到 OFF。
4. If there’s a necessity to stop the machine
right away while machine operating, you
could press the urgent machine halt switch
to switch the power off.
5. 電源線、氣壓管線需確實固定安置,不可散
落在地面,以免人員絆倒而發生危險。
6. 為了生命安全,在任何情況下,不可將電源
地線拔掉運轉機器。
7. 打雷時,為了安全要停止作業, 切斷電源。
8. 離開機器工作地點時或工作結束後一定要將
電源開關轉到 OFF。
9. 機器運轉下,不可卸下罩蓋類。
5. Power cord and pneumatic line pipe need to
make sure be
ing fixed and settle down. Do
not put them disordered on the ground in
case of people stumble and cause danger.
6.No matter under any circumstances, for your
life safety, do not pull out the power ground
wire while operating the machine.
7.For your safety, you need to stop your work
and cut off the power, if it starts thundering.
8.Must switch off the power before you leave
your work or work endin
g.
9.Do not take down any cover while operating
the machine.
緊急停止開關
Urgent machine halt switch
電源開關
Power switch
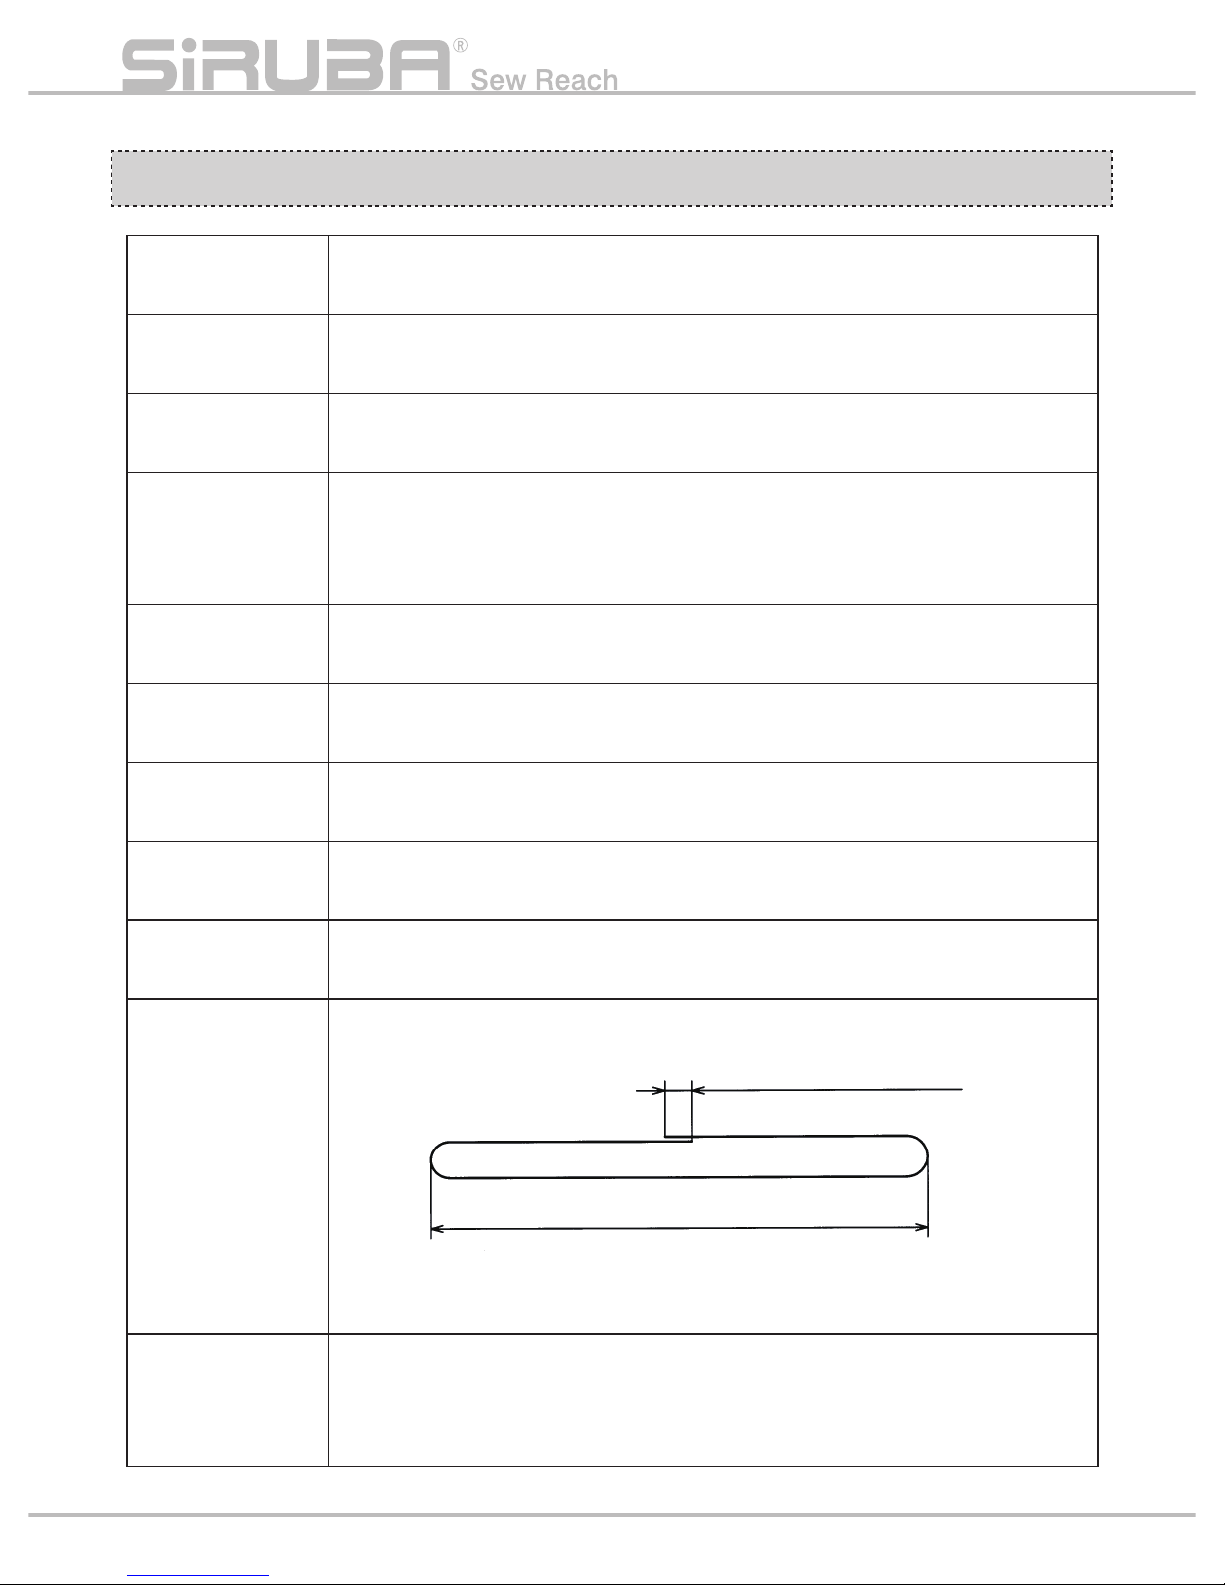
重疊量
LAPPING SIZE
Page 9

Introduction
索引
INDEX
頁 /PAGE
規格 SPECIFICATION 1
安裝 INSTALLATION 2
操作開關 OPERATION SWITCH 3
(1)開關說明 (1)ILLUSTRATION OF SWITCH 3
(2)指示燈的說明 (2)ILLUSTRATION OF INDICATOR LAMP 5
(3)縫紉機操作面板 (3)OPERATION PANEL OF SEWING MACHINE 6
機器啟動準備 PREPARATION OF OPERATING MACHINE 6
(1)確認裝置高度 (1)CHECK THE HEIGHT OF THE DEVICE 6
(2)氣壓 (2)PNEUMATIC PRESSURE 7
(3)電源電壓 (3)POWER SOURCE VOLTAGE 7
(4)加油 (4)LUBRICATION 7
鬆緊帶的穿法 WAY TO THREAD THROUGH ELASTIC TAPE 7
更換鬆緊帶方法 WAY TO R
EPLACE ELASTIC TAPE 9
啟動 OPERATION 10
(1)設定縫紉花樣圖形以及調整圖形長度 (1)SETUP SEWING PATTERN AND SEWING LENGTH ADJUSTMENT 11
(2)設定及調整鬆緊帶長度 (2)ELASTIC LENGTH SETUP AND ADJUSTMENT 13
(3)重疊量設定值 (3)LAPPING SIZE SETUP RATIO 13
(4)鬆緊帶前端的設定 (4)POSITION FOREFRONT OF ELASTIC TAPE 14
(5)啟動機器 (5)STARTING 14
(6)連續運轉 (6)CONTINUOUS OPERATION 15
(7)僅製作一個成品 (7)SEWING ONE PIECE ONLY 15
(8)重新安裝鬆緊帶 (8)REPOSITION ELASTIC TAPE 15
調整接合對位及重疊部分 ADJUST BUTTED SE
AM & LAPPING SEAM 16
(1)接合部分的調整 (1)ADJUST BUTTED SEAM 16
(2)調整重疊範圍 (2)ADJUST LAPPING SEAM 18
指示燈的表示及解除 THE REPRESENTATION OF INDICATOR LAMP & CANCELATION 19
維護用運轉模式 MAINTENANCE OPERATING MODE 23
(1)縫製一個帶圈的連續動作 (1)ONE SHOT OPERATING FOR AN ELASTIC RING 23
(2)機器獨立運轉 (2)MACHINE ISOLATED OPERATION 24
各部分的調整•維護 THE ADJUSTMENT & MAINTENANCE OF EACH PARTS 24
(1)鬆緊帶定位及送帶設備的前後位置 (1)FORE AND REAR POSITION OF ELASTIC TAPE LOCATING
24
AND FEEDING DEVICE
(2)帶端接合位置偏離調整 (2)ADJUST DEVIATION OF TAPE SIDE END JOINT 26
(3)氣壓的強度調整 (3)ADJUSTMENT OF PNEUMATIC INTENSITY 26
(4)輸送滾輪的調整 (4)ADJUSTMENT OF FEEDING ROLLER 27
(5)機器壓腳及托布板的調整標準 (5)ADJUSTMENT STANDARD OF MACHINE PRESSER CRAMP 27
AND FABRIC HOLDING PLATE
(6)接縫檢測器或是鬆緊帶殘餘量感應器 (6)JOINT SEAM DETECTOR OR ELASTIC TAPE REMAINS SENSOR 28
(7)切帶刀的更換及調整 (7)REPLACING KNIFE AND ADJUSTMENT 29
零件圖 PARTS LI
ST 31
選配圖 CHOOSE PARTS 51
Page 10
規格 SPECIFICATION
型 號
Model
ASP-EBJ100S
使用針型
Type of needle
DPx5#14
縫製速度
Sewing speed
2500rpm(最高 /Highest)
生產能力
Output capability
視縫製針數而定
( 舉例)71 針縫製樣式的情形下 8 秒/回
Depends on the stitches
(Ex:)71 stitches thread pattern: 8 sec/cycle
寬 度
Width
6mm ~ 20mm
電 源
Power source
單相/3相200~240V 50/60Hz 3.5A(最大)
single-phase /3phase 200~240V 50/60Hz 3.5A(Highest)
氣 壓
Pneumatic pressure
0.5 MPa
空氣消耗量
Air consumption
30L/ 分
30L/min
機器尺寸
Dimensions
寬 1230X
長 1030X 高 1420mm
(W)1230X(L)1030X(H)1420mm
縫紉尺寸
Sewing size
兩折長度
Two folding length
150~990mm(鬆緊帶圓周長度300~1980mm)
重疊尺寸0( 對合 ) ~13mm
150~990mm(elastic tape circumferences300~1980mm)
Lapping size 0(fold) ~13mm
兩折長度 150~990mm
Two folding length 150~990mm
重疊尺寸 0~13mm
Lapping size 0~13mm
P1
Page 11
安裝 INSTALLATION
P2
Introduction
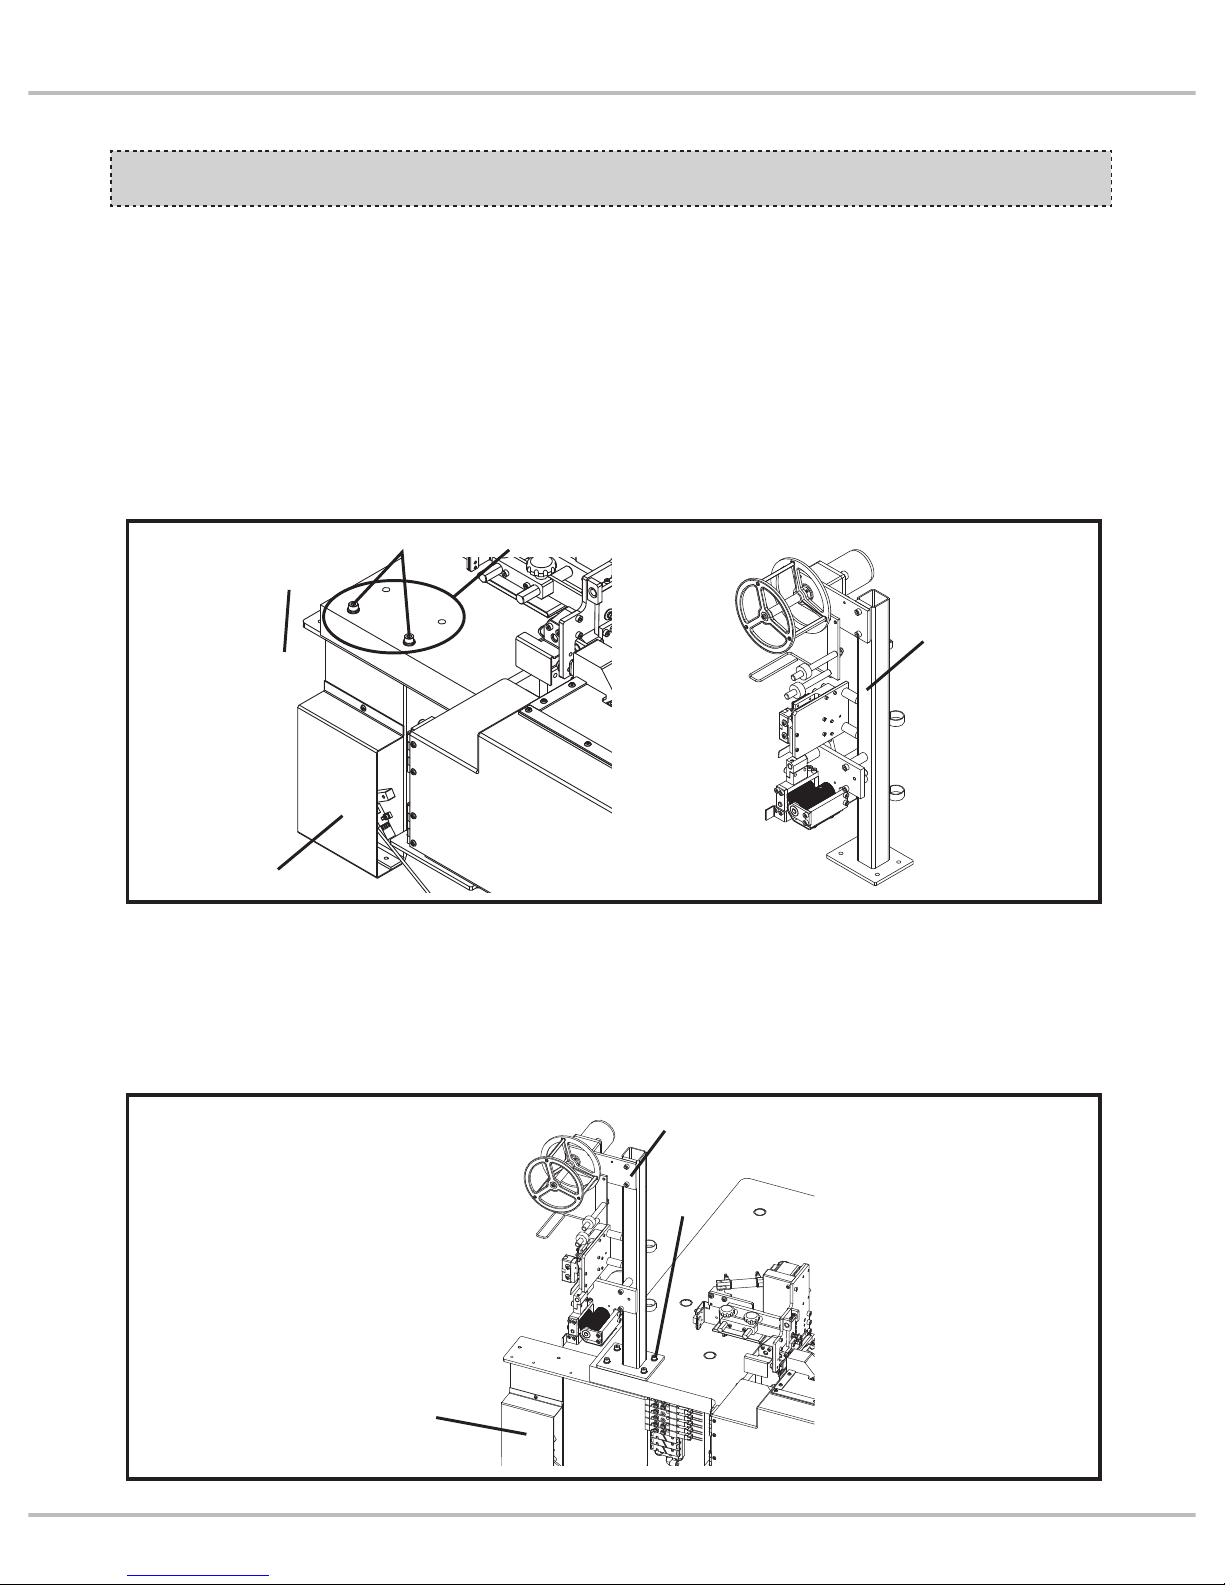
※ 注意:安裝作業需兩人以上執行。
(1) 卸下①的兩個螺絲,將擴充檢測部分②暫時
分離;這時,另一個人用手托住將擴充檢
測部分②,往圖示的方向移動③。(注意
請勿損傷擴充檢測部分②的電線)
(2) 將擴充部分④裝在桌面上之⑤的位置。
(3) 用剛開始卸下的兩個螺絲①和配件盒內的兩
個螺絲將擴充部分③跟擴充檢測部分②固
定。
(4) 將所有插頭和插座連接。( 確實卡住 )
※Caution:The installation work need two or
more people to work on.
(1)Take down two screws of ①, temporarily
dispart the feed detecting part②. At the
moment, the other person use hands to
hold the feed detecting part② and move t
o
the direction ③ on the picture.(Be aware
do not damage wires of the feed detecting
part②)
(2) Install the feeding part ④ onto table ⑤.
(3)Use two screws of ① at the beginning you
took down and the other two screws in the
accessory box to fix the feeding part ③
and the feed detecting part ②.
(4)Plug all the plugs in the sockets. (Make
sure them all be fixed.)
④
④
① ⑤
③
②
①
②
Page 12
P3
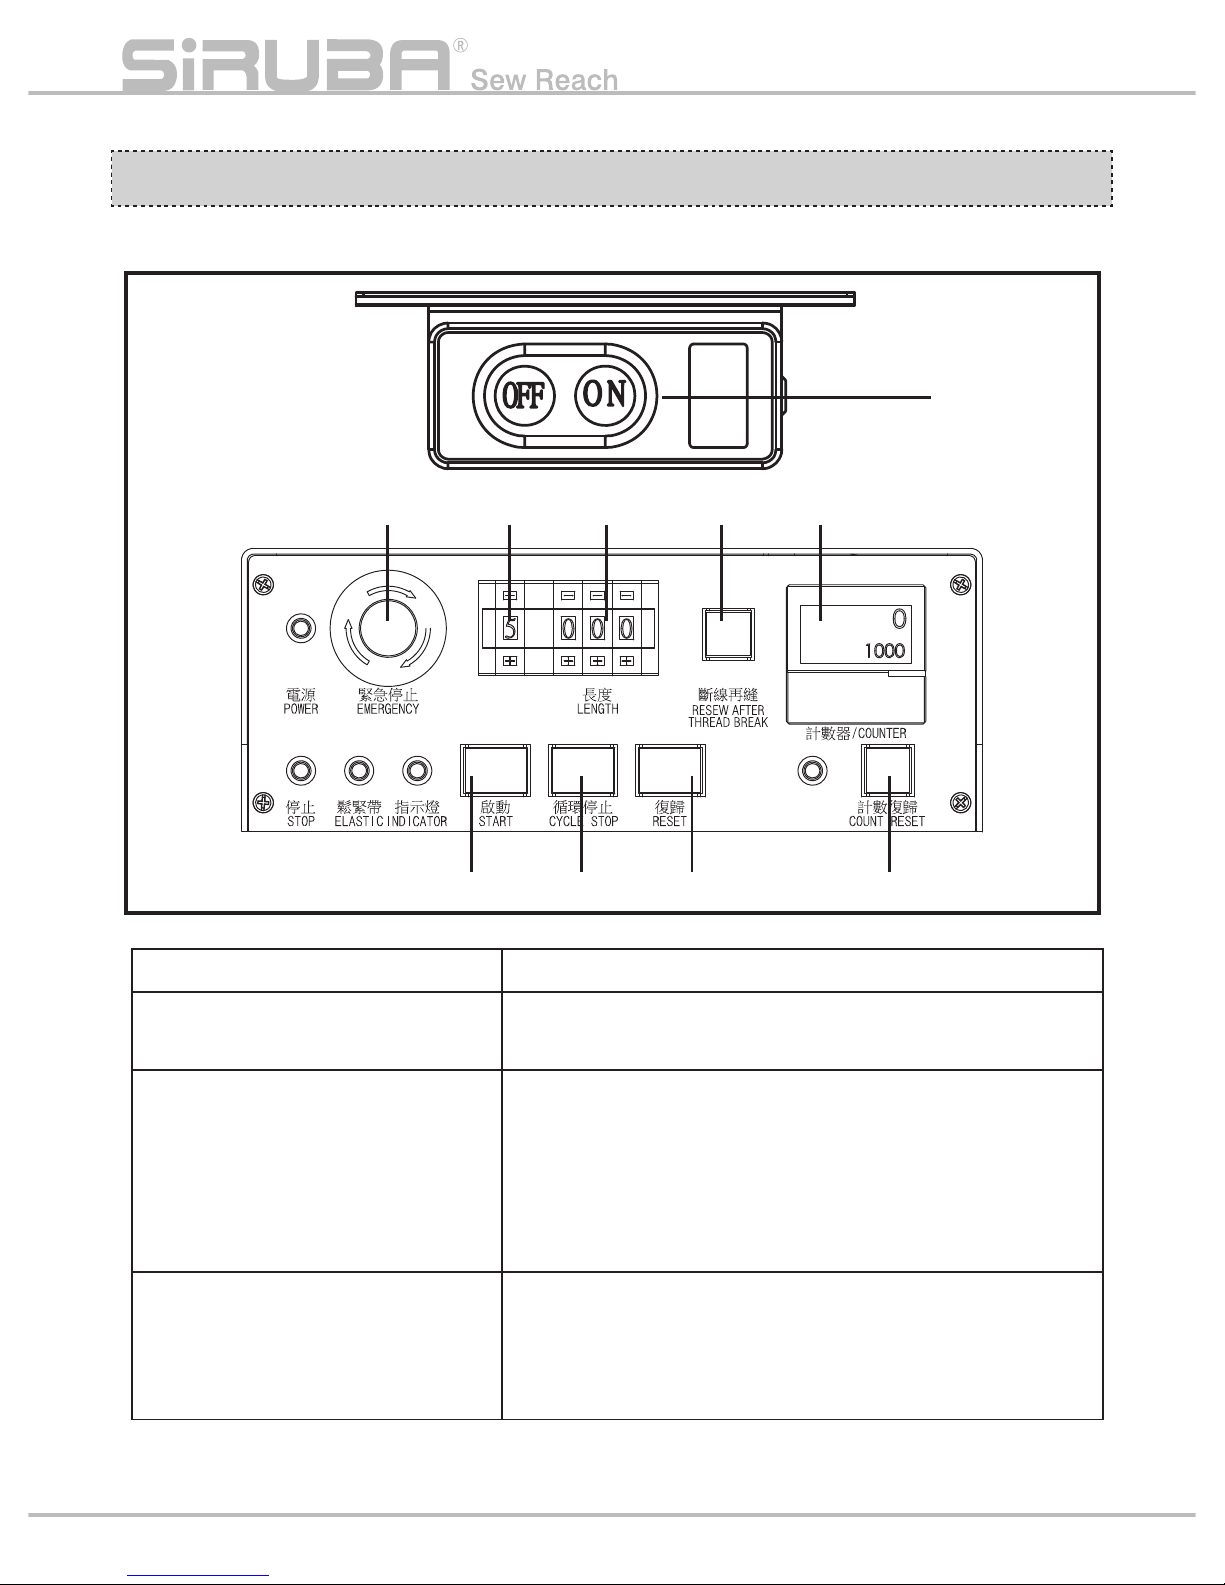
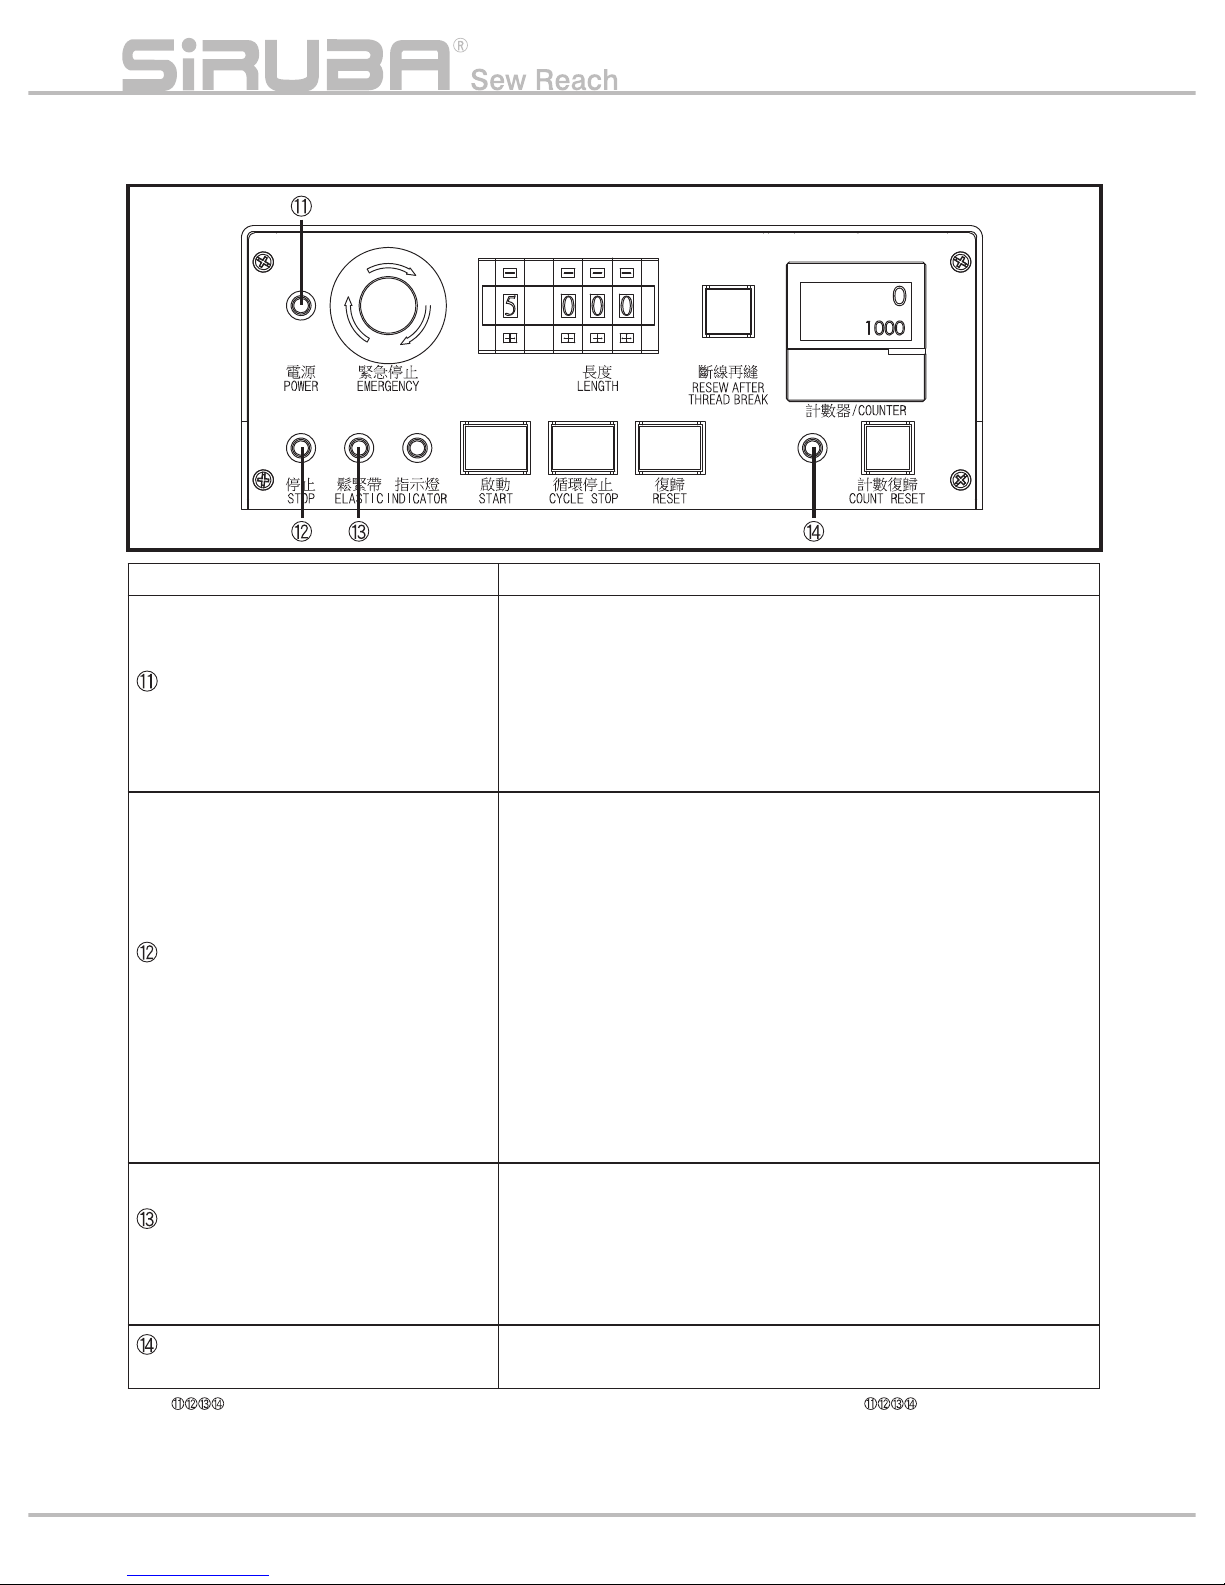
操作開關 OPERATION SWITCH
1. 開關說明 1.Illustration of Switch
①
⑩ ⑥⑤
② ③ ④ ⑨
⑦ ⑧
名稱 Names 功能 Functions
①「電源」開關
「Power」switch
電源的開啟 ( ON/OFF )
Switch power on ( ON/OFF )
②「啟動」開關 ( 綠 )
「START」switch(green)
1. 啟動機器。(P.14)
2. 連續運轉的開始。(P.15)
3. 啟動「縫製一個帶圈的連續動作」。(P.23)
1. Start the machine.(P.14)
2. Start to continuous operation.(P.15)
3. Start one shot operation for an elastic ring. (P.23)
③「循環停止」開關(黃)
「CYCLE STOP」switch(yellow)
1. 連續動作停止。(P.15)
2. 單一成品製作。(P.15)
1. Stop the machine cycle.(P.15)
2. Sew
ing one product only.(P.15)
重疊量
LAPPING SIZE
Page 13

P4
Introduction
④「復歸」開關 ( 藍 )
「RESET」switch(blue)
1. 解除錯誤。
2. 長按時可重新設定鬆緊帶。(P.14)
3. 縫紉機單獨運轉的時候(P.24)可控制壓腳升降。
1. Cancel the error.
2. Press the button over seconds can reset elastic tape.(P.14)
3. Operate sewing machine isolated(P.24)can control presser
foot lifter up and down.
⑤「緊急停止」開關(紅)
「EMERGENCY」switch(red)
立即停止機器。順時鐘方向轉動可解鎖除。(P.15)
Stop the machine immediately. Turn the switch clockwise can
release lock.(P.15)
⑥「長度」設定
開關
「LENGTH」setting switch
製品完成的長度設定。(P.13)
Setting the nished product’s length.(P.13)
⑦「斷線再縫」
「RESEW AFTER THREAD BREAK」
斷線後重新車縫。(P.19)
Re-sewing after broken-thread.(P.19)
⑧「計數器」
「COUNTER」
1. 計算生產的成品數量。(也可當底線的計數器)※
2. 計算數位(上段數位)和設定數位(下段數位)一樣時機器會自
動停止。(P.19)
1. Count the production volume.(useable for the under thread
number.)※
2. Machine would stop automatically when counts number(upper
numbers)as same
as preset counts(lower numbers)(P.19)
⑨「計數復歸」開關(藍)
「COUNT RESET」switch(blue)
使「計數數位」的數值歸零。(P.21)
Reset the「COUNTER」value to zero.(P.21)
⑩「重疊量」設定開關
「LAPPING SIZE」setup switch
微調鬆緊帶的右前端位置。標準值「5」。(P.13、16、17、18)
Fine adjust the elastic tape’s right-forefront position. Standard
「5」.(P.13、16、17、18)
Page 14
P5
2. 指示燈的說明 2.Illustration of indicator lamp
註記:⑴ 燈的詳盡內容以及 解除方式請參 照表中所指示之頁數。
⑵縫紉 機的獨立運轉,以及縫製一個帶圈的連續動 作方式請參照表中所 示之頁數。
Note:( 1)The detailed co ntents o f lamps a nd cancelation pl ease ref er to
the in dicated pages in the form .
(2)Please re fer to t he indic ated pages in the form wh en the s ewing machine
operat es isolated and s ewing on e shot o peration method.
名稱 Names 功能 Functions
「電源」燈(綠)
「POWER」Lamp(green)
1. 電源開關ON的時候亮燈。
2. 機器單獨運轉的模式(P.19)。
3. 啟動「縫製一個帶圈的連續動作」。
1. Light up as power switch ON.
2. Machine operate isolated mode.(P.19)。
3. Start one shot operation for an elastic ring.
「停止」燈(紅)
「STOP」Lamp(red)
1. 當按下「緊急停止」開關的時候亮燈。(P.15)
2. 啟動「縫製一個帶圈的連續動作」。
3. 機器在不可能運轉的狀況下,按下啟動鍵時,將與「斷線」燈
同時閃燈。(P.19)
4. 裝置裡的極限開關異常時,將與「鬆緊帶」燈同時閃燈。
(P.19)
1. Light up as press「EMERGENCY」switch.(P.15)
2. Start one shot operation for an elastic ring.
3. As machine start signal begin, with「THREAD」light flashing
simultaneously under the condition that machine cannot be
operating. (P.19)
4. If the limit switch
in the device abnormal , 「ELASTIC」lamp
would flash at the same time.(P.19)
「鬆緊帶」燈 ( 黃 )
「ELASTIC」Lamp(yellow)
1. 沒有鬆緊帶的時候亮燈。(P.19)
2. 檢測出鬆緊帶的接縫時亮燈。(P.19)
3. 鬆緊帶的延伸異常時亮燈。(P.19)
1. Light up without elastic tape.(P.19)
2. Light up when detecting elastic tape seam.(P.19)
3. Light up when elastic tape’s feeding abnormal.( P.19)
計數燈
Count up lamp
製品設定數量完成時亮燈。(P.19)
Light up as nish the setting amount of production.(P.19)
【操作面板 /Operation】
重疊量
LAPPING SIZE
Page 15
P6
Introduction
1. 確認裝置高度
在尚未送電和送氣的狀態下,將夾住鬆緊帶
的夾具往下壓避免撞到其它部件①,再將送料
盤②往縫紉機位置推,盤上有紅線的面③和
縫紉機針板④為同一高度。當③比④低的時
候 (0.3 mm以內皆可),或③比④高 0.5 mm
以上的時候,將螺絲⑤鬆開(從圖片中的相反
側開始),旋轉高度調整螺絲⑥以微調整高度。
1.Check the height of the device.
Under the circumstance which do not turn
the power on and let the air in.Press the
clamp which clip the elastic tape down to
avoid bumping into other device①.Then
push the feeding plate ② to the position of
sewing machine. The plate ③surface which
has red line, and sewing machine needle
plate④ are the same height. When③ is
lower than ④, (within0.3mm)or ③is
higher than ④ (more than 0.5mm), loosen
screw ⑤(start with the opposite side of
the picture). Rotate the height, adjust
screw⑥ to fine adjust the height.
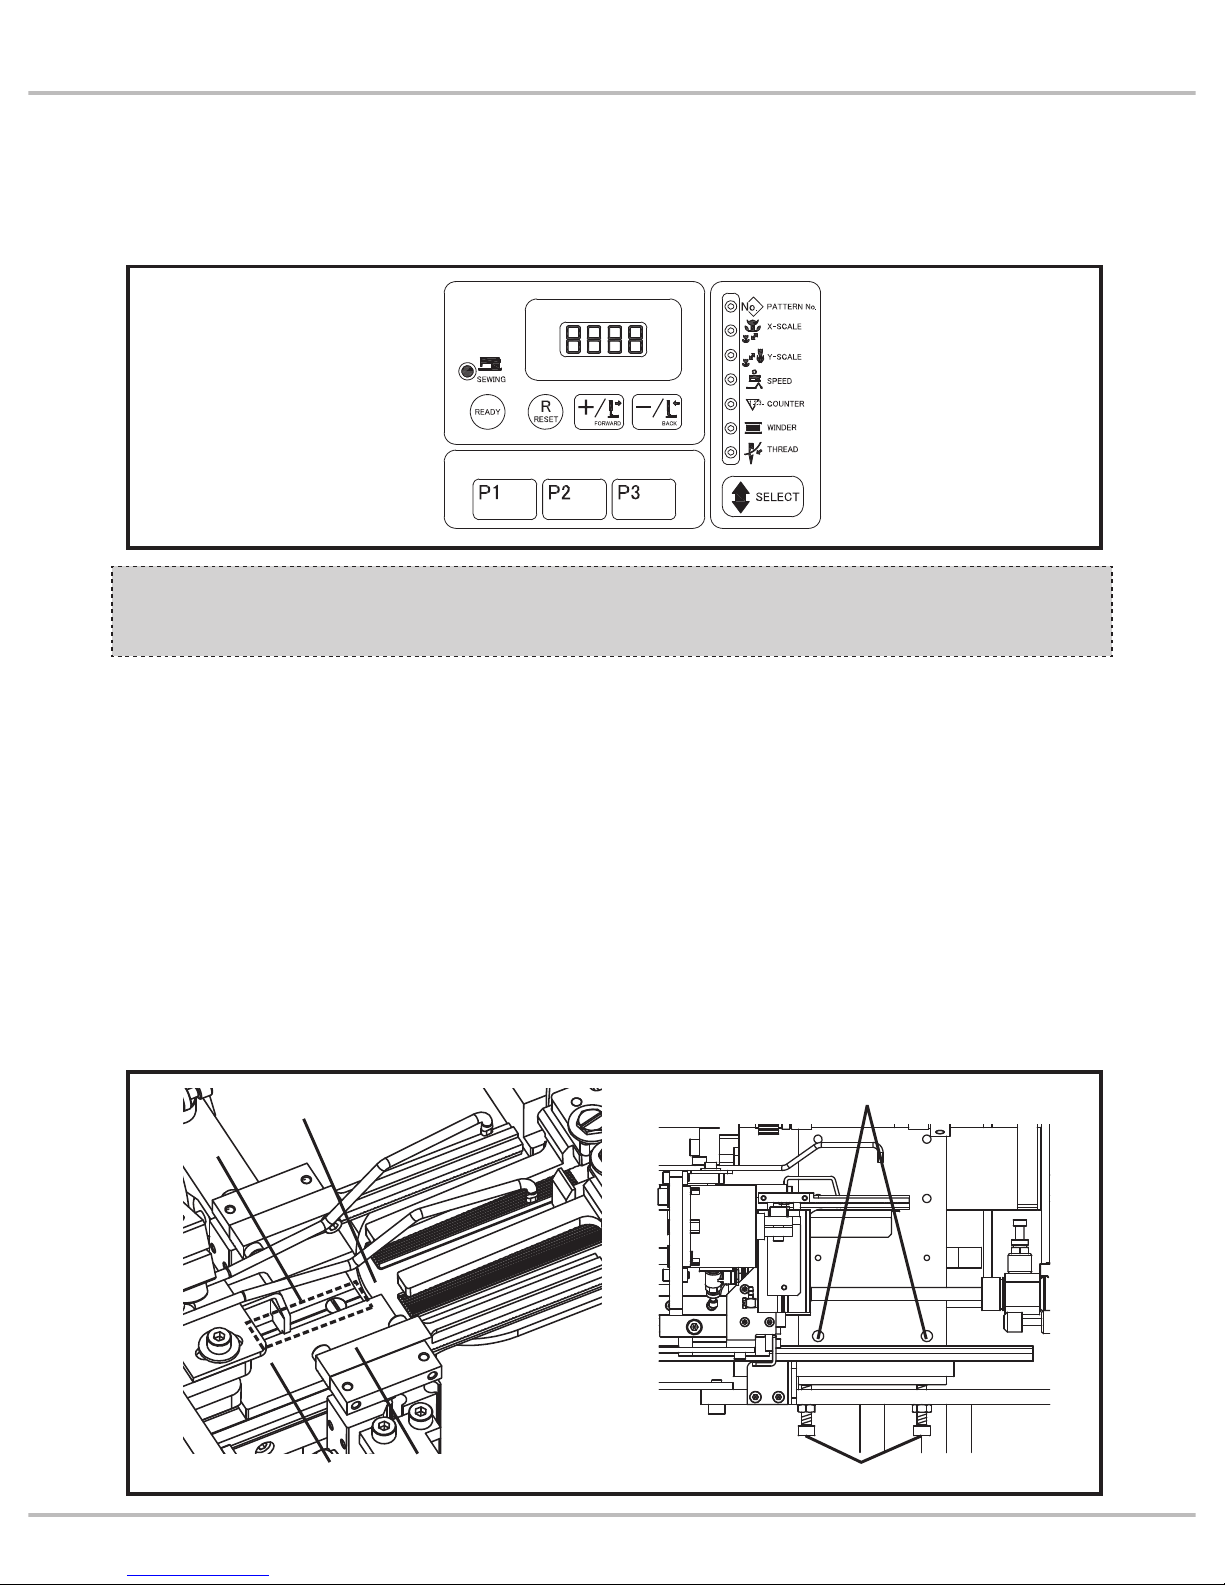
3. 縫紉機操作面板
操作方法以及 LED 指示燈的說明請參照縫紉
機使用說明書。
3.Operation panel of sewing machine
Please refer to the instructions of operating
method and illustration of LED indictor
lamp.
機器啟動準備
PREPARATION OF OPERATING
MACHINE
②
⑥
⑤
④
③
①
Page 16
2. 氣壓
將氣壓過濾調節器設定在 0.5MPa(黑色指
針)。
3. 電源電壓
以額定電壓的 ±10%使用。地線必需接地。
4. 加油
⑴關於機器的加油 ( 上油 ) 請參照縫紉機的使
用說明書。
⑵指標標示的裝置部分(動刀支撐軸)請定期
補充少量機油。
※ 注意:長時間被扭曲皺折的鬆緊帶為不良品
及問題發生的主因,請勿使用。
•請依照圖示將鬆緊帶穿入。
A部分:
將接縫檢測感應鋼片①及送帶滾輪部分的輔
助輪②分別依指示方向打開,穿入鬆緊帶。
(※1)
B部分:
(1) 鬆開把手③,配合鬆緊帶寬度設定送帶軌道
④將鬆緊帶
⑥穿入軌道。
2.Pneumatic pressure
Setup filter regulator to 0.5MPa(black
pointer.)
3.Power source voltage
Apply rated of ±10% voltage. Earth wire
have to grounding.
4.Lubrication
(1) Please refer to instructions of sewing
machine for lubrication.(apply oil)
(2)Apply small drip of oil to arrow-point
(moving kni
fe device)device regularly.
※Caution:The elastic tape which has been
folding and rumpled for long time is the
defective product and the main reason which
may cause trouble. Please do not use it.
•Thread through the elastic tape as following
picture.
Part A:
Open joint detecting induced plate ① and
feeding roller
’s auxiliary
roller ② to the
direction of each arrow, and make through
the elastic tape.(※1)
Part B:
(
1) Loosen knob③, setup feeding guide ④ to
match up elastic tape’s width, and let the
elastic tape ⑥through.
P7
鬆緊帶的穿法
WAY TO THREAD THROUGH
ELASTIC TAPE
Page 17
註記:
※1 : 請將鬆緊帶的接縫處如下圖般重疊搭接。
※2:只需夾緊鬆緊帶的前端部分即可。
請勿強行塞入。
Note:
※1:Lap and joint the elastic tape joint part
as below.
※2:Only need to lap forefront of elastic
tape. Do not lap in force.
P8
Introduction
【例】可用膠帶黏固,但不可用鐵 ( 釘書針 ) 類。
【EX】Can use adhesive tape, do not use
metal kind. (staple)
【A部分 / Part A】 【B 部分 / Part B】
①
②
(2) 將送料滾輪的輔助輪⑤往箭頭方向移動,
再將鬆緊帶⑥的前端約 5 ~ 10 m m(※2)
夾在送料滾輪⑦和輔助輪之間。此時,請
將鬆緊帶⑥的內側貼緊軌道璧面⑧。為了
正確的安裝鬆緊帶的前端位置,請打開電
源開關到 ON 之後執行。(P.10)
(2) Push feeding roller
’s auxiliary
roller ⑤
to the direction arrow pointed, then clip
the elastic tape’s ⑥ forefront about 5~
10mm(※2)between feeding roller⑦
and auxiliary roller. At the moment, let
inner elastic tape ⑥ close to the frame⑧.
In order to install the forefront position of
elastic tape,
please switch ON the power
switch. (P.10)
③
④
⑧
⑥
⑤
⑦
Page 18
P9
更換鬆緊帶方法 WAY TO REPLACE ELASTIC TAPE
當使用不同寬度或厚薄度的鬆緊帶時,我們必
須要對機台做適當的調整,步驟如下:
1. 接縫檢測的感應鋼片的間隙需作調整:鬆緊
帶通過固定板①與感應鋼片②之間,因厚薄
不同,極限開關的感應距離需做調整,調整
②與極限開關③的間隙。調整方法是將兩顆
螺絲④放鬆一點,向左或右移動調整。( 約
鬆緊帶厚度的兩倍左右 )。
2. 調整鬆緊帶寬度:將兩個旋鈕⑦放鬆後,配
合通過軌道平台⑥的鬆緊帶⑤寬度 ( 比鬆緊
帶多 1mm),再將旋鈕⑦轉緊即可。
We need to adjust the machine properly while
using elastic tape with different width and
thickness. Follow the steps below:
1. Joint detecting induced plate’s ga
p
need to do the adjustment: Because of
difference of the thickness, while elastic
tape go through between the fixed plate①
and sensor steel disc②; the sensor distant
of the limit switch need to do adjustment.
Adjust the gap between② and limit
switch③. Loosen two screw④ a little bit,
and move left and right to adjust. (About
double thickness of elastic tape.)
2. Adjust the width of elastic tape: Af
ter
loosen two knobs⑦, match up the width
of elastic tape⑤ (wide 1mm than elastic
tape) through the feeding guide⑥, and
finally tighten the knobs⑦.
①
②
③
⑦
⑥
④
⑤
Page 19

P10
Introduction
啟動 OPERATION
3. 調整鬆緊帶定位片:鬆緊帶⑤的邊緣需調整
與頂片⑧貼平,調整的方式是將旋鈕⑨放鬆
後,調整頂片⑧至鬆緊帶邊緣貼平後,再將
旋鈕⑨旋緊即可。
4. 當發現鬆緊帶會捲曲時,可微調吹氣管⑩的
方向或角度至鬆緊帶⑤平整為止。
※ 啟動的流程操作(概要)
1. 打開電源開關 ON。( 一方面讓鬆緊帶的前端
自動切齊,同時讓機器進行初始化的狀態。)
2. 剛開始一定要設定縫紉樣式及製品長度等。
3. 按「啟動」開關 ( 綠)。將鬆緊帶送入縫紉機
之前,機器會暫時停止。
4. 確認鬆緊帶是否正確安裝。請依鬆緊帶的寬
度、材質等狀況進行調整。
5. 如要開始縫製,再按一次「啟動」開關(綠):
開始連續縫製或者是,「循環停止」開關 ( 黃 ):
僅製作一個成品後即待機。如果不進行縫
製,並且要重新設定鬆緊帶的時候請按「復
歸」開關 ( 藍 )。
3. Adjust elastic tape locating plate: The
edge
of the elastic tape⑤ need to close
tight with stopper⑧. The way to adjust
it is to loosen knob⑨, then adjust the
stopper⑧ until it close tight with the edge
of elastic tape, and finally tighten the
knob⑨.
4. If you found that elastic tape would curl,
fine adjusts the direction or angle of air
blow tube⑩ until elastic tape be level.
※ Brief explanation of operation procedure.
1. Turn on the power sw
itch. (Let forefront of
elastic tape positioning automatically, and
let the machine being initialization.)
2. Must setup the sewing pattern and the
length of product first, etc.
3. Press the switch START(green.)Before
sending elastic tape into sewing machine,
the machine will stop temporary.
4. Assure elastic tape’s position correctly.
Adjust elastic tape according to its width,
material, etc.
5. Pr
ess the switch START (green) again
to start to operate: start to continuous
sewing, or press the switch CYCLE STOP
(yellow): sewing one product only then
standby. If do not operate the machine,
instead to reset elastic tape, press the
switch RESET(blue.)
⑨
⑤
⑧
⑩
Page 20

P11
(1)設定縫紉花樣圖形以及調整圖形長度
1. 打開電源開關至 ON。
2. 按下縫紉機操作面板的 READY 按鍵①後
SEWING LED ②燈熄滅。
3. 按 SELECT 按鍵③,使 PATTERN No. ④旁
的 LED 燈亮起。
4. 按+ /FORWARD 按鍵⑤或者是- /BACK 按
鍵⑥,面板⑦上會顯示不同的鬆緊帶長度的
圖形序號。
※ 注意:請參照次頁的縫紉花樣圖形範例。
另外舉例說明,假如鬆緊帶的寬度 (Y) 是
5mm,表中沒有相對應的鬆緊帶寬度的時
候,請照下述方式使用放大、縮小機能。
5. 按 SELECT 按鍵③,使 Y-SCALE ⑧旁的
LED 燈亮起,再按下+ /FORWARD 按鍵⑤
或按住- /BACK 按鍵⑥即可調整 Y 的放大
縮小比例(百分比)。且最後的數值仍需以
實際縫製的成品來決定。
6. 按 READY 按鍵①後 SEWING LED ②會亮燈。
(1)Setup sewing pattern and sewing
length adjustme
nt.
1.Turn on the power switch.
2.Press READY ① on sewing machine’s
operation panel, then light off SEWING
LED②.
3.Press SELECT③ to light up LED lamp
beside PATTERN No.④.
4.Press+/FORWARD⑤ or-/BACK, the panel
will show different pattern NO. of elastic
tape length.
※Caution: Please refer to example of sewing
pattern from next page. Besides, for
example, if the width (Y) of elastic tape is
5mm, howev
er, the form do not have the
corresponding width of elastic tape, please
follow the expand and reduce function
below.
5.Press SELECT③ switch, to light up the
LED lamp beside Y-SCALE⑧, then press
+/FORWARD⑤ or -/BACK⑥, which
can adjust the expand and reduce ratio
(percentage)of Y. The final figure will still
depends on the actual sewing product.
6.After pressed READY① the SEWING LED②
will light up.
②
④
⑧
⑤ ⑥
⑦
①
③
Page 21

帶寬b
Elastic tape width b
Y (=b-2)
11
P12
Introduction
•縫製花樣圖形列表 •Sewing Pattern List
•放大縮小比例的設定範例
34mm 寬的鬆緊帶,使用與上圖相同的縫製花
樣時:
(1) 圖形序號 No.:設定為 No.35。
(2) 放大縮小比例:把 Y-SCALE 設定為 96 ∼
97%(請依實際縫製的結果決定數值)。
•Setup example of expand/reduce ratio
If 34mm wide of elastic tape was using the
same sewing pattern above:
(1)Pattern No.: No.35 setup.
(2)Expand/Reduce ratio:Setup 96∼97%
Y-SCALE(Please decide the ratio from
sewing results.)
編號
No.
花樣類型
Stitch
diagram
針數
Number of
stitches
圖形尺寸 Sewing size
橫向寬度
Cros s widt h
縱向寬度
Length width
1 15 6
0
2 19 10
3 27 15
4 33 20
5 39 25
6 45 30
7 51 35
8 57 40
9 63 45
10 69 50
11 75 55
12 20 6
3
13 24 10
14 32 15
15 38 20
16 46 25
17 52 30
18 60 35
19 66 40
20 72 45
21 80 50
22 86 55
23 25 6
5.2
24 37 10
25 43 15
26 57 20
27 69 25
28 77 30
29 88 35
30 96 40
31 109 45
32 113 50
33 125 55
編號
No.
花樣類型
Stitch
diagram
針數
Number of
stitches
圖形尺寸 Sewing size
橫向寬度
Cros s widt h
縱向寬度
Length width
34 35 6
6.4
35 47 10
36 59 15
37 71 20
38 87 25
39 98 30
40 111 35
41 127 40
42 139 45
43 151 50
44 163 55
45 60 6
9
46 92 10
47 130 15
48 172 20
49 212 25
50 252 30
51 284 35
52 324 40
53 356 45
54 396 50
55 428 55
56 32 6
10
57 37 10
58 46 15
59 54 20
60 60 25
61 69 30
62 78 35
63 86 40
64 93 45
65 102 50
66 111 55
71
87
98
111
127
139
151
163
6.4
6.4
6.4
6.4
6.4
6.4
6.4
6.4
20
25
30
35
40
45
50
55
Number
of stitches
Sewing size
Length width Cross width
花樣類型
針數
圖形尺寸
縱向寬度 橫向寬度
33
39
45
51
57
63
69
0
0
0
0
0
0
0
20
25
30
35
40
45
50
31
32
33
34
35
36
37
38
71
87
98
111
127
139
151
6.4
6.4
6.4
6.4
6.4
6.4
6.4
20
25
30
35
40
45
50
Number
of stitches
Sewing size
Length width Cross width
花樣類型
針數
圖形尺寸
縱向寬度 橫向寬度
編號
No. Stitch diagram
Number
of stitches
Sewing size
Length width Cross width
花樣類型
針數
圖形尺寸
縱向寬度 橫向寬度
33
39
45
51
57
63
69
75
38
46
52
60
66
72
80
86
57
69
77
88
96
109
113
125
0
0
0
0
0
0
0
0
3
3
3
3
3
3
3
3
5.2
5.2
5.2
5.2
5.2
5.2
5.2
5.2
20
25
30
35
40
45
50
55
20
25
30
35
40
45
50
55
20
25
30
35
40
45
50
55
31
32
33
34
35
36
37
38
41
42
43
44
45
46
47
48
71
87
98
111
127
139
151
163
172
212
252
284
324
356
396
428
6.4
6.4
6.4
6.4
6.4
6.4
6.4
6.4
9
9
9
9
9
9
9
9
20
25
30
35
40
45
50
55
20
25
30
35
40
45
50
55
Number
of stitches
Sewing size
Length width Cross width
花樣類型
針數
圖形尺寸
縱向寬度 橫向寬度
編號
No. Stitch diagram
Number
of stitches
Sewing size
Length width Cross width
花樣類型
針數
圖形尺寸
縱向寬度 橫向寬度
33
39
45
51
57
63
69
75
38
46
52
60
66
72
80
0
0
0
0
0
0
0
0
3
3
3
3
3
3
3
20
25
30
35
40
45
50
55
20
25
30
35
40
45
50
31
32
33
34
35
36
37
38
41
42
43
44
45
46
47
71
87
98
111
127
139
151
163
172
212
252
284
324
356
396
6.4
6.4
6.4
6.4
6.4
6.4
6.4
6.4
9
9
9
9
9
9
9
20
25
30
35
40
45
50
55
20
25
30
35
40
45
50
Number
of stitches
Sewing size
Length width Cross width
花樣類型
針數
圖形尺寸
縱向寬度 橫向寬度
編號
No. Stitch diagram
Number
of stitches
Sewing size
Length width Cross width
花樣類型
針數
圖形尺寸
縱向寬度 橫向寬度
71
87
98
111
127
139
151
163
172
212
252
284
324
356
396
428
6.4
6.4
6.4
6.4
6.4
6.4
6.4
6.4
9
9
9
9
9
9
9
9
20
25
30
35
40
45
50
55
20
25
30
35
40
45
50
55
Number
of stitches
Sewing size
Length width Cross width
花樣類型
針數
圖形尺寸
縱向寬度 橫向寬度
Page 22

P13
(2)設定及調整鬆緊帶長度
1. 用「長度」設定開關① ( 單位:mm) 設定如
左下圖所示之完成長度「L」。設定值的
有效範圍為150~999。設定150以下
的數值仍為150。( 注意 ) 帶圈的全長為
(2×L)mm。
2.「長度」設定開關①所顯示之設定值為標準
值,請依帶圈的長度適度增減設定值。
【注意】 如果鬆緊帶的材質有差異,即使是
相同的L設定值,實際的帶圈長度也會有差
異。( 因鬆緊帶材質軟硬變異多,因此設定的
長度需要依實際作調整,如軟材質應微幅加
長其長度 )
(3)重疊量設定值
調整帶圈的重疊範圍。數字越大其重疊搭接越
多。請將初期的標準值設為「5」。
(2)Elastic length setup and adjustment
1.
Setup finish length 「L」as below, with
length setup switch①(mm). The validity
range of default is 150~999. If the ratio is
lower than 150, same as 150 setup ratio.
(Attention) The whole length of elastic ring
is (2×L)mm.
2. The ratio of setup LENGTH switch① is
standard ratio, please according to elastic
ring’s length to increase or reduce the ratio
properly.
【Attention】 If the material of the elasti
c tape
has differences, the actual length of elastic
ring will be different, even with the same L
ratio. (Because there are lots of varieties of
elastic tape’s material (hardness/softness,)
hence the setup length need to be adjust
according to the material. For example, soft
material should fine add its length.)
(3)LAPPING SIZE setup ratio
Adjust the lap range of elastic ring.
The larger of the numbe
r, the more laps of
elastic ring. Please setup the initial standard
ratio to be「5」.
②
L ( 成品全長的一半 )(Folding Length)
①
重疊量
LAPPING SIZE
重疊量
LAPPING SIZE
Page 23

P14
Introduction
(4)鬆緊帶前端的設定
1. 打開電源開關 ON 時自動執行。
2. 從送料滾輪將新帶子送入的時候,為使第一
個帶圈的長度正確,請參照下列操作方法:
長按「復歸」開關③。(按 1 秒以上)可確
保鬆緊帶送入的前段位置是正確的。此時被
切斷的數公分鬆緊帶將被捨棄。
(5)啟動機器
1. 按「啟動」開關④。機器會拉出一段鬆緊帶
形成帶圈並準備送入縫製,此時機器會暫時
停止。
2. 請確認製品的接合或是重疊部分符合設定。
如果設定有問題請參照前述的處理方法。
3. 只有第一次需要將螺絲⑤鬆開後,將帶子前
端導引器⑥與帶邊貼平。
4. 之後選擇以下的操作。
a. 連續運轉。→ (6) 的操作
b. 只完成一個製品。→ (7) 的操作
c. 重新。→ (8) 的操作
(4)Position forefront of elastic tape
1.Switch on the power and position
automatically.
2.In order to
let the first elastic ring’s length
correctly, after feeding roller send the
new elastic tape in, please follow the
operation below: Press the RESET switch③
more than one seconds. It can insure the
forefront of elastic ring position correctly.
At the time, the centermiters of elastic tape
which been cut off would be abandoned.
(5)Starting
1.Press START switch④, the machine will pull
a length of elas
tic tape which becomes
elastic ring, and start to send into sewing.
The machine would stop temporary at the
time.
2.Please make sure the seam or lap part of
the product fit the setting. If the setting has
any problems, please refer to the resolution
before.
3.Only the first time need to loosen screw⑤,
after, fit in tape edge front guide⑥ to tape
width.
4.Then, follow the operation below:
a.Continuou
s operation. →operation (6)
b.Sewing one piece only. →operation (7)
c.Reposition elastic tape. →operation (8)
③
④
⑤
⑥
Page 24

P15
(6)連續運轉
•確認完成(5)的操作後:
1. 按「啟動」開關④。→連續運轉。
2. 按「循環停止」 開關⑤的時候停止。→最後
的製品完成後即停止。
3. 想要立刻停止機器時,請按「緊急停止」 開
關⑥。→機器停止時,STOP 燈⑦會亮燈。
※ 關於之後的操作方法請參照「指示燈的表示
及解除」。
(7)僅製作一個成品
•確認完成前頁 (5) 的操作後:
按「循環停止」 開關⑤。完成一個成品的製
作後即停止。
(8)重新安裝鬆緊帶
•確認完成前頁 (5) 的操作後:
1. 按「復歸」開關③。卸除已預備車縫的鬆緊
帶。此時可調整鬆緊帶尺寸與重疊範圍。
2. 按「啟動」開關④。機器會依新的設定拉出
鬆緊帶,形成帶圈後會再次暫時停止準備送
入車縫。
(6)Continuous operation
•After make sure finish operation
(5):
1.Press START switch④ →Continuous
operation.
2.Press CYCLE STOP switch⑤ for stop→Stop
after finish the final product.
3.Press the EMERGENCY switch⑥to stop the
machine immediately. →STOP lamp⑦ will
light up when machine stop.
※About the operation later, please refer to
「The representation of indicator lamp &
cancelation」.
(7)Sewing one piece only
•Make sure finish the operation(5) above:
Press CY
CLE STOP switch⑤. Stop after
finish one piece only.
(8)Reposition elastic tape
• Make sure finish the operation(5) above:
1. Press RESET switch③. Put off the elastic
tape which been ready. At the time, you
could adjust elastic tape size and lap
range.
2. Press START switch④. The machine
will depends the new setting to pull out
elastic tape. After became elastic ring, the
machine will stop again tem
porary and be
ready to sew.
⑥
⑦
⑤
④ ③
⑤④
重疊量
LAPPING SIZE
Page 25

P16
Introduction
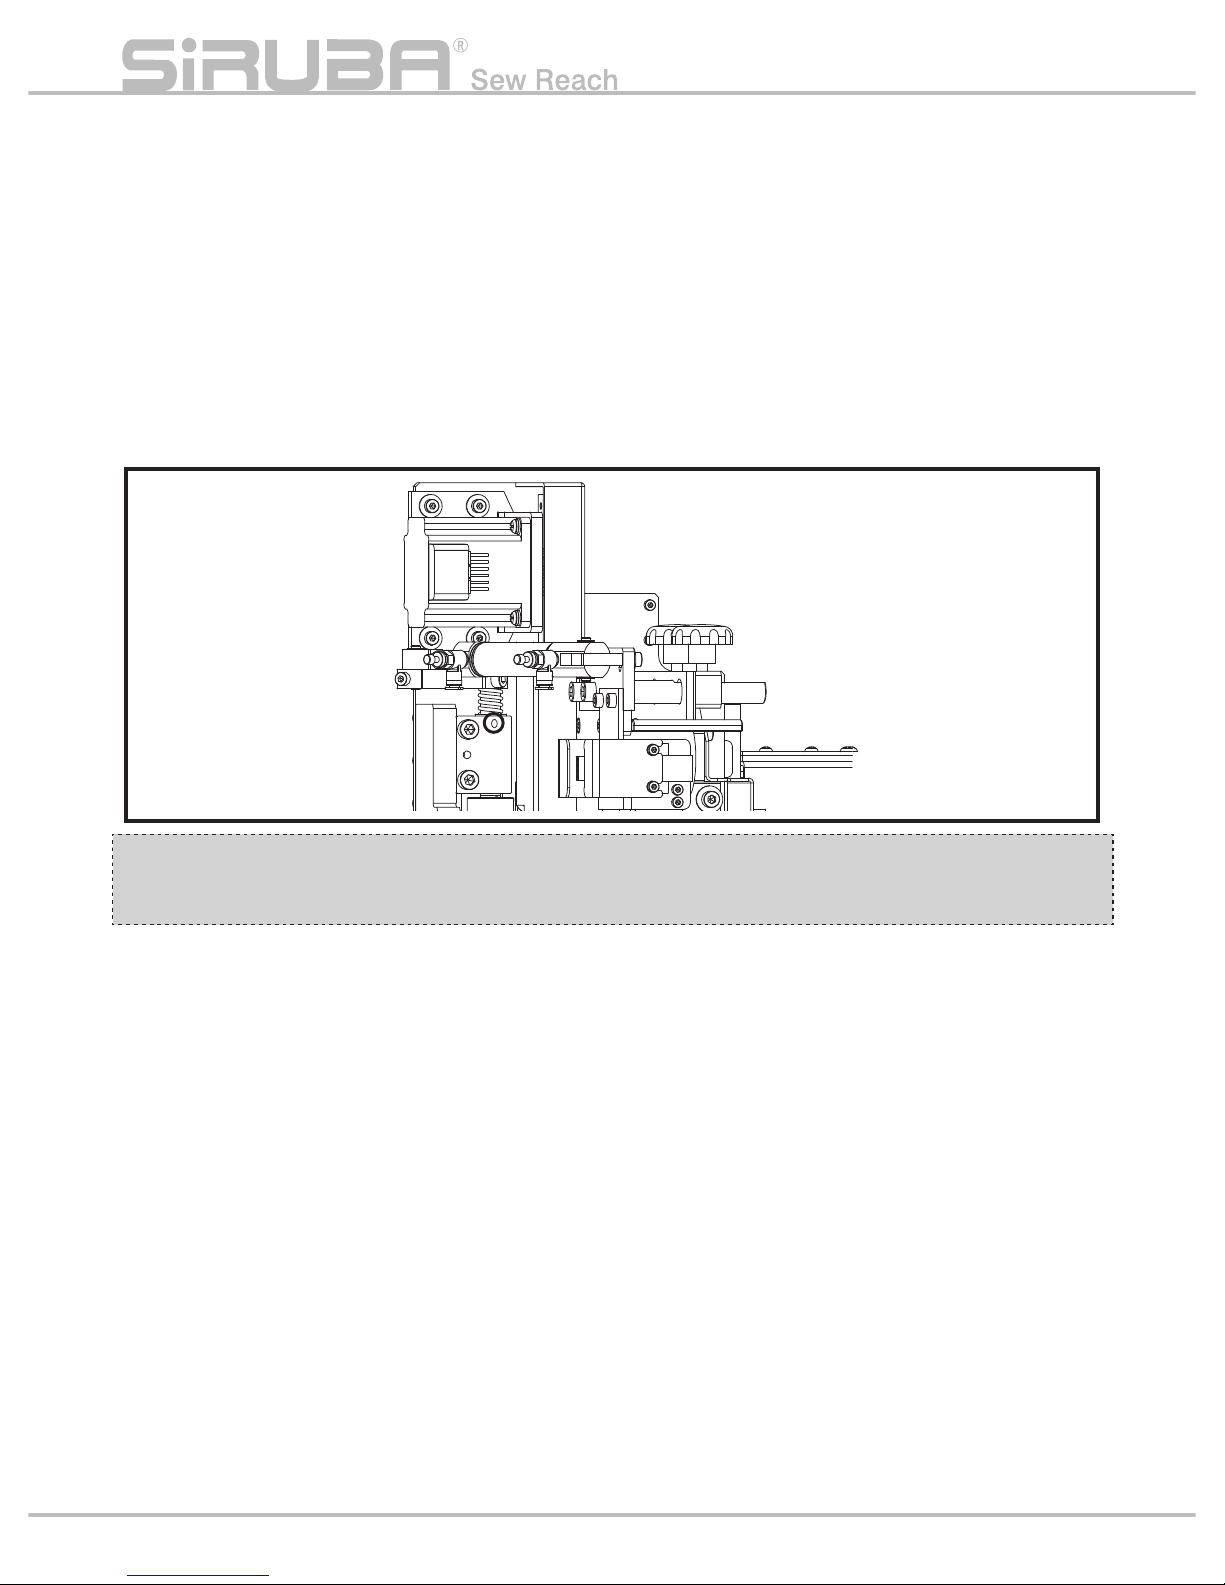
(1)接合部分的調整
1. 鬆開螺絲①,調整左邊供帶氣缸的固定座②
上的紅色刻線與箭頭③的位置對齊。
2. 鬆開螺絲④,調整右邊供帶氣缸的固定座⑤
上的紅色刻線與箭頭⑥的位置對齊。
(1)Adjust butted seam
1. Loosen screw①, adjust and align right end
scribing red line of left hand tape supplier
cylinder fixed seat ② with arrow③ position.
2. Loosen screw④, adjust and align right end
scribing red line of left hand tape supplier
cylinder fixed seat ⑤ with arrow⑥ position.
調整接合位置及重疊範圍
ADJUST BUTTED SEAM &
LAPPING SEAM
⑥③
①
④
⑤②
Page 26

P17
•調整方式
1. 左端⑦的位置在出貨時已調整完畢。※1
2. 右端⑧的位置不合的時候,變更「重疊量」
欄內顯示數值
( 標準:5) 即可調整。※2
3. 接合位置
如果有空隙的時候→ 的數值要
變大。
4. 超過紅線⑩左端⑦的上方重疊的時候→
的
數值要變小。
【註記】
※1:如須再調整的時候請依上述(1)微調
左邊供帶氣缸動固定座②的位置。
※2:數值每增加 1 時,右端⑧的位置約向左
移動 0.6 mm。通常即使更換鬆緊帶,材
質如沒有太大的改變時,使用原本設定
的數值即可。
•Adjustment
1. Left end⑦ position was finished
adjustment before shipment. ※1
2.If right end⑧position could not align, fine
adjust (LAPPING SIZE) rate (standard 5). ※2
3.If the butted joint part has interval→
increase
rate.
4.Over the red line⑩ and lapped on the top
of left end⑦→ decrease
rate.
【Note】
※1:If needed readjust, please refer to
(1) above.Fine adjust left side tape
supplier cylinder fixed seat ② position.
※2:Every time increase 1 rate, position
right end⑧ moving left about 0.6mm.
Usually, if the materials of elastic tape
are similar, use the original rate when
changing elastic tape.
3. 打開電源開關至 ON,按「啟動」開關。
4. 在帶圈車縫的暫停狀況下(下圖),鬆緊帶
的左端⑦和右端⑧與送料板⑨的紅線⑩的位
置對齊即可。
3. Press power sw
itch ON, press START
switch.
4. Under the circumstances that elastic ring
sewing stop (picture below,) elastic tape
left end⑦, right end⑧,and feeding plate
⑨are aligned red line ⑩.
⑧右端
right end
⑦左端
left end
⑨
⑩
重疊量
LAPPING SIZE
Page 27

P18
Introduction
(2)調整重疊範圍
1. 以接合位置設定紅色刻線的位置(調整為下
方圖片的標準位置),左右對齊的刻線要相
同(※)將左邊調整板②往箭頭
的方向移
動,右邊調整板⑤往箭頭
的方向移動。
2. 放鬆螺絲①以調整左邊供帶氣缸的固定座
②,放鬆螺絲④以調整右邊供帶氣缸的固定
座⑤。
【註記】
※ 如左右對齊的刻線不同,帶圈的的重疊中心
會改變。將左右的紅刻線分別移動一刻度的
話,重疊的範圍會改變2~3mm。
(2)Adjust lapping seam
1.Use lapping seam position to setup scribing
red line position.(Adjust standard position
picture below.)For scribing line, move
each direction equally, (※) left hand
adjustment plate ② to direction arrow
,
right hand tape supplier cylinder fixed seat
⑤ to arrow
.
2.Loosen screw ① to adjust left hand tape
supplier cylinder fixed seat ②, loosen
screw④to adjust right hand tape supplier
cylinder fixed seat ⑤.
【Note】
※If each direction scribing line unequal,
the lapping center of elastic ring will be
different. Move each red scribing line right
and left one scale, the lapping size will
become 2~3mm.
⑤
②
①
④④
Page 28

P19
指示燈的表示及解除
THE REPRESENTATION OF
INDICATOR LAMP & CANCELATION
指示燈
Indicator Lamp
狀態
Condition
內容
Explanation of Indicator
解除方法
Cancelation
「停止」燈①
STOP lamp ①
亮燈
Lighting-up
按了「緊急停止」開關⑤。
Press EMERGENCY switch ⑤ .
A1
「鬆緊帶」燈②
Elastic tape(ELASTIC)
lamp ②
亮燈
Lighting-up
1. 鬆緊帶用盡。
2. 檢測出鬆緊帶有接縫。
1. Finish up elastic tape.
2. Detected elastic tape joint.
A2
A3
閃燈
Flashing
1. 鬆緊帶的供應裝置異常。
2. 供應設備 1. 以外的問題。如鬆緊帶脫落等。
1. Elastic tape’s feeding device abnormal.
2. Except feeding device 1’s problem, likev
fall off elastic tape, etc.
A4
A5
累計燈④
Count up lamp ④
亮燈
Lighting-up
「計數器」⑦累計至設定數量。
COUNTER ⑦ count up to setting amount.
A6
「停止」燈①
與「指示燈」③
STOP lamp ①
&INDICATOR lamp ③
同時閃燈
Flashing at
once
縫紉機非待機狀態。(操作縫紉機操作面板的
READY
按鍵未按下。)
Sewing machine isn’t standby position.(Do
not press READY
on sewing machine
operation panel.)
A7
「停止」燈①
與「鬆緊帶」燈②
STOP lamp ① &Elastic
tape(ELASTIC)lamp ②
同時閃燈
Flashing at
once
設備內的極限開關 (LS) 感應器有異常狀況。
Limit switch detector in the device has
abnormal condition.
A8
⑤ ⑥ ⑦
④ ⑩⑧⑨③②①
【操作面板】
Operation Panel
【縫紉機操作面板】
Sewing Machine Operation Panel
重疊量
LAPPING SIZE
Page 29

P20
Introduction
•解除方法
A1.解除「緊急停止」開關
(1) 將「緊急停止」開關⑤依按鈕上的箭頭方
向轉動即可解除。
(2) 按「復歸」開關⑧→停止燈①不亮燈。
(3) 按「啟動」開關⑨→重新啟動(※1)就
算機器被中斷時也可以繼續縫製。
【註記】※1
按下「緊急停止」開關⑤時候,機器是停止
在下列的a或是b的狀態。之後照平常的操
作即可繼續運轉。
a. 打開電源開關至 ON 之後停止在待機位
置。
b. 帶圈準備送入縫製前若在機器運轉中,按
下「緊急停止」開關⑤。縫製會中斷(依
上記 (2) 操作),縫紉機操作面板顯示
E5,依照下面的 (4)、(5) 操作:
(4) 按 R(RESET) 鍵⑩→執行切線。
(5) 再按 R(RESET) 鍵⑩→排除不良品接著與
上記 (3) 的 ※1 相同。
•Cancelation
A1. Cancel EMERGENCY switch
(1) Cancel EMERGENCY switch ⑤to
directi
on of the arrow.
(2) Press RESET switch⑧ → Light off stop
lamp①.
(3) Press START switch⑨ → Restart(※1).
Could continuous sewing even the
machine has suspended.
【Note】※1
Machine will stop in a. or b. condition
below, after press EMERGENCY switch⑤.
Then follow the usual operation, it could
continue operate.
a.Turn on power switch and
stop on
standby position.
b.Before sew elastic ring. If press
EMERGENCY switch⑤ while machine
operating, the sewing would stop.(
operate and follow (2) above.)Sewing
machine operation show E5, operate and
follow the method (4),(5)below:
(4) Press R(RESET)⑩→ Operation thread
trimming work.
(5) Press R(RESET)⑩ again→ Eliminate
reject product, then as same as above
(3)※1.
A2.補充鬆緊帶 ( 鬆緊帶用盡 )
(1) 將剩餘的鬆緊帶抽出。
(請注意!先按「復歸」開關⑧的話鬆緊
帶會變得難以抽出)
(2) 按「復歸」開關⑧。→設備回復待機(原
點)。
(3) 安裝新的鬆緊帶。→「鬆緊帶」燈②不亮。
(4) 長按「復歸」開關⑧讓機器自動偵測並設
定鬆緊帶的起點。
(5) 按「啟動」開關⑨。→重新啟動。
A2. Resupply elastic tape (Finish up elastic
tape)
(1) Take off the remaining elastic tape.
(Attention! The elastic tape would
be hard to take off if press RESET
switch⑧first.)
(2) Press RESET switch⑧ → Device get
back to standby position (Original point)
(3) Position new elast
ic tape.→ Light of
elastic tape (ELASTIC) lamp②.
(4) Press RESET switch⑧ for over seconds
to let machine detects automatically
and setup starting point of elastic tape.
(5) Press START switch⑨ → Restart
operation.
Page 30

A3.排除鬆緊帶的接縫處
(1) 鬆緊帶的接縫處以剪刀剪除。
(2) 按「復歸」開關⑧。→「鬆緊帶」燈②不亮。
(3) 為了將接縫處前面的部分製成製品,按
「啟動」開關⑨。
(4) 繼續連續運轉。
→製作了 1 ~2個製品後,因為「無鬆
緊帶」而自動停止、「鬆緊帶」燈②會再
次亮起,所以依上記A2執行解除操作。
A4.排除鬆緊帶供帶設備異常
(1) 抽出卡住的鬆緊帶。
(2) 重新安裝鬆緊帶 (P.7)。
(3) 按「復歸」開關⑧→設備回復待機(原
點)、「鬆緊帶」燈②不亮。
(4) 長按「復歸」開關⑧後讓機器自動偵測並
設定鬆緊帶的起點。
(5) 按「啟動」開關⑨→重新啟動。
A5.排除鬆緊帶供帶設備異常以外的問題
(1) 排除供帶裝備中的鬆緊帶脫離問題。
(2) 之後與A4的 (2) 以後相同。
A6.計數器累計及設定數量
(1)
按「計數復歸」開關 。→累計燈④熄燈。
(2) 按「啟動」開關⑨。→重新啟動。
A7.縫紉機非待機狀態
(1) 縫紉機操作面板的設定變更後,如
SEWING LED
燈沒亮。按 READY 鍵
後,縫紉機進度待機狀態。
(2) 啟動縫紉機操作面板的下線累計機能
後,當螢幕數值歸零,機器會暫停(縫
紉機使用說明書 P.44),交換下線後按 R
(RESET)鍵⑩。
A3. Eliminate seam of elastic tape
(1) Scissor the elastic tape’s seam.
(2) Press RESET switch⑧ → Light off
elastic tape (ELASTIC) lamp②.
(3) In order to make product from forefront
part of seam, press START switch⑨.
(4) Keep continuous operating.
→ After made 1~2 products, elastic
tape
(ELASTIC) lamp② will light up
again because of “finish up elastic
tape," then automatically stop the
machine. Hence, cancel operation
according to A2 above.
A4. Fix elastic tape feeding device abnormal
(1) Pull off stuck elastic tape.
(2) Reposition elastic tape (P.7).
(3) Press RESET switch⑧→ Device get
back to standby position(Original
point), light off elastic tape ELASTIC
lamp②.
(4) After press
ed RESET switch⑧ over
seconds, let machine automatically
detected and setup starting point of
elastic tape.
(5) Press START switch⑨→ Restart
operation.
A5. Fix the troubles except from elastic tape
feeding device abnormal
(1) Fix the trouble that elastic tape comes
off feeding device.
(2) After, as same as (2) of A4.
A6. Count up counter & amount setting
(1) Press COUNT RESET switch
→ Light
off count up lamp④.
(2) Press START switch⑨ → Restart
operation.
A7. Sewing machine isn’t standby position
(1) After changed the setting of sewing
machine operation panel, If SEWING
LED
didn’t light up, press READY
, then sewing machine would get in
standby position.
(2) When sewing machine operation
panel’s down thread count-up device
can be used,and the machine will
temporary stop when the value on
panel make zero(Sewing machine
instruction P.44), exchange down
thread then press RESET switch⑩.
P21
Page 31

(3) 按「復歸」開關⑧→「停止」燈①熄燈。
(4) 按「啟動」開關⑨→重新啟動。
A8.排除設備內的極限開關 (LS) 異常
(1) 阻斷氣源。
(2) 電源開關設定至 OFF。
(3) 檢查極限開關。※2
【註記】※2
送帶平台移動氣缸及拉帶旋臂各有兩個極限開
關,首先關閉氣閥,打開電源開關在 ON,用
手推拉設備,檢查極限開關的指示燈有沒有
亮。如果安裝的位置偏離就重新調整。如果安
裝位置沒有偏離但指示燈沒亮,則需更換開
關。
•縫製過程中斷線後重新車縫。
(1) 將線重新穿好。※3
(2) 用- /BACK 鍵
將針後退回到斷線的位
置。
(3) 按「斷線再縫」⑥。→繼續縫製。
【註記】※3
針線的穿法請參照縫紉機的使用說明書。
(3) Press RESET switch⑧→ Light off STOP
lamp ①.
(4) Press START switch⑨→ Restart
operation.
A8. Fix limit switch (LS) abnormal in the
device
(1) Stop the air.
(2) Turn off power switch.
(3) Check limit switch. ※2
【Note】※2
Each of feeding plate moving cylinder and
puller hook have two limit switches. First, turn
off air valve and turn on power sw
itch. Use
hands push-and-pull device to check indictor
lamp of limit switch has lighten or not.
Readjust the installed position if its deviated,
if not, but the indicator lamp didn’t light up,
you should replace the switch.
•While sewing ,re-sewing the elastic tape
after broken-thread.
(1) Rethread the thread.※3
(2) Use -/BACK
to let needle back to
the brocken-thread position.
(3) Press RESEW AFTER
THREAD BREAK⑥. → Keep sewing.
【Note】※3
The method of threading thread please refer
to instruction of sewing machine .
P22
Introduction
Page 32

P23
維護用運轉模式
MAINTENANCE OPERATING
MODE
( 1 ) 縫製一個帶圈的連續動作
可確認機器每一個動作的時機以及設備的位置
關係。
1. 按壓「循環停止」開關①不放,一邊打開電源
開關至 ON。
2. 確認「電源」燈②跟「停止」燈③是否同時
閃燈。
3. 按「循環停止」開關①。→停止在最剛開始的
暫停位置。
4. 之後,按「啟動」開關④進行分解動作。→
直到帶圈準備送入縫紉機前的位置。
5. 確認帶圈狀態,按「循環停止」開關①送入縫
紉機等待下一個動作的命令。「復歸」開關
⑤可捨棄鬆緊帶。在這裡「啟動」開關無效。
6. 按「啟動」開關④進行分解動作。→縫製結
束後回復至待機位置,繼續運轉的時候回復
到 3。
( 1 ) One shot operating for an elastic ring
Can assure every movement’s timing of the
machine, and relation of the device’s position.
1
. Press CYCLE STOP switch① and turn on
power switch at once.
2. Make sure POWER lamp② and STOP
lamp③ whether flashing simultaneously or
not.
3. Press CYCLE STOP switch① → Stop at the
first temporary stop position.
4. Hence, press START switch④ and bring
work by once and once. → Till elastic ring
ready to send into front position of sewing
machine.
5. Assure elastic ring condition, press CYCLE
STOP
switch①, then send into sewing
machine to wait next command .Press
RESET switch ⑤ can abandon elastic tape
.Not effective for START switch.
6. Press START switch④ and bring work by
once and once. → After finish sewing, get
back to standby position, and get back to
3 when keep operating.
②
④③ ① ⑤
重疊量
LAPPING SIZE
Page 33

P24
Introduction
( 1 ) 鬆緊帶定位及送帶設備的前後位置
1. 切斷氣源,調整鬆緊帶定位器①和針板孔的
間隔為 4.5~5 mm。( 調整 ) 放鬆螺絲②後
調整。
2. 鬆緊帶送至壓腳下的時候,鬆緊帶的內側
與定位器①相接。( 確認方法 ) 維護用運轉
模式下確認製品在壓腳下的位置。這時確認
帶圈與定位器①是否接合,有一點點的空隙
(0.5mm 以內)是最好的。
( 1 ) Fore and rear position of elastic tape
locating and feeding device
1.Stop the air blow, adjust elastic tape
locator① and needle hold about 4.5~5mm
distance. (Adjustment) Loosen screw②
then adjust.
2.The inner side of the elastic tape a
nd
locator① connected, when elastic tape
is sending under press clamp. (Checking
method) Check the product is under the
press clamp when the operation is under
the maintenance operating mode. At the
time, make sure whether elastic ring and
locator ① are jointed, has a little space
(within 0.5mm) is the best.
各部分的調整•維修
THE ADJUSTMENT &
MAINTENANCE OF EACH PARTS
( 2 ) 機器獨立運轉
設備不運轉只有縫紉機單獨運轉。
1. 同時按「啟動」開關④與電源開關設定至
ON。
2. 確認「電源」燈②是否閃爍。
3. 以手動對位放入布料至壓腳下進行試縫。
4. 按「復歸」 開關⑤的時候,縫紉機的壓腳會
降下。再次按「復歸」開關⑤時壓腳會上升。
5. 按「啟動」開關④,機器就會運轉。
( 2 ) Machine isolated operation
Only sewing machine isolated operation,
without device operation.
1. At the same time press START switch④
and turn the power switch on.
2. Make sure POWER lamp② flashing or
not.
3. Fix the cloth position by hands, and put
the cloth in till presser clamp start to try
sewing.
4. Presser clamp will low down after press
RESET switch⑤. Presser clamp will rise
up after press RESET switch⑤ again.
5. Press START switch④, the machine will
operate.
Page 34

P25
【注意】
鬆緊帶被定位器①壓住的狀態下,製品上浮將
是斷線或縫製不良的原因。這時可調整送帶設
備的前後位置。
•送帶設備的前後位置調整方法
放鬆螺絲③(五個地方),把底座④順著引導
板⑤前後移動。調整後,先鎖緊底座④的三顆
螺絲再將送帶設備後位置固定板⑥的兩顆螺絲
鎖緊於底座④上。
【Caution】In the situation which elastic tape
be pressed by locator①, product puff up will
be the reason of thread breaking or reject.
•Adjusting method of fore and rear position
of feeding device.
Loosen screw③(Five spots), move base
plate④ back and forward with guide
plate⑤.
After adjustment, tighten the three screws of
base plate④, then tighten two screws of fixed
plate⑥ which behind the feeding device on
base plate ④.
①
②
4.5~5mm
③⑥
⑤ ④
Page 35

P26
Introduction
( 2 ) 帶端接合位置偏離調整
•帶圈右端向內側偏離時(左下圖)。
調整方式 :鬆開螺絲①,把夾爪②往箭頭③
方向移動(微調)。
【註記】
依照右下照片的位置將鬆緊帶的側面④⑤接
線變形的程度,以目測調整。
•鬆緊製品右端如往外側偏離時,則朝上記的
反方向調整。
( 3 ) 氣壓的強度調整
氣壓管⑥~⑨的吹氣強度不一,是依各節流閥
調整。
( 2 ) Adjust deviation of tape side end joint
•Right end of elastic ring slip to
inner side.(Left picture below)
Method of adjustment: Loosen screw①,
and move tape puller② to
arrow③ direction.
(Fine adjustment)
【Note】
According to position of right picture below,
adjust changed- shape by visually confirm
elastic side ④⑤ connecting line.
•If elastic product right side slip forward,
adjust counter direction as above.
( 3 ) Adjustment of pneumatic intensity
Air blowing different intensity of air nozzles⑥
~⑨ is adjust with following throttle valve.
①
③
⑤
④
②
⑥
⑦
⑧
⑨
Page 36

P27
( 4 ) 輸送滾輪的調整
•輸送滾輪①上的鬆緊帶往箭頭方向偏離的時
候需要調整。
1. 鬆開螺絲④。
2. 向右下圖一樣,將輔助輪⑤調整稍微傾斜輸
送滾輪①上的鬆緊帶往箭頭方向偏離的時候
需要調整。
( 5 ) 機器壓腳及托布板的調整標準
1. 將針卸下,進入縫紉機單獨運轉模式。
2. 設定縫製式樣。
3. 按「復歸」開關⑥後,降下壓腳。
4. 按+ /FORWARD 鍵⑦後,壓腳⑧跟托布板
⑨移動最右或最左時,讓針孔的中心點和托
布板⑨的內側間隔 1.5 mm。
5. 壓腳⑧內側比托布板⑨內側更往外 1.5 mm,
( 從針孔中心往外 3 mm )。
6. 將托布板、壓腳上的螺絲分別鬆開後調整。
( 4 ) Adjustment of feeding roller
•Elastic tape on the feeding roller① need to
adjust if it slip to direction of arrow.
1. L
oosen screws④.
2. Like right picture below, adjust auxiliary
roller⑤ fine tile to feeding roller①.
( 5 ) Adjustment standard of machine presser
cramp and fabric holding plate
1. Pull off needle and get into sewing
machine isolated operation mode.
2. Setup sewing pattern.
3. After press RESET switch⑥, lower presser
cramp.
4. After press +/FORWARD⑦, when presser
cramp⑧ and fabric holding plate⑨ move
t
o right end or left end, adjust center
of needle hole and inner side of fabric
holding plate⑨ about 1.5mm distance.
5. Inner side of presser cramp⑧outside
forward 1.5mm than fabric holding plate⑨.
(Outside forward 3mm from center of
needle hole.)
6. Loosen then adjust the screws of
fabric holding plate and presser cramp
separately.
⑤①
作業員端
Operator Side
機器端
Machine Side
④
③①
⑨
0.2~0.3mm
0mm
Page 37

P28
Introduction
( 6 ) 接縫檢測器或是鬆緊帶殘餘量感應器
•接縫檢測接器的調整
1. 鬆開螺絲③。
2. ①的部分通過接縫檢測器的時候,把開關
②水平移動調整到開關啟動且發出聲音的位
置。
( 6 ) Joint seam detector or elastic tape
remains sensor
•Adjustment of joint seam detector
1. Loosen screws ③.
2. As part① through joint seam detector,
level move switch② until switch on and the
position which noise making.
⑥
⑦
⑨ ⑨
⑧ ⑧
1.5mm 1.5mm
3mm 3mm
③
①
②
Page 38

P29
殘餘量感應器如果遇到白色或是材質較薄的鬆
緊帶時,由於光線穿透,導致檢測裝置誤判的
時候需調整感應器④。(只要以最容易誤判的
鬆緊帶做調整,往後不需要再調整。)
• 調整方式 :
1. 打開電源開關至 ON。
2. 將誤判的鬆緊帶通過檢測裝置中間。
3. 移動感應器④(將感應器④斜向安裝)降低
敏感度。
4. 檢查感應器受光部分的指示燈(在感應器的
右側,只有在沒有帶子的時候會亮燈)確認
調整效果。
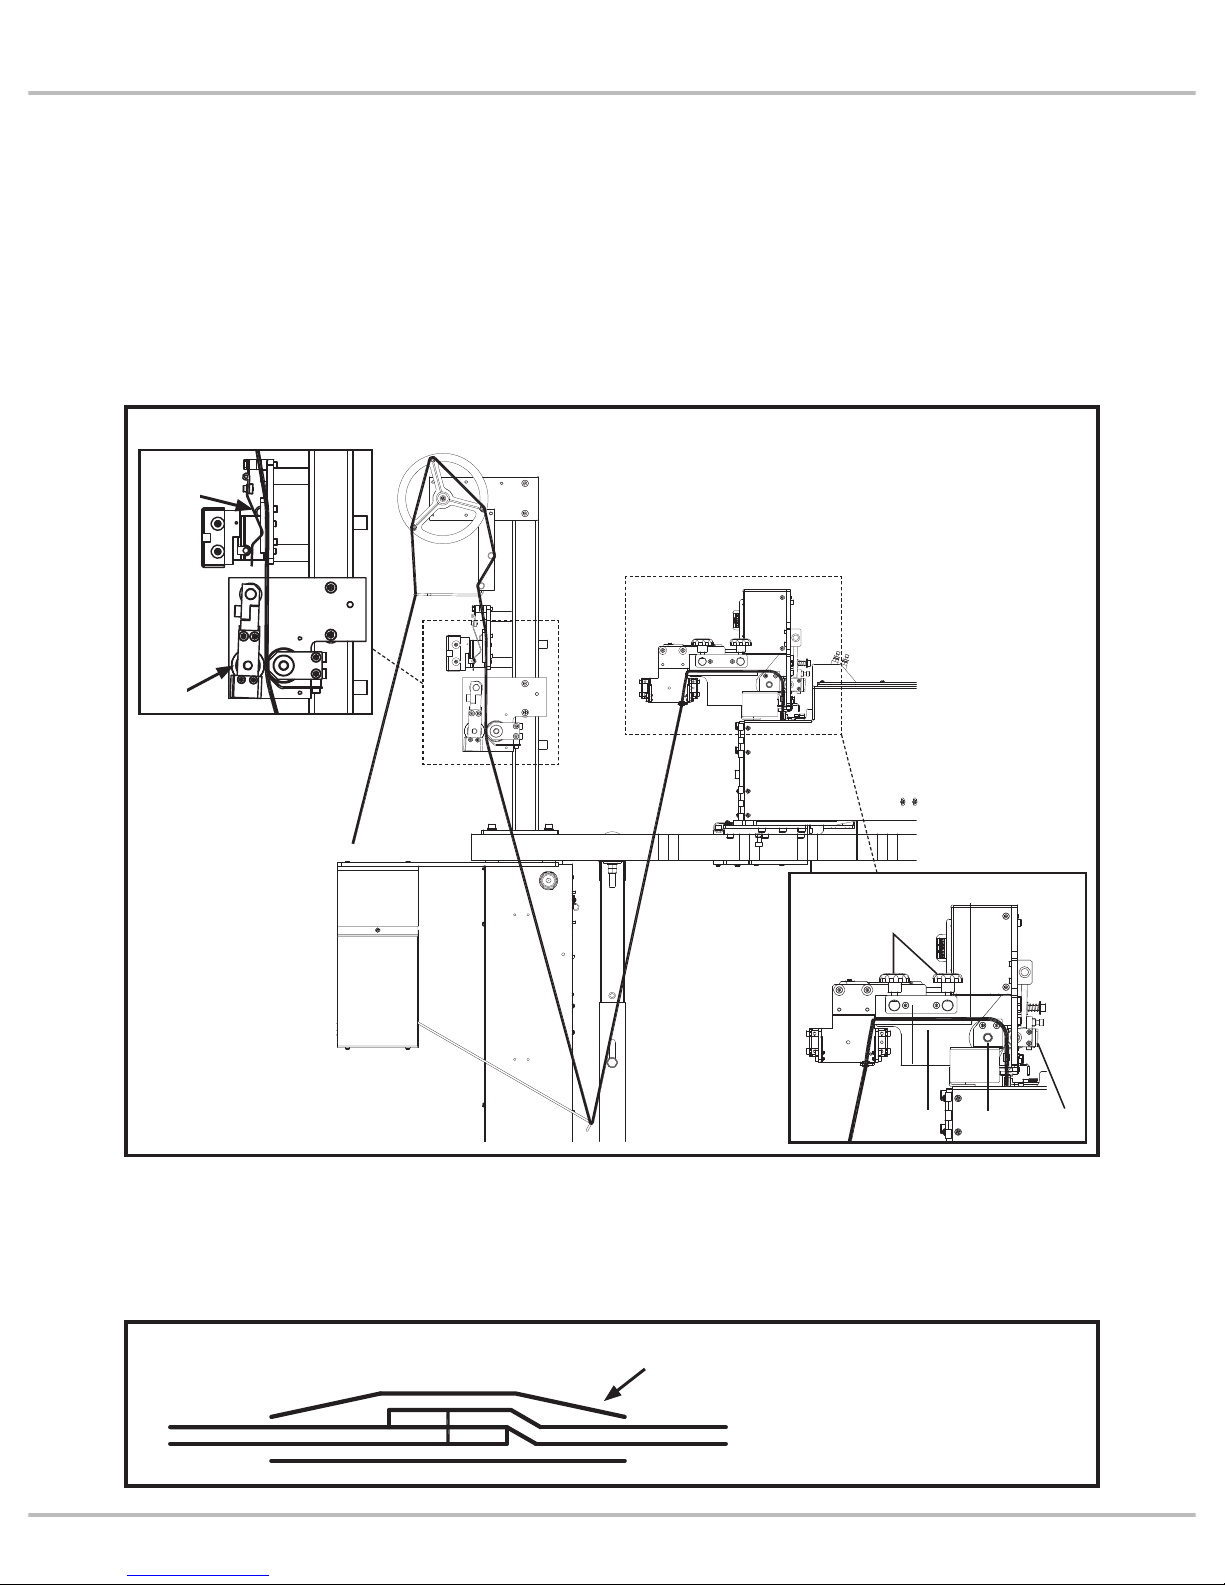
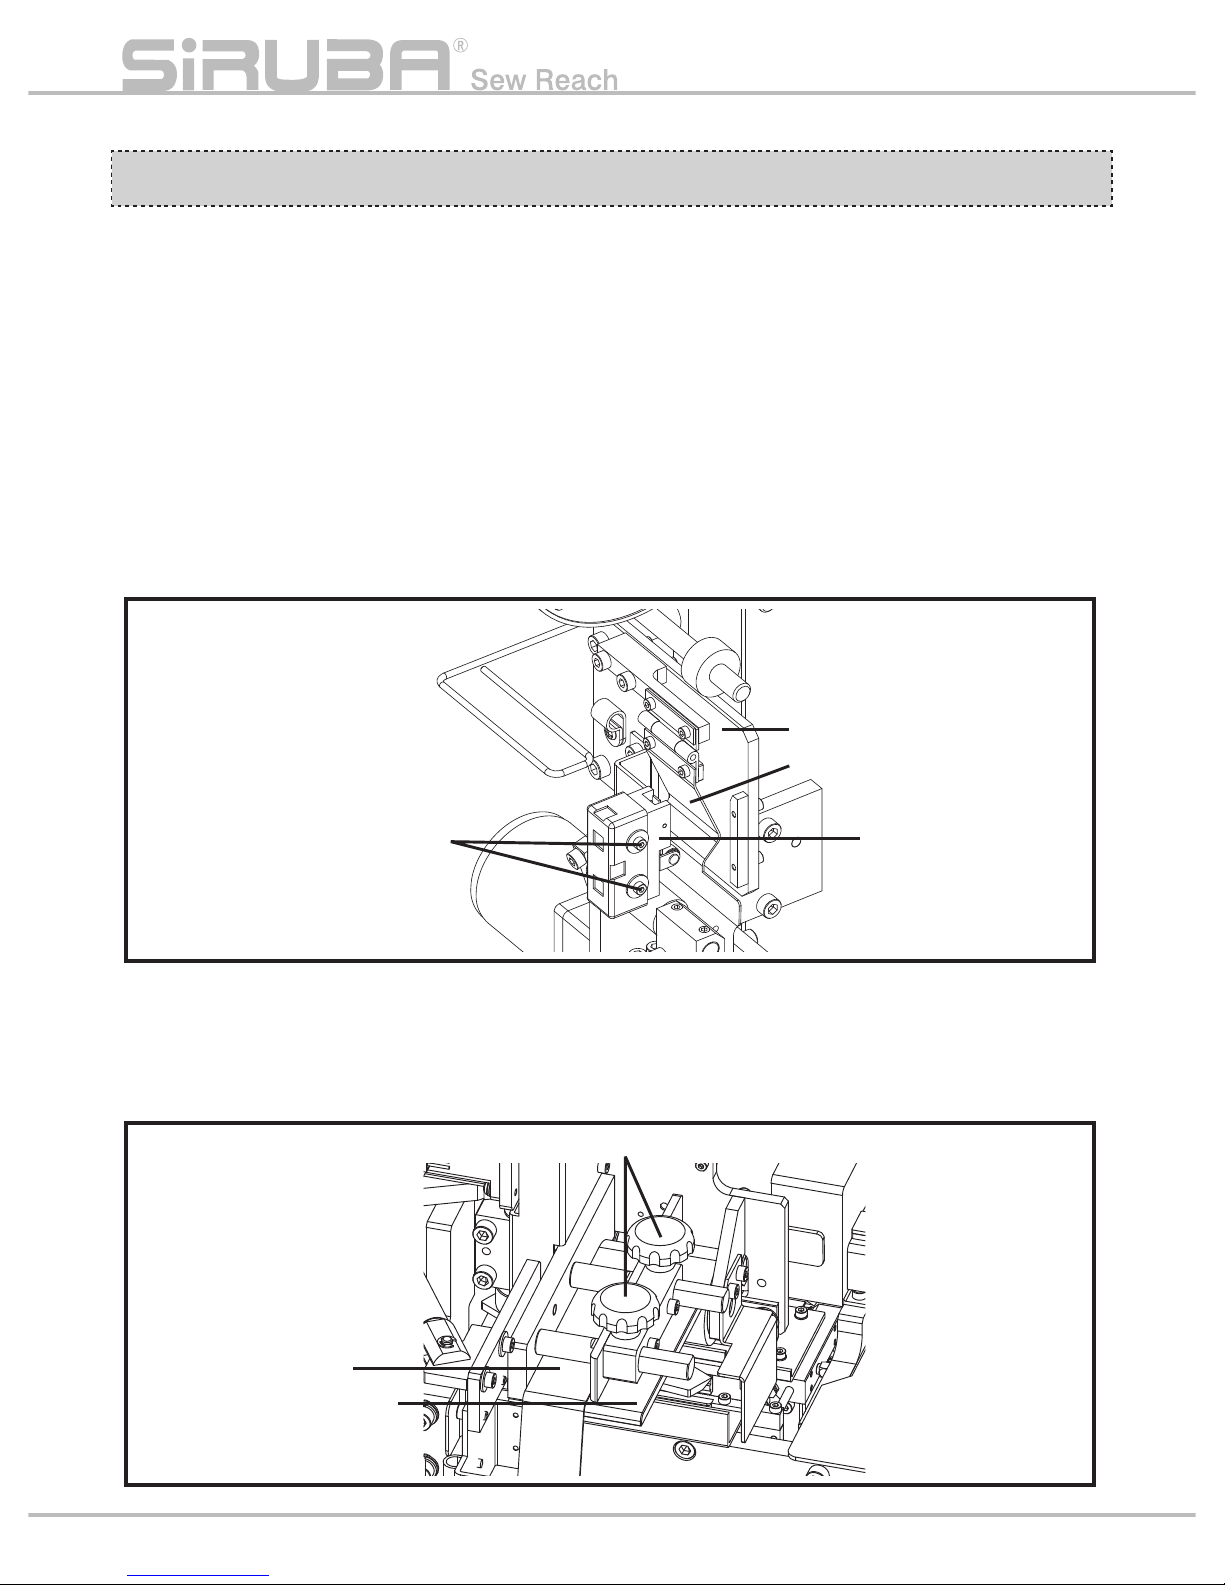
( 7 ) 切帶刀的更換及調整
•活動刀及固定刀的更換方法
1. 取下外殼①、外殼②。
2. 外殼③則是將卸下螺絲④。
3. 更換活動刀⑤的時候卸下螺絲⑥後執行。
If remains detector encounter elastic tape
which are white or sheer, adjust sensor④ if
light pass through that cause detector device
in error judgment. (No need to adjust the
sensor ever after fixed with the most sheer
material)
•Adjustment method
1. Switch on the power source.
2. Let elastic tape which in error judgment
through the middle of detecting device.
3. Move④(Tilted install sensor④)to lower
sensitivity.
4. Check the indicator lamp which on the light
receiving section of sensor.(At the right
side of the sensor will light
up only without
elastic tape)Check the adjustment effect.
( 7 ) Replacing knife and adjustment
•Replacing method of moving knife and fixing
knife.
1. Take off covers ①②.
2. Take off screws ④ for cover③.
3. Operate after replacing moving knife⑤
then take off screws ⑥.
④
①
②
⑤
⑥
③
④
Page 39

2mm
P30
Introduction
4. 固定刀⑦的更換則是螺絲⑧⑨卸下後開始。
•固定刀⑦的安裝標準:固定刀⑦的刀鋒部分
要比底座⑩更向下2mm。
•切帶刀的調整標準
(1) 如下圖所示鋼柱①的部分標準尺寸是
14mm。( 切帶刀的咬合壓力調整方法:鬆
開螺絲②後進行調整。)
(2) 上述的狀況下,活動刀③與固定刀接觸的時
候,下圖④空隙較大的部分,活動刀③及固
定刀⑤之間請間隔 0.2~0.3 mm。鬆開螺絲
⑥後進行調整。
【註記】
④的部分如果間隙太大,因為切帶不良反而
會使刀具提早耗損。
4. Replacement of fixing knife⑦ is starting
after take off screws ⑧⑨.
•Standard installation of fixing k
nife⑦: Fixing
knife⑦ blade edge is lower 2mm than base
plate⑩.
•Standard adjustment of knife
(1)Like picture below, standard size of steel
pillar① is 14mm. ( Adjustment of knife
lapping pressure: Adjust after loosen
screw②.)
(2)In the situation above, when moving
knife③ and fixing knife closed, picture
below, ④ which slit is larger, adjust the slit
between 0.2~0.3 between moving knife③
and fixing kn
ife⑤. Adjust after loosen
screws ⑥.
【Note】
If part ④ slit too large, it will worn out knife
faster because of bad cutting.
⑨
⑩
⑦
⑧
14mm
②
①
⑥
④
③
⑤
•活動式刀具閉合間隙 0.2~0.3mm
Slit 0.2-0.3mm when moving knife close position
•活動式刀具閉合間隙 0mm
Slit 0mm when moving knife
close position
Page 40

P31
Page 41

P32
Page 42

P33
Page 43

P34
Page 44

P35
Page 45

P36
Page 46

P37
Page 47
P38
Page 48
P39
Page 49

P40
Page 50

P41
Page 51

P42
Page 52

P43
Page 53

P44
Page 54

P45
Page 55

P46
Page 56

P47
Page 57

P48
Page 58

P49
Page 59

P50
Page 60

由於對產品的改良及更新 , 本產品使用說明書中與零件圖之產品及外觀的修改恕不事先通知 !
The specification and/or appearances of the equipment described in this instruction
book & parts list are subject to change because of modification which will without
previous notice.
ASP-EBJ100S.MAR.2017
 Loading...