

Page 1

ASP-BST100
使用說明書與零件圖
INSTRUCTION BOOK & PARTS LIST
Page 2

Page 3

重要安全聲明
SAFETY INSTRUCTIONS
•
感謝客戶您購買本公司產品
為安全且正確地使用本產品 ASP-BST100,請
詳細閱讀以下注意事項後再實施操作。
1. 在使用本機器前,請先詳讀說明書內容,必
須遵守說明書的指示與規定。
2. 此設備的使用,由經過適當訓練的操作人員
實行。
3. 在使用本機器時,若發現異常或故障,應立
即停止使用,並切除電源,以進行妥善修理。
4. 嚴格禁止對本機器進行改造和變更。本公司
對改造或變更過的機器不予保固,若因此造
成危害,本公司將不負任何賠償責任。
•
危險
為杜絕觸電事故必須遵守以下安全措施。
1. 安裝本機器時,必須確實做好接地動作。
2. 對本機器的電氣做定檢與維修,都必須由具
有資格的電氣技術人員執行,或專家的監督
指導下進行。
•
警告
為了杜絕觸電、火災、燒損或對人的傷害,必
須遵守以下安全措施。
1. 本機器在有電壓的狀態下,絕對禁止人員接
觸通電之機件。
2. 本機器若需要做零件更換或進行維修時,應
將電源切換至 OFF
狀態。
•
Thank you for purchasing our company’s
products.
For your safety and using our product ASPBST100 properly, please read the instructions
below deliberately, then start operating the
machine.
1.Before using the machine, you must follow
the instructions and rules.
2.The operators must been well trained.
3.If you found some abnormal phenomena
or the machine malfunction, you should
stop using the machine at the moment and
cut the power off, in order to do the proper
repair.
4.Strictly forbid to do the extra transformation
or alteration. We do not have the warranty
to the machine which had been transformed
or altered. Therefore, our company will be
irresponsible for any compensation if the
machine has caused any danger.
•
Hazards
In order to prevent from the electric shock, you
must to obey the safety measure below.
1. While install the machine, make sure you
have do the grounding.
2. The electric routine inspection and
maintenance of the machine have to be
done by the electric technical personnel who
qualied or under the expert’s supervision.
•
Alert
You must to obey the safety measure below,
in order to prevent from the electric shock, fire
accident, burning loss, or human body injured.
1. Absolute forbid workers to touch the
machine
’s
parts while the machine is in a
voltage state.
2. If the machine
’s
parts need to be changed
or do the maintenance, you should switch
the power off.
i
Introduction
Page 4

3. 當本機器不能正確工作時,應立即停止操作
機器。該機器有必要進行修理、電氣或機器
方面的調整時,需要和本公司的代理商或直
接與本公司聯繫商談,採取合適的解決措
施。
4. 本機器的的維修、調整須經由適當訓練的技
術員或專業人員進行。維修時,需使用本公
司所指定的更換零件。
5. 一般的保修檢查,要由經過適當訓練的人來
進行。
6. 在維修或保養各式氣缸或氣壓相關連動機構
時,務必將供應氣源的接頭拔下,在氣壓完
全切斷的狀態方可進行。不過,只限於受過
適當訓練的技術人員或專業人員進行調整和
運行確認時例外。
7. 該機器準備啟動前,所有的保護蓋必須安裝
定位至機器上。
8. 本機器的內部裝置和控制箱裡不能殘積金屬
粉末和灰塵,要定期打掃。
9. 本機器在運行當中,所有可動部分都絕對不
可用手觸碰,或身體(包括頭髮、衣服類)
靠近。
3. While the machine cannot operate properly,
you should
stop operating it immediately. If
the machine has the necessity to repair, or
do the electric and machine adjustment, you
should contact with our factors, or contact
us directly, then take the proper resolution.
4.The machine’s maintenance and adjustment
need to be done by well- trained technician
or professional. You need to use the specific
parts from our company while under
maintenance.
5. The
repair within the warranty need to be
repair by the worker who well trained.
6. While doing the repair or maintain variety
of cylinders and pneumatic actuator
associated, you must unplug the supply air
source connector before you do the repair
and maintenance. However, it could be
only done by the well- trained technician or
professional.
7. Before ready to start the machine, all of the
protective
covers need to be on the position
of the machine.
8. The inner device and the control box of the
machine need to be regularly cleaned, in
case of any dust or metal filings remains in
the machine.
9. While operating the machine, do not use
your hands to touch or let your body to close
(including hair or clothes) all of the movable
parts.
10.Do not use the wet hands to operate the
machine, it mig
ht cause electric shock or
other major injured.
11.Please be sure to follow the alert pictorial
markings by next page.
10. 絕對不可用濕手操作,可能造成觸電等重
大傷害發生。
11. 警告提示如次頁圖案,請務必遵守。
ii
Page 5
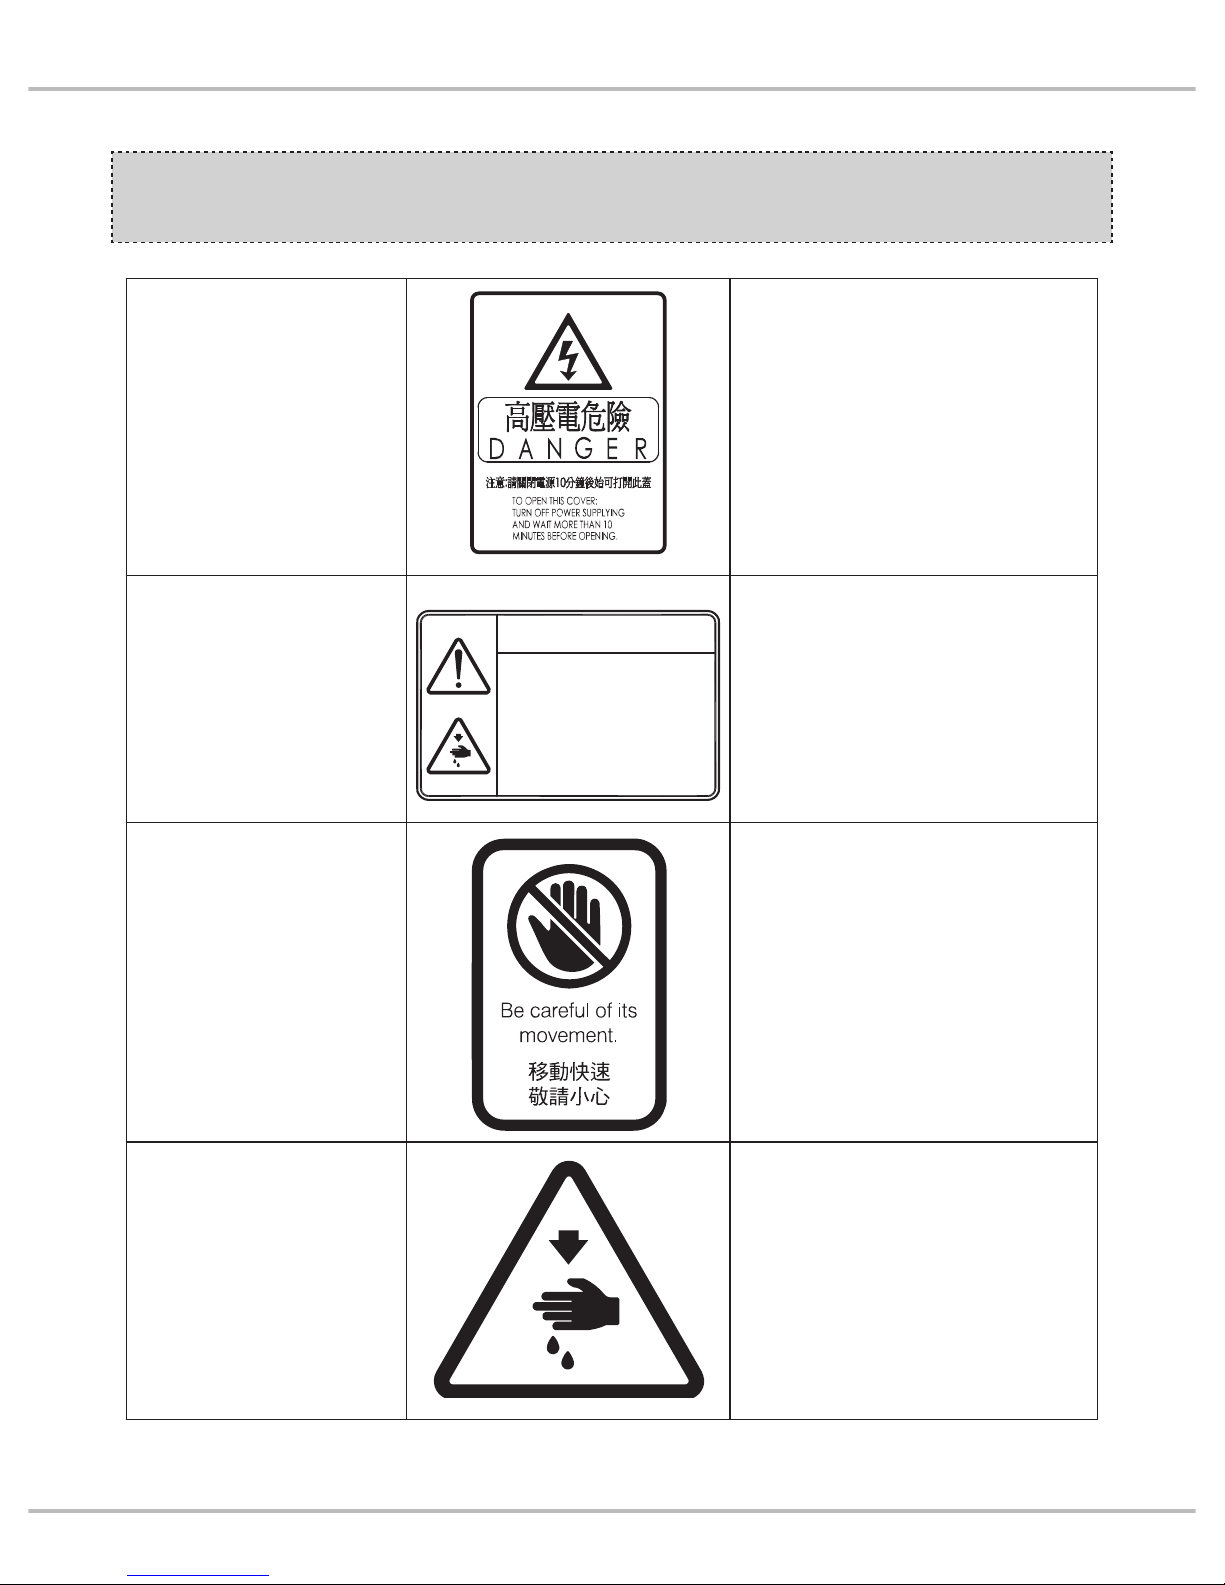
警告圖案表示
INDICATED THE ALERT
PICTORIAL MARKINGS
高壓部位
HIGH-VOLTAGE POSITION
務必關閉電源 10 分鐘後始打開電控
箱蓋子
Be sure to turn off the power and wait
till 10 minutes before opening the
control box’s cover.
高速運動部位
HIGH SPEED MOTION
POSITION
謹防工傷事故
In case of industrial accident
高速運動部位
HIGH SPEED MOTION
POSITION
謹防工傷事故
In case of industrial accident
高速運動部位
HIGH SPEED MOTION
POSITION
謹防工傷事故
In case of industrial accident
CAUTION
機械作動部份請注意裝上
保護裝置
穿線、換線、 調整、清潔
時請注意關閉電源.
Moving parts may cause in jury.
Operate with safety devices.
Turn off main switch before
threading, changing bobbin and
needle, cleaning etc.
iii
Introduction
Page 6
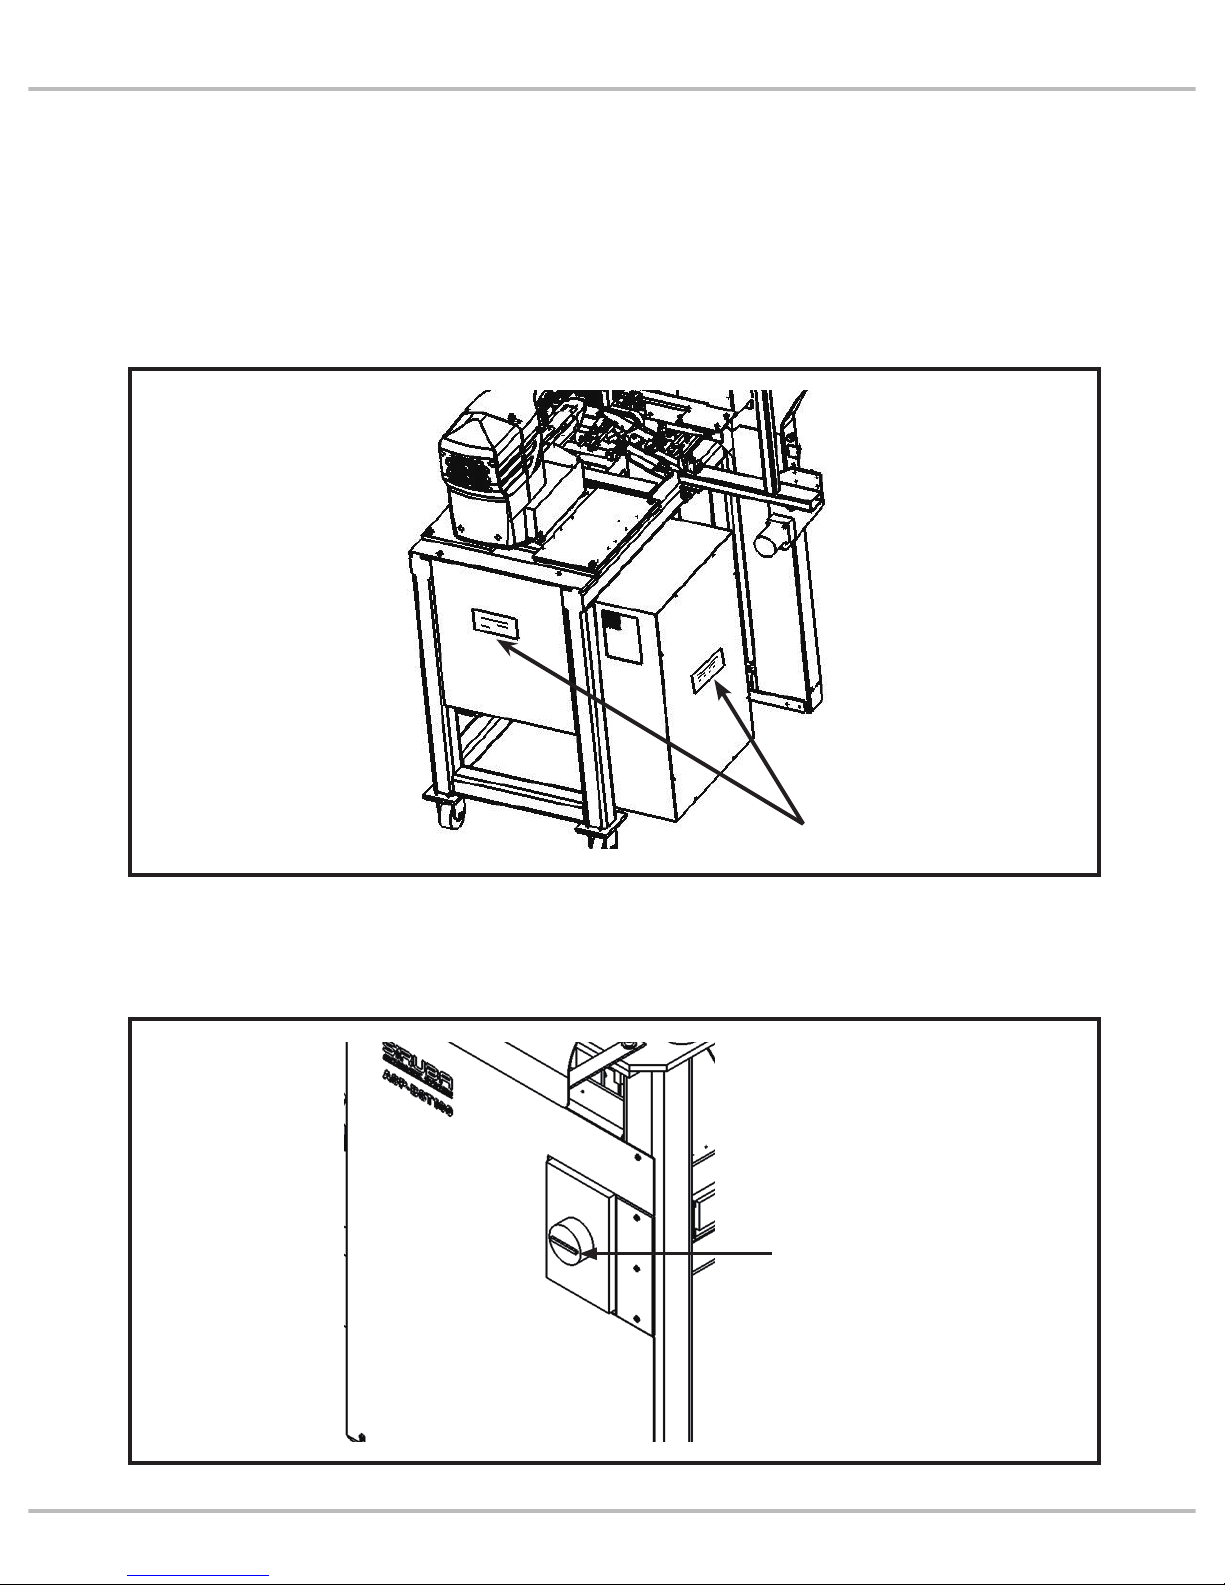
安全注意事項
SAFETY INSTRUCTIONS
2. 為了保修檢修卸掉罩蓋時,必須將電源切到
OFF。
1. 當機器運作中時,請勿將手指等放入機器動
作範圍內。
2.Be sure to turn off the power switch when
the cover is removed for an inspection.
1. Do not put a finger or any other object in the
area where there are moving parts while the
machine is working.
電源開關
Power switch
機器動作範圍 ( 區域 )
Area with moving parts
iv
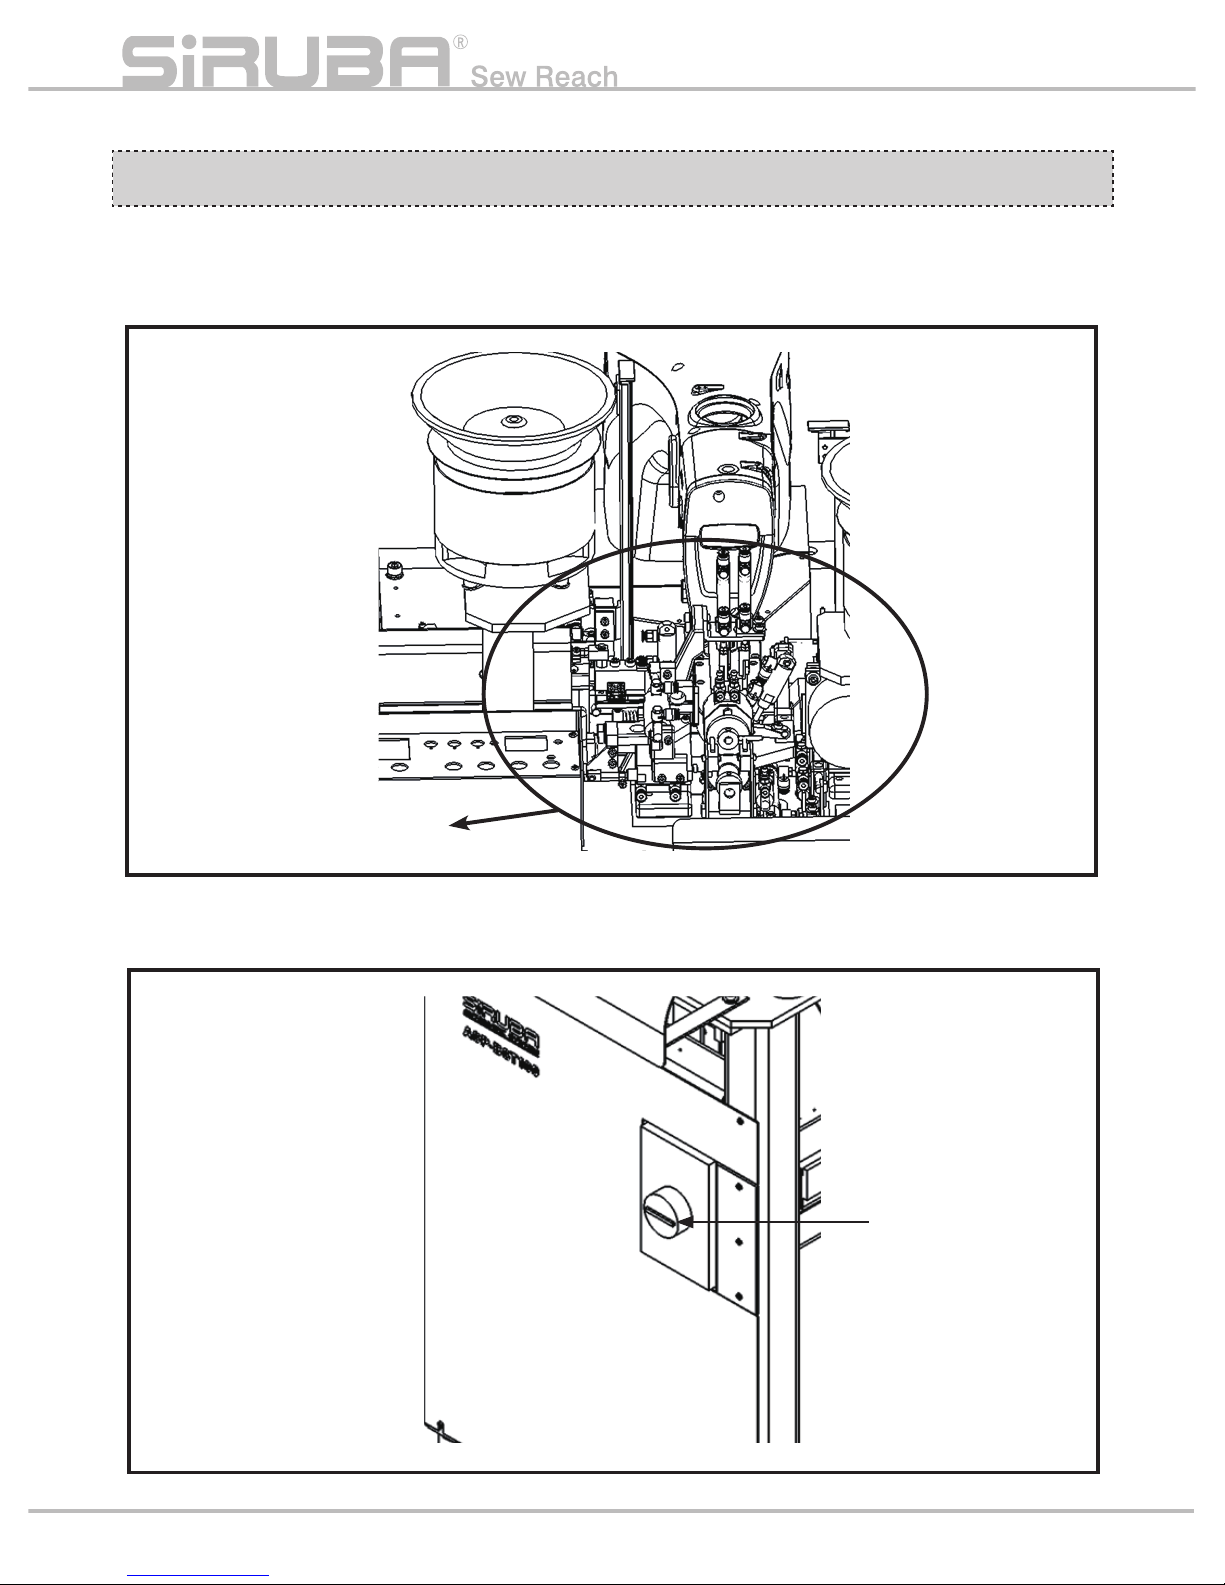
Page 7
3. 對危及人體的高壓電處,貼有觸電危險警告
標記。在貼有本警告的電器控制部位而需要
保修、檢修時,打開罩蓋僅能由專業的電氣
技術人員進行。
4. 機器運轉時,有必要馬上停止機器的時候,
請將緊急停止開關轉到 OFF。
3.An electric shock warning label is affixed
where there is high voltage electric terminal
which is dangerous to the human body.
Nobody except a special electrician should
open the cover to inspect a control box with
a warning label.
4.If there’s a necessity to stop the machine
right away while mach
ine operating, you
could press the urgent machine halt switch
to switch the power off.
觸電危險警告標記
Electric shock warning label
緊急停止開關 ( 電源開關 )
Urgent machine halt switch
(Power switch)
v
Introduction
Page 8

5. 電源線、氣壓管線需確實固定安置,不可散
落在地面,以免人員絆倒而發生危險。
6. 為了生命安全,在任何情況下,不可將電源
地線拔掉運轉機器。
7. 打雷時,為了安全要停止作業, 切斷電源。
8. 離開機器工作地點時或工作結束後一定要將
電源開關轉到 OFF。
9. 機器運轉下,不可卸下罩蓋類。
5.Power cord and pneumatic cord should
be settled, in order to prevent people from
stumbling.
6.For safety do not operate the machine when
it is not earthed.
7.When there is lightning, stop the machine
and pull out the plug for safety.
8.Turn off the power sw
itch when you are not
near the machine or after the operation is
finished.
9.Do not operate the machine with the covers
off.
vi
Page 9

索引
INDEX
頁 /PAGE
規格 SPECIFICATION 1
安裝 INSTALLATION 2
( 一 ) 八字扣保持器 8-SHAPED BUCKLE FEEDING STAND 2
( 二 ) 圓扣保持器 CIRCLED-BUCKLE FEEDING STAND 2
運轉準備 PREPARATION FOR OPERATING 3
( 一 ) 電源電壓 POWER VOLTAGE 3
( 二 ) 氣壓 AIR PRESSURE 3
( 三 ) 加油 LUBRICATION 3
( 四 ) 穿線 THREADING 3
肩帶裝置方法 STRAP INSTALL METHOD 4
操作 OPERATION 5
( 一 ) 操作面板 OPERATION PANEL 5
( 二 ) 自動運轉的啟動與停止 AUTO-OPERATION START & STOP 7
( 三 ) 自動停止燈燈號、燈滅時復原操作 AUTO-STOP LAMP'S LAMP SIGNAL, OPERATION AGAIN AS LIGHT OFF 7
( 四 ) 縫
製樣式 NO. 的變更方法 METHOD OF CHANGING SEWING PATTERN NO. 10
( 五 ) 縫製尺寸的放大、縮小方法 METHOD OF SEWING SIZE MAGNIFY AND MINIFY 11
( 六 ) 單步操作的運轉 ONE SHOT OPERATION 11
( 七 ) MANUAL 操作 MANUAL OPERATION 12
裝置的標準位置 PRECISE POSITION OF DEVICE 13
( 一 ) 切刀 TRIMMER 13
( 二 ) 八字扣的標準尺 STANDARD RULER OF 8-SHAPED BUCKLE 13
( 三 ) 扣環供給底板及扣環供給端頭 BUCKLE FEEDING BED AND UPPER END 14
( 四 ) 裝置台 DEVICE BED 15
測量器的交換與調整 MEASURER'S CHANGING AND ADJUSTMENT 16
( 一 ) 夾帶盒與上彈簧板的交換 CHANGE OF ST
RAP-FIXED DEVICE AND SPRING PLATE 17
( 二 ) 調節式八字扣固定器的調整 ADJUSTMENT OF ADJUSTABLE 8-SHAPED FEEDING HOLDER 18
( 三 ) 扣環供給底板的交換及調整 CHANGE AND ADJUSTMENT OF BUCKLE FEEDING BED 19
( 四 ) 八字扣保持器的交換 CHANGE OF 8-SHAPED BUCKLE FEEDING STAND 20
( 五 ) 穿板及導帶的交換 CHANGE OF STRAP THREAD PLATE AND STRAP GUIDE 20
( 六 ) 圓扣供給端頭的交換 CHANGE OF CIRCLED-BUCKLE FEEDING UPPER END 21
( 七 ) 圓扣保持器的交換 CHANGE OF CIRCLED-BUCKLE FEEDING STAND 21
( 八 ) 八字扣標準尺的調整 ADJUSTMENT
OF 8-SHAPED BUCKLE STANDARD RULER 22
( 九 ) 反摺導帶的調整 ADJUSTMENT OF COUNTER-FOLDED STRAP GUIDE 22
配線圖 WIRING PICTURE 23
配管圖 PIPING PICTURE 25
不良現象,其原因以及解決方法 DEFECTIVE PHENOMENA'S REASON AND SOLUTIONS 29
零件圖 PARTS LIST 33
vii
Introduction
Page 10
規格 SPECIFICATION
型 號
Model
A S P- B S T 1 0 0
使用針型
Needle Type
DP x 5 SERV7 75 (藍獅)
DP x 5 SERV7 75 (Schmetz)
縫製速度
Sewing speed
2000 RPM(最高 /Maximum)
生產能力
Productive capability
五秒 / 約肩帶一條 ( 當肩帶製作尺寸為 400 mm 時)
Approximately 5 sec. / 1 product (As product sewing size is 400 mm)
寬 度
Width
7mm ~ 18mm
電 源
Power source
單相/3相200~240V 50/60Hz 3. 5A(最大)( 視客戶需求 )
Single-phase/3-phase 200~240V 50/60Hz 3.5A(Maximum)(Depend
on customer’s need)
氣
壓
Air pressure
0. 5MPa
空氣消耗量
Air consumption
30L/ 分
30L/min
機器尺寸
Machine size
寬 1200× 深度 1050× 高 1900 mm
Width 1200×Depth 1050×Height 1900 mm
縫紉尺寸
Sewing size
完成尺寸
Finish product size
150 ~ 1200 mm
3
15
肩帶長度 150~1200mm
Length of strap 150~1200mm
P1
Page 11
安裝 INSTALLATION
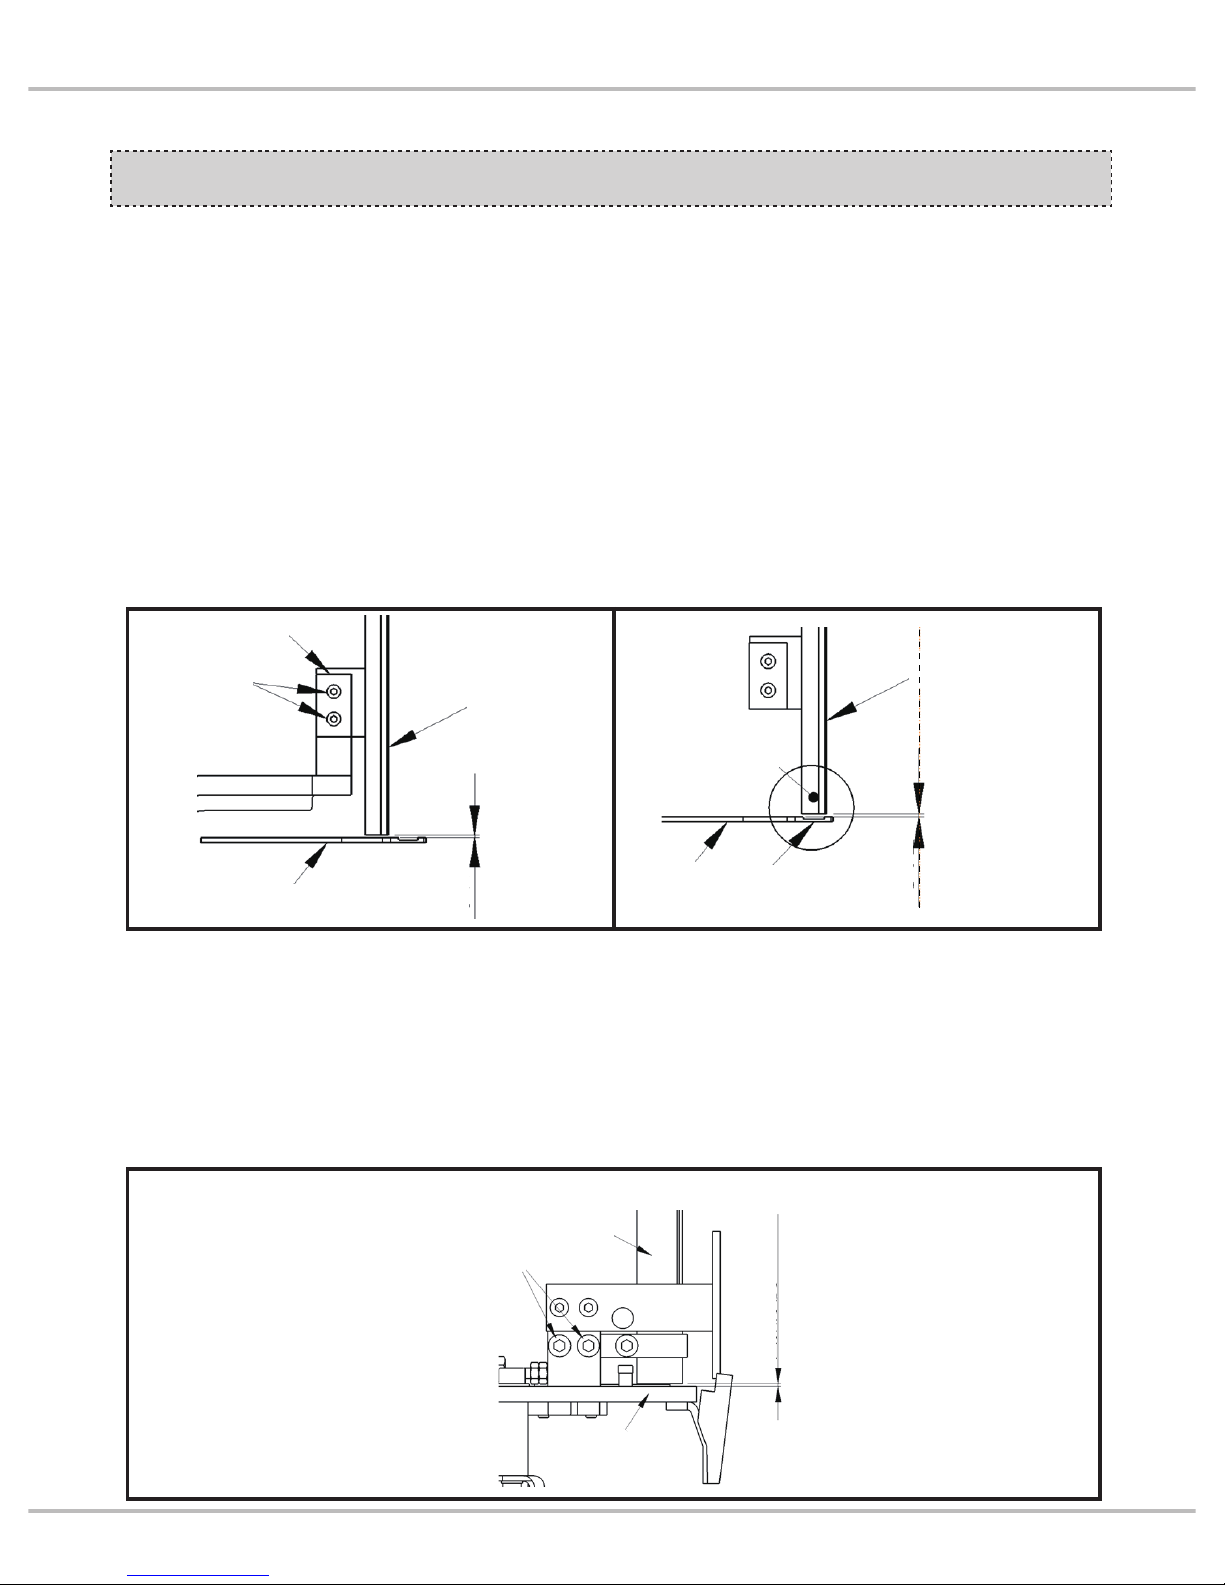
※ 注意:安裝作業需兩人以上執行。
1. 八字扣保持器①
⑴將座板②用螺絲③ (2 顆 ) 固定。
⑵安裝標準
八字扣保持器①與扣環供給底板④的縫隙
為 0.2mm。
扣環供給底板④倒退到最後時,讓八字扣
保持器①底部⑤的內側面和扣環供給下④
的槽一致。
2. 圓扣保持器⑦
⑴將圓扣保持器⑦用螺絲⑧ (2 顆 ) 固定。
⑵安裝標準
圓扣保持器⑦與圓扣供給底板⑨的縫隙為
圓扣厚度的 +0.2mm。
※Caution※ The installation work need two or
more people to proceed.
1.8-shaped buckle feeding stand ①
⑴Use two screws③ to fix plate② .
⑵Install standard
The gap of 8-shaped buckle feeding
stand ①and buckle feeding bed④ are
0.2mm.
As buckle feeding bed④ go backward
at the end, let the inner side of 8-shaped
buckle feeding stand①’s bottom⑤ and
the notch④under the buckle feeding
stand at the same position.
2.Circled-buckle feeding stand ⑦
⑴Use two screws⑧ to fix circled-buckle
feeding stand ⑦.
⑵Install stan
dard
The gap between circled-buckle feeding
stand⑦ and circled-buckle feeding
bed⑨ are the thickness of circledbuckle +0.2mm.
①
③
⑤
⑥
④
①
0.2
0.2
②
④
⑦
圓扣厚度 + 0.2mm
Circ led-bu ckle thickn ess + 0.2mm
⑧
⑨
P2
Introduction
Page 12
運轉準備 PREPARATION FOR OPERATING
1. 電源電壓
⑴在限定電壓的 ±10% 以內使用。
⑵必須接地線。
2. 氣壓
⑴設定為 0.5MPa
3. 加油
⑴縫紉機頭部依照 LK-1900A 的使用指南加
油。
⑵定期在紅漆標記的給油處為裝置加油。
4. 穿線
⑴在斷線檢測器①穿線。
⑵依照 LK-1900A 的使用指南穿線。
1.Power voltage
⑴Limited voltage uses within ±10%.
⑵Need to be earthed.
2.Air pressure
⑴Set at 0.5MPa
3.Lubrication
⑴Lubricate to sewing head according to LK-
1900A instruction manual.
⑵Regularly lubricate to the device on the
red marking places.
4.T
hreading
⑴Thread at disconnecting detector①.
⑵Thread according to LK-1900A instruction
manual.
①
P3
Page 13
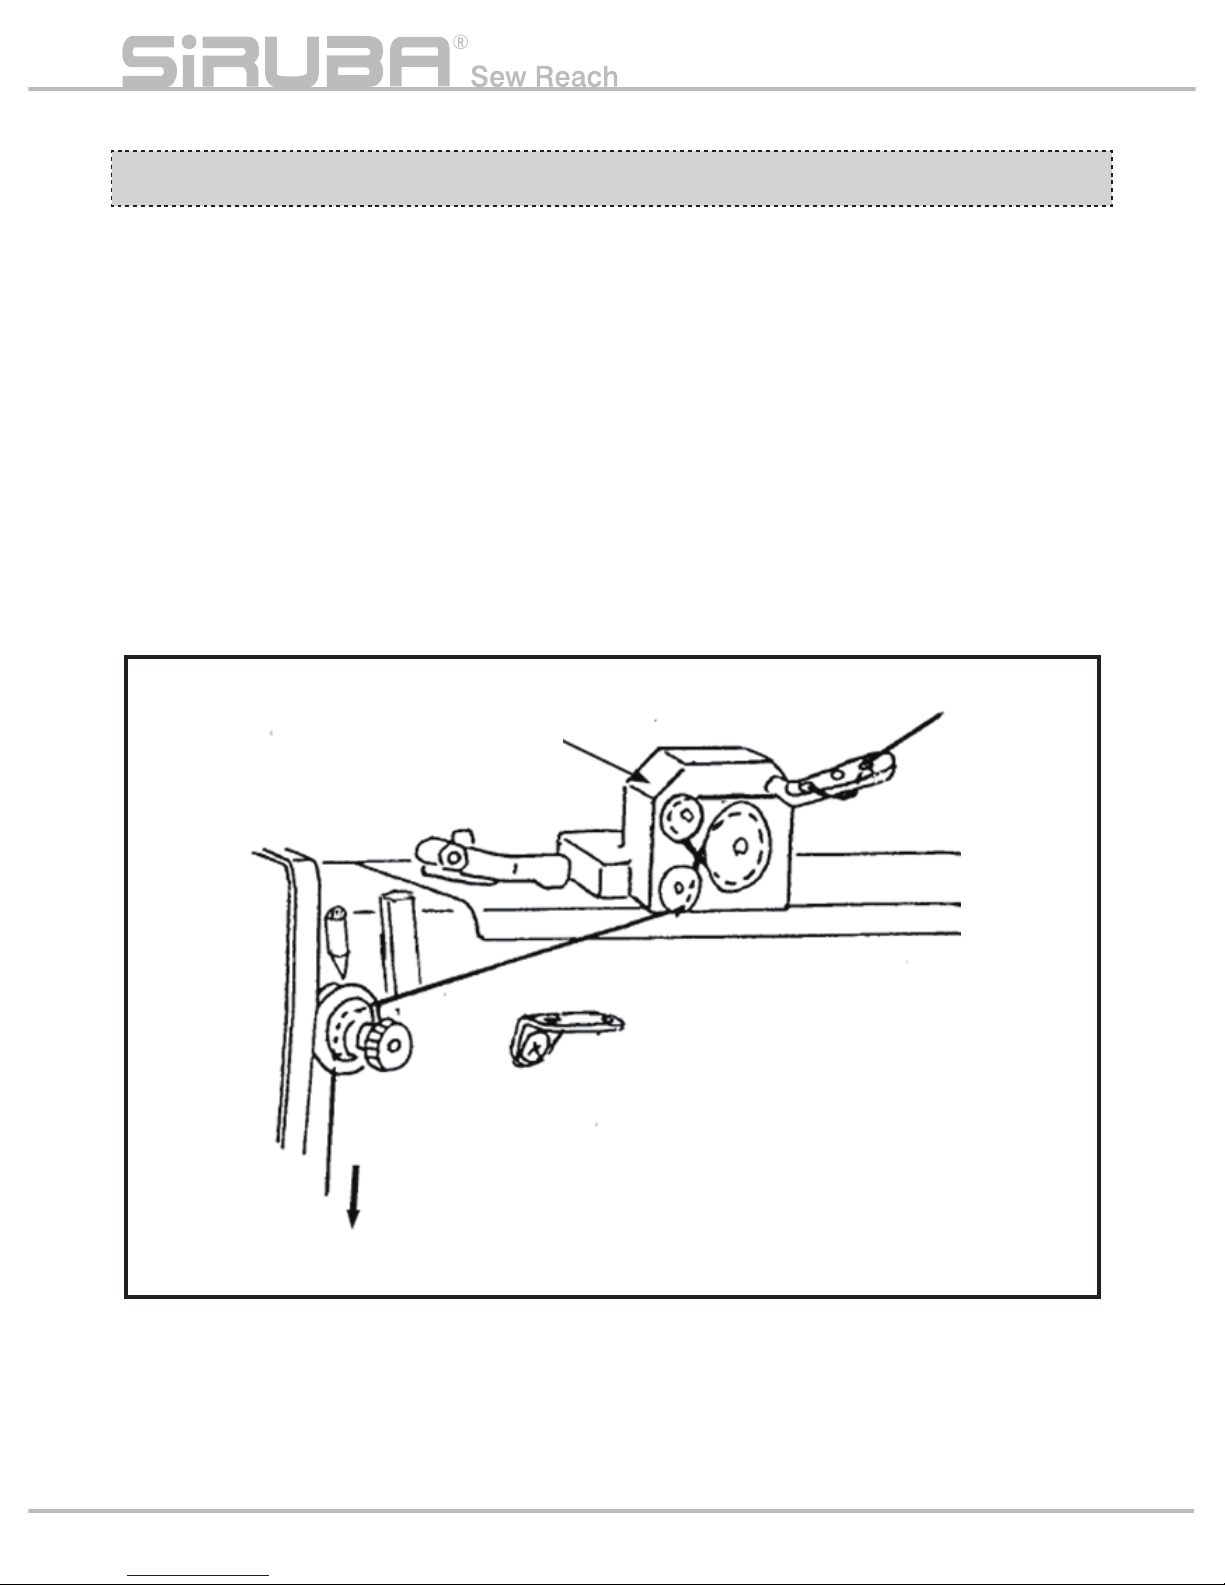
肩帶裝置方向 STRAP INSTALL METHOD
⑴通過送帶導柱①。
⑵通過肩帶結束開關②的中間。
⑶提起肩帶接縫開關③柄桿通過。
⑷通過送帶導柱④。
⑸提起送帶滾輪⑤的柄桿通過。
⑹從導帶線⑥的圈中通過。
⑺通過帶墜⑦。
⑻通過送帶導柱⑧。
⑼按夾帶開關⑨,將帶子放入夾帶盒⑩的槽
部,從夾帶盒
露出約 3~5mm。
⑴ Through tape feeding guide part①.
⑵ Through the middle of strap sensor②.
⑶ Lift the shaft of seam strap sensor③ and
make through.
⑷ Through tape feeding guide part④.
⑸ Lift shaft of tape feeding roller⑤ to make
through.
⑹ Through the antistatic coil⑥.
⑺ Through the counterweight⑦.
⑻ Through tape feeding guide part⑧.
⑼ Press strap-fixed switch⑨, put the strap
in the notch⑩ of strap-fixed
device
and reveal 3~5mm from the strap-fixed
device
.
⑩
①
⑤
⑥
⑦
⑨
⑧
③
④
3~5mm
②
P4
Introduction
Page 14
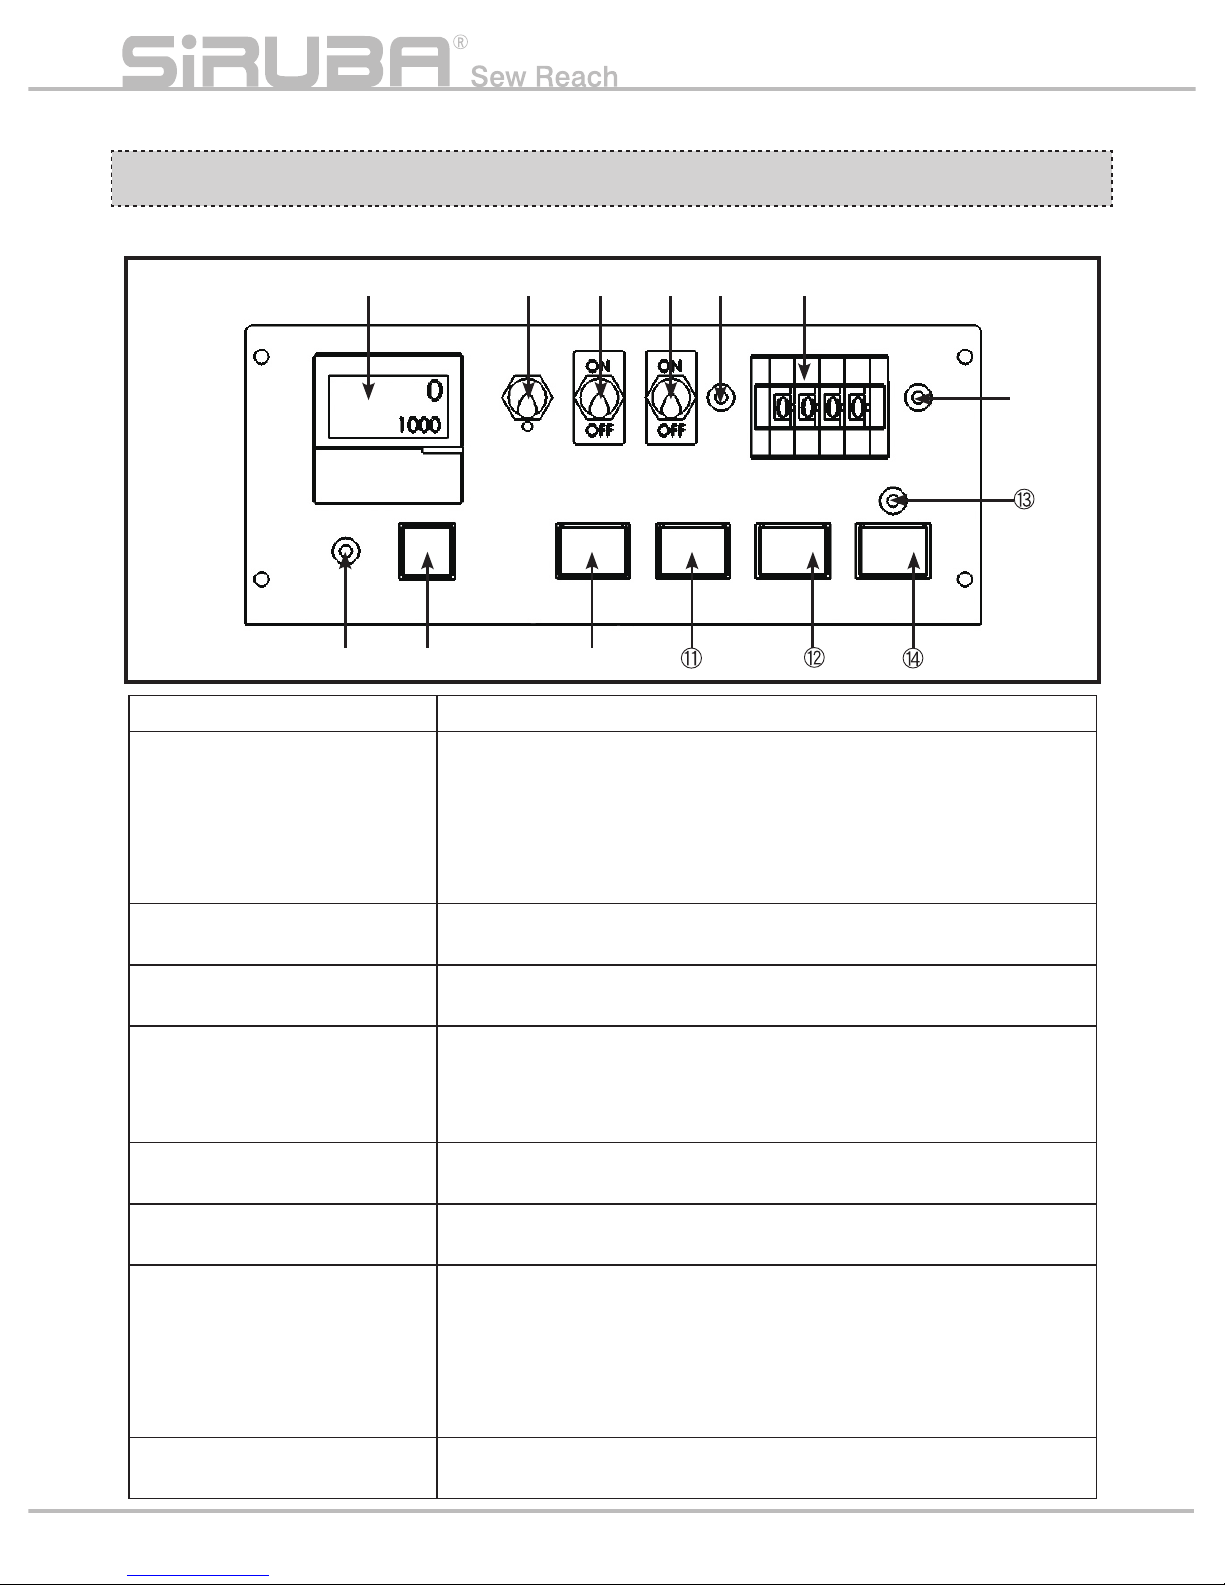
操作 OPERATION
1. 操作面版 1.Operation panel
手動
MANUAL
自動
AUTO
電源
POWER
單動
ONE SHOT
斷線檢知
THREAD
DETECTOR
長度調整
TAPE FEED LENGTH
緊急停止
EMERGENCY STOP
開始
START
循環開始
CYCLE START
循環停止
CYCLE STOP
計數復歸
COUNT RESET
計數器/COUNT
開關名稱 Name 功能 Function
①計量下線
Count
下線消費量用量計算的設定。( 以 1 鎖針 1 計算 )
當其計算與設定值一致時將自動停止。(MANUAL 時則不進行計算 )
Setting of counting lower thread consumption. (one stitch one
count)
Automatically stop as the counting is the same as setting value.
(Will not counting as MANUAL.)
②累計器燈
Counter Lamp
下線消費自動停止燈。(P9)
Lower thread consuming automatically stop lamp. (P9)
③下線累計重新設定開關
Count Reset
將下線計算重新設為「0」。(P9)
Reset lower thread counting as「0」(P9)
④ AUTO/MANUAL 切換開關
AUTO/MANUAL Switch
自動:切換成自動運轉模式。(P7)
手動:切換成縫紉機單獨運轉模式。(P12)
Auto:Change to auto-operation mode. (P7)
Manual:Change to sewing machine isolated operate mode. (P12)
⑤單步操作切換開關
One Shot Operation Switch
切換成單步操作模式。(P11)
Change to one shot operation mode. (P11)
⑥斷線切換開關
Thread Detector
將斷線自動停止狀態調至 ON/OFF 狀態。
Adjust the thread break auto-stop status to ON/OFF.
⑦斷線燈
Thread Detector Lamp
斷線自動停止燈(燈亮)→恢復操作順序為 (P9)
斷線不良自動停止燈 ( 燈滅 ) →復歸操作順序為 (P9)
Thread break auto-stop lamp(Light up)→ Sequence of return to
operation (P9)
Defective thread break auto-stop lamp (Light off) → Sequence of
return to operation (P9)
⑧送量設定開關
Tape Feed Length Switch
帶子長度的設定。(單位:約1mm)
Setting of tape
’
s
length(Unit:About 1mm)
① ④ ⑤ ⑥ ⑦ ⑧
⑩③②
⑨
P5
Page 15
開關名稱 Name 功能 Function
⑨電源燈
Power Lamp
電源開關ON時燈亮。
Light up when power switch ON .
⑩單次循環停止開關
Cycle Stop Switch
1. 自動運轉的停止。
2. 單次循環運轉。(只想製作一個作品時)
3. 定時運轉的最初啟動。(只想制作一個作品時)
1. Auto-operation stop.
2. One cycle operation.(Make one product only.)
3. The initial start of time operation.(Make one product only.)
循環啟動開關
Cycle Start Switch
1. 自動運轉的啟動。
2. 單次循環運轉的最初動作啟動。
1. Start of auto-operation.
2. Initial start of single-cycle operation.
啟動開關
START Switch
1. 扣環用完,帶子用完以及檢測出接頭而自動停止後的再啟動。
2. 八字扣固定器中重新設定扣環。
3. 緊急停止後的再啟動。
4. 斷線不良自動停止後的再啟動。
5. 下線計算後的再啟動。
6. 單步操作之後的動作啟動。
7. MANUAL 模式時的縫紉機啟動。
8.(任選)圓扣裝置不良時,圓扣重新設定。
1. Auto-stop when run out of buckles, tape, and detected piecing
then start all over.
2. Reset buckles in 8-shaped buckle holder.
3. Start again after emergency stop.
4. Start again after defective thread break auto-stop.
5. Start again after
counting lower thread.
6. Motion start after single-operation.
7. Sewing machine start in MANUAL mode.
8.(Optional)Reset circled-buckle as circled-buckle device
defective.
停止燈
Stop Lamp
1. 扣環用完後自動停止燈。(燈亮)(P8)
2. 肩帶用完時自動停止燈。(燈亮)(P8)
3. 檢測出接頭時自動停止燈。(燈亮)(P8)
4. 八字扣固定器中的裝置不良燈。(燈亮)(P8)
5. 緊急停止燈。(燈亮)
6.(任選)圓扣裝置不良燈(燈滅)→恢復操作順序為(P8)
1. Auto-stop lamp after run out of buckle.(Lights up)(P8)
2. Auto-stop lamp after run out of strap.(Lights up)(P8)
3. Auto-stop lamp while detecting strap.(Lights up)(P8)
4. 8-shaped buckle holder defective lamp(Lights up)(P8)
5. Emergency stop lamp(Lights u
p)
6.(Optional)Circled-buckle device defective lamp(Lights off)
→ Sequence of return to operation(P8)
緊急停止開關
Emergency Stop Lamp
全部動作停止。
Whole motions stop.
P6
Introduction
Page 16

2. 自動運轉的啟動以及停止
將 AUTO/MANUAL 切換開關①轉換成
AUTO。
⑴連續運轉
•啟動:按開關②「循環啟動(白)」。
•停止:按開關③「單次循環停止(黃)」。
⑵ 1 循環運轉
• 啟動:按開關③「單次循環停止(黃)」。
(只製作一個作品後,停止)
※ 當電源開關調至 ON 時,LK-1900A 操作面
版表示。(有關 LK-1900A 操作板的詳細程
序,請參照 LK-1900A 使用指南)
2.Auto-operation Start & Stop
AUTO/MANUAL switch① turn on AUTO.
⑴Continuous operation
•Start:Press switch②「Cycle-Start(
White)」.
• Stop:Press switch③「Single-cycle stop
(Yellow)」.
⑵Cycle operation
• Start:Press sw
itch③「Single-cycle stop
(Yellow)」.(Make one product only then
stop.)
※LK-1900A operation panel will show, when
power switch ON.
(Please refer to LK-1900A instruction
manual for LK-1900A operation panel
detailed procedure.)
3. 自動停止燈燈亮、燈滅時的復原操作。 3.Auto-stop lamp’s lamp signal, operation
again as light off.
手動
MANUAL
自動
AUTO
電源
POWER
單動
ONE SHOT
斷線檢知
THREAD
DETECTOR
長度調整
TAPE FEED LENGTH
緊急停止
EMERGENCY STOP
開始
START
循環開始
CYCLE START
循環停止
CYCLE STOP
計數復歸
COUNT RESET
計數器/COUNT
手動
MANUAL
自動
AUTO
電源
POWER
單動
ONE SHOT
斷線檢知
THREAD
DETECTOR
長度調整
TAPE FEED LENGTH
緊急停止
EMERGENCY STOP
開始
START
循環開始
CYCLE START
循環停止
CYCLE STOP
計數復歸
COUNT RESET
計數器/COUNT
②
③
①
③ ②
④
亮燈
Light up
線夾 on
( 參考 LK-1900A 使用手冊 )
Cable clamp on
(Refer to LK-1900A
instruction manual)
縫紉樣式
( 參考 P10)
Sewing pattern
(Refer to P10)
①
P7
Page 17
(1) 當停止燈①燈亮時
a. 八字扣保持器裡的八字扣剩下一點時
補充八字扣,按開關④「啟動(綠)」後
重新啟動。
b. 圓扣保持器裡的圓扣剩下一點時
補充圓扣,按開關④「啟動(綠)」後重
新啟動。
c. 肩帶用完時
重新裝置肩帶,按開關④「啟動(綠)」
後重新啟動。
d. 檢測出肩帶接口
除去接口後,重新裝置肩帶,按開關④
「啟動(綠)」後重新啟動。
e. 八字扣固定器裡的八字扣沒裝置完整
按開關④「啟動(綠)」→八字扣重新設
置後繼續進行作業。
(2) 停止燈①燈滅時「當附有圓扣檢測裝置
(任選)時」※1
a. 圓扣沒補給足夠
(a) 檢查圓扣供給裝置,確認圓扣裝置沒
被阻塞。 (如有阻塞物請將阻塞物除去)
(b) 按開關④「啟動(綠)」→圓扣重新
設置後繼續進行作業。
【注】就算電源開關為 ON 狀態,停止燈①為
燈滅時仍可按開關④「啟動(綠)」→圓扣
重新被設置,等待啟動(待機狀態)。
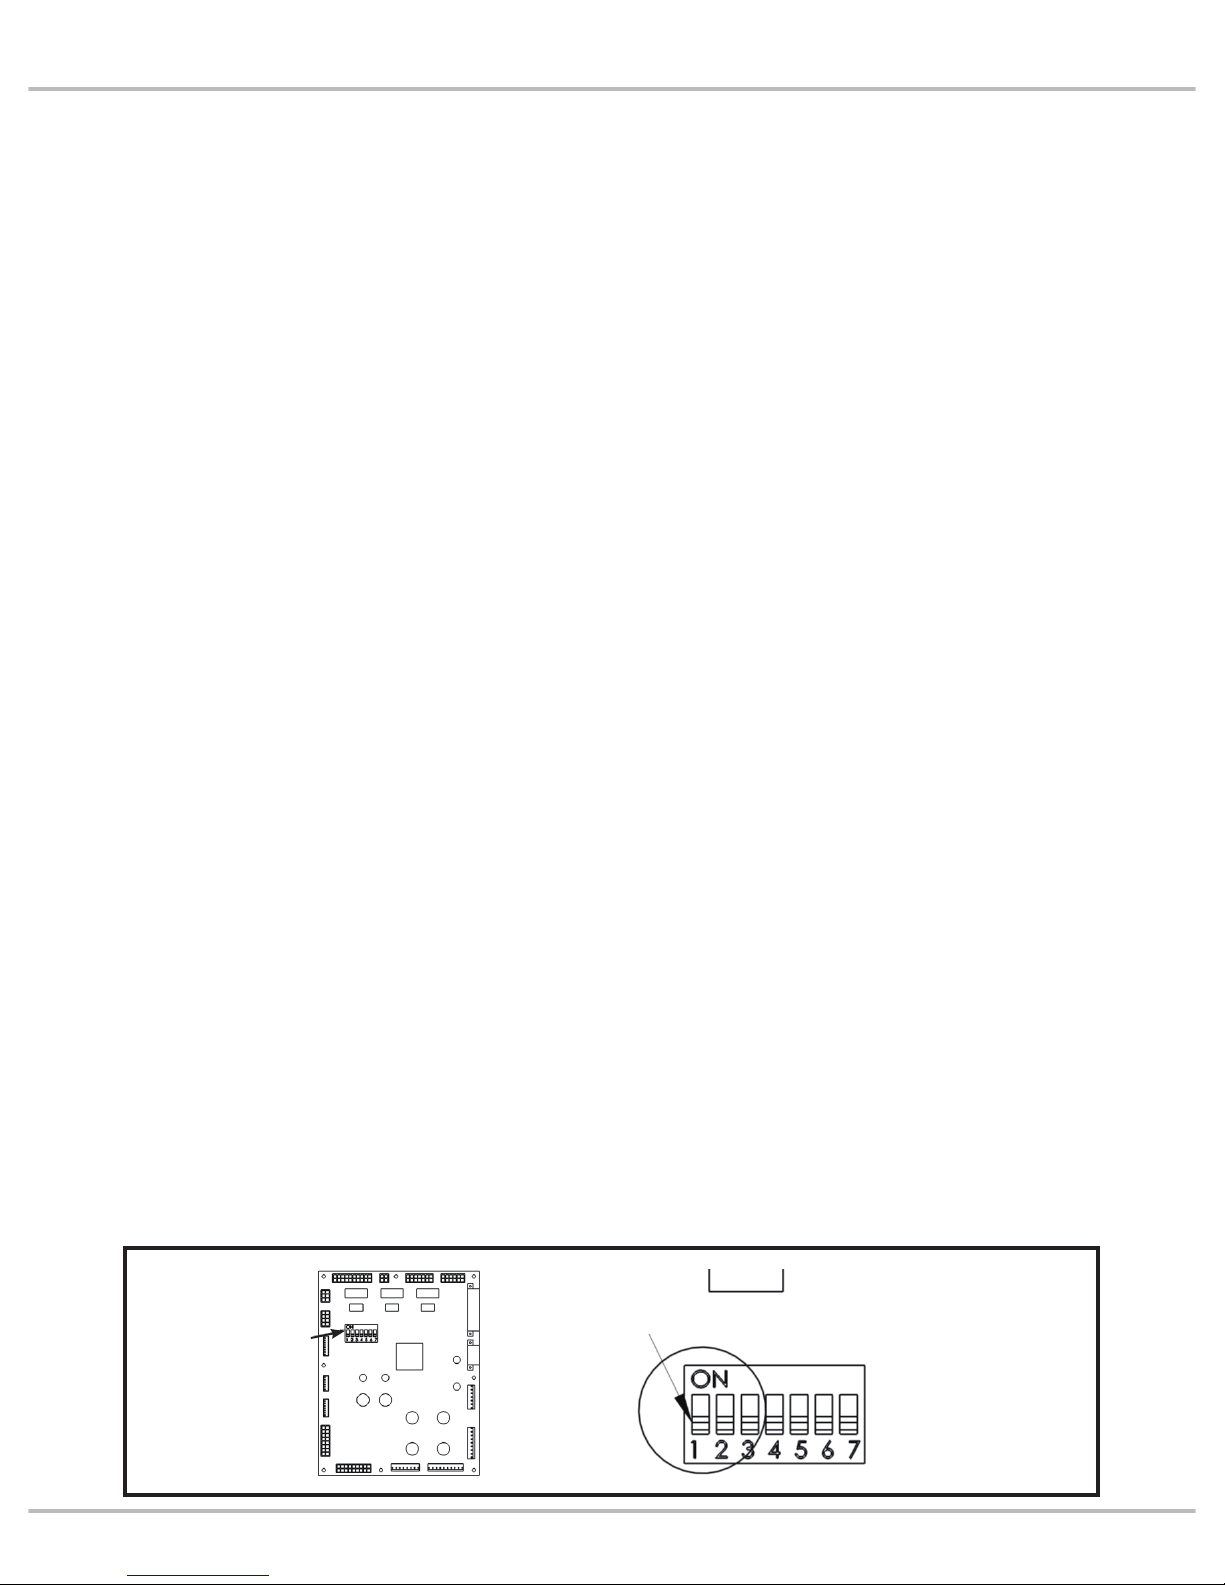
※1:當圓扣檢測器為無效狀態時,制卸基
板 ⑤雙列開關 D
S1 的 NO.1(⑥)為
ON。
(1)When Stop lamp① lights up.
a.8-shaped buckle remains a little in the
8-shaped buckle feeding stand. Resupply
8-shaped buckles, press switch④「
START(green)」then restart.
b.Circled-buckle remains a little in the
circled-buckle feeding stand. Resupply
circled-buckles, press switch④「START
(green)」then restart.
c.Run out of strap.
Reset strap, press switch④「START(
green)」then restart.
d.Detect the seam of strap.
After detach the seam, reset the strap,
then press switch④「START(green)」
then restart.
e.The 8-shaped buckles in the 8-shaped
buckle holder do not set completely.
Press switch④「START(green)」
→ Redo operation after reset 8-shaped
buckles.
(2)Stop lamp① lights off「With circled-buckle
detecting device(Optional)」
a.Circled-buckle insufficient.
(a)Check circled-buckle feed
ing device,
make sure that circled-buckle device
do not be jammed.(Remove the jam if
there have any.)
(b)Press switch④「START(green)
」→Redo operation after reset circledbuckles.
【Note.】You still could press witch④「
START(green)」 even power on and
the stop lamp① lights off.→ Reset circledbuckle and wait for starting(Standby status
).
※1:When circled-buckle detecting device
is invalid, switch board⑤dual
lines
DS1’s NO.1(⑥)is ON.
⑤
⑥
P8
Introduction
Page 18

(3) 斷線燈②燈亮時(當斷線開關⑦)為 ON 狀
態時。
a. 切斷上線
(a) 將電源開關調至 OFF。
(b) 邊按肩帶固定器開關「參照 P4 的(肩
帶裝置方法)」,將下個肩帶的先端
以手動方式調回開始的位置。
(c) 穿線。
(d) 將電源開關調至 ON。
(e) 將縫紉機下殘餘的肩帶除去後,按開
關⑧「循環啟動(白)」重新啟動。
•想要重新縫製發生斷線的肩帶時,可依下列
步驟重新啟動。
1. 在不變動縫紉機下肩帶的狀態下穿線。
2. 同時按下「單次循環停止(黃)」⑨、「循
環啟動(白)」⑧、「啟動(綠)」④三
個開關。→當肩帶被重新縫製後,繼續進
行作業。
(4) 斷線燈②燈滅時(就算斷線切換開關⑦為
OFF 狀態也可進行動作)。
a. 斷線不良
(a) 用剪刀等工具剪去剩餘的線。
(b) 按開關④「啟動(綠)」。→將堆垛
機歸回縫紉機旁,繼續進行作業。
(5) 計算燈③燈亮
a. 下線計算計算完畢
(a) 按開關⑩「下線計算重新設定
(藍)」。
(b)(連續運轉中狀態時)按下
「啟動
(綠)」開關。→繼續進行動作(循
環停止時)按開關⑧「循環啟動
(白)」→再次啟動
(3) When thread break lamp② lights up, the
thread detector⑦ is ON.
a.Cut off upper thread
(a) Switch OFF power switch
(b) Press strap-fixed device switch 「
Refer to P4(Installation of strap)
」, and adjust the front end of the
next strap to the beginning position in
manual way.
(c) Threading.
(d) Turn power switch ON.
(e) After detached the remaining strap
under the sewing machine, press the
switch⑧「Cycle Start(white)」and
restart.
•If you want to re-sew the strap which thread
break, you could restart according to the
procedure below.
1.Thread strap without moving the sewing
machine.
2.Press three switches 「Single-cycle Stop(
yellow)」⑨,「Cycle Start(white)」⑧,「
Start(green)」④ simultaneously. → After
re-sew the strap, proceed operation.
(4) Thread break lamp②
lights off.(Even the
thread break switch⑦ is OFF, it could be
operated.)
a.Thread break defective.
(a) Cut off remaining thread with scissors
or other tools.
(b) Press switch④「START(green)」→
let the unloading part back to sewing
machine and keep the operation.
(5) Counting lamp③ lights up
a.Lower thread counting finish
(a) Press switch⑩「Reset lower thread
counting(blue)」
(b)(Continuous operation)Press
「START(green)」switch.
→Continuous operation(Cycle Stop
)Press switch⑧「Cycle Start(white
)」→Restart
手動
MANUAL
自動
AUTO
電源
POWER
單動
ONE SHOT
斷線檢知
THREAD
DETECTOR
長度調整
TAPE FEED LENGTH
緊急停止
EMERGENCY STOP
開始
START
循環開始
CYCLE START
循環停止
CYCLE STOP
計數復歸
COUNT RESET
計數器/COUNT
②⑦
③
⑩
⑨ ⑧
④
①
P9
Page 19

L 尺寸
L Size
標準樣式 NO.
Standard Pattern NO.針數Stitches
縱向縫製位置修正用樣式
Vertical sewing position correctional pattern
A:縫線偏離位置在前側時
A:Sewing deviate position
forward side
B:縫線偏離位置在後側時
B:Sewing deviate position
backwaard side
7mm 2 30 1 3
8mm 12 31 11 13
10mm 22 39 21 23
13mm 32 45 31 33
16mm 42 56 41 43
18mm 52 64 51 53
4. 縫製樣式 NO. 的變更方法
(1) 按準備鍵①,使縫製②燈滅。
(2) 利用+按鍵③或是-按鍵④來選擇 NO.5
(參照下表)。
(3) 按準備鍵①,使縫製 LED ②燈亮。
•標準縫製樣式
1. 縫製尺寸為擴大縮小率 100% 的尺寸。
2. 以標準樣式 NO. 縫製,當縫線位置如下圖
偏離
時,可使用縫線位置修正用樣式進行修
正。修正量為 0.4mm。
4.Method of changing sewing pattern NO.
(1)Press Ready switch① to let the sewing
switch② lights off.
(2)Use +switch③ or -switch④ to choose
NO.5(Reference table below).
(3)Press Ready switch① to let the sewing
switch LED② lights up.
•Stantard Sewing Pattern
1. Sewing size is to expand the size of the
reduction ratio of 100%.
2. Use standard pattern NO. to sew, as the
sewing
position deviate like below, use
sewing position correctional pattern to
correct. Correction size are 0.4mm.
② ① ③
④
⑤
縫線偏離位置在前側時
Sewing deviate position
forward side
縫線偏離位置在後側時
Sewing deviate position
backwaard side
A B
L
3
P10
Introduction
Page 20

5. 縫製尺寸的放大、縮小方法
(1) 按準備鍵①,使縫製 LED 燈②熄滅。
(2) 按選擇鍵③,使 X 放大縮小率燈④或是 Y
放大縮小率燈⑤點亮。
(3) 利用+鍵⑥或是-鍵⑦來設定放大縮小率
⑧。
(4) 按準備鍵①,使縫製 LED 燈②燈亮。
6. 單步操作的運轉
將機械一連貫動作的主要部份一時停止,確
認機械動作時機以及裝置位置。
(1) 將 AUTO / MANUAL 切換開關⑨調至
AUTO,單步操作切換開關⑩調至 ON。
(2) 按開關
「單次循環停止(黃)」→停止肩
帶被拉出。
(3) 按開關
「啟動(綠)」,進行接下來的動
作。之後按開關
「啟動(綠)」,進行動
作。
(4) 肩帶的縫製及排出結束後,動作完成。
「欲再次重複動作,重新返回 (2)」。
5. Method of sewing size magnify and minify
(1)Press Ready switch①to let sewing LED
lamp② lights off.
(2)Press Selection switch③ to let X scale
rate lamp④ or Y scale rate lamp light up.
(3)Use + switch⑥ or - switch⑦to set the
scale rate ⑧.
(4)Press Ready switch① to let sewing LED
lamp② lights up.
6. One shot operation
Let the main parts of the
machine which
the connecting action temporary stop, to
check the timing of the machine action and
position of the device.
(1)AUTO/MANUAL switch⑨turn to AUTO,
and ONE SHOT operation switch⑩turn ON.
(2)Press switch
「Single-cycle stop(yellow
)」→Stop the strap to be pull out.
(3)Press switch
「START(green)」, and
proceed to the next action. After, press the
switch
「START(green)」to proceed
action.
(4)After strap sewing end and strap out the
machine, the action finish.「Redo the same
action, back to (2)」.
②
①
⑥⑤④⑦
⑧
③
手動
MANUAL
自動
AUTO
電源
POWER
單動
ONE SHOT
斷線檢知
THREAD
DETECTOR
長度調整
TAPE FEED LENGTH
緊急停止
EMERGENCY STOP
開始
START
循環開始
CYCLE START
循環停止
CYCLE STOP
計數復歸
COUNT RESET
計數器/COUNT
⑩
⑨
①
P11
Page 21

7.MANUAL 操作
不更動裝置,只有縫紉機單動作。
(1) 縫紉機單獨運轉
a. 將 AUTO / MANUAL 切換開關①調至 \
MANUAL。
b. 將欲試縫的布料放入縫紉機壓板下,按
開關②「啟動(綠)」。
(2) 下線卷
在筒管中下線尚未準備時進行動作。
a. 將 AUTO / MANUAL 切換開關①調至
MANUAL。
b. 按準備鍵③,使縫制 LED 燈④熄滅。
c. 按選擇鍵⑤,選擇線圈⑥。
d. 按準備鍵③,使縫製 LED 燈④點亮。
e. 按下開關②「啟動(綠)」後下線圈開始動
作。(注意針棒此時也會動作,請先將上線
從針頭上拔除)
f. 再次按下「啟動(綠)」開關②後停止動作。
(緊急停止開關也可使其停止動作)
7.MANUAL operation
Do not move the device, only the sewing
machine single action.
(1)Sewing machine isolated operati
on
a.AUTO/MANUAL switch① turn to
MANUAL.
b.Put the sewing fabric under the presser
bar of sewing machine, press switch②「
START(green)」
(2)Lower thread reel
Proceed action while the reel of lower
thread unready.
a.AUTO/MANUAL switch① turn to MANUAL.
b.Press Ready switch③, to light off sewing
LED lamp④.
c.Press Selection switch⑤, choose the reel⑥.
d.Press Ready switch③, to light up sewing
LED lamp④.
e
. After press switch②「START(green)
」, reel of lower thread start action. (
Be careful the needle will be action, too.
Please pull out the upper thread from
needle first.)
f. Press 「START(green)」 switch② again
then stop action.(The Emergency stop
switch could stop the action, too.)
手動
MANUAL
自動
AUTO
電源
POWER
單動
ONE SHOT
斷線檢知
THREAD
DETECTOR
長度調整
TAPE FEED LENGTH
緊急停止
EMERGENCY STOP
開始
START
循環開始
CYCLE START
循環停止
CYCLE STOP
計數復歸
COUNT RESET
計數器/COUNT
①
②
③
⑥
⑤
④
P12
Introduction
Page 22

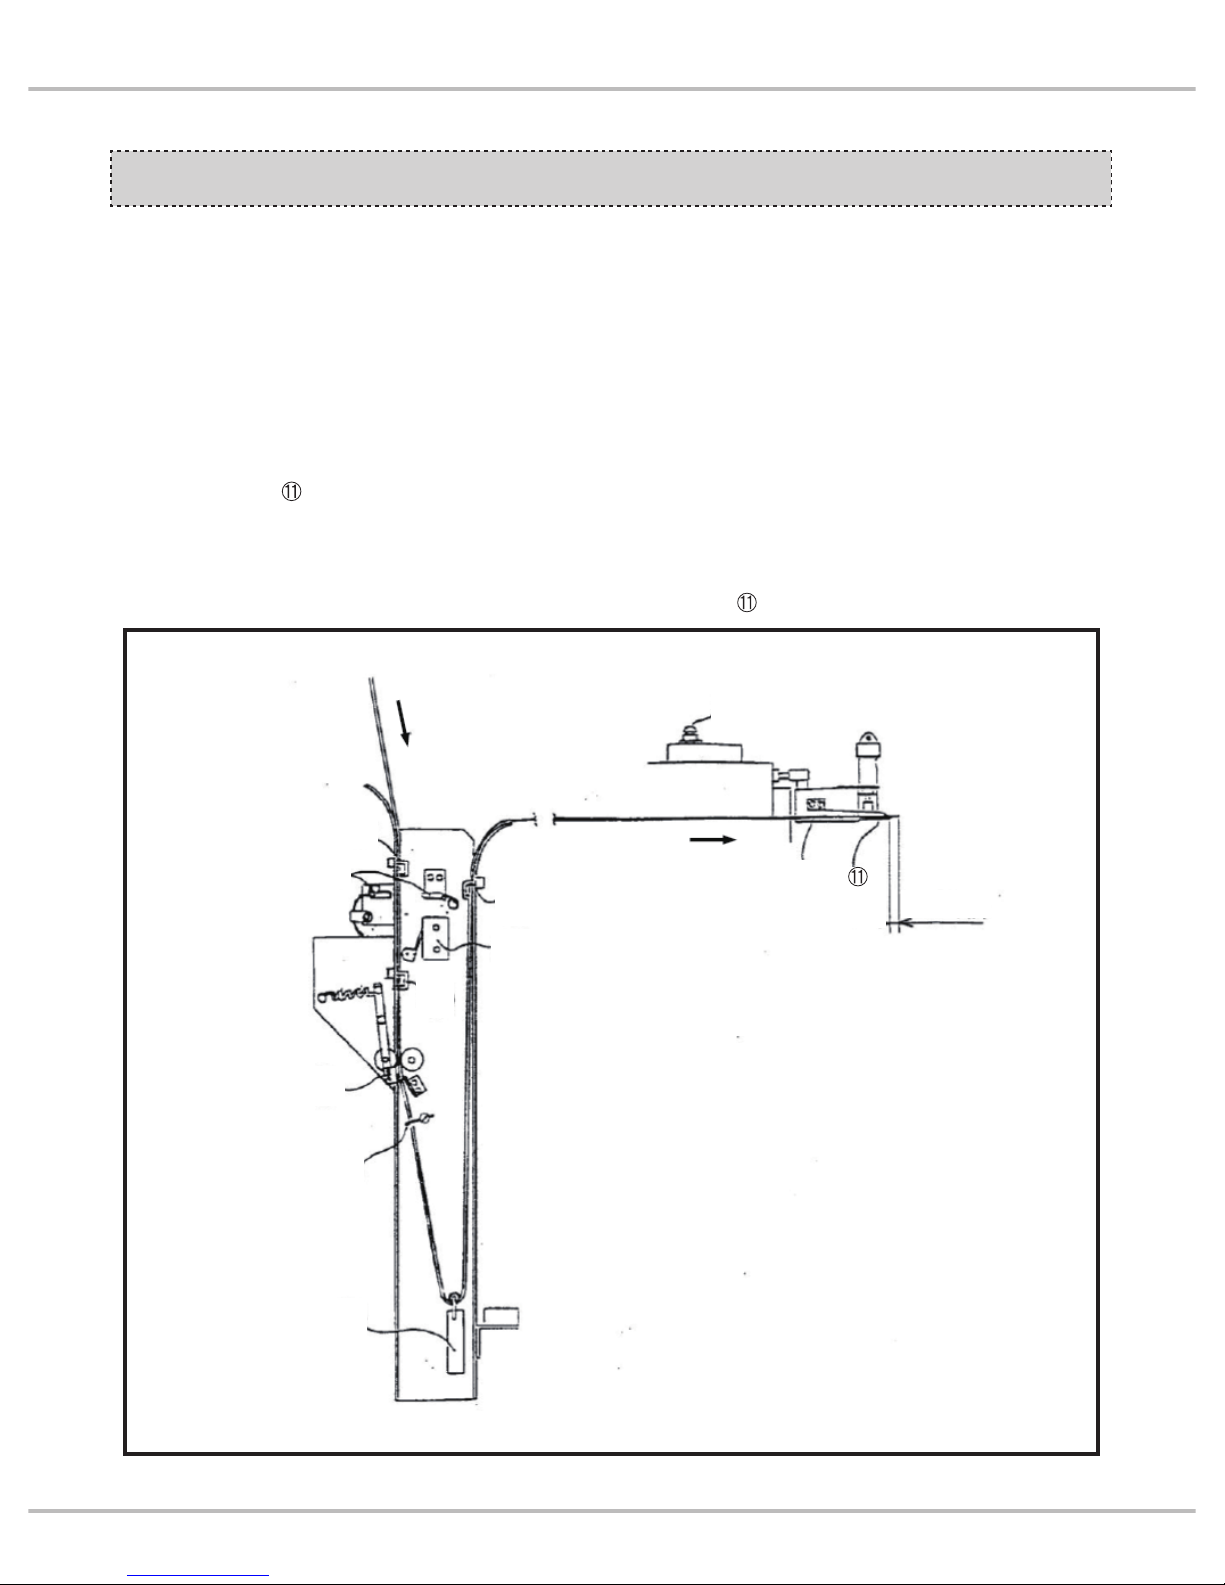
裝置的標準位置 PRECISE POSITION OF DEVICES
1. 切刀
⑴切刀的咬合為 0.5mm。
【調整】將螺絲①轉鬆調整。
⑵切刀壓板:尺寸 1 ~ 2mm。(如將 S 尺
寸調整至必要以上的大小,將會加快切刀
的消耗速度)
【調整】將螺絲
轉鬆調整。
⑶可動式切刀
降下時,將其就空隙與固定
刀具
的前端部份保持 K = 0.2 ~ 0.3mm
的距離。(如將 K 尺寸調整至必要以上的
大小,將會加快切刀的消耗速度)
【調整】將螺絲
轉鬆調整。
2. 八字扣的標準尺
當八字扣固定器②移動到縫紉機旁時,八
字扣固定器②與八字扣標準尺③的縫隙為
0.3mm。
【調整】將螺絲④轉鬆調整。
1.Trimmer
⑴The occlusion of the trimmer is 0.5mm.
【Adjustment】Loosen the screw① to
adjust.
⑵Trimmer presser bar:size1~2mm.(
If adjust the S size larger for necessity, it
would accelerate the consumption speed
of the trimmer.)
【Adjustment】Loosen the screw
to
adjust.
⑶Keep the distance K=0.2~0.3mm
between movable trimmer
and the
front end of the fixed trimmer
as the
movable trimmer
lower down.(If adjust
the k size larger for necessity, it would
accelerate the consumption speed of the
trimmer.)
【Adjustment】
Loosen the screw to
adjust.
2.Standard ruler of 8-shaped buckle
When 8-shaped buckle holder② move aside
to the sewing machine, the gap between
8-shaped buckle holder②and 8-shaped
buckle standard ruler③are 0.3mm.
【Adjustment】Loosen screw④ for
adjustment.
①
0.5mm
肩帶 Strap
K=0.2~0.3mm
S=1~2mm
④
③
②
0.3mm
P13
Page 23

3. 扣環供給底板及扣環供給端頭
⑴供給底板⑤的先端與八字扣固定器②之間
的縫隙為 0.5mm。
【調整】將螺絲⑥轉鬆,以調整螺絲⑦來
調整。
⑵從扣環供給端頭⑧到扣環供給底板⑤的先
端距離為 0.2mm。
【調整】將螺絲⑨轉鬆調整。
3.Buckle feeding bed and upper end
⑴The gap between the front end of feeding
bed⑤ and 8-shaped buckle holder② are
0.5mm.
【Adjustment】Loosen screw⑥ in order
to use screw ⑦to adjust.
⑵The distance between the buckle feeding
front end⑧ with buckle feeding bed front
end ⑤ are 0.2mm.
【Adjustme
nt】Loosen screw⑨ to adjust.
⑧
⑤
0.5mm
0.2mm
⑦
⑥
⑨
②
P14
Introduction
Page 24

4. 裝置台
當肩帶⑦放入縫紉機壓板⑧的下方時,針頭
⑨的中心與縫紉機壓板⑧的記號⑩,肩帶⑦
的中心線
成為一致狀態。
【調整】將螺絲
(3 處)轉鬆,並將裝置
台
以前後方向(箭頭 )移動進行調整。
【注】螺絲
為決定裝置台 位置的螺絲。
當裝置台
在縫紉機旁動作時,轉鬆自鎖螺
帽
,將螺絲 以逆時針方向轉動後進行動
作。欲前後調整裝置台
時,將螺絲 以順
時針方向轉動,用自鎖螺帽
固定其停止位
置。
4. Device bed
While putting strap ⑦ under the presser
bar⑧ of sewing machine, the marking of
the center of the needle end⑨ and the
presser bar ⑧ of sewing machine would
align with the center line
of strap⑦.
【Adjustment】Loosen screw
(three
of them), and move the device desk
backward and forward to adjust(Arrow
).
【
Note】Screw is the screw which
decide the position of the device desk
. When device desk has action
aside to sewing machine, loosen selflocking nut , and do action after turn the
screw counterclockwise. To adjust the
deice desk back and forward, turn the
screw clockwise, then use self-locking
nut to fix it on the position.
⑩
⑩
⑧ ⑧
⑨
⑦
P15
Page 25

①
②
( 一 ) 測量器的種類
⑴肩帶寬度變更時
①夾帶盒
②穿板
③導帶
⑵八字扣變更時
①八字扣保持器
⑶圓扣變更時
②圓扣保持器(組)
(一)Type of measurers
⑴Change the width of strap
①Strap-fixed device
②Strap thread plate
③Strap guide
⑵Change of 8-shaped buckles
①8-shaped buckle feeding stand
⑶Change the circled-buckle
②Circled-buckle feeding stand(set)
測量器的交換與調整
MEASURER'S CHANGING AND
ADJUSTMENT
①
②
③
7mm ASP-1254 ASP-1259 ASP-1264 ASP-1269 ASP-1274 ASP-1279
8mm ASP-1255 ASP-1260 ASP-1265 ASP-1270 ASP-1275 ASP-1279
10mm ASP-1133 ASP-1135 ASP-1096 ASP-1076 ASP-1199 ASP-1198
13mm ASP-1256 ASP-1261 ASP-1266 ASP-1271 ASP-1276 ASP-1280
16mm ASP-1257 ASP-1262 ASP-1267 ASP-1272 ASP-1277 ASP-1281
18mm ASP-1258 ASP-1263 ASP-1268 ASP-1273 ASP-1278 ASP-1281
參數值
Value
更換零件
P16
Introduction
Page 26

( 二 ) 測量器的交換與調整
1. 夾帶盒①與上彈簧板②的交換
⑴ 將螺絲③轉開,並將包括上彈簧板②的彈
簧板組④拆開。
⑵ 將螺絲⑤轉鬆,交換夾帶盒①這時,⑥與
⑦的部份為緊密狀態。
⑶ 上彈簧板②拆除更換,以螺絲③組裝固定
彈簧板組④。
⑷ 用手將夾帶盒①移動側最右側,確認夾
帶盒①的先端⑧是否通過了滾軸⑨中槽的
中心線。如果位置有偏差的話,其原因為
⑥、⑦部份中產生的間隙需修正。
(二)Measurer’s changing and adjustment
1.Change of strap-fixed device① and upper
spring plate②.
(1)Loosen screw③, and take apart the set
of spring plate④ including upper spring
plate②.
(2)Loosen screw⑤, parts ⑥ and ⑦ are
tightly close when change the strap-fixed
device①.
(3)Take apart the upper spring plate② and
use screw③to assemble and fix the set
of spring plate④.
(4)Use hands to move the strap-fixed
device① to the most right side, and
make sure the front end of the strap-fixed
device① has make through the center
line of the middle notch of the roller⑨.
If the position has deviation, the reason
would be the gap
between parts ⑥ and
⑦ which needs correction.
⑥
① ③
④
⑦
⑧
⑨
②
③
⑤ ①
P17
Page 27

2. 調整式八字扣固定器③、④的調整
⑴ 將 2 顆螺絲①與 2 顆螺絲②轉鬆。
⑵ 將八字扣放入調整式八字扣固定器③、④
中,以 2 顆螺絲①與 2 顆螺絲②暫時固定。
⑶ 用手移動帶夾帶盒⑤,將其先端移至八字
扣中心附近。
⑷ 將 2 顆螺絲⑥轉鬆,並把氣缸⑦往箭頭⑧
的方向移動,當從箭頭
的方向推入八字
扣時,讓夾帶盒⑤的先端從八字扣的正中
央通過。
⑸ 將 2 顆螺絲①與 2 顆螺絲②轉鬆,軸⑨
的中心線與八字扣固定器③、④之間保留
0.2mm 左右的空隙。
2.Adjustment of adjustable 8-shape feeding
holder ③,④
(1)Loosen two screws① and two screws②.
(2)Put 8-shaped buckles into adjustable
8-shaped buckle feeding stand③,④ and
use two screws① and two screws② to
fix it temporary.
(3)Move the strap-fixed device⑤with hands,
and moves its front end around the
8-shaped buckle center
.
⑷Loosen two screws⑥, and move the
cylinder⑦ toward arrow⑧ direction. When
push the 8-shaped buckle to the direction
as arrow
, let the front end of the strap-
fixed device⑤ make through the center of
8-shaped buckle.
⑸Loosen two screws① and two screws②,
align the the center line of shaft⑨ and
center line of 8-shaped buckle. Keep
around 0.2mm gap between 8-shaped
buckle holder③,④ .
⑤
③ ②
①
② ④
⑥
⑦ ⑧
③
⑨
④
⑩
相等
Equal
⑤
相等
Equal
P18
Introduction
Page 28

3. 扣環供給底板①的交換及調整
⑴將螺絲②轉開,交換扣環供給底板①。
⑵當扣環供給底板①移至最右邊時,溝③的
中心線④與八字扣固定器的中心線⑥保持
一致。
【調整】轉鬆自鎖螺帽⑦,以轉動氣壓缸
桿⑧來調整。
⑶當扣環供給底板①移動至最右邊時,扣環
供給底板①與八字扣固定器⑤之間的縫隙
為 0.5mm。
【調整】將螺絲⑨轉鬆,以轉動調整螺絲
⑩來調整。
⑷扣環供給端頭
出來時,使其先端比供給
底板②多 0.2mm。
【調整】轉鬆
來調整。
②
①
①
④
③
⑥
⑤
①
⑤
0.5mm
0.2mm
①
⑤
⑧
⑦
①
⑨
⑩
3. Change and adjustment of buckle feeding
bed①
(1)Loosen screw②, and change the buckle
feeding bed①.
(2)When the buckle feeding bed① move to
the right most, align the center line④ of
the notch③and center line⑥ of 8-shaped
buckle holder.
【Adjustment】Loosen self-locking nut⑦
in order to turn the cylinder shaft for
adjustment.
(3)When the buckle feeding bed① move to
the right most, the gap between buckle
feeding bed① and 8-shaped buckle
holder⑤ are 0.5mm.
【Adjustment】Loosen screw⑨ in order
to turn the adjustable screw⑩ for
adjustment.
(4)While the buckle feeding front end
out,
make it more 0.2mm than the feeding
bed②.
【Adjustment】Loosen
for adjustment.
P19
Page 29

4. 八字扣保持器①的交換
⑴將座板②與螺絲③轉開,交換八字扣保持
器①。
⑵八字扣保持器①與扣環供給底板④的縫隙
為 0.2mm。
【調整】以轉鬆螺絲③來調整。
⑶當扣環供給底板退後到最後側時,使八字
扣保持器①的底部⑤的內側面與扣環供給
底板④的溝⑥成一致。
【調整】以轉鬆螺絲③來調整。
5. 穿板⑦及導帶⑨的交換
⑴ 將 2 顆螺絲⑧轉開,交換穿板⑦。安裝時,
要使穿板⑦往箭頭
的方向均勻的進入八
字扣長孔
中。
⑵ 將 2 顆螺絲⑩轉開,交換導帶⑨。
4.Change of 8-shape buckle feeding stand①
(1)Loosen screw③ and bed② to change
8-shape buckle feeding stand①.
(2)The gap between 8-shape buckle feeding
stand① and buckle feeding bed④ are
0.2mm.
【Adjustment】Loosen screw③ for
adjustment.
(3)While buckle feeding bed back to the
most, make the bed inner side⑤ of the
8-shape buckle feeding stand① and the
notch⑥ of the buckle feeding
bed④ at
the same position.
【Adjustment】Loosen screw③ for
adjustment.
5.Change of strap thread plate⑦ and strap
guide⑨
(1)Loosen two screws⑧, and change strap
thread plate⑦. While installing, make
sure to let strap thread plate⑦ through
the 8-shaped buckle hole
toward arrow
direction even.
(2)Loosen two screws⑩to change the strap
guide⑨.
①
②
③
④
0.2
0.2
①
⑥
⑤
④
⑦
⑧
⑦
⑨
⑩
P20
Introduction
Page 30

6. 圓扣供給端頭 的交換
⑴ 轉鬆螺絲
,交換圓扣供給端頭 。轉開
螺絲時,將螺絲
轉鬆把圓扣供給端頭
從上方撥開。組裝時將圓扣供給端頭 由
上方插入,並以螺絲
固定于其停止位
置。
7. 圓扣保持器①的交換
⑴ 將螺絲②轉開,交換圓扣盒①。
⑵ 圓扣保持器①與圓扣投放盤③的縫隙為圓
扣厚度的+ 0.2mm。
【調整】以轉鬆螺絲④來調整。
6. Change of circled-buckle feeding upper
end
(1)Loosen screw , change circled-buckle
feeding upper end
. Loosen screw
, and push circled-buckle feeding upper
end
aside. Assemble circled-buckle
feeding upper end
from up, and fixed it
in the position by screw
.
7.Change of circled-buckle feeding stand①
(1)Loosen screw② and change the circled-
buckle feeding stand①.
(2)The gap between circled-buckle feeding
stand① and circled-buckle putting plate
are the circled-buckle thickness+0.2mm.
【Adjustment】Loosen screw④for
adjustment.
①
②
③
④
圓扣厚度 +0.2mm
Circled-buckle
thickness
+0.2mm
P21
Page 31

8. 八字扣標準尺⑤的調整
⑴ 當八字扣固定器⑥往縫紉機旁側移動時,
八字扣固定器⑥的先端與八字扣標準尺⑤
之間的縫隙為 0.3mm。
【調整】以轉鬆螺絲⑦來調整。
9. 反摺導帶的調整
⑴ 當肩帶①進入於縫紉機壓板②的下方時,
讓前擋板③與後擋板④的各自先端碰到肩
帶①的側面。
【調整】將前擋板③的螺絲⑤轉鬆,移動
量桿⑥進行調整。轉鬆螺絲⑦調整後擋板
④。
8.Adjustment of 8-shaped buckle standard
ruler⑤
(1)While 8-shaped buckle holder⑥ move
to the sewing machine side, the gap
between 8-shaped buckle holder⑥ front
end and 8-shaped buckle standard
ruler⑤ are 0.3mm.
【Adjustment】Loose
n screw⑦ for
adjustment.
9. Adjustment of counter-folded strap guide
(1)When strap① get under sewing machine
presser bar②, let each front end of
the front strap holder③ and rear strap
holder④ touch the side of strap①.
【Adjustment】Loosen t he screw⑤ of the
front strap holder③, move the shaft of
the front strap holder⑥ for adjustment.
Loosen screw⑦ to adjust rear strap
holder④.
⑦
⑤
⑥
0.3mm
④
②
②
①
③
⑥
⑤
P22
Introduction
Page 32

配線圖 WIRING PICTURE
配線圖 Wiring picture 1/2
P23
Page 33

配線圖 Wiring picture 2/2
P24
Introduction
Page 34

配管圖 PIPING PICTURE
Piping picture 1/4
P25
Page 35

Piping picture 2/4
P26
Introduction
Page 36

Piping picture 3/4
P27
Page 37

Piping picture 4/4
P28
Introduction
Page 38

不良現象,其原因以及解決方法
DEFECTIVE PHENOMENA'S
REASON AND SOLUTIONS
現象 Phenomenon 原因 Reasons 對策 Strategies
1. 切刀刀刃不良
1.
Blade of the trimmer
defective
a. 固定切刀的裝置不良 P13「1. 切刀」
的項目中,S 與 K 的尺寸過小
b. 切刀彈簧壓力不足
c. 刀刃耗損
a. Device which fixed trimmer
defective. P13 In item「1.Trimmer」,
size of S and K too small.
b. Pressure of trimmer’s spring not
enough.
c. Blade consumes.
a. 參照 P13 中「1. 切刀」的
S 項目,調整固定刀具,
將 K 的尺寸調整適當
b. 參照 P13 中「1. 切刀」的
b 項目,將刀具的束環調
整適當
c. 研磨切刀,或是更換新品
a. Refer to P13 item S
「1.Trimmer」, adjust the
fixed knife, adjust the size
of K properly.
b. Refer to P13 item b
「1.Trimmer」,adjust the
ring of knife properly.
c. Grind the trimmer or
replace the new one.
2. 斷線檢測不良
(1) 線沒被切斷機械卻停止 ( 控
制板表示燈燈亮 )
(2) 線斷了卻不停機 ( 操作面
板表示燈燈滅 )
2.Thread detector defective
(1)Machine stops without
cutting the thread. (Control
board indicator lamp lights
up. )
(2)Machine wouldn’t stop
even thread break.
(Control board indicat
or
lamp lights off.)
( 用手慢慢的轉動斷線檢測器中的編碼
器的皮帶輪,當基板一的確認燈 LD3
燈滅時 )
a. 線的穿線方法錯誤
b. 縫製時發生斷線
( 用手慢慢的轉動斷線檢測器中編
碼器的皮帶輪,當基板上的確認燈
LD3 燈滅時 )
c. 編碼器不良
( 縫紉機動作中,基板上的確認燈
LD4 燈滅時 )LK-1900A 的感線線斷
線 ( 參照 P23 配線圖 )
(Use hands to roll the belt roller of the
encoder in the thread device slowly
while the checking lamp LD3 of the
board 1 lights off.)
a. Wrong threading method.
b. Thread break while sewing.
(Use hands to roll the belt roller of
the encoder in the thread device
slowly while the checking lamp
LD3 of the board 1 lights off.)
c. Encoder defective.
(The checking lamp LD4 of the
board lights off while sewing
machine operating.)
Thread detector of LK-1900A
thread break. (Refer to P23 Wiring
picture.)
a. 參照 P3 「4. 穿線」
b. 調整縫紉機穿線
c. 交換編碼器
a. Refer to P3
「4.Threading」
b. Adjust the sewing
machine threading
c. Change the enco
der
斷線檢測確認燈
Thread break detect
checking lamp
針下信號確認燈
Under needle
checking lamp
控制基板 ( 主基板 )
Control Board
(Main Board)
P29
Page 39

現象 Phenomenon 原因 Reasons 對策 Strategies
3. 製品的不良
(1) 肩帶縫製不良
(2) 肩帶完成時長度脫落
(3) 帶端不能縫入
3. Product defective
(1) Strap sewing defective
(2) Strap falls off
(3) Strap can not sew
properly
(4) 縫合部份錯開
a. 向上錯開
(4)Stitched part stagger
a.Stagger up
b. 向下錯開
b. Stagger down
•導帶滾輪的壓力力道過強
•導帶滾輪的壓力力道過弱
•肩帶反摺部份長度不足
•導帶板位置錯開
•Feeding strap roller force
of pressure too strong.
•Feeding strap roller force
of pressure too
weak.
•Length of strap counter
folded part insufficient.
•Feeding strap plate
position different.
•壓力力道轉弱 ( 將螺絲往左轉,箭頭 A
方向 )
•壓力力道轉強 ( 將螺絲往右轉,箭頭
B 方向 )
•Make the force weak. (Left turn the
screw, arrow A direction.)
•Make the force strong. (Right turn the
screw, arrow B direction.)
•將肩帶反摺長度放長。
【調整】
1. 轉鬆螺絲①,將刀具調整沿②向著
使氣缸③行程減短 (a 尺寸增長 ) 方
向移動
2. 轉鬆螺絲④,將極限開關安裝板⑤,
向←方向移動。
3. 轉鬆輸帶滾筒調整沿停止螺絲⑥,
將刀具到夾帶盒夾子⑦前端設定為
3 ~ 5mm
•Lengthen the strap folded part.
【Adjustment】
1.Loosen screw ① adjust knife
toward direction ② to make
cylinder ③ stroke shorter (size a
longer.)
2.Loosen screw ④ , to let limited
switch install plate ⑤ move toward
← direction.
3.Loosen feeding strap roller and
adjust stop screw ⑥ , to make the
distance between knife and front
end of strap-fixed device clamp ⑦
3-5mm.
⑤
④
⑥
②
①
③
⑦
3~5mm
A
B
P30
Introduction
Page 40

現象 Phenomenon
原因 Reasons
對策 Strategies
4. 肩帶接縫檢測不良
(1) 到了肩帶接縫口不停
(2) 肩帶從肩帶接縫開關滾輪
上脫落
4. Strap seam detect
defective.
(1)Wouldn’t stop even till
the strap seam end.
(2)Strap fall off from strap
seam sensor roller.
•肩帶接縫檢測調整不良
•肩帶輸送引導針的調整不
良
•Strap seam detect adjust
defective.
•Strap feeding guide
needle adjust defective.
a. 導帶板往 A 的方向移動
b. 導帶板往 B 的方向移動
【調整】
將螺絲⑧轉鬆後進行
a.Feeding strap plate move toward A
direction.
b.Feeding strap plate move toward B
direction.
【Adjustment】
Proceed after loosen screw ⑧
•調整到接縫處,將肩帶接縫開關調至
ON,通過後調至 OFF。
【調整】
將螺絲①轉鬆後進行。
•Adjust to the seam part, turn ON
strap seam sensor, turn OFF after
getting through.
【Adjustment】
Proceed after loosen screw ① .
•將肩帶輸送引導針往箭頭方向移動,
使其和肩帶寬度對齊。
【調整】
將螺絲②、③轉鬆後進行。
•Move the strap feeding guide needle
toward arrow direction in order to
align with the strap’s width.
【Adjustment】Proceed after loosen
screw ②、③ .
①
A
B
⑧
肩帶寬度
肩帶接縫
開關滾輪
②
③
肩帶接縫
Strap seam
開關滾輪
switch roller
肩帶寬度
Width of strap
P31
Page 41

現象 Phenomenon 原因 Reasons 對策 Strategies
5. 按了啟動開關機械沒有開始
動作。( 停止燈燈亮 )
5. Machine without action after
turn ON. (Stop lamp lights
up.)
a. 八字扣、圓扣用完
b. 肩帶有接縫
c. 肩帶用完
d. 肩帶接縫開關在打開狀態
e. 肩帶確認燈燈亮 ( 當使用
薄肩帶的時侯 )
a. Run out of 8-shaped
buckle and circled-
buckle.
b. Strap has seam.
c. Run out of strap.
d. Strap seam sensor ON.
e. Strap checking lamp
lights up. (When use thin
strap.)
a. 補充八字扣、圓扣。( 不要忘記墜子 )
b. 去掉接縫。
c. 安裝上新的肩帶。
d. 參照「(4)肩帶接縫檢
測不良」的
解決方法。到燈滅為止感應器往→方
向移動。
【調整】
將螺絲①轉鬆進行
a. Supply 8-shaped buckle and
circled-buckle. (Don’t forget
counterweight.)
b. Take off seam.
c. Install new strap.
d. Refer「(4)Strap seam detect
defective」solution until lamp lights
off, the sensor move toward →
direction.
【Adjustment】
Proceed after loosen screw ① .
6. 八字扣被安裝至八字扣固定
器後機械沒有反應。( 燈滅 )
6. Machine didn’t react after
install 8-shaped buckle at
8-sha
ped buckle holder.
(Lights off)
•八字扣穿棒沿調整不良
•The shaft which push
8-shaped buckle adjust
defective.
•從燈亮處到沿邊調整到 1mm
【調整】
將螺絲②轉鬆後進行
•Adjust from the light about1mm.
【Adjustment】
Proceed after loosen screw ② .
電燈
燈亮位置
①
②
燈亮位置
Position of lights
電燈
Lamp
1mm
電燈 Lamp
P32
Introduction
Page 42

PARTS LIST
Series
Parts Group
Subclass Remark
Page
Date
1 2 3 4 5
E
D
B
C
A
ASP-1223
ASP-0159
M5x0.8x15L*2
EEC001201
ASP-0202*2
ASP-1231
ASP-0158
ASP-1232
AC323
SM510N
JA291*2
SM418N*2
KN43*2
KN42*4
LA43
SM504
ASP-1239
ASP-1238
ASP-1241
ASP-1242
ASP-1228
ASP-1230
SM418N*2
SM418N*2
SM418N*2
ASP-1226
ASP-1229
ASP-1236
ASP-1237
ASP-1224
AC073
JA291
BST100
2014/07/15
/
1 1
車頭組
P33
Page 43

PARTS LIST
Series
Parts Group
Subclass Remark
Page
Date
1 2 3 4 5
E
D
B
C
A
ASP-1011
ASP-1014
ASP-1018
ASP-1021
ASP-1008
ASP-1007
ASP-1012
ASP-1009
機體組
SM4052*8
ASP-1017
WM4001*14
SM418N*14
BA730*14
NM413*14
SM4052*4
ASP-1083
ASP-1215
ASP-1001
ASP-1010
ASP-1023
WM5000*2
SM5105N*2
ASP-1219*2
SM814N*8
EPT050001
SM4052*5
WM601*2
WM610*2
SM6104N*2
SM4052*4
SM4052*4
SM510N*4
NM413*4
ASP-1006
ASP-1005*2
ASP-1004
ASP-1002
WM810*4
SM812N*4
WM8000*4
SM4052
CP102
SM812N*2
WM810*2
WM8000*2
SM6204N
NM615
CP102
SM4052
ASP-1003
SM812N
SM6203N
SM4052*4
SM814N*4
WM8000*5
WM810
NM615
ASP-1013
WM601*2
WM610*2
SM614N*3
NM615
ASP-1029
PM404
SM5104N*3
ASP-1026
ASP-1024
SM812N*2
WM8000*2
WM810*2
SM5104N*2
ASP-1028
SM812N*2
ASP-1025
SM319N*4
SM412N*2
ASP-1027
ESH001101*2
ASP-1216*2
ASP-1220*2
電磁閥聯座
BST100
2014/07/15
/
1 1
P34
Page 44

ASP-1078
ASP-1075
EM030*2
ASP-1069
ASP-1073
ASP-1072
ASP-1071
ASP-1068
ASP-1074
ASP-1061
ASP-1065
ASP-1058
ASP-1060
ASP-1089
AC062
ASP-1067
ASP-1057
ASP-1062
ASP-1079
ASP-1059
ASP-1063
ASP-1077
ASP-1076
SM418N*2
ASP-1070
AC063
SM411N*2
PM306
SM411N*2
ASP-1064
SM411N*2
M4x0.7x25L*2
ASP-1214
SM611N*2
WM8000*2
SM814N*2
SM6104N*2
WM601*2
EM050
SM611N*2
EM040
SM4106N*2
SM411N*8
SM454*2
SM412N
M2.5x0.45x15L*2
ESH001101
SM6104N*2
WM601*2
SM331*2
SM619N*2
WM601*2
SM412N*2
WM411*2
CP102
SM4052
JA0401*2
JA0401*2
SM510N
ASP-1217
ASP-1240*2
2014/07/15
/3 12
8字扣組
BST100
P35
Page 45

PARTS LIST
Series
Parts Group
Subclass Remark
Page
Date
1 2 3 4 5
E
D
B
C
A
ASP-1128
ASP-1118
ASP-1116
ASP-1112
ASP-1113
ASP-1114
ASP-1111
ASP-1115
ASP-1109
ASP-1110
ASP-1119
ASP-1120
AC064
ASP-1121
ASP-1070
ASP-1123
ASP-1124
ASP-1125
ASP-1117
AC067
ASP-1127
ASP-1126
SM602
SM412N
SM411N
SM454*2
SM812N*2
WM810*2
WM8000*2
SM418N*2
EM030
WM411*2
SM411N*2
SM411N
EM040
EM040
SM614N*2
WM601*2
WM610*2
EM030
SM411N
SM410N
SM516N*2
SM4107N*2
JA291*2
JA291*2
BST100
2014/07/15
/
1 1
切刀組
P36
Page 46

PARTS LIST
Series
Parts Group
Subclass Remark
Page
Date
1 2 3 4 5
E
D
B
C
A
SM418N*2
SM516N*2
ASP-1097
ASP-1099
ASP-1101
ASP-1098
ASP-1108
ASP-1100
ASP-1091
ASP-1084
ASP-1086
ASP-1103
ASP-1102
AC060
ASP-1106
ASP-1087
ASP-1088
SM510N*4
SM319N*2
ESH001101
SM4052
CP102
SM5104N
PM306
SM510N*2
WM8000*2
WM810*2
SM812N*2
SM331*4
PM113
SM310N*3
SM410N*2
ASP-1096
ASP-1092
ASP-1094
ASP-1093
ASP-1095
SM4052*2
AC072
ASP-1090
SM515N*2
SM418N*2
ASP-1216
ASP-1104
SM410N
M2.5x0.45x15L*2
WM510*2
WM5000*2
SM5104N*2
ASP-1089
EM050
SM331
ASP-1107
ASP-1105
SM4052
CP102
ESH001101
ASP-1085
JA113*2
JA251*2
ASP-1218
JA291*3
ASP-1221
EM050*2
WM306
BST100
2014/07/15
/
1 1
送帶穿扣組
P37
Page 47

PARTS LIST
Series
Parts Group
Subclass Remark
Page
Date
1 2 3 4 5
E
D
B
C
A
AC066*2
ASP-1131
ASP-1130
ASP-1132
ASP-1134
ASP-1135
ASP-1133
ASP-1129
SM418N*4
SM410N*2
WM4001*2
穿線組
SM5105N*2
JA291*4
BST100
2014/07/15
/
1 1
P38
Page 48

PARTS LIST
Series
Parts Group
Subclass Remark
Page
Date
1 2 3 4 5
E
D
B
C
A
ASP-1198
ASP-1195
ASP-1197
ASP-1201 ASP-1194
ASP-1200
ASP-1188
ASP-1211
ASP-1193
ASP-1192
AC070
ASP-1189
ASP-1191
AC070
ASP-1190
ASP-1186
ASP-1184
ASP-1185
ASP-1202
ASP-1187
AC071
ASP-1204
ASP-1205
ASP-1206
ASP-1203
SM618
BR1052*2
ASP-1207
ASP-1208
WM604
ASP-1210
SM310N*2
SM5105N*2
BF886JK
WM601*2
SM6104N*2
WM601*2
SM611N*2
SM418N*2
ASP-1078
ASP-1199
WM4001*2
SM412N*2
SM418N*2
SM5106N
SM5105N*2
ASP-1196
SM411N*2
WM402*2
SM418N*2
SM410N*2
SM311N*2
SM412N*2
SM6104N*2
WM601*2
WM8000*3
WM5000*3
SM5105N*3
SM501*2
NM514
SM5104N*2
SM410N*2
JA291
JA291*2
JA291
JA0401
NM615
BST100
2014/07/15
/
1 1
送扣退帶組
P39
Page 49

PARTS LIST
Series
Parts Group
Subclass Remark
Page
Date
1 2 3 4 5
E
D
B
C
A
ASP-1033
ASP-1030
送料組
LF289-E
ASP-1032
BF331
ASP-1031*2
SM6104N*2
WM610*2
WM601*2
SM516N*3
SM4052
CP102
SM4110N*4
WM402*4
EMT014002
EMT010001
EMT010001
EMT014001
SM4110N*4
CP102
SM4052
ASP-1055
SM5107N
BR1050*2
ASP-1039
ASP-1040
SM410N*2
ASP-1042
ASP-1038
SM318N*2
ESE000501
SM4052
CP102
SM418N*4
ASP-1053
ASP-1054
SM410N
ASP-1051
ASP-1050
SM3102N*2
WM306*2
ESH000301
ASP-1047
ASP-0128
SM2050*2
ESE000601
BF331*3
ASP-1045*3
SM418N*2
ASP-1043
ASP-1034
SM602
SM418N*2
SM2050*2
ESE000601
ASP-1036
SM313N*2
SM418N*2
ASP-1046
SM616N*2
SM616N*2
ASP-1037
ASP-1035
SM510N*2
ASP-1044
SM602
SM4052
CP102
ASP-1041
ASP-1049
ASP-1048
ASP-1052*2
ASP-1056
WM402*4
BST100
2014/07/15
/
1 1
P40
Page 50

PARTS LIST
Series
Parts Group
Subclass Remark
Page
Date
1 2 3 4 5
E
D
B
C
A
ASP-1141
ASP-1066
ASP-1122
ASP-1145
ASP-1137ASP-1139
ASP-1136
ASP-1140
AC068
ASP-1142
ASP-1121
ASP-1143
ASP-1138
ASP-1144
SM418N*2
SM418N*2
SM4108N*2
SM504*2
EM030
SM410N*2
SM4106N
WM4001
SM410N*2
SM411N
ASP-1222
EM030
SM410N
EM030
JA291*2
BST100
2014/07/15
/
1 1
送圓扣組
P41
Page 51

PARTS LIST
Series
Parts Group
Subclass Remark
Page
Date
1 2 3 4 5
E
D
B
C
A
ASP-1168
ASP-1164
ASP-1163
ASP-1148
AC064
ASP-1162
ASP-1165
ASP-1176
ASP-1173
ASP-1153
ASP-1150*2
ASP-1151
ASP-1152
ASP-1149
ASP-1154
ASP-1167
ASP-1169
ASP-1067
ASP-1089
SM410N
ASP-1174
ASP-1178
AC069
ASP-1177
AC061
ASP-1170
SM5105N*2
ASP-1147
ASP-1160
ASP-1159
ASP-1157
ASP-1158
ASP-1156
ASP-1146
ASP-1155
ASP-1172
AC603
SM412N*4
EM190
SM418N*2
SM412N*2
SM411N
EM030
EM050
EM040
SM410N*2
SM410N
SM319N*2
ESH001101
SM6104N*2
SM410N*2
ASP-1172
ASP-1216
ASP-1161*2
SM313N*4
BR3220*2
PM306
SM602*4
SM501
SM411N*4
SM520*3
SM411N*2
SM410N
SM410N*2
SM4052
CP102
VX-012-1A3
SM319N*2
ASP-1216
SM410N*2
ASP-1166
SM408*2
ASP-1175
SM418N*2
JA0401
JA291
JA0401
JA291*2
JA0401*2
SM411N
SM335*2
AC058
ESH001101
BST100
2014/07/15
/
1 1
送縫組
P42
Page 52

PARTS LIST
Series
Parts Group
Subclass Remark
Page
Date
1 2 3 4 5
E
D
B
C
A
ASP-1182
ASP-1183
AC065
ASP-1180
ASP-1181
AC602
NM413
SM412N*2
SM4106N*2
SM411N
CP102
SM4052
JA0404*2
JA0401
JA291
BST100
2014/07/15
/
1 1
退料組
P43
Page 53

PARTS LIST
Series
Parts Group
Subclass Remark
Page
Date
1 2 3 4 5
E
D
B
C
A
切刀組
送縫組
JUKI機體
穿線組
送扣退帶組
退料組
ASP-1213
送圓扣組
送料組
BST100
SM4106N*2
WM601*5
WM610*5
SM614N
WM601*2
WM610*2
SM619N*2
WM8000*2
WM810*2
SM812N*2
SM614N*2
WM610*2
WM601*2
WM8000*2
WM810*2
SM812N*2
機體組
SM619N*2
WM610*2
WM601*2
ASP-1171*2
SM5106N*4
SM812N*2
WM810*2
WM8000*2
SM812N*2
WM810*2
WM8000*2
SM4108N*4
ASP-1082*2
SM4106N*2
ASP-1212
ASP-1080
ASP-1081
8字扣組
ASP-1019
SM4106N*2
ASP-1020
WM8000*2
WM810*2
SM812N*2
送帶穿扣組
ASP-1227*2
WM8000*2
ASP-1243*2
ASP-1227*2
ASP-1252
ASP-1016*2
ASP-1015*2
SM553N*4
SM614N*8
NM610*8
WM809*2
WM601*2
SM619N
ASP-1251
BST100
2014/07/15
/
1 1
P44
Page 54

P45
Page 55

Page 56

由於對產品的改良及更新 , 本產品使用說明書中與零件圖之產品及外觀的修改恕不事先通知 !
The specification and/or the equipment described in the instruction book are subject to
change because of modification with out previous notice
ASP-BST100.JUN.2015
 Loading...