

Page 1
ASL-JBH200C
使用說明書與零件圖
ORIGINAL INSTRUCTIONS BOOK & PARTS LIST
Page 2

Page 3

重要安全聲明
SAFETY INSTRUCTIONS
•
Thank you for purchasing our company’s
products.
For your safety and using our product ASLJBH100 properly, please read the instructions
below deliberately, then start operating the
machine.
1.Before using the machine, you must follow
the instructions and rules.
2.The operators must been well trained.
3.If you found some abnormal phenomena
or the machine malfunction, you should
stop using the machine at the moment and
cut the power off, in order to do the proper
repair.
4.Strictly forbid to do the extra transformation
or alteration. We do not have the warranty
to the machine which had been transformed
or altered. Therefore, our company will be
irresponsible for any compensation if the
machine has caused any danger.
•
Hazards
In order to prevent from the electric shock, you
must to obey the safety measure below.
1. While install the machine, make sure you
have do the grounding.
2. The electric routine inspection and
maintenance of the machine have to be
done by the electric technical personnel who
qualied or under the expert’s supervision.
•
Alert
You must to obey the safety measure below,
in order to prevent from the electric shock, fire
accident, burning loss, or human body injured.
1. Absolute forbid workers to touch the
machine
’s
parts while the machine is in a
voltage state.
2. If the machine
’s
parts need to be changed
or do the maintenance, you should switch
the power off.
•
感謝客戶您購買本公司產品
為安全且
正確地使用本產品 ASL-JBH100,請
詳細閱讀以下注意事項後再實施操作。
1. 在使用本機器前,請先詳讀說明書內容,必
須遵守說明書的指示與規定。
2. 此設備的使用,由經過適當訓練的操作人員
實行。
3. 在使用本機器時,若發現異常或故障,應立
即停止使用,並切除電源,以進行妥善修理。
4. 嚴格禁止對本機器進行改造和變更。本公司
對改造或變更過的機器不予保固,若因此造
成危害,本公司將不負任何賠償責任。
•
危險
為杜絕觸電事故必須遵守以下安全措施。
1. 安裝本機器時,必須確實做好接地動作。
2. 對本機器的電氣做定檢與維修,都必須由具
有資格的電氣技術人員執行,或專家的監督
指導下進行。
•
警告
為了杜絕觸電、火災、燒損或對人的傷害,必
須遵守以下安全措施。
1. 本機器在有電壓的狀態下,絕對禁止人員接
觸通電之機件。
2. 本機器若需要做零件更換或進行維修時,應
將電源切換至 OFF 狀態。
i
Introduction
Page 4

3. 當本機器不能正確工作時,應立即停止操作
機器。該機器有必要進行修理、電氣或機器
方面的調整時,需要和本公司的代理商或直
接與本公司聯繫商談,採取合適的解決措
施。
4. 本機器的的維修、調整須經由適當訓練的技
術員或專業人員進行。維修時,需使用本公
司所指定的更換零件。
5. 一般的保修檢查,要由經過適當訓練的人來
進行。
6. 在維修或保養各式氣缸或氣壓相關連動機構
時,務必將供應氣源的接頭拔下,在氣壓完
全切斷的狀態方可進行。不過,只限於受過
適當訓練的技術人員或專業人員進行調整和
運行確認時例外。
7. 該機器準備啟動前,所有的保護蓋必須安裝
定位至機器上。
8. 本機器的內部裝置和控制箱裡不能殘積金屬
粉末和灰塵,要定期打掃。
9. 本機器在運行當中,所有可動部分都絕對不
可用手觸碰,或身體(包括頭髮、衣服類)
靠近。
3. While the machine cannot operate properly,
you should
stop operating it immediately. If
the machine has the necessity to repair, or
do the electric and machine adjustment, you
should contact with our factors, or contact
us directly, then take the proper resolution.
4.The machine’s maintenance and adjustment
need to be done by well- trained technician
or professional. You need to use the specific
parts from our company while under
maintenance.
5. The
repair within the warranty need to be
repair by the worker who well trained.
6. While doing the repair or maintain variety
of cylinders and pneumatic actuator
associated, you must unplug the supply air
source connector before you do the repair
and maintenance. However, it could be
only done by the well- trained technician or
professional.
7. Before ready to start the machine, all of the
protective
covers need to be on the position
of the machine.
8. The inner device and the control box of the
machine need to be regularly cleaned, in
case of any dust or metal filings remains in
the machine.
9. While operating the machine, do not use
your hands to touch or let your body to close
(including hair or clothes) all of the movable
parts.
10.Do not use the wet hands to operate the
machine, it mig
ht cause electric shock or
other major injured.
11.Please be sure to follow the alert pictorial
markings by next page.
10. 絕對不可用濕手操作,可能造成觸電等重大
傷害發生。
11. 警告提示如次頁圖案,請務必遵守。
ii
Page 5
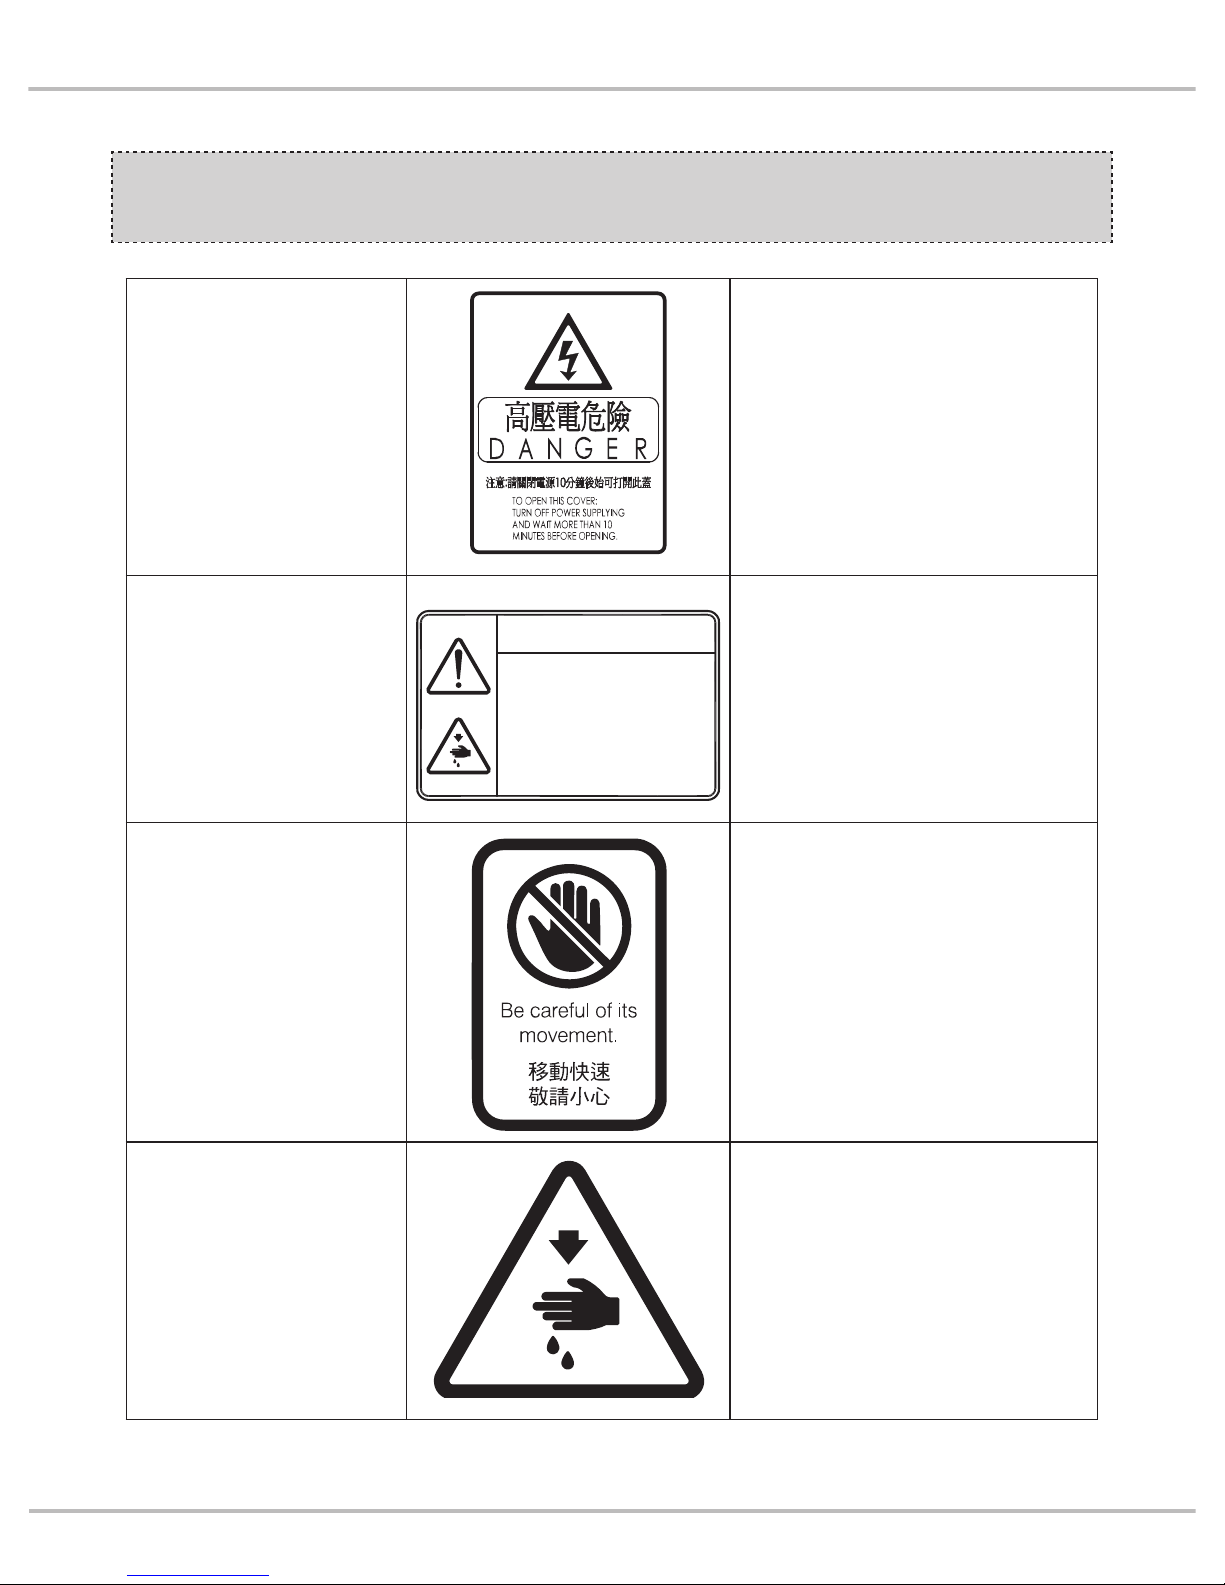
警告圖案表示
INDICATED THE ALERT
PICTORIAL MARKINGS
高壓部位
HIGH-VOLTAGE POSITION
務必關閉電源 10 分鐘後始打開電控
箱蓋子
Be sure to turn off the power and wait
till 10 minutes before opening the
control box’s cover.
高速運動部位
HIGH-SPEED MOTION
POSITION
謹防工傷事故
In case of industrial accident
高速運動部位
HIGH-SPEED MOTION
POSITION
謹防工傷事故
In case of industrial accident
高速運動部位
HIGH-SPEED MOTION
POSITION
謹防工傷事故
In case of industrial accident
CAUTION
機械作動部份請注意裝上
保護裝置
穿線、換線、 調整、清潔
時請注意關閉電源.
Moving parts may cause in jury.
Operate with safety devices.
Turn off main switch before
threading, changing bobbin and
needle, cleaning etc.
iii
Introduction
Page 6

安全注意事項
SAFETY INSTRUCTIONS
電源開關 (Main SW)
Power switch (Main SW)
1. 在機器運行過程中,請勿進入動作區域內。
2. 定期檢查時,打開蓋子後,應務必將電源開
關設置為 OFF。
1. Do not put a finger or any other object
in the area where there are moving parts
while the machine is working.
2. Be sure to turn off the power switch when
the cover is removed for an inspection.
動作區域
Area with moving parts
iv
Page 7
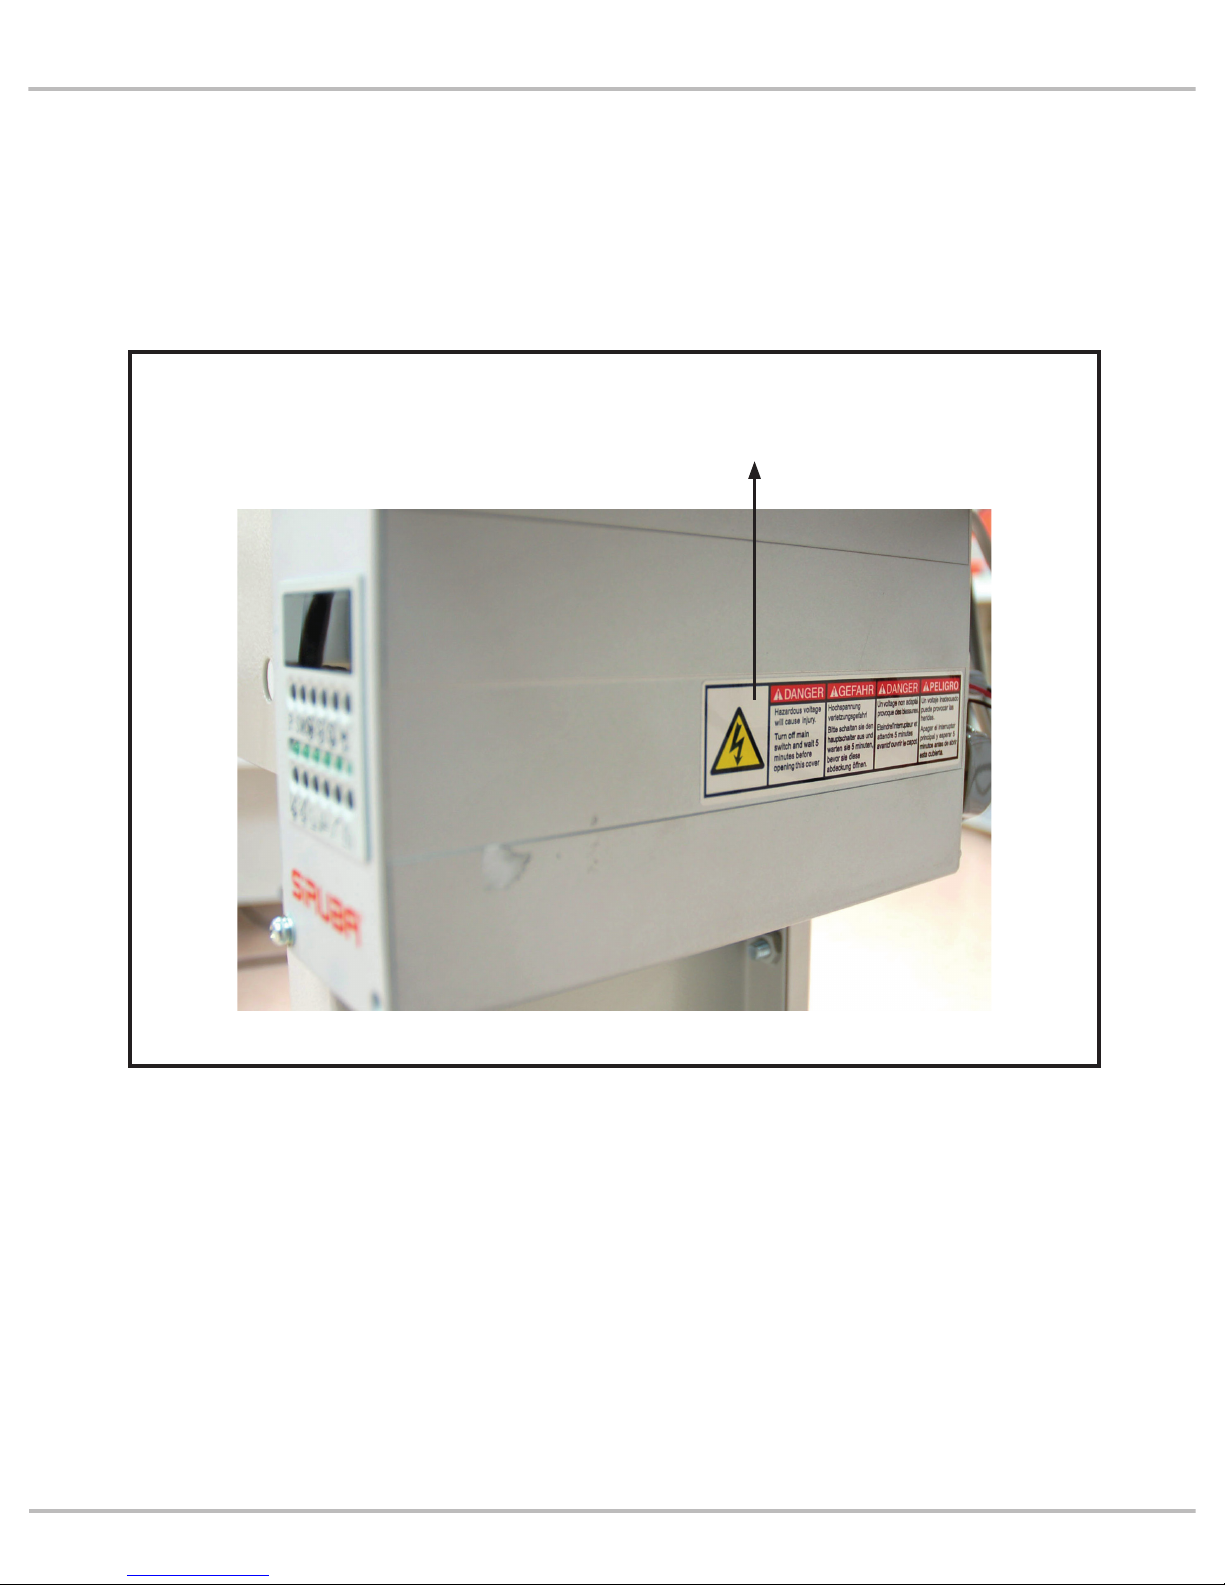
3. 在有對人體有危害的高壓電極的地方都貼了
危險警告的標籤。 在對貼著此標籤的控制部
進行保養、定期檢查時,應由專門的電氣技
術人員操作。
4. 在機器運行中,需要突然中止運行的情況
時,按緊急停止鍵中止機器。
5. 安全起見,未插電源的地線的情況下,請勿
運行機器。
6. 有雷電的天氣。安全起見,請拔出電源插頭。
7. 離開機器操作區時、作業完成後等,請務必
將關閉電源。
8. 在需要打開蓋子類的部件處於未合蓋子的狀
態下請勿運行機器。
3. An electric shock warning label is affixed
where there is high-voltage electric terminal
which is dangerous to the human body.
Nobody except a special electrician should
open the cover to inspe
ct a control box with
a warning label.
4. If there’s a necessity to stop the machine
right away while machine operating, you
could press the urgent machine halt switch
to switch the power off.
5. For safety do not operate the machine when
it is not earthed.
6. When there is lightning, stop the machine
and pull out the plug for safety.
7. Turn off the power switch when you are not
near the machine or a
fter the operation is
finished.
8. Do not operate the machine with the covers
off.
觸電危險警告標籤
Electric shock warning label
v
Introduction
Page 8

索引
INDEX
頁 /PAGE
規格 SPECIFICATION 1
安裝 INSTALLATION 2
運行準備 PREPARATION 3
操作開關 OPERATIONAL SWITCHES 4
褲邊的設置方法 METHOD OF SETTING BOTTOM CLOTH 7
褲邊張力的調整 ADJUSTING BOTTOM CLOTH TENSION 7
褲邊寬度變化零件的調整 ADJUSTING PARTS ACCORDING TO BOTTOM CLOTH WIDTH 8
三層卷邊器的調整 THE ADJUSTMENT OF HEMMER 10
接頭檢測的調整 THE ADJUSTMENT OF SPLICING DETECTOR 11
根據三層卷邊零件的調整 ADJUSTING PARTS ACCORDING TO HEM WIDTH 12
縫紉針距的更改 CHANGE OF STITCH LENGTH 13
上送布滾輪的標準高度 THE STANDARD H
EIGHT OF UPPER FEED ROLLER 14
模式調整 MODE DEPICTION 16
從反面縫切換至正面縫的方法
HOW TO CHANGE THE PARTS TO SEW FACE-UP FROM
BUTTON-UP SEWING
17
調整方法 ADJUSTMENT METHOD 21
下擺布料組裝方法 HOW TO SET FABRICS 22
不良問題的原因和對策 STRATEGIES & CAUSES FOR MALFUNCTION 25
零件圖 PARTS LIST 26
vi
Page 9
型 號
Model
ASL-JBH200C
縫紉機機頭
Machine Head
63900CS
使用針型
Needle Type
DV×57 #18
縫製速度
Sewing Speed
最高 2500 SPM(根據腳踏板的踩踏程度可變)
Max. 2500 SPM(Variable according to the paddle operation)
電 源
Voltage
單相 AC200~240V 50/60Hz
Single Phase AC200~240V 50/60Hz
氣 壓
Air Pressure
0.5 Mpa
機器尺寸
Dimensions
寬 750× 深 700× 高 1300mm(安裝線軸架後 1700mm)
(W)750×(D)700×(H)1300mm
(After thread stand installation, the height is 1700mm)
縫紉針距
Stitch Lengt
h
2.3mm(根據齒輪可更改為 3.6mm)
選項 2.1mm、2.5mm、4.2mm、2.8mm、3.2mm
2.3mm(3.6 mm is also available by changing gear)
Option 2.1mm、2.5mm、4.2mm、2.8mm、3.2mm
下擺內裡尺寸
Trousers Bottom Size
280 ~ 600mm(下擺寬 140 ~ 300mm)
280 ~ 600mm(Bottom circumference 140 ~ 300mm)
三層卷邊寬度
Hem Width
12.7 ~ 30 mm
縫紉開始
Sewing Start Position
根據接頭檢測器自動決定位置 ( 可依使用者需求設定 )
Sensor controll by positioning detector (Capable of setting according to user´s
requirement)
縫紉
結束
Sewing End
根據接頭檢測器做動結束後計算針數 ( 可依使用者需求設定 )
After triggering sensor, system will keep sewing delay stitch number (Capable
of setting according to user´s requirement)
規格 SPECIFICATION
三層卷邊寬度
Hem Width
2
P1
Introduction
Page 10
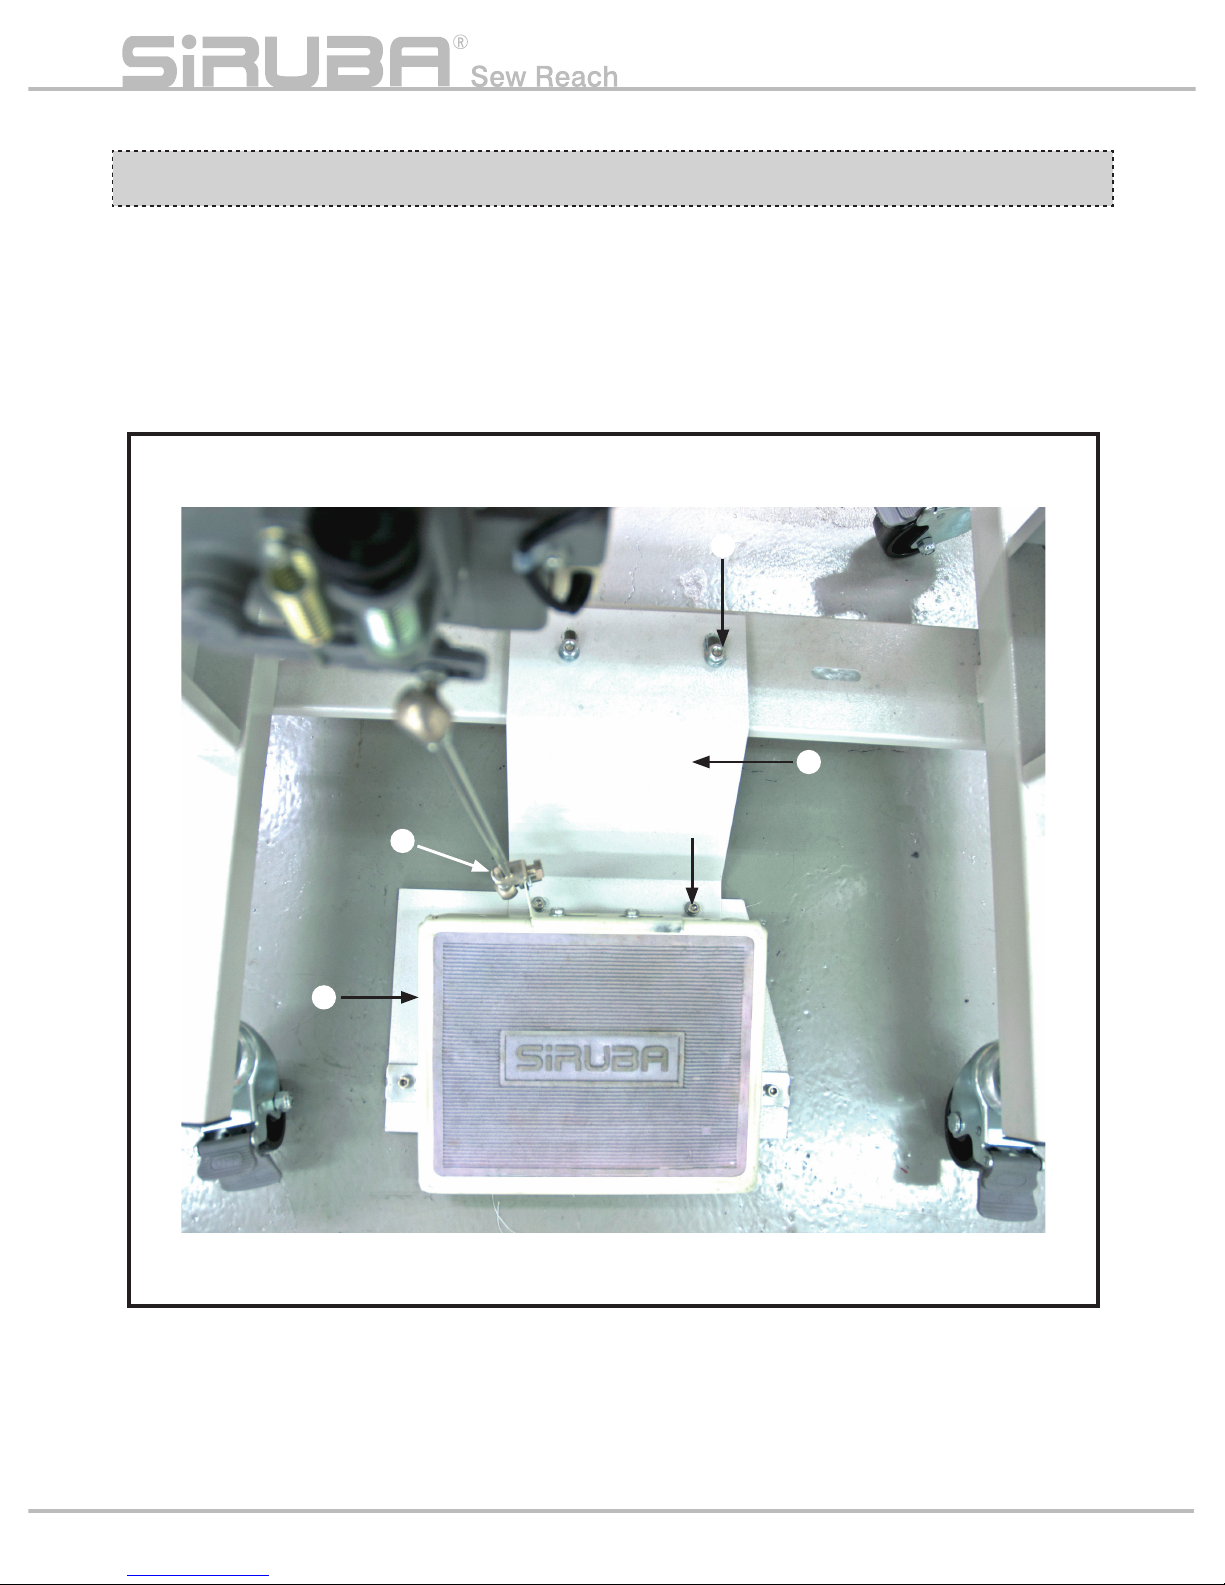
安裝 INSTALLATION
•安裝腳踏板:
(1) 將腳踏板底座①安裝至連接板②上。
(螺絲③)
(2) 將連接板②安裝至桌子橫桿上。(螺絲④)
(3) 安裝聯動棒⑤。
•Install treadle:
(1) Install the treadle base ② to the connector
plate ① .(screw ③)
(2) Install connector ② to the cross bar
between the machine legs.(screw ④)
(3) Attach the connecting rod ⑤ to the treadle.
P2
⑤
④
③
①
②
Page 11
運行準備 PREPARATION
1. 電源電壓:
(1) 應在定壓電壓的 ±10% 下使用。
(2) 地線必須接地。
2. 空氣壓:
(1) 在 0.5Mpa 的空氣壓下使用。
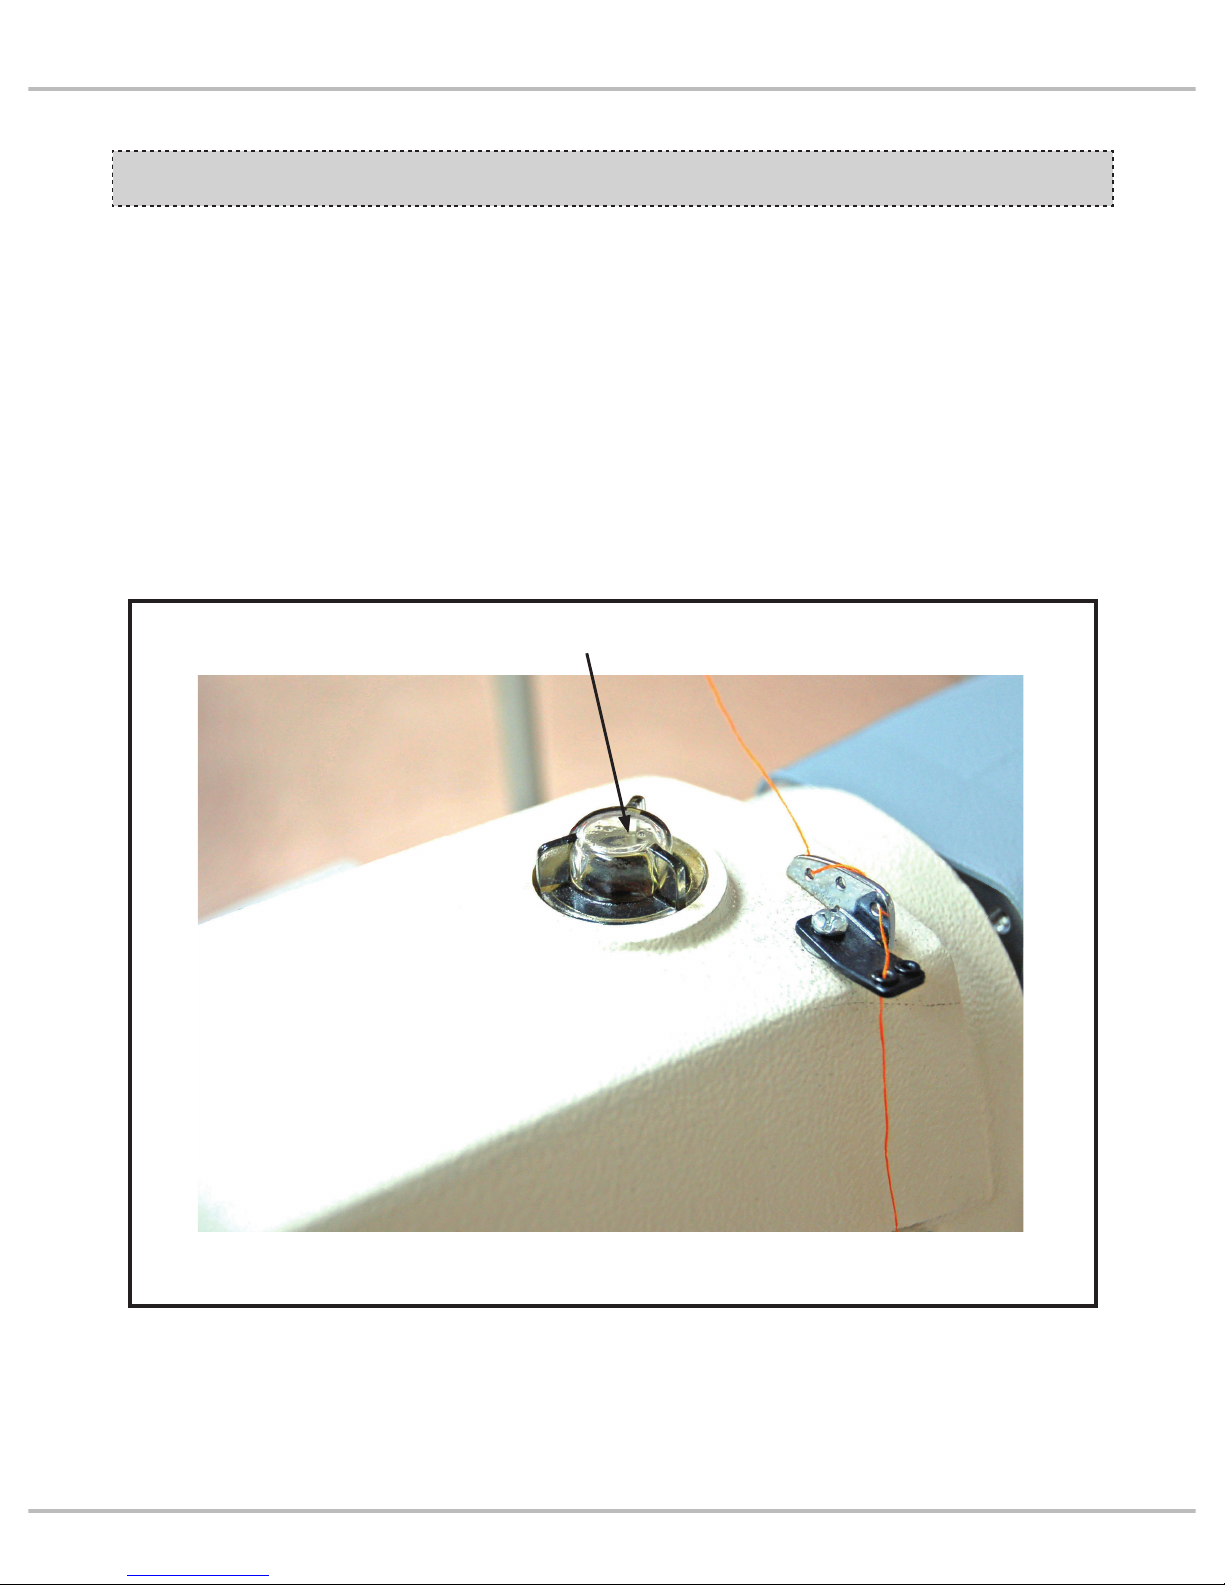
3. 給油:
(1) 按照 63900CS 使用說明書給縫紉機機頭上
臂①給油。
1.Voltage:
(1) Operate ±10% of the rated voltage.
(2) Be sure to connect the earth wire being
grounding.
2. Air Pressure:
(1) Set to 0.5 MPa
3. Lubrication:
(1) Lubricate the sewing machine upper arm
① according to the instruction manual for
63900CS.
①
P3
Introduction
Page 12
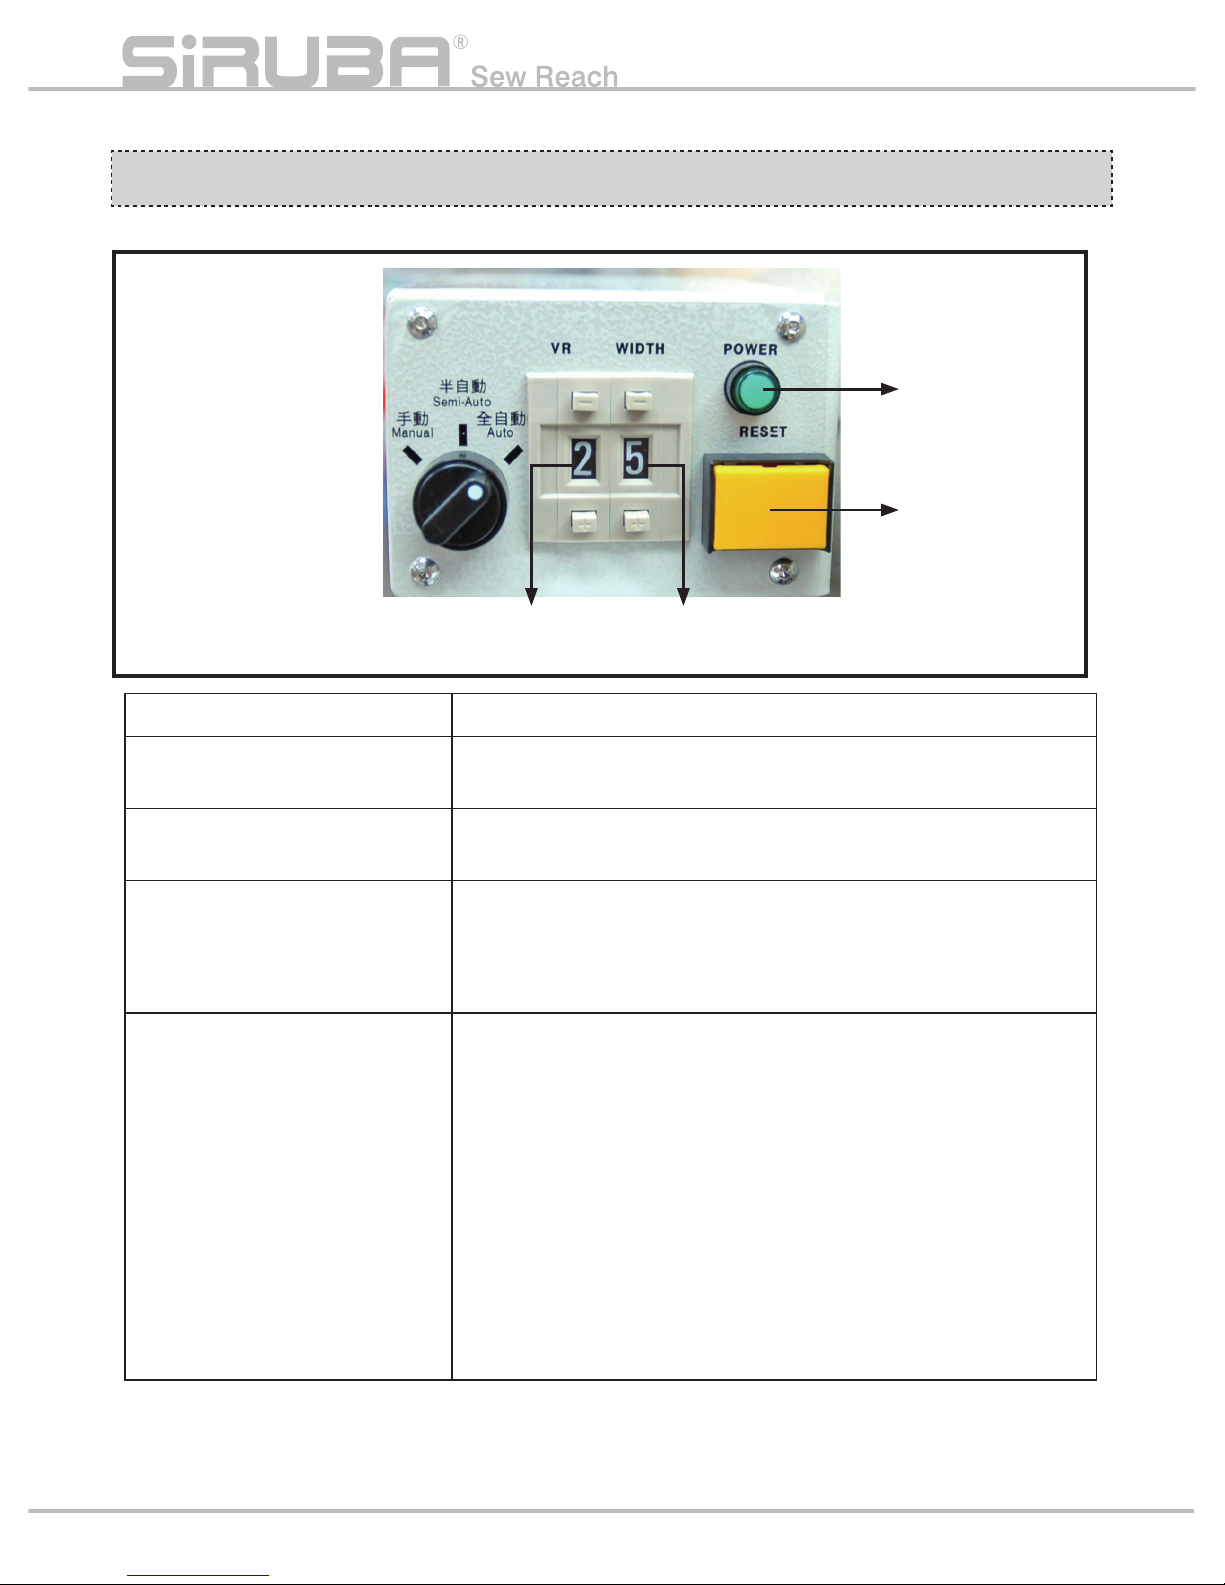
操作開關 OPERATIONAL SWITCHES
1. 操作面板說明: 1.Illustration of operational panel :
名稱 Names 功能 Functions
電源燈
POWER lamp[POWER]
• 打開電源開關,電源燈亮燈。
• Light up if power switch on.
位置距離設定
Distance setting switch [VR]
• 起縫點位置設定。※1
• Start sewing point position setting. ※1
褲邊寬度設定
WIDTH switch [WIDTH]
•「1~9」:根據褲邊寬度 1~9 的設定。※2
•「0」:縫紉機單獨運行模式。※3
•「1~9」:Set 1-9 according to bottom width.※2
•「0」:Sewing machine isolated operation mode.※3
重設開關
RESET switch [RESET]
•未踩腳踏板前:穿過上線,交換底線的時候按此鍵。按第二次時回到
原處。
•空轉前:重新進行褲邊設
定時按此鍵。
•按此鍵的同時同時打開電源開關:進入接頭檢測模式和三層卷邊器
調整模式。(參考 P.9、P.10)
•Before stepping the treadle:Thread through the upper thread, and
press the switch as the bobbin thread is replaced. Press again to
release it.
•Before feeding idle:Press when redoing bottom setting.
•Press reset switch and power switch on simultaneously:
Enter to splicing detector and hemmer adjustment mode.
(See P.9、P.1
0)
電源燈
POWER LAMP
重設開關
RESET SWITCH
褲邊設定開關
WIDTH SWITCH
位置距離設定開關
DISTANCE SETTING SWITCH
※ 1:參考如下頁 2。
※ 2:參考如下頁 3。
※ 3:不執行接頭檢測和三層卷邊的動作。
※1:Refer to page 5,2。
※2:Refer to page 5, 3。
※3:Do not operate the splicing detector
and the hemmer.
P4
Page 13
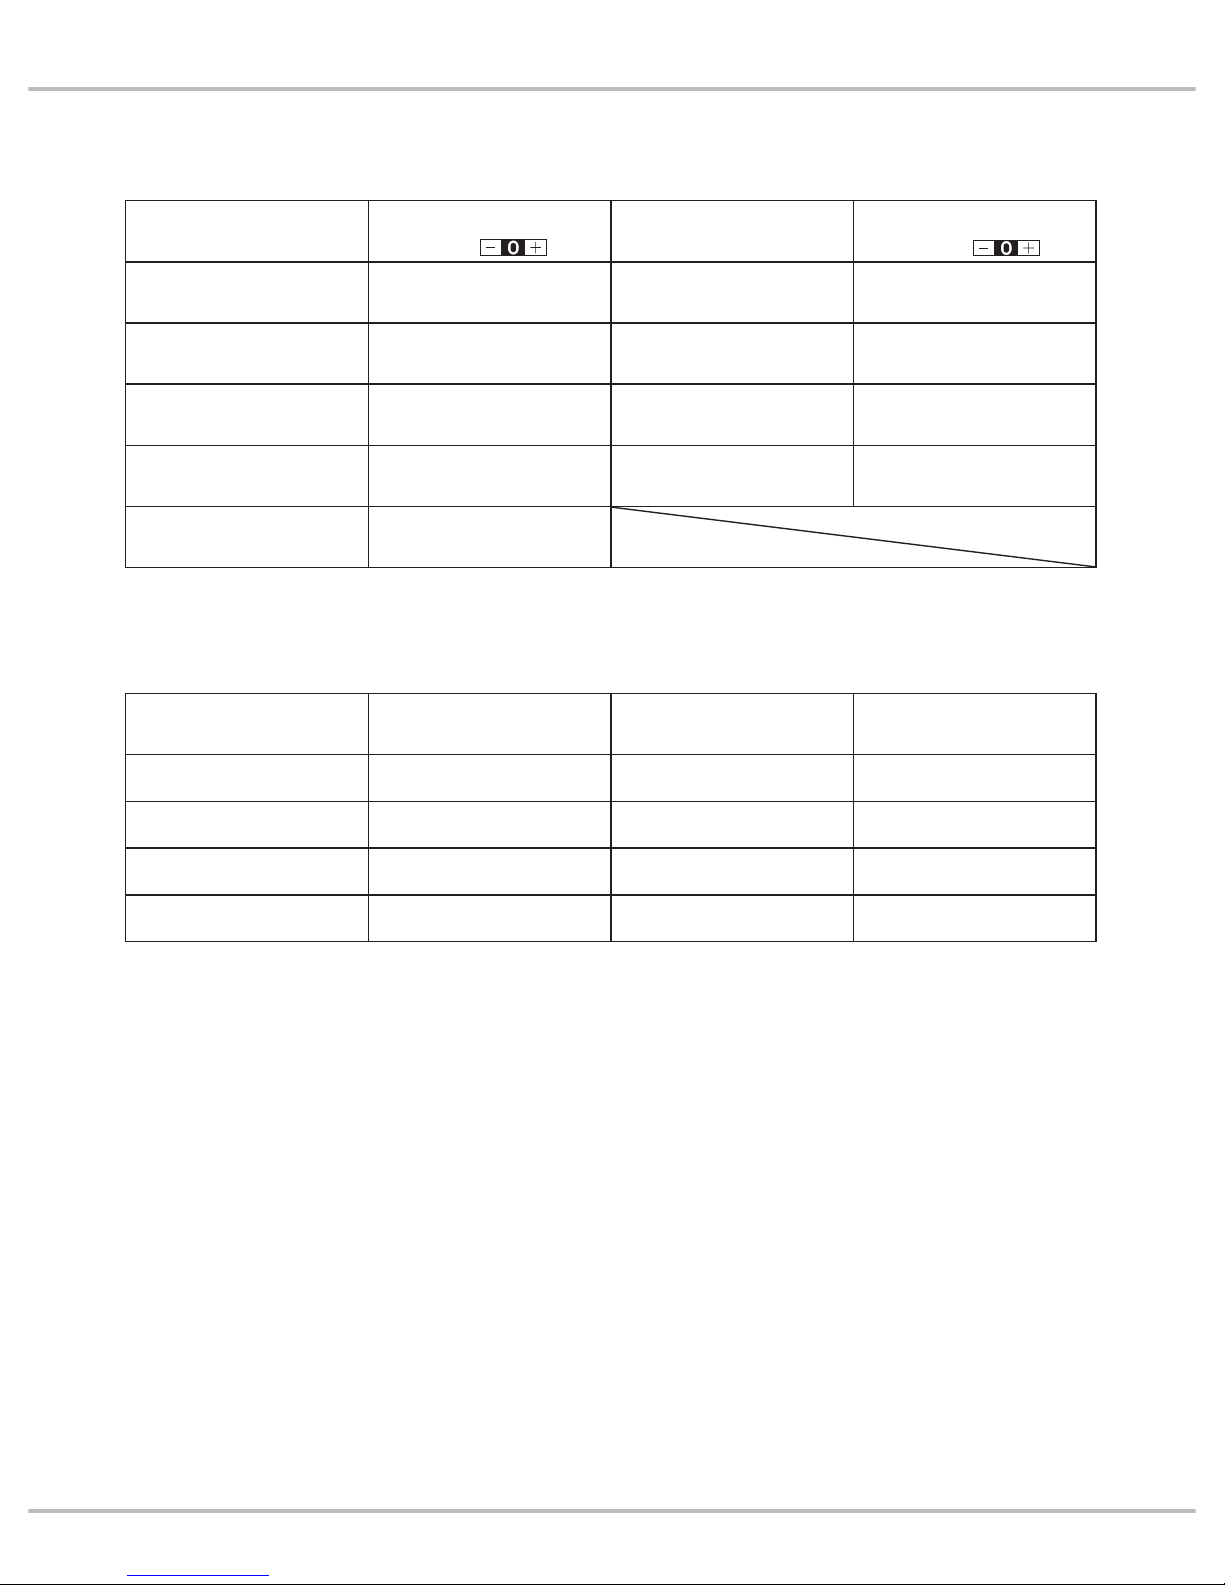
3. 褲邊寬度設定開關(WIDTH)的設定:
2. 位置距離設定開關(VR)的設定:
【參考】
1. WIDTH 的設定是為了保證從縫紉開始到縫
紉結束的過 程 中,可跳過接 頭 而 必須有的
設定。只要不是遠遠超出表所示的設定值,
機器的運行動作都沒有太大問題。
2. 如果在中間的接頭處三層卷邊器滑掉的情況
下,加大設定值。
3. 另外,如果在最後的介面前,卷邊器拔不出
來的情況下,將設定值減小。
3. Setting of bottom width setting switch
(WIDTH):
2. Distance setting switch(VR):
【Reference】
1.Setting a set value by WIDTH switch is
necessary for the machine to skip splicing
between the starting position and the las
t
splicing. Unless the selected set value is
completely wrong, the machine will work
properly.
2.In case the hemmer goes back to its original
position when it comes to a splicing in the
middle, select a larger set value.
3.In case the hemmer doesn't go back to its
original position when it comes just before
the last splicing, select a smaller set value.
褲邊寬度
(mm)
Bottom width
(mm)
WIDTH
褲邊寬度
(mm)
Bottom width
(mm)
WIDTH
140 ~ 150 2 220 ~ 240 6
150 ~ 170 3 240 ~ 260 7
170 ~ 190 4 260 ~ 280 8
190 ~ 220 5 280 ~ 300 9
位置距離(mm)
Distance(mm)
VR
位置距離(mm)
Distance(mm)
VR
-8 ~ -7 1 5 ~ 6 6
-5 ~ -4 2 8 ~ 9 7
-3 ~ -2 3 10 ~ 11 8
-1 ~ 0 4 13 ~ 14 9
2 ~ 3 5
起縫點
Star t sewing point
起縫點
Star t sewing point
P5
Introduction
Page 14
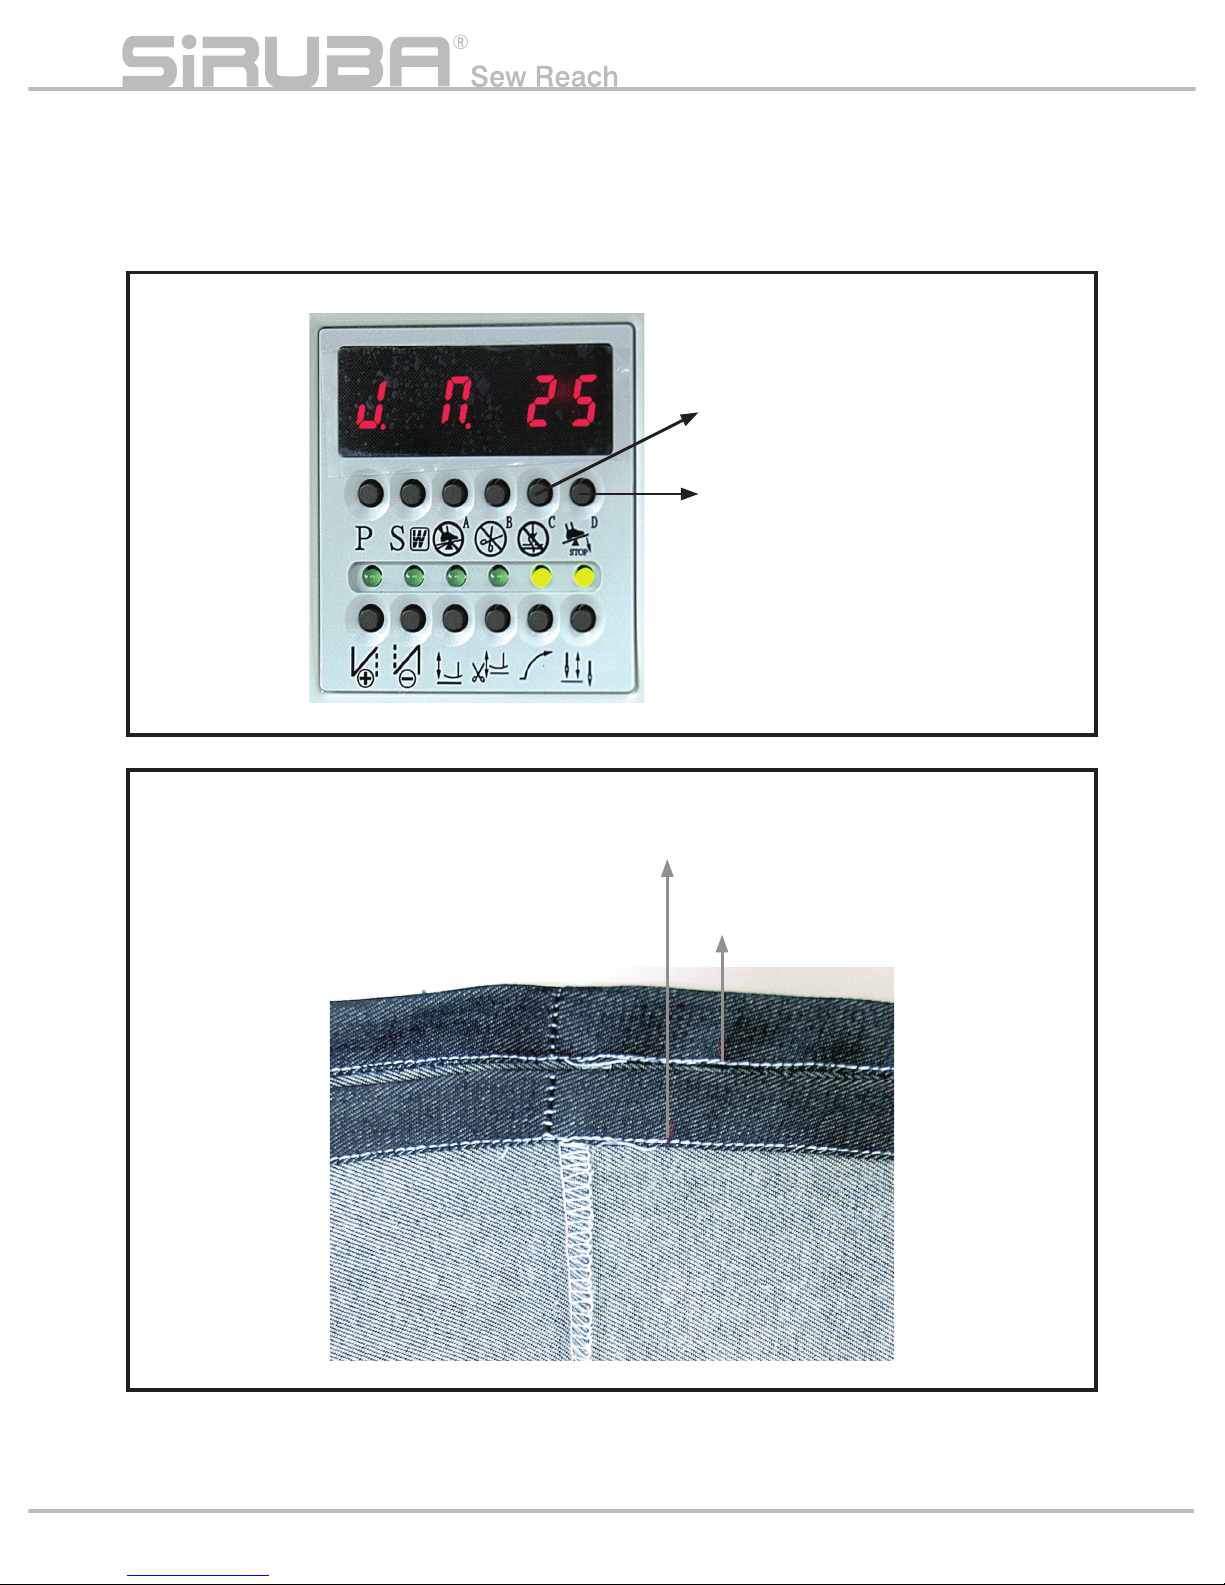
建議針數 20~25 針。 Recommendation is 20 ~ 25 number of
stitches.
4. 搭縫線跡調整: 4. Adjust the number of covering stitches:
P6
增加針數
Increase the number of stitches
減少針數
Decrease the number of stitches
針數 20
20 stitches
針數 25
25 stitches
Page 15

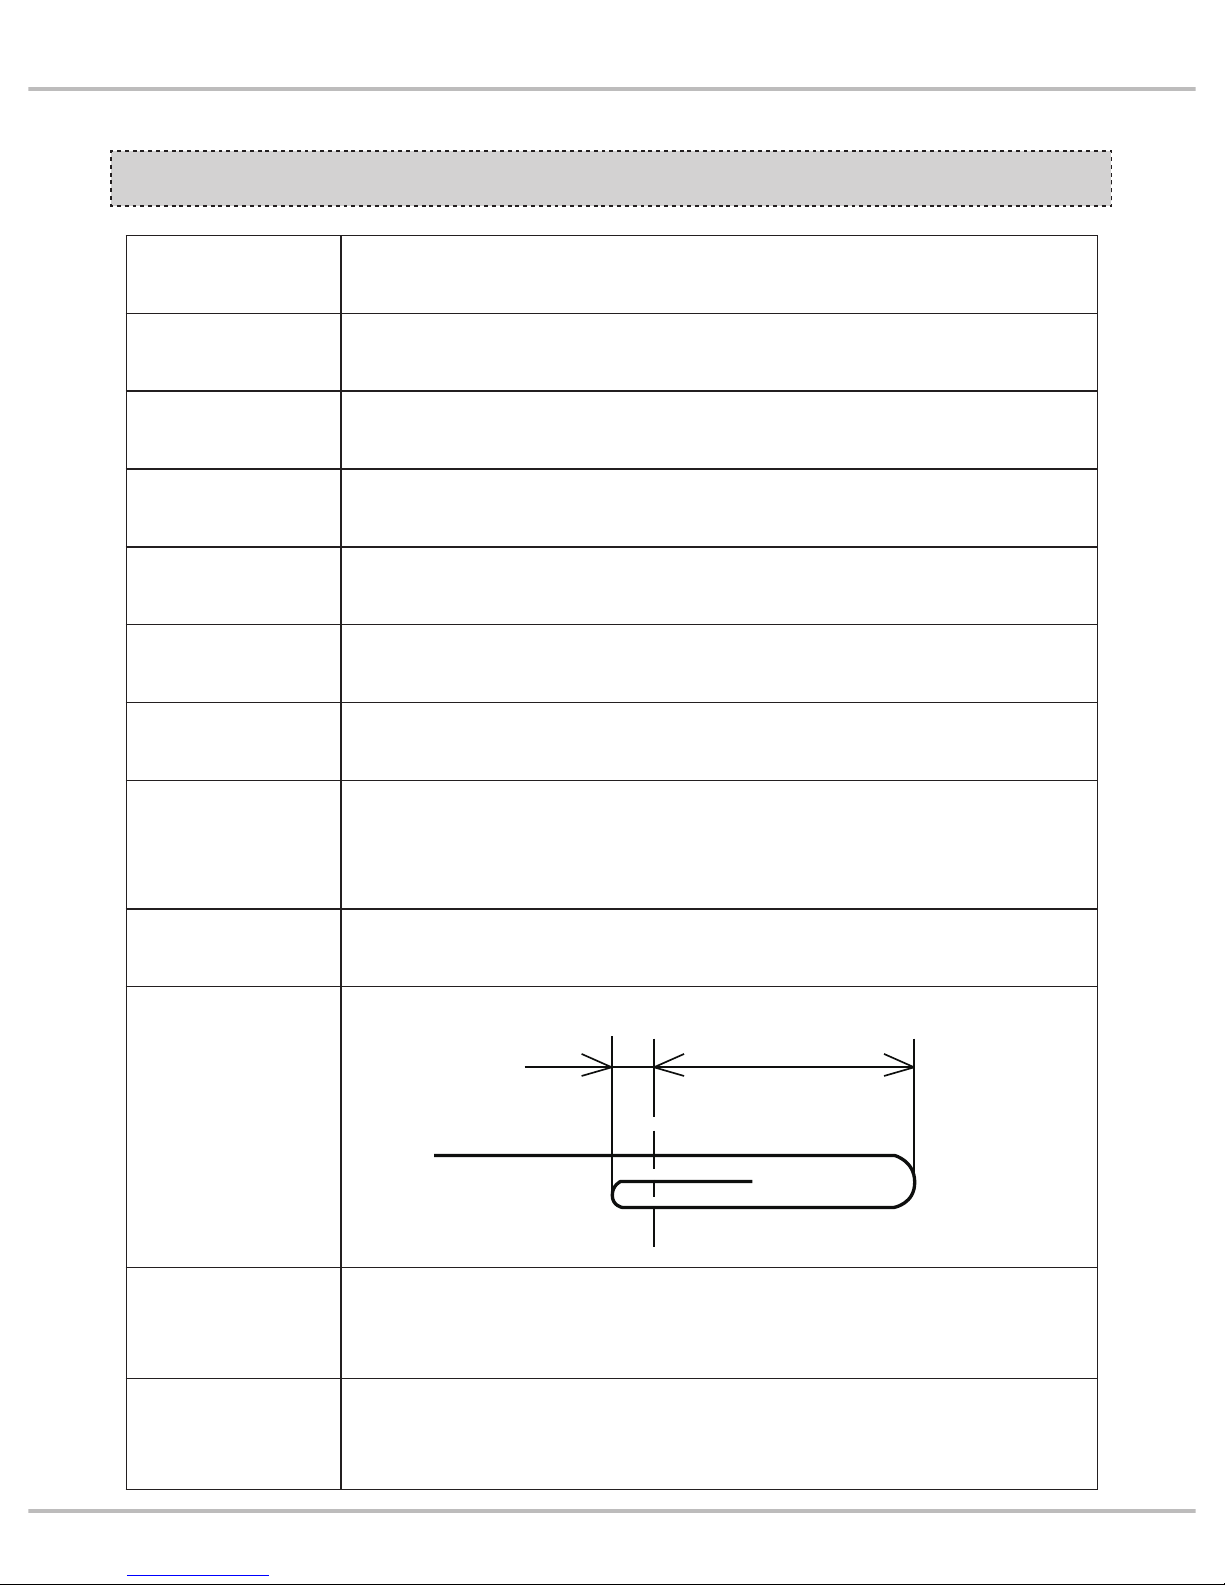
褲邊的設置方法
METHOD OF SETTING
BOTTOM CLOTH
•將褲邊摺 2 次,從開始縫紉的一側的接頭①
到右側這樣的方式設置布料。
•摺 2 次的尺寸 A 請參考下表。
•摺 2 次的參考尺寸:
•Folded the bottom cloth twice, set the
bottom cloth from starting position splicing
side① to the right side.
•Refer to the width of folded twice A table
below.
•Reference width of folded twice:
2
三層摺邊B
Hem width B
縫紉位置
Sewing position
三層摺邊尺寸B (mm)
Hem width B (mm)
兩次摺邊尺寸A (mm)
Width of folded twice A (mm)
12.7 18 ~ 23
15 20 ~ 25
20 25 ~ 30
25 30 ~ 35
褲邊張力的調整
ADJUSTING BOTTOM CLOTH
TENSION
•通過旋鈕①來調整。 拔出旋鈕①後,沿順時
針方向旋轉後壓力升高。 調整後,將旋鈕①
插回並鎖好。
•標準壓力為 0.1~0.2MPa。(薄布料~中厚布
料) 薄布料,具有伸縮性的布料:下調壓力。
厚布料:上調壓力。
•Use knob ① to adjust. Pull the knob ① out,
and turn it clockwise to raise pressure. After
adjustment, put the knob ① back and lock
it.
•Standard pressure is 0.1~0.2MPa.(Thin
~middle-thick fabric) Thin and elastic
fabric:lower pressure. Thick fabric:raise
press
ure.
P7
Introduction
A
①
Page 16

褲邊寬度變化零件的調整
ADJUSTING PARTS ACCORDING
TO BOTTOM CLOTH WIDTH
1. 褲邊寬度 200 ~ 300 mm
⑴將前引導滾輪⑤沿著箭頭方向⑥移動調整。
⑵鬆開調整把手①,將後引導滾輪②沿著箭頭
方向⑦移動調整。
⑶在撐開褲邊的動作中,撐褲邊滾輪開關處於
ON 的狀態,撐褲邊滾輪③回到原處,後引
導滾輪②向左移動。
1.Bottom cloth width 200~300mm
⑴ Move front guide roller ⑤ to the arrow
direction ⑥ to adjust.
⑵Loosen adjusting handle ①,and let rear
guide roller ② move to arrow direction ⑦to
adjust.
⑶During the motion of holding the bottom
clo
th open, the bottom tension roller switch
③ goes back to its original position while it
is in operation, move rear roller ② to left.
P8
②
①
①
⑤ ⑥ ③⑦
Page 17

2. 褲邊寬度 170 ~ 200 mm
⑴將前引導滾輪⑤沿著箭頭方向⑥方向移動調
整。
3. 褲邊寬度 140 ~ 170 mm
⑴前引導滾輪⑤沿著箭頭方向⑨下降。
⑵前引導滾輪軸④沿著箭頭方向⑩旋轉。
2.Bottom cloth width170~200mm
⑴Move front guide roller ⑤ to arrow direction
⑥ to adjust.
3.Bottom cloth width 140~170mm
⑴Lower front guide roller ⑤ to arrow
direction ⑨.
⑵Turn the front guide roller shaft ④ to arrow
direction ⑩.
P9
Introduction
⑤
⑥
⑩
⑤
⑨
④
Page 18

2. 正面縫用的定位件、繞腳機片之基準
(1) 前定位件①基準
前定位件①之端面和針的間隙為 2mm。
( 調整 ) 鬆開螺絲②進行調整。
2. How to adjust front-guide & hemmer for
face-up sewing
(1) Front-guide ①
Between needle & Front-guide is 2mm.
(Adjustment) Loosen screw ②.
針與檔邊距離 2mm
Distance between needle and blocker: 2mm.
1. 在調整模式下 (Reset 長壓 + 電源 ON)
勾布桿與檔邊距離 2mm
1. Under adjustment mode(Hold Reset button
and push power ON), distance between
cloth-hook rod and blocker: 2mm
.
2mm
調整方法 ADJUSTMENT METHOD
P10
Page 19

3. 繞腳機片①拉進時、繞腳機片①和定位頂件
②間隔 A 為 B + 1.5mm。
(例)繞腳寬 20mm 時
B = 22mm、A = 23.5mm 基準尺寸
3. When hemmer ① go backwords, distance
between botton of hemmer-end ① and
ruler ② is A=B+1.5mm.
(Example) Hem width is 20mm
B = 22mm, A = 23.5mm
AB
A=B+1.5mm
① ②
P11
Introduction
Page 20

接頭檢測的調整
THE ADJUSTMENT OF SPLICING
DETECTOR
接頭檢測板①下降的時候,與接頭檢測承軸②
之間的間隙,大約為布料厚度的 3~4 倍。 接
入空氣,按著重設按鈕的同時打開電源開關,
調整會變得容易操作。(調整後,關閉電源)
【調整方法】
⑴微調的情況
鬆開閉鎖螺絲③,旋動調整螺絲來進行調
整。
⑵進行大量調整的情況
鬆開螺絲④,將把手⑤沿著箭頭方向移動
進行調整。
As splicing detector plate ① getting lower,
its gap between splicing detector shaft ② is
about
three or four times thickness of fabric.
Put into air, press Reset switch and turn the
power on simultaneously, which could make
operation easier. (Turn off power after
adjustment.)
【Adjustment】
⑴Fine adjustment
Loosen lockscrew ③, turn adjusting screw
for fine adjustment.
⑵Large adjustment
Loosen screw ④, move han
dle ⑤ to the
arrow direction for adjustment.
④
③
⑤
② ①
布料厚度 ×( 3~4)
Thickness of fabric ×( 3~4)
P12
Page 21

根據三層卷邊零件的調整
ADJUSTING PARTS ACCORDING
TO HEM WIDTH
1. 前引導滾輪定規④
與當定規⑤之間的落差為 2~3mm。
【調整】鬆開螺絲⑥(2 個螺絲),移動前引
導滾輪定規④。
1.Front guide roller ruler ④
The distance between positioning ruler ⑤
is 2~3mm.
【Adjustment】Loosen screw ⑥(two
screws), and move front guide roller ruler
④.
⑥
④
⑤
2 ~ 3 mm
P13
Introduction
Page 22

縫紉針距的更改
CHANGE OF STITCH LENGTH
縫紉針距的變化更改通過「送布量的變更」和
「送針量的變更」來實現。
1. 送布量的變更
送布量的變更通過交換上送布齒輪①和下送
布齒輪②來實現。
•齒輪交換順序
⑴取下螺絲③(2 個螺絲),並取下離合器盒
止動板④。
⑵鬆開螺絲⑤,取出上送布齒輪①。
⑶鬆開螺絲⑥,取出下送布齒輪②。(由於離
合器盒⑦而取不出下送布齒輪②的情況下,
直到離合器盒⑦的壓痕處到達下送布齒輪②
的上部為止,用手轉動縫紉機皮帶輪一邊拔
掉下送布齒輪②。)
⑷將與變更的縫紉針距長度對應的上送布齒輪
①,與離合器盒⑦對準後,一邊轉緊螺絲⑤
固定
⑸用螺絲③安裝離合器盒止動板④。
⑹壓腳放下的狀態下,將與變更的針距長度相
對應的下送布齒輪 ②,與上送布齒輪的齒距
相吻合,並用螺
絲⑥固定。
Stitch length shall be changed by both
change of feeding amount of cloth and
change of needle distance.
1.Change of feeding amount of cloth
Feeding amount of cloth is changed by
replacing upper feeding gear ① and lower
feeding gear.
•Sequence of replacing gear
⑴ Take off screws ③(two screws), and
take clutch case stopper④ out.
⑵ Loosen screw ⑤, and take off upper
feeding gea
r ①.
⑶ Loosen screw ⑥, and take off lower
feeding gear ②. (In case that clutch case
⑦ is in a way to take lower feeding gear
② out, move hollow of clutch case ⑦ by
turning Sewing Machine Pulley by hand till
it comes over lower feeding gear ②, and
then take lower feeding gear ② out. )
⑷ Fix screw ⑤ as pressing upper feeding
gear ① which correspond to the desired
stitch length against clutch case ⑦.
⑸ Use screw ③ to install clutch case stopper
④.
⑹ Lower the Presser all the way down,
and then fix lower feeding gear ② of the
desired stitch length with screw ⑥ as
engaging it with upper feeding gear.
③
⑥
②
⑦
①
④
⑤
P14
Page 23

2. 送針量的變更
將送料刻度⑦的刻度值⑧調整為與更換後的
齒輪相對應的縫紉針距長度一致的刻度值。
2.Change of needle feed amount
Set the scale of Feeding Dial ⑦ which
correspond to gear replaced at dot ⑧
engraved on the sewing machine.
⑦
⑧
P15
Introduction
Page 24

模式調整 MODE DEPICTION
1. 手 動:
(1) 踩→勾布。
(2) 踩→順布。
(3) 踩→車縫 ( 必須持續踩踏 )。
2. 半自動:
(1) 踩→勾布 + 順布。
(2) 踩→自動車縫 ( 無需持續踩踏 )。
3. 自 動:
踩→勾布 + 順布 + 自動車縫。
1.Manual:
(1)Step on the treadle→Hook on cloth.
(2)Step on the treadle→Smooth cloth.
(3)Step on the treadle→Start sewing. (Keep
stepping on to complete full sewing
process.)
2.Semi-Auto:
(1)Step on the treadle→Hook on cloth and
smooth it.
(2)Step on the treadle→Start sewing. (No
need to keep st
epping on.)
3.Auto:
Step on the treadle→Hook on cloth, smooth
it, and complete sewing.
P16
Page 25

不良問題的原因和對策
STRATEGIES & CAUSES FOR
MALFUNCTION
問題
Problems
造成原因
Causes
對策
Strategies
頁碼
Page
1. 三層卷邊刺破。
1. Hemming is not bedone
properly.
① 褲邊兩層摺疊尺寸過小。
② 褲邊張力過小。
① Bottom cloth folded width is too
small.
② The tension of bottom cloth is
too low.
• 調整和三層卷邊一樣的兩層摺
疊尺寸。
• 增大褲邊張力。
• Adjust folded part width to
hem width.
• Raise bottom cloth tension.
5
6
5
6
2. 卷邊出現褶皺。
2. Hem has wrinkles.
① 褲邊兩層摺疊尺寸過大。
① Bottom cloth folded part is too
large.
• 調整和三層卷邊一樣的兩層摺
疊尺寸。
•Adjust fold
ed part width to
hem width.
5
5
3. 不能進行三層卷邊。
3. Hemming cannot be
done at all.
① 三層卷邊引導板的高度過高。
① Upper Guide is placed too high.
• 降低三層卷邊引導板的高度。
• Lower the height of Upper
Guide.
4. 撐開褲腳時,褲邊滾輪
回到原來的位置。
4. Bottom tension roller
goes back to its original
position while bottom
tension is working.
① 撐褲邊裝置的設置和褲腳尺寸
不符。
① Setting of bottom tension device
doesn’t match bottom .
• 將其調整和褲腳尺寸相符合。
• Make arrangement which
suite
d bottom width.
7
7
5. 中間的接頭處,布料從
卷邊器中脫開。
5. Hemmer goes back to
its original position when
it comes to splicing in
middle.
① WIDTH 設定值過小。
① Set value of WIDTH is too small.
• 增大 WIDTH 設定值。
• Select bigger set value of
WIDTH.
4
4
6. 縫紉最後的接頭時,卷
邊器也拔不開。
6. Hemmer doesn’t go
back to its original
position when it comes
to last splicing.
① WIDTH 設定值過大。
① Set value of WIDTH is too big.
• 減小 WIDTH 設定值。
• Select smaller set value
of
WIDTH.
4
4
7. 接頭處無法被檢測出。
7. Splicing cannot be
detected.
① 接頭檢測的調整不良。
① Splicing detector does not
adjust well.
• 根據布料的厚度調整接頭檢測
板的高度。
• Adjust position of splicing
detector plate according to
material thickness.
10
10
8. 斷針。
8. Needle brakes.
① 滾輪送布量和送針量不相符。
① Needle feed amount doesn’t
match roller feed amount.
• 調節滾輪送布量和送針量使之
相符。
• Match needle feed amount
with roller feed amount.
12
12
P17
Introduction
Page 26

P18
Page 27

P19
Page 28

P20
Page 29

P21
Page 30

P22
Page 31

P23
Page 32

P24
Page 33

P25
Page 34

P26
Page 35

P27
Page 36

P28
Page 37

P29
Page 38

P30
Page 39

P31
Page 40

P32
Page 41

P33
Page 42

SV-3
A
B
SV-2
B
A
SV-4
B
A
SV-5
A
B
SV-1
B
A
PARTS LIST
Series
Parts Group
Subclass Remark
Page
Date
1 2 3 4 5
E
D
B
C
A
氣源
UP AIR
黑 (2A)
白 (2B)
白 (3B)
黑 (4A)
氣缸(2A)
氣缸(3)
氣缸(4)
Setting pressure:0.5Mpa
氣缸(5)
白 (5B)
黑 (5A)
氣缸(1B)
氣缸(1A)
白 (1B)
黑 (1A)
ASL-JBH200C
2018/03/26
/
1 2
氣壓流程圖
P34
Page 43

SV-6
A
B
SV-7
B
A
SV-8
A
B
SV-9
B
A
PARTS LIST
Series
Parts Group
Subclass Remark
Page
Date
1 2 3 4 5
E
D
B
C
A
DOWN AIR
黑 (6A)
白 (6B)
氣缸(6)
黑 (7A)
白 (7B)
氣缸(7A)
氣缸(7B)
黑 (8A)
白 (8B)
氣缸(8)
鬆線
白 (9B)
黑 (9A) 氣缸(9)
ASL-JBH200C
2018/03/26
/
2 2
氣壓流程圖
P35
Page 44

由於對產品的改良及更新,本產品使用說明書中之產品及外觀的修改恕不事先通知 !
The specification and/or the equipment and appearances described in the instruction
book are subject to change because of modification which will without previous notice.
ASL-JBH200C.APR.2018
 Loading...