

Page 1
28
8 - Problems and solutions
8.1 - Problems, causes and solutions
Inconvenienti
1- The machine does not start
2- The propeller turns in the opposite direction of the one indicated by the
arrow (on the three-phase model)
3- The product is not ground correctly
Causes
1- The differential switch is in the position “0”
1- The plug switch is in the position "0"
1- Start push button does not work
1- The electric motor is defective
2- Contact technical assistance
3- Plate and blade have not been correctly tightened
3- grooves on the plate or blade is not perfectly sticking
(on the plate plane)
3- Outlet not perfectly introduced into the housing
Solutions
1- Put the switch at position “I”
1- Put the switch at position “I”
1- Contact technical assistance
1- Contact technical assistance
3- Correctly tighten the plate and blade
3- Replace the defective plate couple and the blade
3- Correctly introduce the outlet in the proper housing
1
MEAT MINCER
USE AND MAINTENANCE MANUAL
TC RIO 12
TC RIO 22
TC RIO 32
10/2003
Page 2

2
Index
1. Delivery and warranty 4
1.1 Foreward
1.2 Keeping and using the manual
1.3 Warranty
1.4 Machine description
1.5 Foreseen use
1.6 Forbidden uses
1.7 Machine data
1.8 Protections and safety devices
1.9 Working position
2. Technical features 15
2.1 Main parts
2.2 Technical features
2.3 Machine dimensions and weight
2.4 Noise level
2.5 Electrical diagrams
2.5.1 220 V single-phase electrical diagram
2.5.2 380 V three-phase electrical diagram
3. Controls and indicators 19
3.1 List of controls and indicators
4. Testing, transport, delivery and installation 20
4.1 Testing
4.2 Delivery and moving the machine
4.3 Installation
4.3.1 Package disposal
4.3.2 Moving the machine
4.4 Connecting the electrical system
4.4.1 Three-phase machine
4.4.2 Single-phase machine
5. Start up and stop 23
5.1 Checking the correct electrical connection
5.2 Checking the presence and efficiency of guards and safety devices
5.3 Checking the efficiency of the stop push button
5.4 Starting up the machine
5.5 Stopping the machine
6. Machine use 25
6.1 Lubrication
6.2 Cleaning the machine
6.3 Putting the machine out of service
27
8 Now the propeller, blade, plate, and ring nut can be reassembled.
7 - Maintenance
ATTENTION!
All cleaning and maintenance operations must only be carried out with the
machine at a standstill and disconnected from the mains.
The area where maintenance operations are carried out must always be
kept clean and dry.
Do not allow unauthorized personnel to work on the machine.
All parts, including the utensil, must be replaced, if necessary, with original
spare parts from authorized dealers or directly from the manufacturer.
7.1 - Lubrication
The machine does not require any lubrication.
7.2 - Cleaning the machine
ATTENTION!
Disconnect the machine from the mains before cleaning it.
Do not clean the machine with jets of water.
Use only non-toxic detergents, which are expressly indicated for cleaning
components for foodstuff.
7.3 - Putting the machine out of service
The machine is made of materials such as aluminum, steel and copper,
therefore they do not require particular operations for scrapping.
Therefore, contact specific trash disposal companies and separate the
components according to their material.
Page 3
26
6.3 - Using the meat grinder
1 Make sure the feed tension corresponds with the value shown on the
technical plate.
The tension indicator must be on to indicate it is connected.
2 Slightly tighten the ring nut of the meat grinder and put a little meat in,
press the start push button, making sure that the rotation direction of
the propeller is the same as the one indicated by the arrow (counter-
clockwise).
3 If the meat coming out is cut well the ring nut has been regulated
enough, if not tighten the ring nut again, until a perfect cut is obtained.
4 Stop the machine by pressing the stop push button.
5 A tool is not needed to loosen the ring nut. Unscrew the lever that
blocks that outlet once so that the ring nut is loose and can easily be
extracted. (models 12-22)
6 For models 32, pull the mushroom-head push button out so that the
outlet is unblocked and the ring nut can be unfastened.
7 After carefully cleaning, first assemble the outlet and block it with the
lever, in models 12 - 22; push it until it clicks in model 32; these
operations are necessary to ensure that the outlet is located in the right
position.
Fig. 6.2.1
3
7. Maintenance 27
7.1 Lubrication
7.2 Cleaning the machine
7.2 Putting the machine out of service
8. Problems and solutions 28
8.1 Problems, causes and solutions.
Page 4

4
1 - Delivery and warranty
1.1 - Foreward
ATTENTION!
The symbols used in this manual are meant to draw the reader’s attention
to dangerous points and operations that can endanger the personal safety
of the operator or risk damaging the machine.
Do not use the machine unless you are certain that you have correctly
understood these warnings.
ATTENTION!
For greater clarity, some illustrations in this manual show the machine or
parts of it with the panels or carters removed.
Do not use the machine in these conditions; all protections must be
correctly fitted and in perfect working order.
This manual may not be reproduced, even partially, and its contents
cannot be used for purposes other than those permitted by the
manufacturer.
All breaches of the above are legally punishable.
1.2 - Keeping and using the manual
The purpose of this manual is to instruct the user, by means of texts and
figures, on transport, handling, use, and maintenance of the machine.
This manual must therefore be carefully read before using the machine.
Take care of the manual and keep it near the machine in an easily and
quickly accessible place for future reference.
If the manual should be lost or damaged, ask your dealer or manufacturer
for another copy.
If the machine is sold, inform the manufacturer of the name and address of
the new owner.
The manual reflects the state of technology at the time the machine is sold
and cannot be considered inadequate if it is subsequently updated on the
basis of new knowledge.
In this regard the manufacturer reserves the right to update its products
and related manuals without being obliged to update previous products
and manuals barring exceptional cases.
If in doubt, consult the nearest servicing center or the manufacturer.
The manufacturer’s aim is to continuously optimize its product and it
therefore welcomes any comments or suggestions on how to improve the
machine and/or manual.
25
6 - Using the machine
6.1 - Prescriptions
ATTENTION!
Only authorized personnel may use the machine.
Before beginning work, the operator must ensure that all the guards are in
place and that the safety devices are fitted and in efficient working order. If
that is not the case, switch the machine off and contact the head of
maintenance.
The product to be ground must be in pieces that can enter inside the
loading inlet and must be pushed with the proper pushing device (pestle)
NEVER USE YOUR HANDS.
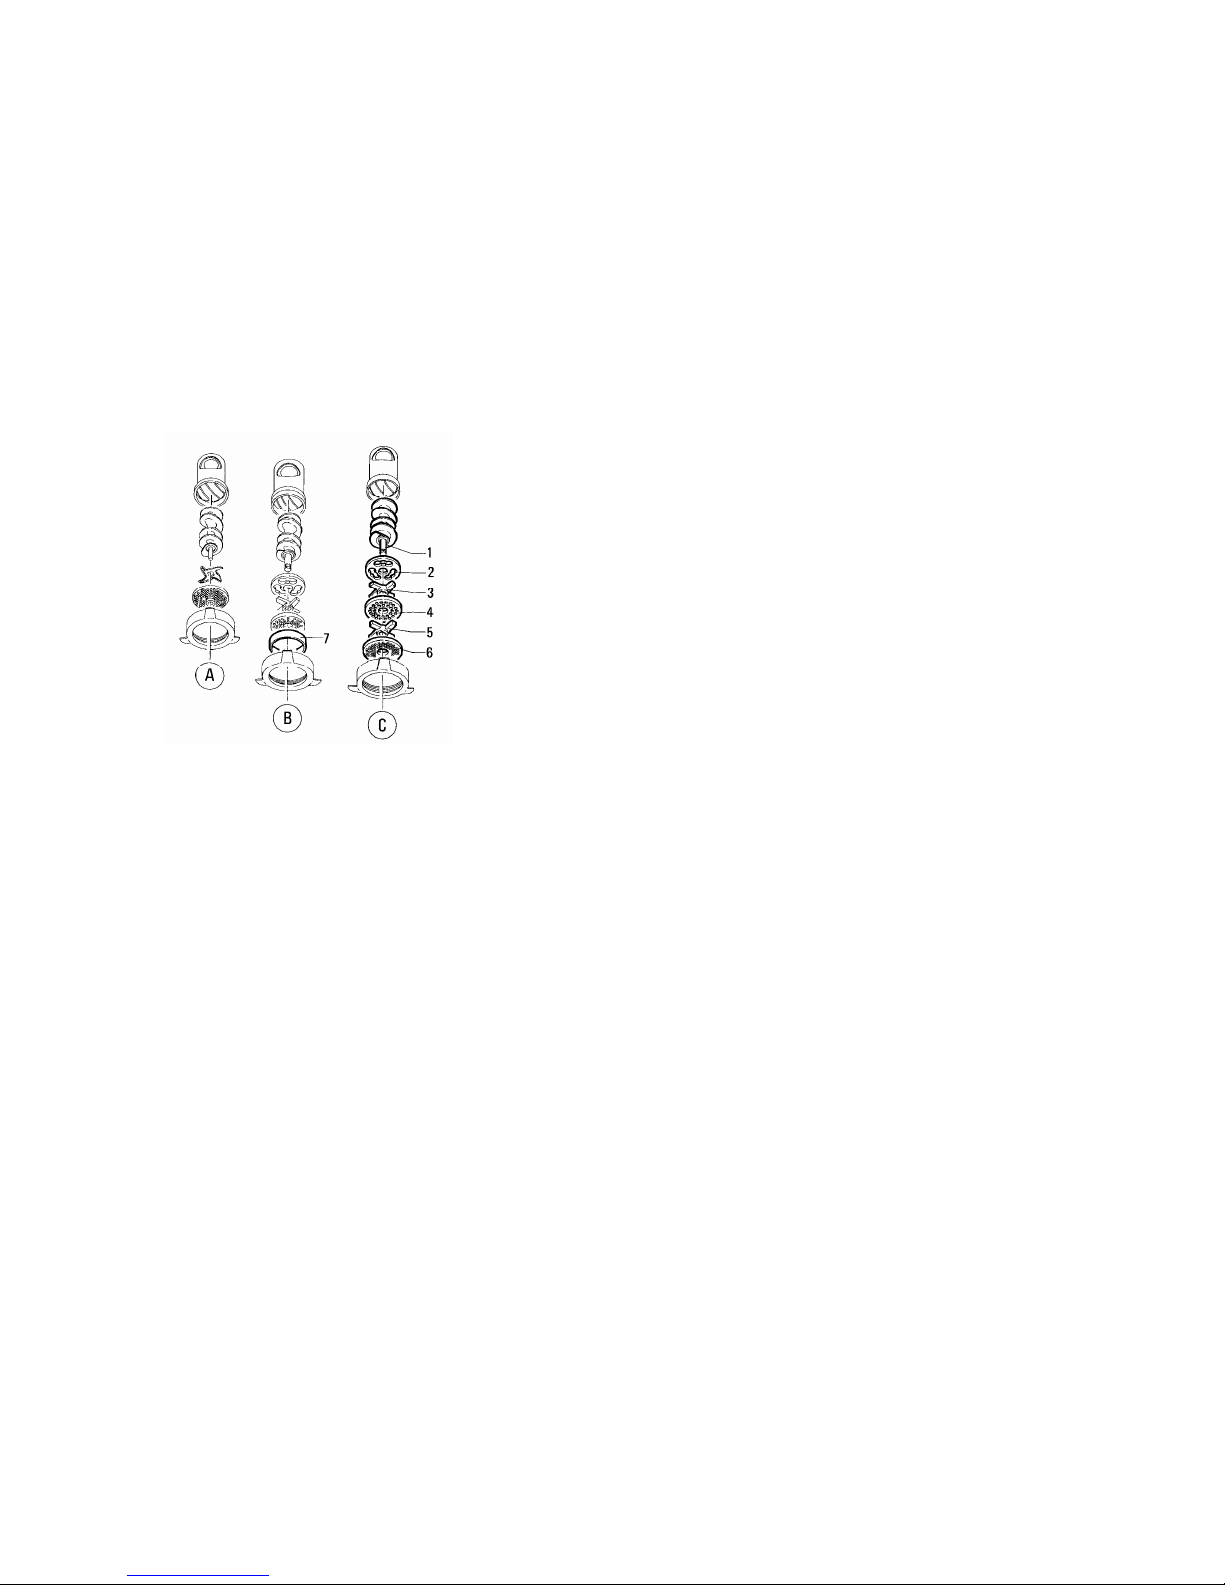
6.2 - Setting up the outlet or the proper pushing device (pestle).
The machine can be set up in three different meat cutting groups:
A - Enterprise or normal
B - Half UNGER
C - Total UNGER
- System -C-, (Total UNGER), is made up of: a propeller "1" to transport
the meat, a hammer mill plate "2", a first blade "3" and the
corresponding plate with holes "4", a second blade "5" with the final
drilled plate "6".
- System -B-, (Half UNGER), substitutes blade “5” and the plate “6” with
the spacer "7".
- System -A-, (Normal), is the simplest method, consisting only of the
transport propeller, a blade and an exit plate.
It is not possible to assemble the plates from groups -C- or -B– on models
with a grinding group -A-, the complete group must be changed.
Page 5

24
5.3 - Checking the efficiency of the stop push button (fig. 5.3.1)
While the machine is connected to the electrical power supply and the
utensil is moving, press the stop push button. The machine must stop.
5.4 - Starting the machine (fig. 5.3.1)
To start the machine just press the start push button (the one with the
arrow on top, “1” Fig. 5.3.1), after having correctly connected the plug to
the electrical outlet and the machine starts.
5.5 - Stopping the machine (fig. 5.3.1)
To stop the machine just press the stop push button, “2” Fig. 5.3.1 and the
machine stops.
Fig. 5.3.1
2
1
5
The machine is delivered to the user under the warranty conditions in
force at the time of purchase.
Contact your supplier for any clarifications required.
1.3 - Warranty
The user is not authorized to tamper with the machine for any reason.
Contact the manufacturer for any anomaly.
Any attempts at dismantling, modifying or tampering with any component
of the machine in general by the user or unauthorized personnel will cause
the Compliance Declaration according to EEC 89/392 law to lapse and
will render the warranty null and void and exempt the manufacturer from
all responsibility for any damage either to people or things.
The manufacturer is also exempt from all responsibility in the following
cases:
- Incorrect installation;
- Improper use of the machine by inadequately trained personnel;
- Failure to comply with the regulations in force in the country the
machine is used;
- Lack of or insufficient maintenance;
- Use of unoriginal spare parts and spare parts not specifically designed
for the model;
- Total or partial failure to follow the instructions.
1.4 - Machine description
The meat grinder you have purchased is a simple, compact, highly
productive and powerful machine.
- Seeing that must be used to grind food products the components that
can come into contact with the product have been carefully chosen to
guarantee maximum hygiene. The machine body is made of stainless
steel.
- The hopper is made of stainless steel to guarantee maximum hygiene
and to facilitate cleaning.
- The utensils are made of stainless steel to guarantee a longer life and
maximum hygiene.
- The machines are robust, with a modern design, made of aluminum
alloy and with machine body made of 18/8 stainless steel.
- Inlets in stainless steel fusion with the possibility of applying the total or
partial UNGER system.
- The possibility of inverting the rotation direction of the propeller by
means of a selector.
- Rigid locking of the inlet to improve the cutting of the meat and to
lengthen the duration of the plates and blades.
Page 6

6
- Both the three-phase and single-phase motors are ventilated with the
following advantages:
- highly consistent yield and motor duration;
- increase in effective work time due to fewer interruptions;
- low heating index to always keep the meat fresh and unaltered.
The models represented in this manual have been built in compliance with
the EEC 89/392 Law and modifications thereafter.
In the case of accidents, the manufacturer cannot be held responsible if
the machine has been modified or tampered with, if safety protections
have been removed of if it has been used for purposes unforeseen by the
manufacturer.
1.5 - Foreseen use
The machine has been designed and built to grind meat and similar
products.
It must only be used in professional environments and by skilled personnel
specifically trained for its use, who have read this manual before operating
the machine. The machine must only be used on a stable work table.
The amount of the meat to be ground must fit completely inside the
loading inlet; it must not come out of the hopper.
1.6 - Unforeseen uses
The machine must only be used for the purposes expressly intended by
the manufacturer, in particular:
- Do not use the machine to grind food products different from meat and
similar foodstuffs.
- Do not use the machine if it has not been correctly installed with all the
protections intact and correctly assembled to avoid the risk of severe
personal injury.
- Do not touch electrical components without having previously
disconnected the machine: risk of electrocution.
- Do not work products that are bigger than what can be contained in the
loading hopper.
- Do not wear garments that do not comply with safety laws. Consult
your employer regarding current safety regulations and necessary
safety devices.
- Do not start the machine if it is not working correctly.
- Before using the machine make sure that any dangerous condition has
been appropriately eliminated. If a fault occurs stop the machine and
notify maintenance personnel.
- Do not allow unauthorized personnel to carry out work on the machine.
In the event of an electrical accident, first remove the victim from the
conductor (as he will probably be unconscious). This operation is
23
5 - Start up and stop
5.1 - Checking the correct electrical connection
Put the plug into the electrical outlet;
The power indicator (“5” Fig. 3.1.1 page 20) must be lit;
Press the start push button (“2” Fig. 3.1.1 page 20), and check the rotation
direction of the utensils (in the 380 three-phase version).
The blade must rotate in the same direction indicated by the arrow (“C” fig.
1.7.2 page10), that is counter-clockwise.
If the rotation direction is incorrect, disconnect the machine from the
electrical power supply and contact our dealer in the area.
Note:
In the machines connected to a single-phase line and designed for singlephase power supply, the correct rotation direction is defined directly by the
manufacturer.
5.2 - Verifica presenza ed efficienza delle protezioni e delle sicurezze
1 - Checking the presence and efficiency of the guards and safety
devices
1 - Product outlet.
Make sure the product outlet has holes with a diameter less than 8 mm.
If it does not, a proper guard must be installed on the outlet.
2 - Hand guard
(only TC 32 CE).
In the TC 32 CE model the hopper must have hand guards
3 - Stainless steel hopper.
The stainless steel hopper is firmly welded to the casing.
4 - Electrical component protection carters.
Make sure they exist, are intact and correctly fastened to the components
inside the machine.
.
Page 7

22
Connect the cable to the three-phase electrical supply network, inserting a
16 ampère magnetothermic differentiated switch.
5.4.2 - Single-phase machine with 220 Volt-50 Hz
In this set up the machine is outfitted with a feeding cable with a 3 x 1.5
mm section.
This is connected to a three-pole single-phase outlet.
Connect the cable to the 220 Volt-50 Hz single-phase electrical supply
network, inserting a 16 amps differential magnetothermic switch.
In set ups with voltages different from those cited, consult the
manufacturer.
If a feeding cable needs to be longer, use a cable with the same section
as the one installed by the manufacturer.
L1
N
N: solitamente o è di colore BLU oppure è indicato con il N° 4
L1
N
L1
L2
L3
N: usually it is of blue colour or it is indicated with N° 4
7
dangerous as the victim is a conductor in this case and touching him
can mean being electrocuted.
You should therefore disconnect contact directly from the power supply
valve or, if this is not possible, distance the victim using insulating
material (wooden or PVC sticks, fabric, leather, etc.). A doctor should
be promptly called and the patient taken to the hospital.
1.7 - Machine data
An exact description of the "Model", "Serial number" and "Year of
construction" for the machine will help our servicing department to
provide a rapid efficient response.
Whenever you contact the servicing department or request spare parts,
always state the above information.
The data can be found in the plate in fig 1.7.1.
As a memorandum we suggest filling in the data for the machine you have
purchased in the table below:
ATTENTION!
Do not, for any reason, alter the data given on the rating plate.
Meat grinder model………………………..
Serial number…………………………….
Year of construction……………………...
Type………………………………………...
Page 8

8
A = meat grinder model
B = serial number
C = electrical motor power in Watts
D = ampere
E = motor frequency expressed in Volts
F = machine weight in Kg
G = manufacturer
Fig. 1.7.1
Matr. __________
A. ______ Hz.
_______ Volt
_____ Kg.
LA FELSINEA SRL via L. Einaudi
35016 Piazzola sul Brenta PD ITALY
A
B
C
D
E
F
_______Watt
G
21
legislation of such countries.
4.3.2 - Moving the machine
ATTENTION!
Carefully handle the machine and avoid accidental drops that could
seriously damage it.
To avoid pulling muscles when lifting the machine, bend your legs for
strength.
4.4 - Connecting the electrical system
ATTENTION!
Make sure the electrical source corresponds to the values indicated on the
identification plate on the machine.
Each operation should be carried out by specialized personnel who are
expressly authorized by the supervisor.
Make sure that the electrical lead is not damaged
4.4.1 - Three-phase machine with 380 Volt-50Hz and three-phase
machine with 220 Volt-50 Hz
In these set ups the machine is outfitted with a feeding cable with a 4 x 1.5
mm section.
This is connected to a three-phase plug.
L1
L2
L3
Page 9

20
4 - Testing, transport, delivery and installation
4.1 - Testing
The machine you have purchased has been tested in our factories to
ensure it functions well and is correctly set.
During this testing, work trials with material identical to what the user will
work with have been carried out.
4.2 - Delivery and moving the machine
All the material shipped has been carefully checked before consignment to
the shipping agent.
Unless otherwise stipulated by the client or hindered by particularly
burdensome transport, the machine is wrapped in nylon and cardboard.
Upon receipt of the machine check that the packaging is intact.
Should the packaging be damaged, sign the shipping agent’s transport
documents noting that, for example: “I accept but..." and give the reason.
Upon opening the packaging, should there be genuinely damaged
machine components, declare the damage to the shipping agent within
three days of the date indicated on the transport documents.
4.3 - Installation
ATTENTION!
The area in which you intend to install the machine must be horizontal and
solid. The surface upon which it rests must guarantee safe support.
Furthermore, it is necessary to position the machine leaving ample space
around it.
This allows for better working maneuverability and guarantees access for
periodic maintenance.
Make sure there is sufficient lighting around the machine to guarantee
correct visibility for the machine operator.
- Remove the cellophane that is wrapped around the machine and any
other packaging material found within.
4.3.1 - Disposal of the packaging
The packaging components, like cardboard, nylon and wood can be freely
disposed of, as they are compatible with solid urban waste.
Nylon is a pollutant and, if burned, produces toxic fumes. Do not burn and
do not dispose of it in the environment, but dispose of it according to laws
in force.
If the machine is delivered in countries in which there are particular laws
regarding waste disposal, dispose of the packaging according to the
9
1.7.1 - Warning and danger signs (fig. 1.7.2)
ATTENTION!
Do not intervene on electrical components while the machine is connected
to the power supply.
Risk of electrocution.
Observe the warnings on the signs. Failure to observe them can
cause serious injury and even death.
Make sure the signs are always fitted and readable; if they are not, fit or
replace them.
D
B
ATTENZIONE
E’ VIETATO USARE PIASTRE USCITA
CARNE CON FORO
UGUALE O SUPERIORE A
Mm 8 SENZA UNA ADEGUATA
PROTEZIONE
C
A
F
E
APERTO
ON
OFFEN
OUVERT
ADIERTO
CHIUSO
LOCKED
ZU
FERME
CERRADO
Fig. 1.7.2
A
B
C
D
E
F
Page 10

10
1.8 - Protections and safety devices
ATTENTION!
Before proceeding to using the machine make sure the safety devices are
correctly positioned and intact.
Make sure they are working properly at the beginning of every work shift. If
there are anomalies notify the head of maintenance.
Fig. 1.8.1
1
2
3
4
19
3 - Controls and indicators
3.1 - List of controls and indicators
1 - Start push button
- Press to start the machine
2 - Stop push button
- Press to stop the machine
3 - Gear inversion push button
- Enables inverting the propeller rotation direction
Fig. 3.1.1
2
1
3
4
5
6
Page 11

18
2.5 - Electrical diagrams
2.5.1 - Single-phase electrical diagram at 220V
2.5.2 - Three-phase electrical diagram at 380V
PINK
YELLOW
WHITE
GREEN
BROWN
GREY
PINK
YELLOW
WHITE
GREEN
BROWN
FUSE
BOND
(TENSION CHANGE)
ONE PHASE
LINE
ONE PHASE
TRACTION
WINDNG
START
WINDNG
THERMIC
MICROSWITCH
START
CONDENSER
TREE PHASE
LINE
BOND
(TENSION CHANGE)
FUSE
GREY
THERMIC
MICROSWITCH
11
1. Product outlet, with plate holes smaller than 8 mm.
In this case it is impossible to insert fingers inside the outlet.
Upon request from the client, exit plates with holes having a diameter
greater than 8 mm can be installed.
In this case the user will be responsible for installing the proper outlet
protection.
2. Hand guard.
The hopper in the TC 32 RIO model, has the rigidly welded protection
"2", Fig.1.8.1 pag. 13, in compliance with the circular from the Work
and Welfare Ministery n° 66 dated 05.09.79.
The smaller models do not need this protection due to the smaller sizes
of the loading inlet.
3. Stainless steel hopper is firmly blocked at the loading inlet (TC 32
RIO).
4. Electrical components protection carters.
The lower part of the machine is closed with a carter, blocking
involuntary access to electrical components inside of it.
5 - Blockage lever for ground meat outlet
- Lift the lever to enable disassembly of the outlet and related parts (see
sticker).
- Lower the lever to block the outlet in the working position, making sure
that it is positioned in the predisposed housing (see sticker).
ATTENTION!
Never tamper with the safety devices.
Page 12

12
1.8.1 - Meat outlet blockage lever (TC 12 - 22 RIO)
The outlets on models 12 - 22 are fastened by a lateral system that
enables easily unscrewing the ring nut, even after having used the
machine for a long time.
In fact, the ring nut tends to get rigid after the meat grinder has worked
intensely. In these models, after having unscrewed the outlet fastening
lever half a turn, the ring nut can be easily unscrewed by hand, without
using any force.
Correct use:
If you want the machine to work correctly and the meat to be precisely
ground, the outlet must be firmly blocked in all the meat grinders.
Always avoid incorrect assemblies; it is very important to follow these
assembly procedures:
1. Insert the outlet and block it with the fastening lever
2. Make sure the lever is in the same position as
indicated in the label shown on the side (between 3
o’clock and 6 o’clock)
3. Insert the propeller
4. Insert the knife and plate
5. Make sure the knife is assembled with the blade
facing the plate
6. Fasten the ring nut and gently tighten it.
A
PERTO
ON
OFFEN
OUVERT
A
DIERTO
CHIUSO
LOCKED
ZU
FERME
CERRADO
Fig. 1.8.2
Fig. 1.8.3
A
PERTO
ON
OFFEN
OUVERT
A
DIERTO
CHIUSO
LOCKED
ZU
FERME
CERRADO
17
2.4 - Noise level emitted
Tests on the noise emitted by the machine indicate that the equivalent
noise level is less than 70 dBA.
Upon request the manufacturer can provide a copy of the noise test.
Dimensions
AxBxC
Net weight
mm kg
TC RIO 12
435 x 395 x H410 27
TC RIO 22
435 x 395 x H410 28
TC RIO 32
540 x 430 x H470 42
Page 13

16
2.2 - Technical features
2.3 - Machine dimensions and weight
Note
All the measurements are expressed in millimeters.
Motor Feed Hourly
production
Outfitted
plates
watt/hp kg/h. ø mm
TC RIO 12
736/1 230-400V/50Hz 150 4,5
TC RIO 22
1472/2 230-400V/50Hz 300 4,5
TC RIO 32
2208/3 230-400V/50Hz 500 6
Fig. 2.3.1
A B
C
13
1.8.2 - Rapid unblocking system (with knob lever) TC 32 RIO
The outlets on the models 32 are fastened with the rapid unblocking
system. This method enables quickly blocking and unblocking the outlet.
Blocking is simple, just correctly position the outlet and slightly push it until
there is a click; do this after making sure there is not any residue from the
previous grinding left inside the machine. The dirty residue, in fact, does
not enable the outlet to hook onto the lever and the white gasket on the
mushroom head push button would remain lifted instead of sticking to the
machine casing. (Fig. 1.8.5)
To unblock the outlet just take the push button and pull it out, in this way
the outlet can be easily extracted.
Correct use:
If you want the machine to work correctly and the meat to be precisely
ground, the outlet must be firmly blocked in all the meat grinders.
Always avoid incorrect assemblies; it is very important to follow these
assembly procedures:
1. Insert the outlet until you hear a click
2. Make sure the white gasket on the push button
sticks to the machine casing (Fig. 1.8.5).
3. Insert the propeller
4. Insert the knife and plate
5. Make sure the knife is assembled with the
blade facing the plate
6. Fasten the ring nut and gently tighten it.
Fig. 1.8.4
Fig. 1.8.5
Page 14

14
1.9 - Working position
The correct operator working position to optimize working with the
machine is shown in fig. 1.9.1.
Fig. 1.9.1
15
2 - Technical features
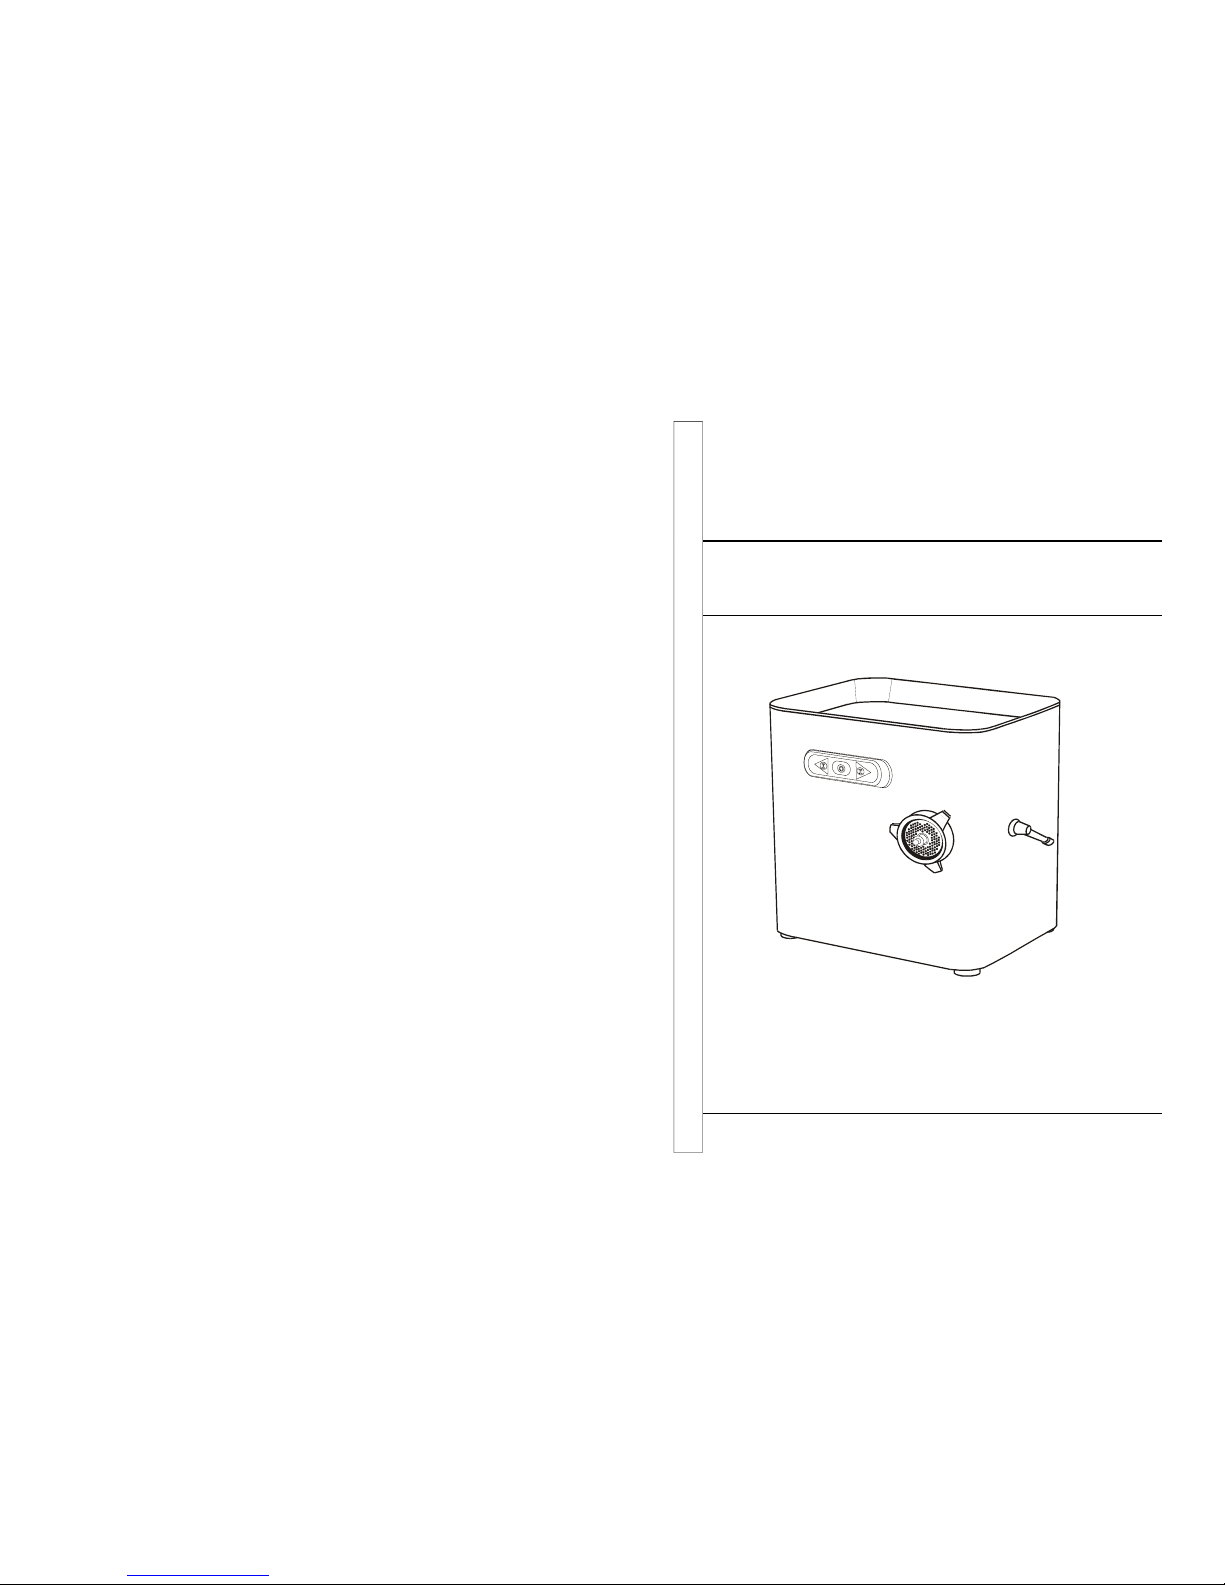
2.1 - Main parts
To faciltate understanding the manual, the main machine parts are listed
below and shown fig. 2.1.1.
1. Pestle - tool used to introduce the meat into the grinfìding group
2. Inlet blockage lever
3. Machine controls
4. Feet
5. Outlet for ground meat
6. Loading hopper
7. Loading inlet
Fig. 2.1.1
1
2
3
5
4
6
7
 Loading...