

Page 1
USE AND MAINT
ENANCE
INSTRUCTIONS MANUAL
Ed. 04/2021 - ver.002
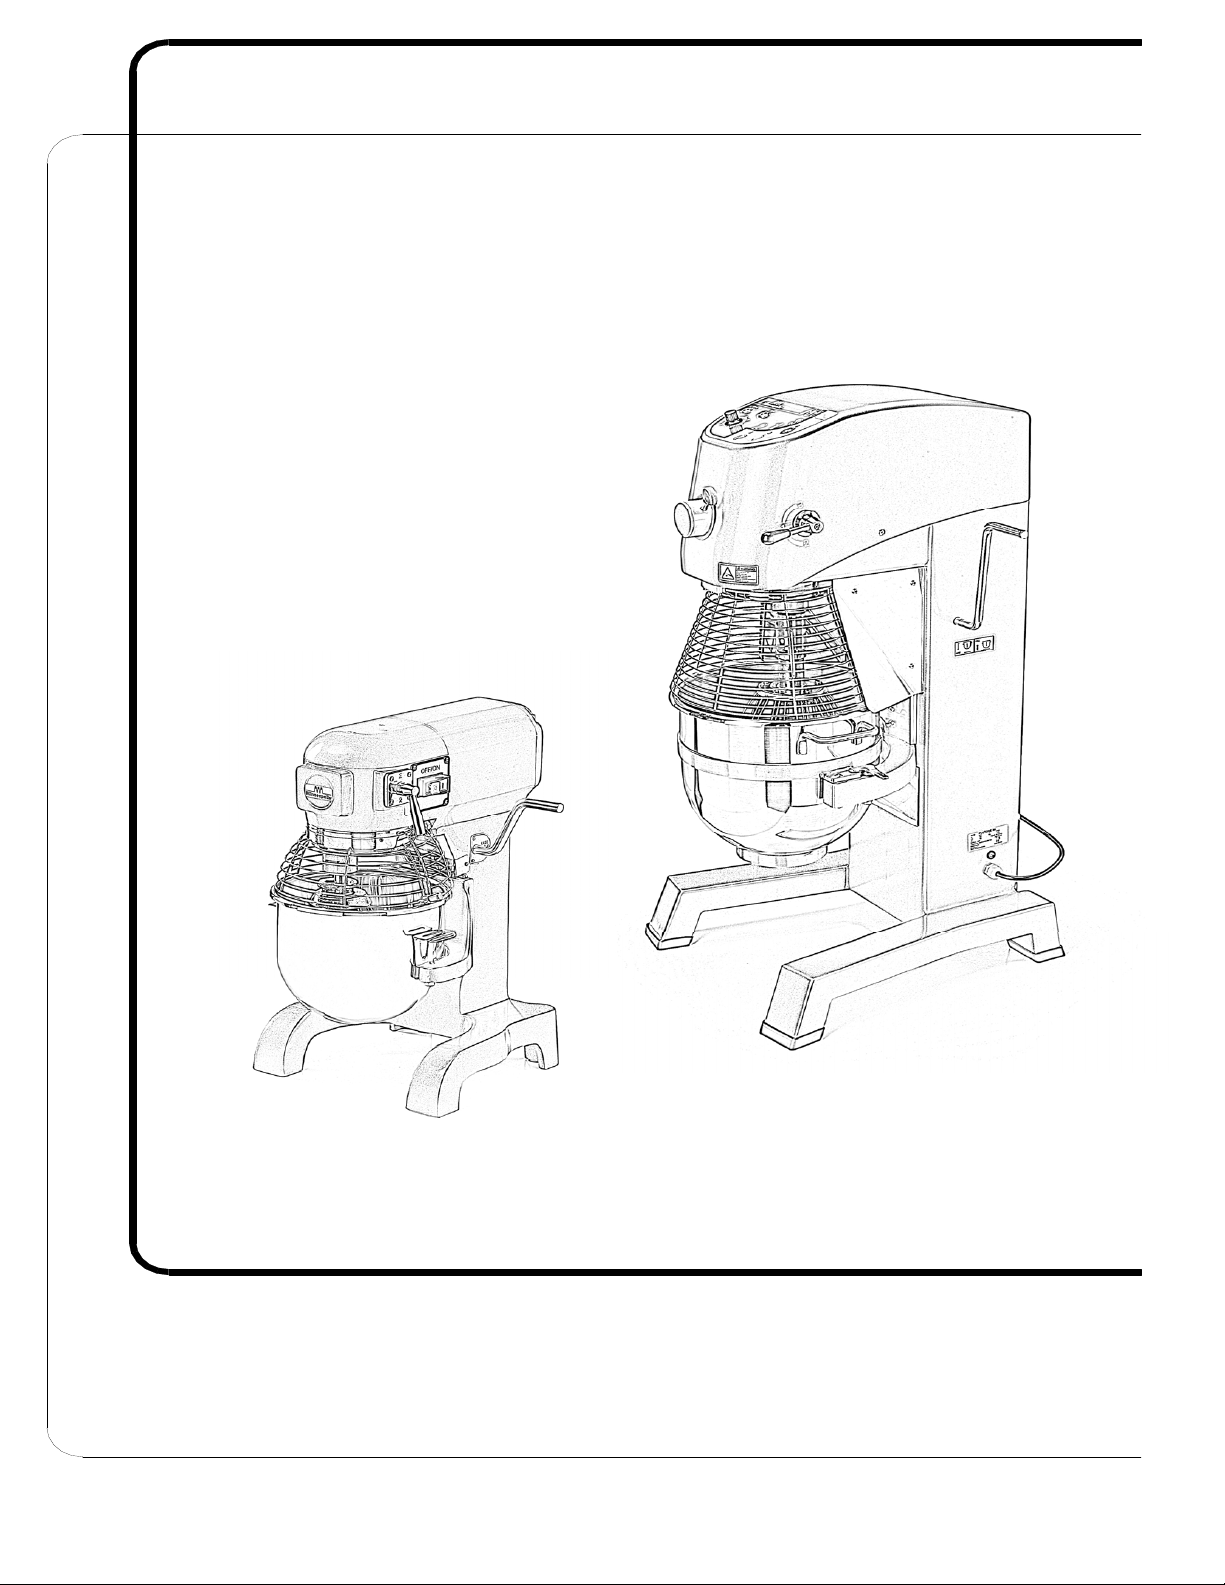
Planetary mixers 10-20-30-40
1
Page 2

PREMISE
This manual has been edited to supply the client with information on the machine and on the rules connected to it,
as well as the use and maintenance instructions for a better use of the mean, keeping its efficiency intact in time.
This manual must be handed over to the persons in charge of using the machine and its periodic maintenance.
INDEX OF CHAPTERS
CHAP. 1 - INFORMATION ON THE MACHINE page 3
1.1 - GENERAL PRECAUTIONS
1.2 - SAFETY DEVICES INSTALLED ON THE MACHINE
1.2.1 - mechanical safety devices
1.2.2 - electrical safety devices
1.3 - DESCRIPTION OF THE MACHINE
- general description
1.3.1
1.3.2 - constructive features
1.3.3 - machine composition
CHAP. 2 - TECHNICAL DATA page 6
2.1 - SIZE, WEIGHT, FEATURES ...
CHAP. 3 - RECEIVING THE MACHINE page 7
3.1 - SHIPPING THE MACHINE
3.2 - CHECKING THE PACKAGE UPON RECEIPT
3.3 - DISPOSAL OF PACKAGING
CHAP. 4 - INSTALLATION page 8
4.1 - PLACING THE MACHINE
4.2 - SINGLE PHASE ELECTRICAL CONNECTION
4.2.1 - THREE PHASE ELECTRICAL CONNECTION
4.2.2 - tools rotation direction
4.3 - ELECTRICAL LAYOUT
4.3.1 - Electrical system layout mod. 10-20-30
4.4 - FUNCTIONING CHECK
CHAP. 5 -
5.1 - CONTROLS
5.2
CHAP.
6.1 - GENERALITY
6.2
6.2.1 - cleaning the tools and bowl
6.2.2 - general cleaning
CHAP. 7 - MAINTENANCE page 12
7.1 - GENERALITY
7.2 - POWER SUPPLY CABLE
7.3 - TOOLS
USE OF MACHINE
- LOADING THE PRODUCT
ROUTINE CLEANING
6 -
- PROCEDURE TO FOLLOW WHEN CLEANING MACHINE
pa
p
a
ge 9
ge 10
CHAP. 8 - DISMANTLING page 12
8.1 DECOMMISSIONING
8.2 - RAEE Waste of Electrical and Electronic Appliances
2
Page 3

CHAP. 1 - INFORMATION ON THE MACHINE
1.1 - GENERAL PRECAUTIONS
The
machine must only be used by trained staff who must be perfectly aware of the safety rules contained in this
manual.
In case of personnel turnover, provide training in time.
Disconnect the machine from the mains before cleaning and maintaining.
When intervening for machine maintenance or cleaning (and therefore protections are removed), carefully evaluate
the residue risks.
During maintenance or cleaning, keep concentrated on the operations in progress.
Periodically check the state of the power supply cable; a worn cable or not intact, represents a serious electrical
danger.
Should the machine give reason to presume or show a malfunctioning, do not use it and do not try to repair it; but call the
“After-Sales Centre”.
Do not use the machine for frozen products, products with bones and, however, non-food products.
Do not try to place your hands or other objects in the container whilst the machine is working.
The manufacturer is lifted of every responsibility in the following cases:
⇒the machine is tampered with by unauthorised personnel;
⇒components are replaced with other non originals;
⇒the instructions in this annual are not attentively followed;
⇒the machine surfaces are treated with unsuitable products.
1.2 - SAFETY DEVICES INSTALLED ON THE MACHINE
1.
2.1 - mechanical safety devices
With regard to mechanical safety, the machine described in this manual is in compliance with Directive EEC 2006/42.
1.2.2 - electrical safety devices
With regard to mechanical safety, the machine described in this manual is in compliance with Directive EEC 2006/95,
2004/108.
Therefore, the machine is provided with micro which causes the machine to stop in case the protection grid on the bowl is
removed (see FIG. n.1).
Despite the machine being equipped with the electrical and mechanical protections (both during functioning and during
cleaning and maintenance), RESIDUE RISKS do however exist, which cannot be completely removed, recalled in this
manual with ATTENTION. They refer to the danger of bruising during cleaning of the machine and of accessories.
1.3 - DESCRIPTION OF THE MACHINE
1.3.1 - general description
Planetary mixer has been designed and realised by our company, with the precise aim to homogenise, emulsify, whipup food products like eggs, flour, cream and, however, not particularly hard or consistent, and guarantee:
3
Page 4

- Maximum safety
- Maximum hygie
the elimination of the rough edges in the parts of the machine which come into contact with the product, in order to
obtain an easy and complete cleaning as well as easy dismantling;
- Maximum yield;
- Robustness and
- Maximum noiselessness;
- Easy handling.
1.
3.2 - constructive features
Planetary mixer is made with the following materials:
- Painted aluminium and cast iron body;
- Ea
sily removable stainless steel bowl;
- Stainless steel and aluminium tools;
- Chrome steel protection grid.
in use, cleaning and maintenance;
ne thanks to the careful selection of the materials which come into contact with food products, and with
stability of all its components;
4
Page 5
1.3.3 - machine c
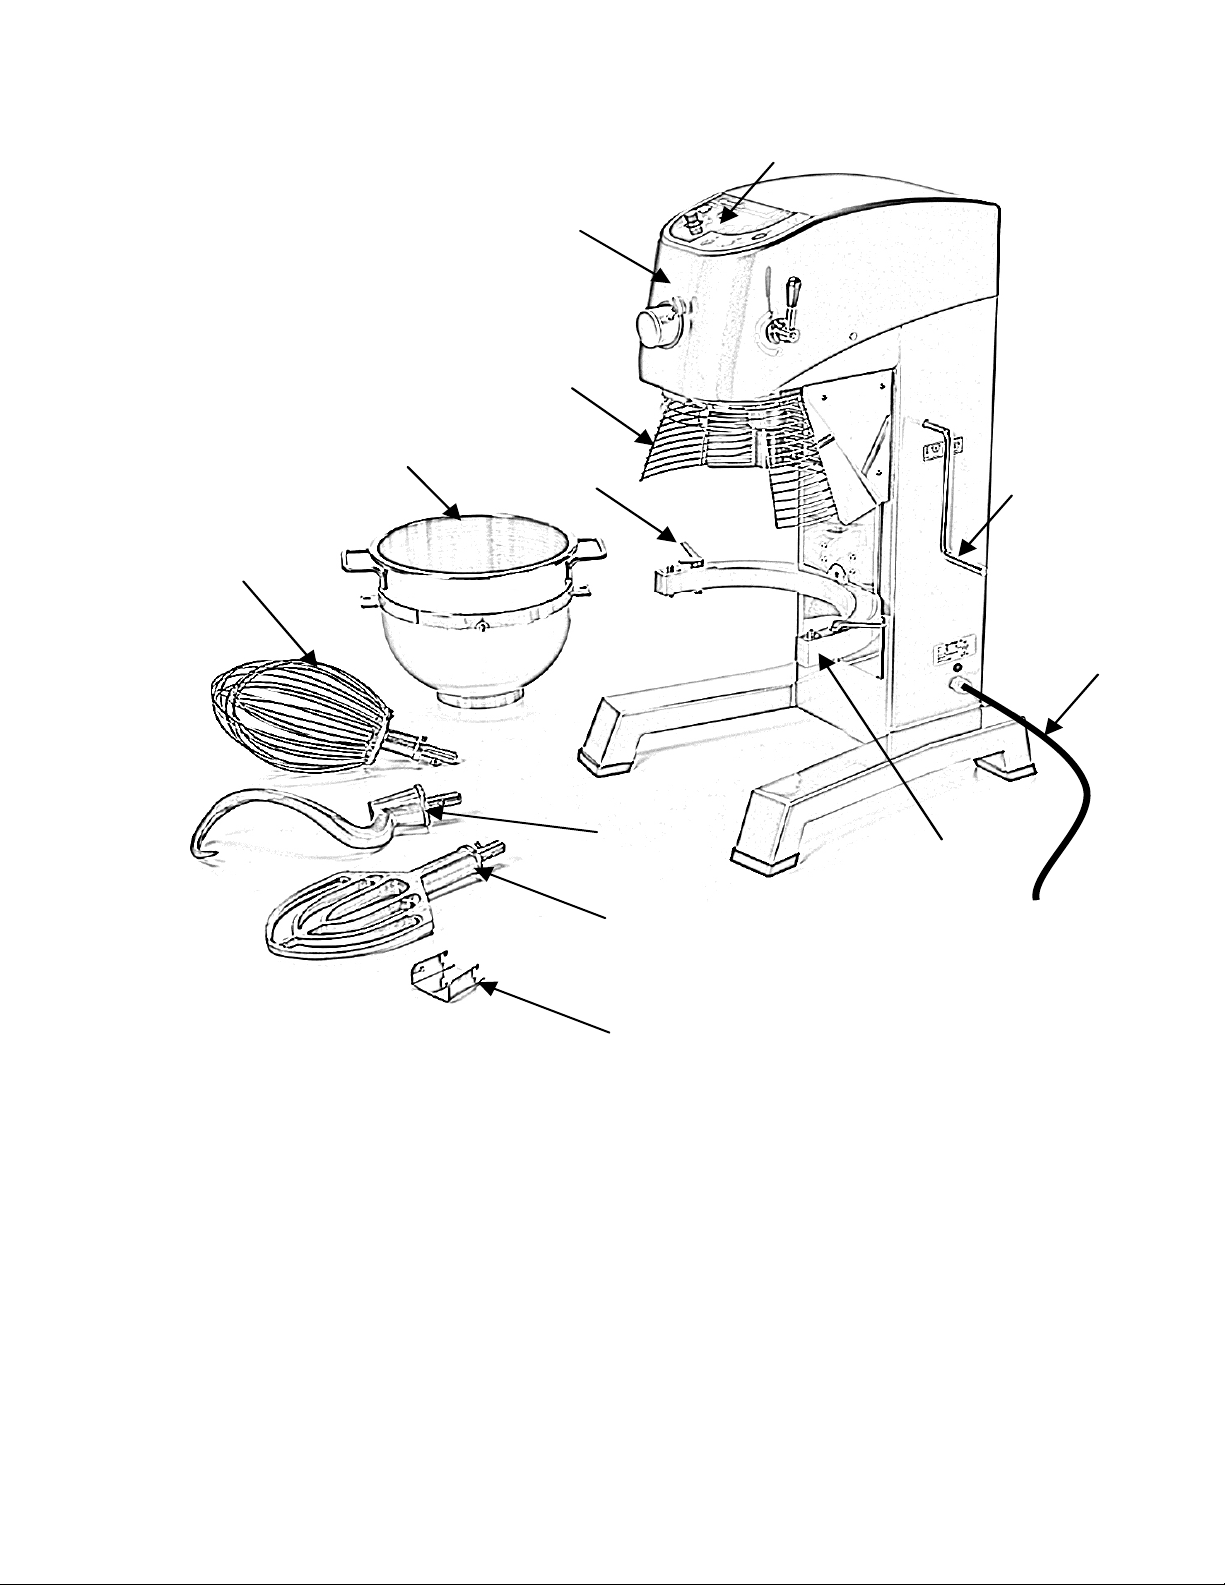
FIG. n.1 - General view of the machine
omposition
4
5
2
1
3
12
11
6
7
8
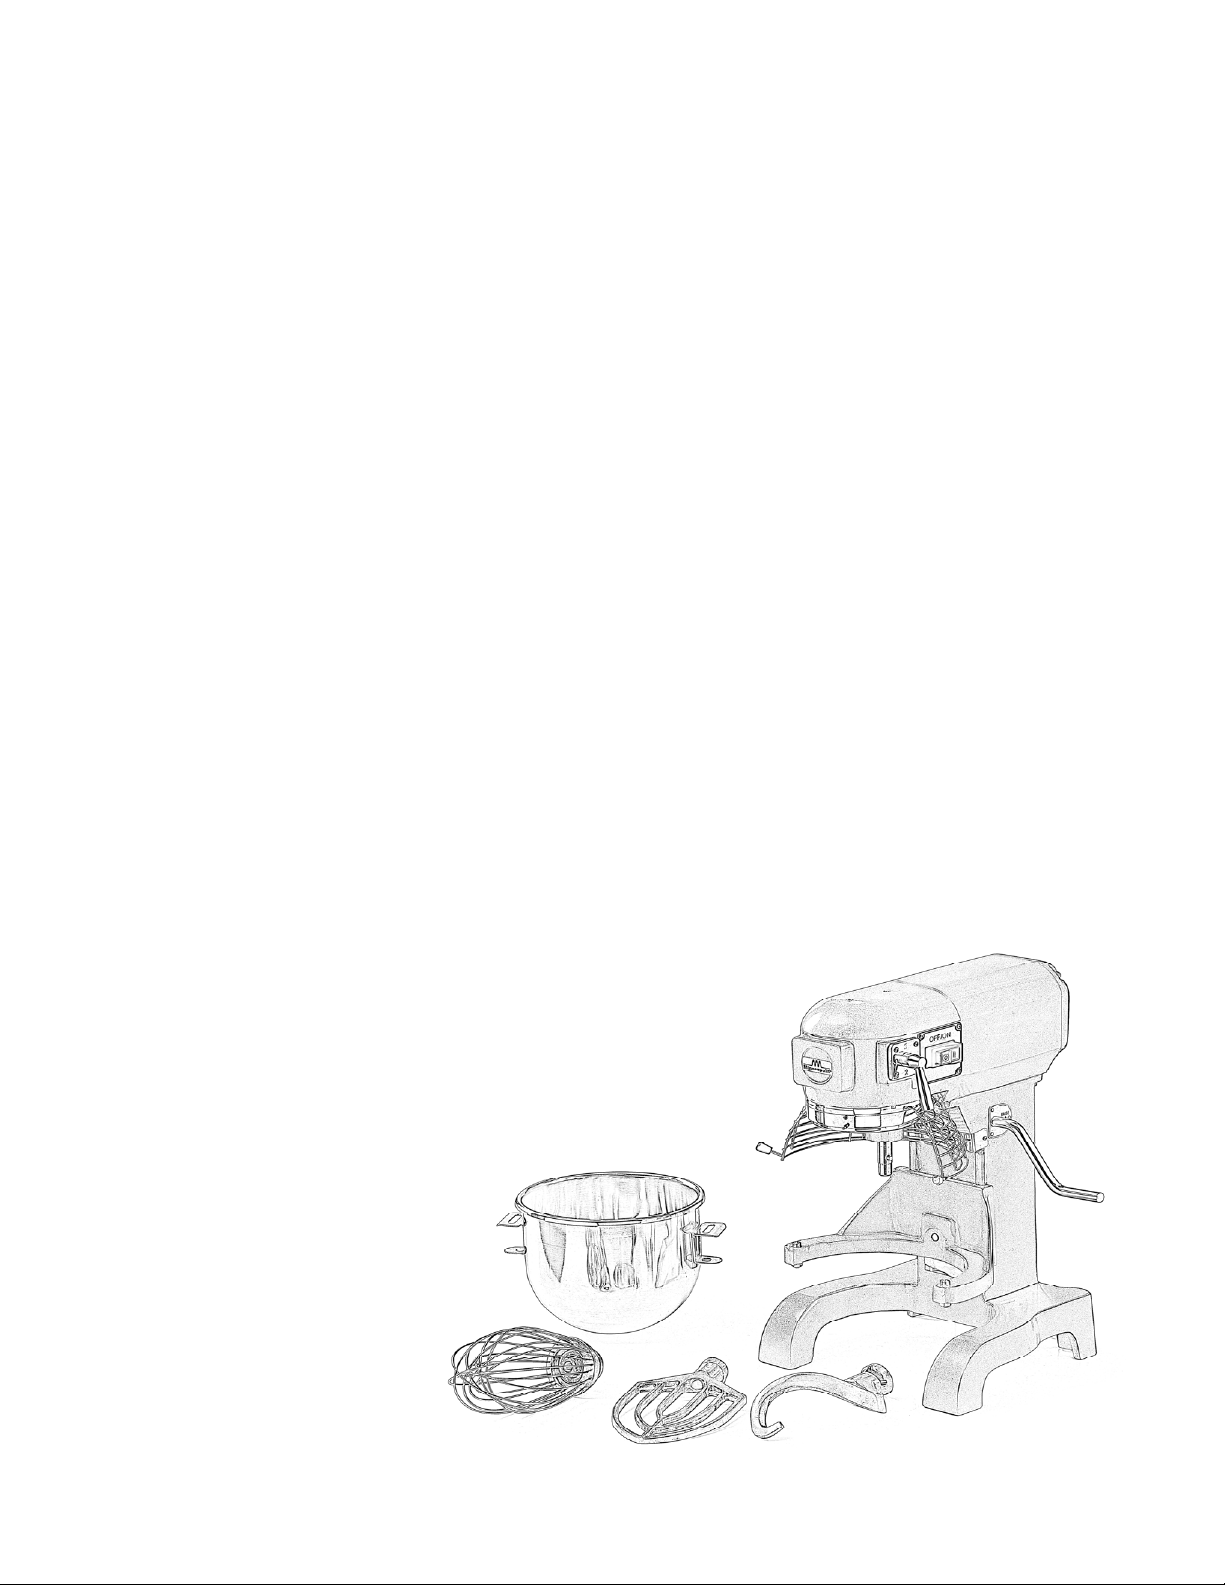
KEY:
1 Machine body 7 Spatula
2 Protection grid 8 F
eed tray for add ingredients for mod. 30-40
10
9
3 Bo
4 Bowl 10 Power supply cable
5 Whisk 11 Bowl lift/lower leve
6 Hook 12 Controls
wl fixing hook for. Mod. 20-30-40 9 Bowl support
5
r
Page 6
CHAP. 2 - TECHNICAL DAT
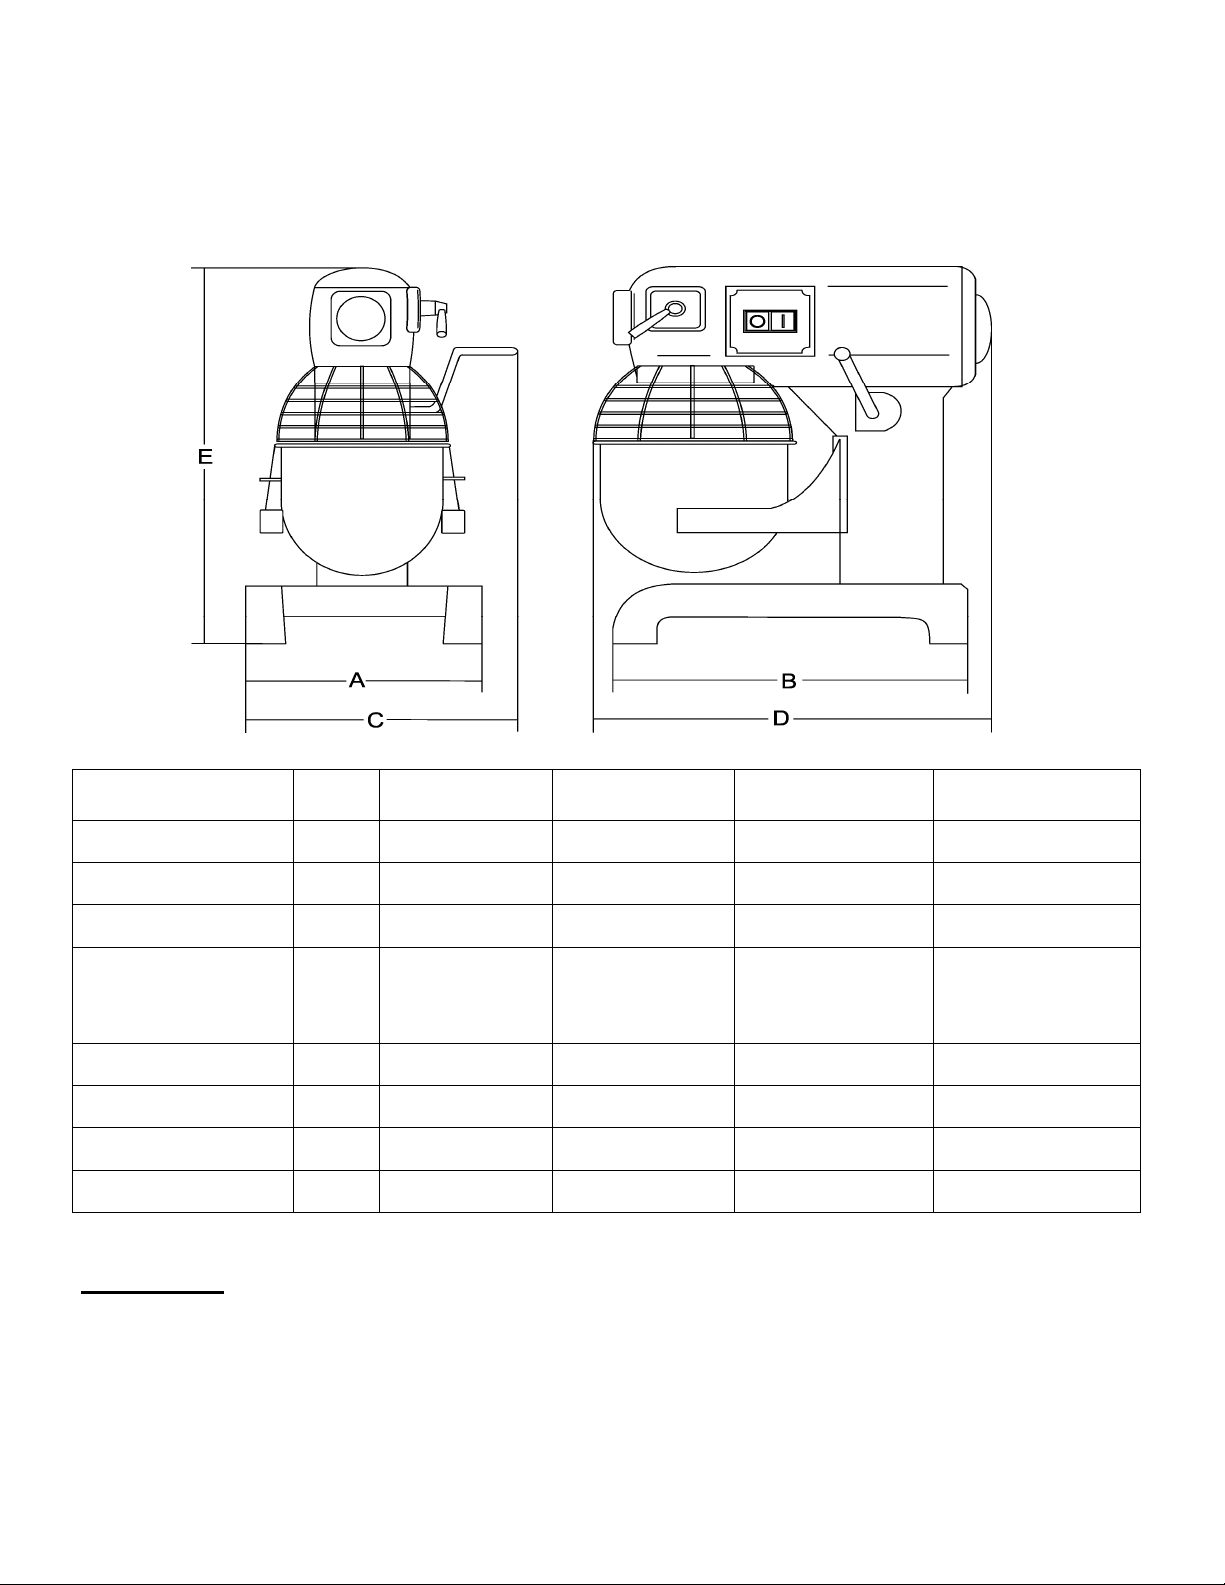
2.1 - SIZE, WEIGHT, FEATURES ... FIG. n.2 Overall dimensions
A
Model u
AxB
CxDxE
Bowl capacity
Wh
isk revolutions
tor
Mo
Power supply
weight
Net
Noise
level
ATT
ENTION: The electrical features for which the machine is prepared, are indicated on a plaque applied on the
back of the machine; before carrying out the electrical connection, see 4.2 electrical connection.
.m.
mm
mm
r.r.p.
Wat
dB
lt
kg
440x500x630
t
10 lt.
36
0x345
10
108
1 =
2 =
195
355
3 =
450
230V/50Hz
40
70
≤
20 lt.
42
0x440
515x560x770
20
= 97
1
2
= 220
= 316
3
1100
0V/50Hz
23
83
70≤ 70
63
lt.
30
58
0x660
0x650x1160
30
= 93
1
2
= 167
= 285
3
1500
230V/5
0Hz
169
≤
40 lt.
670x784
707x698x1316
40
= 99
1
2
= 221
= 307
3
2200
223
70
0Hz
≤
400V/5
6
Page 7
CHAP. 3 - RECEIVING THE MACHINE
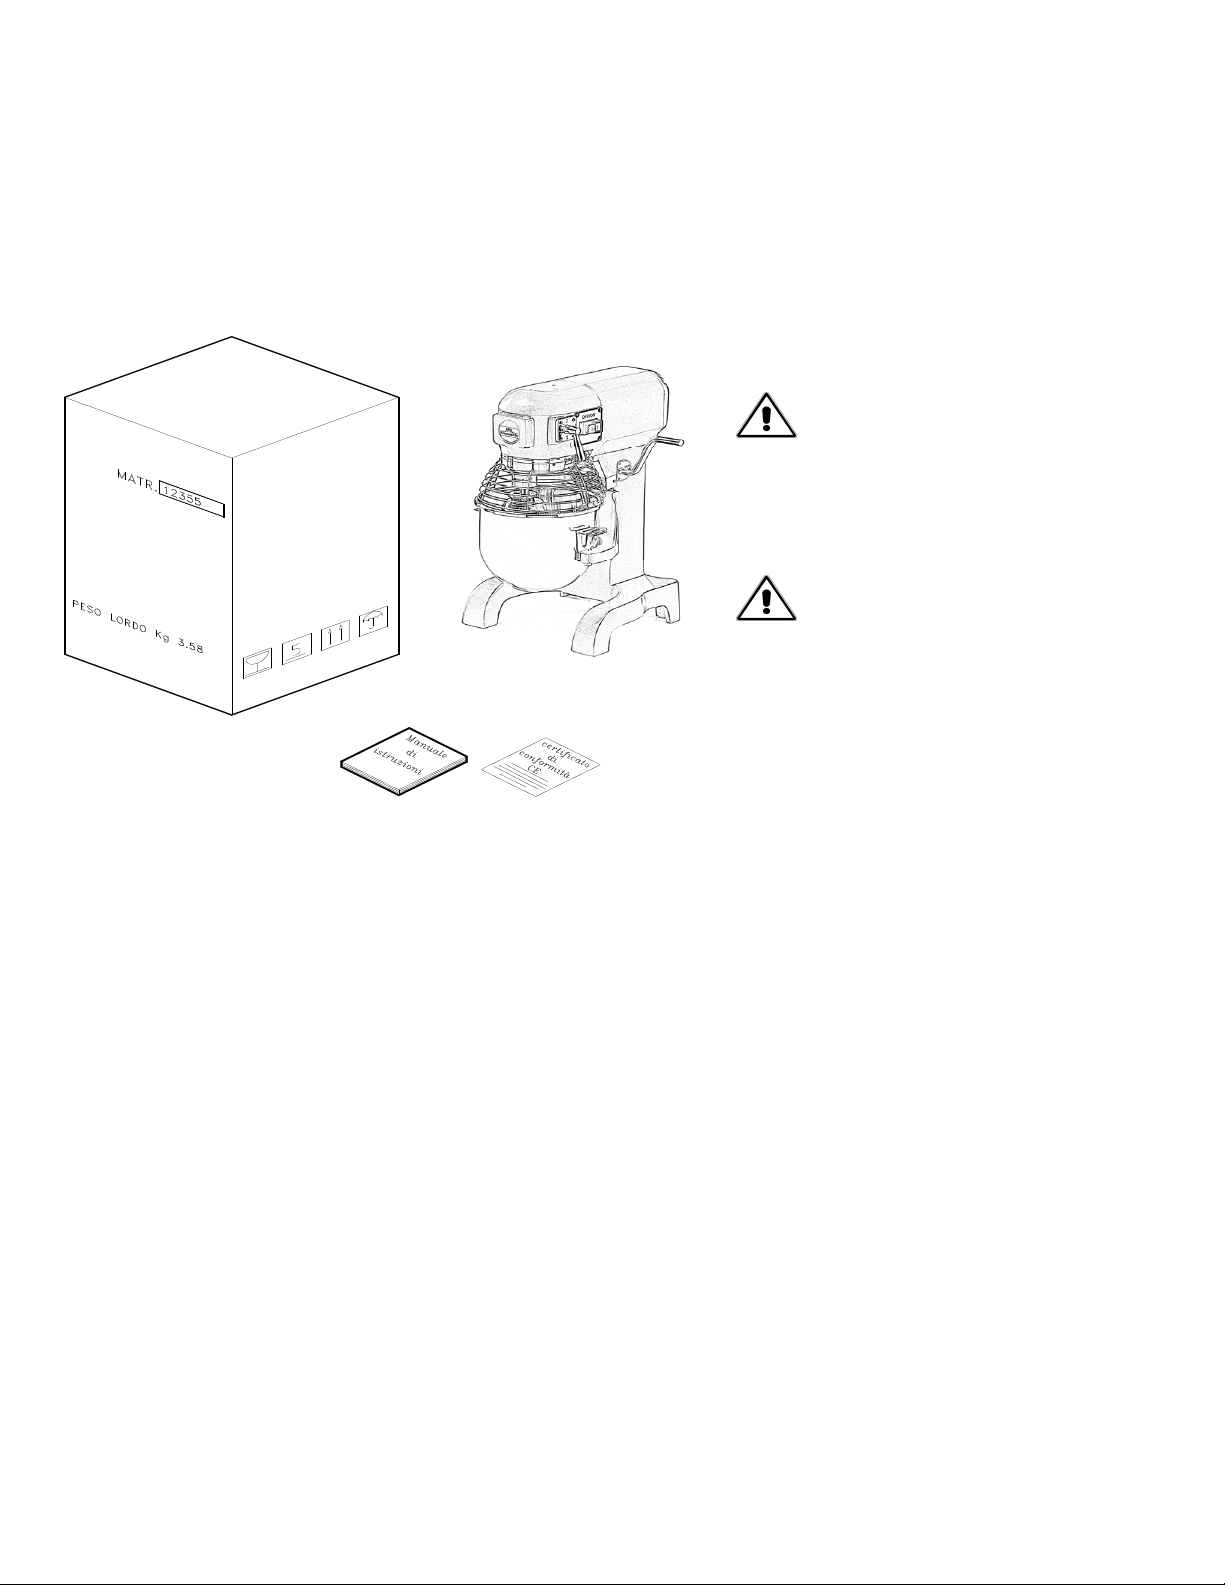
1 - SHIPPING THE MACHINE (see FIG. n.3)
3.
Planetary mixer leaves our warehouses accurately packed; the packaging is made of:
a)
a) ) external wooden bo
b) ) the machine
c) ) this manual
d) CE declaration of conformity.
x;
b)
c)
d. 20-30-40
Mo
Heavy package. Do not lift manually
unless with help of at least three people
Move the packag
trolleys or manually, equipped with lifting
d
)
straps
e only by electrical
IG. n.3 - Packaging description
F
2 - CHECKING THE PACKAGE UPON RECEIPT
3.
Upon receiving t
(see FIG. n.3). Whereas, if, upon receiving the package it shows signs of mistreatments, impacts or falls, show the
damage to the carrier and, within 3 days from delivery date, shown on the documents, draft a precise report on the
damages sustained
held from the 4 f
3.3 - DISPOSAL OF PACKAGING
The packaging components (cardboard, plastic strap) are products assimilable with municipal solid waste; for this reason,
they can be easily disposed of
n case the machine is installed in countries where particular rules exist, dispose of the packaging in compliance with
I
that provided
he package, if there are no external damages, open it to check that all the material is contained within
by the machine. Do not turn the package upside down!! When transporting, be sure that it is firmly
undamental points (keeping it parallel to the ground).
.
by the rules in force.
7
Page 8
CHAP. 4 - INSTALLATION
4.1 - PLACING
THE MACHINE
The surface on which the machine will be located must allow for the support dimensions indicated in the table (see
Chap. 2), and, therefore, be sufficiently wide, correctly levelled, dry, smooth, robust and stable.
Also, the machine must be installed in a room with 75% max humidity, not salty and a temperature between +5°C
and +35°C; however, in rooms which do not entail disorders of the same.
4.2 - SINGLE PHASE ELECTRICAL CONNECTION
The machine is equipped with a power supply cable with 3x1.5 mm² section; 1.5m length and a “SHUKO” plug.
Connect the machine 230 Volt 50 Hz, interposing a 10A, ∆ I = 0.03A magneto-thermal circuit breaker. Ensure the
earthing plant is perfectly functional.
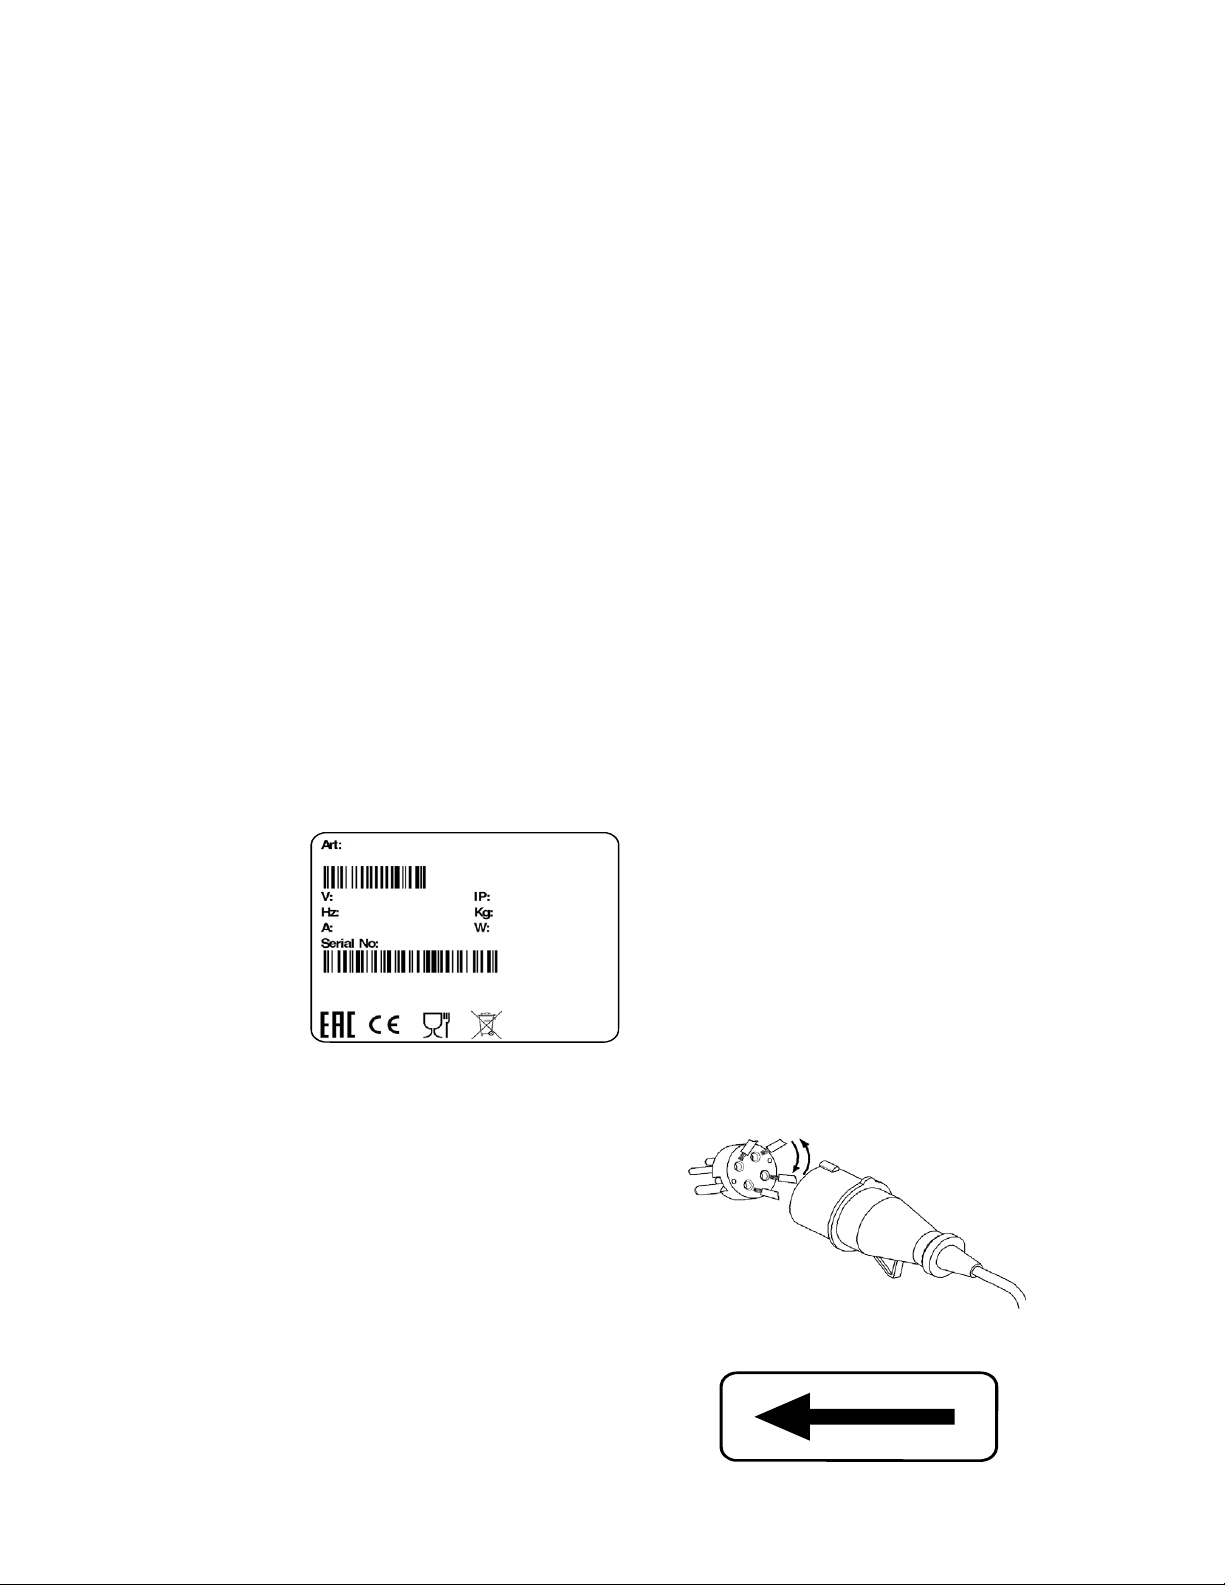
Also check that the data reported on the technical-serial number plaque (FIG.n.4) corresponds to the data reported on the
delivery and accompanying documents.
4.2.1 - THREE PHASE ELECTRICAL CONNECTION
The machine is equipped with a feeding cab
CEI plug. Connect the machine to the 400 V. - 50Hz three-phase supply mains, interposing a magnetot
le with a cross section area of 5x1,5mm², length ≅1.5m and a red 15A 3F + T
hermic differential
switch of 10 A, ∆I=0.03A.
Also check that the data reported on the technical-serial number plaque (FIG.n.4) corresponds to the data reported on the
delivery and accompanying documents.
(A)
FI
G. n.4 - Technical-serial number plaque
2.2 - tools rotation direction
4.
(A) = Product code and name
(B) = Power supply
(C) = Motor frequency
(D) = Amperage
(B)
(E) = Serial number
(C)
(F) = Barcode
(D)
(G) = Manifacturer
(E)
(H) = International Protection
(I) = Weight
(G)
(H)
(I)
(L)
(F)
(M)
Check the direction of the tools rotation with a pulse of the
“I” push-button (ON), immediately followed by the “0” pushbutton OFF.
The direction of the tools rotation must be clockwise
when looking at the machine from the front side (see arrow
Fig. n°6). In the case that the rotation direction is not exact,
invert (Fig. n°5)) the positi of two of the three phase wires
(black, gray or brown) in the plug.
LEGEND
(L) = Power
(M) = Origin
FIG. n.5
8
FIG. n.6
Page 9
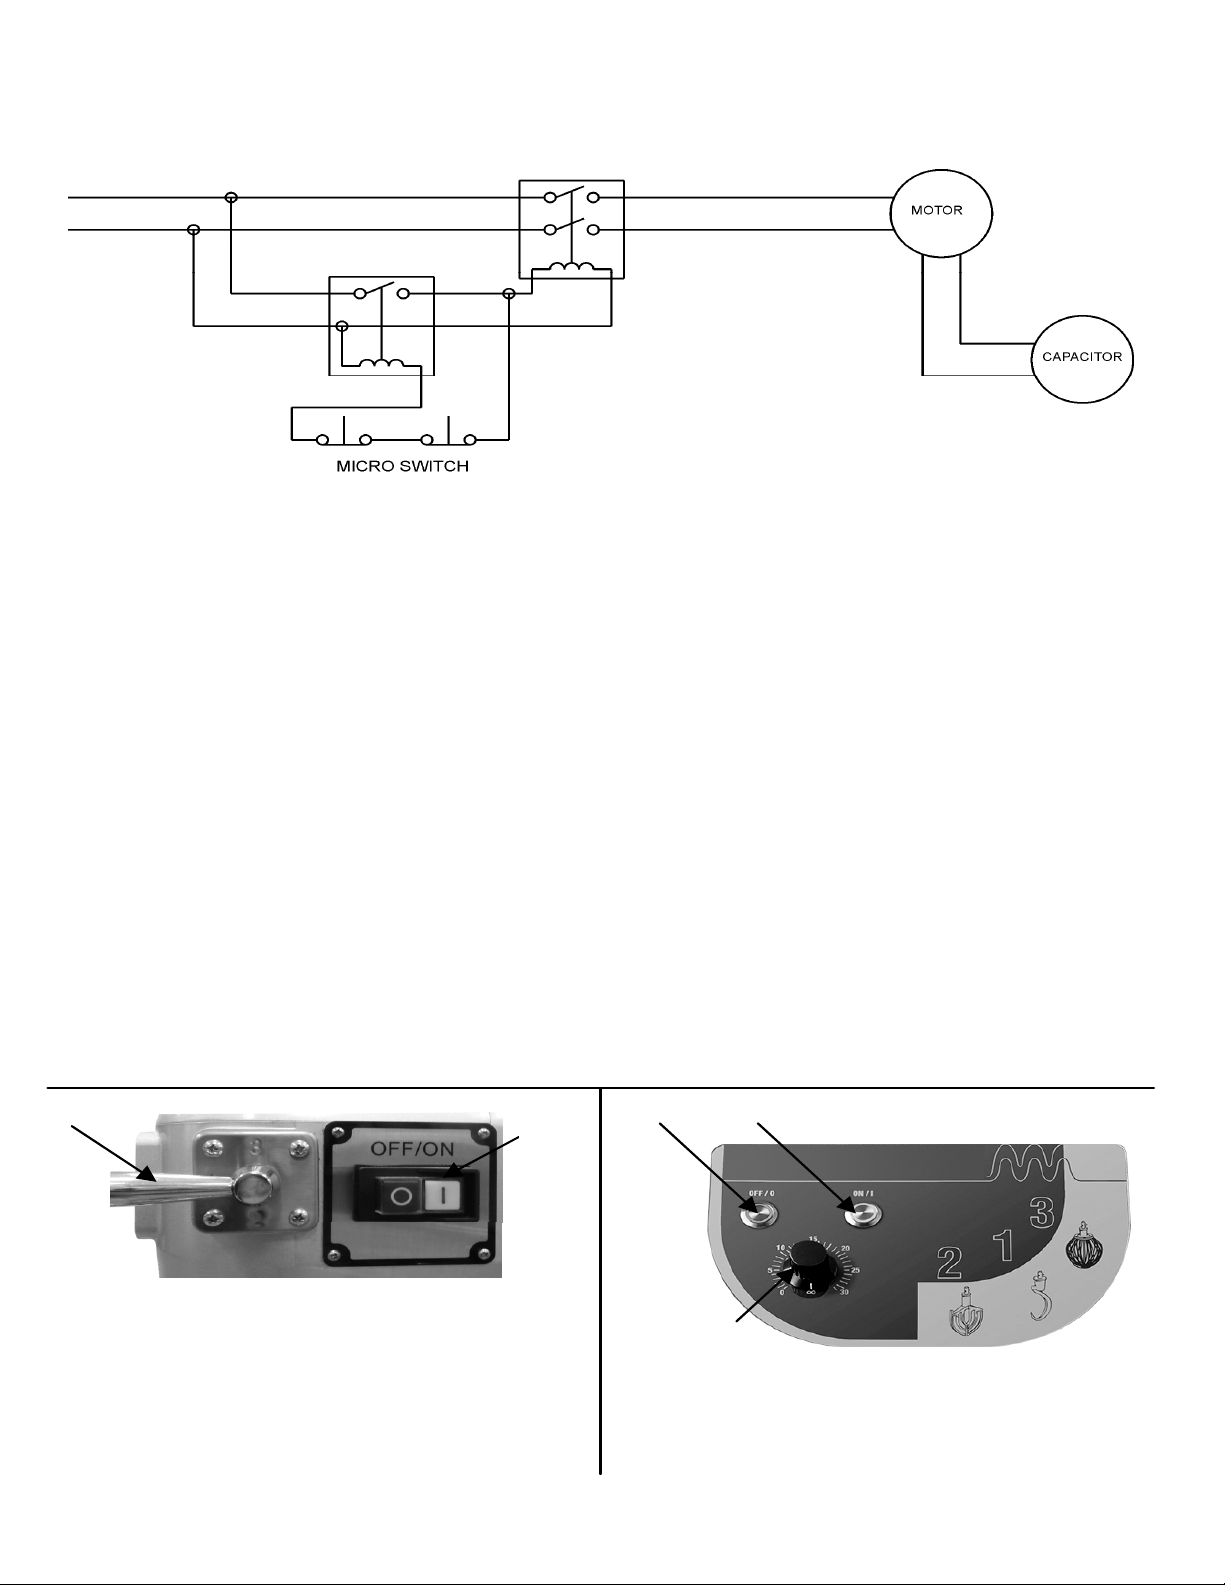
4.3 - ELECTRICAL LAYOUT
4.
3.1 - Electrical system layout mod. 10-20-30
POWER SUPPLY
230 V 50 Hz
FIG. n.7
4.4 - FUNCTIONING
CHECK (FIG. n.1) Before
testing the machine ensure that:
- T
he mixing bowl (FIG. n.1 - ref.8) is perfectly housed;
- The tool (FIG. n.1 - ref.5-6-7) is perfectly mounted;
- There are no accessories inside the bowl (FIG. n.1 - ref.8);
- The grid (FIG. n.1 - ref.2) is perfectly closed.
he procedure is the following:
T
1. action the Planetary mixer by
pressing start button “I”, and subsequently stop button “0”;
2. Check if by opening the grid or lowering the bowl (FIG. n.1 - ref.2-8) the Planetary mixer switches off.
CHAP. 5 - USE OF MACHINE
1 - CONTROLS
5.
The controls are arranged on the body of the machine as highlighted in the following figure.
Planetary mixer mod
. 10 - 20
Planetary mixer mod.
30 - 40
2
1
- 0/I switch
2 - speed selector 1-2-3
F
IG. n.8 - Position of controls
1
9
1 2
3
1 - push-button
push-button ON/I 3 - timer
OFF/0 2 -
Page 10
5.2 - LOADING THE PRODUCT
The goods to be mixed must be loaded into the bowl exclusively
tention to the tool.
at
ENTION! Do not introduce solid products! The procedure
ATT
is the following:
with the motor still, paying
1. Lower the lever (Fig.1 -
2. Insert the tool suitable for the work to be carried out;
3. Insert the bowl in the appropriate supports and fix it with the hooks present in the supports (Fig.1 - ref.3).
4. . ATTENTION) place the product into the bowl paying attention to the inserted tool;
5. Lift the lever (Fig.1 - ref.10) anti-clockwise, in order to bring the bowl in working position;
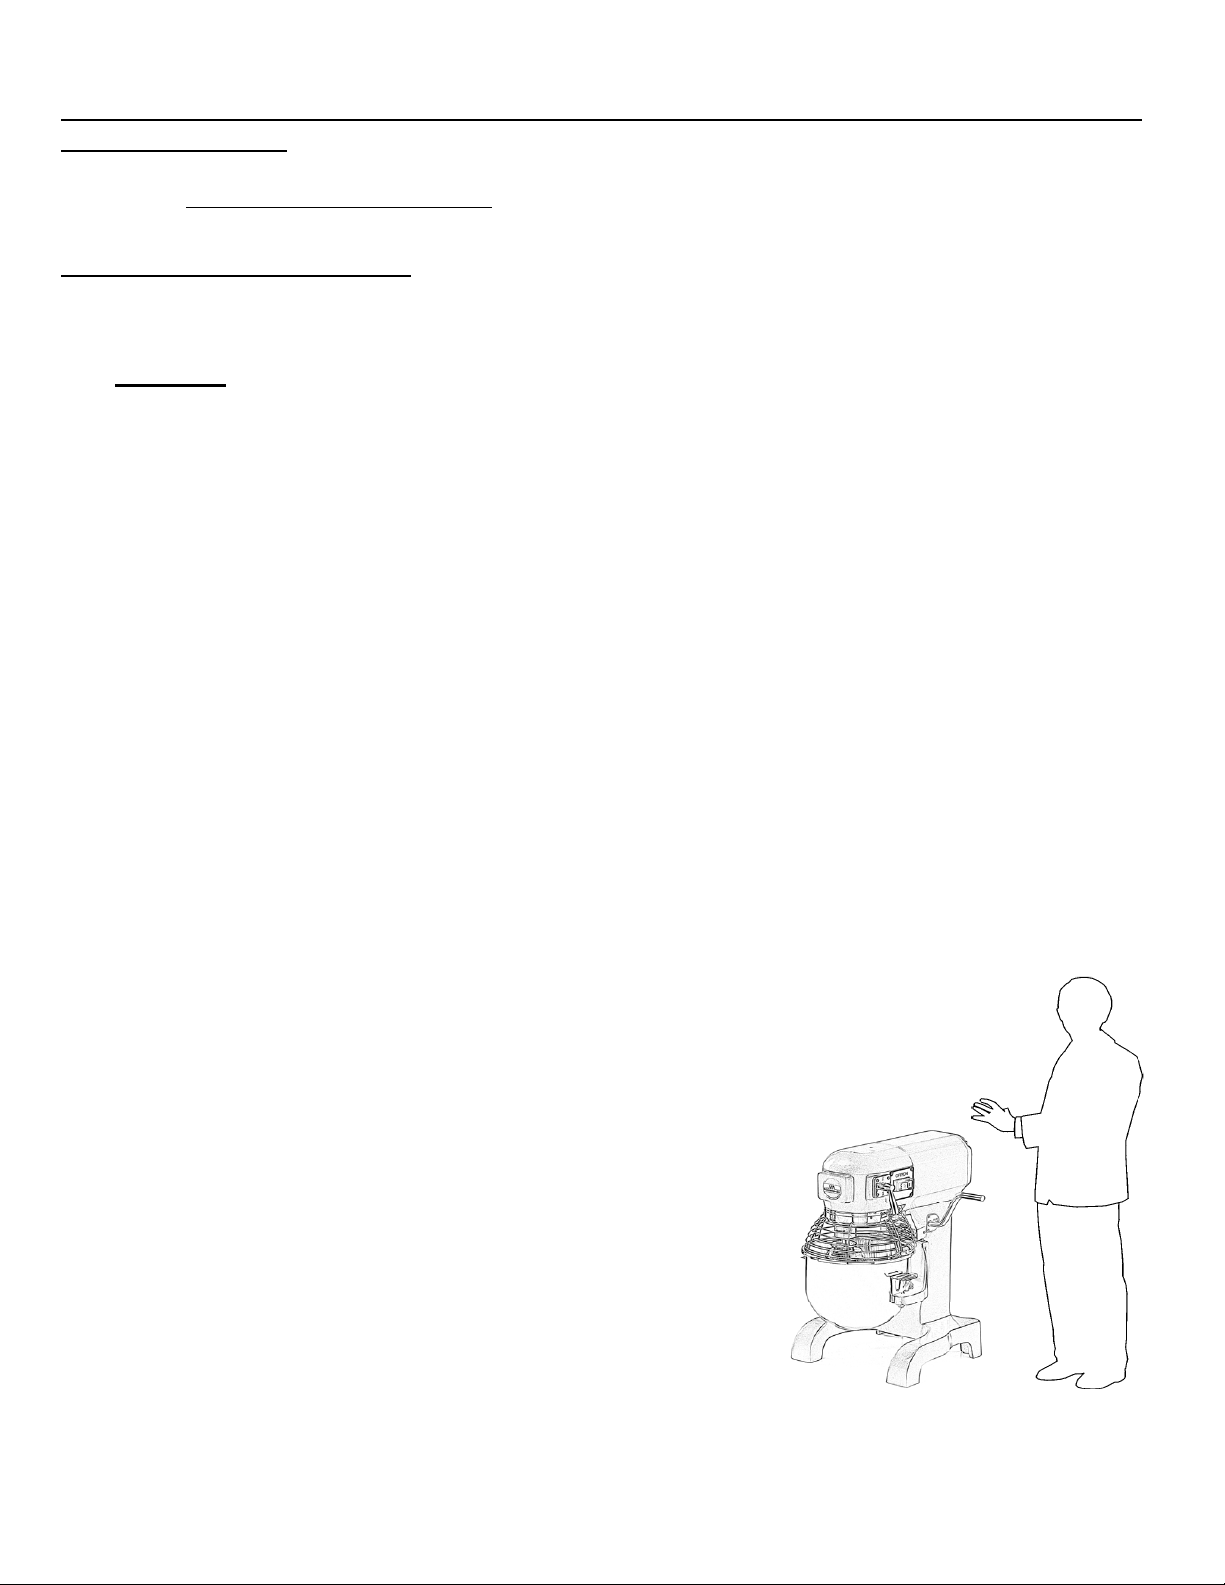
6. Assume a correct position in order to avoid accidents (see FIG. n.9): the body must be perpendicular to the work
surface; the hands must not force the machine components or obstruct the movements of the same.
In any case, do not lean on to the machine, avoiding assuming positions which might entail direct contact
with the machine.
7. Start the machine by pressing the “I” button.
8. To change speed, turn power off, select the desired speed then turn power on,
9. At the end of the work stop the machine by pressing stop button “0”;
10. Lower the lever (Fig.1 - ref.10) clockwise, the bowl lowers, therefore cautiously remove the bowl.
ref.10) clockwise.
ATT
ENTION!
Please use the planetary mixer for maximum 30 minutes ON and then leave it
10 minutes OFF
FIG. n.9 - Correct position
10
Page 11
CHAP. 6 - ROUTINE CLEANING
6.1 - GENERALITY
The machine must be cleaned at least once a day or, if necessar
All parts of the machine which come
•
scrupulously cleaned.
The machine must not be cleaned with high pressure cleaners or water jets but with water and neutral detergents.
•
Tools, scrubbers and anything else which might superficially damage the machine must not be used.
Before carrying out an
a) Disconnect the mains to completely isolate the machine from the rest of the plant;
6.2 - PROCEDURE TO FOLLOW WHEN CLEANING THE MACHINE
6.2.1 - cleaning the tools and bowl
To clean the tools holder it is necessary to:
a) Remove the bowl from the machin
b) CAREFULLY disman
Once the components
The bowl and tool used must be washed with hot water and neutral detergents every time they are to be left unused for
more than two hours or at least once a day.
y cleaning operation it is necessary to:
tle the tool.
have been removed, clean them with warn water and a neutral detergent.
into direct or indirect contact with the product to be worked, must be
e body;
y, more frequently.
ENTION! Do not wash any Planetaria component in the dishwasher.
ATT
6.2.2 - general cleaning
NB.: Disconnect the power supply
The body of the machine can be cleaned with a neutral detergent and a damp cloth, frequently rinsed with warm water.
When finished, accurately dry all parts.
FIG. n.10
11
Page 12

CHAP. 7 - MAINTENANCE
7.1 - GENERALITY
Before carrying
Disconnect the power supply from the mains to completely isolate the machine from the rest of the plant.
7.2 - POWER SUPPLY CABLE
Periodically check the wear of the cable and eventually call the “AFTER-SALES CENTRE” to replace it.
7.3 - TOOLS
If the tools should not work the product correctly, call the “AFTER-SALES CENTRE”.
CHAP. 8 - DISMANTLING
8.1 - DECOMMISSIONING
If, for any reason it should be decided to place the machine out of order, ensure it cannot be used by any other
person: disconnect and cut the electrical connections.
out any maintenance operation it is necessary to:
8.
2 - RAEE Waste of Electrical and Electronic Appliances
According to art.13 of Legislative Decree 25 July 2005, n.151 ”Implementation of Directives 2002/95/EC,
20
02/96/EC and 2003/108/EC, concerning the restriction on the use of certain hazardous substances in
electrical and ele
The symbol of the crossed out wheeled bin on the appliance or on its packaging indicates that, at the end of its lifespan, the product must be collected separately from other waste.
Once reached the end of its life-span, the differential collection of
manu
facturer. The user wanting to dispose of this appliance will therefore have to contact the manufacturer and follow
he system adopted by him to allow the separate collection of the appliance that has reached the end of its life-span.
t
The adequate diff
and compatible environmental disposal, contributes to avoid possible negative effects on the environment and on
health, and favours the re-use and/or recycle of the materials composing the machine.
The unlawful disposal of the
provided by the
ctronic equipment, as well as the disposal of waste”.
this appliance is arranged and managed by the
erential collection for the subsequent start of the appliance dismantled for recycling, treatment
product on behalf of the owner, involves the application of administrative sanctions
normative in force.
12
 Loading...