

Page 1
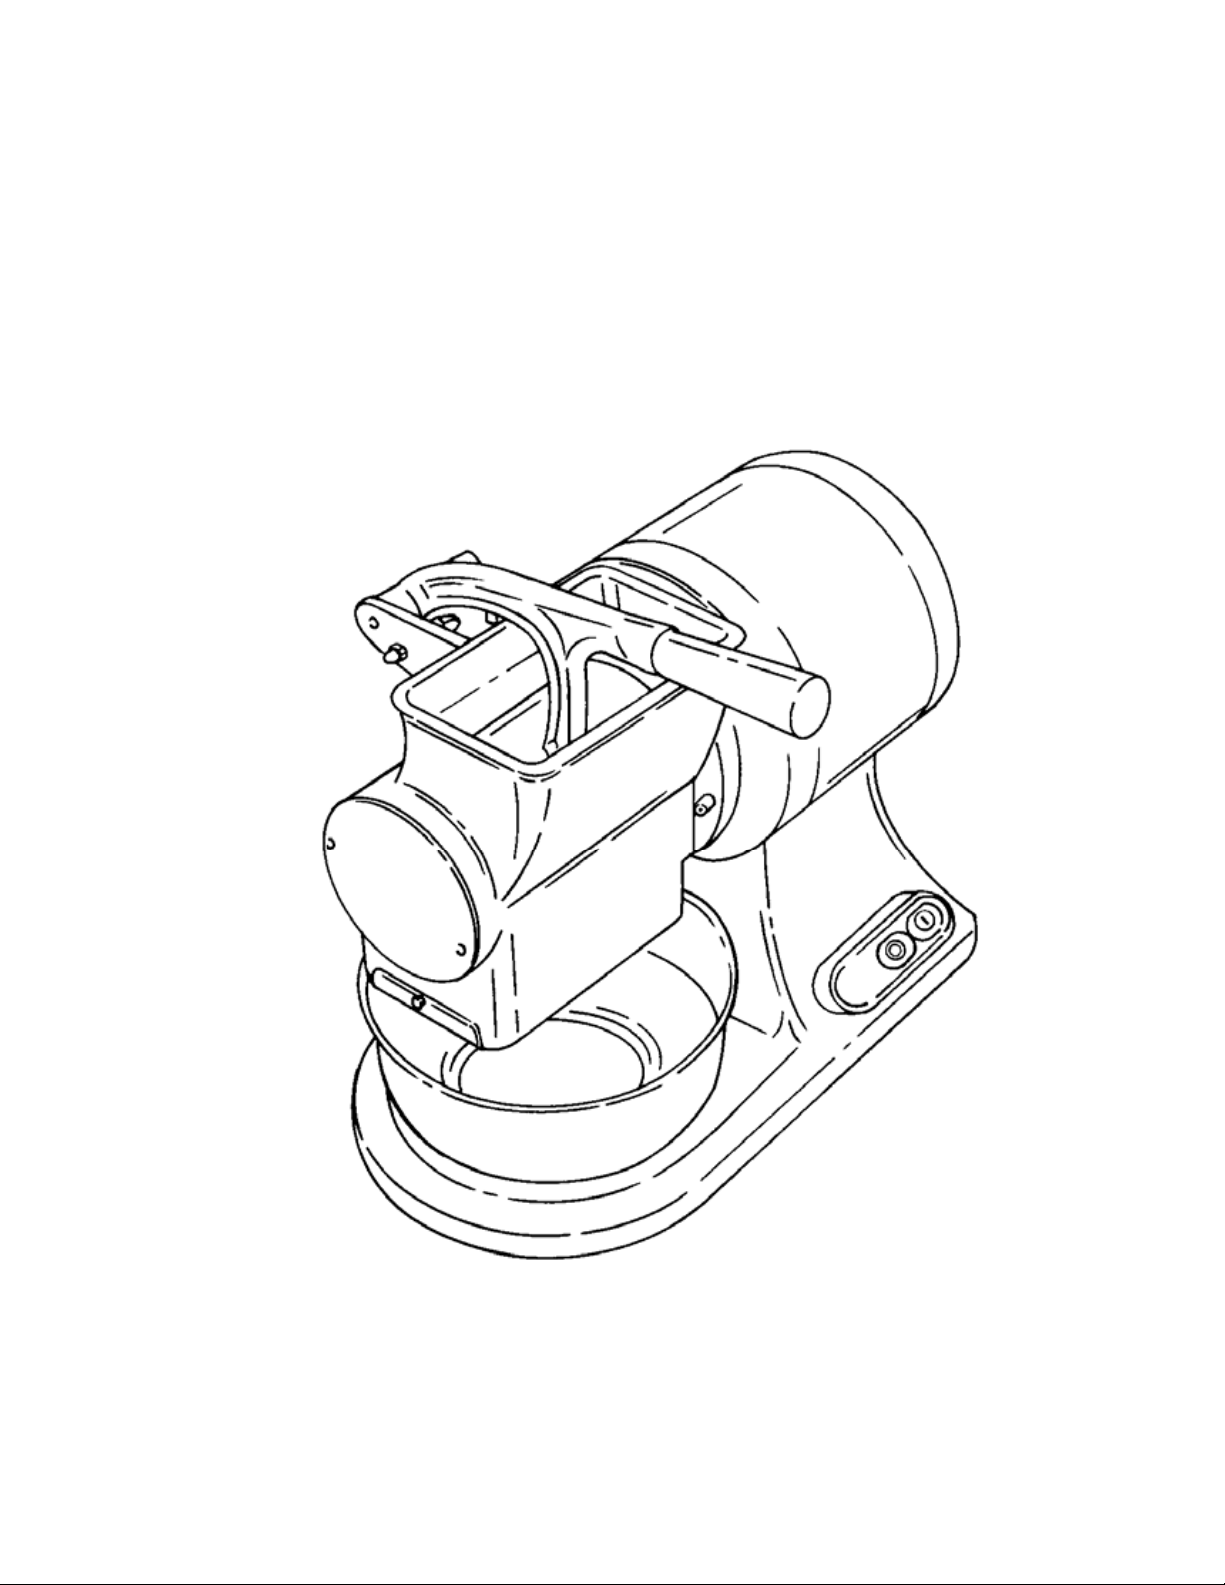
GF / GP CE
USE AND MAINTENANCE MANUAL
1
Page 2

FOREWORD
- This manual
the necessary operating and maintenance instructions in order to ensure machine performance and
longevity.
- This manual is to be used by qualified and skilled operators with thorough knowledge of machine use
and maintenance.
CONTENTS
CHAP. 1 - INFORMATION ON THE MACHINE p
1.1 - GENERAL PRECAUTIONS
1.2 - SAFETY DEVICES INSTALLED ON THE MACHINE
1.3 - DESCRIPTION OF THE MACHINE
1.3.1 - General description
1.3.2 - Manufacturing features
1.3.3 - Machine components
CHAP. 2 - TECHNICAL SPECIFICATION
2
.1
-
is meant to provide Customers with information on the machine and its specifications and
age 4
p
age 7
OVERALL DIMENSIONS, WEIGHT, FEATURES...
CHAP. 3 - RECEIVING THE MACHINE p
.1
3
3
.2
3.3
CHAP. 4 - INSTALLATION
.1
4
4
.2
.2.1 - GF/GP with single-phase motor
4
4.2.2 - GF with three-phase motor
4
.3
4.3.1 - Single-
4.3.2 - Three-phase wiring diagram
.4
4
4.4.1 - Single-phase wiring diagram
4.5
CHAP. 5 - USE OF THE MACHINE
5.1
5
.1.1 - Controls for the KIT FRANCIA
.2
5
DESPATCH OF THE MACHINE
-
- PACKAGE CHECK UPON RECEIPT
PACKAGING DISPOSAL
-
SETTING UP OF THE MACHINE
-
-
ELECTRICAL CONNECTION
-
WIRING DIAGRAM GF
phase wiring diagram
WIRING DIAGRAM GP
-
FUNCTIONAL CHECK
-
- CONTROLS
LOADING THE PRODUCT IN THE GRATER
-
age 8
p
age 9
p
age 13
2
Page 3

CHAP. 6 - GENERAL CLEANING
6.1
6.2
FOREWORD
HOW TO CLEAN THE MACHINE
-
p
age 14
CHAP. 7 -
7.1
7.2
7
.3
7.4
CHAP. 8 - SCRAPPING
.1
8
8.2
MAINTENANCE
-
FOREWORD
-
FEET
- POWER SUPPLY CABLE
-
CONTROLS
- PUTTING THE
SCRAPPING
-
MACHINE OUT OF SERVICE
p
age 15
p
age 15
3
Page 4

CHA
1.1 - GENERAL PRECAUTIONS
Th
⇒Th
P. 1 - INFORMATION ON THE MACHINE
• The GF/GP must be operated only by highly qualified personnel who are fully aware of the safety
measures described in this manual.
• In case of a personnel turnover, training is to be provided in advance.
• Although the machine incorporates safety devices and protections for dangerous parts, it is
recommended not to touch the moving parts or the machine with wet hands.
• Before starting cleaning and maintenance operations, disconnect the plug from the supply socket.
• To carry out cleaning and maintenance of the GF/GP assess the residual risks carefully (as protections
are removed).
• Cleaning and maintenance require concentration.
• A regular check of the power supply cable is absolutely necessary (to avoid any danger unroll
completely the feeding cable); avoid any compression with weights or contact with hot or cutting
surfaces and do not pull the cable to disconnect it from the power supply.
• If the GF/GP malfunctions, it is recommended not to use it and do not try to repair it; please call the
“Service Centre”.
• Do not use the GF/GP for processing frozen products or non food products.
• Do not introduce metal objects or other into the grater opening.
• Never grate the product without using the pusher handle.
e manufacturer shall not be liable for damage to things or injury to persons in the event:
e machine or the safety devices and protections have been tampered with by non authorised personnel;
⇒Non original spare parts are installed;
⇒Th
⇒The machine surface is not cleaned with the right product (flammable, corrosive
1.2 - SAFETY DEVICES AND PROTECTIONS INSTALLED ON THE
MACHINE
Safety devices for protecting against electrical hazards conform to EEC 2006/95, 2004/108, and
mechanical hazards conform to EEC 2006/42.
The GF/GP is equipped with:
e instructions provided in this manual are not followed scrupulously;
or toxic substances).
• Protection grid (1) on the exit opening (see FIG. n°1), avoiding the possible contact between hands
and roller during the operations;
• Relay on the control circuit, in case of interruption in the power supply it is necessary to restart the
machine.
• Safety microswitch (2) stops the machine when the pusher handle is lifted.
The GF/GP is fitted with electrical and mechanical safety devices for machine
4
Page 5
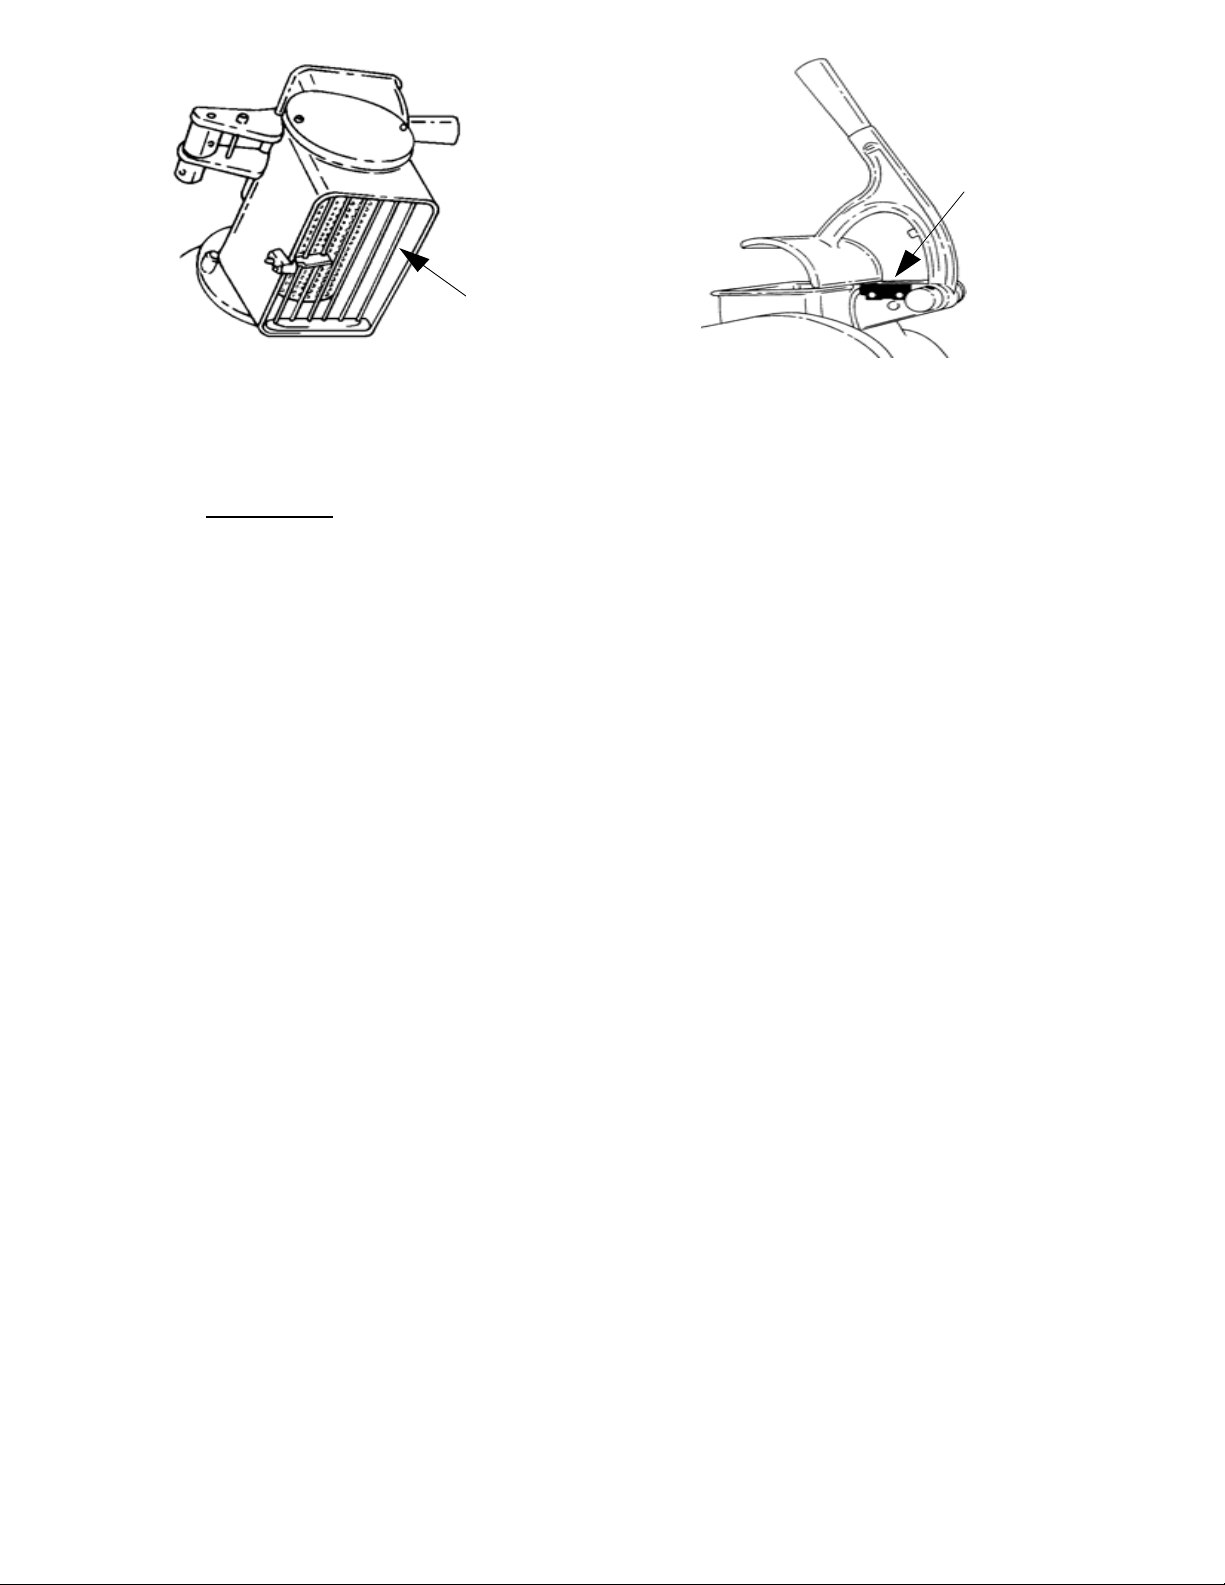
FIG. n°1 - Safety position
2
1
operation as well as cleaning and maintenance operatio
However, there are RESIDUAL RISKS which cannot be eliminated completely. These risks are listed in this
manual under WARNINGS.
These risks are injury to hands caused by the roller when cleaning.
1.3 - DESCRIPTION OF THE MACHINE
1.3.1 - General description
The GF/GP has been designed and manufactured by our firm with the aim of ensuring:
- the
- the highest standard of hygiene due to a careful selection of materials which come into contact with food
- easy to mount;
- robust and stable components;
- practical and easy to move.
highest degree of safety during use, cleaning and maintenance;
products, elimination of sharp edges in the GF/GP that come into contact with the food product, facilitating
and ensuring perfect cleaning, as well as facilitating machine disassembly and part removal;
1
.3.2 - Manufacturing features
The GF/GP is completely made of anodised and polished aluminium.
These materials ensure hygiene and resistance to acids, salts and rust.
The GP grater roller is made of punched aluminium, while the GF roller is made of stainless steel.
ns.
5
Page 6
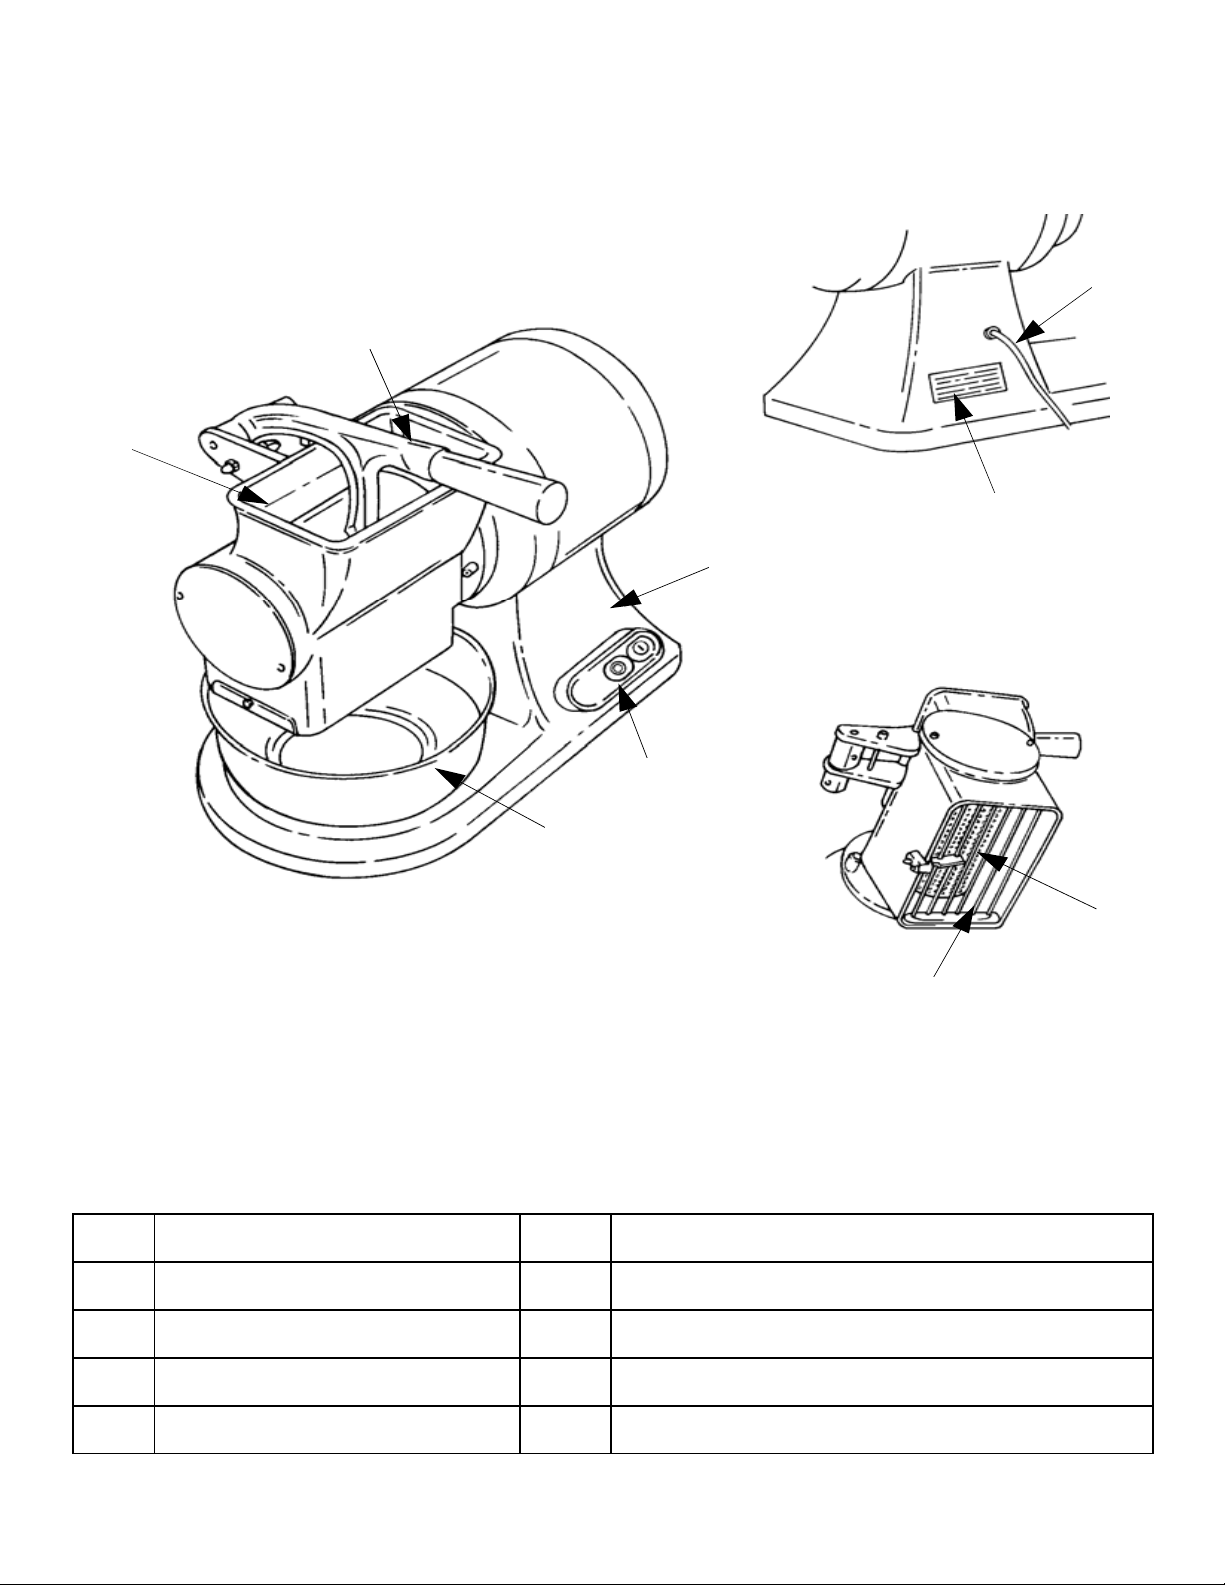
1.3.3 - Machine components
FIG. n°2 - General view of the machine
2
3
8
9
1
6
LEGEND:
11
Base
2 Pusher
33 rater 8 Po
handle
6 B
7 Pu
7
4
5
owl
shbutton ON/OFF
wer supply cable
4 Grater roller 9 Rating plate - serial number
55 rid
6
Page 7
C
HAP. 2 - TECHNICAL SPECIFICATIONS
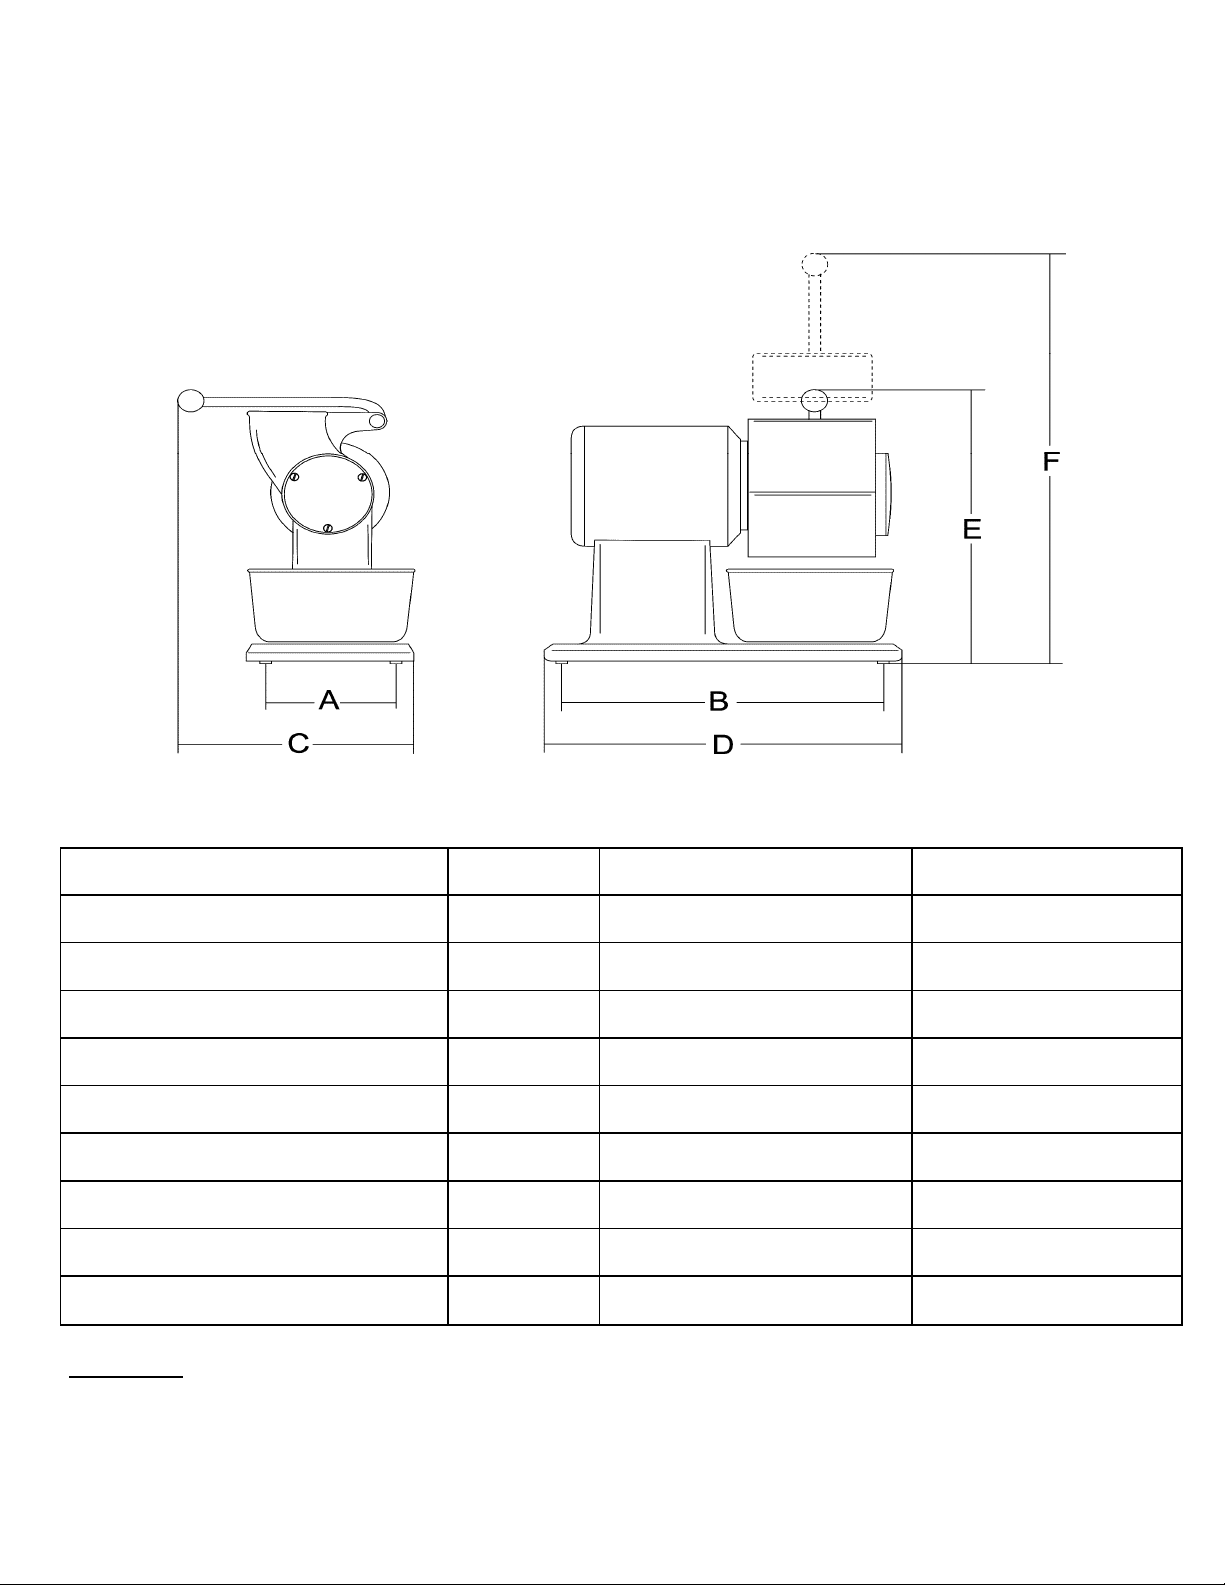
2.1 - OVERALL DIMENSIONS, WEIGHT, FEATURES ... FIG. n° 3 - Overall
dimensions
T
AB. n°1 - OVERALL DIMENSIONS AND TECHNICAL FEATURES
.m.
Model
Power
Po
wer source
Drum revolutions
Mouth dimensions
Ax
B
CxDxE
F
Net weight
ise level
No
WARNING: Machine electrical sp
grater; before connecting to power supply, please read § 4.2 wiring.
ecifications are indicated on the rating plate af-fixed to the back of the
u
W
att/Hp
r.r.p.
mm
mm
mm
mm
g
K
B
d
5
88/0,8
2
30-400 V/50Hz
1
30x70
1
1
85x270
2
90x390x370
GF GP
3
80/0,5
2
30 V/50Hz
400
60
5
6
1
7
2
0≤
400
1
10x65
1
1
50x220
50x290x310
50
4
8
07≤
7
Page 8
C
HAP. 3 - RECEIVING THE MACHINE
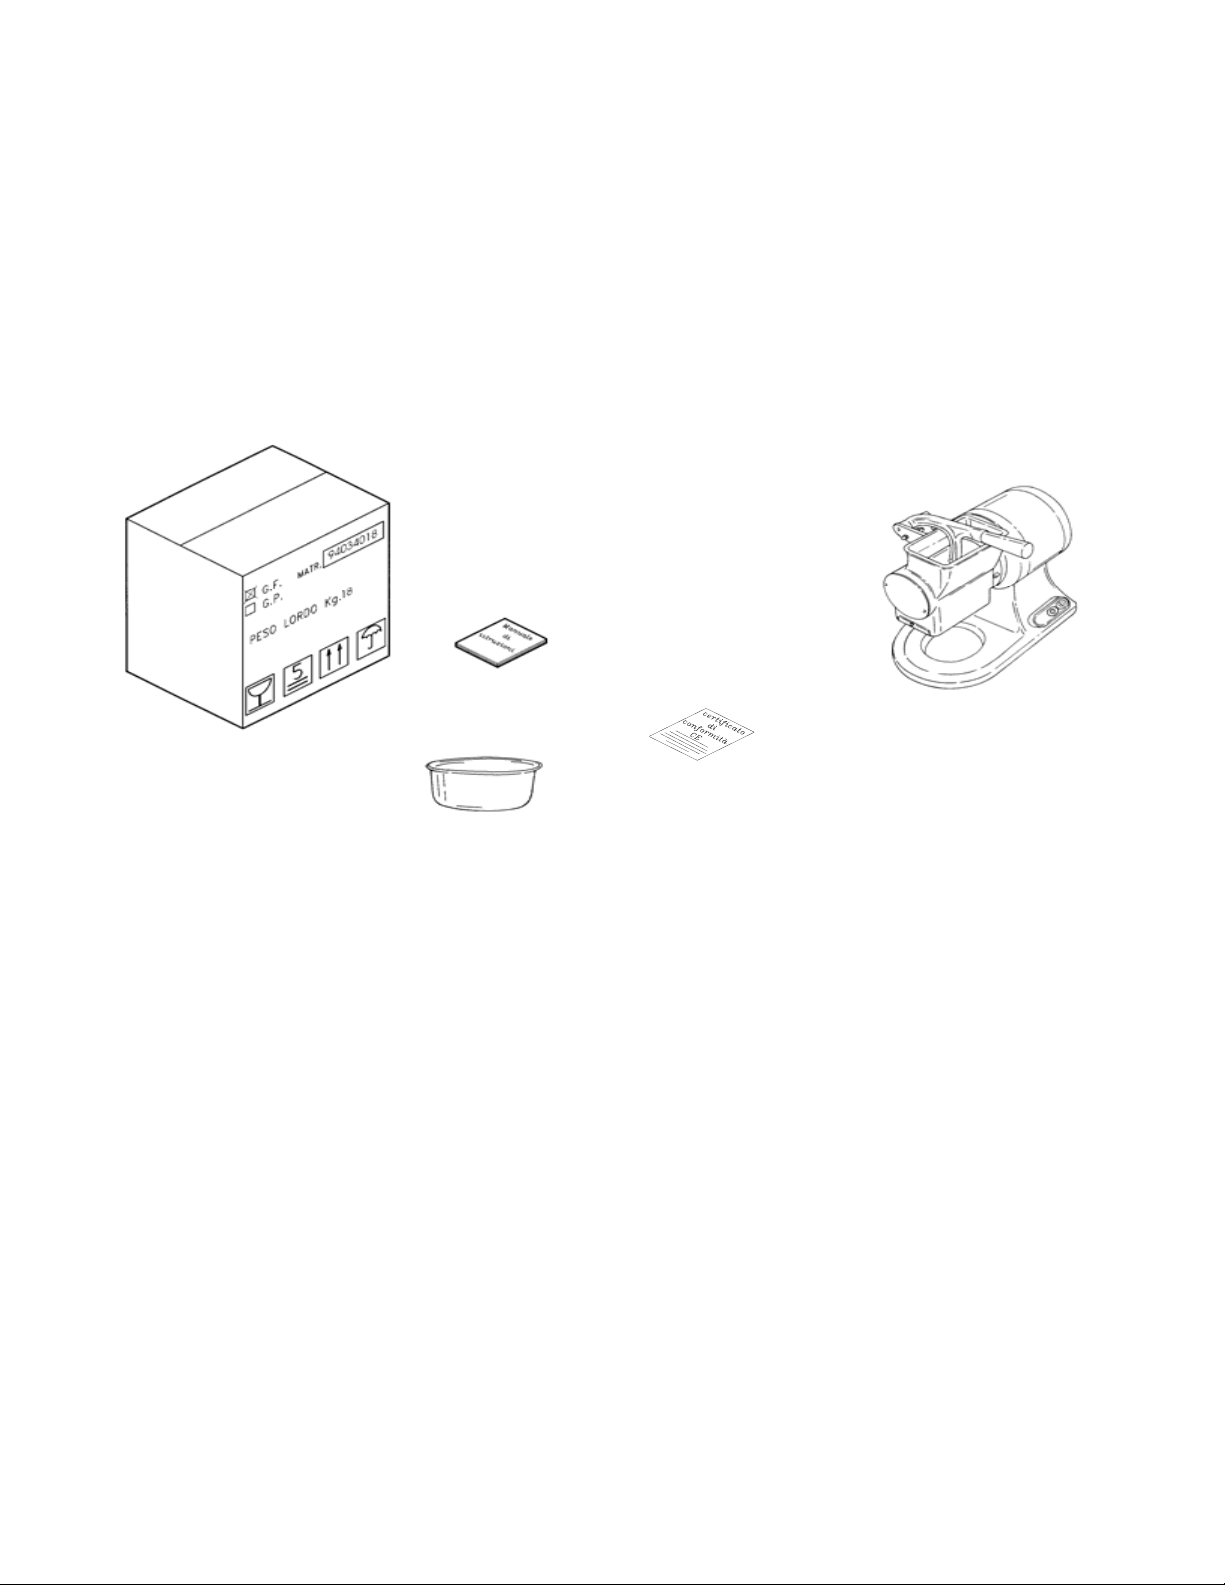
3.1 - DESPATCH OF THE MACHINE (see FIG. n°4)
The machine is accurately packed and then despatched from our warehouses. The package includes:
a) a solid cardboard box;
b) the machine;
c) this manual;
d) a bowl;
e) EC conformity declaration.
a)
c)
e)
d
)
FIG. n°4 - Package
3
.2 - PACKAGE CHECK UPON RECEIPT
If the package shows signs of damage caused during transport, the carrier must be informed immediately;
moreover a detailed report on the extent of the damage caused to the machine must be notified to the carrier
within three days from the delivery date on the shipping documents. Do not overturn the package!! When
the package is transported, make sure the box is lifted by the 4 corners (parallel to the ground).
)
b
description
3.3 - PACKAGING DISPOSAL
The components of the packaging (cardboard, pallet if supplied, plastic straps and polyurethane foam) are
urban solid waste; therefore they can be easily disposed of. If the machine has to be installed in countries
where specific regulations are in force, packaging must be disposed of in compliance with such regulations.
8
Page 9
CHAP. 4 - INSTA
4.1 - SETTING UP OF THE MACHINE
Th
e machine must be installed on a suitable and adequate size work table refer to Tab. 1; the surface must
be solid, stable and fixed at a height of 80 cm from the ground.
Moreover the machine must be installed in a room with max. 75% non saline humidity at a temperature
etween +5°C e +35°C; in a location and environment that does not provoke malfunctions or faults in the
b
mach
ine.
.2 - ELECTRICAL CONNECTION
4
4
.2.1 - GF/GP with single-phase motor
The grater GF/GP is equipped with a power supply cable with a 3x1 mm.², section; 1.5 m length and a
“SHUKO” plug.
Connect the machine to 230 Volt 50 Hz single-phase power supply, by interposing a differential
thermomagnetic switch 10A, ∆ I = 0.03A. Check correct machine earthing.
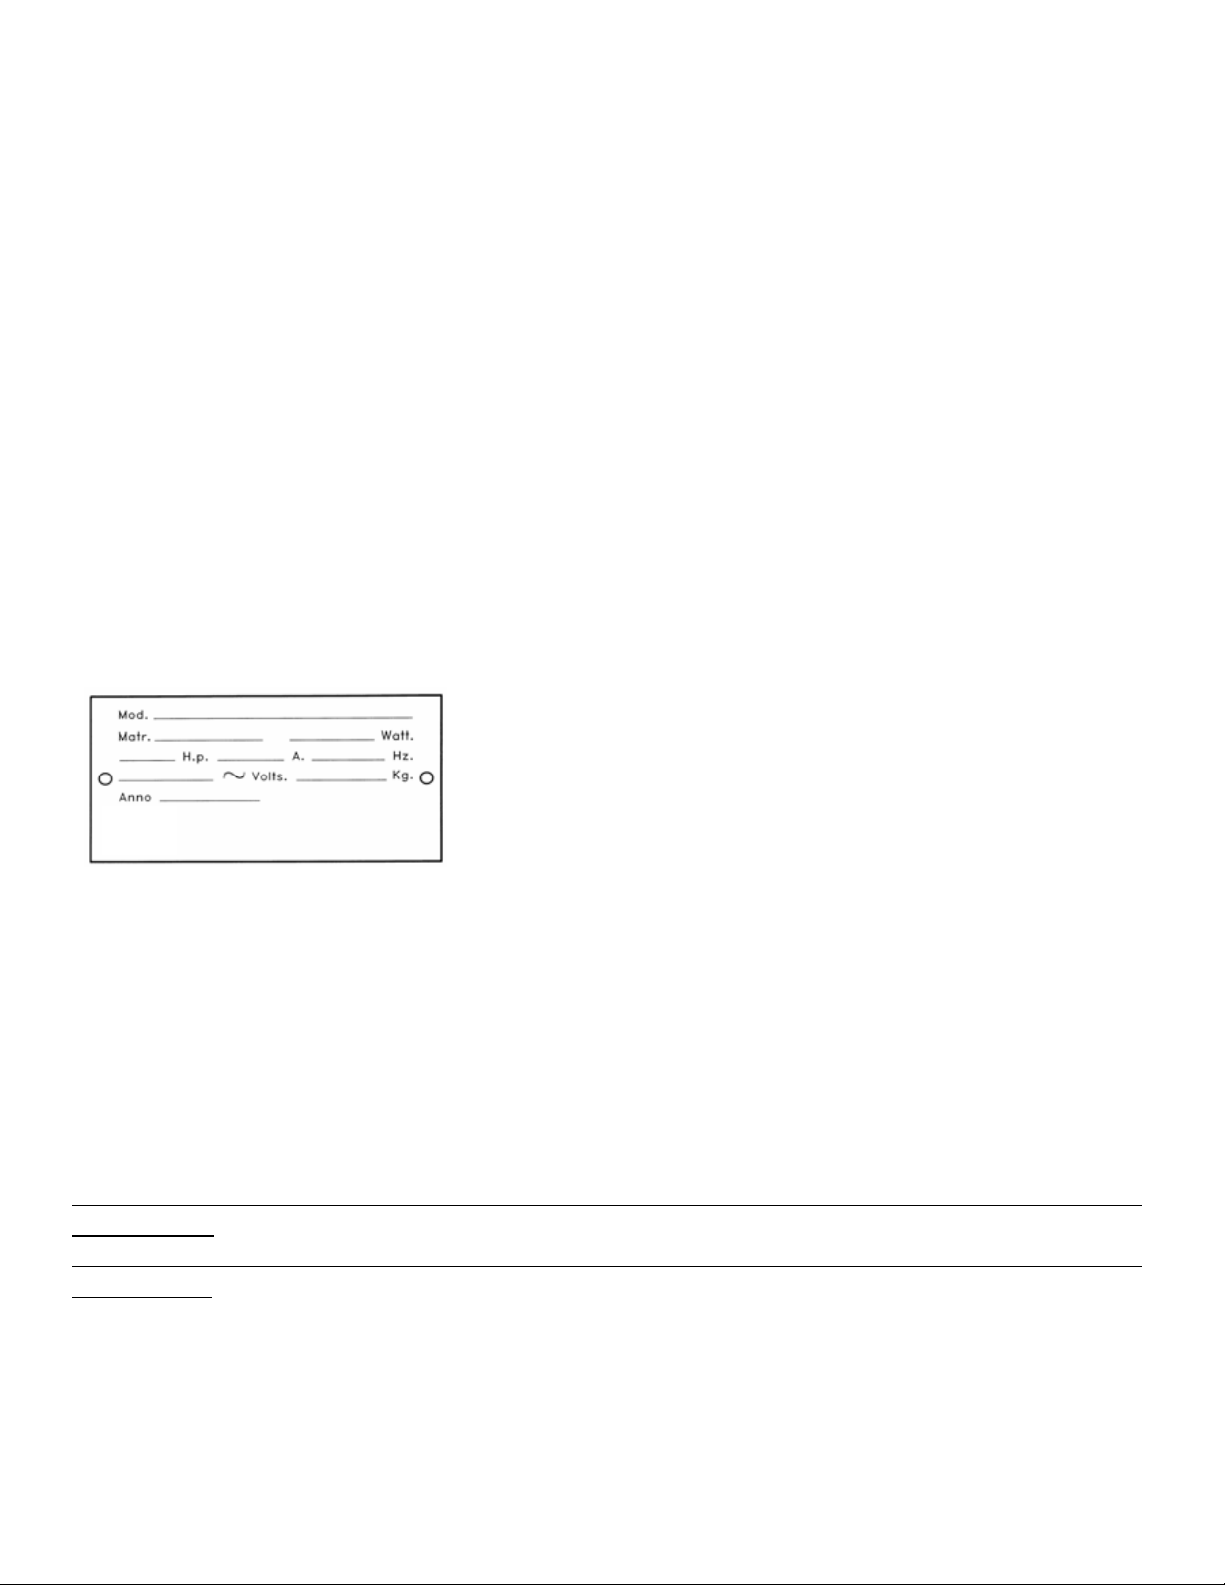
Moreover check that the specifications on the rating plate-serial number (FIG. n°5) correspond to the
specifications provided in the consignment and delivery note.
LLATION
G. n°5 - Rating plate - serial number
FI
4.2.2 - GF with three-phase motor
The GF is equipped with a power supply cable with a 5x1 mm.²section and length ≅ 1.5 m.
Connect the machine to 400V. / 50 Hz three-phase power supply with a IEC plug (red), by interposing a
differential thermomagnetic switch 10 A., ∆I = 0.03 A. Check correct machine earthing.
Before connecting definitively the machine to the mains, check the rotation sense of the disk with a pulse on
ON pushbutton (see FIG. n°10) immediately followed by the OFF pushbutton
The rotation sense looking at the roller from above the opening must be counter-
clo
ckwise (see point 4.5 - FIG. n°9).
If the rotation sense is not correct, invert the position of two of the three-phase wires
in
the plug.
The motor installed on the g
Unless otherwise specified, the grater is equipped with 400V.connection, to modify it to three-phase 230V.
Call the “SERVICE CENTRE”.
rater GF can operate with 400V. and 230V.
9
Page 10
4
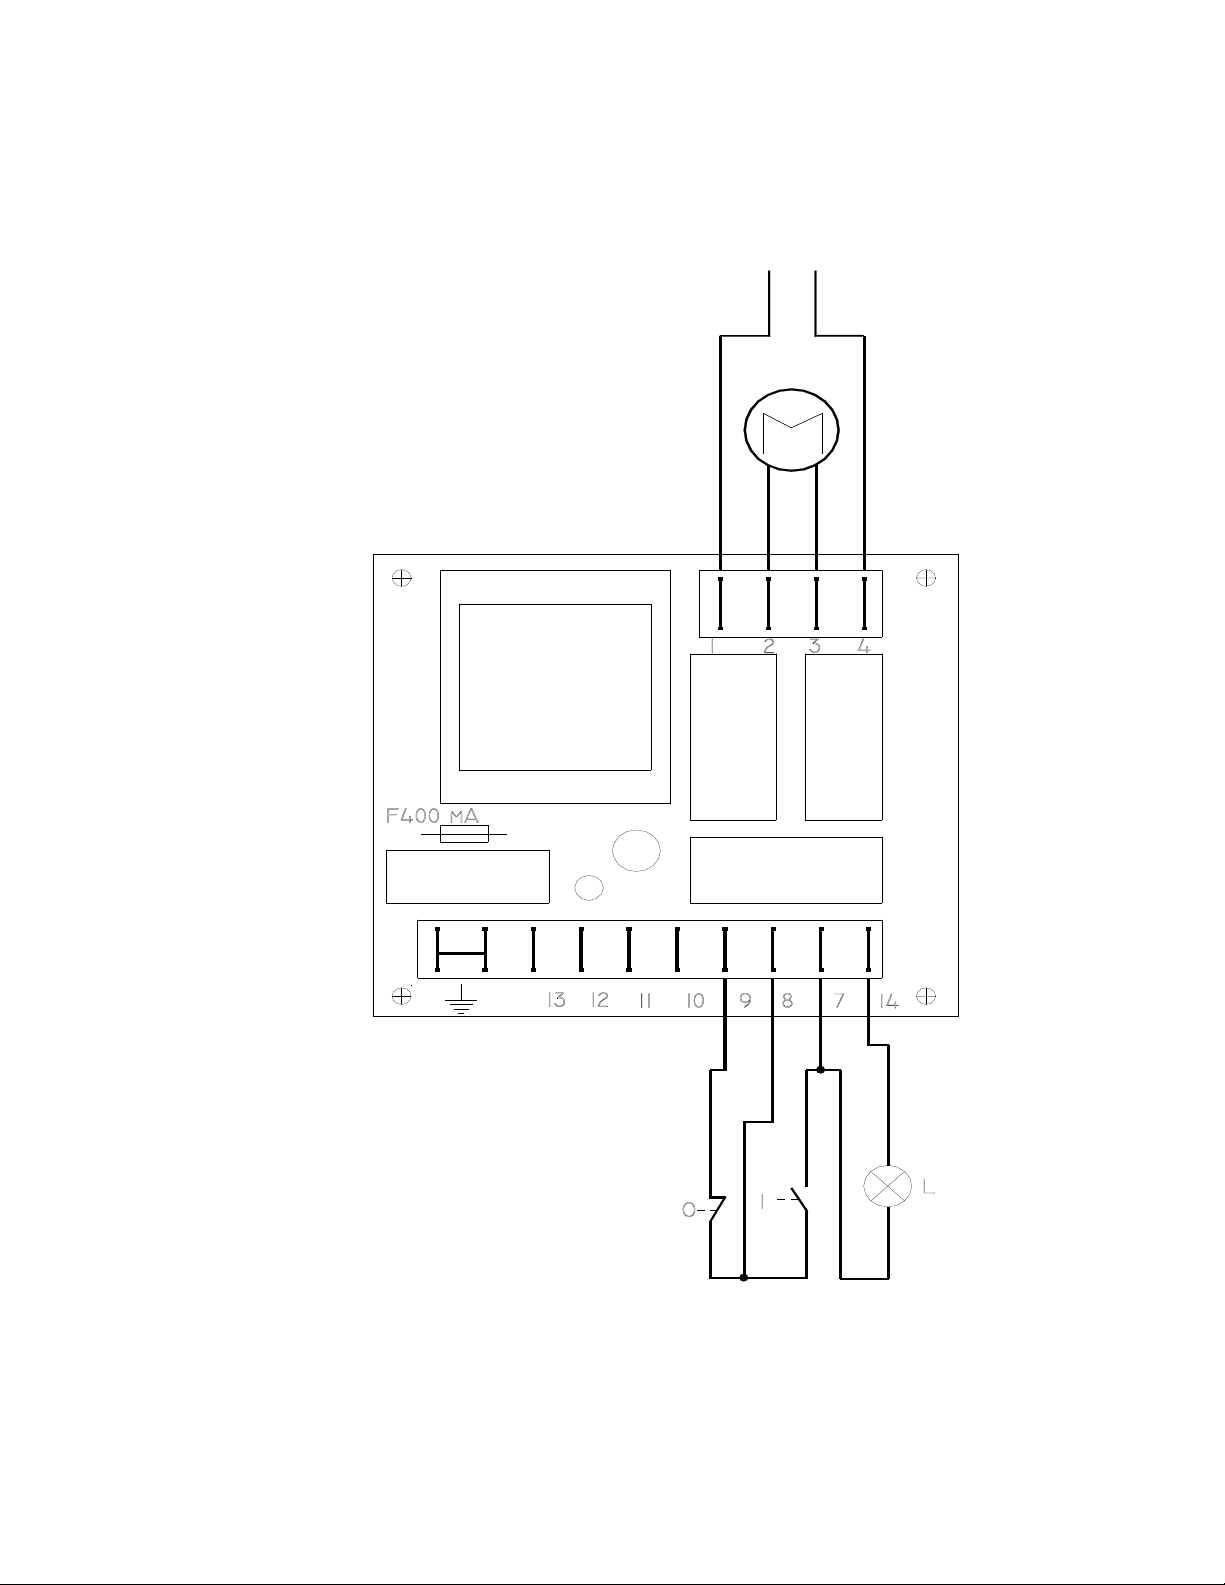
.3 - GF WIRING DIAGRAM 4.3.1 - Single-
phase wiring diagra
O = STOP
I = START
L = PILOT LAMP
MOTOR 230V
m
24V M =
1-4 = 230V
2-3 = MOTOR
INGLE-PHASE
S
230V/50Hz
FI
G. n°6 - GF Single-phase wiring diagram
0
1
Page 11
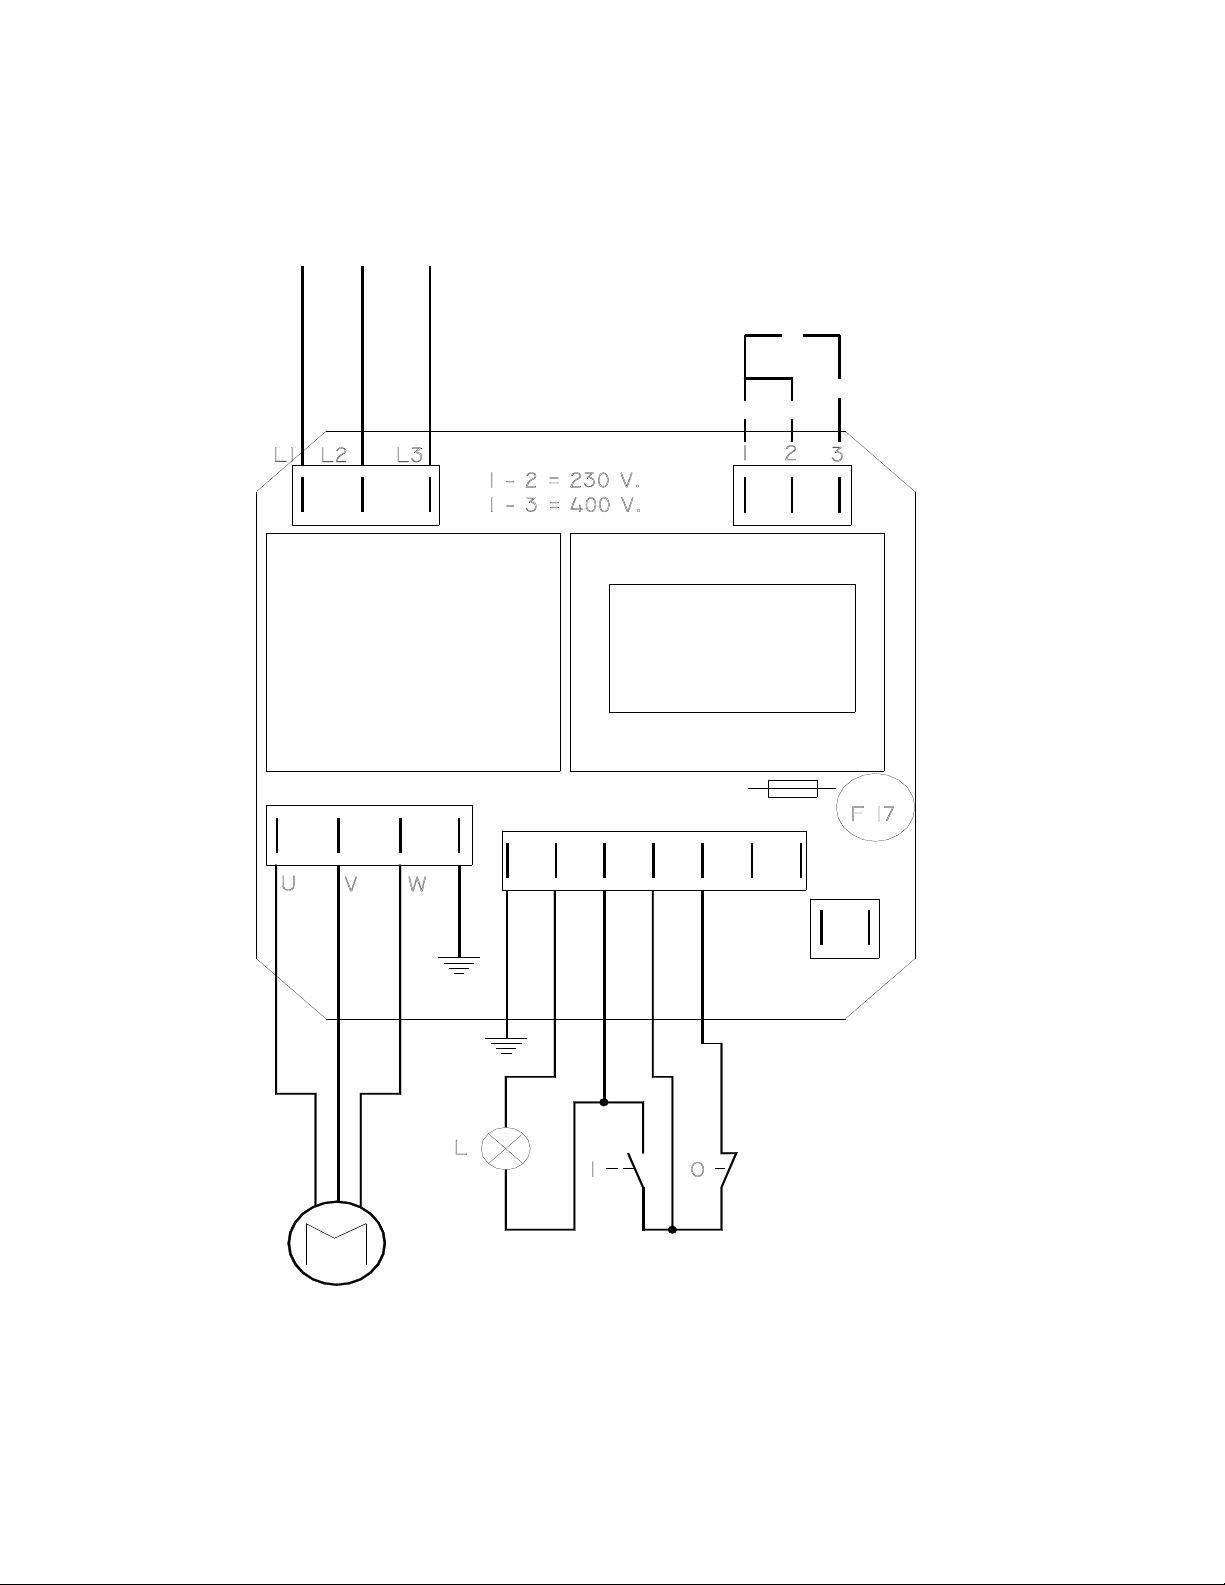
4.3.2 - Three-phase wiring diagram
THREE-PHASE
230V/50Hz
380V/50Hz
FIG. n°7 - GF Three-phase wiring diagram
11
O = STOP
I = START
L = PILOT LAMP
M = MOTOR 230V
24V
Page 12
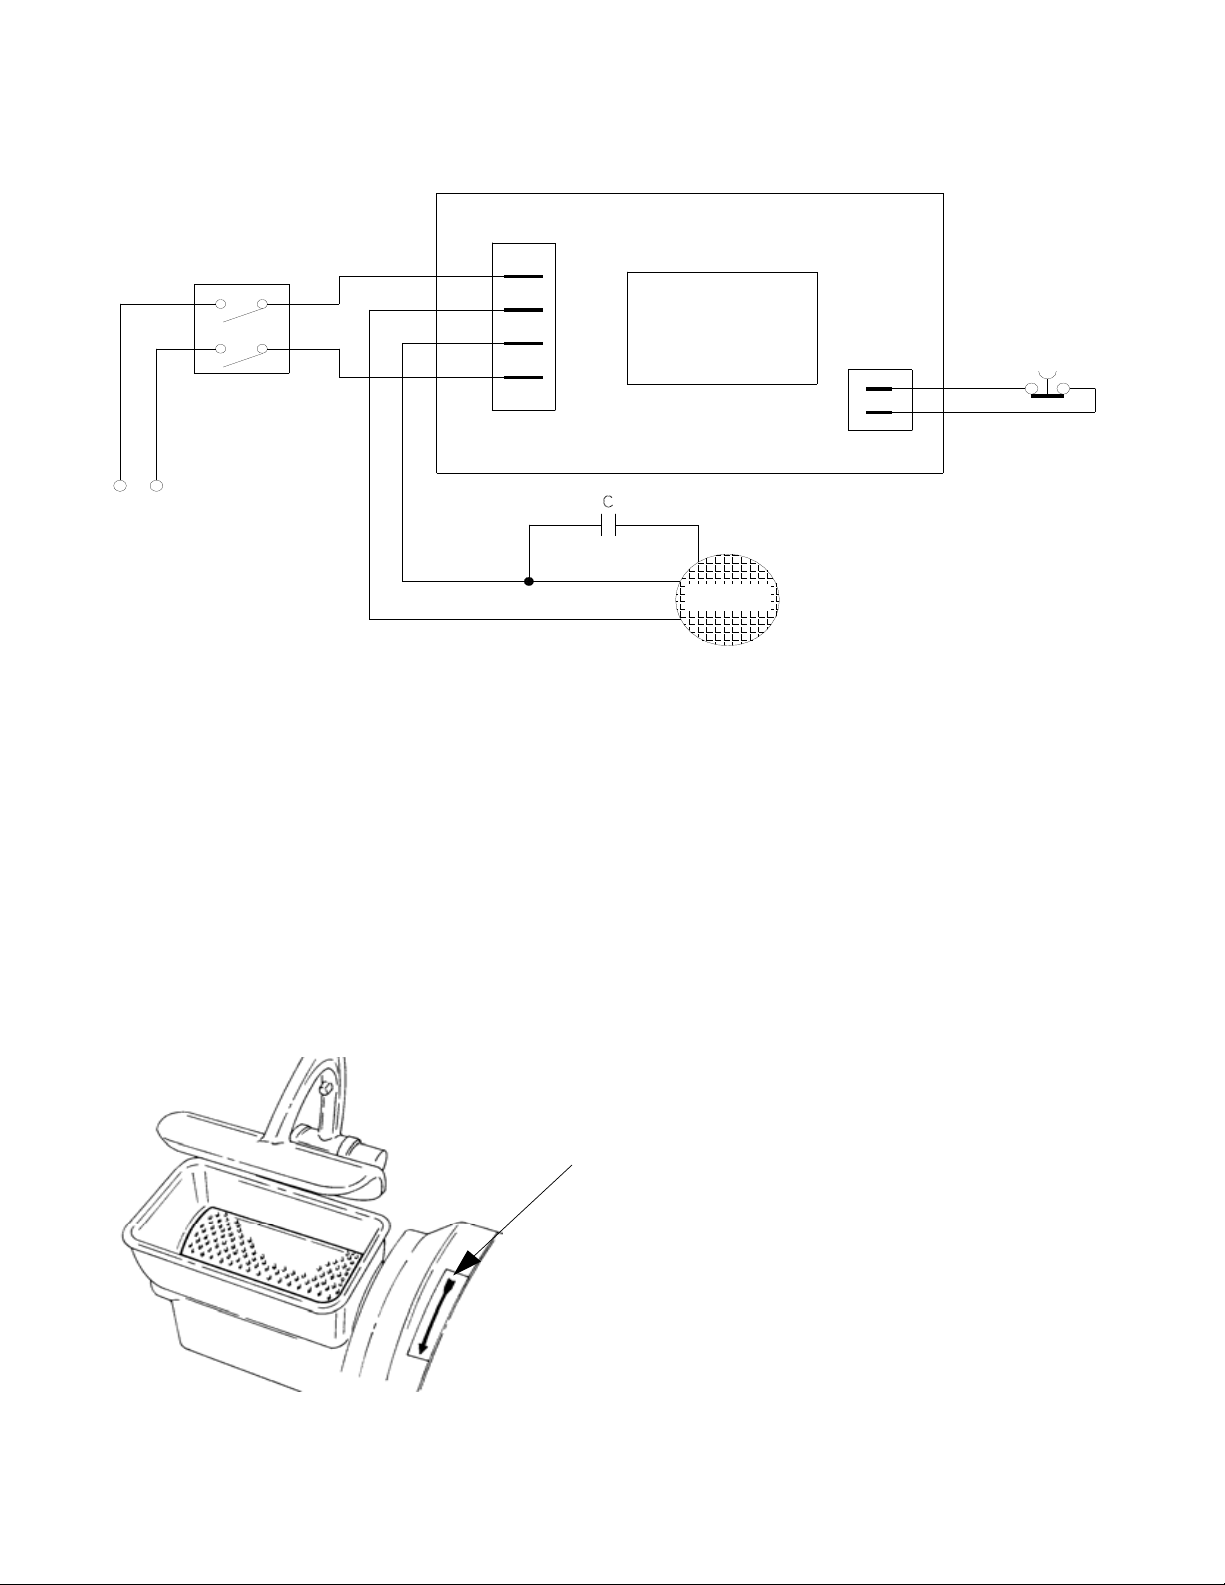
.4 - GP WIRING DIAGRAM
4
4.4.1 - Single-phase wiring diagram
SWITCH WITHWI TH T
S
INGLE-PHASE
230V/50Hz
RELAIS
MOTOR
M
ICROSWITCH
FIG. n°8 - GP Single-phase wiring diagram
4
.5 - FUNCTIONAL CHECK
To check the correct machine operation, proceed as follows :
- Turn ON/OFF pushbutton and check
the grating roller rotates counterclockwise. Looking at the roller from
above, check the roller rotates in the direction indicated by the arrow (from right to left) affixed to the
machine on the side of the grater (see FIG. n°9);
- Check the grater starts when the pusher handle is lowered into position and stops when the pusher handle
is raised.
S
ticker indicating direction of rotation
f grater
o
FIG. n°9 - Rotation of g
1
2
rater roller
Page 13
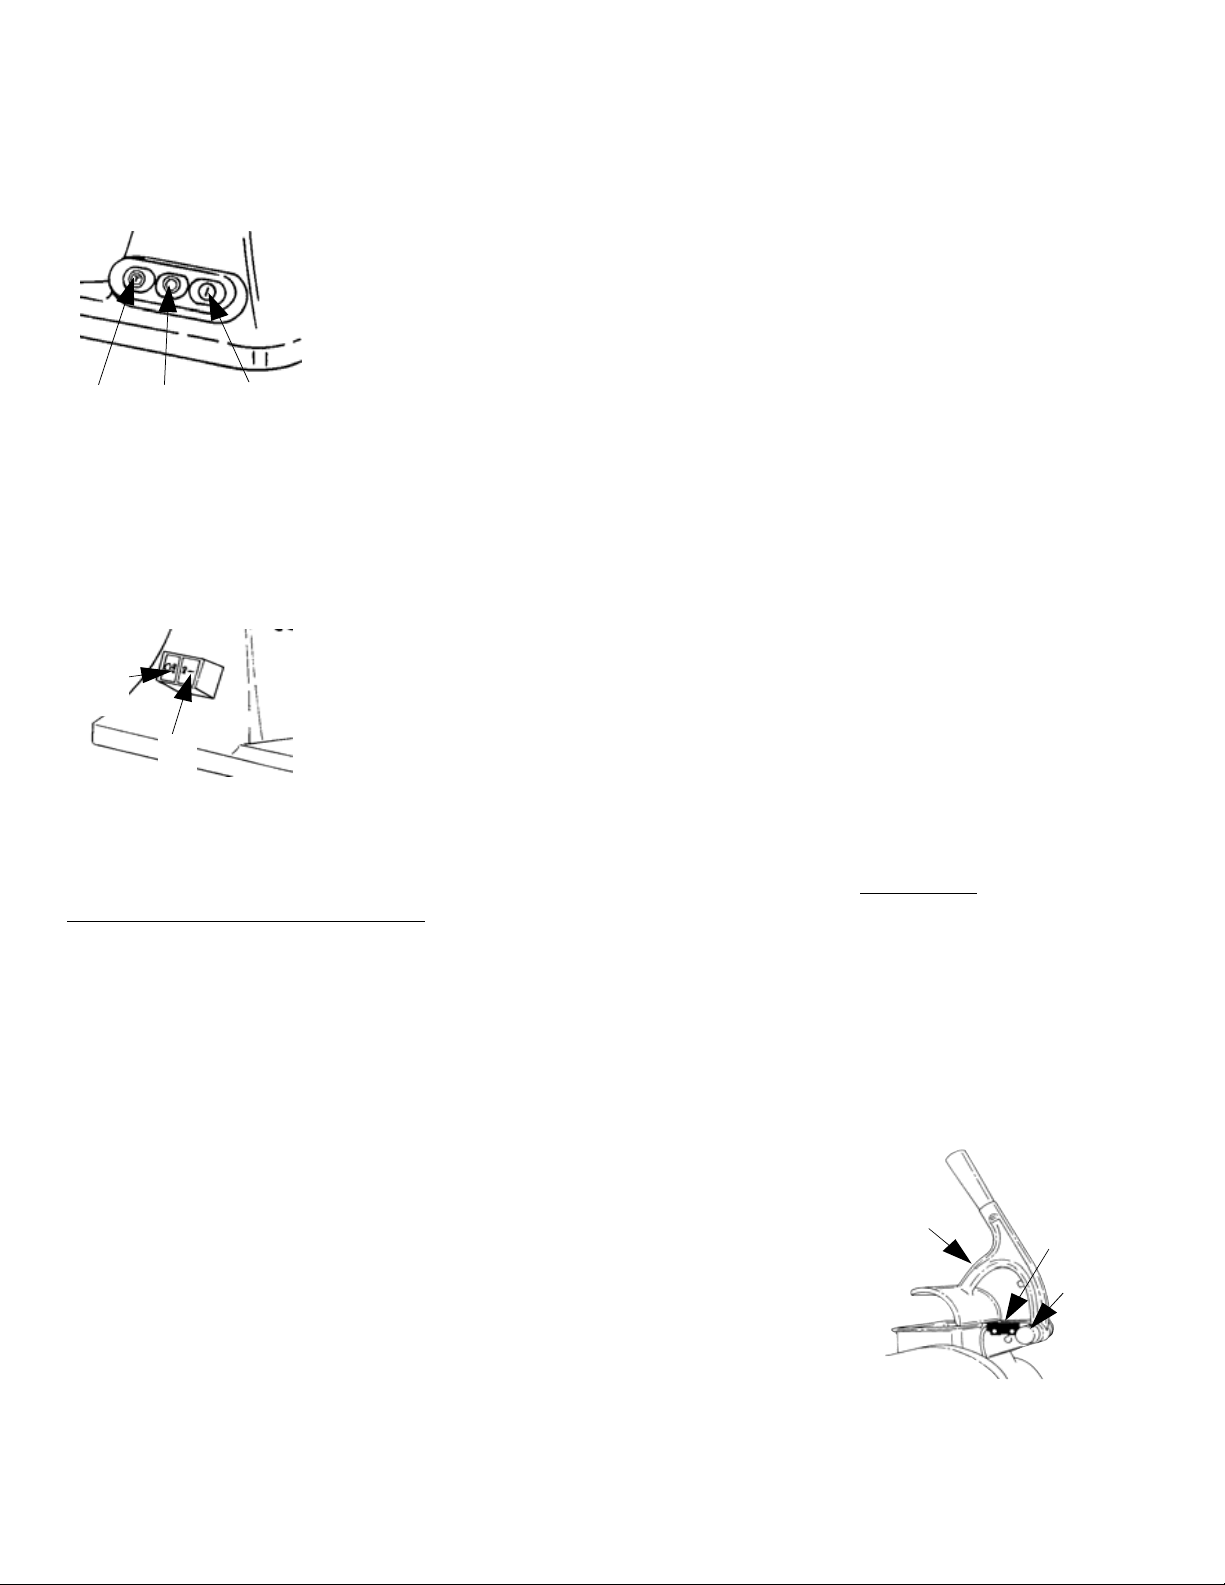
CHAP. 5 - USE OF THE
5.1 - CONTROLS
GF controls are located in the position illustrated in the figure below.
MACHINE
1
- ON pushbutton “I”.
2 - OFF pushbutton “0”.
3 - Pushbutton “T” to invert the rotation sense
3
FI
G. n°10a - Controls position
.1.1 - Controls for the KIT FRANCIA
5
The controls for the KIT FRANCIA are placed on the body of the grater GF/GP as follows:
FIG. n°10b - Con
.2 - LOADING THE PRODUCT IN THE GRATER (see FIG. n°11) N.B.: The product
5
must be loaded with the machine off.
Proceed as follows:
.
1
2
.
2 1
1
- ON pushbutton “I”.
2
1
trol position
t the pusher handle;
Lif
Introduce the product in the grating mouth and press it with the lever.
The quantity of the product loaded into the opening must not impede correct closure of pusher
handle (1) enabling contact with the micro-safety switch (3). This condition is necessary to start the
machine,
2 - OFF pushbutton “0”.
If there is no contact, the machine will not start.
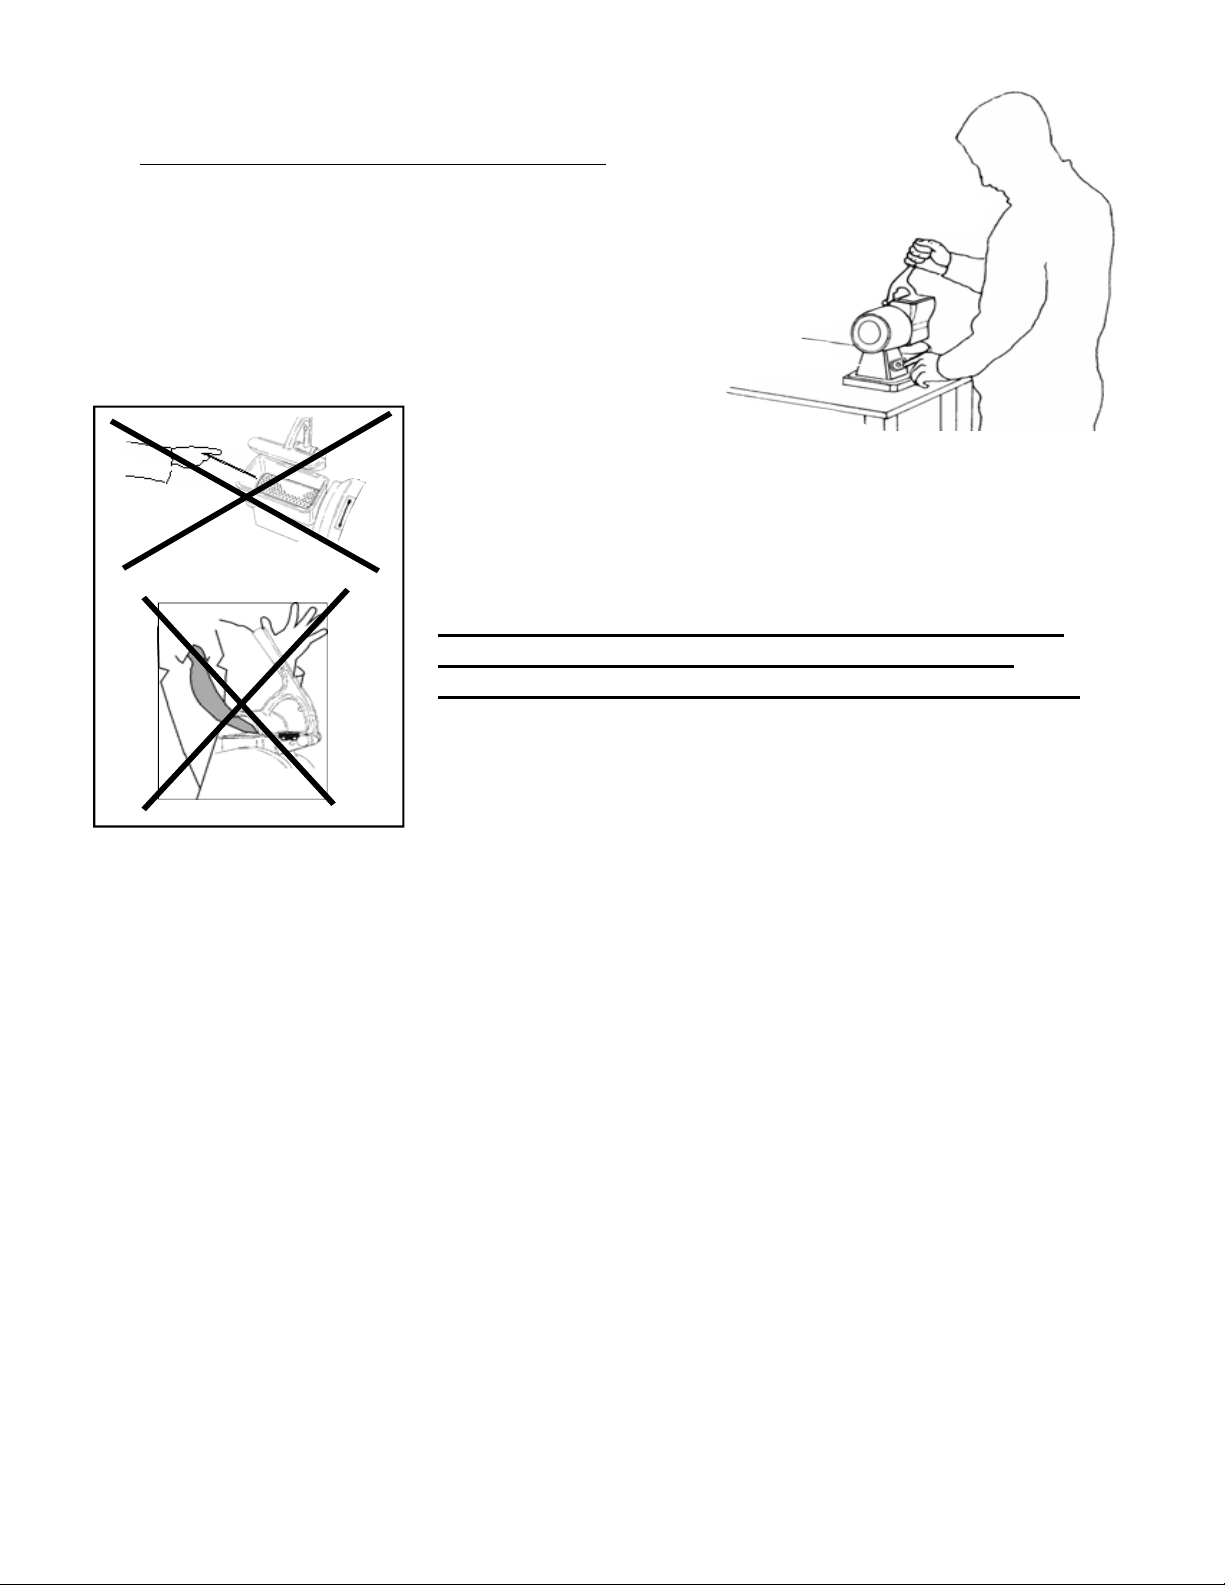
. To prevent accidents, place yourself correctly; your body must be
3
perpendicular to the working table (see FIG. n°12); do not introduce your hands
into the grater opening when it is ON. Do not use the grater if parts of your
body come into contact with the machine;
4. Turn on the machine by pressing pushbutton “ON” (FIG. n°10a-b);
5
. At the end of operation, turn off the machine by pressing
pushbutton
G. n°11 - Loading the product
FI
13
1
3
2
Page 14
“OFF” (FIG. n°10a-b).
N.B.: Avoid using the machine without a food product
FIG. n°12 - Correct position
FIG. n°13
Do not introduce metal object in the mouth of the
rater or in the exit opening, and do not wear
g
large clothes that could get t
C
HAP. 6 - GENERAL CLEANING
.1 - FOREWORD
6
e machine must be cleaned at least once a day. If necessary clean when required during the
• Th
day.
• All the GF/GP parts that come into contact directly or indirectly with the food product must be
cleaned thoroughly.
• Never clean the GF/GP with pressurised water, water jets or in the dishwasher; do not use brushes or
other tools or anything that could damage the machine.
• Before cleaning, disconnect the machine plug from the power supply and isolate it from the
mains power supply.
- Caution ...
angled in the machine.
.2 - HOW TO CLEAN THE MACHINE
6
All the accessories can be cleaned with a water jet at medium temperature (50°C) with neutral
detergent. The body of the machine can be cleaned with a wet cloth frequently rinced with water.
WARNING: Clean the grater roller with a brush, always handle with care to avoid being cut.
14
Page 15

C
HAP. 7 - MAINTENANCE
7.1 - FOREWORD
Before performing any maintenance operation, disconnect the plug from the mains to isolate it from the
mains power supply.
7.2 - FEET
Feet may deteriorate or lose elasticity, reducing machine stability. If support feet show signs of wear or
damage, replace.
7.3 - POWER SUPPLY CABLE
Periodically check for wear in the power supply cable. If the power supply cable shows signs of wear or
damage call the “SERVICE CENTRE” for a replacement.
7.4 - CONTROLS
The pushbutton sticker or cover could be damaged.
I
n this case, call the “SERVICE CENTRE” for a replacement.
HAP. 8 - SCRAPPING
C
8.1 - PUTTING THE MACHINE OUT OF SERVICE
If for some reason, you decide to put the machine out of service, make sure nobody can use it: eliminate
electrical connections.
8.2 - SCRAPPING
When the machine is out of service, it can be disposed of. To scrap the machine contact your local
Specialised Waste Treatment Centre, separate components (refer to chap. 1 par.3.2 ).
15
Page 16

INSTRUCTIONS FOR USERS
Directive 2002
substances in electrical and electronic equipment, and waste electrical and electronic equipment
This symbol, crossed out wheelie bin, on the product or on its packaging indicates that this product must
not be disposed of with your other household waste.
Separate waste collection of this appliance is organised and managed by the manu-facturer. It is the
user’s responsibility to contact the manufacturer and follow the waste treatment system the manufacturer
has adopted for separate waste collection.
The separate collection and recycling of your waste equipment at the time of disposal will help to conserve
natural resources and ensure that it is recycled in a manner that protects human health and the environment.
/95/EC, 2002/96/EC and 2003/108/EC on the restriction of the use of certain hazardous
6
1
 Loading...