

Page 1
OPERATING AND MAINTE
NANCE MANUAL
Ed. 02/2012
SQUEEZER
1
Page 2

INTRODUCTION
This instruction manual gives the customer all the necessary information about the appliance and
th
e manufacturing standards applied, as well as all instructions for use and maintenance so that
the appliance can be used correctly maintaining its efficiency in time.
This instruction manual is for the end user and for service personnel.
INDEX
CHAP. 1 - INFORMATION ABOUT THE APPLIANCE pag. 4
1.
1 - GENERAL WARNINGS
1.2 - SAFETY FEATURES INSTALLED
1.2.1 - mechanical safety protections
1.2.2 - electrical safety protections
1.3 - APPLIANCE DESCRIPTION
1.3.1 - general description
1.3.2 - constructive characteristics
1.3.3 - appliance elements
CHAP. 2 - TECHNICAL DATA p
2.1 - OVERALL DIMENSIONS, WEIGHT, CHARACTERISTICS .
CHAP. 3 - CONSIGNING THE APPLIANCE
3.1 - TRANSPORTING THE APPLIANCE
2
3.
.
3
3
CHAP. 4 - INSTALLING THE APPLIANCE
1
4.
2
4.
4.3 - WIRING DIAGRAM
4
.4
CHAP. 5 - USING T
5.1 - CONTROLS
5.2 - USING THE APPLIANCE
CHAP. 6 - REGULAR CLEANING pag. 10
6
.1
6.2 6
.2.1 - cleaning the squeezer and juice container
6.2.2 - general cleaning
- CHECKING PACKAGING UPON CONSIGNMENT
DISPOSING OF PACKAGING
-
- APPLIANCE LOCATION
- CONNECTING TO ELECTRICITY SUPPLY
- FUNCTIONAL C
HE APPLIANCE
- GENERALITIES
PROCEDURE TO FOLLOW FOR CLEANING THE APPLIANCE
HECK
..
ag. 6
pag. 7
7
pag.
p
ag. 9
2
Page 3

CHAP. 7 - MAINTENANCE
7.1 - GENERALITIES
7.2 - FOOT SUPPORTS
7.3 - POWER SUPPLY CABLE
ag. 11
p
CHAP.
8
.1
8
.2
8 - SCRAPPING
-
OUT OF SERVICE
- WEEE Waste of Electric an
d Electronic Equipment
ag. 12
p
3
Page 4

HAP. 1 - INFORMATION ABOUT THE APPLIANCE
C
1.1 - GENERAL WARNINGS
• Th
e appliance must only be used by personnel who has carefully studied this manual and
understood all the safety standards described herein.
I
f there should be a turnover in personnel, it is necessary that this manual is carefully studied
•
before using the appliance.
Before cleaning or servicing the appliance, disconnect the electricity power supply.
•
• When cleaning or servicing the appliance (safety protections removed) take into consideratio
possible hazards- Residual Risks.
• When servicing or cleaning the appliance always concentrate on what you are doing and avoid any
possible distractions.
• Check the electricity power cable on a regular basis; a worn or damaged cable causes a dangerous
electrical hazard
• If the appliance has a presumed malfunction or does not work correctly, do not use it or repair it.
Contact the “Service Centre”.
Do not use this appliance for frozen food products and non-food products
The manufacturer cannot be held responsible for the following situations:
⇒if the appliance or safety devices are tampered with by unauthorised personnel
⇒if non original spare parts are used;
⇒if the instructions given in this manual are not carefully and correctly followed or respected;
⇒if
unsuitable cleaning products are used to clean the appliance
1.2 - SAFETY FEATURES INSTALLED
1.2.1 - mechanical safety features
Regarding the mechanical safety featrures the appliance described herein conforms with the EU directives
EEC 2006/42.
The safety protection is a micro-switch that activates the appliance when the squeezer is pressed.
1.2.2 - electrical safety features
Regarding electrical safety features, this appliance conforms to the EU directives EEC 2006/95,
2004/108 and to standards EEC EN 60335-1, EN 55014.
Although the appliance is fitted out with electrical and mechanical safety protections that conform to the
standards in force (these protections are for when the appliance is working and when it is being cleaned or
serviced) there are however, RESIDUAL RISKS that cannot be completely eliminated and are
indicated by the wording CAUTION in this manual. These risks refer to the risk of being cut or injured
by sharp components.
n all
4
Page 5
1.3 - APPLIANCE DESCRIPTION
.3.1 - General Description
1
- We have designed and manufactured this fruit-squeezer for squeezing fruit guaranteeing:
- the maximum
- the maximum of hygiene thanks to a meticulous selection of the materials that come in contact with
the food product, and thanks to the elimination of any sharp and rough edges that come in contact
with the product, cleaning is easy and thorough and components can be easily removed;
- robust and stable components and structure
- maximum reduced noise level ;
- easy to h andle.
.3.2 - Constructive Characteristics
1
The fruit-squeezer is made from either white or chrome-plated shock-resistant ABS. The juice container
is made from stainless steel and the squeezer is made from ABS suitable for food products. The main
structure is in steel.
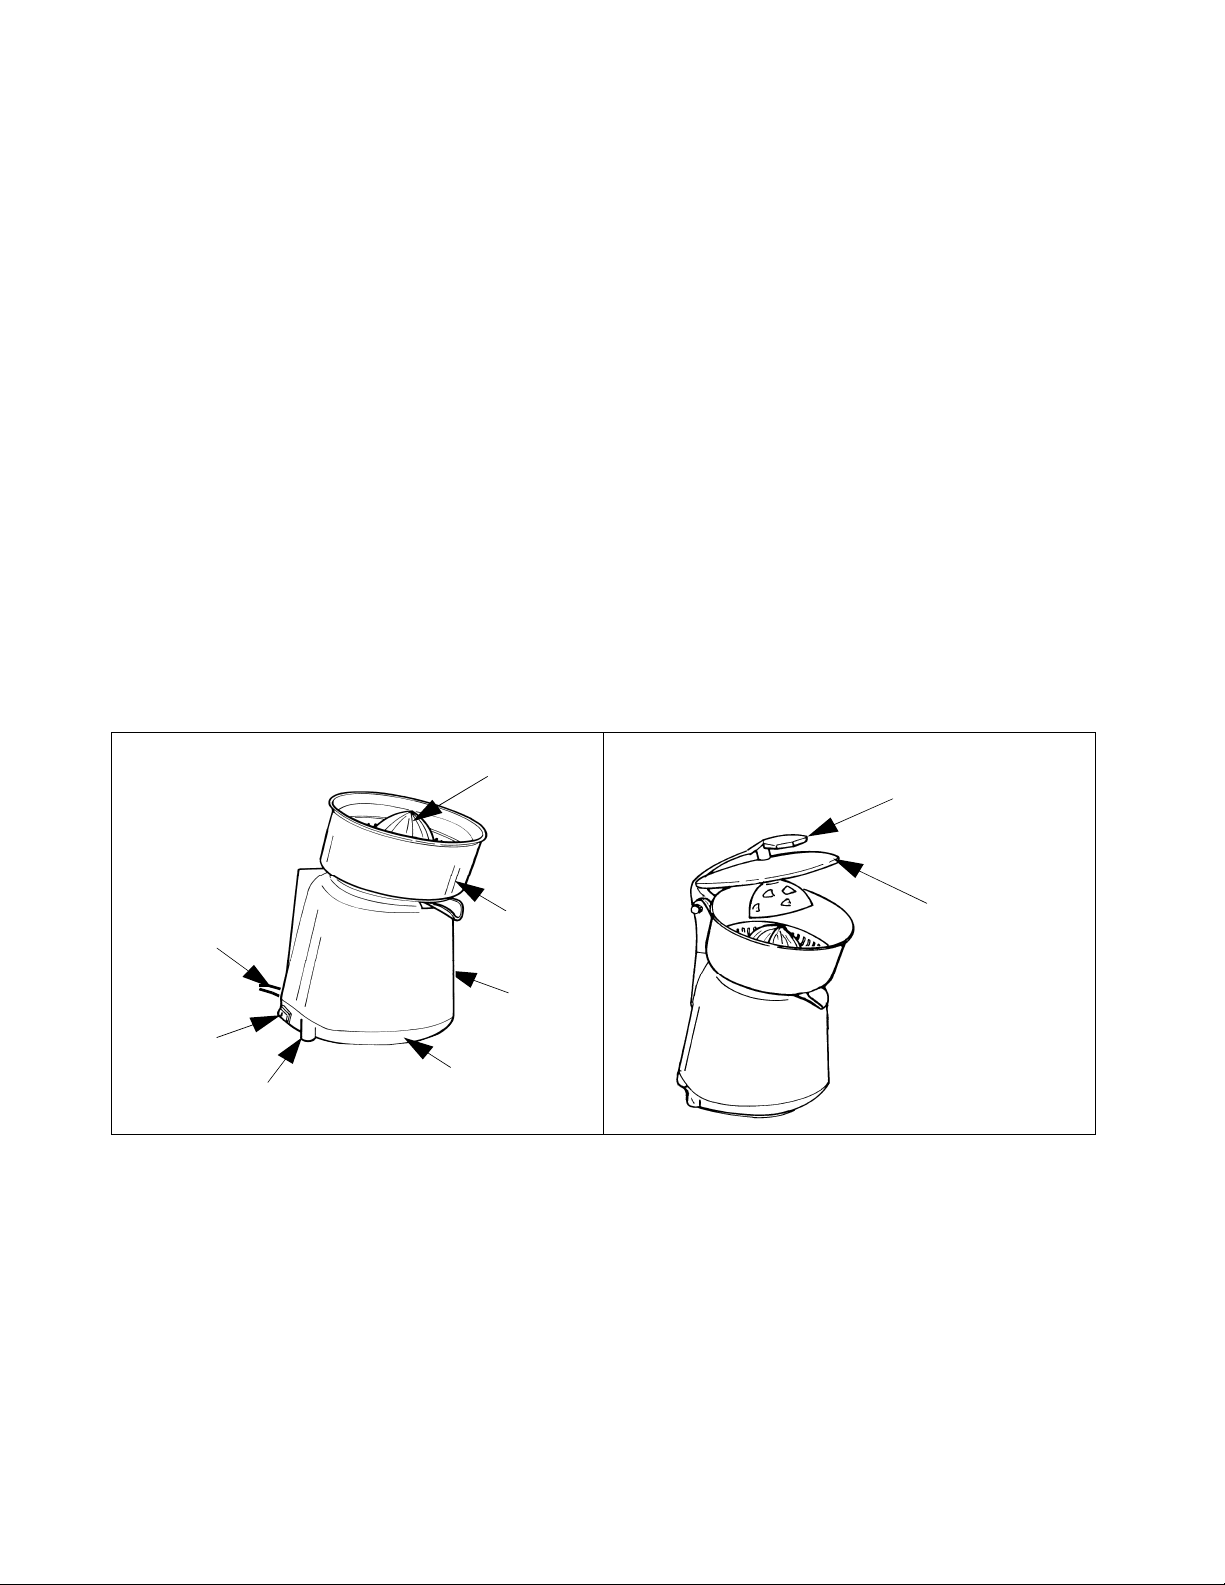
1.3.3 - Appliance Components
FIG. n°1 - general view of the appliance
of safety when using, cleaning and servicing;
STANDARD WITH LEVER
7
6
5
LEGEND:
1
- Main structure
- Base
2
3
- Juice container
2
4
3
1
- Foot supports
5
6
- Switch
- Power supply cable
7
8
- Cover
9
8
- Squeezer
4
- Lever
9
5
Page 6
C
HAP. 2 - TECHNICAL DATA
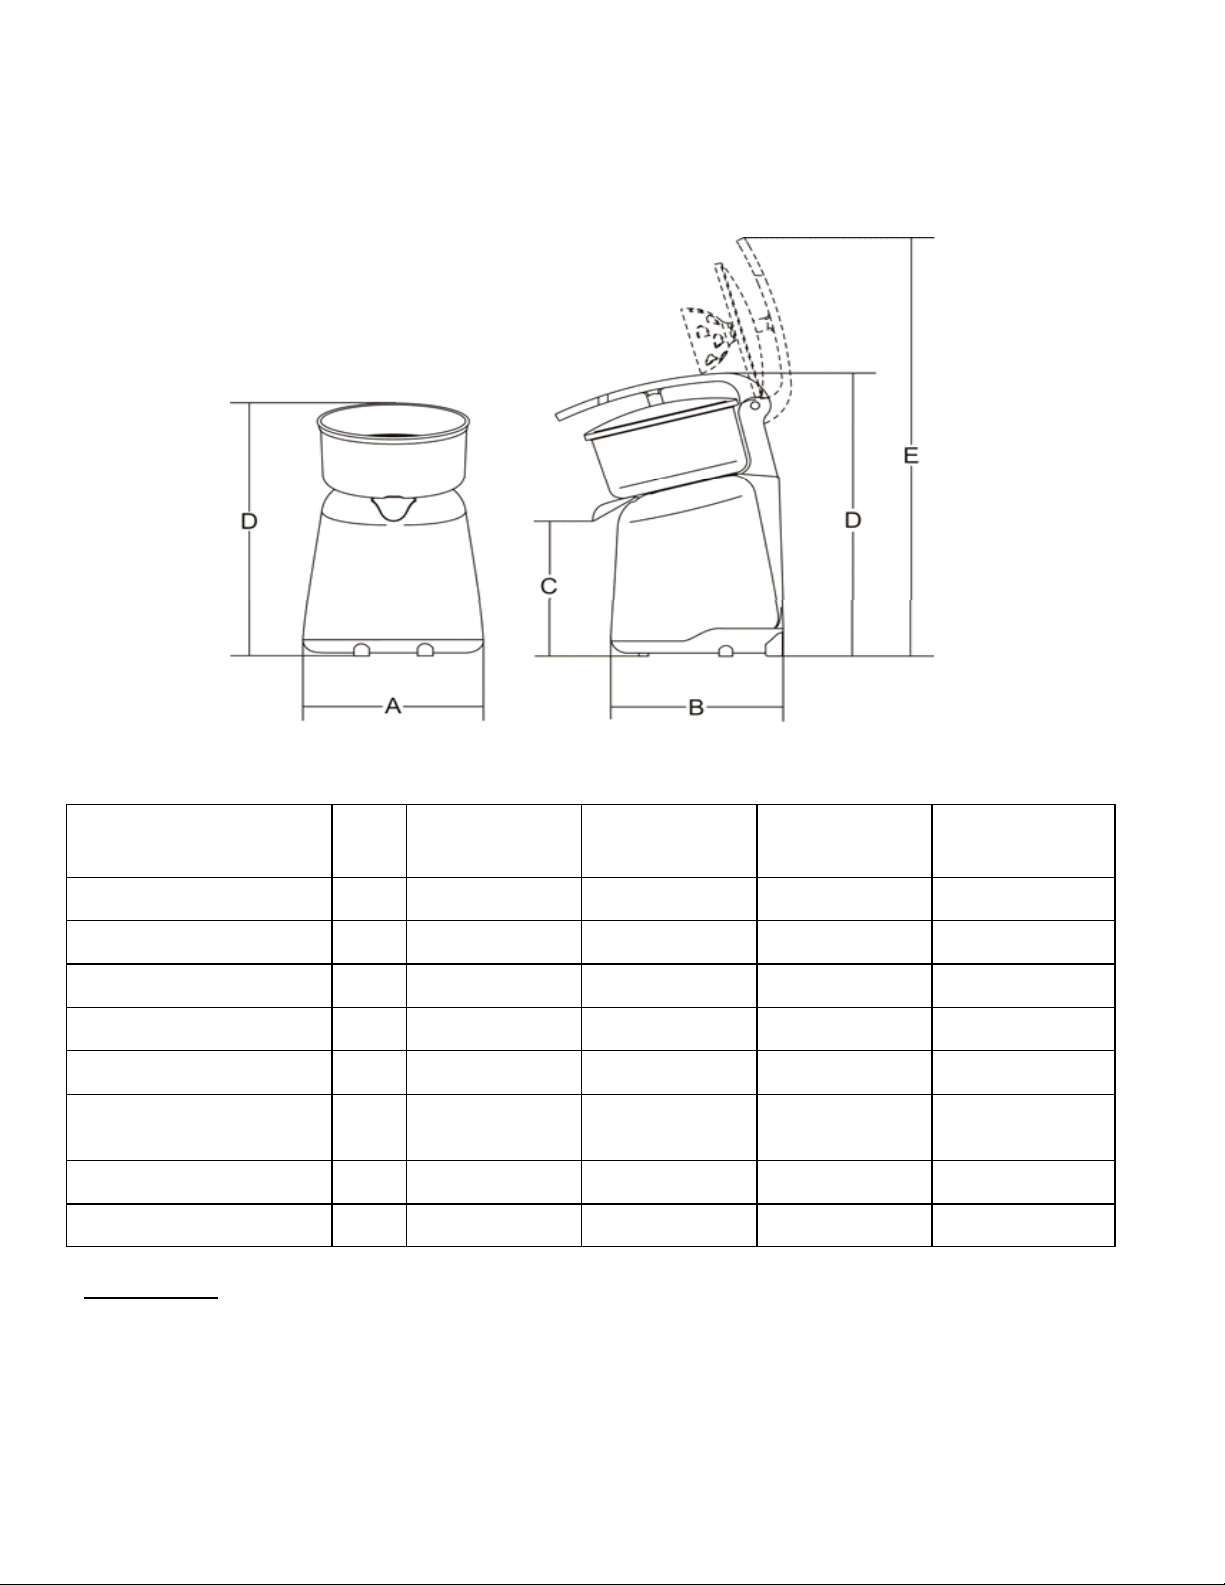
2.1 - MEASUREMENTS, WEIGHT, CHARACTERISTICS ... FIG. n°2 Overall dimensions
TAB. n°1 - MEASUREMENTS AND TECHNICAL CHARACTERISTICS
Model
A x B x D
E
C
Revolutions
r
Moto
Power
supply
Net weight
Noise level
C
AUTION: the appliance is designed for the electrical specifications given on the plate applied to the
u.m. St
mm
mm
mm
g/1’
W
n
M
kg
d
B
andard
210x210x280 210x210x280 210x265x385 210x265x385
- - 480 480
155 155 155 155
320 280÷750 320 280÷750
150 150 150 150
30V 50/60Hz
2
F+N
3 3 3
80≤ 80≤ 80≤ 80≤
VV St
30V 50/60Hz
2
F+N
andard
with lever)
(
30V 50/60Hz
2
F+N
.5
VV
with lever)
(
30V 50/60Hz
2
F+N
.5
3
rear of the appliance; before connecting to the electricity power supply refer to chapter 4.2 connecting to
the electricity supply.
6
Page 7
C
HAP. 3 - CONSIGNING THE APPLIANCE
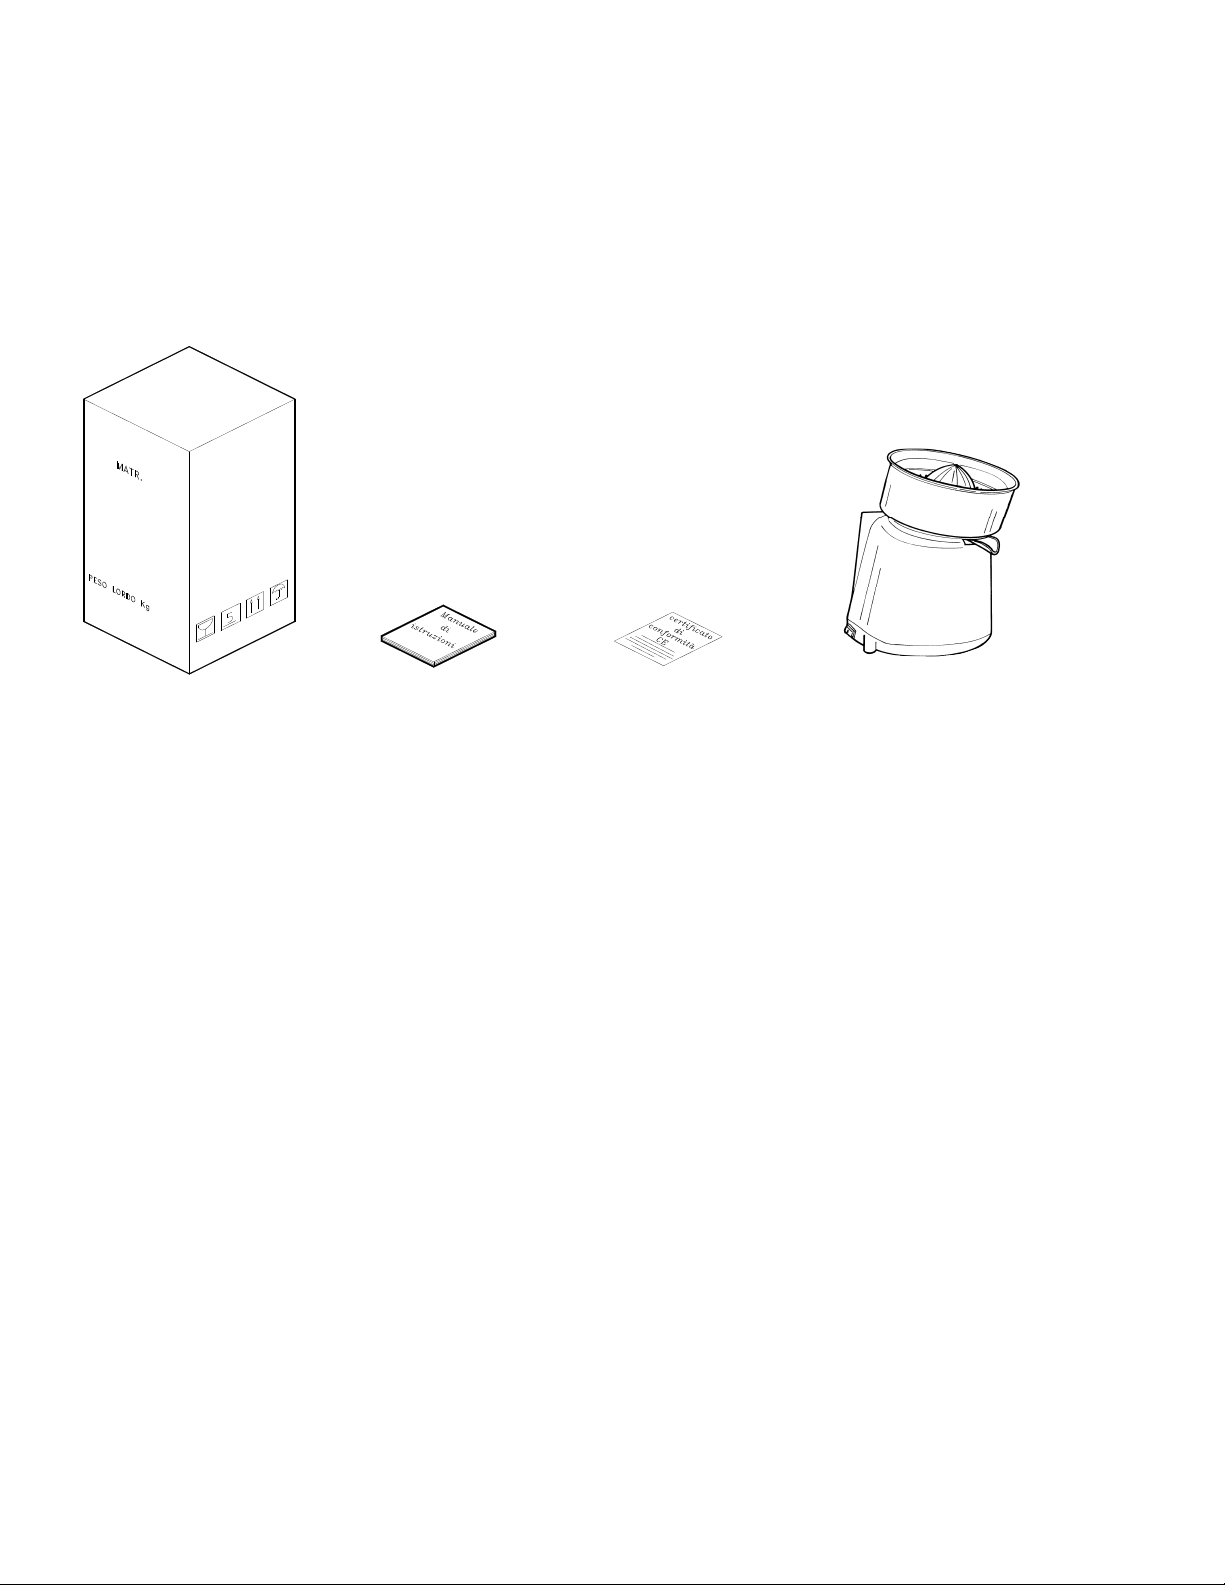
3.1 - TRANSPORTING THE APPLIANCE (see FIG. n°3)
The fruit-squeezer leaves our warehouse carefully packed; packaging consists in:
a) a resistant cardboard box;
b
) the appliance;
c) this manual;
d) CE Certificate of Conformity.
)
b
a)
c)
FI
G. n°3 - Packaging
3.2 - CHECKING PACKAGING UPON CONSIGNMENT
When the goods are r
make sure that inside there are all the listed items (see Fig. n°3). If when the goods are delivered there are
signs of damage to the packaging, such as dents or if they have been dropped, immediately inform the
forwarding agent or courier, and within three days from the date indicated on the documents draw up a
detailed list and report of all damage to the goods. Do not turn the packed goods upside down!! When
transporting the package make sure its four main points are firmly secured (maintain the goods parallel to
the ground).
3.3 - DISPOSING OF PACKAGING
The various items used for packaging (cardboard, plastic straps) are normal urban waste products and can
be disposed of without difficulty.
If the appliance is destined to countries where there are specific standards regarding waste, dispose of
packaging respecting the standards and laws in force.
eceived proceed with opening the packaging if there are no signs of damage, and
)
d
C
HAP. 4 - INSTALLING THE APPLIANCE
.1 - APPLIANCE LOCATION
4
The work surface where the appliance will be located must be suitable for its size, please refer to the
measurements given in Tab. 1. (depending on the model). The work surface must be level dry, smooth,
solid and stable.
The appliance must be located in a non-salty environment with a max humidity value
7
Page 8
of 75% and with a temperature between +5° and +35°C; and however, always in areas and
that do not cause any type of malfunction to the appliance.
4.4.2 - CONNECTING TO THE ELECTRICITY SUPPLY
The fruit-squeezer comes supplied with a 3 x 1,5 mm2 section (thickness) and ≅ 1.5 m long power cable
and with a SHUKO plug.
Connect the appliance to a 230V./50Hz power supply, interposing a differential -thermo magnetic switch
type 10A, ∆ I = 0.03A. At this point make sure the main earth circuit functions correctly.
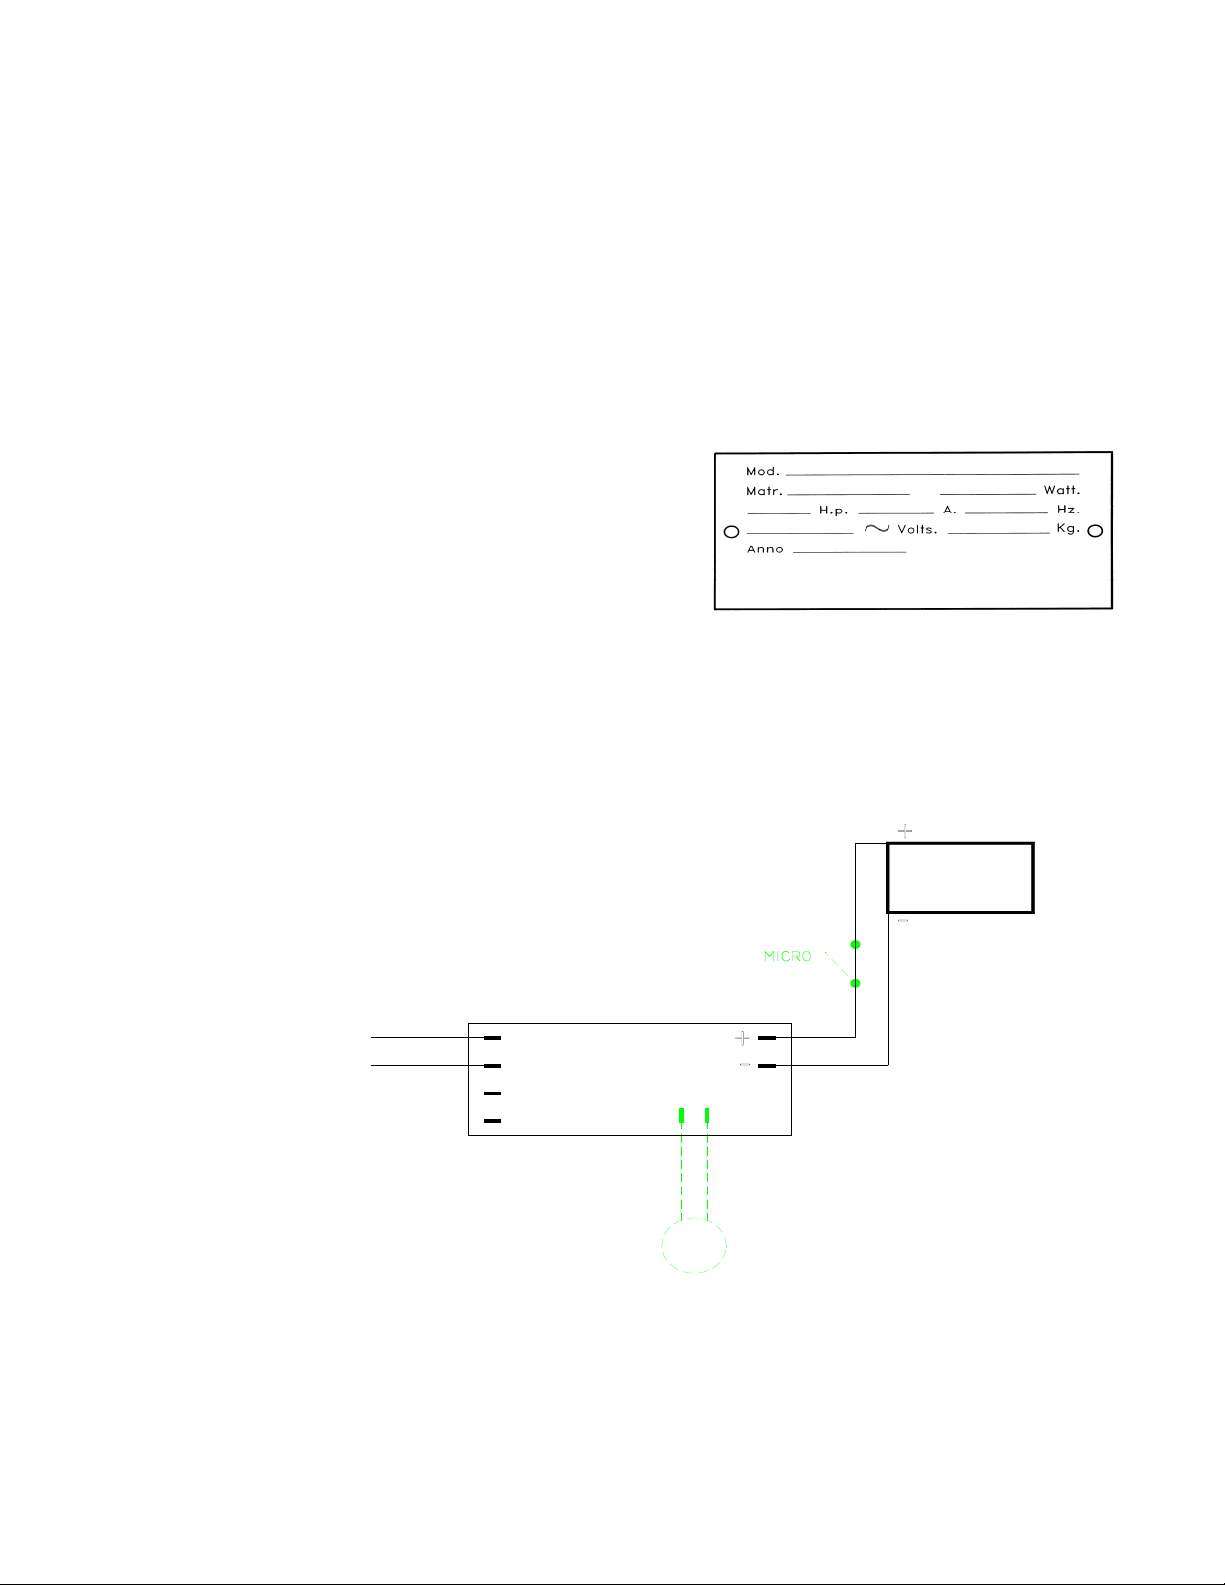
Also check that the information given on the technical data and serial number plate (FIG. n°4) corresponds
to the information given in the accompanying documents.
FIG. n°4 - Technical data & serial number plate
environments
4.3 - WIRING DIAGRAM
Po
wer source
230V./50Hz
MOTOR
Variable speed device
FIG. n°5 - Wiring diagram Mn
8
Page 9
4
.4 - FUNCTIONAL CHECK
To check the appliance works correctly proceed as follows:
1 check that the appliance works when the squeezer is pressed;
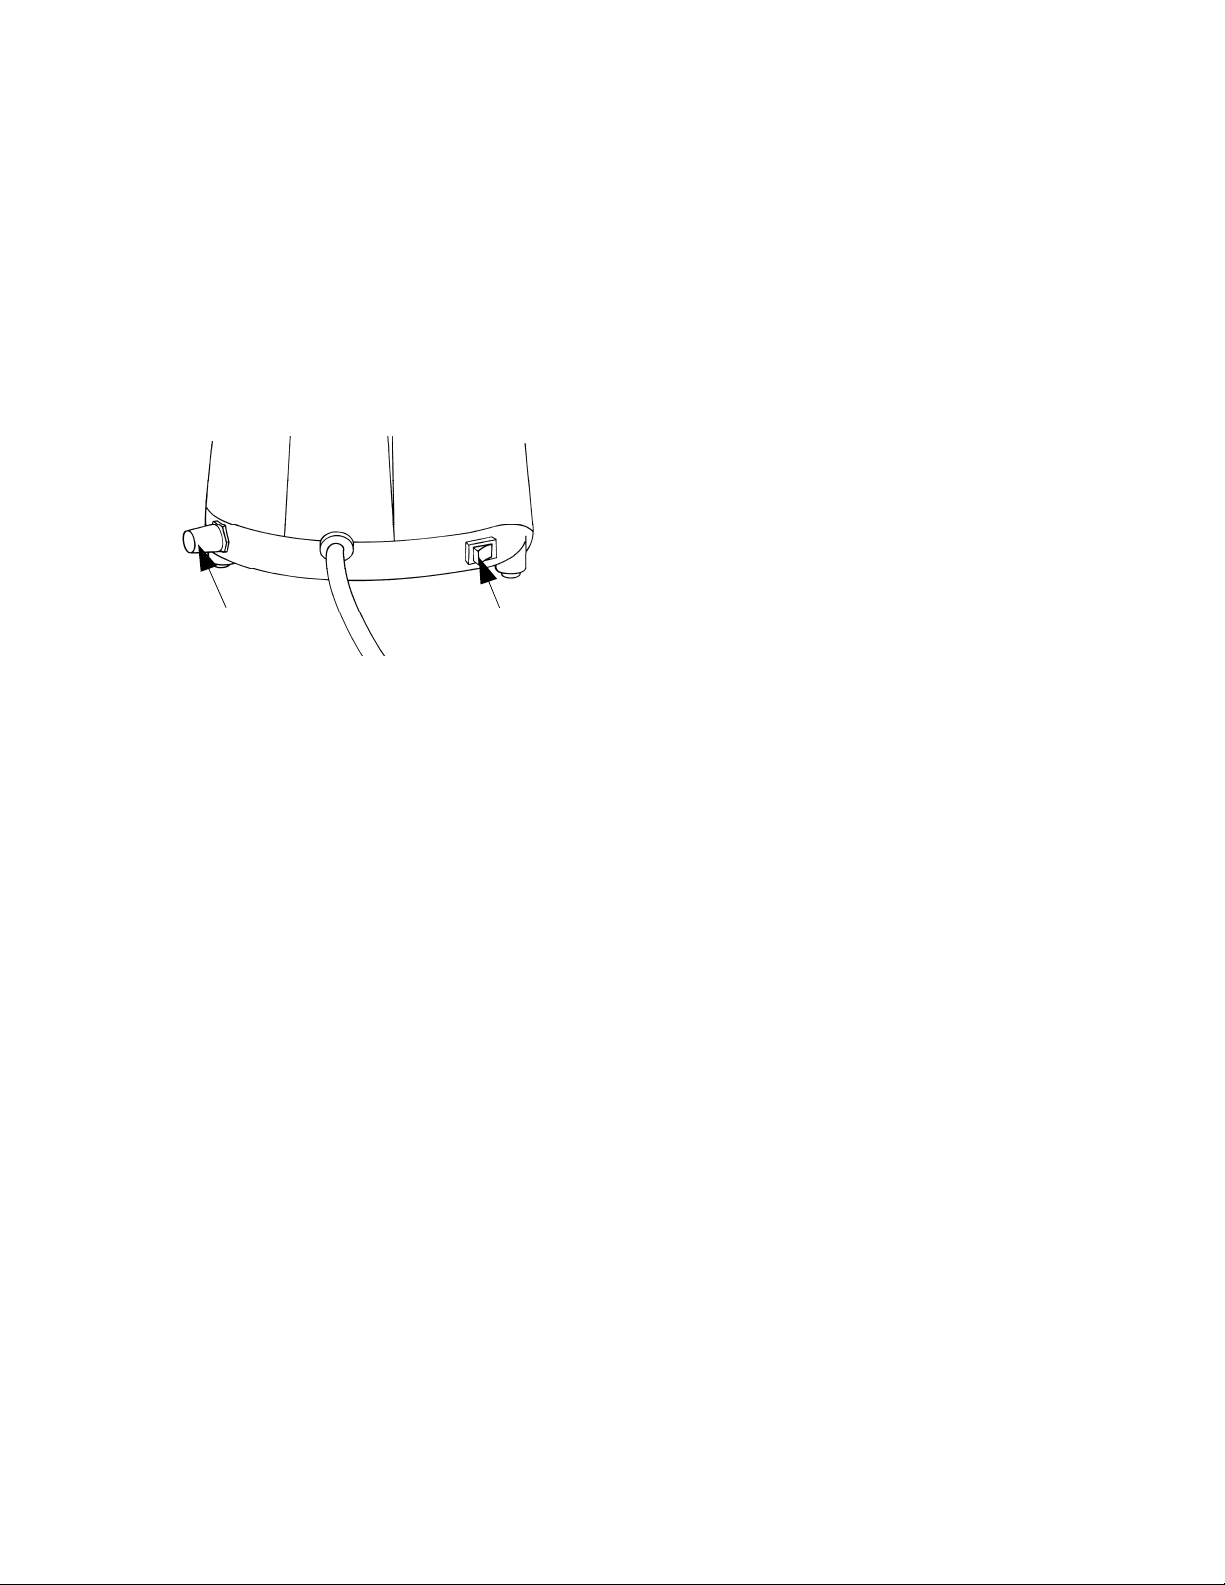
2 for models VV check that the number of revs increase (ref.2 FIG.n°6), when the knob is turned.
HAP. 5 - USING THE APPLIANCE
C
5.1 - CONTROLS
The controls for the citrus fruit-squeezer are shown in the below diagram.
1
. on/off switch:
- osition I start
- osition 0 stop
2. speed variator (mod. VV)
2 1
FIG. n°6 - Controls
5
.2 - USING THE SQUEEZER
To squeeze the fruit follow the below instructions:
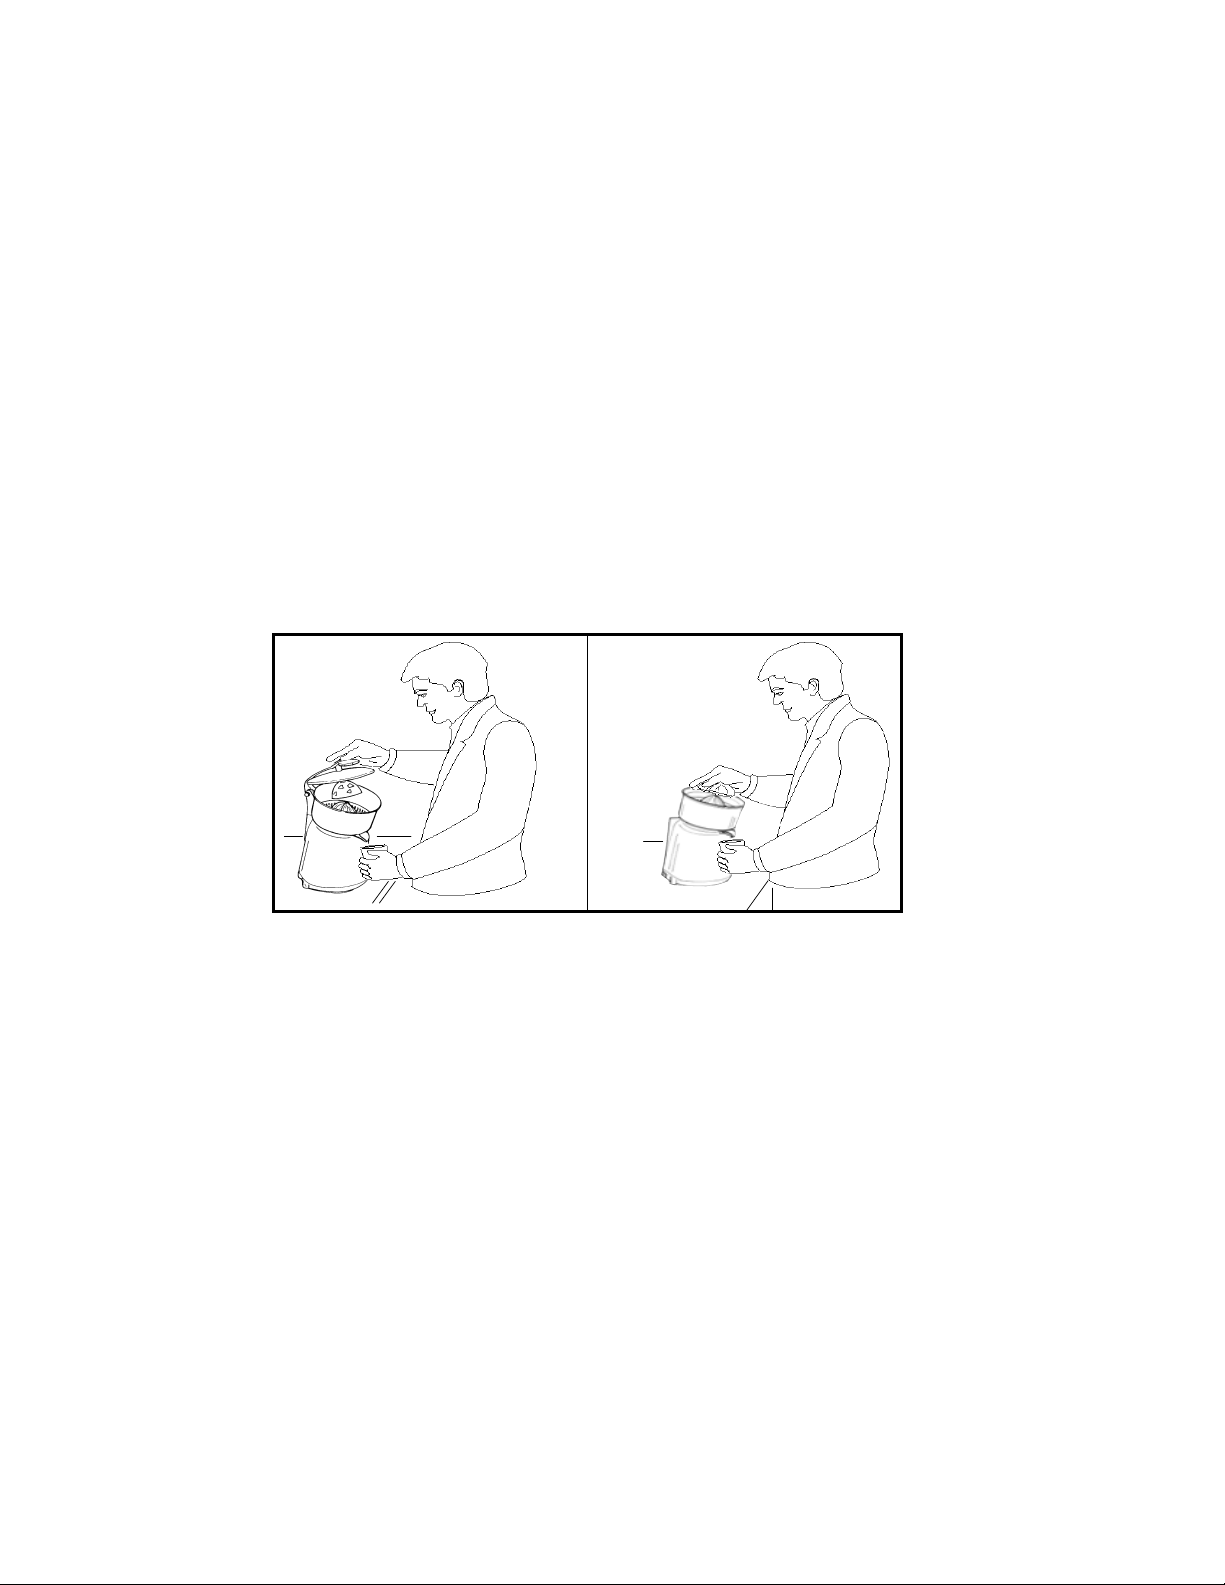
Always stand in th
work surface (see FIG. n°7); do not force any of the components with your hands or obstruct them in any
way.
Be careful that your body or any part of it does not come in contact with the squeezer when
working
STANDARD MODEL
. place the citrus fruit with the cut half onto the strainer cone and press gently down;
1
2. switch the start button to “I” to turn the citrus fruit squeezer on;
3. continue until the citrus fruit is completely squeezed;
4. turn the citrus fruit squeezer off by switching the start button to “0”.
MIRCRO-SWITCH MODEL
1
. switch the start button to “I”;
2. place the citrus fruit with the cut half onto the strainer cone and press gently down. The citrus
fruit squeezer will start rotating;
3. continue until the citrus fruit is completely squeezed;
4. turn the citrus fruit squeezer off by switching the start button to “0”.
e correct position to avoid accidents. Your body must be perpendicular to the
9
Page 10
L
EVER MODEL
. switch the start button to “I”;
1
2. raise the lever and place the citrus fruit with the cut half onto the strainer cone and lower the lever.
The citrus fruit squeezer will start rotating;
3. continue until the citrus fruit is completely squeezed;
4. raise the lever and turn the citrus fruit squeezer off by switching the start button to “0”.
SPEED-CHANGE MODEL
1
. switch the start button to “I”;
. raise the lever and place the citrus fruit with the cut half onto the strainer cone and lower the lever.
2
The citrus fruit squeezer will start rotating
3. continue until the citrus fruit is completely squeezed;
4. raise the lever and turn the citrus fruit squeezer off by switching the start button to “0”;
5. To increase productivity turn the knob (ref. FIG. n°6) clockwise so as to just motor speed top the
required speed.
;
G.n°7 - Correct position
FI
C
HAP. 6 - REGULAR CLEANING
6.1 - GENERALITIES
the appliance must be cleaned at
scrupulously clean all the various components of the fruit-squeezer whether they come in direct contact
with the food product or not.
never clean the fruit-squeezer with a pressurised water-jet or industrial cleaner, brushes or any other
type of cleaning utensil that could damage the surface of the appliance. Use water and a neutral
detergent.
efore cleaning you must:
B
a) r
emove the electricity supply plug isolating the appliance from the main power circuit.
b) switch the on/off switch (ref.1 FIG. n°6) to “0”;
c) turn the knob (ref.2 FIG. n°6) to the minimum speed (only for models VV).
least once a day or if necessary more than once.
10
Page 11
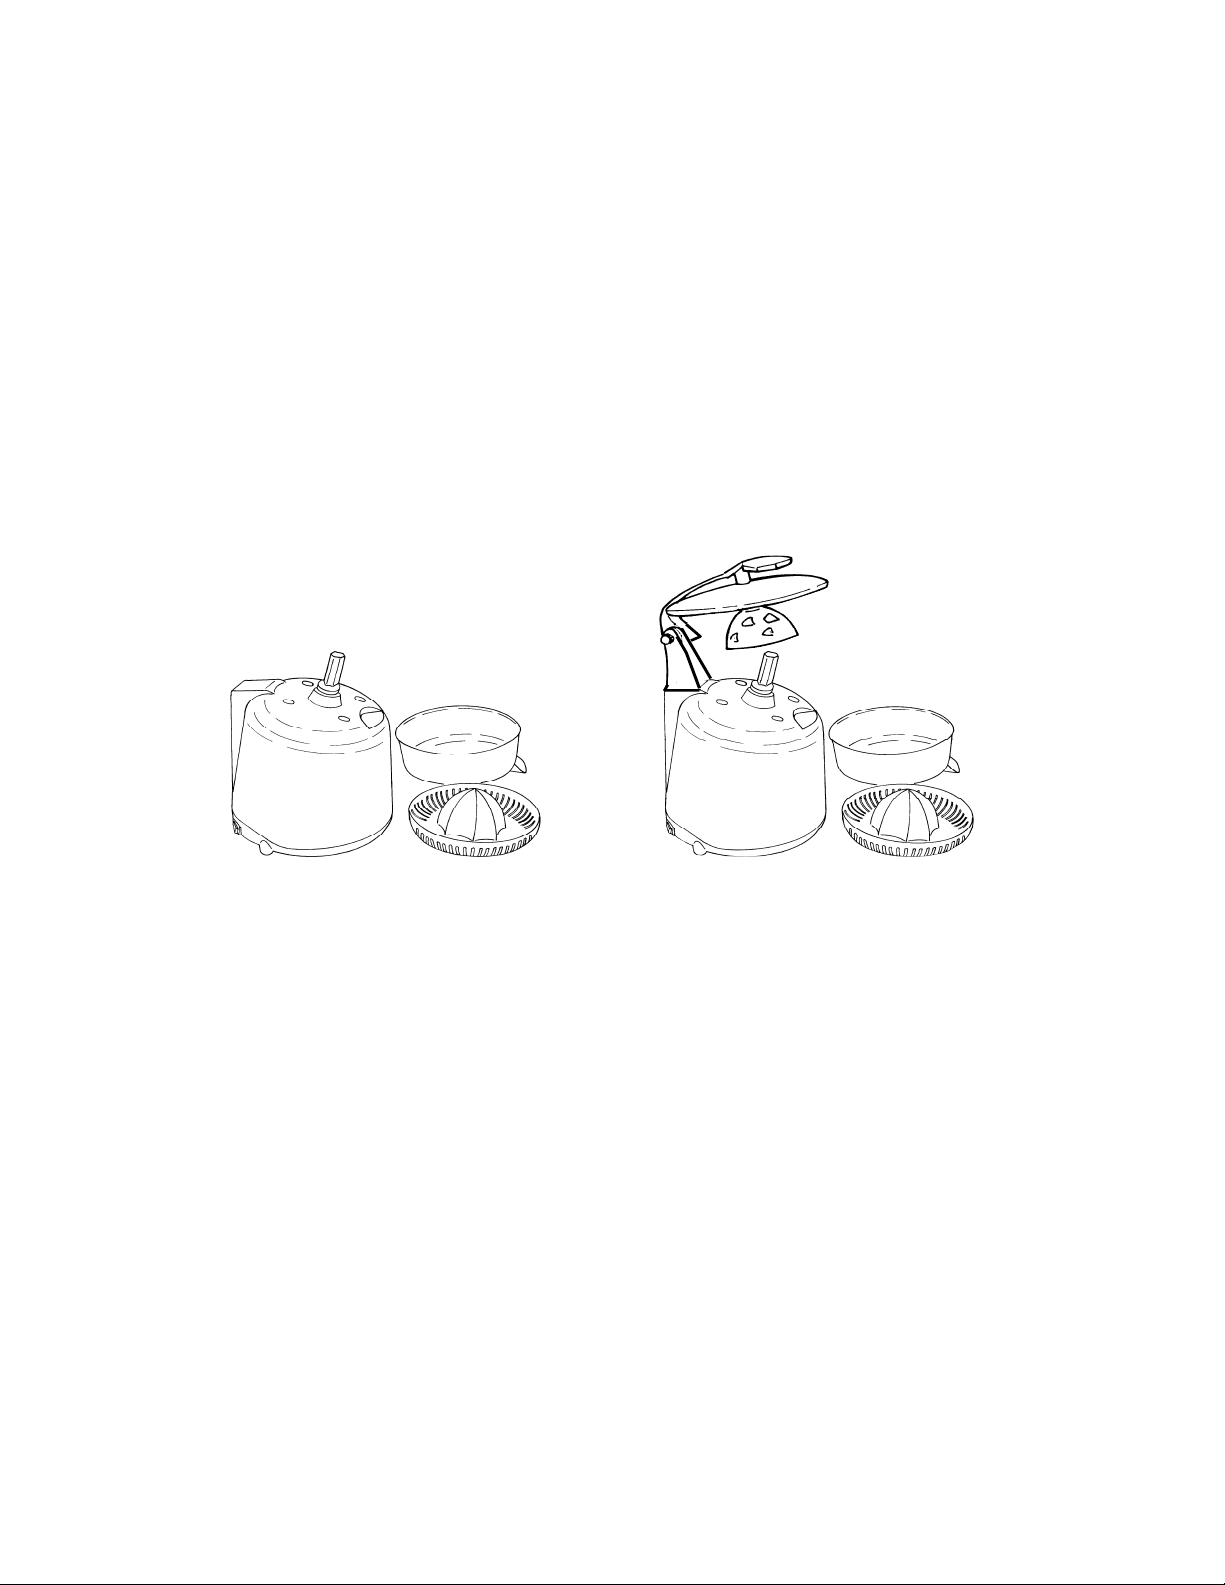
.2 - PROCEDURE TO FOLLOW FOR CLEANING THE APPLIANCE 6.2.1 - cleaning the
6
squeezer and juice container
To clean these two items proceed as follows:
a) car
b) now remove the juice container.
Once these components have been removed wash them using warm water and a neutal detergent.
efully remove the squeezer from the main structure;
.2.2 - general cleaning
6
N.B.: disconnect the electricity supply
To clean the main structure use neutral detergent and a damp cloth and remember to frequently rinse with
clean water. Once all components are washed, dry them well.
CHAP. 7 - MAINTENANC
7.1 - GENERALITIES
E
FIG.n°8 - Clean
efore servicing the appliance you must disconnect the electricity supply plug isolating the
B
appliance from the main power source.
7.2 - FOOT SUPPORTS
In time the foot supports can detriorate loosing their elastic properties causing instability. If this is the
case replace them.
7.3 - POWER SUPPLY LINE
Periodically check wear in the power cable and if necessary contact the “SERVICE CENTRE” for a
replacement.
ing the components
11
Page 12

HAP. 8 - SCRAPPING
C
8.1 - OUT OF SERVICE
If the appliance for some reason is to be put out of service, make sure it can no longer be used:
disconnect and remove all electrical connections.
8
.2 - WEEE Waste of Electric and Electronic Equipment
Directive 2002/95/EC, 2002/9
substances in electrical and electronic equipment, and waste electrical and electronic equipment.
This symbol, crossed out wheelie bin, on the product or on its packaging indicates that this product must
not be disposed of with your other household waste.
Separate waste collection of this appliance is organised and managed by the manufacturer. It is the
user’s responsibility to contact the manufacturer and follow the waste treatment system the
manufacturer has adopted for separate waste collection.
The separate collection and recycling of your waste equipment at the time of disposal will help to conserve
natural resources and ensure that it is recycled in a manner that protects human health and the
environment.
6/EC and 2003/108/EC on the restriction of the use of certain hazardous
SERVICE
AUTHORISED DEALER
CENTRE
12
 Loading...