

Page 1
WEEE Waste of Electric and Electronic Equipment
Directive 2002/95/EC, 2002/96/EC and 2003/108/EC on the restriction of the use of
certain hazardous substances in electrical and electronic equipment, and waste
electrical and electronic equipment .
This symbol, crossed out wheelie bin, on the product or on its packaging indicates that
this product must not be disposed of with your other household waste.
Separate waste collection of this appliance is organised and managed by the manufacturer. It is the user’s responsibility to contact the manufacturer and follow the waste treatment system the manufacturer has adopted for separate waste collection.
The separate collection and recycling of your waste equipment at the time of disposal will
help to conserve natural resources and ensure that it is recycled in a man ner that pr otects
human health and the environment.
7
USER'S MANUAL
INDUCTION RANGE
mod. PI-2,5 Kw / PI-2,5 Kw incasso
Page 2
1
USE AND CARE INSTRUCTIONS – IMPORTANT SAFEGUARDS
READ ALL INSTRUCTIONS BEFORE OPERATION
1. Use an individual 230V., 15 AMPERE electrical socket.
2. DO NOT block the air-intake panel, blocking may overheat the unit.
3. Use pans 14 cm or larger in diameter. We recommend pans be less than 26c m in
diameter. Please refer to the next page for a list of suitable and unsuitable pans.
4. DO NOT touch the hot surfac e of the ceramic plate. NOTE: The induction range itself
does not produce any heat during cooking, however, the heat from the pan will leave
the surface of the ceramic hot!
5. DO NOT cook empty pots or pans. Heating an empty pan will automatically activate
the overheating protection device and the unit will shut off.
6. Place the induction range on a horizontal surface and at least 10cm away from the
wall and other objects for proper ventilation.
7. DO NOT place any objects or tools in the air-intake panel. Doing so may cause electrical shock.
8. To protect against electrical shock, DO NOT immerse the unit, the cord or the plug i n
or near water or other liquids.
9. Close supervision is necessary when the induction range is used or near children.
10. DO NOT operate the induction range if it has been damaged in any manner or if the
unit malfunctions. Return the unit to the nearest authorized service facility for examination or repair.
11. The use of any accessories not recommended by the manufacturer may cause injuries.
12. Keep the power cord away from heat.
13. DO NOT place the induction range in, on or near open flames, electric burners, heated
ovens or other high temperature surroundings.
14. DO NOT heat any sealed cans on the induction range. A heated can may explode.
15. DO NOT move the induction range while cooking or when the pan is hot.
16. After the induction range has cooled down, unplug the cord and cl ean as follows, CERAMIC PLATE: wipe with damp cloth or use a mild, non-abrasive cleaning solution.
BODY: wipe the control panel with soft cloth or use a mild cleaner.
17. DO NOT use induction range for other than intended use.
18. Unplug when not in use.
19. When storing, DO NOT place any objects on top of the induction range.
20. When using an induction range (smooth top rang e) for cooking, keep your pacem aker
2 feet (approx. 60 cm) from the heating areas.
SAVE THESE INSTRUCTIONS!!!
SUITABLE COOK UTENSILS- FOR INDUCTION HEATING PLATES
SUITABLE POTS
1. Iron
2. Cast iron
3. Stainless steel
6
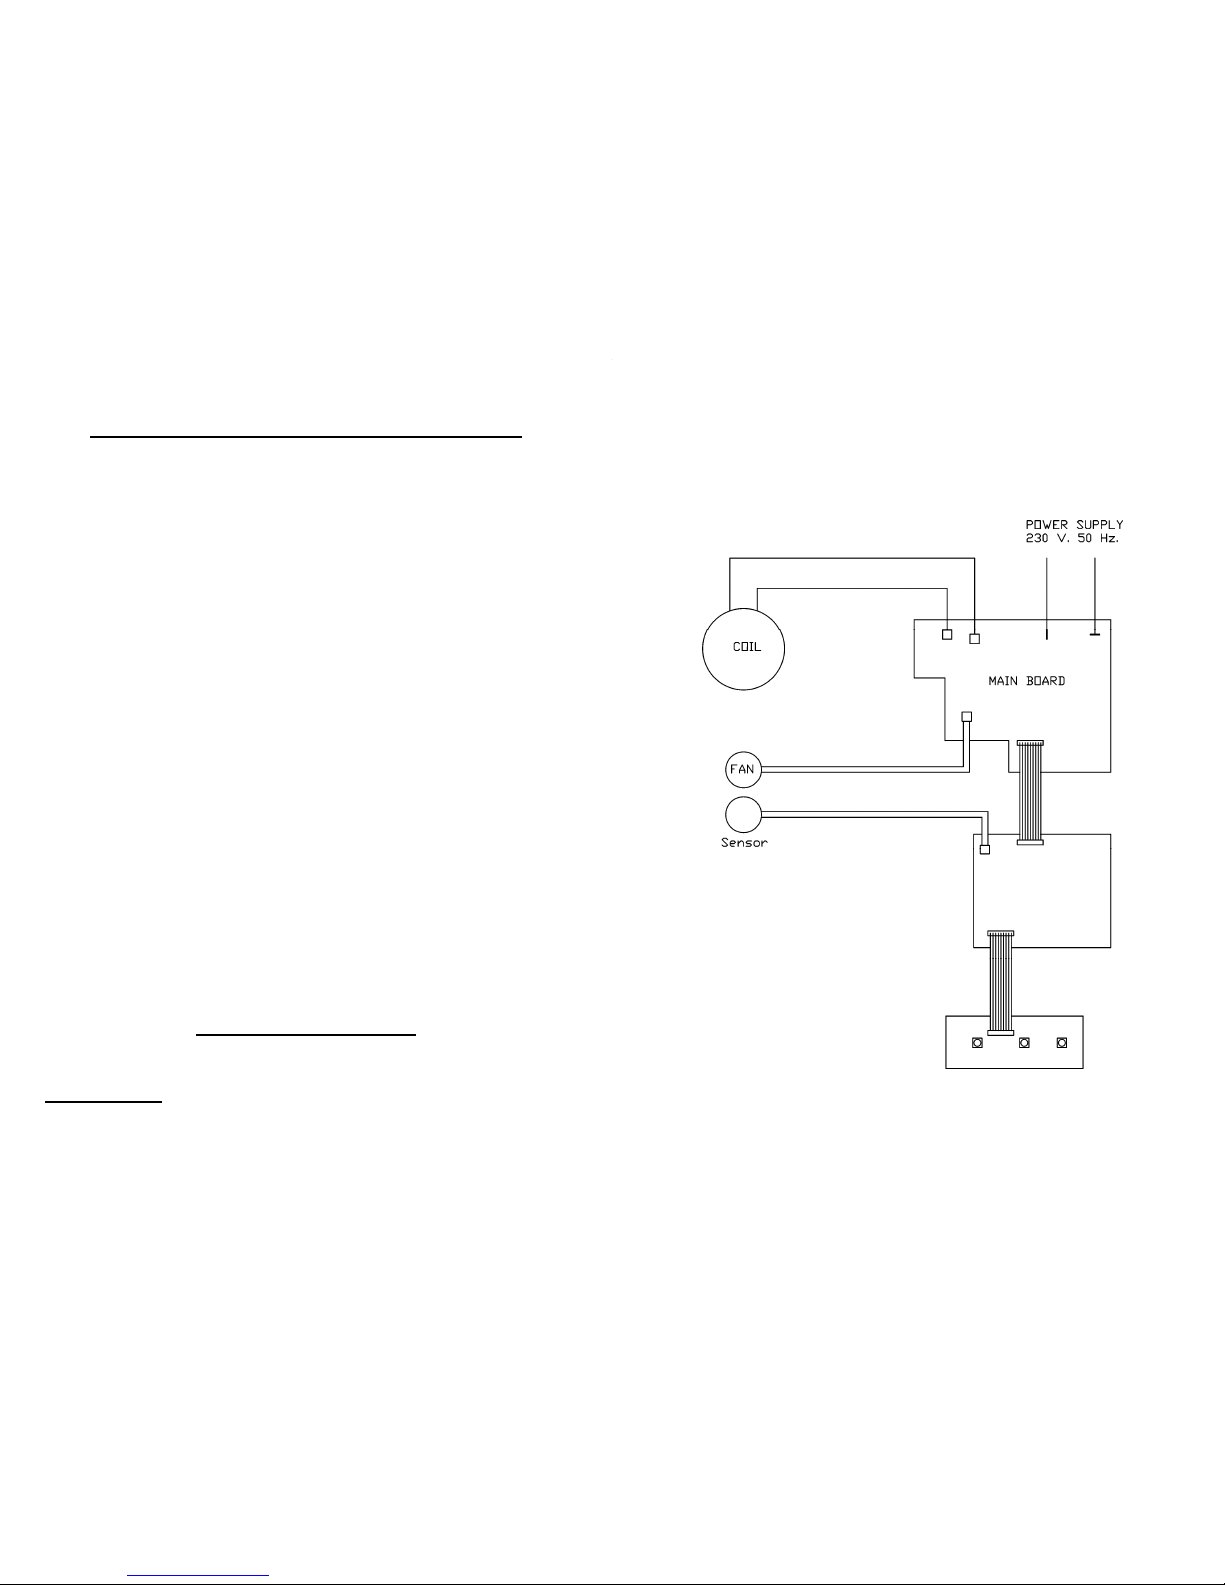
WIRING DIAGRAM
Page 3

9. Air-Outlet
10. Foot Stand
SPECIFICATION:
TROUBLE SHOOTING
1. If your induction range seems to be working improperly, it doesn't necessarily mean
it's a faulty. In all cases, check the following points.
2. If you fail to identify the problem contact the after-sales service without delay.
5
model nr.
P.I 2,5 Kw P:I 2,5 Kw incasso
Voltage 230V ~ 50 Hz
Vitro-Ceramic Plate 322 x 270 mm 322 x 270 mm
Electrical Power
Consuption
max 2.500 watt.
Safety Device Over time Protector (2 Hrs)
Automatic Safety Shut-Off
Material Compatibility Detector
Overheating Protection Device
IC Auto Reset
Dimensions 320 x 440 x H 115 mm 320 x 500 x H 115 mm
Net weight 7,5 Kg 9 Kg
Remarh: The switching frequency is verified by different
Power setting
If............. It might be caused................
No indication light when power "on". Cable/terminal block is loosed.
Broken circuit of fuse; or automatic switch
in your house
Power supply stopped.
Heating indicator does not light-in
Appliance fails to hesd up
Unsuitable cooking utensil,
Utensil doesn’t located at the center
properly.
Utensil is small than 5 cm.
Over-heating protection is activated.
Appliance suddenly stops heating during
operation
High ambient temperature.
Air entrance or outlet blocked.
Over-heating protection activated.
2
4. Enamelware
All pots and pans must have a magnetic bottom.
All pots and pans must have a flat bottom.
All pots and pans should have a diameter between 14 and 26 cm.
UNSUITABLE POTS
1. Pot with diameter below 5 cm.
2. Stainless steel pans with aluminum bottom
3. Pottery
4. Glass pans
5. Aluminum pans
6. Bronze pans
7. Copper pots
8. Pans with feet
SAFETY DEVICE
Overtime Detector
If the pan is left on the induction range for more than 2 hours, or if the user does not operate any functions for more than 2 hours, the range will automatically shut off.
Automatic Safety Shut-Off
If the induction range is left on for more than 60 seconds without a pan or with an incompatible pan, the unit will automatically shut off.
Material Compatibility Detector
If the pan’s material or it’s dimensions are not suitable for this induction range, the pan
indicator will not light.
Small Object Detector
The induction range will not recognize any objects or utensils smaller than 5 cm in diameter. For best results, use pans that are between 14 cm and 26 cm in diameter.
Overheating Protection Device
If the pan’s temperature becomes too high, and the temperature remains too high for 60
seconds, the unit will shut off automatically. And there will be a short warning sound after
unit shut off automatically.
IC Auto Reset Device
Main control micro processor equipped with watch dog device , the IC will auto reset
when the software program goes wrong.
HOW DOES YOUR INDUCTION HOB WORK?
A high frequency (20-35KHz) induction coil underneath the surface ceramic top plate heats the cooking utensil by magnetic friction. The heat is produced directly within the pan.
It's controlled by electronic circuit to offer superior performance and functions. During cooking, no energy is lost between the hob and the food. When you switch off, the cooking is
stopped immediately.
Page 4

3
PRECAUTION BEFORE USING YOUR INDUCTION HOB
1. The glass top is of strong, hard, and non- porous properties. But, in case of breakage,
even it's only slight cracking, disconnect the appliance from the mains immediately
and contact the after-sales service.
2. The appliances is equipped with 'small obj ect detector'. But, it's recommended not to
place metal kitchen utensils, pan lids, knives, or other metal objects on the induction
heating zone. If an inductor is switched on, there is a risk of becoming hot.
3. When using yo ur induction hob, don't place any mag netable objects on the glass top,
such as credit cards, cassettes, etc.
4. Scientific tests have shown that the induction hob presents no danger. Whatsoever,
for persons using pacemaker, please keep 30 cm distance from the unit while the induction hob is in using.
5. To prevent from overheating, do not place aluminum-foiled or iron plate on the top
plate.
6. Put the appliance on a horizontal surface but keep away from wall or articles at least 5
-10 cm.
7. Do not put any articles like iron wire or tools into the air entrance or outlet to prevent
from electric shock.
8. Immediate clean-up is recommended when water left on the top plate.
OPERATION INSTRUCTION
1. Plug power cord into 230V., 50Hz, 15A power socket.
2. Turn on power by rotary the power control knob, power level display led will light on.
3. Rotary power control knob clockwise, the power level led will display from step.1 to
step.9.
4. Put a suitable pan on central position of top plate, and rotate power control knob to
desire power level. Step.1 position is the minimum, step. 9 position is the maximum.
5. Heating indicator light will indicates the pan i s suitable or not. If the Heating indicator
light is on, then the pan is heating. If the Heating indicator light is off, It indicates that
the power is on, but no pan or no suitable pan is on top plate position.
6. This unit is equipped with 'over he ating protection device', which will stop po wer temporally when top plate temperature reaches 230°C (+/-20°C). The power will start again automatically when the temperature of top plate reduced under 230°C (+/- 20°C).
If you put an empty pan on it, and heat-up at max. Power, it will reach 230°C very soon. So, the safety device will stop output power temporarily to prevent overheating.
Upon this situation, the Heating indicator light will flash to indicate the over heating
protection function is on.
7. Temperature holding function: Push “Temperature” function key, the temperature
holding function will start working. The LED indicate the temperature holding at 60°C
(+/- 5°C), push “Temperature” function key again, the LED indicate the temperature
holding at 80°C. “Temperature” function key pushed each time, the holding temperature will be changed as a circulate mold. 60°C -> 80°C -> 140°C -> 180°C - > 220°C ->
60°C ->
8. When Temperature holding function working, the “Temperature” indicator light will
start flashing. It’s mean the temperature not yet arrived the setting temperature. When
the pan’s temperature arrive the settino temperature, the Temperature” indicator light
will keep steady on.
9. Cha nge Temperature hol ding function to “Powe r” function: Push “Power” functio n key,
and the function will back to “Power” again. Then the rotary control knob will be activa-
ted again.
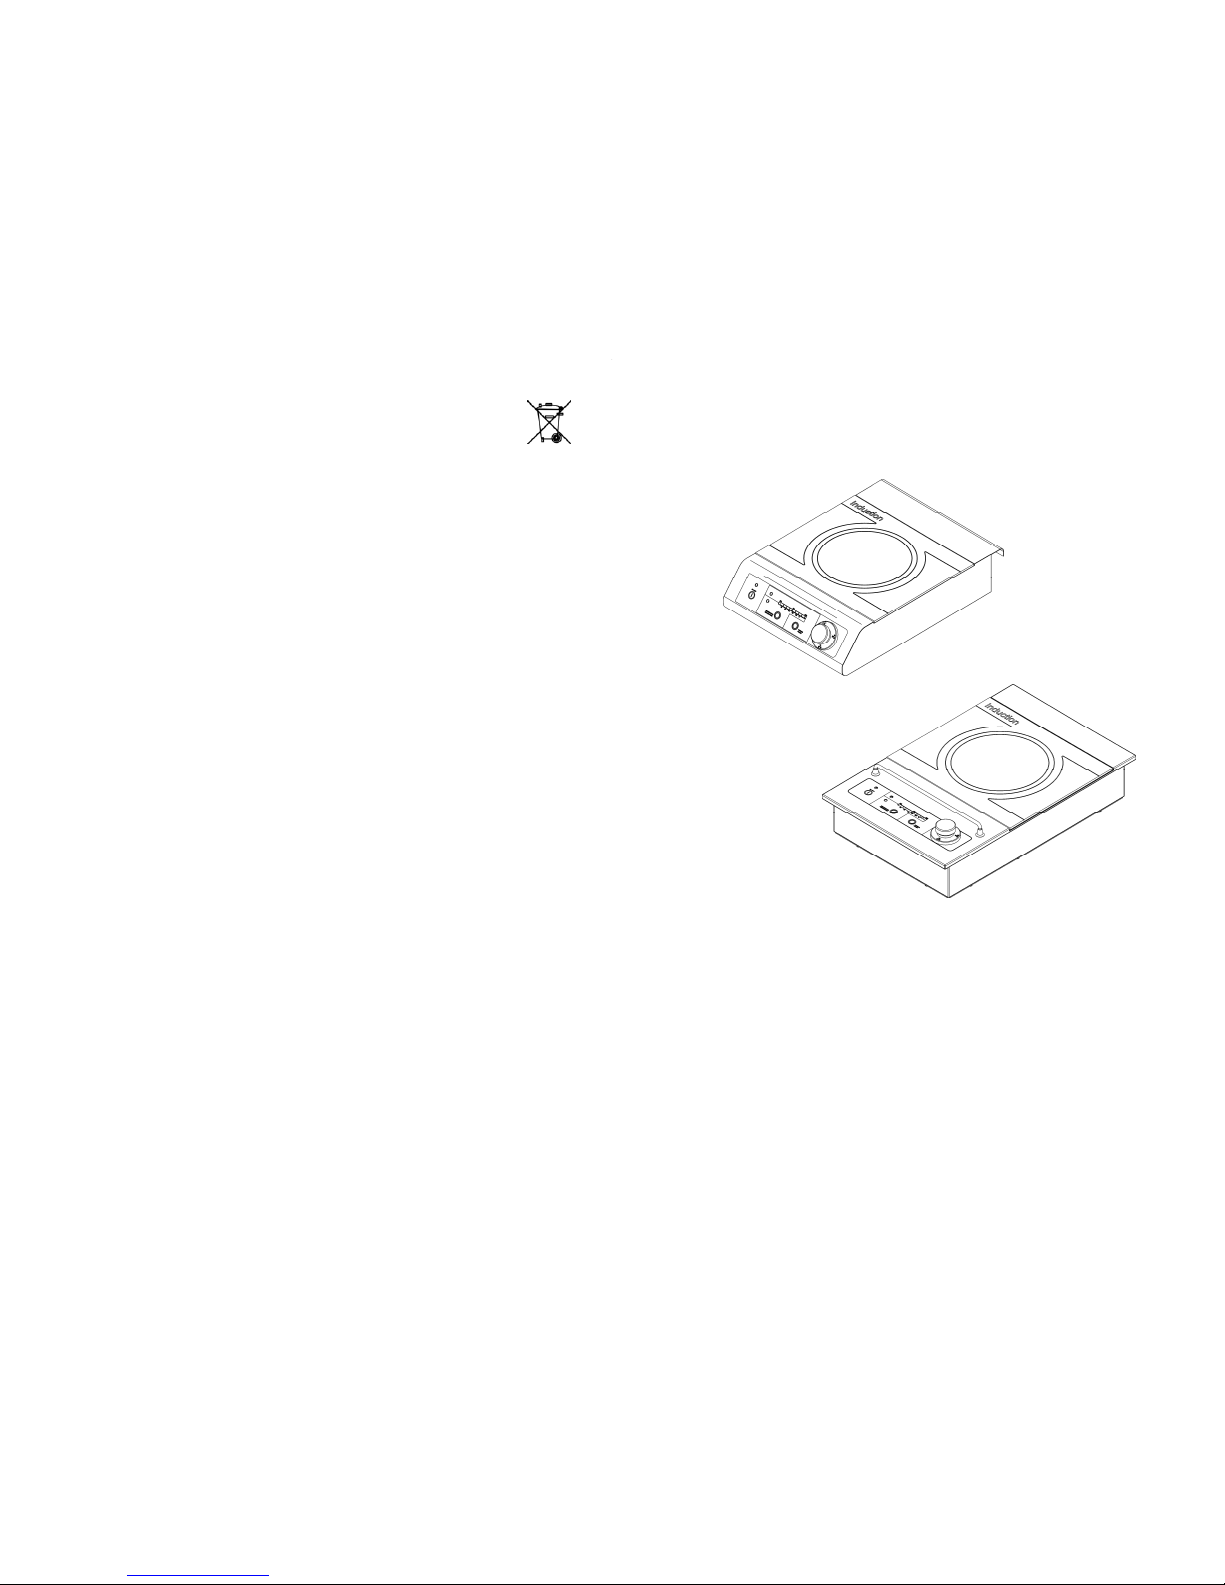
Control Panel:
1. Power On/ Off Key.
2. “Heating” indicator light.
3. “Potenza” function indicator light.
4. “Temperature”(Holding Temperature) function indicator light.
5. “Temperature”(Holding Temperature) function key.
6. “Heat” function key.
7. Power Level / Holding Temperature display LED lights.
8. Power regulator rotary knob.
FEATURES & DESCRIPTION:
1. 2500 watt Induction Heating Zone
2. Ceramic Top Plate
3. Bottom Chassis
4. Rotary Control Knob. (Power regulator)
5. Induction Heating Indicator Light
6. Heat function indicator light.
7. “Temperature” function Indicator Light
8. Air-Intake
2
3
7
1
5
6
4
8
4
6
1
2
9
3
10
5
7
4
8
 Loading...