

USER GUIDE


Commander Touch User Guide
Table of Contents
Introduction .......................................................................... 4
Features ..........................................................................................4
Safety and Care Information ........................................................................5
What’s in the Box? .................................................................................6
Commander Touch Connections .....................................................................7
Step 1: Install the Commander Touch Display Controller ................................................8
Step 2: Install the Commander Touch Tuner Module ...................................................11
Step 3: Install the Magnetic Mount Antenna and Route the Antenna Cable ..............................12
Step 4: Install the Wiring .......................................................................... 19
Step 5: Subscribe .................................................................................23
Step 6: Update the Commander Touch Software .....................................................24
Using Commander Touch .............................................................. 28
Turning the Commander Touch On and Off ..........................................................28
Navigation Basics .................................................................................28
The Main Display Screen ...........................................................................29
Understanding the Swipe Area Carousel ............................................................ 31
Tuning Channels ..................................................................................32
Favorite Channels .................................................................................33
Commander Touch Features ........................................................... 33
Channel Lock .....................................................................................35
Pause & Replay ...................................................................................38
Traffic and Weather Now ......................................................................... 40
TuneStart ....................................................................................... 42
TuneMix ........................................................................................ 43
Settings ............................................................................ 45
About .......................................................................................... 45
FM ............................................................................................. 46
Display Options ..................................................................................47
Audio Level ..................................................................................... 48
Channel Lock .................................................................................... 48
Feature Settings ................................................................................. 49
Signal Indicator .................................................................................. 50
Power Options .................................................................................. 50
Factory Reset ....................................................................................52
Demo Mode ......................................................................................52
Troubleshooting ..................................................................... 54
Product Specifications ................................................................ 56
Patent and Environmental Information .................................................. 58
FCC Statement ...................................................................... 59
Important Legal Information ...........................................................60
Owners Record ......................................................................61
3

Introduction
Commander Touch User Guide
Features
Thank you for purchasing the SiriusXM Commander Touch!
The SiriusXM Commander Touch™ has these exciting features to enhance your overall experience:
•Enjoy SiriusXM through your vehicle’s in-dash audio system* with controls on the color
touchscreen display
•Compact touchscreen controller mounts directly to your dash, and the tuner hides discreetly
behind the dash for a fully integrated look with no/minimal visible wires
•Full-color display with album art, artist name, song title, channel logos and program information
•Pause, Rewind and Replay live Satellite Radio
•Automatically start songs from the beginning on your favorite channels with TuneStart™
•Use TuneMix™ to hear a mix of songs from your favorite channels
•Keep moving with the most current updates using Traffic & Weather Now™
•Connects to any radio with either an AUX input or FM connection
•Professional installation recommended for best results
•Commander Touch can easily be updated by a USB flash drive (not included) to add new
features and capabilities as they become available
•Works on the XM Network
Please consult this User Guide when using your Commander Touch.
*Requires FM radio. If your vehicle has an Auxiliary Input, use the included AUX Audio Cable for best performance. Will also
work with cassette adapter (sold separately).
4

Commander Touch User Guide
Safety and Care Information
IMPORTANT! Self installation instructions and tips are provided for your convenience. It is
your responsibility to determine if you have the knowledge, skills, and physical ability
required to properly perform an installation. SiriusXM shall have no liability for damage or
injury resulting from the installation or use of any SiriusXM or third party products. It is
your responsibility to ensure that all products are installed in adherence with local laws
and regulations and in such a manner as to allow a vehicle to be operated safely and
without distraction. SiriusXM product warranties do not cover the installation, removal or
reinstallation of any product.
•Do not expose to extreme temperatures (above 158°F or below -4°F, or above 70°C or below
-20°C).
• Do not expose to moisture. Do not use device near or in water. Do not touch the device with
wet hands.
• Do not let any foreign matter spill into device.
• Do not store in dusty areas.
• Do not expose to chemicals such as benzene and thinners. Do not use liquid or aerosol
cleaners. Clean with a soft damp cloth only.
•Do not expose to direct sunlight for a prolonged period of time, and do not expose to fire,
flame, or other heat sources.
• Do not try to disassemble and/or repair device yourself.
• Do not drop your device or subject it to severe impact.
• Do not place heavy objects on device.
• Do not subject device to excessive pressure.
• If the LCD screen is damaged, do not touch the liquid crystal fluid.
Introduction
Warning!
•Opening the case may result in electric shock.
•If the liquid crystal fluid comes in contact with your skin, wipe the skin area with a cloth and
then wash the skin thoroughly with soap and running water. If the liquid crystal fluid comes into
contact with your eyes, flush the eyes with clean water for at least 15 minutes and seek medical
care. If the liquid crystal fluid is ingested, flush your mouth thoroughly with water. Drink large
quantities of water, and induce vomiting. Seek medical care.
•When using this product, it is always important to keep your eyes on the road and hands on
the steering wheel. Not doing so could result in personal injury, death, and/or damage to your
device, accessories, and/or to your vehicle or other property.
•Vehicle installation, service activation, and Radio configuration functions should not be
performed while driving. Park your vehicle in a safe location before beginning installation.
•This product contains chemicals known to the State of California to cause cancer and birth
defects or other reproductive harm.
•Your device should be placed in your vehicle where it will not interfere with the function of
safety features, e.g., deployment of airbags. Failure to correctly place device may result in
injury to you or others, if the unit becomes detached during an accident and/or obstructs the
deployment of an airbag.
5
Introduction
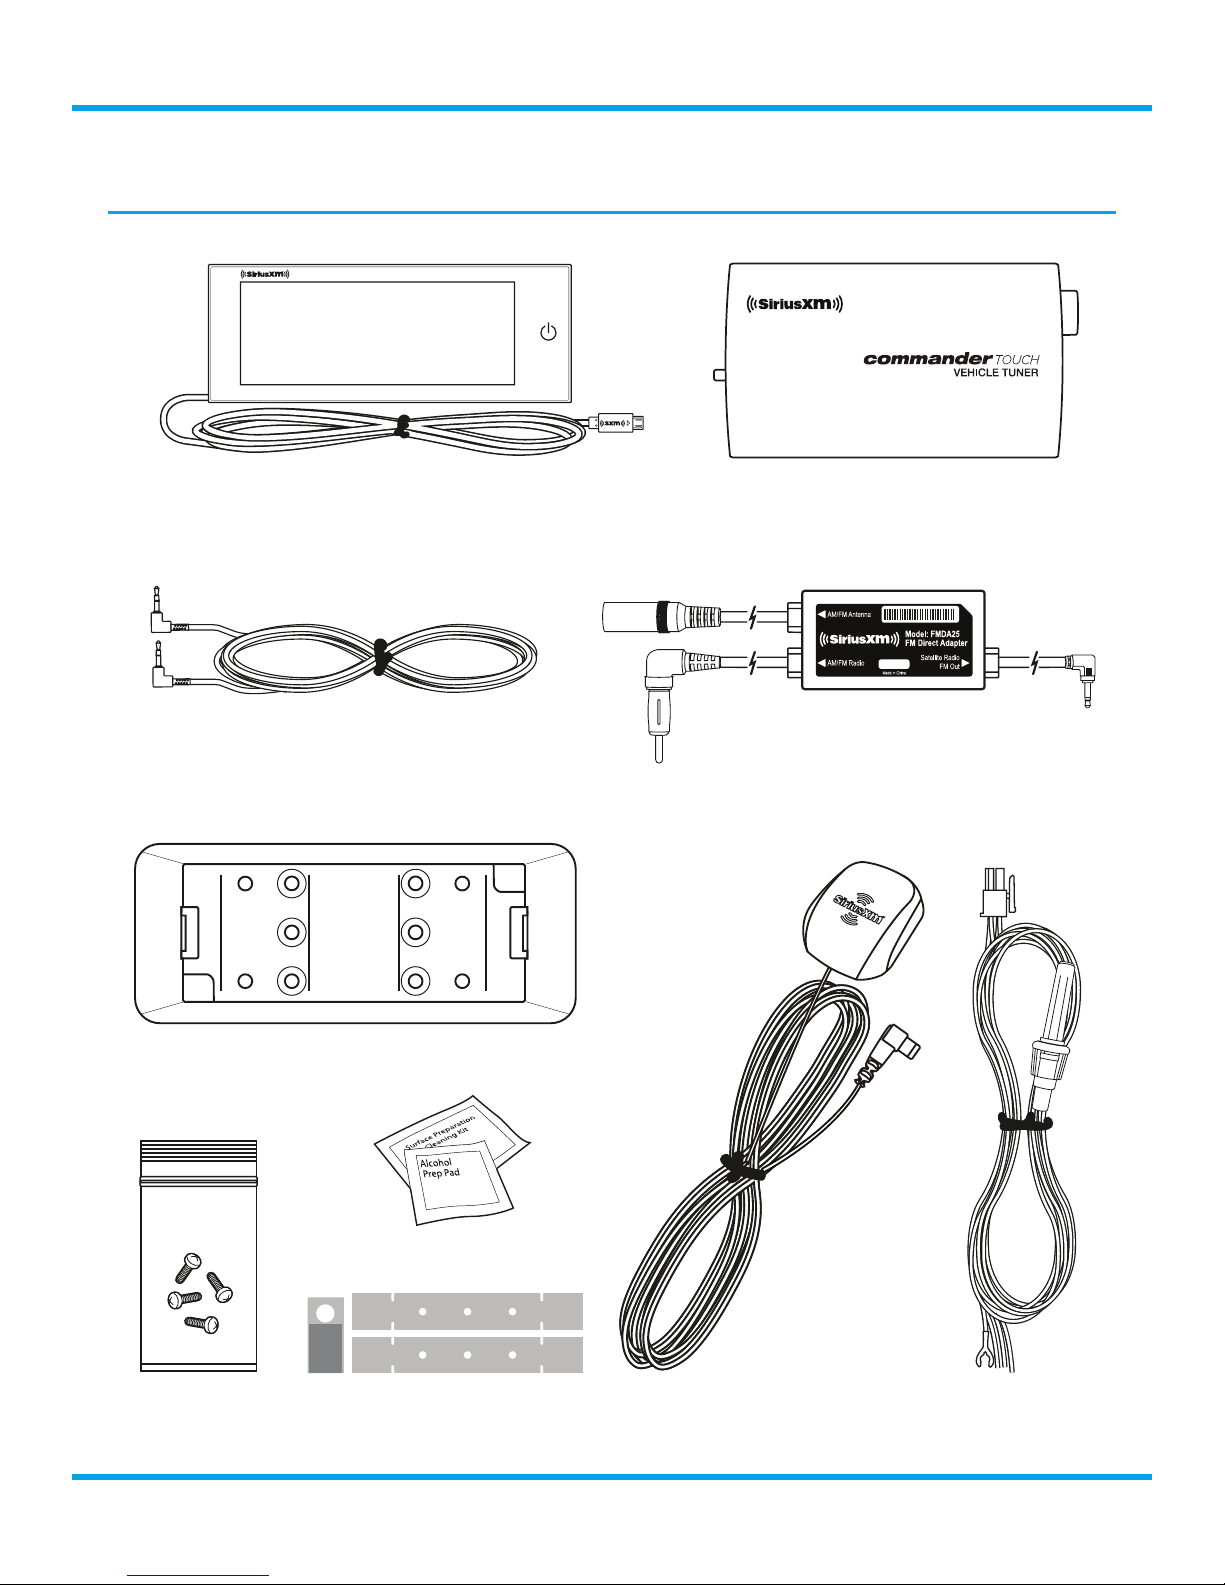
What’s in the Box?
Commander Touch User Guide
Commander Touch Display Controller
Aux Audio Cable
Flush Mount
Commander Touch Tuner Module
FMDA25 FM Direct Adapter
Antenna Alcohol
Preparation Pad
Screws (4)
Mounting Brackets and
Release Tool
6
Magnetic Mount Antenna
Wiring Harness
Commander Touch User Guide
Introduction
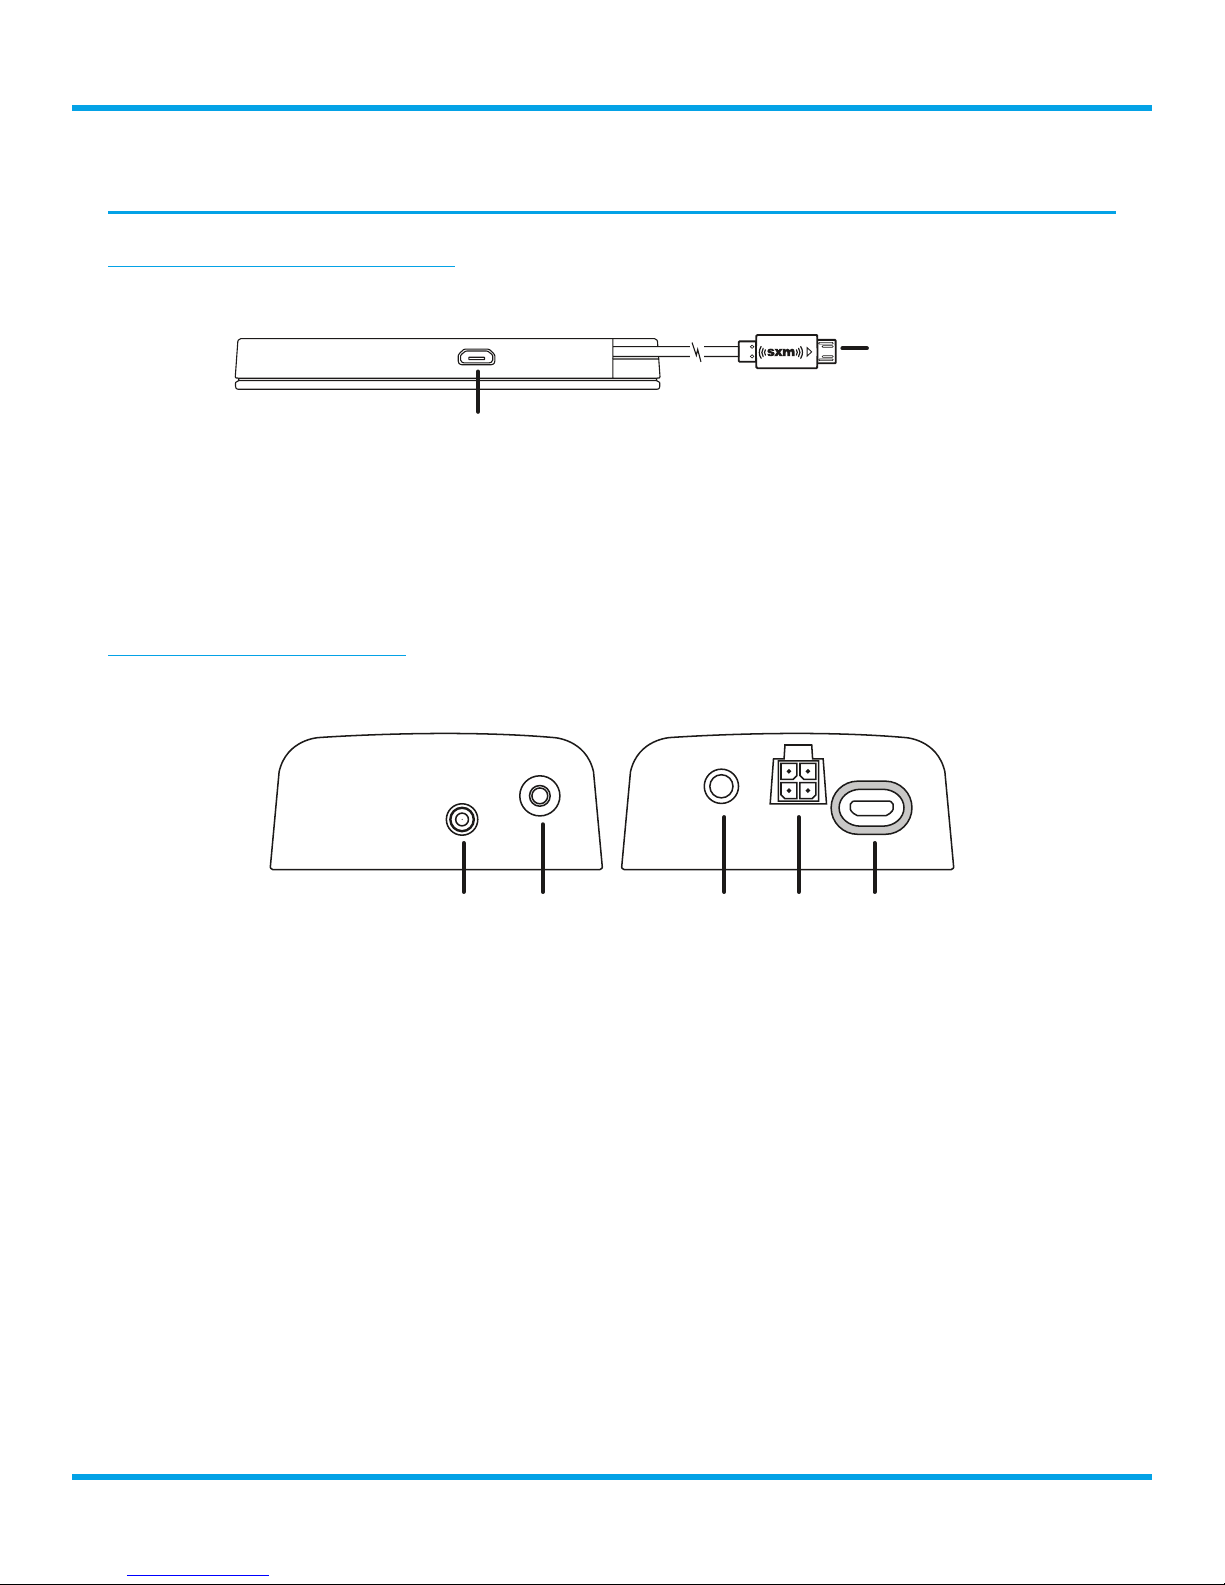
Commander Touch Connections
Display Controller Connections
Display Controller Bottom View
Display Controller
Pigtail Cable
Micro USB Port
Display Controller Pigtail Cable: Connects to the DISP connection on the Tuner Module.
Micro USB Port: SiriusXM may occasionally release a system software update for Commander Touch.
The update can be installed by connecting a USB Flash Drive with the software update to the micro
USB port located at the bottom of the Display Controller. A micro USB Flash Drive or a USB type A
Flash Drive with a USB type A to Micro USB Adapter is required (not included).
Tuner Module Connections
Tuner Module
Left Side View
ANT FM AUX PWR DISP
ANT (Antenna): Connection for the Magnetic Mount Antenna.
FM: Connection for the FMDA25 FM Direct Adapter.
AUX (Auxiliary audio output): Connection for the AUX Audio Cable.
PWR (Power): Connection for the Wiring Harness.
DISP (Display): Connection for the Display Controller pigtail cable.
Right Side View
7

Introduction
Step 1: Install the Commander Touch Display Controller
WARNING! DO NOT attempt to install Commander Touch while driving. Park your vehicle
in a safe location before beginning installation.
The Commander Touch Display Controller can be
mounted in a variety of ways. It can be adhered
to a dash surface using double sided tape or hook
and loop tape (not included), or directly attached
to a dash surface using the included screws. The
Display Controller has a standard AMPS mounting
pattern on the back which is compatible with
many other types of mounting solutions designed
for vehicles, such as a suction cup windshield
mount, a pedestal mount, a dash mount, a vent
clip mount, etc; consult your retailer or installer.
Depending on your vehicle you may also be able to
use the included Flush Mount for a more integrated
look.
AMPS mounting pattern on the rear of
the Commander Touch Display Controller
for alternate mounting solutions
Commander Touch User Guide
The Commander Touch includes a flush mount installation option which requires cutting an opening
in the dash or console of the vehicle which may or may not be suitable for your specific vehicle. A
professional installer will know if flush mounting is a suitable mounting solution for your vehicle, or
can recommend other installation options that are tailored to your specific vehicle, including custom
designing an installation solution. Please read through this User Guide before making the decision to
install the Commander Touch yourself. SiriusXM recommends professional installation.
NOTE! The installation shown in this User Guide is for the flush mounting option included
with the Commander Touch. Self installation instructions and tips are provided for your
convenience. It is your responsibility to determine if you have the knowledge, skills and
physical ability required to properly perform an installation. SiriusXM shall have no liability
for damage or injury resulting from the installation or use of any SiriusXM or third party
products. It is your responsibility to ensure that all products are installed in adherence
with local laws and regulations and in such a manner as to allow a vehicle to be operated
safely and without distraction. SiriusXM product warranties do not cover the installation,
removal or reinstallation of any product. SiriusXM recommends professional installation of
this product.
Installing the Commander Touch Display Controller Using the Flush Mount
1. Locate a suitable place in your dash or center console for installing the Flush Mount. The Flush
Mount requires an opening of 48 mm high x 110 mm wide, and an approximate clearance behind
the dashboard or console of 25 mm
depth to accommodate the Mounting
Brackets. Avoid any location which will
block or interfere with an airbag, or a
location which interferes with the safe
operation of the vehicle.
2. A template is available online to assist in
cutting the opening. Go to
com/commandertouch
www.siriusxm.
and download and
print the template. Place the template
on the area selected and carefully cut
the opening, following the outline on the
template.
110mm
48mm
8

Commander Touch User Guide
3. Once the opening has been cut, remove the
template and place the Flush Mount in the
opening. The Flush Mount is asymmetrical so
the top/bottom orientation is not important.
4. Bend each of the two Mounting Brackets
into a U shape. If needed, the ends of the
Mounting Brackets can be trimmed using
metal shears to accommodate thicker dash
material.
Introduction
5. Attach the Mounting Brackets to the rear
of the Flush Mount, using the provided 4
screws. Position the legs of the Mounting
Brackets against the inside of the dash or
console surface and tighten the screws. Note
that you may need to bend or cut the ends
of the mounting brackets depending on the
specific application.
Alternate Mounting Method: If the above
mounting method does not work in your
particular installation, the Mounting Brackets
can also be attached to the Flush Mount
by using the center threaded hole in the
Mounting Bracket, and the tabs on bent as
necessary for the installation. The Mounting
Brackets can also be trimmed using a shears
to accommodate the installation.
Attach the Mounting Brackets using a screw
through the front of the Flush Mount to the
Mounting Bracket at the rear of the Flush
Mount.
9

Introduction
6. Once the Flush Mount is secured in place, insert
the Commander Touch Display Controller into the
Flush Mount. First, route the cable from the left
side of the Display Controller into the opening
at the bottom left of the Flush Mount, and then
gently press the Display Controller into the Flush
Mount, left side first and then the right side. It
will snap into place.
7. Route the cable from the Display Controller to
the place behind the dash or center console
where you plan to install the Tuner Module.
(Refer to the next step.)
Removing the Display Controller from the Flush Mount
To remove the Display Controller from the Flush Mount
use the Release Tool. Center the tool on the right side
and press in between the Display Controller and the
Flush Mount until the latch releases. (You may need to
rock it gently from side to side slightly to release the
latch.) Then pry the Display Controller out of the Flush
Mount.
Commander Touch User Guide
10
Commander Touch User Guide
Introduction
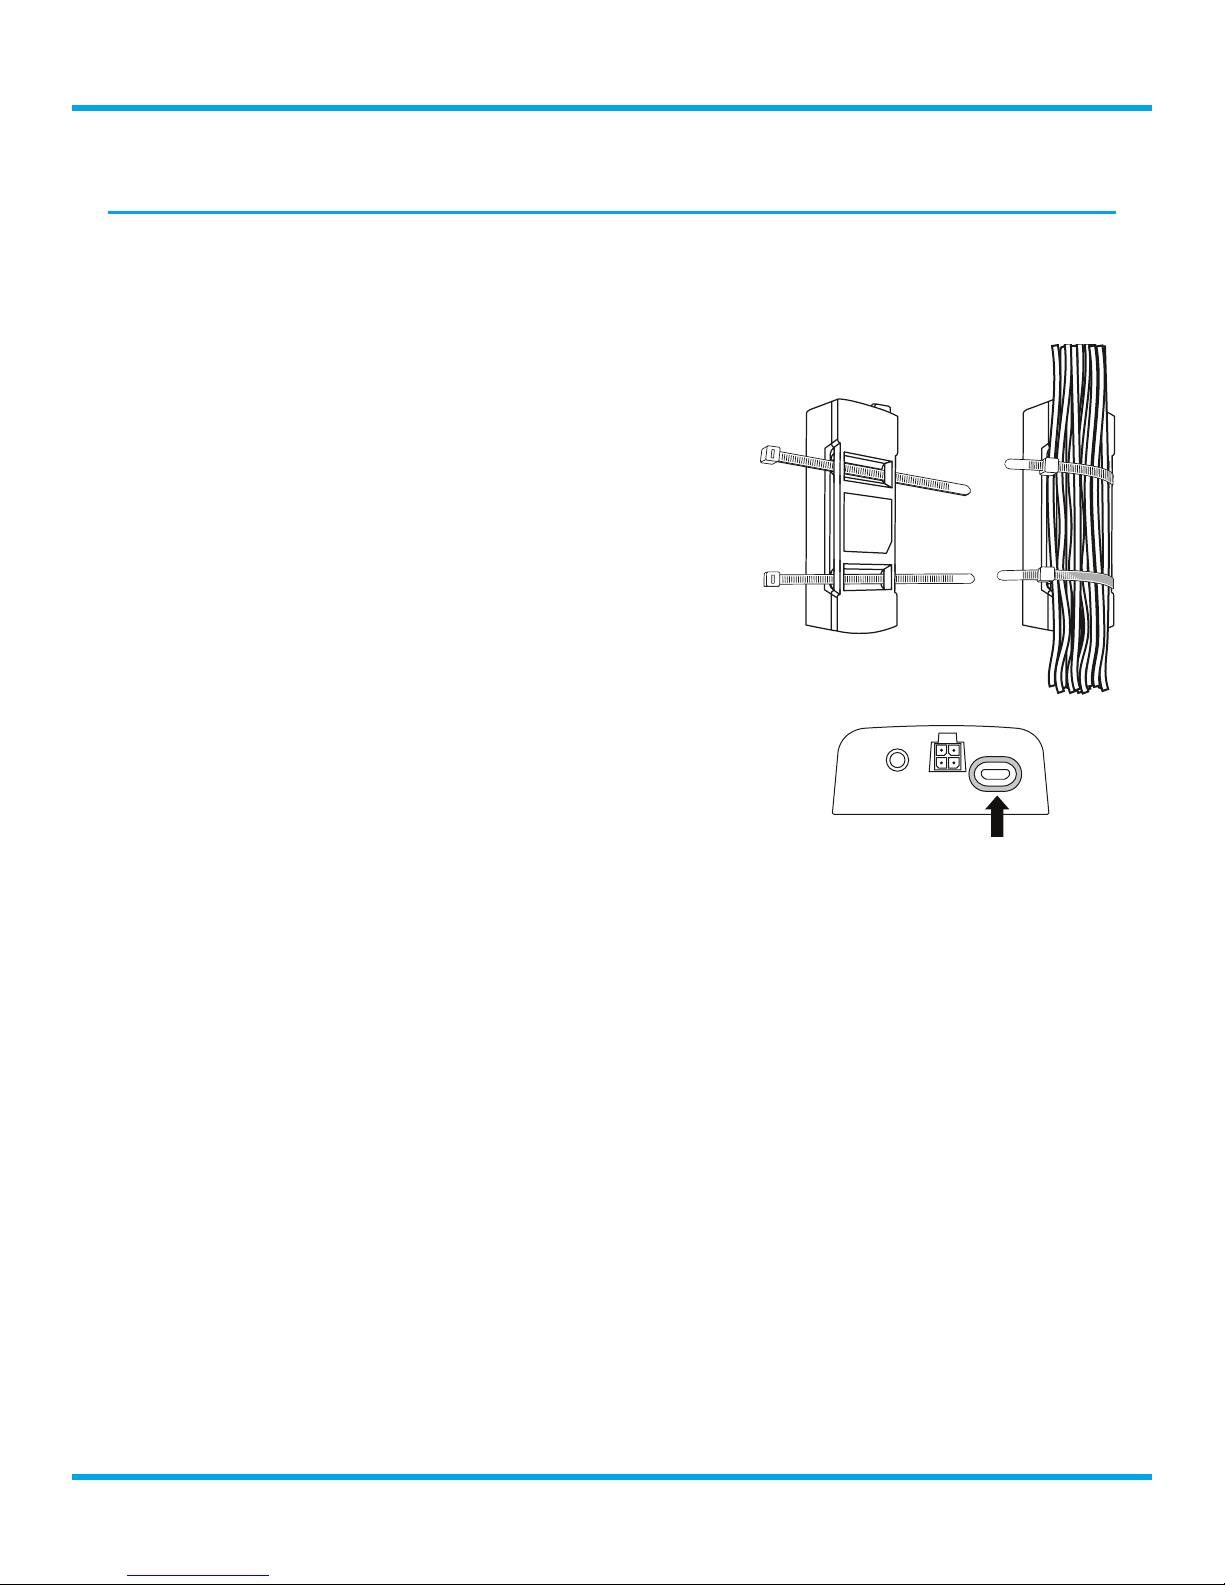
Step 2: Install the Commander Touch Tuner Module
The Commander Touch Tuner Module should be installed and secured behind the dash or center
console using wire ties (not included). Keep in mind that you will need to route several cables to the
Tuner Module, so allow enough clearance for the cable connections.
1. Find a location for the Tuner Module with suitable
clearance for the cable connections.
2. Thread the wire ties through the molded brackets on
the underside of the Tuner Module as shown. Secure
the Tuner Module to a bracket or wiring harness
using the wire ties. Avoid brackets with sharp edges
and any moving parts such as gas, clutch, and brake
pedals.
3. Connect the cable from the Display Controller to the
DISP connection on the Tuner Module.
Display Connector
11

Introduction
Commander Touch User Guide
Step 3: Install the Magnetic Mount Antenna and Route the Antenna Cable
Proper placement of the Magnetic Mount Antenna is very important. Consult a professional installer if
you are uncomfortable with installing the antenna yourself. More detailed installation instructions and
illustrations can be found at siriusxm.com/installation and clicking on the XM Vehicle Installation link.
•Place the Magnetic Mount Antenna on the outside of your vehicle on a
horizontal surface that always faces the sky. The antenna contains a strong
magnet which will stick to any metal part of your vehicle, but will not
damage the vehicle.
•Avoid placing the antenna near obstacles that could block a clear view of
the sky (such as roof racks, other antennas like AM/FM, cellular, and GPS),
preventing the satellite signal from reaching the antenna.
•Consult a professional installer to find an alternate antenna mounting location if your vehicle
roof is made from a non-magnetic material such as aluminum, fiberglass, or carbon fibre, or you
have difficulty finding a location for your antenna.
•Clean the surface of the selected mounting location using a alcohol preparation pad and let it
dry thoroughly.
Select the Best Location for the Magnetic Mount Antenna
For most vehicles the best location is on the roof, centered above the rear window
or front windshield.
•Sedan or Coupe: Recommended mounting location is above the rear window
or front windshield
•Pickup or SUV: Recommended mounting location is above the front
windshield
•Convertible: Recommended mounting location is above the front windshield,
or alternately on the trunk lid, on the front hood, or on top of the front fender.
CAUTION! Don’t mount
the antenna inside the
vehicle, for example, on
the dashboard.
CAUTION! Don’t mount
the antenna on any of
the vehicle’s front, back
or side pillars.
CAUTION! Don’t mount
the antenna close to a
roof rack. Adjust the rack
so it’s further away from
the antenna or move the
antenna closer to the
center of the roof.
12

Commander Touch User Guide
F
rubber mouldin
ar
CAUTION! Don’t mount
the antenna close to
another antenna. Mount
it at least 3 inches away.
Introduction
Route the Antenna Cable
Before you begin routing the antenna cable, read these general instructions for how to route and hide
the antenna cable. Then route your antenna cable according to the step-by-step instructions which
follow for your specific type of vehicle.
Use care when routing the antenna cable into and through the vehicle interior, avoiding sharp objects
that can damage the cable. Keep the antenna cable away from moving parts such as gas, clutch,
and brake pedals, trunk and door hinges, and sliding seat brackets. Hide the antenna wire inside the
vehicle cabin by routing the cable under the carpet and behind plastic trim, toward the Tuner Module
location. Coil and secure any excess cable in a hidden location, such as under the carpet, using wire
ties (not included). CAUTION! Do not kink or sharply fold the antenna cable.
Use a blunt plastic putty knife, a credit card,
a plastic knife, or a similar blunt tool to lift the
rubber window moulding
Tuck the cable under the
moulding around the window
eed cable under
g
ound window
13

Route cable out from under rear windshield
moulding and tuck int
ar
atherstripping
Av
we
Bring cable out of weatherstripping and into trunk
xisting
wall and into cabin
Introduction
o weatherstripping
ound trunk opening
oid sharp bends by running cable through
atherstripping for several inches
Commander Touch User Guide
Pull weatherstripping
from trunk opening
Tuck cable into weatherstripping.
Route cable through we
several inches to avoid sharp bends
Pull cable out of weatherstripping
and route through trunk to cabin
Route cable out of window
moulding and into weatherstripping around trunk opening
Route cable along trunk
wall and into cabin through
gap or conduit, along e
wiring harness
14
Route cable along trunk
Commander Touch User Guide
Continue routing cable under
t
knife or similar blunt
hicle
Introduction
Use a blunt plastic putty
tool
to lift edge of interior
trim and tuck cable
under trim. Continue
towards front of vehicle
Route cable under
trim or upholstery
Route cable from trunk
under interior trim, into
cabin and towards front
of vehicle
Continue routing cable
under trim or carpet
towards front of ve
carpet or console to radio location
Pull carpet
or mat back
Coil excess
cable under
carpet or ma
TIP! Always be careful to include enough slack in your cable to accommodate open doors
or trunk lids. Use things typically found around the home, like electrical tape, to secure
cables in areas so that hinges do not pinch the cable with the door. Hide any excess cable
in the trim.
Bring cable out from trim
and route under carpet to
dashboard or console
Bring cable out
from trim
15
Introduction
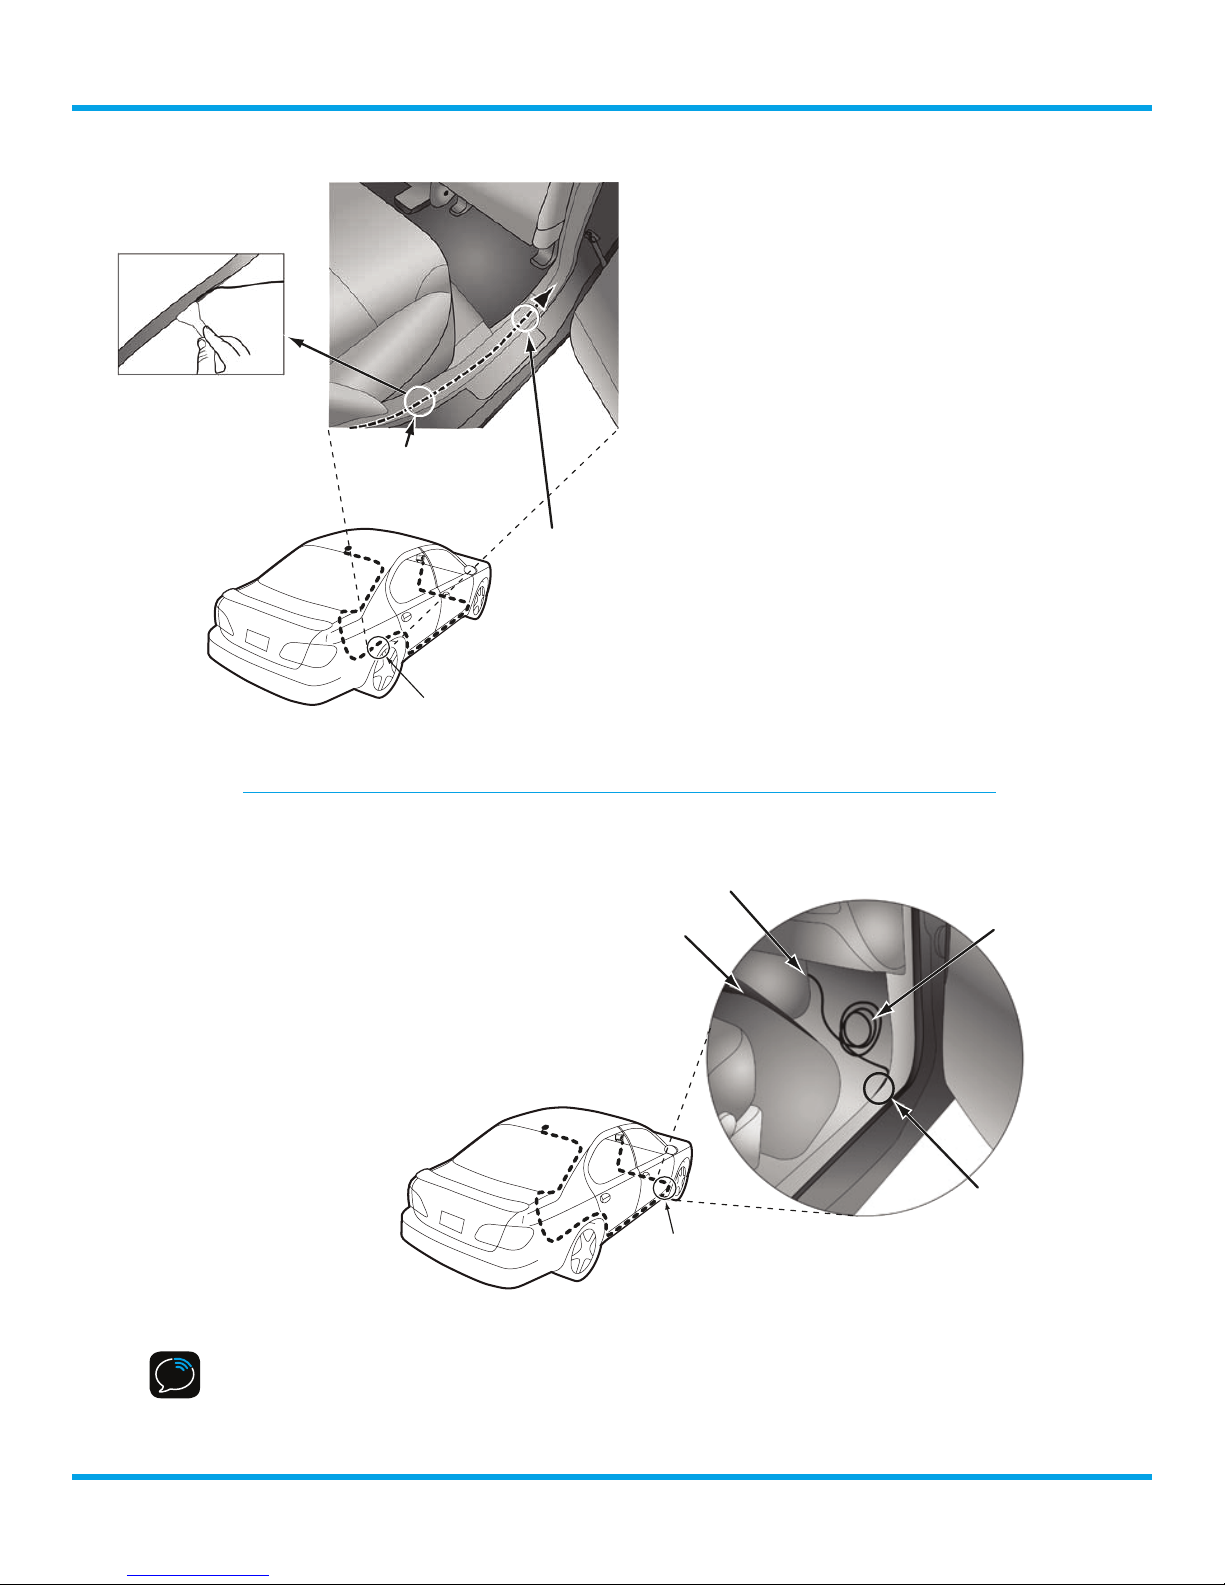
Sedan/Coupe With Antenna Placed at the Rear of the Roof:
1. Feed the antenna cable from the antenna underneath the rubber molding around the rear
window. Use a blunt plastic putty knife or similar blunt tool to lift the rubber molding around
the rear window and tuck the antenna cable underneath the
molding. Route the antenna cable around and down the window
to the lowest point. If your rear window does not have rubber
molding, we recommend consulting a professional installer.
2. Route the antenna cable out of the window molding and into
the rubber weather stripping around the trunk opening. Lift the
weather stripping from the opening and tuck the cable inside
it, then replace the weather stripping. To avoid sharp bends in
the cable, run the cable inside the weather stripping for a few
inches, then remove the cable from the weather stripping inside
the trunk. Keep the cable away from hinges, gears, etc., that could damage it.
3. Route the cable out from the rubber weather stripping and along the trunk wall. Continue
routing the cable into the vehicle cabin through a conduit or along an existing wiring harness.
4. Route the cable through the main cabin area under the interior trim, towards the front of the
vehicle. Use a blunt plastic putty knife or similar blunt tool to lift the plastic trim just enough
to tuck the cable under underneath. Avoid side airbag locations on back pillars and above the
doors. Airbag locations are marked with “SRS” logos. Be careful not to crimp or cut the cable.
Commander Touch User Guide
5. Bring the cable out from the trim near the front of the cabin and route it under the carpet
toward the dashboard or console. Coil any excess cable in a hidden location, such as under the
carpet, keeping it away from any vehicle pedals or controls. Secure the excess cable with wire
ties (purchased separately).
6. Bring the end of the cable out at the PowerConnect Vehicle Dock
location. Leave yourself enough cable so you can easily connect it to the
antenna connector of the dock.
7. Connect the antenna connector to the ANT connection of the Tuner
Module. Note: Use only SiriusXM approved antennas.
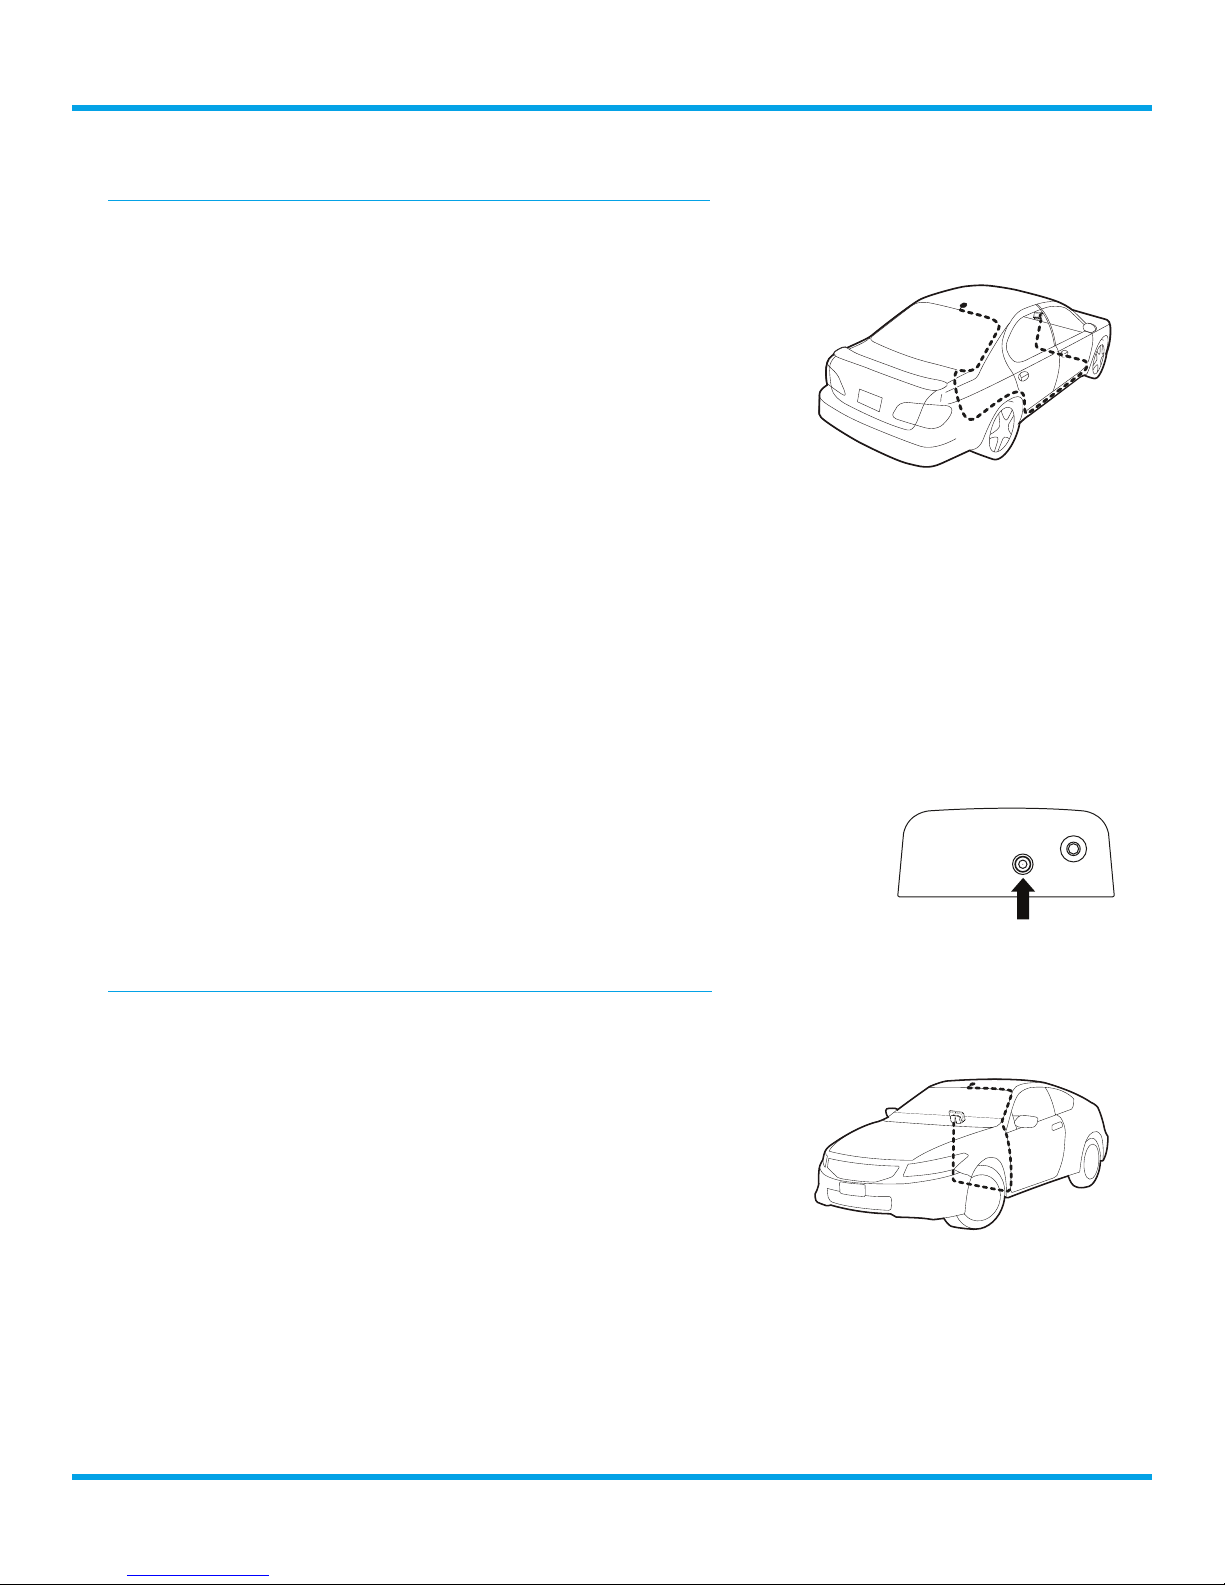
Sedan/Coupe With Antenna Placed at the Front of the Roof
1. Feed the antenna cable from the antenna underneath the rubber molding around the
windshield. Use a blunt plastic putty knife or similar blunt tool to lift the rubber molding
around the windshield and tuck the antenna cable underneath
the molding. Route the antenna cable around and down the
windshield to the lowest point.
2. At the lowest corner of the windshield, route the cable out of
the windshield molding and into the rubber weather stripping
around the door opening. Lift the weather stripping from the
opening and tuck the cable inside it, then replace the weather
stripping. Run the cable inside of the weather stripping to the
bottom of the door opening.
3. Pull the cable out of the weather stripping at the bottom of the door opening and route it under
the carpet toward the dashboard. Coil any excess cable in a hidden location, such as under the
carpet, keeping it away from any vehicle pedals or controls. Secure the excess cable with wire
ties.
Antenna
4. Bring the end of the cable out at the PowerConnect Vehicle Dock location. Leave yourself
enough cable so you can easily connect it to the antenna connector of the dock.
16
Commander Touch User Guide
5. Connect the antenna connector to the ANT connection of the Tuner
Module. Note: Use only SiriusXM approved antennas.
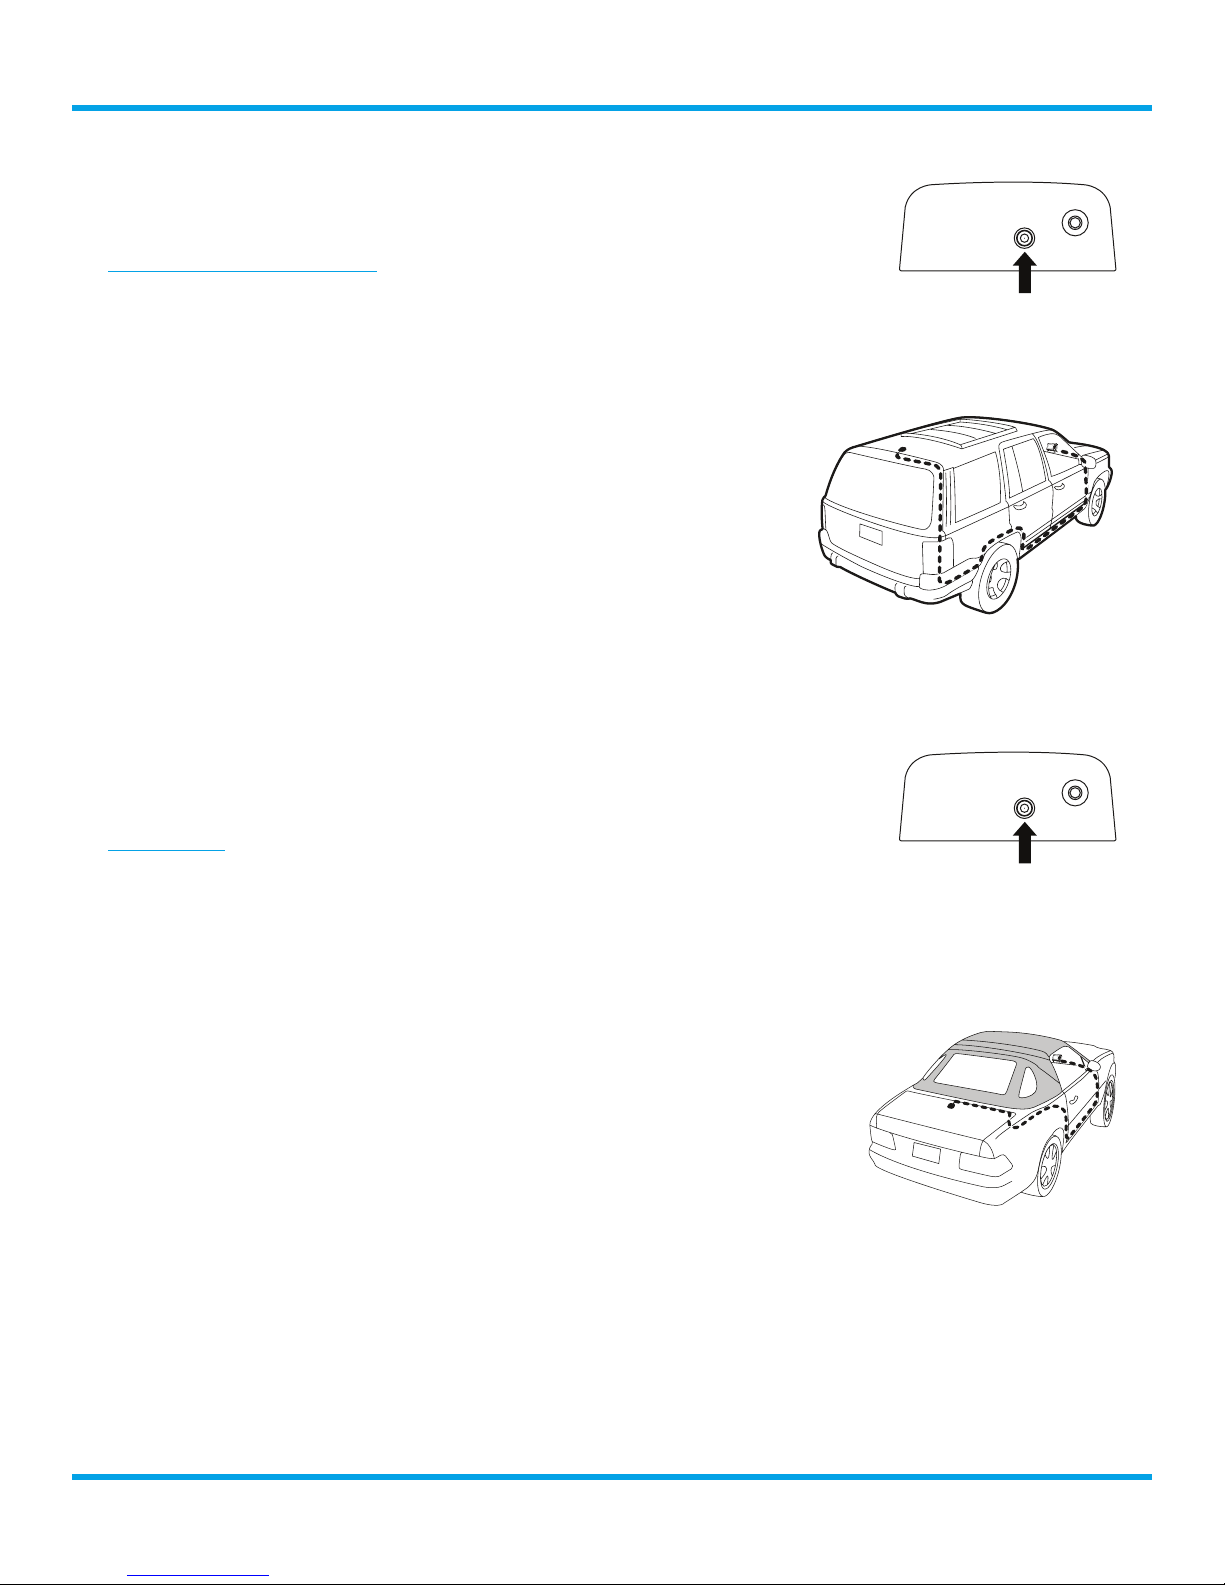
Sport Utility Vehicle (SUV)
Introduction
1. Feed the antenna cable underneath the rubber weather stripping of the
rear tailgate window/door and route the cable along the rear hatch. Lift the weather stripping
from the opening and tuck the cable inside it, then replace the weather stripping. Pull the cable
out from weather stripping and route it into the cabin under the interior trim. Avoid hinges or
gears that could crimp or cut the cable.
2. Route the cable through the SUV’s main cabin area under the
interior trim, towards the front of the vehicle. Use a blunt plastic
putty knife or similar blunt tool to lift the plastic trim just enough
to tuck the cable under underneath. Avoid side airbag locations
on back pillars and above the doors. Airbag locations are marked
with “SRS” logos. Be careful not to crimp or cut the cable.
3. Bring the cable out from the trim near the front of the cabin and
route it under the carpet toward the dashboard or console. Coil
any excess cable in a hidden location, such as under the carpet,
keeping it away from any vehicle pedals or controls. Secure the excess cable with wire ties
(purchased separately).
4. Bring the end of the cable out at the PowerConnect Vehicle Dock location. Leave yourself
enough cable so you can easily connect it to the antenna connector of the dock.
5. Connect the antenna connector to the ANT connection of the Tuner
Module. Note: Use only SiriusXM approved antennas.
Convertible
1. Bring the antenna cable from the antenna into the trunk at the front
edge of the trunk lid. Keep any bends in the cable loose. Tape or tie the cable along the inside of
the trunk lid to the trunk lid hinge strut.
Antenna
Antenna
2. Allow enough slack in the cable so the trunk lid can easily open and close and keep the cable
away from hinges, gears, etc., that could crimp or cut it. Route the cable along the trunk wall and
into the cabin through a conduit or along an existing wiring harness.
3. Route the cable through the main cabin area under the interior trim,
towards the front of the vehicle. Use a blunt plastic putty knife or
similar blunt tool to lift the plastic trim just enough to tuck the cable
under underneath. Avoid side airbag locations on back pillars and
above the doors. Airbag locations are marked with “SRS” logos. Be
careful not to crimp or cut the cable.
4. Bring the cable out from the trim near the front of the cabin and route
it under the carpet toward the dashboard or console. Coil any excess
cable in a hidden location, such as under the carpet, keeping it away from any vehicle pedals or
controls. Secure the excess cable with wire ties (purchased separately).
5. Bring the end of the cable out at the PowerConnect Vehicle Dock location. Leave yourself
enough cable so you can easily connect it to the antenna connector of the dock.
6. Connect the antenna connector to the ANT connection of the Tuner Module. Note: Use only
SiriusXM approved antennas.
17
Introduction
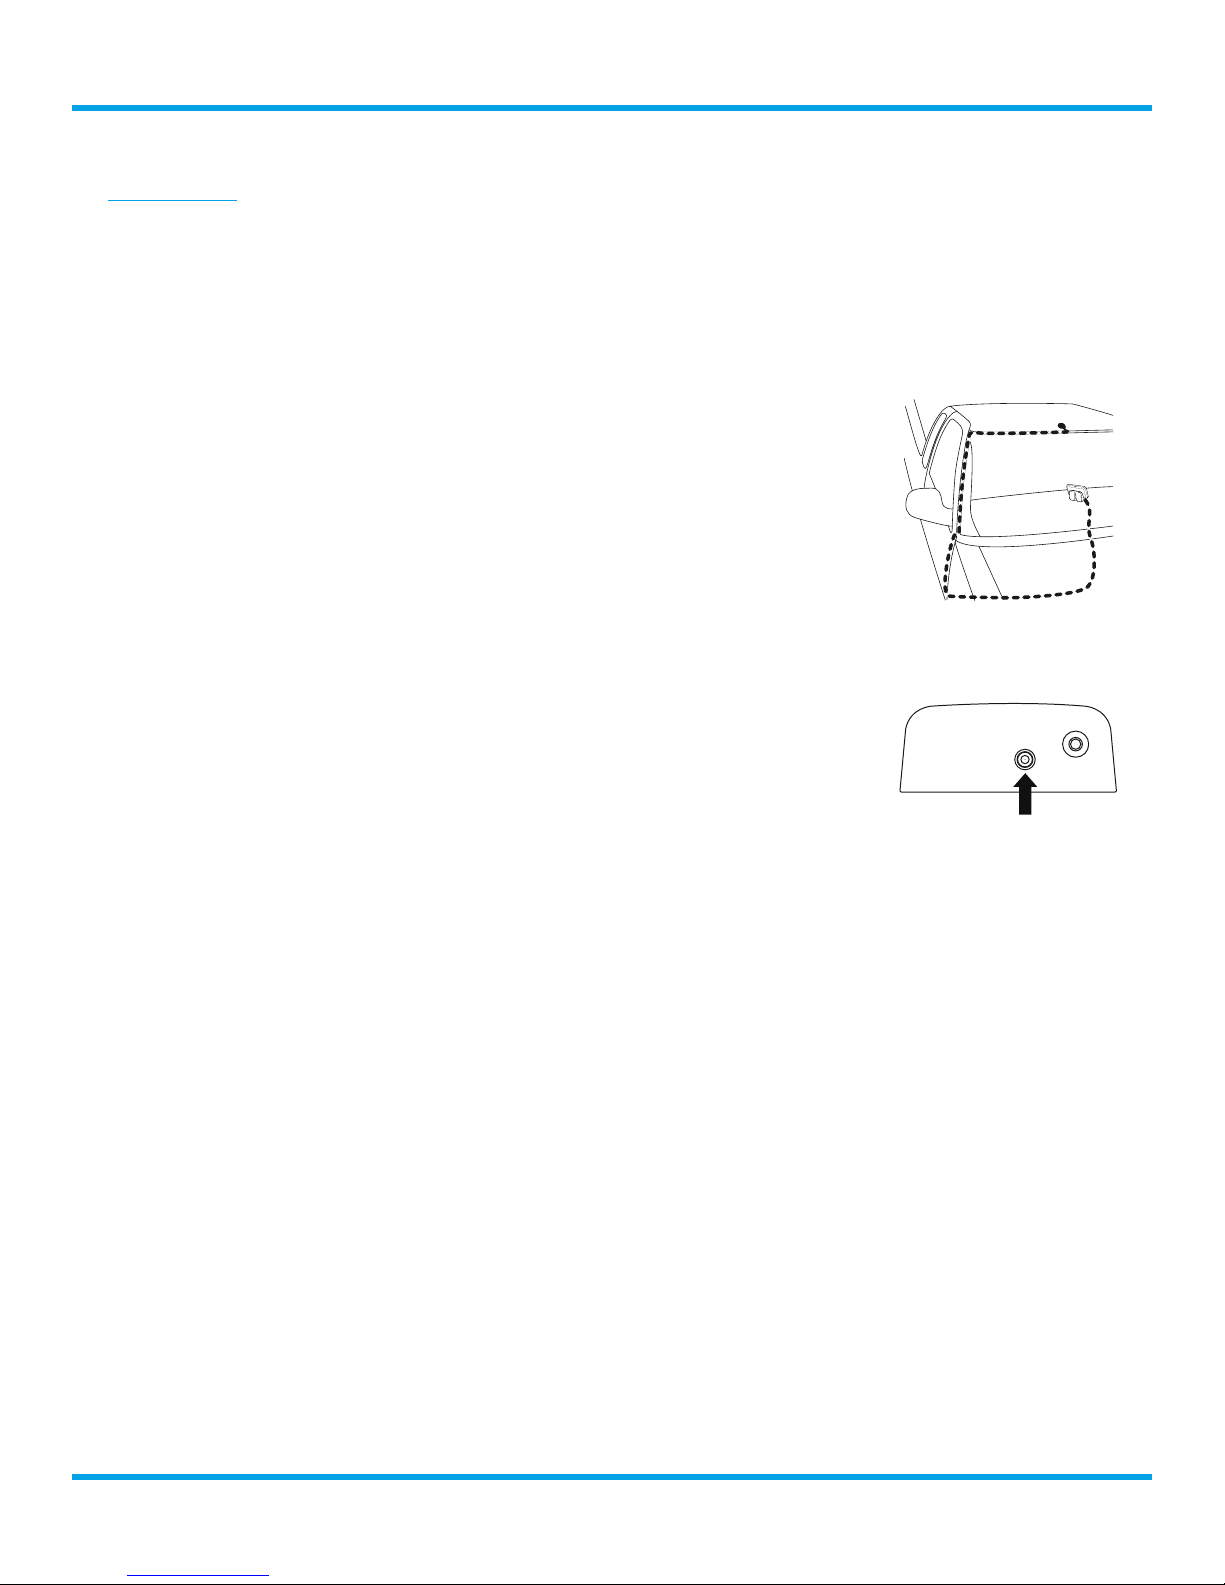
Pickup Truck
1. Use a blunt plastic putty knife or similar blunt tool to lift the rubber molding around the
windshield and tuck the antenna cable underneath it.
2. Continue tucking the cable underneath the windshield molding around the windshield to the
lowest corner.
3. At the lowest corner of the windshield, route the cable out of the windshield molding and into the
rubber weather stripping around the door opening. Lift the weather stripping from the opening
and tuck the cable inside it, then replace the weather stripping. Run the
cable inside of the weather stripping to the bottom of the door opening.
4. Pull the cable out of the weather stripping at the bottom of the door
opening and route it under the carpet toward the dashboard. Coil any
excess cable in a hidden location, such as under the carpet, keeping it
away from any vehicle pedals or controls. Secure the excess cable with
wire ties.
5. Bring the end of the cable out at the PowerConnect Vehicle Dock
location. Leave yourself enough cable so you can easily connect it to the
antenna connector of the dock.
Commander Touch User Guide
6. Connect the antenna connector to the ANT connection of the Tuner Module. Note: Use only
SiriusXM approved antennas.
Antenna
18

Commander Touch User Guide
Introduction
Step 4: Install the Wiring
Refer to the wiring diagram below and install the Power Wiring Harness, and the AUX In or FM Input
audio connection.
Display Controller
ANTENNA
FM
OUT
FMDA25
(included)
Tuner Module
Vehicle
Antenna
DISPLAY
POWER
AUX
AUDIO
OUT
AUX In
or
FM Input
6 ft. Pigtail Cable
4A Fuse
Battery (yellow)
Accessory (red)
Ground (black)
Illumination (orange)
3.5mm AUX Audio Cable (included)
Vehicle Radio
AUX
88.1
19

Introduction
Commander Touch User Guide
Install the Power Wiring Harness
The wiring harness has 4 wires: BAT (battery, yellow); ACC (accessory, red); ILL (illumination, orange);
GND (ground, black). When installing the harness, keep the fuse holder which is connected to the
BAT wire in a location that is accessible in case the fuse ever needs to be replaced.
1. Plug the Wiring Harness connector to the PWR connector on the Tuner
Module.
2. Route and connect the BAT yellow wire to a constant 12 volt source, a
source which is always on even when the vehicle is turned off.
3. Route and connect the ACC red wire to a switched 12 volt source, a source which provides
power only when the vehicle is turned on. This should be tied to the vehicle’s accessory wire.
4. Route and connect the ILL orange wire to a 12 volt source which is on when the vehicle exterior
parking or headlights are turned on. Connection to the ILL wire is optional but it will allow you
to take advantage of the independent Auto Day/Night brightness setting option.
5. Route and connect the GND black wire to the vehicle ground connection, usually the vehicle’s
metal chassis. A lug is provided so that it can be secured to the chassis with a screw or existing
bolt.
Power
Install the Audio Connection
There are two ways to connect the audio for the Commander Touch: using the AUX Audio Cable,
or using the FMDA25 FM Direct Adapter. Both audio connection solutions are included with the
Commander Touch, and both audio solutions can be active at the same time.
•AUX Audio Cable: Best: If your vehicle’s radio has a auxiliary input jack, this is the easiest way
to connect the audio and provides excellent audio.
•FMDA25 FM Direct Adapter: Good: The FMDA25 FM Direct Adapter directly connects the FM
signal from the Commander Touch to the vehicle’s radio, reducing any interference which might
be present from FM radio stations. When the Commander Touch is turned off, the vehicle’s FM
antenna is automatically connected back to the vehicle’s radio. The FMDA25 FM Direct Adapter
connects directly in-line with the vehicle’s existing AM/FM antenna input.
Follow the instructions below for the audio connection you have selected.
Connecting the Audio Using the AUX Audio Cable
The auxiliary input jack may be located on the face plate of the vehicle’s radio, on the back of the
radio, anywhere on the front dash panel, inside the glove compartment, or inside the center console
in between the front seats.
1. Connect the AUX Audio Cable to the auxiliary input jack of the vehicle radio.
2. Connect the other end of the AUX Audio Cable to the AUX connector on the Tuner Module.
3. Turn the vehicle’s radio on, and set it to the AUX In source.
4. Press the Power button on the Commander Touch Display Controller.
After the start up sequence you should hear SiriusXM Preview
Channel 1 through your vehicle’s radio.
20
AUX Out

Commander Touch User Guide
FM ANTENNA
OMMANDER
MINI
Introduction
5. The audio level can be adjusted by swiping to the Settings page, tap Audio Level, then tap
Audio Output Level and adjust the audio output level.
Swipe left or right to Settings
page and tap Audio Level
Ta p Audio Output Level and then
adjust the audio output level
The installation is complete and you are now ready to activate your Commander Touch. Continue
with “Step 5: Subscribe” on page 23.
Connecting the Audio Using the FMDA25 FM Direct Adapter
Certain vehicle models will require adapters to connect the vehicle’s AM/FM antenna to the FMDA25,
and to connect the FMDA25 to the vehicle’s radio. These adapters are sold separately by most
professional installers.
1. Remove the vehicle’s radio from the dash and disconnect the AM/FM antenna cable from the
rear of the vehicle’s radio.
2. Plug the FM Antenna Connector (A) from the FMDA25 into the same connector on the vehicle’s
radio. (Additional antenna adapter may be required.)
TO VEHICLE
FM ANTENNA
SOCKET (B)
FM ANTENNA
CONNECTOR (A)
TO VEHICLE
RADIO
CONNECTOR (C)
TO C
TOUCH TUNER
MODULE FM
CONNECTOR
3. Plug the vehicle’s AM/FM antenna cable into the female FM Antenna Socket (B) of the FMDA25.
(Additional antenna adapter may be required.)
4. Plug the Mini Connector (C) of the FMDA25 into the FM connection of
the Tuner Module.
5. Reinstall the vehicle’s radio into the dash.
6. The FMDA25 should be secured behind the vehicle’s radio
location or under the dash using a wire tie (not included).
Wrap the wire tie around the molded indents of the FMDA
as shown to prevent the FMDA25 from slipping, and secure
the FMDA25 to a bracket or wiring harness using the wire tie.
Avoid brackets with sharp edges and any moving parts such
as gas, clutch, and brake pedals.
7. Turn the vehicle’s radio on, and tune it to FM channel 88.1.
8. Press the Power button on the Commander Touch Display Controller. After the start up
sequence you should hear SiriusXM Preview Channel 1 through your vehicle’s radio.
FM
21

Introduction
9. The audio level can be adjusted by swiping to the Settings page, tap Audio Level, then tap
Audio Output Level and adjust the audio output level.
NOTE! The Audio Output Level adjusts both the AUX audio output level as well as the
FMDA audio output level. Use caution when making the adjustments. For FM it is
recommended to adjust the level to MAX.
Commander Touch User Guide
Swipe left or right to Settings
page and tap Audio Level
10. If channel 88.1 has static or interference, other FM channels can be selected by swiping to the
Settings page, tap FM and adjust the FM channel. Tap a + button to save it as a preset. Set the
vehicle’s radio to the same FM channel.
Swipe left or right to Settings
page and tap FM
The installation is complete and you are now ready to activate your Commander Touch. Continue
with “Step 5: Subscribe” on page 23.
Ta p Audio Output Level and then
adjust the audio output level
Change the FM Channel
22

Commander Touch User Guide
Introduction
Step 5: Subscribe
Follow these steps to subscribe your Commander Touch. Once you have successfully activated the
Commander Touch, you will be able to tune to other channels.
1. Make sure your Commander Touch is turned on, receiving the SiriusXM signal, and tuned to
Preview Channel 1 so that you can hear the SiriusXM audio. (Refer to “Tuning Channels” on page
32 for instructions on tuning channels.)
2. Make a note of your Radio ID. You can find it
by swiping to Settings and tapping About, by
tuning to channel 0, on a label on the bottom of
the gift box, and on the label on the back of the
Commander Touch Tuner Module.
NOTE! The Radio ID does not use the letters
I, O, S, or F.
3. To subscribe: See Important Legal Information in this User Guide. Then:
•Online: Go to www.siriusxm.com/activatenow to access or set up an online account, subscribe
to the service, and activate your Commander Touch.
OR
•By phone: Call 1-866-587-4225 (If calling to activate, be sure to mention “Never Miss A Beat”).
Activation usually takes 10 to 15 minutes after you have completed the subscription process, but may
take up to an hour. We recommend that your Commander Touch remain on until subscribed. Once
subscribed, the Commander Touch will receive, and you can tune to, the channels in your subscription
plan.
23

Introduction
Commander Touch User Guide
Step 6: Update the Commander Touch Software
SiriusXM may occasionally release software updates for Commander Touch. It is recommended that
you periodically check for a newer version, and update the software in your Commander Touch
whenever a newer version is available.
Determining the Software Version of your Commander Touch
You can determine whether your Commander Touch has the latest software by comparing the
software version numbers of your Commander Touch to the version numbers of the latest software
release from SiriusXM. The latest SiriusXM software version for Commander Touch is:
Display Controller: V00.00.26 Tuner Baseband: V11.38.00
Tuner Micro: V00.02.04 (Swipe up) NAND Image: V00.00.16 (or higher)
To check the software version of your Commander Touch,
swipe to Settings, swipe up or down if necessary, tap the About
button, and tap Software Information. If you find that any of
the software version numbers listed above are higher numbered
than the versions in your Commander Touch, you should update
the software in your Commander Touch. For example, V00.00.21
is a newer software version than V00.00.19.
Prerequisites for a Software Update
Before you attempt to update the software in your Commander Touch, be sure you can meet the
following prerequisites. If you cannot meet all of the prerequisites, do not attempt a software update.
Instead, please consult a professional installer who can update the software for you, or call SiriusXM
at: 1-866-635-2349. Prerequisites:
1. Most USB Flash Drives will work. The USB Flash Drive should be empty, not have partitions, and
be formatted as FAT32. You can find a list of USB Flash Drives that have been tested by SiriusXM
starting on page page 26.
2. You must have a USB type A to Micro USB OTG (On the
Go) adapter, or OTG adapter cable, if your USB Flash Drive
has a USB type A connector. Although adapters will vary
in appearance, a typical example of each type is shown to
the right. OTG adapters can be purchased from most online
electronics retailers.
3. You must have the knowledge to download the software update file (or files) from the SiriusXM
website, can extract the files from a ZIP archive, and copy them to your USB Flash Drive.
4. You can gain access to the micro USB port the bottom
of the Commander Touch Display Controller. If your
Display Controller has been installed using the Flush
Mount, you will need the Release Tool to release the
Display Controller from the Flush Mount.
If the Display Controller has been custom installed by a professional installer, and you cannot
access the micro USB port, you may need to consult the installer to help you gain access to the
micro USB port.
Micro USB Port
5. You must have a minimum of up to 5 to 10 minutes for a DCU/DLP Software Update, and 20-25
minutes for a NAND Image Update to complete the software update. Once you begin a software
24

Commander Touch User Guide
update, the process cannot be interrupted.
6. You can provide uninterrupted power to your Commander Touch for the duration of the
software update.
Introduction
Software Update Instructions
Commander Touch must remain on during the entire software update process. If power is
interrupted during the software update process your Commander Touch will become damaged.
1. Go to www.siriusxm.com/commandertouch and download the software update file. This file will
be named SXVCT1_SW_Update_vxx.xx.xx.zip. (xx.xx.xx is the software version number.)
2. Open the ZIP archive and extract the software update file(s) to a folder on your computer. They
will be named SXVCT1_S.xxx and/or SXVCT1_N.xxx.
3. Copy any files you may have off of your USB Flash Drive to another location, and then erase or
reformat (FAT32) the USB Flash Drive. Copy the SXVCT1_S.xxx and/or SXVCT1_N.xxx file(s) to
the root directory of the USB Flash Drive. Do not put them in a folder on the drive.
4. You will need access to the USB port on the bottom of the Display
Controller. If the Display Controller is mounted in the Flush Mount,
remove the Display Controller from the Flush Mount using the
Release Tool. Center the tool on the right side and press in between
the Display Controller and the Flush Mount until the latch releases.
(You may need to rock it gently from side to side slightly to release
the latch.) Then pry the Display Controller out of the Flush Mount.
5. Turn your Commander Touch on. This may require you to
turn the ignition in your vehicle to ACC to provide power
to Commander Touch. Wait until Commander Touch is
completely powered on.
6. Connect the USB Flash Drive to the USB port on the
bottom of the Commander Touch. Use the adapter or
adapter cable, if necessary.
7. Swipe to Settings, swipe up or down if necessary, tap
the About button, and swipe up to the second page.
8. If the software update only included the file named
SXVCT1_S.xxx, tap DCU/DLP Software Update. If the
software update only included the file named
SXVCT1_N.xxx, tap NAND Image Update. If the software
update included both files, perform the DCU/DLP
Software Update first, and then repeat this procedure to
perform the NAND Image Update.
9. You will be prompted to begin the software update. Tap
Update to proceed.
10. If there are any problems in reading the file on the USB
Flash Drive, you will be alerted by an advisory message,
and the software update will be aborted.
Micro USB Port
Step 7Step 9Step 9
25

Introduction
11. As the software update is taking place, a progress bar
will be displayed. The progress bar may advance, and
then stop for a periods of time; this is normal. Wait
until the software update finishes, which can be 5 to 10
minutes for a DCU/DLP Software Update, and 20-25
minutes for a NAND Image Update.
12. If you are performing the DCU/DLP Software Update, an
advisory will tell you when this portion of the software
update has completed, and Commander Touch will
restart itself and complete the software update.
13. While the software update is completing, there may be
a period of time where the display screen is dark but
the power light blinks several times. DO NOT POWER
OFF Commander Touch. Once the software update is
complete, the main now playing screen will be displayed.
If you are performing the NAND Image Update, the radio
will restart and display the main now playing screen.
14. To verify the software update, swipe to Settings, swipe
up or down if necessary, tap the About button, and tap
Software Information.
Commander Touch User Guide
Step 11Step 12Step 13
15. If you need to do a NAND Image Update also, repeat this software update procedure beginning
at step 7.
SiriusXM Approved USB Flash Drives
The following is a list of flash drives which may be used for updating the software in your
Commander Touch. There may be many other USB flash drives that will work, however they have not
been tested by SiriusXM. If you have trouble using your own USB flash drive, please try one from this
list.
USB OTG (On the Go) flash drives do not require special adapters. The following have been
validated by SiriusXM:
Brand Capacity Drive Type Product Name Model No.
PNY 32 GB OTG Drive PNY - Duo-Link Metal OTG 32GB USB 2.0 Flash
Drive
SanDisk 64 GB OTG Drive SanDisk - Ultra 64GB Micro USB/USB 3.0 Flash
Drive
SanDisk 32 GB OTG Drive SanDisk - Ultra 32GB Micro USB/USB 3.0 Flash
Drive
SanDisk 16 GB OTG Drive SanDisk - Ultra 16GB Micro USB/USB 3.0 Flash
Drive
Sony 32 GB OTG Drive Sony 32GB Microvault USB Flash Drive for
Smartphone
Sony 16 GB OTG Drive Sony 16GB Microvault USB Flash Drive for
Smartphone
P-FDI32GOTGM-GE
SDDD2-064G-A46
SDDD2-032G-A46
SDDD2-016G-A46
USM32SA1/B
USM16SA1/B
26
Continued on the next page...
Commander Touch User Guide
Introduction
USB Flash Drives which require a OTG (On the Go) Adapter or OTG Adapter Cable that have been
validated by SirusXM:
Brand Capacity Drive Type Product Name Model No.
PNY 32 GB Regular PNY - Micro Metal Attaché 32GB USB 2.0
Flash Drive
PNY 16 GB Regular PNY - Micro Metal Attaché 16GB USB Flash
Drive
Transcend 8 GB Regular Transcend 8GB JetFlash 500 USB 2.0 Flash
Drive
SanDisk 16 GB Regular SanDisk 16GB 2.0 Flash Cruzer Glide USB
Drive
P-FDI32G/APPMT2-GE
P-FDI16G/APPMT2-GE
TS8GJF500
DCZ60-016G-B35
Note that an OTG Adapter or OTG Adapter Cable can be purchased from an electronics retailer, or
purchased from an online retailer.
27

Using Commander Touch
Swipe Area
Commander Touch User Guide
Turning the Commander Touch On and Off
Press the Power button to turn the Commander Touch on. Press and hold the Power button for one
second to turn off. The display may stay on for a second or two after you press and hold for one
second; this is normal. You can also press and hold until the display turns off.
Power
Button
NOTE! When Commander Touch is installed with the FMDA25 FM Direct Adapter, if the
accessory power is on in the vehicle, turning Commander Touch off will switch the audio
back to the vehicle’s radio so that you can listen to AM or FM channels.
Navigation Basics
The Commander Touch uses a touchscreen to navigate and make selections. Use your finger to
make selections by tapping the icons displayed on the screen. Some icons have a double behavior,
depending upon whether you tap and release the icon, or whether you tap and hold the icon. For
example, the Traffic and Weather Now icon will play the traffic and weather report when it’s tapped
and released, or will display a list of available cities when it’s tapped and held.
The swipe area can be navigated by
dragging your finger across the swipe
area, left and right, and up and down.
You can also quickly flick your finger
to navigate between pages. Refer to
“Understanding the Swipe Area Carousel”
on page 31 for more information
about the Swipe Area.
28
Swipe
Left, Right, Up, Down
Commander Touch User Guide
r r r
Using Commander Touch
The Main Display Screen
The following is a brief description of the main display screen and swipe area pages.
e
w
t
1
2345
99 q
8
Swipe Area
u
y
6
7
1. Channel/Category List. Tap for a list of channels with channel content.
2. Channel Logo.
3. Traffic and Weather Now. Tap and hold to select a city near you. Tap for a traffic and weather
report; tap again to exit report. (Icon is blue when a new traffic and weather report is available.)
4. Pause and Replay. Tap to display the Pause and Replay controls and tap again to display
channel controls. Tap and hold to jump to live.
5. Swipe Area. Swipe left and right to change content, or up and down to scroll through content
pages. Tap to select a button icon or items displayed in the swipe area. Content which can
be displayed are: Favorite Channels (shown); Album or Content Art (shown); Replay List; and
Settings.
6. Indicates that additional pages are available for the currently displayed content. Swipe up or
down to scroll pages. Highlighted page dot indicates current page.
7. Satellite Signal Strength indicator.
8. Tap to begin TuneMix. (First save at least two music channels as favorite channels to enable
TuneMix.)
29

i
Using Commander Touch
9. Channel Up/Down. Tap q to tune to previous channel or p to tune to next channel. Tap and
hold to rapid browse and tune other channels.
10. Channel number and favorite page indicator. Tap to directly enter a channel number and tune
to the channel. When shown, a star indicates the channel has been saved as a favorite channel.
11. Song/Program Title, or Talk Show Schedule, or Game Time/Game Details.
12. Artist Name, or Talk Show Host, or Sports Teams/Score.
13. Pause and Replay Controls. Tap a control to Rewind, Play/Pause, and Fast-Forward.
14. Pause and replay time bar shows current listening position behind live broadcast.
Swipe Area Content
15. Favorites pages. Save and select up to 18 favorite channels on 3
pages (shown on previous page). Tap + to save a channel as a
favorite. Tap and hold to replace or delete a favorite channel.
16. Album Art. Album cover art for the currently playing song, or
content information for the channel (shown on previous page).
17. Replay List. A list of songs or talk program segments which have
recently aired on the currently tuned channel.
18. Settings (Page 1):
About: Displays Radio ID and subscription status, software
information, and allows a software update.
FM: Turn the FM tuner on or off, adjust FM channels, and set preset
FM channel presets.
Display Options: Set the screen display mode and adjust day and
night screen brightness.
Audio Level: Adjust the audio output level. Audio level adjusts both
AUX and FM outputs.
Channel Lock: Lock/unlock channels. Also set and change the
channel lock code.
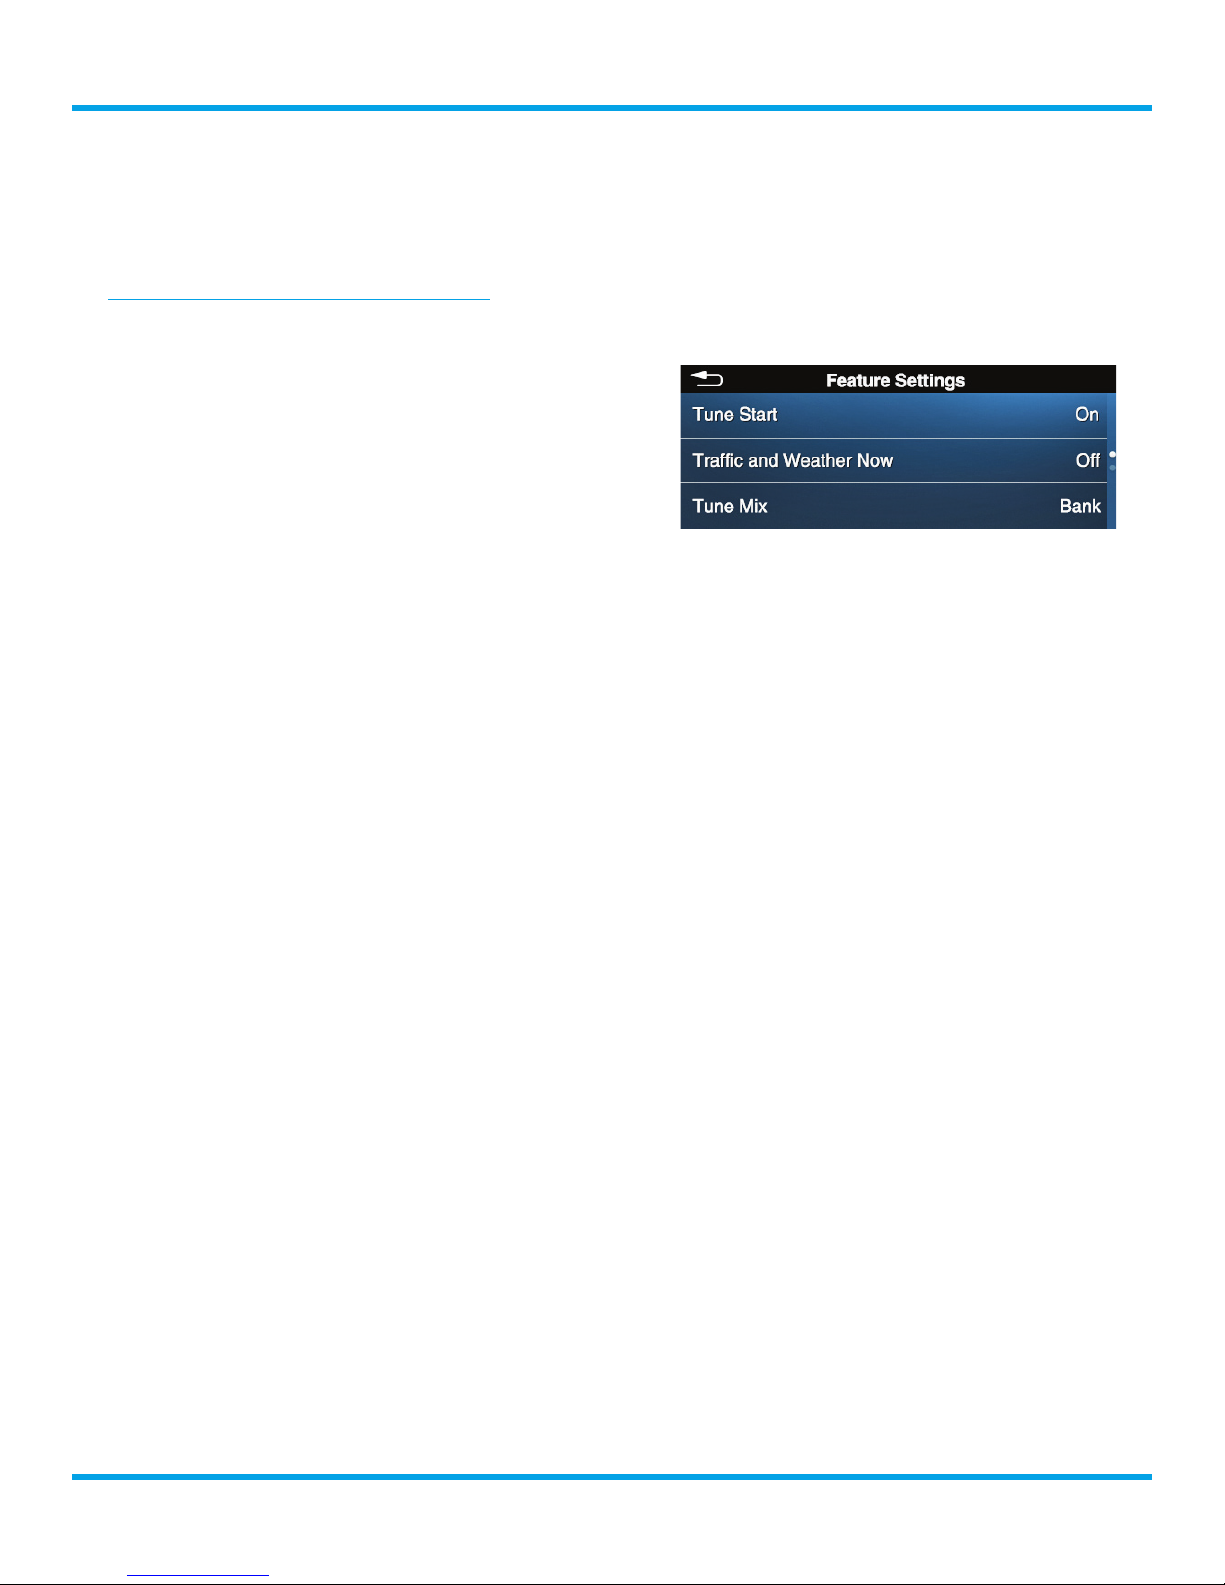
Feature Settings: Turn TuneStart, Traffic and Weather Now, and
Audible Beep on or off. Set TuneMix to Bank or All Channels mode.
19. Settings (page 2):
Signal Indicator: Displays the satellite and terrestrial signal strength.
Power Options: Adjust the delayed power off mode, and the Power
button mode.
Factory Reset: Reset the Commander Touch to the factory settings.
Demo Mode: Turn the Demo Mode on or off, and manually start the
Demo Mode.
Commander Touch User Guide
o
p
30
Commander Touch User Guide
Main Display Screen Swipe Area
Swipe
Using Commander Touch
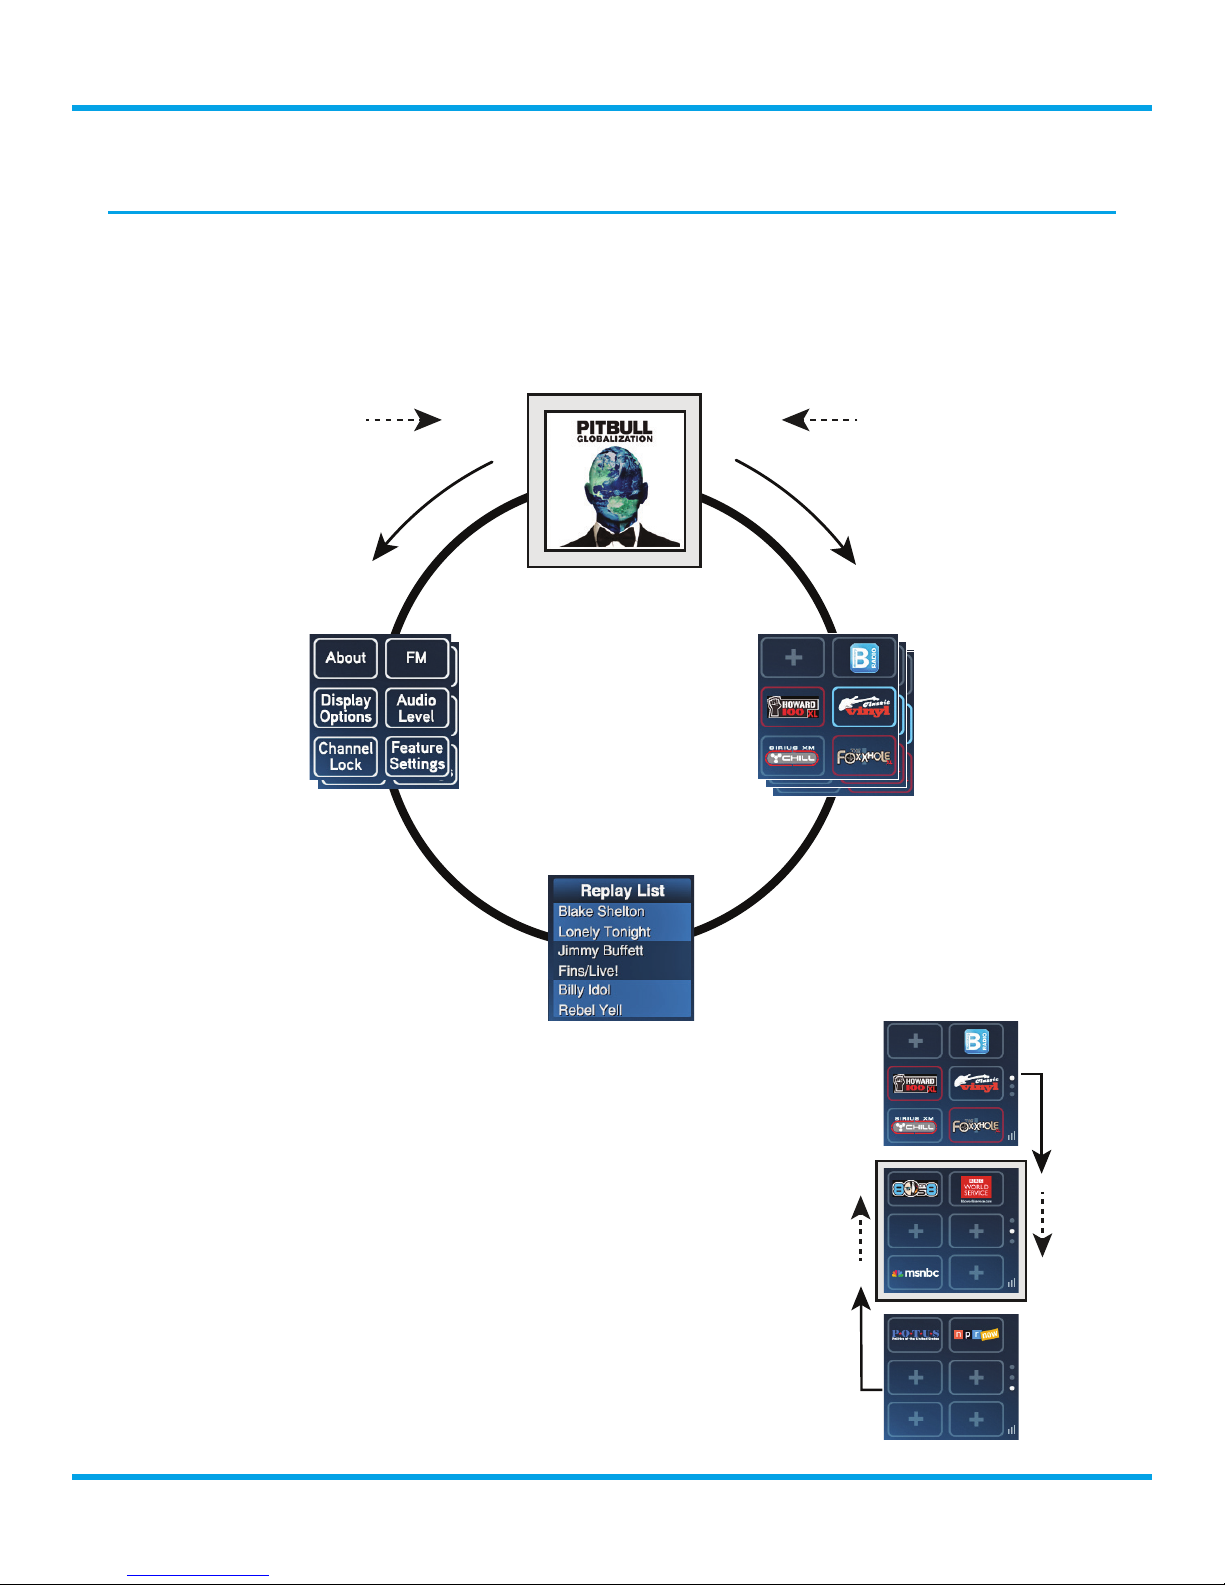
Understanding the Swipe Area Carousel
The swipe area on the Commander Touch main display screen is a circular carousel which contains
Album Art, Favorites, Replay List, and Settings. You can swipe left or right in the Swipe Area to
change what is displayed in the Swipe Area.
Swipe
Right
Swipe
Left
Some Swipe Area content may have more than one page. These
additional pages can also be viewed by swiping up or down to
display the pages. The page dots at the right center edge of the
screen indicate if the content displayed in the swipe area has
additional pages, and also what page is currently being displayed.
Swipe
Up
Down
31

Using Commander Touch
Commander Touch User Guide
Tuning Channels
Tuning Channels
1. Tap the Channel Up/Down icons q p to immediately tune to the next or previous channel.
2. Tap and hold to quickly scroll through the channels. Release to tune to the channel that is
displayed.
Viewing the Channel and Category Lists and Tuning Channels
Channels are organized into categories to make it easier
for you to find channels according to the genre (pop,
rock, comedy, etc.). When browsing the channel list, it
can be viewed in numerical order or in category order.
1. Tap the Channel/Category List icon.
2. Tap the All Channels/Categories button in the
upper right corner to toggle between numerical
order or category order for the channel list. The
currently tuned channel will be highlighted.
3. Tap and drag up and down to scroll through the
channel list.
If you are in category list mode, tap and drag left or
right to change categories, or tap on the category
name at the top to display a list of categories to
choose from.
4. If you find a channel to tune to, tap the channel in
the list. The channel will be tuned and will return to
the main display screen.
5. Tap the Back icon in the upper left corner to exit.
Directly Tuning Channels
A channel can be tuned directly by entering the channel number.
1. Tap the Channel Number icon on the main display
screen.
2. Tap the number buttons 0-9 to enter the channel
numbers. As you enter the numbers, some of
the number buttons will become unselectable to
avoid tuning a non-existent channel. After you
have entered the channel number, wait a moment
until the channel is tuned, or tap the Go icon to
immediately tune to the channel.
Should you attempt to tune a channel which is not
part of your subscription package, you will receive an
advisory and the channel will not be tuned.
32

Commander Touch User Guide
Commander Touch Features
Favorite Channels
You can set up to 18 of your favorite channels (6 each in three pages) so you can easily access those
channels. Channels saved as favorites remember up to 30 minutes of content that played on those
favorite channels, so that when you tune a favorite channel you can rewind up to 30 minutes.
Favorite channels which are locked are shown with
a red border on the favorite button. If you selected a
favorite channel which is locked, you will be prompted
to enter the lock code before the channel is tuned. Refer
to “Channel Lock” on page 35 for more information
concerning locked channels.
When you save or replace a favorite, a confirmation screen will indicate that you are saving or
replacing a favorite, and the page and location on the page of the favorite.
Favorites are also used for the TuneStart and TuneMix features. Refer to “TuneStart” on page 42
and “TuneMix” on page 43 for more information.
Saving a Channel as a Favorite Channel
1. Tune to the channel you want to save as a favorite channel.
2. In the Swipe Area, swipe to Favorites.
3. Swipe up and down to display the favorite page in which you want to save the favorite channel.
4. Tap the button you want to assign to that favorite channel. Buttons which display a + do not
have a channel assigned to them.
5. If the button you tapped already has a channel
assigned to it, a selection screen will be displayed
where you can Cancel (do nothing), Delete (delete
the currently saved channel as a favorite channel),
or Replace (replace the currently saved channel
with the currently tuned channel).
6. A confirmation screen will be displayed when you
save a favorite channel.
Tuning to a Favorite Channel
1. In the Swipe Area, swipe to Favorites.
2. Swipe up and down to display the page containing the favorite channel.
3. Tap the favorite channel button to tune to the channel. If you selected a favorite channel which
is locked, you will be prompted to enter the lock code before the channel is tuned.
Deleting or Replacing a Favorite Channel
1. If you are replacing a favorite channel, tune to the channel you want to save.
2. In the Swipe Area, swipe to Favorites.
3. Swipe up and down to display the page containing the favorite channel you want to delete or
33

Commander Touch Features
replace.
4. Tap the favorite channel button you want to delete
or replace.
5. A selection screen will be displayed where you can
Cancel (do nothing), Delete (delete the currently
saved channel as a favorite channel), or Replace
(replace the currently saved channel with the
currently tuned channel). Tap a button.
Commander Touch User Guide
34

Commander Touch User Guide
Commander Touch Features
Channel Lock
The channel lock feature allows you to lock access to individual channels. A 3-digit numerical code
controls access to locked channels.
Locked channels are skipped when you tune channels
using the Channel Up/Down icons q p. When you
browse a channel/category list, a lock icon is shown to
the right of the channel number indicating it is locked. In
the favorites page, locked channels are shown with a red
border on the favorite button.
If you attempt to tune to a locked channel, either by
using direct tune, through the channel/category list, or a
favorite channel, you’ll be prompted to enter your 3-digit
code. When the correct code is entered, the channel
will be tuned. All locked channels become unlocked and
remain unlocked until you turn Commander Touch off,
and back on. In the category list, the previously locked
channels will show an unlocked icon.
Turning Channel Lock On/Off
By default the Channel Lock feature is off. You’ll need to select a lock code and turn the feature
on before you can lock channels. You can also use the Channel Lock On/Off feature to temporarily
disable Channel Lock. When you turn Channel Lock off, Commander Touch will remember the
channels you had locked. When you turn Channel Lock on again, the channels will again be locked.
1. In the Swipe Area, swipe to Settings, swipe up or down if necessary, and tap Channel Lock.
2. At the Channel Lock screen tap Set Lock Code and you will be prompted to enter a lock code.
Enter 3 digits and tap Go.
3. A confirmation screen will display the code you
have entered. Make a note of the lock code and tap
OK.
4. The Channel Lock screen will be displayed. Tap
Channel Lock On/Off to turn the Channel Lock
feature on or off.
5. Tap the Back icon in the upper left corner to exit.
Locking and Unlocking Individual Channels
If you have not yet turned Channel Lock on, you’ll need to follow the procedure above to turn
Channel Lock on before you can lock or unlock channels.
1. In the Swipe Area, swipe to Settings, swipe up or
down if necessary, and tap Channel Lock.
2. You will be prompted to enter the lock code. Enter
the lock code and tap Go.
3. Tap Lock/Unlock Individual Channels [ ].
4. Channels are listed according to category. Tap
35

Commander Touch Features
individual channels to lock the channel. A lock icon
will be displayed to the left of the channel number
to indicate it is now a locked channel. (Tap a locked
channel to unlock.)
5. Swipe left or right to change categories, and when
you are finished locking or unlocking channels tap
the Back icon in the upper left corner to exit.
6. The Channel Lock screen is again displayed, and the Lock/Unlock Individual Channels [ ]
entry will show how many channels are currently locked. For example, Lock/Unlock Individual
Channels [9] indicates 9 channels are locked.
7. Tap the Back icon in the upper left corner to exit.
Commander Touch User Guide
Setting All Locked Channels to Unlocked
There is a quick way to set every locked channel to unlocked at once, without having to unlock them
one-by-one.
1. In the Swipe Area, swipe to Settings, swipe up or down if necessary, and tap Channel Lock.
2. You will be prompted to enter the lock code. Enter the lock code and tap Go.
3. At the Channel Lock screen swipe up and select
Unlock All Locked Channels.
4. Unlock All Locked Channels will become dim
confirming that there are no longer any locked
channels.
5. Tap the Back icon in the upper left corner to exit.
Changing the Lock Code
1. In the Swipe Area, swipe to Settings, swipe up or down if necessary, and tap Channel Lock.
2. You will be prompted to enter the lock code. Enter the lock code and tap Go.
3. At the Channel Lock screen tap Change Lock Code
and you will be prompted to enter a new lock code.
Enter 3 digits and tap Go.
4. A confirmation screen will display the code you
have entered. Make a note of the lock code and tap
OK.
5. Tap the Back icon in the upper left corner to exit.
Listening to a Locked Channel
There are several ways to tune to a channel which has been locked. One is to directly tune to the
locked channel; another is to select the locked channel from the channel/category list, and if you
have saved a locked channel as a favorite channel, you can tune the locked channel using favorites.
To Directly Tune to a Locked Channel by Entering the Channel Number
1. Tap the Channel Number icon on the main display screen.
36

Commander Touch User Guide
2. Tap the number buttons 0-9 to enter the channel number and wait a moment until the channel
is tuned, or tap the Go icon to immediately tune to the channel.
3. You will be prompted to enter the lock code. Enter
the lock code and tap Go.
4. If you have entered the correct lock code the
channel will be tuned.
Note that all locked channels are now unlocked, and will
remain unlocked until you power Commander Touch off
and on again.
Also refer to “Directly Tuning Channels” on page 32.
To Tune a Locked Channel from the Channel/Category List
1. Tap the Channel/Category List icon.
2. Tap the Channels/Categories button in the upper right corner to toggle between numerical
order or category order for the channel list.
Commander Touch Features
3. Tap and drag up and down to scroll through the channel list. If you are in category list mode, tap
and drag left or right to change categories.
4. Once you have found the locked channel you want
to tune to, indicated by the lock icon , tap the
channel in the list.
5. You will be prompted to enter the lock code. Enter
the lock code and tap Go.
6. If you have entered the correct lock code the
channel will be tuned.
Note that all locked channels are now unlocked, and will remain unlocked until you power
Commander Touch off and on again.
To Tune a Locked Channel from Favorites
1. In the Swipe Area, swipe to Favorites, swipe up or down if necessary, and tap a locked favorite
channel. Locked channels have a red border around the favorite channel button.
2. You will be prompted to enter the lock code. Enter
the lock code and tap Go.
3. If you have entered the correct lock code the
channel will be tuned.
Note that all locked channels are now unlocked, and will
remain unlocked until you power Commander Touch off
and on again.
Forgotten Lock Code
If you have forgotten your lock code, it can be cleared by performing a factory reset. A factory rest
will clear the lock code, turn off Channel Lock, and clear all locked channels. Refer to “Factory Reset”
on page 52.
37

Commander Touch Features
Commander Touch User Guide
Pause & Replay
Pause & Replay gives you the opportunity to “hear that again” by temporarily storing and then letting
you access the stored content. For the currently tuned channel, you can pause and replay for as long
as you have been tuned to the channel, up to a maximum of approximately 60 minutes.
You can also pause and replay up to approximately 30 minutes from channels which you have saved
as favorite channels. (Refer to “Favorite Channels” on page 33 for more information on favorite
channels.)
You can toggle between the channel and replay controls by tapping the Replay icon.
Tapping Play/Pause or Rewind places the Commander Touch into pause & replay
mode, and the time bar is displayed.
TIP! Turning Commander Touch off removes the temporarily stored content. Note that if the
ACC (accessory) power connection is used, and the power option mode is set to Standby
mode, and the delayed power mode is not set to Off, Commander Touch will continue to
store content for the amount of time that was selected for delayed power mode, 10, 20, or
30 minutes. After the time selected for delayed power mode expires without power returning
to the ACC power connection, Commander Touch will turn off and the temporarily stored
content will be removed. Refer to “Power Options” on page 50 for more information.
Using Play/Pause
1. Tap the Replay icon to display the replay controls.
2. Tap Play/Pause to pause the live broadcast.
Commander Touch will mute the audio but
continue to store live audio.
3. Tapping Play/Pause again will begin playing
the stored audio from the point at which the
Commander Touch was paused.
Listening to the Previous Track or Program
1. Tap the Replay icon to display the replay controls.
1. Tap Rewind to rewind to the beginning of the current song or program.
2. Repeated taps of Rewind continues to skip backwards to the start of the previous song or
program until the beginning of the stored audio is reached. When the beginning is reached,
playback automatically begins.
TIP! Pressing and holding Rewind moves backwards through the stored audio in 10 second
intervals.
Listening to the Next Track or Program
1. Tap the Replay icon to display the replay controls.
1. Tap Fast-Forward to skip forward to the start of the next song or program.
2. Repeatedly pressing and releasing Fast-Forward skips forward to the beginning of the next
song or program until the live broadcast is reached. Pause & replay will end when the live
38

Commander Touch User Guide
broadcast is reached.
TIP! Pressing and holding Fast-Forward moves forward through the stored audio in 10
second intervals.
Commander Touch Features
Returning to the Live Broadcast
Pressing and holding the Replay icon while Commander Touch is in pause & replay exits pause &
replay and resumes playing the live broadcast, and the channel controls are displayed.
39

Commander Touch Features
Commander Touch User Guide
Traffic and Weather Now
The Traffic and Weather Now feature provides an up-to-date traffic and weather report for a selected
city near your location. Tapping the Traffic and Weather Now icon plays the report.
Selecting a City
If you have not yet selected a city near you, the first time you tap the Traffic and Weather Now icon
you will be prompted to select a city. You can also change the selected city at any time.
1. If this is the first time you are selecting a city, tap
the Traffic and Weather Now icon. If you had
already selected a city, and wish to change the city,
tap and hold the Traffic and Weather Now icon
until the list of cities is displayed.
2. Tap and drag up or down the list of cities to find
your desired city, and tap the city name.
3. A confirmation of the selected city will be displayed.
Listening to a Traffic and Weather Now Report
When you first turn Commander Touch on, it may take several minutes for the traffic and
weather report for the selected city to become available. When unavailable, the Traffic and
Weather Now icon is gray. When a traffic and weather report is available, the Traffic and
Weather Now icon changes from gray to blue. Once the traffic and weather report has been
tuned, the icon will change back to white until a more recent report becomes available. It’s
possible that a newer report will become available while you are listening to a report. The icon
will change to blue, and you can listen to the newer report by tapping the Traffic and Weather
Now icon again.
1. Tap the Traffic and Weather Now icon to tune to the traffic and weather report. The channel you
are currently listening to will be paused.
2. The report will play and when finished you will be
returned back to the channel you were previously
listening to.
3. If you wish to end the report, tap the Traffic and
Weather Now icon or fast-forward to the end of
the report by tapping Fast-Forward.
4. The channel you were listening to previous to the Traffic and Weather Now report will be tuned,
and will begin playing from the point where you had selected the Traffic and Weather Now
report. You are currently listening behind the live broadcast. If you want to return to live, tap and
hold the Replay icon.
Disabling Traffic and Weather Now
If you do not want to use the Traffic and Weather Now feature, you can disable it and remove the
Traffic and Weather Now icon from the screen.
1. If you have not yet selected a city, tap the Traffic and Weather Now icon. If you had already
selected a city tap and hold the Traffic and Weather Now icon until the list of cities is displayed.
40
Commander Touch User Guide
2. Tap Disable at the beginning of the list of cities.
3. A confirmation will be displayed, and Traffic and Weather Now is disabled.
Commander Touch Features
Enabling Traffic and Weather Now
If you had previously disabled the Traffic and Weather Now feature, you can re-enable it.
1. In the Swipe Area, swipe to Settings, swipe up or
down if necessary, and tap Feature Settings.
2. Tap Traffic and Weather Now to turn it to on.
3. Tap the Back icon in the upper left corner to exit.
If you had previously selected a city, Traffic and Weather
Now will provide the report for the selected city. If you
had not previously selected a city, you will need to do
so. Refer to “Selecting a City” on page 40.
41

Commander Touch Features
Commander Touch User Guide
TuneStart
TuneStart plays the current song from the beginning when you tune to a qualified music channel
which you have saved as a favorite channel. (Refer to “Favorite Channels” on page 33 for more
information on favorite channels.) A TuneStart will also occur if you tune back to the channel that was
tuned immediately prior to the currently tuned channel.
Visually there will be no indication that a TuneStart has occurred and you are not listening live. When
you tap the Replay icon, the time bar will be displayed showing that you are listening behind the live
broadcast. If you wish to return to the live broadcast, tap and hold the Replay icon.
In order for a TuneStart to occur, the beginning of the song must be present in the TuneStart
memory. If Commander Touch is powered on after a song has already begun to be broadcast, a
TuneStart will not be possible for that song.
A TuneStart will only occur once per song. For example, if you tune to favorite music channel and
a TuneStart occurs, then tune a different channel, and then tune back to the same favorite music
channel while the same song is still playing, a TuneStart will not occur. However, if you want to hear
the song from the beginning, you can always tap the Replay icon to display the replay controls, and
tap Rewind to return to the beginning of the song.
NOTE! Certain music channels are not eligible for TuneStart due to the way in which they
are broadcast. While these music channels can be saved as favorites, a TuneStart will not
occur for these channels.
Turning TuneStart On and Off
TuneStart is on by default.
1. In the Swipe Area, swipe to Settings, swipe up or
down if necessary, and tap Feature Settings.
2. Tap TuneStart to toggle between On and Off.
3. Tap the Back icon in the upper left corner to exit.
42

Commander Touch User Guide
Commander Touch Features
TuneMix
TuneMix plays songs in a unique mix from the music channels you have saved as favorites, allowing
you to build a single blended music channel of 2 - 18 channels, or three blended music channels from
2 to 6 music channels each.
When in Bank mode, TuneMix uses the music channels from the currently selected favorite page in
the Swipe Area for the TuneMix channel. This allows you to create three blended music channels with
different listening experiences, for example, rock music in one favorite page, pop music in another
favorite page, and country music in another. When in All Channels mode, TuneMix uses the music
channels from all favorite pages.
Bank or All Channels mode can be selected by tapping the Feature Settings button in Settings in the
Swipe Area.
Tips for Obtaining the Best Experience from TuneMix
Familiarize yourself with the following tips to help you obtain the best experience from TuneMix:
•The more music channels you save as favorites, the more songs TuneMix will have to play. For
best results, save a minimum of three music channels as favorites.
•Certain music channels are not eligible for TuneMix due to the way in which they are broadcast.
While these music channels can be saved as favorites, they will not be included in TuneMix.
TuneMix only uses qualified music channels.
•If you turn Commander Touch off while TuneMix is playing, Commander Touch will resume
playing TuneMix when turned back on.
Listening to TuneMix
1. First save a minimum of two qualified music channels to a favorite page. Refer to “Favorite
Channels” on page 33 to learn how to save favorite channels.
2. When in Bank mode, make sure the favorite page from which you want TuneMix to play is the
current favorite page by swiping to Favorites and swiping up or down to the desired favorite
page. You can always swipe to display something else in the Swipe Area, such as album art, and
the selected favorite page will remain the current favorite page for TuneMix. All Channels mode
will play songs from qualified music channels from all favorite pages.
3. Tap the TuneMix icon to begin. If any of the
TuneMix channels are locked, you will be prompted
to skip the locked the channels and continue
TuneMix without those channels, or to unlock
those channels. If you choose to unlock, you will
be prompted to enter the lock code. If you don’t
make a choice, TuneMix will play without the locked
channels.
4. The TuneMix icon will turn blue to indicate that
Commander Touch is in TuneMix mode. Songs
that you don’t want to listen to can be skipped by
tapping the Fast-Forward icon. You can also pause
TuneMix by tapping the Play/Pause icon, or rewind
by tapping the Rewind icon.
43

Commander Touch Features
5. When in Bank mode, you can change the TuneMix
channel by changing the favorites page. Swipe to
Favorites, and swipe up or down to change the
current favorites page.
6. To end TuneMix and continue listening to the
channel currently playing in TuneMix tap the
TuneMix icon. To end TuneMix and return to the
channel you had been listening to prior to TuneMix
tap and hold the TuneMix icon.
Changing the TuneMix Listening Mode (Bank/All Channels)
1. In the Swipe Area, swipe to Settings, swipe up or
down if necessary, and tap Feature Settings.
2. Tap TuneMix to toggle between Bank or All
Channels.
3. Tap the Back icon in the upper left corner to exit.
Commander Touch User Guide
44

Commander Touch User Guide
Settings provides information about Commander Touch,
and allows you to change the configuration settings.
There are two pages of choices in Settings. In the Swipe
Area, swipe to Settings. Swipe up or down to display the
settings pages, and tap a settings button.
About
About provides information about your Commander
Touch, and also allows you to update the Commander
Touch software.
Radio ID
This is the unique identification number of your
Commander Touch. You will need to provide this number
when subscribing your Commander Touch.
Settings
Subscription Status
This is the status of the SiriusXM subscription for your Commander Touch. Possible statuses are:
•Unsubscribed: Your Commander Touch is not subscribed to the SiriusXM service. Go to www.
siriusxm.com/activatenow to access or set up an online account, subscribe to the service,
and activate your Commander Touch, or call 1-866-587-4225. (If calling to activate, be sure to
mention “Never Miss A Beat”.)
•Subscribed: Your Commander Touch is currently subscribed to the SiriusXM service.
•Suspended: Your Commander Touch subscription is suspended. Please call SiriusXM Listener
Care at 1-888-601-6296, or if you have set up an online account, go to www.siriusxm.com and
login and check your account status.
Software Information
This displays the version numbers of the software in your Commander Touch.
You should to check if a newer software version is
available for your Commander Touch. Tap Software
Information to display the current versions of the
Commander Touch system software. Then go online
to www.siriusxm.com/commandertouch and compare
software versions. If there is a newer software version
available, follow the steps in the next section to perform
a software update.
If you are having difficulty with, or have a question
about, your Commander Touch, and call SiriusXM
Listener Care or go online to chat with a SiriusXM
support team, they may ask for the software version of
your Commander Touch.
45

Settings
Commander Touch User Guide
Software Update
SiriusXM may occasionally release a system software
update for Commander Touch. The update can be
installed by connecting a USB Flash Drive with the
software update to the micro USB port located at the
bottom of the Display Controller.
Refer to “Step 6: Update the Commander Touch
Software” on page 24 for detailed instructions on how
to update the software.
FM
FM is used when your Commander Touch has been installed using the FMDA25 FM Direct Adapter.
The FM setting allows you to turn the FM transmitter on and off, and to set and select FM channels
and presets. Note that if there is no connection to the FM output of the Tuner Module, when you tap
FM and advisory will tell you There is no connection to FM out.
Creating FM presets is an easy way to change FM channels if you encounter any audio interference.
You can preselect 4 FM channels, and then easily switch between them with a tap. Remember that
when you change the FM channel that you also need to set your vehicle’s FM radio to the same FM
channel.
Turning the FM Transmitter On or Off
1. In the Swipe Area, swipe to Settings, swipe up or
down if necessary, and tap FM.
2. Tap the button at the lower left toggle between FM
On and FM Off.
3. When you turn FM off, an advisory will tell you that
the audio is enabled through the AUX output. Tap
the OK button.
When you turn FM on, an advisory will tell you the
FM channel, and to set you vehicle radio to the
same FM channel. Tap the OK button.
4. Tap the Back icon in the upper left corner to exit.
46

Commander Touch User Guide
Saving FM Channel Presets
1. In the Swipe Area, swipe to Settings, swipe up or down if necessary, and tap FM.
2. Tap the up and down icons to change the
FM channel. The new FM channel is immediately
tuned.
3. Tap one of the 4 preset buttons at the bottom
of the screen. You can tap an empty FM preset
button with a + to set a new FM preset, or tap an
existing FM preset button to change it to the new
FM channel.
4. An advisory will tell you the FM channel, and to set you vehicle radio to the same FM channel.
Tap the OK button.
5. Tap the Back icon in the upper left corner to exit.
Selecting an FM Channel or FM Preset
1. In the Swipe Area, swipe to Settings, swipe up or down if necessary, and tap FM.
Settings
2. To select an FM channel, either tap the up and down icons to change the FM channel
and immediately tune the FM channel, or tap one of the 4 preset buttons at the bottom of the
screen to tune the FM channel. (If you tap an empty FM preset button with a + the FM channel
will be saved as a new FM preset. If you tap an existing FM preset button it will change the FM
preset to the new FM channel.)
3. Tap the Back icon in the upper left corner to exit.
Display Options
Display Options allows you to change the brightness of
the of the display screen. You can set the brightness for
day and night, and also select the mode.
Changing the Display Mode
The display mode can be set three different ways:
•Auto: Commander Touch will automatically adjust the screen brightness to the brightness
setting you have selected for day and for night if the Illumination wire has been connected
to your vehicles lighting system. When the lights are on, the display will change to the Night
setting. When the lights are off, the display will change to the Day setting.
•Day: The screen brightness will always be at the brightness setting you have selected for day.
•Night: The screen brightness will always be at the brightness setting you have selected for
night.
1. In the Swipe Area, swipe to Settings, swipe up or
down if necessary, and tap Display Options.
2. Tap Display Mode and tap the desired mode
button, Auto, Day, or Night.
3. Tap the Back icon in the upper left corner to exit.
47
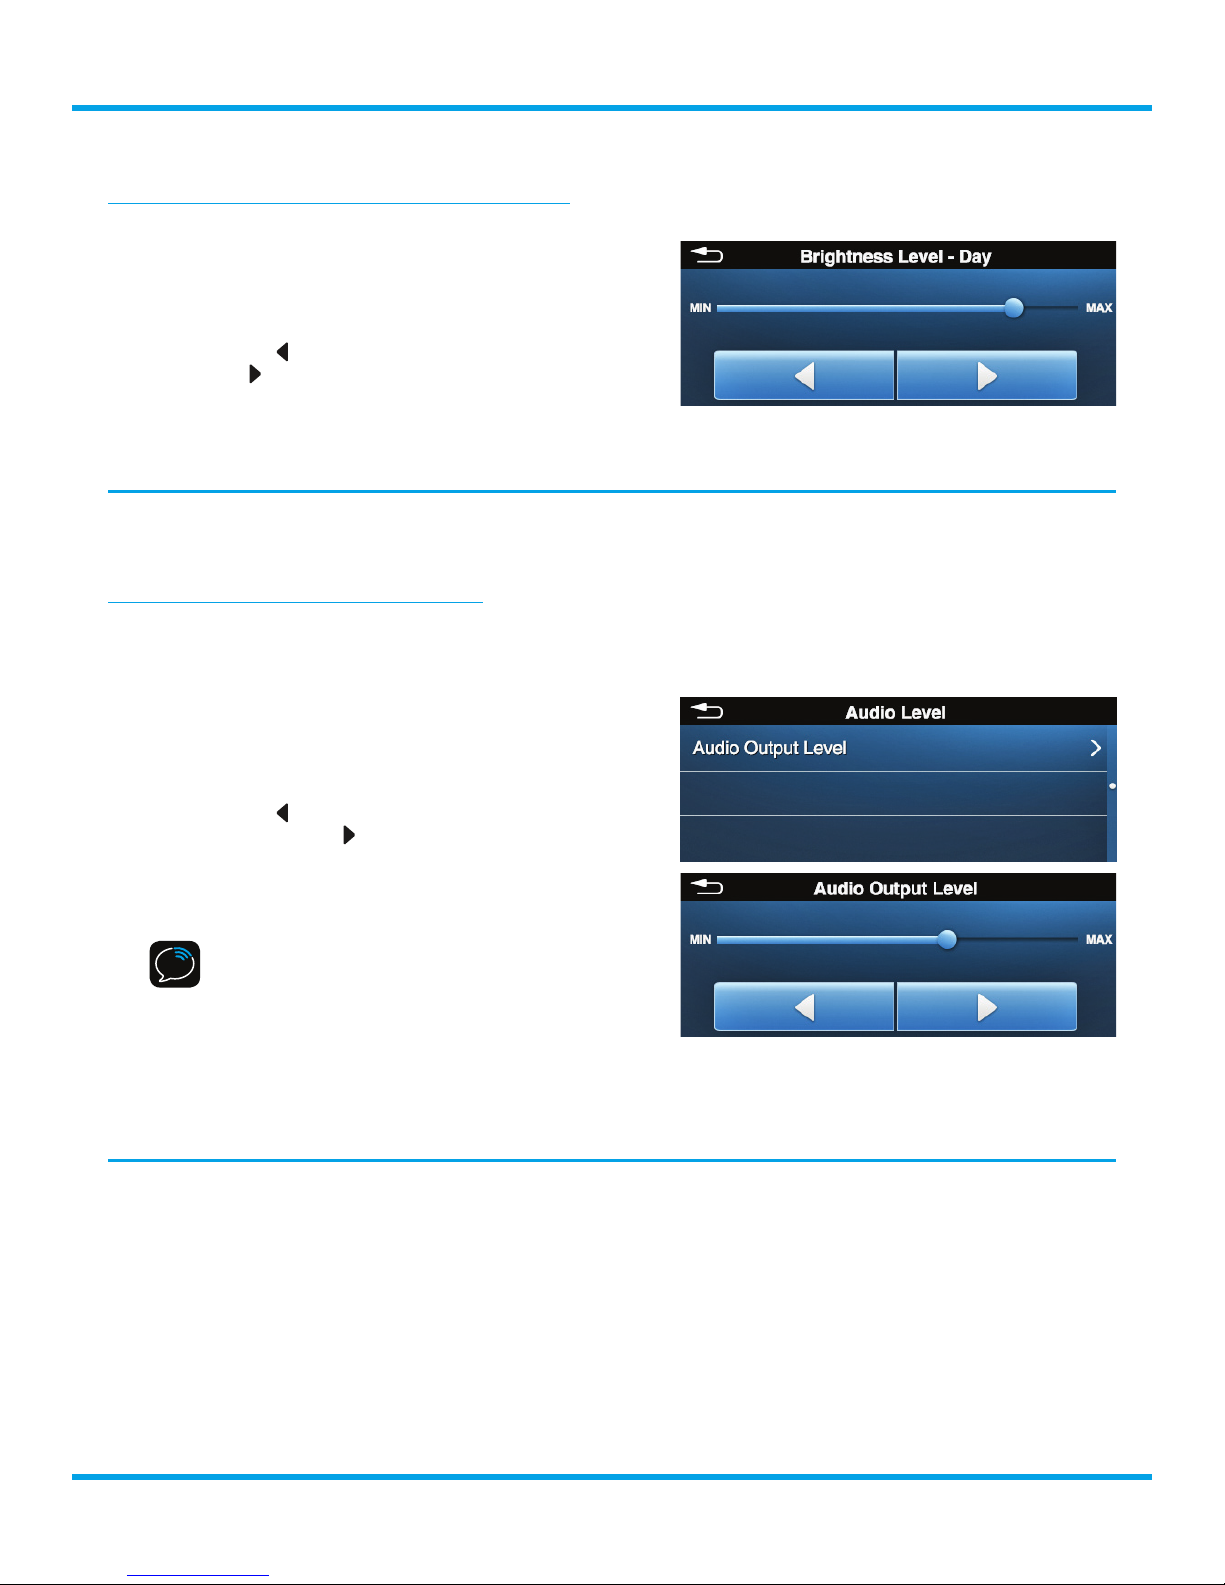
Settings
Commander Touch User Guide
Changing the Day/Night Brightness Level
1. In the Swipe Area, swipe to Settings, swipe up or
down if necessary, and tap Display Options.
2. Tap Brightness Level - Day or Brightness Level -
Night.
3. Tap the left icon to decrease the brightness and
the right icon to increase the brightness.
4. Tap the Back icon in the upper left corner to exit.
Audio Level
Audio Level allows you to adjust the audio output level for both AUX and FM outputs.
Adjusting the Audio Output Level
The audio level output should be used to adjust the audio volume to the match the vehicle’s stereo
system, for AM/FM, CDs, or other audio output. Do not use the audio output level as a volume
control. Use the volume control on your vehicle’s stereo instead.
1. In the Swipe Area, swipe to Settings, swipe up or
down if necessary, and tap Audio Level.
2. Tap Audio Output Level.
3. Tap the left icon to decrease the audio output
level and the right icon to increase the audio
output level.
4. Tap the Back icon in the upper left corner to exit.
NOTE! The Audio Output Level adjusts both
the AUX output and the FM output
simultaneously. For FM we recommend
starting at the MAX level and turning it down
only if it is too loud compared to your other
FM channels.
Channel Lock
Refer to “Channel Lock” on page 35 for details on Channel Lock.
48

Commander Touch User Guide
Feature Settings
Feature Settings allows you to turn the TuneStart, Traffic and Weather Now, and Audible Beep
features on and off, and also change the TuneMix listening mode to Bank or All Channels.
Turning TuneStart On and Off
Refer to “TuneStart” on page 42 for more information about TuneStart.
1. In the Swipe Area, swipe to Settings, swipe up or
down if necessary, and tap Feature Settings.
2. Tap TuneStart to toggle between On and Off.
3. Tap the Back icon in the upper left corner to exit.
Turning Traffic and Weather Now On and Off
Refer to “Traffic and Weather Now” on page 40 for more information on Traffic and Weather Now.
Settings
1. In the Swipe Area, swipe to Settings, swipe up or down if necessary, and tap Feature Settings.
2. Tap Traffic and Weather Now to toggle between On and Off.
3. Tap the Back icon in the upper left corner to exit.
Changing the TuneMix Listening Mode (Bank/All Channels)
Refer to “TuneMix” on page 43 for more information on the TuneMix Bank and All Channels
modes.
1. In the Swipe Area, swipe to Settings, swipe up or down if necessary, and tap Feature Settings.
2. Tap TuneMix to toggle between Bank (only channels saved on the current page of favorites) and
All Channels (all music channels that you have saved on any of the favorite pages).
3. Tap the Back icon in the upper left corner to exit.
Turning Audible Beep On and Off
Audible Beep controls whether a beep sound will occur
when an advisory or alert is displayed.
1. In the Swipe Area, swipe to Settings, swipe up or
down if necessary, and tap Feature Settings.
2. Swipe up and tap Audible Beep to toggle between
On and Off.
3. Tap the Back icon in the upper left corner to exit.
49
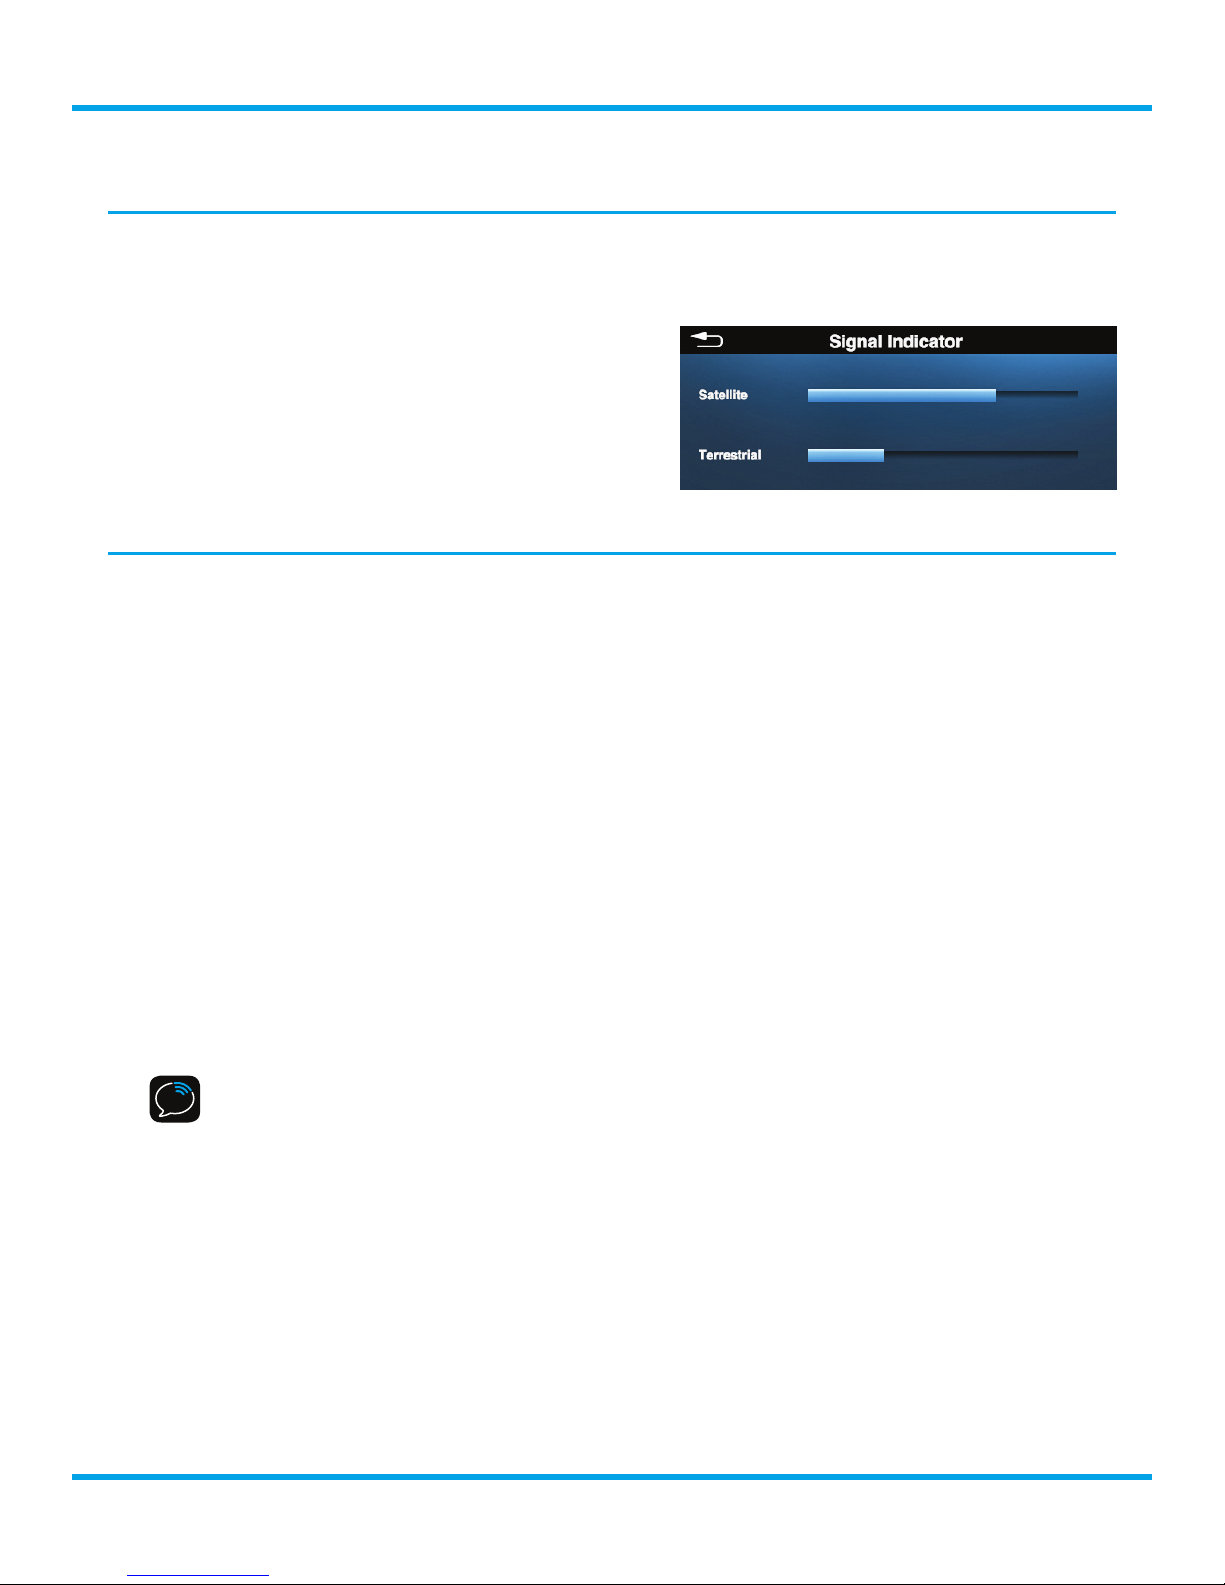
Settings
Commander Touch User Guide
Signal Indicator
Signal Indicator will visually display the strength of the satellite and terrestrial signals being received.
For best reception, your Magnetic Mount Antenna should have an unobstructed view of the SiriusXM
satellites. In large cities, there are also terrestrial
transmitters (ground repeaters) to help increase the
signal coverage.
1. In the Swipe Area, swipe to Settings, swipe up or
down if necessary, and tap Signal Indicator.
2. Tap the Back icon in the upper left corner to exit.
Power Options
Power Options allow you to set how Commander Touch behaves when the power button is pressed
to turn Commander Touch off, and when power is removed from the ACC (accessory) power
connection.
There are two modes, Standby Mode and Sleep Mode. Standby Mode requires that the ACC
(accessory) power connection is connected to the ACC connection in your vehicle. If instead your
installation connected the ACC power connection together with the BAT (battery) power connection,
Commander Touch can only function in Sleep Mode.
SiriusXM strongly recommends that you properly connect the ACC line and use Standby Mode. Sleep
mode should only be used for installations where the vehicle does not have a switched power source
for the ACC connection.
1. Standby Mode: Standby mode has two types of behavior, depending upon whether the ACC
(accessory) power connection has power.
• ACC power connection has power (when the vehicle’s ignition is on): Pressing the Power
button for one second will turn off the display screen, turn off the FMDA25 FM Direct Adapter
(if used in the installation), and turn off the Power button light. The tuner will remain on and the
channel content will be temporarily stored. When the Power button is pressed again, the screen
will turn back on, and the channel will play.
TIP! A typical scenario would be where your vehicle is running, but you wanted to turn
Commander Touch off so you could listen to something else on the vehicle’s stereo system,
like the AM or FM radio, but wanted to return to the channel you were listening to on
SiriusXM and not miss anything.
• ACC power connection does not have power (when you turned the vehicle’s ignition off): If
the Delayed Power Off Mode is set to Off, Commander Touch will turn off. You will need to
press the Power button to turn it on again.
If the Delayed Power Off Mode is set to 10, 20, or 30 minutes, the display screen, the FMDA25
FM Direct Adapter (if used in the installation), and the Power button light will turn off. The tuner
will remain on, the current channel will be paused, and the channel content will be temporarily
stored. If power is restored to the ACC power connection (the vehicle’s ignition is turned back
on) before the delayed power off time expires (10, 20, or 30 minutes), the screen will turn back
on, and the channel will resume playing from the point where it was paused. If the delayed
power off timer expires before power is restored to the ACC power connection, Commander
Touch will turn itself off.
50

Commander Touch User Guide
TIP! A typical scenario would be where you needed to exit your vehicle for a short time,
perhaps to grab a cup of coffee. You’d turn the ignition off, do the errand, return before
the delayed power off time expired, and restart the vehicle. Commander Touch would
automatically turn back on, and begin playing from the point where you had turned the
vehicle off. The delayed power off timer protects your vehicle from a dead battery by
turning Commander Touch off if you are unable to return to the vehicle within 10, 20, or
30 minutes.
2. Sleep Mode: In Sleep Mode, when either the power button is pressed for one second, or the
ACC power line does not have power (typically when you turn the vehicle off), Commander
Touch will turn off. You will need to press the Power button to turn it on again.
CAUTION! Sleep mode is only recommended for installations where the vehicle does not
have a switched power connection for the ACC to be connected. Sleep mode will turn
OFF Commander Touch, but there will still be some extra current consumption that can
lead to battery drain if left in this mode for long periods.
Setting the Delayed Power Off Mode Timer
This setting is only used when the Power Button Mode is set to Standby mode.
1. In the Swipe Area, swipe to Settings, swipe up or
down if necessary, and tap Power Options.
Settings
2. Tap Delayed Power Off Mode.
3. Tap Off, 10 minutes, 20 minutes, or swipe up and
tap 30 minutes.
4. Tap the Back icon in the upper left corner to exit.
Setting the Power Button Mode
1. In the Swipe Area, swipe to Settings, swipe up or
down if necessary, and tap Power Options.
2. Tap Power Button Mode.
3. Tap Standby mode or Sleep mode.
4. Tap the Back icon in the upper left corner to exit.
51

Settings
Commander Touch User Guide
Factory Reset
Factory Reset restores Commander Touch back to the factory settings. All configuration changes will
be reset, the lock code deleted, and all favorite channels deleted.
1. In the Swipe Area, swipe to Settings, swipe up or
down if necessary, and tap Factory Reset.
2. You will be prompted to confirm that you want
to proceed with the factory reset. Tap Restore to
proceed or tap Cancel if you changed your mind
and do not want to proceed with the factory reset.
3. A confirmation screen will verify that Commander
Touch has been reset to the factory settings. Tap
Continue and you will be returned to the main
display screen.
Demo Mode
Demo Mode is a demonstration of several of the features and display screens of Commander Touch.
Demo mode starts automatically when, for a period of time (approximately one hour), Commander Touch
detects it’s not connected to the antenna, or the antenna stops receiving a signal. Demo mode ends when
the antenna is connected properly or when a signal is received again.
If desired, you can also manually put Commander Touch in demo mode. You can exit demo mode at any
time by tapping the main display screen.
The ability for Commander Touch to enter demo mode is enabled by default. If you don’t want
Commander Touch to automatically enter the demo mode, you can disable the demo feature and
enable it again at another time if desired.
Turning the Demo Mode On and Off
1. In the Swipe Area, swipe to Settings, swipe up or
down if necessary, and tap Demo Mode.
2. Tap Demo Mode On/Off to toggle between On and
Off.
3. Tap the Back icon in the upper left corner to exit.
Manually Entering Demo Mode
1. In the Swipe Area, swipe to Settings, swipe up or
down if necessary, and tap Demo Mode.
2. Tap Enter Demo Mode.
3. You will be advised that Commander Touch is
52

Commander Touch User Guide
entering the Demo Mode.
4. Tap the screen to exit Demo Mode.
5. You will be prompted whether you want to exit
Demo Mode. Tap Confirm to exit Demo Mode.
6. Tap the Back icon in the upper left corner to exit.
Settings
53

Troubleshooting
Commander Touch has been designed and built to be trouble-free but if you experience a problem,
try this:
•Check that all connections are firm and secure.
•Make sure you have installed Commander Touch as described in this User Guide.
If screen displays: Try this:
Check Antenna The radio has detected a fault with the SiriusXM antenna. The antenna
cable may be either disconnected or damaged.
Verify that the antenna cable is connected to the Tuner Module.
Inspect the antenna cable for damage and kinks. Replace the antenna if the
cable is damaged.
SiriusXM products are available at your local car audio retailer or online at
www.shop.siriusxm.com.
Check Tuner Check the connections to Tuner Module that all connections are firmly and
securely plugged in.
No Signal The SiriusXM Commander Touch is having difficulty receiving the SiriusXM
satellite signal.
Verify that your vehicle is outdoors with a clear view of the sky.
Verify that the SiriusXM magnetic mount antenna is mounted on a metal
surface on the outside the vehicle.
Move the SiriusXM antenna away from any obstructions.
Inspect the antenna cable for damage and kinks.
Consult the SiriusXM Commander Touch User Guide for more information
on antenna installation. Replace the antenna if the cable is damaged.
SiriusXM products are available at your local car audio retailer or online at
www.shop.siriusxm.com.
Subscription Updated The radio has detected a change in your SiriusXM subscription status.
Tap OK to clear the message.
Visit www.siriusxm.com or call 866-635-2349 if you have questions about
your subscription.
Channel XXX
Unavailable
Channel Not
Subscribed
Channel Locked The channel that you have requested is locked by the radio’s Channel Lock
The channel that you have requested is not a valid SiriusXM channel or the
channel that you were listening to is no longer available. You may also see
this message briefly when first powering on Commander Touch.
Visit www.siriusxm.com for more information about the SiriusXM channel
lineup.
The channel that you have requested is not included in your SiriusXM
subscription package or the channel that you were listening to is no longer
included in your SiriusXM subscription package.
Visit www.siriusxm.com or call 866-635-2349 if you have questions about
your subscription package or would like to subscribe to this channel.
feature. See “Channel Lock” on page 35 for more information on the
Channel Lock feature and how to access locked channels.
Commander Touch User Guide
54
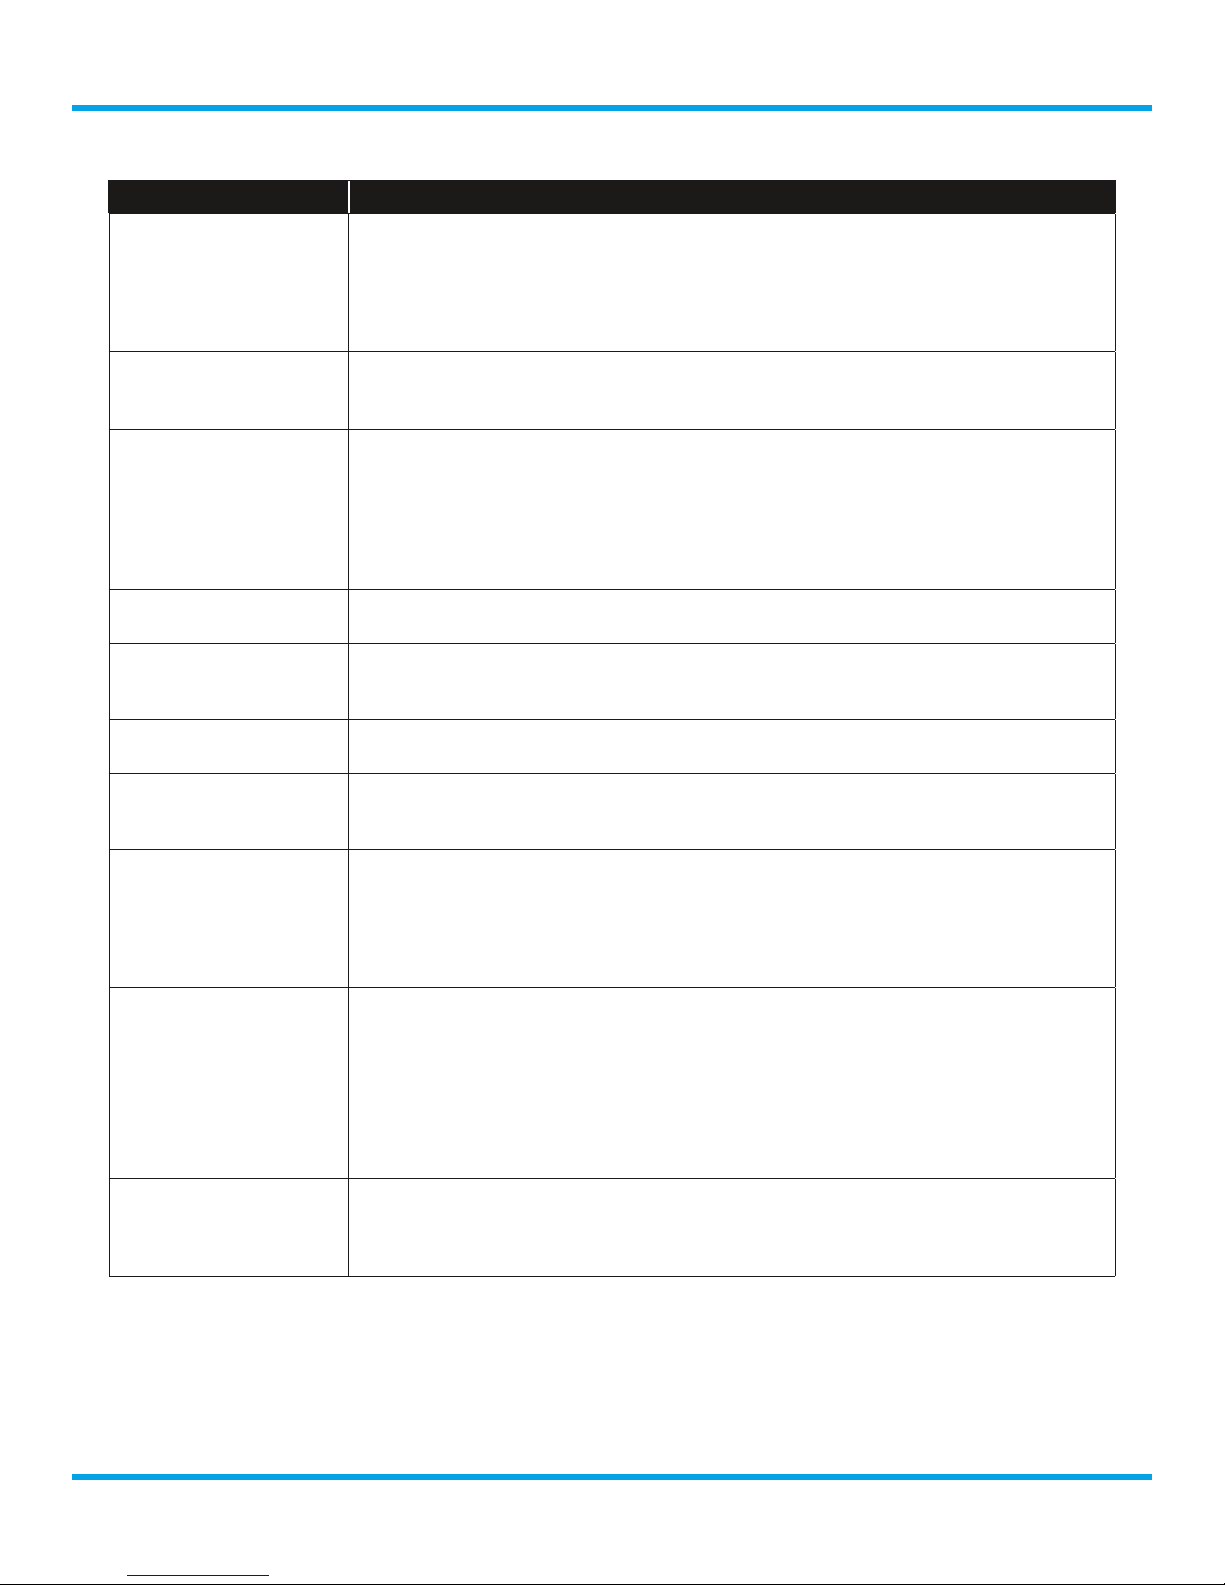
Commander Touch User Guide
If this happens: Try this:
You do not receive all
the channels to which
you subscribed
Audio sounds too soft Raise the volume of your stereo system or increase the audio output level
No audio when using
the Aux In Cable
Audio fades or has
static when listening
No audio when using
FMDA25 FM Direct
Adapter
No song title or artist
name is displayed
Traffic and Weather
Now sounds different
from other channels
The demo is playing Your Magnetic Mount Antenna is not connected or you are not receiving
TuneMix does not
function as expected
Not all music channels
saved as favorite
channels are playing
in TuneMix
Ensure that you have subscribed to the service by following the steps in “Step
5: Subscribe” on page 23.
Go to www.siriusxm.com/refresh and follow the directions to refresh your
Radio.
Call 866-635-2349 for further assistance.
of Commander Touch until the sound quality improves. Refer to “Audio
Level” on page 48.
Check all cables between your Commander Touch and your vehicle’s stereo
system for a firm and secure connection.
Ensure you have selected the AUX input source on your vehicle’s stereo
system.
Increase the audio output level of Commander Touch. Refer to “Audio
Level” on page 48.
Check all cables for a firm and secure connection.
Check that your Commander Touch and your vehicle’s FM radio are tuned
to the same FM channel.
The information may not be available or updates may be in progress.
These channels use a different audio technology than other channels so
they often sound different from other channels.
the signal. Check that the antenna is connected properly and is not
obstructed.
Tap the display screen to exit Demo Mode.
You can disable Demo Mode. Refer to “Demo Mode” on page 52.
There may be several possible reasons:
You have not saved enough qualified music channels as favorites. Save a
total of at least two favorite music channels on a favorite page.
If TuneMix is set to Bank mode, swipe to the favorites page to be sure it is
the current favorite page.
Also refer to “Tips for Obtaining the Best Experience from TuneMix” on
page 43.
Certain music channels are not eligible for TuneMix due to the way in which
they are broadcast. While these music channels can be saved as favorites,
they will not be included in TuneMix.
Troubleshooting
55

Product Specifications
Commander Touch User Guide
System
Power Requirements .........................11 - 16 VDC (12 V nominal), 2 A (max)
Operating Temperature ....................... -4°F to +158°F (-20°C to +70°C)
Audio Output ............................... 0.1 - 2.0 V
peak (7 steps)
rms
Display Controller
Display Type ................................ Full Color LCD
Input Operation ............................. Capacitive Touch (single point)
Resolution ..................................480 px x 180 px
Cable Length ................................ 6.5 ft (2 m)
Dimensions (WxHxD) ........................ 4.1 in x 1.69 in x 0.48 in
(105 mm x 43 mm x 12.3 mm)
Weight ..................................... 3.88 oz (110 g)
Tuner Module
Connections ................................Power, Display, Antenna, FM, AUX
Dimensions (WxHxD) ........................ 3.99 in x 2.23 in x 0.89 in
(101.5 mm x 56.5 mm x 22.7 mm)
Weight ..................................... 2.5 oz (71 g)
Vehicle Antenna
Type .......................................Magnetic Mount
Connector .................................. SMB female, right angle
Cable Length ................................ 23 ft (7.0 m)
FMDA25 FM Adapter
Dimensions (WxHxD) ........................ 1.75 in x 1.0 in x .6875 in
(44.5 mm x 25.5 mm x 17.5)
Satellite Radio FM Cable Length ...............6 ft (1.82 m)
FM Radio Plug Motorola (Male) length ......... 8 in (203 mm)
FM Antenna Jack Motorola (Female) length .... 8 in (203 mm)
Weight ..................................... 2.1 oz (60 g)
Aux Audio Cable
Connectors ................................. 1/8 in (3.5 mm) to 1/8 in (3.5 mm) stereo male
Cable Length ................................ 4 ft (1.2 m)
Power Harness
Wires .......................................BAT (Yellow), ACC (Red), GND (Black),
ILL (Orange)
In line fuse (BAT Wire) ....................... 4 A (AGC Type)
Length ..................................... 19.7 in (0.5 m)
Weight ..................................... 0.8 oz (13 g)
Flush Kit
Flush Mounting Cup
Dimensions (outer) (WxHxD) ................. 5.3 in x 2.17 in x 0.77 in
Dimensions (cut out) (WxHxD) ................ 4.33 in x 1.89 in (110 mm x 48 mm)
Weight ..................................... 1.6 oz (44 g)
56
(135 mm x 55mm x 19.6 mm)

Commander Touch User Guide
Screws
Quantity .................................... 4 each
Type .......................................M4 x 8
Weight (each) ...............................0.04 oz (1 g)
Brackets
Quantity .................................... 2 each
Dimensions (WxHxD) ........................ 0.5 in x 3.12 in x 0.03 in
(12.7 mm x 79.2 mm x 0.70 mm)
Weight (each) ...............................0.2 oz (6 g)
Removal Tool
Dimensions (WxHxD) ........................ 0.5 in x 1.1 in x 0.03 in
(12.7 mm x 28 mm x 0.70 mm)
Weight ..................................... 0.04 oz (1 g)
Product Specifications
57

Patent and Environmental Information
Commander Touch User Guide
Patent Information
It is prohibited to, and you agree that you will not, copy, decompile, disassemble, reverse engineer,
hack, manipulate, or otherwise access and/or make available any technology incorporated in this
product. Furthermore, the AMBE® voice compression software included in this product is protected
by intellectual property rights including patent rights, copyrights, and trade secrets of Digital
Voice Systems, Inc. The software is licensed solely for use within this product. The music, talk,
news, entertainment, data, and other content on the Services are protected by copyright and other
intellectual property laws and all ownership rights remain with the respective content and data
service providers. You are prohibited from any export of the content and/or data (or derivative
thereof ) except in compliance with applicable export laws, rules and regulations. The user of this or
any other software contained in a Sirius XM Radio Inc is explicitly prohibited from attempting to copy,
decompile, reverse engineer, hack, manipulate or disassemble the object code, or in any other way
convert the object code into human-readable form.
Environmental Information
Follow local guidelines for waste disposal when discarding packaging and electronic appliances.
Perchlorate Material - special handling may apply. See www.dtsc.ca.gov/hazardouswaste/perchlorate
(Applicable to California, U.S.A.)
58

Commander Touch User Guide
The user is cautioned that changes or modifications not expressly approved by Sirius XM Radio Inc.
can void the user’s authority to operate this device.
This device complies with Part 15 of the FCC Rules. Operation is subject to the following two
conditions:
1. This device may not cause harmful interference.
2. This device must accept any interference received, including interference that may cause
undesired operation.
This equipment has been tested and found to comply with the limits for a Class B digital device,
pursuant to Part 15 of the FCC Rules. These limits are designed to provide reasonable protection
against harmful interference in a residential installation.
This equipment generates, uses, and can radiate radio frequency energy and, if not installed and
used in accordance with the installation instructions, may cause harmful interference to radio
communications. However, there is no guarantee that interference will not occur in a particular
installation. If this equipment does cause harmful interference to radio or television reception, which
can be determined by turning the equipment off and on, the user is encouraged to try to correct the
interference by one or more of the following measures:
FCC Statement
•Reorient or relocate the receiving antenna of the affected receiver.
•Increase the separation between the SiriusXM equipment and the affected receiver.
•Connect the SiriusXM equipment into an outlet on a circuit different from that to which the
affected receiver is connected.
•Consult the dealer or an experienced radio/TV technician for help.
WARNING! The FCC and FAA have not certified this Satellite Radio Receiver for use in any aircraft
(neither portable nor permanent installation). Therefore, Sirius XM Radio Inc. cannot support this
type of application or installation.
59

Important Legal Information
Commander Touch User Guide
IMPORTANT NOTICE: REQUIRED SUBSCRIPTION
Hardware and subscription sold separately, and activation fee required. Other fees and taxes may
apply. Subscriptions governed by SiriusXM Customer Agreement; see www.siriusxm.com. Service
automatically renews into the subscription Package you choose (which may differ from the Package
which arrived with the Radio), for additional periods of the same length, and automatically bills at
then-current rates, after any complimentary trial or promotional period ends. You must call us to
cancel at 1-866-635-2349. Fees and programming are subject to change.
© 2015 Sirius XM Radio Inc. “Sirius”, “XM” and all related marks and logos are trademarks of Sirius XM
Radio Inc. and its subsidiaries. All other marks and logos are the property of their respective owners.
All rights reserved. Certain features depend on subscription package.
WARNING: This product contains chemicals known to the State of California to cause cancer and birth
defects or other reproductive harm.
60

Commander Touch User Guide
The Radio model number is located below and the XM Radio ID is located on the label on the back of
Commander Touch.
Record the XM Radio ID in the space provided below. Refer to these numbers whenever you call your
dealer regarding this product.
Radio Model Number: SXVCT1
Radio ID:___________________________
Owners Record
61

Sirius XM Radio Inc.
1221 Avenue of the Americas
New York, NY 10020
1.866.635.2349
siriusxm.com
© 2015 Sirius XM Radio Inc.
SXVCT1UG 151028a
 Loading...