

Page 1
Installation and User Guide
SIRIUS Speaker Dock
Portable Audio System for SIRIUS Dock and Play Radios
For use with most newer SIRIUS Dock and Play Radios
Page 2

Congratulations on the purchase of your new
SIRIUS Speaker Dock, Portable Audio System for
SIRIUS Dock and Play Radios!
Your new SIRIUS Speake r Dock lets you enjoy SIRIUS® Satellite Radio’s dig ital
entertainment in your home, office, or other location. Use this manual as a guide for
installation.
The Speaker Dock will work with most SIRIUS dock and play radios that have the new
Universal Connector. I t is compatible with the dock and play radios listed below as
well as with any newer models sold subsequently:
Sportster 5 ™
•
Starmate 5 ™
•
Starmate 4
•
Starmate 3
•
Stratus 5 ™
•
Stratus 4
•
Stratus
•
For the latest informa tion about this and other SIRIUS product and accessories, visit
http://www.sirius.com.
Page 3

Table of Contents
TABLE OF CONTENTS . . . . . . . . . . . . . . . . . . . . . . . . . . . 3
COPYRIGHTS & TRADEMARKS . . . . . . . . . . . . . . . . . . . . . .4
WARNING AND SAFETY INFORMATION . . . . . . . . . . . . . . . . . . . 5
Safety Precautions . . . . . . . . . . . . . . . . . . . . . . . . . . . . 5
Warnings . . . . . . . . . . . . . . . . . . . . . . . . . . . . . . . 5
PACKAGE CONTENTS . . . . . . . . . . . . . . . . . . . . . . . . . . . 6
CONTROLS AND CONNECTORS . . . . . . . . . . . . . . . . . . . . . . 7
INSTALLATION . . . . . . . . . . . . . . . . . . . . . . . . . . . . . . 9
Docking the SIRIUS Radio . . . . . . . . . . . . . . . . . . . . . . . . 9
Installing the Indoor/Outdoor Antenna for Indoor Use . . . . . . . . . . . . . . 10
Installing the Indoor/Outdoor Antenna for Outdoor Use . . . . . . . . . . . . . 17
Connecting the AC Power Adapter . . . . . . . . . . . . . . . . . . . . . 18
Subscribing to SIRIUS Service . . . . . . . . . . . . . . . . . . . . . . . 18
OPERATION . . . . . . . . . . . . . . . . . . . . . . . . . . . . . . 20
TROUBLESHOOTING . . . . . . . . . . . . . . . . . . . . . . . . . . 21
OPTIONAL ACCESSORIES . . . . . . . . . . . . . . . . . . . . . . . . 23
SPECIFICATIONS . . . . . . . . . . . . . . . . . . . . . . . . . . . . 24
SIRIUS ID . . . . . . . . . . . . . . . . . . . . . . . . . . . . . . . 25
[ Tabl e of Con tent s ]
3
Page 4

Copyrights & Trademarks
© 2008 SIRIUS XM Radio Inc. All Rights Reserved.
® “SIRIUS”, the SIRIUS dog logo, channel names and logos are trademarks of SIRIUS
XM Radio Inc. All Righ ts Reserved.
™ “Sportster”, “Starma te”, and “Stratus” are trademarks of SIRIUS XM Radio Inc.
Hardware, subscription , and activation fee required. For full Terms & Conditions, visit
http://sirius.com. Pri ces an d programming are subject to change. Not available in HI
and AK. Equipment and subscription sold separately. Installation required with some
equipment.
[ Copy righ ts & Tra demarks ]
4
Page 5

Warning and Safety Information
Safety Precautions
Be sure to observe the following warnings. Failure to follow these safety instructions
and warnings may resul t in a serious accident and/or personal injury.
Installation must be p erformed according to this installation guide. SIRIUS is not
•
responsible for issues arising from installations not performed according to the
procedures in this gui de.
Use only the provided AC Power Adapter
•
Do not install the uni t where it will be exposed to high levels of humidity, moisture,
•
or dust.
To avoid short circuit s, do not open the unit, and never put or leave any metallic
•
objects (coins, tools, etc.) inside the unit.
If the unit emits smok e or unusual odors, turn the power off immediately, and dis-
•
connect the unit from any power source.
Do not drop the unit o r subject it to strong shocks.
•
The installation and u se suggestions contained in this manual are subject to any
•
restrictions or limita tions that may be imposed by applicable law. The purchaser/
user should check appl icable law for any restrictions or limitations before installing
and/or operating this unit.
Warnings
Clea ning and Main tenance
If the Speaker Dock be comes dirty, turn the power off and wipe it clean with a soft
cloth. Do not use hard cloths, strong cleaning fluids, paint thinner, alcohol, or other
volatile solvents to c lean. These may cause damage to the unit.
[ Warn ing and Safe ty Informat ion ]
5
Page 6
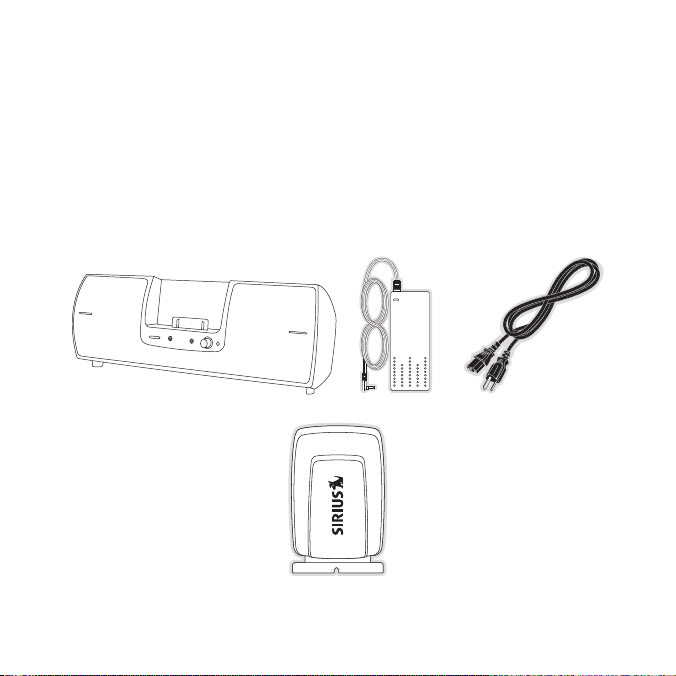
Package Contents
The following items ar e included with your purchase of the SIRIUS Speaker Dock.
Unpack the kit careful ly and make sure that everything shown is present. If anything is
missing or damaged, or if the Speaker Dock fails to operate properly, notify your dealer
immediately. It is rec ommended that you retain the original carton and packing materials in case you need t o ship your Speaker Dock in the future.
[ Pack age Cont ents ]
6
Speak er DockSpeak er Dock
AC Ad apterAC Ad apter Power CordPower Cord
Indoo r/Outdoor AntennaIndoo r/Outdoor Antenna
Page 7
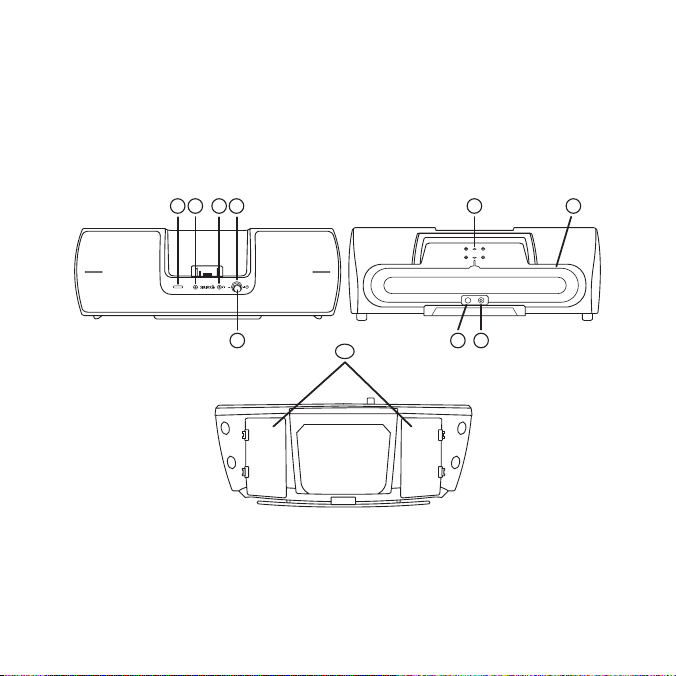
Controls and Connectors
source aux in
52Front View Rear View
Bottom View
8 93 4
1
10
76
Figur e 1Figur e 1
Figure 1 and the secti on following identify and describe the controls and connectors
of the Speaker Dock.
Powe r and Volume Knob: Pressing the knob turns the Speaker Dock’s power
1.
On or Off. Turning the knob increases or decreases the volume level (+/—).
Sour ce But ton: Switches audio output between SIRIUS radio and the AUX input.
2.
AUX IN Con nector : Inpu t connection for audio from an external device, such as
3.
[ Cont rols & C onne ctors ]
7
Page 8

an MP3 player, CD play er etc.
Head phone Connec tor: S tereo headphone jack to privately listen to the Speaker
4.
Dock.
Powe r On/L ow Bat tery L ight: The light is a constant blue when the Speaker
5.
Dock is powered on. Th e light will turn red when the batteries in the Speaker
Dock are nearly discha rged and need replacement.
DC P OWER C onnect or: Co nnection for the AC Power Adapter. (DC Power)
6.
ANTE NNA Co nnecto r: Con nection for the Indoor/Outdoor Antenna (Antenna).
7.
Ante nna St orage: Stora ge area for the Indoor/Outdoor Antenna.
8.
Cabl e Stor age: Storage area for the antenna cable.
9.
Batt ery Co mpartm ents: Two ba ttery compartments for a total of eight “D” size
10.
cells.
[ Cont rols & C onne ctors ]
8
Page 9
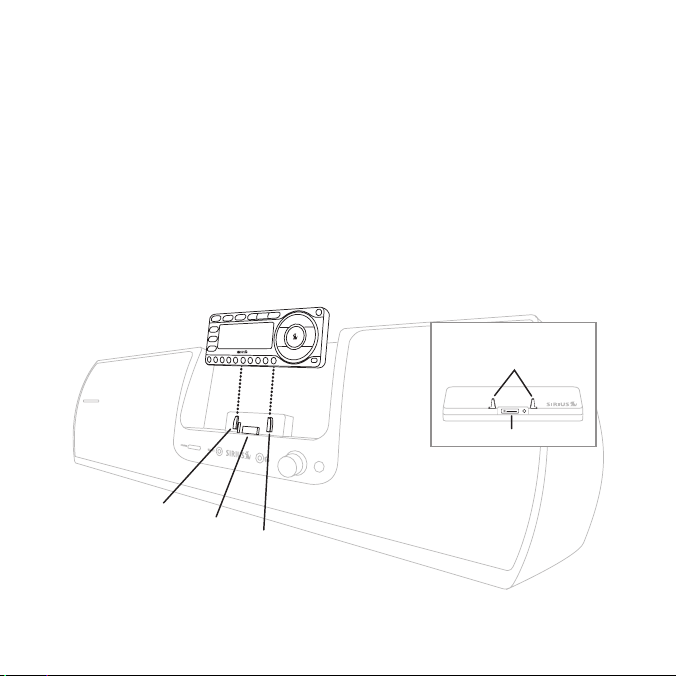
Connector
Docking Rail
Docking Rail
SIRIUS Radio (Back & Bottom View)
Connector
Docking Slots
Figur e 2Figur e 2
Installation
Docking the SIRIUS Radio
Place your SIRIUS Dock and Play radio into the Speaker Dock as follows:
Locate the docking slots on the back of your SIRIUS radio, and the connector on the
1.
bottom of your radio. (Refer to Figure 2.)
Align the radio with t he docking rails and connector on the front of the Speaker
2.
Dock so that the docki ng rails can slide into the docking slots. (Figure 2)
Once aligned, gently p ress the radio down so that it slides down the docking
3.
rails until it is full y seated in the Speaker Dock.
[ Inst alla tion ]
9
Page 10

Installing the Indoor/Outdoor Antenna for Indoor Use
Before installing the indoor/outdoor antenna, please read this entire section.
Please visit htt p://ww w.sirius.com/install and click on Home Installa tion for
more information on ho me antenna installation. You can also find out information
about various signal d istribution accessories for the home, such as the Echo
Home Wireless Signal R epeater System or the 50’ Antenna Extension Cable,
both available for pur chase at http://www.sirius.com. These accessories can
aid you in receiving t he SIRIUS signal at home. (See page 23.)
To ensure consistent r eception of the SIRIUS signal in your home, it is important that
the antenna be oriente d correctly. Note the following Best, Better, and Good considerations for antenna pla cement.
BEST reception can be achieved by mounting the antenna on the outside of the
building on a soffit at the roof, with a clear 360 degree view of the sky. (Figure 3, A)
This position will afford the best view of the sky for best reception. When placed in
this location, an antenna extension cable may be required. Next best, it can be placed
outside on a flat surface (Figure 3, B) with nothing blocking its view of the sky. Be
sure that the home itself is not blocking the view of the sky.
BETTER reception can be achieved by placing the antenna outside on a window, on
a porch, or on a patio, or by mounting it to the side of the building. The antenna will
have to be facing in the direction of the SIRIUS satellites as explained later, with the
largest possible clear view of the sky in the direction of the satellites.
GOOD reception can be achieved by placing the antenna indoors on a windowsill.
The window will need t o be facing in the direction of the SIRIUS satellites, as explained later, and hav e a clear view of the sky. The antenna may need to be placed
on a raised flat surfa ce, such as a book, to raise it above the level of the window
frame. (Figure 4)
[ Inst alla tion ]
10
Page 11

B.
A.
Figur e 3Figur e 3
Note : If your location is in major metropolitan area, the antenna can possibly be located inside the home because terrestrial (or ground) repeaters are used to boost
signal strength. If yo u are able to achieve a good terrestrial signal with the antenna
indoors, you can disre gard the remainder of these antenna installation instructions.
Refer to the section, Testin g and Optimizing the Antenna Signal Stren gth on
page 15 for details ab out displaying the terrestrial signal strength.
[ Inst alla tion ]
11
Page 12

Figur e 4Figur e 4
If you cannot obtain a clear 360 degree clear view of the sky (Best), then for the Better
and Good installations you must at least have a clear view of the sky in the direction of
the SIRIUS satellites, as shown in the following map diagram. (Figure 5)
[ Inst alla tion ]
12
Page 13

1
2
3
4
5
HORIZON
SKY
SOUTH
WEST EAST
NORTH
Use the map to find th e area you are located in (1 to 5). Then find the direction in
Figur e 5Figur e 5
which you need to have a clear view of the sky:
Area 1: You will need a location with a clear view o f the sky facing EAST or
NORTHEAST
Area 2: You will need a location with a clear view o f the sky facing NORTH or
NORTHEAST
Area 3: You will need a location with a clear view o f the sky facing NORTH or
NORTHWEST
Area 4: You will need a location with a clear view o f the sky facing WEST or
NORTHWEST
Area 5: You will need a clear view of the sky facing STRAIGHT UP (Outdoors only,
refer to Figure 3)
[ Inst alla tion ]
13
Page 14

SOUTH
WEST
Aimed Northeast
EAST
NORTH
Aimed Northerly
Figur e 6Figur e 6
The location for the a ntenna must have an unobstructed view of the sky in the direction
indicated for your are a. (Figure 6)
For example, suppose y ou live in Area 2. You determined that your antenna will need
to have a clear view o f the sky facing North or Northeast. The exact direction is determined by your speci fic location in Area 2 relative to the X on the map: If you live in
Texa s, you will need a more Northerly facing clear view of the sky whereas if you live
in s outher n Cali fornia , you will need a more Northeast facing clear view of the sky.
Once you have found a suitable location for the antenna, route the antenna cable to
the Speaker Dock. Be s ure you avoid any obstructions that could crimp, kink, or twist
the cable. Use protect ive grommets wherever rough openings are encountered. If the
antenna is installed o utdoors, route the cable from the antenna location to the interior
of the home, working t he cable through the basement, under a window sill, etc., and
make adjustments to ta ke up cable slack as necessary. Connect the antenna cable to
the antenna connector of the Speaker Dock. (Refer to Figure 1 on page 7.) Optional
antenna extension cabl es are available if needed. (Refer to Optional Accessories on
page 23.)
14
[ Inst alla tion ]
Page 15

Test ing and Optim izing the Ant enna S ignal Strengt h
Figur e 7Figur e 7
The stronger the SIRIU S signal strength, the less likely it is that you will experience an
interruption of the au dio when listening to a broadcast. To assist you in adjusting the
antenna aiming for opt imal reception, your SIRIUS radio can display a screen showing
the strength of the SI RIUS signal being received, similar to Figure 7.
Turn your Speaker Dock and SIRIUS radio ON. Access the signal indicator (or antenna
aiming) screen of your SIRIUS radio. Consult your radio’s manual for instructions on
accessing the screen. The SATELLITE (or SAT) portion of the display screen (Figure
7) shows the strength of the signal being received from the satellite, while the TERRESTRIAL (or TER) port ion of the display screen shows the strength of the signal
being received from te rrestrial (ground) repeaters, if available.
Aiming the antenna consists of two adjustments. The first adjustment is to tilt the clamshell
at an angle. (Figure 8) While observing the signal strength, make small adjustments to the
angle of tilt of the clamshell until the highest possible signal strength is achieved.
[ Inst alla tion ]
15
Page 16

THIS SURFACE OF THE
ANTENNA SHOULD BE
POINTED AT THE SKY
TOWARDS THE DIRECTION
OF THE SATELLITES
Figur e 8Figur e 8
Figur e 9Figur e 9
The second adjustment is to turn the antenna slightly to the left or right until the highest possible signal st rength is achieved. (Figure 9)
[ Inst alla tion ]
16
Page 17

Figur e 10Figur e 10
The SIRIUS satellites are not in a fixed place in space and move relative to the earth.
As a result, the signa l level at the antenna will vary throughout the day. Once you think
you have aimed and poi nted your antenna at the optimal direction, it is important to
check that you are rec eiving an uninterrupted signal all the time. To ensure that you
continuously receive t he SIRIUS signal, we recommend that you observe your antenna
set-up occasionally ov er the period of few hours and adjust the aim and tilt of the
antenna as necessary.
For more tips on installing the antenna, please visit the SIRIUS website at http://www.
sirius.com and click on the Install/Activate link .
Installing the Indoor/Outdoor Antenna for Outdoor Use
The indoor/outdoor antenna should be placed into the storage area on the top of the
Speaker Dock as shown in Figure 10. The antenna clamshell should face the sky.
Wrap the excess antenn a cable around the storage area at the rear, and plug the
antenna cable into the Antenna connector. If you have reception problems, turn the
Speaker dock in the di rection of the satellites and try tilting the antenna in the direction of the satellites .
Alternately, if there is no clear view of the sky where the Speaker Dock is located
outdoors, the antenna can be removed from the Speaker Dock placed where there is a
clear view of the sky, and aimed in the direction of the satellites.
[ Inst alla tion ]
17
Page 18

Connecting the AC Power Adapter
The Speaker Dock can o perate on either batteries (8 “D” cells) or by using the AC
Power Adapter. Connect the AC Power Adapter to the DC Power connector at the
rear of the Speaker Do ck. (Refer to Figure 1 on page 7.) Connect the Power Cord to
the AC Power Adapter a nd plug it into an AC outlet.
Subscribing to SIRIUS Service
If you have not yet su bscribed your radio to the SIRIUS Satellite Radio service, you’ll
need to subscribe befo re you can listen to SIRIUS programming on your radio. To
subscribe, do the foll owing:
Be sure that the SIRIU S radio is correctly installed as described in this manual, in
1.
the Speaker Dock, and that the antenna is oriented to receive the SIRIUS signal.
Press the Power/Volume knob to turn on the Speaker Dock.
2.
Turn the radio on. Aft er the start up sequence, the radio will update the SIRIUS
3.
channel line-up. Wait until the channel updates have completed before pressing
any buttons.
Once the channels have been updated, the display will change to Call 1-888-
4.
539- SIRIUS to Subscrib e and will tune to channel 184. You will not be able to
listen to other channe ls until you activate your SIRIUS subscription.
Use the radio’s channe l up/down buttons to tune to channel 0 to display the
5.
radio’s unique 12-digi t SIRIUS ID Number (SID). You can also tune to channel
0 by using the remote control: Press the Select button, then the 0 (zero) button,
and then press the Sel ect bu tton again. The SID is also available on the radio’s
packaging, and may als o be accessed by pressing the MENU button and selecting SIRIUS ID. Write t he SID down in the space provided near the end of this
guide.
Have your credit card handy and contact SIRIUS on the Internet at: ht tps:// acti-
6.
[ Inst alla tion ]
18
Page 19

vate .siriu sradio .com/ and follow the prompts to activate your subscription. You
can also call SIRIUS t oll-free at: 1-888-539-SIRIUS (1-888-539-7474).
When you have successf ully subscribed to the SIRIUS service, and the radio has
7.
been updated with your subscription information, an alert will be displayed. To
continue, press any bu tton.
You are now ready to b egin enjoying SIRIUS Satellite Radio’s digital entertainment,
and can tune to other channels.
[ Inst alla tion ]
19
Page 20

Operation
Before you can listen to the SIRIUS programming, you need to subscribe to the
SIRIUS Satellite Radio service if you have not done so already. Please be sure to follow the activation ins tructions for your specific SIRIUS radio instructions.
Once the Speaker Dock has been installed according to the installation directions,
power on the Speaker D ock by pressing the Power/Volume knob on the front panel.
The light on the front panel surrounding the knob should light up blue to indicate
power is on. If the ra dio does not power on at the same time, press the power On/Off
button on the radio.
You should now hear th e SIRIUS audio. If you do not, increase the volume of the
Speaker Dock by turnin g the Power/Volume knob clockwise (+).
If the light on the fr ont panel surrounding the Power/Volume knob should turn red
while the Speaker Dock is powered on, this indicates that the battery power is low.
Replace the batteries.
Usin g the AUX Inp ut
If you want to listen to an external audio device such as an MP3 player or CD player
through the Speaker Do ck, do the following:
Initially set the volu me level on the audio device to mid-range.
1.
Connect the output of the audio device to the aux in connector on the front
2.
panel of the Speaker D ock. Press the source button to select the AUX input.
Adjust the volume on t he audio device to obtain satisfactory audio output from
3.
the Speaker Dock. If t he sound is distorted, lower the volume level on the audio
device and increase th e volume level on the Speaker Dock.
[ Oper atio n ]
20
Page 21

Troubleshooting
Symp tom Solu tion
Speaker Dock does
not power on
Speaker Dock does
not operate on
batteries
SIRIUS radio displays:
Ante nna No t Dete cted
The AC Power Adapter i s not connected, or the AC outlet
into which it is plugg ed is not working. Check that the AC
Power Adapter is conne cted to the Speaker Dock. Try
plugging the AC Power adapter into a different outlet.
Batteries are not inst alled, are installed incorrectly, or
are bad. Install new b atteries, if necessary, observing the
correct polarity.
When the AC Power Adap ter is connected to the Speaker
Dock, the battery operation is disabled. Disconnect the AC
Power Adapter or Cigar ette Lighter Adapter.
If the power light is red, this indicates that the batteries
need to be replaced. I nstall new batteries, if necessary,
observing the correct polarity.
The indoor/outdoor ant enna is not properly connected to
the Speaker Dock. Chec k the indoor/outdoor antenna connection to the Speaker Dock.
Radio is not completel y seated into the Speaker Dock. Reseat the radio into th e Speaker Dock.
[ Trou bles hoot ing ]
21
Page 22

Trou blesho oting Contin ued
Symp tom Solu tion
SIRIUS radio displays:
Acqu iring Signal
No sound from the
Speaker Dock
speakers
[ Trou bles hoot ing ]
22
No SIRIUS signal is be ing received. Check for obstacles
over or around the ind oor/outdoor antenna.
Ensure antenna is poin ted in the right direction toward the
sky for your area to b e able to see the SIRIUS satellite.
Change the location of the antenna to eliminate nearby
obstacles (buildings, trees, overhangs etc.).
Power/Volume knob is i n the extreme counter clockwise (-)
position. Turn it cloc kwise toward the (+) position.
Headphones are connect ed to the Speaker Dock. Disconnect the headphones.
An audio device is con nected to the aux in connection
and is not producing s ound. Press the source button to
select audio output fr om the SIRIUS radio.
Page 23

Optional Accessories
The following optional accessories are available for purchase from your SIRIUS retailer
or at http://www.siriu s.com to maximize your SIRIUS experience:
Echo Home Wireles s Signal Repe ater S ystem (Model #: SIR-WRS1)
The Echo Home Wireless Repeater System makes it easier to position and install your
SIRIUS indoor/outdoor antenna for best reception without restricting where you want
to place your SIRIUS r adio or Speaker Dock. You can enjoy SIRIUS radio throughout
your home without the need to run antenna wires.
The Echo Transmitter c onnects to the SIRIUS antenna and sends the SIRIUS signal
throughout your home, including through walls and floors. The signal is received by
the Echo Antenna, whic h connects to any SIRIUS radio. Now your SIRIUS radio can
be conveniently locate d anywhere in your home, even in interior rooms, without restrictions due to antenna p lacement.
50’ Antenna Exten sion Cable (M odel # : 14230)
The 50’ Antenna Extens ion Cable extends the reach of your SIRIUS antenna cable by
an additional 50 feet. It includes a built-in signal amplifier to ensure reliable reception
of the SIRIUS signal.
[ Opti onal Acc esso ries ]
23
Page 24

Specifications
Nominal Output Power p er Channel . . . . . . . . . . . . . . . . . . . . . . . . . . . . . .5 Watts RMS
Total Harmonic Distort ion (THD) . . . . . . . . . . . . . . . . . . . . . . . . . . . . . . . 0.2% at 1 Watt
Speaker Frequency Resp onse . . . . . . . . . . . . . . . . . . . . . . . . . . . . . . . . . 60Hz to 20kHz
Signal-to-Noise Ratio (S/N) . . . . . . . . . . . . . . . . . . . . . . . . . . . . . . . . . . >70d B Maxi mum
Headphone Output Imped ance . . . . . . . . . . . . . . . . . . . . . . . . . . . . . . . . . . . . . 32 Ohms
Headphone Output Level (Variable) . . . . . . . . . . . . . . . . . . . . . . . . . . . . . . . . . . . 12mW
Headphone Connector Ty pe . . . . . . . . . . . . . . . . . . . . . . . . . . 3.5mm Stereo Jack (1/8”)
Auxiliary Input Impeda nce . . . . . . . . . . . . . . . . . . . . . . . . . . . . . . . . . 3K Ohms (Nominal)
Auxiliary Input Level . . . . . . . . . . . . . . . . . . . . . . . . . . . . . . . . . 2.0 Volts RMS (Maximum)
Auxiliary Input Connec tor . . . . . . . . . . . . . . . . . . . . . . . . . . . . . 3.5m m Stereo Jack (1/8”)
Battery Type/Quantity . . . . . . . . . . . . . . . . . . . . . . . . . . . . . . . . . . . . . . “D” Cell / 8 Total
AC Adapter . . . . . . . . . . . . . . . . . . . . . . . . . . . . . . . . . . . . . 12 Volt, 3A, Center Positive
Overall Dimensions (W x H x D) . . . . . . . . . . . . . . . . . . . . . . . . . . . . . . . . . 19” x 8” x 7”
Weight (Without Batter ies) . . . . . . . . . . . . . . . . . . . . . . . . . . . . . . . . . . 7.3 l bs. (3 .3 Kg)
[ Spec ific atio ns ]
24
487mm x 204.5mm x 179m m
Page 25

SIRIUS ID
Write down the SIRIUS ID (SID) of your SIRIUS radio in the space provided below.
SID:
[ SIRI US I D ]
25
Page 26

Page 27

Page 28

sirius.com
SIRIUS XM Radio Inc.
1221 Avenue of the Americas
New York, NY 10020
800.869.5590
SUBX2 (SUBX2082808a)
OO.ABCD1.001
 Loading...