

Page 1

SUBX1
SIRIUS Plug and Play Boombox
For use with most newer SI RI US P lu g an d Pl ay R ec ei ve rs
User Guide
Page 2

Congratulations on the Purchase of your new SUBX1 SIRIUS
Plug and Play Boombox!
Your new SU BX1 SIRIUS Plug and Play Boombox lets you enjoy SIRIUS® Satellite Radio’s
digital ent ertainment in your home, office, or other location. Use th is manual as a gu ide for the
installatio n.
The Boombox will work with most newer SIRIUS plug and play satellite receivers. See yo ur
Plug and Pl ay user manual for specific product compatibility.
For the lat est information about this and other SIRIUS products and a ccessories, visit
http://www. sirius.com.
Page 3

Table of Contents
TABLE OF CONTENTS . . . . . . . . . . . . . . . . . . . . . . . . . . . . . . 3
WARNING AND SAFETY INFORMATION . . . . . . . . . . . . . . . . . . . . . . 4
Safety Precautions . . . . . . . . . . . . . . . . . . . . . . . . . . . . . . . .4
Warnings . . . . . . . . . . . . . . . . . . . . . . . . . . . . . . . . . . . 4
COPYRIGHTS & TRADEMARKS . . . . . . . . . . . . . . . . . . . . . . . . . 5
PACKAGE CONTENTS . . . . . . . . . . . . . . . . . . . . . . . . . . . . . . 6
CONTROLS . . . . . . . . . . . . . . . . . . . . . . . . . . . . . . . . . . 7
INSTALLATION . . . . . . . . . . . . . . . . . . . . . . . . . . . . . . . . . 8
Docking the SIRIUS Receiver . . . . . . . . . . . . . . . . . . . . . . . . . . .8
Installing the Indoor/Outdoor Antenna for Indoor Use . . . . . . . . . . . . . . . . . . 9
Connecting the AC Power Adapter . . . . . . . . . . . . . . . . . . . . . . . . 12
Subscribing to the SIRIUS Service . . . . . . . . . . . . . . . . . . . . . . . . 12
OPERATION . . . . . . . . . . . . . . . . . . . . . . . . . . . . . . . . . 13
TROUBLESHOOTING . . . . . . . . . . . . . . . . . . . . . . . . . . . . . 14
OPTIONAL ACCESSORIES . . . . . . . . . . . . . . . . . . . . . . . . . . . 15
WARRANTY . . . . . . . . . . . . . . . . . . . . . . . . . . . . . . . . . 16
SPECIFICATIONS . . . . . . . . . . . . . . . . . . . . . . . . . . . . . . . 17
SIRIUS ID . . . . . . . . . . . . . . . . . . . . . . . . . . . . . . . . . . 18
[ Table o f Conte nt s ]
3
Page 4

Warning and Safety Information
Safety Precautions
Be sure to observe the following warnings. Failure to follow these sa fety instructions and
warnings ma y result in a serious accident and/or personal injury.
Installatio n must be performed according to this installation guide. SIRIUS is not res pon-
•
sible for i ssues arising from installations not performed according t o the procedures in this
guide.
Use only th e provided AC Power Adapter.
•
Do not inst all the unit where it will be exposed to high levels of hu midity, moisture, or dust.
•
To avoid sh ort circuits, do not open the unit, and never put or leave any metallic obj ects
•
(coins, too ls, etc.) inside the unit.
If the unit emits smoke or unusual odors, turn the power off immediat ely, and disconne ct
•
the unit fr om any power source.
Do not drop the unit or subject it to strong shocks.
•
The install ation and use suggestions contained in this manual are sub ject to any restr ic-
•
tions or li mitations that may be imposed by applicable law. The purch aser should check
applicable law for any restrictions or limitations before installing and/or operating this unit.
Warnings
Clea ning and Ma inte nance
If the Boom box becomes dirty, turn the power off and wipe it clean wi th a soft cloth. Do not
use hard cl oths, strong cleaning fluids, paint thinner, alcohol, or o ther volatile sol vents to
clean. Thes e may cause damage to the unit.
[ Warni ng a nd Sa fe ty I nform at io n ]
4
Page 5

Copyrights & Trademarks
© 2006 SIRI US Satellite Radio Inc. All Rights Reserved.
® “SIRIUS”, the SIRIUS dog logo, channel names and logos are trademar ks of SIRIUS Sate l-
lite Radio Inc. All Rights Reserved.
Hardware, s ubscription, and activation fee required. For full Terms & Conditions, visi t
http://siri us.com. Prices and programming are subjec t to change. Not available in HI a nd AK.
Equipment a nd subscription sold separately. Installation required wit h some equipment.
[ Copyr ig ht s & T ra de ma rks ]
5
Page 6
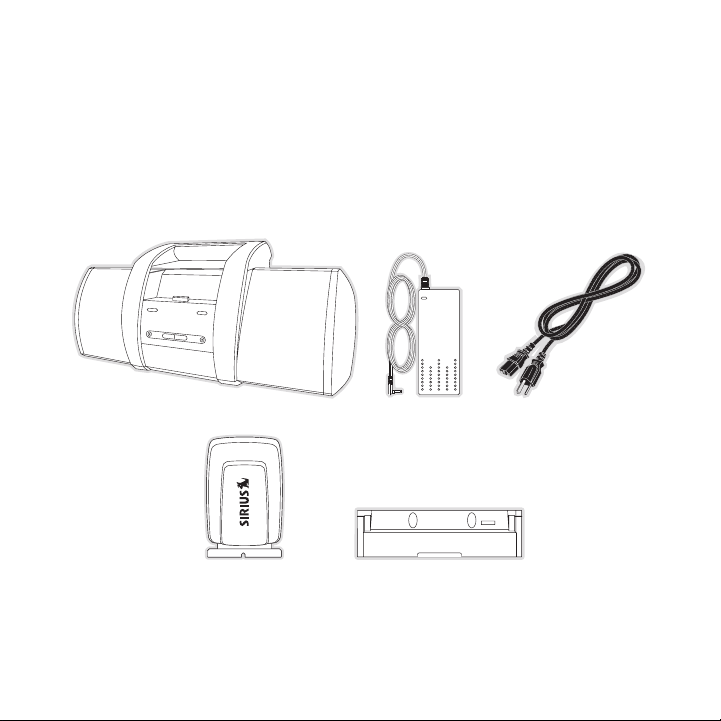
Package Contents
The followi ng items are included with your purchase of the SUBX1 SIRI US Plug and Play
Boombox. Un pack the kit carefully and make sure that everything shown is present. If a nything
is missing or damaged, or if the Boombox fails to operate properly, n otify your dealer immediately. It i s recommended that you retain the original carton and pack ing materials in case you
need to shi p your boombox in the future.
[ Packa ge C onten ts ]
6
Boomb oxBoomb ox
Indoo r/Out door Anten naIndoo r/Out door Anten na Docki ng Ad apterDocki ng Ad apter
Power CordPower CordAC Ad apterAC Ad apter
Page 7

POWER
AUX IN
SOURCE
+
LOCK
DC POWER ANTENNA
2
5
10 10
9
11 12
6 7
43 8
1
Figur e 1Figur e 1
Controls
Figure 1 an d the section following identify and describe the buttons and connectors of the
Boombox.
Powe r On/Of f Button: Turns the Boombox power On or O ff.
1.
Powe r On/Lo w Battery Light: This light is green when the Boombox is p owered on.
2.
The light w ill turn red when the batteries in the Boombox are nearly discharged and ne ed
replacement .
Lock Button : Locks the SIRIUS receiver or Docking Adapter in the Boom box
3.
Sour ce Butt on: Switches audio output between the SIRIUS receiver and the AUX input.
4.
AUX Connect ion: Input connection for audio from an external device, s uch as an MP3
5.
player, CD Player, etc.
Volu me Up/D own Buttons (+/—) : Increases or decreases the volume level .
6.
Head phone C onnection: Stereo headphone jack for priv ate listening to Boombox.
7.
Ante nna Sto rage: Storage area for the Indoor/Outdoor Antenna.
8.
Cabl e Stora ge: Storage area for the antenna cable.
9.
Batt ery Com partments: Battery compartments for a tot al of eight “D” s ize cells.
10.
DC5V Power Connector: Connection for the AC Power Ad apter.
11.
ANT Antenna Connector: Connection for the Indoor/Out door Antenna.
12.
[ Contr ol s ]
7
Page 8

Installation
POWER
AUX IN
SOURCE
+
LOCK
LOCK
Figur e 1Figur e 1
Docking the SIRIUS Receiver
If your rec eiver is a SIRIUS Plug and Play series ST or SV, you will need to install t he Docking
Adapter pro vided with the kit. Refer to Figure 1 and install the adap ter into the fron t of the
Boombox, po sitioning it behind the docking connector and against the backrest. Then sl ide
the Lock bu tton to the left to lock the adapter in the Boombox. The r eceiver may now b e
placed into the Boombox, pressing the receiver down until it is fully seated.
For other S IRIUS Plug and Play receivers, place the receiver into the Boombox, alignin g the
connector o n the receiver with the connector on the boombox, and gent ly press the rece iver
down until it is fully seated in the dock. Then slide the Lock button to the left to l ock the
receiver in the Boombox.
8
[ Insta ll at ion ]
Page 9

Installing the Indoor/Outdoor Antenna for Indoor Use
When using the boombox indoors read this entire section before instal ling the indoor/o utdoor
antenna.
To ensure c onsistent reception of the SIRIUS signal indoors, it is im portant that the antenna
be oriented correctly. Note the following considerations for antenna placement:
BEST recept ion can be achieved by placing the antenna outside on the roof, with a clea r
360 degree view of the sky. This position will afford the best view o f the sky for bes t
reception. When placed in this location, an antenna extension cable m ay be required.
BETT ER rece ption can be achieved by placing the antenna outside a win dow, or by
mounting it to the side of the house. In either case, try to achieve the best possible clear
view of the sky.
GOOD recept ion can be achieved by placing your antenna in a window. T ry to achieve
a clear uno bstructed view of the sky. If your location is in major me tropolitan area, the
antenna may be located inside the home because terrestrial transmitte rs are used to bo ost
signal stre ngth.
If you cann ot obtain a clear 360 degree view of the sky (Best), then for the Be tter an d Good
installatio ns you must at least have a clear view of the sky in the d irection of the S IRIUS satellites, as s hown in the following map diagram. (Figure 2)
[ Insta ll at ion ]
9
Page 10

1
2
3
4
5
HORIZON
SKY
SOUTH
WEST EAST
NORTH
Use the map to find the area you are located in (1 t o 5 ). Then find t he direction in w hich you
Figur e 2Figur e 2
need to hav e a clear view of the sky:
Area 1: You wi ll need a window or outdoor location with a clear view of the sky facing
EAST or NOR THEAST or SOUTHEA ST
Area 2: You wi ll need a window or outdoor location with a clear view of the sky facing
NORT H or NO RTHEAST
Area 3: You wi ll need a window or outdoor location with a clear view of the sky facing
NORT H or NO RTHWEST
Area 4: You wi ll need a window or outdoor location with a clear view of the sky facing
WEST or NOR THWEST or SOUTHWE ST
Area 5: You wi ll need a clear v iew of the sky facing STRAI GHT UP (Outdoo rs only)
Choose a mo unting location for the antenna which has an unobstructed view of the sky i n the
direction f or your area.
10
[ Insta ll at ion ]
Page 11

For example , suppose you live in Area 2. You determi ned that your ant enna will need to have
Signal Indicator
Figur e 3Figur e 3
a clear vie w of the sky facing North or North east. T he exact directio n is determined b y your
specific lo cation in Area 2 relative to the X on the map: If you live in Texas, you wi ll need a
more North facing clear view of the sky whereas if you live in southe rn Califor nia, yo u will
need a more Northeast facing clear view of the sky.
Once you ha ve found a suitable location for the antenna, route the an tenna cable to th e
Boombox. Be sure you avoid any obstructions that could crimp, kink, o r twist the cable . Use
protective grommets wherever rough opening s are encountered. If th e antenna is installed outdoors, rout e the cable from the antenna location to the interior of t he home, working the cable
through the basement, under a window sill, etc., and make adjustments to take up cable slack
as necessar y. Connect the antenna cable to the ANT c onnection on the rear of the boomb ox.
(Figure 1) Optional antenna extension cables are available if needed. Refer to the Opt ion al
Acce ssories section for more details.
Test ing and Opt imiz ing the Ant enna Si gnal Str eng th
The stronge r the SIRIUS signal strength, the less likely it is that y ou will experienc e an interruption of the audio when listening to a broadcast. To assist you in adjusting the ant enna
aiming for optimal reception, your SIRIUS receiver can display a scre en similar to Fig ure 3
showing the strength of the SIRIUS signal being received.
To access t he antenna aiming or signal indicator screen, consult the manual which acco mpanied your S IRIUS receiver. The SATELLITE portion of the display scree n (Figure 4) show s the
strength of the signal being received from the satellite, while the T ERRESTRIAL portio n of the
display scr een shows the strength of the signal being received from t errestrial based transmitters, if av ailable. Make small adjustments to the aiming of the anten na until you achi eve the
strongest p ossible signal.
[ Insta ll at ion ]
11
Page 12

Connecting the AC Power Adapter
Connect the AC Power Adapter to the DC5V connector a t the rear of the Boombox (Figure 1).
Connect the AC power cord to the AC Power Adapter and plug it into an AC outlet.
Subscribing to the SIRIUS Service
If you have not yet subscribed your receiver to the Sirius Satellite Radio service, yo u’ll need to
subscribe b efore you can listen to your receiver. To subscribe, do th e following:
Be sure tha t the SIRIUS receiver is correctly installed as described in this manual, i s in
1.
the Boombox , and that the antenna is oriented to receive the SIRIUS s ignal.
Turn the re ceiver on. After the startup sequence, it will update the SIRIUS channel li ne-
2.
up. Wait un til the channel updates have completed before pressing any buttons.
Once the ch annels have been updated, the display will change to
3.
Call 1-888- 539-SIRIUS to Sub scribe and will tune to channel 184. You will not be able
to listen t o other channels until you activate your SIRIUS subscripti on.
Use the rec eiver’s channel up/down buttons to tune to channel 0 to di splay the receiv-
4.
ers’s uniqu e 12-digit SIRIUS ID Number (SID). You can also tune to ch annel 0 by using
the remote control: Press the Select button then the 0 (zero) button and then press th e
Sele ct butt on again. The SID number is also available on the receiver ’s packaging, and
may also be accessed by pressing the MENU button and selecting Sirius ID. Write the
SID number down in the space provided near the end of this guide.
Have your c redit card handy and contact SIRIUS on the Internet at:
5.
https://activat e.siriusradio.com /
and follow the prompts to activate your subscription. You can also ca ll SIRIUS toll-fr ee
at: 1-888-5 39-SIRIUS (1-888-539-7474).
When you ha ve successfully subscribed to the SIRIUS service, and the receiver has
6.
been update d with your subscription information, an alert will be dis played. To contin ue,
press the S elect button.
You are now ready to begin enjoying SIRIUS Satellite Radio’s digital entertainment, an d can
tune to oth er channels!
12
[ Insta ll at ion ]
Page 13

Operation
Once the Bo ombox has been installed according to the installation dir ections, power on the
Boombox by pressing the Power On/Off button on the front panel. The l ight on the front panel
of the Boom box should light green to indicate the power is on. If the receiver does no t power
on at the s ame time, press the Power On/Off button on the receiver.
You should hear the SIRIUS audio. If you do not, adjust the volume of the Boombox by p ressing the Vol ume Up button on the front panel.
If you want to listen to an external audio device such as an MP3 play er or CD player t hrough
the Boombox , do the following:
Initially s et the volume level on the audio device to mid-range.
1.
Connect the output of the audio device to the AUX co nnection at the f ront of the Boom-
2.
box. Press the Source button to select the AUX input .
Adjust the volume on the audio device to obtain satisfactory audio ou tput from the
3.
Boombox. If the sound is distorted, lower the volume level on the aud io device.
If the ligh t on the front panel should turn red while the Boombox is powered on, this indicates
that the ba ttery power is low. Replace the batteries.
[ Opera ti on ]
13
Page 14

Troubleshooting
Symp tom Solu tion
Boombox doe s not
power on
Boombox doe s not
operate on batteries
SIRIUS rece iver
displays: A ntenna Not
Dete cted
SIRIUS rece iver
displays: A cquiring
Sign al
No sound fr om the
Boombox spe akers
The AC Powe r Adapter is not connected, or the AC outlet into
which it is plugged is not working. Check that the AC Power
Adapter is connected to the Boombox. Try plugging the AC
Power adapt er into a different outlet.
Batteries a re not installed, are installed incorrectly, or are bad.
Install new batteries, if necessary, observing the correct polarity.
When the AC Power Adapter is connected to the Boombox, the
battery ope ration is disabled. Disconnect the AC Power Adapter.
The indoor/ outdoor antenna is not connected to the Boombox.
Check the i ndoor/outdoor antenna connection to the Boombox.
Receiver is not completely seated into the Boombox. Re-seat the
receiver in to the Boombox.
No satellit e signal is being received. Check for obstacles over or
around the satellite antenna.
Change the location of the antenna to eliminate nearby obstacles
(buildings, trees, overhangs, etc).
Headphones are connected to the Boombox. Disconnect the
headphones.
An audio de vice is connected to the AUX connection a nd is not
producing s ound. Press the S ource button to select a udio output
from the SI RIUS receiver.
[ Troub le sh ootin g ]
14
Page 15

Optional Accessories
The followi ng optional accessory is available for purchase from your SIRIUS retailer t o maximize your S IRIUS experience:
Dire cted 14230 50 f t. SIRI US a ntenna exte nsio n
The antenna extension cable extends the reach of your SIRIUS antenna cable by an addit ional
50 ft. It includes a built-in signal amplifier to insure reliable re ception of the SI RIUS signal. A
maximum of two cable extensions can be connected together to create a 100 ft. extensio n.
[ Optio na l Acces so ri es ]
15
Page 16

Warranty
12 M onth Warran ty
SIRIUS S atellite Ra dio Inc. (t he “Company ”) w arrants to the origina l retail pu rchaser of this produc t
that sho uld this pr oduct or an y part ther eof, under norm al use and conditions, be proven defective i n
material or workman ship within 12 months from the da te o f original purchase, s uch defect( s) will be
repaired or replace d with new or recondit ione d produ ct ( at the Comp any’s optio n) without charge for
parts an d repair la bor. To obt ain repair or r eplacem ent within the terms of th is Warranty , the produ ct
is to be delivered with proof of warranty cov erage ( e.g. dated bill of sale), specificati on of defec t(s),
transpor tation prep aid, to the location s hown below unde r WARRANTY RETURN.
This War ranty does not extend to the elim inat ion of exte rnally gene rated stati c or noise, to correct ion
of anten na problems , to costs incurred fo r in stallat ion, removal or reinstalla tion of the product, o r to
damage t o tapes, co mpact discs , speakers, acc essorie s, o r vehicle e lectrical s ystems.
This War ranty does not apply t o any produ ct o r part ther eof which, in the opin ion of the Company,
has suff ered or bee n damaged t hrough alte rati on, imp rope r installat ion, mishan dling, misu se, neglect ,
accident , or by rem oval or def acement of the factory ser ial number/ bar code la bel(s). THE EXTENT
OF THE C OMPANY’S LI ABILITY UND ER THIS WAR RANT Y IS LI MITE D TO THE RE PAIR OR
REPLACEM ENT PROVIDE D ABOVE AND , IN NO EVE NT, SHALL T HE C OMPANY’S LI ABILITY
EXCEED T HE PURCHASE PRICE PAID BY PURCHAS ER F OR THE PROD UCT.
This War ranty is in lieu of al l other exp ress warran ties or liabili ties. ANY I MPLIED WARR ANTIES, INCLUDING ANY IMPLIED WARRANTY O F MERCHANTA BILI TY, SHA LL B E LIMITED T O THE DURATION OF THIS WRITTE N WARRANTY. ANY ACTION FOR BREACH OF ANY WARRANT Y HEREUNDER IN CLUDING ANY IMPLIED WA RRANTY OF M ERCH ANTABIL ITY MUST BE BRO UGHT
WITHIN A PERIOD OF 48 MONTHS F ROM DATE OF ORI GINAL P URCH ASE. IN NO CASE SHALL
THE COMP ANY BE LIAB LE FOR ANY CONSEQUENTI AL O R INCID ENTA L DAMAGES F OR
BREACH O F THIS OR A NY OTHER WA RRANTY, EXP RESS OR IMP LIED , WHATSOEVE R. No
person o r represent ative is au thorized to ass ume for the Company an y liability other than expressed
herein i n connectio n with the sale of thi s pr oduct. Some states do not allow l imitations on how long
an impli ed warranty lasts or t he exclusio n or limita tion of inciden tal or cons equential d amage so th e
above li mitations o r exclusion s may not a pply to you . Th is Warranty gives you specific le gal rights and
you may also have o ther rights which vary fro m state to state.
WARRANTY RETURN: To obtain rep air or repl acem ent wit hin the terms o f this Warr anty, pleas e return pro duct to an authorized retailer or cal l Custo mer Service at 1-800-869-5 187; proof of purchase
and desc ription of defect are required. P rodu cts to be r eturned to an approved warranty s tation must
be shipp ed freight prepaid.
16
[ Warra nt y ]
Page 17

Specifications
Nominal Out put Power per Channel . . . . . . . . . . . . . . . . . . . . . . . . . . . . . . . . . . . . 5 Watts RMS
Total Harmo nic Distortion (THD) . . . . . . . . . . . . . . . . . . . . . . . . . . . . . . . . . . . . . 0.3% at 1 Watt
Speaker Fre quency Response . . . . . . . . . . . . . . . . . . . . . . . . . . . . . . . . . . . . . 100Hz to 14.8kHz
Signal-to-N oise Ratio (S/N) . . . . . . . . . . . . . . . . . . . . . . . . . . . . . . . . . . . . . . . . >65dB Maximu m
Headphone O utput Impedance . . . . . . . . . . . . . . . . . . . . . . . . . . . . . . . . . . . . . . . . . . . 32 Ohms
Headphone O utput Level (Variable) . . . . . . . . . . . . . . . . . . . . . . . . . . . . . . . .200m V (Maximum)
Headphone C onnector Type . . . . . . . . . . . . . . . . . . . . . . . . . . . . . . . . 3.5mm S tereo Jack (1/8”)
Auxiliary I nput Impedence . . . . . . . . . . . . . . . . . . . . . . . . . . . . . . . . . . . . . . . 6K Ohms ( Nominal)
Auxiliary I nput Level . . . . . . . . . . . . . . . . . . . . . . . . . . . . . . . . . . . . . . . . . . . 2.0 Volts (Maximum)
Auxiliary I nput Connector . . . . . . . . . . . . . . . . . . . . . . . . . . . . . . . . . . . 3.5mm Stereo Jack (1/8”)
Battery Typ e/Quantity . . . . . . . . . . . . . . . . . . . . . . . . . . . . . . . . . . . . . . . . . . . . “D” Cell / 8 Total
AC Adapter . . . . . . . . . . . . . . . . . . . . . . . . . . . . . . . . . . . . . . . . . . . . . . . .5 Vo lt, Center Positive
Overall Dim ensions (W x H x D) . . . . . . . . . . . . . . . . . . . . . . . . . . . . . . . . . . . . 19.2” x 8.8 ” x 8”
487mm x 223 mm x 205mm
Weight (Wit hout Batteries) . . . . . . . . . . . . . . . . . . . . . . . . . . . . . . . . . . . . . . . . . . . . . . . . 7.3 lbs.
3.3 Kg
[ Speci fi ca tions ]
17
Page 18

SIRIUS ID
Write down the SIRIUS ID (SID) of your SIRIUS receiver in the space p rovided below.
SID:
18
[ SIRIU S ID ]
Page 19

SIRI US Cust omer Service: 1-888-539-7474
customercar e@sirius-radio.com
SIRI US Sate llite Radio Inc.
1221 Avenue of the Americas
New York, N Y 10020
1-888-539-7 474
http://www. sirius.com
Page 20

SI RIU S Sa tell ite Rad io I nc.
1221 Avenue of the Americas
New York, NY 10020
(800) 869-5590
http://sirius.com
SIRIUS SUBX1 (0 61906a)
 Loading...