

Page 1

STH2 Home Installation Kit
Installation Guide
Page 2
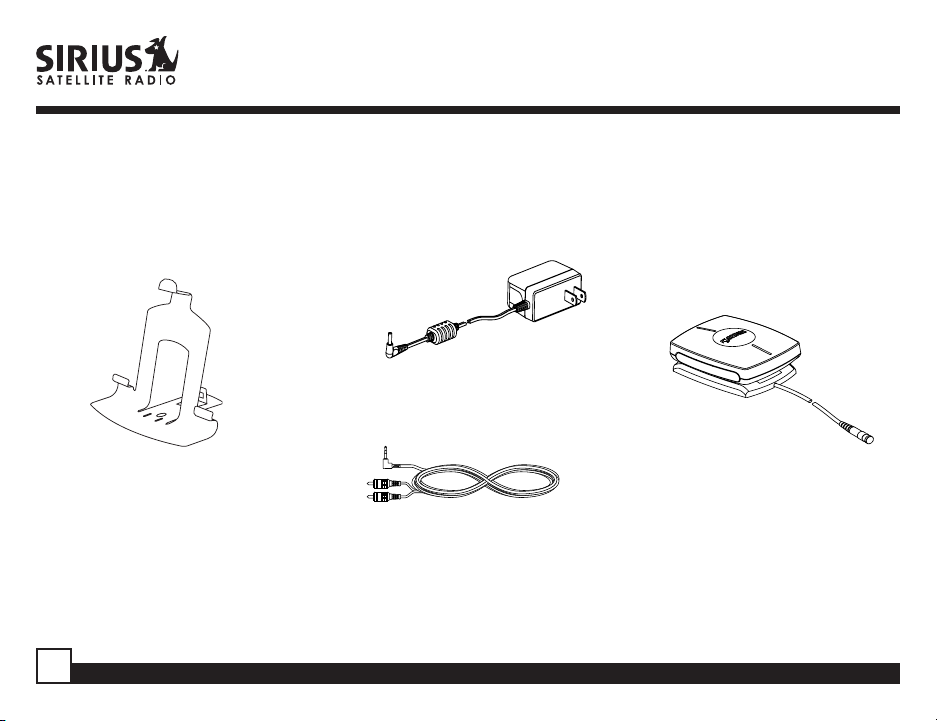
Box Contents:
When you unpack your STH2 Home Installation Kit, it should include everything as shown below:
Home Stand
For the latest information about this and other SIRIUS products, visit http://www.sirius.com. If anything is
missing or damaged, or if any component of the STH2 Home Installation Kit fails to operate, notify your
SIRIUS dealer immediately. It is recommended that you keep the original packaging in case you need to return
or ship the STH2 Home Installation Kit in the future.
2
AC Power Adapter
Indoor/Outdoor
Windowsill Antenna
Audio Cable
Starmate Replay STH2 Installation Guide
Page 3
Safety Precautions
Caution
Take the following precautions to keep the Home Installation Kit components in proper working order:
• Installation must be performed according to this installation guide. Sirius Satellite Radio is not responsible for
issues arising from installations not performed according to the procedures in this installation guide.
• Use only the included AC power supply.
• Do not install the Home Installation Kit components where they will be exposed to high levels of humidity,
moisture, or dust.
NOTE: Use of the included windowsill antenna inside a home requires placement at a North, Northwest or
Northeast facing window (depending on where you live). If a proper window location is not available, the
antenna must be placed outside the home, away from any overhead obstructions which may block the view of
the sky in the above mentioned directions. Follow the directions for proper placement of the antenna carefully.
SIRIUS Customer Service: 1-888-539-7474
SIRIUS Product Support: 1-800-869-5590
customercare@sirius-radio.com
Starmate Replay STH2 Installation Guide
3
Page 4

Installing the STH2 Home Installation Kit
A
Placing the Receiver in the Home Stand: Place
the Receiver into the home stand by first placing the
bottom of the Receiver into the tabs at the bottom of
the stand (1), and then pivoting the top of the
Receiver into the stand until it snaps into place (2).
NTENNA
1
2
Audio Connection: If you will be connecting the
Starmate Replay Receiver to your home
entertainment system, plug the mini connector of
the audio cable into the AUDIO OUT connector of
4
AUDIO OUT
POWER
the Receiver. Connect the audio cable’s white RCAtype connector to your home entertainment
system’s left channel stereo input. Connect the red
connector to the right stereo input. Alternately, you
may use the FM transmitter feature of the Receiver
to transmit to the FM Radio of your home
entertainment system. Consult the user guide of the
Receiver for instructions on how to use the FM
transmitter feature.
AC Power Connection: Plug the AC Power
Adapter mini connector into the POWER connector
Starmate Replay STH2 Installation Guide
Page 5

of the Receiver. Plug the AC Adapter into a suitable
outlet.
Antenna Connection: Plug the antenna connector
into the ANTENNA connector of the Receiver,
pushing firmly until the connector is fully seated.
Antenna Placement: Proper installation of the
windowsill antenna is important for consistent
satellite signal reception. The SIRIUS satellites
follow a fixed orbit over North America, and
depending upon your location in North America, the
antenna needs to be aimed in the general direction
of the satellites. Use the map as a general guideline
for direction, aiming the antenna as straight up as
possible, while facing it toward the X shown on the
map, which represents the approximate location of
the SIRIUS satellites over North America. Make sure
the windowsill you choose for the antenna has a
clear line of sight to the sky, without any
obstructions such as an extended roof-line, a soffit,
an extended window frame, trees, bushes,
buildings, etc., blocking the view of the sky. If you do
not have a windowsill facing the correct direction, or
do not have an unobstructed view of the sky, you
can locate the antenna outside the home in a more
suitable location. It is waterproof.
In major US cities, you may be able to receive the
signal from the SIRIUS ground repeaters, which
could allow you to place the antenna away from a
window if the signal is strong enough.
From the following map, locate the number
designation of the area in which you live and consult
the key which follows for the direction in which to
aim the antenna.
1
5
X
2
4
3
Starmate Replay STH2 Installation Guide
5
Page 6

Map Area 1: Aim the antenna to face East,
Northeast or Southeast, towards the X.
Map Area 2: Aim the antenna to face North or
Northeast, towards the X.
Map Area 3: Aim the antenna to face North or
Northwest, towards the X.
Map Area 4: Aim the antenna to face West,
Northwest or Southwest, towards the X.
Map Area 5: Aim the antenna to face straight up.
When you have installed the antenna in a suitable
location, check the signal strength display of the
Receiver to verify that you are receiving a suitable
signal. (Consult the user guide of your Receiver for
instructions on how to access the signal strength
display.)
Signal Indicator
SAT - +SAT - +
TER - +TER - +
A minimum of 3 bars of either satellite (SAT) or
terrestrial (TER) signal strength is required for
consistent reception. If you are not obtaining at least
three bars, try adjusting the antenna, changing the
aiming in small increments to see if you can obtain
better signal reception.
If the Receiver loses reception at times, this is
indication that the antenna is not aimed in the
optimal direction. Try adjusting the antenna,
changing the aiming in slight increments to see if
you can obtain more consistent signal reception.
6
Starmate Replay STH2 Installation Guide
Page 7

12 MONTH LIMITED WARRANTY
Sirius Satellite Radio Inc. (the “Company”) warrants to the original retail purchaser of this product that should this product or any part
thereof, under normal use and conditions, be proven defective in material or workmanship within 12 months from the date of original
purchase, such defect(s) will be repaired or replaced with new or reconditioned product (at the Company’s option) without charge for
parts and repair labor. To obtain repair or replacement within the terms of this Warranty, the product is to be delivered with proof of
warranty coverage (e.g. dated bill of sale), specification of defect(s), transportation prepaid, to the location shown below under
WARRANTY RETURN.
This Warranty does not extend to the elimination of externally generated static or noise, to correction of antenna problems, to costs
incurred for installation, removal or reinstallation of the product, or to damage to tapes, compact discs, speakers, accessories, or
vehicle electrical systems.
This Warranty does not apply to any product or part thereof which, in the opinion of the Company, has suffered or been damaged
through alteration, improper installation, mishandling, misuse, neglect, accident, or by removal or defacement of the factory serial
number/bar code label(s). THE EXTENT OF THE COMPANY’S LIABILITY UNDER THIS WARRANTY IS LIMITED TO THE REPAIR OR
REPLACEMENT PROVIDED ABOVE AND, IN NO EVENT, SHALL THE COMPANY’S LIABILITY EXCEED THE PURCHASE PRICE PAID
BY PURCHASER FOR THE PRODUCT.
This Warranty is in lieu of all other express warranties or liabilities. ANY IMPLIED WARRANTIES, INCLUDING ANY IMPLIED
WARRANTY OF MERCHANTABILITY, SHALL BE LIMITED TO THE DURATION OF THIS WRITTEN WARRANTY. ANY ACTION FOR
BREACH OF ANY WARRANTY HEREUNDER INCLUDING ANY IMPLIED WARRANTY OF MERCHANTABILITY MUST BE BROUGHT
WITHIN A PERIOD OF 48 MONTHS FROM DATE OF ORIGINAL PURCHASE. IN NO CASE SHALL THE COMPANY BE LIABLE FOR ANY
CONSEQUENTIAL OR INCIDENTAL DAMAGES FOR BREACH OF THIS OR ANY OTHER WARRANTY, EXPRESS OR IMPLIED,
WHATSOEVER. No person or representative is authorized to assume for the Company any liability other than expressed herein in
connection with the sale of this product. Some states do not allow limitations on how long an implied warranty lasts or the exclusion or
limitation of incidental or consequential damage so the above limitations or exclusions may not apply to you. This Warranty gives you
specific legal rights and you may also have other rights which vary from state to state.
WARRANTY RETURN: To obtain repair or replacement within the terms of this Warranty, please return product to an authorized Sirius
Sportster retailer or call Customer Service at (800) 869-5187; proof of purchase and description of defect are required. Products to be
returned to an approved warranty station must be shipped freight prepaid.
Starmate Replay STH2 Installation Guide
7
Page 8

SIRIUS Satellite Radio Inc.
1221 Avenue of the Americas
New York, NY 10020
1-888-539-7474
www.sirius.com
© 2005 SIRIUS Satellite Radio. “SIRIUS” and the SIRIUS dog logo are registered trademarks of Sirius Satellite Radio Inc.
STH2 (071305a)
 Loading...