

Page 1
FEA
FM Extender Antenna
For use with SIRIUS Plug & Play Radios and Vehicle Kits
Installation Guide
Page 2

Page 3

Table of Contents
TABLE OF CONTENTS . . . . . . . . . . . . . . . . . . . . . . . . . . . . . . 3
WARNING AND SAFETY INFORMATION . . . . . . . . . . . . . . . . . . . . . . 4
Safety Precautions . . . . . . . . . . . . . . . . . . . . . . . . . . . . . . . .4
COPYRIGHTS & TRADEMARKS . . . . . . . . . . . . . . . . . . . . . . . . . 5
PACKAGE CONTENTS . . . . . . . . . . . . . . . . . . . . . . . . . . . . . . 6
GETTING STARTED . . . . . . . . . . . . . . . . . . . . . . . . . . . . . . . 7
INSTALLATION . . . . . . . . . . . . . . . . . . . . . . . . . . . . . . . . 10
WARRANTY . . . . . . . . . . . . . . . . . . . . . . . . . . . . . . . . . 19
[ Table o f Conte nt s ]
3
Page 4

Warning and Safety Information
Safety Precautions
Be sure to observe the following warnings. Failure to follow these sa fety instructions and
warnings ma y result in a serious accident and/or personal injury.
Installatio n must be performed according to this installation guide. SIRIUS® is not res pon-
•
sible for i ssues arising from installations not performed according t o the procedures in this
guide.
Do not inst all the FM Extender Antenna where it will hinder or block your view. In som e
•
states it m ay be illegal to mount it on the windshield of your vehicl e. Check applicab le law
for any res trictions or limitations before installing the extender ca ble on your winds hield.
Do not inst all the FM Extender Antenna where it may hinder the functi on of safety devi ces
•
such as an airbag. Doing so may prevent the airbag from functioning p roperly in the ev ent
of an accid ent.
The install ation and use suggestions contained in this manual are sub ject to any restr ic-
•
tions or li mitations that may be imposed by applicable law. The purch aser should check
applicable law for any restrictions or limitations before installing the extender cabl e.
Noti ce T o Drive rs I n Calif orni a and Minne sota
State law p rohibits drivers in California and Minnesota from using su ction mounts on t heir
windshields while operating motor vehicles. Other dashboard or fricti on mounting optio ns
should be u sed. SIRIUS does not take any responsibility for any fines , penalties, or d amages
that may be incurred as a result of disregarding this notice. (See Ca lifornia Vehicle Code Section 26708( a); Minnesota Statutes 2005, Section 169.71)
[ Warni ng a nd Sa fe ty I nform at io n ]
4
Page 5

Copyrights & Trademarks
© 2006 Siri us Satellite Radio Inc. All Rights Reserved.
® “SIRIUS”, the SIRIUS dog logo, channel names and logos are register ed trademarks of
Sirius Sate llite Radio Inc. All Rights Reserved.
[ Copyr ig ht s & T ra de ma rks ]
5
Page 6
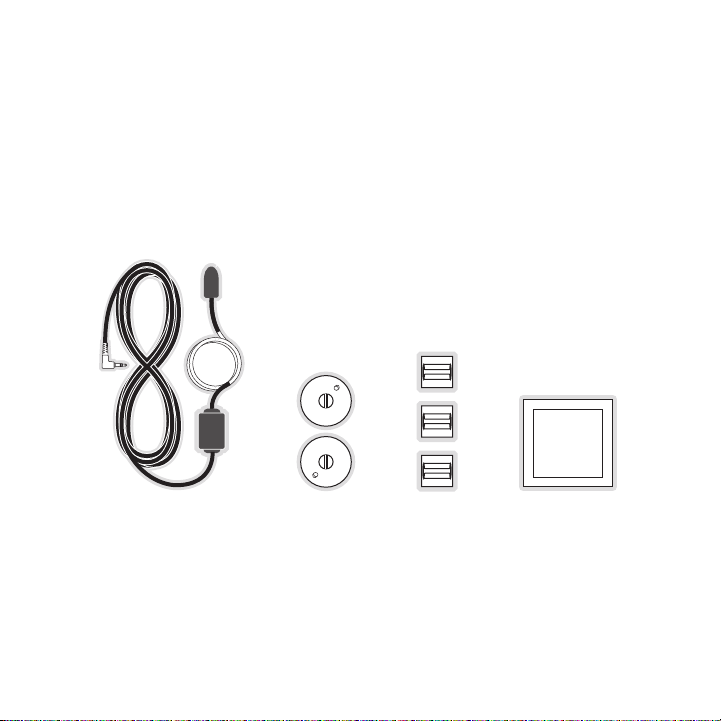
Package Contents
Alcohol
Prep Pad
The followi ng items are included with the SIRIUS FM Extender Antenna package that came
with your S IRIUS radio or SIRIUS vehicle kit. Unpack carefully and ma ke sure that ever ything
shown is pr esent. If anything is missing or damaged, or if the antenn a fails to operat e properly,
notify your dealer immediately. It is recommended that you retain the original carton and packing materia ls in case you need to ship your FM Extender Antenna in th e future.
[ Packa ge C onten ts ]
6
Sucti on Cu ps (2 )Sucti on Cu ps (2 )FM Ex tende r Ant ennaFM Ex tende r Ant enna
Self Adhes ive
Self Adhes ive
Cable Guid es (3 )
Cable Guid es (3 )
Alcoh ol Sw abAlcoh ol Sw ab
Page 7
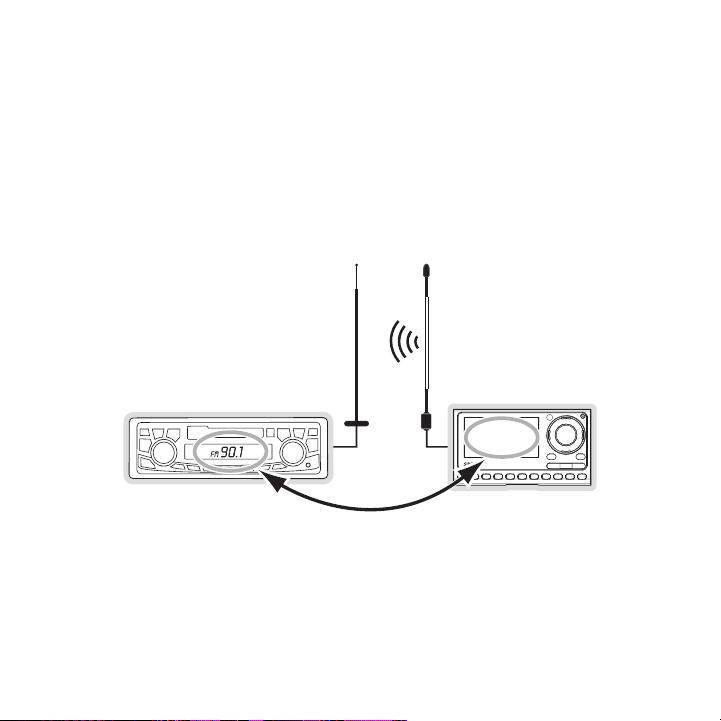
Getting Started
Vehicle Radio
SIRIUS Radio
FM Extender CableVehicle FM Antenna
Match Channels
90.1
Using the F M Extender Antenna included with your SIRIUS radio or vehi cle kit provides an FM
signal with maximum audio quality from your SIRIUS radio. The FM Exte nder Antenna brin gs
the FM sign al transmitted from your SIRIUS radio into close proximity with your vehicl e’s FM
antenna to provide a strong FM signal for good reception.
If you will be using a Direct Connection, please refer to the manual which accompanied your
SIRIUS plug and play radio or vehicle dock.
Proper plac ement of the FM Extender Antenna inside your vehicle in cl ose proximity to the vehicle’s own FM antenna will provide a strong FM signal for good recep tion. The FM Exte nder
Antenna has permanent adhesive mounts for installing it on your vehic le’s window.
Because of the different kinds of FM antennas found in vehicles, and the varied locati ons of
the antenna in each vehicle, SIRIUS suggests profess ional installatio n of this product in your
vehicle. Pr ofessional installation provides an experienced technician to install this product in
[ Getti ng S tarte d ]
7
Page 8

your vehicl e, knowledge of your vehicle for locating the vehicle’s FM antenna, install ation of
this produc t, and routing the cable and connecting it to your SIRIUS radio. Ask your S IRIUS
retailer if they provide professional installation services, or can r ecommend a profes sional
installatio n service.
The FM ante nnas found in vehicles are of four distinct types:
Aeri al Type Fe nder Mo unted F M
•
Ante nna: A fixed or retractable aerial
antenna loc ated on the front or rear
fender of t he vehicle.
Aeri al Type Ro of Moun ted FM An-
•
tenn a: A fi xed aerial antenna mounted
on the roof (often at the front or rear of
the roof, j ust above the window glass).
[ Getti ng S tarte d ]
8
Page 9

On G lass Ty pe FM Ante nna: Wires on
•
the window glass of the vehicle, usually
near the to p of the window. It may be
located on the windshield glass, the rear
window glas s, or a rear side window in
some SUV an d mini-van type vehicles
(and other vehicles). It will look similar to
the rear wi ndow defroster wires found in
many vehicl es.
“Sha rk Fin” Ty pe FM A ntenna: A device
•
resembling a shark fin (or other shape)
located on the vehicle roof above the rear
window.
Before atte mpting installation, you should verify the type and locati on of the FM ante nna in
your partic ular vehicle. If you have trouble locating it, consult the manual which acc ompanied
your vehicl e, consult a dealer for your type of vehicle, or consult a professional ins taller.
[ Getti ng S tarte d ]
9
Page 10

Installation
Suction Cups
The FM Exte nder Antenna should be placed inside the vehicle, as close as possible to t he
vehicle’s F M antenna. A test mounting should be done first using the included suction cup
mounts to t est the installation. Once an acceptable location has been found, you will remove
the suction cups and permanently adhere the FM Extender Antenna using the adhesive
mounts.
To install the FM Extender Antenna in your vehicle, follow these inst ructions:
Attach the suction cups to the FM Extender Antenna in the positions s hown in Figure 1.
1.
Figur e 1Figur e 1
In this ste p, follow the specific instructions in sub-step a, b, c, o r d depending on the
2.
type of FM antenna in your vehicle:
a. Installation Instructions for Vehicles with Aerial Type Fender Mounted FM Antenna.
For vehicle s where the FM radio antenna is located on the front fende r, the FM
Extender An tenna should be mounted vertically on the front windshield at the edge
of the glas s nearest to the antenna. (Figure 2)
For vehicle s where the FM radio antenna is located on the rear fender , the FM
Extender An tenna should be mounted vertically on the rear window at t he edge of
the glass n earest to the antenna. (Figure 3)
Clean the a rea where the suction cups will be mounted with the suppli ed alcohol
swab and at tach the FM Extender Antenna to the section of glass close st to the
FM antenna in a vertical orientation. (Figure 2 or Figure 3) The wire between the
two suction cups should be pulled taut and as straight as possible, a nd should not
obstruct th e driver’s view.
[ Insta ll at ion ]
10
Page 11

Alternate mounting
location on adjacent
A-Pillar
Impo rtant C aution: In some states it may not be lega l to put the FM E xtender
Impo rtant C aution: In some states it may not be lega l to put the FM E xtender
Antenna on the windshield glass. In this case, the FM Extender Antenn a should
Antenna on the windshield glass. In this case, the FM Extender Antenn a should
be mounted on the A-Pillar adjacent to the FM antenna. (Figure 2) Cle an the area
be mounted on the A-Pillar adjacent to the FM antenna. (Figure 2) Cle an the area
where the s uction cups will be mounted with the supplied alcohol swab .
where the s uction cups will be mounted with the supplied alcohol swab .
Figur e 2Figur e 2
Figur e 3Figur e 3
[ Insta ll at ion ]
11
Page 12

b. Installation Instructions for Vehicles with Aerial Type Roof Mounted FM Antenna.
For vehicle s where the FM radio antenna is located on the front or re ar of the
roof of the vehicle, the FM Extender Antenna should be mounted horizo ntally on
the front o r rear glass below the FM antenna, or installed into the h eadliner of the
vehicle und er the FM antenna.
If you are installing the FM Extender Antenna on the window glass, cl ean the
•
area where the suction cups will be mounted with the supplied alcohol swab and
attach the suction cups to the glass under the FM antenna in a horizo ntal orientation. The w ire between the two suction cups should be pulled taut and as straight
as possible , and should not obstruct the driver’s view. (Figure 4)
If you are installing the FM Extender Antenna into the headliner, rem ove the suc-
•
tion cups a nd tuck the wire into the headliner, stretched taut and st raight, and
centered un der the FM antenna.
Figur e 4Figur e 4
12
[ Insta ll at ion ]
Page 13

c. Installa tion In structions for Ve hicles wit h On Gl ass Type F M Anten na.
For vehicle s where the FM radio antenna is located on the window glas s, the FM
Extender An tenna can be mounted horizontally on the glass, directly o ver the FM
radio anten na, or installed into the headliner of the vehicle directl y above the FM
antenna.
If you are installing the FM Extender Antenna on the window glass, cl ean the
•
area where the suction cups will be mounted with the supplied alcohol swab and
attach the suction cups to the glass centered over the FM radio anten na in a horizontal orie ntation. The wire between the two suction cups should be p ulled taut
and as stra ight as possible, and should not obstruct the driver’s vie w. (Figures 5
& 6)
If you are installing the FM Extender Antenna into the headliner, rem ove the suc-
•
tion cups a nd tuck the wire into the headliner, stretched taut and st raight, and
centered ab ove the FM antenna.
Figur e 5Figur e 5
[ Insta ll at ion ]
13
Page 14

14
Figur e 6Figur e 6
[ Insta ll at ion ]
Page 15

d. Inst allatio n Instruct ions fo r Vehicles with S hark Fi n Type FM Antenna . For
vehicles wh ere the FM radio antenna is located on the rear of the roo f of the vehicle, the FM Extender Antenna should be mounted horizontally on the glass below
the FM ante nna, or installed into the headliner of the vehicle under the FM antenna.
If you are installing the FM Extender Antenna on the window glass, cl ean the
•
area where the suction cups will be mounted with the supplied alcohol swab and
attach the suction cups to the glass below the FM antenna in a horizo ntal orientation. (Figure 7) The wire between the two suction cups should be pulled taut an d
as straight as possible, and should not obstruct the driver’s view.
If you are installing the FM Extender Antenna into the headliner, rem ove the suc-
•
tion cups a nd tuck the wire into the headliner, stretched taut and st raight, and
centered un der the FM antenna.
Figur e 7Figur e 7
[ Insta ll at ion ]
15
Page 16

Plug the FM Extender Antenna into the FM OUT connect or of the vehicle dock, or your
FM OUT
From FM
Extender Cable
FM OUT
From FM Extender Cable
3.
SIRIUS radi o:
For plug an d play radios such as Strat us, Sta rmate 3 , S tarmate 4, Spo rts ter 3, and
Spor tster 4 , etc., which use a vehicle dock, refer t o Figure 8:
Figur e 8Figur e 8
For portabl e radios such as Sti letto which use a veh icle dock, refer to Figure 9:
Figur e 9Figur e 9
[ Insta ll at ion ]
16
Page 17

For radios such as In V which have connectors built i nto the radio and do not use a
FM OUT
From FM Extender Cable
90.1
vehicle doc k, refer to Figure 10:
Figur e 10Figur e 10
Tune your vehicle’s FM radio and your SIRIUS radio to the same FM channel (Figure 11):
4.
a. Turn off your SIRIUS radio a nd tune through t he FM channels on your vehicle’s
radio to lo cate an FM channel that is not broadcasting in your area. If you use
an FM chann el that is being used by a local broadcaster, it will inte rfere with the
performance of your SIRIUS radio. Once you have located an FM channel that is
not broadca sting in your area, save it as a preset on your vehicle ra dio. This will
become your SIRIUS preset.
Figur e 11Figur e 11
b. Turn on y our SIRIUS radio. Press and hold t he Menu button un til the FM Freque ncy
screen is d isplayed. Set the channel number on your SIRIUS radio to m atch the
SIRIUS pres et on your vehicle’s radio. Refer to the user guide which accompanied
your SIRIUS radio for detailed instructions on how to do this.
[ Insta ll at ion ]
17
Page 18

Note : The FM transmitter in your SIRIUS radio is auto matically set t o FM c hannel
Adhesive Adhesive
88.1. This may not be the best channel in your area.
You should now hear the audio from your SIRIUS radio over your vehicl e’s FM radio. If
5.
the audio q uality is not satisfactory, try moving the FM Extender Ant enna slightly to see if
a better si gnal can be obtained.
If you are mounting the FM Extender Antenna in the headliner of the vehicle, skip this
6.
step. When yo u are satisfied with the mounting location, remove the suc tion cup mounts
and peel th e backing off the adhesive mounts. Permanently adhere it i n the same position on the glass (or A-Pillar), keeping it taut and as straight as p ossible. (Figure 12)
Figur e 12Figur e 12
Route the a ntenna cable to your SIRIUS radio. Use the included self a dhesive cable
7.
guides (if necessary) to hold the antenna wire in place until it reac hes the weather
stripping o r moulding at the edge of the window. Take advantage of an y existing cable
channels or wiring conduits and route the cable around the passenger compartment to
the vehicle dock. Take care not pull the cable across sharp edges tha t could damage it ,
and keep it away from areas where it might entangle feet. Coil and se cure any excess
antenna cab le in a location where it can be hidden and secured.
Plug the FM Extender Antenna into the FM OUT connect or of the vehicle dock. (Refer to
8.
step 3 on p age 16.)
This comple tes the installation of the FM Extender Antenna. If you’re not sure which F M
channels ar e not broadcasting in your home or travel cities, you can also go to http:/ /si rius.
com/ fmchann el and search for a suggested FM channel based on your zip code.
[ Insta ll at ion ]
18
Page 19

Warranty
12 M onth Warran ty
SIRIUS S atellite Ra dio Inc. (t he “Company ”) w arrants to the origina l retail pu rchaser of this produc t
that sho uld this pr oduct or an y part ther eof, under norm al use and conditions, be proven defective i n
material or workman ship within 12 months from the da te o f original purchase, s uch defect( s) will be
repaired or replace d with new or recondit ione d produ ct ( at the Comp any’s optio n) without charge for
parts an d repair la bor. To obt ain repair or r eplacem ent within the terms of th is Warranty , the produ ct
is to be delivered with proof of warranty cov erage ( e.g. dated bill of sale), specificati on of defec t(s),
transpor tation prep aid, to the location s hown below unde r WARRANTY RETURN.
This War ranty does not extend to the elim inat ion of exte rnally gene rated stati c or noise, to correct ion
of anten na problems , to costs incurred fo r in stallat ion, removal or reinstalla tion of the product, o r to
damage t o tapes, co mpact discs , speakers, acc essorie s, o r vehicle e lectrical s ystems.
This War ranty does not apply t o any produ ct o r part ther eof which, in the opin ion of the Company,
has suff ered or bee n damaged t hrough alte rati on, imp rope r installat ion, mishan dling, misu se, neglect ,
accident , or by rem oval or def acement of the factory ser ial number/ bar code la bel(s). THE EXTENT
OF THE C OMPANY’S LI ABILITY UND ER THIS WAR RANT Y IS LI MITE D TO THE RE PAIR OR
REPLACEM ENT PROVIDE D ABOVE AND , IN NO EVE NT, SHALL T HE C OMPANY’S LI ABILITY
EXCEED T HE PURCHASE PRICE PAID BY PURCHAS ER F OR THE PROD UCT.
This War ranty is in lieu of al l other exp ress warran ties or liabili ties. ANY I MPLIED WARR ANTIES, INCLUDING ANY IMPLIED WARRANTY O F MERCHANTA BILI TY, SHA LL B E LIMITED T O THE DURATION OF THIS WRITTE N WARRANTY. ANY ACTION FOR BREACH OF ANY WARRANT Y HEREUNDER IN CLUDING ANY IMPLIED WA RRANTY OF M ERCH ANTABIL ITY MUST BE BRO UGHT
WITHIN A PERIOD OF 48 MONTHS F ROM DATE OF ORI GINAL P URCH ASE. IN NO CASE SHALL
THE COMP ANY BE LIAB LE FOR ANY CONSEQUENTI AL O R INCID ENTA L DAMAGES F OR
BREACH O F THIS OR A NY OTHER WA RRANTY, EXP RESS OR IMP LIED , WHATSOEVE R. No
person o r represent ative is au thorized to ass ume for the Company an y liability other than expressed
herein i n connectio n with the sale of thi s pr oduct. Some states do not allow l imitations on how long
an impli ed warranty lasts or t he exclusio n or limita tion of inciden tal or cons equential d amage so th e
above li mitations o r exclusion s may not a pply to you . Th is Warranty gives you specific le gal rights and
you may also have o ther rights which vary fro m state to state.
WARRANTY RETURN: To obtain rep air or repl acem ent wit hin the terms o f this Warr anty, pleas e return pro duct to an authorized retailer or cal l Custo mer Service at 1-800-869-5 187; proof of purchase
and desc ription of defect are required. P rodu cts to be r eturned to an approved warranty s tation must
be shipp ed freight prepaid.
[ Warra nt y ]
19
Page 20

Page 21

SIRI US Cust ome r Servi ce: 1-888-539-7474
customercar e@sirius-radio.com
SIRI US Sate lli te Radi o Inc.
1221 Avenue of the Americas
New York, N Y 10020
1-888-539-7 474
http://www. sirius.com
Page 22

SI RIU S Sa tell ite Rad io I nc.
1221 Avenue of the Americas
New York, NY 10020
(800) 869-5590
http://sirius.com
SIRIUS FEA FM E xtender A ntenna We bsite (12 1206d)
 Loading...