

Page 1

ESR-T100
SIRIUS Satellite Radio Tuner
User’s Manual
Page 2

Thank you for purchasing this product.
Please read this user’s manual in its entirety before operating this equipment.
After reading this manual, be sure to keep it in a handy place (e.g., glove compartment).
Check the contents of the enclosed warranty card and keep it carefully with this manual.
Contents
1. FEATURES ............................... ........................................... .........................................1
2. PRECAUTIONS .......................................................... ................................................. 2
3. INSTALLATION AND WIRING CONNECTIONS..................................... ............ 4
4. SYSTEM EXAMPLES............................. ... .................................................................7
5. CONTROLS.................... .. ...... ..... ... ..... ..... ... ..... ...... .. ...... ..... ... ..... ... ..... ..... ... ..... ...... .. ....8
6. SIRIUS OPERATION......................................... ... .................................................... 10
1. FEATURES
CD-Changer (CDC) Cable Connection
RCA Output
Single Antenna Terminal
18 Channel Presets
CD-Changer (CDC) Pass-through Function
1
Page 3

2. PRECAUTIONS
1. Upon initial startup or when starting
after turning off the backup power
supply, the receiver will take longer to
play audio and may take up to 30
seconds after reception of the SIRIUS
signal before audio is heard.
2. Channel names are stored in memory
30 to 60 seconds after start of normal
operation. If the power is turned off
before the text data is written, it may
not be correctly displayed on the next
power up. Perform a reset operation if
no text data is displayed.
3. If the receiver ever stops functioning or
appears unresponsive, reset it.
Resetting: Disconnect the SIRIUS
Receiver power cable (the CDC cable
if connected to the CDC and the 4-pin
power cable during standalone
operation), wait 10 seconds and
connect it again. The last channel,
preset memory and other data stored
in the receiver are deleted returning it
to its default settings.
4. A CDC and standalone operation
switch is provided on the underside of
the receiver. The switch is set to CDC
position at the time of shipment. Do not
set this switch to the standalone
position when using the CDC cable
(headunit operation).
5. The receiver becomes warm during
operation; this is normal and not a
cause for concern.
6. Do not touch the connector pins on the
receiver as this may damage the ICs
inside the unit.
7. No station is selected when the [DSP]
button is pressed quickly after a
channel is changed. This is because
button operations are not accepted
until the channel is confirmed. It takes
between 1.5 to 5 seconds to change
channels.
This equipment has been tested to comply
with the limits for a Class B digital device,
pursuant to Part 15 of the FCC Rules.
These limits are designed to provide
reasonable protection against harmful
interference in a residential installation.
This equipment generates, uses, and can
radiate radio frequency energy and, if not
installed and used in accordance with the
instructions, may cause harmful
interference to radio communications.
However, there is no guarantee that
interference will not occur in a particular
installation.
If this equipment does cause harmful
interference to radio or television reception,
which can be determined by turning the
equipment off and on, the user is
encouraged to consult the dealer or an
experienced radio/TV technician for help.
CAUTION
USE OF CONTROLS, ADJUSTMENTS, OR
PERFORMANCE OF PROCEDURES OTHER
THAN THOSE SPECIFIED HEREIN, MAY
RESULT IN HAZARDOUS RADIATION
EXPOSURE.
THE COMPACT DISC PLAYER or
COMMANDER SH O U L D NO T BE
ADJUSTED OR REPAIRED BY ANYONE
EXCEPT PROPERLY QUALIFIED SERVICE
TECHNICIANS.
CHANGES OR MODIFICATIONS NOT
EXPRESSLY APPROVED BY THE
MANUFACTURER FOR COMPLIANCE
COULD VOID THE USER’S AUTHORITY TO
OPERATE THE EQUIPMENT.
INFORMATION FOR USERS:
CHANGES OR MODIFICATIONS TO THIS
PRODUCT NOT APPROVED BY THE
MANUFACTURER WILL VOID THE
WARRANTY AND WILL VIOLATE FCC
APPROVAL.
2
Page 4

What is SIRIUS Satellite
Radio?
Over 110 channels of the best
entertainment and completely
commercial-free music for your car,
home or office.
Only SIRIUS has over 60 original
music channels, from today’s hits to
R&B oldies to classical masterpieces.
From authentic country and real
bluegrass to cool jazz, hot latin, reggae,
rock, and many more. Best of all, it’s all
completely commercial free.
Sirius also has over 50 channels of
world-class sports, news and
entertainment. Included as part of your
subscription you get up to 16 NFL
games a week, up to 40 NBA games a
week and up to 40 NHL games a week.
Coupled with great sports news from
ESPN, the SIRIUS sports offering is
unrivaled. And don’t forget a host of
other great news and entertainment
like CNBC, Fox News, Radio Disney
and E! Entertainment Radio.
With SIRIUS, the emphasis is on the
music and entertainment you want.
The music is hosted by Sirius Jockey s,
who are true experts. They back up
the music with compelling information
about the song being played, and they
understand that sometimes it’s best to
just let the music speak for itself.
Rely on SIRIUS rocket science for
superior coverage
Only SIRIUS has three powerful
satellites that fly directly over the US
ensuring coast-to-coast coverage with
high elevation angles. This gives the
satellites a “clear line of sight” to your
car or home with much less concern for
buildings, trees or other objects that
might block conventional satellite
signals.
Once you experience over 110
channels of digital entertainment, you’ll
never want to leave your car. For more
information, visit www.sirius.com.
3
Page 5
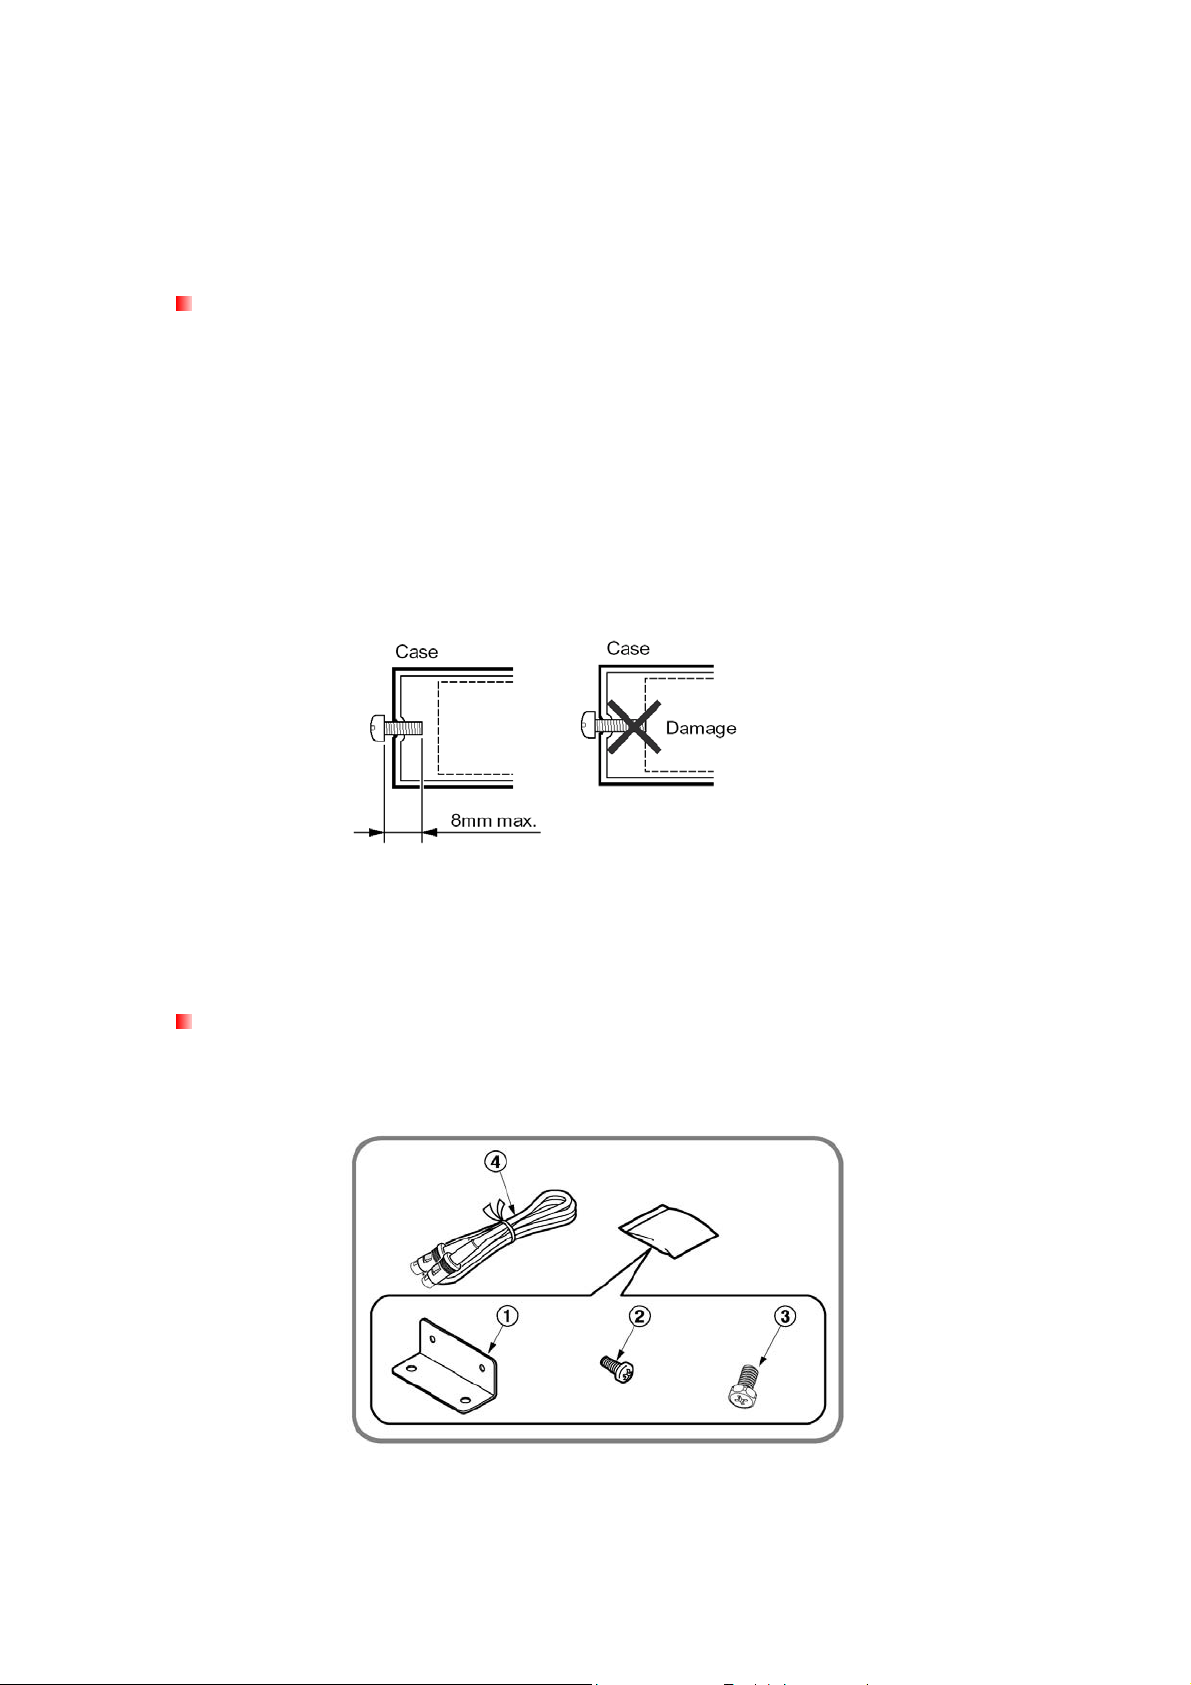
3. INSTALLATION AND WIRING CONNECTIONS
Before Installation
1. Before starting, be sure to disconnect the battery’s negative “–” terminal to
prevent accidents due to short-circuits.
2. Location – Consider safety and operability when selecting a place for installation.
Avoid the following.
• Locations where the unit will hamper or interfere with driving.
• Locations where the unit could injure passengers if the car stops suddenly.
• Locations exposed to direct sunlight or hot air from the heater, etc.
• Locations where the unit may be exposed to rain or water.
3. Be sure to use the included screws and brackets. Screws other than those
supplied could damage the unit.
4. When drilling holes to mount the receiver, be sure to check beforehand that
there are no obstructions or items on the other side that could be damaged (fuel
tank, wire harnesses or other electronic devices).
Accessories
Mounting bracket .............. 2 pieces
Mounting screw(M4).......... 4 pieces
Screw(M6) ......................... 4 pieces
CDC cable ......................... 1 piece
4
Page 6

Installation Example (Installing the unit under the driver’s seat)
1. Attach the mounting brackets to
the sides of the ESR-T100 using the
screws provided.
2. Select the location on the floor mat.
Drill holes in the floor mat to match
the positions of the holes in the
mounting brackets.
3. Insert the canoe clips from the rear
of the floor mat and install the
SIR-CL1.
There are three mounting holes on
each side of the SIR-CL1. Select
the appropriate holes to match to
the installation location.
Connection Example and Identification of Parts
CDC input/output terminal
Connect to the main unit or CD/MD
changer using the CDC cable as
specified.
ANTENNA terminal
Connect to the SIRIUS antenna (sold
separately)
5
Page 7

How to Connect
1. CDC Cable
Orient the CDC cable in the direction
shown in the figure and insert it until it is
locked in position. To remove the CDC
cable, pull it by lightly grasping the slide
cap
2. SIRIUS antenna
Make sure power is “Off”.
Connect a SIRIUS antenna (sold
separately) to the SIRIUS antenna
terminal and press until locking tab
engages.
in your fingers.
To disconnect, make sure power is “Off”,
then press the rear of the locking tab
to release.
6
Page 8

4. SYSTEM EXAMPLE
Main unit compatible with CDC
connection
CD changer compatible with CDC
connection
CDC cable (provided with the
SIR-CL1)
Using this cable, connect the
7
SIR-CL1 to the main unit.
CDC cable (provided with the CD
changer)
SIRIUS antenna (sold separately)
Front speakers
Rear speakers
Page 9

5. CONTROLS
Source unit buttons, examples (ECD-T1540/ECD-T1545/ECD-T1560)
[DSP]
[LOC]
[BND]
[ ]
[ ]
[MOD]
Notes:
•Since this manual covers several models, the names of some buttons vary by
model.
8
Page 10

Display Items
Source unit display, example
Operation status indication
Preset channel
indication
9
Page 11

6. SIRIUS OPERATION
Selecting SIRIUS SATELLITE RADIO modes
Press the [MOD] button to select the SIRIUS mode. The SIRIUS indication lights
up when SIRIUS mode is selected.
Notes:
• The [MOD] button selects the external devices connected to the source unit in
order, for example: AM/FM mode AUX mode SIRIUS mode CD changer
mode etc.
Selecting a band
Press the [BND] button to select a band. Each press of the button changes the
display as shown below.
S1 S2 S3 S1 …
The currently received band is displayed in the function mode indication.
Models without a function mode indication display the band name and channel
number in the display.
Information displayed during reception
The following information is displayed when SIRIUS Satellite Radio cannot be
received normally.
• UPDATING: when the receiver is turned on the first time or after a reset. Do not
turn power off during this time as the receiver is downloading the channel guide.
• LINKING
attempting to reacquire a signal. (“LINKING” is shown on an 8-digit display)
• INVALID/ CHANNEL: a channel without a broadcast has been selected
• CALL 888/ 539-SIRI: a channel not available in your subscription
• NO ANT: no antenna is connected or there is a problem with the antenna
Switching the display
1. Press the [DSP] button to select the desired display.
The main display or the clock display appears each time you press the [DSP]
button.
2. In the main display, press the [DSP] button to cycle between the following
display modes:
Channel name song title artist name category name time channel
name …
Notes:
• The display shows the abbreviated channel name for 2 seconds when a station is
selected before returning to the chosen display mode.
: when there has been a temporary loss of signal and the receiver is
(Message “INVALID” or “CHANNEL” is shown on an
8-digit display)
(Message “CALL 888” or “539-SIRI” is shown on the
display)
10
Page 12

Channel selection
Channels are selected with the following buttons.
• The
or button (Seek Tuning)
• A [LOC] button
For details, see the following operation descriptions.
Notes:
•The audio output is muted and other button operations are not accepted during
the channel selection process (tuning).
Seek Tuning
1. Press the
or button. The receiver seeks the next available channel
below or above the current channel.
The receiver moves to seek channels below or above the current channel. If the
channel found when either button is released is available, that channel is received.
Otherwise, seeking continues until an available channel is found.
Recalling a preset station
A total of 18 SIRIUS stations can be stored (6-SR1, 6-SR2 and 6-SR3). This allows
you to select your favorite SIRIUS stations and store them in memory for later
recall.
1. Press the [BND] button and select the desired SIRIUS band (SR1, SR2 or SR3)
to store the channel in.
2. To recall a stored SIRIUS station, press [
] button to select the group (S1, S2
BND
or S3) and then choose the station (from 1~6) that you prefer.
Storing a preset station
1. Press the [BND] button and select the desired SIRIUS band (S1, S2 or S3) to
store the channel in.
2. Select the desired station with seek tuning, manual tuning or preset tuning.
3. Press and hold one of [DIRECT] buttons for 2 seconds or longer to store the
current station into preset memory.
Notes:
• When the name of a channel stored in memory is changed by SIRIUS, the display
will show the new channel name immediately. It will not be removed from the
preset channel location.
• A channel stored in memory may be discontinued at the option of SIRIUS. If you
attempt to access this channel from the preset location, the receiver will give you
the “INVALID” or “CHANNEL” response. At that time, you may select another
station to store in memory.
11
Page 13

Category selection function
SIRIUS allows you to select broadcast channel by category.
Receiving stations selected by category
1. Press the [LOC] button to enter the category selection mode.
2. Press [CD-] [CD+] to select the category.
3. Press
or button to tune in a station from the Category.
Notes:
• When the category selection mode is entered, the category of the current or last
received channel is displayed first.
• Press the
or button within 7 seconds after a category has been set
to continue seeking channels up or down. The category selection mode is
canceled and normal reception is resumed if no operation is performed for 7
seconds.
12
Page 14

SANYO MOBILE AUDIO
MODEL ESR-T100 LIMITED WARRANTY
OBLIGATIONS
In order to obtain warranty service, the product must be delivered to and picked up from an Authorized Sanyo Factory Service Center at the user’s expense, unless specifically
stated otherwise in this warranty. The names and addresses of Authorized Sanyo Service Centers may be obtained by calling the toll-free number listed below.
THIS WARRANTY IS VALID ONLY ON SANYO PRODUCTS PURCHASED AND USED IN THE UNITED STATES OF AMERICA.
THIS WARRANTY APPLIES ONLY TO THE ORIGINAL RETAIL USER, AND DOES NOT APPLY TO PRODUCTS USED FOR ANY INDUSTRIAL, PROFESSIONAL OR COMMERCIAL PURPOSE. THE ORIGINAL DATED BILL OF SALE OR SALES SLIP MUST BE SUBMITTED TO THE AUTHORIZED
SANYO SERVICE CENTER AT THE TIME WARRANTY SERVICE IS REQUESTED.
Subject to the OBLIGATIONS above and EXCLUSIONS below, SANYO FISHER COMPANY (SFC) warrants this SANYO product against defects in
materials and workmanship for the periods specified below. SFC will repair or replace (at its option) the product and any of its parts which fail to
conform to this warranty with new or reconditioned products or parts. The warranty period commences on the date the product was first purchased at retail.
PARTS: 1 YEAR
LABOR: 1 YEAR
For product operation, authorized service center referral, service assistance or problem resolution, call:
FACTORY SERVICE 1-800-421-6382
Weekdays 8:00 AM - 5:00 PM Pacific TIme
EXCLUSIONS
This warranty does not cover (A) the adjustment of customer-operated controls as explained in the appropriate model’s instruction manual, or (B) the repair of any
product whose serial number has been altered, defaced or removed.
This warranty shall not apply to the cabinet or cosmetic parts, knobs, batteries or routine maintenance.
This warranty does not apply to uncrating, setup, installation, removal of the product for repair or reinstallation of the product after repair.
This warranty does not apply to the elimination of car static or motor noise, correction of antenna problems, or damage to compact discs, speakers, accessories or
vehicle electrical systems.
This warranty does not apply to repairs or replacements necessitated by any cause beyond the control of SFC including, but not limited to, any malfunction, defect or
failure caused by or resulting from unauthorized service or parts, improper maintenance, operation contrary to furnished instructions, shipping or transit accidents,
modification or repair by the user, abuse, misuse, neglect, accident, incorrect power line voltage, fire, flood or other Acts of God, or normal wear and tear.
The foregoing is in lieu of all other expressed warranties and SFC does not assume or authorize any party to assume for it any other obligation or liability.
THE DURATION OF ANY WARRANTIES WHICH MAY BE IMPLIED BY LAW (INCLUDING THE WARRANTIES OF MERCHANTABILITY AND FITNESS) IS LIMITED TO
THE TERM OF THIS WARRANTY. IN NO EVENT SHALL SFC BE LIABLE FOR SPECIAL, INCIDENTAL OR CONSEQUENTIAL DAMAGES ARISING FROM OWNERSHIP
OR USE OF THIS PRODUCT, OR FOR ANY DELAY IN THE PERFORMANCE OF ITS OBLIGATIONS UNDER THIS WARRANTY DUE TO CAUSES BEYOND ITS CONTROL.
SOME STATES DO NOT ALLOW LIMITATIONS ON HOW LONG AN IMPLIED WARRANTY LASTS AND/OR DO NOT ALLOW THE EXCLUSION OR LIMITATION OF CONSEQUENTIAL DAMAGES, SO THE ABOVE LIMITATIONS AND EXCLUSIONS MAY NOT APPLY TO YOU.
THIS WARRANTY GIVES YOU SPECIFIC LEGAL RIGHTS. YOU MAY HAVE OTHER RIGHTS, WHICH VARY FROM STATE TO STATE.
For your protection in the event of theft or loss of this product, please fill in the information below for your own personal records.
Model No. Serial No.
(Located on back or bottom side of unit)
Date of Purchase Purchase Price
Where Purchased
 Loading...