

Page 1
Magnetic Mount Vehicle Antenna
Installation Guide
Page 2

Warning and Safety Information
Caution
Because adhesive is used in the insta llation of the rubber cover/tail, it is recommended that
the antenna be installed at or above room temperature (68 degrees). Lower tem peratures m ay
cause the adhesive on the rubber cove r/tail to not adhere properly to the veh icle roof. Warmer
temperatures will also allow for easi er over all antenna installation, includ ing easier routing of
the antenna cable through the rubber molding around the windows and other are as in the v ehicle. Maximum adhesion usually occur s within 72 hours at room temperature, s o car washe s
as well as other contact with the ant enna and rubber cover/tail should be avo ided during this
72 hour period.
Warning
Be sure not to cut, damage, or punctu re the external jacket of the antenna ca ble during the
installation procedure. Damage to the antenna cable can cause the SIRIUS sign al to be
degraded or unavailable, and can also cause water to intrude via the cable in to the ante nna
causing the antenna to fail.
Do not lengthen or shorten the antenn a cable by cutting it. Doing so will cau se the ante nna to
not function properly.
[ War ni ng an d Safet y Inf or matio n ]
2
Page 3
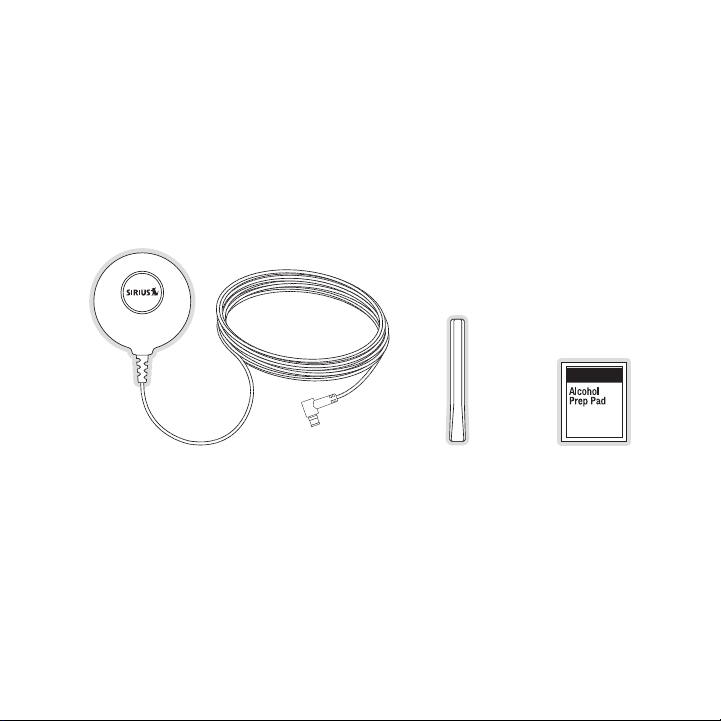
Package Contents
The following items are included with your purchase of the SIRIUS Magnetic Mo unt Vehicle
Antenna. Unpack the kit carefully and make sure that everything shown is pres ent. If any thing
is missing or damaged, or if the kit fails to operate properly, notify your d ealer immed iately. It
is recommended that you retain the or iginal carton and packing materials in c ase you nee d to
ship your kit in the future.
Magne tic Mo unt
Magne tic Mo unt
Vehic le Ant enna
Vehic le Ant enna
Rubbe r
Rubbe r
Cover /Tail
Cover /Tail
Alcoh ol Swa bAlcoh ol Swa b
[ Pac ka ge Co nt ents ]
3
Page 4

Installation
The installation of the magnetic ante nna consists of two installation steps:
Mounting the magnetic antenna and cov er/tail on the vehicle
•
Routing the antenna cable through the vehicle to the SIRIUS radio or vehicle dock
•
The following sections provide instru ctions for both installation steps.
Antenna Mounting
The SIRIUS Magnetic Mount Vehicle Ant enna has a strong magnetic mount designe d to hold
the antenna in place during normal dr iving conditions (highway/city). This al so allows f or easy
removal for transferring the antenna to other vehicles.
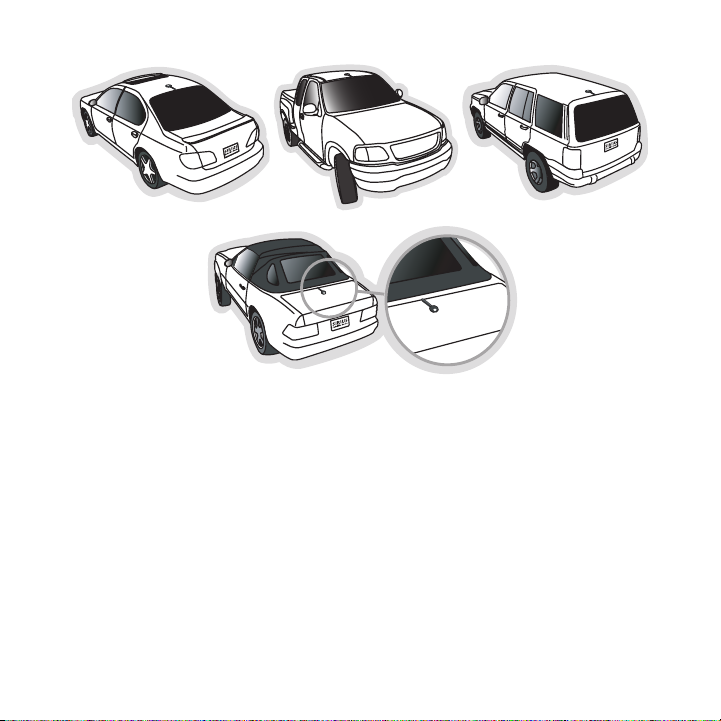
Figure 1 shows the optimal mounting l ocation for the antenna on several types of vehicle s.
These mounting positions should be ob served when installing the antenna:
Seda n/Coupe/SUV /Mini-Van: Install the antenna at the rear center of the roof, near the
•
rear window.
Pick up Truck: Install the antenna at the front center of the roof, near the w indshield.
•
Conv ertible: Install the antenna at t he front center of the trunk lid, near t he rear win dow.
•
The SIRIUS antenna needs to have an u nobstru cted area o f 3 inches by 3 in ches around
it. It is important to mount the ante nna where no obstructions will block the antenna fr om
receiving the SIRIUS signal. Objects which can obstruct the antenna could be a roof rack , a
sunroof, a roof mounted cargo contain er, another antenna, etc. If your vehicl e has a pot ential
obstruction, be sure that the SIRIUS antenna is mounted at least 3 inc hes away fr om it (but no
closer than 3 inches from the roof ed ge, or trunk lid in the case of a conver tible).
Note : Read the Do and Do N ot installa tion tips beginning on page 13 for additional anten na
installation information.
4
[ Ins ta llati on ]
Page 5
Follow this procedure to mount the an tenna:
Figur e 1Figur e 1
Sedan /CoupeSe dan/C oupe
Picku p Truc kPicku p Truc k
SUV/M ini-Va nSUV/M ini-Va n
Conve rtibleConve rtible
Select an appropriate mounting positi on for your type of vehicle that has an unobstruct-
1.
ed area of 3 inches by 3 inches aroun d the antenna.
Attach the rubber cover/tail to the a ntenna, as shown in Figure 2, and press the antenna
2.
cable into the rubber cover/tail. The rubber cover/tail will help to position the antenn a
the correct distance from the edge of the roof or trunk lid.
Clean the surface area of the vehicle where you will be installing the antenn a with the
3.
alcohol prep pad.
Peel the protective material from the adhesive strips (Figure 2) and press th e rubber
4.
cover/tail firmly into place on the v ehicle (Figure 3).
[ Ins ta llati on ]
5
Page 6
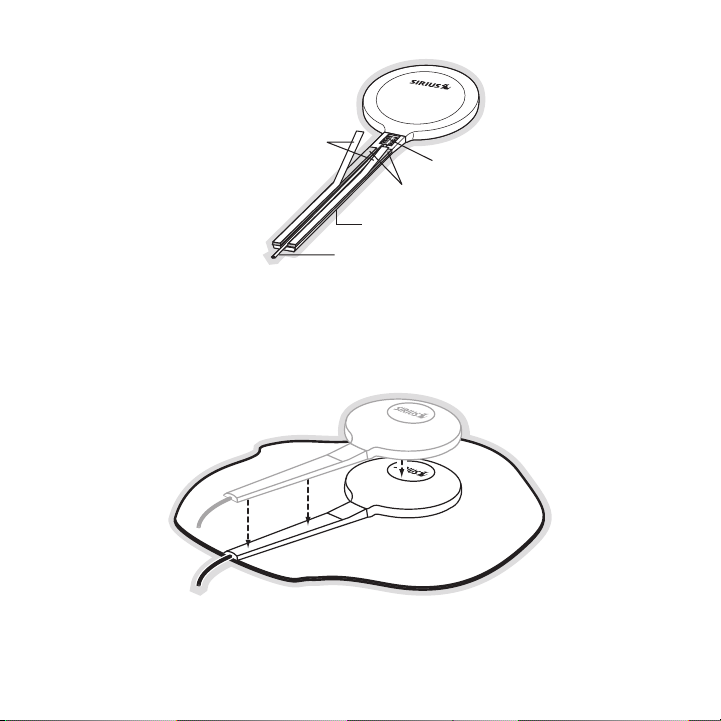
Rubber Cover/Tail
Protective Material
Adhesive Strips
Strain Relief
Antenna Cable
Figur e 2Figur e 2
Figur e 3Figur e 3
Double check that the location of the antenna and rubber cover/tail are corre ct, and
5.
continue to press firmly down on rubb er cover/tail for another 30 seconds. At room
temperature (68 degrees), maximum adh esion usually occurs within 72 hours. Du ring
this period, avoid car washes and oth er contact with the antenna and rubber a ntenna
cable cover/tail.
[ Ins ta llati on ]
6
Page 7
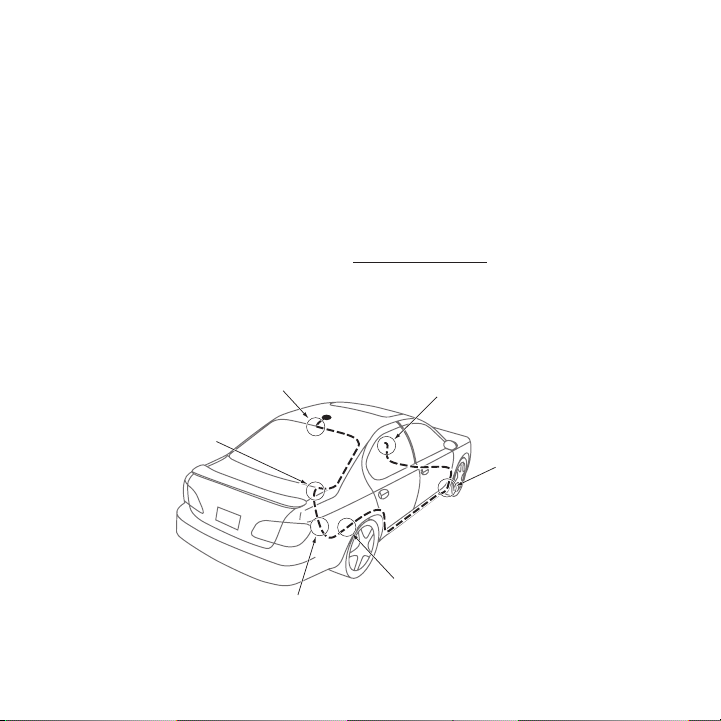
Cable Routing
1. Fe ed Cable Un der
Rubber Molding
A round Windo w
4. Rou te Cable fr om Trunk
Un der Interio r Trim, int o
Ca bin and Tow ards Front
of Vehicle
6. Br ing Cable O ut To
S IRIUS
Radio
Locati on
5. Bri ng Cable ou t from
Tr im and Rout e Under
Ca rpet to Das hboard
or Console.
2. Rou te Cable Ou t of
Wi ndow Moldin g and
In to Weathers tripping
Ar ound Trunk Opening
3. Rou te Cable Al ong
Tr unk Wall an d Into
Ca bin
Figur e 4Figur e 4
When you have successfully mounted th e antenna, you can begin the cable routi ng portion
of the installation. Separate antenna cable routing procedures are provided f or each typ e of
vehicle:
Seda n/Coupe on page 7
•
Pick up Truck on page 8
•
SUV/ Mini-Van on page 10
•
Conv ertible on page 11
•
Note that additional breakout illustr ations for each step of the antenna cabl e routing p rocedures can be found on the SIRIUS webs ite at http://www.sirius.com. Click on the Inst all/ Ac-
tiva te link and then follow the link for the Car Instal lation Tips .
Seda n/Co upe Ante nna Cabl e Ro utin g Pr ocedure
Figure 4 shows how the antenna cable should be routed from the antenna to you r SIRIUS
radio in a sedan/coupe.
[ Ins ta llati on ]
7
Page 8

Follow these detailed cable installat ion instructions:
Feed the cable from the antenna under neath the rubber molding around the rear window.
1.
Use a plastic putty knife or similar object to lift the rubber molding around the rear
window and tuck the antenna cable und erneath the molding. Route the antenna c able
around and down the window to the low est point. If your rear window does not have rubber molding, SIRIUS recommends consul ting with a professional installer.
Route the antenna cable out of the wi ndow molding and into the rubber weather strip-
2.
ping around the trunk opening. Lift t he weather stripping from the opening an d tuck the
cable inside it, then replace the wea ther stripping. To avoid sharp bends in the cable,
run the cable inside of the weather s tripping for a few inches, then remove t he cable
from the weather stripping inside of the trunk. Keep the cable away from hing es, gears,
etc., that could damage it.
Route the cable out from the rubber w eather stripping and along the trunk wal l. Continue
3.
routing the cable into the cabin thro ugh a conduit or along an existing wirin g harness.
Route the cable through the main cabi n area under the interior trim, towards the front
4.
of the vehicle. Use the plastic putty knife to lift the plastic trim just eno ugh to tuck the
cable under underneath. Avoid side ai rbag locations on back pillars and above the
doors. (Airbag locations are marked w ith “SRS” logos.) Be careful not to crim p or cut
the cable.
Bring the cable out from the trim nea r the firewall and route it under the ca rpet toward
5.
the dashboard or console. Coil any ex cess cable in a hidden location, such as under the
carpet, keeping it away from any vehi cle pedals or controls. Secure the exces s cable
with wire ties.
Bring the end of the cable out at the SIRIUS radio location. Leave yourself e nough cable
6.
so you can easily connect it to the a ntenna connector of the SIRIUS radio or vehicle
dock.
Pick up T ruck Ant enna Cab le R outi ng P rocedure
Figure 5 shows how the antenna cable should be routed from the antenna to you r SIRIUS
radio in a pickup truck.
8
[ Ins ta llati on ]
Page 9

1. Rou te Cable
Un der Rubber
Mo lding Aroun d
Wi ndshield
2. Con tinue Tucki ng Cable
Un der Molding To
Bo ttom of Win dshield
3. Rou te Cable Ou t of Moldin g
an d Into Weat herstrippin g
Ar ound Door O pening.
Co ntinue to B ottom of
Do or Opening.
4. Bri ng Cable ou t from
We atherstripp ing and
Ro ute Under C arpet.
5. Bri ng Cable Ou t to
SI RIUS Radio
Lo cation
Figur e 5Figur e 5
Follow these detailed cable installat ion instructions:
Use a plastic putty knife or similar tool to lift the rubber molding around t he windshie ld
1.
and tuck the antenna cable underneath it.
Continue tucking the cable underneath the windshield molding around the winds hield to
2.
the lowest corner.
At the lowest corner of the windshiel d, route the cable out of the windshield molding an d
3.
into the rubber weather stripping aro und the door opening. Lift the weather s tripping
from the opening and tuck the cable i nside it, then replace the weather strip ping. Run
the cable inside of the weather strip ping to the bottom of the door opening.
Pull the cable out of the weather str ipping at the bottom of the door opening and route it
4.
under the carpet toward the dashboard . Coil any excess cable in a hidden loca tion, such
as under the carpet, keeping it away from any vehicle pedals or controls. Sec ure the
excess cable with wire ties.
[ Ins ta llati on ]
9
Page 10

1. Fe ed Cable U nder
Rubber Seal Arou nd
Hatch Opening
3. Ro ute Cable
Under Carpet
to Das hboard
4. Br ing Cable Out To
S IRIUS
Radio
Locati on
2. Rou te Cable U nder
In terior Tri m, int o
Ca bin and To wards
Fr ont of Veh icle
Figur e 6Figur e 6
Bring the end of the cable out at the SIRIUS radio location. Leave yourself e nough cable
5.
so you can easily connect it to the a ntenna connector of the SIRIUS radio or vehicle
dock.
SUV/ Mini -Van Ant enna Cab le R outi ng P rocedure
Figure 6 shows how the antenna cable should be routed from the antenna to you r SIRIUS
radio in an SUV or a Mini-Van.
Follow these detailed cable installat ion instructions:
Feed the antenna cable underneath the rubber weather stripping of the rear ta ilgate
1.
window/door and route the cable along the rear hatch. Lift the weather stripp ing from
the opening and tuck the cable inside it, then replace the weather stripping. Pull the
cable out from weather stripping and route it into the cabin under the interi or trim. Av oid
hinges or gears that could crimp or c ut the cable.
Route the cable through the SUV’s mai n cabin area under the interior trim, to wards the
2.
front of the vehicle. Use a plastic p utty knife to lift the plastic trim just enough to tuck
the cable under underneath. Avoid sid e airbag locations on back pillars and a bove the
[ Ins ta llati on ]
10
Page 11

6. Br ing Cable O ut To
S IRIUS
Radio
Locati on
1. Bri ng Cable fr om
An tenna Into Inside
of Trunk Lid
2. Tap e Cable Alo ng
In side of Lid to
Hi nge Strut
4. Rou te Cable fr om Trunk
Un der Interio r Trim, int o
Ca bin and Tow ards Front
of Vehicle
5. Bri ng Cable ou t from
Tr im and Rout e Under
Ca rpet to Das hboard
or Console.
3. Tie Cable to H inge Strut, Allowing
Sl ack for Lid to Open an d Close.
Ro ute Cable I nto Cabin
Th rough Exist ing Wire
Ch annel.
Figur e 7Figur e 7
doors. (Airbag locations are marked w ith “SRS” logos.) Be careful not to crim p or cut
the cable.
Bring the cable out from the trim nea r the firewall and route it under the ca rpet toward
3.
the dashboard or console. Coil any ex cess cable in a hidden location, such as under the
carpet, keeping it away from any vehi cle pedals or controls. Secure the exces s cable
with wire ties.
Bring the end of the cable out at the SIRIUS radio location. Leave yourself e nough cable
4.
so you can easily connect it to the a ntenna connector of the SIRIUS radio or vehicle
cradle/dock.
Conv erti ble Ante nna Cabl e Ro utin g Pr ocedure
Figure 7 shows how the antenna cable should be routed from the antenna to you r SIRIUS
radio in a convertible.
Follow these detailed cable installat ion instructions:
[ Ins ta llati on ]
11
Page 12

Bring the cable from the antenna into the trunk at the front edge of the trun k lid. Keep
1.
any bends in the cable loose. Tape or tie the cable along the inside of the t runk lid to the
trunk lid hinge strut.
Allow enough slack in the cable so th e trunk lid can easily open and close an d keep the
2.
cable away from hinges, gears, etc., that could crimp or cut it. Route the ca ble along t he
trunk wall and into the cabin through a conduit or along an existing wiring h arness.
Route the cable through the main cabi n area under the interior trim, towards the front o f
3.
the vehicle. Use a plastic putty knif e to lift the plastic trim just enough t o tuck the cable
under underneath. Avoid side airbag l ocations on back pillars and above the d oors. (Airbag locations are marked with “SRS” l ogos.) Be careful not to crimp or cut th e cable.
Bring the cable out from the trim nea r the firewall and route it under the ca rpet toward
4.
the dashboard or console. Coil any ex cess cable in a hidden location, such as under the
carpet, keeping it away from any vehi cle pedals or controls. Secure the exces s cable
with wire ties.
Bring the end of the cable out at the SIRIUS radio location. Leave yourself e nough cable
5.
so you can easily connect it to the a ntenna connector of the SIRIUS radio or vehicle
dock.
12
[ Ins ta llati on ]
Page 13

Tips
The following D o and Do No t antenna m ounting tips illustrate how to install t he antenna for
optimal performance, and also illustr ate where the antenna should not be inst alled.
Do
Do
Mount the antenna on the
roof, at least 3 inches from
the edge.
Mount the antenna on
the roof where it has a
clear view of the sky in all
directions.
[ Tip s ]
13
Page 14

Do
3”
Mount the antenna on the
roof where it has at least
3 inches of clear space
around it.
14
Do
Use the supplied rubber
tail cover to protect the
antenna cable.
[ Tip s ]
Page 15

Do N ot
Don’t mount the antenna
inside the vehicle, for
example, on the dashboard.
Do N ot
Do N ot
Don’t mount the antenna
on any of the vehicle’s
front, back or side pillars.
Don’t mount the antenna
close to a roof rack. Adjust
the rack so it’s further
away from the antenna or
move the antenna closer to
the center of the roof.
[ Tip s ]
15
Page 16

Do N ot
Do N ot
16
Don’t mount the antenna
close to another antenna.
Mount it at least 3 inches
away.
Don’t mount the antenna
closer than 3 inches from
the edge of the roof.
Use the supplied rubber
tail/cover as a guide for
judging proper length and
correct positioning.
[ Tip s ]
Page 17

Troubleshooting
Symp tom Solu tion
SIRIUS receiver
displays Antenn a Not
Dete cted message
SIRIUS receiver
displays Acquir ing
Sign al message.
The SIRIUS antenna is not properly co nnected to the radio or
vehicle dock, or the connection has b ecome loose. Check the
SIRIUS antenna connection to the radi o or dock and make sure it
is a good, snug fit.
If the antenna is properly connected to the radio or vehicle dock,
there may be a break in the cable or a problem with the antenna.
The SIRIUS antenna is not receiving a ny signal. Check for
obstacles around the antenna and make sure it is mounted in
an optimal location. (Refer to the Do and Do Not mounting tips
beginning on page 13.)
Note : Signal reception can also be hi ndered if your vehicle is in a
covered garage or parking structure o r you drive under structures
or obstacles such as bridges, overpas ses, trees with a lot of foliage etc., for a prolonged period.
[ Tro ub lesho ot ing ]
17
Page 18

Trou bleshooting Co ntin ued
Symp tom Solu tion
There is static or loss
of clarity in the SIRIUS
radio’s audio signal
If you are using your SIRIUS radio’s FM transmitter to wirelessly
transmit the audio from your SIRIUS r adio to your vehicle’s FM
radio, the FM channel you selected is most likely being used by
a local broadcaster, which is interfe ring with the performance of
your SIRIUS radio. Turn off your SIRI US radio and tune through
the FM channels on your vehicle radio to locate an FM channel
(between 88.1 and 107.9 MHz) that is not broadcasting in your
area. Once you have located an FM cha nnel that is not broadcasting in your area, save it as a preset on your vehicle radio. This will
be your SIRIUS preset. Turn on your S IRIUS radio and locate its
FM Frequency adjustments (under “FM T ransmitter Options” in
Settings or Menu). Set the FM frequen cy on your SIRIUS radio to
match the frequency of the SIRIUS pre set on your vehicle radio.
Note : To find the best FM frequency w ith the lowest interference
in your home or travel cities, you ca n also go to http://www.sirius.
com and use the My SIR IUS Frequen cy F inder and search for a
suggested FM frequency based on zip c ode.
If you are connecting your SIRIUS rad io directly to your vehicle’s
audio system using an “AUX IN” or “LI NE IN” input, the cable
may not be properly connected. Make s ure the cable is properly
connected, both to the “AUX IN” or LI NE IN” connector on your
vehicle’s audio system and to the “LI NE OUT” connector on your
SIRIUS radio.
[ Tro ub lesho ot ing ]
18
Page 19

Copyrights & Trademarks
© 2007 Sirius Satellite Radio Inc. Al l Rights Reserved.
® “SIRIUS”, the SIRIUS dog logo, chan nel names and logos are trademarks of Si rius Satell ite
Radio Inc. All Rights Reserved.
Hardware, subscription, and activatio n fee required. For full Terms & Conditi ons, visit
http://sirius.com. Prices and program ming are subject to change. Not availabl e in HI and AK.
Equipment and subscription sold separ ately. Installation required with some e quipment.
SIRI US Customer Servic e: 1-888-539-74 74
customercare@sirius-radio.com
SIRI US Satellit e Radio Inc .
1221 Avenue of the Americas
New York, NY 10020
1-888-539-7474
http://www.sirius.com
[ Cop yr ights & Trad em ark s ]
19
Page 20

SI RIU S S ate lli te Rad io Inc.
1221 Avenue of the Americas
New York, NY 10020
(800) 869-5590
http://sirius.com
SIRIUS Magnetic Mount Ve hicle Ant enna DOT2 (051707a )
Page 21

New York, NY 10020
(800) 869-5590
http://sirius.com
Page 22

New York, NY 10020
(800) 869-5590
http://sirius.com
Page 23

New York, NY 10020
(800) 869-5590
http://sirius.com
Page 24

 Loading...