

SIRI SIRIPRO 57, SIRIPRO 68, SIRIPRO 80, SIRIPRO 130, SIRIPRO 90 Operating And Maintenance Manual

since 1975
Tel. 059/313191 - Fax 059/311362
Email: info@siri.mo.it http//www.siri.mo.it
SIRIPRO
57 – 68 – 80 – 90 – 130
MANUALE D’USO E MANUTENZIONE
OPERATING AND MAINTENANCE MANUAL
S.I.R.I s.r.l.
Via R.Dalla Costa, 44/46
41122 MODENA (ITALY)
MANUEL D’ EMPLOI ET ENTRETIEN
BEDIENUNGS- UND WARTUNGSHANDBUCH

130
SIRI PRO 57-68-80-90-
Manuale Uso e Manutenzione Ver 1.0

SIRI PRO 57-68-80-90-130 Manuale Uso e Manutenzione Ver 1.0

SIRI PRO 57-68-80-90-130 Manuale Uso e Manutenzione Ver 1.0
COMPONENTI DELLA TAGLIAPIASTRELLE (Fig.1)
La macchina è nei suoi elementi principali così composta:
1) Base
2) Asta di scorrimento
3) Manico
4) Squadro
MONTAGGIO TAGLIAPIASTRELLE (Fig.2) (Fig.3)
La tagliapiastrelle viene consegnata al Cliente all’interno dell’apposito cartone come
rappresentato in Fig.2 o valigetta (optional).
Per montare la tagliapiastrelle è quindi necessario:
1) Estrarre la macchina dal cartone
2) Allentare il pomello di blocco del carrello di taglio Fig.4
3) Svitare il pomello (A) che ferma lo squadro nella posizione di trasporto. Inserire il
fulcro dello squadro nell’apposito foro situato sulla base sotto l’asta di scorrimento.
Bloccare lo squadro nella posizione desiderata passando il pomello (A) nell’asola dello
squadro e avvitandolo nel foro predisposto sulla base.
3) Svitare il pomello (B), aprire la prolunga squadra (C) e riavvitare il pomello (B)
4) Nel caso di incisione di piastrelle di grandi dimensioni estrarre i supporti laterali (D)
INCISIONE A 90° (Fig.4) (Fig.5) (Fig.6)
Per effettuare tale tipo di incisione bloccare lo squadro contro l’apposito blocco in modo
che lo squadro stesso risulti perpendicolare all’asta di scorrimento.
Posizionare la piastrella sulla base, portandola a contatto con squadro e squadretto
(avvalersi delle scale millimetriche presenti su squadro e squadretto per regolare le
dimensioni della piastrella da incidere).
Incidere la piastrella partendo dalla parte dell’operatore. Per effettuare l’incisione spingere il manico verso l’alto, muovere il cursore in avanti ed abbassare il manico in modo
che la rotella di taglio (B) di Fig.5 arrivi a contatto con la piastrella.Tenendo il manico
abbassato spingere per tutta la lunghezza della pistrella fino ad ottenere un’icisione
completa come rappresentato in Fig.6.
Se l’incisione non avviene in maniera corretta, tornare ad eseguire l’operazione.
ROTTURA PIASTRELLA (Fig.7)
Per rompere la piastrella ad incisione avvenuta è necessario rilasciare il cursore in modo
che la rotella di taglio non sia più a contatto con la piastrella e quindi abbassare di
nuovo il manico nella posizione rappresentata in Fig.7, ad una distanza compresa tra 1
e 2 cm dal bordo ed esercitare una pressione sulla parte terminale del manico.
SIRI PRO 57
(art. 20057)
SIRI PRO 68
(art. 20068)
SIRI PRO 80
(art. 20080)
SIRI PRO 90
(art. 20090)
57 cm /
68 cm /
80 cm /
90 cm /
22”
40 x 40 cm /
26”
31”
57 x 57 cm /
35”
63 x 63 cm /
48 x 48 cm /
15”
20 mm /
18”
20 mm /
22”
20 mm /
25”
20 mm /
7,87”
7,87”
7,87”
7,87”
SIRI PRO 130
(art. 20130)
130 cm /
51”
90 x 90 cm /
35”
20 mm /
7,87”

SIRI PRO 57-68-80-90-130 Manuale Uso e Manutenzione Ver 1.0
INCISIONE E ROTTURA A 45° (tagli diagonali) (Fig.4 - Fig.8 Fig.9 - Fig.10)
Per effettuare tale tipo di incisione occorre allentare il pomello (B) di Fig.8 e ruotare lo
squadro fino a battuta contro l’apposito fermo (A) di Fig.8 e bloccarne la posizione
serrando il pomello (B) di Fig.8.
Posizionare la piastrella sulla base, portandola a contatto con squadro e squadretto
avvalendosi delle apposite scale millimetriche presenti. Le scale (C) e (D) di Fig.9
rappresentano la lunghezza (espressa in millimetri) dei due lati uguali del triangolo
isoscele generato con il taglio a 45°. La scala (E) di Fig.9 rappresenta l’altezza di tale
triangolo (espressa in millimetri). La scala (F) di Fig.9 è l’equivalente in pollici della
scala (D) di Fig.9.
Per effettuare l’incisione operare come nel taglio a 90°.
Per piastrelle di grandi dimensioni si consiglia di: rompere la piastrella dopo l’incisione
appoggiando le due mani sui due lati divisi dall’incisione ed esercitare pressione fino alla
rottura (Fig.10). In caso i tagli a 90° e 45° non fossero corretti, agire sugli appositi
eccentrici (A e C) di Fig.8.
ALTRI TIPI DI TAGLIO (Fig.11) (Fig.12)
Se si desidera tagliare la piastrella con un’inclinazione differente da 45°, effettuare un
segno corrispondente alla linea di taglio desiderata sulla piastrella stessa, posizionarla
sulla macchina ed avvalendosi delle scale (A) e (B) di Fig.11 e dell’indicatore angolare
(E) di Fig.12 fare in modo che la linea di incisione della rotella coincida con la linea di
taglio precedentemente disegnata.
Se si desiderano tagliare listelli di piastrella con larghezza inferiore a 4 cm, si consiglia
di tagliare prima una striscia di larghezza doppia a quella che si vuole ottenere e
successivamente tagliare a metà la striscia ottenuta .
MANUTENZIONE (Fig.4)
Per sostituire la rotella svitarela vite (D) di Fig.4. Sostituire la vite ogni volte che si
sostituisce la rotellina di taglio.
Mantenere la guida pulita e lubrificarla con silicone spray ( non usare grasso o olio)
Per regolare il carrello di taglio agire come in Fig.4:
- viti (B) per oscillazioni orizzontali
- vite (C) per oscillazioni verticali
Ø 22 mm
7/8”
Ø 22 mm
7/8”
Ø 22 mm
7/8”
Ø 22 mm
7/8”
Ø 22 mm
7/8”
80x34x26 mm /
31”x13”x10”
93x34x26 mm /
37”x13”x10”
104x34x26 mm
/ 41”x13”x10”
115x34x26 mm
/ 45”x13”x10”
150x45x30 mm
/ 59”x18”x12”
12 Kg / lb 18 PZ – PCS
13 Kg / lb 14 PZ – PCS
15 Kg / lb 12 PZ – PCS
17 Kg / lb 8 PZ – PCS
35 Kg / lb 6 PZ – PCS

SIRI PRO 57-68-80-90-130 Manuale Uso e Manutenzione Ver 1.0
TILE CUTTER COMPONENTS (Fig. 1)
The machine basically consists of:
1) Base
2) Sliding rod
3) Handle
4) Square
FITTING TILE CUTTER (Fig.2) (Fig.3)
The tile cutter is delivered to the customer inside a box, as shown in Fig.2 or in a case
(optional).
To fit the tile cutter, it is therefore necessary to:
1) remove the machine from the box
2) unscrew the knob on the cutting trolley Fig.4
3) unscrew the knob (A) that locks the square in the conveying position. Insert the pin
of the square into the hole underneath the sliding rod. Lock the pin in the required
position by placing the knob (A) in the slot of the square and tightening it in the hole
on the base
3) Unscrew the knob (B), open the square extension (C) and retighten the knob (B)
4) To make incisions in large tiles, take out the side supports (D)
90°-INCISION (Fig.4) (Fig.5) (Fig.6)
To make this type of incision, lock the square against the block in such a way that the
square is perpendicular to the sliding rod.
Position the tile on the base, place it in contact with the square and small square (use
the millimetric scales on the square and small square to adjust the dimensions of the
tile on which the incision is to be made).
Make the incision on the tile starting from the side of the operator. To make the
incision, move the handle upwards, press the metal slider forward and then move
downwards the handle so that the cutting cutter wheel (B) of Fig.5 comes into contact
with the tile. Keeping the handle down push it for all the tile length to obtain a complte
incision as in Fig.6.
If the incision is not made correctly, repeat the operation.
BREAKING TILE (Fig.6) (Fig.7)
To break the tile after the incision has been made release the metal slider then push the
handle downwards in the position shown in Fig.7, at a distance between 1 and 2 cm
from the edge and make pressure on the end part of the handle.
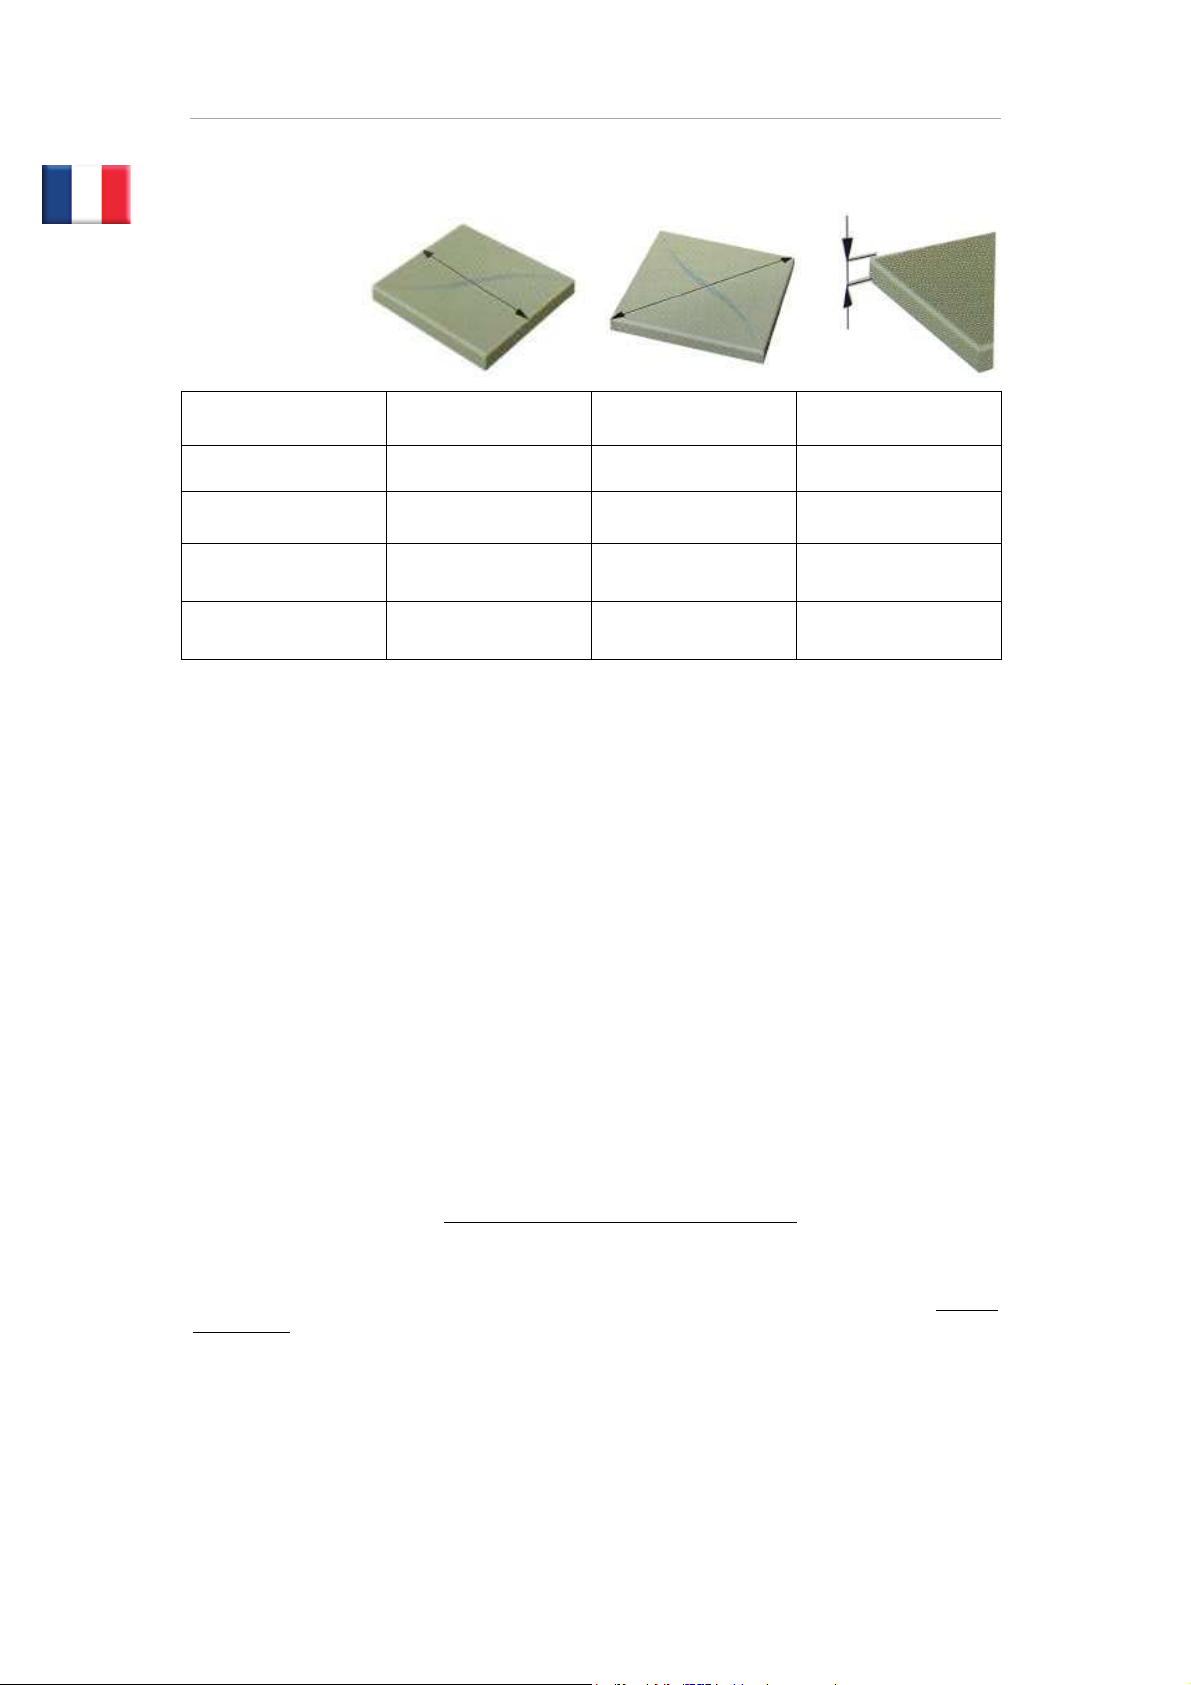
SPECIFICATIONS
SIRI PRO 57
(art. 20057)
SIRI PRO 68
(art. 20068)
SIRI PRO 80
(art. 20080)
SIRI PRO 90
(art. 20090)
57 cm /
68 cm /
80 cm /
90 cm /
22”
40 x 40 cm /
26”
31”
57 x 57 cm /
35”
63 x 63 cm /
48 x 48 cm /
15”
20 mm /
18”
20 mm /
22”
20 mm /
25”
20 mm /
7,87”
7,87”
7,87”
7,87”
SIRI PRO 130
(art. 20130)
130 cm /
51”
90 x 90 cm /
35”
20 mm /
7,87”

SIRI PRO 57-68-80-90-130 Manuale Uso e Manutenzione Ver 1.0
INCISION AND BREAKING AT 45° (diagonal cuts) (Fig.4 - Fig.8 Fig.9 - Fig.10)
To make this type of incision, loosen the knob (B) of Fig.8 , rotate the square until it
makes contact with the stops (A) of Fig.8 and lock it in position by tightening the knob
(B) of Fig.8.
Position the tile on the base, by bringing it into contact with the square and small
square, using the millimetric scales present. The scales (C) and (D) of Fig.9 indicate
the length (expressed in millimetres) of the two equal sides of the isosceles triangle
generated by the 45° cut. The scale (E) of Fig.9 shows the height of this triangle
(expressed in millimetres). The scale (F) of Fig.9 is the equivalent in inches of the
scale (D) of Fig.9.
To make the incision, follow the same procedure as for the 90°-cut.
For large tiles, it is advisable to: break the tile after making the incision, resting a hand
on either side of the incision and exert pressure until the tile breaks (Fig.10). If the
cuts at 90° or 45° are incorrect, use the eccentrics (A /C ) of Fig.8.
OTHER TYPES OF CUT (Fig.11) (Fig.12) (Fig.13) (Fig.14)
(Fig.15)
If you wish to cut the tile at an angle of other than 45°, make a corresponding mark on
the desired cutting line on the tile, position it on the machine and use the scales (A)
and (B) of Fig.11 and of the angular indicator (E) of Fig.12 to ensure that the incision
line of the cutter wheel coincides with the previously indicated cutting line.
If you wish to cut strips of tile that are less than 4 cm in width, first cut a strip that is
twice the width that you wish to obtain and then cut halfway down the obtained strip .
MAINTENANCE (Fig.4)
Use the screw to replace the cutter wheel (D) of Fig.4.
Every time you replace the cutting wheel replace the screw too.
Keep the guide clean and regularly use silicone spray. ( do not use grease or oil )
To adjust cutting trolley act like in Fig.4:
- screws (B) for horizontal swinging
- screw (C) for vertical swinging
Ø 22 mm
Ø 22 mm
Ø 22 mm
Ø 22 mm
80x34x26 mm /
31”x13”x10”
93x34x26 mm /
37”x13”x10”
104x34x26 mm
/ 41”x13”x10”
115x34x26 mm
/ 45”x13”x10”
12 Kg / lb 18 PZ – PCS
13 Kg / lb 14 PZ – PCS
15 Kg / lb 12 PZ – PCS
17 Kg / lb 8 PZ – PCS
Ø 22 mm 150x45x30 mm
/ 59”x18”x12”
35 Kg / lb 6 PZ – PCS

SIRI PRO 57-68-80-90-130 Manuale Uso e Manutenzione Ver 1.0
COMPOSITION DU COUPE-CARREAUX (Fig. 1)
Les principaux éléments du coupe-carreaux sont :
1) le socle
2) la barre de glissement
3) la poignée
4) la règle graduée
MONTAGE DU COUPE-CARREAUX (Fig. 2) (Fig. 3)
Le coupe-carreaux est livré dans un emballage en carton comme illustré sur la Fig. 2
ou dans une valise (optionnelle). Pour monter le coupe-carreaux, procédez de la façon
suivante:
1) Déballez la machine du carton.
2) Dévissez le pommeau (A) qui fixe la règle graduée dans sa position de transport.
Introduisez l’axe d’appui de la règle graduée dans le trou prévu à cet effet sur le socle
sous la barre de glissement. Fixez la règle graduée dans la position souhaitée en
passant le pommeau (A) dans la fente de la règle graduée et en le vissant dans un des
trous prévus sur le socle
3) Dévissez le pommeau (B), ouvrez la rallonge de la règle (C) et revissez le pommeau
(B).
4) En cas de carreaux de grandes dimensions, ouvrez les supports latéraux (D).
COUPE A 90° (Fig. 4) (Fig. 5) (Fig. 6)
Pour effectuer ce type de coupe, placez la butée (A) de la Fig. 4 et bloquez la règle
graduée contre le heurtoir (B) de la Fig. 4 de façon à ce que la règle graduée soit
perpendiculaire à la barre de glissement. Posez le carreau sur le socle de façon à ce
qu’il touche la règle graduée (servez-vous des échelles graduées présentes sur la règle
graduée pour régler les dimensions du carreau à couper). Coupez le carreau en partant
de la partie opposée à l’opérateur. Poussez la poignée vers le haut de façon à ce que la
roulette de coupe (B) de la Fig. 5 arrive en contact avec le carreau et tirez la poignée
vers vous (la prise sur la poignée peut s’effectuer de deux façons différentes comme
illustré sur la Fig. 5 et Fig. 6.
Si la coupe n’est pas bonne, recommencez l’opération.
CASSURE DU CARREAU (Fig. 6) (Fig. 7)
Pour séparer le carreau, après l’incision, soulevez la poignée et en utilisant le levier sur
le manche ,Fig.6. Faire baisser le séparateur sur le carreau, à la distance de presque 2
cm de bord. À ce moment, exercer une pression sur le manche pour séparer le carreau
Fig.7 le séparateur remontera automatiquement dans la position de repos.Pour casser le
carreau après la coupe, placez la poignée dans la position illustrée dans la Fig. 7, à une
distance de 2 cm environ du bord et exercez une pression sur la partie finale de la
poignée
SIRI PRO 57-68-80-90-130 Manuale Uso e Manutenzione Ver 1.0
DONNÉES TECHNIQUES
SIRI TOP 57
(art. 5057)
SIRI TOP 68
(art. 5068)
SIRI TOP 80
(art. 5080)
SIRI TOP 90
(art. 5090)
57 cm /
68 cm /
80 cm /
90 cm /
22”
40 x 40 cm /
26”
31”
57 x 57 cm /
35”
63 x 63 cm /
48 x 48 cm /
15”
20 mm /
18”
20 mm /
22”
20 mm /
25”
20 mm /
7,87”
7,87”
7,87”
7,87”
SIRI TOP 130
(art. 5130)
130 cm /
51”
90 x 90 cm /
35”
20 mm /
7,87”
COUPE ET CASSURE A 45° (coupes diagonales) (Fig. 4 - Fig. 8 Fig. 9 - Fig. 10)
Pour ce type de coupe, il faut dévisser le pommeau (B) de la Fig. 8 et tournez la butée
(A) de la Fig. 4 dans le sens des aiguilles d’une montre. Tournez la règle graduée
jusqu’à ce qu’elle touche les butées (A) de la Fig. 8 et bloquez la position en vissant le
pommeau (B) de la Fig. 8. Posez le carreau sur le socle de façon à ce qu’il touche la
règle graduée en vous servant des échelles graduées prévues à cet effet. Les échelles
(C) et (D) de la Fig. 9 représentent la longueur (exprimée en millimètres) des deux
côtés égaux du triangle isocèle produit par la coupe à 45°. L’échelle (E) de la Fig. 9
représente la hauteur de ce triangle (exprimée en millimètres). L’échelle (F) de la Fig.
9 est l’équivalent en pouces de l’échelle (D) de la Fig. 9.
Pour cette coupe, procédez comme pour la coupe à 90°. Pour les carreaux de grandes
dimensions, il est conseillé de casser le carreau après l’avoir coupé en appuyant avec
les deux mains sur les deux côtés partagés par la ligne de coupe et d’appuyer jusqu’à la
cassure (Fig. 10). En cas de coupes à 90° et + ou -45° non correctes, agissez sur les
excentriques en fer (B) de la Fig. 4 et (A) de la Fig. 8.
AUTRES TYPES DE COUPE (Fig. 11) (Fig. 12) (Fig. 13) (Fig. 14)
(Fig. 15)
Pour couper un carreau à une inclinaison différente de 45°, faites une marque
correspondant à la ligne de coupe souhaitée sur le carreau même. Posez le carreau sur
la machine et faites en sorte que la ligne de coupe de la roulette coïncide avec la ligne
de coupe marquée précédemment en vous aidant des échelles (A) et (B) de la Fig. 11
ou (C) et (D) de la Fig. 12 et de l’indicateur angulaire (E) de la Fig. 13. Pour couper
des listels d’une largeur inférieure à 4 cm, il est conseillé de couper d’abord une bande
d’une largeur double à celle que l’on souhaite obtenir (Fig. 14), puis de couper à moitié
la bande ainsi obtenue (Fig. 15).

SIRI PRO 57-68-80-90-130 Manuale Uso e Manutenzione Ver 1.0
ENTRETIEN (Fig. 16) (Fig. 17) (Fig. 18)
Pour changer la roulette, agissez sur la vis (C) de la Fig. 16. Pour changer les éléments
anti-rayures (D) de la Fig. 16, démontez les éléments usés et encastrez les neufs sur
la poignée Le rail doit toujours être propre et lubrifié régulièrement avec un spray prévu
à cet effet. Pour changer les 2 rails, dévissez les vis (A) et (B) de la Fig. 17 et retirezles comme illustré dans la Fig. 18 (les rails doivent être changés lorsque leur usure est
telle à ne plus permettre le serrage des vis (A) et (B) de la Fig. 17 pour réduire le jeu
avec l’axe).
Ø 12 mm
Ø 12 mm
Ø 12 mm
Ø 12 mm
Ø 12 mm 150x45x30 mm
80x34x26 mm /
31”x13”x10”
93x34x26 mm /
37”x13”x10”
104x34x26 mm
/ 41”x13”x10”
115x34x26 mm
/ 45”x13”x10”
/ 59”x18”x12”
10 Kg / 22 lb 18 PZ – PCS
11 Kg / 24 lb 14 PZ – PCS
12 Kg / 26 lb 12 PZ – PCS
13 Kg / 28 lb 8 PZ – PCS
35 Kg / 77 lb 6 PZ – PCS

SIRI PRO 57-68-80-90-130 Manuale Uso e Manutenzione Ver 1.0
BESTANDTEILE DER FLIESENSCHNEIDEMASCHINE (Abb.1)
Die wesentlichen Bestandteile der Maschine sind:
1) Untergestell
2) Gleitstange
3) Griff
4) Winkelanschlag
MONTAGE DER FLIESENSCHNEIDEMASCHINE (Abb. 2) (Abb. 3)
Die Fliesenschneidemaschine wird dem Kunden wie in der Abb. 2 gezeigt in einem
Karton oder einem Koffer (OPTION) geliefert.
Zur Montage der Fliesenschneidemaschine wie folgt vorgehen:
1) Die Maschine aus dem Karton nehmen.
2) Den Knopf (A) losschrauben, der den Winkelanschlag in der Transportposition
festhält. Den Mittelpunkt des Winkelanschlags in die entsprechende Bohrung auf dem
Untergestell unter der Gleitstange einführen. Den Winkelanschlag in der gewünschten
Position blockieren, indem der Knopf (A) im Langloch des Winkelanschlags zu
verschieben und in einer der auf dem Untergestell vorhandenen Bohrungen
festzuschrauben ist.
3) Den Knopf (B) lösen, die Verlängerung des Winkelanschlags (C) öffnen und den
Knopf (B) wieder festschrauben.
4) Zum Einkerben großformatiger Fliesen die Seitenhalter (D) herausziehen.
90°-SCHNITT (Abb.4) (Abb.5) (Abb.6)
Für diese Schnittart den Feststeller (A) Abb. 4 positionieren und den Winkelanschlag
gegen die entsprechende Sperre (B) Abb.4 blockieren, sodass der Winkelanschlag
rechtwinklig zur Gleitstange liegt.
Die Fliesen auf das Untergestell setzen und mit Winkelanschlag und Hilfswinkel in
Berührung bringen (die auf Winkelanschlag und Hilfswinkel vorhandenen
Millimeterskalen benutzen, um die Abmessungen der zu schneidenden Fliese
einzustellen).
Von der dem Bediener gegenüberliegenden Seite beginnend die Fliese schneiden. Um
den Schnitt durchzuführen, den Griff so nach oben schieben, dass das Schneidrad (B)
Abb.5 die Fliese berührt und den Griff zu sich ziehen (es gibt zwei verschiedene
Greifmethoden, siehe dazu die Abb. 5 und Abb.6.
Falls der Schnitt nicht korrekt erfolgt, den Vorgang wiederholen.
FLIESENBRUCH (Abb.7).
Um die Fliese nach dem Schnitt zu brechen, den Griff in einem Abstand von etwa 2 cm
vom Rand in die in der Abb.7 gezeigte Position bringen und auf den Endbereich des
Griffs Druck ausüben.

SIRI PRO 57-68-80-90-130 Manuale Uso e Manutenzione Ver 1.0
TECHNISCHE ANGABEN
SIRI TOP 57
(art. 5057)
SIRI TOP 68
(art. 5068)
SIRI TOP 80
(art. 5080)
SIRI TOP 90
(art. 5090)
57 cm /
68 cm /
80 cm /
90 cm /
22”
40 x 40 cm /
26”
31”
57 x 57 cm /
35”
63 x 63 cm /
48 x 48 cm /
15”
20 mm /
18”
20 mm /
22”
20 mm /
25”
20 mm /
7,87”
7,87”
7,87”
7,87”
SIRI TOP 130
(art. 5130)
130 cm /
51”
90 x 90 cm /
35”
20 mm /
7,87”
45°-SCHNITT UND –BRUCH (Diagonalschnitte) (Abb.4 – Abb.8 –
Abb.9 – Abb.10)
Für diesen Schnitt den Knopf (B) Abb.8 lockern und den Feststeller (A) Abb.4 im
Uhrzeigersinn drehen. Den Winkelanschlag bis zum Anschlag gegen die entsprechenden
Feststeller (A) Abb.8 drehen und durch Spannen des Knopfs (B) Abb.8 in dieser
Position blockieren.
Die Fliese auf das Untergestell positionieren und unter Verwendung der vorhandenen
Millimeterskalen mit Winkelanschlag und Hilfswinkel in Berührung bringen. Die Skalen
(C) und (D) Abb.9 stellen die Länge (in Millimeter) der beiden gleichen Seiten des
gleichschenkligen Dreiecks dar, die mit dem 45°-Schnitt erzeugt werden. Die Skala (E)
Abb.9 stellt die Höhe dieses Dreiecks (in Millimeter) dar. Die Skala (F) Abb.9
entspricht der Skala (D) Abb.9 in Zoll.
Um den Schnitt durchzuführen, wie beim 90°-Schnitt vorgehen.
Bei großformatigen Fliesen wird folgendes empfohlen: Die Fliese nach dem Schnitt
brechen, indem beide Hände auf die beiden vom Schnitt getrennten Teile zu setzen sind
und bis zum Bruch Druck ausgeübt wird (Abb.10). Bei nicht korrekten 90°-Schnitten
und +/-45°-Schnitten die entsprechenden eisernen Exzenter (B) Abb.4 und (A) Abb.8
betätigen.
SONSTIGE SCHNITTARTEN (Abb.11) (Abb.12) (Abb.13)
(Abb.14) (Abb.15).
Falls die Fliese mit einem anderen Schnitt als 45° geschnitten werden soll, die
gewünschte Schnittlinie auf der Fliese zeichnen, die Fliese auf die Maschine setzen und
mit Hilfe der Skalen (A) und (B) Abb.11 oder (C) und (D) Abb.12 und des
Winkelanzeigers (E) Abb.13 dafür sorgen, dass die Schnittlinie des Schneidrads mit
der zuvor gezeichneten Schnittlinie übereinstimmt.
Falls bis zu 4 cm breite Listellos geschnitten werden sollen, sollte zuvor ein doppelt
breiter Streifen geschnitten (Abb.14) und dieser Streifen danach halbiert werden
(Abb.15).

SIRI PRO 57-68-80-90-130 Manuale Uso e Manutenzione Ver 1.0
WARTUNG (Abb.16) (Abb.17) (Abb.18)
Zur Auswechslung des Schneidrads die Schraube (C) Abb.16 bedienen.
Zur Auswechslung der Kratzschutzeinrichtungen (D) Abb.16 die abgenutzten
Kratzschutzeinrichtung demontieren und neue auf dem Griff einspannen.
Die Führung muss stets sauber sein und regelmäßig mit dem Ölspray geölt werden. Zur
Auswechslung der 2 Führungen die beiden Schrauben (A) und (B) Abb.17
losschrauben und laut Abb.18 herausstreifen (die Gleitführungen sind nur dann
auszuwechseln, wenn sie derart abgenutzt sind, dass sie sich zur Reduzierung des
Achsspiels nicht mit den Schrauben (A) und (B) Abb.17 festziehen lassen).
Ø 12 mm
Ø 12 mm
Ø 12 mm
Ø 12 mm
Ø 12 mm 150x45x30 mm
80x34x26 mm /
31”x13”x10”
93x34x26 mm /
37”x13”x10”
104x34x26 mm
/ 41”x13”x10”
115x34x26 mm
/ 45”x13”x10”
/ 59”x18”x12”
10 Kg / 22 lb 18 PZ – PCS
11 Kg / 24 lb 14 PZ – PCS
12 Kg / 26 lb 12 PZ – PCS
13 Kg / 28 lb 8 PZ – PCS
35 Kg / 77 lb 6 PZ – PCS

SIRI PRO 57-68-80-90-130 Manuale Uso e Manutenzione Ver 1.0
since 1975
S.I.R.I s.r.l.
Via R.Dalla Costa, 44/46
41122 MODENA (ITALY)
Tel. 059/313191 - Fax 059/311362
Email: info@siri.mo.it http//www.siri.mo.it
 Loading...