

Page 1
SircleBind CW-350
1
www.sirclecorp.com
Page 2
Thank you for your purchase of the SircleBind C W-3 50 3:1 wire and
plastic comb binding machine.
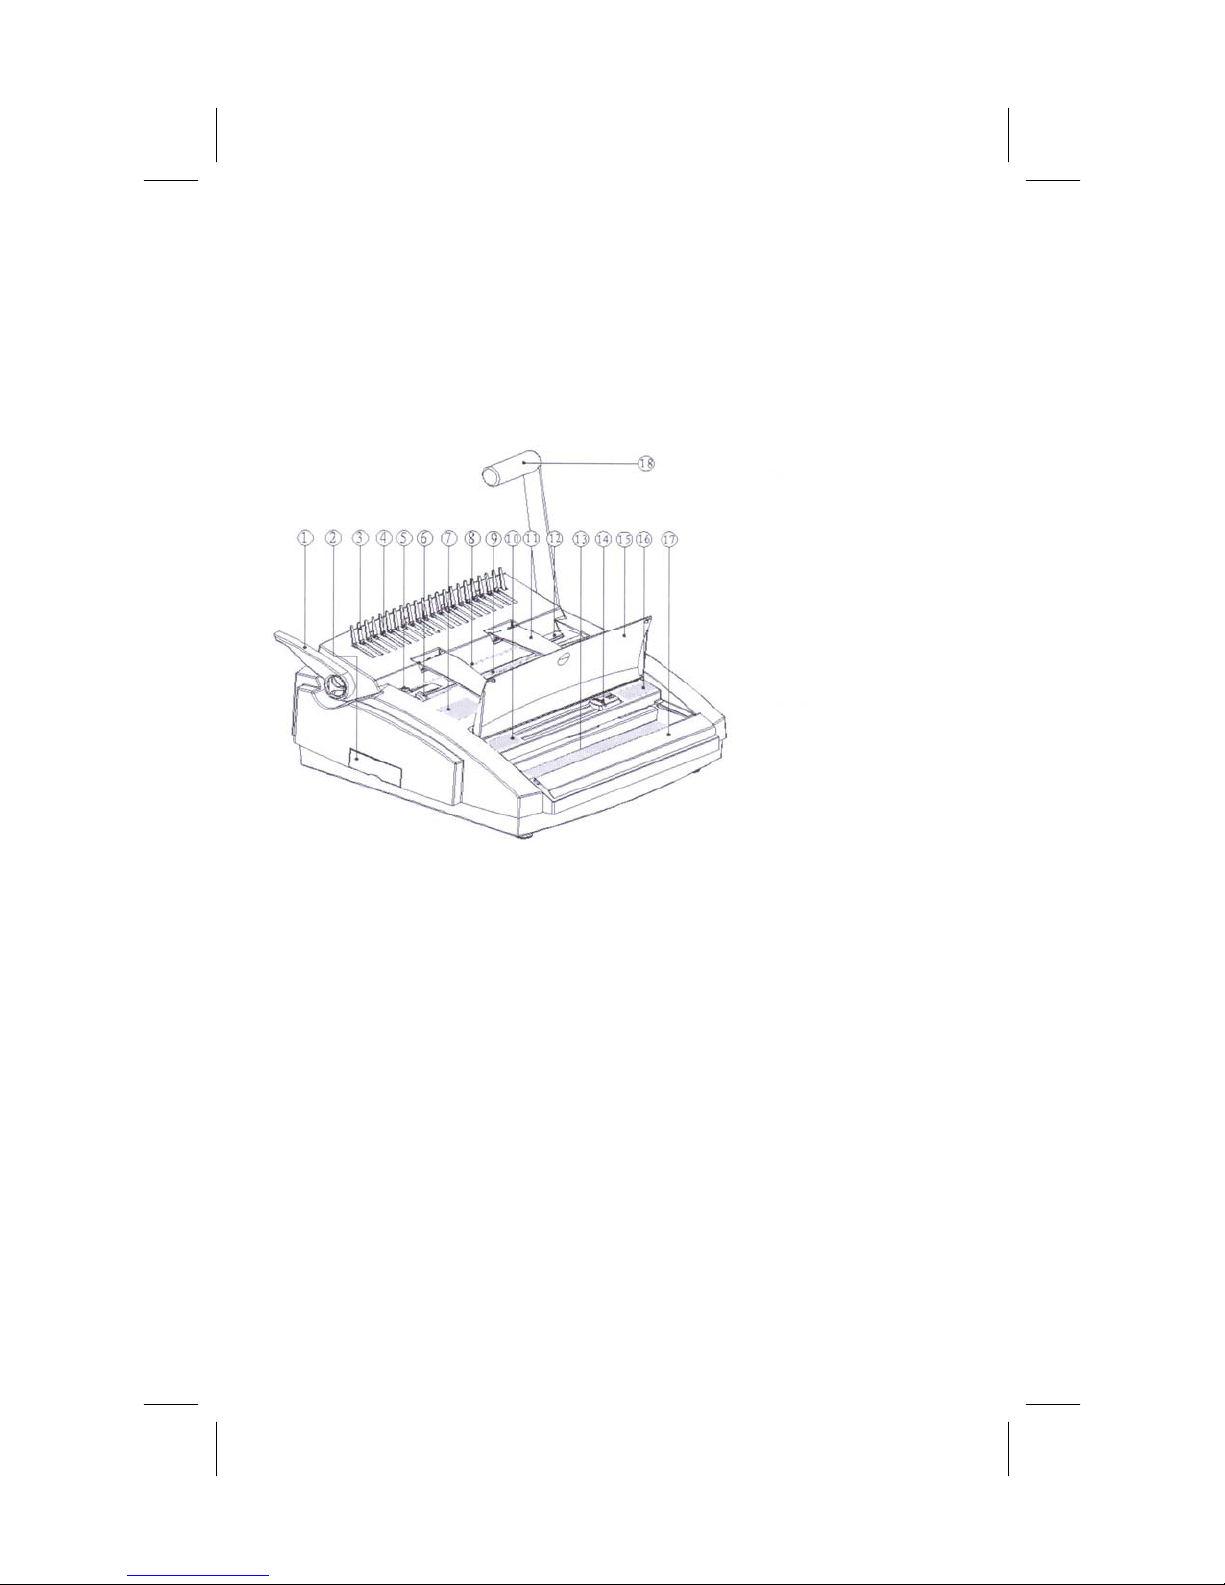
1. Plastic Comb Opening
Lever
2. Waste Tray
3. Metal Fingers of Comb
Spreader
4. Metal Hooks of Comb
Spreader
5. Paper Alignment for
Wire Punch
6. Paper Alignment for
Plastic Comb Punch
7. Wire Measuring Guide
8. 3:1 Wire Punch Throat
9. Plastic Comb Punch
Throat
10. Plastic Comb Measuring
Guide
11. Paper Support
12. Margin Depth Control
13. Wire Closer
14. Wire Comb Adjuster
15. Cover
16. Sheet Measuring Guide
17. Wire Hanger
18. Wire Comb Closing
Handle and Punch Handle
General Precautions:
1. Read the instructions carefully and thoroughly prior to using th e
machine.
2. Avoid punching metal objects such as staples or paper clips.
This may jam the machine.
3. Keep fingers away from the punching throat and wire closer to
avoid injury.
4. Empty waste tray frequently for best results.
2
Page 3
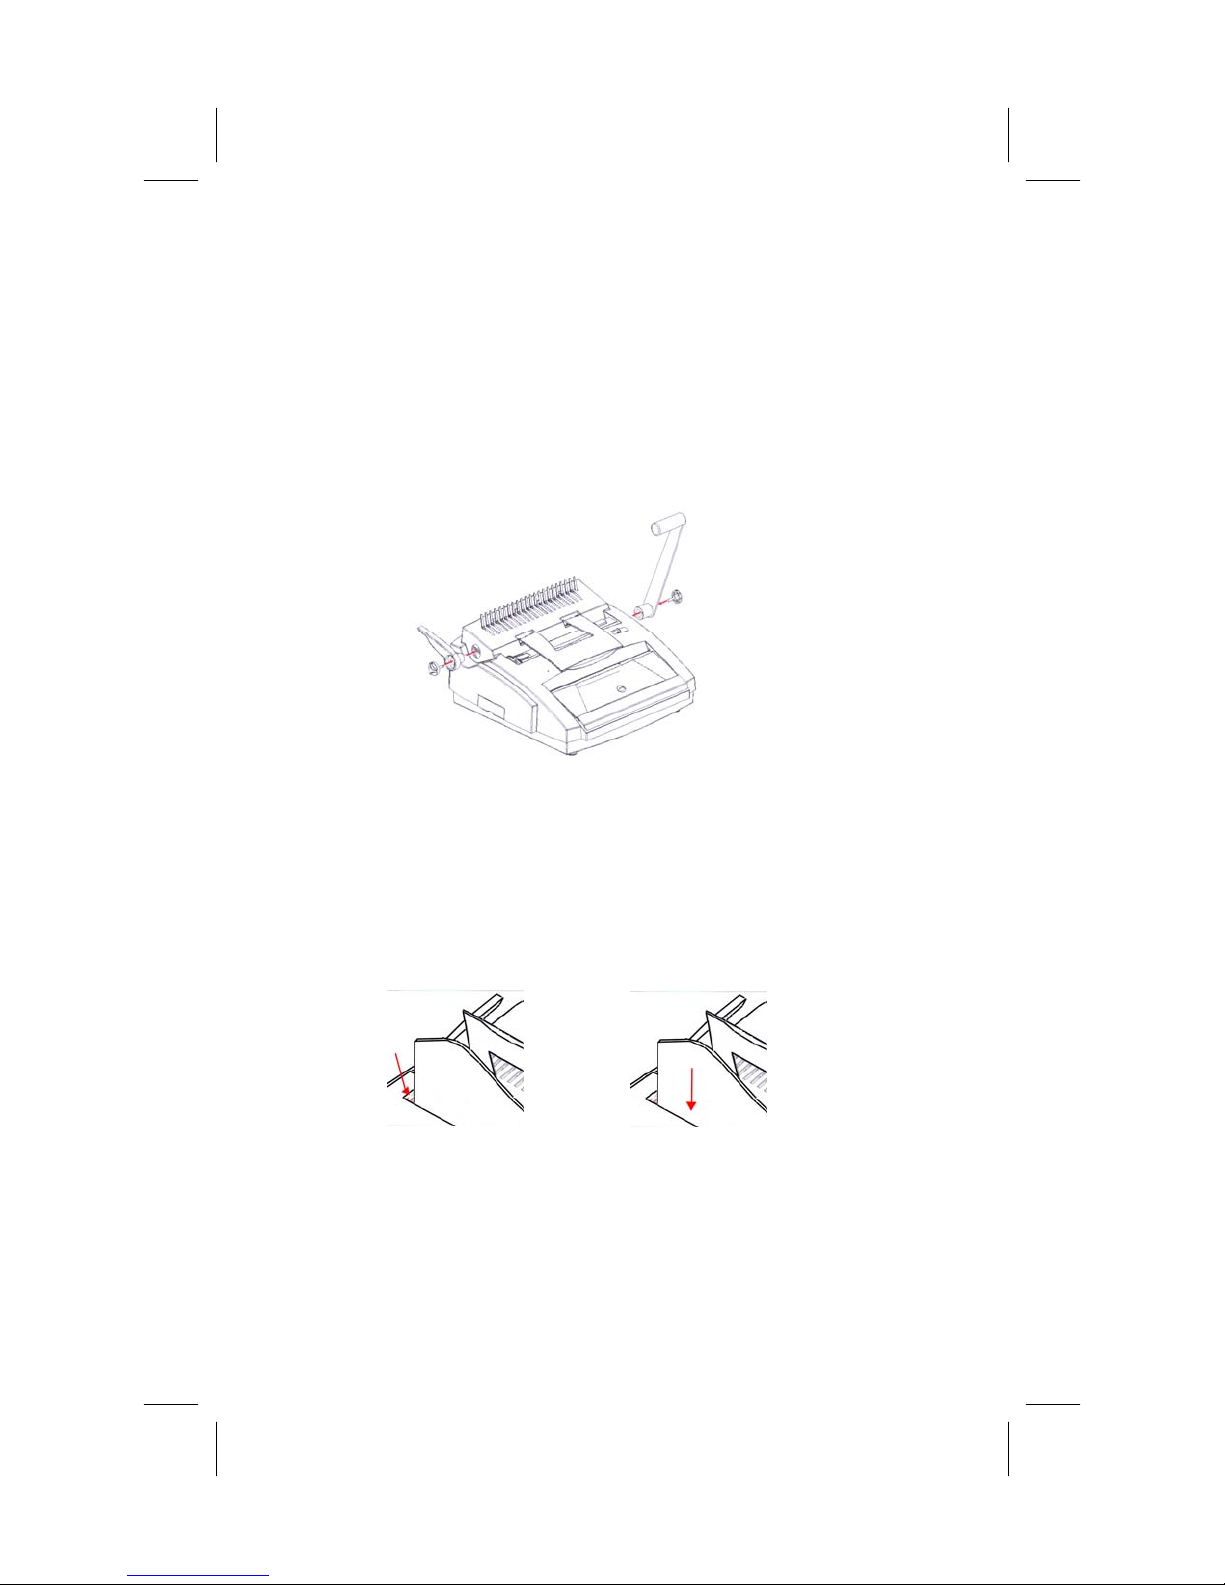
Asssembly (See Fig. 1.1):
1. Place machine on flat surface.
2. Insert handle onto the handle axle on the right side of the machine.
3. Fasten the handle into place with the screw provided.
4. Insert plastic comb opening lever onto the lever axle on the left
side of the machine.
5. Fasten the lever into place with the screw provided.
Fig. 1.1
Plastic Comb
Punch:
1. Lift up the paper support tray.
2. Use the paper margin guide to properly align papers. Tip: To
ensure proper alignment, use a piece of scrap paper to test the
punch and adjust if necessary. (See Fig. 2.1)
3. Insert the document into the plastic comb punch throat. (Max.
20 sheets of 20 lb paper). (See Fig. 2.2)
Fig. 2.1 Fig. 2.2
4. Pull down on punch handle.
5. Remove punched docum ent .
3
Page 4
Bind:
1. Select the plastic comb most suitable for your document size.
Use the plastic comb measuring guide or the following table t o
assist you in your selection.
Diameter 6 8 10 12 14 16 20 22 25 28 32 38 44 50
Max # of
Shts
25 45 65 95 125 145 175 210 240 270 310 375 440 500
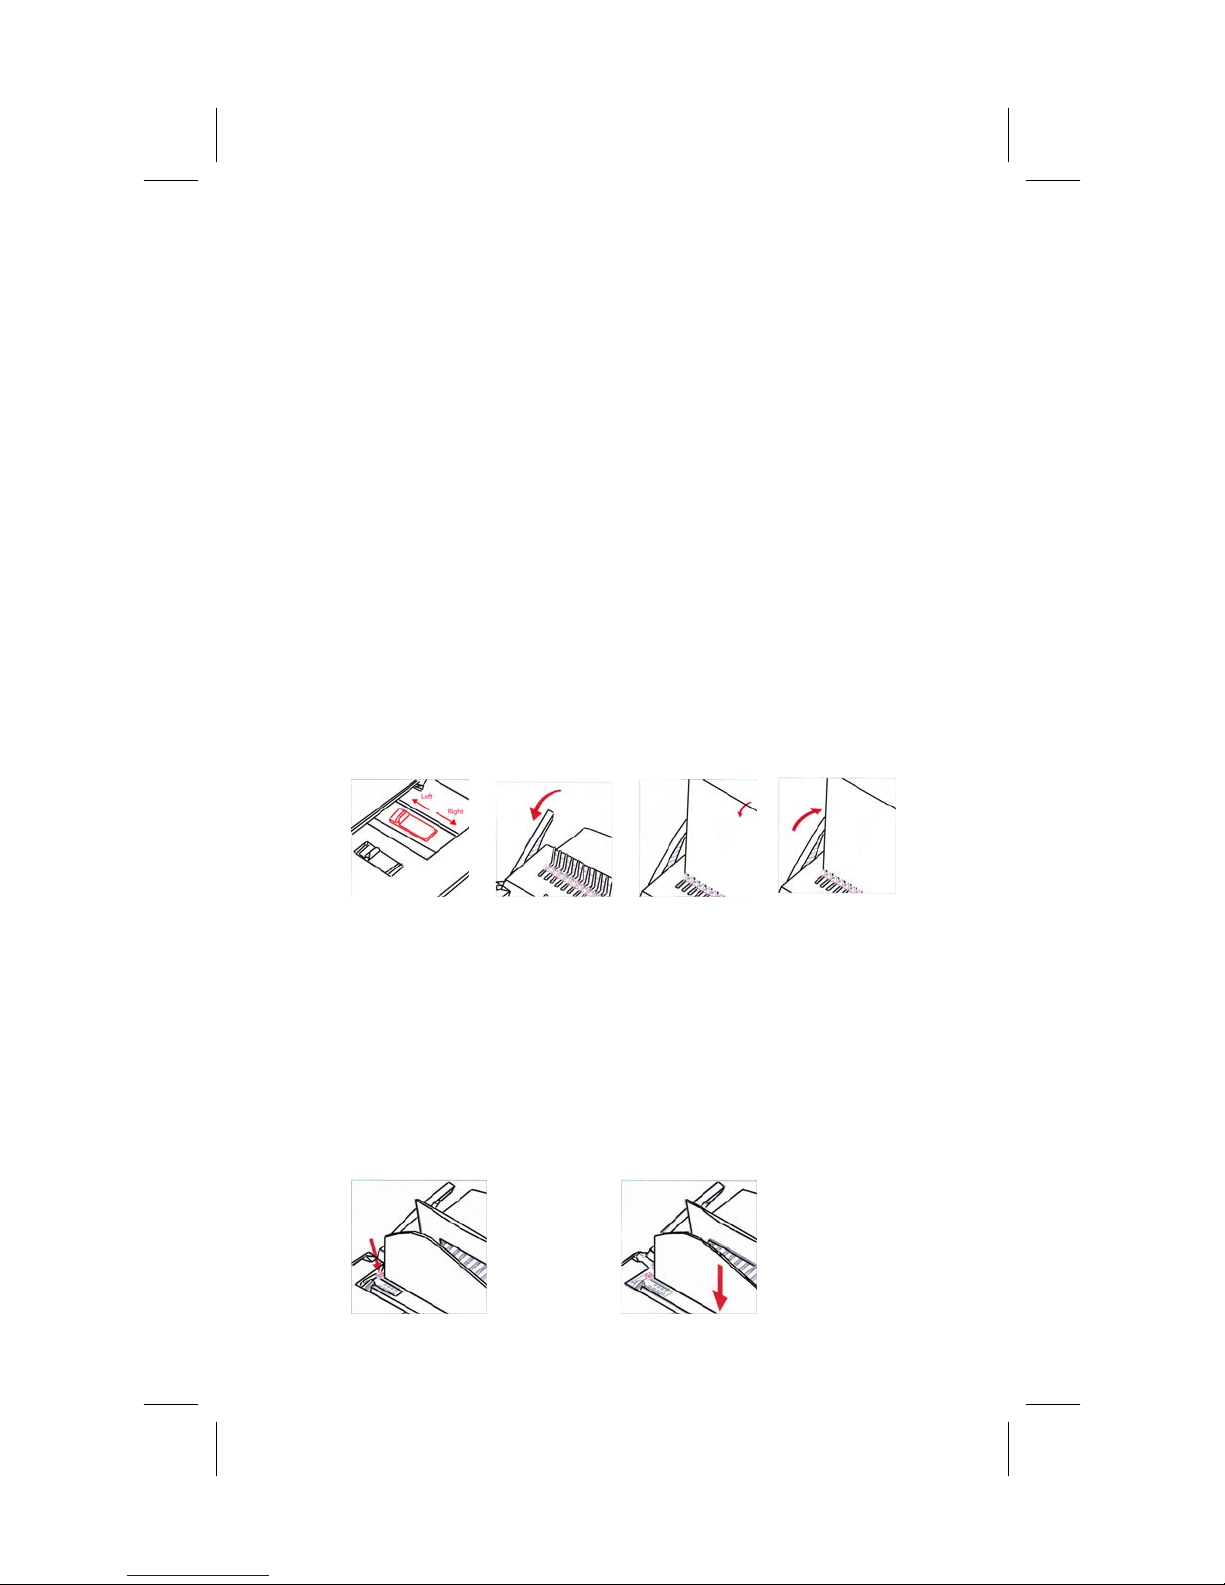
2. Set the punch depth control to the appropriate setting—ie: if
you are using a comb that is less than 12mm, slide the control to
the left and if you are using a comb that is greater than 12mm,
slide the control to the right. (See Fig. 3.1)
3. Insert the plastic comb, with the open side up, behind the metal
fingers of the comb spreader.
4. Pull the comb opening lever towards the back of the machine to
open the comb. (See Fig. 3.2)
5. Thread the sheets on the plastic comb. (See Fig. 3.3)
6. Push the comb opening handle down towards the front to the
machine to close the comb. (See Fig. 3.4)
Fig. 3.1
Fig. 3.2 Fig. 3.3
Fig. 3.4
3:1 Wire
Punch:
1. Lift the support tray up.
2. Use the paper margin guide to properly align papers. Tip: To
ensure proper alignment, use a piece of scrap paper to test the
punch and adjust if necessary. (See Fig. 4.1)
3. Insert the document to be punched in the 3:1 wire throat. (See
Fig. 4.2)
4. Pull down on the punch handle.
5. Remove punched docum ent .
Fig. 4.1 Fig. 4.2
4
Page 5
How to Bind with Wire Combs
This machine is designed to bind wire combs from 5 to 28mm. Fro
m
g
table below you can select the appropriate wire comb size accordin
number of sheets you are binding.
Bind:
1. Use the wire diameter guide to determine the appropriate size
wire to be used for your document. It can also be determined
using the following table. Note: The standard is 20lb paper.
Binding Comb 5 6 8 10 11 12 14 16 19 22 25 28
Max. # of Sheets 30 45 85 100 115 135 155 185 215 245 275 320
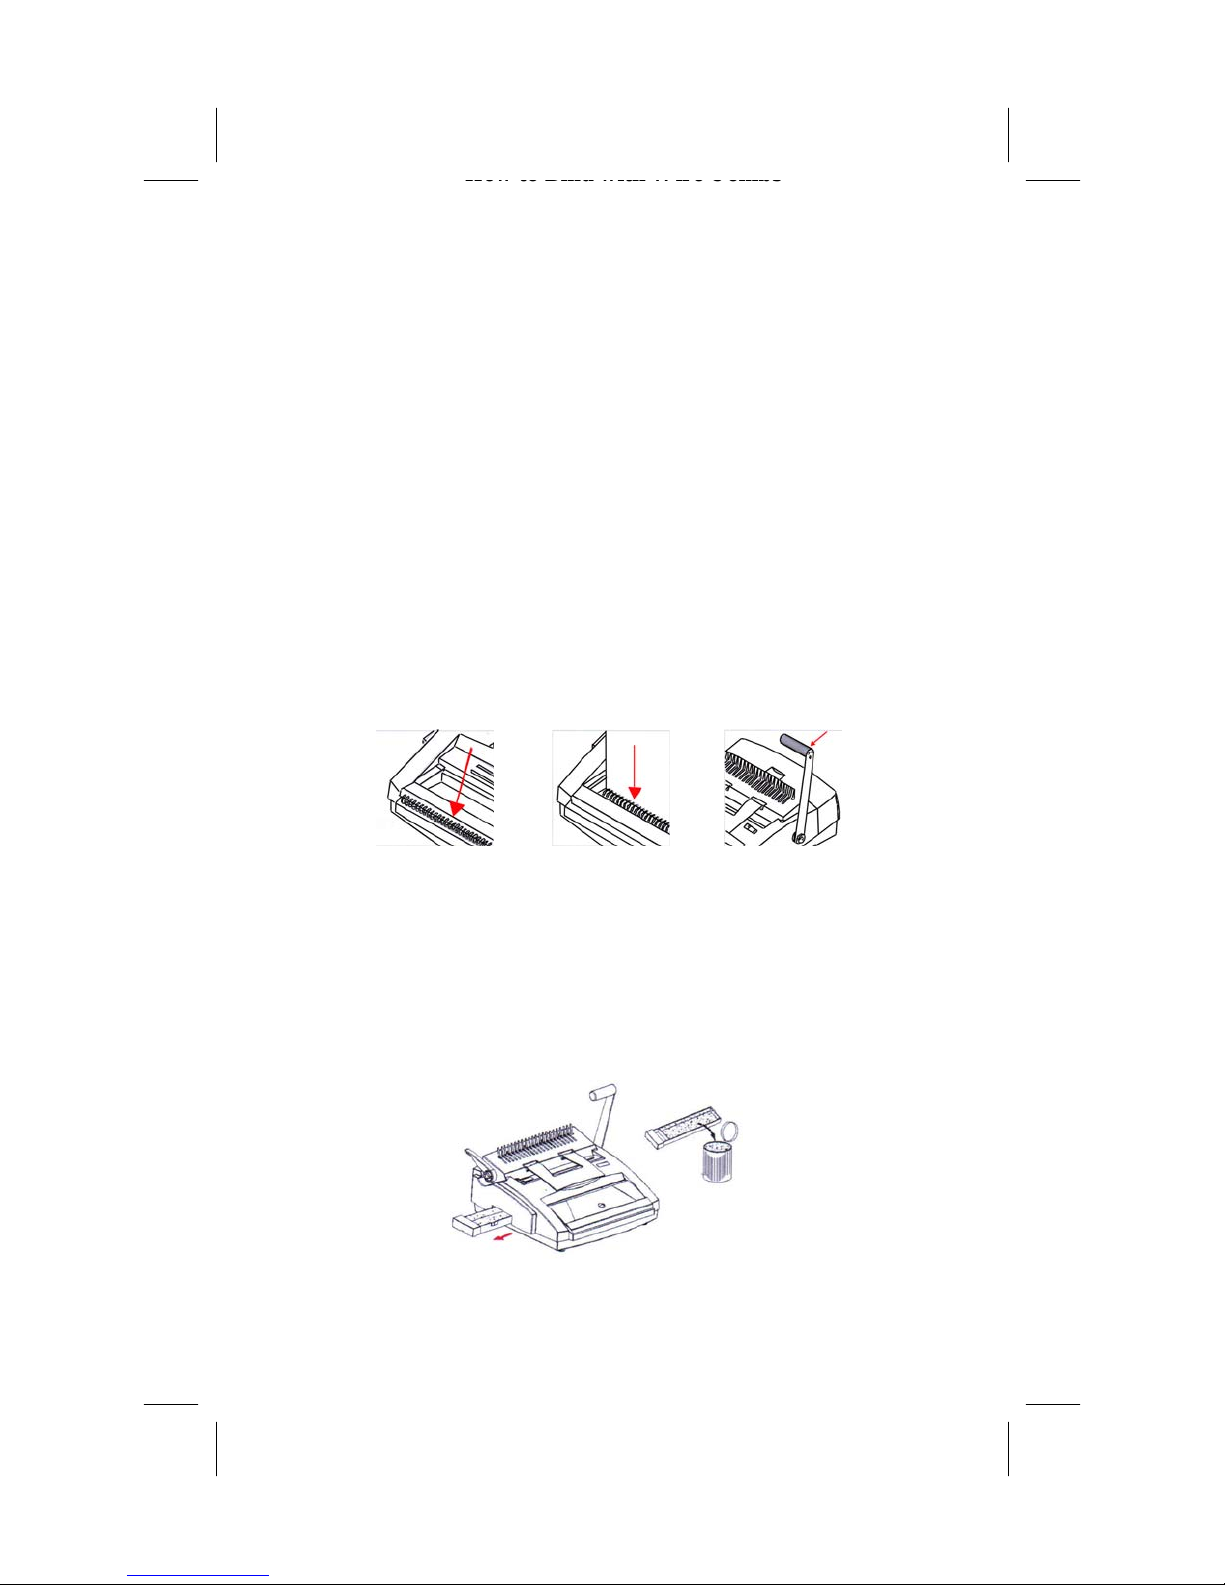
2. Place wire open side up on the wire hanger.(See Fig. 5.1)
3. Thread pages onto the wire hanger.
4. Lift the wire closing handle so it is in the vertical or upright
position.
5. Place the document in the wire throat so that the side to be
bound enters first. (See Fig. 5.2)
6. Hold the document steady and pull down on the wire closing
handle to bind the document. (See Fig. 5.3)
7. Remove the bound document.
Fig. 5.1 Fig. 5.2 Fig. 5.3
Emptying the Trash (See Fig. 6.1):
1. If you hear an alarm, it is necessary to empty the machine.
Note: The machine will not function unless the bin is emptied.
2. Slide the waste tray out of the unit.
3. Empty the waste tray.
4. Slide the waste tray back into the machine.
Fig. 6.1
5
Page 6
Technical Specifications
Punching Functions Multiple
Punch Style 3:1 Wire
Plastic Comb
Punch Manual
Punch Capacity Comb-20sheets (20 lb paper)
Wire-15 sheets (20 lb paper)
Operating Method Punch-Manual
Bind-Manual
Punch Depth Control Yes for Plastic Comb
Max. Page Size Letter
Bind Capacity Comb-2” (51mm)
Wire-1” (28 mm)
Sheet Capacity 306
Margin Guide Yes
Edge Guide Adjustable
Paper Load Vertical
Disengageables No
Machine Dimensions 18” x 17.75” x 9”
Box Dimensions 20.5” x 11” x 21”
MC Dimensions 21.25” x 11.75” x 22.25”
Net Weight 30.8 lbs
Gross Weight 37.8 lbs
www.sirclecorp.com
6
 Loading...