

SIRCHIE RIDGE PRO PLUS Operator's Manual
RIDGE PRO PLUS
DIGITAL MAGNIFIER
SIRCHIE
®
Technical Data and Reference Information
OPERATOR'S MANUAL
Products • Vehicles • Training
100 Hunter Place, Youngsville, NC 27596 USA
(919) 554-2244, (800) 356-7311 • www.sirchie.com • sirchieinfo@sirchie.com

2 of 12
MA14-710ENG-REV1
Table of Contents
Read Me First ....................................................................................................2
Overview ..........................................................................................................2
Hardware Description........................................................................................3
Quick Start .....................................................................................................3-4
Charging the Unit .............................................................................................4
Battery LED Descriptions .................................................................................... 4
Button Descriptions ...........................................................................................4
Opening and Closing the Handle ......................................................................5
Opening and Using the Viewing Stand ..............................................................5
Magnifying Live Images ..................................................................................... 5
Magnifying Frozen or Saved Images ..................................................................5
Switching Between Full Color and Grayscale ...................................................... 5
Freezing an Image ............................................................................................6
Turning LED Lights Off ....................................................................................... 6
Using the Reference Line or Masks .....................................................................6
Displaying Reference Line .................................................................... 6
Displaying Masks ................................................................................. 7
Storage Mode ...................................................................................................7
Saving an Image .................................................................................7
Deleting an Image ............................................................................7-8
Viewing Saved Images.......................................................................................8
Saving an Image When Memory is Full ..............................................................8
Storage Mode Icons...........................................................................................8
Transferring Images to a Computer Using the USB Cable ................................8-9
Transferring Images to Ridge Pro Plus 50 Using the USB Cable ........................... 9
Auto Review Mode .......................................................................................9-10
Troubleshooting .........................................................................................10-11
Technical Specifications ...................................................................................11
Read Me First
• Before using Ridge Pro Plus
®
50 for the first time, you must charge its battery. A
full charge takes approximately three hours.
Refer to Charging the Unit for battery charging procedures.
Refer to Battery LED Descriptions for battery status descriptions.
• For the basics to help you get started using Ridge Pro Plus, read Quick Start.
• For an overview of Ridge Pro Plus and its operation, review the information in
this guide first.
Overview
Thank you for purchasing Ridge Pro Plus.
Ridge Pro Plus is a compact video magnifier that can magnify an object from two to
12 times its size and is ideal for latent print examination as well as reviewing many
types of evidence. Its compact size and large screen make it easier to view than a
standard loupe or magnifier, and allows you to freeze and save the images for review.
3 of 12
MA14-710ENG-REV1
Features:
• 5-megapixel, auto-focus camera that provides sharp HD quality images
• 5-inch full color LCD screen.
• The unit has both an integrated fold-away handle and viewing stand.
• Continuous zoom from 2x to 12x
• 2 color modes: color and grayscale
• Captures images as bitmap (BMP) files for easy transfer to a computer via USB
• LED lighting
• Reference lines and masks to pinpoint key areas
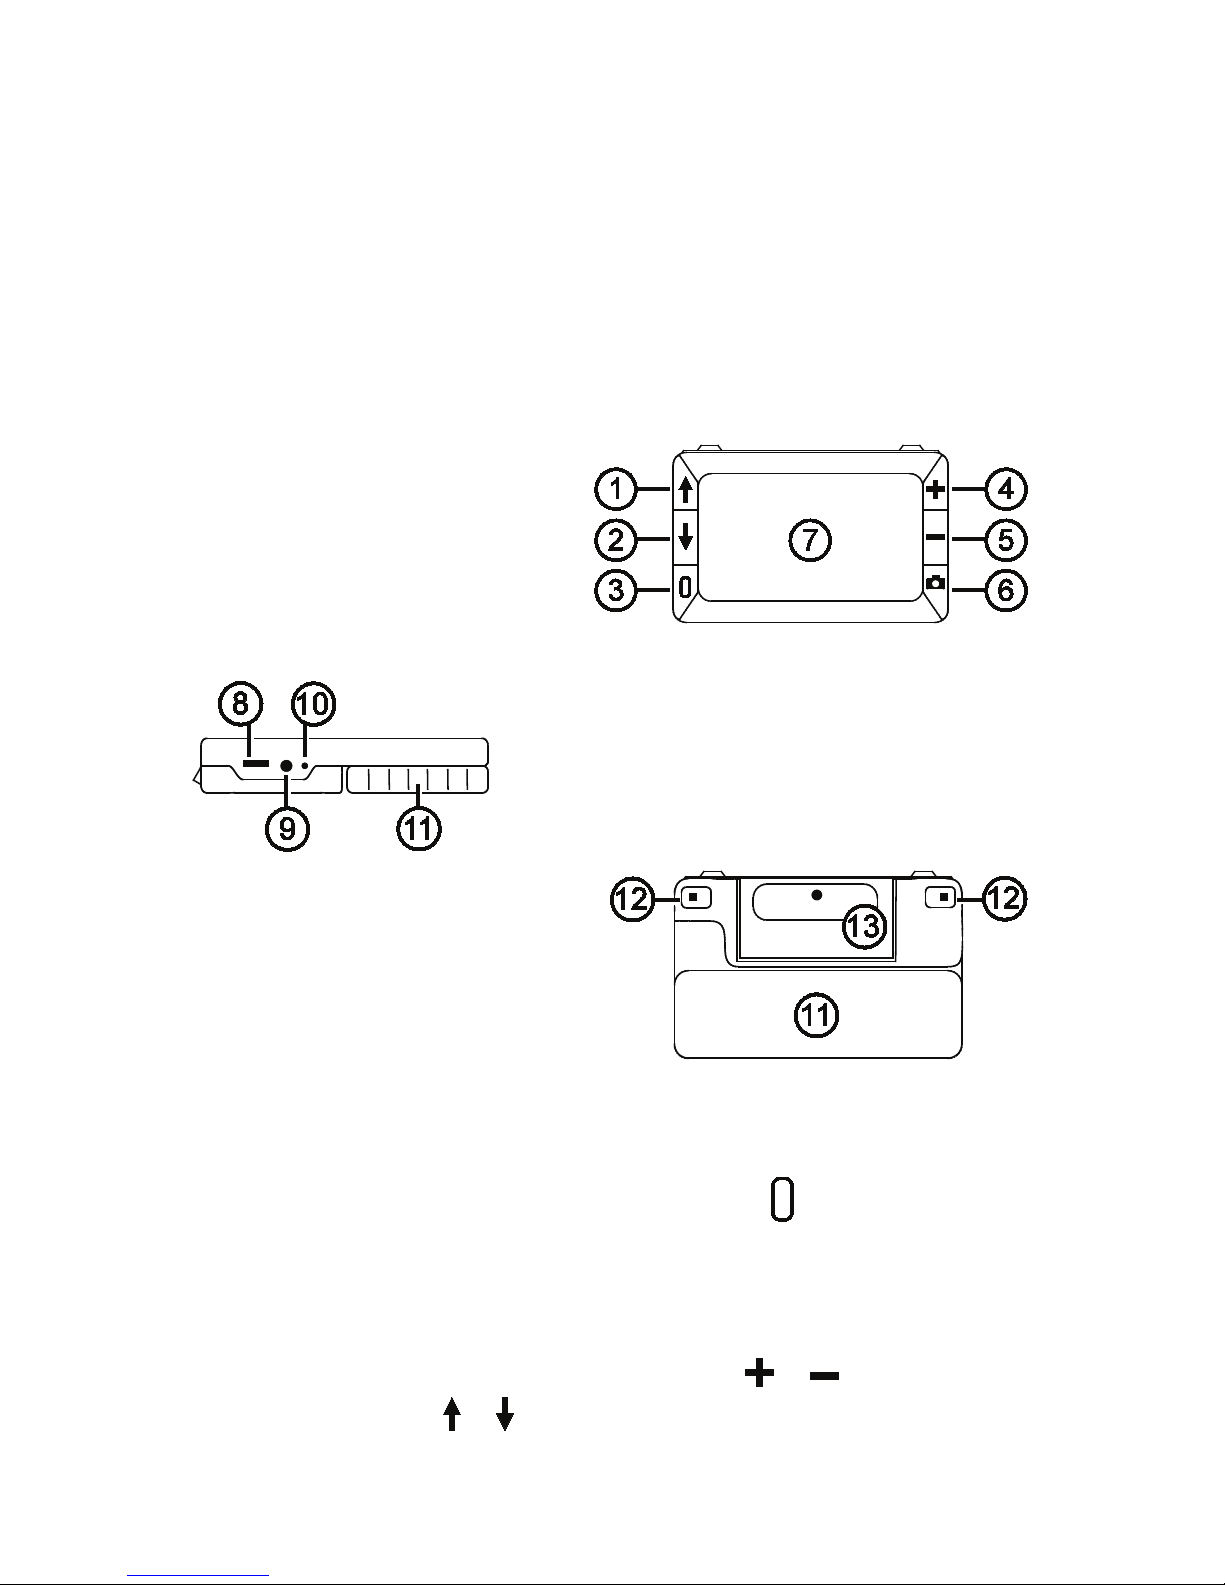
Hardware Description
1. Color Mode Scroll Up (Blue)
2. Color Mode Scroll Down (Blue)
3. Power (Green/Yellow)
4. Magnification Increase (Yellow)
5. Magnification Decrease (Yellow)
6. Freeze Frame (Red)
7. LCD screen
8. USB port (micro-USB)
9. Power connector (5V; 2.1A)
10. Battery LED
11. Handle in closed position
12. LED lights
13. Camera (5 MP)
Quick Start
Below are steps to quickly set up and use the unit for the first time.
1. Make sure the unit is fully charged.
2. Turn the unit on by pressing the green/yellow button
.
3. Do one of the following:
• Rotate and extend the handle to hold and use the unit like a magnifying
glass.
• Open the stand to place the unit on a flat surface.
4. Adjust the magnification using the yellow buttons (
or ).
5. Select a color mode (
or ) that best suit your viewing needs.
4 of 12
MA14-710ENG-REV1
6. Freeze the image on the LCD screen so that you may take your time and
inspect details in the image.
7. Save the image or return to live view
.
Once you become comfortable using the unit, try the following advanced features.
• Turn the LED lights on or off to adjust for glare and reflections when viewing an
item.
• Use the reference line and masks to help you align the object that you are view
-
ing on the unit’s screen.
• Save, view, and delete images stored on the unit.
• For additional storage, transfer images from the unit to your computer.
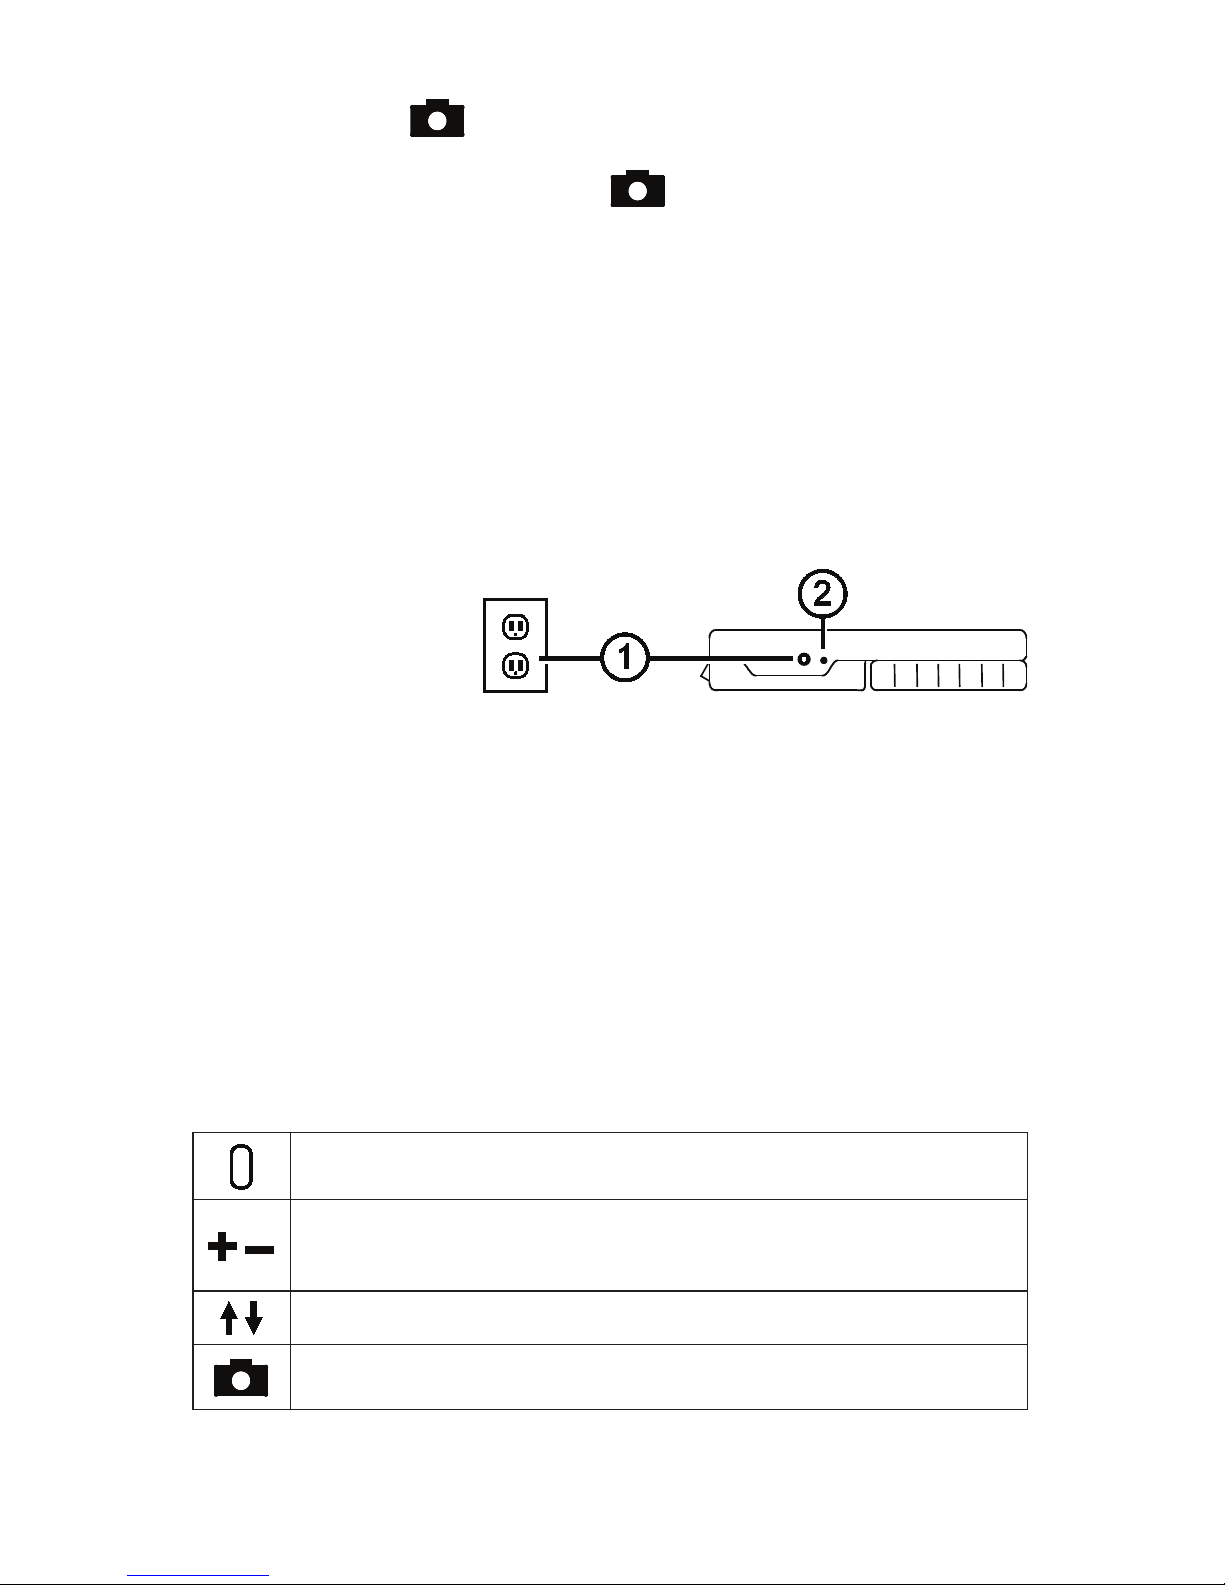
Charging the Unit
Note: You must use the supplied power adapter to charge the unit. It cannot be
charged using the computer’s USB port.
1. Plug one end of the
power adapter into the
unit and the other end
into a wall outlet (1).
2. The battery indicator
LED blinks green to show that the battery is charging (2).
3. The LED stops blinking and glows a steady green once the battery is charged.
Unplug the power adapter from the unit. The battery indicator LED turns off.
4. You can now use the unit for approximately three hours of continuous use. When
the battery is low, the battery indicator LED flashes red. Connect the power
adapter and plug it in to recharge the battery.
Battery LED Descriptions
Green – Solid: Battery charged – power adapter connected
Green – Flashing: Battery charging – power adapter connected
Red – Flashing: Battery low
Red – Solid: Error – unplug power adapter, wait a few seconds, and plug in again
Button Descriptions
Power (Green/Yellow): Press to turn power on. Press it again to turn
power off.
Magnification (Yellow): Press and HOLD for continuous zoom magnification with live images. When viewing frozen images, press and
release to incrementally increase or decrease magnification.
Color Mode (Blue): Press to switch between full color and grayscale.
Freeze Frame (Red): Press to freeze the current image. Press it again
to turn off Freeze Frame mode and return to live view.
 Loading...