

Siqura FD360IR Series User Manual

002B0XZXZ1A4
FD360IR Series
High-Definition 6 MP
Fisheye Camera with D/N and IR
User Manual
Ver. 1.6
FD360IR
FD360IR-E

2
Note: To ensure proper operation, please read this manual thoroughly before using the product and retain the information
for future reference.
Copyright © 2016 Siqura B.V.
All rights reserved.
FD360IR
User Manual v1.6 (151703-1.6)
MW10
Nothing from this publication may be copied, translated, reproduced, and/or published by means of printing,
photocopying, or by any other means without the prior written permission of Siqura.
Siqura reserves the right to modify specifications stated in this manual.
Brand names
Any brand names mentioned in this manual are registered trademarks of their respective owners.
Liability
Siqura accepts no liability for claims from third parties arising from improper use other than that stated in this manual.
Although considerable care has been taken to ensure a correct and suitably comprehensive description of all relevant
product components, this manual may nonetheless contain errors and inaccuracies. We invite you to offer your
suggestions and comments by email via t.writing@tkhsecurity.com. Your feedback will help us to further improve our
documentation.
How to contact us
If you have any comments or queries concerning any aspect related to the product, do not hesitate to contact:
Siqura B.V.
Zuidelijk Halfrond 4
2801 DD Gouda
The Netherlands
General : +31 182 592 333
Fax : +31 182 592 123
E-mail : sales.nl@tkhsecurity.com
WWW : www.siqura.com

3
Table of Contents
1. Overview ................................................................................................................................ 5
2. Menu Tree .............................................................................................................................. 5
2.1 Home Page.................................................................................................................. 6
2.1.1 Function Items on the Home Page ............................................................... 6
2.2 System ........................................................................................................................ 9
2.2.1 System ......................................................................................................... 9
2.2.2 Security ...................................................................................................... 11
2.2.2.1 User ............................................................................................ 11
2.2.2.2 HTTPS ........................................................................................ 13
2.2.2.3 IP Filter ....................................................................................... 15
2.2.2.4 IEEE 802.1X ............................................................................... 17
2.2.3 Network ...................................................................................................... 19
2.2.3.1 Basic ........................................................................................... 19
2.2.3.2 QoS ............................................................................................ 23
2.2.3.3 SNMP ......................................................................................... 24
2.2.3.4 UPnP .......................................................................................... 26
2.2.4 DDNS ......................................................................................................... 27
2.2.5 Mail ............................................................................................................ 28
2.2.6 FTP ................................................................................................ ............ 28
2.2.7 HTTP .......................................................................................................... 29
2.2.8 Events ........................................................................................................ 29
2.2.8.1 Application .................................................................................. 29
2.2.8.2 Motion Detection ......................................................................... 34
2.2.8.3 Network Failure Detection ........................................................... 40
2.2.8.4 Tampering................................................................................... 42
2.2.8.5 Periodical Event .......................................................................... 46
2.2.8.6 Manual Trigger ............................................................................ 49
2.2.8.7 Audio Detection .......................................................................... 53
2.2.9 Storage Management (Local Recording) .................................................... 57
2.2.9.1 SD Card ...................................................................................... 57
2.2.9.2 Network Share (NAS) ................................................................. 59
2.2.10 Recording (Local Recording) ...................................................................... 61
2.2.11 Schedule ................................................................ .................................... 62
2.2.12 File Location (Snapshots and Web Recording) ........................................... 63
2.2.13 View Information ........................................................................................ 63
2.2.13.1 Log File ....................................................................................... 63

4
2.2.13.2 User Information ......................................................................... 64
2.2.13.3 Parameters ................................................................................. 64
2.2.14 Factory Default ........................................................................................... 65
2.2.15 Software Version ........................................................................................ 65
2.2.16 Software Upgrade ...................................................................................... 66
2.2.17 Maintenance ............................................................................................... 67
2.3 Streaming .................................................................................................................. 68
2.3.1 Video Format .............................................................................................. 68
2.3.2 Video Compression .................................................................................... 70
2.3.3 Video Text Overlay ..................................................................................... 71
2.3.4 Video OCX Protocol ................................................................................... 72
2.3.5 Video Frame Rate ...................................................................................... 72
2.3.6 Video Mask ................................................................................................ 73
2.3.7 Audio (Audio Mode and Bit Rate Settings) ................................................. 74
2.4 Camera ...................................................................................................................... 76
2.4.1 Exposure .................................................................................................... 76
2.4.2 White Balance ............................................................................................ 77
2.4.3 Picture Adjustment ..................................................................................... 80
2.4.4 IR Function ................................................................................................. 81
2.4.5 Noise Reduction ......................................................................................... 82
2.4.6 Profile ......................................................................................................... 83
2.4.7 Backlight .................................................................................................... 84
2.4.8 Digital Zoom ............................................................................................... 84
2.4.9 WDR Function ............................................................................................ 84
2.4.10 Fisheye Setting .......................................................................................... 85
2.4.11 TV System.................................................................................................. 88
2.5 Logout ....................................................................................................................... 89
Appendix A: Install UPnP Components..................................................................................... 90
Appendix B: IP Addresses from Decimal to Binary .................................................................. 91

5
1. Overview
The FD360IR high-definition 6 MP fisheye camera is provided with a
user-friendly browser-based configuration interface. This manual offers detailed
information about the Home page, system settings, and camera settings.
For compliancy information, see the EU Declaration of Conformity, which is
available for download at http://www.siqura.com/support-files.
2. Menu Tree
There are five tabs on the Home Page: <Home>, <System>, <Streaming>,
<Camera>, and <Logout>.
Home
Users can monitor live video of the targeted area on this page.
System
The administrator can set the host name, system time, root password, network
related settings, etc. Further details are presented in the System chapter.
Streaming
The administrator can modify the video resolution and rotation type, and select
an audio compression mode on this page.
Camera
The Camera tab is available to the administrator and user accounts that have
been granted the privilege of camera control. On this tab, the administrator and
users can adjust various camera parameters, including <Exposure>, <White
Balance>, <Picture Adjustment>, <IR Function>, <Noise Reduction>, <Profile>,
<Backlight>, <Digital Zoom>, <WDR Function>, , <Fisheye Setting>, and <TV
System>.
Logout
Click the tab to log on to the camera with a different user name and password.
6
2.1 Home Page
Click the <Home> tab to access the home page. There are several function
buttons on the home page. Detailed information of each item is given in the
following section.
2.1.1 Function Items on the Home Page
Multiple Languages Support
Multiple languages are supported for the graphical user interface, including
German, English, French, Italian, and Simplified Chinese.
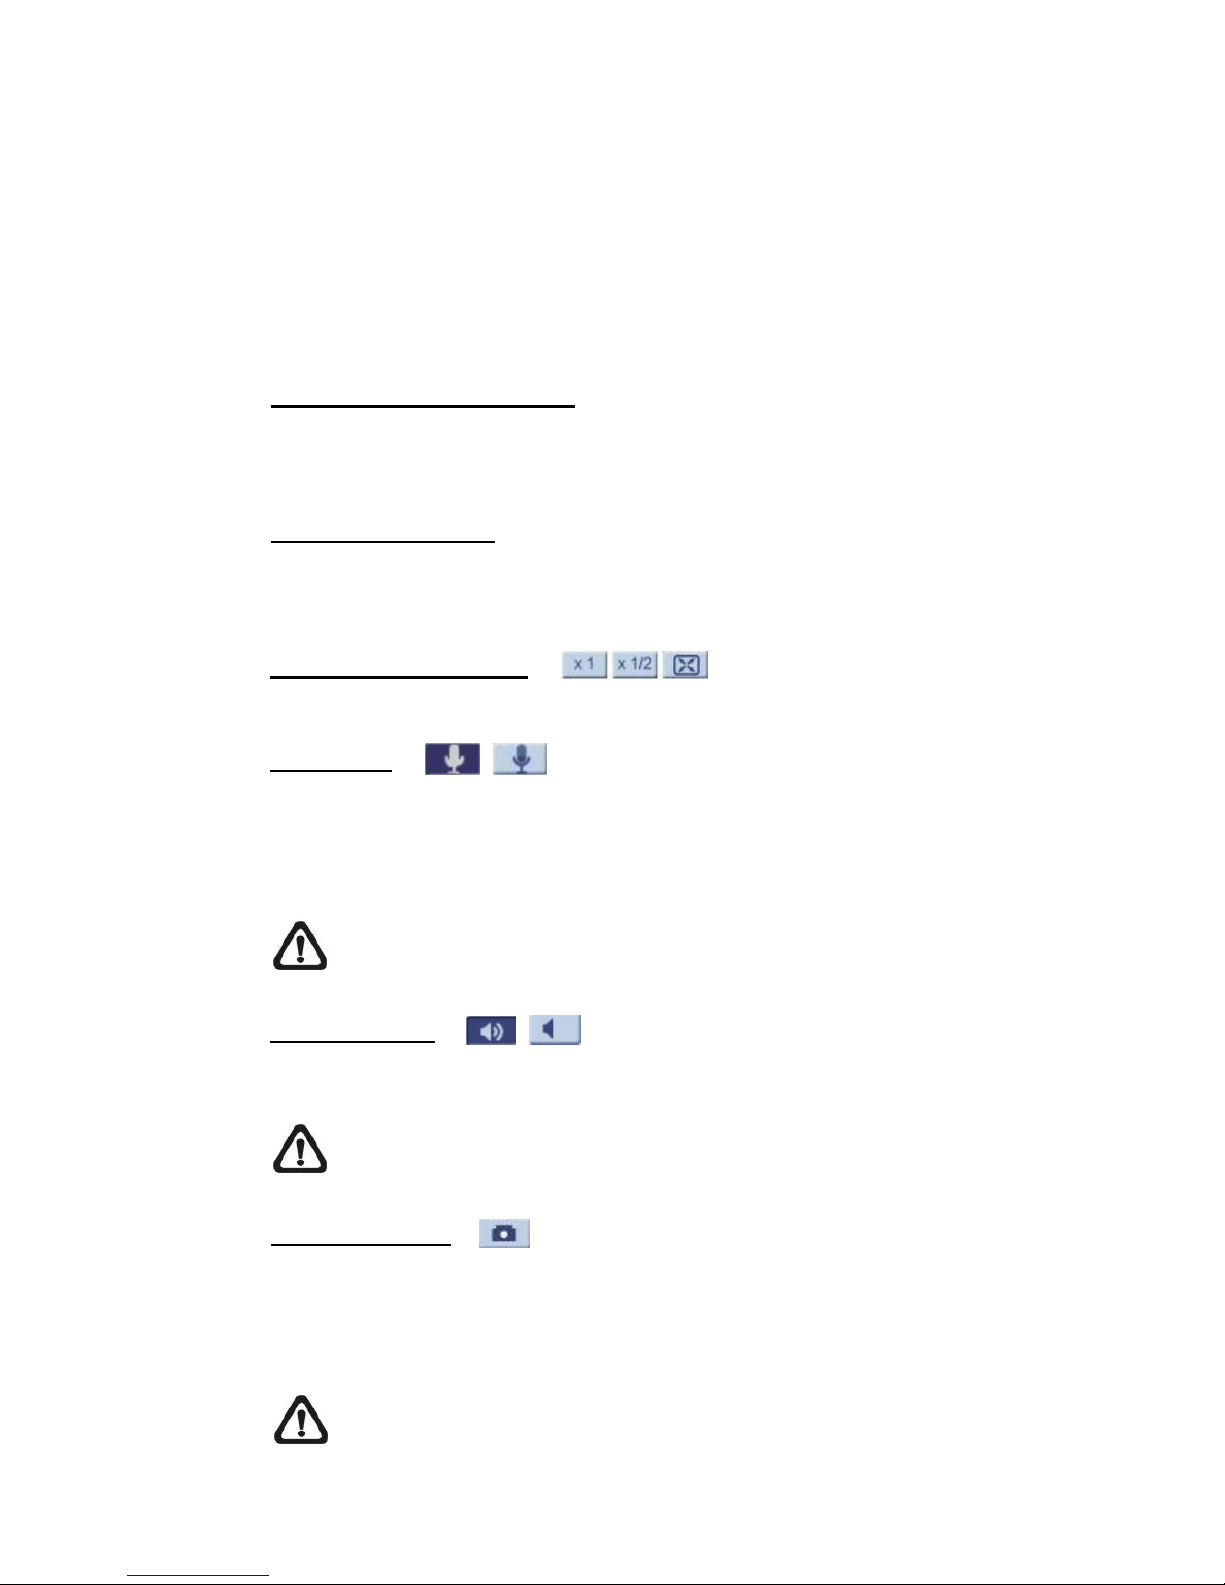
Digital Zoom Control
In full screen mode, users can implement digital PTZ by rotating the mouse
wheel (to zoom in/out) and dragging the mouse into any direction.
Screen Size Adjustment
Image display size can be adjusted to x1/2 and full screen.
Talk button
(On/Off)
The Talk function allows the local site to talk to the remote site. Click the button
to enable/disable the Talk function. See Security> User> Add user> Talk /
Listen for further details.
NOTE: This function is available to users who have been granted this
privilege by the administrator.
Speaker button
(On/Off)
Click the <Speaker> button to mute/activate the audio.
NOTE: This function is available to users who have been granted this
privilege by the administrator.
Snapshot button
Click the button and a JPEG snapshot is automatically saved to the designated
location. The default storage location for snapshots is: C:\. To change the
storage location, see section File Location for further details.
NOTE: Under the Windows 7 or Windows 8 operating system, to
implement the Snapshot function, users must run IE as administrator.
7
To run IE as administrator, right-click the IE browser icon and then
select “Run As Administrator” to launch IE.
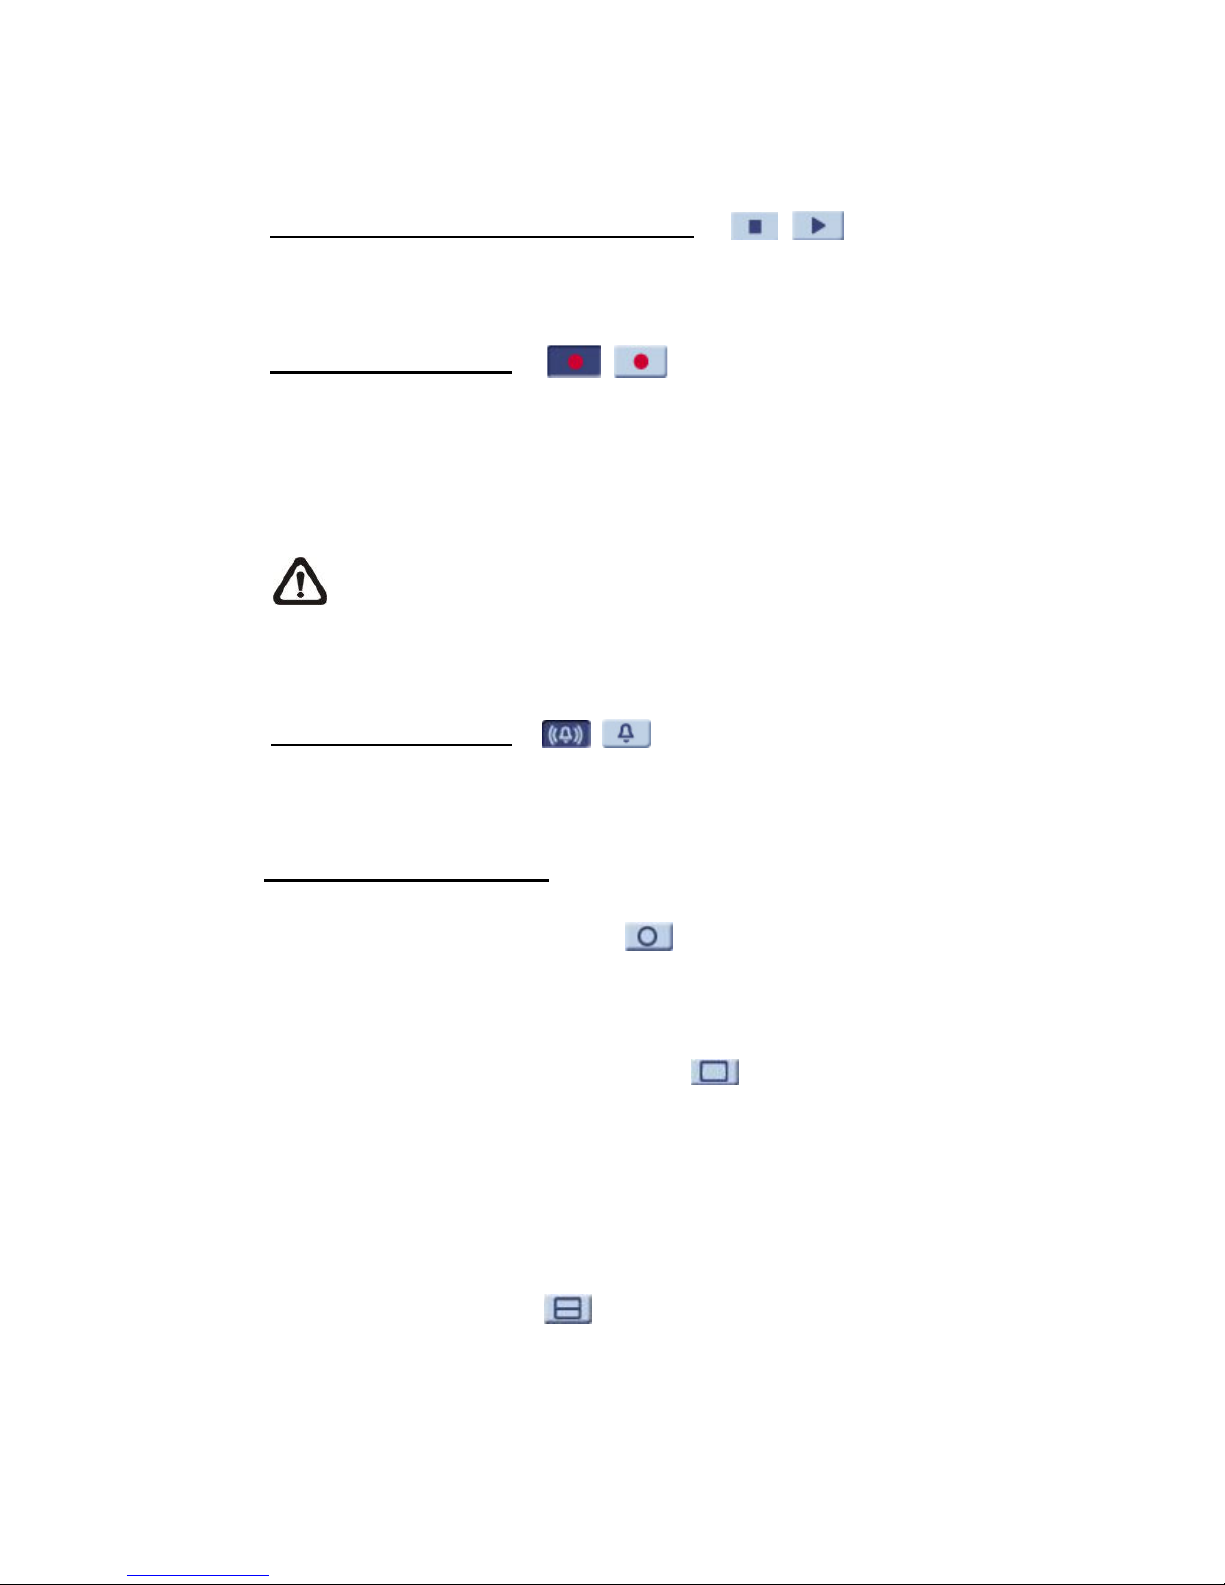
Video Streaming Pause / Restart button
(Pause/Restart)
Click the <Stop> button to disable video streaming. The video preview goes
blank. Click the <Restart> button to show live video again.
Web Recording button
(On/Off)
Click the <Recording> button and the Live View images from the web browser
are directly recorded to the specified location on the local hard drive, which is
configured on the <File Location> page. The default storage location for web
recording is: C:\. See section File Location for further details.
NOTE: Under the Windows 7 or Windows 8 operating system, to
implement the Web Recording function, users must run IE as
administrator. To run IE as administrator, right-click the IE browser icon
and then select “Run As Administrator” to launch IE.
Manual Trigger Button
(On/Off)
Click the <Manual Trigger > button to activate/deactivate the manual trigger.
See section Manual Trigger of the next chapter for further details.
Fisheye Image Adjustment
Fisheye Source Image
Click the <Fisheye Source Image> button to view live video as
hemisphere fisheye source images.
Single view with ePTZ
For a Ceiling Mount installed camera, click the <Single ePTZ> button
to view the dewarped live images and virtually pan/tilt/zoom the
camera according to your needs. Users can implement virtual PTZ by
rotating the mouse wheel (to zoom in/out), and dragging the mouse
into any direction.
360° Panoramic
For a Ceiling Mount installed camera, click the <360° Panoramic>
button to view the dewarped live images as two 180° views.

8
Quad View with ePTZ
For a Ceiling Mount installed camera, click the <Quad View> button to
view the dewarped live images as four ePTZ views.
180° Panoramic
For a Wall Mount installed camera, click the <180° Panoramic> button
to view the dewarped live video as a single 180° view.
Triple view with dual ePTZ
For a Wall Mount installed camera, click the <Dual ePTZ> button to
view the dewarped live video as a single 180° view with two ePTZ
views. Users can implement virtual PTZ by rotating the mouse wheel
(to zoom in/out), and drag the mouse into any direction in the ePTZ live
video panes.
The available Fisheye Image Adjustment buttons are different according to the
dewarping method and installation method selected on the <Fisheye Correction>
setting page. The following table shows the available buttons in different
dewarping methods and installation methods. The supported buttons are
represented by “√”.
Dewarping Method /
Installation Method
Button
Front End Correction*
Back End Correction
Ceiling
Mount
Wall
Mount
Ceiling
Mount
Wall
Mount
Fisheye Source Image
-
-
√
√
Single View with ePTZ
√** - √
-
360° Panoramic
√ - √
-
Quad View with ePTZ
√ - √
-
180° Panoramic
- √ -
√
Triple view with dual ePTZ
- √ -
√
*If users use the Front End Correction method for dewarping, the buttons are
only shown when the video format is set to H.264-2 or MJPEG on the Home
page.
**If users use the Front End Correction method, the Single ePTZ button
supported in Ceiling Mount installation is only available when the resolution of
the second stream is lower than “960 x 960”.

9
2.2 System
On the <System> tab, there are submenus including: <System>, <Security>,
<Network>, <DDNS>, <Mail>, <FTP>, <HTTP>, <Events>, <Storage
Management>, <Recording>, <Schedule>, <File Location>, <View Information>,
<Factory Default>, <Software Version>, <Software Upgrade>, and
<Maintenance>.
NOTE: The <System> configuration page is accessible only to the
administrator.
2.2.1 System
The System page can be found under the path: System> System.
Host Name
The host name is for camera identification. If the alarm function (see section
Application) is enabled and set to send alarm message by Mail/FTP, the host
name entered here is displayed in the alarm message. The maximum length of
the Host Name is 63 characters.
Time Zone
Select the time zone in the drop-down list according to the location of the
camera.
Enable Daylight Saving Time
To enable DST, select the item, and then specify the time offset and DST
duration. The format for the time offset is [hh:mm:ss]. If, for example, the
amount of time offset is one hour, enter “01:00:00” into the field.
Time format
Choose a time format (yyyy/mm/dd or dd/mm/yyyy) in the drop-down list. The
format of the date and time displayed above the live video window is changed
according to the selected format.
10
Sync with Computer Time
Select the item and the video date and time are synchronised with the PC date
and time.
NOTE: Users must click the <Save> button to confirm the setting.
Otherwise, the time is not synced.
Manual
Using this item, the administrator can set the video date and time manually. The
entry format should be identical with the examples shown next to the text boxes.
Sync with NTP server
Using the Network Time Protocol (NTP) is an alternative method of
synchronising the clock of the camera with an NTP server. In the text box,
specify the server to be used for synchronising. Then select an update interval
in the drop-down list. For further information about NTP, see www.ntp.org.
NOTE: The clock of the camera is synchronised every time the camera
boots up.
Click <Save> to save the settings.

11
2.2.2 Security
The Security setting can be found under this path: System> Security.
Clicking <Security> opens a submenu with options including <User>, <HTTPS>,
<IP Filter>, and <IEEE 802.1X>.
2.2.2.1 User
The User page can be found under this path: System> Security> User.
Admin Password
Use this section to change the administrator password. Enter the new password
in <Admin password> and <Confirm password>. The maximum length is 14
characters. The input characters/numbers are displayed as dots for security
purposes. Click <Save> to confirm the changes. After the changes are
confirmed, the web browser prompts the administrator to log on to the camera
with the new password.
NOTE: The following characters are valid: A-Z, a-z, 0-9, !#$%&’-.@^_~.
Add User
Using this section, the administrator can add new users. Enter the new user
name in <User name> and the password in <User password>. A user name can
be up to 16 characters and the maximum length of the password is 14
characters. Select the boxes below to assign privileges for functions, including
“Camera control”, “Talk”, and “Listen”. Click <Add> to add the new user. The
name of the newly added user is displayed in the <User name> list. There is a
maximum of twenty user accounts.
I/O access
This item supports fundamental functions that enable users to view live
video when they access the camera.
Camera control
This item allows the appointed user to change camera parameters on
the camera setting page.

12
Talk/Listen
The Talk and Listen functions allow the appointed user in the local site
(PC site) to communicate with, for example, the administrator in the
remote site.
Manage User
Delete user
In the <User name> list, select the user name that is to be deleted. Click
<Delete> to delete the selected user account.
Edit user
In the <User name> list, select the user that you wish to edit. Click
<Edit> and a pop-up window appears. In this window, enter the new
user password and change the privileges. Click <Save> to confirm the
changes. Then click <Close> to complete the editing.
HTTP Authentication Setting
HTTP Authentication identifies whether a user is authorised to access the
camera. Users are required to enter a valid user name and password before
they can log on to the camera. Two types of authentication are available.
Basic
This type provides basic protection against unauthorised access. It is
supported by most browsers. Note that passwords are sent over the
network in clear text. If intercepted they can be reused by unauthorised
users. Select this type only if you are using an SSL connection or a
dedicated line.
Digest
This type is a more secure option. It encrypts the password before
sending it over the network.
Streaming Authentication Setting
This setting provides security against unauthorised users attempting to open a
stream via the Real Time Streaming Protocol (RTSP). If the setting is enabled,
users are required to enter their user name and password before viewing the
live streams. There are three security modes available: Disable, Basic and
Digest.

13
Disable
If the disable mode is selected, no security is provided to prevent
unauthorised access. Users are not asked to provide their user name
and password for authentication.
Basic
This mode provides basic protection for the live streams. There is still
the risk of the password being intercepted.
Digest
Digest mode is a safer option for protection. The password is sent in an
encrypted format to prevent it from being stolen.
NOTE: Users must click the <Save> button to apply the setting.
2.2.2.2 HTTPS
The HTTPS setting can be found under this path: System> Security> HTTPS.
HTTPS allows secure connections between the IP camera and web browser
using <Secure Socket Layer (SSL)> or <Transport Layer Security (TLS)>, which
protect camera settings or user name / password info against snooping. To
implement HTTPS, a self-signed certificate or a CA-signed certificate must be
installed.
To use HTTPS on the IP camera, an HTTPS certificate must be installed. The
HTTPS certificate can be obtained by either creating and sending a certificate
request to a Certificate Authority (CA) or creating a self-signed HTTPS
certificate, as described below.
Create Self-signed Certificate
Before a CA-issued certificate is obtained, users can create and install a
self-signed certificate.
Click <Create> and provide the information required to install a self-signed
certificate for the camera. See the last part of the Provide the Certificate
Information section for more details.
NOTE: The self-signed certificate does not provide the same high level
of security as the CA-issued certificate.

14
Install Signed Certificate
Click the <Create Certificate Request> button to create and submit a certificate
request in order to obtain a signed certificate from a CA.
Provide the request information in the create dialogue. See the following section
Provide the Certificate Information for more details.
When the request is complete, the subject of the Created Request is shown in
the text box. Click <Properties> below the Subject box, copy the PEM-formatted
request, and then send it to the selected CA.
When the signed certificate is returned, install it by uploading the signed
certificate.
Provide the Certificate Information
To create a Self-signed HTTPS Certificate or a Certificate Request to CA, enter
the information as requested.
Create Self Signed Certificate
Create Certificate Request
Country
√
√
State or Province
√
√
Locality
√
√
Organisation
√
√
Organisational Unit
√
√
Common Name
√
√
Valid Day
√
-
Country
Enter a two-letter code to indicate the country that the certificate will be
used in. For example, type “US” to indicate the United States.
State or province
Enter the local administrative region.
Locality
Enter other geographical information.
Organisation
Enter the name of the organisation to which the entity identified in
“Common Name” belongs.

15
Organisation Unit
Enter the name of the organisational unit to which the entity identified in
“Common Name” belongs.
Common Name
Indicate the name of the person or other entity that the certificate
identifies (often used to identify the website).
Valid days
Enter the period in days (1 to 9999) to indicate the valid period of the
certificate.
Click <OK> to save the Certificate Information after completion.
2.2.2.3 IP Filter
The IP Filter setting can be found under this path: System> Security> IP Filter.
With the IP Filter function, users can allow or deny access to the camera from
specific IP addresses.
Enable IP Filter
Select the box to enable the IP Filter function. Once enabled, the listed
IP addresses (IPv4) in the <Filtered IP Addresses> list box are
allowed/denied access to the camera.
Click <Allow> or <Deny> in the drop-down list and click on the <Apply>
button to determine the IP filter behaviour.
Add IP Address
Type the IP address in the text box under the <Filtered IP Address> list
and click <Add>. The newly added address is shown in the list. Up to
256 IP addresses can be specified.
To filter a group of IP addresses, type an address in the text box,
followed by a slash and a number ranging from 1 to 31, such as
192.168.2.81/30, for example. The number after the slash defines how
many IP addresses will be filtered. For details, see the following
example.

16
Example: Filtering a group of consecutive IP addresses
The steps below show what is filtered when 192.168.2.81/30 is
entered.
Step 1: Convert 192.168.2.81 to binary format. The binary digits are
11000000.10101000.00000010.01010001. See Appendix B: IP
Addresses from Decimal to Binary for conversion of IP addresses to
binary format. The number “30” after the slash refers to the first 30
digits of the binary number.
Step 2: Convert a few IP addresses before and after 192.168.2.81
to binary format. Then compare their first 30 digits to the binary
format of 192.168.2.81.
a. Convert 192.168.2.80 to binary. The binary representation is
11000000.10101000.00000010.01010000. The first 30 digits
are the same as the binary digits of 192.168.2.81. Therefore
192.168.2.80 is filtered.
b. Convert 192.168.2.79 to binary. The binary representation is
11000000.10101000.00000010.01001111. The first 30 digits
are different from the binary digits of 192.168.2.81. Therefore,
192.168.2.79 is not filtered. This also means that the IP
addresses preceding 192.168.2.79 are not filtered.
c. Repeat the procedure given in a” with the IP addresses
following 192.168.2.81. Stop when the situation described in
“b” occurs – that is, the 30th digit of the binary format of IP
address 192.168.2.84 is different, and is not filtered.
As a result, the IP addresses 192.168.2.80 to 192.168.2.83 are
filtered when entering 192.168.2.81/30. The following table clearly
shows that the 30th digit of the binary format of IP addresses
192.168.79 and 192.168.84 differ from the others. Therefore, these
two IP addresses are not filtered.

17
IP Addresses
Binary Numbers
192.168.2.79
11000000.10101000.00000010.01001111
192.168.2.80
11000000.10101000.00000010.01010000
192.168.2.81
11000000.10101000.00000010.01010001
192.168.2.82
11000000.10101000.00000010.01010010
192.168.2.83
11000000.10101000.00000010.01010011
192.168.2.84
11000000.10101000.00000010.01010100
Delete IP Address
To remove an IP address from the list, select the IP, and then click
<Delete>.
2.2.2.4 IEEE 802.1X
The IEEE 802.1X setting can be found under this path: System> Security>
IEEE 802.1X.
The camera is allowed to access a network protected by 802.1X/EAPOL
(Extensible Authentication Protocol over LAN).
Users need to contact the network administrator to obtain certificates, user IDs,
and passwords.
CA Certificate
A CA certificate is created by a Certification Authority for validation purposes.
Upload the certificate to check the server’s identity.
Client Certificate / Private Key
Upload the Client Certificate and Private Key to authenticate the camera itself.
Settings
Identity
Enter the user identity associated with the certificate. Up to 16
characters can be used.
Private Key Password
Enter the password (maximum 16 characters) associated with the user
identity.

18
Enable IEEE 802.1X
Select the box to enable IEEE 802.1X.
Click <Save> to save the IEEE 802.1X/ EAP- TLS setting.

19
2.2.3 Network
The Network settings can be found under this path: System> Network.
Clicking <Network> opens a submenu with options including <Basic>, <QoS>,
<SNMP>, and <UPnP>.
2.2.3.1 Basic
Basic settings can be found under this path: System> Network> Basic.
Use this page to set a new IP address for the camera, configure other
network-related parameters, and activate the IPv6 address (if the network
supports this).
General
This section is for configuring a new IP address for the camera. To assign an IP
address, contact the network provider to find out the network type first. Then
refer to the network type and follow the instructions to set up the IP address.
NOTE: If the network type is Point-to-Point Protocol over Ethernet
(PPPoE), obtain the PPPoE username and password from the network
provider.
Get IP address automatically (DHCP)
Click the item and then click <Save> to confirm the new setting. A notice
about a camera system restart appears. Click <OK> and the camera
system is restarted. A new IP address is assigned to the camera. Close
the web browser and search the camera through Siqura Device
Manager. With Siqura Device Manager - a tool that you can download at
http://www.siqura.com/support-files - you can locate, manage, and
configure Siqura IP cameras and video encoders.
NOTE: Before searching the camera through Siqura Device
Manager, record the MAC address of the camera for later use
and identification. It can be found on the label or on the package
container of the camera.
Step 1: Download Siqura Device Manager, double-click the setup file,
and follow the installation steps to install the software.

20
Step 2: Start Siqura Device Manager, wait while the network is scanned.
Detected devices appear in the List View pane. If multiple
network adapters exist, select the appropriate adapter to scan
the network you wish to connect to. To perform a manual search,
click the Rescan button. Use the tabs in the Tree View pane to
define the scope of your search. Click the column headings in
the List View pane to sort devices by type, IP address, or name.
Step 3: To connect to the webpages of the camera, double-click its entry
in the device list, or right-click the entry, and then click Open
Web Page.
Step 4: To directly change the network settings of the camera with
Siqura Device Manager, go to the list of detected devices, and
then right-click the entry for the camera. Click Change Network
Settings, click Enable DHCP, and then click OK. Wait one
minute, and then rescan the network. You can identify the
camera by its MAC address.
Step 5: To access the webpages of the camera, double-click its entry in
the list of found devices.
NOTE: A DHCP server must be installed on the network in order
to provide DHCP network support.
Use fixed IP address
Click the item and enter the new IP address. Note that the specified IP
address and the IP address of the PC should be in the same subnet.
Enter the IP address of the Default gateway (explained later) as required.
Click <Save> to confirm the new setting. A notice about a camera
system restart appears. Click <OK> and the system restarts. Wait for 15
seconds. The camera’s IP address in the URL bar is changed and the
user has to log on again.
When using a fixed IP address to connect the camera, users can access
the camera by typing the IP address in the URL bar and pressing
<Enter> on the keyboard. Alternatively, users can access the camera
with Siqura Device Manager, as described in the previous section.

21
To assign a fixed IP address through Siqura Device Manager, right-click
the camera entry in the list of detected devices, click Change Network
Settings, and then click Static IP. You can then provide the camera with
an appropriate IP address, netmask, and gateway address for the
desired network configuration.
IP address
This is necessary for network identification.
Subnet mask
This is used to determine if the destination is in the same subnet.
The default value is “255.255.255.0”.
Default gateway
This is the gateway used to forward frames to destinations in
different subnets. An invalid gateway setting prevents transmissions
to destinations in different subnets.
Primary DNS
Primary DNS is the primary domain name server that translates host
names into IP addresses.
Secondary DNS
Secondary DNS is a secondary domain name server that backs up
the primary DNS.
Use PPPoE
For PPPoE users, enter the PPPoE user name and password into the
text boxes, and click <Save> to complete configuring the setting.

22
Advanced
This section describes the Web Server port, RTSP port, MJPEG over HTTP port,
and HTTPS port settings.
Web Server port
The default web server port is 80. With the default web server port set to
‘80’, users can simply enter the IP address of the camera in the URL bar
of a web browser to connect to the camera. If the web server port is
changed to any number other than 80, users have to enter the camera’s
IP address followed by a colon and the port number. For example, a
camera with IP address 192.168.0.100 and web server port 8080 can be
accessed by entering “http://192.168.0.100:8080” in the URL bar.
RTSP port
The default setting of RTSP Port is 554; the setting range is from 1024
to 65535.
MJPEG over HTTP port
The default setting of MJPEG over HTTP Port is 8008; the setting range
is from 1024 to 65535.
HTTPS port
The default setting of HTTPS Port is 443; the setting range is from 1024
to 65535.
NOTE: Make sure that the port numbers set above are unique,
otherwise a network conflict may occur.
IPv6 Address Configuration
If the network supports IPv6, users can select the <Enable IPv6> check box and
click <Save>. An IPv6 address is displayed next to <Address> and users can
use it to connect to the camera.

23
2.2.3.2 QoS
The QoS (Quality of Service) setting can be found under this path: System>
Network> QoS.
QoS allows providing differentiated service levels for different types of traffic
packets, which guarantees delivery of priority services especially when network
congestion occurs. Adapting the Differentiated Services (DiffServ) model, traffic
flows are classified and marked with DSCP (DiffServ Codepoint) values, and
thus receive the corresponding forwarding treatment from DiffServ capable
routers.
DSCP Settings
The DSCP value range is from 0 to 63. The default DSCP value is 0, which
means DSCP is disabled. The camera uses the following QoS Classes: Video,
Audio, and Management.
Video DSCP
This class applies to applications such as MJPEG over HTTP,
RTP/RTSP, and RTSP/HTTP.
Audio DSCP
This setting is available for IP cameras which support audio.
Management DSCP
This class applies to HTTP traffic: Web browsing.
NOTE: To enable this function, make sure the switches/routers in the
network support QoS.

24
2.2.3.3 SNMP
The SNMP (Simple Network Management Protocol) setting can be found under
this path: System> Network> SNMP.
With Simple Network Management Protocol (SNMP) support, the IP camera
can be monitored and managed remotely by the network management system.
SNMP v1/v2
Enable SNMP v1/v2
Select the version of SNMP to use by selecting the box.
Read Community
Specify the community name that has read-only access to all supported
SNMP objects. The default value is “public”.
Write Community
Specify the community name that has read/write access to all supported
SNMP objects (except read-only objects). The default value is “private”.
SNMP v3
SNMP v3 supports an enhanced security system that provides protection
against unauthorised users and ensures the privacy of the messages. Users are
requested to enter a security name, authentication password, and encryption
password when setting the camera connections in the network management
system. With SNMP v3, the messages sent between the cameras and the
network management system are encrypted to ensure privacy.
Enable SNMP v3
Enable SNMP v3 by selecting the box.
Security Name
The maximum length of the security name is 32 characters.
NOTE: Valid characters are A-Z, a-z, 0-9, !#$%&’-.@^_~.
Authentication Type
Two authentication types are available: MD5 and SHA. Select SHA for a
higher security level.

25
Authentication Password
The authentication password must be eight characters or more. The
input characters/numbers are displayed as dots for security purposes.
NOTE: Valid characters are A-Z, a-z, 0-9, !#$%&’-.@^_~.
Encryption Type
Two encryption types are available: DES and AES. Select AES for a
higher security level.
Encryption Password
The minimum length of the encryption password is eight characters and
the maximum length is 512 characters. The input characters/numbers
are displayed as dots for security purposes. The encryption password
can also be left blank. In that case, the messages are not encrypted to
protect privacy.
NOTE: Valid characters are A-Z, a-z, 0-9, !#$%&’-.@^_~.
Traps for SNMP v1 / v2 / v3
Traps are used by the camera to send messages to a management system on
important events or status changes.
Enable Traps
Select the box to activate trap reporting.
Trap address
Enter the IP address of the management server.
Trap community
Enter the community to use when sending a trap message to the
management system.
Trap Option
Warm Start
A Warm Start SNMP trap signifies that the SNMP device, such as the IP
camera, reinitialises itself by performing a software reload.
Click <Save> when finished.
26
2.2.3.4 UPnP
The UPnP setting can be found under this path: System> Network> UPnP.
UPnP Setting
Enable UPnP
If enabled, UPnP allows the camera to advertise its presence and
services to control points (for example, a VMS) on the network. The icon
of the connected camera appears in My Network Places to allow direct
access.
NOTE: To enable this function, make sure that UPnP is installed
on the computer. See Appendix A: Install UPnP components for
the UPnP installation procedure.
Enable UPnP port forwarding
When UPnP port forwarding is enabled, the IP camera is allowed to
open the web server port on the router automatically.
NOTE: To enable this function, make sure that the router
supports UPnP and that it is activated.
Friendly name
Set the name that the IP camera will use to identify itself on the network
Click <Save> when finished.

27
2.2.4 DDNS
The DDNS setting can be found under this path: System> DDNS.
The Dynamic Domain Name System (DDNS) allows a host name to be
constantly synchronised with a dynamic IP address. In other words, it allows
those using a dynamic IP address to be associated with a static domain name,
so that others can connect to it by name.
Enable DDNS
Select the item to enable DDNS.
Provider
Select one DDNS host from the provider list.
Host name
Enter the registered domain name in the field.
Username/E-mail
Enter the user name or email required by the DDNS provider for authentication.
Password/Key
Enter the password or key required by the DDNS provider for authentication.
Click <Save> when finished.

28
2.2.5 Mail
The Mail setting can be found under this path: System> Mail.
The administrator can send an email via Simple Mail Transfer Protocol (SMTP)
when event is triggered. SMTP is a protocol for sending email messages
between servers. SMTP is a relatively simple, text-based protocol, where one or
more recipients of a message are specified and the message text is transferred.
Two sets of SMTP can be configured. Each set includes SMTP Server, Server
Port, Account Name, Password and Email Address settings. Select the box
“SMTP SSL” to send emails via encrypted transmission. For SMTP server
details, contact the network service provider for more specific information.
Click <Save> when finished.
2.2.6 FTP
The FTP setting can be found under this path: System> FTP.
The administrator can configure the camera to send an alarm message to up to
two FTP sites. Enter the FTP details, which include a server, server port, user
name, password and remote folder. Select the box “passive mode” to be
connected with the FTP server by passively receiving the FTP server’s IP
address through a dynamic port. Alternatively, clear the box to directly connect
to the FTP server via active mode.
Click <Save> when finished.
 Loading...