

Siqura BC2xSeries,BC2x Series User Manual
User
Manual
Siqura BC2x Series
1/3” CCD Color Box Camera


i
Contents
CONTENTS
1. PREFACE .......................................................................................................1
1.1. CHANGE LOG ...................................................................................................2
2. CAUTIONS.....................................................................................................3
3. OVERVIEW ....................................................................................................5
3.1. FEATURES .......................................................................................................5
4. IP CAMERA CONFIGURATION AND OPERATION ...................................................7
4.1. ACCESSING THE IP CAMERA ..................................................................................7
4.1.1. Device Search software setup ...................................................................7
4.1.2. Changing the IP camera's Network property................................................9
4.2. BROWSER-BASED VIEWING ................................................................................. 11
4.2.1. Installing SiquraViewer ..........................................................................11
4.3. SIQURA BC2X USER INTERFACE............................................................................ 11
5. SYSTEM SETTINGS ....................................................................................... 13
5.1. SYSTEM TIME SETTINGS..................................................................................... 13
5.1.1. Sync with computer time........................................................................ 13
5.1.2. Manual ................................................................................................ 14
5.2. USER MANAGEMENT ......................................................................................... 14
5.2.1. Root password ...................................................................................... 14
5.2.2. Add user .............................................................................................. 15
5.2.3. User permissions................................................................................... 15
5.2.4. Manage users ....................................................................................... 16
5.2.5. User information ................................................................................... 16
5.3. NETWORK ..................................................................................................... 17
5.3.1. Acquire IP address automatically (DHCP) .................................................. 18
5.3.2. Use a fixed IP address............................................................................ 19
5.4. DDNS ........................................................................................................ 20
5.5. MAIL .......................................................................................................... 21
5.6. FTP ...........................................................................................................22
5.7. ALARM CONFIGURATION ..................................................................................... 23
5.8. MOTION DETECTION .........................................................................................25
5.9. IMAGE CAPTURE .............................................................................................. 27
5.10. IRIS ADJUSTMENT ............................................................................................ 28
5.11. VIEW LOG FILE ............................................................................................... 29
5.12. VIEW SYSTEM PARAMETERS ................................................................................. 30
5.13. FACTORY DEFAULT ...........................................................................................31
5.14. SOFTWARE VERSION ......................................................................................... 32
5.15. SOFTWARE UPGRADE ........................................................................................ 33
6. VIDEO AND AUDIO STREAMING...................................................................... 37

ii
Contents
6.1. VIDEO RESOLUTION AND ROTATE TYPE .................................................................... 37
6.1.1. Video resolution .................................................................................... 38
6.1.2. Video rotate type .................................................................................. 38
6.2. VIDEO COMPRESSION........................................................................................ 40
6.3. VIDEO STREAM PROTOCOL .................................................................................. 42
6.4. VIDEO FRAME SKIP .......................................................................................... 43
6.5. AUDIO MODE AND BIT RATE SETTINGS .................................................................... 44
7. CAMERA SETTINGS....................................................................................... 47
7.1. EXPOSURE .................................................................................................... 47
7.2. WHITE BALANCE ............................................................................................. 48
7.3. BACKLIGHT SETTING......................................................................................... 49
7.4. BRIGHTNESS SETTING ....................................................................................... 49
7.5. SHARPNESS SETTING ........................................................................................50
7.6. CONTRAST SETTING .........................................................................................50
7.7. DIGITAL ZOOM SETTING .................................................................................... 50
7.8. IR CUT FILTER SETTING.....................................................................................50
APPENDIX A: TECHNICAL SPECIFICATION................................................................... 51
APPENDIX B: BACK FOCUS ADJUSTMENT.................................................................... 53

1
Preface
1. PREFACE
The information given in this manual was current when published. The company reserves the
right to revise and improve its products. All specifications are subject to change without
notice.
Notice
To work with a Siqura BC2x Series camera, an installer or technician must have a basic
knowledge of CCTV systems and their components, electrical wiring, and low-voltage
electrical connections, and have read this manual completely
Copyright
Under copyright laws, the contents of this installation manual may not be copied,
photocopied, translated, reproduced or reduced to any electronic medium or machine-
readable format, in whole or in part, without prior written permission of the company.
Important information
Before proceeding, please read and observe all instructions and warnings in this manual.
Retain this manual with the original bill of sale for future reference and, if necessary,
warranty service. When unpacking your unit, check for missing or damaged items. If any
item is missing, or if damage is evident, DO NOT INSTALL OR OPERATE THIS PRODUCT.
Contact Optelecom-NKF for assistance.

2
Preface
Regulations
This device complies with Part 15 of the FCC
Rules. Operation is subject to the following two
conditions:
(1) this device may not cause harmful
interference, and (2) this device must accept any
interference received, including interference that
may cause undesired operation.
This symbol on the product or on its packaging
indicates that this product shall not be treated as
household waste in accordance with Directive
2002/96/EC. Instead it shall be handed over to the
applicable collection point for the recycling of electrical
and electronic equipment. By proper waste handling of
this product you ensure that it has no negative
consequences for the environment and human health,
which could otherwise be caused if this product is
thrown into the garbage bin. The recycling of materials
will help to conserve natural resources.
For more details information about recycling of this
product, please contact your local city office, your
household waste disposal service or the seller of the
product.
Compliance is evidenced by written declaration from our
suppliers, assuring that any potential trace
contamination levels of restricted substances are below
the maximum level set by EU Directive 2002/95/EC, or
are exempted due to their application.
1.1. Change Log
Version 1.1 of this manual contains clarifications to the sections on accessing the IP camera
(section 4.1.1) and installing the SiquraViewer software (section 4.2.1).
Version 1.2 of this manual clarifies the location of the default IP address and the IP address
the camera reverts to in the event of a hard reset.

3
Cautions
2. CAUTIONS
Only qualified service personnel or system installers should install and connect
this product.
Handle the camera carefully.
Do not abuse the camera. Avoid striking, shaking, etc. as the camera can be damaged
by improper handing or storage.
Do not disassemble the camera.
To prevent electric shock, do not remove screws or covers. There are no user
serviceable parts inside. If necessary, ask a qualified technician for servicing.
Do not operate the camera beyond the specified temperature, humidity and
power source ratings.
Verify the power source is appropriate before you plug in and operate the unit.
If the camera is installed outdoors, make sure it is sheltered from direct sunlight.
Do not use strong or abrasive detergents when cleaning the camera.
Use a dry cloth to clean the camera when it is dirty. If the dirt is hard to remove, use a
mild detergent and wipe gently. To clean the lens, use lens tissue or a cotton tipped
applicator and ethanol. DO NOT clean the lens with strong detergents.


5
Overview
3. OVERVIEW
The Siqura BC2x Series Cameras feature a 1.3 Megapixel progressive scan image sensor that
delivers unparalleled image quality. Utilising this progressive scan sensor, it produces images
of rapid moving objects with minimum motion blurring. Dual streaming enables users to view
both MJPEG images and MPEG-4 video to achieve superior image quality and conserve
bandwidth. With ultra high resolution, users can monitor critical areas with greater detail like
never before.
3.1. Features
Image Quality
• Sony progressive scan CCD/CMOS sensor
• 1.3 Megapixel high definition
• Low light sensitivity 0.2 lux@F1.2
Application
• Dual streaming: MJPEG & MPEG-4
• Digital zoom: 1x ~ 12x
• Two-way audio
• Image rotation: Flip, Mirror, and 180
° rotation
Easy Installation
• Compact size and light weight
• Interface: 10/100 Ethernet with RJ-45 connector
For the precise features of each model, see Appendix A, Technical Specification.

7
IP Camera Configuration and Operation
4. IP CAMERA CONFIGURATION AND OPERATION
This section describes how to access the IP camera and browse its web interface.
important The Siqura BC2x web interface software only supports Internet Explorer 6.x
or higher.
4.1. Accessing the IP Camera
If you already know the IP address of the IP camera, you can access its web interface by
simply typing its IP address in your web browser’s URL field. Alternatively, users can search
the for the camera in their network using the application
DeviceSearch.exe, found in
the supplied CD's DeviceSearch folder. This application will detect and list all the Siqura BC2x
cameras found in the network.
The Device Search application is also available on the Software Downloads page of
www.optelecom-nkf.com. (Login required.)
4.1.1. Device Search software setup
To explore your network for installed devices
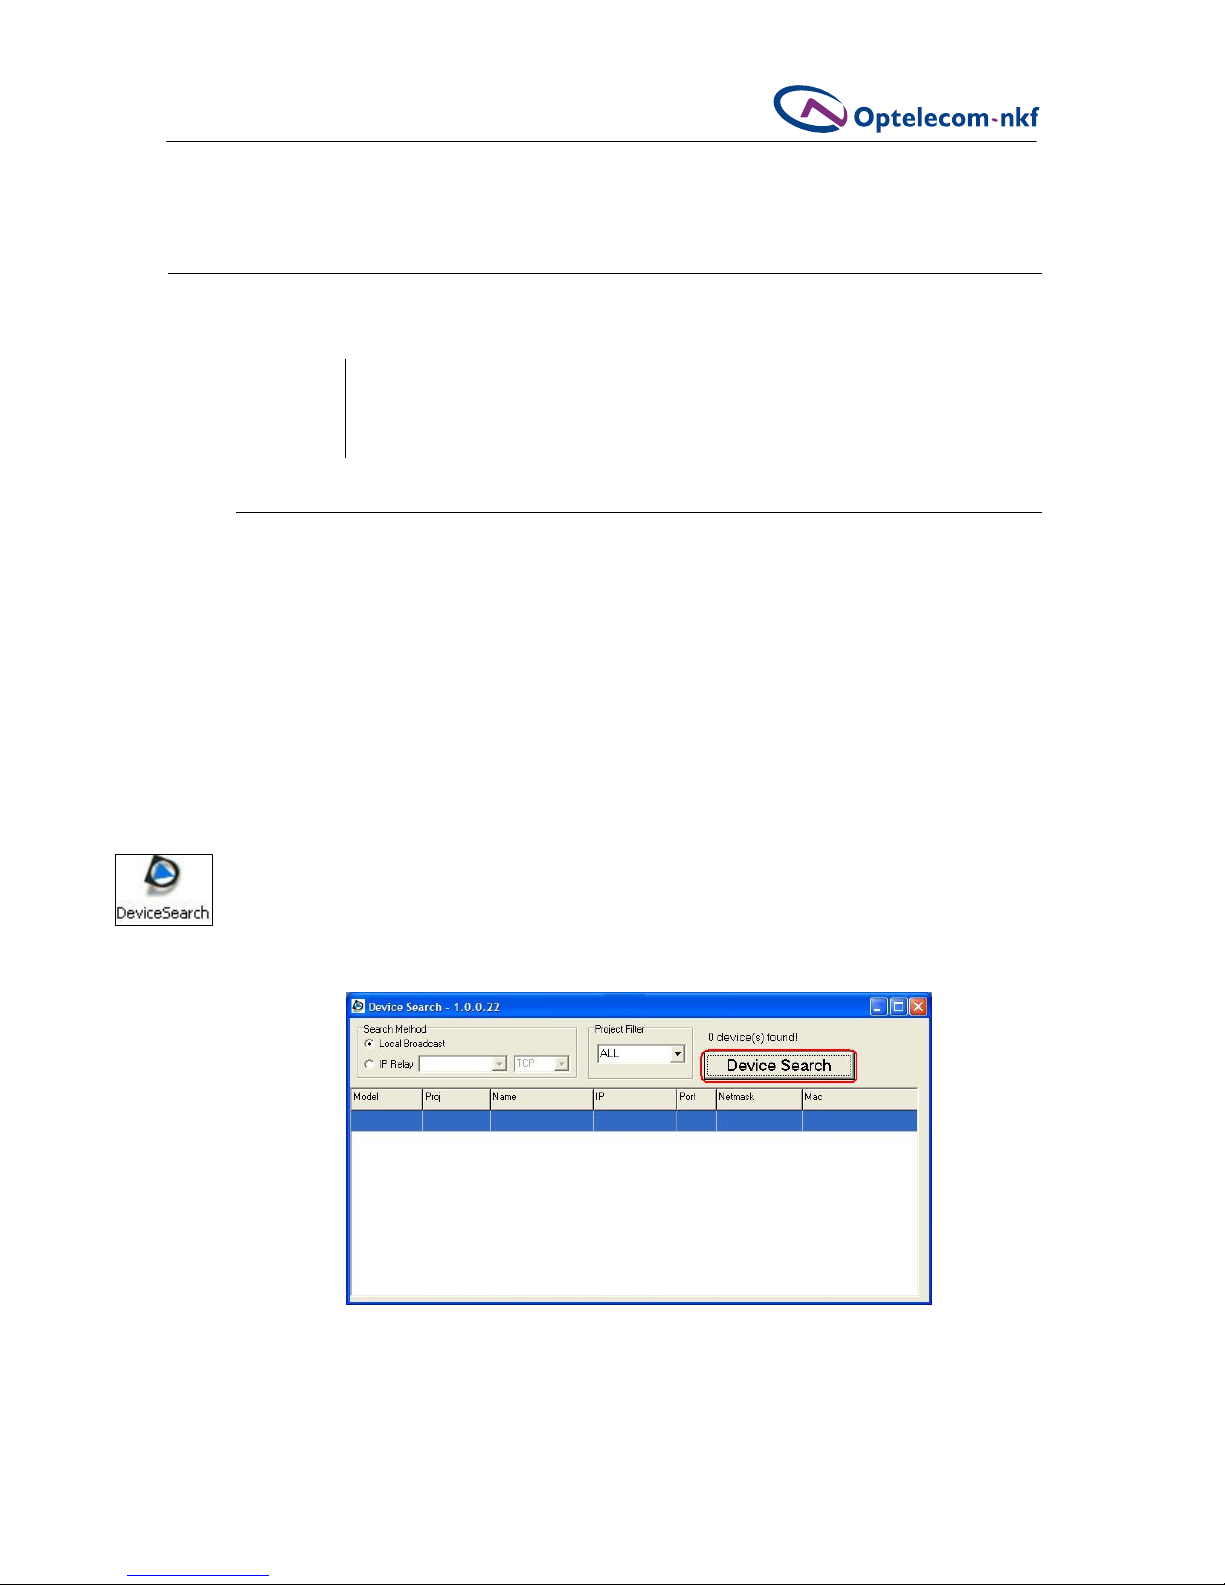
1. Double click on the Device Search.exe icon to launch the Device Search
application.
Its window will appear as shown in figure 3.1.
2. Click the
Device Search button.
Figure 4.1 Device search window
8
IP Camera Configuration and Operation
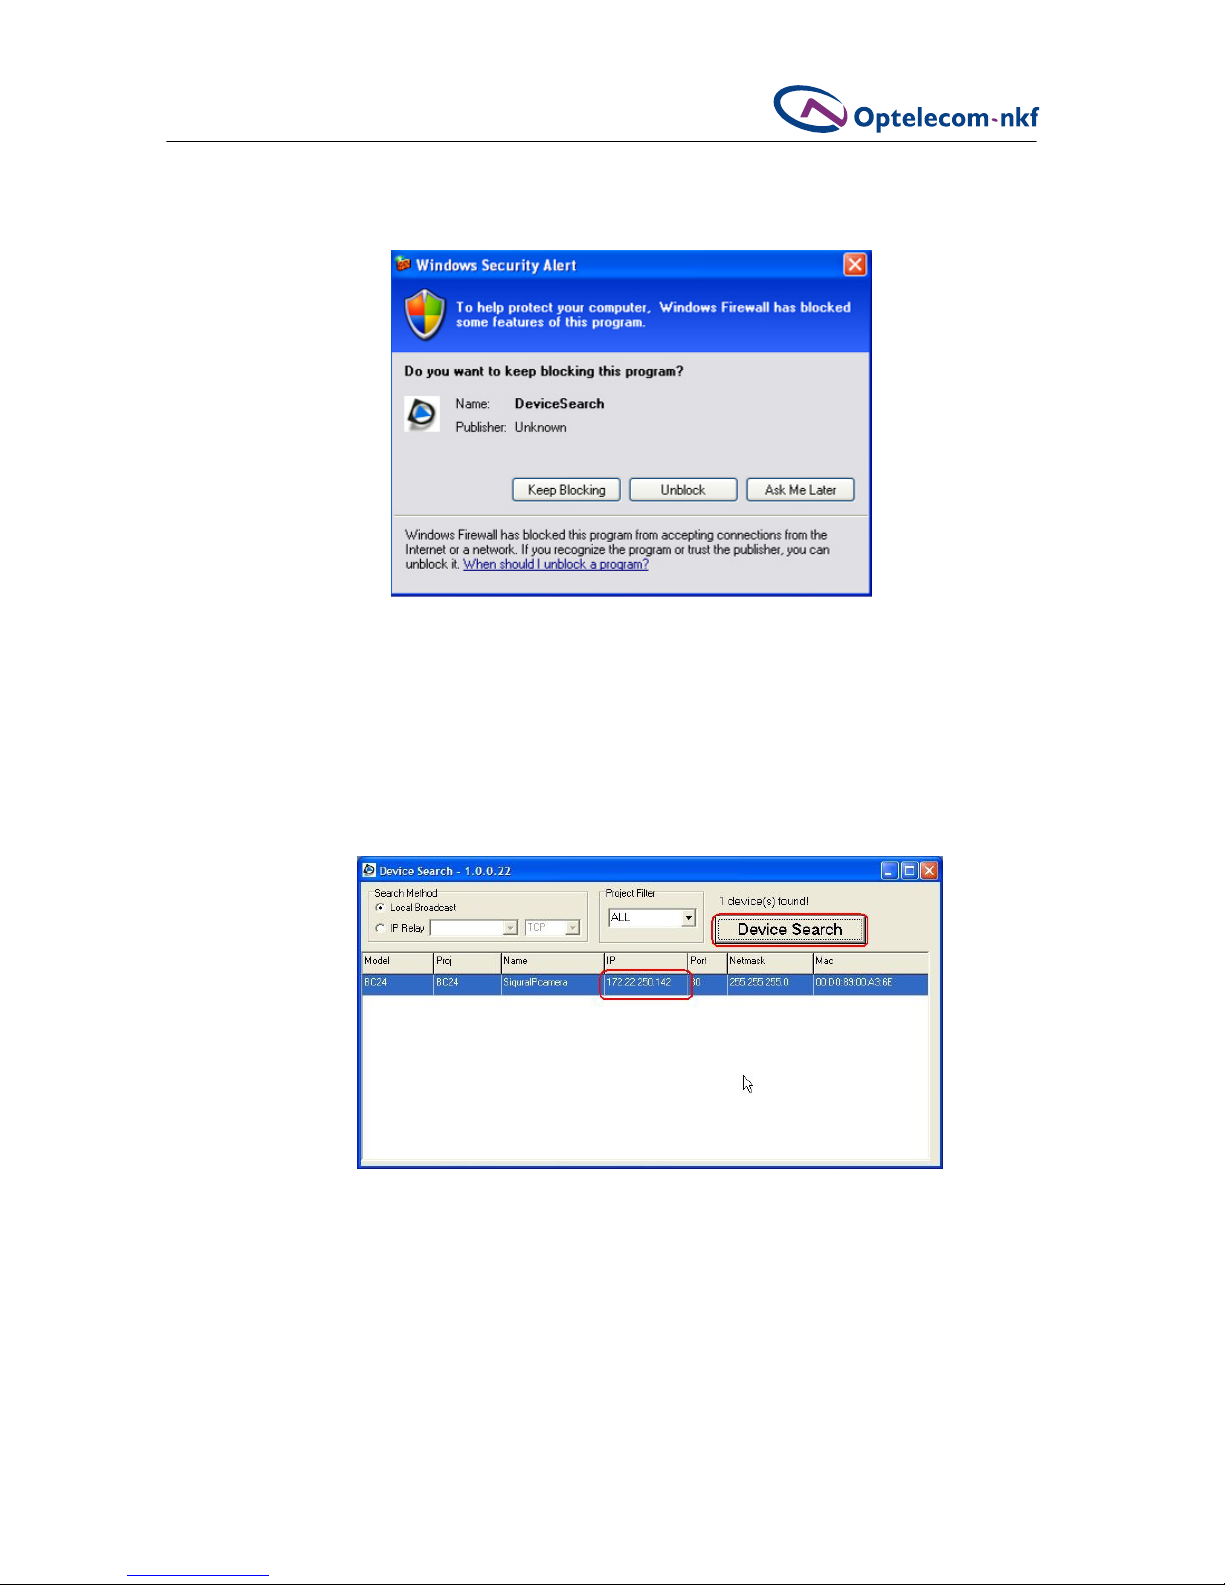
3. If a security alert window displays, as shown in figure 4.2, click Unblock to continue.
4. Click Device Search again.
All the found IP devices will be listed in the page, as shown in the figure below. The
IP Camera's default IP address (not shown in figure 4.3) is in the
10.x.x.x series.
The precise address is printed on a label on the bottom of the camera.
Note that if the camera is hard reset, the IP address reverts to
192.168.0.250.
Figure 4.2 Device search security alert
Figure 4.3 Device search - all found devices
9
IP Camera Configuration and Operation
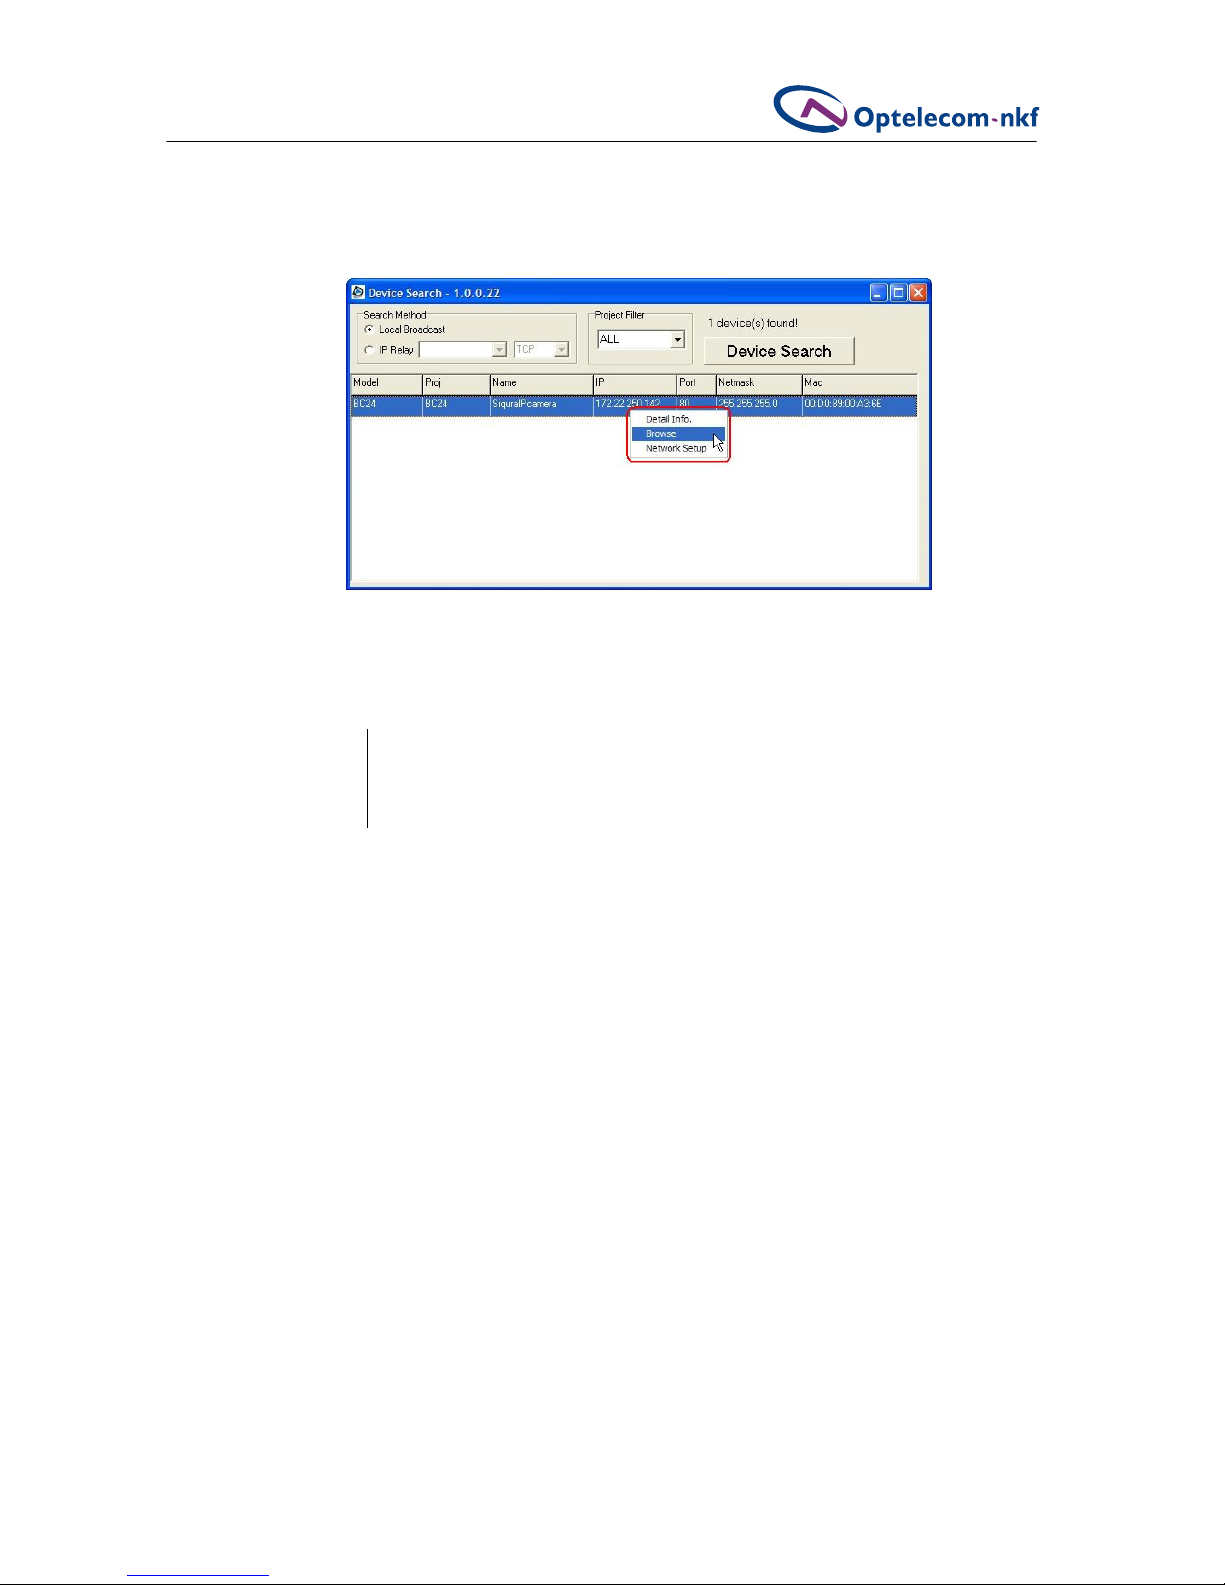
5. Right click a found device and select Browse to access the camera directly via the web
browser, as shown in figure 4.4.
The user is prompted for username and password. The default login and password for
the administrator are Admin / 1234. Both ID and password are case-sensitive.
please note For reasons of security it is strongly advised to change the administrator's
password. See section 5.2, User Management, for further details.
Additionally, users can change the camera's network property, either DHCP or Static IP
directly in the list of found devices. Refer to the section 4.1.2 to learn how to change the
IP Camera's network property.
4.1.2. Changing the IP camera's Network property
Users can directly change an IP Camera's network property, e.g. from static IP to DHCP, in
the finding device list.
Figure 4.4 Browse found devices
10
IP Camera Configuration and Operation
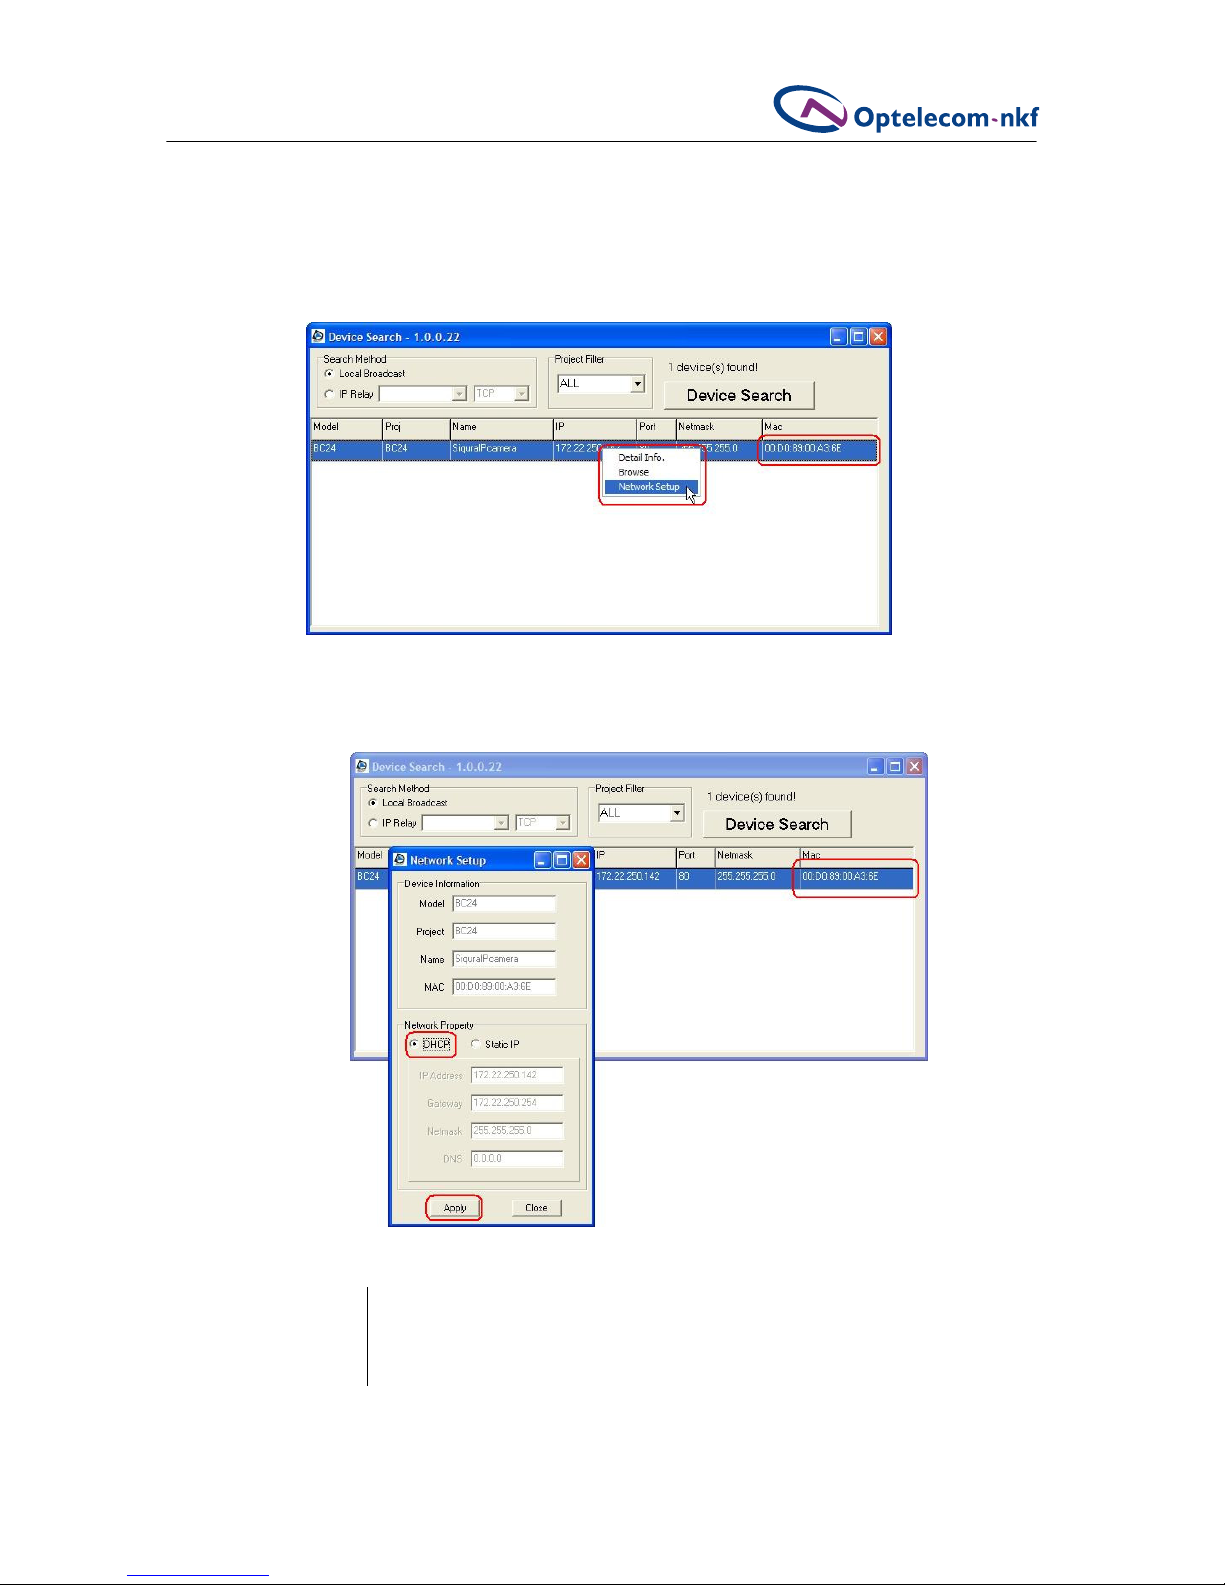
To change the IP Camera's network property
1. In the device list, select the IP Camera you would like to change.
2. Right-click the selected item and choose
Network Setup as shown in figure 4.5.
Meanwhile, record the IP Camera's MAC address for future identification.
3. In the Network Setup page, select
DHCP, and click Apply.
please note A DHCP server must be installed on the network in order to apply DHCP
network support.
Figure 4.5 Changing network properties
Figure 4.6 Applying DHCP
11
IP Camera Configuration and Operation
4. Click OK on the Note indicating you have changed a setting. Wait for one minute to
re-search for the IP Camera.
5. Click the
Device Search button to search all the devices again, and select the IP Camera
with the correct MAC address.
6. Double click on the IP Camera and log in when prompted.
4.2. Browser-Based Viewing
Figure 4.7 shows the main page of the IP camera user interface. Upon first connection to the
camera, the user is prompted to install the SiquraViewer ActiveX control.
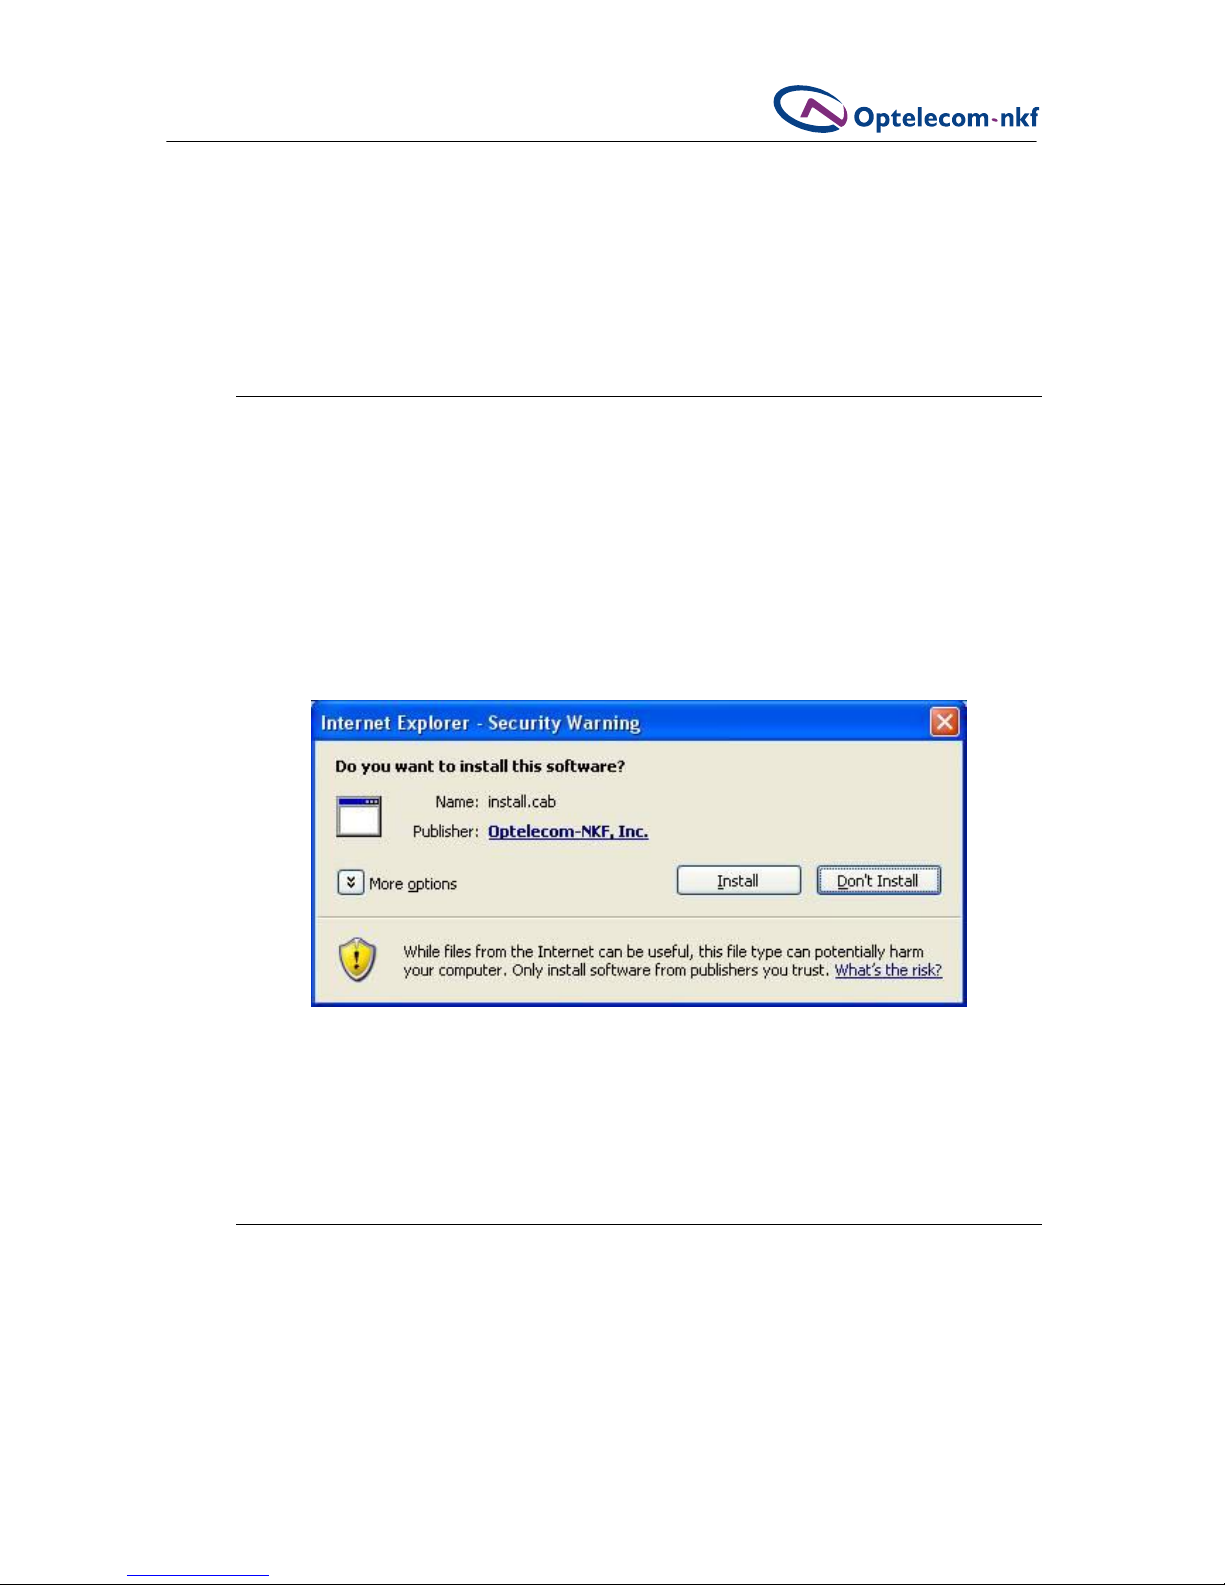
4.2.1. Installing SiquraViewer
To install the SiquraViewer software
1. When first accessing the camera via the browser, you are prompted to install the
SiquraViewer. The installation file is named
install.cab. When Internet Explorer
displays the security warning shown in figure 4.7, click Install.
2. When prompted by the SiquraViewer installation wizard to install, click
Next.
3. When installation is complete, click
Finish.
The Siqura home page will display as shown in figure 4.8.
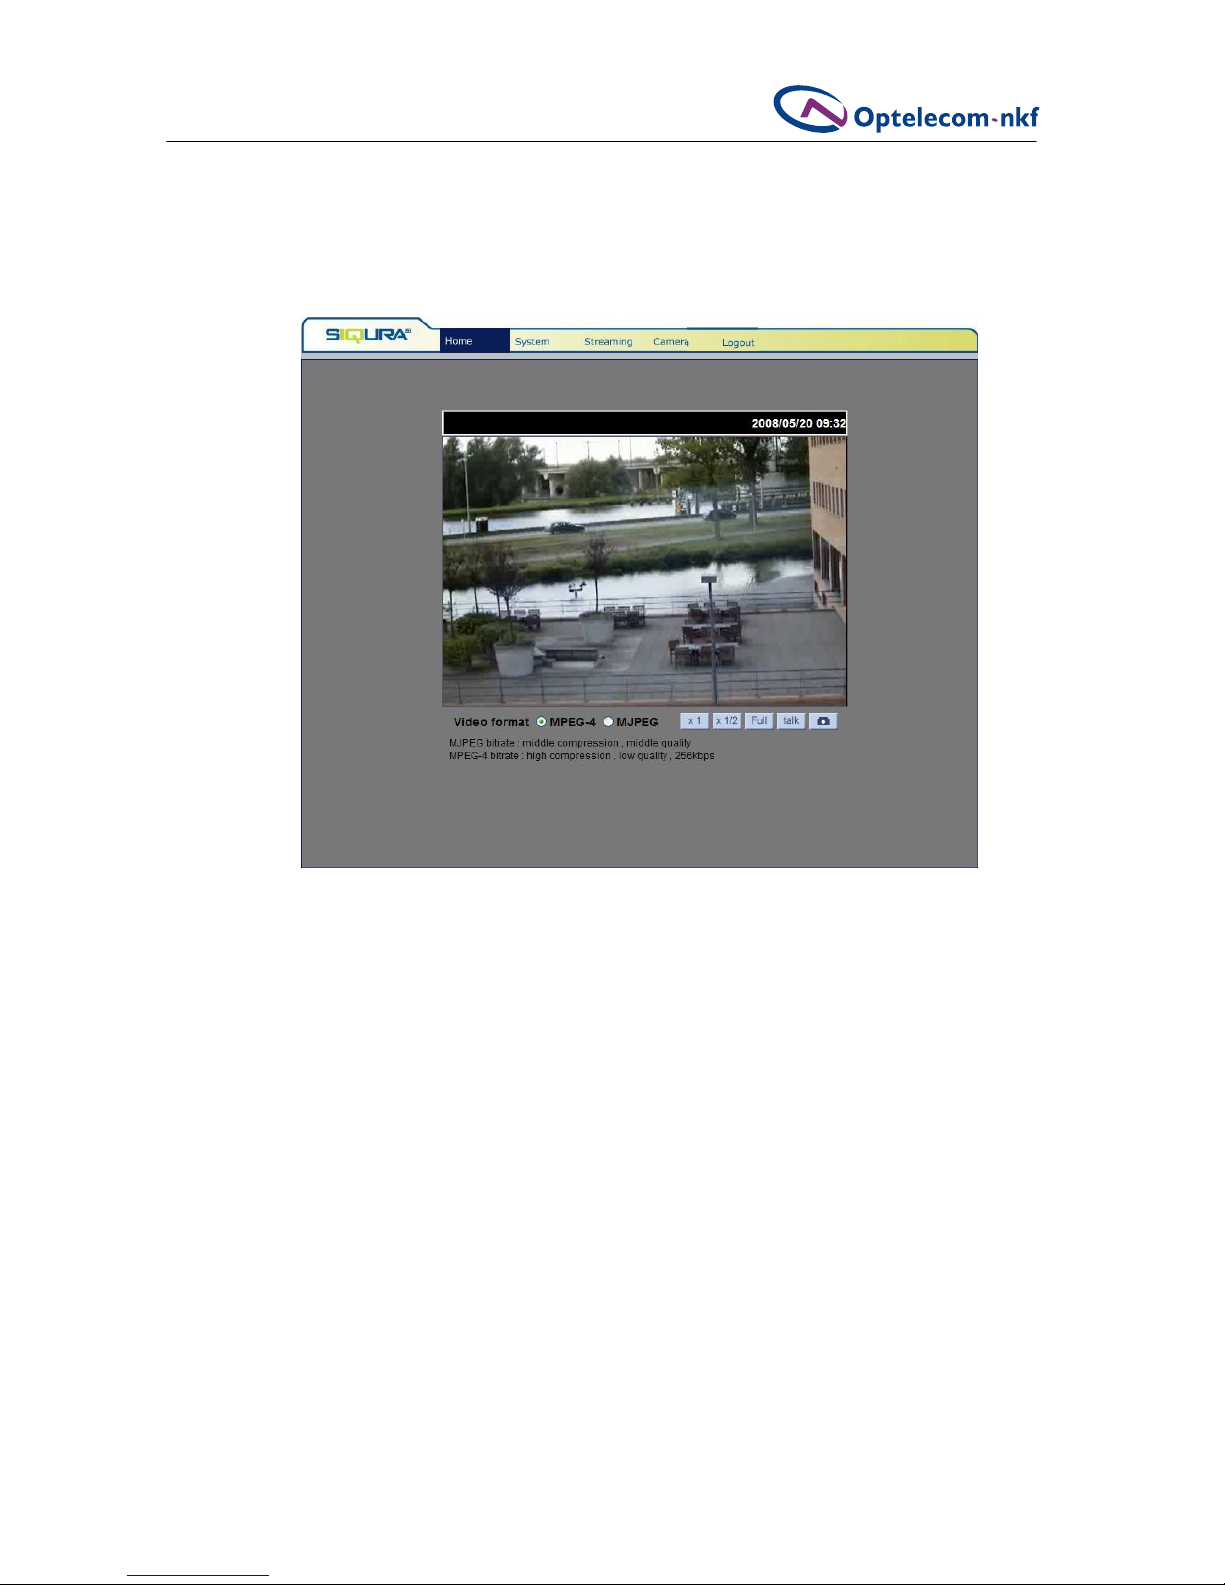
4.3. Siqura BC2x User Interface
Across the top of the main page, shown in figure 4.8, are the main menu items: Home,
System, Streaming, Camera, and Logout. They are located across the top of the panel,
and described in the following sections.
Figure 4.7 SiquraViewer installation security warning
12
IP Camera Configuration and Operation
At the bottom of the main page, users can adjust video display size (x1, x1/2 and full
screen), select the video format (MPEG-4 and MJPEG), talk to a remote site (described in
section 5.2 User Management) and save snapshots (only supported at MJPEG over RTSP as
described in section 5.9 Image Capture).
Home
Users can monitor live video of the targeted area.
System setting
In this section the Administrator sets host name, system time, root password, network
related settings, etc. This area is further described in section 5, System Settings.
Streaming setting
In this section the administrator can set video and audio formats and compression
parameters. These settings are described in section 6 Video and Audio Streaming.
Camera setting
In this section, users can adjust various camera parameters, including Exposure, White
Balance, Brightness, Sharpness, Contrast and Digital Zoom. These parameters are described
in section 7, Camera settings.
Figure 4.8 BC2x series camera home page
13
System Settings
5. SYSTEM SETTINGS
The System tab is comprised of 15 categories, listed in the left-hand column of the
webpage. Each category is explained separately in the following sections.
please note The System configuration page is only accessible to the Administrator.
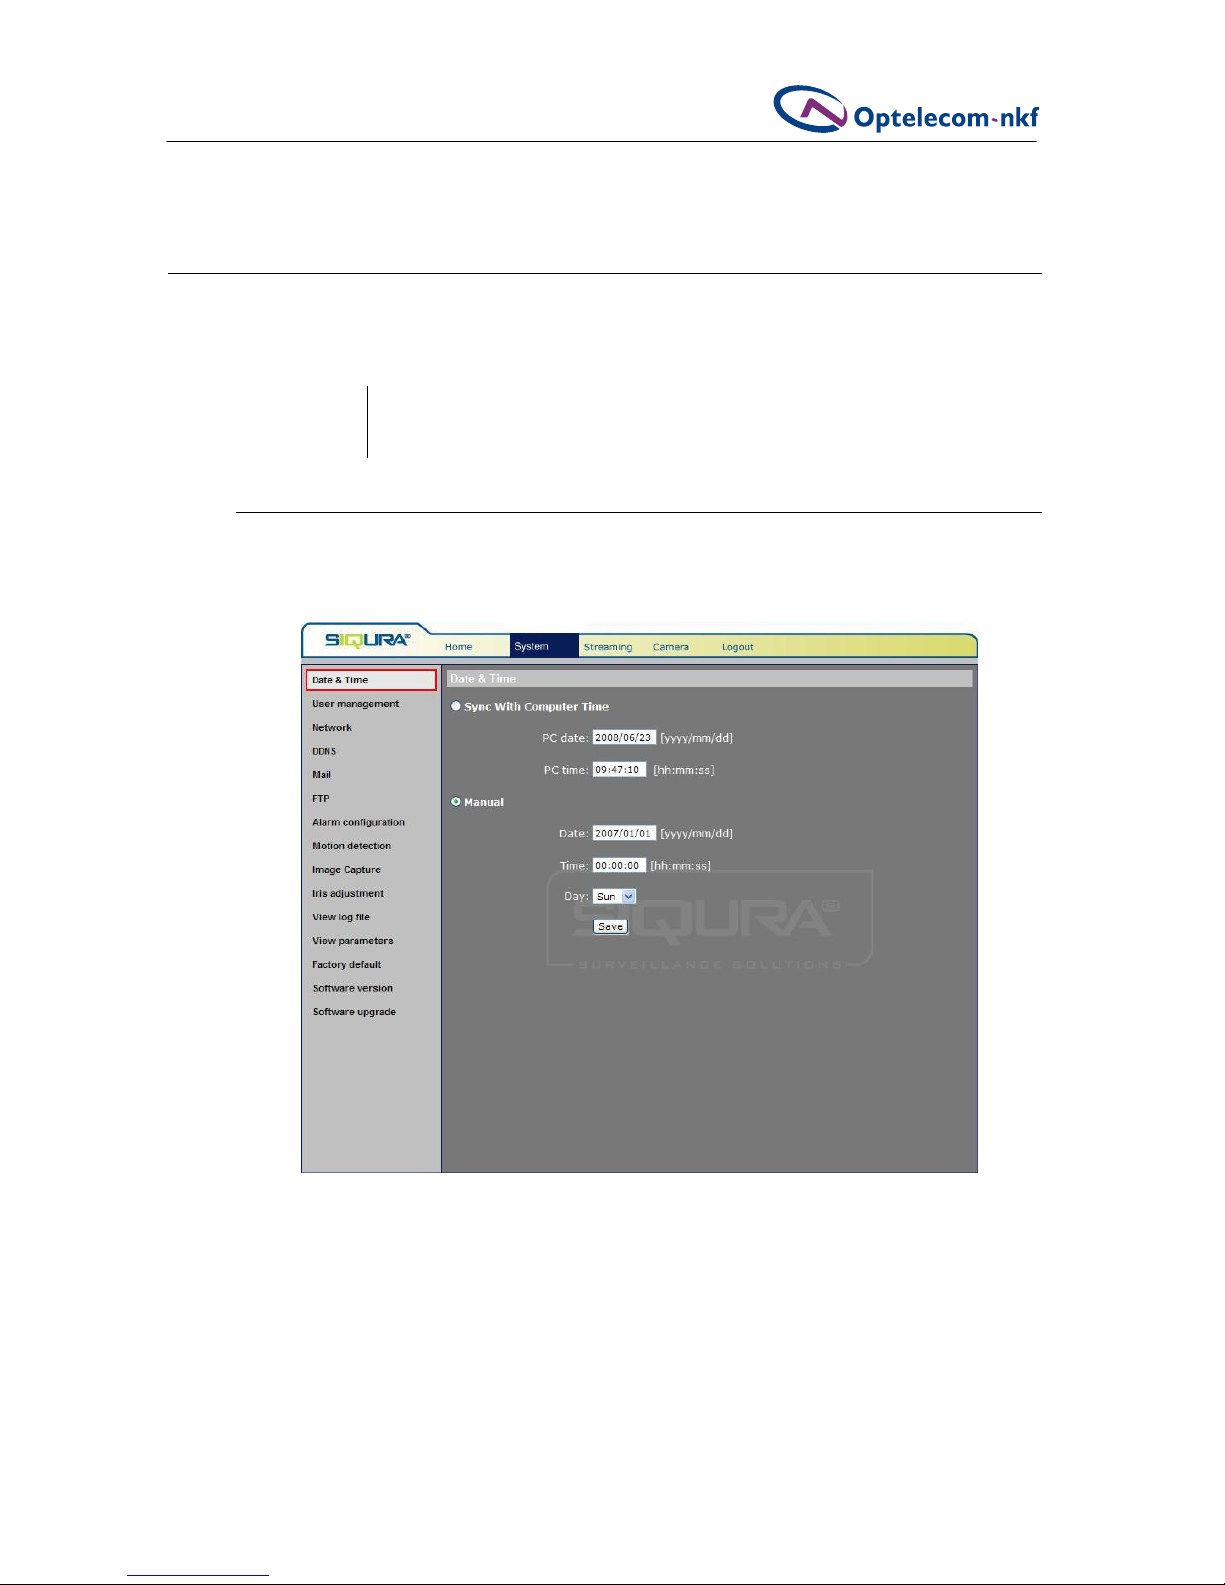
5.1. System Time Settings
To view the options discussed in this section, click the first category, Date & Time in the left
column as shown in figure 5.1.
5.1.1. Sync with computer time
If selected, the displayed date and time will be synchronized with those of the user's PC.
Figure 5.1 System settings
14
System Settings
5.1.2. Manual
The Administrator can also set video date, time and day manually. Note that the entry
format for date and time should reflect that shown next to the entry field.
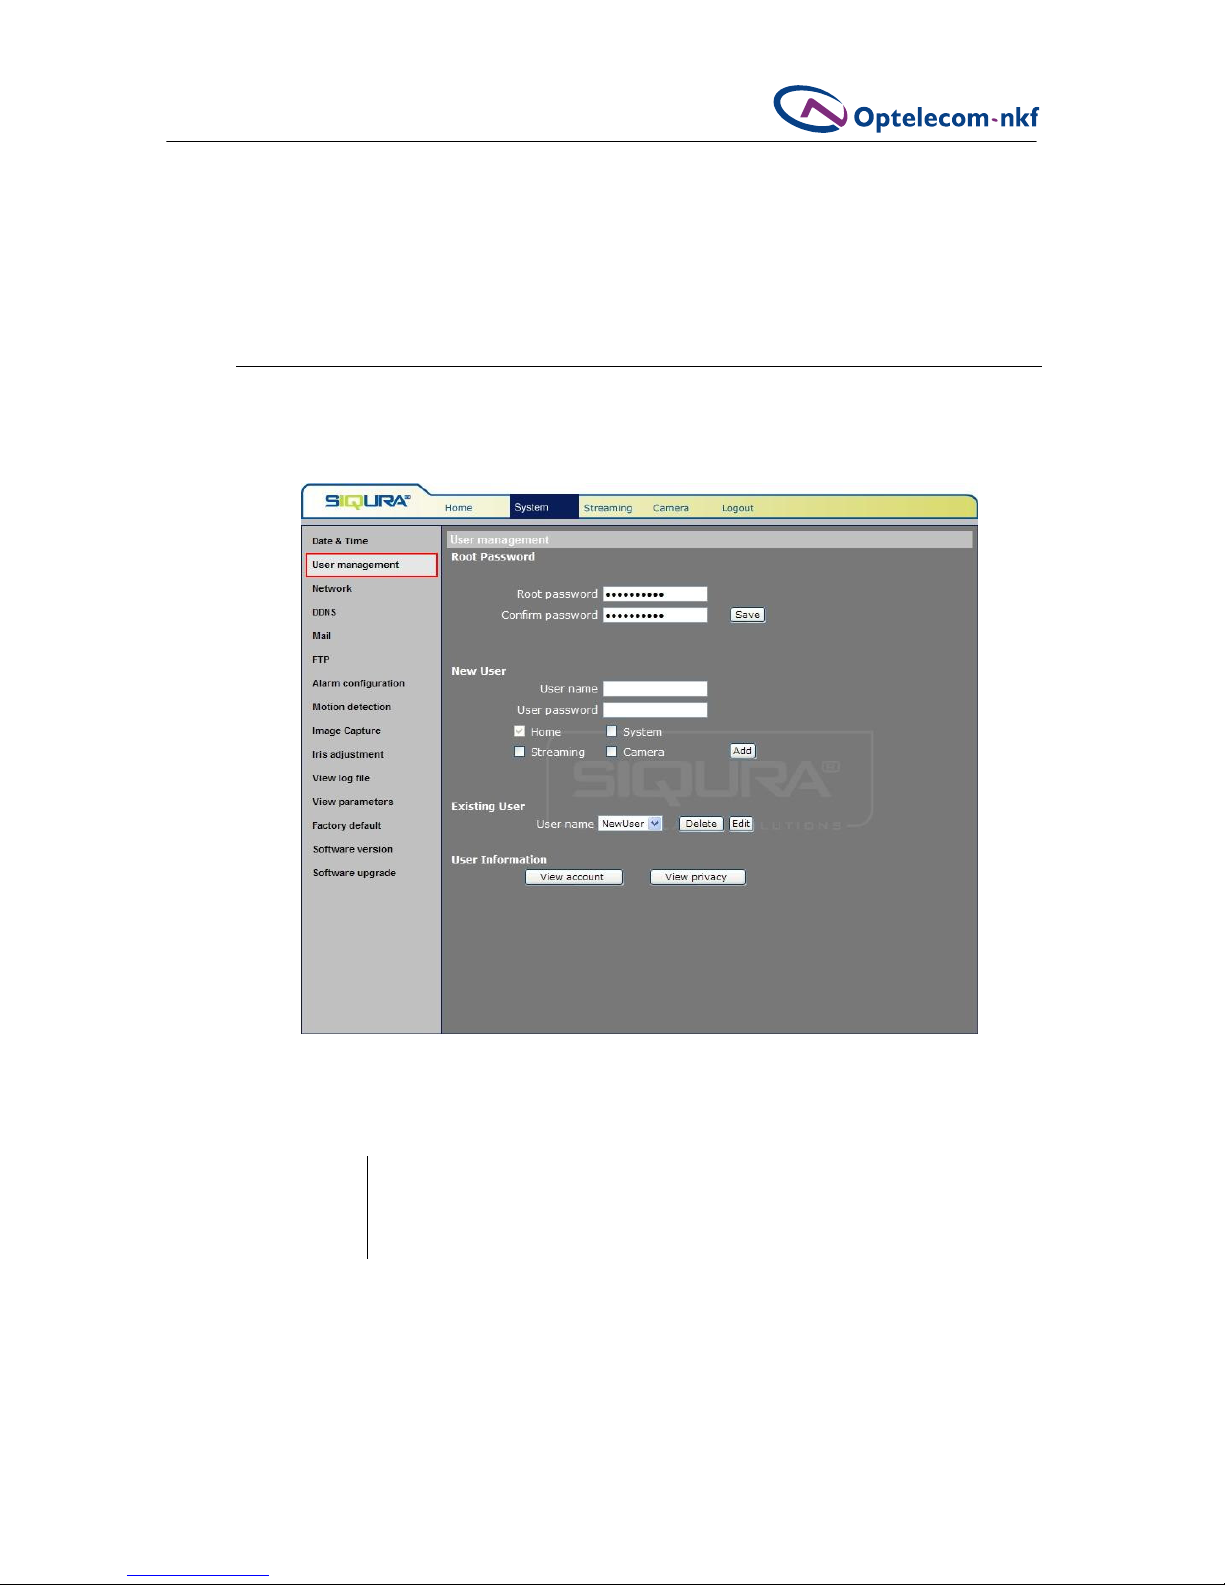
5.2. User Management
To add and delete users and to configure user permissions, click User management in the left
hand column. This screen is shown in figure 5.2.
5.2.1. Root password
please note The root username is Admin and the default password is 1234.
Both username and password are case sensitive.
It is recommended that the administrator change this password.
Figure 5.2 User management settings
 Loading...