

Page 1

LR1 USER MANUAL
© 2018 All rights reserved
SIPMI PRINTER COMPANY INC
For the most recent version of this manual please visit www.sipmi.net
SIPMI
®
Drink Yourselfie!
™
US Patent Pending
Page 2

General Notices:
The information in this document is subject to change without notice. NO WARRANTY OF ANY KIND IS MADE WITH REGARD TO THIS MATERIAL, INCLUDING, BUT
NOT LIMITED TO,THE IMPLIED WARRANTIES OF MERCHANTABILITY AND FITNESS FOR A PARTICULAR PURPOSE.
No liability is assumed for errors contained herein or for incidental or consequential damages in connection with the furnishing, performance, or use of this
material. This document contains proprietary information that is protected by copyright. All rights are reserved. No part of this document may be photocopied,
reproduced, or translated into another language without prior written consent.
Trademark Acknowledgments: All trademarks are the property of their respective owners.
Printing History
Edition 1, Copyright 2019, All rights reserved.
FCC Compliance Statement: This device complies with part 15 of the FCC rules. Operation is subject
to the following two conditions: (1) this device may not cause harmful interference, and (2) this device must accept any interference received, including
interference that may cause undesired operation.
For Users in the United States: This product is intended to be supplied by a UL listed Direct Plug-In Power Supply marked "Class 2"or a UL listed ITE Power Supply
marked "LPS" with output rated 12VDC, 5A or higher. This equipment has been tested and found to comply with the limits for a Class A digital device, pursuant to
Part 15 of the FCC Rules. In a domestic environment this product
may cause radio interference, in which case the user may be required to take adequate measures. This equipment generates, uses, and can radiate radio
frequency energy and, if not installed and used in accordance with the instructions, may cause harmful interference to radio communications. However, there is
no guarantee that interference will not occur in a particular installation. If this equipment does cause harmful interference to radio or television reception, which
can be determined by turning the equipment off and on, the user is encouraged to try to correct the interference by one or more of the following measures:
Re-orient or relocate the receiving antenna.
Increase the separation between the equipment and receiver.
Connect the equipment into an outlet on a circuit different from that to which the receiver is connected.
Consult the dealer or an experienced radio/TV technician for help.
Use of shielded cables is required to comply with the Class A limits of Part 15 of the FCC Rules. You are cautioned that any changes or modifications not expressly
approved in this manual could void your authority to operate and/or obtain warranty service for this equipment.
For Users in Canada: This digital apparatus does not exceed the Class A limits for radio noise for digital apparatus set out on the Radio Interference Regulations of
the Canadian Department of Communications. Le present appareil numerique n'emet pas de bruits radioelectriques depassant les limites applicables aux appareils
numeriques de la class A prescrites dans le Reglement sur le brouillage radioelectrique edicte par le ministere des Communications du Canada.
Product Disposal
Do not dispose of the printer or supplies in the same manner as normal household waste. Consult your local authorities for disposal and recycling options.
Battery Notice
This product contains Perchlorate material. Special handling may apply. For more information, go to http://www.dtsc.ca.gov/hazardouswaste/perchlorate/
WARNING!
CAUTION!
USE OF CONTROLS OR ADJUSTMENTS OR PERFORMANCE OF PROCEDURES OTHER
THAN THOSE SPECIFIED HEREIN MAY RESULT IN HAZARDOUS RADIATION.
CAUTION!
RISK OF EXPLOSION IF BATTERY IS REPLACED BY AN INCORRECT TYPE.
DISPOSE OF USED BATTERIES ACCORDING TO THE INSTRUCTIONS.
TO PREVENT FIRE OR SHOCK HAZARD, DO NOT EXPOSE THE UNIT TO RAIN OR
MOISTURE. TO REDUCE THE RISK OF ELECTRIC SHOCK, DO NOT REMOVE EXTERIOR PANELS. NO USER-SERVICEABLE PAR TS INSIDE. REFER SERVICING TO
QUALIFIED SERVICE PERSONNEL. OPERATE THE UNIT WITH ONLY THE PROPER ELECTRICAL SPECIFICATIONS AS LABELED ON THE PRINTER AND AC ADAPTER.
THE PRINT AREA CONTAINS HAZARDOUS MOVING PARTS. KEEP FINGERS AND OTHER BODY PARTS AWAY.
SIPMI
®
Drink Yourselfie!
™
US Patent Pending
Page 3

SIPMI
®
Drink Yourselfie!
™
US Patent Pending
Ta bl e of Contents
Section 1: Getting Started 4.......................................................................................
A.
B.
C.
D.
E.
F.
Choosing a Good Location 4 ........................................................................
Transporting the Printer 4 ...........................................................................
Unpacking and Inspection 5 .......................................................................
Identifying the Parts 5 .................................................................................
Installing/Removing the Photo Tr ay 9 ............................................................
Installing/Removing the Cut Waste Bin 10................................................
Section 2: SIPMI Paper Reel & Ink 11.......................................................................
A.
B.
C.
D.
Paper and Reel Specifications 11 ...............................................................
Installing SIPMI Paper 12 ............................................................................
Removing SIPMI Paper 16 ..........................................................................
Ink Installation and Removal 17................................................................
Section 3: SIPMI WIFI & APP Connectivity (iOS) 20 ................................................
A. Downloading of SIPMI APP 21 ....................................................................
B. Connecting to SIPMI WIFI 22 .......................................................................
C. Printing from SIPMI APP 23 .......................................................................
D. Photo Library Prints 24...............................................................................
Section 5: Troubleshooting and Maintenance 27.....................................................
A.
B.
C.
D.
Solving Print Problems 27 ..........................................................................
Interpreting the Printer's Indicator Lights 31 ...........................................
Printer Maintenance 33 ...............................................................................
Technical Support 35...................................................................................
Section 4: Creating a SIPMI Beverage 25 .................................................................
A.
B.
Glassware Selection 25 ...............................................................................
Beverage, Foam and Image Wash Line 26 ...............................................
Addendum: SIPMI Wireless Operating Procedures 36...........................................
Page 4

Section 1: Getting Started
THANK YOU…
The SIPMI LR1 will print extremely high resolution images for you
to create memorable SIPMI Imaged beverages both as a live and
preset experience.
This User's Manual is your complete step-by-step
guide to quickly and easily setting up and printing with your new
printer!
A. CHOOSING A GOOD LOCATION
Place the printer on a flat surface in a location with adequate
air circulation to prevent internal heat build up. Do not place
the printer near heat sources such as radiators or air ducts, or
in a place subject to direct sun light, excessive dust,
mechanical vibration or shock.
Allow for adequate clearance in front of the printer to
accommodate the printed photo paper as it is leaving the
printer.
Allow for adequate overhead and rear clearance for opening
the top cover to allow easy access to the photo paper and ink
cartridge. The printer will require an additional 12 inches (30.5
cm) of overhead space and 1 inch (2.5 cm) of rear space to
open the cover.
B. TRANSPORTING THE PRINTER
When transporting the printer please leave the cartridge
installed in the printer.
SIPMI recommends using a hard protective traveling case with
wheels and custom cut-out foam protection - suggestions are
available at www.sipmi.net.
Disconnect the power cord when transporting the printer. If you
choose to remove the cartridge before shipping, please follow
this procedure: With the printer powered on,
remove the cartridge, wait ten seconds for the cartridge cap to
retract. Power off the printer.
Page 5
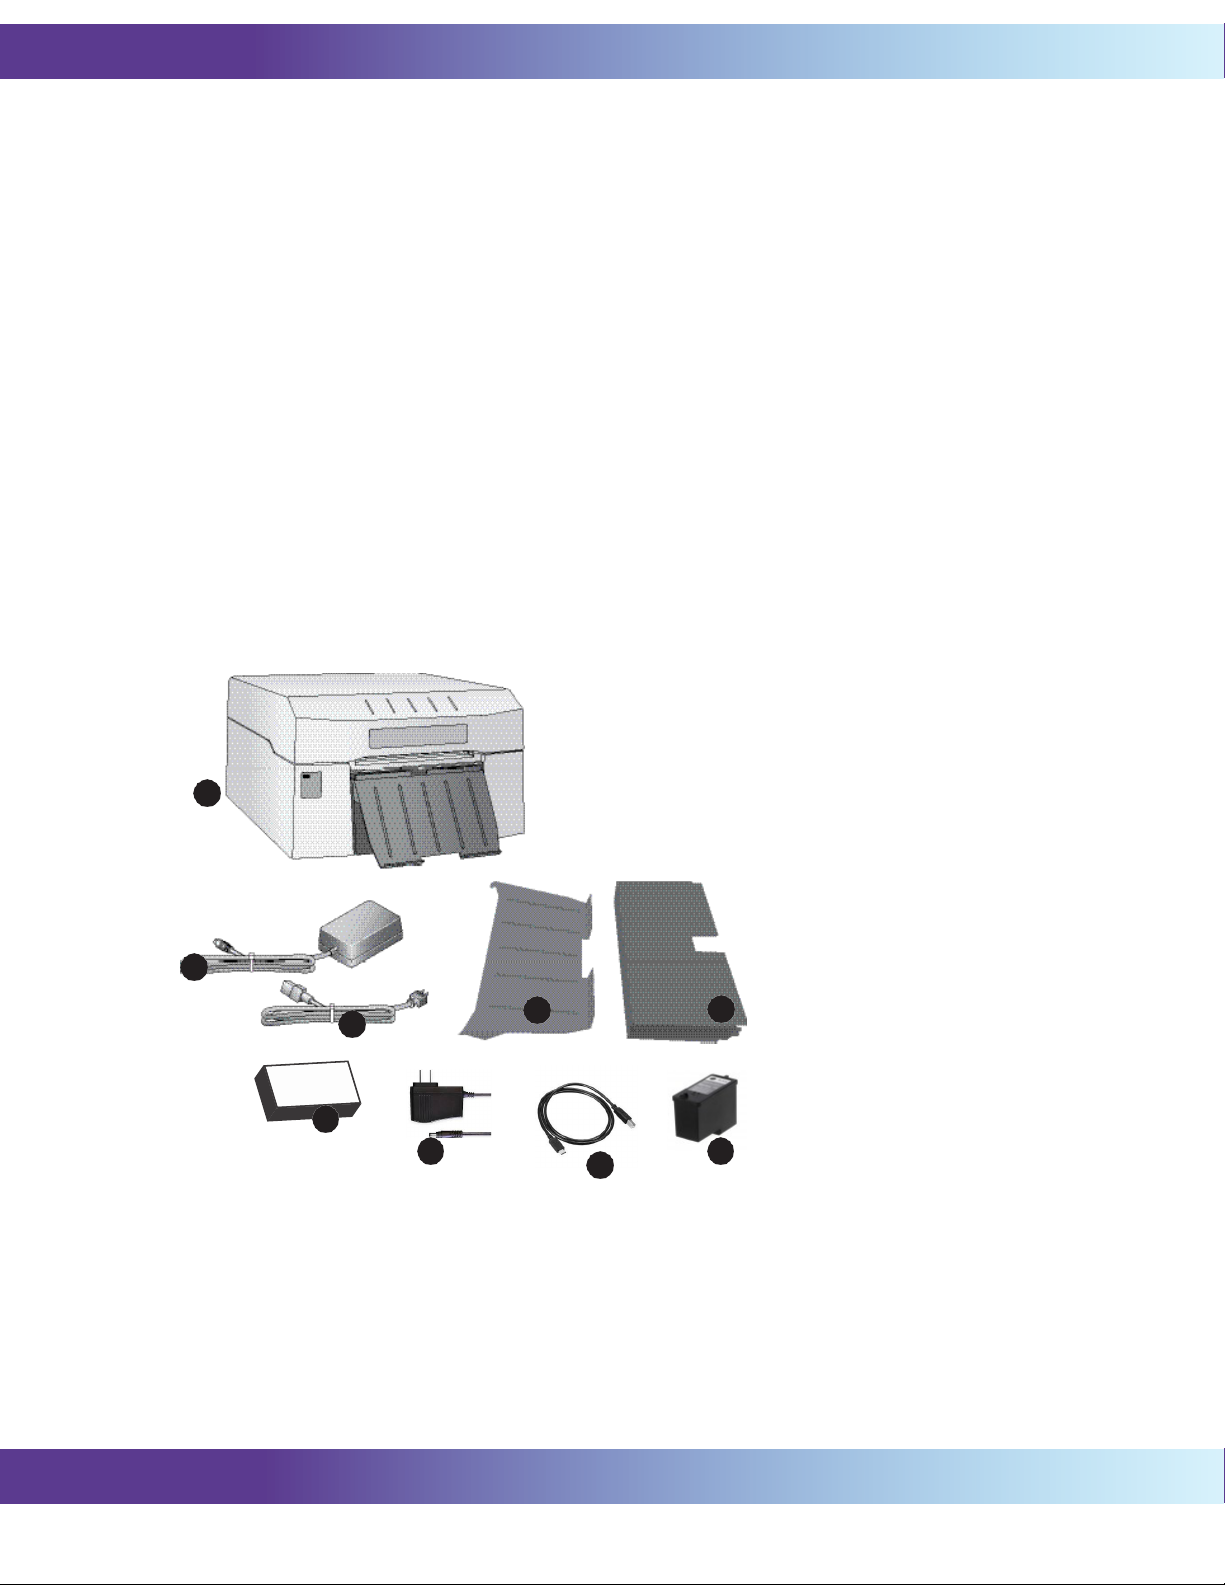
C. UNPACKING AND INSPECTION
While unpacking your printer, inspect the carton to ensure that
no damage has occurred during shipping. Make sure that all
supplied accessories are included with your unit.
The following items are included in the supply box:
1. SIPMI LR1 Printer
2. Power Adapter
3. Separate Power Cord Cut
4. Waste Bin
5. LR1 Tray
6. SIPMI WIFI Device
7. SIPMI WIFI Device Power Adapter
8. SIPMI WIFI Device USB Printer Cable
9. SIPMI Edible Ink
1
2
5
4
3
2
SIPMI WIFI
6
789
1
Page 6
D. IDENTIFYING THE PARTS
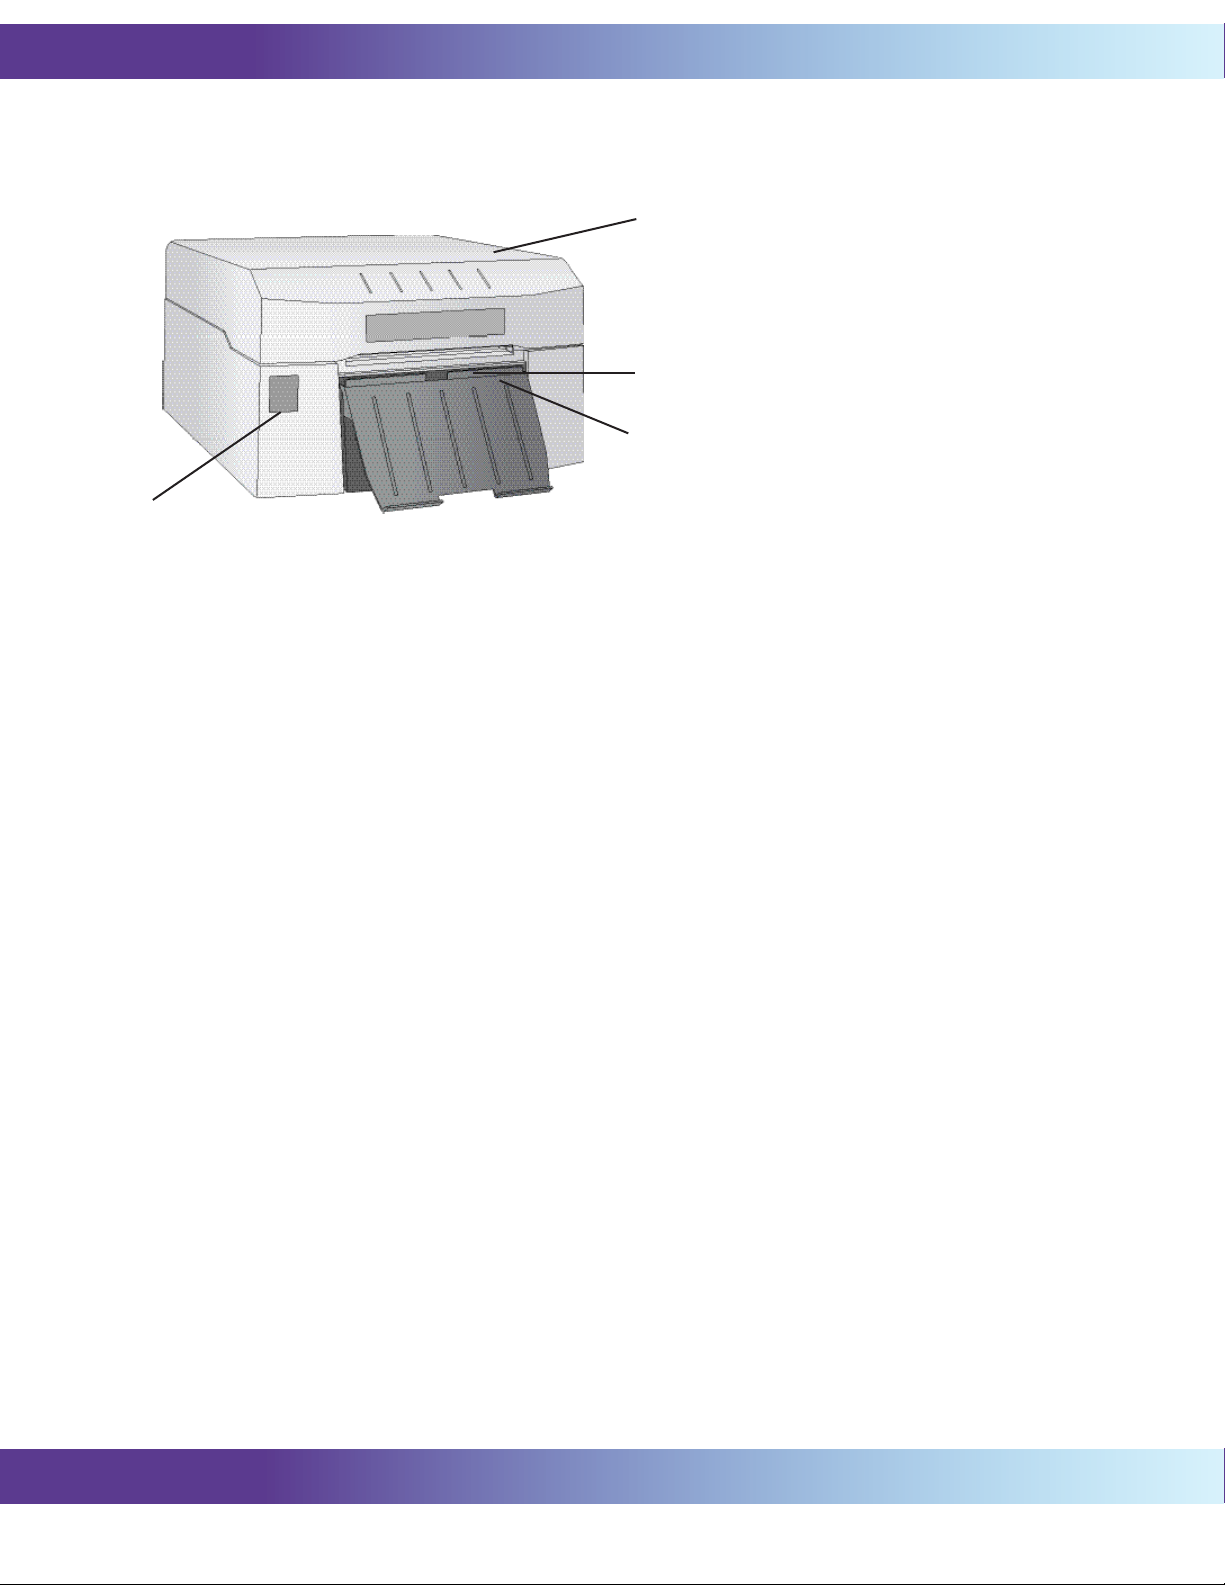
This illustration shows the front of the printer with its LED
indicator lights.
Top Cover
Cut Waste Bin
Photo Tray
Power, Ink,
Paper, Error LEDs
The Power LED will illuminate when the printer is plugged in
and switched on.
The Ink LED will illuminate when the ink cartridge is low or
not installed.
The Paper LED will illuminate when the media is not installed
or is empty.
The Error LED will illuminate when there is an error that
requires viewing in the Primera PrintHub software. Open the
software to view the error message.
The Cut Waste Bin holds all of the strips cut from between
photos. Empty it when you change the paper.
The Photo Tray collects the SIPMI printed Images
The To p Cover can be opened to access/change the photo
paper and ink cartridge.
Page 7
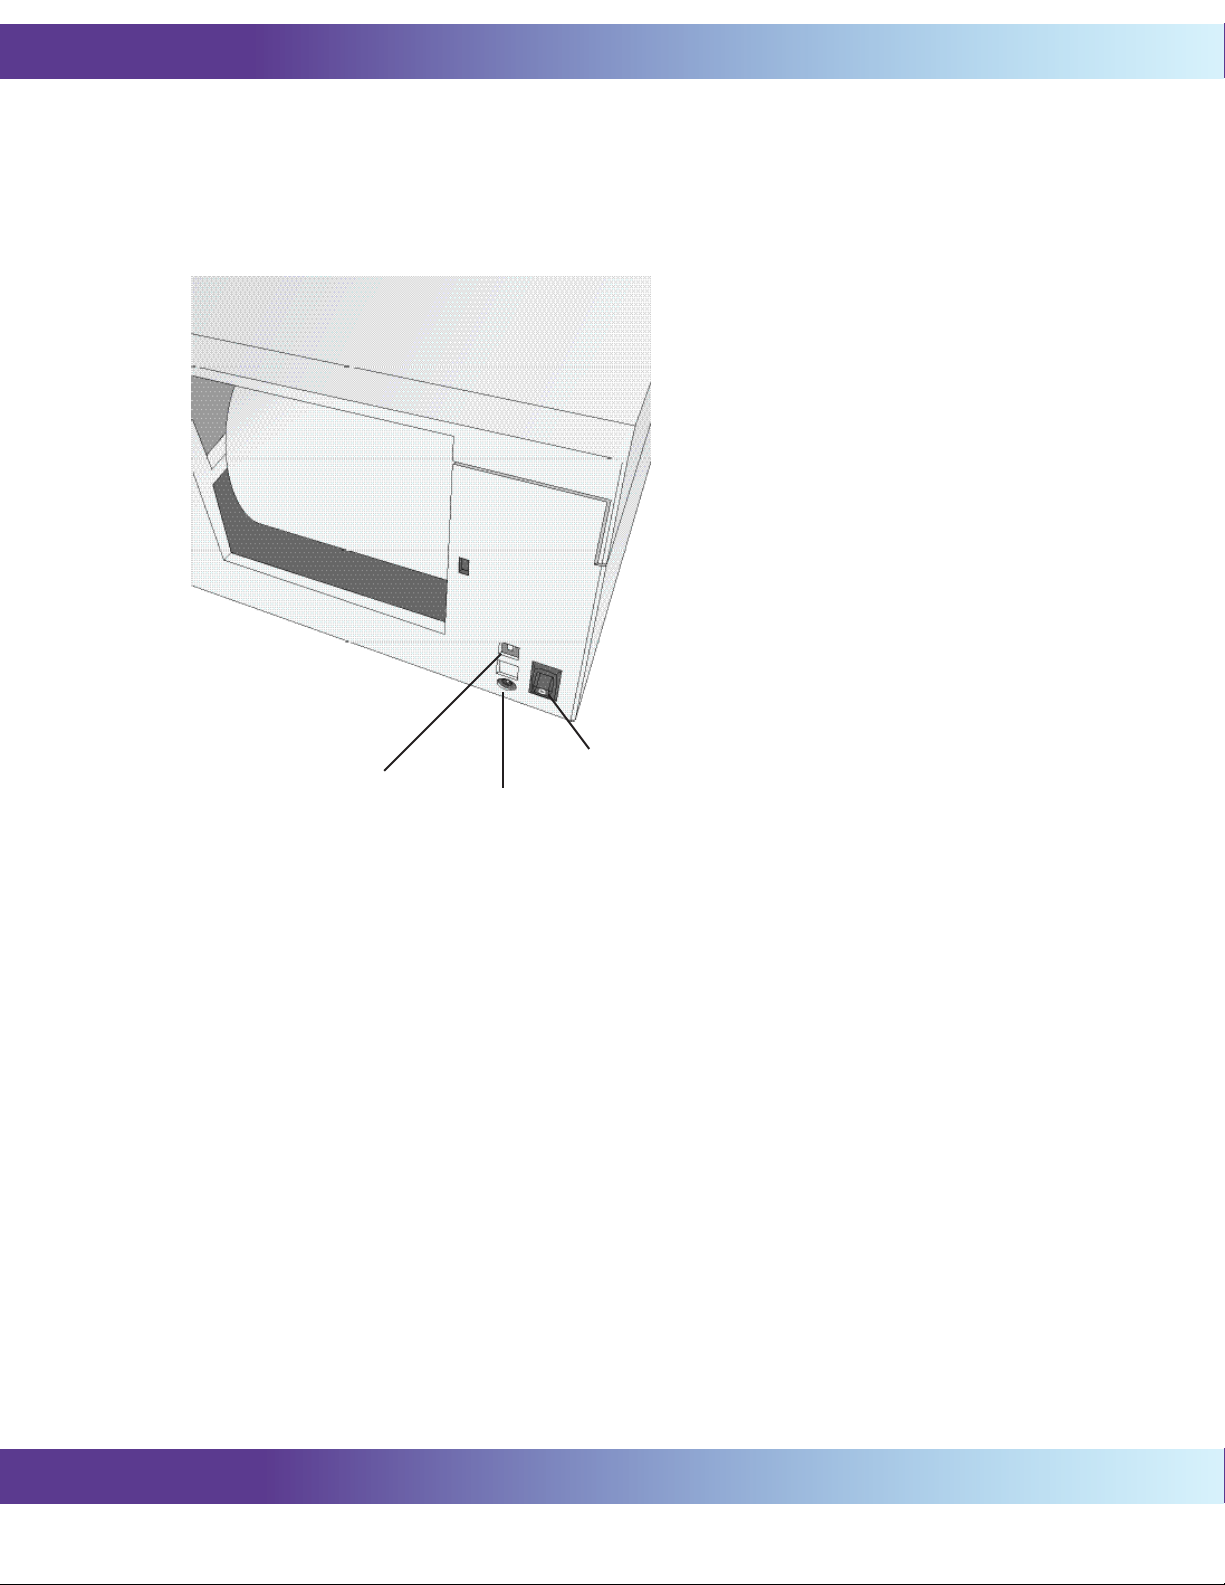
This illustration shows the input ports, power switch, and
media loop opening found on the rear panel of the printer.
USB Port
(Connect
to SIPMI
WIFI)
Power Port
Power Switch
Page 8
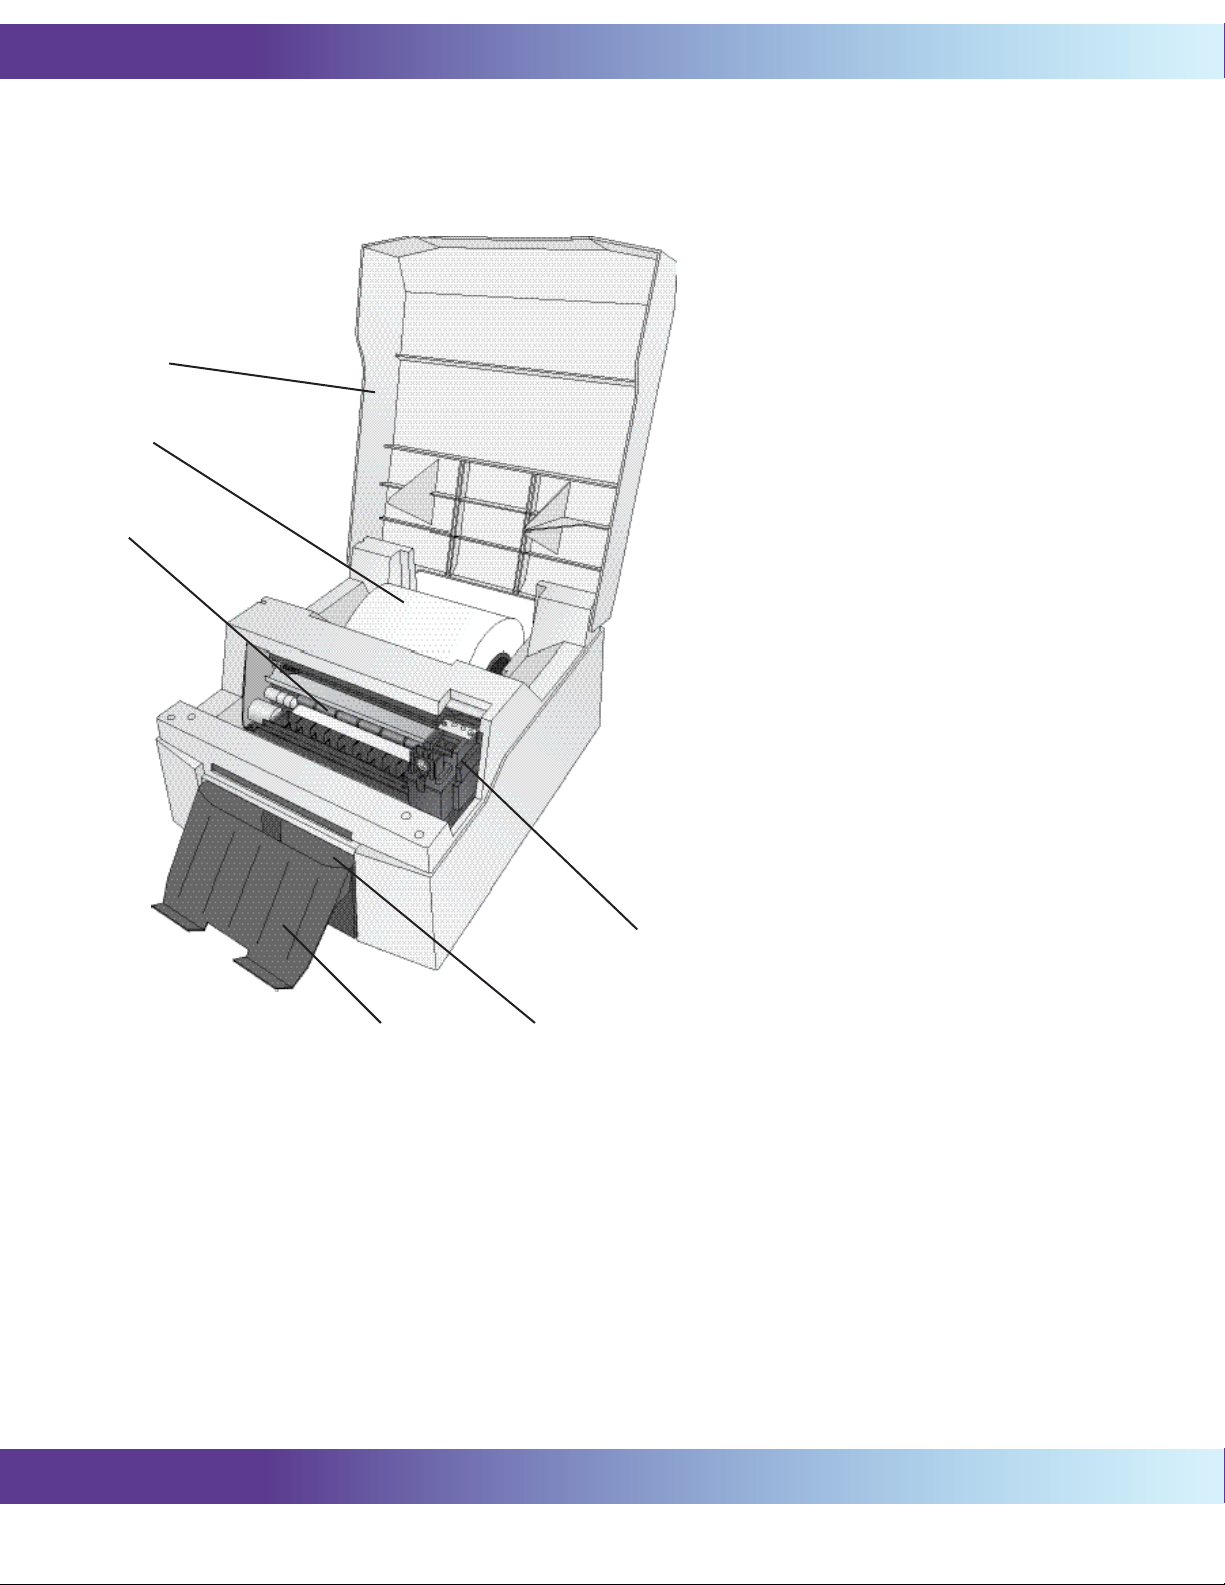
This illustration shows the interior of the printer.
Top Cover
SIPMI Paper Reel
Pinch Rollers
Ink Cartridge Carrier
Cut Waste Bin
Photo Tray
Page 9
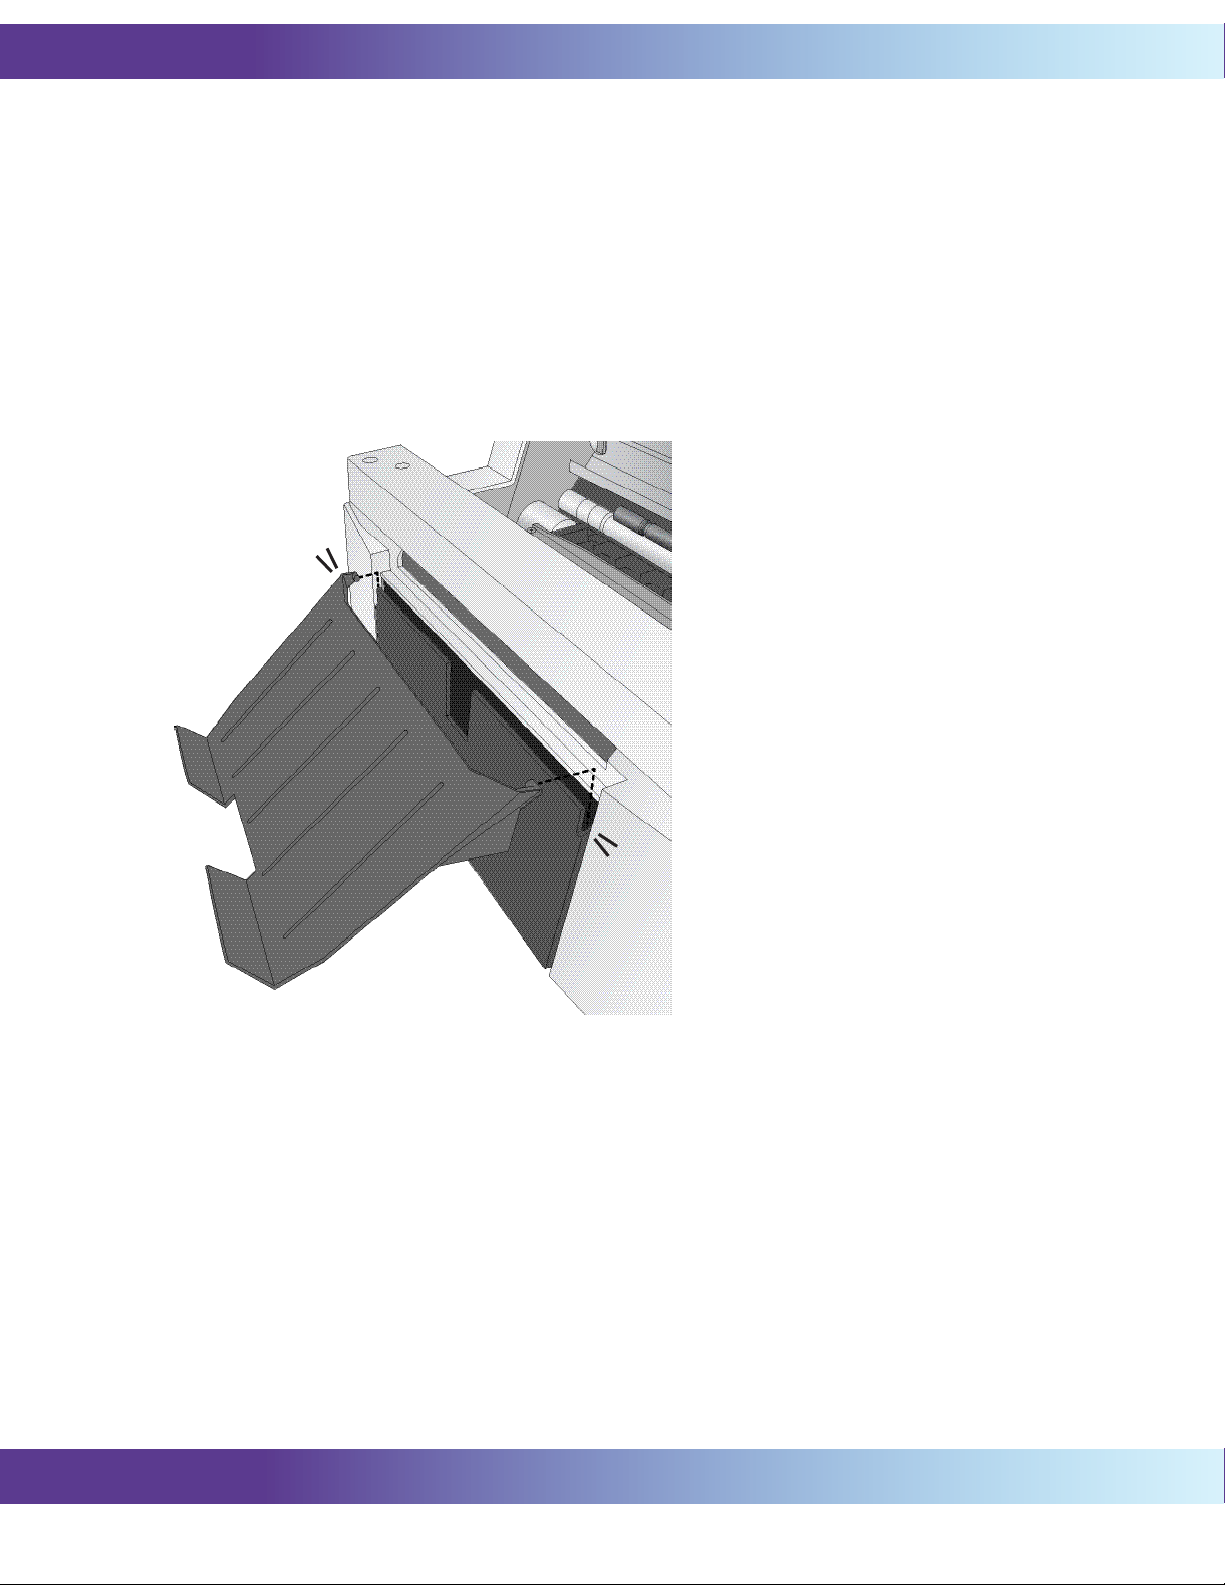
E. INSTALLING/REMOVING THE SIPMI PRINT TRAY
•
The photo tray is used to capture the printed SIPMI Paper
Disks after printing.
If you are printing larger photos, remove the photo tray to
prevent feed and cut problems.
•
To remove the photo tray, lift up until the pegs are clear of the
waste cut bin and then pull out. Yo u may have to hold down
the cut waste bin in order to remove the photo tray since the
photo tray snaps into place.
Click
To install the photo tray, first make sure the cut waste bin is
installed, then lower the tray until the pegs are secured
behind the front lip of the cut waste bin. The pegs will snap
into place.
Click
Page 10
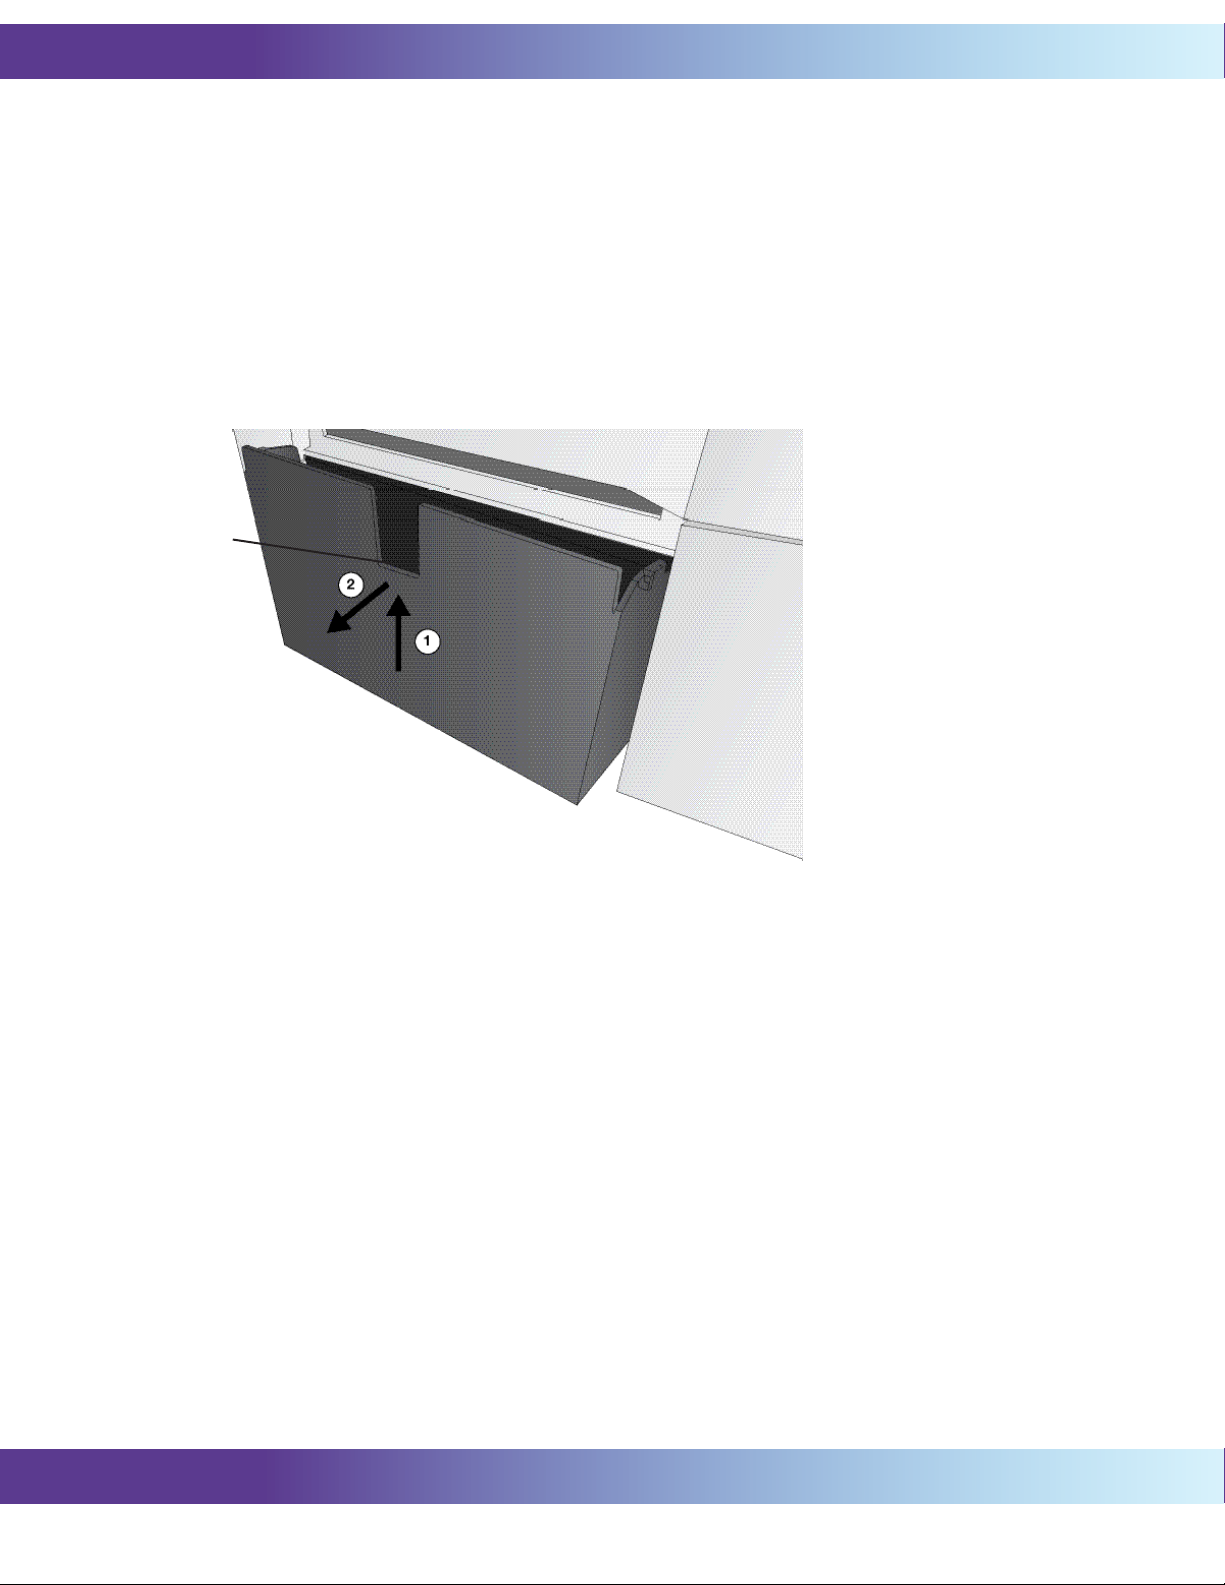
F. INSTALLING/REMOVING THE CUT WASTE BIN
The cut waste bin captures the SIPMI Paper strips of paper cut
from between disks before and after a photo is printed. This
bin should be emptied every time you finish a roll of photo
paper.
To remove the cut waste bin, first remove photo tray. Remove
the cut waste bin by lifting up and pulling out.
Notch
Note:
When emptying the cut waste bin, the photo tray and the cut
waste bin can be removed together since they snap together.
To install the cut waste bin, make sure the notch is facing
out, then push in and down.
Page 11
Section 2: SIPMI Paper Reel & Ink
The LR1 accepts ONLY SIPMI Paper which contains a Smart
Chip that identifies the remaining available prints. The SIPMI
Paper contains the frosting edible circles with a diameter of
2.99inches. The frosting edible circles is what your images are printed
onto. The frosting edible circles will then peel off from the packing
sheet for easy application on top of SIPMI Foam which is applied on
top of your beverage. The SIPMI Edible Ink cartridge and driver
settings are calibrated to work specifically with the installed
paper.
It keeps track of the length of paper remaining.
The software will notify you when a roll of paper is empty. The
printing is perfectly aligned to hit only the 2.99 inch frosting
edible circles.
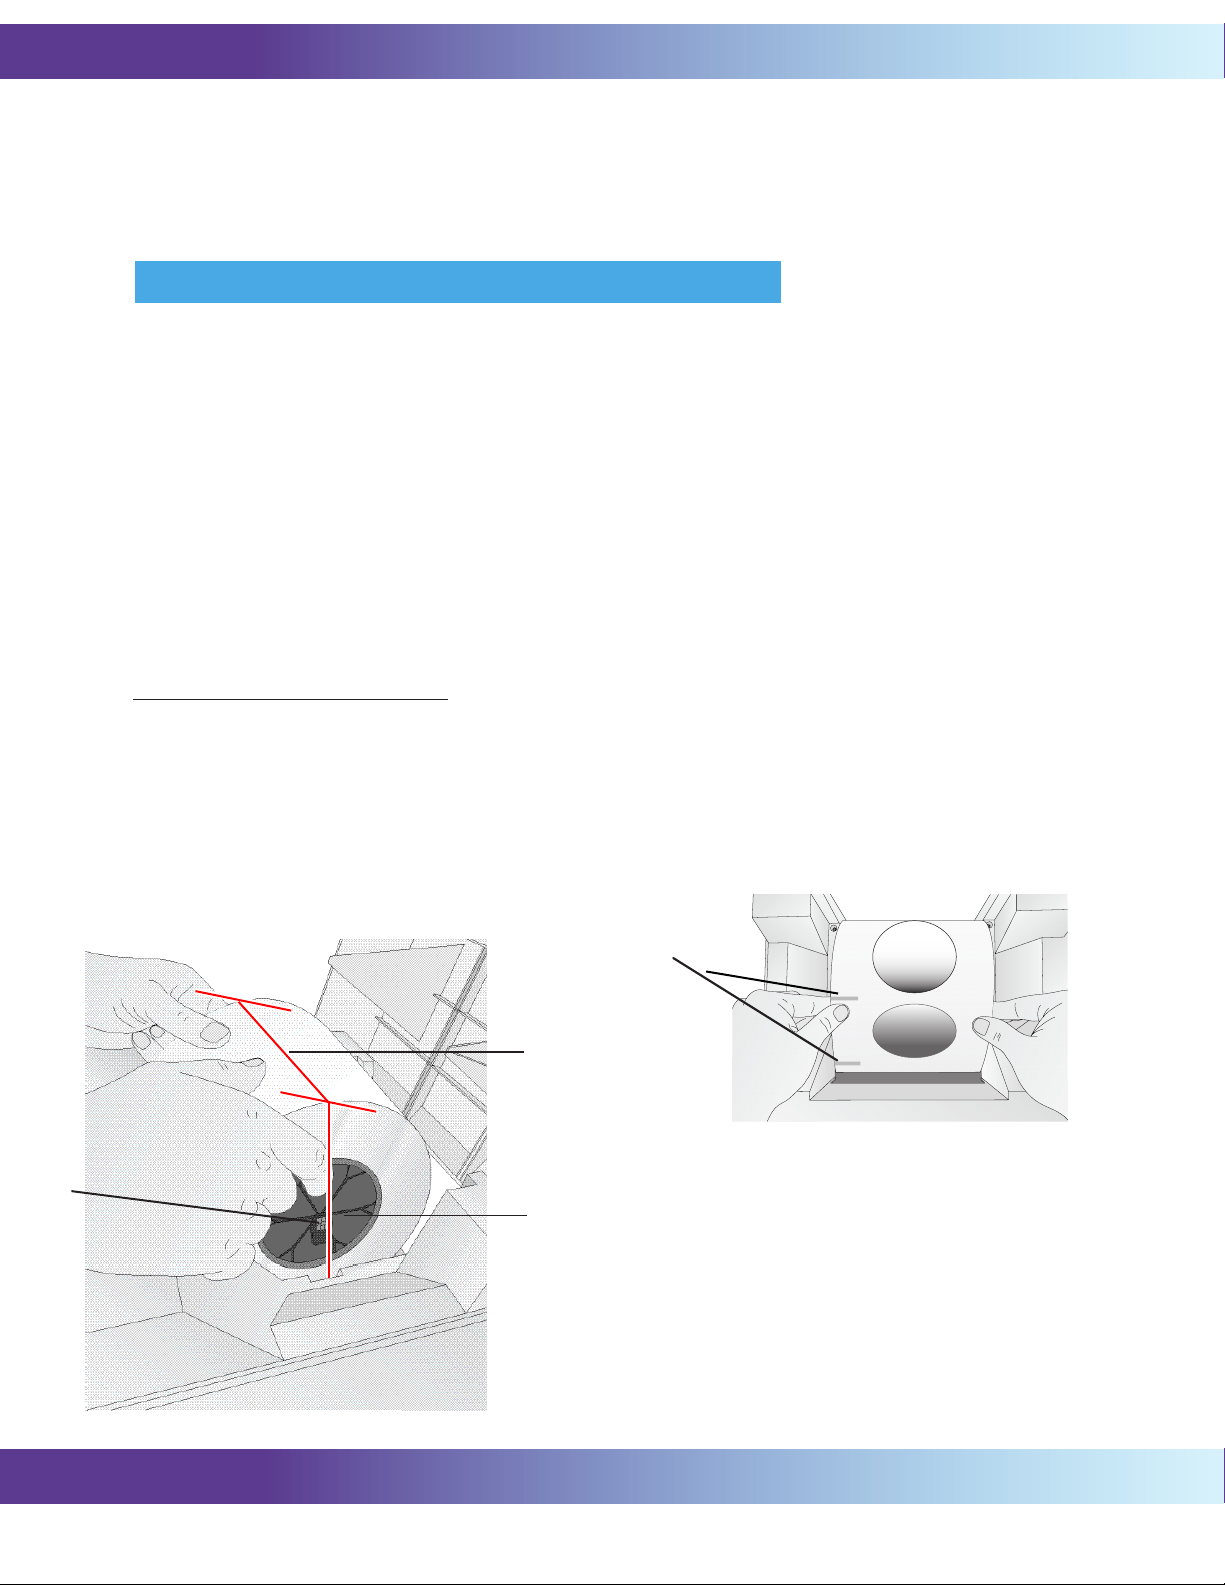
A. PAPER AND ROLL SPECIFICATIONS
Each reel comes with 120 2.99inch edible frosting circles.
After each print, the SIPMI LR1 cuts the backing paper
in-between the guide markers that are located on the
back of the backing sheet
Black Guide
Markers
Underneath
Roll Specifications
6" Wide
Smart
Chip
3" Inner
Diameter Core
Page 12
B. INSTALLING PHOTO PAPER
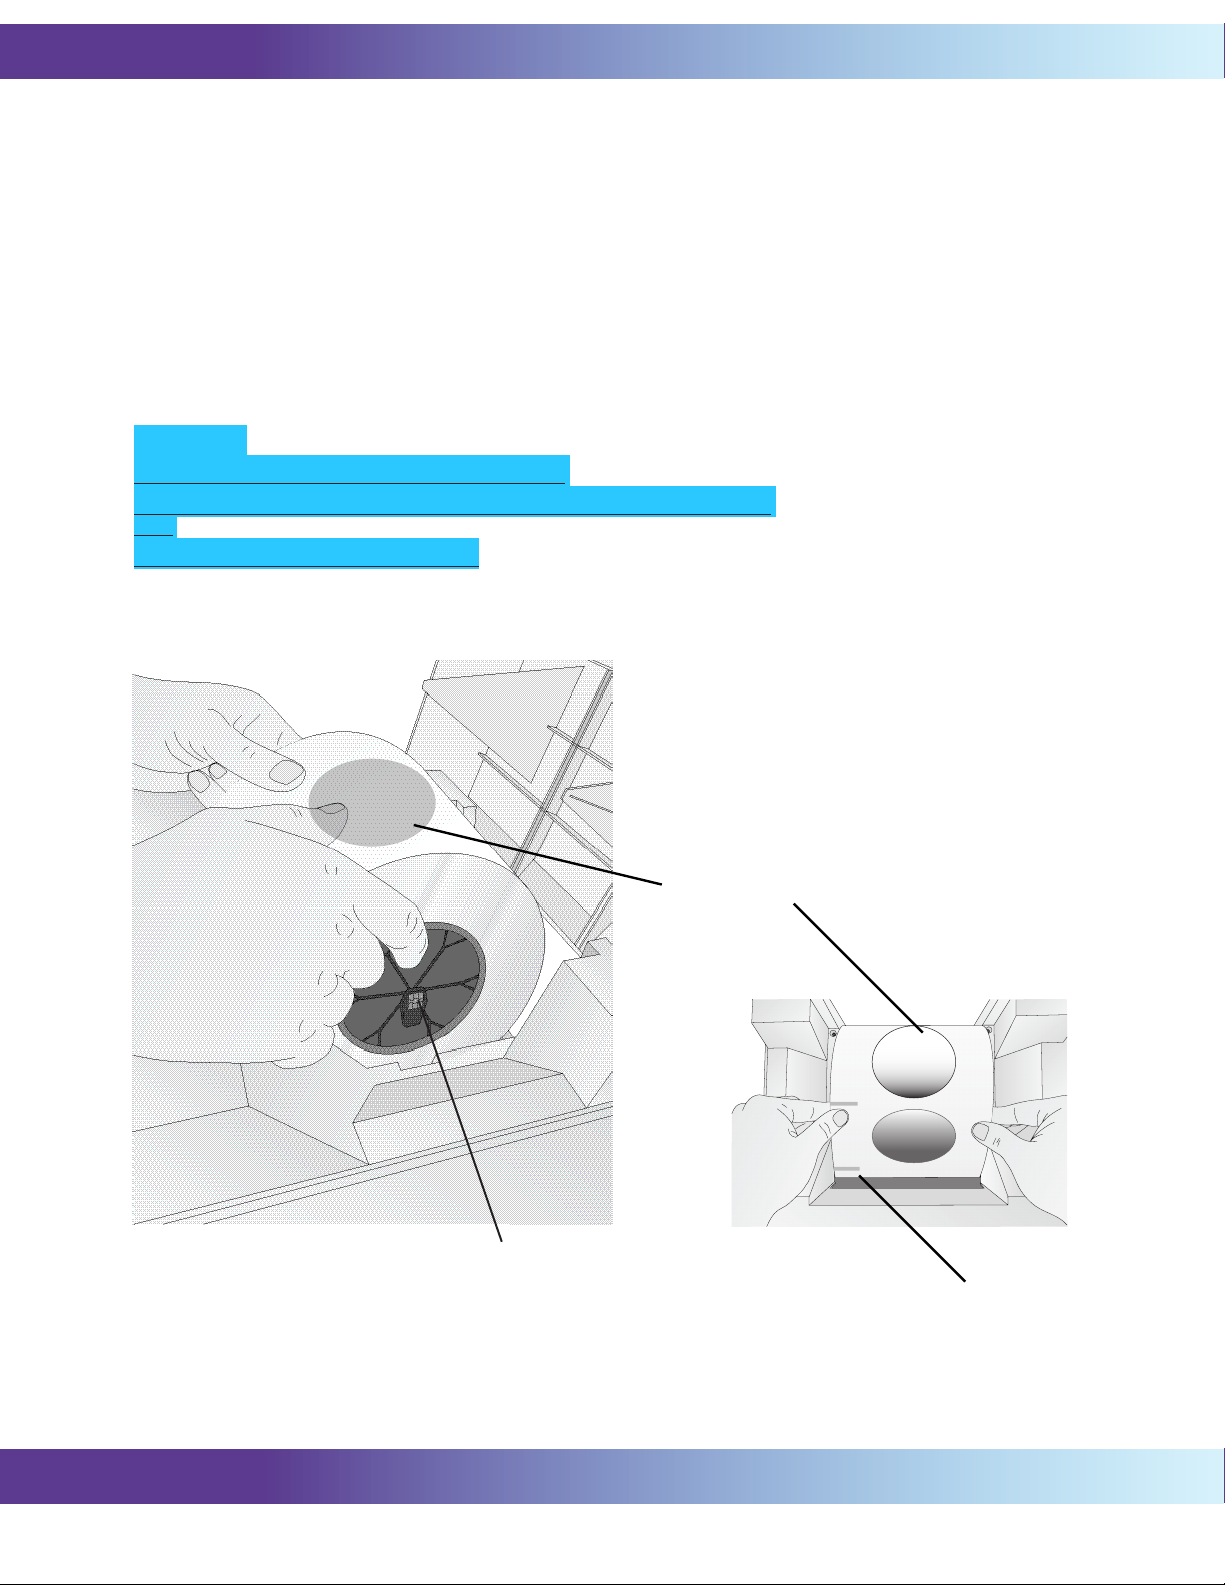
Plug in the power cable and switch on the printer. Open the top cover
of the SIPMI LR1 Printer.
Locate a SIPMI Paper reel.
Grasp the reel with both hands as shown, taking care not to touch the smart
chip. (It must hang freely.)
Place the reel into the reel area in the back of the printer.
IMPORTANT:
SIPMI FROSTING CIRCLES ARE ON TOP FACING UP;
THE BLACK GUIDE MARKERS ARE ON THE UNDERNEATH LEFT HAND SIDE;
AND
THE SMART CHIP IS ON THE RIGHT SIDE.
Smart Chip Right Hand Side
Frosting Circle Facing Up
Black Guide Markers
Underneath Left Hand
Side.
Page 13
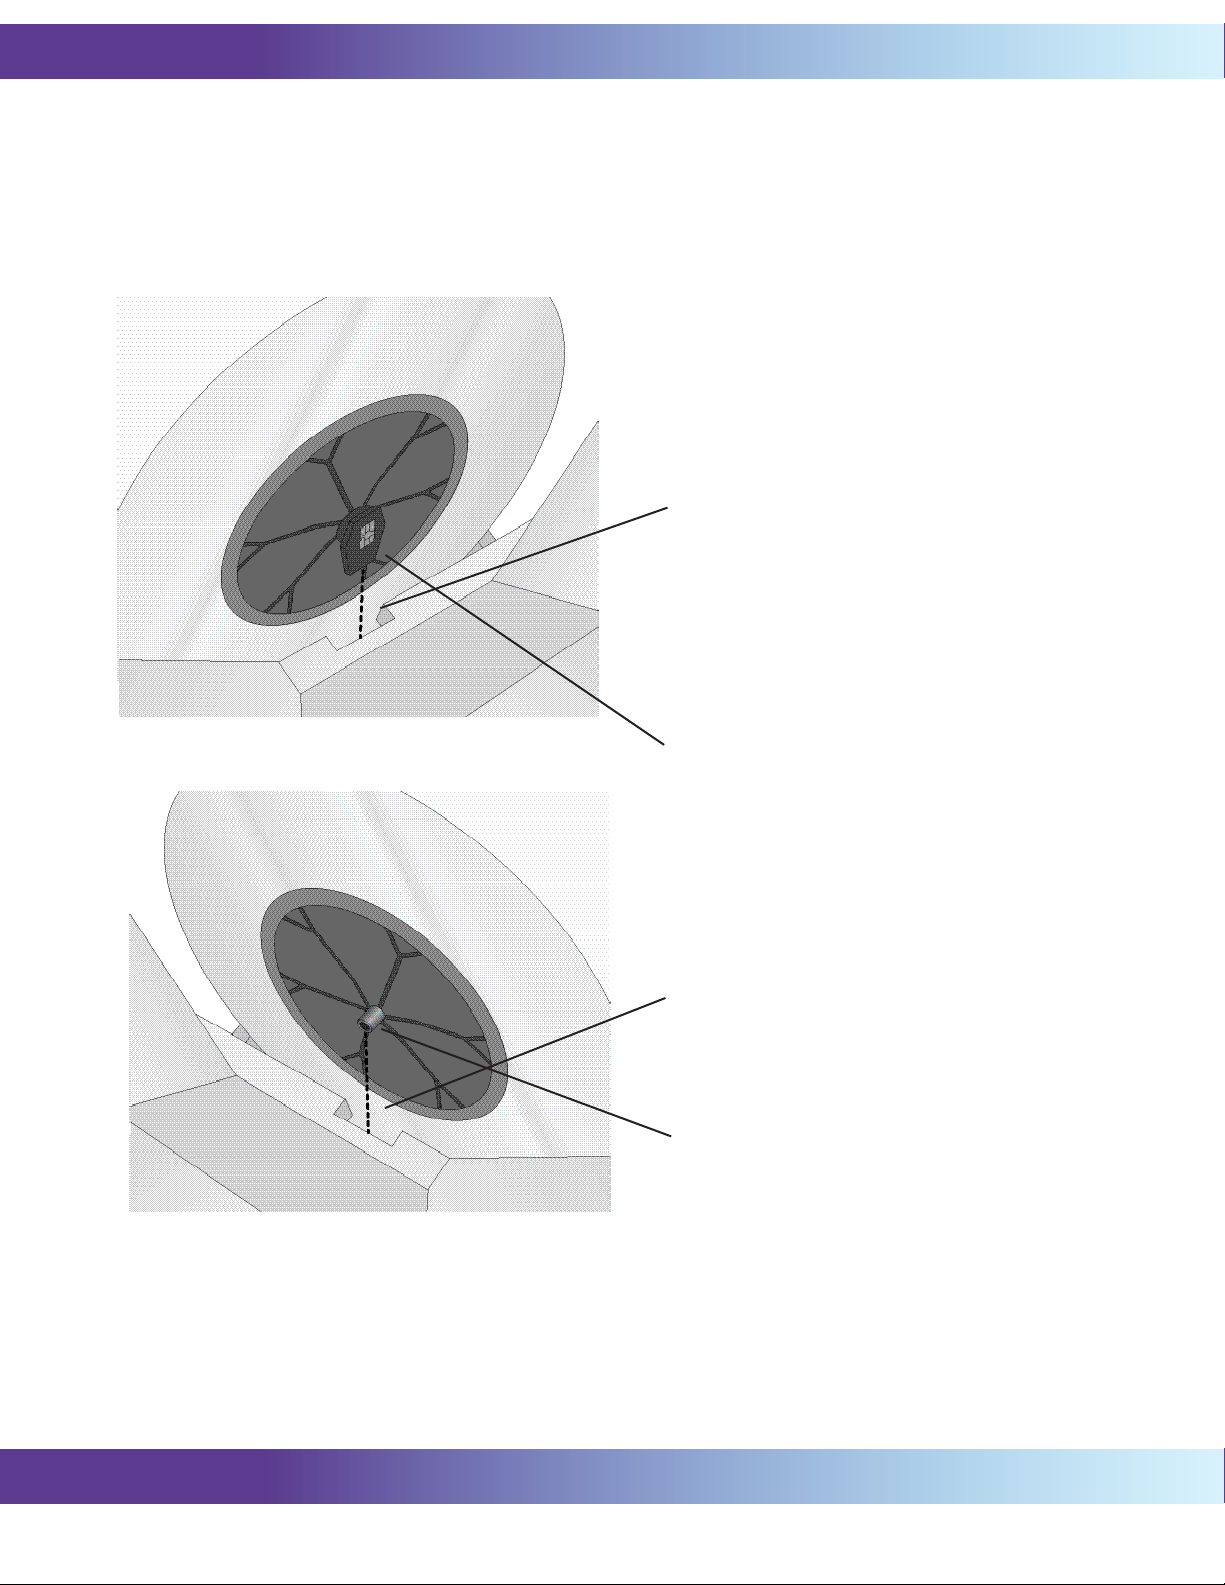
The smart chip will orient itself automatically for
installation. Insert it into the corresponding slot on the
right side of the printer and insert the pin on the left side
of the roll into the slot on the left side of the printer. Push
down on the roll slightly to ensure that it is fully seated at
both ends.
Smart
Chip
Slot
Pin
Slot
Right Hand Side
Left Hand Side
Page 14
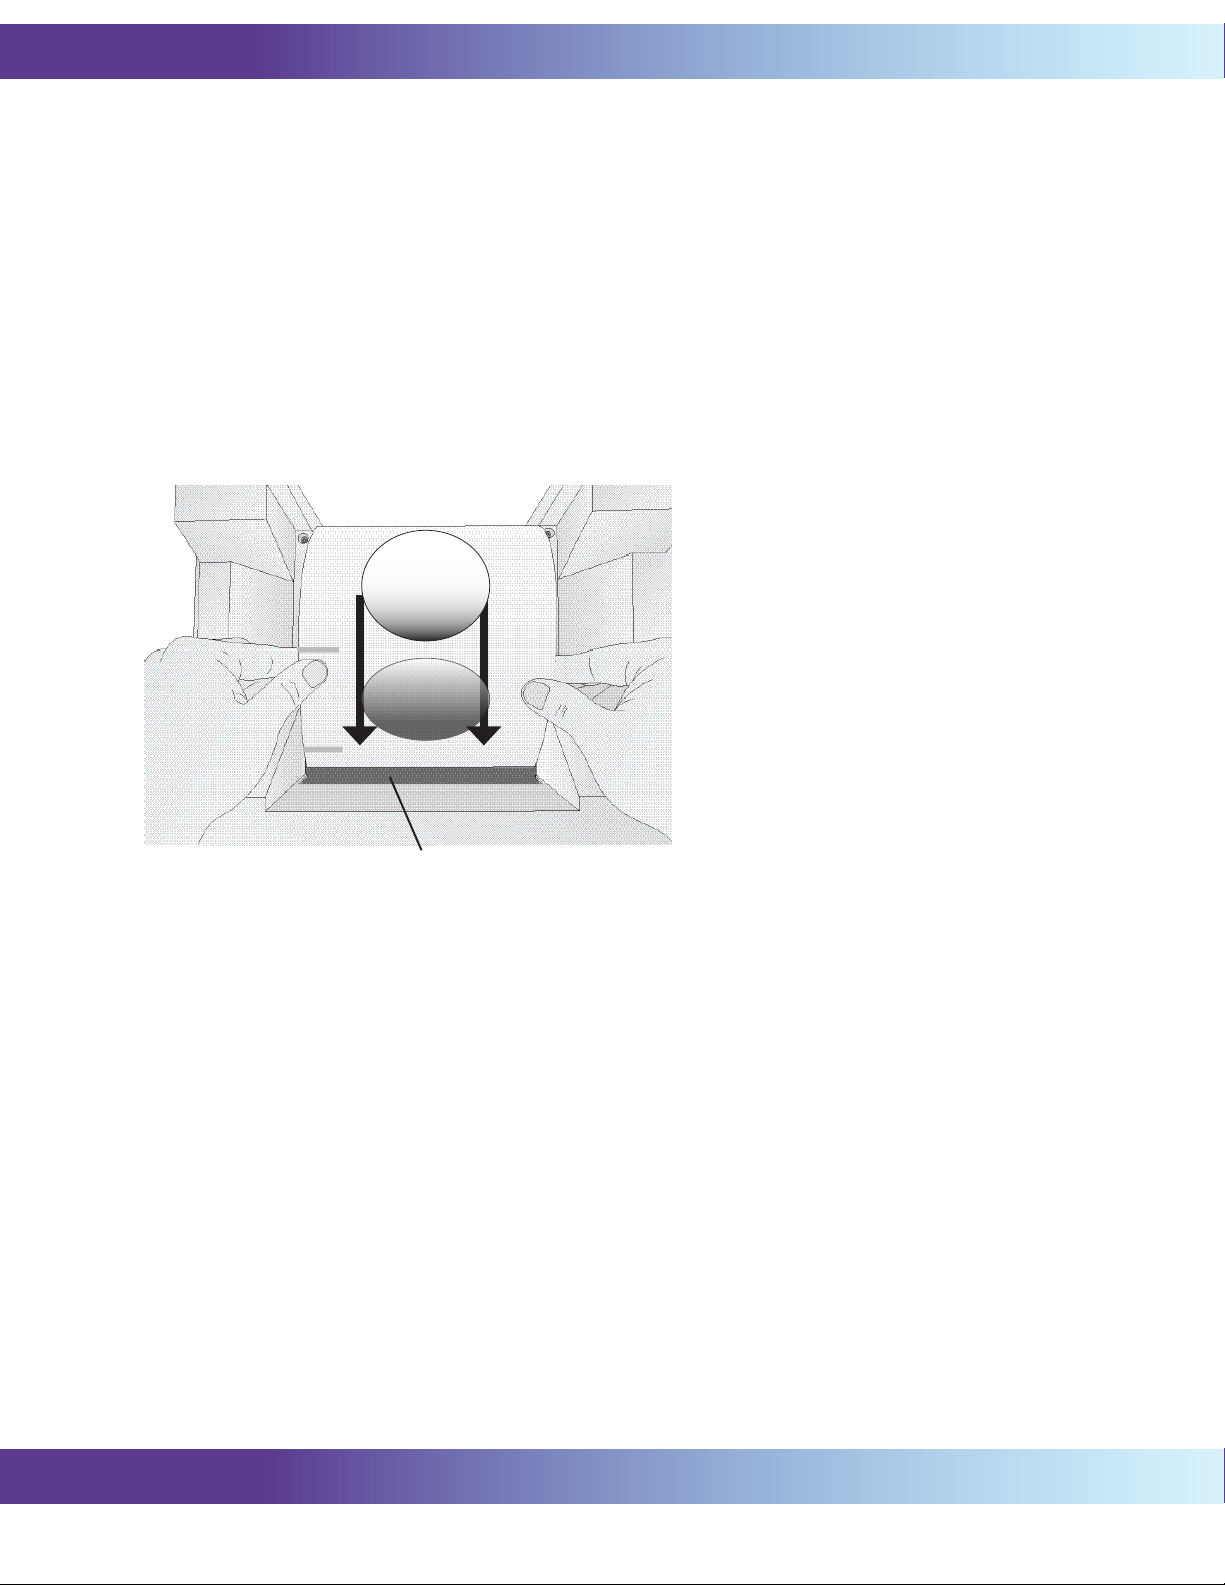
Once the roll is installed, place your index fingers on each
side of the roll. Use your thumbs to slowly turn the reel
forward and guide the leading edge of the paper into the feed
area, using your index fingers as guides to keep the paper
aligned with the reel. Keep feeding the paper forward until
the printer grabs the paper and feeds it forward.
Feed Area
Once the printer detects the paper it automatically feeds it
forward, cuts off a small strip, and reserves it so it is ready
for printing. At this point check the alignment! There are
two ways to check alignment.
Page 15
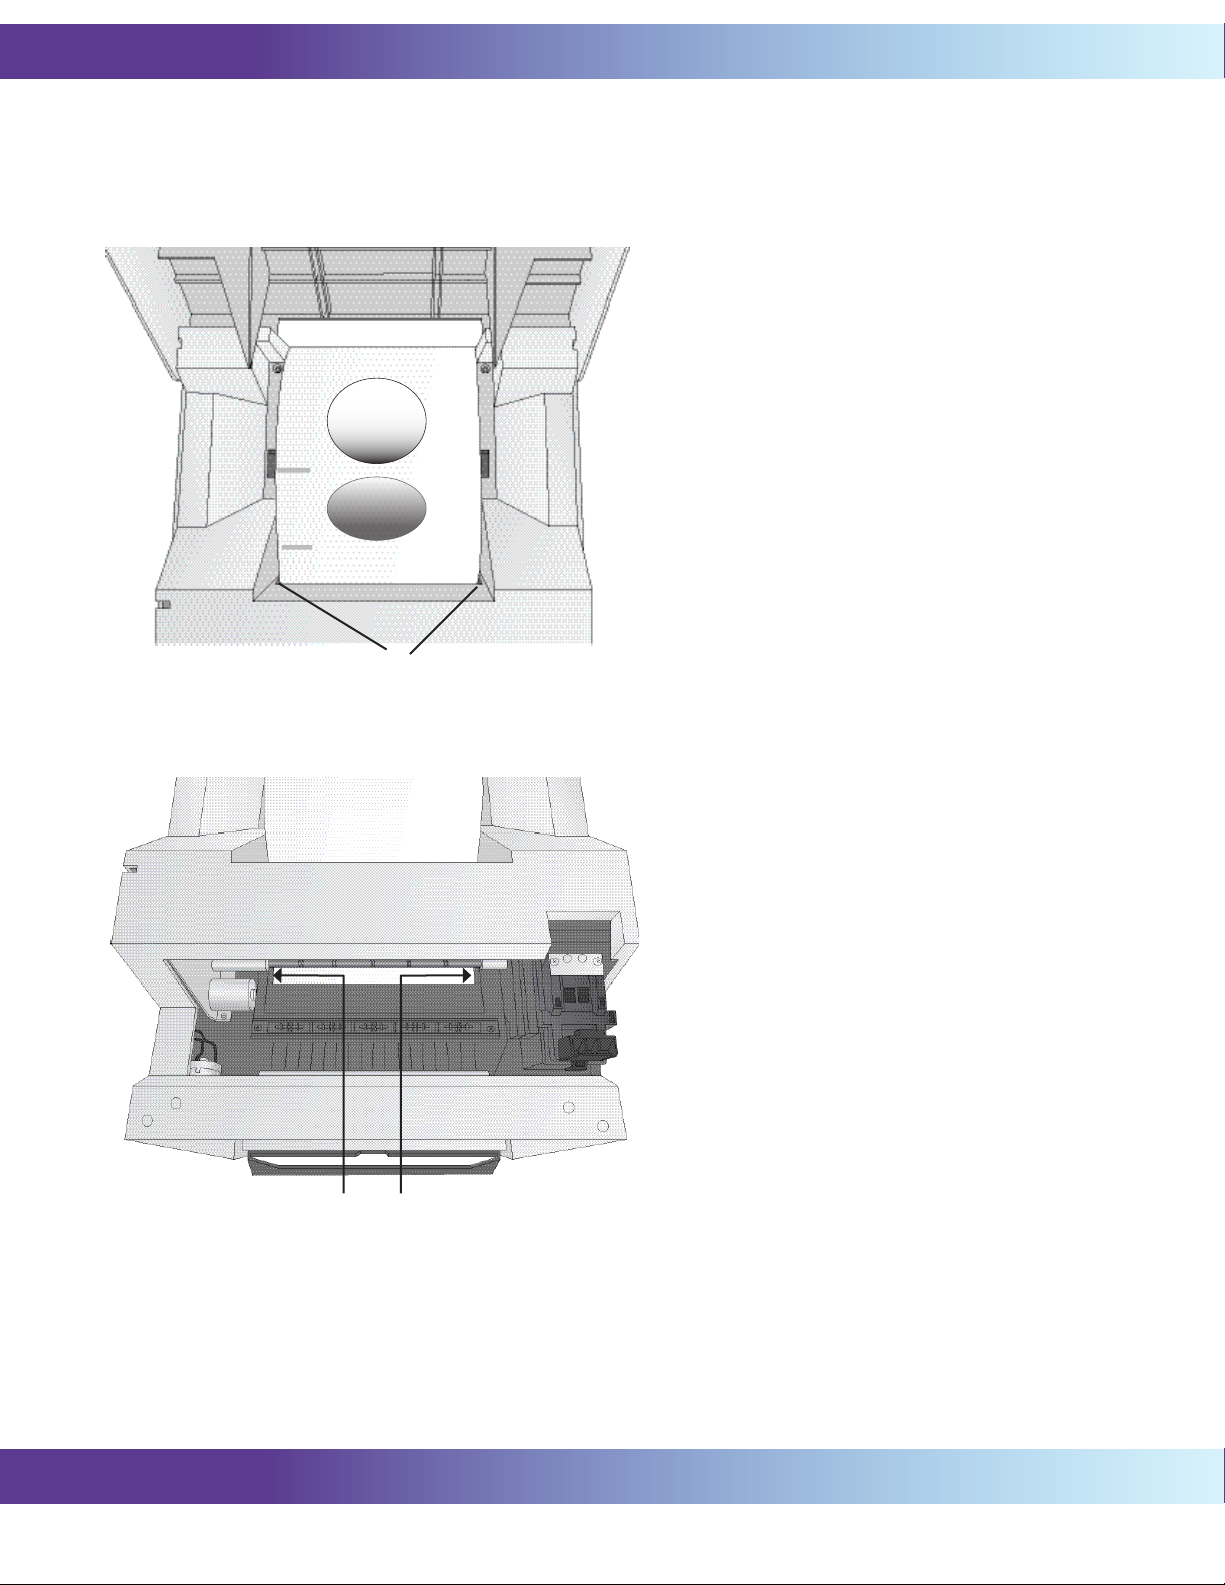
First, there should be an equal space on the left and the
right side of the paper in the feed area.
Equal gap on each side
Second, check the alignment of the paper relative to the
pinch rollers in the print area. The amount of paper visible
should be equal across the width of the paper.
Equal amount of visible
paper on each side
Page 16
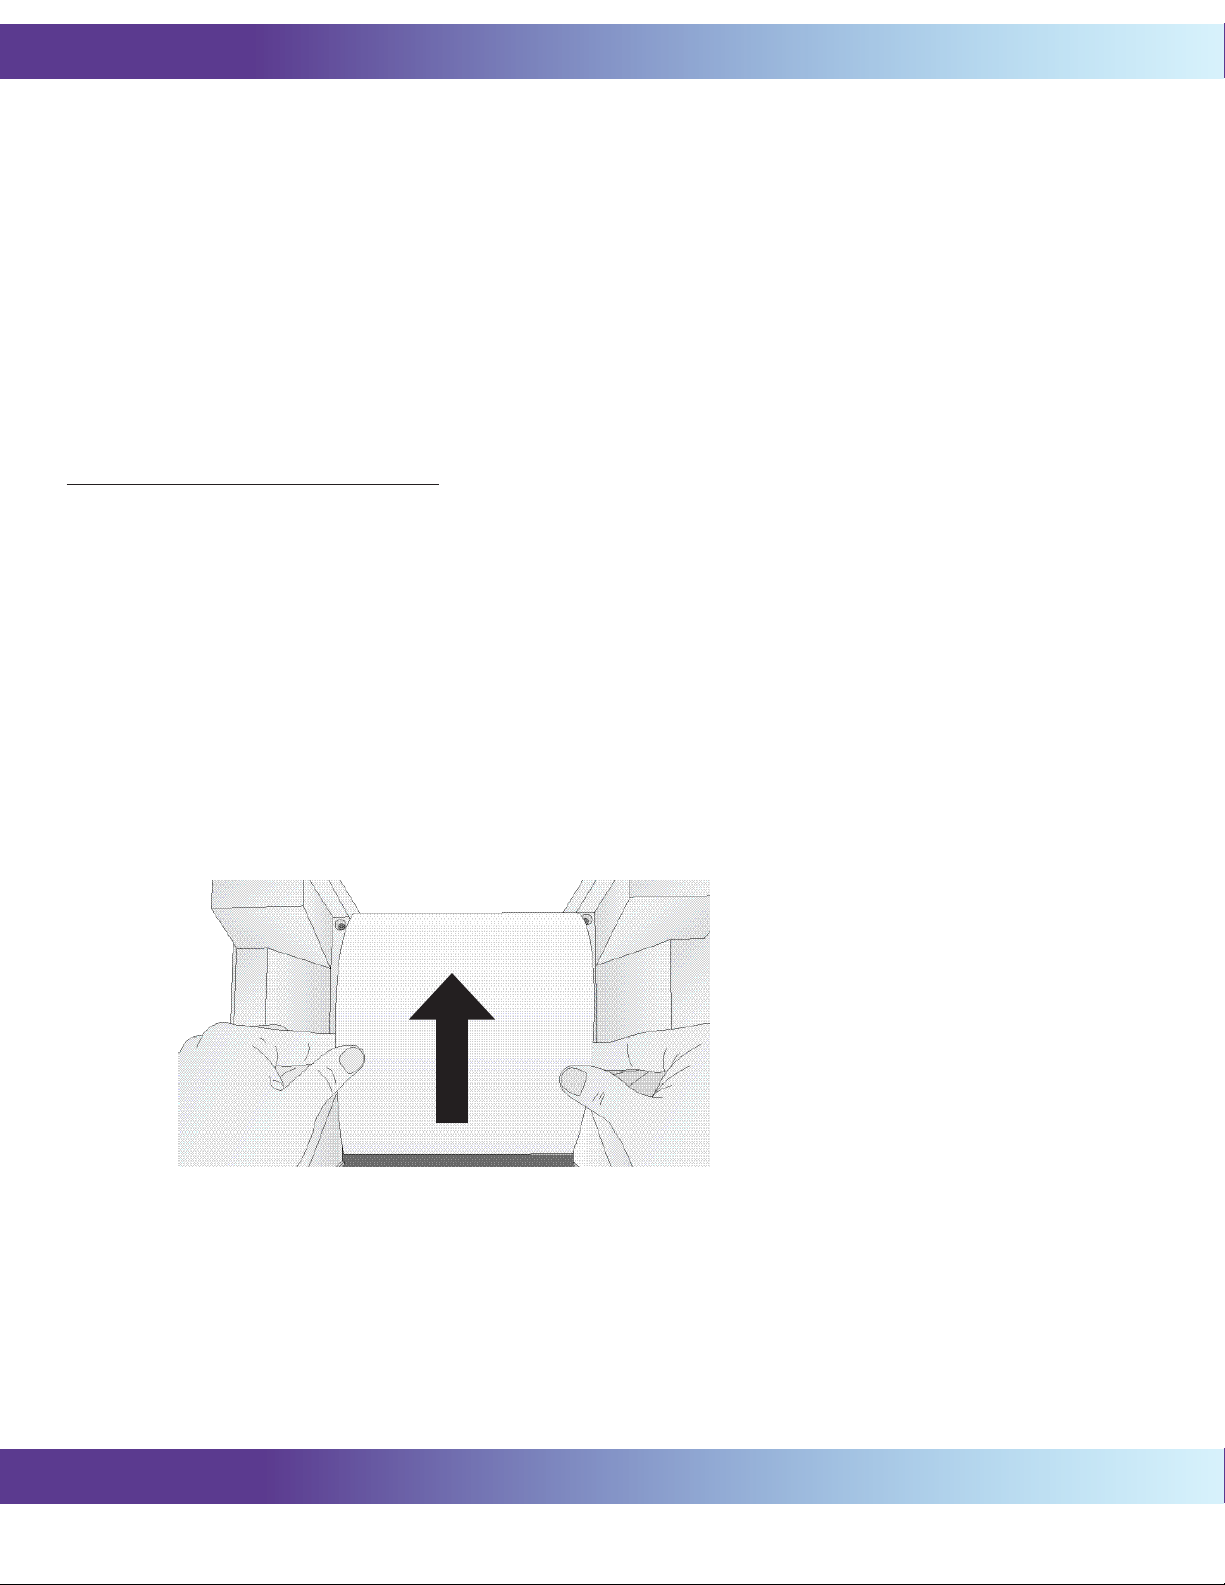
8. If the paper is not centered in the feed area or not
aligned with the pinch rollers, follow the instructions
in the next section to unload the paper. Then repeat
the loading process. Repeat until the paper is
aligned.
9. Close the Cover. When the cover is closed it pressed
the pin on the left side and the smart chip on the
right side into the corresponding slots. This is
especially important when the paper is nearly empty
and the roll becomes lighter.
C. REMOVING A SIPMI PAPER REEL
When the SIPMI Paper Reel is nearly empty you will
receive an empty reel message via the SIPMI APP. At that
point you will need to remove the paper from the feed
area and remove the reel. You may also find it necessary
to remove the paper from the feed area if the paper is
out of alignment. Follow these instructions to remove
the paper and the reel.
1.
2.
Open the top cover.
Place your index fingers on each side of the reel. Use
your thumbs to slowly turn the roll backward until the
leading edge of the roll is out of the feed area.
If you are installing a new reel, lift the reel out of
the printer and discard it or recycle the cardboard
core and (acetal) plastic core holders at your local
recycling facility.
3.
Important Note: There may be several feet of unprinted paper at the
end of each reel. This is to ensure a proper slack loop can be
maintained and there will be no feeding problems. Extra paper
is added to each roll to ensure the stated length of each reel is
present.
Page 17
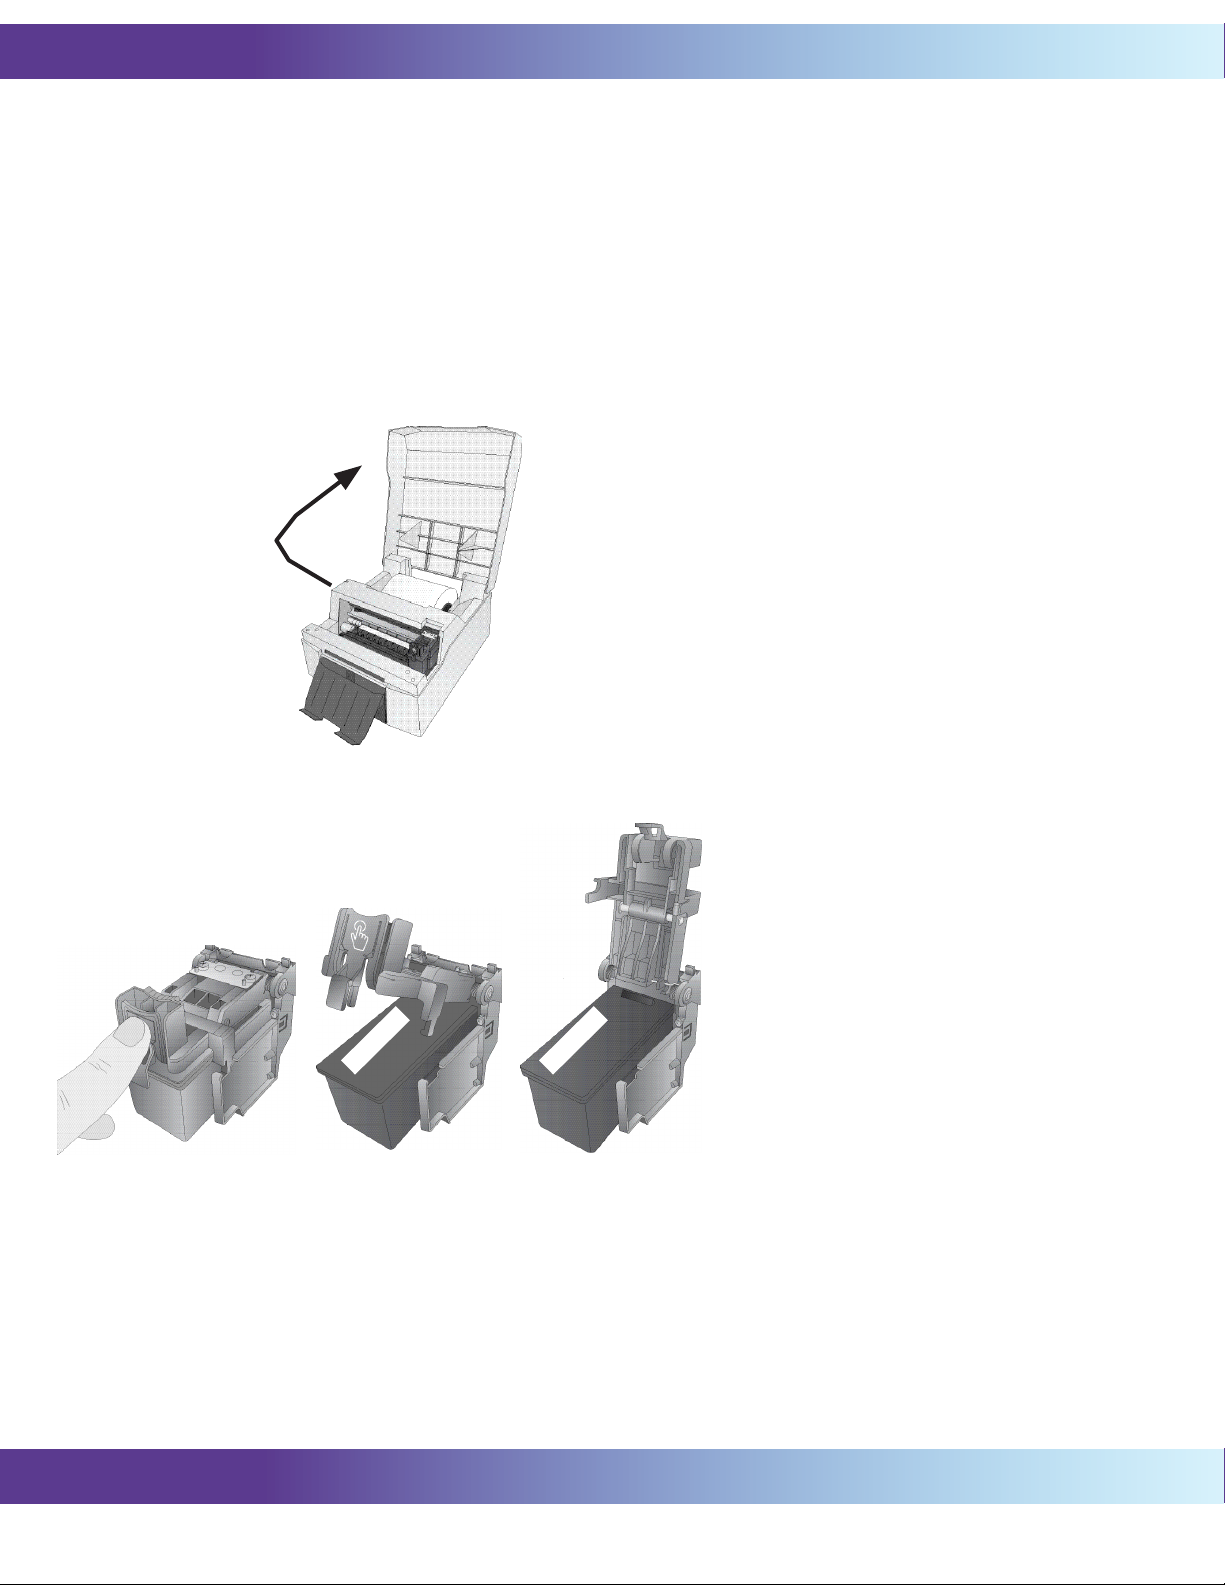
C. REPLACING SIPMI EDIBLE INK CARTRIDGES / INK LOW WARNING
Yo u can replace SIPMI Edible Ink cartridges at any time or
wait for the Ink Low Warning to prompt you to replace
cartridges. The first and only ink low warning will occur at 0%
ink remaining. You can continue printing at this point, but the
ink may run out at any moment which will result in poor print
quality. If you dismiss the ink low warning, you will not be
warned again.
To change an ink cartridge, follow this procedure:
Open the Top Cover.
Press or pinch the tab on the front of the cartridge carrier
to open the carrier lid.
SIPMI INK
SIPMI INK
Page 18
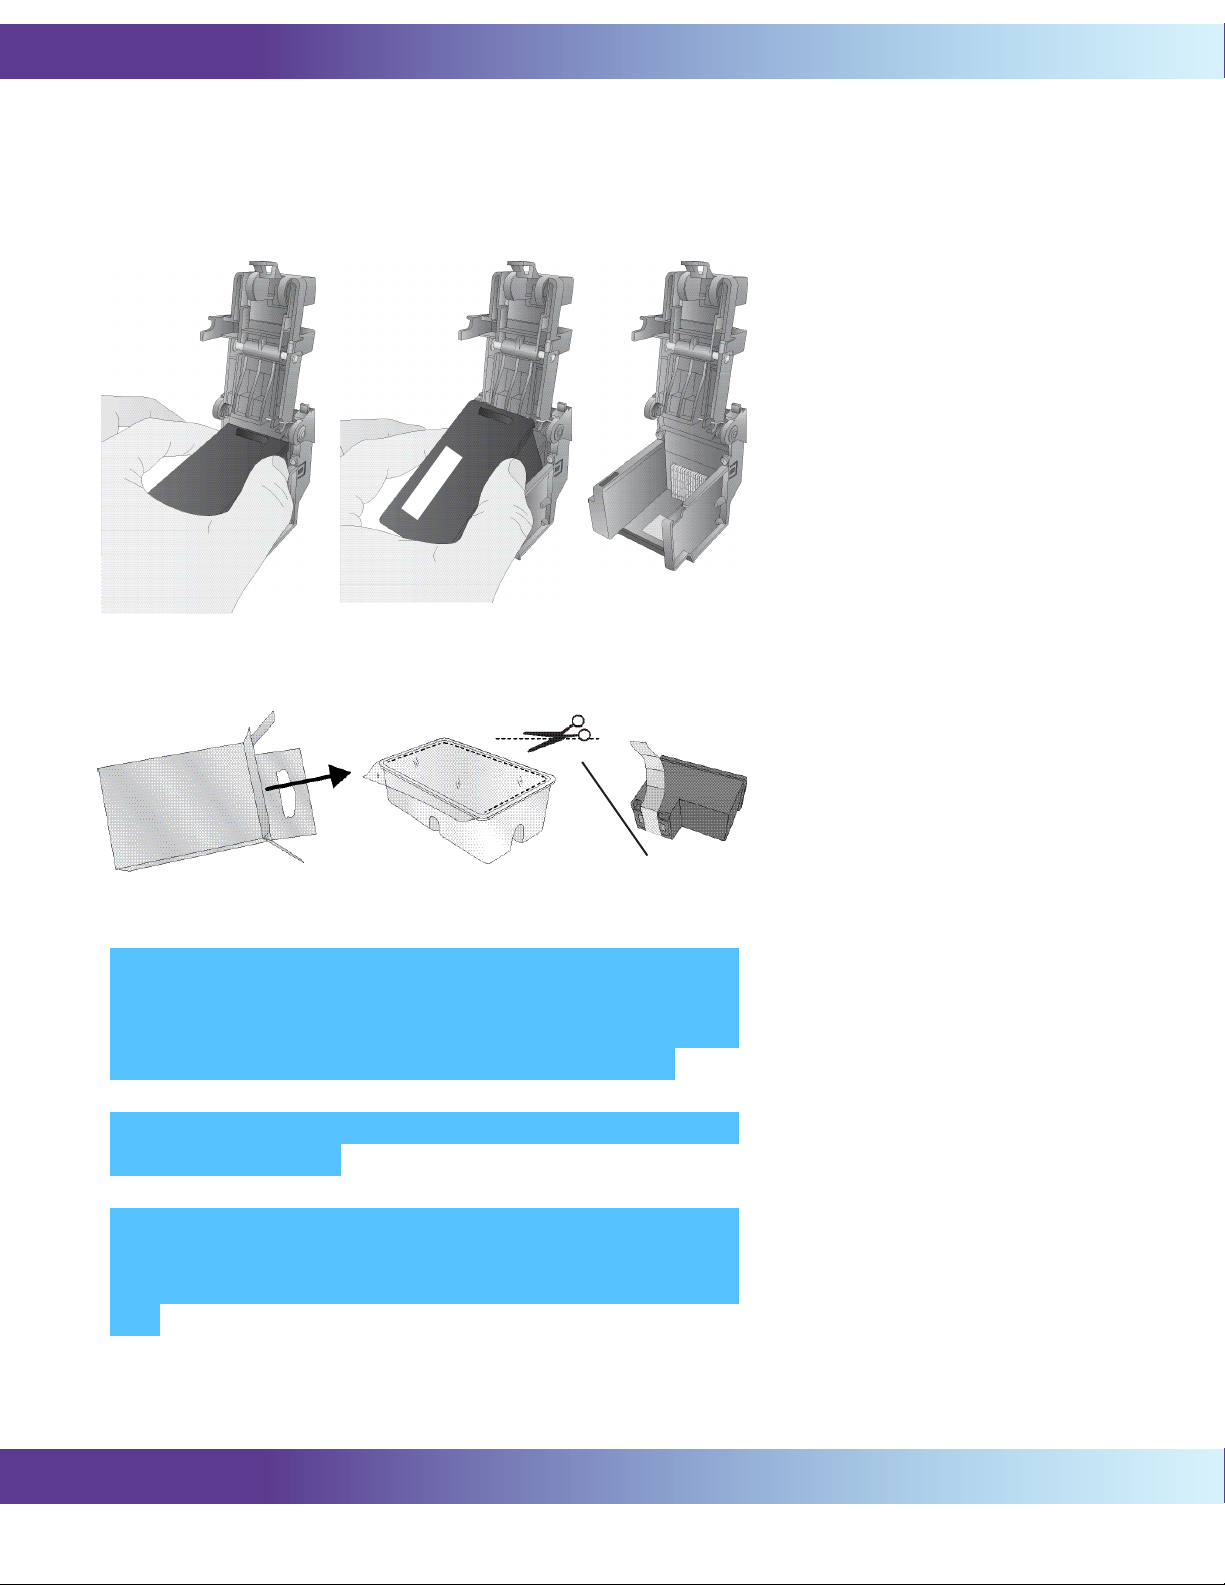
3.
Remove the ink cartridge.
4.
Locate a new ink cartridge and remove it from its
packaging. Remove the foil outer packaging and the tape
covering the nozzles.
SIPMI INK
WARNING: THE SIPMI LR1 WILL ONLY
OPERATE USING GENUINE SIPMI LR1 CERTIFIED FIT
FOR HUMAN CONSUMPTION FOOD GRADE INK.
DO NOT ATTEMPT TO USE ANY OTHER SOURCE OF
INK WHATSOEVER.
WARRANTY VOID AND FATAL OR HARMFUL RISK TO
HEALTH MAY OCCUR IF YOU ATTEMPT TO USE ANY
OTHER FORM OF INK OTHER THAN SIPMI EDIBLE
INK.
Page 19
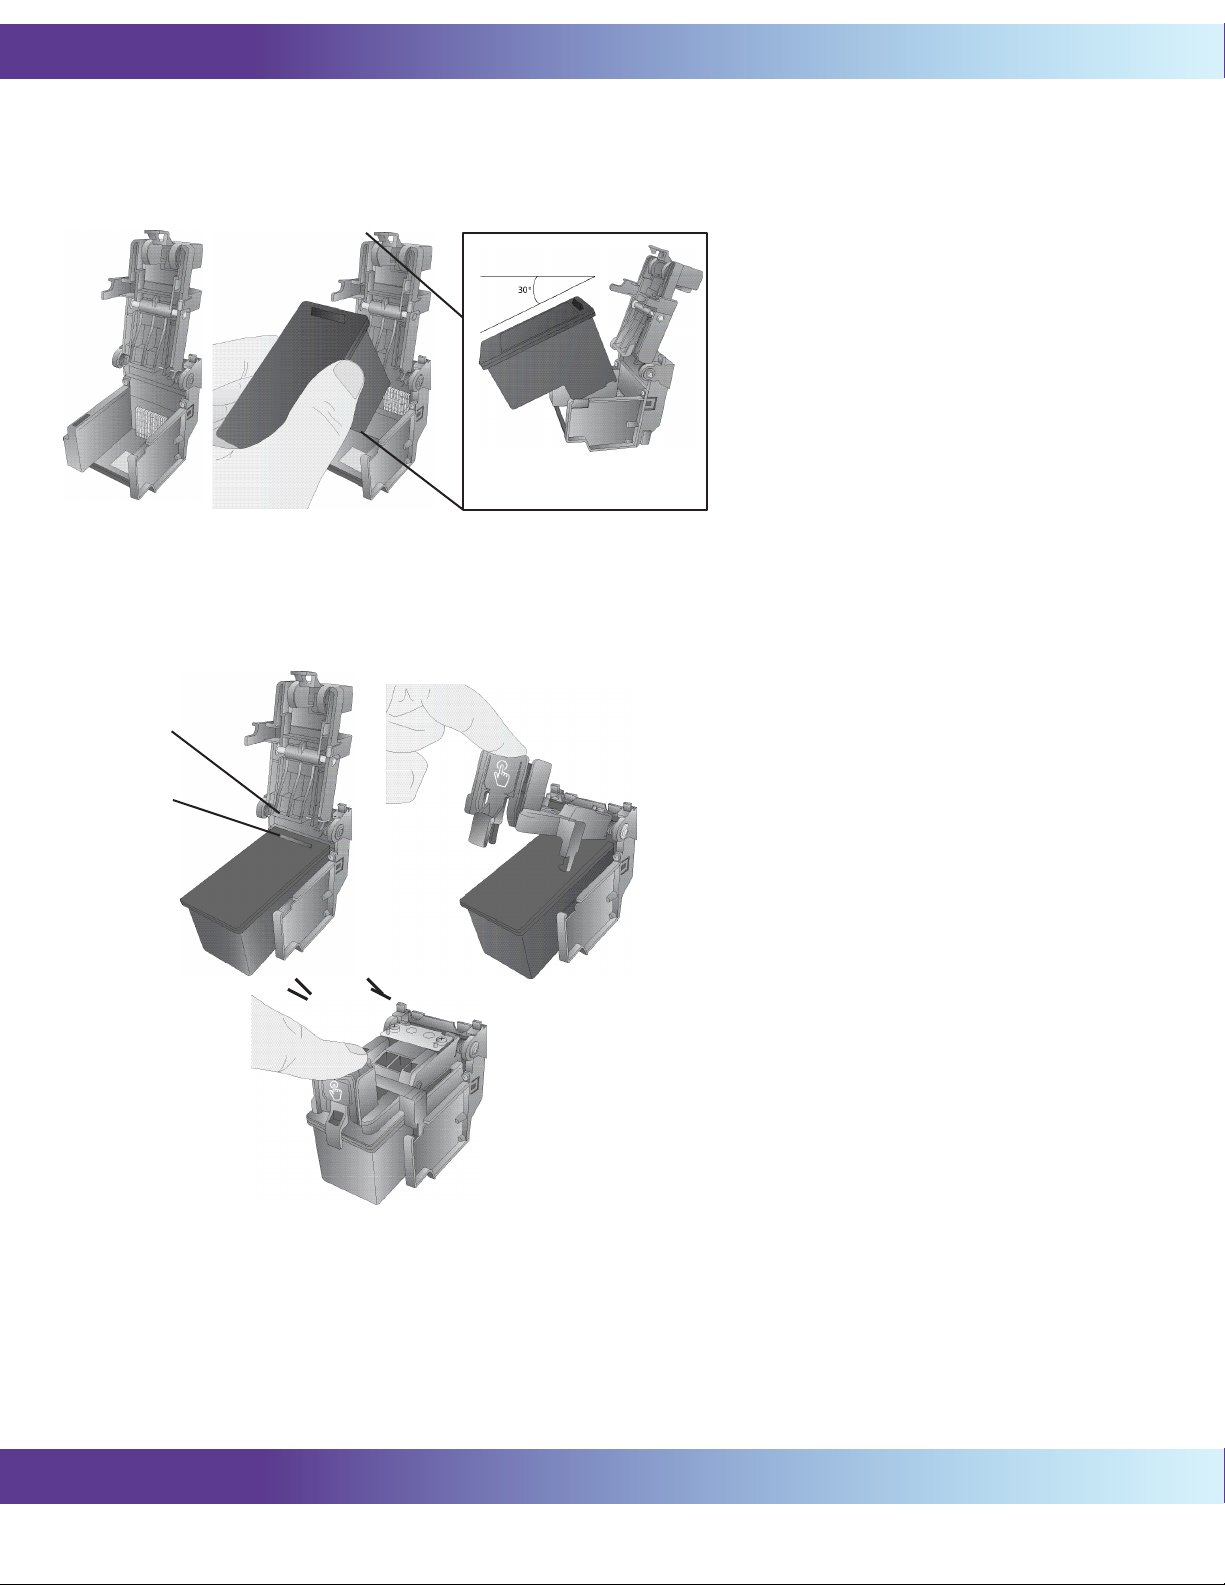
5.
Place the new ink cartridge into the empty cartridge
carrier. Note: When installing the cartridge, tilt the
cartridge at a slight backward angle of approximately 30
degrees.
6.
Make sure the ink cartridge is pushed back far enough so
the ridge on the cartridge is behind the spring-loaded
pusher on the lid. Close the lid of the cartridge carrier by
lightly pressing down from the top until you hear a click.
Pusher
Ridge
Click
Side View
Page 20
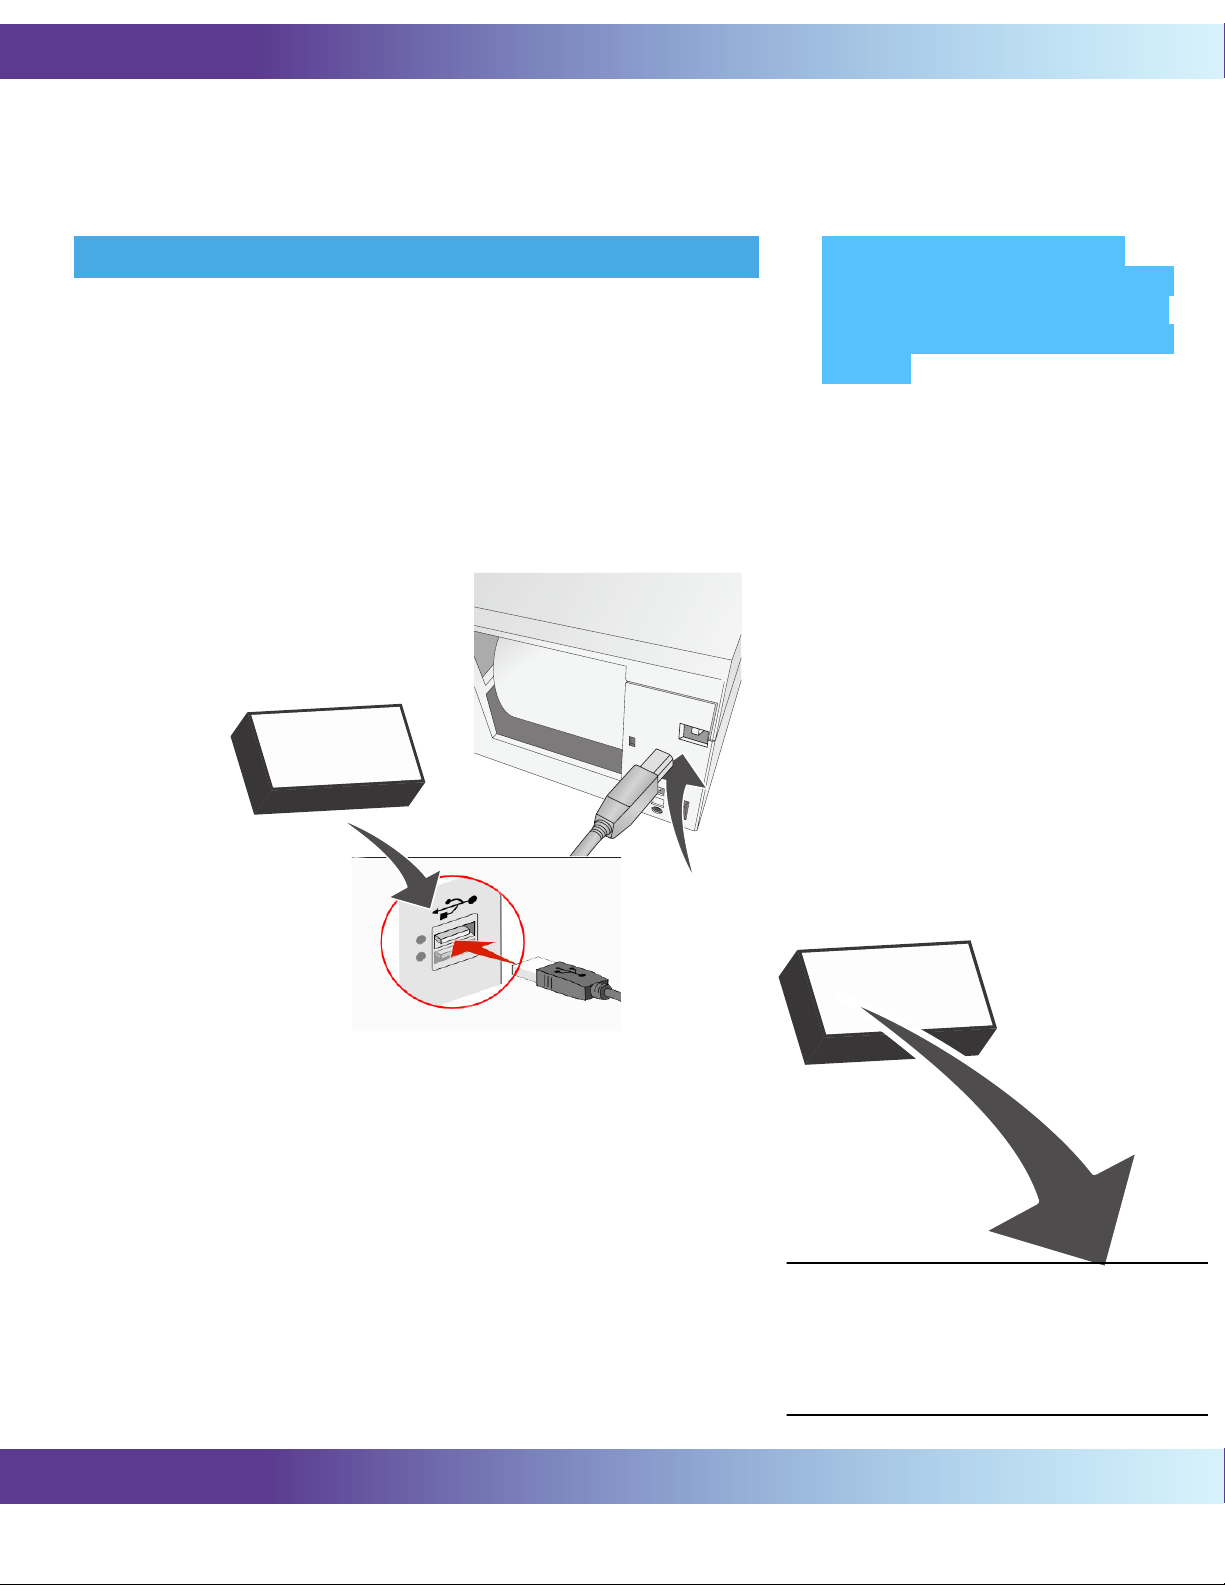
Section 3: SIPMI WIFI & APP Connectivity (iOS)
SIPMI WIFI
A. INSTALLING SIPMI WIFI DEVICE
1. Connect the SIPMI WIFI to the power adaptor and switch
on at the power outlet.
2. Connect the USB Printer cable to the rear of the SIPMI
LR1 with the USB connection end connected to any USB
socket on the SIPMI WIFI Device.
3. Make note of the unique SIPMI WIFI Signal name and the
corresponding password marked on the SIPMI WIFI
Device. You will use this to connect your smart device to
the SIPMI LR1.
SIPMI WIFI
SIPMI WIFI!
SIPMI WIFI: SIPMI_XXX_XXX_XXX
PASSWORD: XXX_XXX_XXX
For detailed instructions on
Wireless connection options and
troubleshooting, please refer to
the Addendum at the end of this
manual.
Page 21
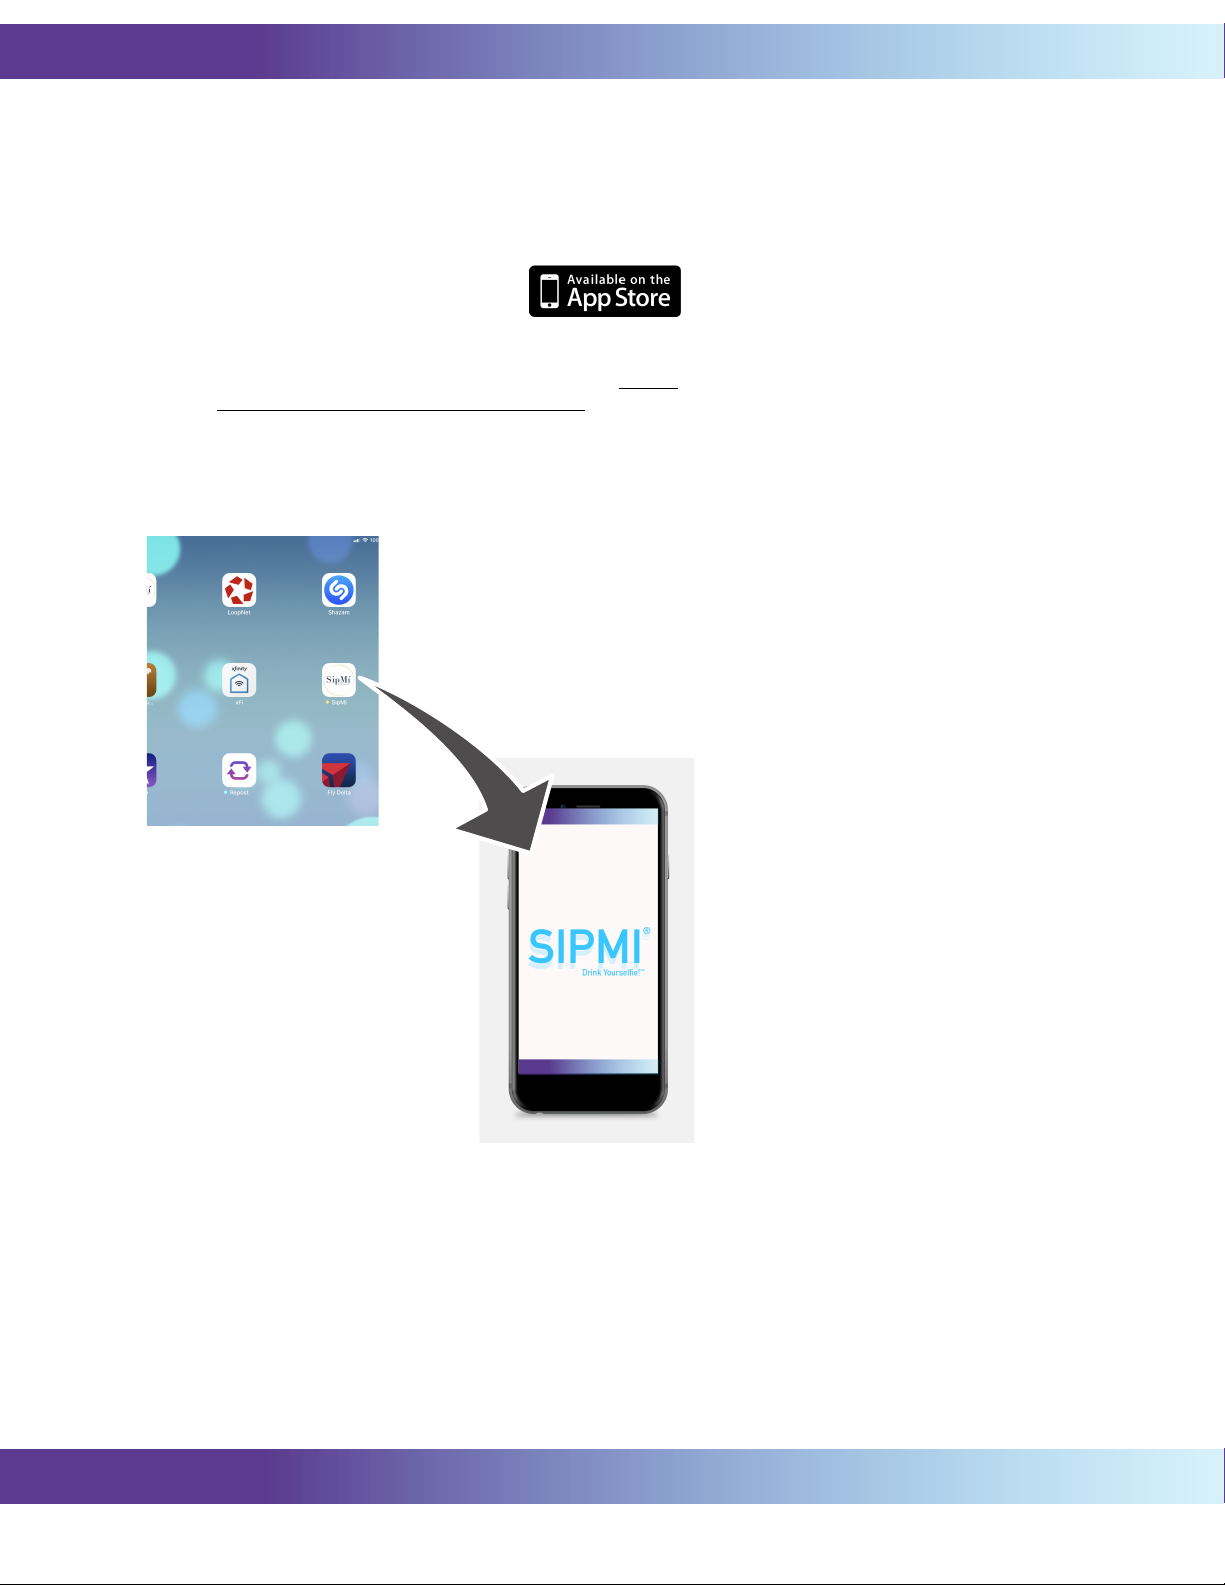
1. Visit the Apple APP store and download the SipMi APP
from onto your smart phone and or device -https://
apps.apple.com/us/app/sipmi/id1291413411
2. Open the SIPMI APP and from the home page click
“CONNECT TO LR1”
B. INSTALLING SIPMI WIFI DEVICE
Page 22
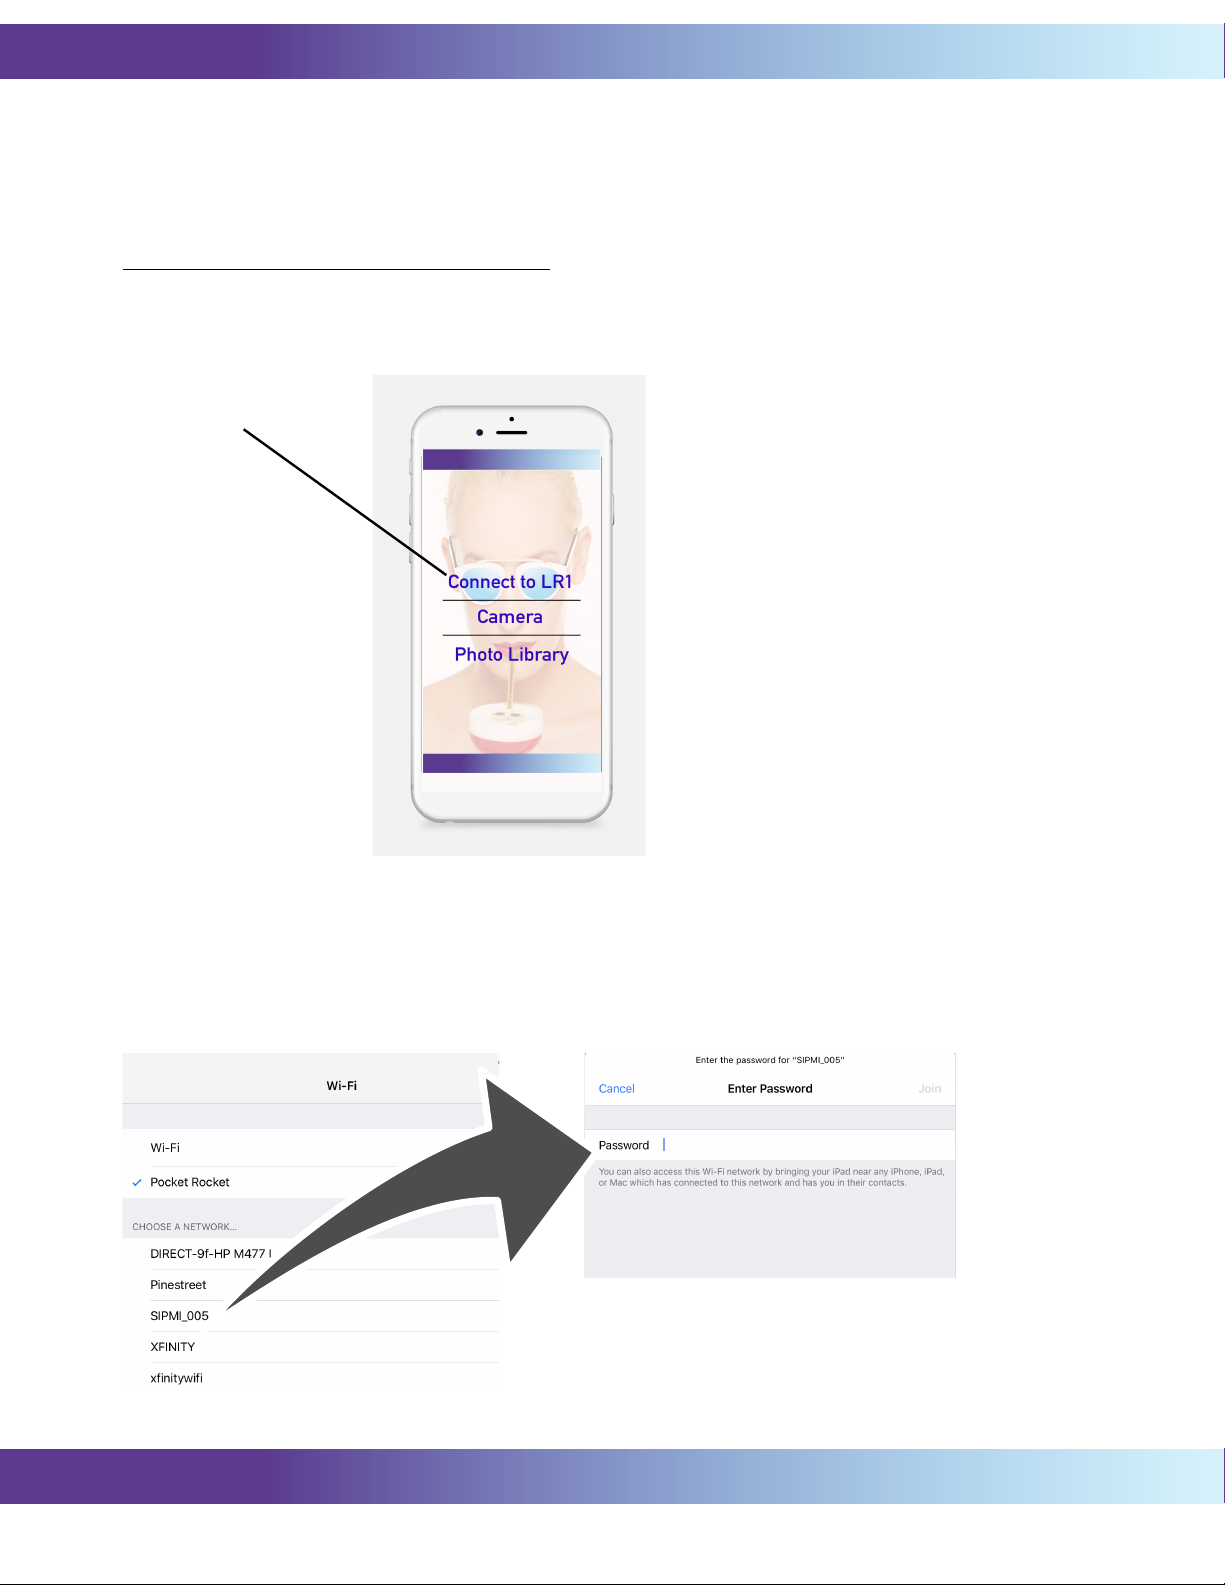
Connect to LR1 - Wifi
Settings
1. Visit the Apple APP store and download the SipMi
APP from onto your smart phone and or device -
https://apps.apple.com/us/app/sipmi/id1291413411
2. Open the SIPMI APP and from the home page click
“CONNECT TO LR1”
3. From your WIFI settings search for the SIPMI LR1
WIFI and the unique name provided on the device.
4. Input the password provided on the SIPMI WIFI
Device.
Page 23
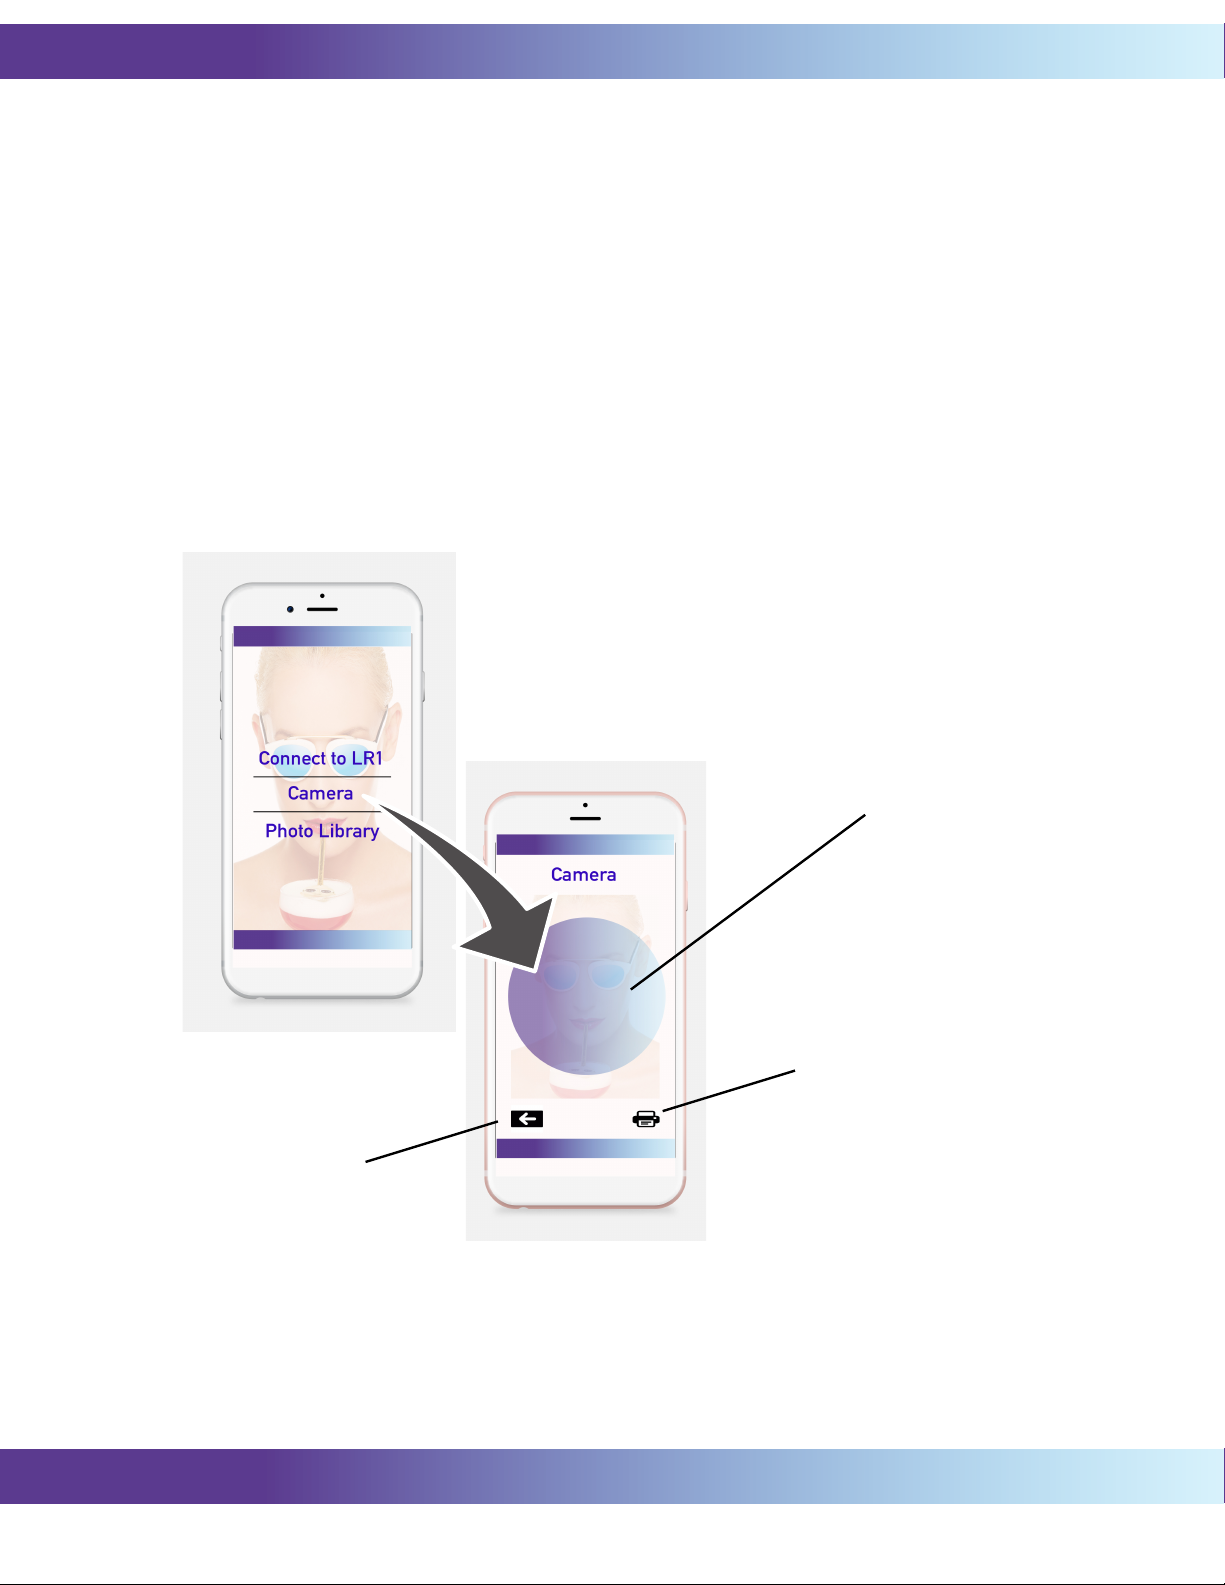
1. From the SIPMI APP Menu, select “CAMERA”
2. Ensure your subject is in the middle of the circle guide.
3. You can adjust the image zoom in and zoom out using
two fingers pinching in and out.
4. Ensure you are within the 50ft range from the SIPMI
WIFI Device
5. Take the picture and press the "PRINT" icon selecting
the quantity to print.
B. PRINTING LIVE IMAGE TO THE LR1
Circle guide - place
subject in center of guide.
Press to print image Follow print instructions.
Back Space - to menu
Page 24
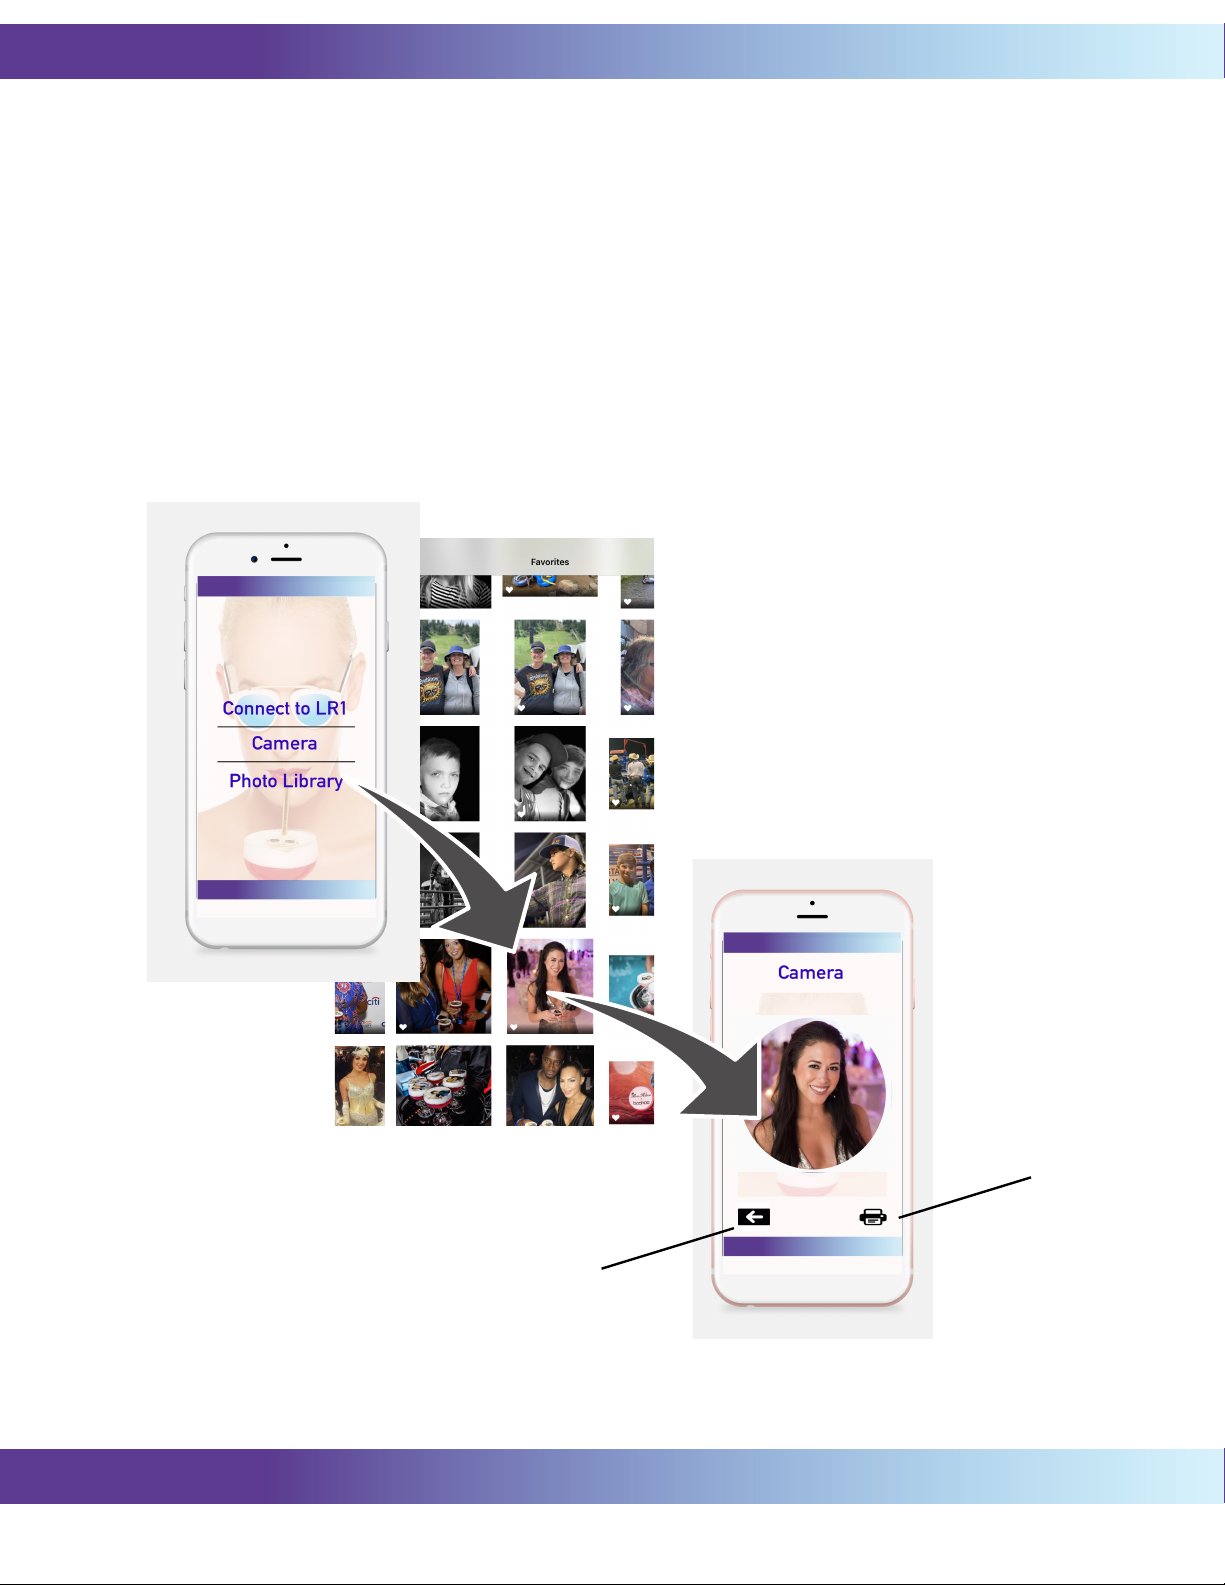
1. From the SIPMI APP Menu, select “PHOTO LIBRARY”
2. Select the image you wish to print and it will upload to
the camera guide circle.
3. Ensure your subject is in the middle of the circle guide.
4. You can adjust the image zoom in and zoom out using
two fingers pinching in and out.
5. Ensure you are within the 50ft range from the SIPMI
WIFI Device
6. Press the "PRINT" icon selecting the quantity to print.
C. PRINTING PRESET IMAGES TO THE LR1 FROM PHOTO LIBRARY
Press to print image Follow print instructions.
Back Space - to menu
Page 25

Section 4: CREATING A SIPMI BEVERAGE
A. GLASS SELECTION
Ensure that the rim diameter of your selected glass is
between 3inches and 3.5 inches. This will allow the
image to sit on top of the SIPMI Foam on the beverage
with an adequate space between the edge of the image
and the rim of the glass for you to drink the beverage
while keeping the image perfectly intact.
Outer diameter of glass - larger than
3inches and smaller than 3.5inches
Diameter of SIPMI Image (peeled edible
and printed frosting circle from SIPMI
Paper Reel placed on top of SIPMI FOAM)
2.99inches
Page 26

B. WASH-LINE AND FOAM APPLICATION
In order to ensure the right level of SIPMI Foam the
wash-line of the beverage (the beverage liquid fill line)
should be 0.5 inches from the top rim of the glass.
The SIPMI Foam that is placed onto the top of the
beverage should not exceed more than 1/4 inch to
ensure that the image is not above the rim line.
Glass Rim Line
Total Image, Foam and Beverage Fill Line
Total Beverage and Foam Line
Total Beverage Fill Line
Page 27
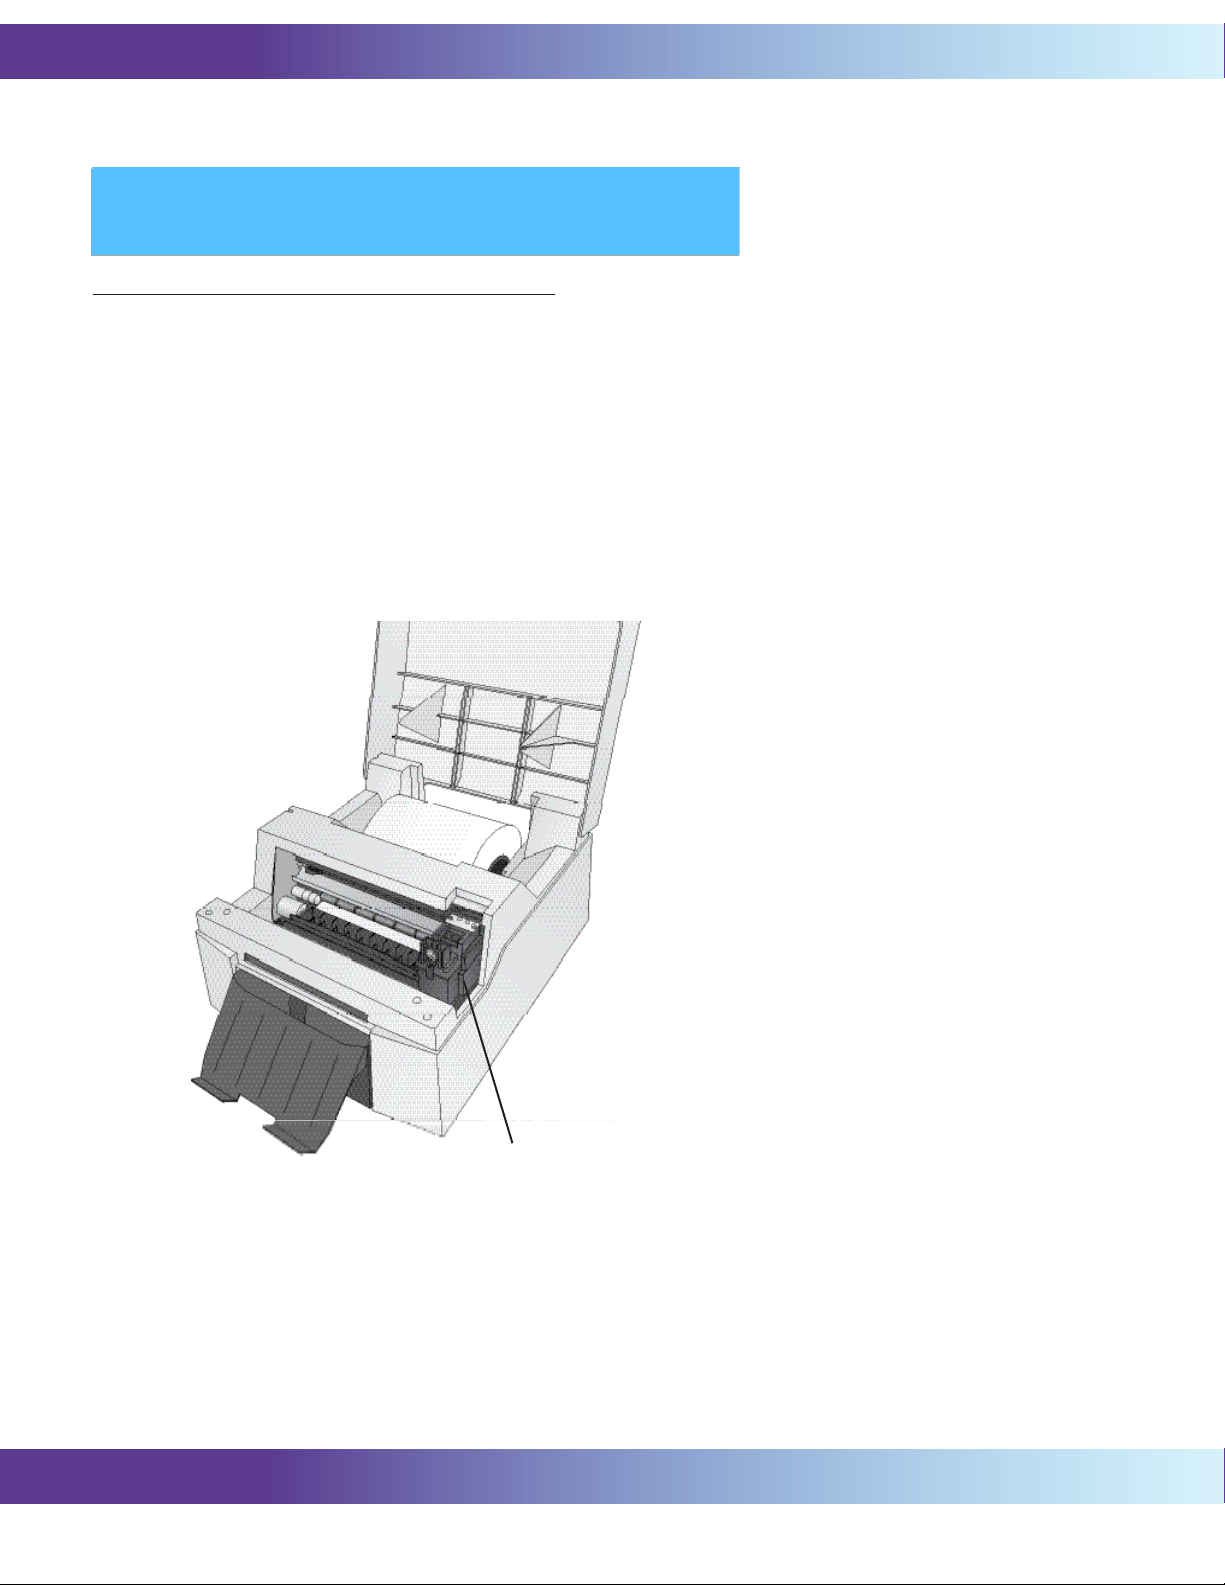
A. SOLVING PRINT QUALITY PROBLEMS
Many factors can affect the quality of a print.
Power off the printer!
Clean the Maintenance Area.
Gently move the cartridge to the left to access the maintenance
area. This includes the rubber cartridge nozzle cap and the
plastic roller. Under normal use this can become dirty with
ink. Clean with a paper towel dampened with rubbing alcohol.
Maintenance area
Section 6: Tro ubl es ho ot ing and
Maintenance
Page 28
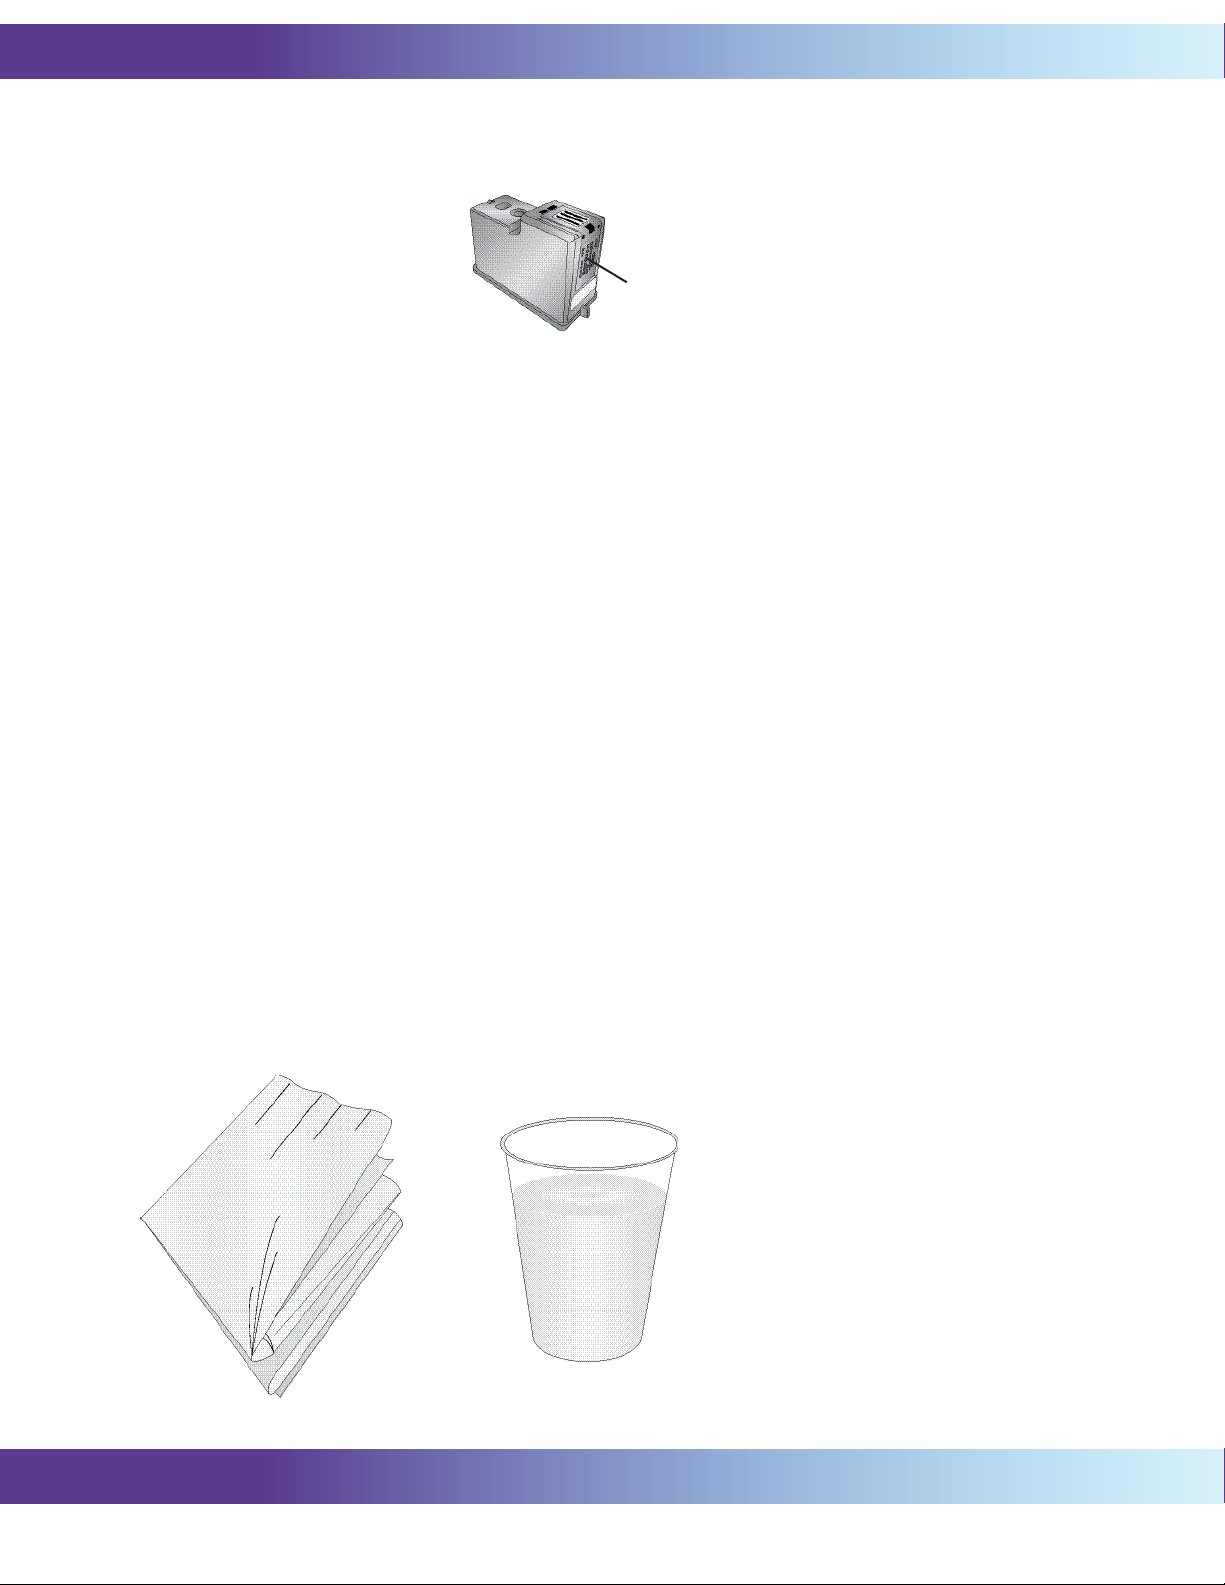
Copper Contacts. Clean the
copper contacts on the back of
the cartridge carrier and the
corresponding contacts on the
ink cartridge with a paper towel
d a mp e n e d w i th r ub b in g
alcohol.
Copper
contacts
Image Resolution (DPI). Try another image. Perhaps the
resolution of the current image is not sufficient for a
quality print. We recommend a 300 DPI image. Images
less than 150 DPI may print pixelated.
Cable. Try another USB cable. Make sure that it is less than
6 feet (2 meters) long. Faulty cables or cables that are too
long interrupt communications which can result in print
quality issues.
B. POOR PRINT QUALITY – CLEANING THE INK CARTRIDGE
It may be necessary to clean the ink cartridge nozzles if you
notice poor print quality, or if you suspect a cartridge nozzle
has become slightly dried out or clogged. If the cartridge has
been left out of the printer for more than 30 minutes, the ink in
the print head nozzles may have dried. If you are having print
quality problems, follow the steps below to clean the
cartridge.
Before moving on to the next step, ensure that the ink level
of the cartridge is more than 10%. If the ink level is lower
than 10%, replace the cartridge.
If the print has missing colors or voids, remove the ink
cartridge from the printer and proceed to step.
Prepare items needed for procedure.
Glass of Water
Two Paper Towels
folded four times each
Page 29
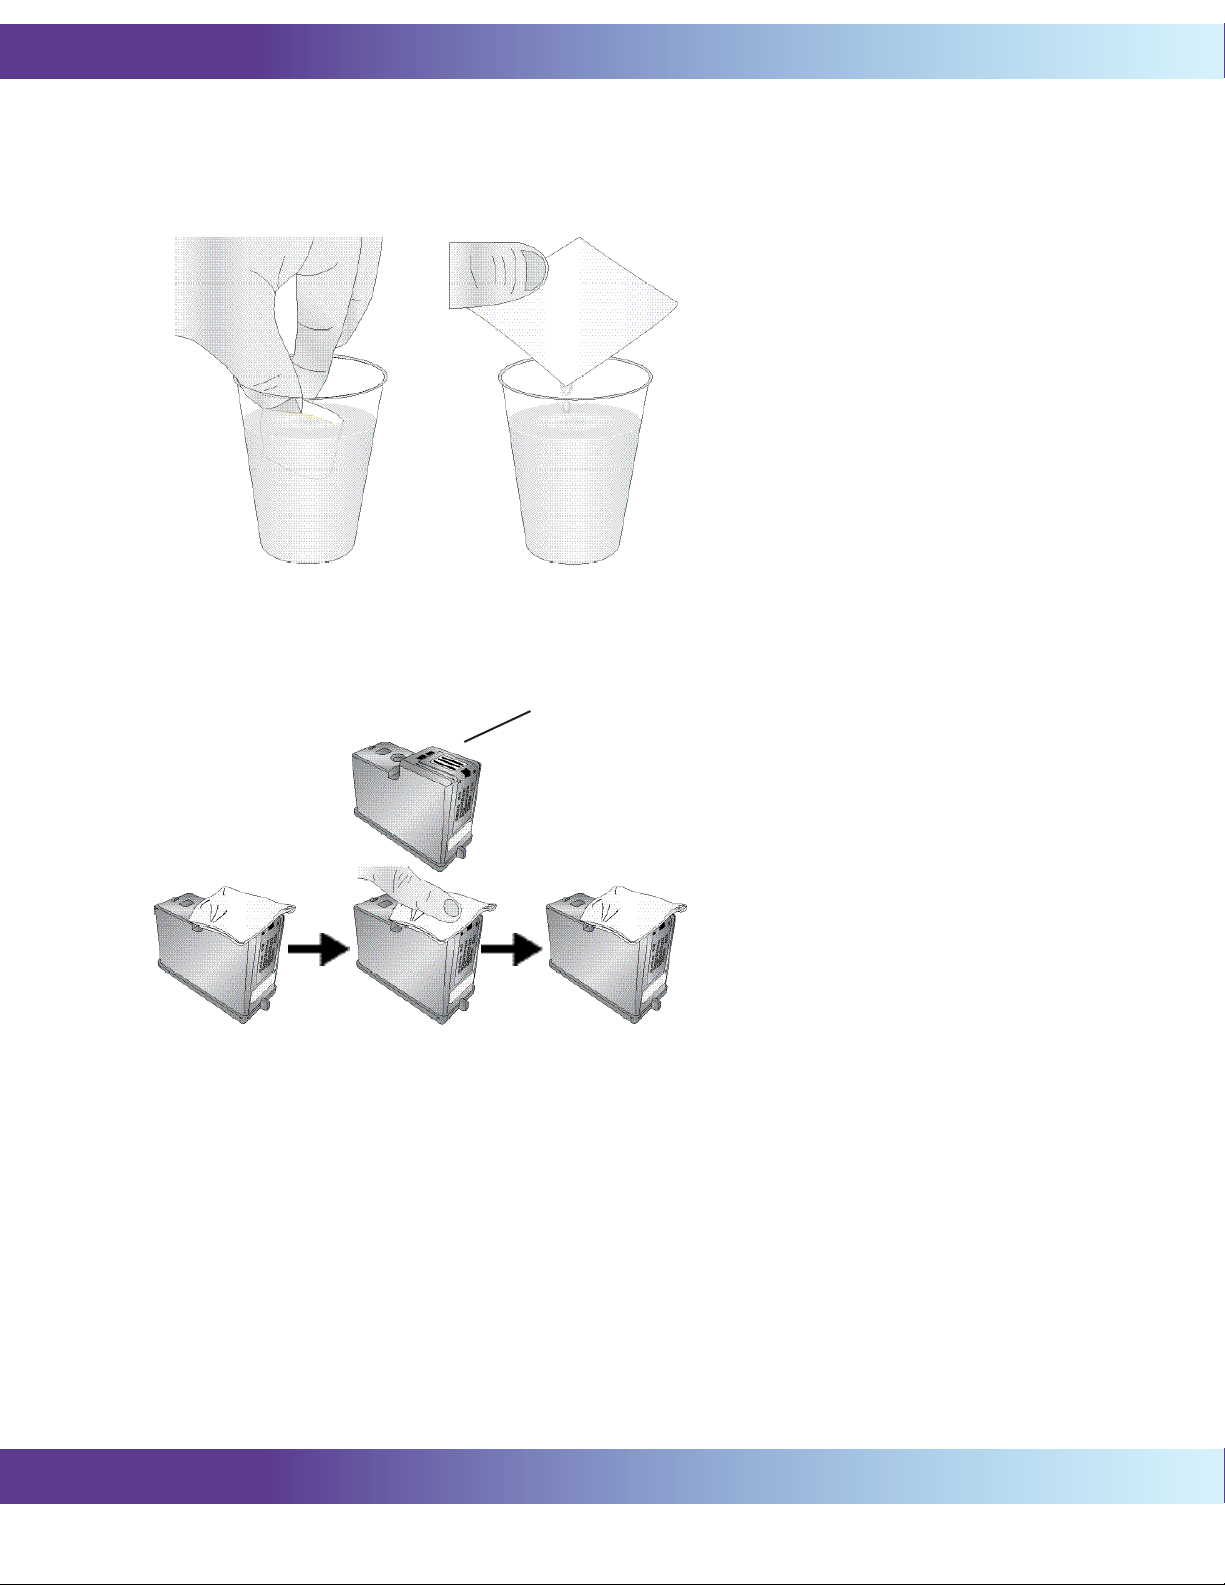
Soak the paper towels in water for 5 seconds.
Note: Do not squeeze water from paper towels after removing
from water.
Place one paper towel on ink cartridge nozzles. Gently
press the paper towel with your finger. Leave the paper
towel on the nozzles for 30-40 seconds.
Place one paper
towel on nozzles
Gently press
paper towel with
finger
Leave paper
towel on nozzles
for 30-40 seconds
Cartridge Nozzle
Page 30
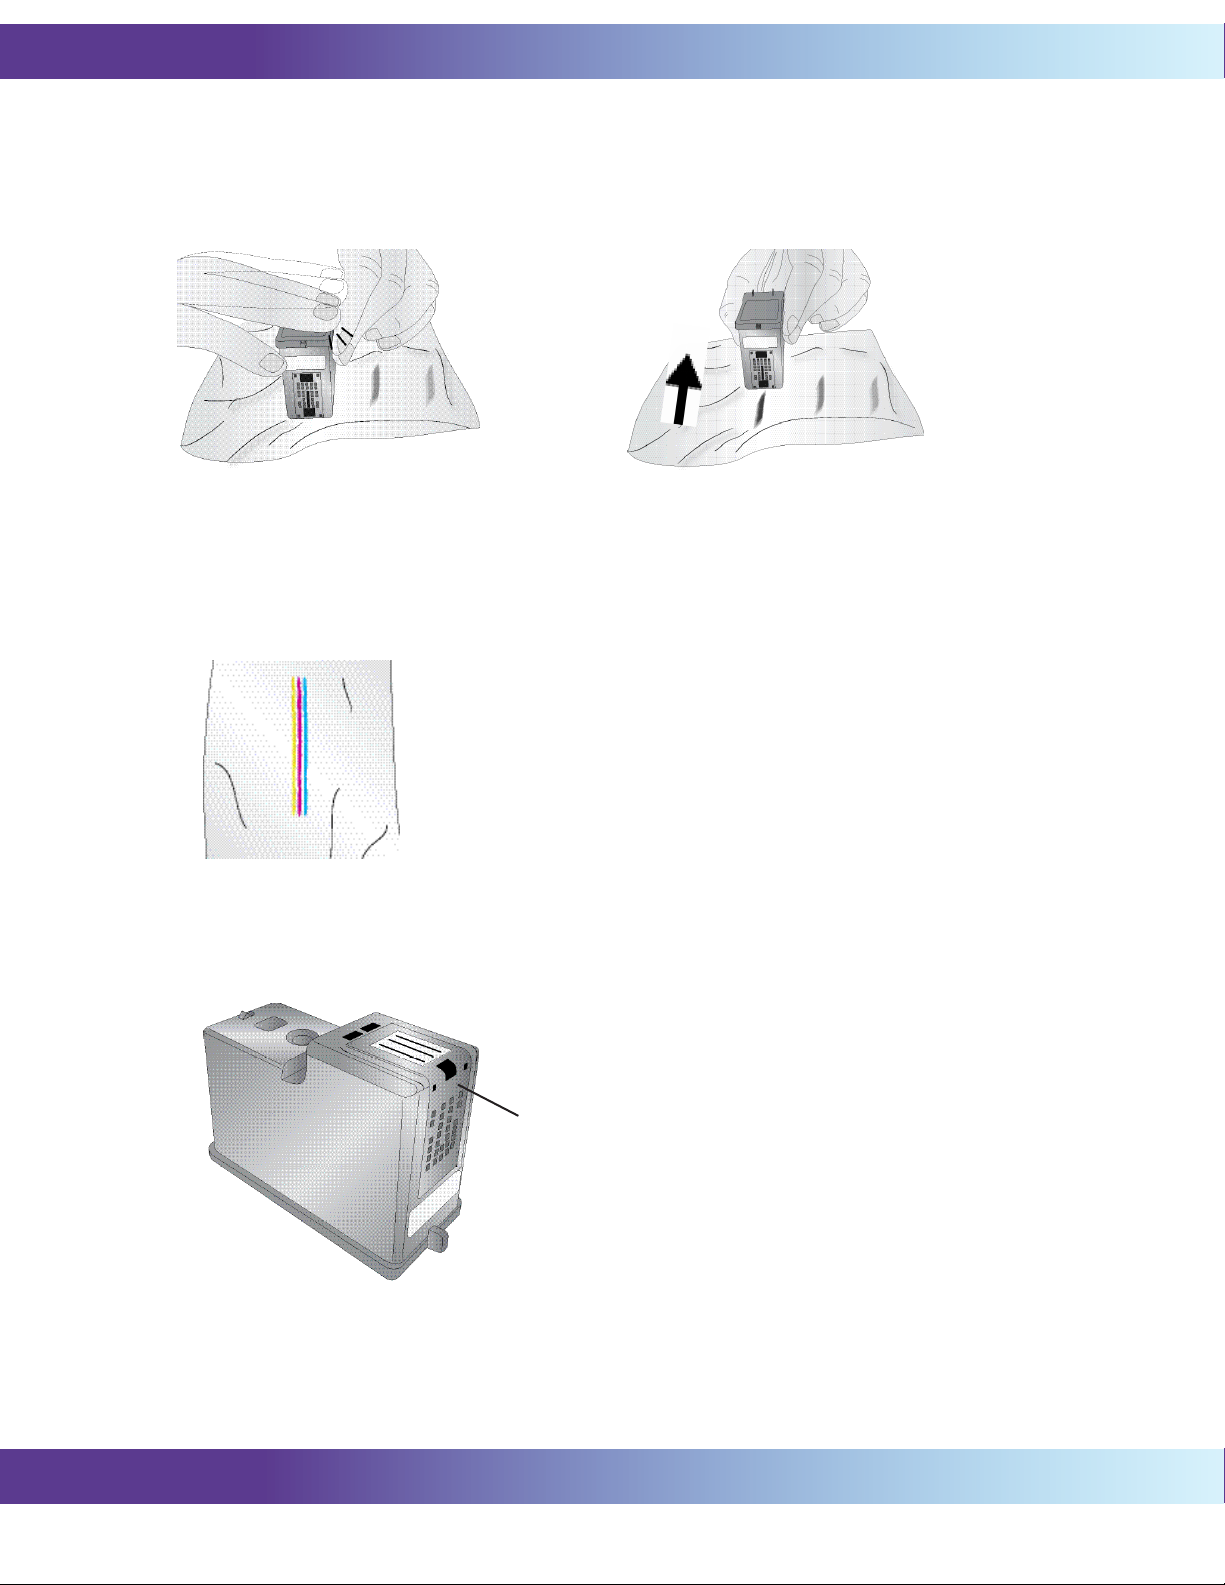
Wipe nozzles
1. Place a second damp paper towel
on flat/hard surface.
2. Press the nozzles into the paper
towel.
3. Firmly tap the top of the cartridge
three times to force the ink out.
1. Wipe/Drag the cartridge in the direction
indicated.
2. Repeat until all colors are seen on the
paper towel.
After wiping the nozzles, the paper towel
should show all three colors.
If all three colors are present, repeat the entire
process or attempt running the nozzle under
warm water.
If paper towel still doesn't show all three
colors repeating step 7, then replace the
cartridge.
Dry the ink cartridge.
Dry excess water
from cartridge. Ensure
cartridge contacts are
completely dry. Printer
damage may result if
cartridge contacts are
not completely dry.
Verify the ink cartridge is now functioning
properly by printing your image.
Page 31
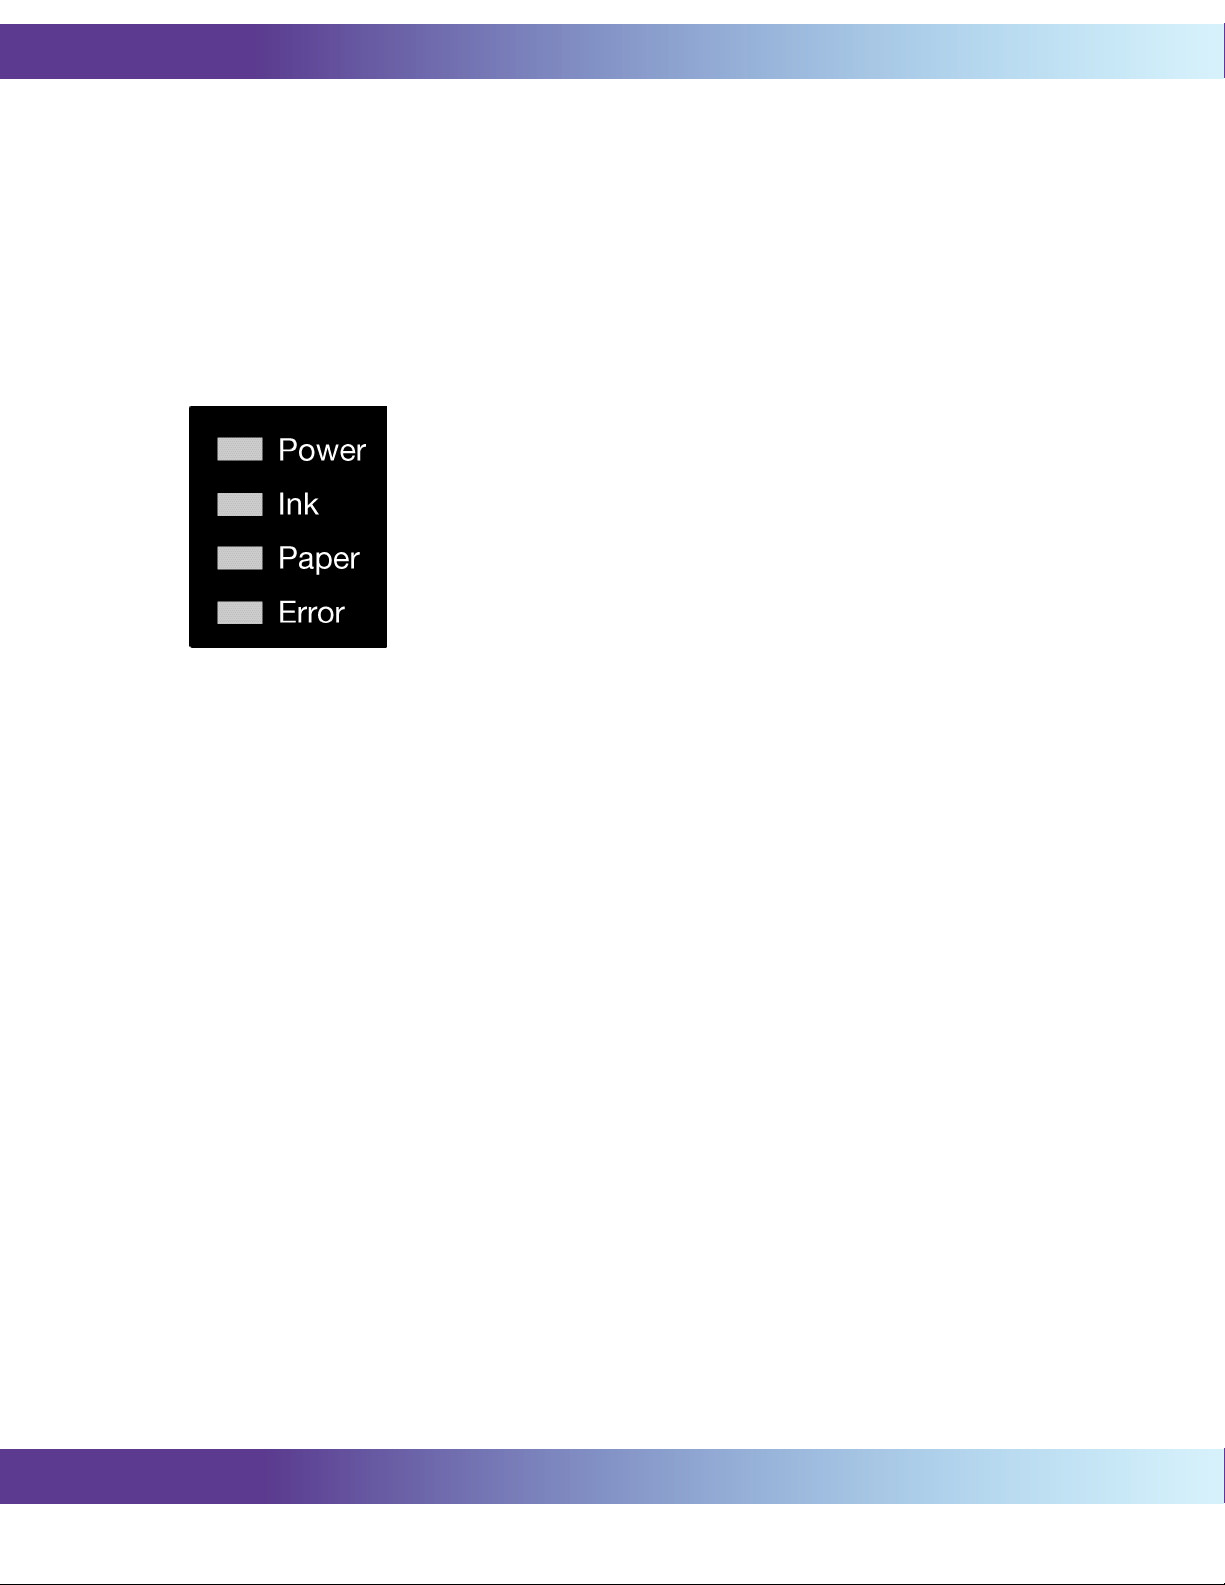
C. INTERPRETING THE PRINTER’S INDICATOR LIGHTS
Most error messages will appear on your computer screen via
the PrintHub application or the Printer Utility (Mac).
However, if the error prevents communication with the
computer, the LED lights may be used to help diagnose the
problem.
Power. The Power LED will
illuminate when the printer is
plugged in and power is switched
on. It will flicker when it is
processing or printing a job.
Ink. The Ink LED will illuminate
when the ink is low. The LED will
flash when no ink cartridge is
detected.
Paper. The Paper LED will
illuminate when there is no paper
loaded into the feed area. The
Paper LED will flash when no roll
of paper is detected.
Error. The Error LED will flash in
any error condition.
Page 32
E. PRINTER MAINTENANCE
Every 25 ink cartridges it is necessary to replace the internal
ink filters. To replace the ink filters follow these instructions:
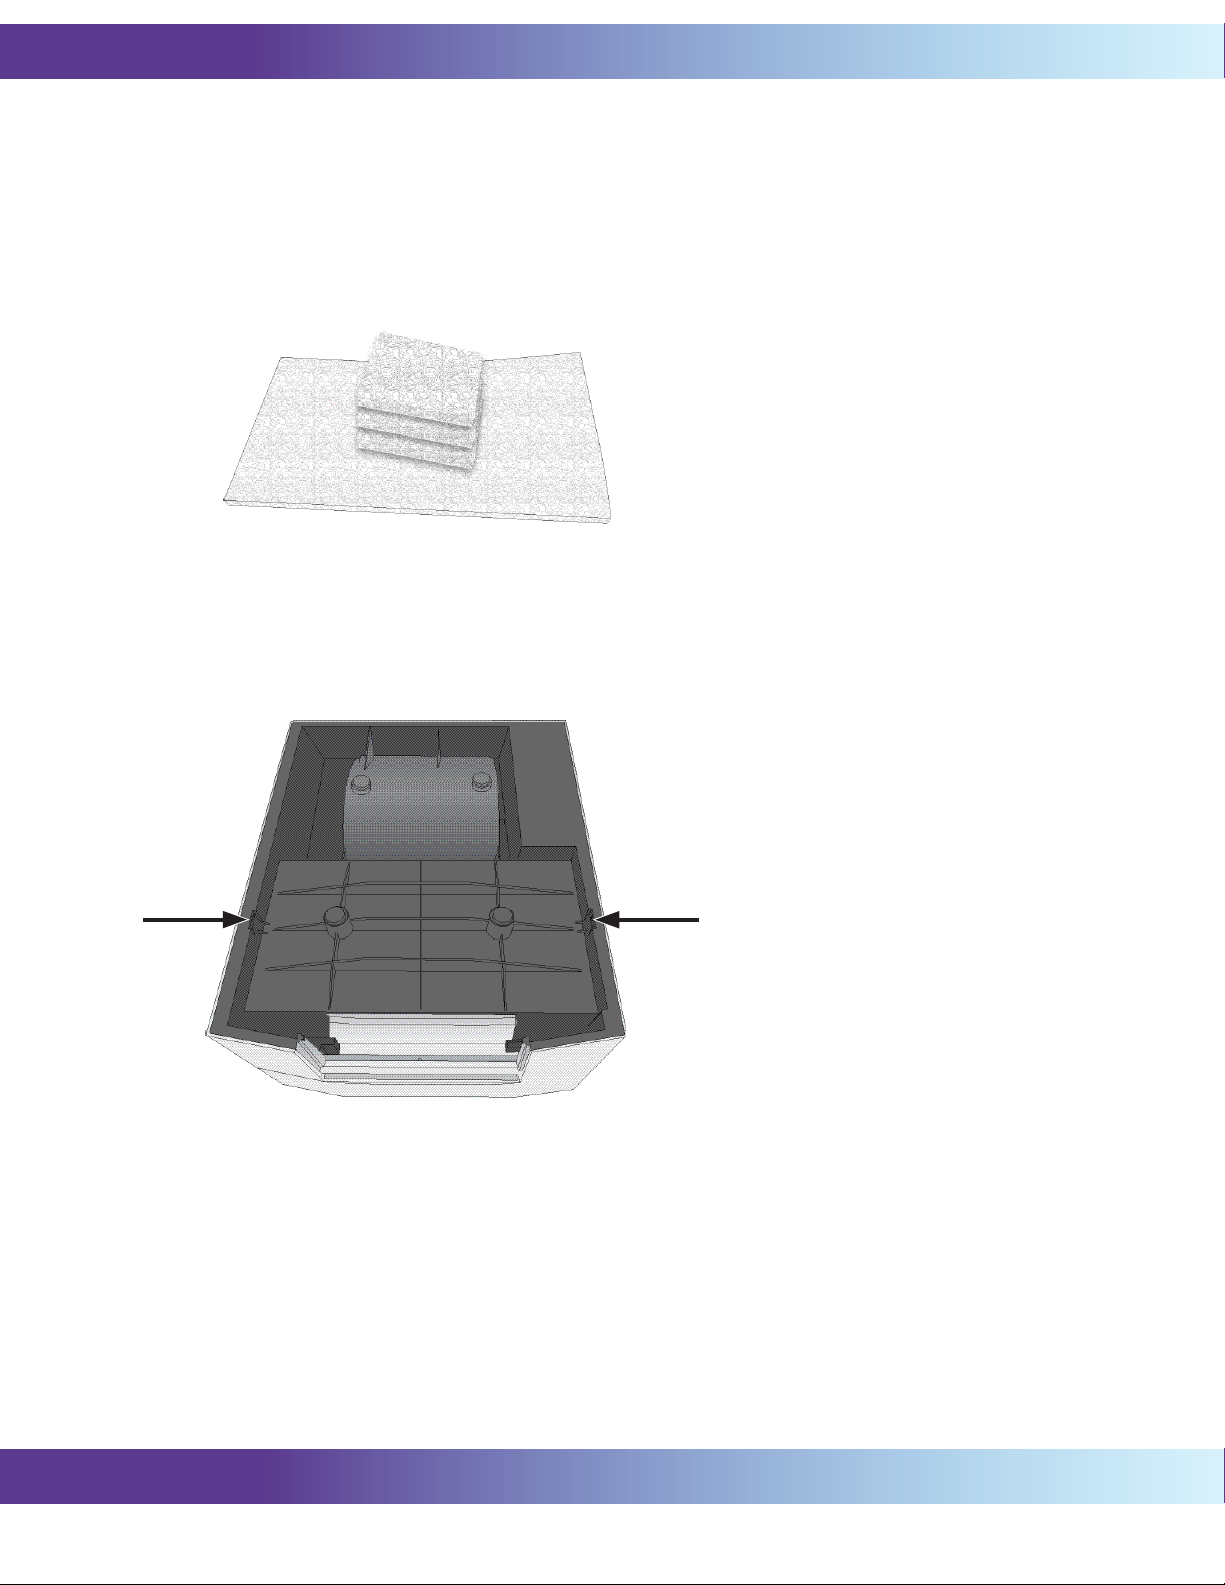
Purchase the SIPMI LR1 Ink Filter Replacement Kit. The
kit contains 3 small filters and 1 large pad.
Remove the photo paper from the SIPMI LR1. Remove the
photo tray and the cut waste bin.
Switch off the printer and remove the power cable.
Turn the printer over so the bottom is facing up. While you
turn the printer over, hold the cover closed so that it does
not fall open.
Press the locking tabs inward on both the left and right side
inward slightly, one at a time, while lifting upward on the
tray. Remove tray.
Page 33
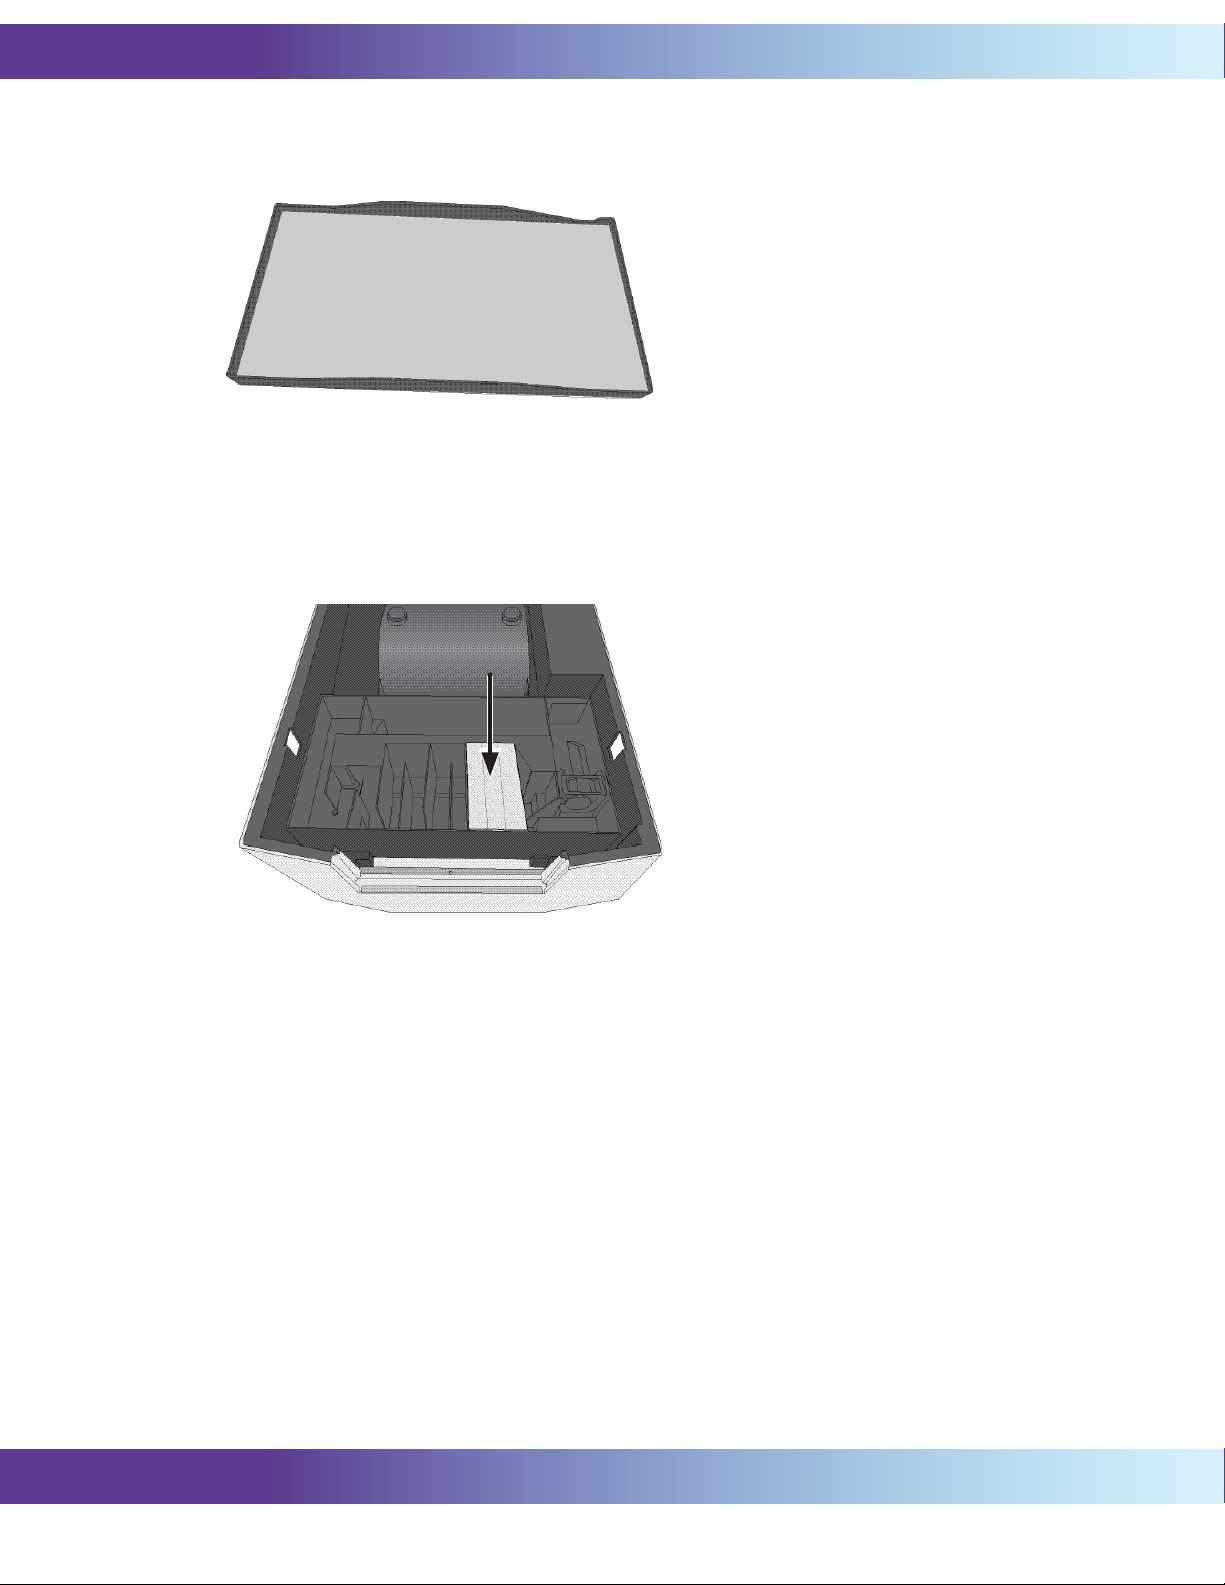
Turn the ink filter tray over and set it on a table.
Remove the large ink pad. Replace it with the new pad.
Press the pad around the edges to completely seat the pad
in the tray. Yo u may wish to use rubber gloves to handle the
used ink pads and filters.
Now remove the used filters from the printer. On the
bottom of the printer you will see three ink filters stacked
next to each other. Remove these and discard them.
Insert the new filters. All three should be installed together.
The longer edge should be facing down and toward the
front of the printer.
Replace the ink pad tray. Push down near each tab until
you hear a click. The orientation of the tray is not
important.
Turn the printer right side up.
Page 34
E. PRINTER MAINTENANCE
Every 25 ink cartridges it is necessary to replace the internal
ink filters. To replace the ink filters follow these instructions:
Purchase the SIPMI LR1 Ink Filter Replacement Kit. The
kit contains 3 small filters and 1 large pad.
Remove the photo paper from the SIPMI LR1. Remove the
photo tray and the cut waste bin.
Switch off the printer and remove the power cable.
Turn the printer over so the bottom is facing up. While you
turn the printer over, hold the cover closed so that it does
not fall open.
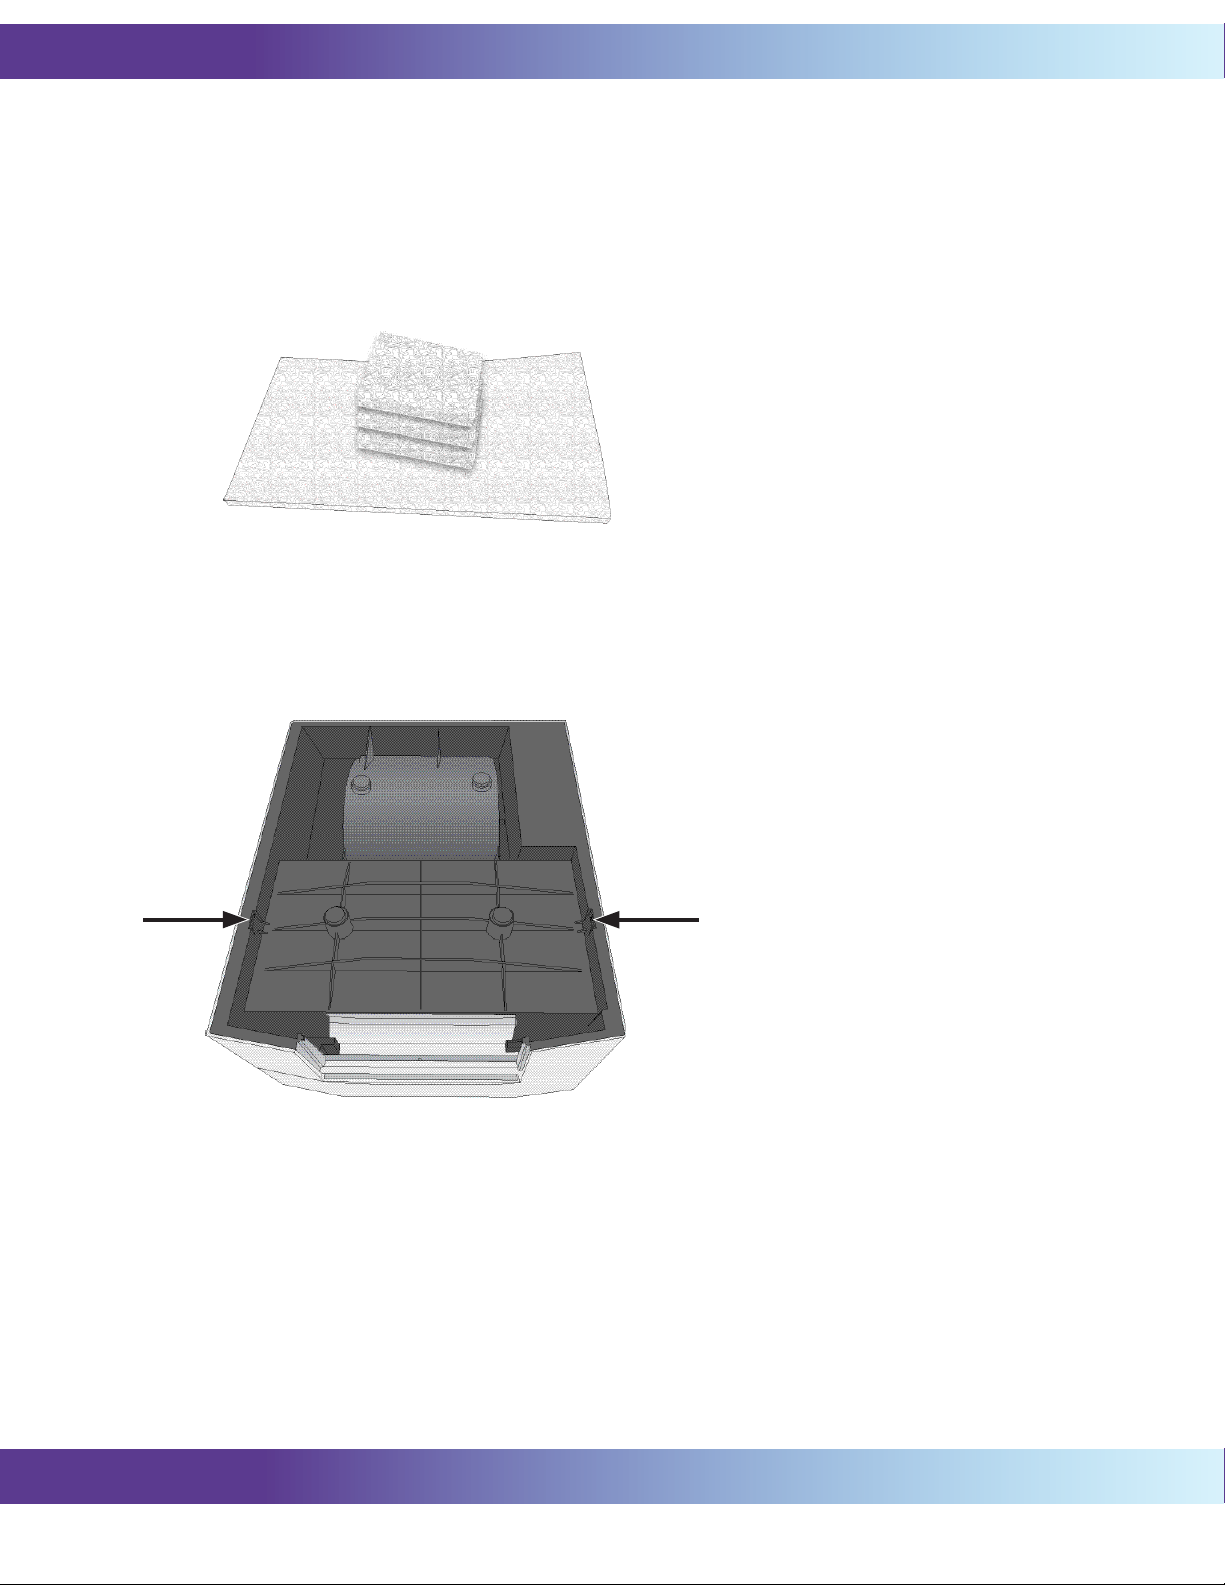
Press the locking tabs inward on both the left and right side
inward slightly, one at a time, while lifting upward on the
tray. Remove tray.
Page 35

F. TECHNICAL SUPPORT
If you have difficulties in operating your printer, the procedures
in this manual, should, in most cases, solve the problem. If you
still have difficulty, contact Technical Support using one of the
methods listed below.
Source
Location
Email Support
Phone Support
XXX_XXX_XXXX (Mon - Fri 8 a.m. - 6 p.m EST)
Chat Support
www.sipmi.net look for the chat prompt
on lower right
Page 36
Addendum: SIPMI Wireless Operating
Procedures
This Addendum is aimed at outlining in detail the SIPMI Wireless
system, how to install and troubleshoot. Each location is different
with its own wireless network issues and complications. The
purpose of this Addendum is to overcome such issues.
Overview
SIPMI Wireless is a print server that allows the SIPMI LR1 unit to
receive prints from IPhone/IPad devices using the SIPMI app. It
features two separate network modes, one which creates its own
ad-hoc network that IPhone/IPad devices can connect to and print
to the LR1, and infrastructure mode, which allows users of the
device to connect their LR1 unit to their own wireless network,
making it accessible throughout their personal network
infrastructure.
SIPMI Wireless utilizes a CUPS print server to allow the
LR1 unit to receive jobs from IPhone/IPad devices, and a
management portal that can be used to access the CUPS web
portal, view information about the currently connected network,
and choose/connect to the network they would like to use their LR1
unit on.
Page 37

Initial setup procedure
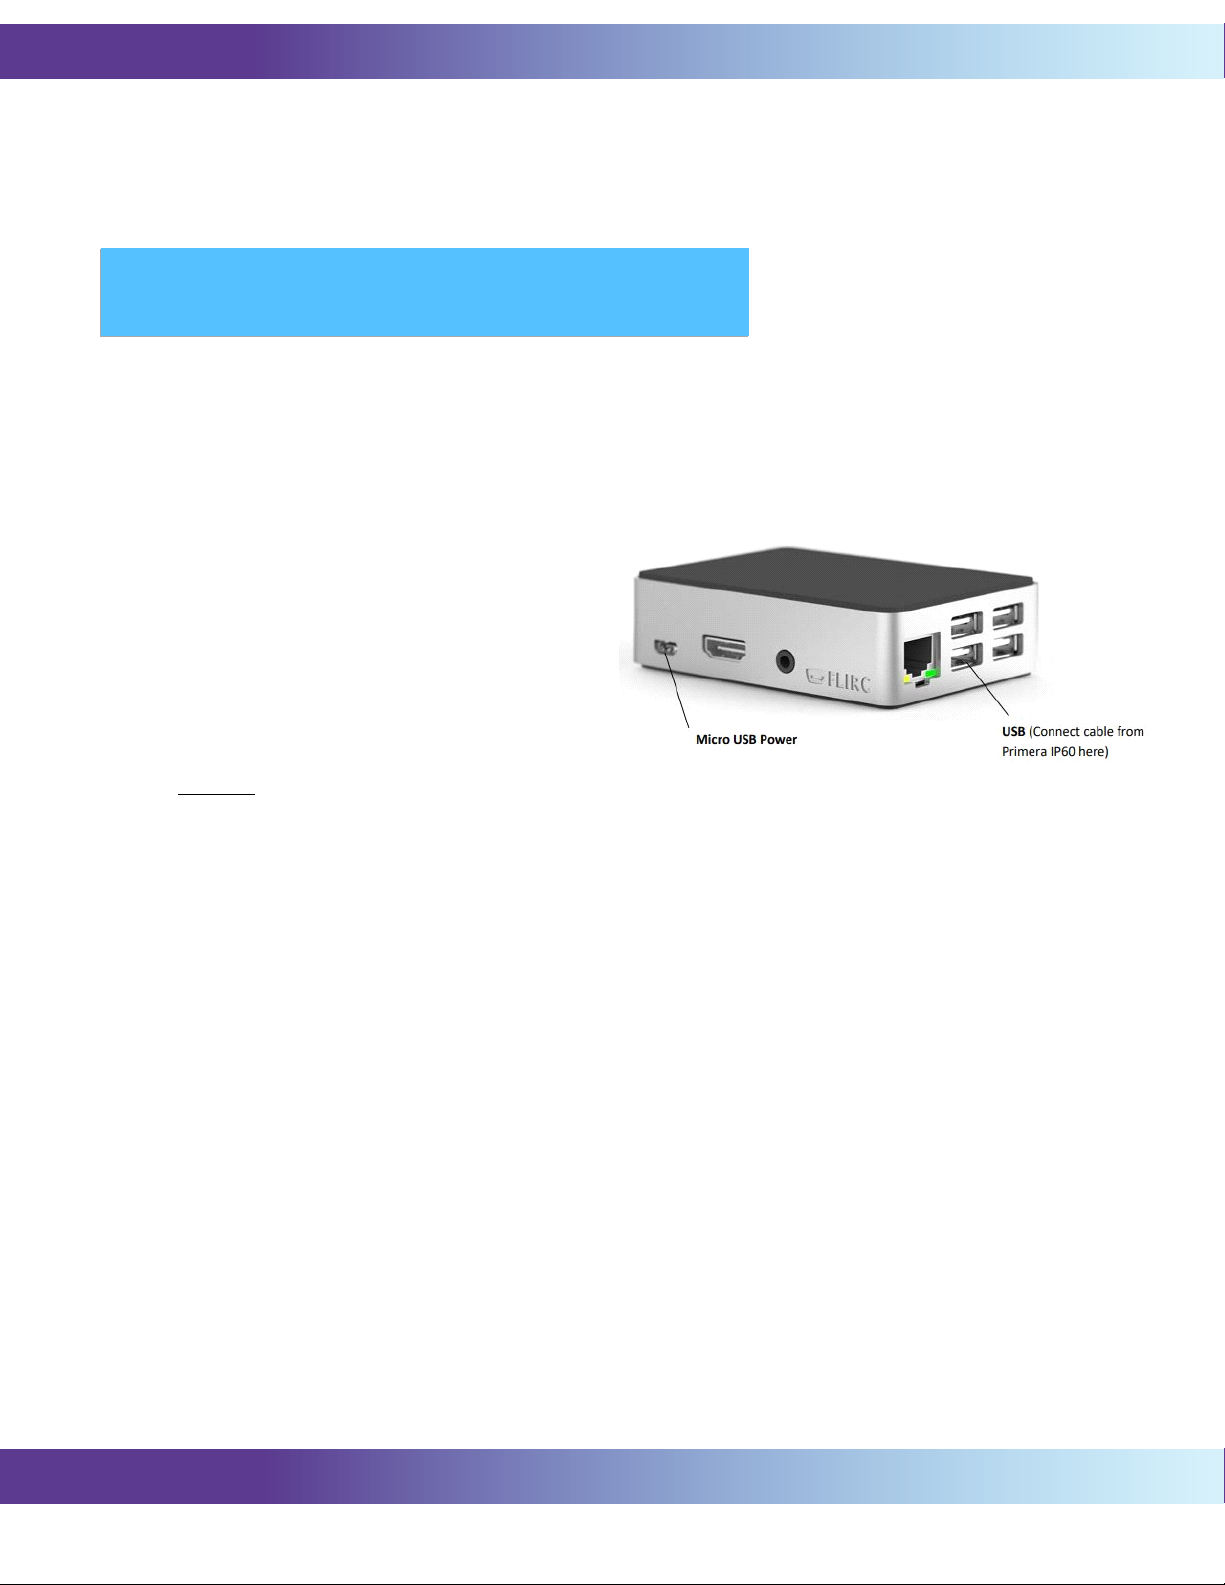
When the user first receives their SIPMI Wireless module, all
they will need to do to set it up is connect the module to power
using the micro usb power supply, and connect their LR1 unit to
the device using a standard usb a-b printer cable. When the
device first reaches the user, it will not have any previously
saved network information, so upon first power-up, the ad-hoc
network will be activated and the LR1 wireless print module will
create its own Wi-Fi network. At this point, users of the module
can connect their IPhone/IPad device to the newly generated
ad-hoc network using the default password (drinkyourselfie),
and will have the ability to print to their LR1 device immediately.
Connecting to personal Wi-Fi
If the user would like to connect SIPMI Wireless to their
personal network infrastructure:
• Starting connected to SIPMI Wireless’s ad-hoc wireless
network, navigate using your Safari web browser to
Sipmi-xxxxxx.local (Last six digits will vary)
• The web portal will appear and ask for login info,
default user and pass is:
User: admin
Pass: drinkyourselfie
• The web portal should now be open, and presenting
you with local networks it can connect to. Once you
have found the network you would like to connect to,
click/tap the name on the screen.
• A dropdown will appear asking for either your chosen
networks Wi-Fi password, or warning you that there
are security risks associated with connecting to open
Wi-Fi networks. For a password secured Wi-Fi
network, enter your password and press connect.
Page 38

For an open Wi-Fi network, view the warning message and
press either ok to connect or close to exit and choose
another.
• After choosing your network and pressing connect, the web
portal will show the user a message telling them that the
connection is being attempted, and to switch to the chosen
Wi-Fi network on their IPhone/IPad to continue using the
device and printing. After switching networks, the user can
verify the unit is now connected to the chosen network by
accessing the web portal(Sipmi-xxxxxx.local) once more. If
the password has been accepted and the switch has
occurred, you will now see “You are currently connected to:
<userwifi>” displayed above the network choices. You are
now ready to print to your LR1 unit from your local Wi-Fi
connection, and the web portal will be accessible to any
IPhone/IPad connected to the network. *
*Note: Users must authenticate before having access to the
web portal, so anyone attempting to access Sipmixxxxxx.local inside the network will be unable to access it
unless they login using the admin credentials, or user
credentials set up by the device admin themselves.
Page 39

Reverting to Hotspot
If the user would like to connect SIPMI Wireless back to its original
Hotspot Wi-Fi network:
• From an iPhone/iPad device on the same network as the SIPMI
LR1 wireless print module, navigate using the safari web
browser to Sipmi-xxxxxx.local and authenticate to view the web
portal.
• On the navigation bar on the main page of the web portal, press
the “Hotspot” radio button.
• User will receive a message alerting them that SIPMI Wireless
is switching back to its hotspot
• Go to Wi-Fi setting in your iPad/iPhone device, it may take up to
a minute for the hotspot SSID(Network name) to appear in your
Wi-Fi network list.
• Once Hotspot network name reappears, connect using the
default password (drinkyourselfie) or the password you have
set.
• SIPMI Wireless is now ready to print once more, and the web
portal accessible at Sipmi-xxxxxx.local
!
Note: Users can also quickly switch back to their previously
connected infrastructure Wi-Fi network by pressing the “WiFi”
radio button in the navigation bar of the web portal.
Page 40

Setting your own Hotspot SSID and Password
On the Navigation panel inside of the web portal, you can use the configure hotspot
button to set a new network name and password for your SIPMI Wireless hotspot.
To do this:
• Navigate to the web portal(Sipmi-xxxxxx.local)
• In the Navigation panel, locate and select the configure hotspot button
• A window will appear, enter the network name and password you wish to
have and press the update button
• SIPMI Wireless may take a moment to configure. If you are connected to
hotspot, you will need to select your newly created network inside of the
WiFi selection panel of your iPhone/iPad. If connected to a personal
network, you will stay connected to it until you switch to the hotspot which
now is accessible using your new password.
NOTE: If you switch your Hotspot network name, it will not change the
webserver access address. You can still access the web portal at Sipmi-
xxxxxx.local
Reverting to Hotspot by restart
If you are connected to a local WiFi network, but no longer remember which one, you
can fall back to Hotspot without using the webserver by following these steps:
1. Unplug all Primera units from SIPMI Wireless
2. Power cycle SIPMI Wireless and wait 1 minute
3. SIPMI Wireless will automatically fall back to hotspot and you will have access
to it once again
Revert to default SSID & Pass
There may be a time when you change the SSID or Password of your Hotspot
network, but forget the password and cannot access the Hotspot network, or you may
simply wish to return SIPMI Wireless to its original state. To do this:
• Unplug all Primera units from SIPMI Wireless
• Power cycle SIPMI Wireless, wait 1 minute. SIPMI Wireless will revert to
hotspot.
• Power cycle SIPMI Wireless 2 more times without any printers plugged in,
waiting at least 30 seconds between power cycles.
• After the second power cycle, SIPMI Wireless will recalibrate and the WiFi
SSID for the Hotspot will be reset to SIPMI Wireless + last six of device MAC
(Sipmi-xxxxxx.local).
Page 41

Troubleshooting
• I accidentally entered the wrong password for my personal Wi-Fi!
SIPMI Wireless will attempt to make a connection, and if it is
unsuccessful, it will simply revert back to its own ad-hoc wireless
network.
• Printer cannot be found on personal infrastructure Wi-Fi network
If your printer is not showing up after connecting the SIPMI LR1
wireless print module to your local network, check to make sure that
the switch actually happened first. You may have entered the wrong
password, or the security settings of your network may have barred
the device from authenticating to it. In either case, the ad-hoc wireless
network will be activated and your LR1 and the management portal will
be accessible once more.
• My web portal has become unresponsive!
If your web server becomes unresponsive after you have made a
network/ad-hoc switch, this is completely normal. By nature, the SIPMI
LR1 wireless print module is both ad-hoc and infrastructure capable,
but not at the same time. You will only be able to access the web portal
from the same network that SIPMI Wireless is connected to. If your
web portal becomes unresponsive and stops loading after a network
switch, it is a good indication that you are not connected to the same
network as SIPMI Wireless. Check to make sure that you are on the
same network the module is connected to. If not connected to any
infrastructure networks, you can find your SIPMI Wireless module and
access its web portal on its self-generated ad-hoc network.
 Loading...