

Page 1
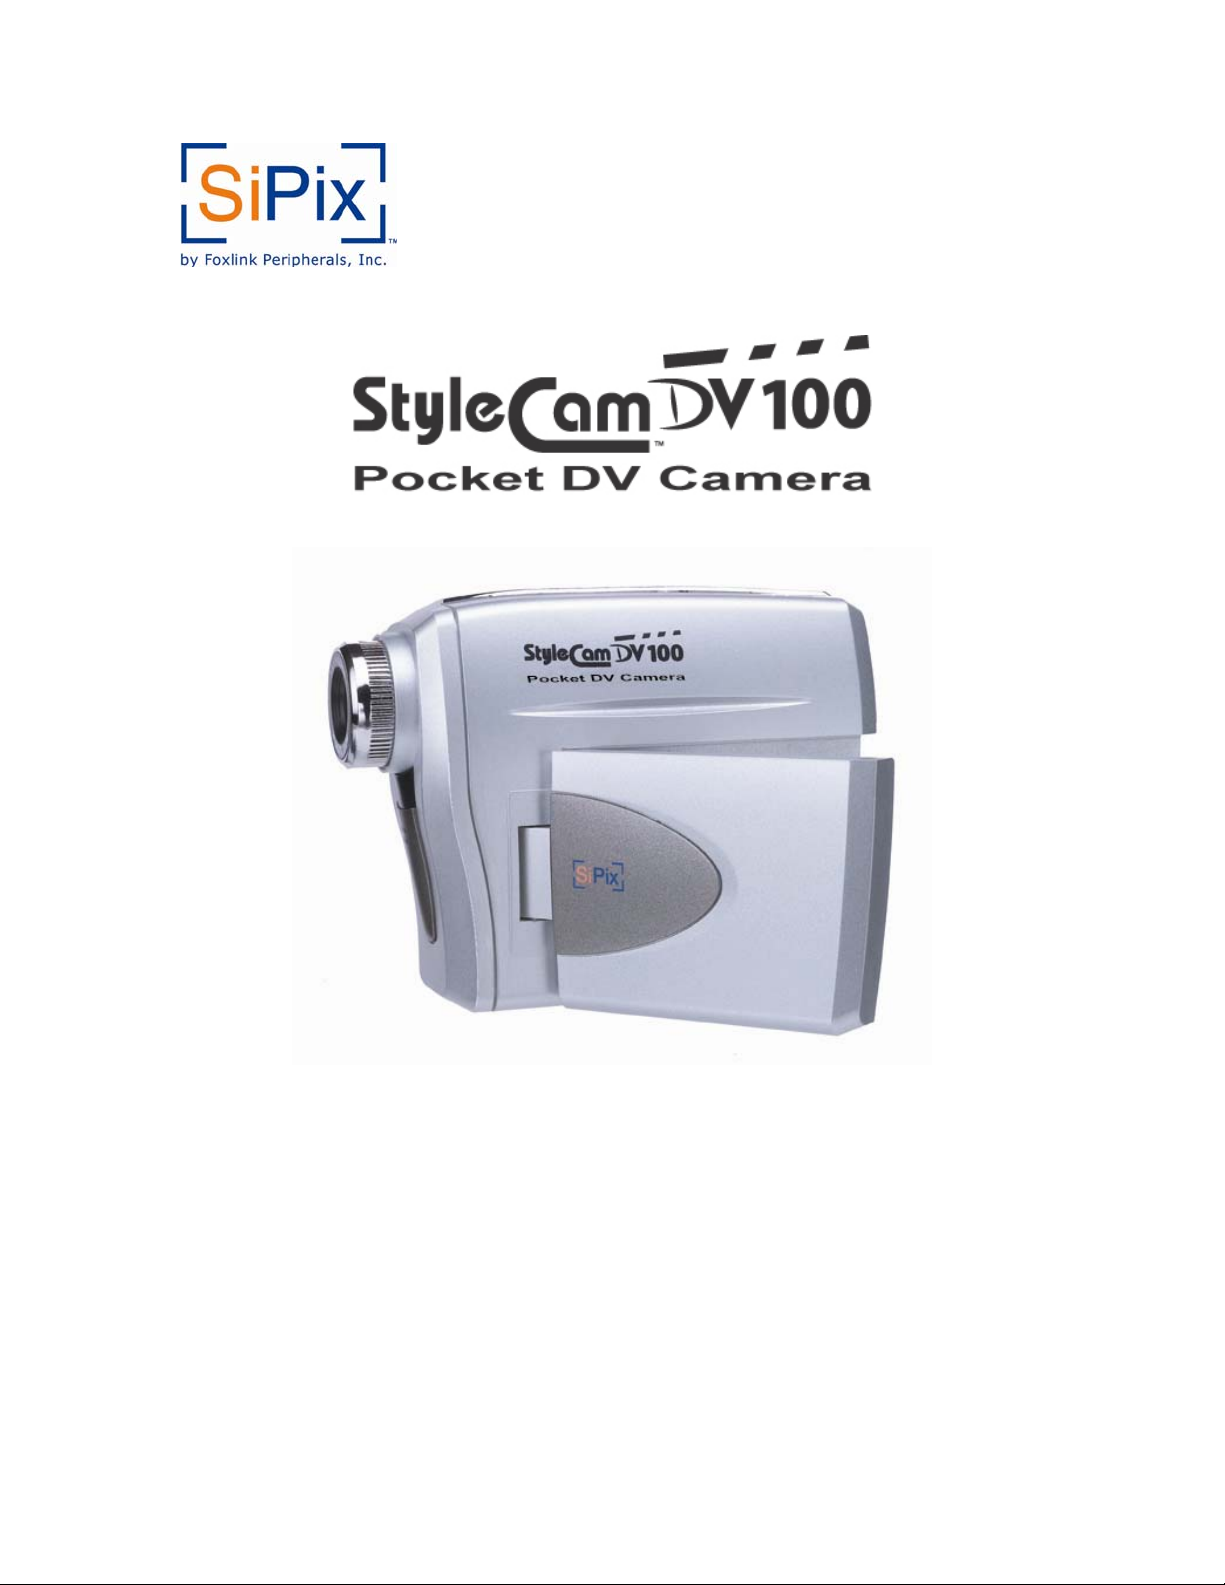
Pocket DV Camera &
1.3 Mega Pixel Digital Still Camera
Owner’s Manual
Page 2

About This Manual
This manual is designed to assist you in using the StyleCam DV100 Pocket DV Camera.
Information in this document has been carefully checked for accuracy; however, no guarantee is
given to the correctness of the contents. The information in this document is subject to change
without notice.
Edition
First Edition, May 2003
Copyright
© Copyright 2003
This document contains proprietary information protected by copyright. All rights are reserved. No
part of this manual may be reproduced by any mechanical, electronic or other means, in any form,
without prior written permission of the manufacturer.
Federal Communications Commission (FCC) Compliance
This equipment has been tested and found to comply with the limits for a Class B digital device,
pursuant to Part 15 of the FCC Rules. These limits are designed to provide reasonable protection
against harmful interference in a residential installation. This equipment generates, uses, and can
radiate radio frequency energy and, if not installed and used in accordance with the instructions,
may cause harmful interference to radio communications. However, there is no guarantee that
interference will not occur in a particular installation. If this equipment does cause harmful
interference to radio or television reception, which can be determined by turning the equipment
off and on, the user is encouraged to try to correct the interference by one or more of the
following measures:
• Reorient or relocate the receiving antenna.
• Increase the separation between the equipment and the receiver.
• Connect the equipment to an outlet on a circuit different from that to which the receiver is
connected.
• Consult the dealer or an experienced radio/TV technician for help.
Warning!
You are cautioned that changes or modifications not expressly approved by the party responsible
for compliance could void your authority to operate the equipment.
ii
Page 3

Declaration of Conformity
This device complies with part 15 of the FCC rules. Operation is subject to the following
conditions:
This device may not cause harmful interference.
This device must accept any interference received, including interference that may cause
undesired operation.
Canadian Department of Communications
This class B digital apparatus meets all requirements of the Canadian Interference-causing
Equipment Regulations.
Cet appareil numérique de la classe B respecte toutes les exigences du Réglement sur le
matériel brouilieur du Canada.
Trademark Recognition
2003 Foxlink Peripherals, Inc. StyleCam is trademarks of Foxlink Peripherals, Inc. SiPix is
registered by SiPix Group Ltd. and used under license. MS-DOS and Windows are registered
trademarks of the Microsoft Corporation registered in the USA and other countries. Windows is
an abbreviated term referring to the Microsoft Windows Operation System. Other company or
product names are trademarks or registered trademarks of their respective companies.
iii
Page 4

TABLE OF CONTENTS
Getting Started _________________________________________________________ 2
About the StyleCam DV100 Pocket DV Camera __________________________________ 2
Unpacking the StyleCam DV100 _______________________________________________ 2
Identifying Components ______________________________________________________ 3
Inserting the Batteries _______________________________________________________ 4
Inserting & Removing the Memory Card (SD/MMC) _____________________________ 4
Fastening the Hand Strap to the StyleCam DV100 ________________________________ 4
StyleCam DV100 Operations______________________________________________ 5
Turning the Power ON/OFF __________________________________________________ 5
Identifying Camera Icons_____________________________________________________ 5
Capturing Digital Video, Still Image & Audio Files _______________________________ 6
Advanced Features __________________________________________________________ 7
Setting the Capture Mode ____________________________________________________ 9
Reviewing Digital Video, Still Image & Audio Files ______________________________ 11
Identifying Error Messages __________________________________________________ 16
Software Installation ___________________________________________________ 18
Software Overview and Features _____________________________________________ 18
Installing the Software ______________________________________________________ 18
Making Connections ___________________________________________________ 21
Connecting to a PC _________________________________________________________ 21
Connecting to a TV_________________________________________________________ 21
Download Video/Image/Audio to Your PC__________________________________ 22
Downloading via ArcSoft PhotoImpression _____________________________________ 23
StyleCam DV100 as PC-CAM ____________________________________________ 24
Product Specification___________________________________________________ 26
TROUBLESHOOTING _________________________________________________ 27
ONE YEAR LIMITED WARRANTY – US/CANADA_________________________ 28
WARRANTY SERVICE – US/CANADA ___________________________________ 29
TECHNICAL SUPPORT – US/CANADA __________________________________ 30
WARRANTY & TECHNICAL SUPPORT – EUROPE ________________________ 31
WARRANTY & TECHNICAL SUPPORT – ASIA ___________________________ 32
1
Page 5

Getting Started
About the StyleCam DV100 Pocket DV Camera
Congratulations on your purchase of the StyleCam DV100. Your StyleCam DV100 pocket digital
video camera has been ergonomically designed to allow you to quickly and easily take digital
video and digital still images.
You can download the videos and images using the included software and USB cable. The
StyleCam DV100 driver provides easy file transfer from the camera to your computer. Also
included is ArcSoft PhotoImpression and VideoImpression software that make photo and video
editing and enhancing fun. For more information on how to use ArcSoft PhotoImpression and
VideoImpression, you may visit its website at www.arcsoft.com
Unpacking the StyleCam DV100
Please open the StyleCam DV100 box and remove all contents. If anything is missing or
damaged, please contact your reseller immediately. Your package should contain the following
items:
• 1 StyleCam DV100 camera
• 1 Hand strap
• 1 Camera pouch
• 1 USB cable
• 1 A/V cable
• 2 AA alkaline batteries
• 1 Quick Start Guide
• 1 Software CD containing:
− StyleCam DV100 Driver
− ArcSoft PhotoImpression
− ArcSoft VideoImpression
− Owner’s Manual (PDF)
− Adobe Acrobat Reader
.
2
Page 6
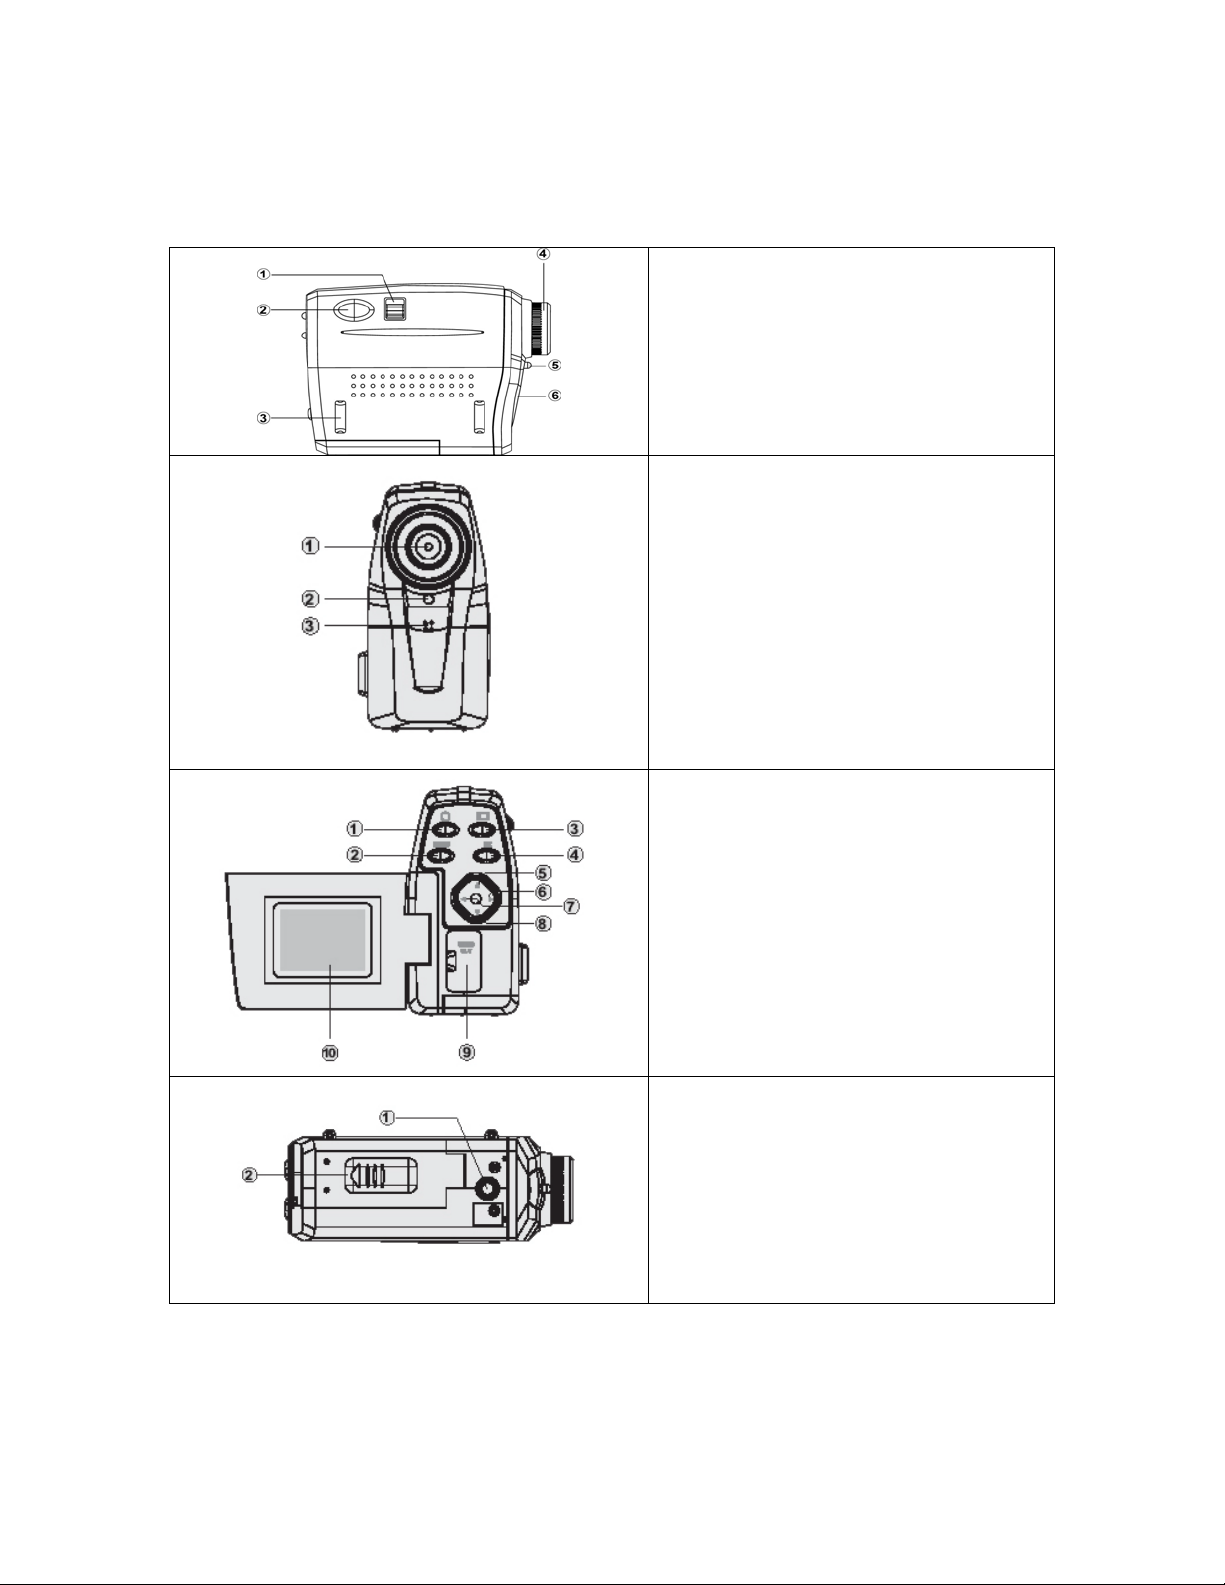
Identifying Components
Please refer to the following diagram to get to know your StyleCam DV100.
1. Capture/Playback switch
2. Record/Shutter button
3. Hand strap holder
4. Lens (2X digital zoom)
5. Status LED
6. Microphone
1. Lens (2X digital zoom)
2. Status LED
3. Microphone
1. Power ON/OFF button
2. Menu button
3. Display ON/OFF/thumbnail button
4. Enter/OK button
5. Navigation up button (zoom-in)
6. Navigation right button (menu settings)
7. Navigation left button (menu settings)
8. Navigation down button (zoom-out)
9. A/V & USB ports
10. 1.6” TFT color LCD
1. Tripod socket
2. Battery compartment door (SD/MMC
card slot inside this compartment)
3
Page 7
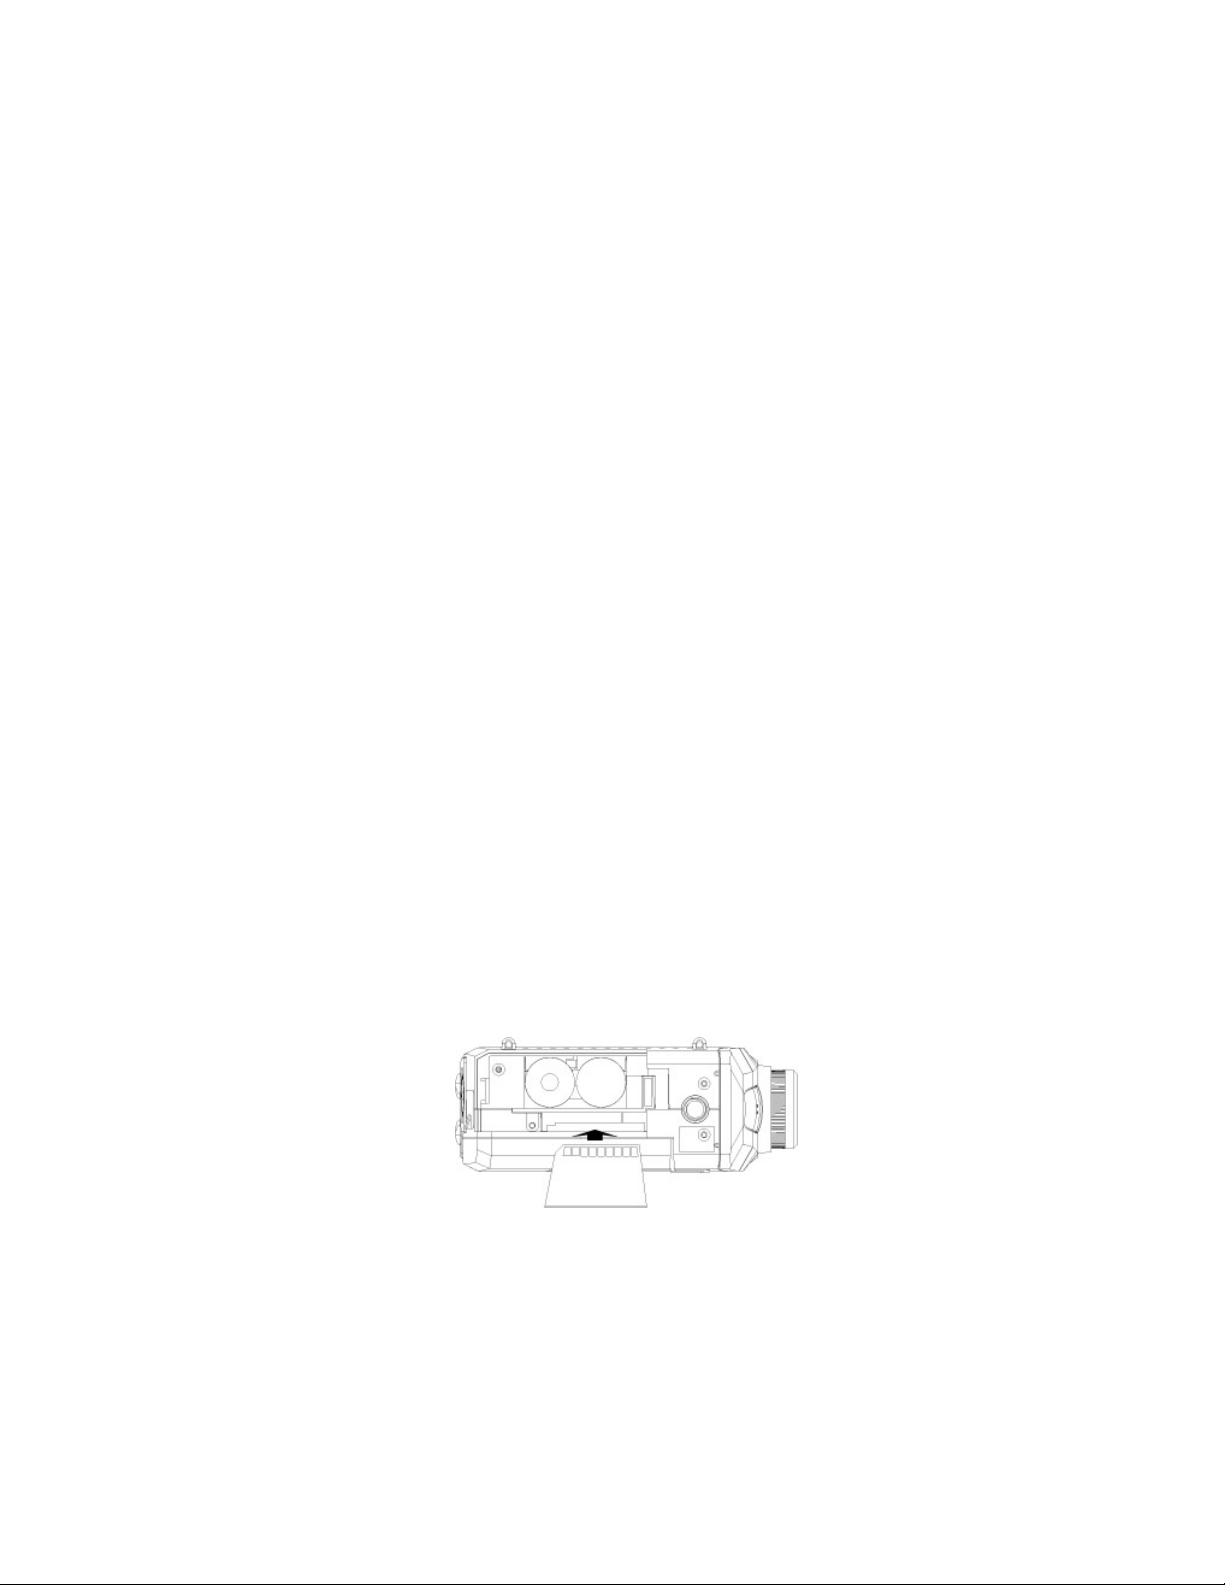
Inserting the Batteries
The StyleCam DV100 uses two AA alkaline batteries or two AA Ni-MH rechargeable batteries.
Please follow the instructions below to insert the batteries into your StyleCam DV100 camera.
1. Open the battery compartment cover by sliding the door in the direction of the arrow
shown on the cover.
2. Note the battery polarities on the inside of the battery cover and insert two new
batteries.
3. Close the battery cover by sliding it back and clicking it close.
Note:
• Do not open the battery cover when the camera’s power is ON.
• Please remove the batteries before storing the camera.
Inserting & Removing the Memory Card (SD/MMC)
The StyleCam DV100 uses a Secure Digital or a MultiMedia Card memory card (optional). The
maximum capacity allowed for the memory card is 256MB. Please follow the instructions below to
insert a SD or a MMC card into your StyleCam DV100 camera.
1. Make sure the camera’s power is OFF.
2. Open the battery compartment cover by sliding the door in the direction of the arrow
shown on the cover.
3. Find the memory card slot that is located along the side of the compartment and insert a
SD or MMC card. Insert the card so that the label is facing away from inside the
batteries.
4. Press down on the memory card so that it fits securely inside the slot. Close the battery
cover to start using the camera.
5. To remove the memory card, press down on the memory card with your thumb and the
card will eject. Pull the card out with your fingers and close the battery cover.
Fastening the Hand Strap to the StyleCam DV100
Use the StyleCam DV100 hand strap to give you support when taking a digital video or still image.
Open the Velcro strap and insert one end of the Velcro strap through the strap holder and the
other end of the Velcro strap through the other strap holder. Bring the two ends to the center
where the surface is made of minute hooks and secure the ends of the straps on the minute
hooks by pressing on them. You can adjust the length of the hand strap by adjusting the position
of where you secure the Velcro attachment.
4
Page 8
StyleCam DV100 Operations
Turning the Power ON/OFF
1. Make sure that you have inserted two new AA batteries into the StyleCam DV100
camera.
2. Set the StyleCam DV100 to either Capture mode or Playback mode using the
Capture/Playback switch.
2. Open the LCD monitor by flipping it out from the camera.
3. Press the Power button located on the top left corner of the control panel.
4. The camera’s splash screen will appear on the LCD briefly and then the menu will
display.
5. To power off the camera, press the Power button again and the LCD will shut off.
Once your StyleCam DV100 is powered on, a splash screen will display briefly and the main
menu for either Capture mode or Playback mode will appear (depending on which one you
selected).
Note: The camera will not power off when you close the LCD screen. However, the StyleCam
DV100 has an auto power off feature that will shut off the camera after 60 seconds of inactivity.
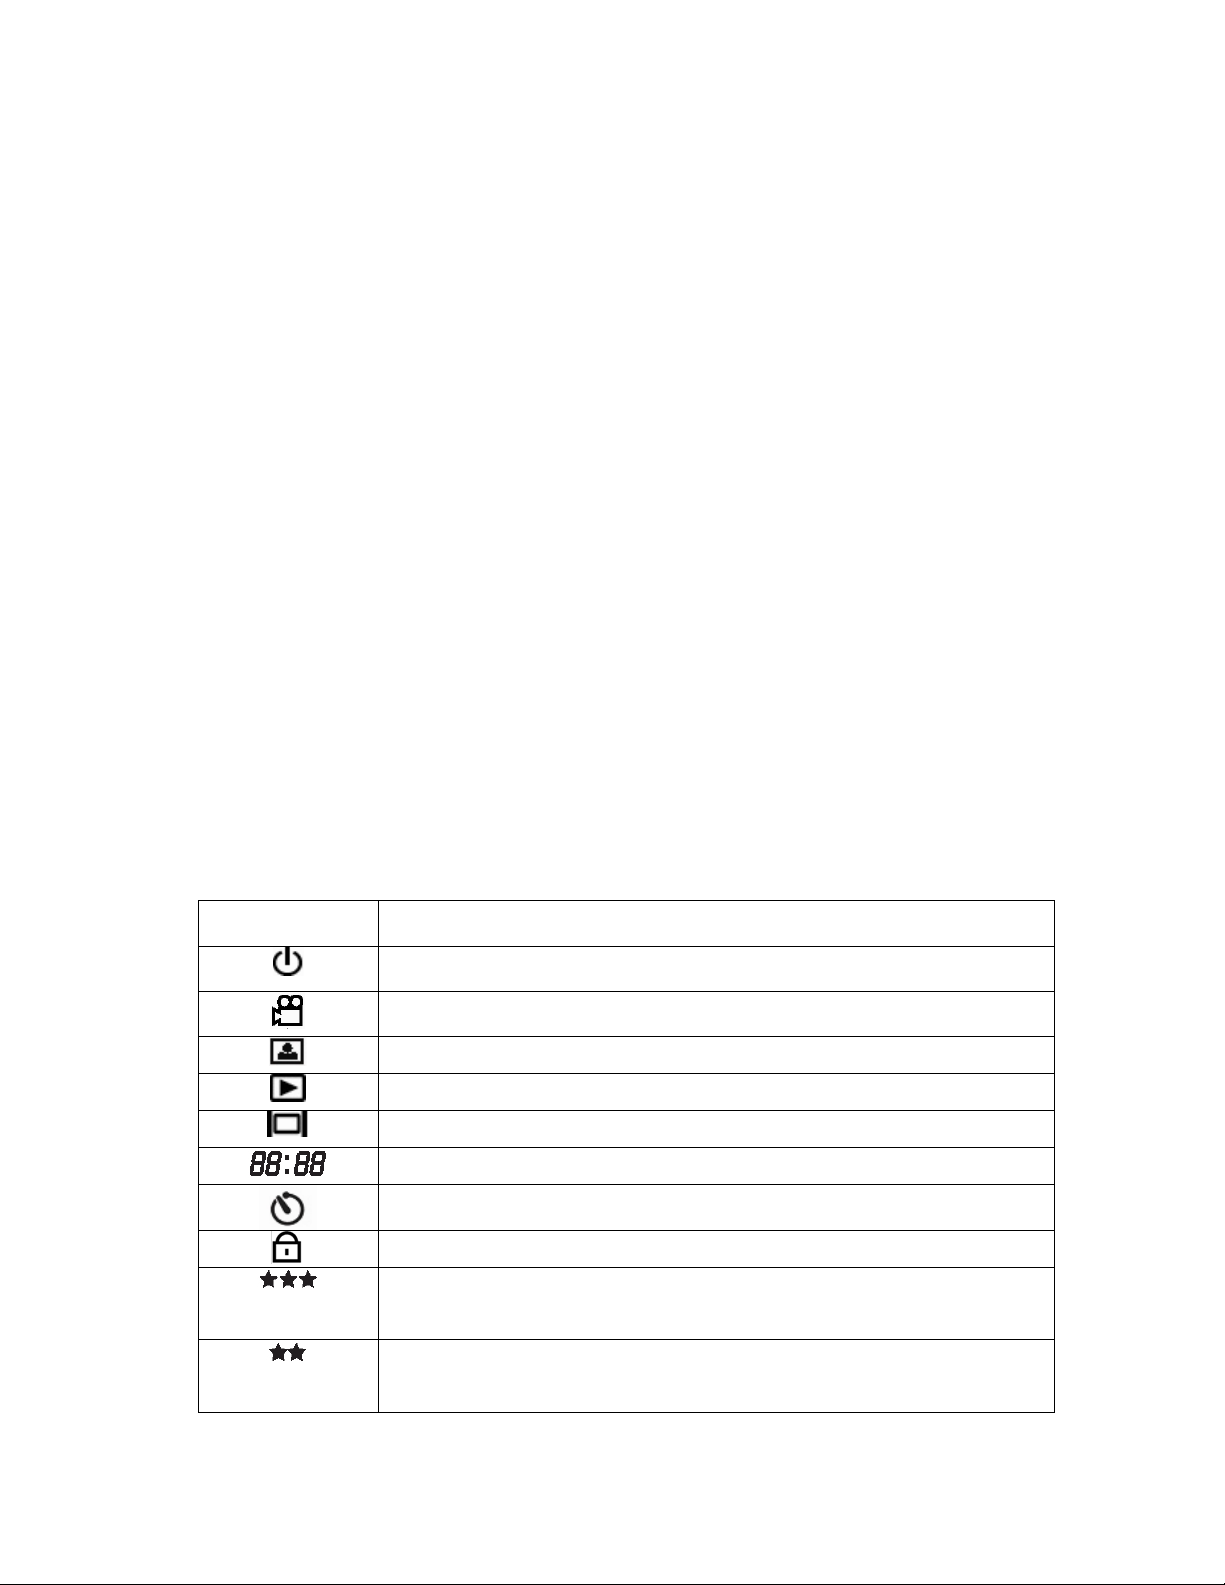
Identifying Camera Icons
Icons
Descriptions
Power ON/OFF button
Capture mode – video
Capture mode – still image
Playback mode – video/still image
Display – LCD display and view thumbnail images in Playback mode
Time counter or video/image number counter
Self-timer – 10 seconds
Lock – indicate file is protected
Superfine resolution:
• 640x480 (video)
• 1280x1024 (still image)
Fine resolution:
• 320x240 (video)
• 1280x1024 (still images)
5
Page 9
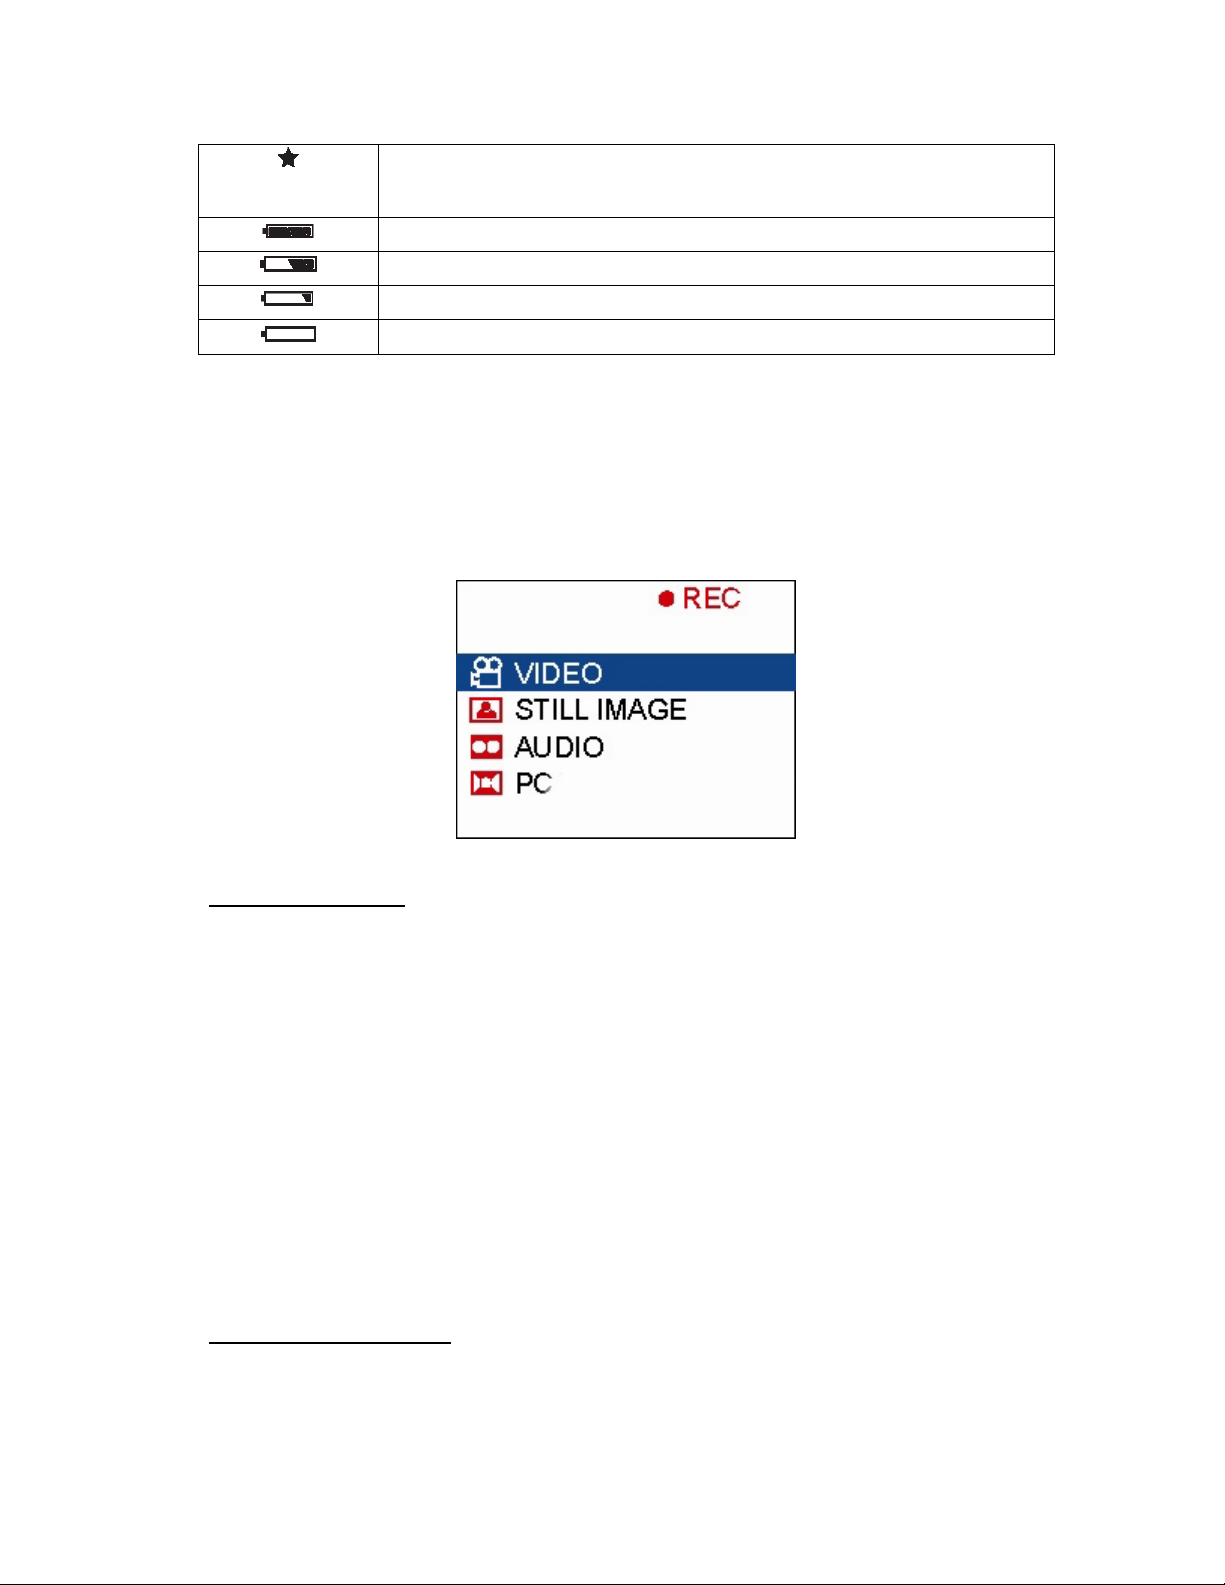
Economy resolution
• 160x120 (video)
• 640x480 (still image)
Battery indicator – full
Battery indicator – 50% full
Battery indicator – almost empty (have extra sets of batteries available)
Battery indicator – empty (will not record any more image or video)
Capturing Digital Video, Still Image & Audio Files
The StyleCam DV100 allows you to capture digital video, digital still images, and digital audio on
the built-in 8MB or on SD/MMC memory cards. Please follow the instructions below to learn how
to record video, image, or audio.
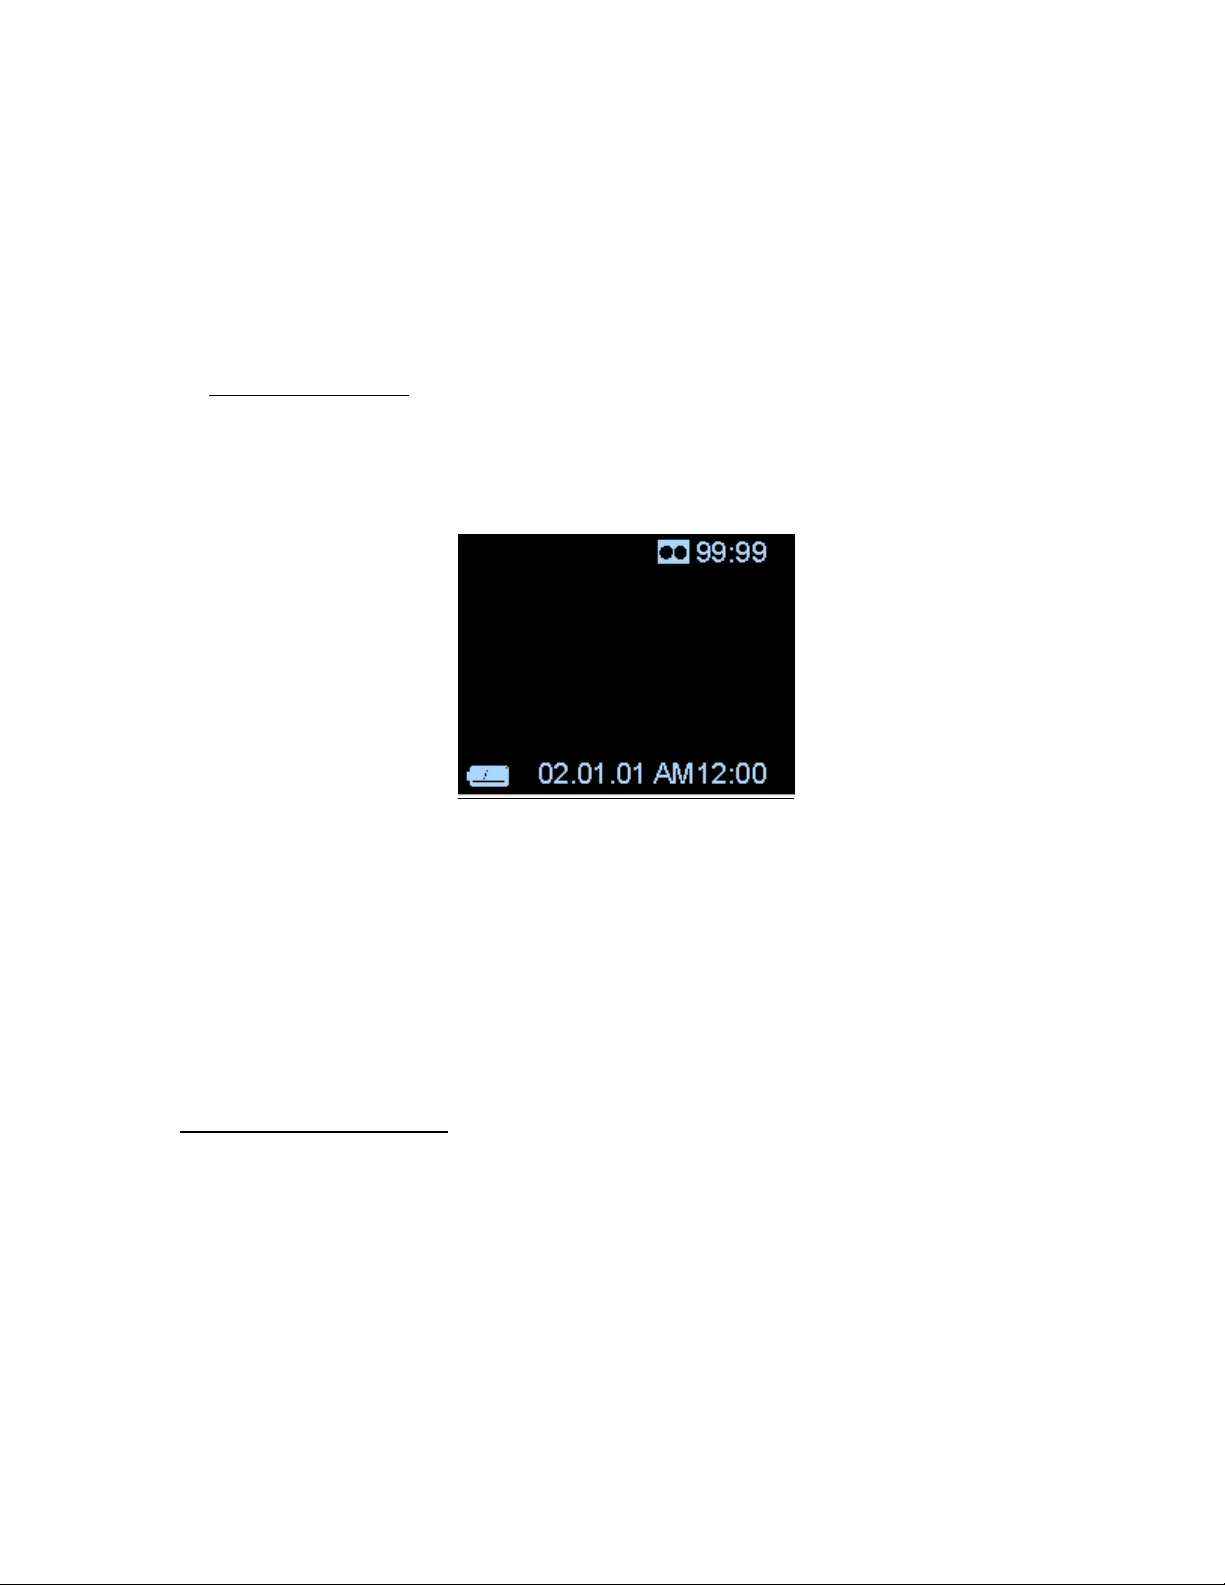
CAPTURE MODE – MAIN MENU
Capture Mode - Video
Set the Capture/Playback switch to Capture mode (upward). Open the LCD screen, and press
the Power button to power on the camera. The Capture mode main menu will appear (shown
above).
To take a digital video, use the Navigation buttons to highlight “VIDEO” and press the OK
button.
The LCD will display the subject that you’re aiming at. The video icon and the image counter
are shown in blue. To begin capturing a digital video, press the Shutter button once. The
capture icon and the counter icon will change to red, and the video counter will start counting
in seconds.
Note: You only need to press the Shutter button once. Do not hold down on the button.
To stop recording your digital video, press the Shutter button again. The video icon and
counter will change back to blue, and the counter will stop counting.
Capture Mode – Still Image
The StyleCam DV100 can take digital still images at 1.3 Mega Pixels. From the Capture main
menu shown above, use the Navigation up/down buttons to highlight “STILL IMAGE” and
press the OK button.
6
Page 10
The LCD will display the subject that you’re aiming at. The image icon will show besides the
image counter. The image counter indicates the number of pictures that you can take on the
remaining the memory.
To take a still image, hold the camera steady, view your subject through the LCD, and press
the Shutter button. The image counter will count down the number of pictures you can take
using the remaining memory.
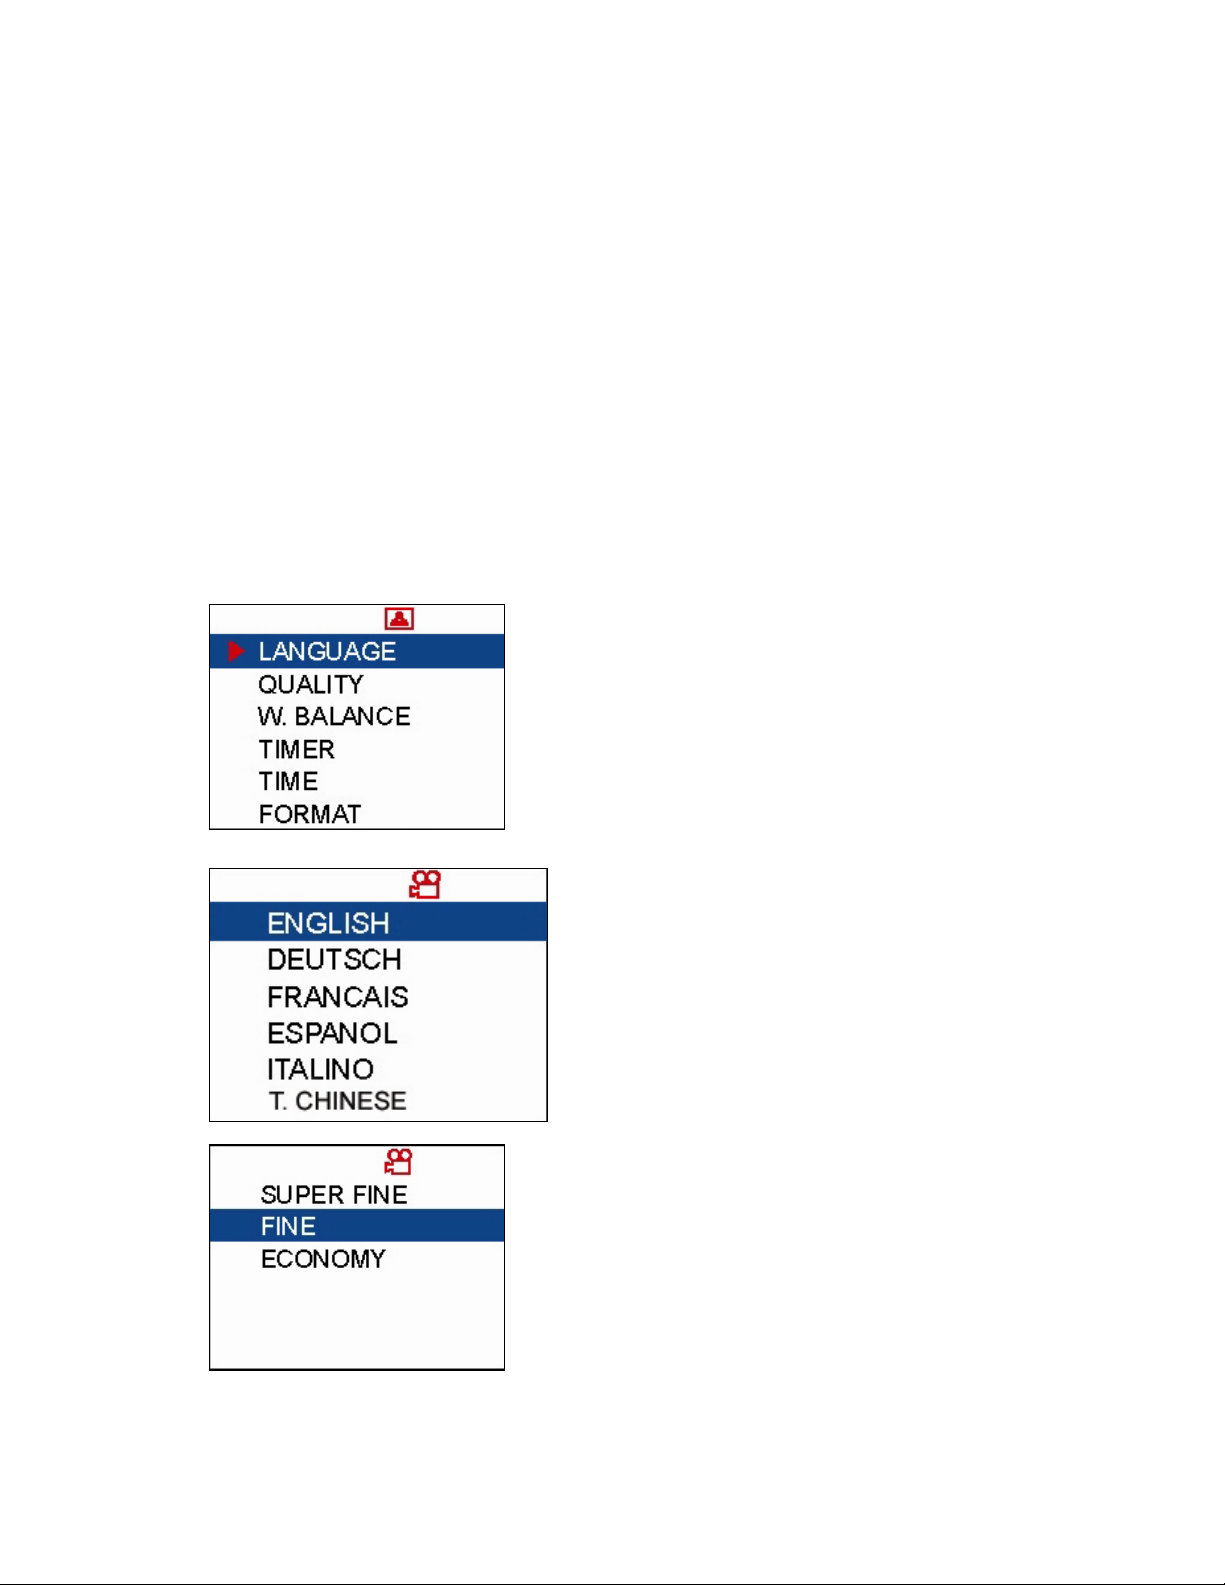
Capture Mode – Audio
You can use the StyleCam DV100 to record voice annotation. From the Capture mode main
menu, use the Navigation up/down buttons to highlight “AUDIO” and press the OK button.
The LCD screen will turn blank with only the camera icons as shown below.
To begin recording, press the Shutter button once. The LCD screen will turn completely black
and the red LED will light (located on the front of the camera above the microphone). Speak
clearly near the microphone during recording.
To stop recording, press the Shutter button again. The time counter will show the amount of
time left to record on the available memory.
Note: The audio will record even if the LCD screen is closed.
Advanced Features
Using 2X Digital Zoom - Video
The StyleCam DV100 allows you to zoom-in on your subject before taking a video so you could
capture the action up-close. Please note that the zoom feature only works on 320x240 and
160x120 resolution mode. Please follow the instructions below to use the 2X digital zoom.
1. Set the video resolution to Fine or Economy mode (320x240, 160x120 respectively).
2. Before pressing the Shutter button to record a video, press the Navigation up button to
zoom-in on your subject, or press the Navigation down button to zoom-out on your
subject.
3. A zoom lever will display on the right side of the LCD screen as you press the
Navigation up/down buttons.
7
Page 11

4. When you’re ready to take a video, press the Shutter button to begin recording.
Using the Self-Timer – Video
The StyleCam DV100 allows you to be in the video using the 10-second self-timer feature. Please
follow the instructions below to use the self-timer.
1. Set the camera to video preview mode.
2. Before pressing the Shutter button to record a video, press the Navigation right button to
bring up the video sub-menu.
3. Use the Navigation up/down buttons to highlight “TIMER” and press the Navigation right
button again.
4. Another sub-menu will appear with ON or OFF. Use the Navigation up/down button to
highlight “ON” and press the OK button. The sub-menu will re-appear.
5. Press the Navigation left button to back out of the sub-menu, and you will be able to
preview the scene through the LCD screen. A self-timer icon will display on the left side
of the LCD screen.
6. Set the camera on a flat surface and press the Shutter button. The red LED will begin to
blink.
7. You have 10 seconds to position yourself before the camera begins to record a video.
Using 2X Digital Zoom – Still Image
The StyleCam DV100 allows you to zoom-in on your subject before taking a picture. Please
follow the instructions below to use the 2X digital zoom.
1. Set the image resolution to your desired quality (superfine, fine, or economy).
2. Before pressing the Shutter button to shoot a picture, press the Navigation up button to
zoom-in on your subject, or press the Navigation down button to zoom-out on your
subject.
3. A zoom lever will display on the right side of the LCD screen as you press the
Navigation up/down buttons.
4. Press the Shutter button to take a picture.
Using the Self-Timer – Still Image
The StyleCam DV100 allows you to be in the photo using the 10-second self-timer feature.
Please follow the instructions below to use the self-timer.
1. Set the camera to still image preview mode.
2. Before pressing the Shutter button to take a picture, press the Navigation right button to
bring up the image sub-menu.
3. Use the Navigation up/down buttons to highlight “TIMER” and press the Navigation right
button again.
4. Another sub-menu will appear with ON or OFF. Use the Navigation up/down button to
highlight “ON” and press the OK button. The sub-menu will re-appear.
8
Page 12
5. Press the Navigation left button to back out of the sub-menu, and you will be able to
preview the scene through LCD screen. A self-timer icon will display on the left side of
the LCD screen.
6. Set the camera on a flat surface and press the Shutter button. The red LED will begin to
blink.
7. You have 10 seconds to position yourself before the camera takes a picture.
Setting the Capture Mode
You can configure the Capture mode to your desired setting to take digital video and digital still
images. The features and setup procedure is similar for both video and still image modes. Please
follow the instructions below to configure your StyleCam DV100 Capture mode.
Note: When you want to exit a current menu at any time, simply press the Navigation left button
to back out of the screens.
From the Capture main menu use the Navigation buttons to highlight either “VIDEO” or “STILL
IMAGE” and then press the OK button. On the next screen, press the Navigation right button,
and the following sub-menu will appear:
The following are the options for video and still
image:
• Language
• Quality
• White balance
• Self-timer
• Time/date
• Format
• Anti-flicker
• Time/date stamp (still image only)
LANGUAGE
From the sub-menu, highlight “LANGUAGE” and
press the Navigation right button. You will see a list
of the available languages.
There are six languages you can choose from:
English, German, French, Spanish, Italian, and
Traditional Chinese. Use the Navigation up/down
buttons to highlight your selection and press the OK
button.
QUALITY
From the sub-menu, highlight “QUALITY” and press
the Navigation right button. You will see a list of the
available resolutions.
Use the Navigation up/down buttons to highlight your
selection and press the OK button.
• Superfine = 640x480
• Fine = 320x240
• Economy = 160x120
9
Page 13
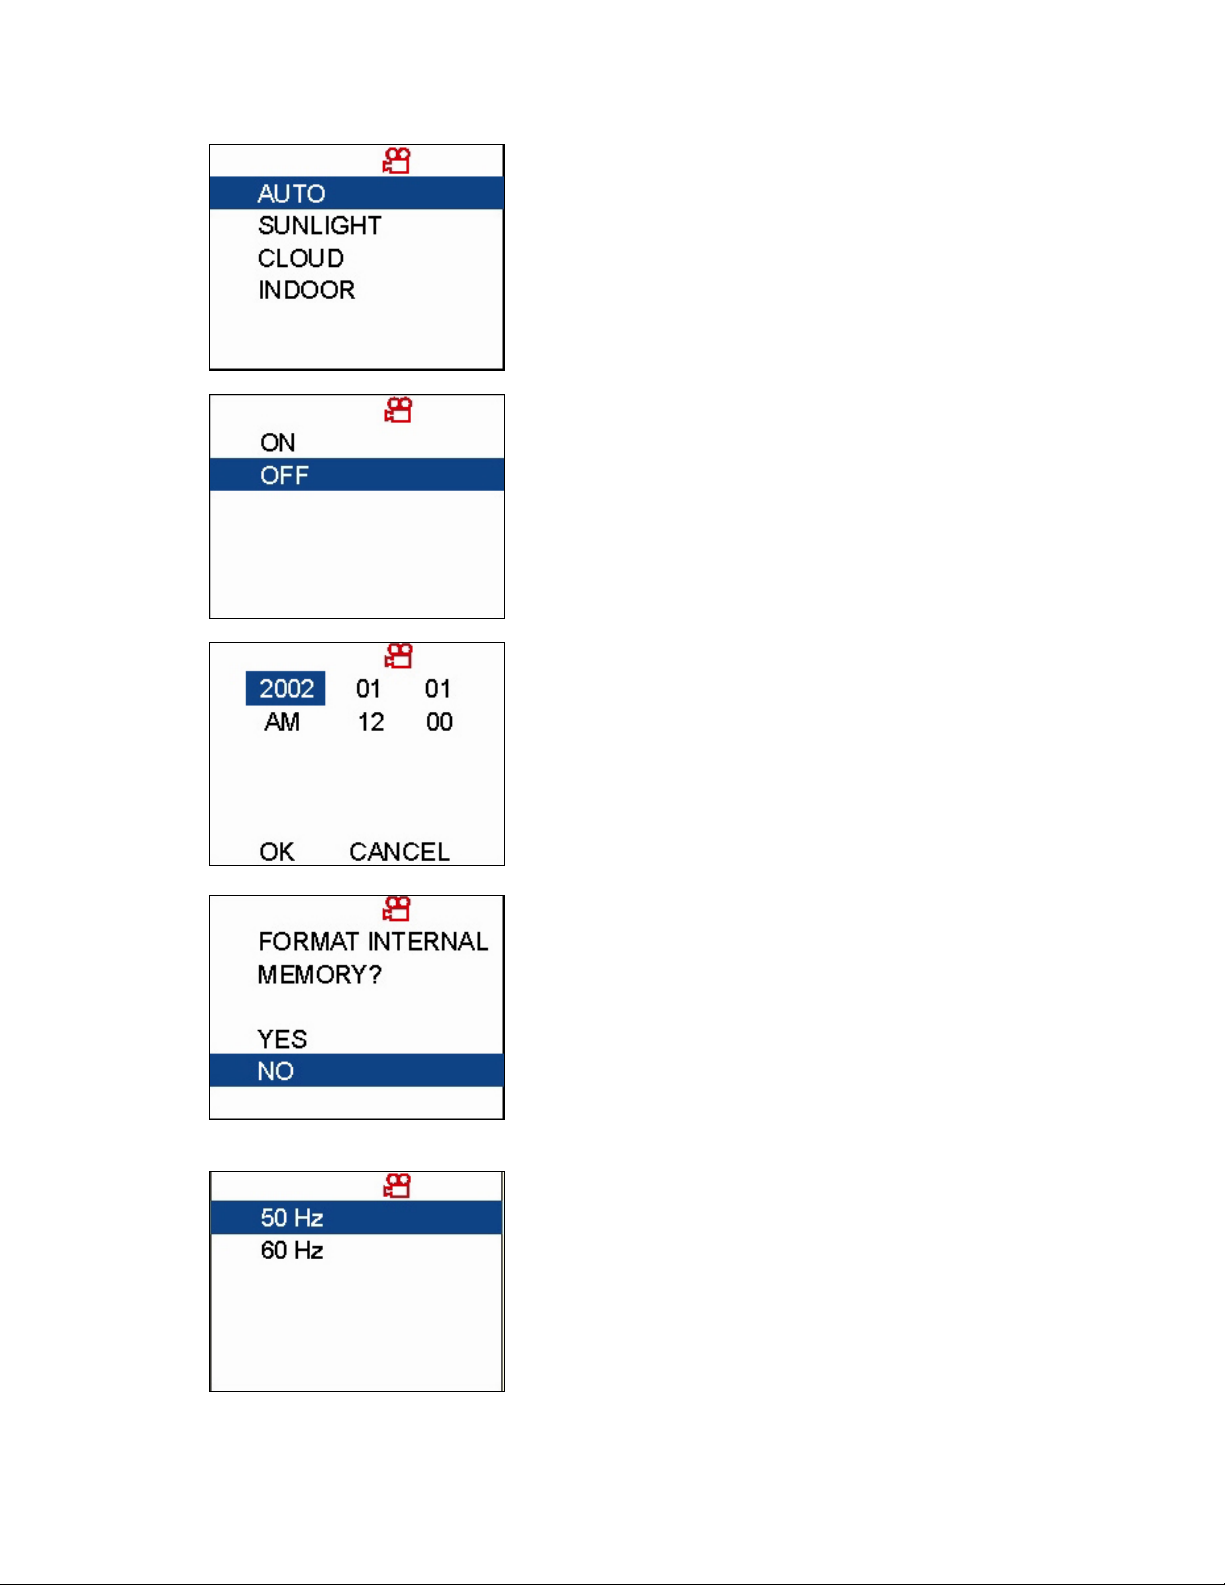
WHITE BALANCE
From the sub-menu, highlight “W. BALANCE” and
press the Navigation right button. You will see a list
of the available white balance options.
Use the Navigation up/down buttons to highlight your
selection and press the OK button.
TIMER
From the sub-menu, highlight “TIMER” and press the
Navigation right button. The screen shown on the left
will appear.
Use the Navigation up/down buttons to highlight your
selection and press the OK button.
TIME
From the sub-menu, highlight “TIME” and press the
Navigation right button. The screen shown on the left
will appear.
Use the Navigation up/down/right/left buttons to scroll
through and modify each value. When you’re done,
scroll to the OK on the bottom and press the OK
button.
FORMAT
From the sub-menu, highlight “FORMAT” and press
the Navigation right button. The screen shown on the
left will appear.
Use the Navigation up/down buttons to highlight YES
or NO, and press the OK button.
Note: If files are saved on both internal memory and
the memory card. The camera will format the card
first. You will need to remove the card before
formatting the internal memory.
ANTI-FLICKER
From the sub-menu, highlight “ANTI-FLICKER” and
press the Navigation right button. The screen shown
on the left will appear.
Use the Navigation up/down/right/left buttons to
highlight your selection and press the OK button.
• 50 Hz – Europe
• 60 Hz – US/CANADA/ASIA
10
Page 14
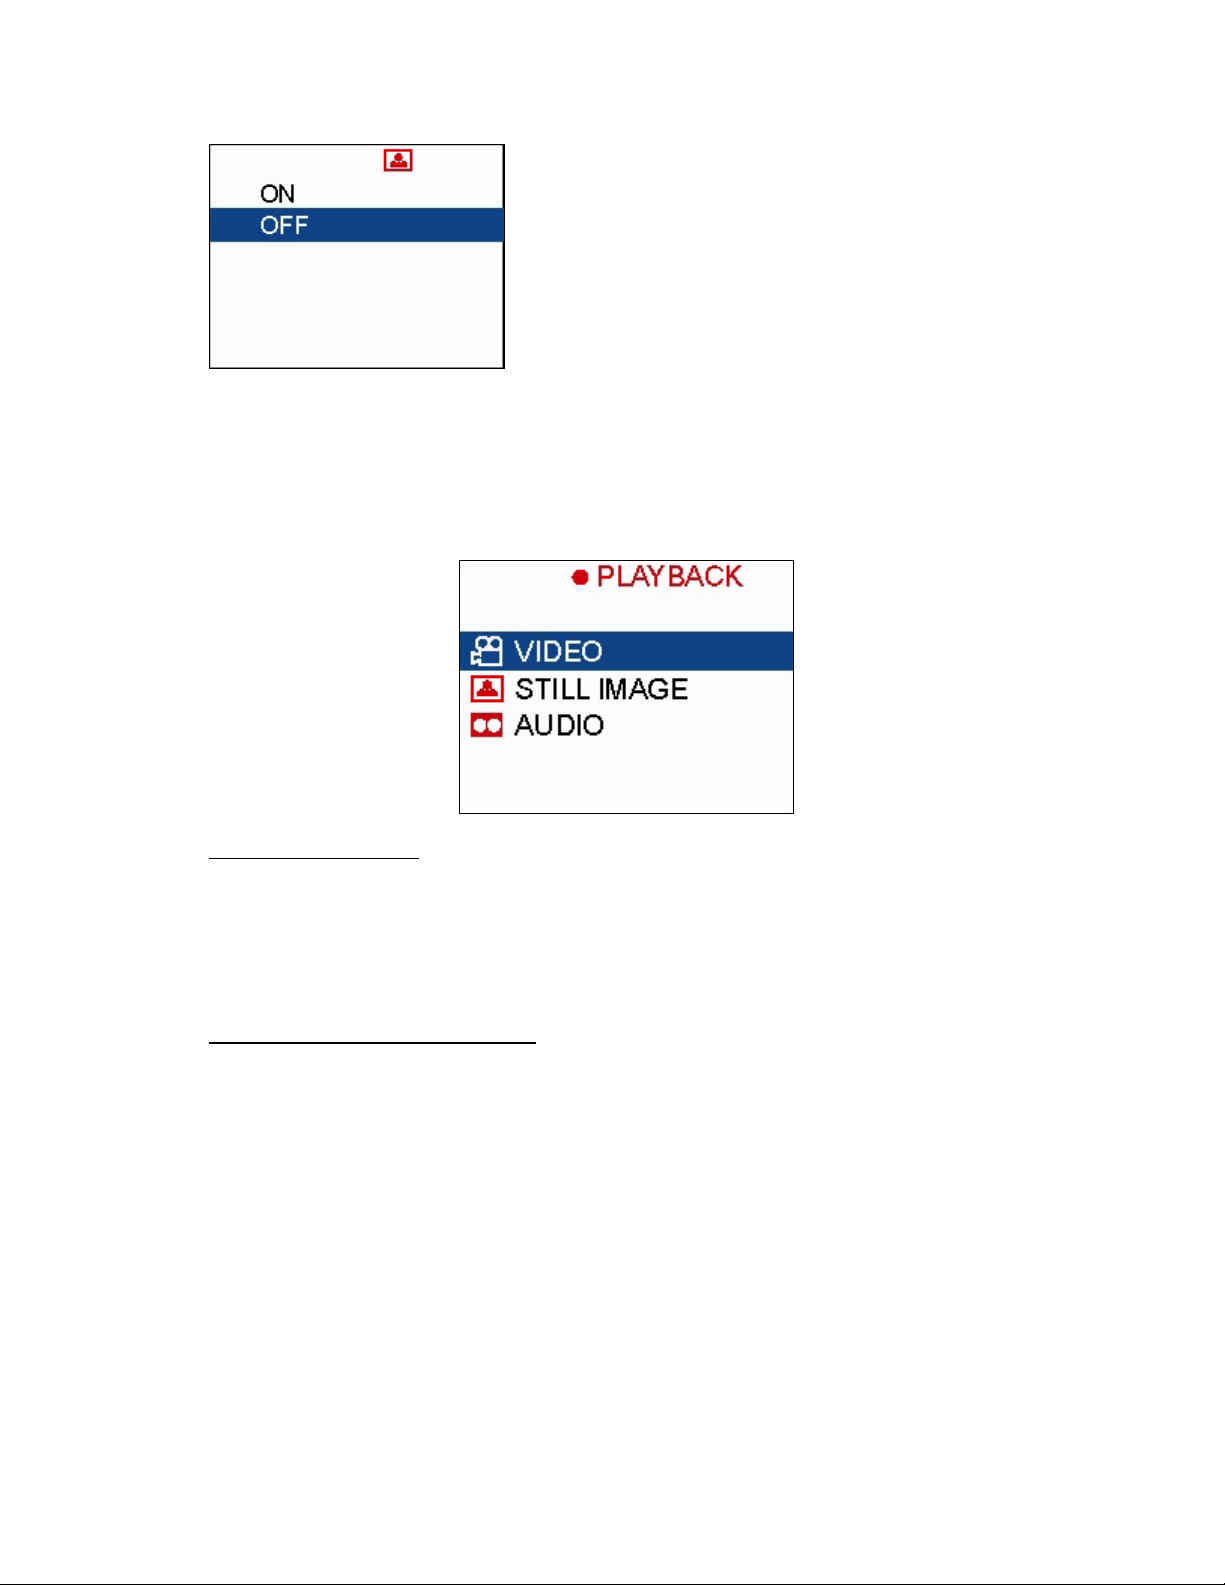
TIME STAMP (For still image only)
From the sub-menu, highlight “TIME STAMP” and
press the Navigation right button. The screen shown
on the left will appear.
Use the Navigation up/down buttons to highlight your
selection and press the OK button.
Reviewing Digital Video, Still Image & Audio Files
The StyleCam DV100 allows you to playback the digital videos, still images, and audio files that
you have recorded. Please follow the instructions below to playback your files.
PLAYBACK MODE – MAIN MENU
Playback Mode – Video
From the Playback main menu use the Navigation up/down buttons to highlight “VIDEO” and
press the OK button.
The last video you took will display on the LCD screen. Press the OK button to play this video
on the LCD. Or use the Navigation up/down buttons to select previous videos and playback
Playback Video – Sub-Menu Options
The Playback video sub-menu offers the following features:
• Erase
• Lock
• TV Output
ERASE
This feature allows you to delete digital video(s) from the internal memory or the memory card
used. From the sub-menu, use the Navigation up/down buttons to highlight “ERASE” and
press the Navigation right button.
Another screen will appear with two options: Erase THIS or Erase ALL.
• To erase the CURRENT video showing on the LCD screen, highlight “THIS” press the
OK button, and the video will be deleted.
• To erase ALL of the videos saved on the memory, highlight “ALL” and press the OK
button. The camera will prompt you to confirm this selection. Highlight “YES” or “NO”
and press the OK button.
11
Page 15
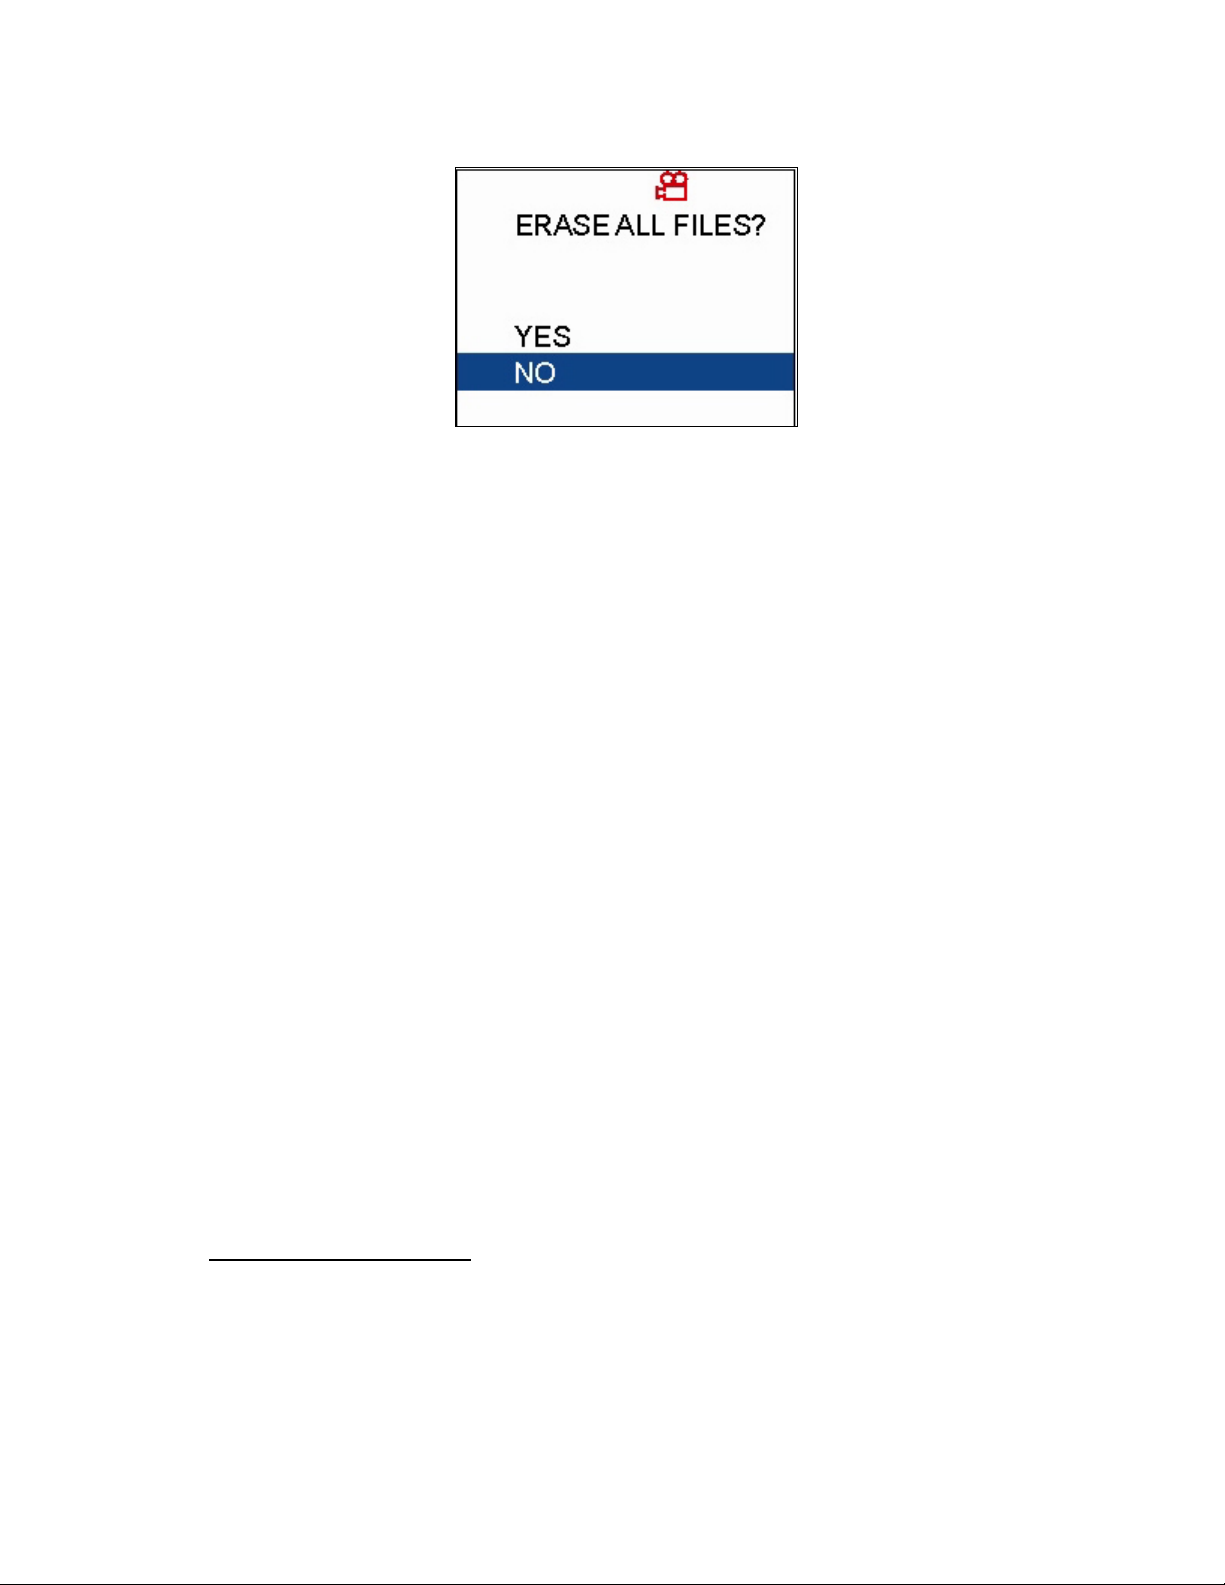
Note: You cannot retrieve a video once you have deleted it.
LOCK
This feature allows you to lock the digital videos, still images, or audio files so that you will not
erase the files accidentally. From the sub-menu use the Navigation up/down buttons to
highlight “LOCK” and press the Navigation right button.
You will see two options: lock THIS or lock ALL.
• To lock the CURRENT video displaying on the LCD screen, highlight “THIS” and
press the OK button. You will see a “lock” icon appear on the top of the screen.
• To lock ALL of the digital videos, highlight “ALL” and press the OK button.
• To unlock the digital video(s), highlight “THIS” or “ALL” again and press the OK
button. The “lock” icon will disappear.
Note: once you locked a video, you cannot delete it.
TV OUTPUT
This feature allows you to view your digital video on a TV set. From the sub-menu use the
Navigation up/down buttons to highlight “TV OUTPUT” and press the Navigation right button.
You will see two options: NTSC or PAL
• NTSC – US/CANADA
• PAL – EUROPE
Use the Navigation up/down buttons to highlight “NTSC” or “PAL” according to your region
and press the OK button.
Note: You need to connect the StyleCam DV100 to the TV with the supplied AV cable before
you can view your files on the TV. Please refer to “Making Connections” for detailed
instructions.
Playback Mode – Still Images
From the Playback main menu use the Navigation up/down buttons to highlight “STILL
IMAGE” and press the OK button.
The last photo you took will display on the LCD screen. Press Navigation up/down buttons to
scroll through the pictures you took. Or press the Navigation right button to bring up the
Playback mode still image sub-menu.
12
Page 16
Playback Still Image – Sub-Menu Options
The Playback still image sub-menu offers the following features:
• Magnify
• Erase
• Lock
• Slideshow
• TV Output
• DPOF (only when a memory card is used)
MAGNIFY
This feature allows you to zoom in on your picture when playback on the LCD screen. To
magnify an image, use the Navigation up/down buttons to highlight “MAGNIFY” and press the
Navigation right button.
The image will zoom in on your LCD screen; use the Navigation buttons to view different
areas of your picture.
To back out of the Magnify screen, press the OK button
ERASE
This feature allows you to delete digital image(s) from the internal memory or the memory card
used. From the sub-menu, use the Navigation up/down buttons to highlight “ERASE” and
press the Navigation right button.
Another screen will appear with two options: Erase THIS or Erase ALL.
• To erase the CURRENT image showing on the LCD screen, highlight “THIS” press
the OK button, and the image will be deleted.
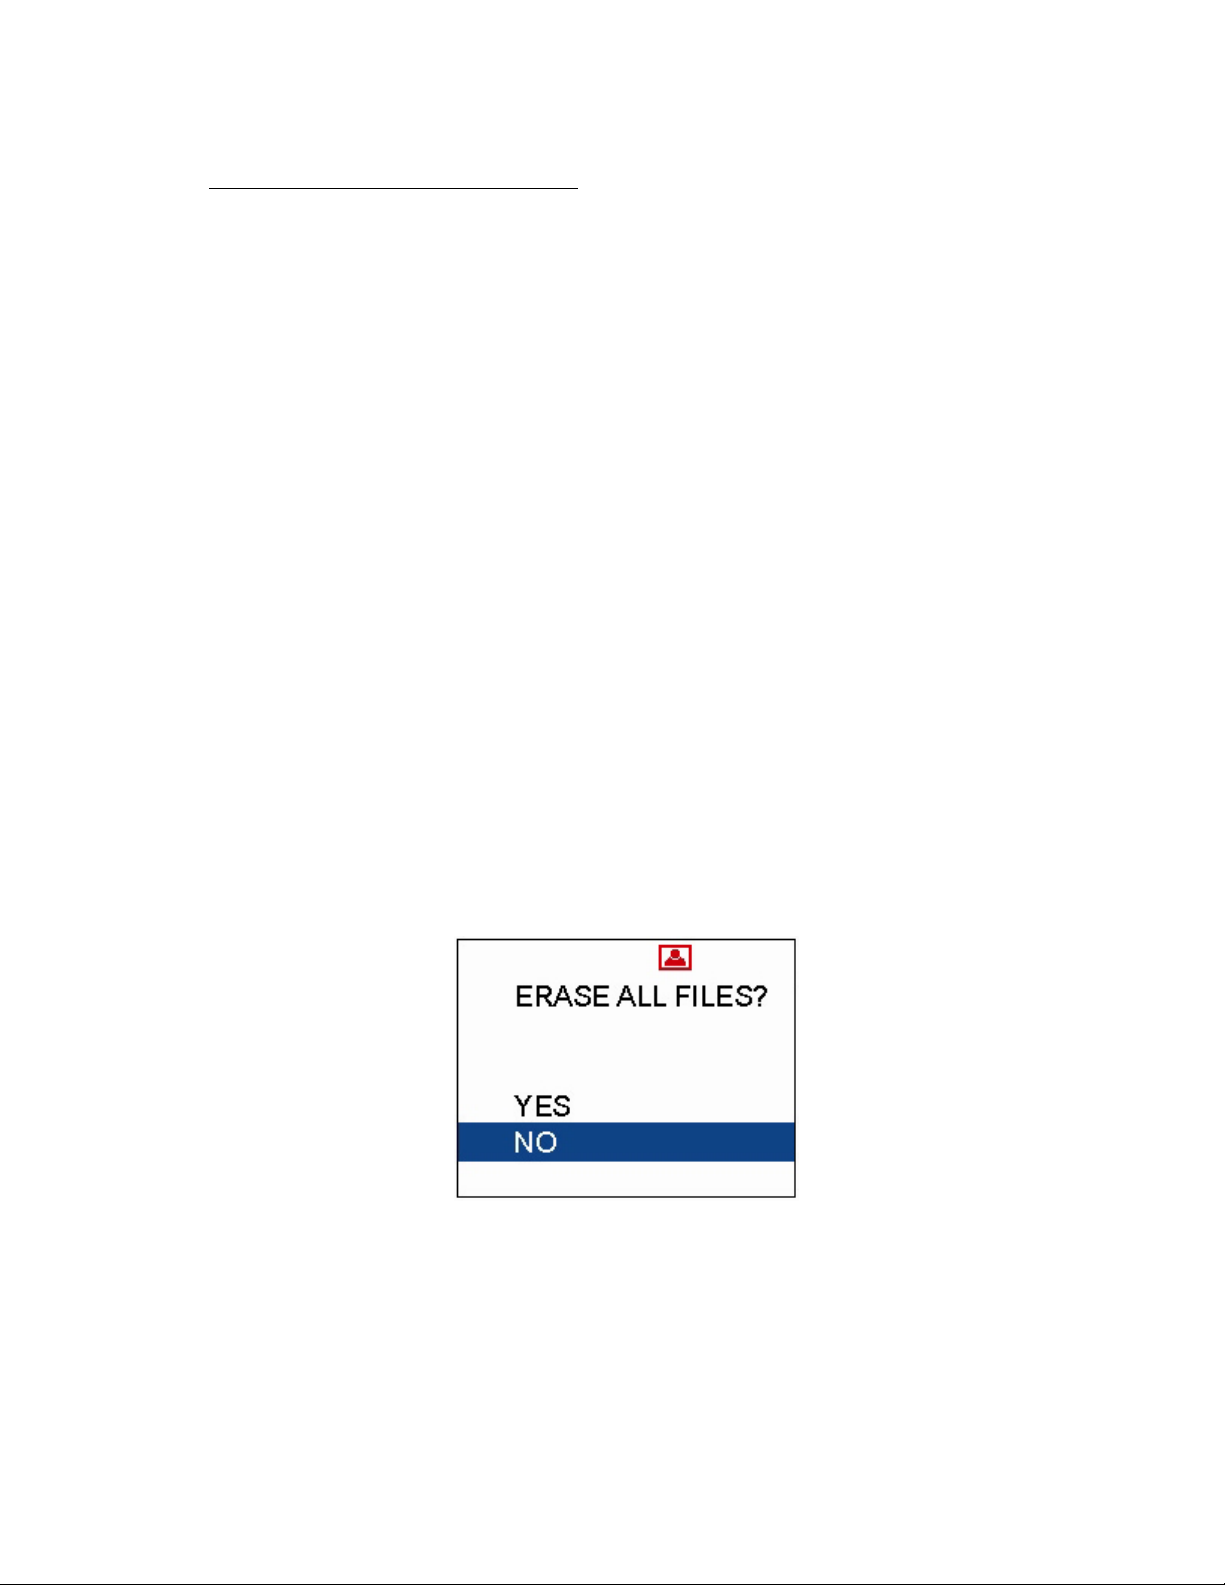
• To erase ALL of the images saved on the memory, highlight “ALL” and press the OK
button. The camera will prompt you to confirm this selection. Highlight “YES” or “NO”
and press the OK button.
Note: You cannot retrieve an image once you have deleted it.
LOCK
This feature allows you to protect your still image(s) against accidental erase. From the submenu use the Navigation up/down buttons to highlight “LOCK” and press the Navigation right
button.
You will see two options: lock THIS or lock ALL.
13
Page 17
• To lock the CURRENT image displaying on the LCD screen, highlight “THIS” and
press the OK button. The “lock” icon will appear on the top of the LCD screen.
• To lock ALL of the images, highlight “ALL” and press the OK button.
• To unlock the image(s), highlight “THIS” or “ALL” again and press the OK button. The
“lock” icon will disappear from the LCD screen.
Note: once you locked an image, you cannot delete it.
SLIDESHOW
This feature allows you to run a slideshow of the pictures you took with the StyleCam DV100
camera. From the still image sub-menu use the Navigation up/down buttons to highlight
“SLIDESHOW” and press the Navigation right button.
The option “ON” should be highlighted, and then press the OK button to run a slideshow.
To end a slideshow, press the OK button and the screen will go back to the sub-menu. Press
the Navigation left button to exit the sub-menu.
TV OUTPUT
This feature allows you to view your still images on a TV set. From the sub-menu use the
Navigation up/down buttons to highlight “TV OUTPUT” and press the Navigation right button.
You will see two options: NTSC or PAL
• NTSC – US/CANADA
• PAL – EUROPE
Use the Navigation up/down buttons to highlight “NTSC” or “PAL” according to your region
and press the OK button.
Note: You need to connect the StyleCam DV100 to the TV with the supplied AV cable before
you can view your files on the TV. Please refer to “Making Connections” for detailed
instructions.
DPOF (Digital Print Order Format)
This feature allows you to program the number of copies you want to print your pictures to an
external printer. From the sub-menu use the Navigation up/down buttons to highlight “DPOF”
and press the Navigation right button.
You will see three options: THIS, ALL, or RESET
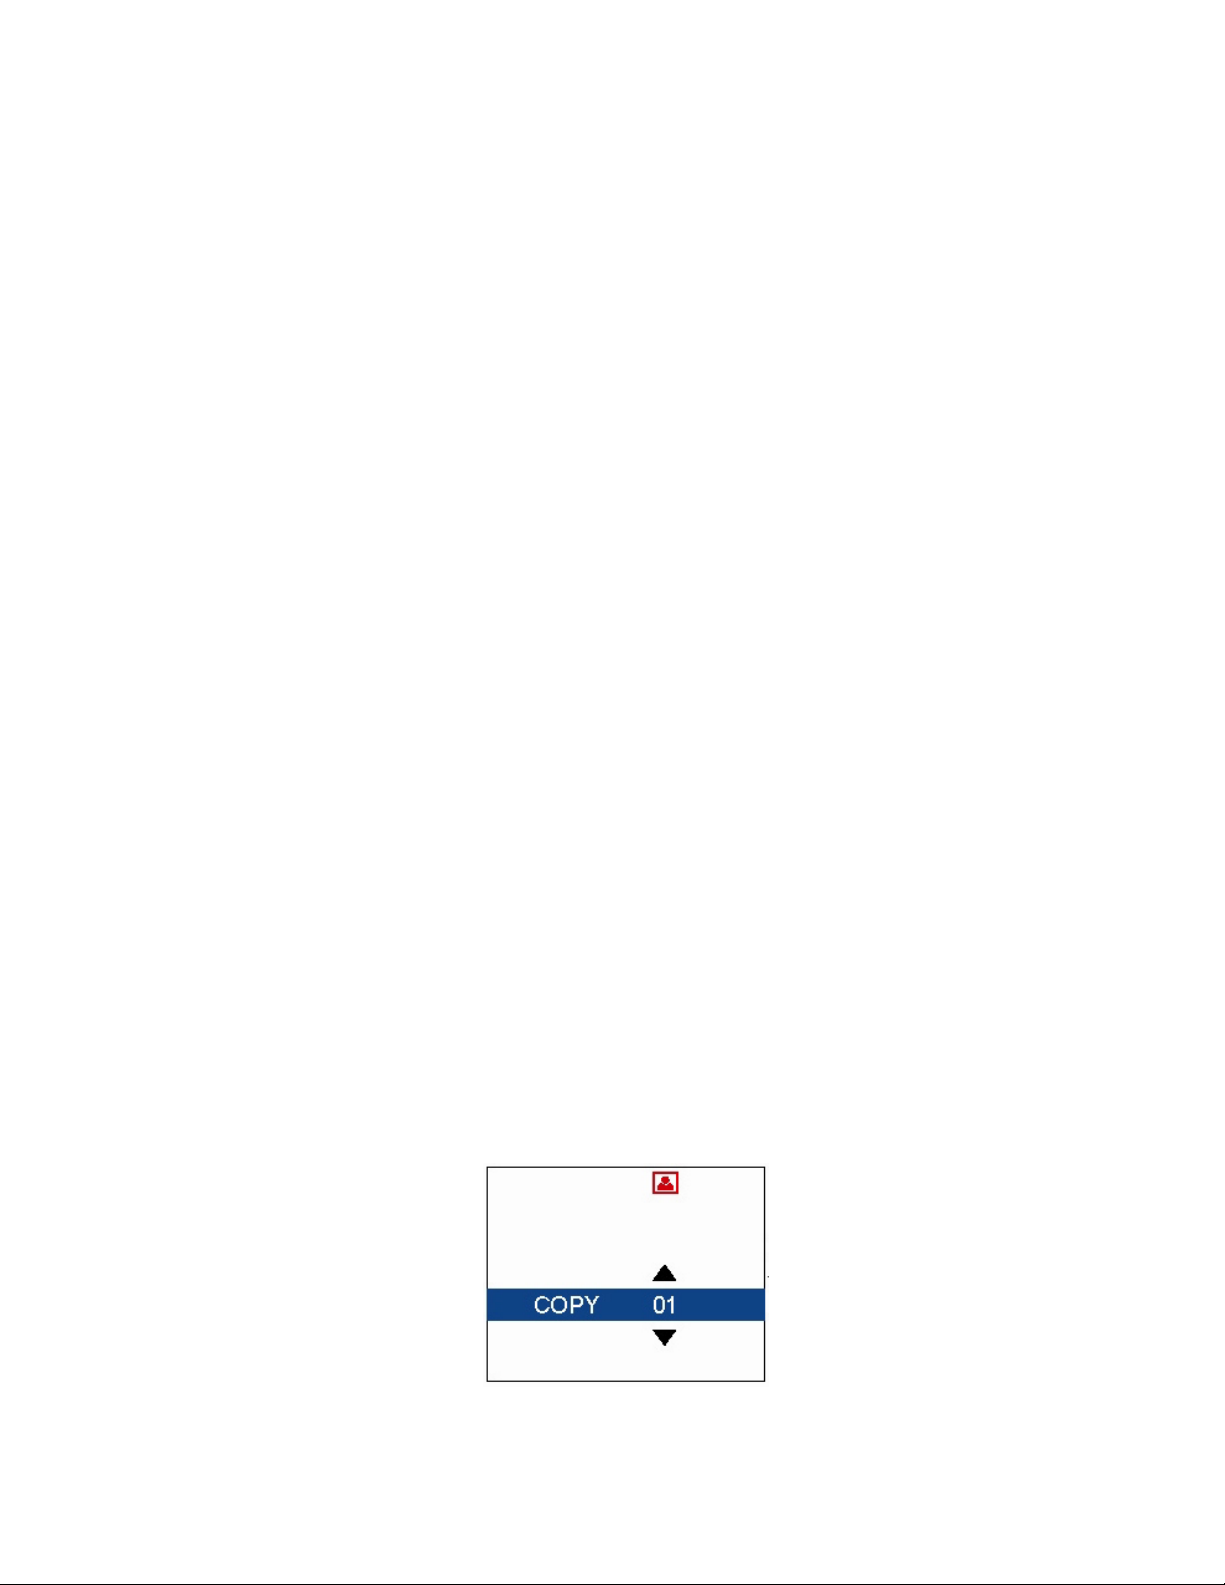
• To set the DPOF on the current image showing on the LCD screen – Use the
Navigation up/down button to highlight “THIS” and press the Navigation right button.
From the next screen (shown below) use the Navigation up/down buttons to indicate
how many copies of the image you want to print and press the OK button.
• To set the DPOF on all of the images saved on the memory – Use the Navigation
up/down button to highlight “ALL” and press the Navigation right button. From the next
14
Page 18
screen (shown below) use the Navigation up/down buttons to indicate how many
copies of the image you want to print and press the OK button.
• To reset any previous DPOF programs – Use the Navigation up/down buttons to
highlight “RESET” and press the OK button.
Note: DPOF will only work when you have a memory card inserted in the StyleCam DV100.
The DPOF will not function with internal memory.
THUMBNAILS
You can review the pictures you have taken in thumbnail format. Simply press the Display
button from the control panel of your camera and the images will display in thumbnails. Press
the OK button to exit the thumbnail screen.
Playback Mode – Audio Files
From the Playback main menu use the Navigation up/down buttons to highlight “AUDIO” and
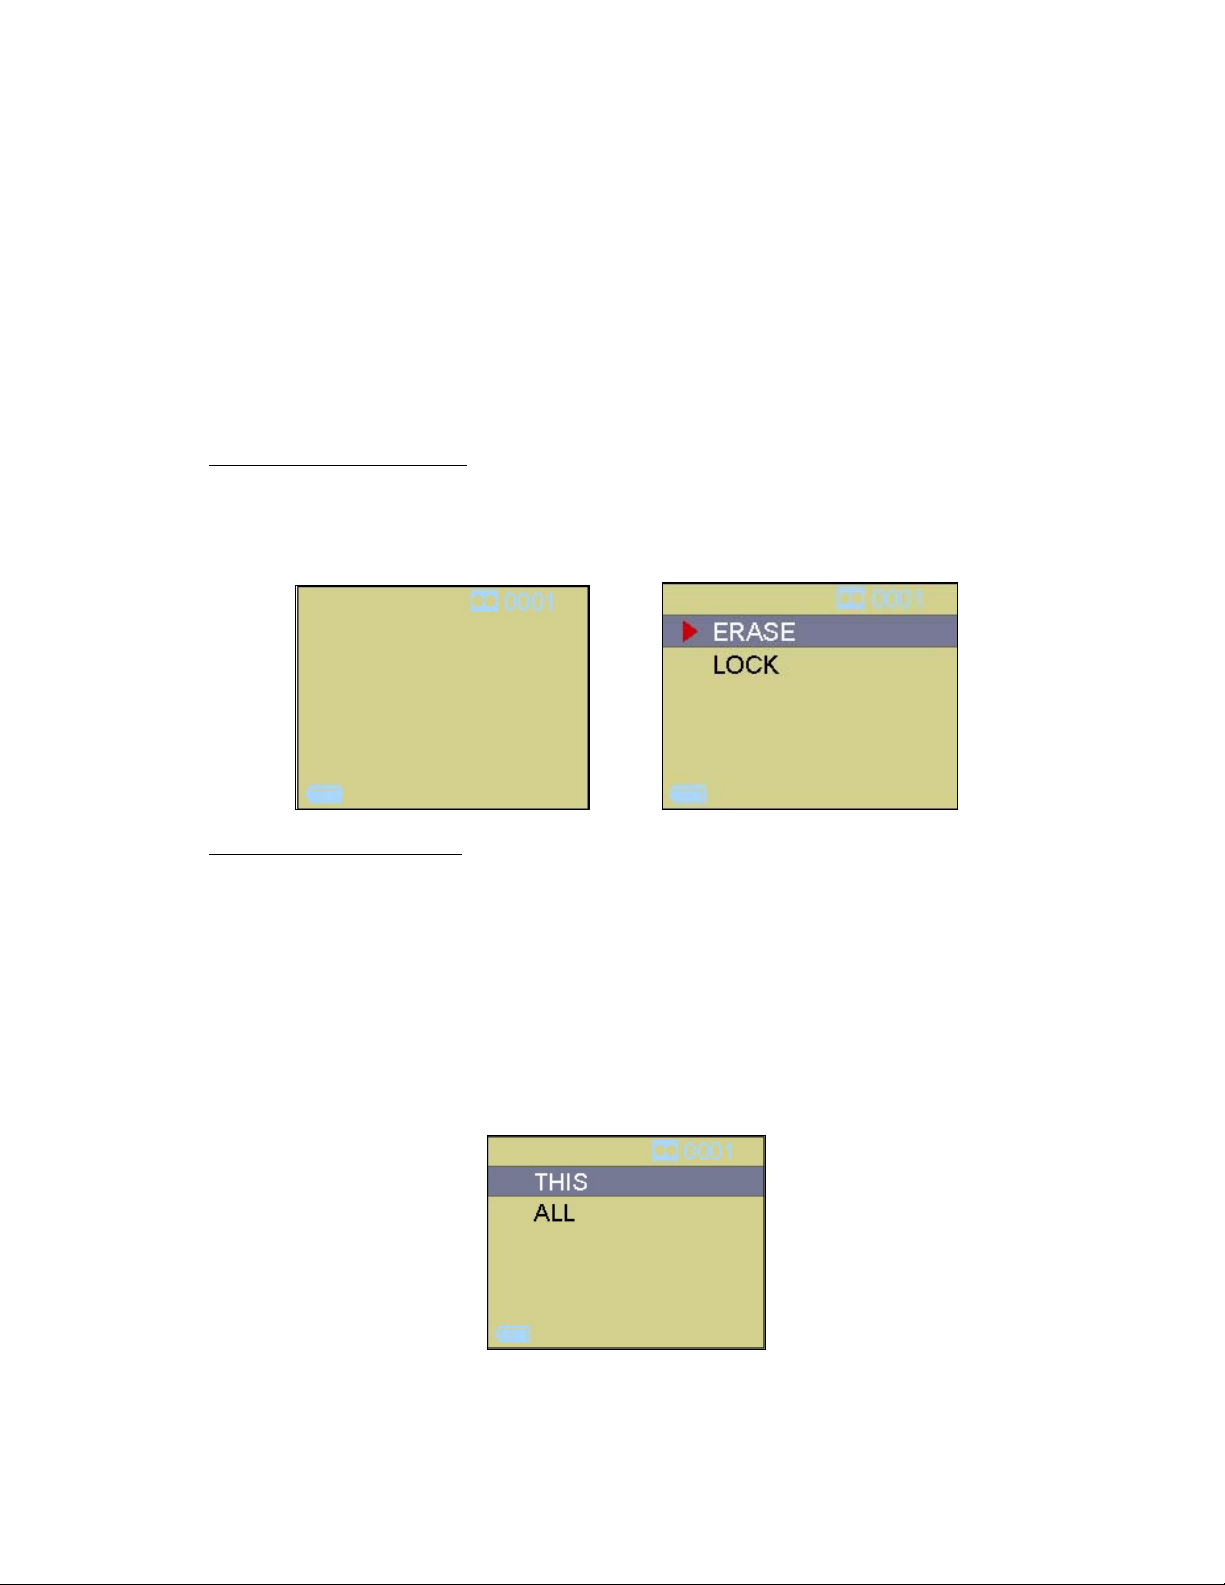
press the OK button. A blank screen will appear (shown below on the left), press the
Navigation right button to bring up the audio sub-menu (shown below on the right).
Playback Audio – Sub-Menu
The Playback audio sub-menu offers the following features:
• Erase
• Lock
ERASE
This feature allows you to delete audio file(s) from the internal memory or the memory card
used. From the audio sub-menu, use the Navigation up/down buttons to highlight “ERASE”
and press the Navigation right button.
Another screen will appear with two options: Erase THIS or Erase ALL.
• To erase the CURRENT audio file, highlight “THIS” press the OK button, and the
audio file will be deleted.
15
Page 19
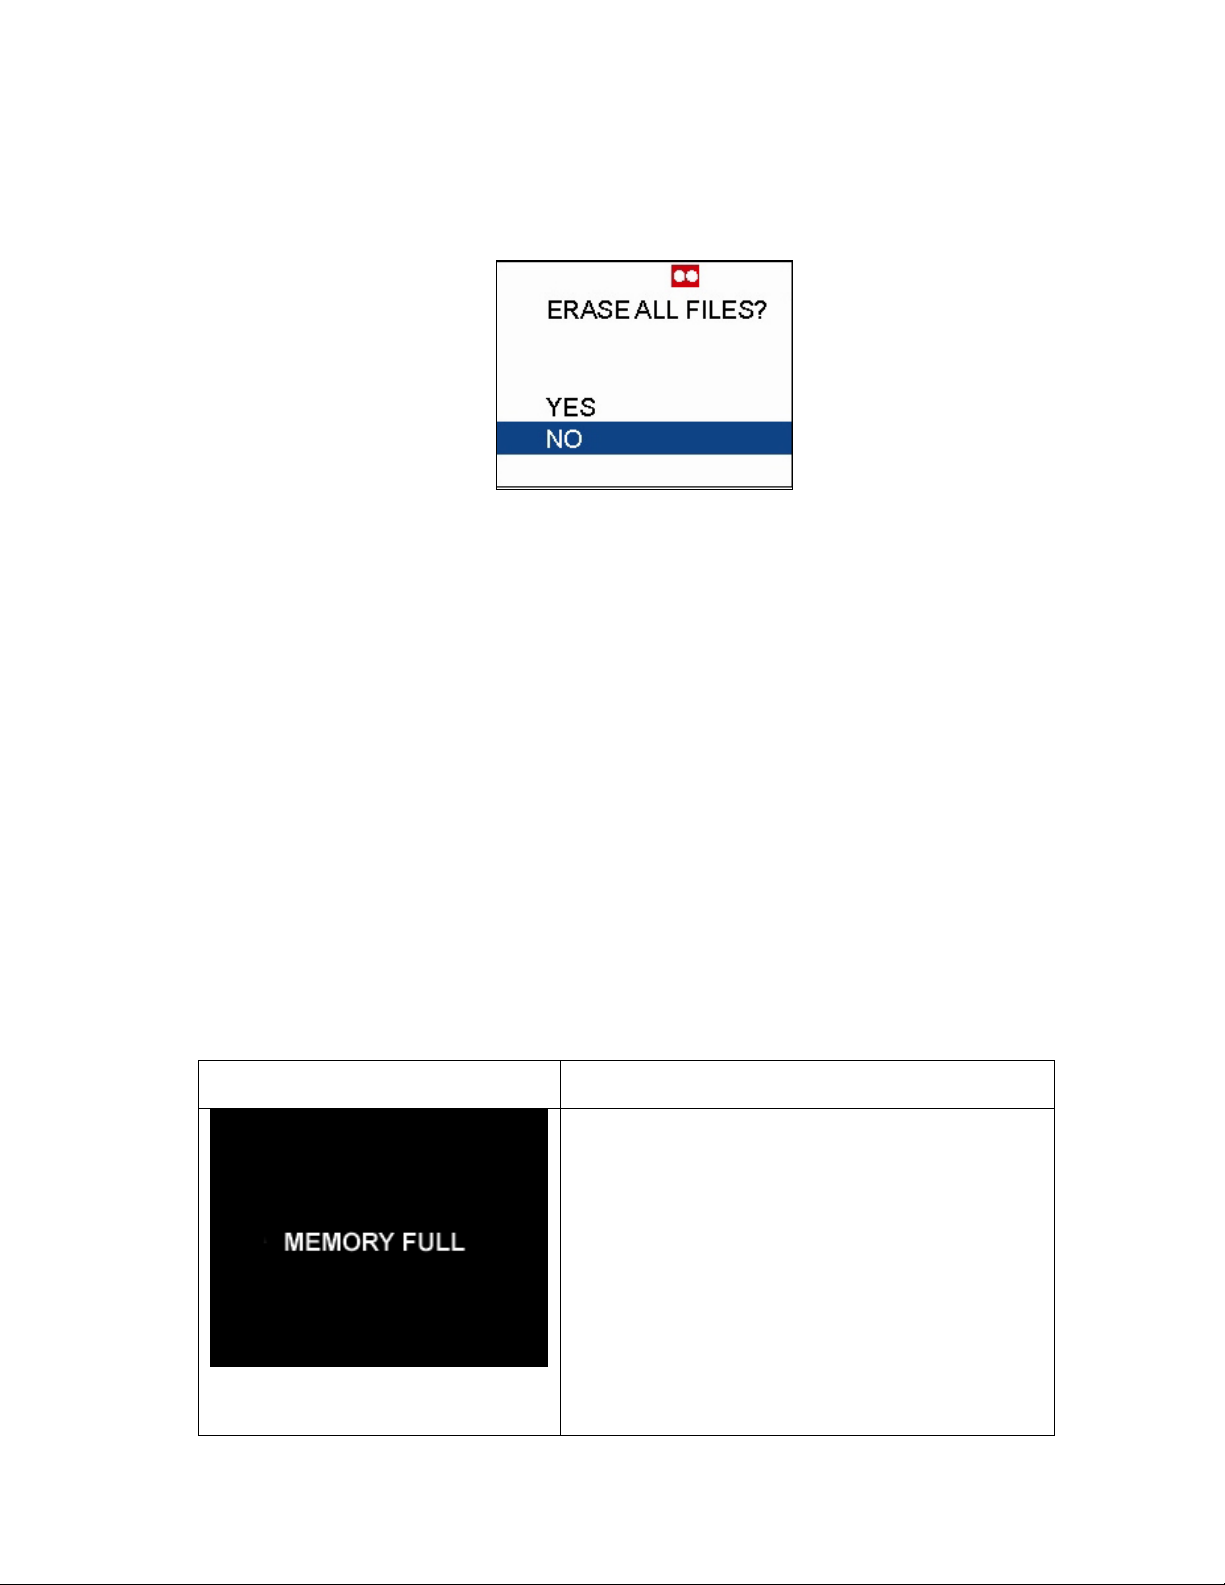
• To erase ALL of the audio files saved on the memory, highlight “ALL” and press the
OK button. The camera will prompt you to confirm this selection. Highlight “YES” or
“NO” and press the OK button.
Note: You cannot retrieve an audio file once you have deleted it.
LOCK
This feature allows you to protect your audio file(s) against accidentally being erased. From
the audio sub-menu use the Navigation up/down buttons to highlight “LOCK” and press the
Navigation right button.
You will see two options: lock THIS or lock ALL.
• To lock the CURRENT audio file, highlight “THIS” and press the OK button.
• To lock ALL of the audio files, highlight “ALL” and press the OK button.
• To unlock the audio file(s), highlight “THIS” or “ALL” again and press the OK button.
Note: once you lock an audio file, you cannot delete it.
Identifying Error Messages
The StyleCam DV100 camera will display an error message if an operation is inaccessible. The
chart below illustrates these error messages that you may run into while using the StyleCam
DV100.
Error Messages
Explanations
If the internal memory or the memory card that you’re
using is full, and you’re trying to take more digital
videos, still images or audio, then this error message
will appear to warn you that there is no more memory
for storage.
Please delete some of the files or insert another
memory card.
The error message will appear under the following
Capture modes:
• Video
• Still image
• Audio
16
Page 20
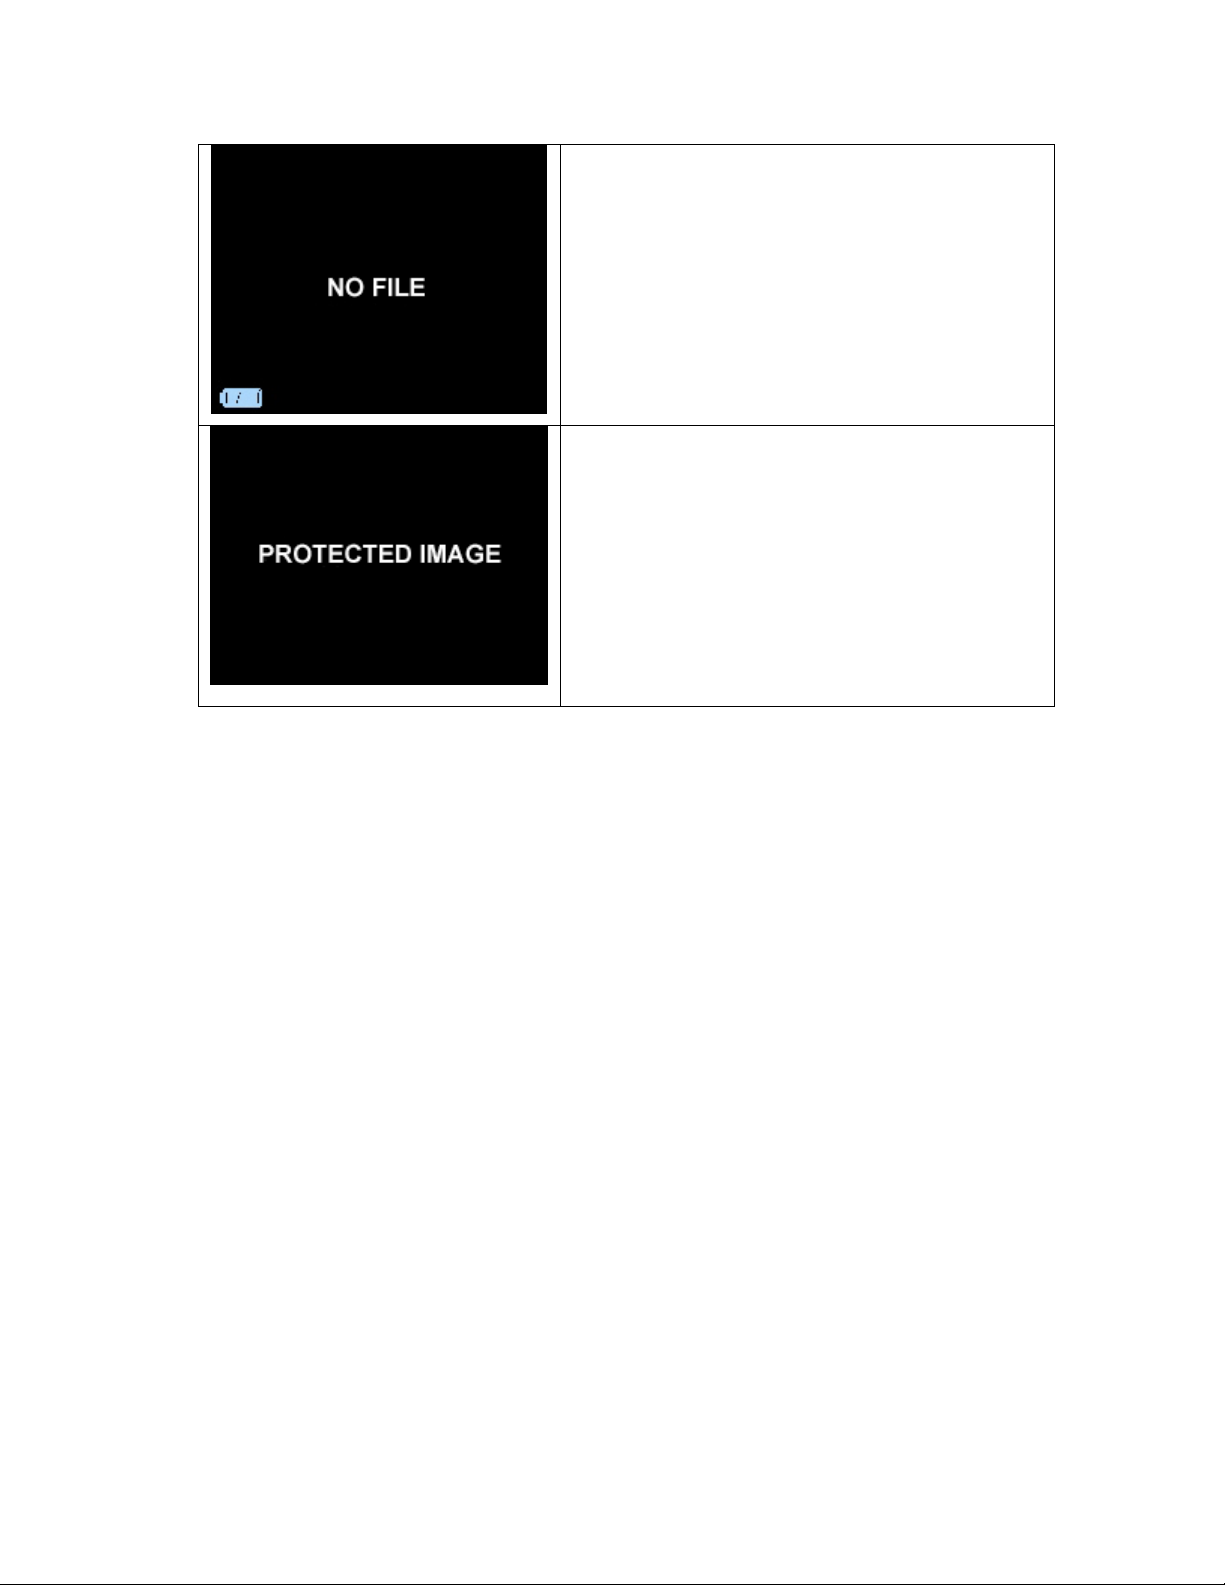
If no video, still image, or audio is taken with the
StyleCam DV100 and you’re trying to playback one
of the files, then this error message will appear.
This error message will appear under the following
Playback modes:
• Video
• Still image
• Audio
If a video, still image, or audio file is locked and
you’re trying to erase this file, then this error
message will appear to warn you that the file is
protected.
The error message will appear under the following
Playback modes:
• Video
• Still image
• Audio
17
Page 21
Software Installation
Software Overview and Features
The StyleCam DV100 includes the camera driver that provides fast and easy video and image
download. Also included are ArcSoft PhotoImpression and VideoImpression software. With these
programs you can edit, retouch, and enhance your video clips and still images with ease. Adobe
Acrobat Reader allows you to view the Owner’s Manual in PDF format.
StyleCam DV100 Driver
• Provides easy and fast downloads
• Installs Owner’s Manual automatically on your computer
ArcSoft PhotoImpression 4.0
• Provides easy-to-use and powerful tools for photo editing and image enhancing
• Includes templates to create calendars and greeting cards
• Features step-by-step instructions to create exciting panoramas
ArcSoft VideoImpression 1.7
• Provides easy-to-use tools for video editing and organization
• Offers tools to edit and combine video files, create new movies from other video,
animation, and image files
• Features cool transitions to add to your video clips
• Supports dual soundtrack to enables you to provide narration and background music
Adobe Acrobat Reader 5.05
• Open and review the StyleCam DV100 Owner’s Manual in PDF
Installing the Software
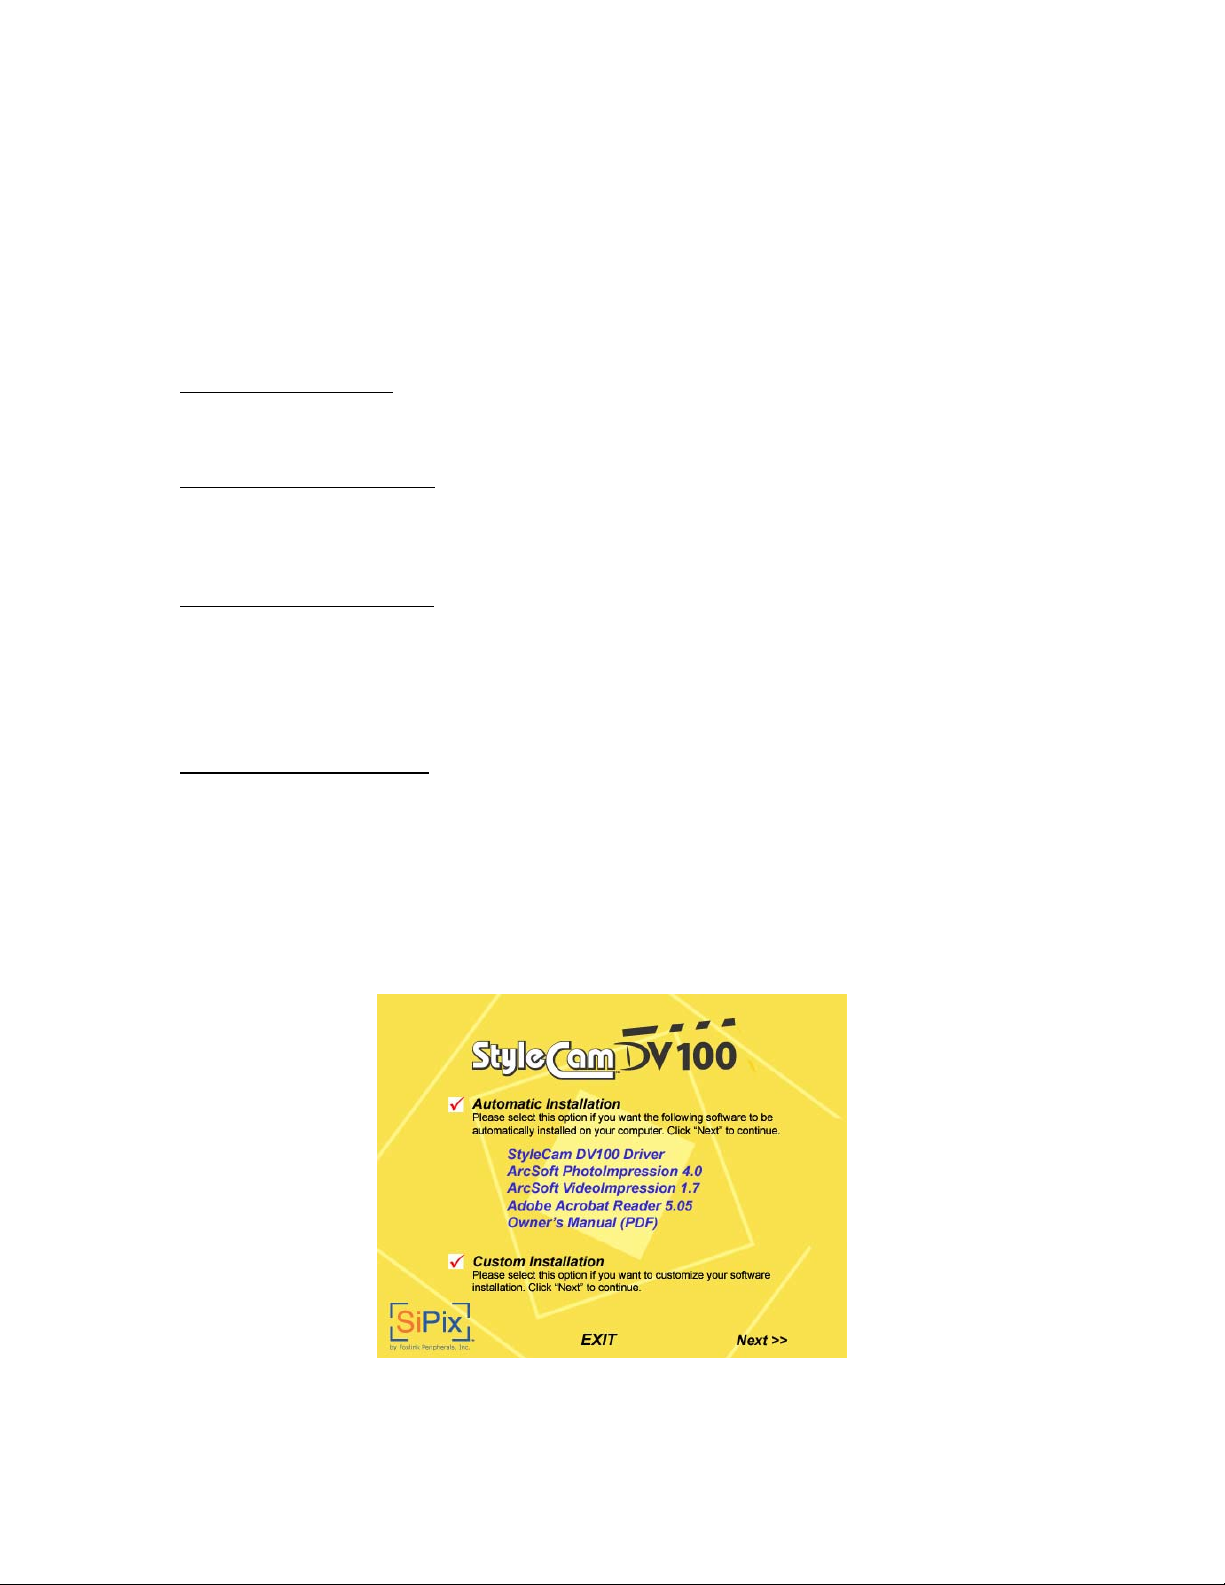
Insert the supplied CD software into your computer’s CD-ROM drive. The CD should auto run. If
the CD does not auto run, go to Start → Run and type in “d:\setup.exe” (where D:\ is your CD-
ROM drive). The StyleCam DV100 Installer Menu will appear as shown below.
18
Page 22
You have two options: “Automatic Installation” and “Custom Installation”. We recommend you
choose Automatic Installation. Please check your choice and click “Next” to continue the
installation of your software.
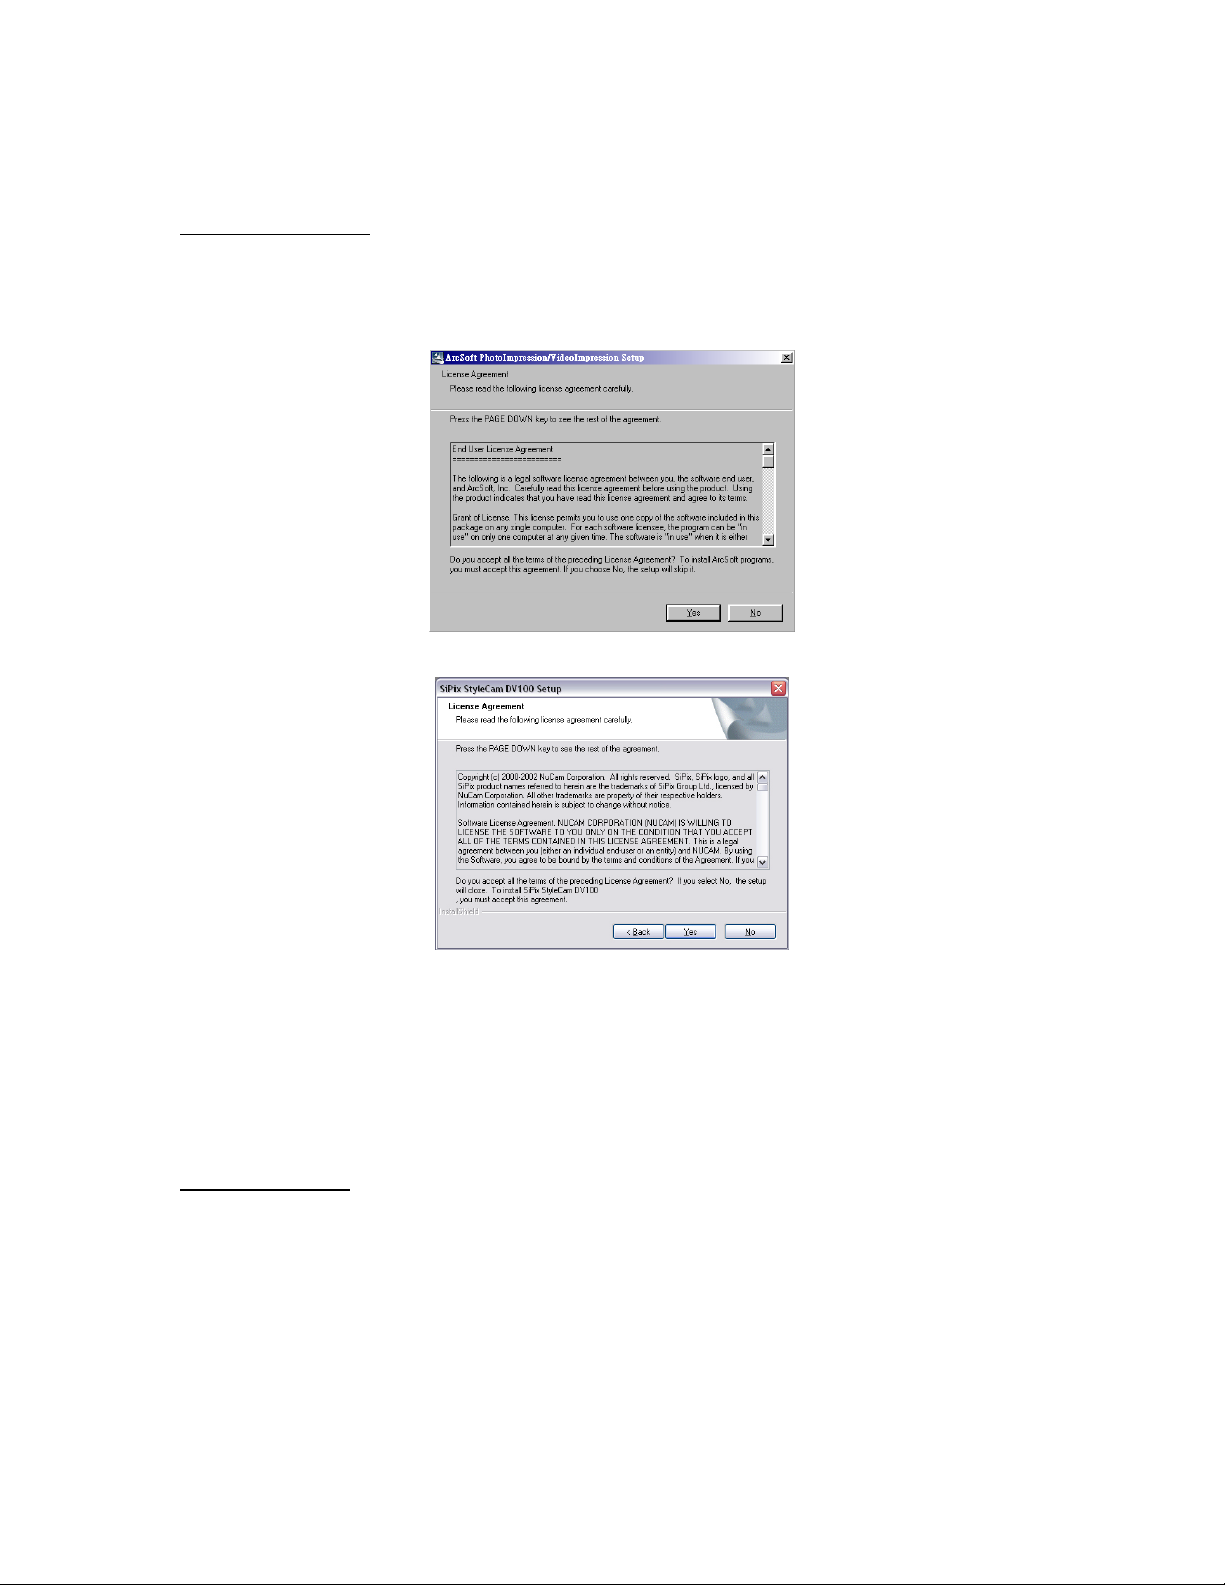
Automatic Installation
The automatic installation will install all the software on the CD to your computer. You will be
prompted to accept a license agreement with the third party software company and with SiPix at
the beginning of the installation. Please check “Yes” to continue the installation of your software.
ArcSoft License Agreement
SiPix License Agreement
1. At the end of the installation process, the computer will prompt you to restart your system.
Please save and close all running programs to prevent any loss of data. Select “Yes, I
want to restart my computer now.” and click “OK” to finish the installation of your software.
After restarting your computer, the driver will automatically install the Acrobat Reader
program. (Note: Please keep the CD inside your CD-ROM drive after restarting the
computer. You may remove the CD after all applications successfully install on your
computer.)
Custom Installation
The custom installation allows you to select the individual applications provided on the CD to
install to your computer. Please note that you must install the StyleCam DV100 Driver in order to
use the camera as a PC-camera to record digital video.
From the previous Installer Menu if you selected “Custom Installation” the following screen will
appear:
19
Page 23
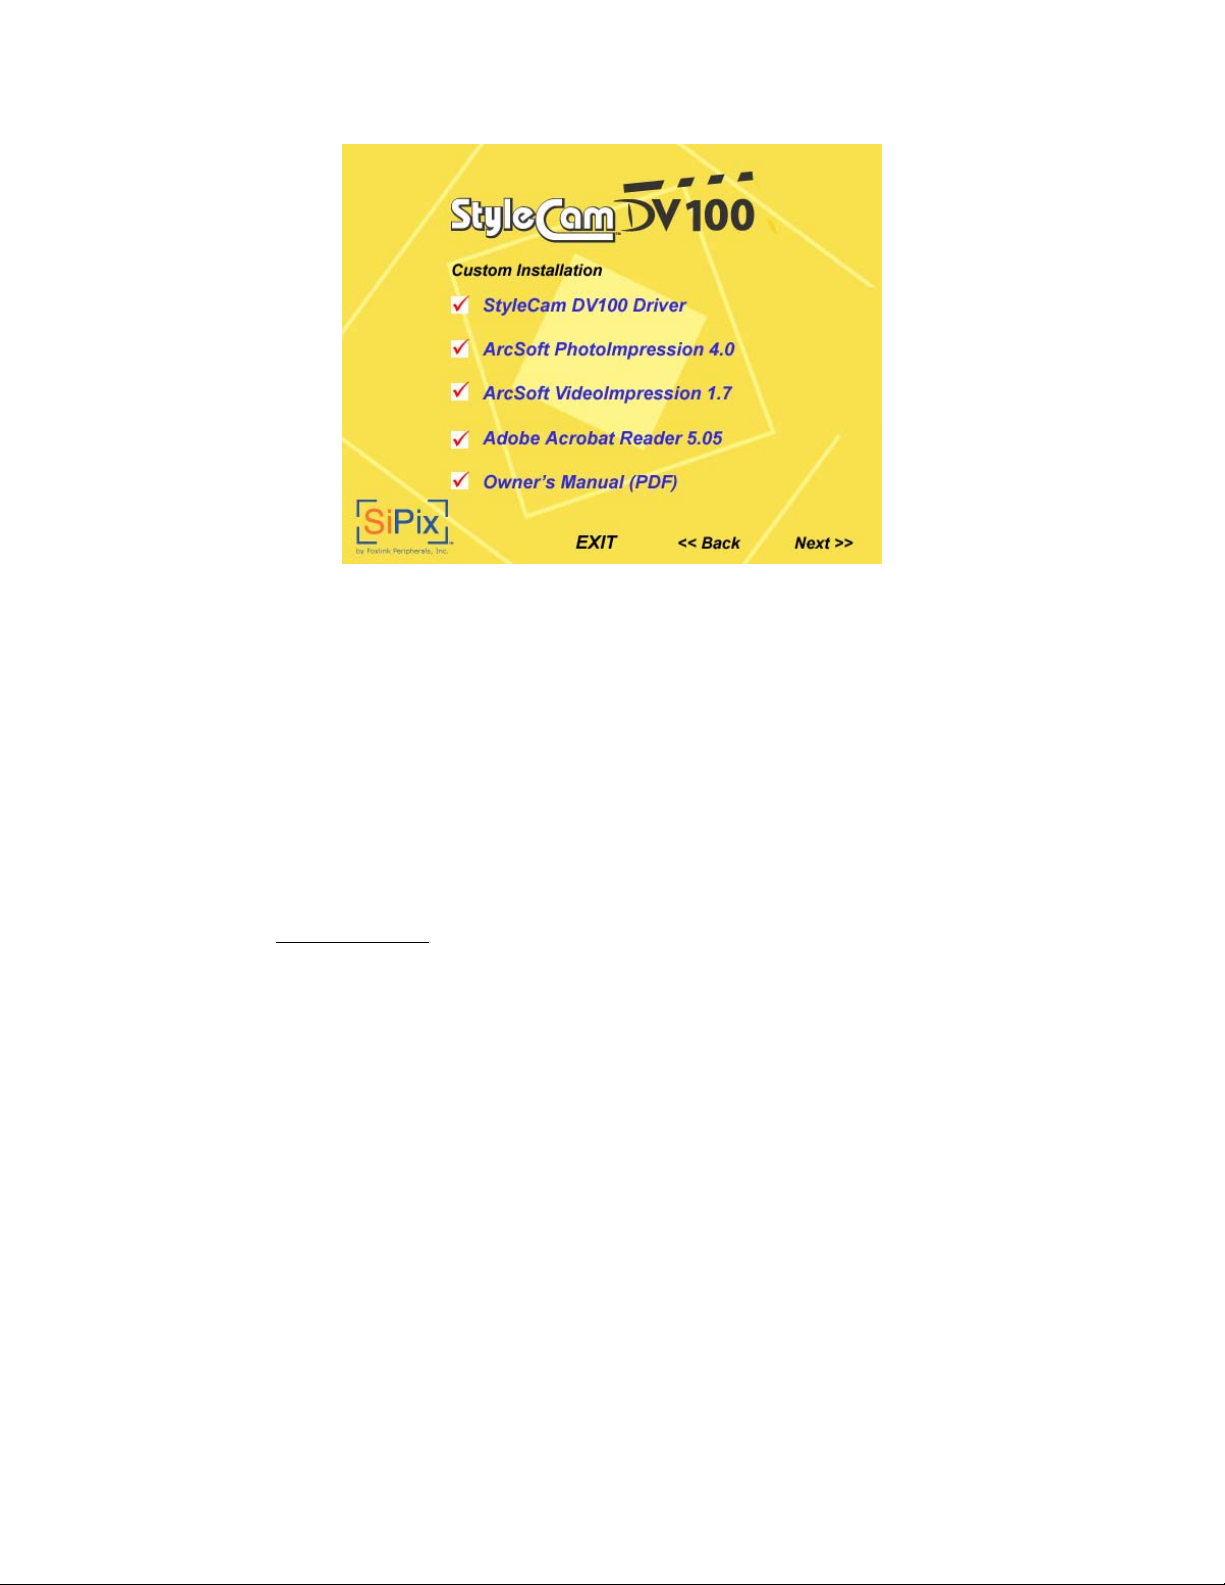
1. Check the application(s) that you want to install on your computer and click “Next” to
continue the installation of your software.
2. Follow the on-screen instructions to complete installing each software that you chose.
The installation will be in the order of the menu above.
3. When you finish installing ALL software, select “Yes, I want to restart my computer now”
and click “Finish”.
Note: It is important that you save and close all running programs before starting your computer.
For information on how to use ArcSoft PhotoImpression and VideoImpression, please visit its
website at www.arcsoft.com
.
20
Page 24
Making Connections
Connecting to a PC
By connecting the StyleCam DV100 to a computer you can perform two operations: download
files and capturing video with ArcSoft VideoImpression. Please follow the instructions below to
connect your camera to the computer.
1. Make sure the camera’s power is turned off.
2. Plug the small end of the USB cable to the USB port of your StyleCam DV100.
3. Plug the larger end of the USB cable to the USB port of your computer.
4. Set the Capture/Playback switch to Capture mode.
5. Press the Power button on the StyleCam DV100.
6. The computer should detect a new hardware and install the hardware driver. Please
follow the on-screen instructions to install the hardware drivers.
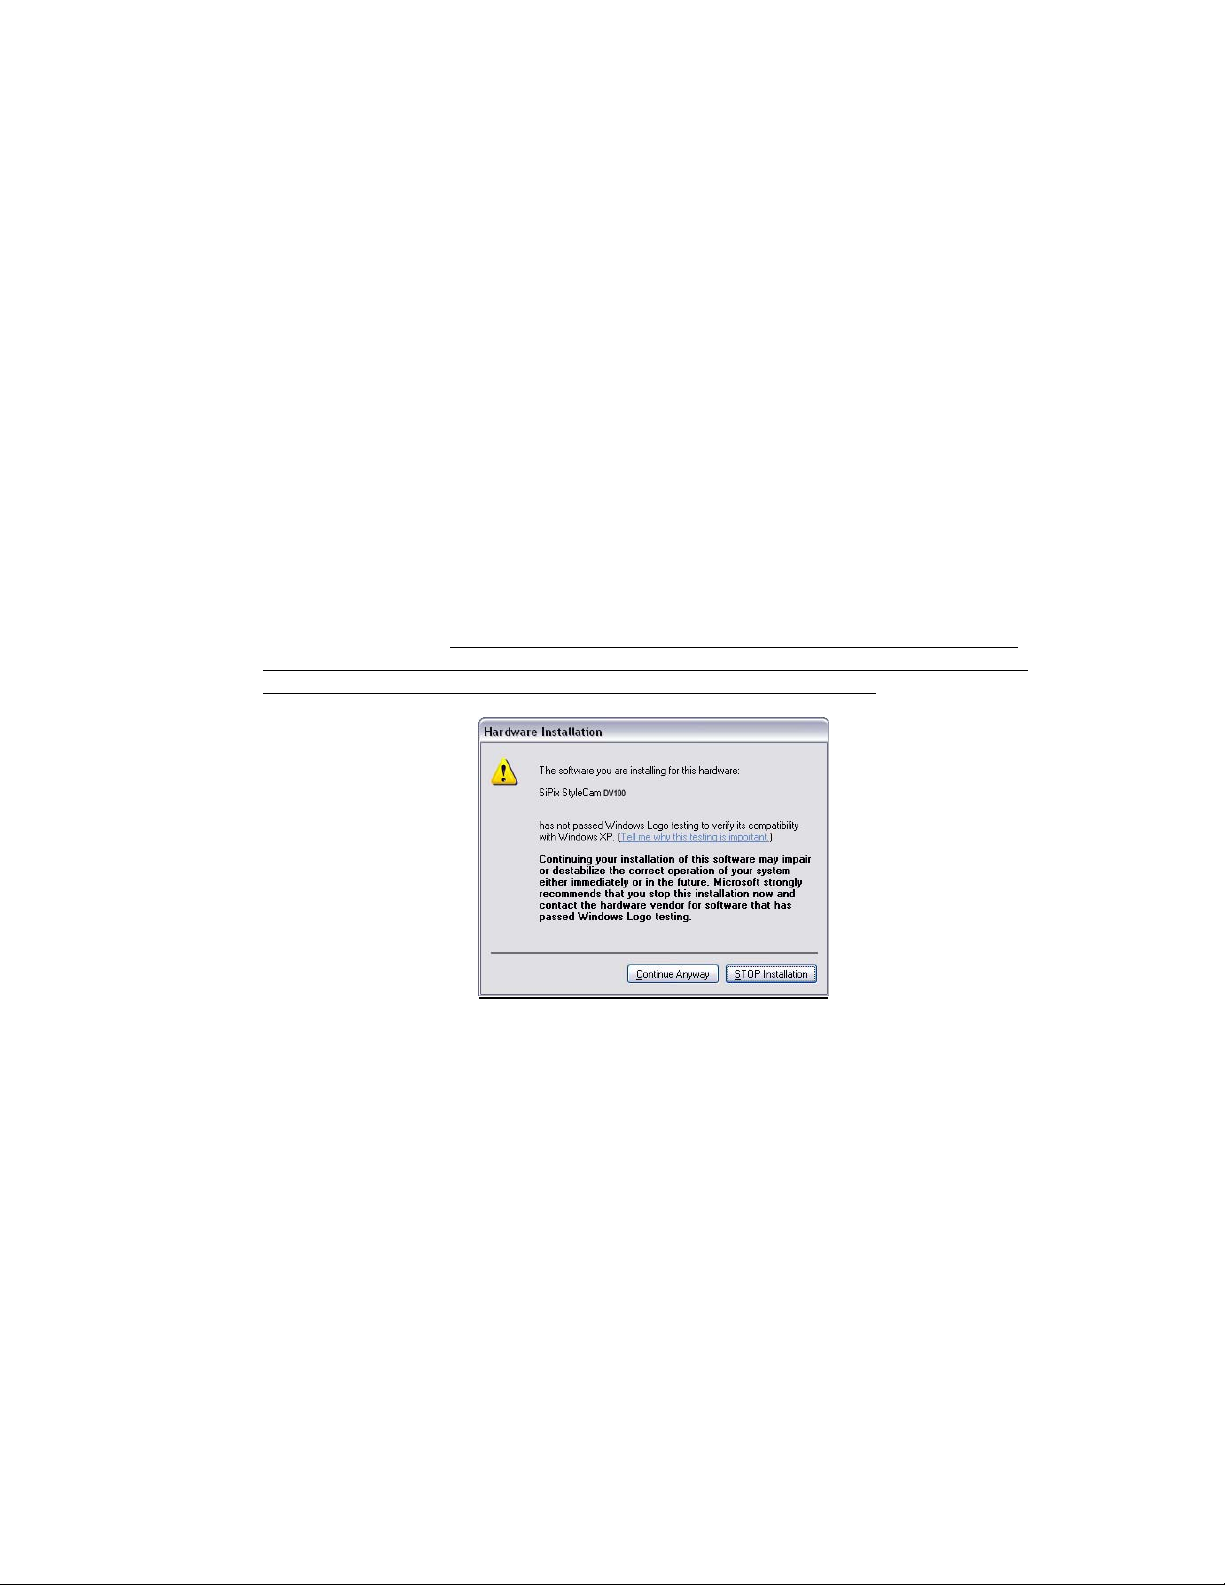
There are two drivers that you need to install: DV100 PC camera driver and DV100
video camera driver. If you encounter a message on Windows XP (shown below) that
warns you the drivers are not certified, please ignore this message and click “Continue
Anyway”. Installing the driver will not harm your computer in any way.
Please wait until the hardware drivers install before you use the camera.
7. When the installation completes, you may start to use the StyleCam DV100 to download
files or record live video while tethered to the computer.
Connecting to a TV
By connecting the StyleCam DV100 to a TV set you can view your digital video or still images on
the TV screen. Please follow the instructions below to connect your camera to the TV set.
1. Make sure your StyleCam DV100 is powered to off.
2. Use the supplied A/V cable to connect your StyleCam DV100 to your TV. Connect the
white cable to the white connector on your TV, and the yellow cable to the yellow
connector.
3. To play back files, please refer to the “Playback Digital Videos & Still Images” section.
21
Page 25
Download Video/Image/Audio to Your PC
Once you have installed the StyleCam DV100 driver and connected your camera to the computer.
You can download the files to your computer easily. Please follow the instructions below to
download your digital video, image, and audio files.
1. Connect the StyleCam DV100 to the computer. Refer to the “Making Connections”
section.
2. Set the Capture/Playback switch to Capture mode and power on the camera.
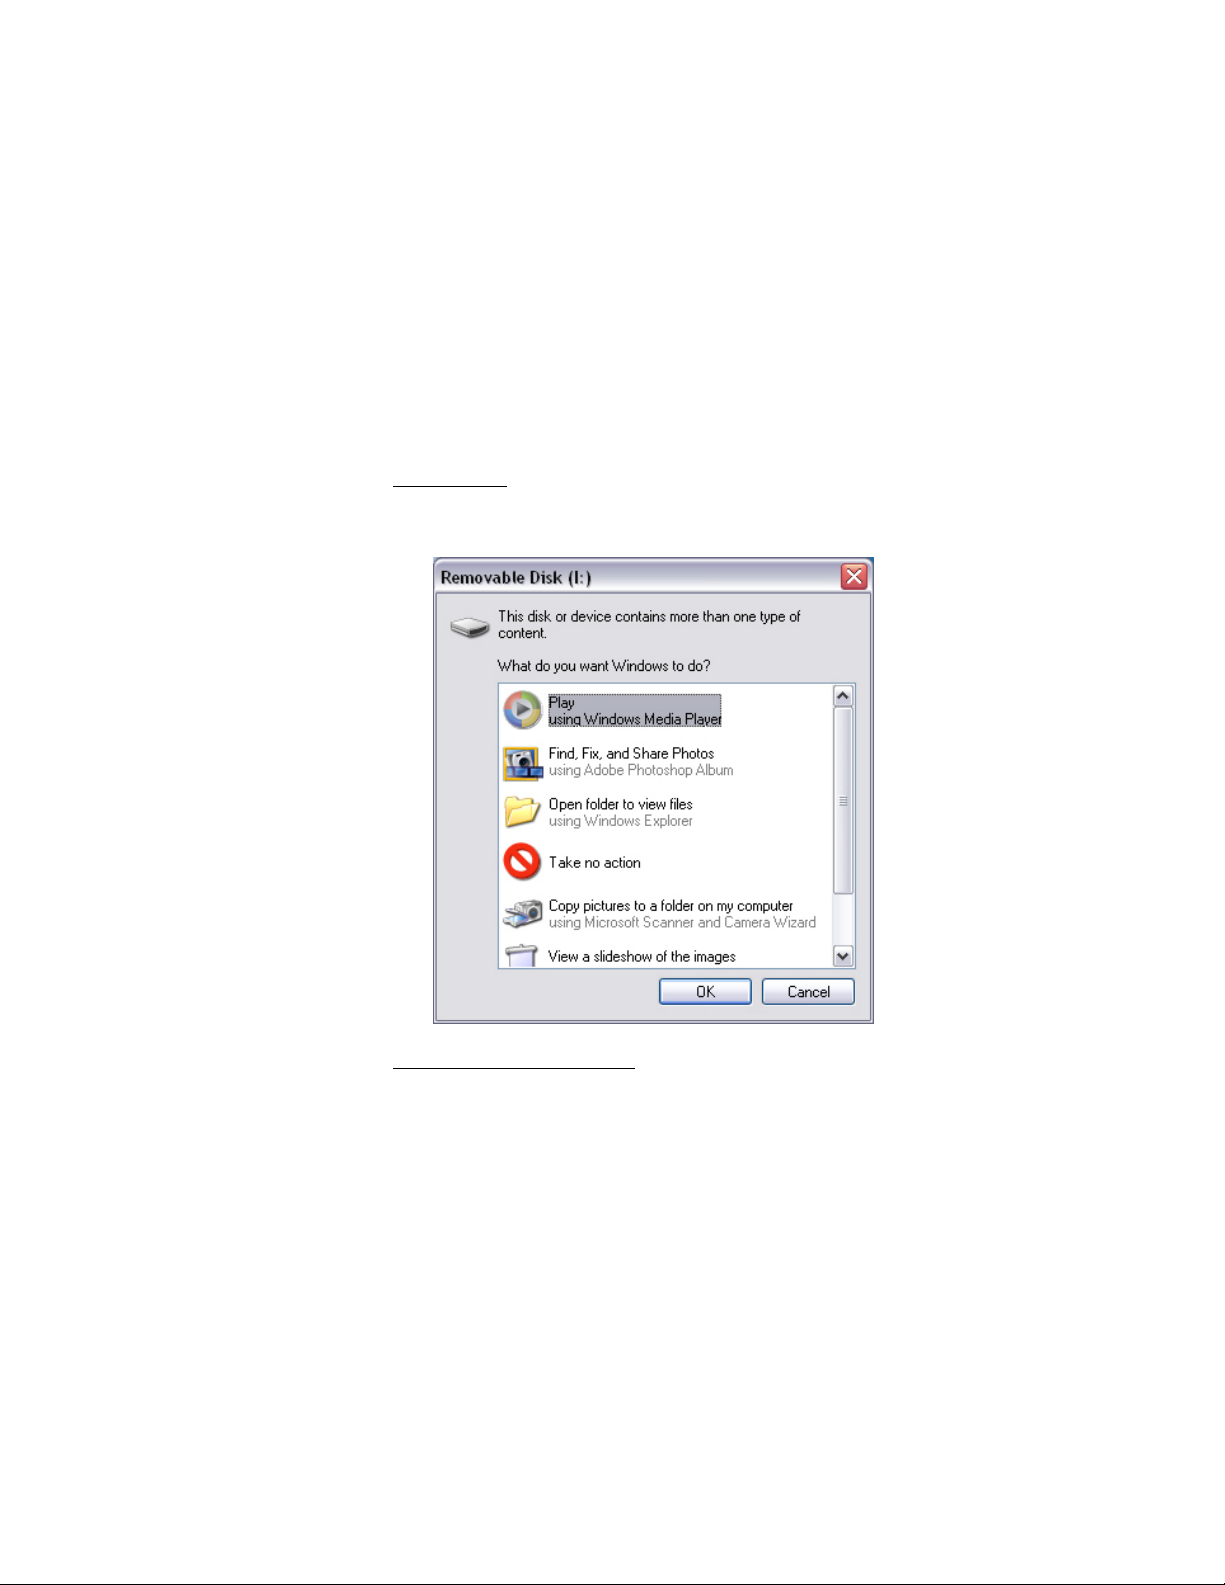
3. The StyleCam DV100 uses mass storage so the computer will detect a hardware
device.
If you’re using Windows XP
operations offered by Windows to download, view, or play your digital files (shown
below).
, the Windows Wizard will open and you can select the
4. If you’re using Windows 98/98se/Me/2000
Disk (D:\)” or the next available letter for the removable disk.
You will see a folder called “DCIM” is inside this drive. Double-click to open this folder,
and then double-click to open the next folder “100SIPIX”. Your video, image, and audio
files are stored under this folder.
5. To download the files to your computer, highlight the files that you want to save, and
choose one of the following way to move your files:
1. Copy & Paste
• With the mouse cursor on the highlighted files, right-click on your mouse and
select “Copy”.
• Go to the desired location on your computer and right-click on the mouse again,
and select “Paste”.
, go to “My Computer” and open “Removable
22
Page 26

2. Drag & Drop
• With the mouse cursor on the highlighted files, left-click on the mouse and hold
down on the button.
• Drag the files to your desired location, and release the button.
Downloading via ArcSoft PhotoImpression
You can also download the files using ArcSoft PhotoImpression that is included with this product.
Please follow the instructions below to transfer your digital files using third party applications.
1. Connect the StyleCam DV100 to your computer. Refer to the “Making connections”
section.
2. Set the Capture/Playback switch to Capture mode and power on the camera.
3. Launch ArcSoft PhotoImpression by clicking Start → Programs → ArcSoft → ArcSoft
PhotoImpression → PhotoImpression 4.0.
4. From the “File” menu on the top bar select “Open”.
5. Use the drop-down list to locate Removable Disk (D:\) or the next available letter for the
removable disk.
6. Open the folders “DCIM” → “100SIPIX”.
7. Your digital files are stored under this folder.
Note: Please use ArcSoft PhotoImpression 4.0 to open digital still images only. You can use
ArcSoft VideoImpression 1.7 or Windows Media Player to open digital video files. For audio files,
please use Windows Media Player or any other audio software you have on your computer.
23
Page 27
StyleCam DV100 as PC-CAM
The StyleCam DV100 can be used as a PC-camera when connected to a computer using the
supplied USB cable. You will need ArcSoft VideoImpression or other video application to operate
the StyleCam DV100 as a PC-camera.
Capturing Live Video with ArcSoft VideoImpression
1. Set the Capture/Playback switch to Capture mode and press the Power button to power
on the camera.
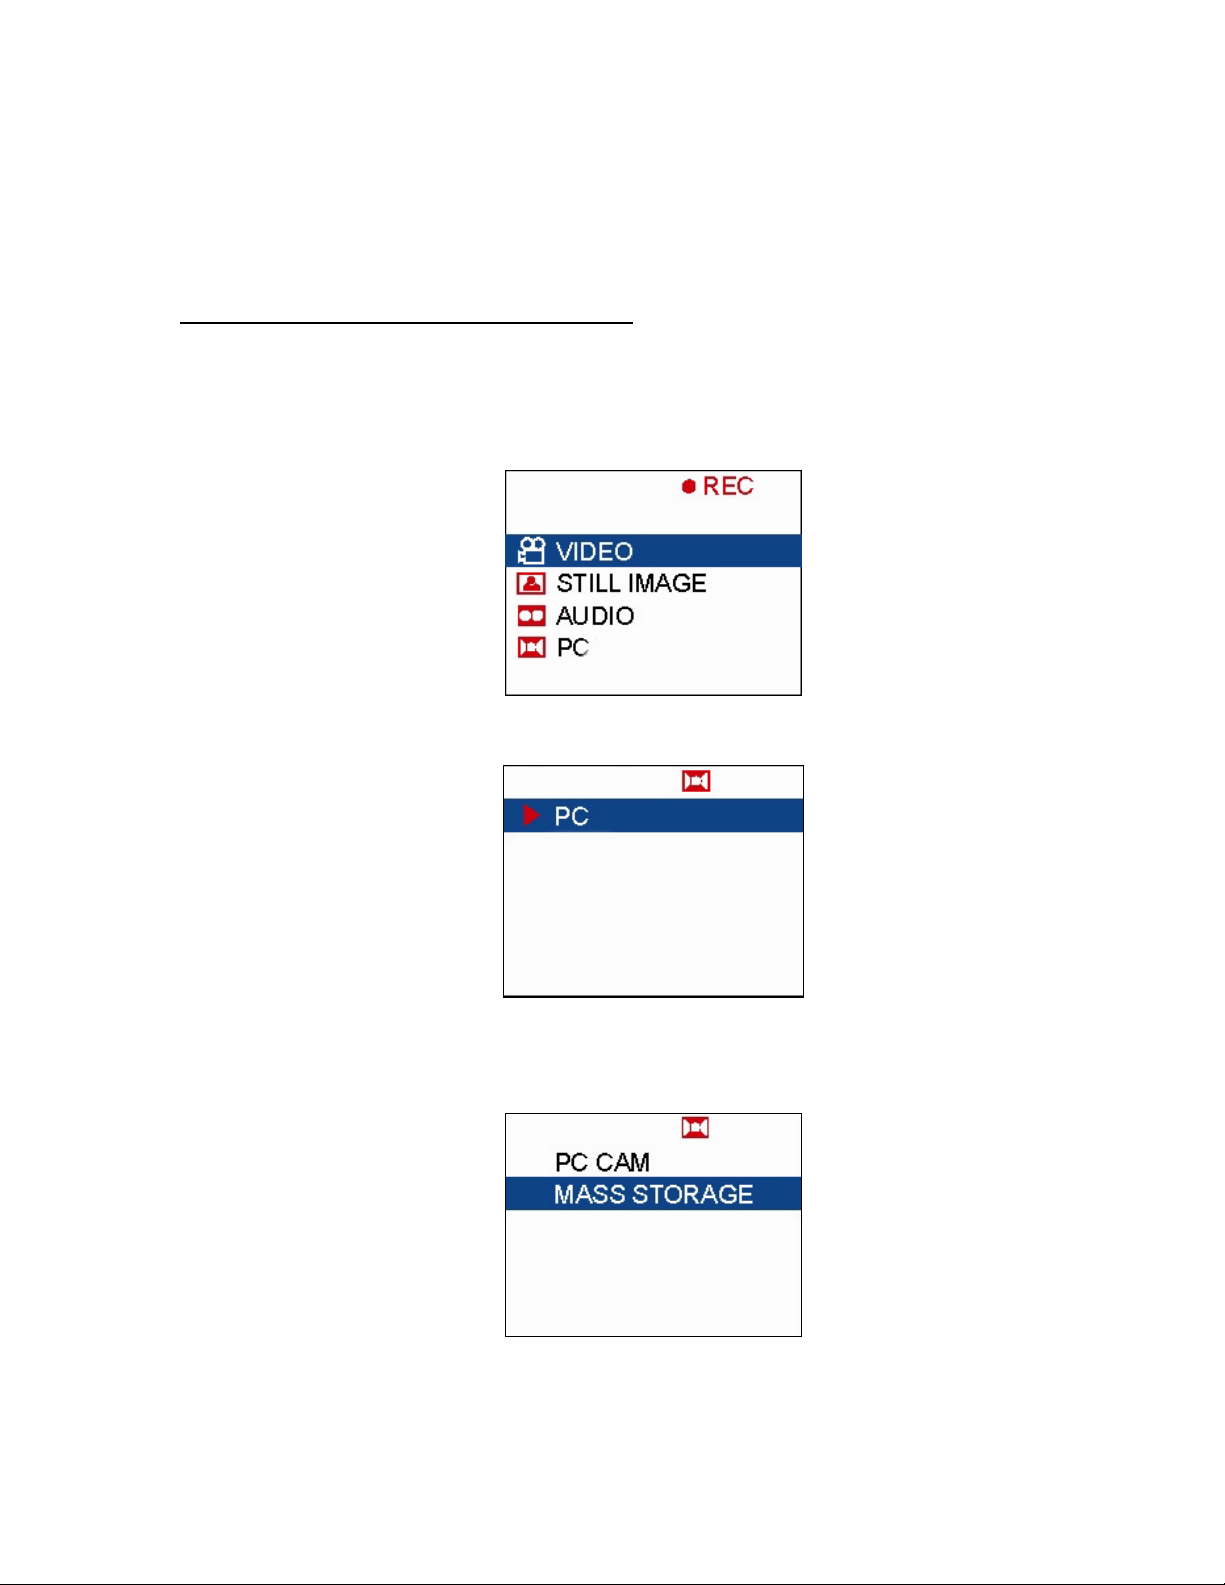
2. From the main menu highlight “PC” using the Navigation down button and press the OK
button to select it.
3 The following screen will appear:
Press the Navigation right button again to bring up the sub-menu.
4. Use the Navigation up/down button to highlight “PC CAM” and press the OK button.
Note: Mass storage is for downloading files to your computer.
24
Page 28

5. Launch ArcSoft VideoImpression by clicking Start → Programs → ArcSoft → ArcSoft
VideoImpression → VideoImpression 1.7.
6. Click “New” and then “Capture” from VideoImpression screens.
7. The StyleCam DV100 will start to capture live video.
8. Click the “Record” button on the VideoImpression screen to record the video.
To learn more about how to use ArcSoft VideoImpression 1.7 please visit www.arcsoft.com
contact ArcSoft technical support.
, or,
25
Page 29

Product Specification
Image sensor ½” CMOS sensor with 1.3 million pixels
Memory 8MB built-in flash memory, SD/MMC card slot (256MB)
Video resolution 640 x 480 320 x 240 160 x 120
Video frame rate 8 fps 15 fps 15 fps
Video capacity * 40 sec 60 sec 180 sec
Image resolution
(compression ratio)
Image capacity * 14 34 82
Audio capacity * Up to 10 minutes
File format Video Still image Audio
AVI JPEG WAV
PC camera 320 x 240 (default) @ 15 fps
Slideshow Yes (thumbnail, play)
Self-timer 10 sec (video and still image)
Date stamp Yes
DPOF Yes
Mass storage Yes
TV output Yes (NTSC/PAL)
Lens Full glass, 4-element
Focal length 8.5mm (43mm equivalent on a 35mm camera)
Focus range Fixed 43.3” (1.1m) – infinity
Lens aperture F3.5
Shutter speed ¼ - 1/1000 sec. (electronic)
White balance Auto
ISO Sensitivity Auto
Exposure Auto
Zoom 2X digital zoom
LCD Display 1.6” TFT color LCD
Microphone Built-in
Computer interface USB v1.1 standard mini B-type
Power source 2 AA alkaline or Ni-NM batteries
Power saving Auto power off after 60 sec. of inactivity
Operating system Windows 98, 98se, Me, 2000, XP
Camera dimension 3.94”x2.91”x1.42” (100x74x36mm)
Camera weight 4.98 oz (155g) without batteries
Operating temperature
Operating humidity
Storage temperature
Storage humidity
1280 x 1024
6:1
USB v2.0 full speed compatible
6.43 oz (200g) with batteries
32°F - 104°F (0°C - 40°C)
0% – 90% (Non condensation)
-40°F - 158°F (-40°C - 70°C)
0% – 90% (Non condensation)
1280 x 1024
12:1
640 x 480
* For the built-in 8MB flash memory. Video, image and audio capacity varies.
26
Page 30

TROUBLESHOOTING
Problem Possible cause Solution
The camera has no
power.
The camera won’t
take a picture.
The pictures are
blurry.
The picture is too
light.
The batteries are discharged. Replace the batteries with freshly
charged ones.
The batteries are inserted
incorrectly.
Is the camera connected to a
computer?
Is the camera’s power on? The camera powers off automatically
Is the camera connected to a
computer?
The camera or subject was
moving when the picture was
taken.
You are facing a bright light
when taking the picture.
Check the battery orientation.
The camera’s buttons are not
functional when connected to a PC.
Disconnect the camera to take more
pictures.
after 60 seconds. Make sure the
camera’s power is ON before taking a
picture.
The camera’s buttons are not
functional when connected to a PC.
Disconnect the camera to take more
pictures.
Hold the camera steady to take
pictures. Or use a tripod and set the
tripod on a flat surface to ensure
steadiness.
Change the angle of the picture so that
bright lights do not shine directly
towards the camera lens.
27
Page 31

ONE YEAR LIMITED WARRANTY – US/CANADA
SiPix, a Foxlink Peripherals, Inc. brand, warrants this hardware product against defects in
material and workmanship for a period of one year from the original date of purchase as identified
on the proof of purchase (your receipt). It is the end-user’s responsibility to make certain this
product is in working condition with the intended computer system within the one-year warranty
period.
These are the sole remedies and SiPix’s sole liabilities for performance or failure to perform of the
product. SiPix reserves the right to change its warranty policy at any time for all products
distributed after the date of such change in warranty. Except as set forth above, all other
warranties whether express or implied, including but not limited to, the implied warranties of
merchantability and fitness for a particular purpose are hereby excluded.
SiPix shall not be liable for incidental, special or consequential damages arising out of or related
to the use or performance of the product, including, without limitation, loss of data or use of data
processing facilities or equipment, regardless of whether SiPix may have been advised about the
possibility of such damages arising out of use of the product shall be limited to the amounts paid
by purchaser for such product.
This warranty is only valid within the boundaries and territories of the USA and Canada. SiPix is
not responsible for costs incurred due to shipping, insurance, customs, or duties. SiPix is not
responsible for non-traceable packages or packages shipped without a valid RMA number on the
outside of the package.
This warranty does not apply if the product has been damaged by an accident, electrical fault,
through misuse or abuse. If the product has been altered without written authorization from SiPix,
the warranty will be void.
This warranty applies only to hardware products manufactured by or for SiPix. Warranted
products must bear the “SiPix” brand name, trade name, or logo. The aforementioned warranty
and remedies are exclusive, and in lieu of all others, whether oral, written, expressed or implied.
SiPix specifically disclaims any and all implied warranties of merchantability and fitness for a
particular purpose.
SiPix is not responsible for incidental or consequential damages resulting from any breach of
warranty. SiPix is not responsible under any other legal theory, including, but not limited to lost
profits, and any cost of recovering reprogramming or reproducing any program or data stored in
or used with SiPix products.
28
Page 32

WARRANTY SERVICE – US/CANADA
If your SiPix product needs to be returned for repair, you must contact SiPix technical support
prior to shipment for an RMA number before sending in the product. The RMA number is a
Return Merchandise Authorization number. SiPix will refuse all shipments without a
proper RMA number. The RMA number MUST be printed on the outside of the original shipping
carton in large print written in black ink next to the shipping label. Failure to properly pack
shipment could cause serious damage to the product and void the warranty.
Should any defect(s) be discovered, the product may be returned to SiPix with a valid RMA
number. If you are returning product for repair, please be sure to do the following:
1. Call SiPix Customer Support Mon-Fri during regular business hours at 510.651.9199 and
obtain an RMA (Return Merchandise Authorization) number.
2. Print your RMA number on the OUTSIDE of the original shipping carton in large print
written in black ink next to the shipping label.
3. Include a copy of the bill of sale with the returned product.
4. Unless otherwise instructed, do not return any manuals or software when returning items
for repair.
5. Ship to SiPix via a traceable shipping method and retain the tracking number.
Note: This product is intended for use only within the boundaries and territories of the United
States and Canada. If you purchased this product in Mexico or South America and need
assistance or repair, you must contact your originating reseller for service and support. SiPix,
Fremont CA, will not accept any shipments from outside the boundaries and territories of the USA
and Canada. SiPix often bundles many different third party software options with its products. If
any of these options were ordered with your SiPix product and they appear to be missing or
incorrect, contact your reseller immediately.
29
Page 33

TECHNICAL SUPPORT – US/CANADA
SiPix provides technical support at no cost during the one-year warranty period. Users with
questions or concerns of a technical nature should first refer to the product manual, as usage and
troubleshooting information is provided in detail. For additional information or assistance, users
should visit the SiPix Web-site, as tutorials, updated drivers, frequently asked questions and
news updates are available. www.sipixdigital.com/support
Should you require further assistance, you may contact SiPix technical support representatives
by calling 510.651.9199. SiPix Technical Support is available from 8 AM to 6 PM PST, Monday
through Friday, excluding holidays.
30
Page 34

WARRANTY & TECHNICAL SUPPORT – EUROPE
Technical Support
SiPix provides technical support at no cost during the two-year European warranty period. Users
with questions or concerns of a technical nature should first refer to the product manual, as usage
and troubleshooting information is provided in detail. For additional information or assistance,
users should visit the SiPix Website, as tutorials, updated drivers, frequently asked questions and
news updates are available at www.sipixdigital.com/support
Should you require further assistance, you may contact SiPix technical support representatives
by calling:
For free Technical Support call in Europe*: 00800-800 SiPix (00800-80074749) or by E-Mail :
[email protected]
Friday, excluding public holidays.
Technische Unterstützung
SiPix bietet kostenlose technische Unterstützung innerhalb der zweijährigen Europäischen
Garantiefrist. Wenn Sie technische Fragen haben, sollten Sie zuerst das Benutzerhandbuch
lesen, da sich detaillierte Informationen zur Verwendung und Fehlerbehebung in dem
Benutzerhandbuch befinden. Für zusätzliche Informationen oder Unterstützung besuchen Sie
bitte die SiPix Web-Site, wo Lehrgänge, aktuelle Treiber, häufig gestellte ich habe eine
badeanzur, esist blaü. www.sipixdigital.com/support
Sie können ebenfalls Kontakt mit dem Team unserer technischen Unterstützung aufnehmen, um
weitere Hilfe zu erhalten:
Gebührenfreie technischen Hotline in Europa* : 00800-800 SiPix (00800-80074749) oder per E-
Mail : [email protected].
Unsere technische Unterstützung steht Ihnen von Montag bis Freitag von 9 Uhr bis 18 Uhr
Mitteleuropäischer Zeit ausschließlich Feiertagen zur Verfügung.
Support Technique
SiPix fournit le support technique sans frais pendant la période de garantie d’ deux ans. Les
utilisateurs qui se posent des questions de nature technique doivent se référer tout d'abord au
Manuel Utilisateur, car les informations relatives à l'utilisation et au dépannage sont présentées
en détail. Pour les informations supplémentaires ou l'aide, les utilisateurs peuvent visiter le site
web de SiPix www.sipixdigital.com/support , car il met à leur disposition des tutoriaux, des pilotes
mis à jour, des questions fréquemment posées et des mis à jour d’informations.
Si vous avez besoin de plus d'aide, vous pouvez contacter les représentants du support
technique SiPix en appelant:
Pour assistance Technique rappeler le numéro gratuit en Europe* :00800-800 SiPix
(00800-80074749) ou par E-Mail : [email protected]
Le Support Technique de SiPix est disponible de 9h à 18h, du lundi au vendredi, sauf les jours
fériés.
TEL: 00800-800 SiPix
*Finland, Norway, Sweden, Denmark, Austria, Belgium, The Netherlands, Luxembourg, France, Switzerland, Italy, UK,
Ireland and Germany.
. SiPix Technical Support is available from 9 AM to 6 PM CET, Monday through
31
Page 35

WARRANTY & TECHNICAL SUPPORT – ASIA
Technical Support
Upon receipt of this SiPix product you are immediately eligible for Technical Support during the
warranty period of ONE YEAR from the purchase date. Users with questions or concerns of a
technical nature should first refer to the product manual, as usage and troubleshooting
information is provided in detail. For additional information or assistance, users should visit the
SiPix Website, as tutorials, updated drivers, frequently asked questions and news updates are
available. www.sipixdigital.com/support
. For technical support please call 886.2.8792.9588.
32
 Loading...