

Page 1
SC-2100
2.1 Mega Pixel Digital Still Camera
Owner’s Manual
Page 2

About this manual
This manual is designed to assist you in using the SiPix Model SC-2100,
2.1M Digital camera. Information in this document has been carefully
checked for accuracy; however, no guarantee is given to the correctness of
the contents. The information in this document is subject to change without
notice.
Edition
First Edition, December 2000
Copyright
© Copyright 2000
Prepared by
This document contains proprietary information protected by copyright. All
rights are reserved. No part of this manual may be reproduced by any
mechanical, electronic or other means, in any form, without prior written
permission of the manufacturer.
Federal Communications Commission (FCC) Compliance
This equipment has been tested and found to comply with the limits for a
Class B digital device, pursuant to Part 15 of the FCC Rules. These limits are
designed to provide reasonable protection against harmful interference in a
residential installation. This equipment generates, uses, and can radiate
radio frequency energy and, if not installed and used in accordance with the
instructions, may cause harmful interference to radio communications.
However, there is no guarantee that interference will not occur in a particular
installation. If this equipment does cause harmful interference to radio or
television reception, which can be determined by turning the equipment off
and on, the user is encouraged to try to correct the interference by one or
more of the following measures:
♦
Reorient or relocate the receiving antenna.
♦ Increase the separation between the equipment and the
receiver.
♦
Connect the equipment onto an outlet on a circuit different from
that to which the receiver is connected.
♦
Consult the dealer or an experienced radio/TV technician for
help.
ii
Page 3

Warning:
meet FCC emission limits and to prevent interference to the
nearby radio and television reception. It is essential that only the
manufacturer’s recommended power cord be used. Use only
shielded cables to connect I/O devices to this equipment.
You are cautioned that changes or modifications not expressly
approved by the party responsible for compliance could void
your authority to operate the equipment.
A shielded-type power cord is required in order to
Declaration of conformity
This device complies with part 15 of the FCC rules. Operation is subject to
the following conditions:
♦ This device may not cause harmful interference.
♦
This device must accept any interference received, including
interference that may cause undesired operation.
Canadian Department of Communications
This class B digital apparatus meets all requirements of the Canadian
Interference-causing Equipment Regulations.
Cet appareil numérique de la classe B respecte toutes les exigences du
Réglement sur le matériel brouilieur du Canada.
Trademark recognition
Microsoft MS-DOS and Windows are registered trademarks of Microsoft
Corp.
Other product names used in this manual are the properties of their
respective owners and are acknowledged.
iii
Page 4

Safety and handling precautions
Camera information
♦
Do not take apart or attempt to service the camera yourself.
♦
Do not expose the camera to moisture, or extremes in
temperature.
♦ Let the camera warm up when moving from a cold to a warm
temperature.
♦
Do not touch the lenses of the camera.
♦ Do not expose the lens to direct sunlight for extended periods.
Battery information
♦
Turn off the camera before installing or removing batteries.
♦
Use only AA alkaline, lithium, or rechargeable NiCD or NiMH
batteries.
♦
Always replace the batteries with four new or freshly charged
batteries.
♦ Do not use batteries that are leaking, corroded, or damaged.
♦
Do not attempt to recharge non-rechargeable batteries.
♦ When charging rechargeable batteries, use a battery charger
specifically designed for the type of battery. If the charger is
designed to accommodate multiple battery types, be sure to
adjust its settings to match the type of battery you are
recharging.
♦
Remove the batteries from the camera if you are going to store
the camera for extended periods.
iv
Page 5

Table of Contents
Getting Started ........................................................................................ 1
Identifying components .......................................................................... 2
Identifying components – main switch and LCD .................................. 4
Installing and removing the CompactFlash
Inserting batteries ................................................................................... 7
Using the LCD monitor .......................................................................... 8
Setup Mode screens ................................................................................ 9
Playback Mode screens......................................................................... 11
Capture Mode screens .......................................................................... 12
Protecting Images................................................................................. 18
Connecting to an AC power source...................................................... 21
Viewing pictures on your TV (NTSC or PAL)..................................... 22
Installing software ................................................................................ 23
Connecting the SC-2100 to your PC .................................................... 25
Downloading pictures to your PC ........................................................ 26
card ................................ 6
Troubleshooting.................................................................................... 28
Specifications........................................................................................ 30
One Year Limited Warranty ................................................................. 31
Warranty Service .................................................................................. 33
Technical Support................................................................................. 34
v
Page 6

Getting Started
Congratulations on your purchase of this SiPix SC-2100, 2.1M Digital
camera. Your SiPix 2.1M Digital camera has been designed to allow you
to quickly and easily take quality digital pictures.
With a 2.1 Mega Pixel CCD image sensor you are assured of highresolution, clear pictures that can be printed, displayed on a Web site, or
sent to others via e-mail.
The supplied software and drivers enable you to easily download your
pictures to a PC. With the application software you can edit pictures with
tools such as sharpen, smooth, red eye correction, and brightness and
contrast adjustment. Other software features include special effects such
as create panorama images and cylinder. The USB cable allows fast
download of pictures.
Unpacking the camera
Open the carton and carefully remove the contents. If anything is
missing or damaged, please contact your dealer immediately. The
shipping carton should contain the following items:
Camera
•
Owner’s manual
•
Camera strap
•
USB connector cable
•
Four AA alkaline batteries
•
8MB CompactFlash card
•
SC-2100 CD-ROM containing;
•
- SiPix SC-2100 TWAIN driver
- User’s manual in PDF format
- Quick Start Guide
MGI PhotoSuite IIISE
•
Note: Do not throw the carton away. Save the carton for future use.
- 1 -
Page 7
b
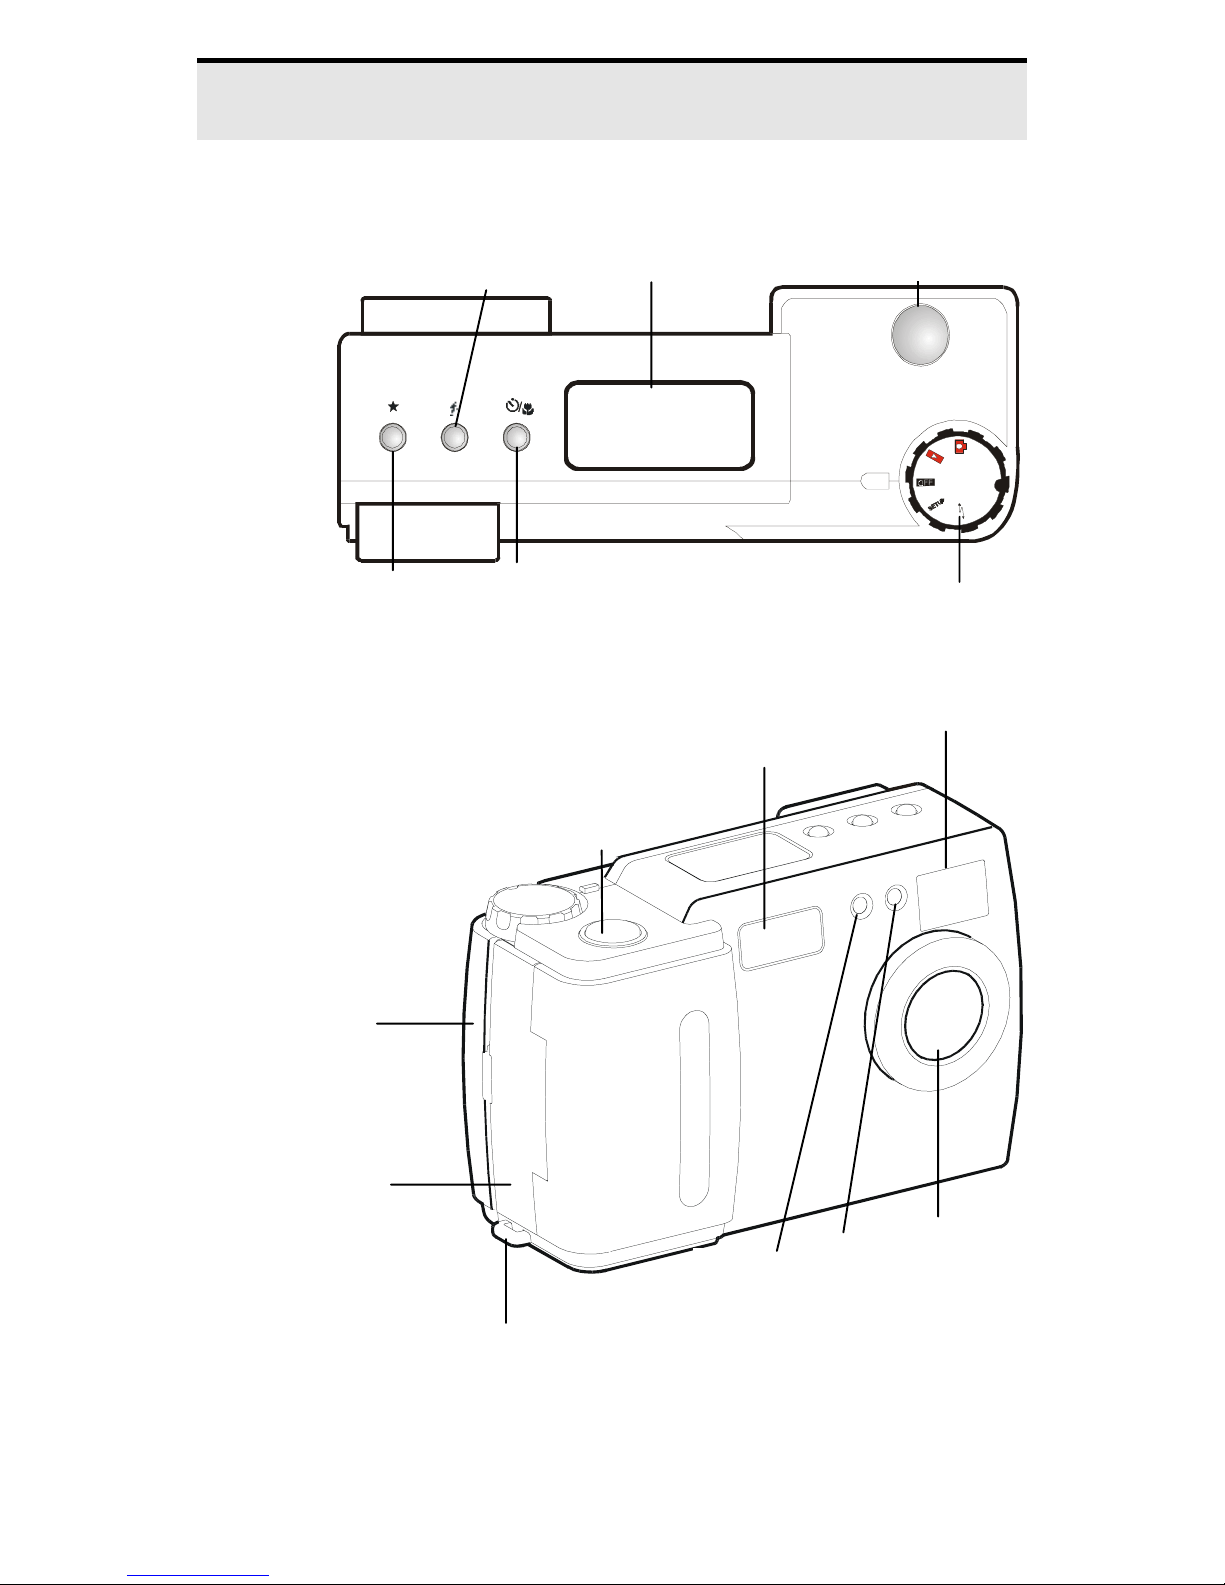
Identifying components
Top view
Front View
Resolution
button
Flash
button
Selftimer/Macro
button
Shutter
release button
LCD status
display
Shutter release
utton
Main switch
Viewfinder
Flash
CompactFlash
cover
Connector
cover
Hand-strap hook
Self-timer
indicator
Photo
sensor
- 2 -
Lens
Page 8
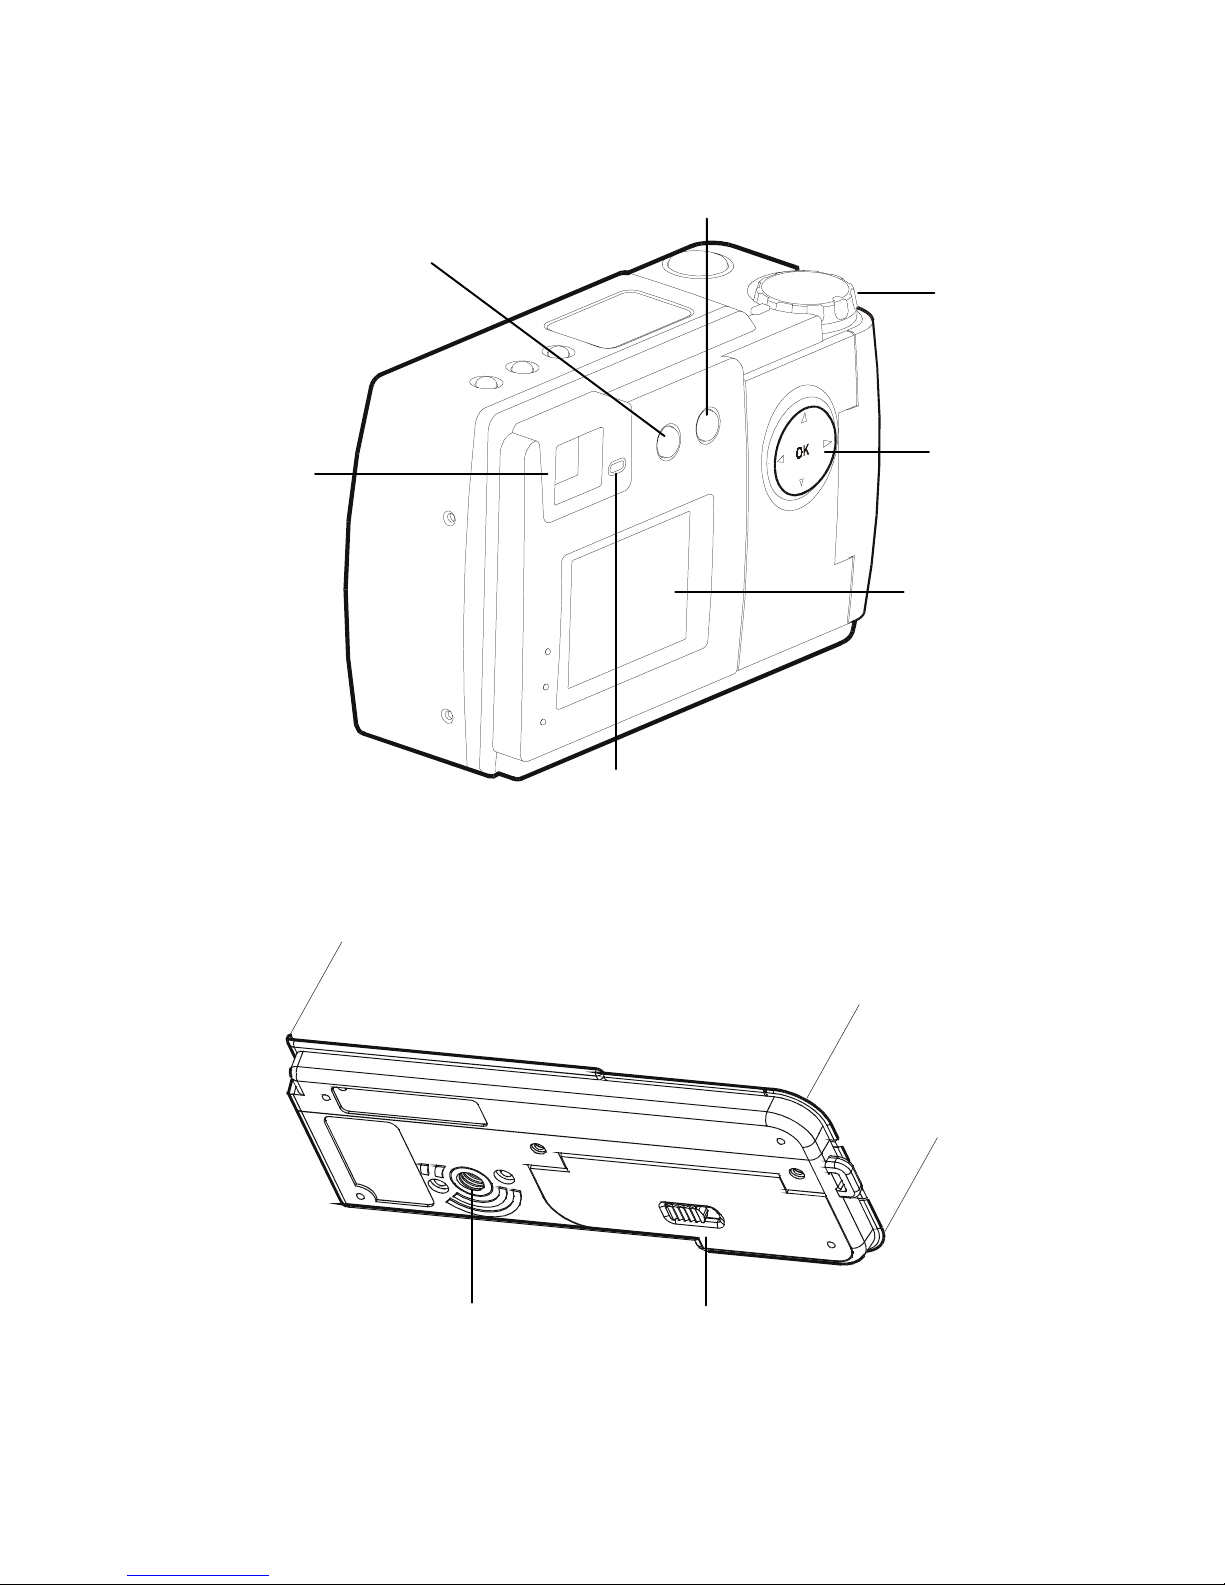
Rear view
During capture: LCD (on/off) button
During review: Delete
Viewfinder
Menu button
Standby LED
Main switch
Zoom/Navigator
LCD monitor
Bottom view
Tripod
socket
Battery
compartment
- 3 -
Page 9
Identifying components – main switch and LCD
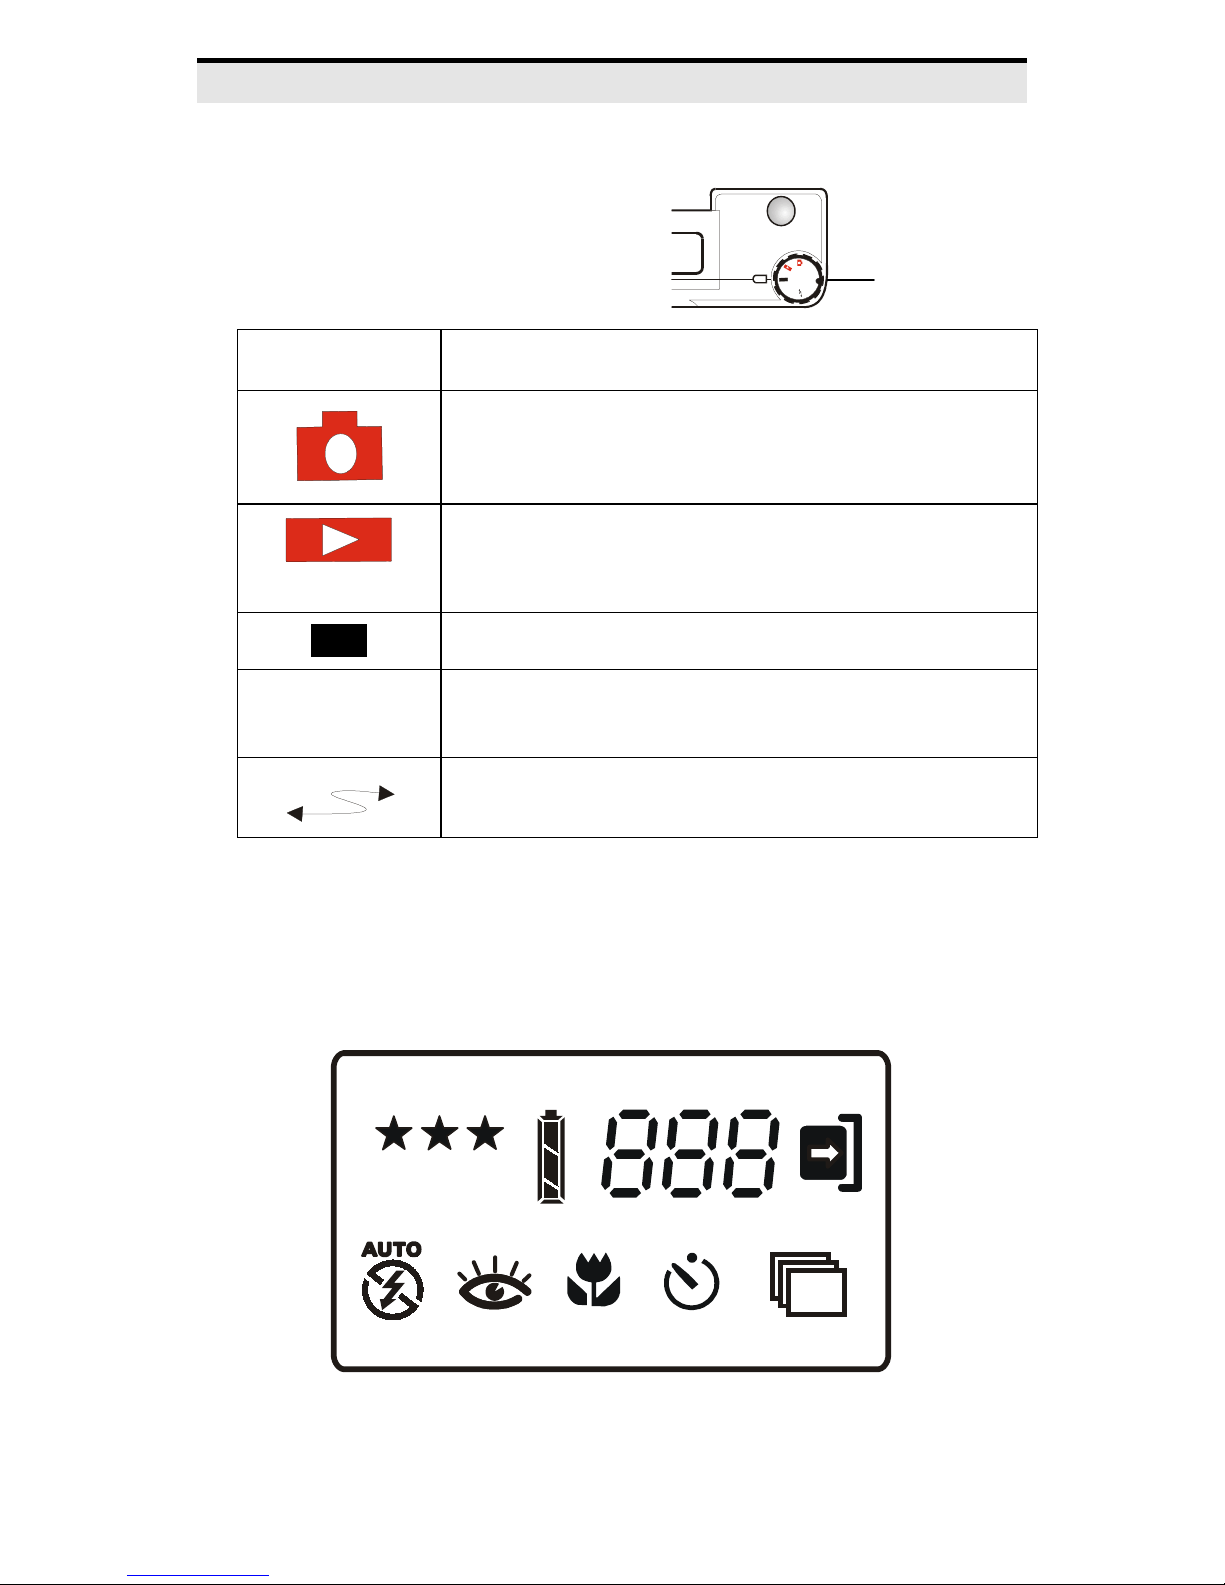
Main switch
There are five settings for the main
switch; refer to the following table:
F
O
F
P
U
T
E
S
Main switch
Icon Description
Capture setting for taking pictures
Playback setting for viewing pictures
OFF
SETUP
Powers off the camera
Setup for changing camera’s basic configuration
Upload for uploading pictures to your PC
LCD status display
The following illustration shows all LCD status icons available in the
LCD status display:
LCD
Icons
- 4 -
Page 10
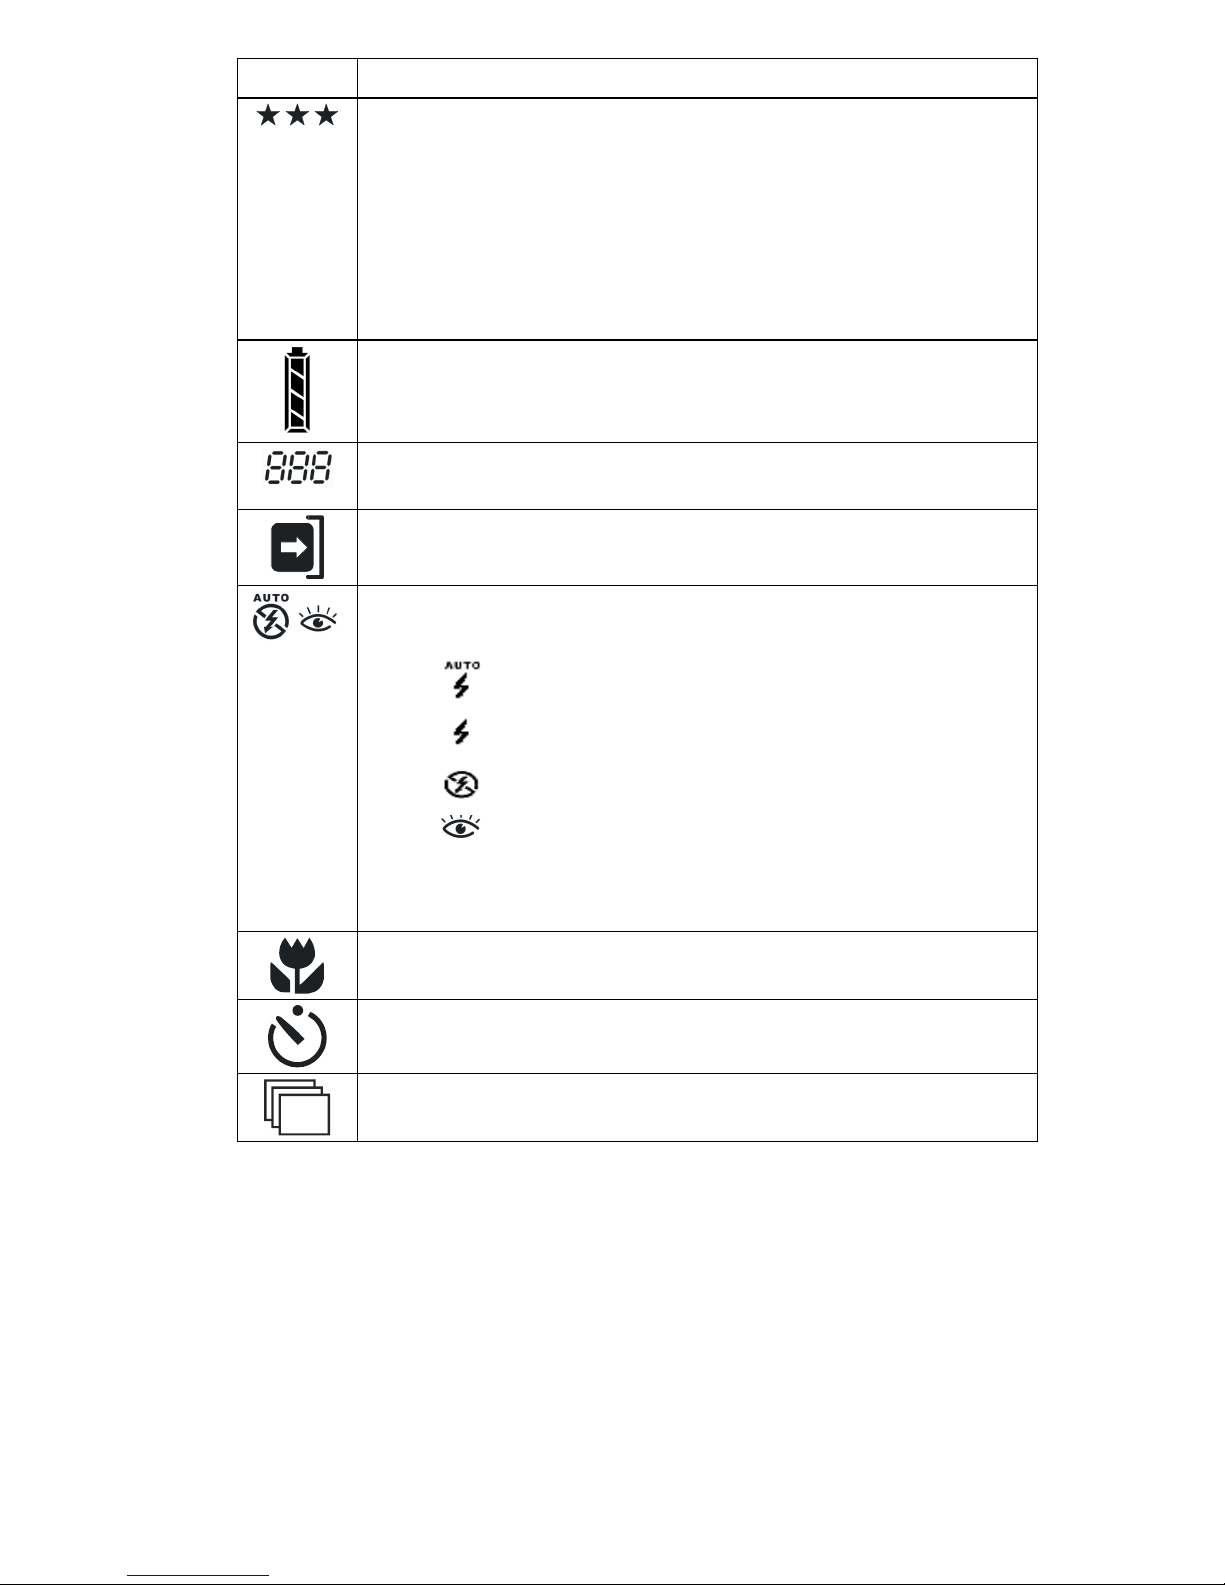
Icon Meaning
Indicates the picture quality setting
• Three Stars:
(6)
pictures maximum (for supplied 8MB card)
1600 x 1200 super-fine resolution,
six
• Two Stars:
maximum (for supplied 8MB card)
One Star:
•
maximum (for supplied 8MB card)
Indicates the battery charge level
Indicates the number of pictures remaining on the
CompactFlash memory card
Warns that no CompactFlash memory card is inserted
The following options are available by repeatedly pressing
the flash button:
• Automatic Flash:
• Flash Always On:
•
No Flash:
1600 x 1200 fine resolution, 31 pictures
800 x 600 standard resolution, 63 pictures
Flash occurs automatically
Flash is always on
Flash function is disabled.
• Red Eye:
Note:
Macro function is enabled
Self-timer function is enabled
Continuous shoot (four frames in sequence) function is
enabled
The standby LED blinks until the flash is charged
Pre-flash to reduce red-eye effect
- 5 -
Page 11

Installing and removing the CompactFlash
1.
2.
3.
4.
Set the main switch to
OFF
.
Open the CompactFlash cover.
Installing: First make sure that the eject button is not
protruding. Next, insert the CompactFlash card with the label
on the card facing the front of the camera. Push firmly until
the card is flush with the housing. See note below.
Removing:
Push the eject button; the button protrudes. Now
push the eject button again to partially eject the
CompactFlash card. Remove the CompactFlash card. Once
the card is removed, make sure that the eject button is no
longer protruding before closing the cover.
Close the CompactFlash cover.
card
Note:
If you feel resistance when inserting the CompactFlash
card, check the orientation of the card. The card should insert
smoothly and easily when correctly orientated
- 6 -
Page 12
Inserting batteries
1.
2.
Set the main switch to
OFF
.
To open the battery compartment cover located on the
bottom of the camera, slide the release latch; the cover
opens.
3.
Note the battery polarity on the inside cover and insert the
batteries in the battery compartment.
4.
Close the battery compartment cover pressing until it clicks
shut.
Note:
Use only AA alkaline, lithium, or rechargeable NiCD or
NiMH batteries. Inserting the batteries with the incorrect
polarity will not damage the camera or batteries.
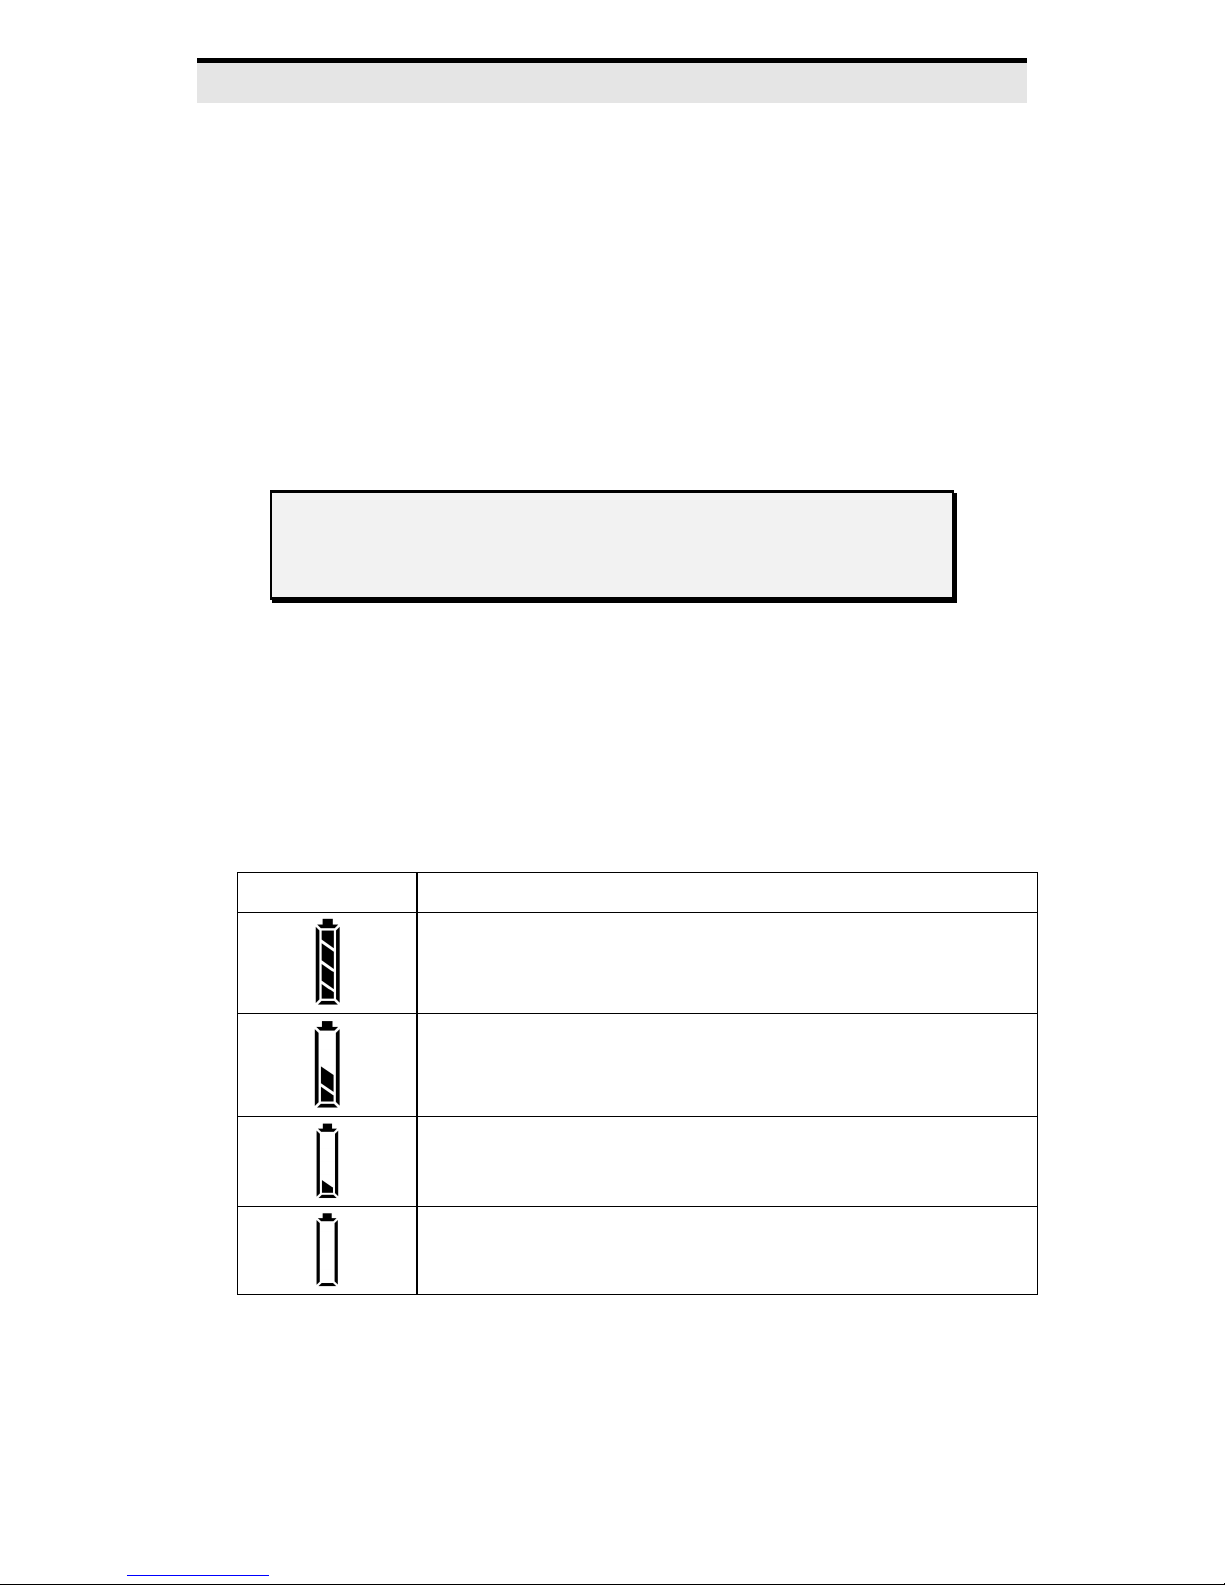
Battery display
Battery icon Meaning
The batteries have a full charge, or the AC adapter is
connected
The batteries have approximately 50% power left
The batteries have approximately 25% power left
The batteries are almost empty. Replace the batteries
with fresh batteries
- 7 -
Page 13
Using the LCD monitor
The 1.8-inch color LCD monitor allows you to preview pictures before
and right after they’ve been taken. The LCD monitor will not operate
when the main switch is
OFF
.
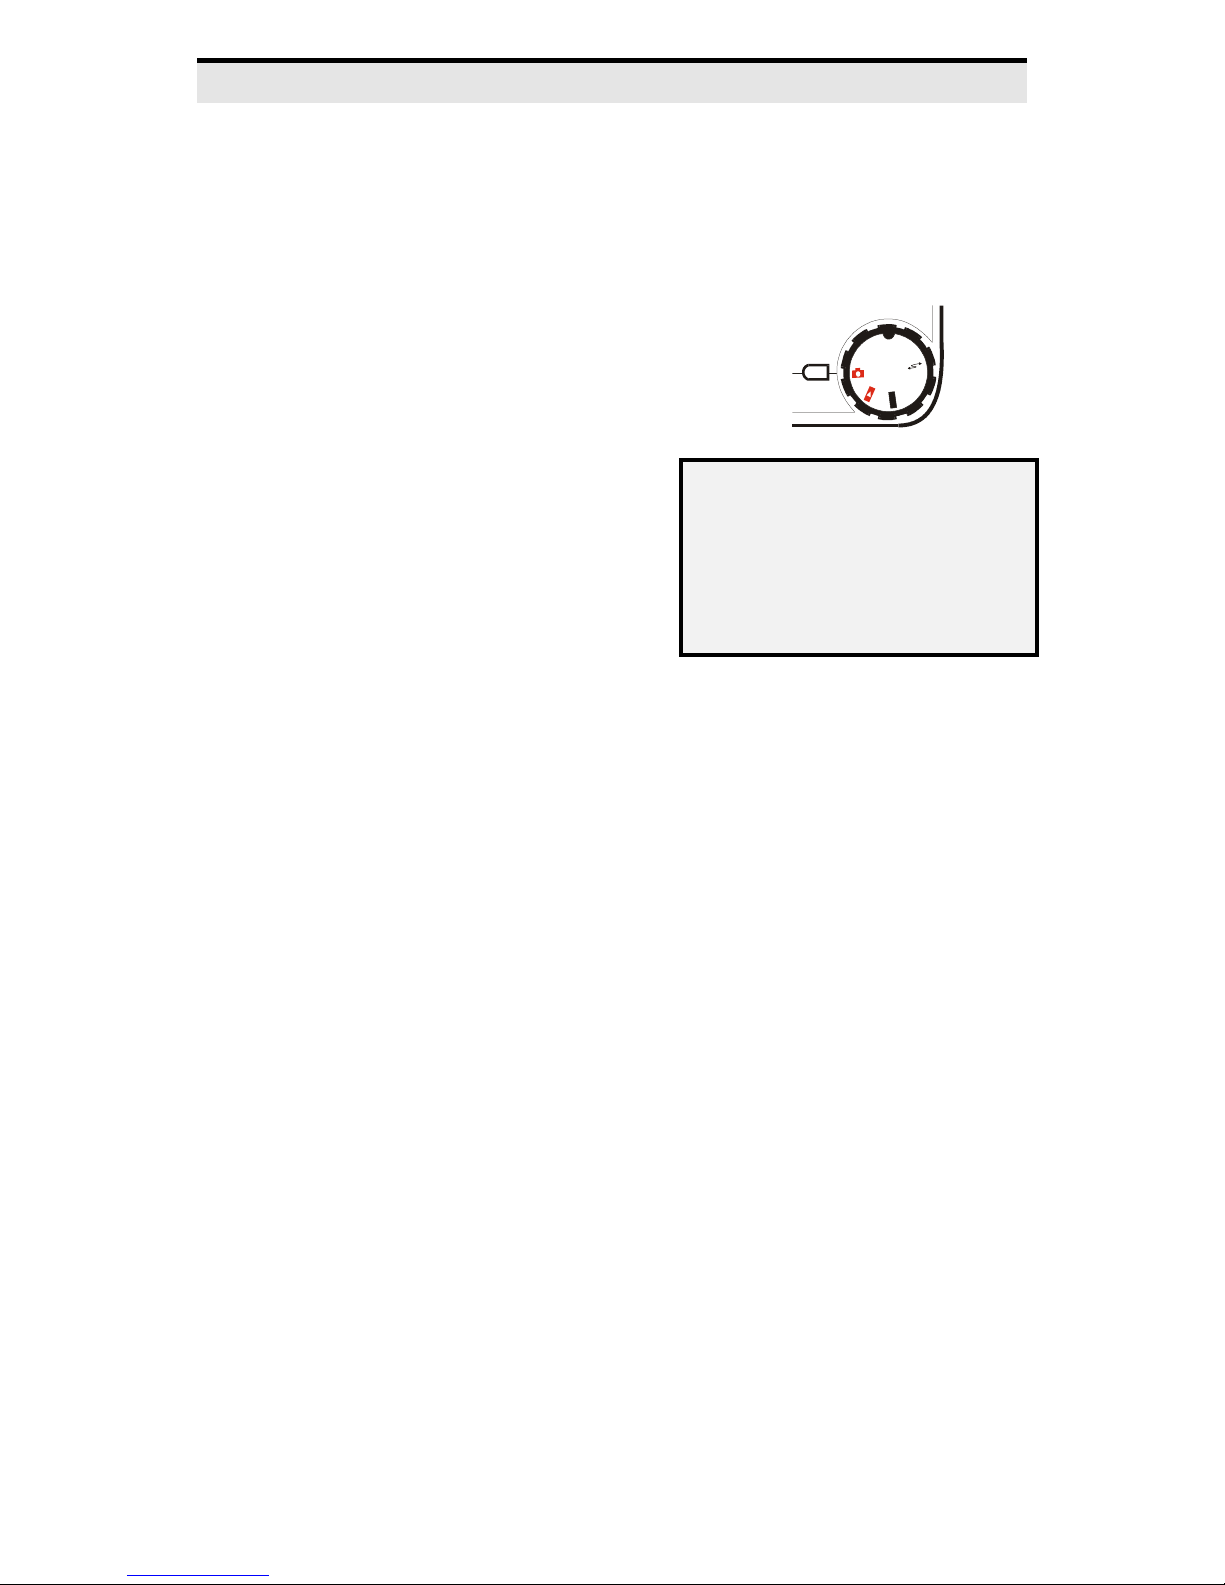
Capture Mode preview
To turn the LCD monitor on in Capture
mode, turn the main switch to
and press the
Delete/LCD (on/off)
button.
Capture
P
U
T
E
S
F
F
O
Note: To set the time, refer to the
instructions on page 10.
09 / 16 / 2000
10 : 30
Playback preview
After taking pictures, you can preview them from Playback Mode. You
will have the option to instantly delete pictures, freeing up storage space.
You can also enable “protect” to prevent images being deleted.
There are two methods for Playback Mode: Single image display and
Thumbnail display. For more information on how to switch back and
forth between these modes, see page 11.
- 8 -
Page 14
Setup Mode screens
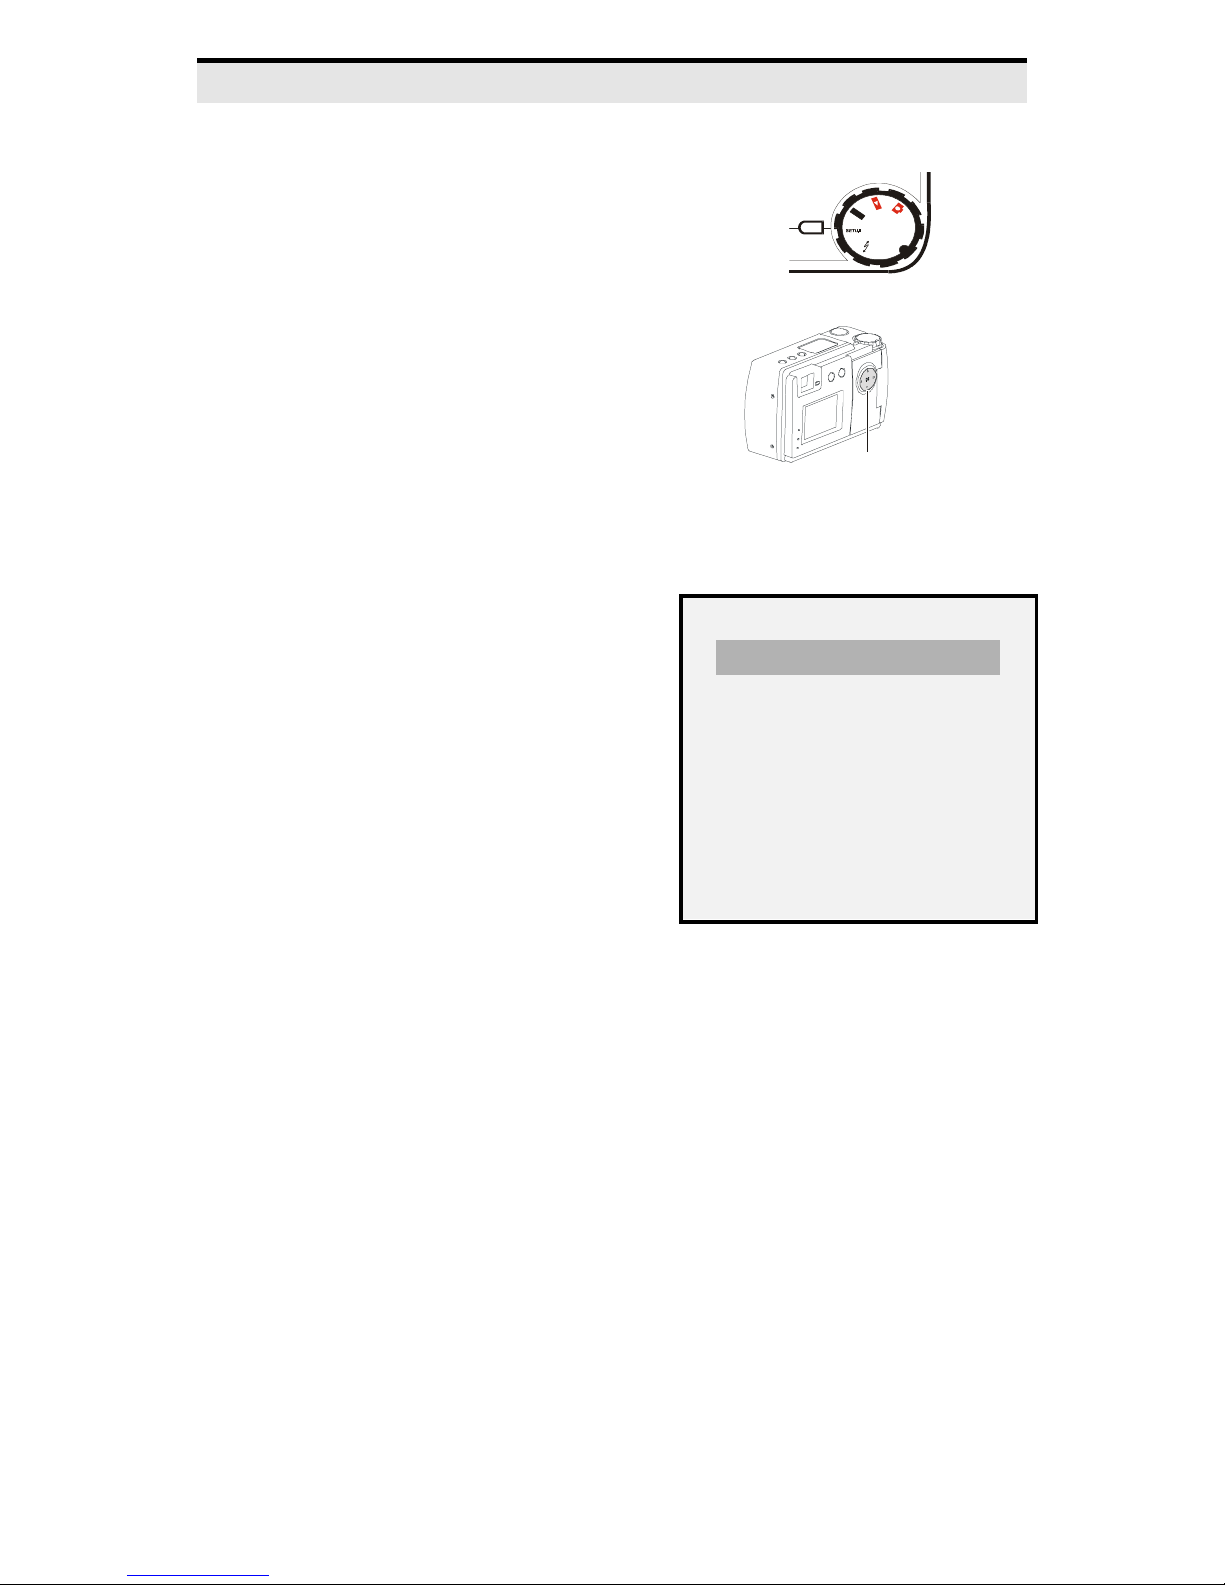
To access the Setup Mode screens, set
the main switch to
SETUP
. The Setup
Menu screen appears.
Use the Zoom/Navigator
up/down
arrows to scroll menus. Use the
Zoom/Navigator
button to make
OK
selections.
Setup Menu
In the main menu, scroll to the item
you would like to adjust and press
. Next, scroll to the desired setting
OK
and press
OK
.
O
F
F
Zoom/Navigator
button
SETUP MODE
AUTO POWER OFF
BEEP
LANGUAGE
SELF TIMER
VIDEO FORMAT
CARD FORMAT
DATE TIME
RESET
Auto Off
This item determines the amount of time before the camera shuts off
automatically, when it is not in use. In the main menu scroll to
Power Off
and press
. Scroll to the desired setting and press
OK
Beep
This setting allows you to turn off the “beep” sound. In the main menu
scroll to
Beep
and press
. Scroll to the desired setting and press
OK
Language
This setting allows you to select the language that the menus are
displayed in. In the main menu scroll to
Scroll to desired language and press
OK
Language
.
and press
Auto
OK
OK
.
OK
.
.
- 9 -
Page 15

Self Timer
This setting allows you to select the amount of delay for the selftimer. In the main menu scroll to
Self Timer
and press
OK
Scroll to desired setting and press
Video Format
This setting allows you to select the video format for viewing images
using your television (Video cable required). Two video formats are
available: NTSC and PAL. In the main menu scroll to
Format
Card Format
This setting allows you to erase all of the data stored on the
CompactFlash card (including “Protected” images). In the main
menu scroll to
to format (erase all data) the CompactFlash.
OK
Scroll to No and press
formatting the card.
Date Time
, choose format and press
Card Format
OK
and press
to exit to the main menu without
OK
OK
.
.
. Scroll to
OK
Video
and press
Yes
This setting allows you to set the date and time.
1. In the main menu scroll to
2.
Year
then use the
is selected: use the
up/down
arrows to move to the next item.
left/right
Date Time
and press
OK.
arrows to change the value,
3. Repeat Step 2 for the other date and time items and date stamp.
4. Scroll to
and press
Set
to enter the new time and exit this
OK
menu.
To exit menu, scroll to Exit and press
Exit
.
Reset
This item lets you reset the camera
settings to the factory defaults.
In the main menu scroll to
and press
OK
. Press
Yes
Reset
or No and
then Exit.
RESET
YES
NO
- 10 -
Page 16

Playback Mode screens
Caution!
button
deletes pictures
To access the Playback Mode screens, set the main switch to
Playback
Press the
Use the Zoom/Navigator
the Zoom/Navigator
In Playback Mode pressing the Delete/LCD (on/off)
does not turn the LCD monitor on or off but instead
.
Menu
button. The Playback menu screen appears.
up/down
button to make selections.
OK
arrows to scroll menus. Use
Playback Menu
In the main menu, scroll to the item you would like to adjust
and press
Type
This item sets how many images you can view in Playback
mode. In the main menu scroll to
two options: 1 image (Single Image) or 9 images (Thumbnail).
Scroll to the desired setting and press
. Next, scroll to the desired setting and press
OK
and press
Type
.
OK
OK
.
OK
. You have
Protect
This item lets you protect images from being deleted. Move to
the image that you want to protect. In the main menu scroll to
Protect
unprotect and press
and press
. Scroll to
OK
OK
to protect, or No to
Yes
.
Slide Show
When enabled this item will begin a slideshow of all currently
loaded images at three- or ten- second intervals. In the menu
scroll to
press
Delete All
This item lets you delete all images (except protected images) from
the CompactFlash card. In the main menu scroll to
press
Slide Show
to start the slideshow.
OK
. Select
OK
Note: To delete protected images you must first “unprotect” the
image. This is done in the Protect menu. Select No to unprotect.
and press OK. Scroll to
or No and press
Yes
OK
3 Sec
.
or
Delete All
10 Sec
and
and
- 11 -
Page 17

Capture Mode screens
Use the
Zoom/Navigator
up/down arrows to scroll menus. Use the
Zoom/Navigator OK button to make selections.
Capture Menu
In the main menu, scroll to the item
you would like to adjust and press
. Next, scroll to the desired setting
OK
and press
OK
.
CAPTURE MODE
TYPE
EXPOSURE VALUE
WHITE BALANCE
SPECIAL EFFECT
SHARPNESS
Type
This item lets you choose if one image (Single Image) will be taken
when the shutter release button is pressed or four images (Continuous
Shoot). In the main menu scroll to
desired setting and press
OK
.
Type
and press
. Scroll to the
OK
Exposure Value
This setting controls the amount of light the sensor in the camera sees.
In the main menu scroll to
Exposure Value
and press
. A higher
OK
setting (+) results in a brighter image; a lower setting (-) a darker
image. Select the desired setting and press
OK
.
White Balance
This item lets you set the white balance for your pictures. In the main
menu scroll to
White Balance
and press
. For general photos, use
OK
automatic. If auto is not working for your particular lighting, then use
the Daylight setting for outdoor pictures, Fluorescent for indoor office
lighting (long tube style bulb), and Tungsten for home lighting (light
bulbs found in lamps). Scroll to the desired setting and press
Special Effect
This item lets you take pictures in black & white or color. In the main
menu scroll to
Special Effect
setting and press
OK
.
and press
. Scroll to the desired
OK
OK
.
- 12 -
Page 18

Sharpness
This item affects the sharpness of the pictures you take. In the main
menu scroll to
and press
OK
Sharpness
.
and press
. Scroll to the desired setting
OK
Turning the camera on and off
1.
2.
Set the main switch to
Capture
.
Check the current settings in the LCD status display. (See
LCD status display.)
3.
Press the
Delete/LCD (on/off)
button to turn on the LCD
monitor.
4.
To turn the camera off, set the main switch to
Taking pictures (single frame)
1.
2.
3.
4.
5.
6.
Set the main switch to
Capture
.
Check the current settings in the LCD status display.
Press the picture resolution button to set the image quality.
Set the flash mode.
Ensure the standby LED has stopped flashing and align the
picture through the viewfinder.
Press the shutter release button to take the picture. You hear
a beep as the picture is taken. The LCD status display
indicates the number of pictures you have left.
OFF
.
Sequential shooting (four frames)
The sequential shot takes four pictures in sequence with a 1-second (lowlight) to 1/30-second (bright-light) interval between each frame. Refer to
the following.
Note:
To take a sequential shot, there must be at least four
images left on the CompactFlash card.
The flash is disabled for sequential shots.
- 13 -
Page 19

1.
2.
3.
4.
5.
Set the main switch to
Press the
Delete/LCD (on/off)
Capture
monitor.
Press the
Menu
button to open the Playback Mode main
menu.
Use the Zoom/Navigator
up/down
Type
arrows to scroll to
and press
OK
. The Type
screen appears.
Use the Zoom/Navigator
up/down
Continue Shoot
arrows to scroll to
and press
.
button to turn on the LCD
PLAYBACK MODE
TYPE
PROTECT
AUTOPLAY
DELETE ALL
TYPE
SINGLE IMAGE
CONTINUE SHOOT
OK
.
6.
7.
8.
Press the
Menu
button to exit the Playback Mode menu.
Ensure the standby LED has stopped flashing and align the
picture through the viewfinder.
Press the shutter release button down and continue to hold
down to sequentially take the pictures. Repeat steps 7 and 8
to take another sequential shot.
Note:
If the camera is turned off after taking a sequential shot
and then turned back on, the default “Single Image” is reset.
Setting the resolution (picture quality)
- 14 -
Page 20
1.
2.
Set the main switch to
Press the picture resolution button to set the picture
resolution to super fine, fine or standard.
3.
Ensure the standby LED has stopped flashing and align the
picture through the viewfinder.
4.
Press the shutter release button to take the picture.
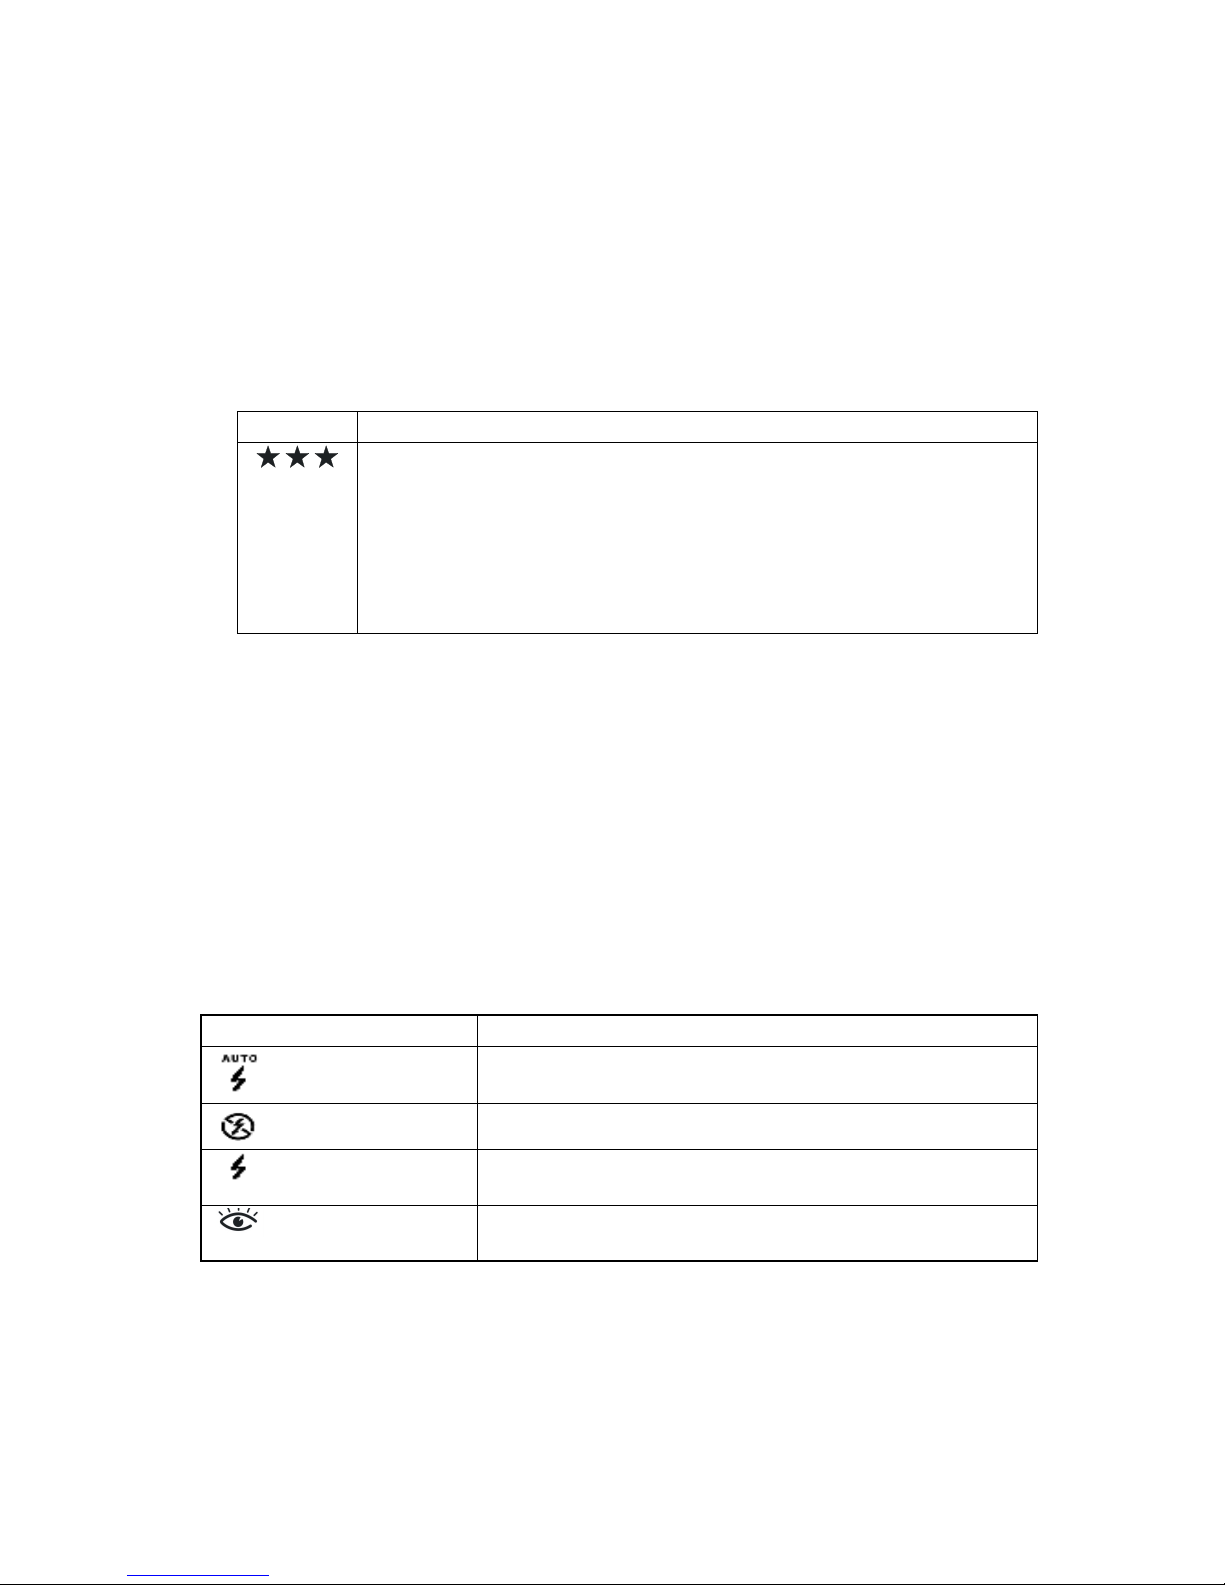
Icon Meaning
Indicates the picture quality setting:
•
• Two Stars: 1600 x 1200 fine resolution, 31 pictures
•
Capture
Three Stars: 1600 x 1200 super-fine resolution, six pictures
maximum.
maximum.
One Star:
maximum.
800 x 600 standard resolution, 64 pictures
.
Setting the flash
1.
2.
3.
Flash Mode Meaning
No Flash
Red Eye
Set the main switch to
Press the flash mode button and select the mode you want.
Ensure the standby LED has stopped flashing and align the
picture through the viewfinder.
The flash occurs automatically when ambient lighting is
Automatic Flash
Flash Always On
insufficient for picture capture.
The flash function is disabled.
The flash is used with every picture regardless of
lighting conditions
When taking pictures with the flash, the common redeye effect is reduced
Capture
.
- 15 -
Page 21

Setting the Self-timer
1.
2.
3.
4.
5.
6.
Note:
results.
Set the main switch to
Press the self-timer/macro button to enable self-timer mode.
The self-timer icon appears in the LCD status display.
Ensure the standby LED has stopped flashing and align the
picture through the viewfinder.
Press the shutter release button. You have ten (or thirty
seconds) to move to your location for the picture.
The self-timer indicator starts to blink red. After seven (or
27) seconds, the self-timer indicator blinks faster for three
seconds to alert you to prepare for the picture. After three
seconds, the camera takes the picture.
Use a tripod with the self-timer function for optimal
Capture
.
Using the zoom function
If the LCD monitor is turned on when you enable zoom, a “2X” icon is
shown at the top of the display.
1.
2.
3.
4.
5.
Set the main switch to
Press the
monitor.
Press the Zoom/Navigator
subject. Press the Zoom/Navigator up
out.
When LED has stopped flashing, align the picture through
the viewfinder.
Press the shutter release button to take the picture.
Delete/LCD (on/off)
Capture
.
button to turn on the LCD
down arrow to zoom in on the
up
/
down
/
arrow to zoom
- 16 -
Page 22

Using the macro function
Enable the macro function for close-up photography between
approximately 8”-23” (20cm-60cm) from the subject.
1.
2.
3.
4.
5.
Set the main switch to
Capture
.
Press the self-timer/macro button three times to enable macro
mode. (Press the self-timer/macro button twice to enable
macro mode and the self-timer.)
The macro icon appears in the LCD status display.
Ensure the standby LED has stopped flashing and align the
picture through the viewfinder.
Press the shutter release button.
- 17 -
Page 23

Protecting Images
Pro
tecting and deleting images in S
ingle image display
mode
When the camera is turned on in Playback mode, it displays by default in
Single image mode.
Set the main switch to
Playback
to turn on the LCD monitor.
The current picture and total stored pictures are displayed in the
bottom-left corner.
Protecting images
1.
2.
3.
4.
Use the Zoom/Navigator
desired image.
Press the
Menu
button to open the Playback Mode main
menu.
Use the Zoom/Navigator
arrows to scroll to
. The Protect screen appears.
OK
Protect
Use the Zoom/Navigator
and press
to protect the selected image.
OK
left/right
up/down
and press
up/down
arrows to scroll to the
arrows to scroll to
PLAYBACK MODE
TYPE
PROTECT
SLIDE SHOW
DELETE ALL
Yes
5.
Press the
the Playback Mode menu.
Deleting images
1.
2.
Use the Zoom/Navigator
desired image.
Press the
appears.
Menu
button to exit
left/right
Delete/LCD (on/off)
Menu button
arrows to scroll to the
button. The Delete menu
- 18 -
Page 24

3.
Use the Zoom/Navigator
Press
Note: You cannot delete a protected image. You must first “unprotect” the image.
to delete the selected image and exit the menu.
OK
up/down
arrows to scroll to
Yes.
Protecting and deleting images in Thumbnail
display mode
1.
2.
3.
Set the main switch to
Press the
Use the Zoom/Navigator
and press
Menu
OK
button to open the Playback Mode main menu.
. The Type screen appears.
Playback.
up/down
arrows to scroll to
Type
4.
5.
The pictures you have taken are displayed in Thumbnail format. Use
the Zoom/Navigator
this example, five images are loaded. The selected image—number 3 in
this example—is highlighted with a white border. If more than nine
images are stored, the images will automatically load when you scroll
past the last Thumbnail.
Use the Zoom/Navigator
Thumbnail
Press the
and press
Menu
button to exit the Playback Mode menu.
left/right
OK
arrows to scroll through the pictures. In
up/down
.
arrows to scroll to
Protecting images
1.
Use the Zoom/Navigator
desired image.
left/right
arrows to move to the
2.
Press the
Menu
button to open the Playback Mode main menu.
- 19 -
Page 25

3.
4.
5.
6.
Deleting images
1.
2.
Use the Zoom/Navigator
and press
Use the Zoom/Navigator
press
Press the
A “Protect” icon is shown in the top-right of the LCD monitor
indicating the image is protected.
Use the Zoom/Navigator
desired image.
Press the
appears.
OK
up/down
. The Protect screen appears.
OK
up/down
to protect the selected image.
Menu
Delete/LCD (on/off)
button to exit the Playback Mode menu.
left/right
arrows to scroll to
arrows to scroll to
arrows to move to the
button. The Delete menu
Protect
and
Yes
3.
Use the Zoom/Navigator
Press
to delete the selected image and exit the menu.
OK
up/down
arrows to scroll to
Yes.
- 20 -
Page 26
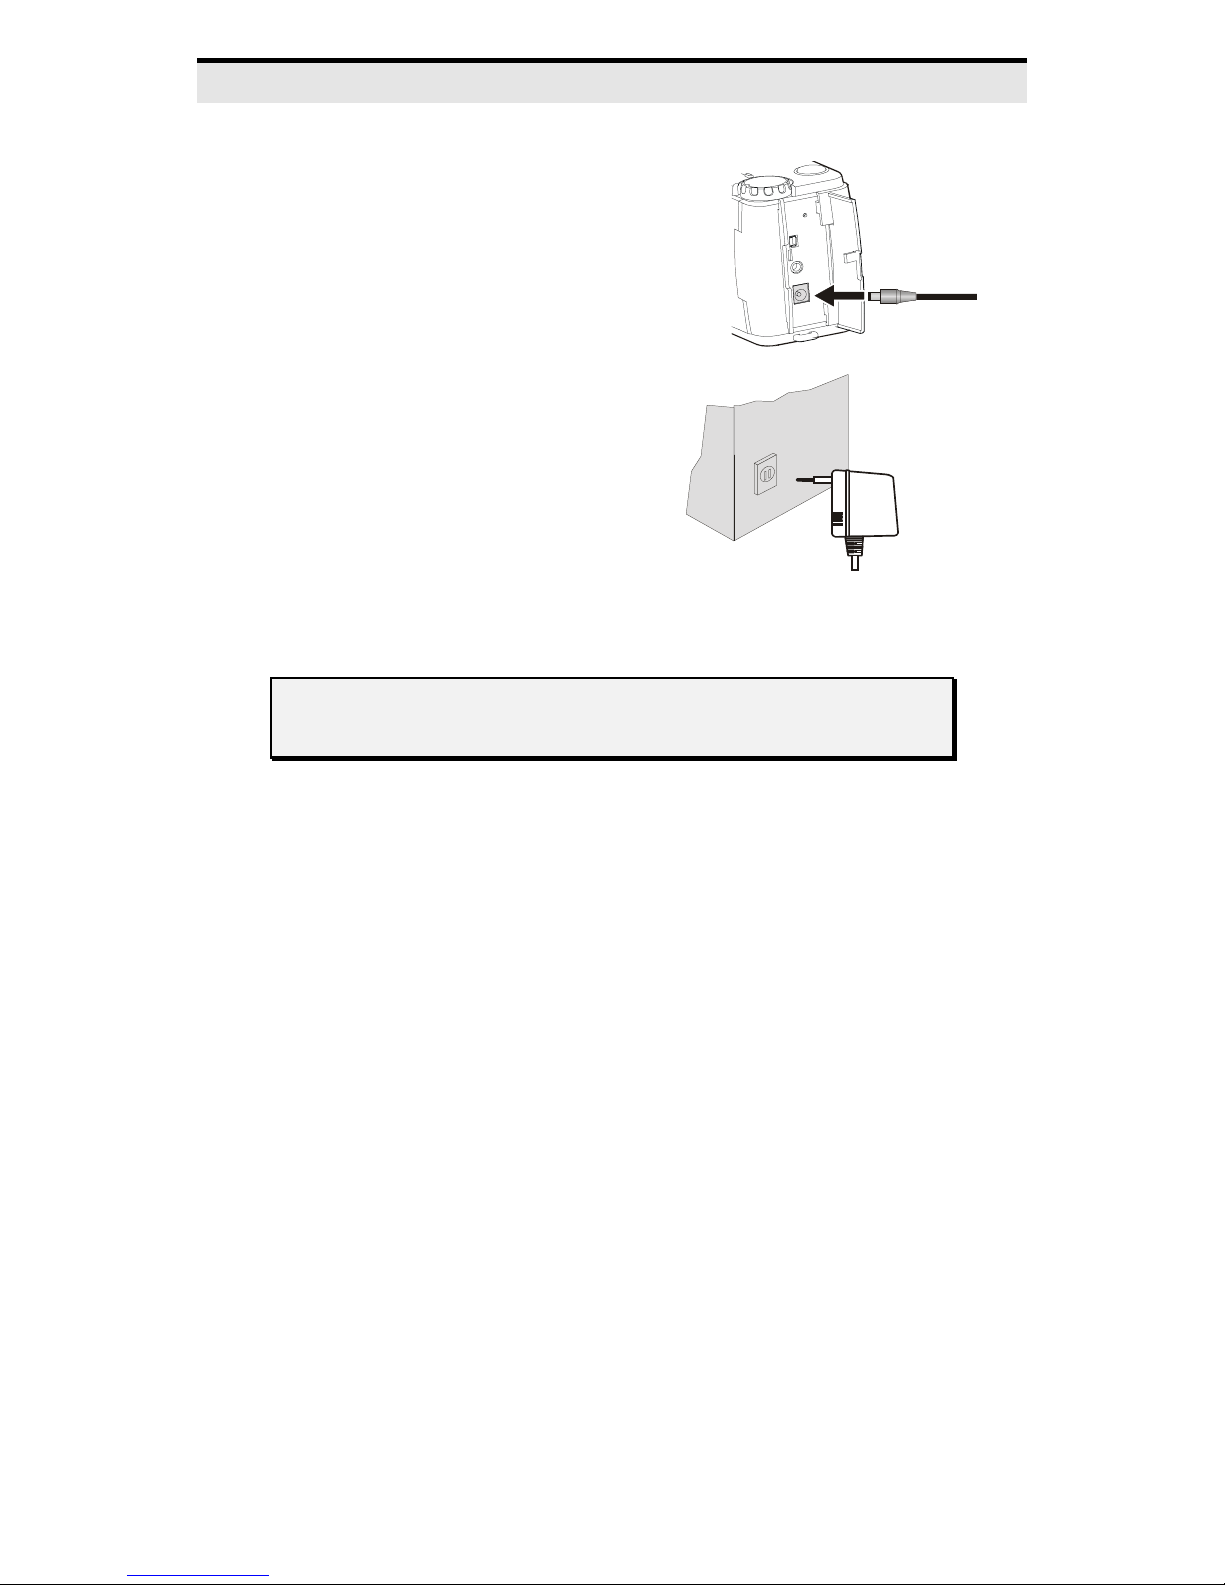
Connecting to an AC power source
1.
Set the main switch to
OFF.
2.
3.
Open the connector cover.
Insert the AC adapter jack
into the AC input.
4.
Plug the AC adapter into a
wall outlet.
Note:
Ensure that the AC adapter you use matches the electrical
specifications for the camera. Refer to the Appendix for details.
- 21 -
Page 27
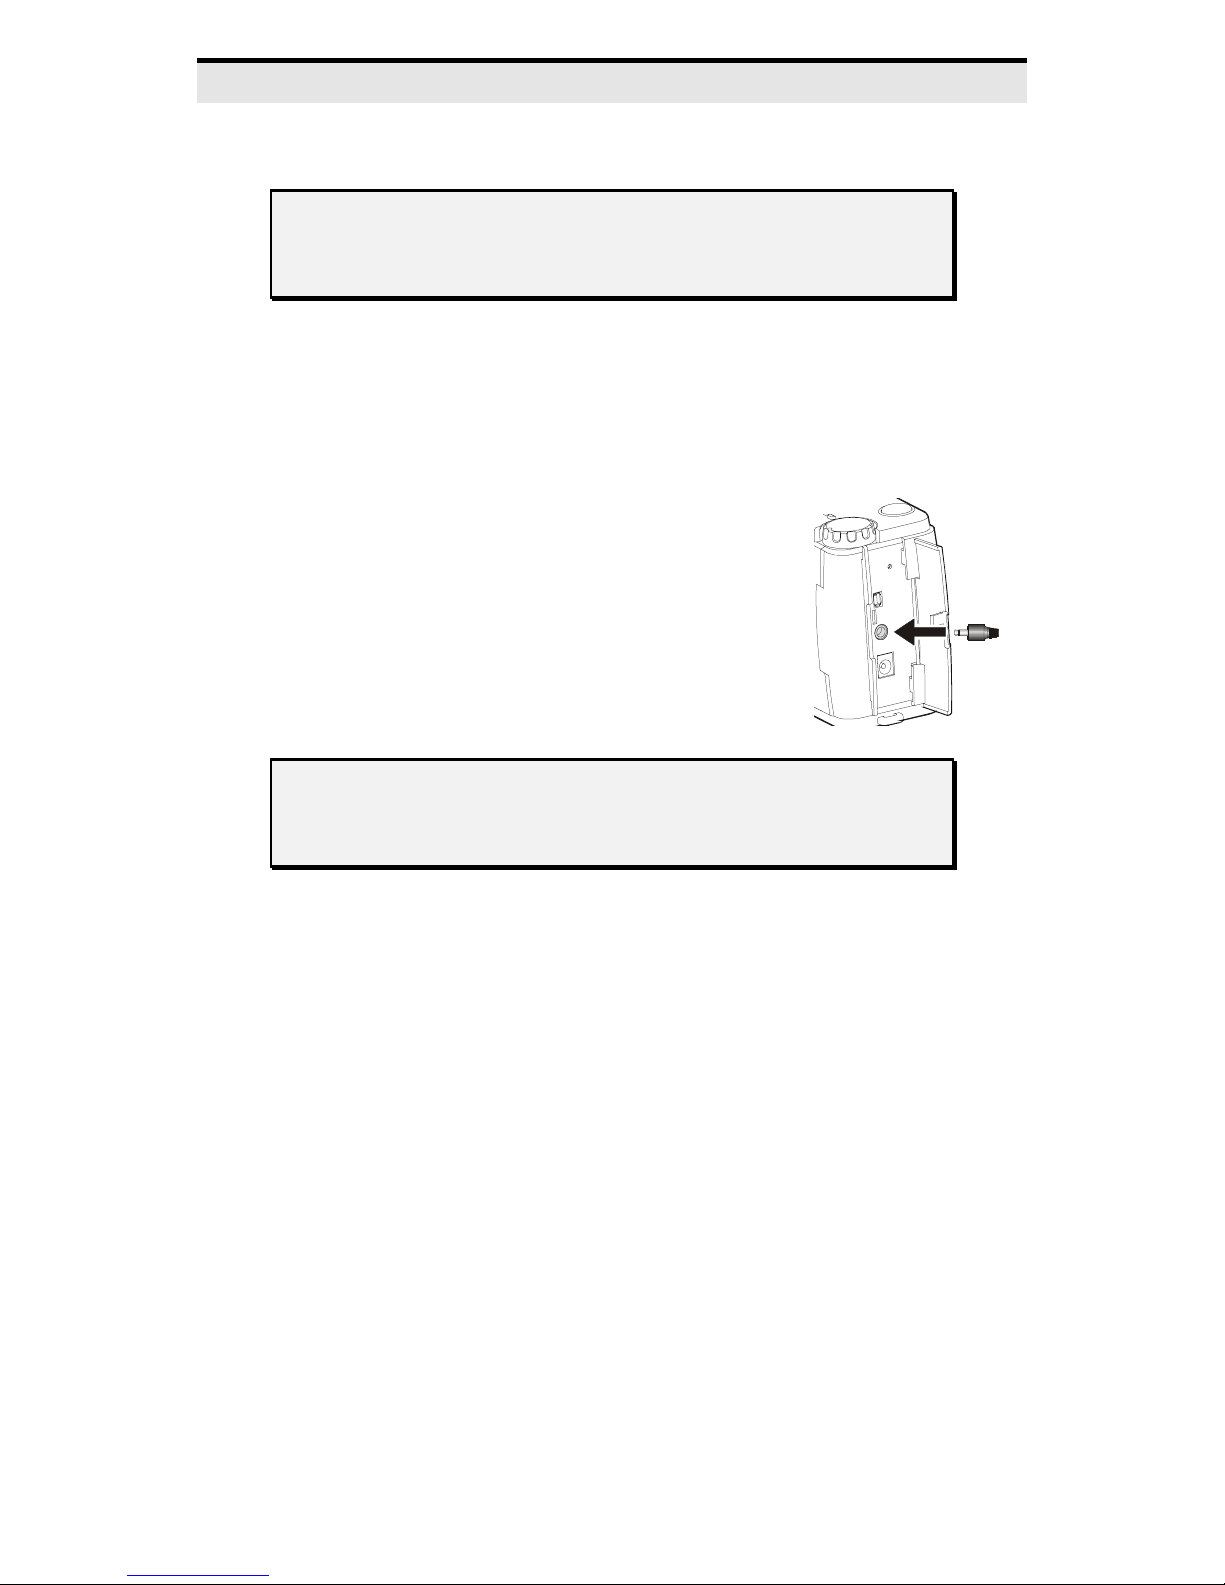
Viewing pictures on your TV (NTSC or PAL)
Note: You will need to determine the video format of your TV—
NTSC or PAL—and set the camera accordingly before
proceeding
1.
2.
3.
Set the main switch to
Playback
.
Open the connector cover.
Connect the video cable jack to the
video port on the camera.
4.
Connect the video cable RCA jack to
the video-in port of the TV. The TV
displays the image. Use the navigator
button to scroll through the images.
Note:
Camera operations such as protecting or deleting images
when connected to a TV are the same as when using the
camera’s LCD monitor.
- 22 -
Page 28

Installing software
Please follow these instructions to install the included SC-2100 Twain
driver and MGI PhotoSuite III SE image editing software. This software
will enable you to download the images from your SiPix SC-2100 digital
camera to your computer.
1. Insert the SiPix SC-2100 CD into the CD-ROM drive. The
installation program should auto-run. If the installation program
does not automatically run, select Start and Run. Enter D:\setup.exe
(where “D” is your CD-ROM drive) Choose
process will begin. The recommended installation is to install both
the SC-2100 Twain driver and MGI PhotoSuite III SE included on
a separate CD. Images cannot be downloaded without installing the
SC-2100 Twain driver and using it with a Twain compliant
imaging application like MGI PhotoSuite IIISE. Follow the
onscreen instructions to install the SC-2100 TWAIN driver. Restart
the computer when instructed.
. The Installation
OK
2. Insert the MGI PhotoSuite III SE CD into the CD-ROM drive. The
installation program should auto-run. If the installation program
does not automatically run, select Start and Run. Enter D:\setup.exe
(where “D” is your CD-ROM drive) Choose
. The Installation
OK
process will begin.
1. On the first screen, click
Next
.
2. Read through the Licensing Agreement
3. After reading the Licensing Agreement, click
Yes
.
- 23 -
Page 29
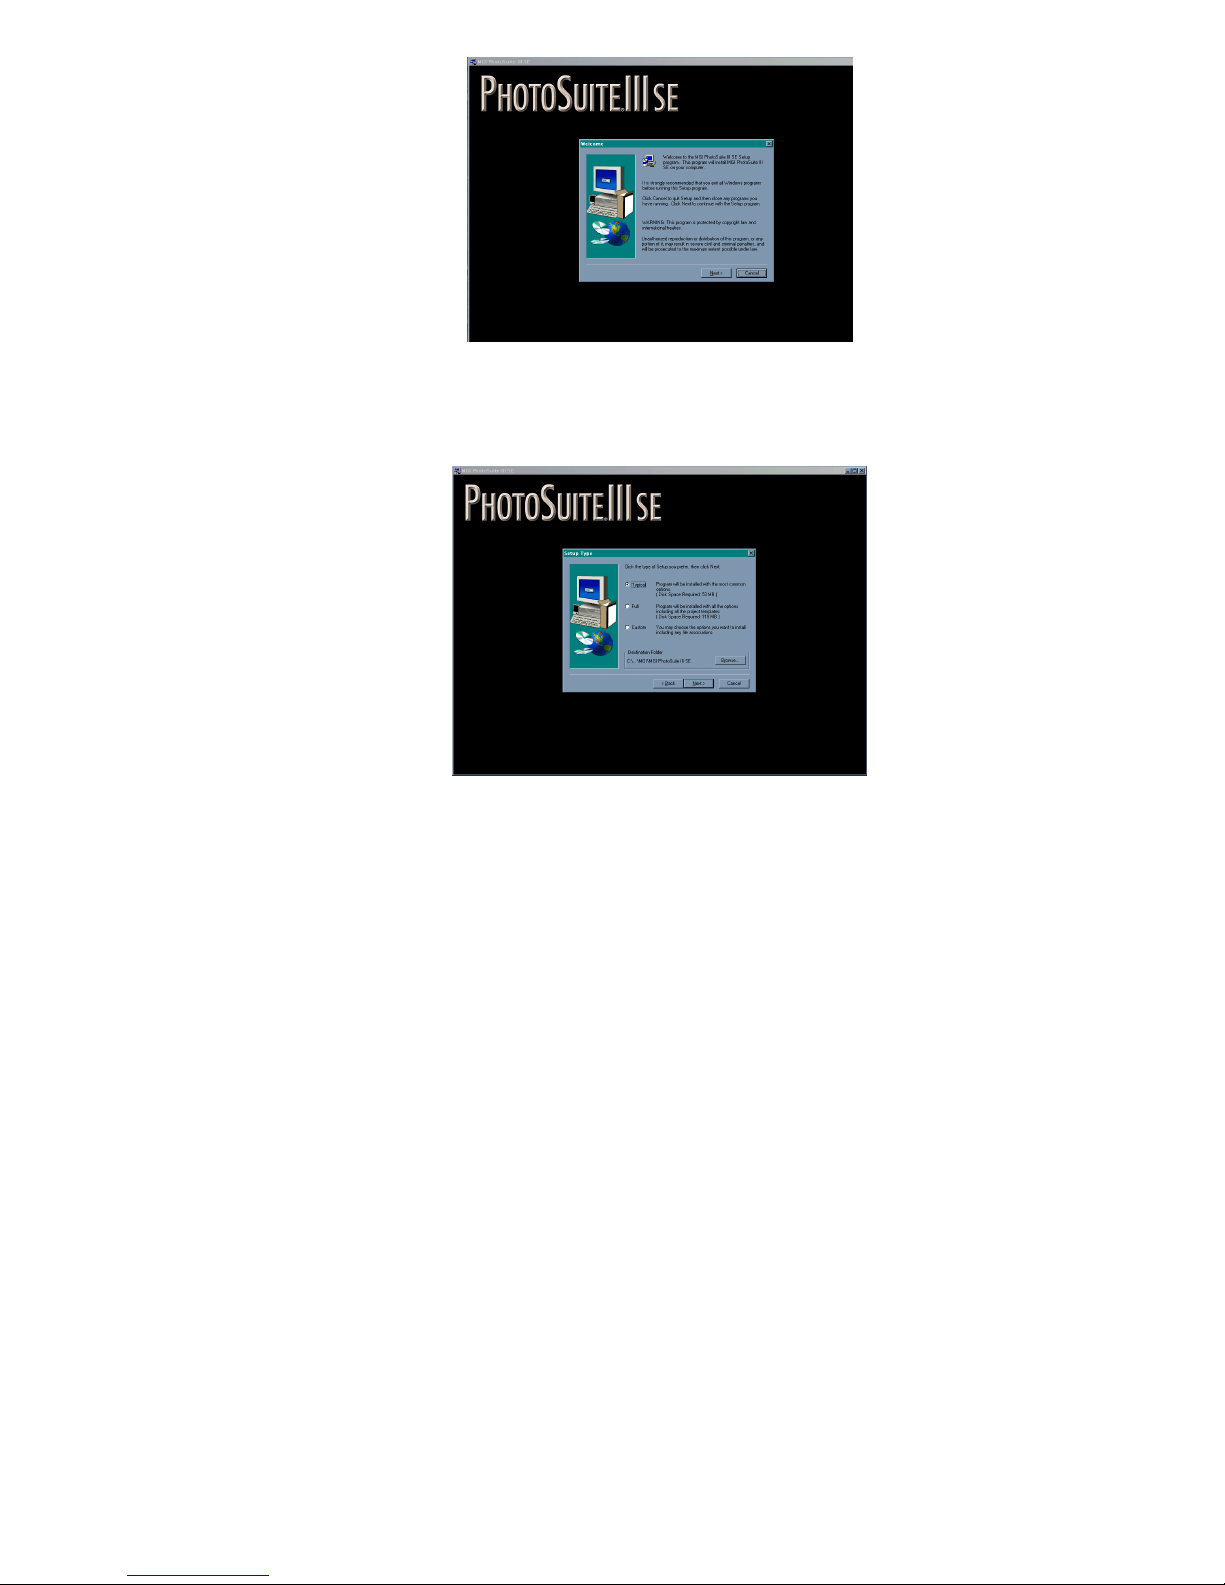
4. Choose which type of installation you would like. If you are
not sure, choose
Typical
. Click
Next
.
5. The Current Settings window is to show the installation
settings. Ensure you have selected the proper settings. Click
.
Next
6. Your application is now installing.
7. After installation it is recommend that you restart your
computer before using the MGI PhotoSuite IIISE imaging
application.
- 24 -
Page 30
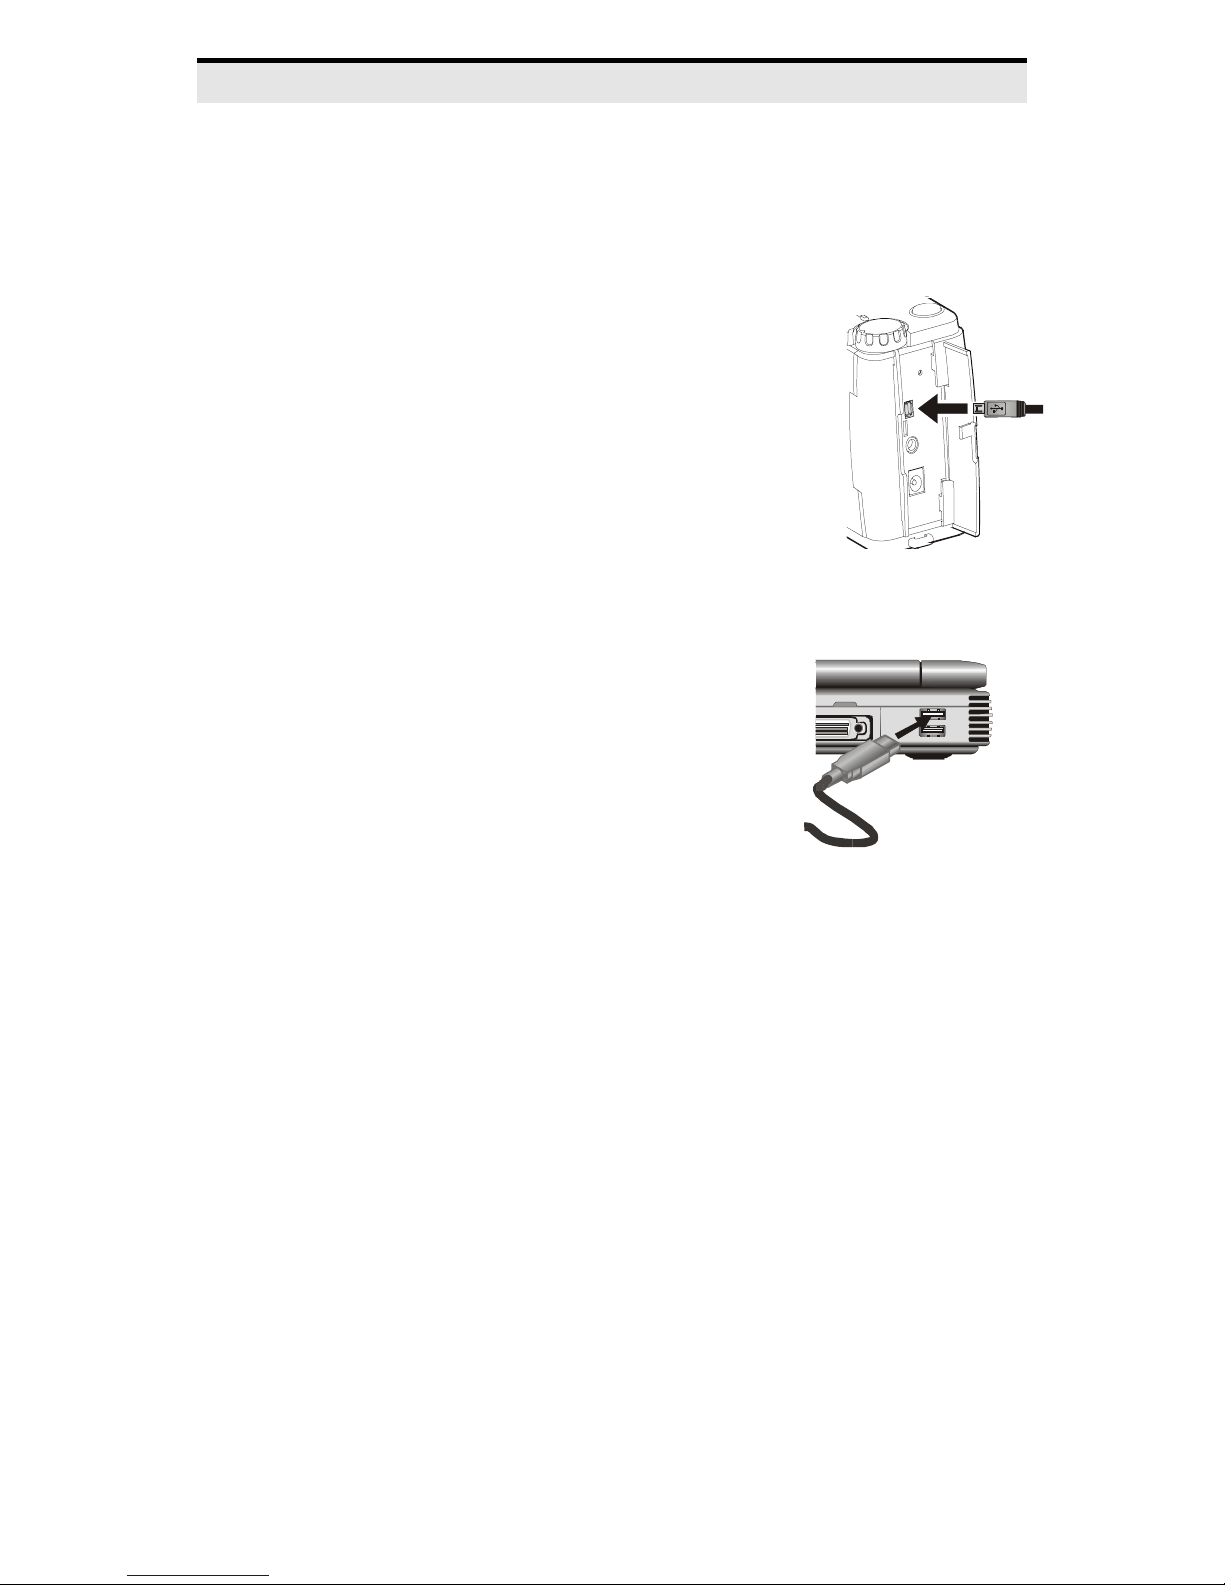
Connecting the SC-2100 to your PC
Use the supplied USB cable to connect your SC-2100 digital camera to a
PC or notebook computer and download your pictures. Refer to the
following illustration:
1.
2.
3.
4.
Set the main switch to CONNECT.
Open the connector cover.
Connect the small USB connector to the
USB connector on the camera.
Connect the large USB connector to the
USB connector on the PC or notebook
computer.
5.
After you have connected your camera to your computer, the
LCD monitor shows: CONNECT
- 25 -
Page 31
Downloading pictures to your PC
Note:
Ensure you have installed your MGI PhotoSuite III SE
software.
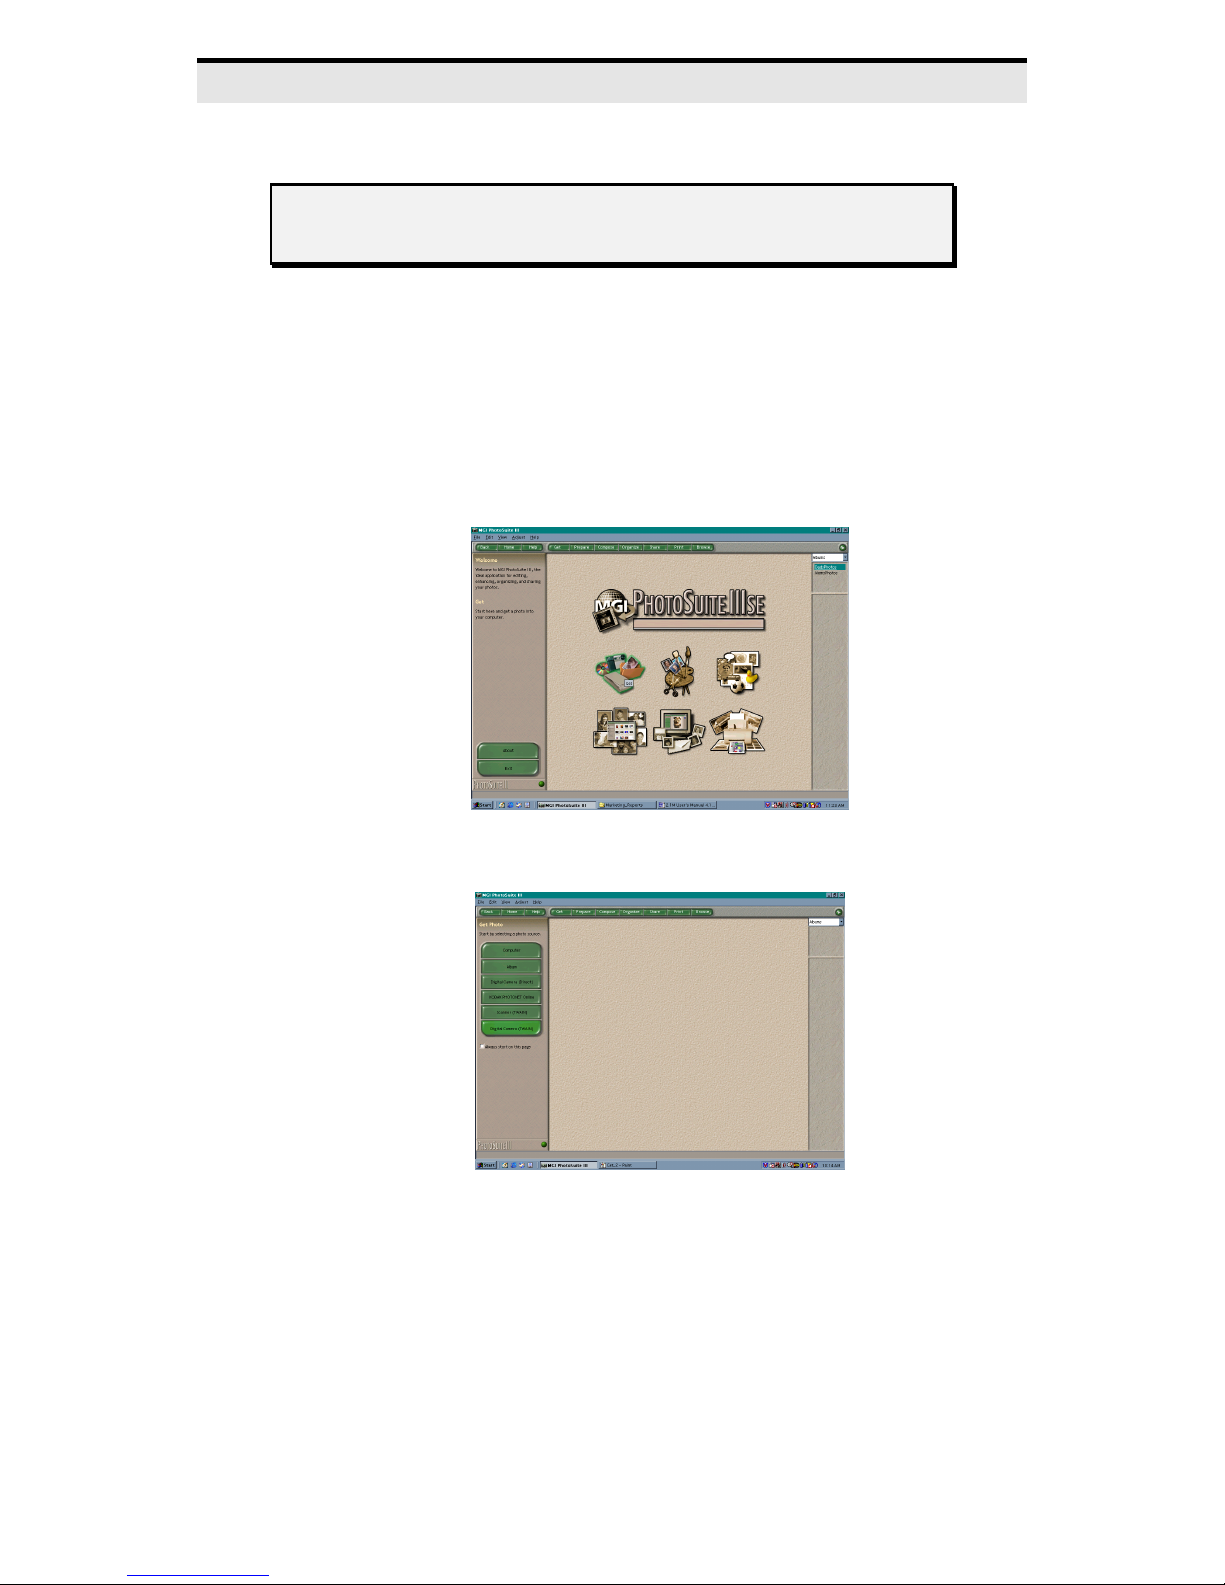
Follow these instructions to use the included software to download
pictures:
1. Click
click the
Start, Programs
MGI PhotoSuite III SE
2. Choose
3. Choose
from the menu across the top of the window.
Get
Digital Camera (Twain)
hand side of the window.
, and
MGI PhotoSuite III SE
icon to open the program.
from the menu on the left
. Then
- 26 -
Page 32
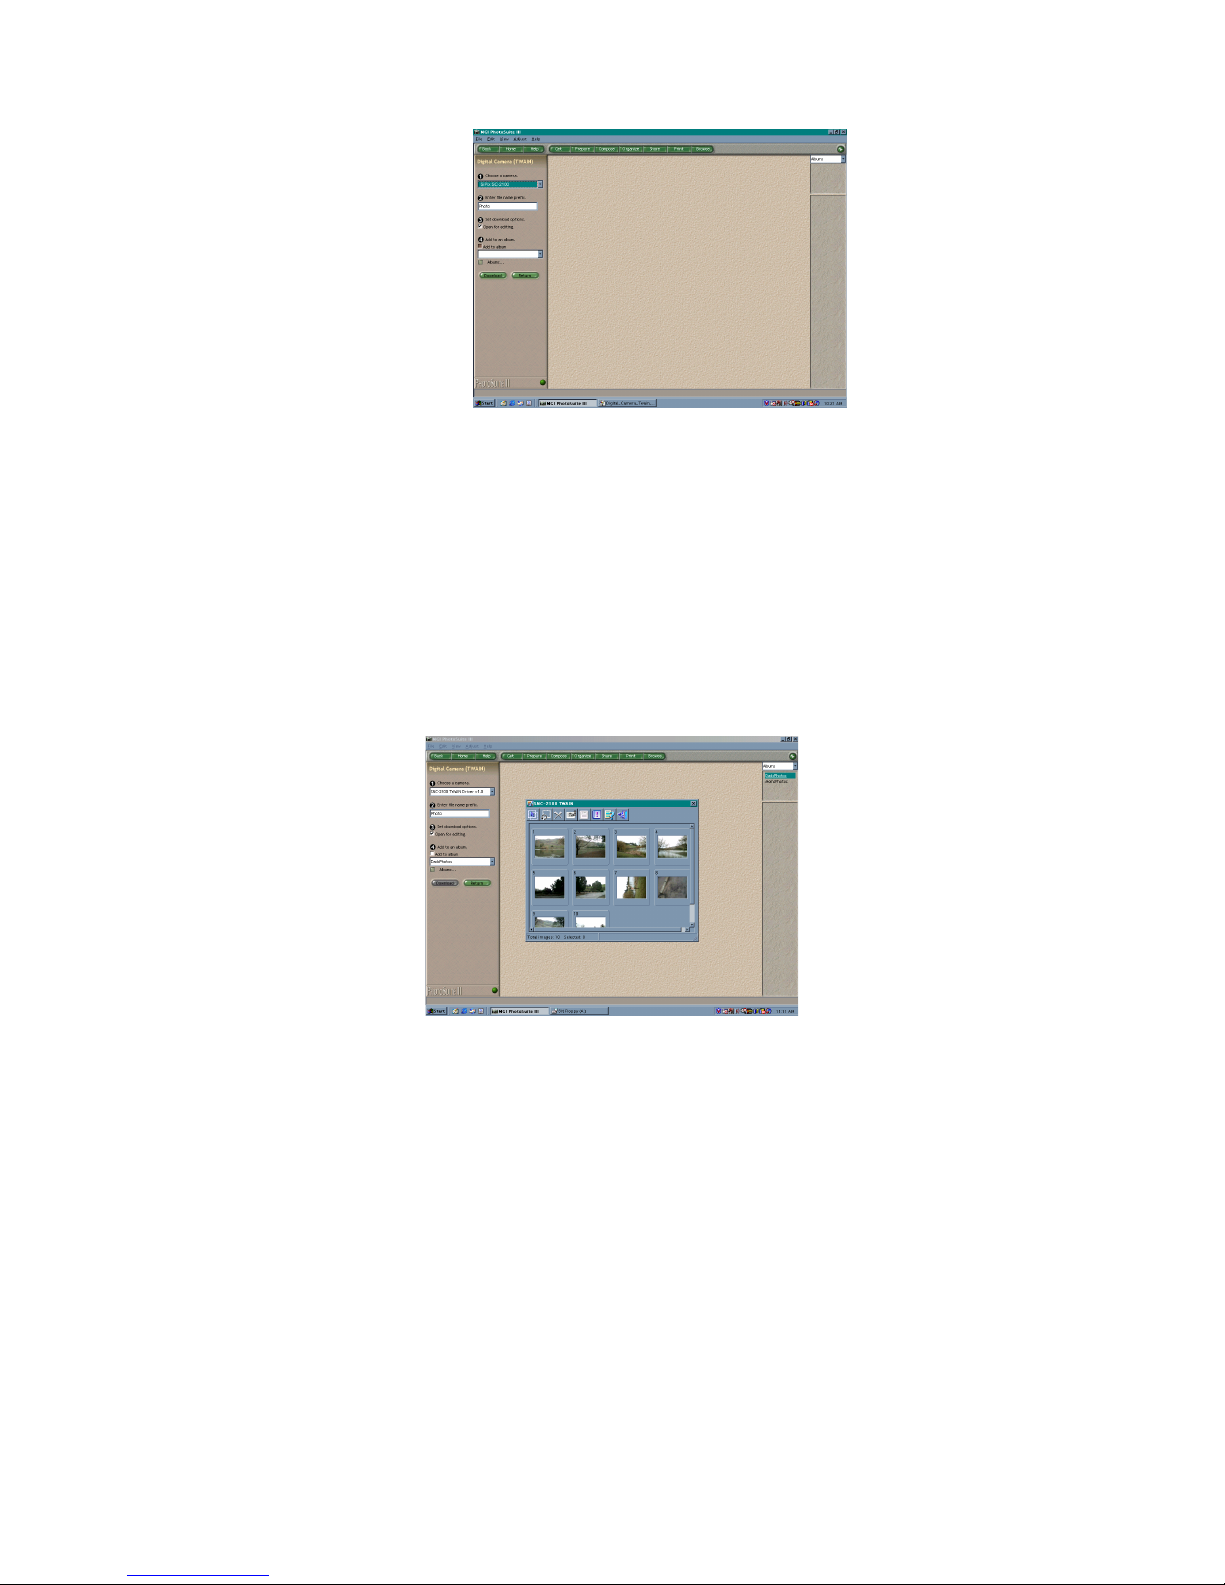
4. Under Choose a Camera select the SC-2100 digital camera
Twain driver.
5. Name your images in the name prefix text box. Numbers will
automatically be added to the end of the names.
6. Choose if you want the images to open for editing in MGI
PhotoSuite III SE.
7. Next choose if you would like to add these files to an already
existing album or create a new album. (Be sure to check the
“add to album” box)
8. Now click the download button. A screen will display the
images from your camera.
9. Select the images you want to download to your computer or
click the upper left button to select all of the images. Click the
transfer button and the images will download to your
computer.
10. You can now use this application to edit your images or to
print them.
- 27 -
Page 33

Troubleshooting
Problem Possible cause Solution
The camera has no
power.
The camera won’t
take a picture.
The camera is off. Make sure that the
main switch is not set
OFF
to
The batteries are
discharged.
The batteries are
inserted incorrectly.
The AC adapter is not
plugged in.
Ensure that the
Standby LED is on and
is not flashing.
Is the FlashCard full? If the Flashcard is full,
Replace batteries
Check the battery
orientation.
Ensure that the AC
adapter is plugged into
a working outlet. Also,
make sure that the AC
adapter has the correct
specifications for the
camera.
If the LED is flashing,
wait until it emits a
steady light before
taking the picture.
you cannot take any
more pictures. Delete
some pictures to free
up memory.
.
Is the CompactFlash
card inserted
correctly?
Is the camera
connected to a
computer?
If the CompactFlash
card is inserted
incorrectly, a message
is displayed in the LCD
status display.
The camera’s buttons
are not functional
when connected to a
PC. Disconnect the
camera to take more
pictures.
- 28 -
Page 34

Troubleshooting (continued)
The flash doesn’t
work.
The pictures are
blurred
The pictures are dark Flash is needed Turn the flash on.
The pictures are too
light.
Is the flash on? Ensure that the flash is
set correctly.
The batteries may be
weak.
Camera or subject was
moving when the
picture was taken.
You are facing a bright
light when taking the
picture.
The flash is set to
Flash always on.
If the batteries are too
weak, the flash is
unable to recharge.
Turn the camera off
and wait a few
seconds before turning
it back on. If this
doesn’t work, you need
to replace the batteries
Hold the camera
steady or put it on a
tripod to take pictures.
Re-position shot with
light source behind
you.
Set the flash to
Automatic flash.
- 29 -
Page 35

Specifications
Image Sensor
Color LCD
External
storage media
Picture modes
Color Depth
Output file format
Optics system
Shutter speed
Exposure
Processing time
USB
communication
AC Adapter
Battery type
Strobe light
Battery life
Compliance
• 2.11 Mega Pixels CCD
•
1.8-inch TFT color LCD
CompactFlash card (type 1)
Status Image format
*** 1600 x 1200 6 images
** 1600 x 1200 31 images
* 800 x 600 63 images
•
24-bit color
•
JPEG (Exif 2.1)
•
Lens aperture: F3.0/F8.0
Storage
per 8 MB card
• 1 to 1/500 second electronic shutter meter
•
Auto exposure
•
Picture to picture < 4 sec.
•
Cable definition:
V 1.1mini USB connector,
3.5-mm mini plug.
•
Output:
6 V DC @ 1.8A
• 4 x AA alkaline batteries
•
Range: 0.9m ~ 3m
•
Sixty images with Flash and LCD on.
Regulatory compliance:
Video out
White balance
Image
processing
Focus
•
Safety – UL/CSA/CE
•
FCC – Class B
• EN55022:95 Class B (CE)
• /IEC950
!
NTSC or PAL (user selectable)
•
Auto white balance
•
Balanced for daylight/ fluorescent / tungsten
•
White balance
•
Optical black subtract
•
Gamma correction
•
Bayer pattern interpolation and edge
enhancement on luma channel
• Range/depth of field: 0.5 m ~
∞
- 30 -
Page 36

One Year Limited Warranty
SIPIX, INC. WARRANTS THIS HARDWARE PRODUCT AGAINST
DEFECTS IN MATERIAL AND WORKMANSHIP FOR A PERIOD
OF ONE YEAR FROM THE ORIGINAL DATE OF PURCHASE AS
IDENTIFIED ON THE PROOF OF PURCHASE (YOUR RECEIPT).
IT IS THE END-USERS RESPONSIBILITY TO MAKE CERTAIN
THIS PRODUCT IS IN WORKING CONDITION WITH THE
INTENDED COMPUTER SYSTEM WITHIN THE ONE-YEAR
WARRANTY PERIOD.
THESE ARE THE SOLE REMEDIES AND SIPIX’S SOLE
LIABILITIES FOR PERFORMANCE OR FAILURE TO PERFORM
OF THE PRODUCT. SIPIX RESERVES THE RIGHT TO CHANGE
ITS WARRANTY POLICY AT ANY TIME FOR ALL PRODUCTS
DISTRIBUTED AFTER THE DATE OF SUCH CHANGE IN
WARRANTY. EXCEPT AS SET FORTH ABOVE, ALL OTHER
WARRANTIES, WHETHER EXPRESS OR IMPLIED, INCLUDING
BUT NOT LIMITED TO, THE IMPLIED WARRANTIES OF
MERCHANTABILITY AND FITNESS FOR A PARTICULAR
PURPOSE ARE HEREBY EXCLUDED.
SIPIX SHALL NOT BE LIABLE FOR INCIDENTAL, SPECIAL OR
CONSEQUENTIAL DAMAGES ARISING OUT OF OR RELATED
TO THE USE OR PERFORMANCE OF THE PRODUCT,
INCLUDING, WITHOUT LIMITATION, LOSS OF DATA OR USE
OF DATA PROCESSING FACILITIES OR EQUIPMENT,
REGARDLESS OF WHETHER SIPIX MAY HAVE BEEN ADVISED
ABOUT THE POSSIBILITY OF SUCH DAMAGES. SIPIX’S
MAXIMUM LIABILITY FOR ANY AND ALL DAMAGES ARISING
OUT OF USE OF THE PRODUCT SHALL BE LIMITED TO THE
AMOUNTS PAID BY PURCHASER FOR SUCH PRODUCT.
This warranty is only valid within the boundaries and territories of the
USA and Canada. SiPix is not responsible for costs incurred due to
shipping, insurance, customs, or duties. SiPix is not responsible for nontraceable packages or packages shipped without a valid RMA number on
the outside of the package.
This warranty does not apply if the product has been damaged by an
accident, electrical fault, through misuse or abuse. If the product has
been altered without written authorization from SiPix, the warranty will
be void.
This warranty applies only to hardware products manufactured by or for
SiPix. Warranted products must bear the “SiPix” brand name,
- 31 -
Page 37

tradename, or logo. The aforementioned warranty and remedies are
exclusive, and in lieu of all others, whether oral, written, expressed or
implied. SiPix specifically disclaims any and all implied warranties of
merchantability and fitness for a particular purpose.
SiPix is not responsible for incidental or consequential damages resulting
from any breach of warranty. SiPix is not responsible under any other
legal theory, including, but not limited to lost profits, and any cost of
recovering reprogramming or reproducing any program or data stored in
or used with SiPix products.
- 32 -
Page 38

Warranty Service
If your SiPix product needs to be returned for repair, you must contact SiPix technical
support prior to shipment for an RMA number before sending in the product.
number is a Return Merchandise Authorization number. SiPix will refuse all
shipments without a proper RMA number.
The RMA number
MUST
be printed on the
outside of the original shipping carton in large print written in black ink next to the shipping
label. Failure to properly pack shipment could cause serious damage to the product and void
the warranty.
Should any defect(s) be discovered, the product may be returned to SiPix with a
valid RMA number. If you are returning product for repair, please be sure to
do the following:
1) Call SiPix Customer Support Mon-Fri during regular business hours toll free at
866-888-1678 and obtain an RMA (Return Merchandise Authorization)
number.
The RMA
2) Print your RMA number on the OUTSIDE of the original shipping carton in
large print written in black ink next to the shipping label.
3) Include a copy of the bill of sale with the returned product.
4) Unless otherwise instructed, do not return any manuals or software when
returning items for repair.
5) Ship to SiPix via a traceable shipping method and retain the tracking number.
Note:
This product is intended for use only within the boundaries and territories of the
United States and Canada. If you purchased this product in Mexico or South America and
need assistance or repair, you must contact your originating reseller for service and support.
SiPix Imaging, Milpitas CA, will not accept any shipments from outside the boundaries and
territories of the USA and Canada. SiPix often bundles many different third party software
options with its products. If any of these options were ordered with your SiPix product and
they appear to be missing or incorrect, contact your reseller immediately.
- 33 -
Page 39

Technical Support
Upon receipt of this SiPix product you are immediately eligible for Technical Support during
the warranty period one year from the purchase date. If you need technical assistance after
reviewing your manual, please have the product model number and any error codes written
down when you call. To ensure a prompt resolution, please be in the proximity of the SiPix
product when placing a call. Our technical hours are from 8 AM to 6 PM Pacific Time
Monday through Friday, and 9 AM to 5 PM Saturday, excluding holidays toll-free at 866888-1678
Technical Support within one year (in warranty) call toll free: 866-888-1678
•
Technical Support after one year (out of warranty): 408-719-5076 (customer
•
pays for any toll charges)
Web Site Support: www.SiPix.com
•
- 34 -
 Loading...