

Page 1
Page 2

Pocket Printer A6 User’s Guide
Trademarks
SiPix is a registered trademark of SiPix, Inc. Pocket Printer and Pocket Printer
A6 are trademarks of SiPix, Inc. Windows is a registered trademark of
Microsoft Corporation. Palm is a registered trademark of Palm Computing,
Inc. Handspring is a registered trademark of Handspring Inc. Other names
and trademarks appearing herein are trademarks of their respective holders.
Copyright
2001 SiPix, Inc. All rights reserved. No part of this publication may be
reproduced, transmitted, transcribed, stored in a retrieval system, or
translated into any language or computer language, in any form or by any
means, electronic, mechanical, magnetic, optical, chemical, manual, or
otherwise, without the prior written permission of SiPix Imaging, Inc.
Important Safeguards
• Please read these instructions, and save them for later use.
• Follow all warnings and instructions marked on the product.
• When replacement parts are required, make sure that service technicians
have used replacement parts that conform to at least the same safety
standards with regard to fire, electric shock, or other hazards.
• Avoid using this product in a wet or moist environment.
• Use only the type of power source indicated on the product label.
• Do not attempt to service this product yourself as opening or removing the
product casing may expose you to dangerous voltage or other hazards.
CAUTION
Replace only with the AA size, 1.5V, alkaline or Ni-Cd rechargeable batteries.
Replace only with new batteries of the same brand. Check with local codes
for possible special disposal instructions.
WARNING: Do not place recharged non-rechargeable alkaline batteries
in the unit.
SiPix Technical Support http://www.sipixdigital.com/support/
2
Page 3

Pocket Printer A6 User’s Guide
Welcome!
Thank you for purchasing your SiPix Pocket Printer A6.
We think that you will find the printer to be an exceptional value, as it offers a broad
range of connectivity options and functions. Because of it’s light weight and modest
power requirements, it’s likely that you will find that the Pocket Printer A6 will become
an important part of your everyday work life, whether you are a mobile professional,
student, or are simply interested in reclaiming valuable desktop real estate.
The Pocket Printer A6 can be connected to either a Windows-based PC, or to a Palmbased PDA. Users interested in printing from a Windows CE environment should review
the information regarding third-party solutions.
Generally, the Pocket Printer A6 is an easy to use, easy to install product. But we’ve
created extensive technical resources for users who experience performance problems, or
require additional information regarding the installation or use of the printer. We
encourage users to read this guide, and to save it for future reference.
Further, the SiPix web site is an excellent resource for in-depth review of even more
technical information, as well as late-breaking news, updates, and recently released
drivers and software. Please visit the SiPix web resources at your leisure:
We encourage you to register your Pocket Printer A6 online, as it will ensure that you
receive service and support during the one-year warranty period. You can also elect
(optionally) to receive product news and updates, and information regarding special
offers on printer paper and accessories.
Again, thank you for choosing SiPix!
SiPix Technical Support http://www.sipixdigital.com/support/
3
Page 4
Pocket Printer A6 User’s Guide
Getting Started
Pocket Printer A6 Package Contents
When unpacking your Pocket Printer A6, make sure you've received all the
components:
4 x AA Alkaline battery
AC Adapter
Printer Cable (PC end: D-sub 9 pin, Printer end: Mini Din 8 pin)
One roll of A6 roll paper
Owner’s Manual
Driver CD-ROM (includes Windows and Palm OS drivers)
Protective Pouch
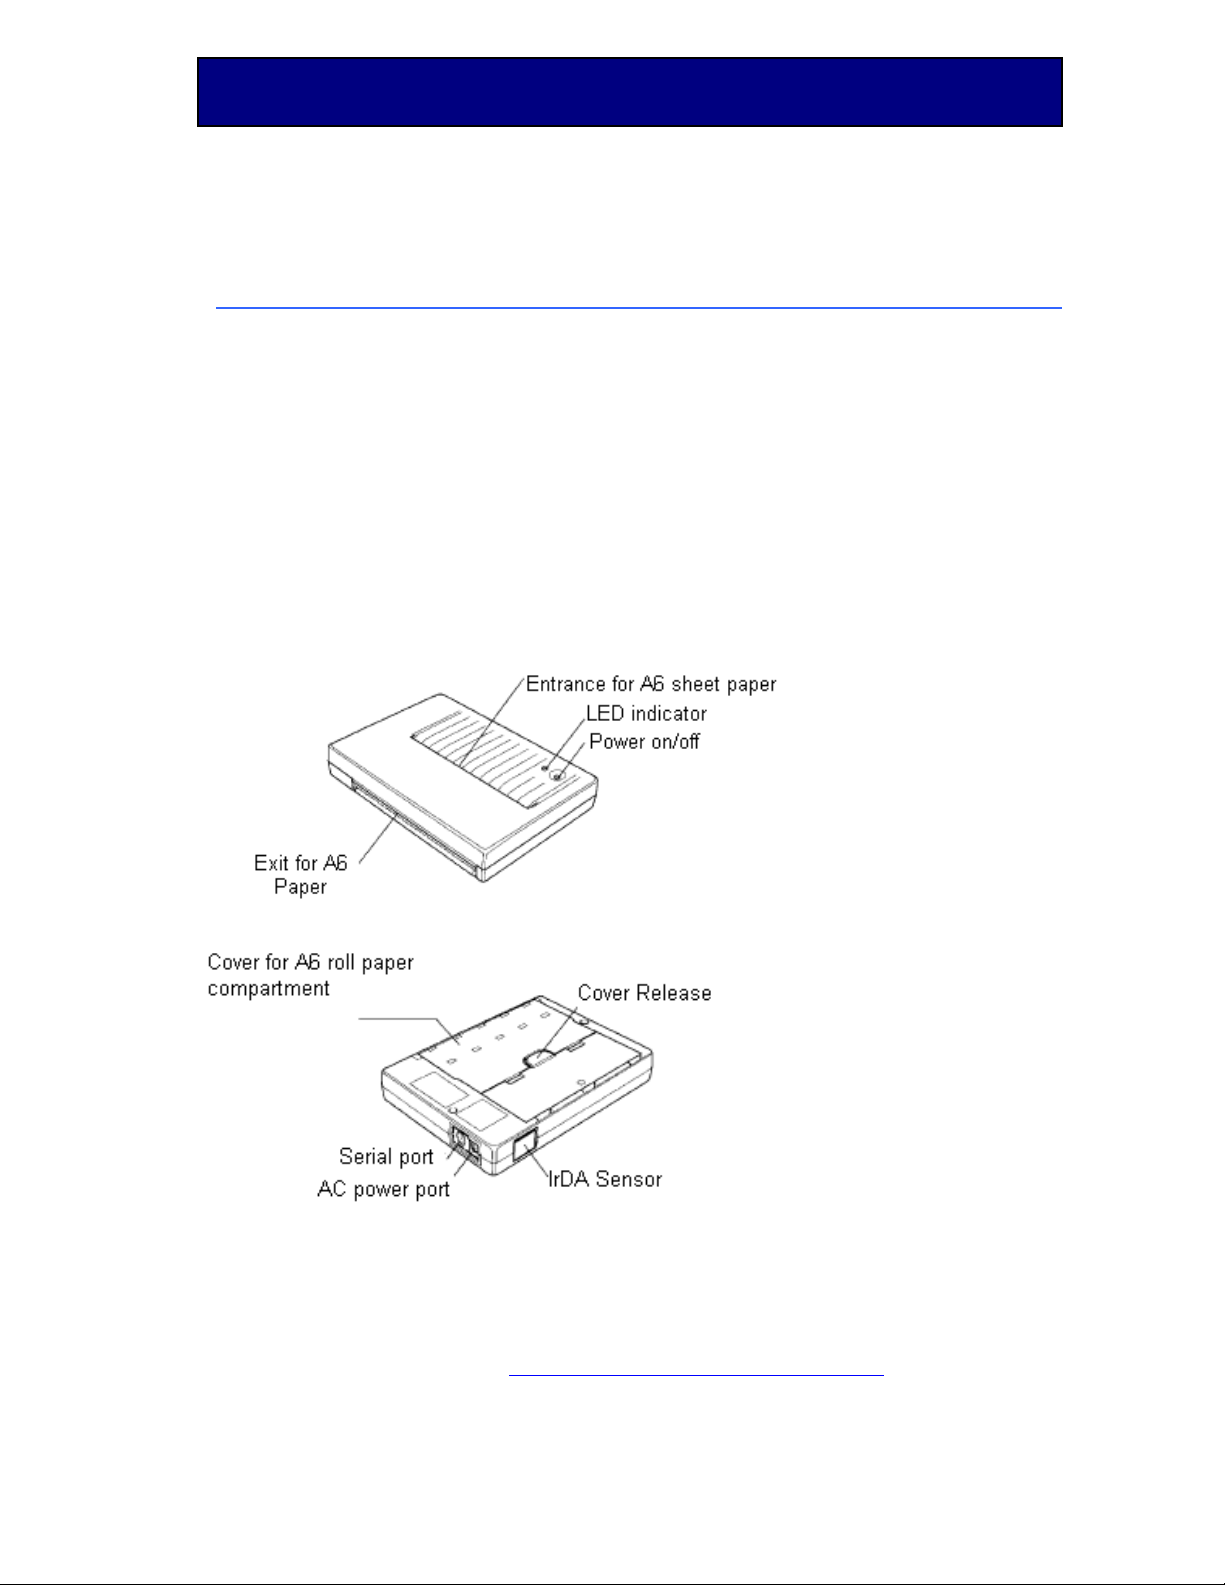
The Pocket Printer A6: Front, Back, Inside
SiPix Technical Support http://www.sipixdigital.com/support/
4
Page 5
Pocket Printer A6 User’s Guide
Setting Up the Pocket Printer A6
Selecting a power source
Select the power source for your needs. Batteries allow portability, while the AC adapter
allows reliable long-term use.
Using batteries
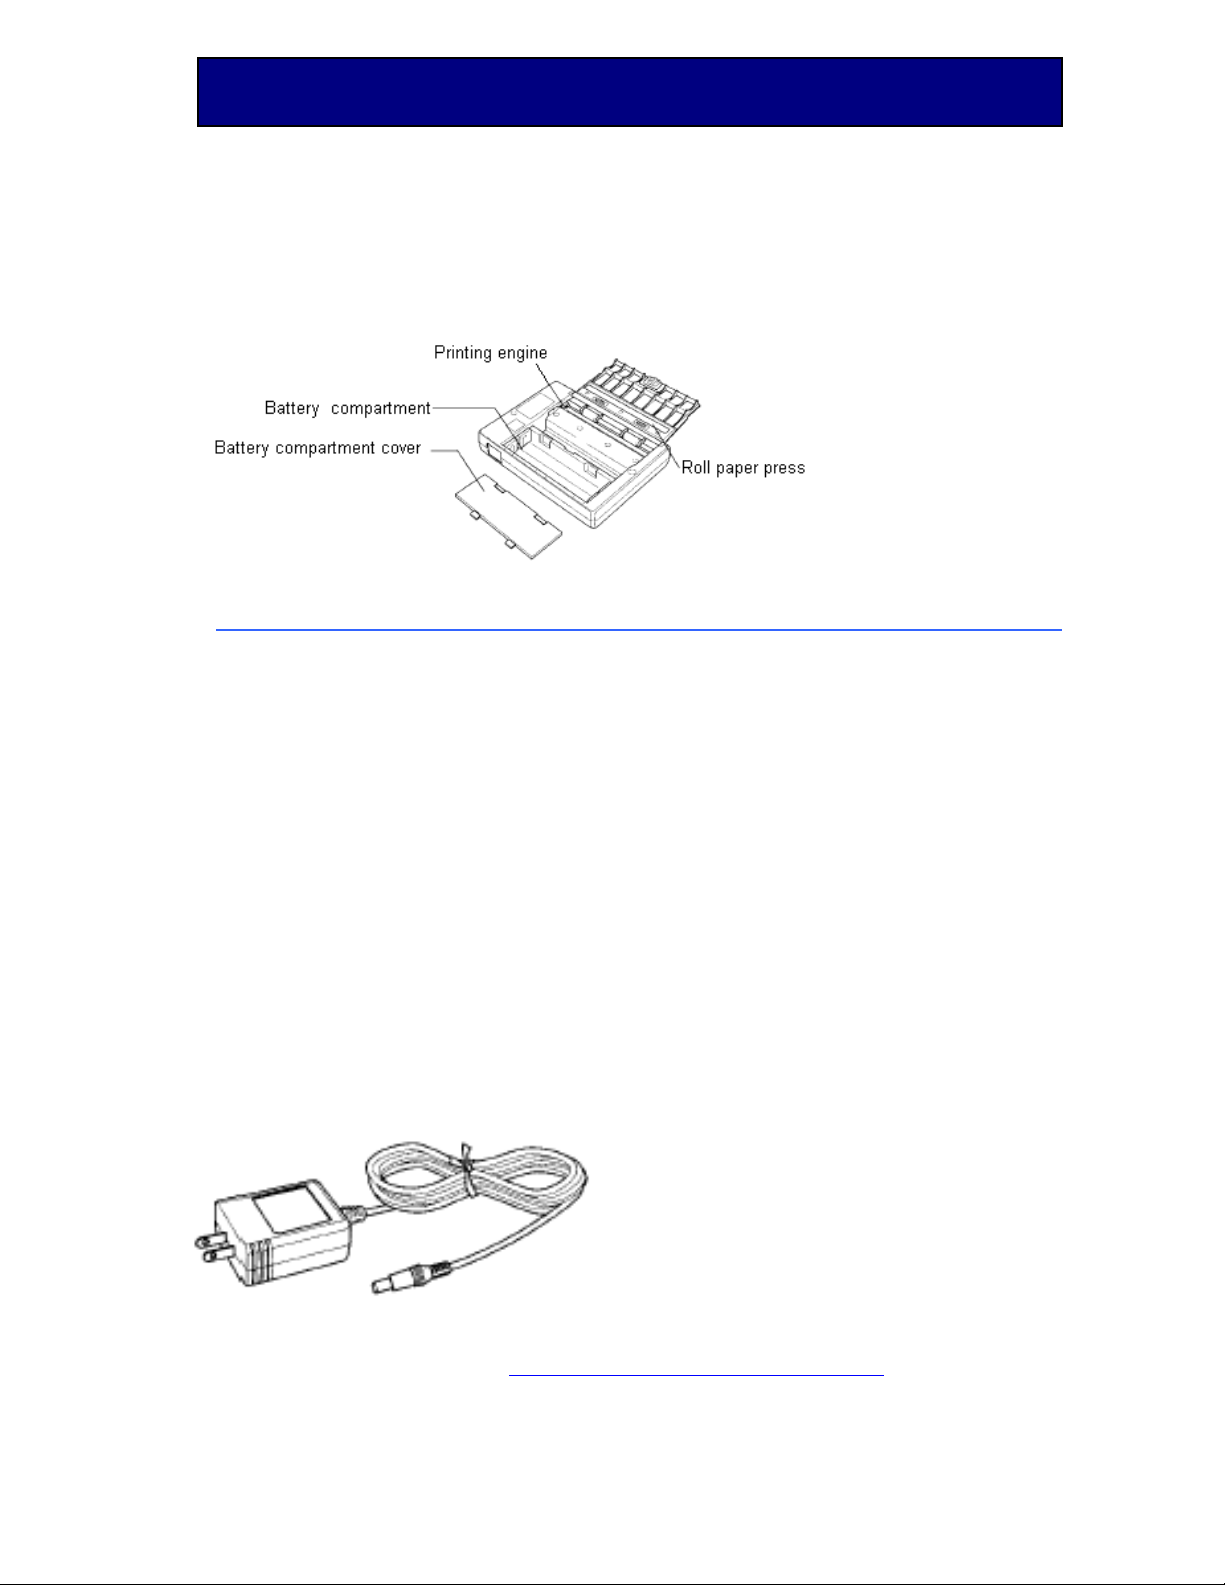
Load the 4 AA batteries into the compartment as indicated by the instruction sticker
located next to the battery compartment.
Low Battery Indicator Light
When the light on top of the printer continues to blink, this indicates the battery power is
running low. You should replace the batteries or use the AC adapter.
Using the AC power adapter
Remove the 4 AA alkaline batteries from printer. Plug the AC adapter into a power
outlet. Insert the other end of the adapter into the Pocket Printer A6. Removing the
batteries and using the AC adapter will extend the battery life and should be used
whenever possible.
SiPix Technical Support http://www.sipixdigital.com/support/
5
Page 6
Pocket Printer A6 User’s Guide
Turning the Printer On and Off
Push and release the power button once to turn the printer on. The green power
indicator will illuminate and the printer is ready to use. While the Pocket Printer A6
is on, push and release the power button once to turn the printer off. To conserve
power, the Pocket Printer A6 will automatically turn off after 3 minutes (batteries) or
1 hour (AC) of inactivity.
Loading the A6 roll paper
Ensure that the printer is off.
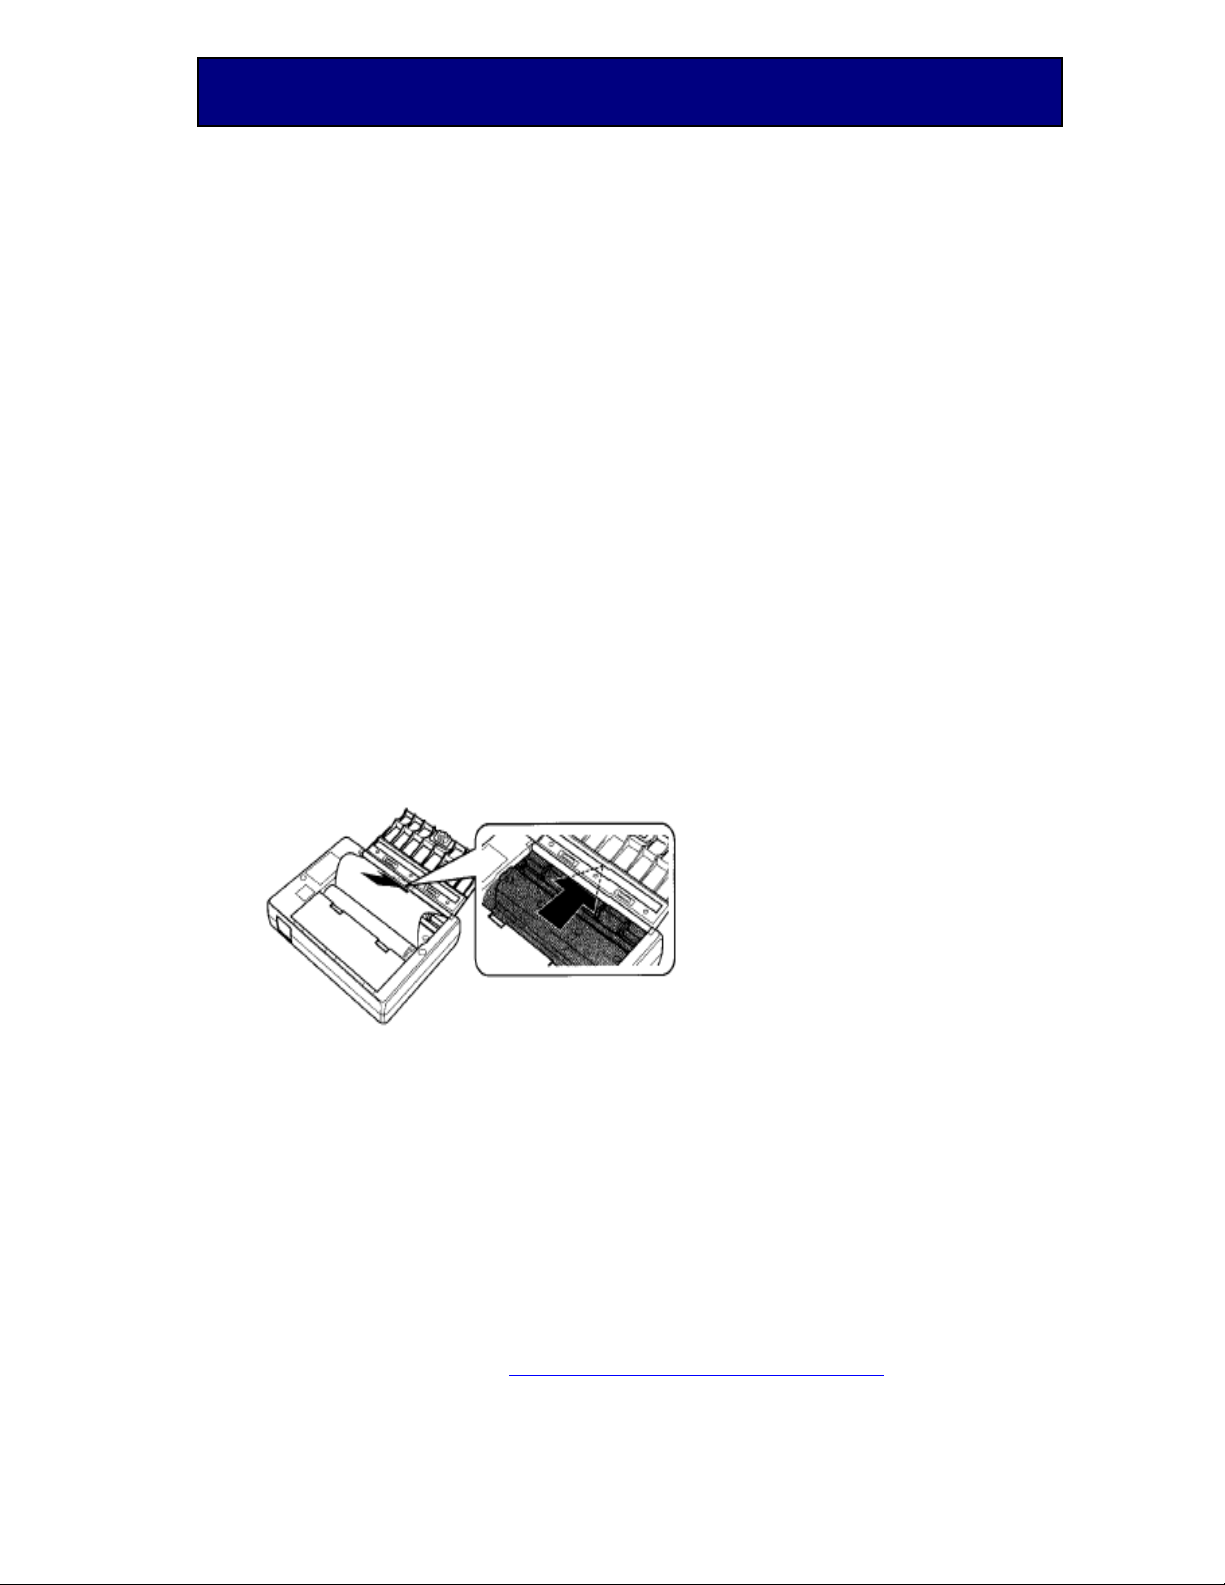
Open the A6 roll paper compartment.
Remove the roll paper from the protective plastic bag.
Remove the tape that secures the roll paper.
Put the roll paper into the compartment.
Note the correct direction and position as the illustration indicates, darker side
facing up and white side down.
Pull about 1/2" (10mm) of A6 roll paper out of the exit.
Close the cover of the A6 roll paper compartment.
Pull the paper upward and tear it off from the edge of exit.
Loading the A6 Sheet Paper
Ensure that the printer is on and that the roll paper has been removed.
Load the sheet paper from the entrance located on the top of the printer as the
illustration below indicates.
SiPix Technical Support http://www.sipixdigital.com/support/
6
Page 7

Pocket Printer A6 User’s Guide
1. The bright white side of the sheet paper should be face-up while loading
the paper.
2. A beep will chime indicating the paper has loaded successfully
Note: Do not use sheet paper and roll paper simultaneously
Installing the Driver Software for the Pocket Printer A6
Windows 98/98SE/ME
Insert the SiPix Pocket Printer A6 CD into the CD-ROM drive. The CD should auto
run, otherwise, go to Start Æ Run; enter D:\SiPixMenu.exe (where D:\ is your
CD-ROM drive)
From the Installer Menu click on “Install Windows 98/98SE/ME Printer Driver”
The Welcome screen will appear, click “Next” to continue setup
In the Add Printer Wizard screen, click “Next” to continue setup
The following screen will show you a list of manufacturers and drivers, click the
“Have Disk” button, and then “Browse”, type in D:\Windows (where D:\ is your
CD-ROM drive) and click OK.
On the next screen highlight “SiPix Pocket Printer A6” and click “Next”
Select “COM1: Communication Port” (or Com 2, the one to which the printer is
connected) and click “Next”
The system will start installing the driver at this point you will need to put in your
Windows 98 CD. If your computer did not come with a Windows 98 CD then the cab
files should be on your computer and you most likely will not be prompted for these
files.
Type in the printer name SiPix Pocket Printer A6, and click “Finish”
You will see an installation bar, when it finishes processing, the SiPix Pocket Printer
A6 printer driver will be installed on your computer.
SiPix Technical Support http://www.sipixdigital.com/support/
7
Page 8
Pocket Printer A6 User’s Guide
How to Install A6 Printer Driver (Windows 2000/XP)
Insert the SiPix Pocket Printer A6 CD into the CD-ROM drive. The CD should auto
run, otherwise, go to Start Æ Run; enter D:\ SiPixMenu.exe (where D:\ is your
CD-ROM drive)
From the Installer Menu click on “Install Windows 2000/XP Printer Driver”
The Welcome screen will appear, click “Next” to continue setup
On the Add Printer Wizard screen, select “Local Printer Attached to this Computer”
and uncheck “Automatically detect and install my Plug and Play printer” and click
“Next”
Select “Use the following port” and select “COM1: (Serial Port)” from the drop down
list and click “Next”
On the Add Printer Software screen, click the “Have Disk” button that is located on
the lower right of the screen.
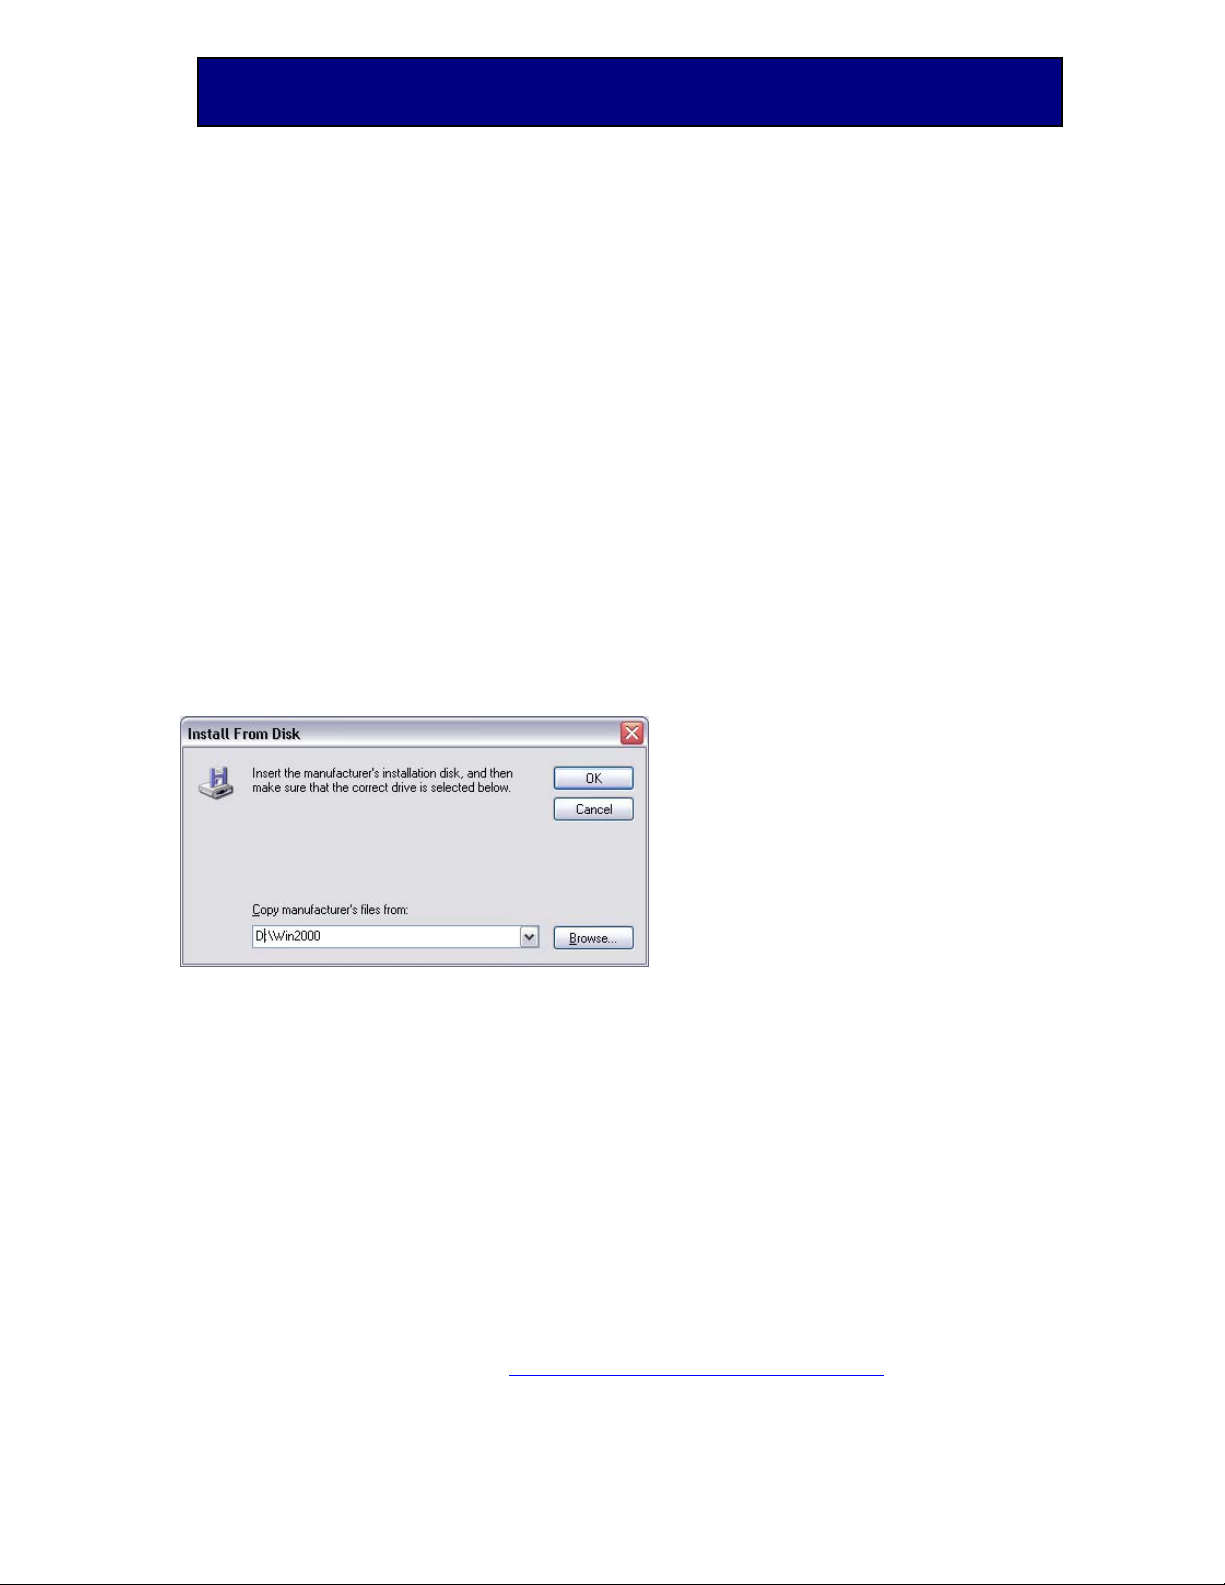
In the Install From Disk screen, type in D:\Win2000 (where D:\ is your CD-ROM
drive) and click “OK”
Highlight “SiPix Pocket Printer A6” and click “Next”
On the Name Your Printer screen, type in SiPix Pocket Printer A6, select whether
or not you want this to be your default printer, and then click “Next”
On the Printer Sharing Screen, select “Do not share this printer” and click “Next”
On the Print Test Page Screen, select “No” and click “Next”
Click “Finish” to complete Printer Driver setup.
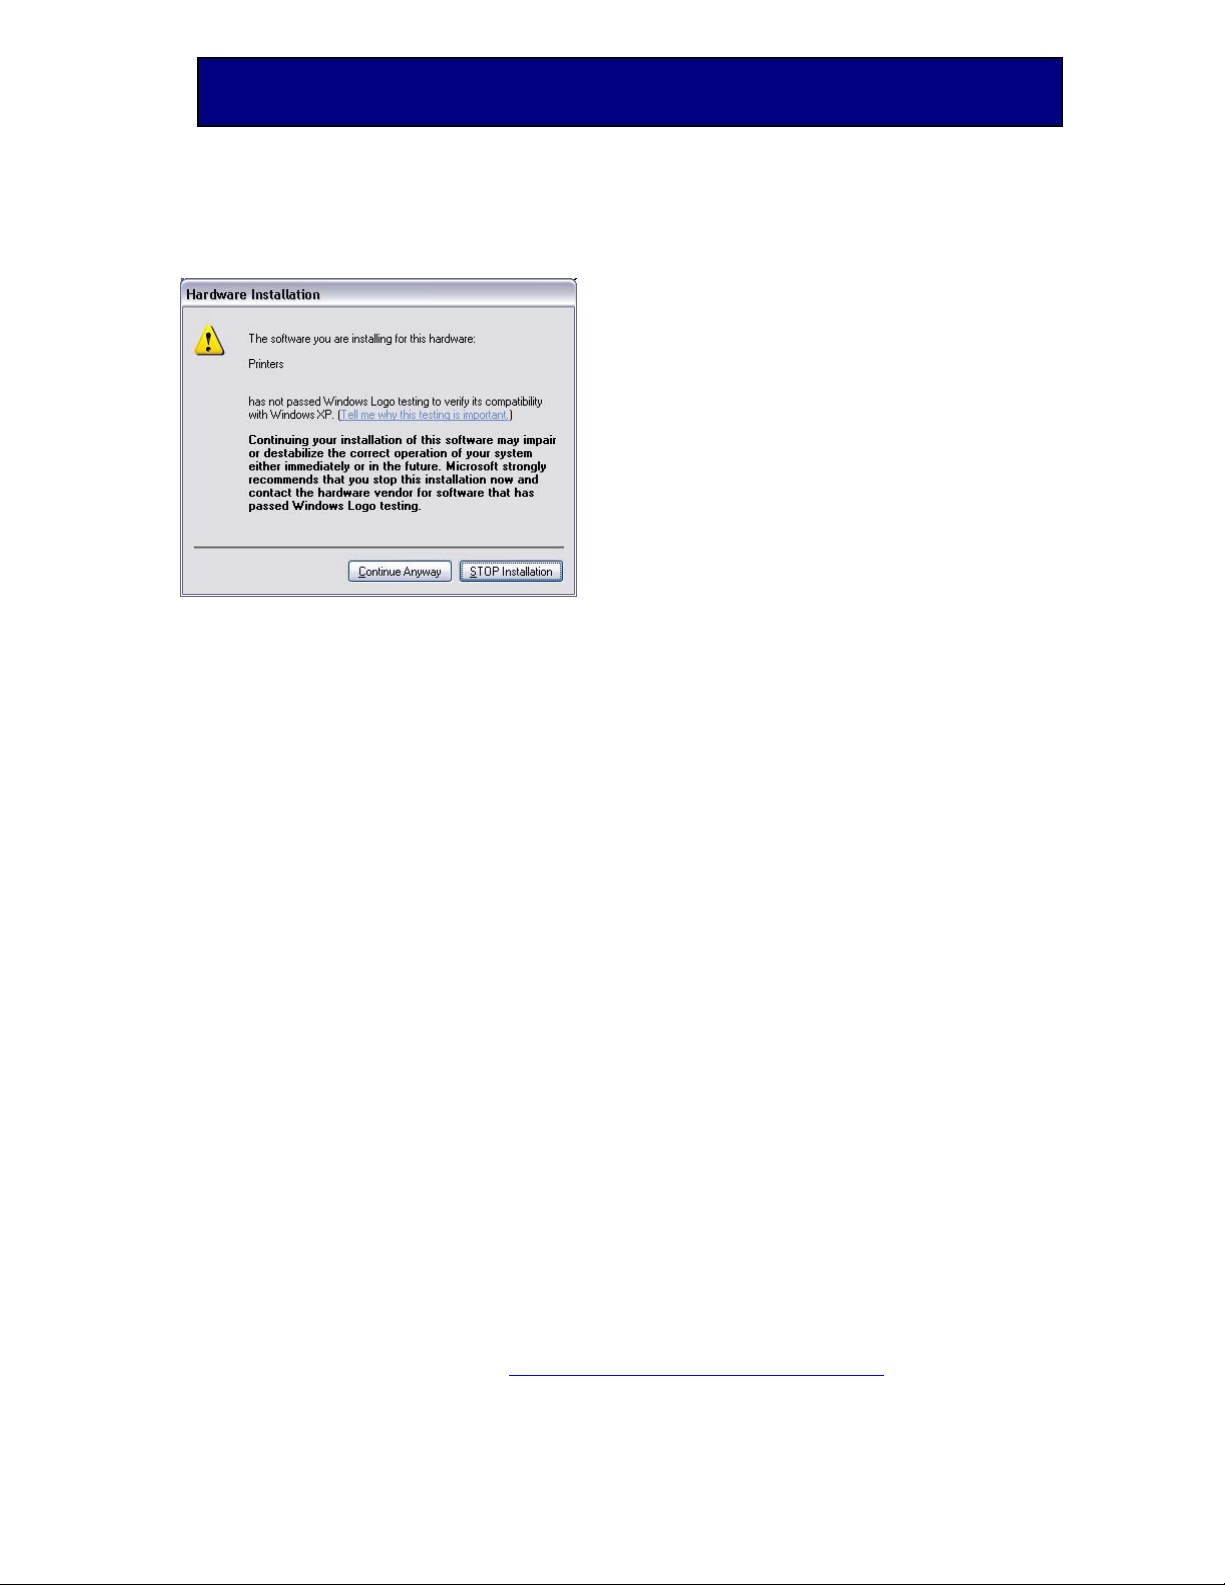
A Microsoft Hardware Installation warning message may appear, you can ignore this
message by clicking “Continue Anyway” (Ignoring this message will not effect your
computer or printer driver)
SiPix Technical Support http://www.sipixdigital.com/support/
8
Page 9
Pocket Printer A6 User’s Guide
An installation bar will appear, when it completes processing, your Pocket Printer A6
Printer Driver will be installed on your computer.
Configuring the RS-232 Serial Port
Note: If you are using COM 2 please substitute below for Com 1.
Highlight the “My Computer” icon on your desktop and use the right mouse button
to right click on the icon, then pull down to “Properties” and left click
“Properties” on this menu.
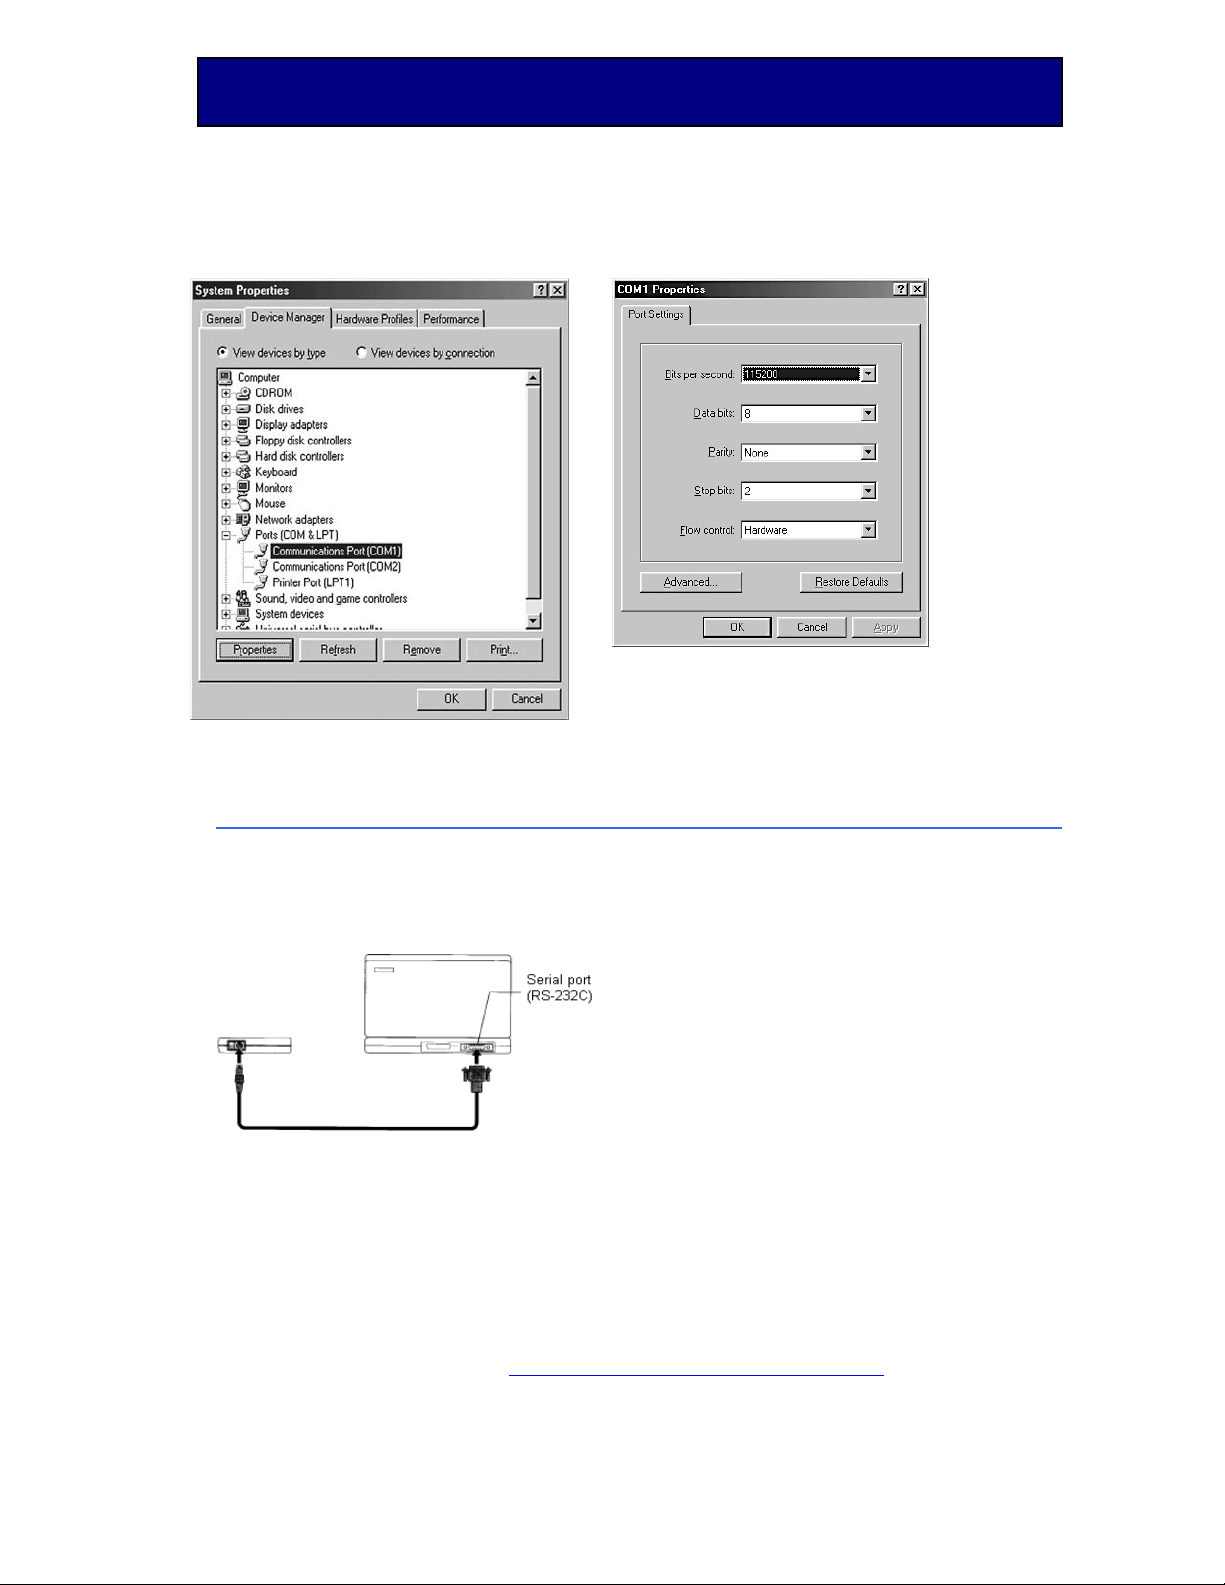
Choose the “Device Manager” tab on the “Computer Properties” screen. (See Figure
A)
Highlight “Communications Port (COM 1) and press the “Properties” button, this will
bring up the “Com 1 Properties” screen. (See Figure B)
Change the port settings:
From: Bits per second “9600” – Stop Bits “1” – Flow Control “Xon/Xoff.”
To: Bits per second “115200” – Stop Bits “2” – Flow Control “Hardware.” (See
Figure B)
SiPix Technical Support http://www.sipixdigital.com/support/
9
Page 10
Pocket Printer A6 User’s Guide
Figure A Figure B
Using the Pocket Printer A6 on a PC
Using the RS-232 (Serial) Printer Cable
After the Pocket Printer A6 driver is installed, connect the printer RS-232 cable as
shown in the diagram below.
Using the Infrared Port
Ensure that your PC has built-in infrared port (IrDA1.0), and that it is setup and
active. Position the printer such that the parallel distance between the printer’s
infrared port and PC’s infrared port is no more than 12” (30cm), and the angle
between the computer and printer is no more than 15 degrees.
SiPix Technical Support http://www.sipixdigital.com/support/
10
Page 11

Pocket Printer A6 User’s Guide
Using the USB Cable (Optional)
SiPix now offers an optional USB-To-Serial Adapter Cable, allowing users to easily
connect the Pocket Printer A6 to the USB port of a PC. Please visit the SiPixShop
(www.sipixdigital.com/sipixshop), our online parts & accessories store, for additional
information.
For information on the installation and use of the USB-To-Serial Adapter Cable,
please refer to the setup guide
Printing with the Pocket Printer A6
The Pocket Printer A6 functions as a Windows printer, and is available in all
applications that allow printing. After the drivers have been installed, connect the
printer and turn it on. Then, simply select the Pocket Printer A6 when you print from
an application.
Paper Settings
The Pocket Printer A6 is capable of automatically resizing documents from A4 or
Letter size to A6. This feature allows you to leave your applications set for Letter size
paper, which is convenient if you use other full-size printers. To configure the printer
to automatically resize to A6 paper, do the following:
Click on" Start" and select "Settings". Click on " Printers"
Right click on the Pocket Printer A6 icon and select “Properties”
Click on the “Paper” tab. Select “A4”
Click on the “Device Options” tab. Set “Image Control” to 50%
Note: The Pocket Printer A6 uses A6 size paper (4 1/8” x 5 3/4”). When it is
enlarged 200% on a copy machine, it will produce approximately Letter or A4 size
(8.5 x 11.7).
If you prefer to change the page setup or layout manually using your application,
then do the following to configure the printer:
Click on" Start" and select "Settings". Click on " Printers"
Right click on the Pocket Printer A6 icon and select “Properties”
Click on the “Paper” tab. Select “A6” or “A6 Roll”
Click on the “Device Options” tab. Set “Image Control” to 100%
PDA Instructions
How to Install Pocket PC Printer Driver (98/98SE/ME/2000/XP)
Note: You must install Active-Sync for the Pocket PC on your computer before
installing the Pocket PC Printer Driver (You can download this from Microsoft’s
website). If the “Install Pocket PC Printer Driver” is grayed out on your Installer
Menu, that means your Active Sync program is not properly installed and has not
been detected by your computer.
SiPix Technical Support http://www.sipixdigital.com/support/
(included with the adapter or available online.)
11
Page 12
Pocket Printer A6 User’s Guide
1. From the Installer Menu, click on “Install Pocket PC printer application”
2. On the Pending Application Install Screen, click OK to continue installing your
Pocket PC Printer Driver
3. The Pocket PC Printer Driver will be installed the next time you Active-Sync
your Pocket PC device.
Note: Installing the Pocket PC Printer Driver will automatically install Pocket PC
Capture software.
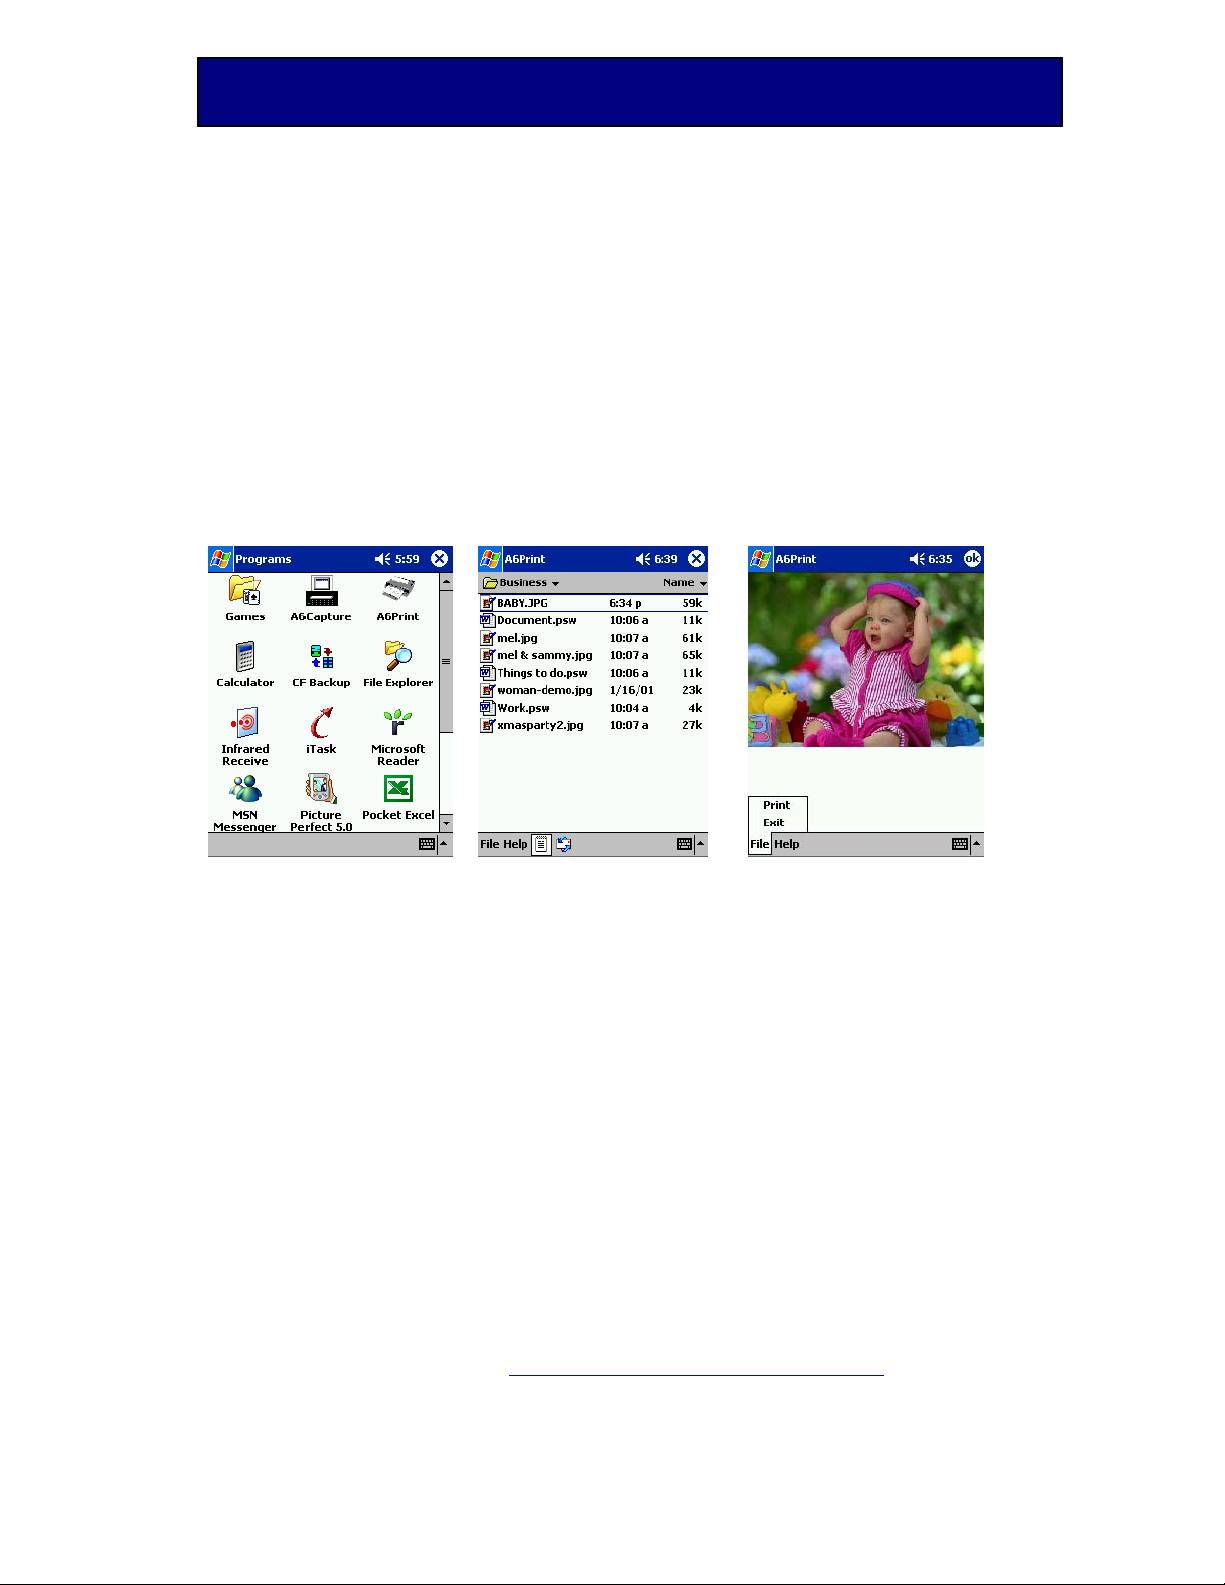
How To Print a File:
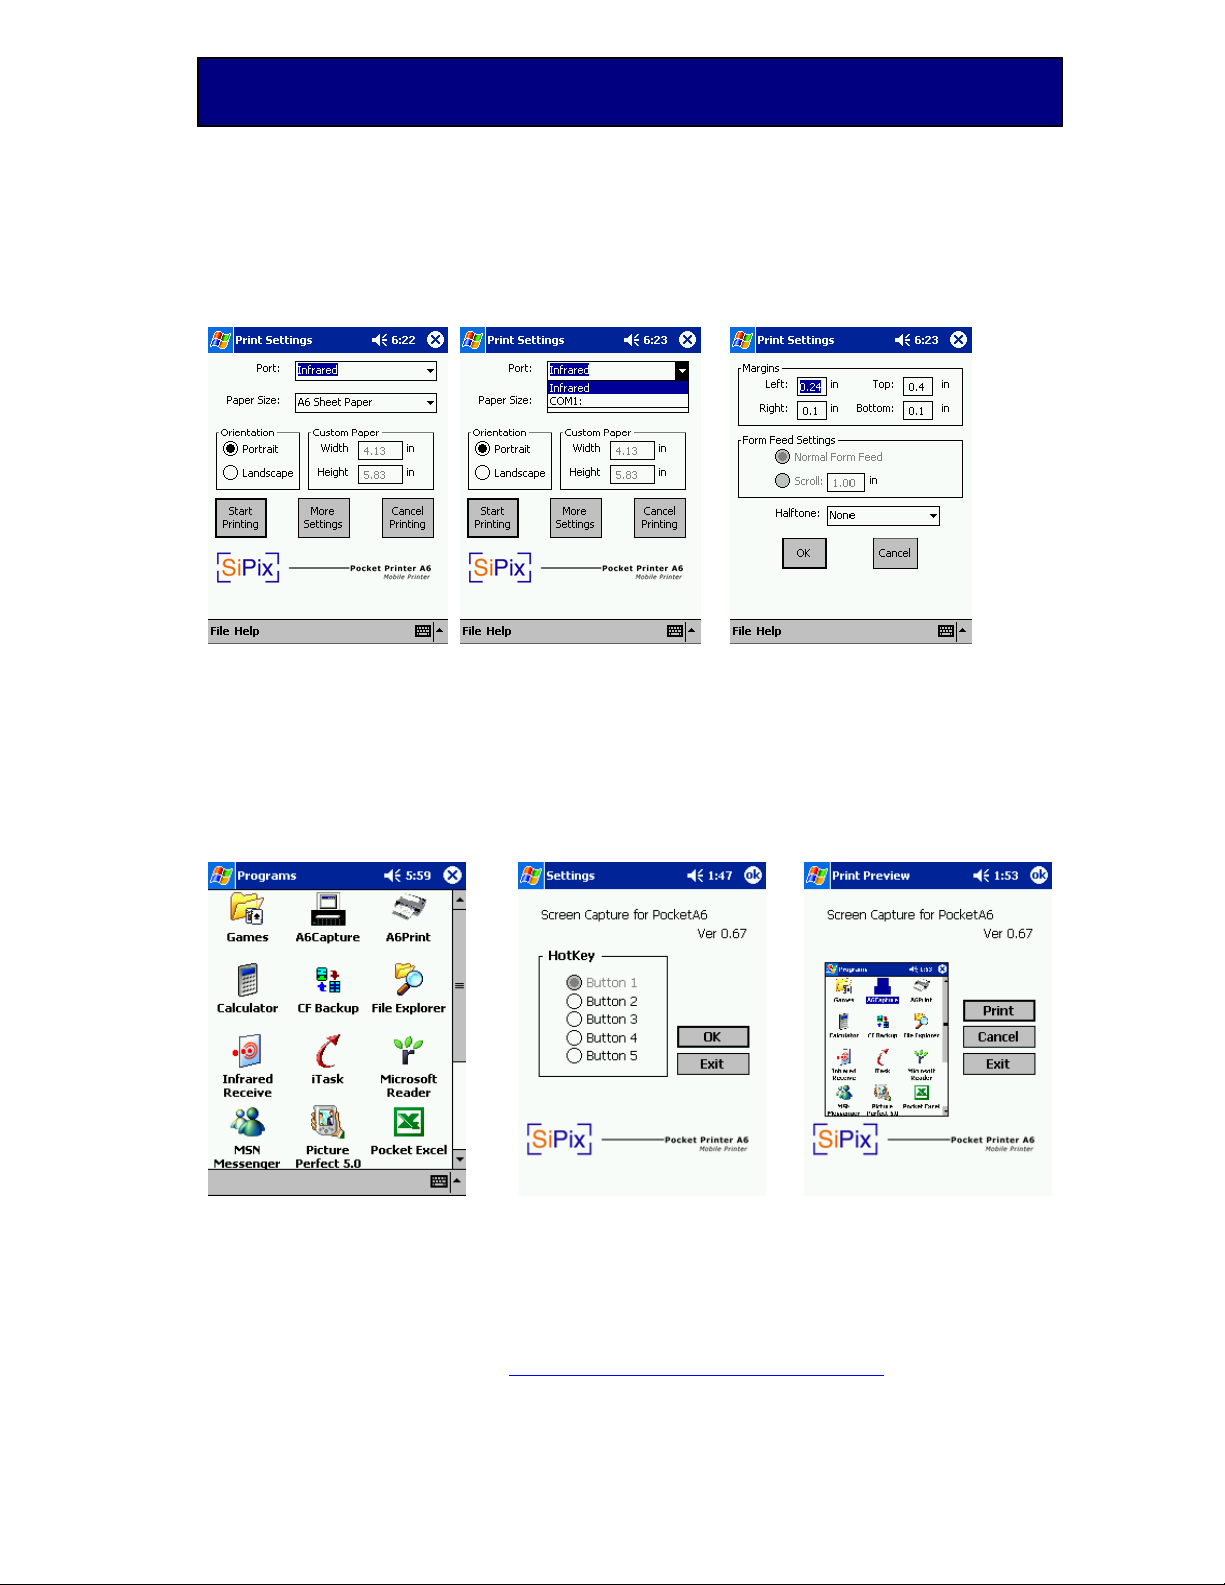
Figure 1 Figure 2 Figure 3
1. Tap Start Æ Programs Æ A6Print (see Figure 1).
2. From Figure 2 Tap on a file to print. (Example – BABY.JPG).
3. The image will display (Figure 3), from the File menu at the bottom click
Print.
Note: This step is only for image files
4. If all settings are correct, tap to Print, the image should now print from your
A6 printer.
Note: The small “Note Pad Page” icon at the bottom of Figure 2 is for printing text and
image files. Next to this icon is a small envelope with a blue arrow coming around the top
and the bottom of the envelope, depress this to have a list of your e-mails for printing.
Default Printer Settings
The following are default settings from the print screen are: (Figures 4-6)
1. Port: Infrared (Figures 4-5)
2. Paper Size: “Sheet Paper” (Figures 4-5)
3. Orientation: Portrait (Figures 4-5)
4. Halftone: None (“None” is for printing Text only. To print an image file, set
this box to “Dither 4 x 4” or “Dither 8 x 8”) (Figure 6)
SiPix Technical Support http://www.sipixdigital.com/support/
12
Page 13
Pocket Printer A6 User’s Guide
Print Settings:
Figure 4 Figure 5 Figure 6
How to Use Windows CE Capture Software
From your Pocket PC device, go to: Start Æ Programs Æ A6 Capture
Upon opening the Capture program you will see a screen that allows you to
choose the capture buttons (Figure B). We recommend you choose Button 1 as
the Capture Button and then click OK.
When you want to capture a screen, press the Capture Button, and this will lead
you to the Print Preview screen (Figure C).
(Figure A)
Figure A Figure B Figure C
On the Print Preview screen, the following choices are listed:
Print – Brings you to the print setting screen to print the page.
Cancel – Cancel printing, but will leave the program active.
Quit – Exit the program without printing and without leaving the program active.
SiPix Technical Support http://www.sipixdigital.com/support/
13
Page 14

Pocket Printer A6 User’s Guide
Note: When you have the Capture Program open, you may receive error
messages when attempting to print from the Pocket Printer A6. Please close the
Capture Program before attempting to print other documents from your Pocket
PC device. To exit the Capture Program, select Quit.
Palm OS ~ PDA Instructions
How to Install Palm OS Printer Application (98/98SE/ME/2000/XP)
Note: You must install Hot-Sync 3.0 or later for Palm OS (You can download this from Palm’s
website). If the “Install Palm OS Printer Driver” is grayed out on your Installer Menu, that
means your Palm Desktop program is not properly installed and has not been detected by your
computer.
• From the Installer Menu, click “Install Palm OS printer application”
• On the Palm Install Tool screen, select the correct user, and click “Done”
• Click “OK“ on the following message to confirm the installation. The next time
you Hot-Sync your PDA, the Palm printer driver will automatically install.
Beaming the Driver to Another PDA for Use with Your A6 Printer
1. Press the “Home” icon in the lower left corner of your PDA until you have
“All” in the upper left corner.
2. Press the “Menu” icon below the “Home” Icon.
3. From the drop down menu in the upper left corner press “Beam.”
4. Find “A6PrinterLib” in the list and highlight it.
5. Press the “Beam” button on the screen to send IrPrint to another person’s
PDA. They must be running Palm OS 3.x or later.
6. The other PDA will need to accept this beamed program.
7. Find “A6Print” in the list and highlight it.
8. Press the “Beam” button on the screen to send IrPrint to another person’s
PDA. They must be running Palm OS 3.x or later.
9. The other PDA will need to accept this beamed program, then they will be
able to use A6Print with a SiPix Pocket Printer A6.
Using the Pocket Printer A6 with your PDA
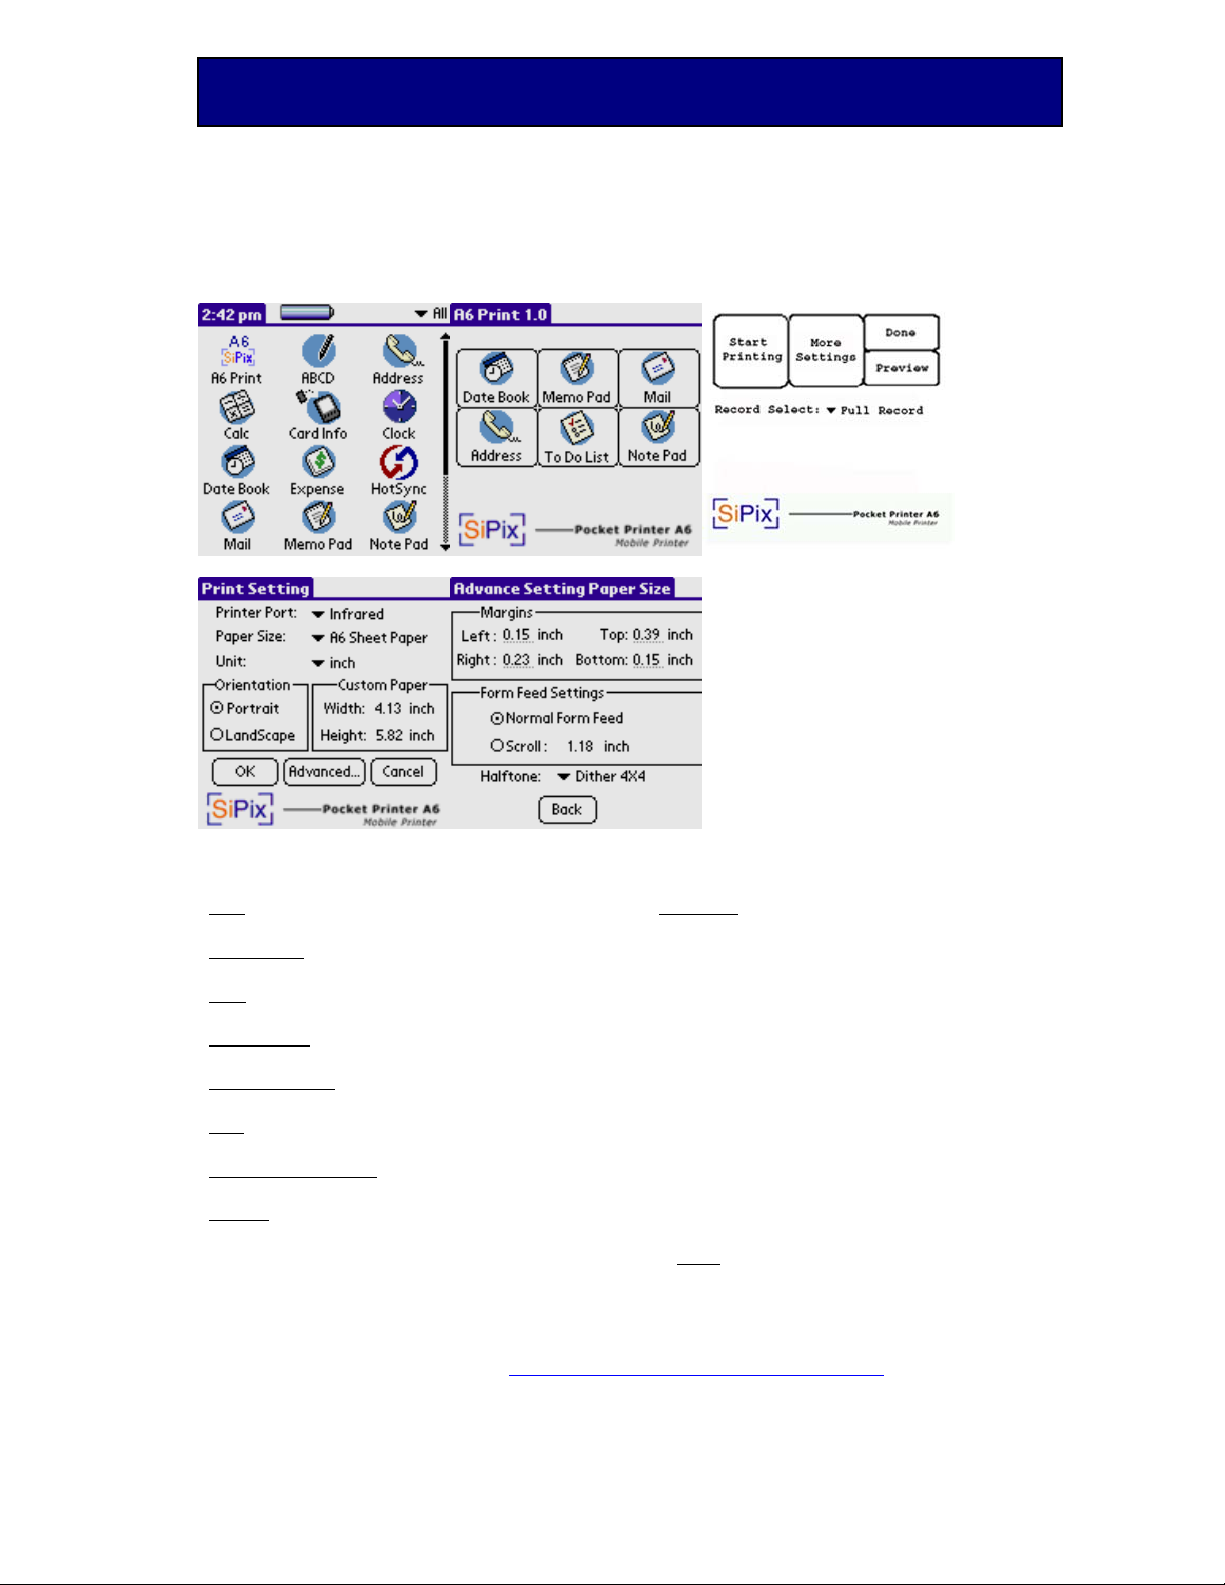
1. Press the “Home” icon in the lower left corner of your PDA until you
have “All” in the upper left corner. (Figure 1)
2. Find “SiPix A6Print” in the list and tap it with your stylus. (Figure 1)
3. Choose which application listed you would like to print from and
select it by pressing it with your stylus on it. (Figure 2)
4. In most listings you will need to tap the correct document.
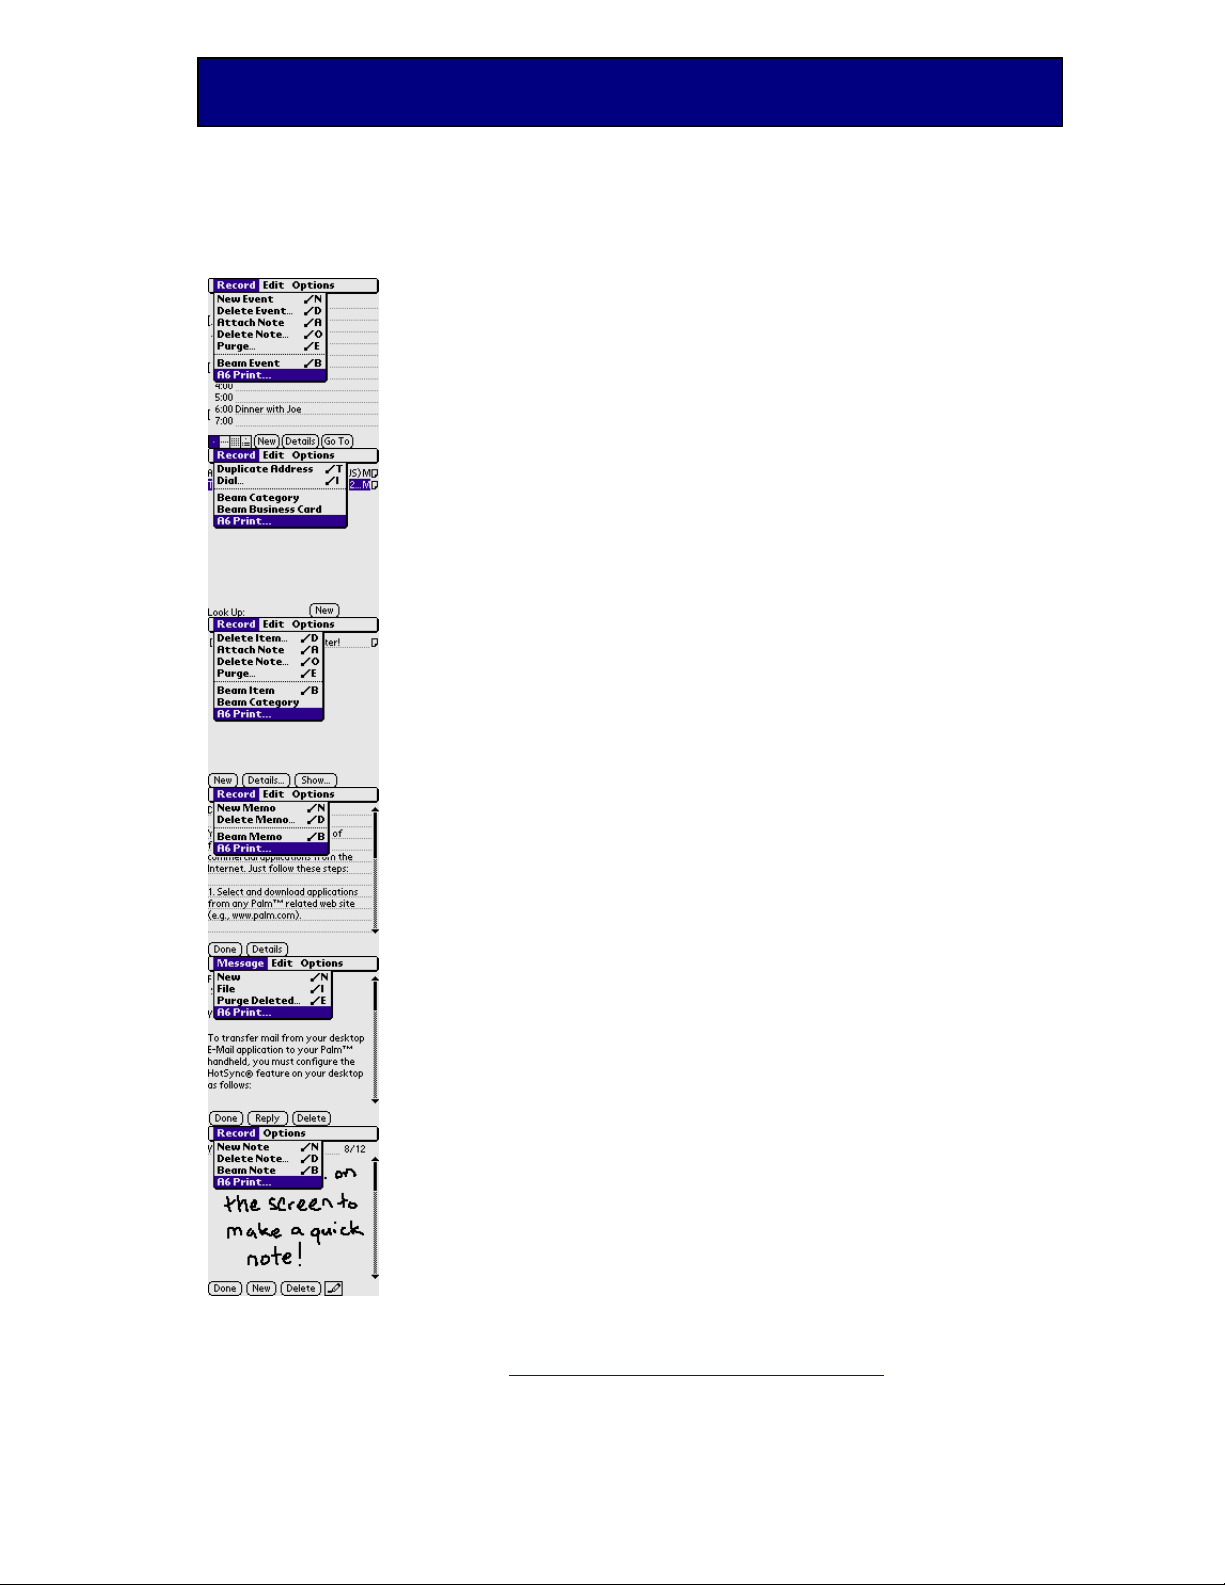
5. Tap the “Menu” in the top left corner.
6. From the drop down menu in the upper left corner press “A6 Print.”
7. On the A6Print Screen (Figure 3) press “Start Printing.”
SiPix Technical Support http://www.sipixdigital.com/support/
14
Page 15
Pocket Printer A6 User’s Guide
A6Print prints via infrared and in the future to PDA Serial Cables
Figure 1 Figure 2 Figure 3
Start Printing ~ Starts Print
More Settings ~ Defined in Table II
Done ~ Cancels Print Job
Preview ~ Allows you to view document
before printing.
Record Select ~ Defined in Table III
Figure 4 Figure 5
Figure 4 ~ More Settings Page Figure 5 ~ Advanced Settings
Port
- Set the interface from the Palm to the
Printer. Infrared ~or~ Cable
Paper Size
Sheet Paper ~or~ Roll Paper ~or~ Custom
Unit
print. Inch ~or~ MM
Orientation
document. Portrait ~or~ Landscape
Custom Paper
Width ~or~ Length
OK:
- This will save settings and close the
“More Settings” / “Print Settings” screen.
Advanced Settings
Settings menu
Cancel
screen and return to the Print submenu. (This
does not cancel the print)
: - Set the appropriate paper type.
- Set the unit of measure to be used for
- Change the orientation of the
- For custom fitted paper.
- Go to the Advanced
- Cancel any changes made to this
Margins:
inches or mm.
Left ~ Right ~ Top ~ Bottom
Form Feed Settings:
Normal Form Feed ~ Standard settings
Scroll Feed ~ is a custom setting for the
amount of feed after a print on roll paper. It
adjusts if you wish for more or less room at
the bottom of the print.
Halftone:
None = B/W
Dither 4x4 = 16 shades of gray
Dither 8x8 = 32 shades of Gray
Back
Set Values for all four margins in
- Return to the Print Settings Menu
SiPix Technical Support http://www.sipixdigital.com/support/
15
Page 16
Pocket Printer A6 User’s Guide
Print Date Book
A6Print allows you to print a single day of date book
appointments.
Print Address Book
With A6Print you can print
1. Address booklet entries by category or by view,
2. Full or brief contact information,
3. Business card,
4. Mailing label. (see Figure 3)
Print To Do List
The To Do List print option allows you to print items due
today, tomorrow, or everything in the selected category or all
categories.
Print Memo Pad
Memo Pad allows you to print your notes. Simply select the
document name and print.
Print Mail
Print Mail allows you to select and print your mail.
Print Note Pad
Print Note Pad allows you to select and print your Note Pad
notes or drawings.
SiPix Technical Support http://www.sipixdigital.com/support/
16
Page 17

Pocket Printer A6 User’s Guide
Serial Port Communications: troubleshooting
HotSync Manager: allows the system to synchronize with PDA devices. Users are
able to turn off the HotSync Manager, which generally runs in the background. For
additional information please see: Disabling the HotSync Manager on a PC.
Writing / Graphics Tablets: older tablets use serial ports in order to communicate.
They can occasionally interfere with the communication of other serial devices (such
as digital cameras or printers) because they “poll” the computer’s serial ports.
Disabling such devices is not always as simple as detaching the hardware (tablet.) In
cases, for example, the device’s driver must be uninstalled, as well. Please contact
the vendor for additional information on uninstalling or disabling Serial Port Graphics
Tablets.
UPS Devices: uninterruptible power supplies are generally connected to the Serial
Port of a PC in order to allow the computer to properly shut down in the event of a
power outage. Removing the UPS may not be a good solution, as related software
drivers and utilities would continue to interfere with the operation of digital cameras
and printers, even after the UPS hardware has been removed. Please contact the
vendor for additional information.
Serial Mouse: computers with a single Serial Port don’t allow multiple Serial devices
to be attached. A serial mouse, for example, would prevent the user from connecting
other Serial devices. Generally, users should consider switching to a
PS2 or USB mouse in resolving the matter. Please contact the vendor for additional
information.
External Modem: modems that use external Serial ports prevent other Serial
devices from being attached (if the computer has only one Serial Port.) Users should
generally consider using a USB or an Internal modem in resolving the matter. Please
contact the vendor of the computer for additional connectivity information or options.
Disabling HotSync Manager for PC: Palm or Handspring Visor PDA devices use the
Palm Desktop and HotSync Manager software in synchronizing data between the PDA
and the computer. When the HotSync Manager software is running, it will prevent
other software from accessing or utilizing the Serial Port. When the Pocket Printer A6
attempts to print, the HotSync Manager software will effectively block any
communication.
In order to resolve this, you should temporarily close the HotSync Manager software.
When you would like to sync the PDA, you can easily restart the HotSync Manager
software. To close the HotSync Manager, please RIGHT CLICK the HotSync Manager
ICON—it’s a red and blue circle—in your System Tray, located next to the Clock.
Select EXIT.
SiPix Technical Support http://www.sipixdigital.com/support/
17
Page 18

Pocket Printer A6 User’s Guide
Further, you can prevent the HotSync Manager software from automatically starting
when you boot your computer. Typically, you would simply start the software when it
was needed. Please contact the vendor of the PDA for additional information on this
matter.
Infrared Port Communications: troubleshooting
Please note: There are a number of factors that affect IR communication; we've
listed them below. But it's important to remember that not all computers are
identical when it comes to the configuration and setup, especially where the BIOS
is concerned. For that reason, we encourage you to contact the manufacturer with
questions specific to the system you are using. Bottom line: make sure that you
are using updated, accurate information relative to your hardware /software
configuration.
System BIOS/IR Port is not enabled: Refer to the documentation that was
provided with your system to access the system BIOS. Find the Infrared Data Port,
and ensure that this port is not disabled. If you are given a choice for the COM
port, you should select COM 4; if you are given a choice for Infrared Mode, you
should select FAST IR. Save any changes that you have made, and restart your
system.
Infrared communication function is not enabled: Your computer's IR port may
not be enabled. Ensure that the Infrared communication function is enabled. The
Control Panel should have an Icon for Infrared; double click the Icon. Looking
under the OPTIONS tab, ensure that the Enable Infrared Communications option is
checked. Select the APPLY button, if you've made any changes.
Infrared Port is not visible in the Device Manager: Check to ensure that the
Infrared Port is visible in the Device Manager, and that there are no exclamation
points (!) or Xs (x) next to the name. To access the Device Manager, right-click on
MY COMPUTER, select PROPERTIES, and select the Device Manager Tab.
SiPix Technical Support http://www.sipixdigital.com/support/
18
Page 19

Pocket Printer A6 User’s Guide
Troubleshooting Matrix and Solutions Guide
Issue: Solution:
The document
does not print in a
single page or is
printed out of
proportion:
The printer doesn't
print when using
the serial cable
The printer doesn’t
print when using
IrDA
No printout when
the indicator blinks
The paper feeds
through but
nothing prints out
White lines appear
in diagrams
printed
A6 sheet paper is
stuck and will not
move out from the
printer
automatically
The Power turns
off suddenly
Click "Properties" and then properties of the printer will be
shown. Choose the "Paper" tab. Make sure this is not set to
"User Defined", or "Custom". A4 is the most common setting.
Click "Properties" to set the printer settings and click "Device
Options" tab to choose 100%, or 50% reduction (set 50% for
printing data that is formatted for A4 or 8.5x11 size).
Check "Port Settings" and confirm the transmission speed is
115200 bps and that the “flow control” is set to “Hardware”.
Check and confirm that COM 1 is the chosen printer port.
Check if COM 4 is chosen. The port listed as "infrared serial
port" should be selected (usually COM 4).
Contact the Computer hardware vendor to ensure that the
computer’s IrDA port is activated and set-up correctly.
The battery power is too low. Please replace the batteries or
use the AC adaptor.
The print area of A6 paper is up side down. Ensure the bright
white side is up.
When white lines appear in a horizontal direction, it is the
normal phenomena of a serial-port printing device.
Please turn off the power and on again. Then hold down the
power button, the paper should advance until the button is
released.
To save battery power the printer turns off after 3 minutes of
inactivity (batteries), or 1 hour of inactivity (AC power). Press
the power button to turn the printer on.
The batteries have run low. Replace the batteries or use the
AC adapter.
SiPix Technical Support http://www.sipixdigital.com/support/
19
Page 20

Pocket Printer A6 User’s Guide
Specifications
Item Product Specification
Printer method Serial Thermal Transfer Method
Resolution 400 x 400dpi
Total printing dot 1500 dot/line
Printing speed Windows PC ~ About 2 pages/min. (Not including data received time)
Pocket PC ~ Average, under one minute per page
Palm OS ~ Average, approximately one minute per page
Font None
Print Media Roll Paper (wide 105mm x 2.5 M)
Sheet A6 Paper (wide 105mm x 148mm)
Interface Infrared communication:
Conforming to IrDA 1.0 (for secondary only)
Transfer rate (2400; 9600; 19.2K; 38.4K; 57.6K; 115.2K) bps
Directivity: Approximately ±15º
Serial interface
RS-232C Standard
Transfer Condition: 115.2K bps (Application only)
Data length: 8 bit
Stop bit: 1 or 2 bit
Parity: None
Flow Control: Hardware
Input Power Battery: 4 AA Alkaline Battery
AC Adapter: DC 9V 1.5A
Power
Consumption
Battery Life Approximately 50 sheets using AA alkaline batteries
Printer Weight 250g (8.75 ounces) without batteries or paper
Printer
Dimensions
Paper A6 Roll Paper: 4.13” x 98.4” (105mm x 2.5m)
Environment
Condition
15 W
5.85” (L) x 4.25” (H) x .875” (D)
150mm (L) x 109mm (H) x 22mm (D)
A6 Sheet Paper, 100 Sheets: 4.13” x 5.83” (105mm x 148mm)
Operating Temp
Storage Temp
Operating Humidity
Storage Humidity
Storage Humidity
: 41°- 95°F (5°-35°C)
: 32°-122° (0-50°C)
: 30~60%RH
: 30~60%RH (Operating with paper)
: 30~80%RH (Non-Operating, W/O paper)
SiPix Technical Support http://www.sipixdigital.com/support/
20
Page 21

Pocket Printer A6 User’s Guide
Warranty Information
ONE YEAR LIMITED WARRANTY
SiPix, Inc. warrants this hardware product against defects in material and
workmanship for a period of one year from the original date of purchase as identified
on the proof of purchase (your receipt). It is the end-user’s responsibility to make
certain this product is in working condition with the intended computer system within
the one-year warranty period.
These are the sole remedies and SiPix’s sole liabilities for performance or failure to
perform of the product. SiPix reserves the right to change its warranty policy at any
time for all products distributed after the date of such change in warranty. Except as
set forth above, all other warranties whether express or implied, including but not
limited to, the implied warranties of merchantability and fitness for a particular
purpose are hereby excluded.
SiPix shall not be liable for incidental, special or consequential damages arising out of
or related to the use or performance of the product, including, without limitation,
loss of data or use of data processing facilities or equipment, regardless of whether
SiPix may have been advised about the possibility of such damages arising out of use
of the product shall be limited to the amounts paid by purchaser for such product.
This warranty is only valid within the boundaries and territories of the USA and
Canada. SiPix is not responsible for costs incurred due to shipping, insurance,
customs, or duties. SiPix is not responsible for non-traceable packages or packages
shipped without a valid RMA number on the outside of the package.
This warranty does not apply if the product has been damaged by an accident,
electrical fault, through misuse or abuse. If the product has been altered without
written authorization from SiPix, the warranty will be void.
This warranty applies only to hardware products manufactured by or for SiPix.
Warranted products must bear the “SiPix” brand name, trade name, or logo. The
aforementioned warranty and remedies are exclusive, and in lieu of all others,
whether oral, written, expressed or implied. SiPix specifically disclaims any and all
implied warranties of merchantability and fitness for a particular purpose.
SiPix is not responsible for incidental or consequential damages resulting from any
breach of warranty. SiPix is not responsible under any other legal theory, including,
but not limited to lost profits, and any cost of recovering reprogramming or
reproducing any program or data stored in or used with SiPix products.
SiPix Technical Support http://www.sipixdigital.com/support/
21
Page 22

Pocket Printer A6 User’s Guide
RMA Information & Warranty Services
If your SiPix product needs to be returned for repair, you must contact SiPix
technical support prior to shipment for an RMA number before sending in the
product. The RMA number is a Return Merchandise Authorization number.
SiPix will refuse all shipments without a proper RMA number. The RMA
number MUST be printed on the outside of the original shipping carton in large print
written in black ink next to the shipping label. Failure to properly pack shipment
could cause serious damage to the product and void the warranty.
Should any defect(s) be discovered, the product may be returned to SiPix with a
valid RMA number. If you are returning product for repair, please be sure to do the
following:
1) Call SiPix Customer Support Mon-Fri during regular business hours toll free at
866-888-1678 and obtain an RMA (Return Merchandise Authorization) number.
2) Print your RMA number on the OUTSIDE of the original shipping carton in large
print written in black ink next to the shipping label.
3) Include a copy of the bill of sale with the returned product.
4) Unless otherwise instructed, do not return any manuals or software when
returning items for repair.
5) Ship to SiPix via a traceable shipping method and retain the tracking number.
Note: This product is intended for use only within the boundaries and territories of
the United States and Canada. If you purchased this product in Mexico or South
America and need assistance or repair, you must contact your originating reseller for
service and support. SiPix Imaging, Milpitas CA, will not accept any shipments from
outside the boundaries and territories of the USA and Canada. SiPix often bundles
many different third party software options with its products. If any of these options
were ordered with your SiPix product and they appear to be missing or incorrect,
contact your reseller immediately.
SiPix Technical Support http://www.sipixdigital.com/support/
22
Page 23

Pocket Printer A6 User’s Guide
Technical Support Information
SiPix provides technical support at no cost during the one-year warranty period.
Users with questions or concerns of a technical nature should first refer to the
product manual, as usage and troubleshooting information is provided in detail. For
additional information or assistance, users should visit the SiPix Web-site, as
tutorials, updated drivers, frequently asked questions and news updates are
available. http://www.sipixdigital.com/support
Should you require further assistance, you may contact SiPix technical support
representatives by calling:
Technical Support call: 510-651-9199
SiPix Technical Support is available from 8 AM to 6 PM PST, Monday through Friday,
excluding holidays.
Additional Resources and Information
This manual and troubleshooting guide contain complete and accurate information
regarding the setup and use of your SiPix Pocket Printer A6. SiPix also provides
additional, web-based resources that offer up-to-date information, drivers,
troubleshooting tips and frequently asked questions. We encourage users to visit the
SiPix website for these resources, and for news & updates.
http://www.sipixdigital.com/support/ppa6index.shtml
Please take a moment to register your SiPix products. The registration process is
simple, and is available online. During the registration, you will be given the option of
receiving email updates that often contain useful and pertinent information regarding
your SiPix products. Please visit the link below.
http://www.sipixdigital.com/registration/index.shtml
SiPix Technical Support http://www.sipixdigital.com/support/
23
 Loading...