

Page 1
SIP Industrial Products Limited
Gelders Hall Road
Shepshed
Loughborough
Leicestershire
LE12 9NH
United Kingdom
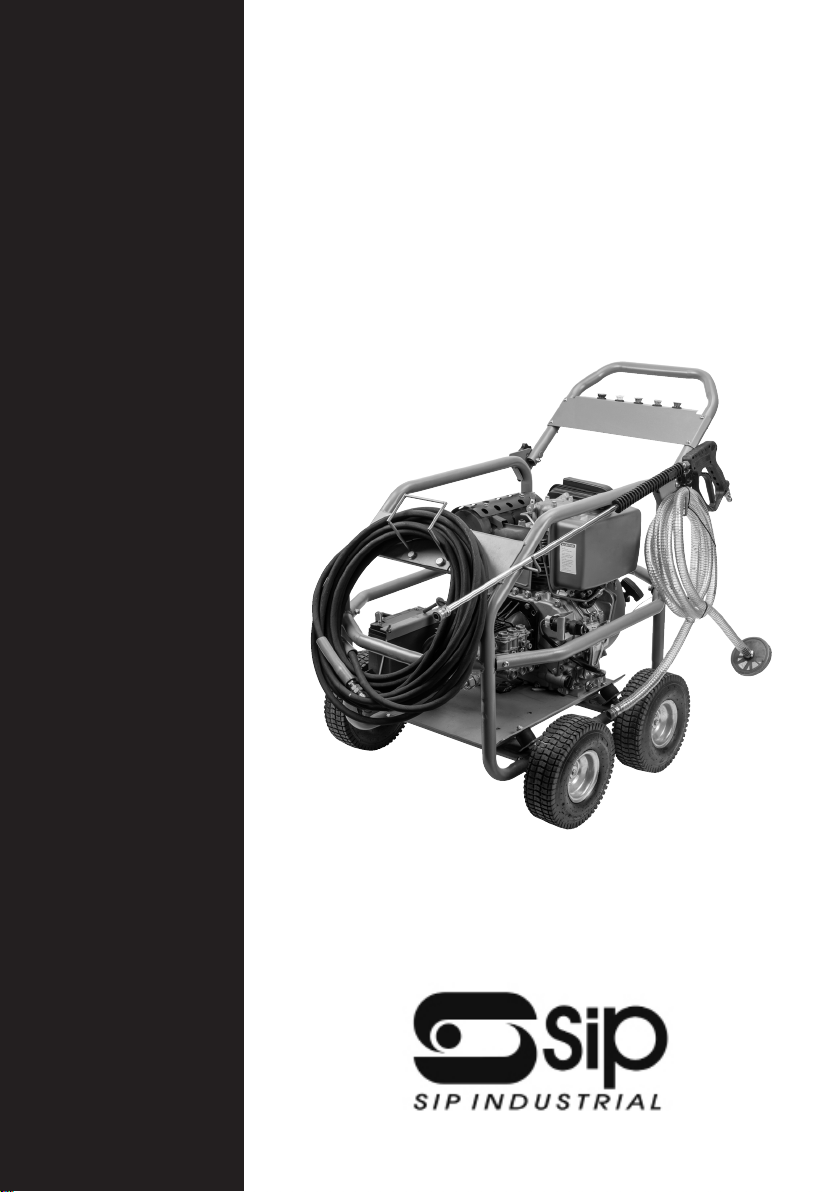
Tempest CW-D 300TX
08989
For help or advice please
contact your distributor, or sip
directly on: Tel.: 01509 500400
Email:[email protected] or
www.sip-group.com
Page 2

Page 3
CONTENTS
Page No. Descripon
4. Safety Instrucons
7. Guarantee
8. Your item
9. Technical Specicaons
10. Assembly Instrucons
12. Operang Instrucons
15. Maintenance
17. Trobuleshoong
19. Exploded Drawing
20. Spare Parts List
21. Wiring Diagram
22. UK - Declaraon Of Conformity
23. EU - Declaraon Of Conformity
Page 4
SAFETY INSTRUCTIONS
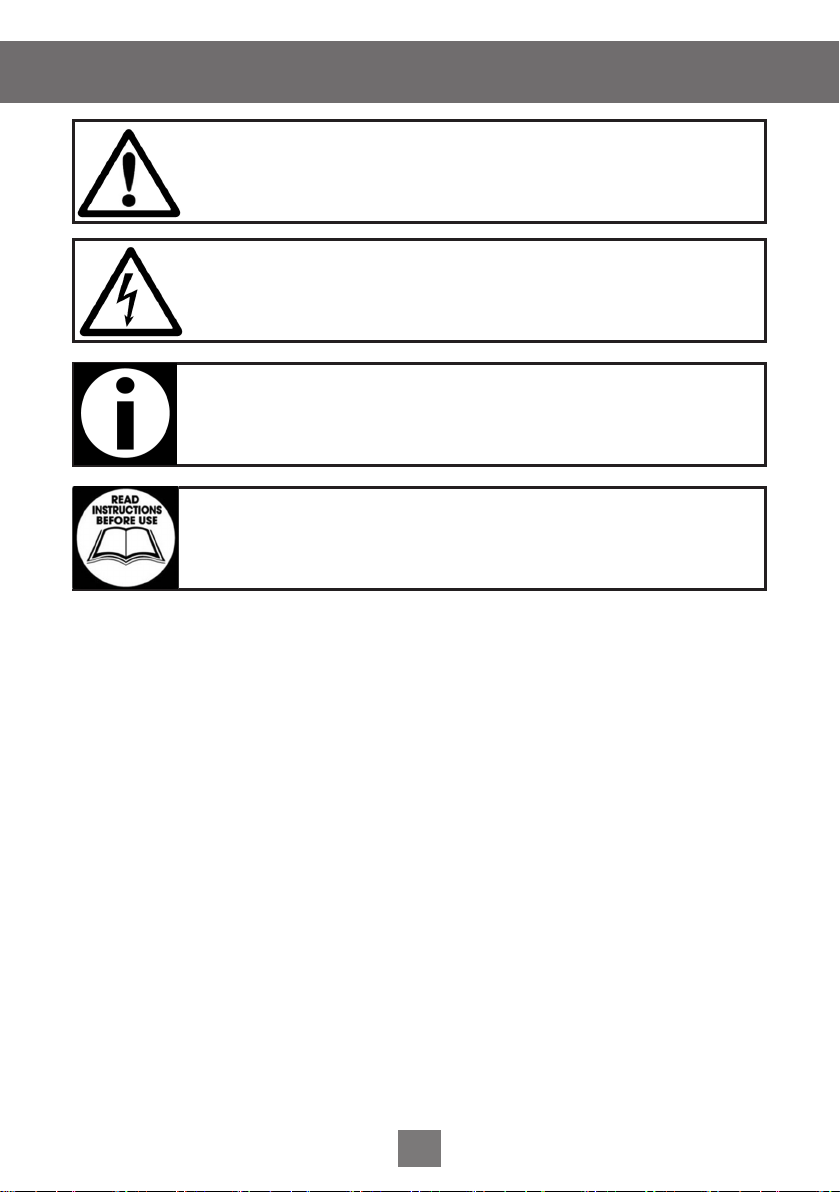
Danger / Cauon: This picture indicates risk of personal injury and/
or the possibility of damage.
Warning: This picture indicates risk of electrical injury or damage!
Note: This picture indicates supplementary informaon.
Important: Please read the following instrucons carefully, failure to
do so could lead to serious personal injury and / or damage to the
item.
When using this item, basic safety precauons should always be followed to reduce
the risk of re, electric shock and personal injury.
Read all these instrucons before operang the machine and save this user manual
for future reference.
The warnings and cauons menoned in this user manual cannot cover all possible
condions and situaons that may occur. It must be understood by the operator that
common sense and cauon are factors which cannot be built into this product, but
must be applied.
This item should not be modied or used for any applicaon other than that for
which it was designed.
This pressure washer was designed to supply high pressure water for the purpose of
cleaning mainly inanimate objects.
If you are unsure of its relave applicaons do not hesitate to contact us and we will
be more than happy to advise you.
General Safety Instrucons
• KNOW YOUR PRESSURE WASHER: Read and understand the owner’s manual and
labels axed to the machine. Learn its applicaons and limitaons, as well as the
potenal hazards specic to it.
• KEEP WORK AREA CLEAN: Cluered and dark areas invite accidents.
4
Page 5

SAFETY INSTRUCTIONS
• DO NOT USE THE PRESSURE WASHER IN DANGEROUS ENVIRONMENTS: Provide
adequate space surrounding the work area. Do not use in environments with a
potenally explosive atmosphere.
• KEEP CHILDREN AND UNTRAINED PERSONNEL AWAY FROM THE WORK AREA: All
visitors should be kept at a safe distance from the work area.
• STORE THE PRESSURE WASHER SAFELY WHEN NOT IN USE: The pressure washer
should be stored in a dry locaon, drained of any water and fuel, out of the
reach of children and in a frost free environment.
• USE SAFETY CLOTHING / EQUIPMENT: Use CE approved safety glasses during
operaon. Loose clothing or jewellery may become entangled in moving
components, causing equipment damage and/or personal injury.
• STAY ALERT: Always watch what you are doing and use common sense. Do not
operate the pressure washer when you are red or under the inuence of
alcohol or drugs.
• CHECK FOR DAMAGED PARTS: Before every use of the pressure washer, any
damage found should be carefully checked to determine that it will operate
correctly, safely and perform its intended funcon. Any damaged, split or missing
parts that may aect its operaon should be correctly repaired or replaced by an
authorised service centre unless otherwise indicated in this instrucon manual.
• KEEP ALL COVERS / PANELS IN PLACE: Never operate the pressure washer with
any covers / panels removed, this is extremely dangerous.
• USE ONLY RECOMMENDED ACCESSORIES: Consult this user manual, your
distributor or SIP directly for recommended accessories. Follow the instrucons
that accompany the accessories. The use of improper accessories may cause
hazards and will invalidate any warranty you may have.
• HAVE YOUR PRESSURE WASHER REPAIRED BY A QUALIFIED PERSON: The pressure
washer is in accordance with the relevant safety requirements. Repairs should
only be carried out by qualied persons using original spare parts, otherwise this
may result in considerable danger to the user.
• Stop operaon immediately if you noce anything abnormal.
• Be sure that the Pressure washer is placed on a at level surface prior to and
during operaon. The Pressure washer must not slide or shi during operaon
• Keep all untrained persons away from the Pressure washer during operaon.
• Be aware of moving parts and hot surfaces that occur during normal operaon of
this Pressure washer.
• Never operate the Pressure washer with damaged, broken or missing parts, or
with any guards or covers removed.
• Do not rell the fuel tank while the engine is running. Always allow engine to
cool before refuelling and be careful to prevent fuel spillage during rells. Also
make sure the fuel tank cap is securely in place before starng the engine.
• Never refuel whilst smoking or in the vicinity of a naked ame, or other sources
5
Page 6
SAFETY INSTRUCTIONS
of ignion. Should any fuel make contact with your clothes; change and wash
them immediately. If any fuel makes contact with your skin wash with soap and
water immediately.
• Always operate this Pressure washer in a well venlated area to reduce the risk
of suocaon.
• Never cover the Pressure washer or restrict the exhaust or air ow in any way.
• Always ensure that the Pressure washer is at least 1m (3) away from any walls
or buildings to allow correct air ow.
• Never drag the pressure washer with the hose in order to move it.
• Only connect the pressure washer to a cold water supply; never connect to a hot
water supply.
• To prevent accidental water spray, the pistol trigger should be placed in the
locked posion when not in use.
• When not in use, always ensure that the pressure washer is fully drained of any
water and stored in a warm environment to protect it from frost damage.
• Never direct the ow of water at other persons, animals, electrical, electronic
items or towards the pressure washer itself.
• Keep hands and other body parts away from high pressure water stream as water
pressure will cause severe bodily harm.
• Do not stand or sit on the pressure washer, it was not designed for this purpose
• Never run the pressure washer without a clean water supply connected to it.
• Never run the pressure washer for more than 30 seconds without depressing the
trigger.
• Do not operate this pressure washer in temperatures below 5°C. Operang
pressure washer under the temperature of 5°C may cause damage to pump and
other pressure washer parts.
• Do not hold the water outlet (nozzle) too close to the surface being cleaned or
damage could occur.
• Only use recommended detergents for pressure washers. Using detergents not
specically recommended for use with pressure washers can cause damage to
pump and other pressure washer components.
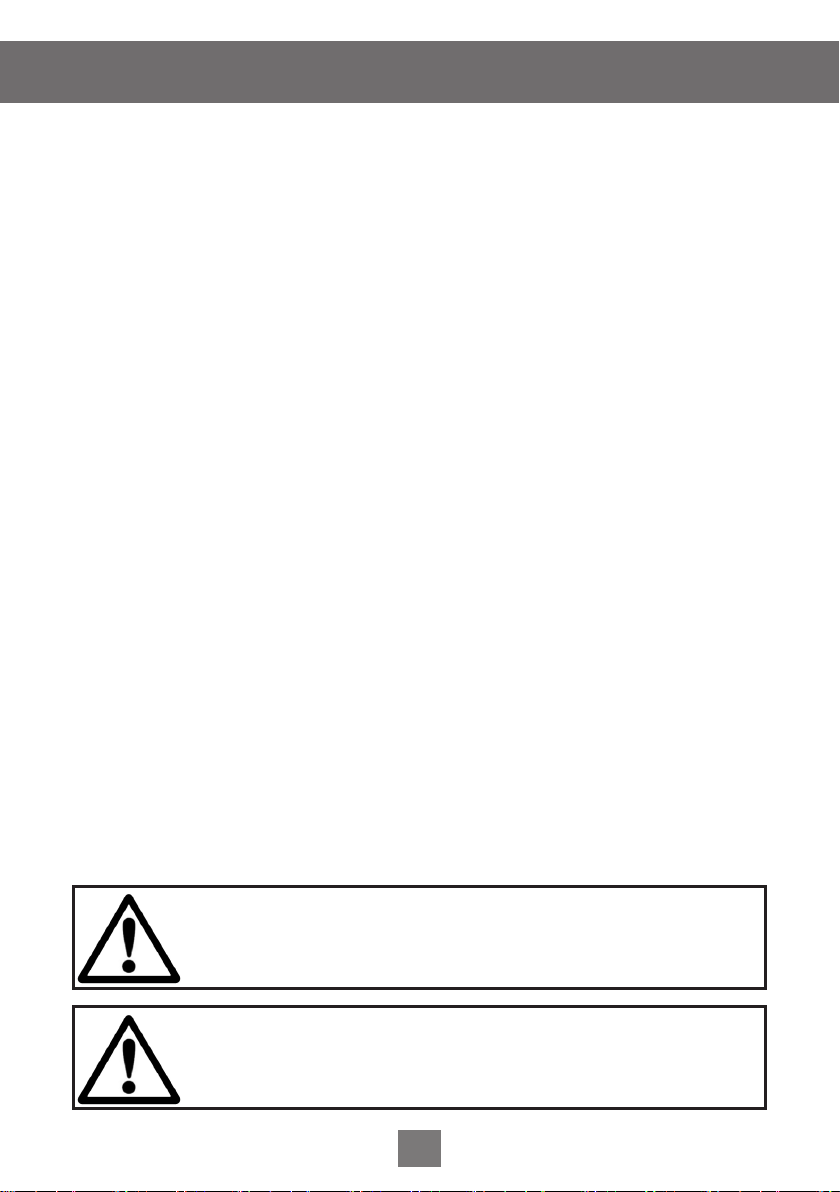
Danger / Cauon: Exhaust fumes produced during normal operaon
are poisonous. Do not operate this pressure washer in enclosed
areas.
Danger / Cauon: The fuel used to run this pressure washer
(unleaded petrol) is highly ammable. Never re-fuel the pressure
washer whilst it is sll running.
6
Page 7
GUARANTEE
This item is covered by a 24 month parts and labour warranty covering failure due
to manufacturers defects. This does not cover failure due to misuse or operang the
item outside the scope of this manual - any claims deemed to be outside the scope
of the warranty may be subject to charges Including, but not limited to parts, labour
and carriage costs, failure to regularly clean your item will shorten its working life and
reduce performance.
This guarantee does not cover consumables such as lters, spark plugs, oil, high
pressure hoses, pistols, lances, nozzles etc.
NOTE: Proof of purchase will be required before any warranty can be
honoured.
7
Page 8
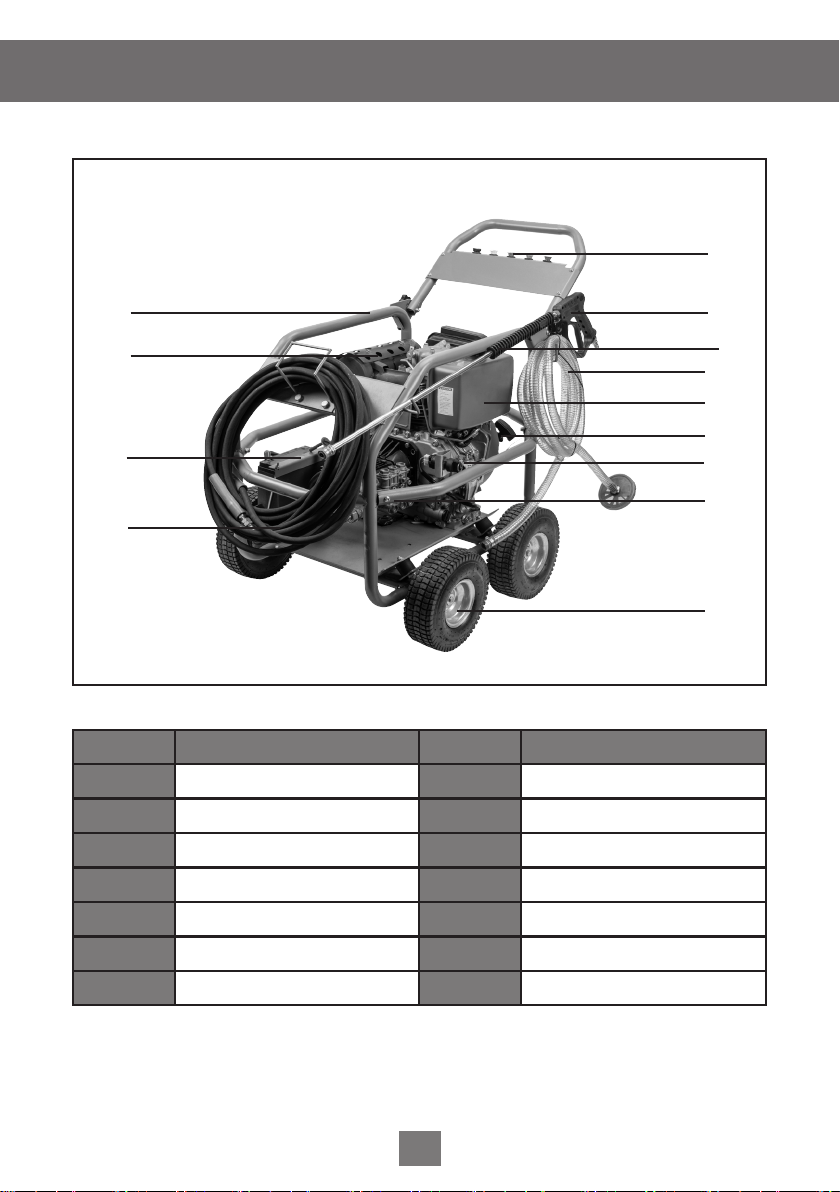
YOUR ITEM
5
4
3
2
1
Ref. Descripon Ref. Descripon
1.
2.
3.
4.
High Pressure Hose
Baery
Exhaust system
Frame
8.
9.
10.
11.
Sucon Hose
Air Filter
Recoil
Key Set & Ignion
6
7
8
9
10
11
12
13
5.
6.
7.
Set of Nozzles
Pistol
Chromed Lance
12.
13.
Pump
Wheel
8
Page 9
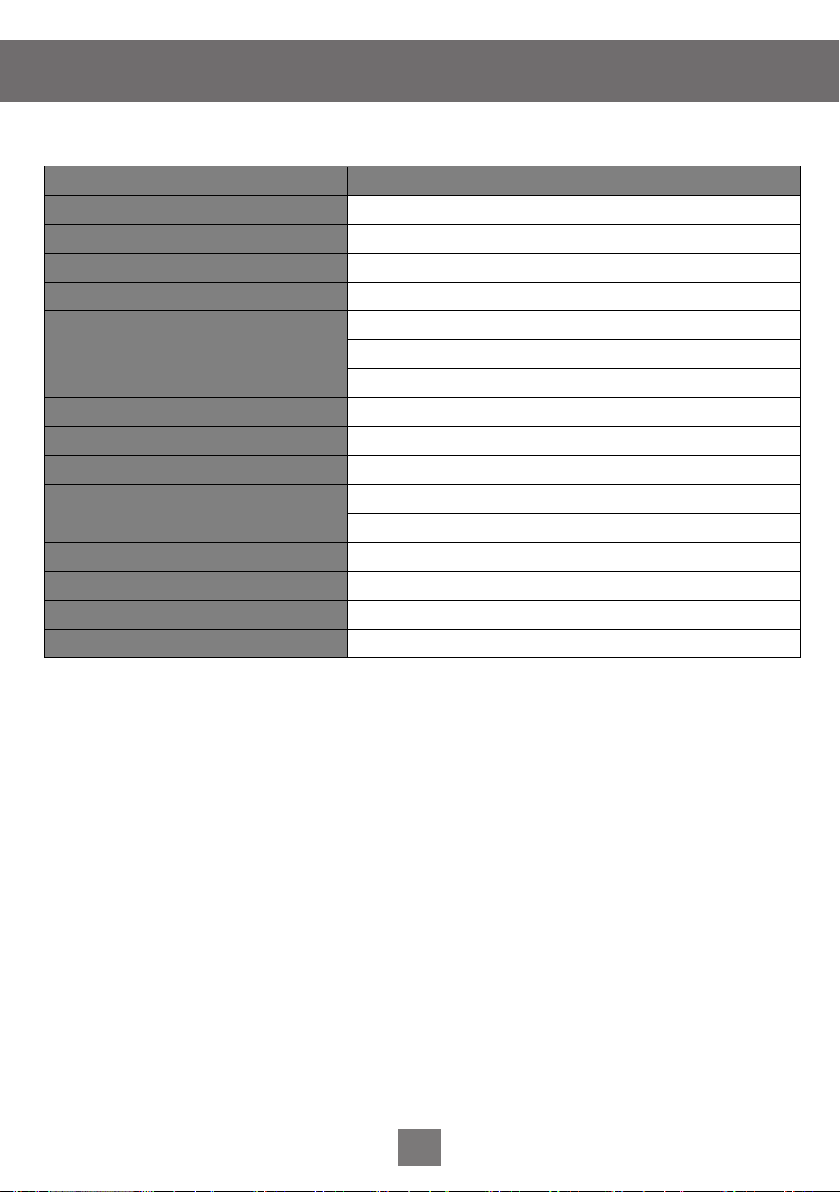
TECHNICAL SPECIFICATION
08989 SIP Tempest CW-
Engine Power
Engine Type
Fuel Type
Fuel Tank Capacity
Engine Oil 10W30 / 10W40
Engine Oil Qty
Staring System Electric & Recoil
Pump Type Cranksha / Triplex
Pump Oil Type UTTO (Universal Tractor Transmission Oil) - EP32 Grade
Pump Pressure 300Bar Max / 250Bar Rated
Pump Flow
High Pressure Hose Length
No. of Nozzles
Sound Level
Weight
Single cylinder; 4 stroke; air cooled; Direct injecon; Euro V
D 300TX Diesel Pressure Washer Model
9HP
Diesel
5.5Litres
1.7Litres
-
Variable 900Litres / Hour
15mtrs
5
o O
C
C / 50Min / Max Temperature
5
110dB LwA
95.5KG NW / 113.5KG GW
9
Page 10
ASSEMBLY INSTRUCTIONS
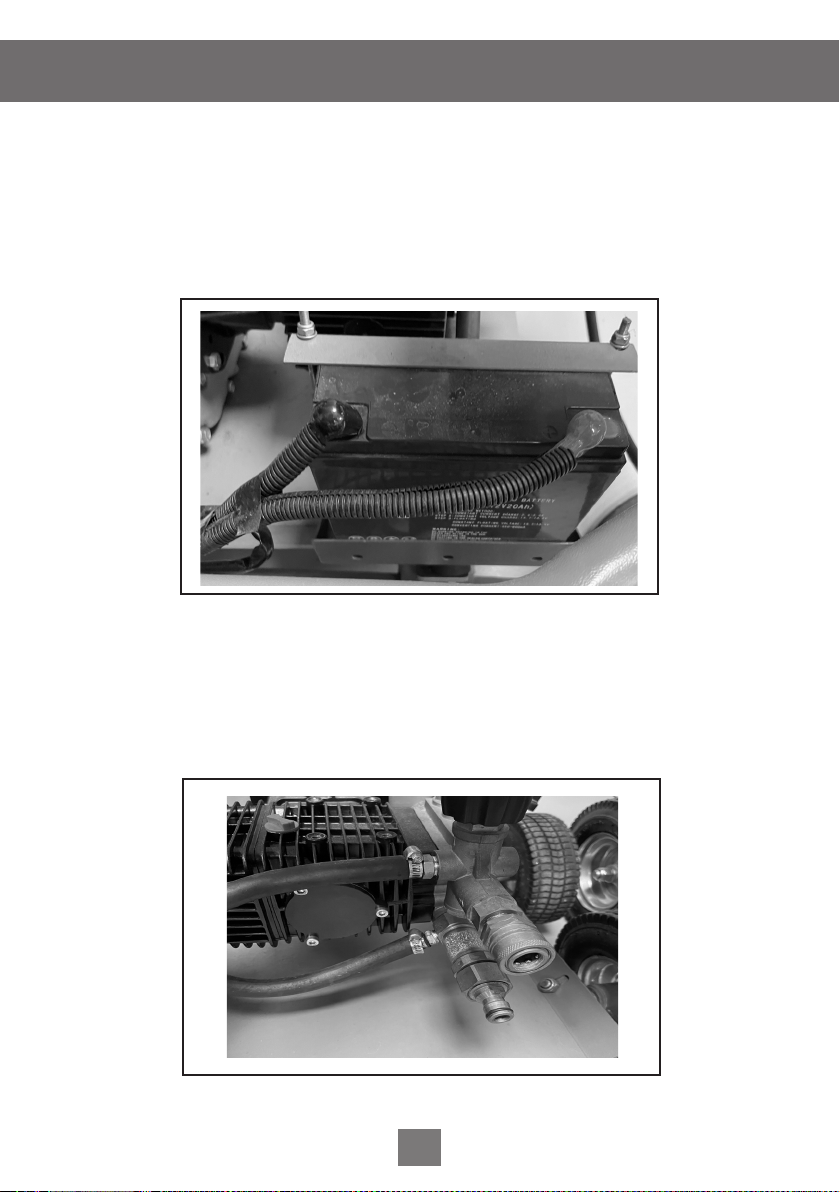
CONNECTING TERMINALS TO THE BATTERY
Make sure you connect the posive terminal rst, then the negave terminal.
Posive (+) - Red
Negave (-) - Black
Fig.1
WATER SUPPLY AND HOSE FITTING
Connect the mains water supply to the inlet of the water pump (A) and aach the
hose to the outlet of the pump (B).
B
Fig.2
A
10
Page 11
ASSEMBLY INSTRUCTIONS
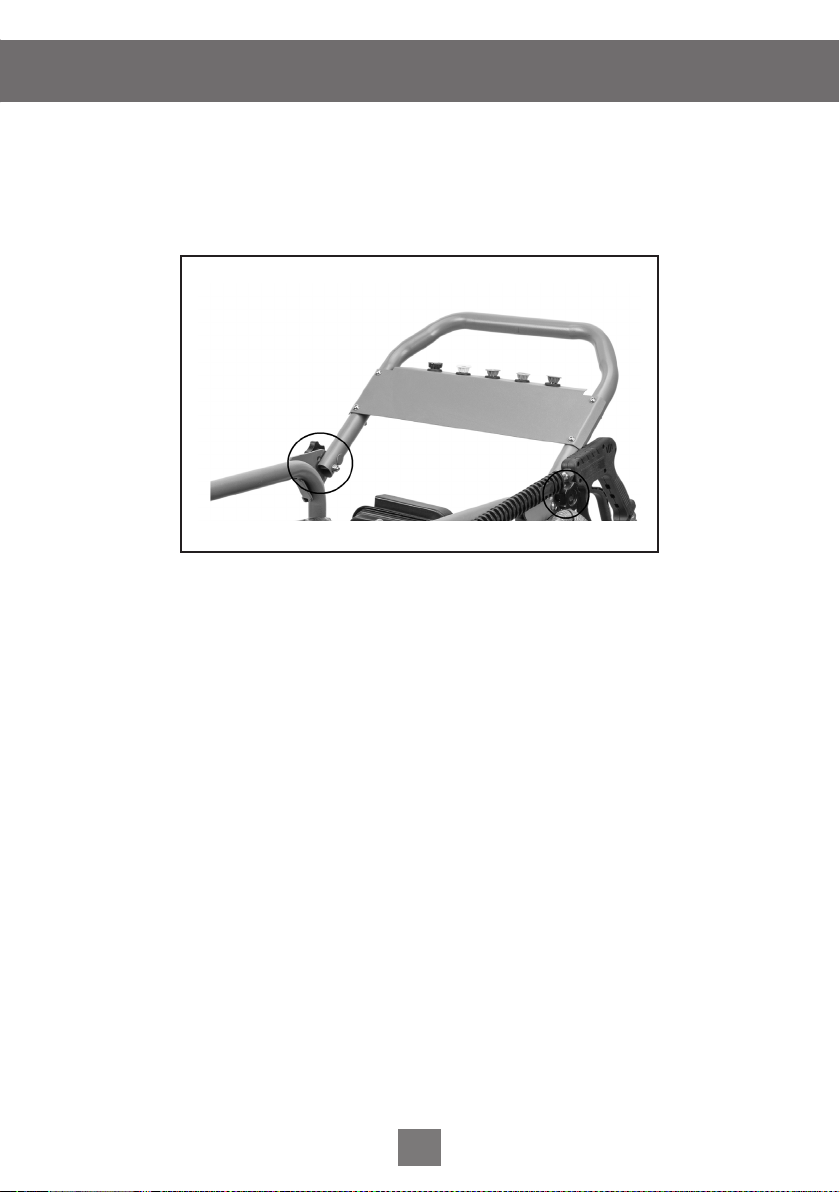
PUSH HANDLE
Aach the push handle to the frame with the two plasc knobs provided and the two
dome nuts.
Fig.3
11
Page 12
OPERATING INSTRUCTIONS
Danger / Cauon: Before you operate the pressure washer ALWAYS
check that no damage is present and that everything that should be,
is ght and secure.
Danger / Cauon: Hot Surfaces. Always ensure that the pressure
washer is turned o and allowed to fully cool before any refuelling
or maintenance procedures are carried out.
FILLING THE ENGINE WITH OIL / CHECKING THE OIL LEVEL
This pressure washer is shipped from the factory without oil in the pump and
engine.
• Engine oil is a major factor aecng engine performance and service life. Nondetergent oils and vegetable oils are not recommended.
• Use premium quality 10W30 4-stroke engine oil.
• Do not add commercial addives to the recommended oil and do not mix petrol
with the oil.
• Oil 10W-30 is recommended for general, all temperature use.
• Check the oil level in the crankcase of the engine before each start.
• The oil level should be posioned between the lower and upper level marks on
the oil ller cap (oil gauge).
NOTE: When checking the oil level, always ensure that the pressure
washer is placed on a rm level surface.
Danger / Cauon: Be sure oil level is maintained. Failure to do so will
invalidate any warranty you may have.
12
Page 13
OPERATING INSTRUCTIONS
ADDING FUEL
• Turn the pressure washer o and let it cool for at least two minutes before
removing the fuel cap. Loosen the fuel cap slowly to release pressure.
• Clean the area around the fuel cap.
• Fill the tank outdoors. Never overll the tank. Stop lling when the fuel level is at
the middle of the lter.
• Screw the fuel cap and ghten it.
Danger / Cauon: Fuel and fuel vapour are extremely ammable
and explosive. Fire or explosion from misuse of fuel can cause severe
burns and even death.
NOTE: Always operate the pressure washer outdoors in a well
venlated area.
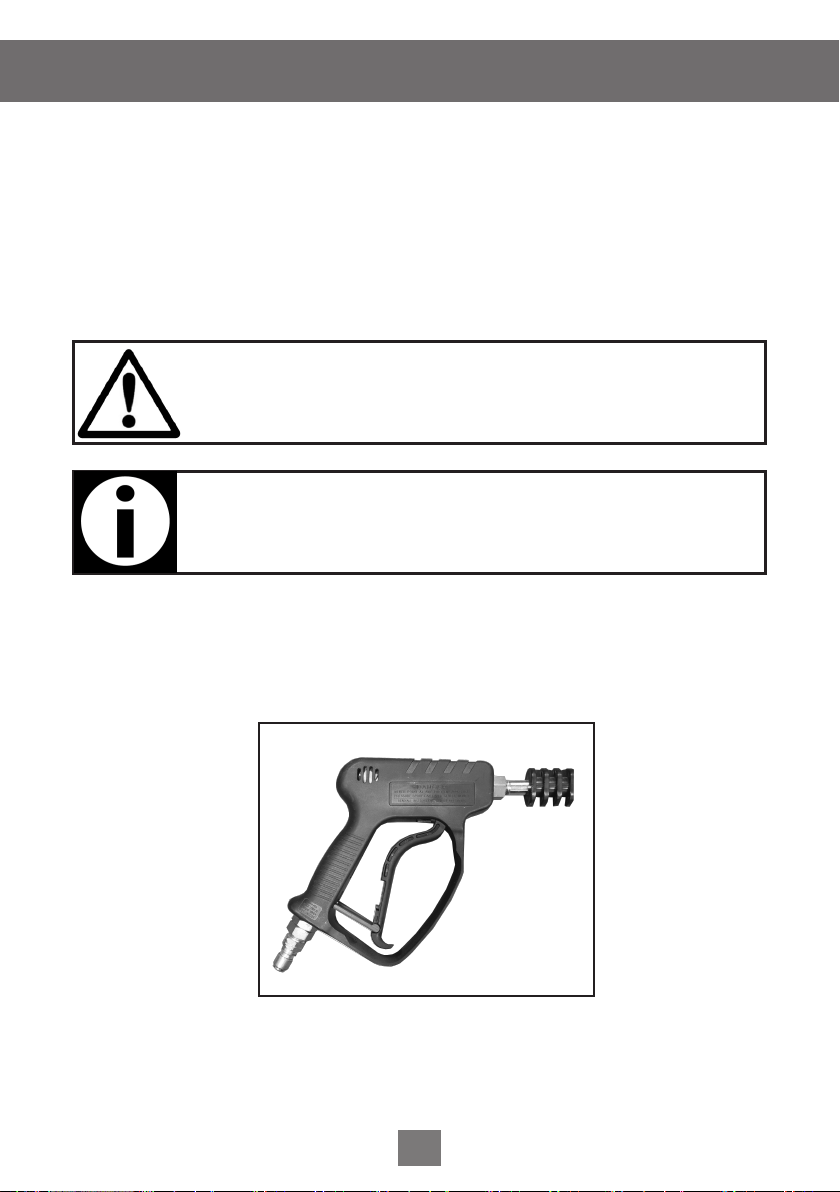
OPERATING THE PISTOL / LANCE FUNCTIONS
The trigger can be locked to stop it funconing unintenonally by operang lever D.
Fig.14
D
Fig.14
OPERATING THE PRESSURE WASHER
• Choose the correct nozzle according to your required spray paern
(0°,15°,25°,40°) or detergent nozzle (the one with the larger orice) and connect
by quick coupling.
13
Page 14
OPERATING INSTRUCTIONS
NOTE: Ensure that the trigger is in the “o” posion & locked when
changing nozzles.
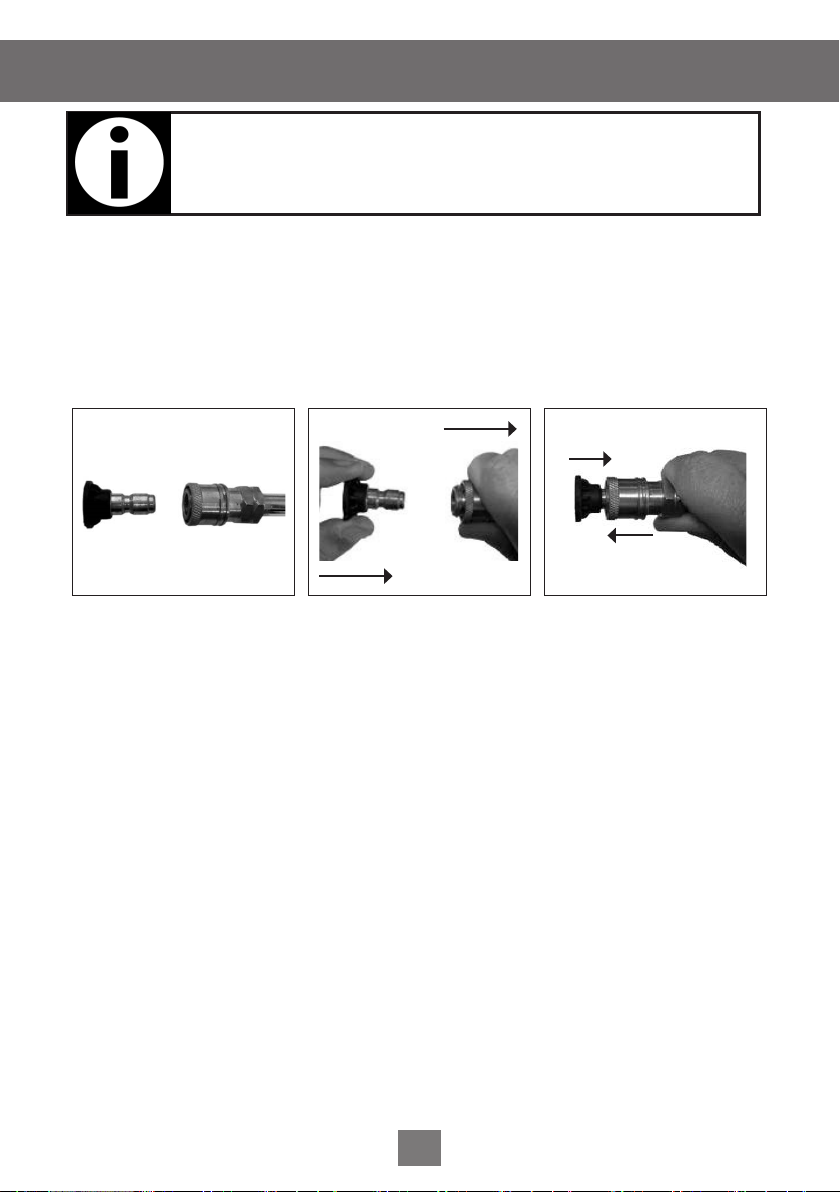
The low pressure (black) nozzle should be fitted to when starting the engine.
Pull back on the quick coupler connection at the end of the lance (see Fig. A). Push
the nozzle into the quick coupler connection and allow the connector to spring
back; This will hold the nozzle in position (see Fig. B).
Once the engine is running, follow these instrucons to t the required nozzle.
Fig. A
• Check and determine that the water supply source is capable of exceeding the
output in litres per minute of the pump.
• If you are drawing water from a clean static source i.e water butt, rather than a
pressure main, the pressure washer must be primed and placed as close as
possible to the water source.
• When drawing water from the mains supply, you need a hose with 5/8” (16mm)
outside diameter for lengths up to 15mtr, or a 3/4” (19mm) diameter for lengths
up to 30mtrs.Make sure all the connections and attachments are properly fitted
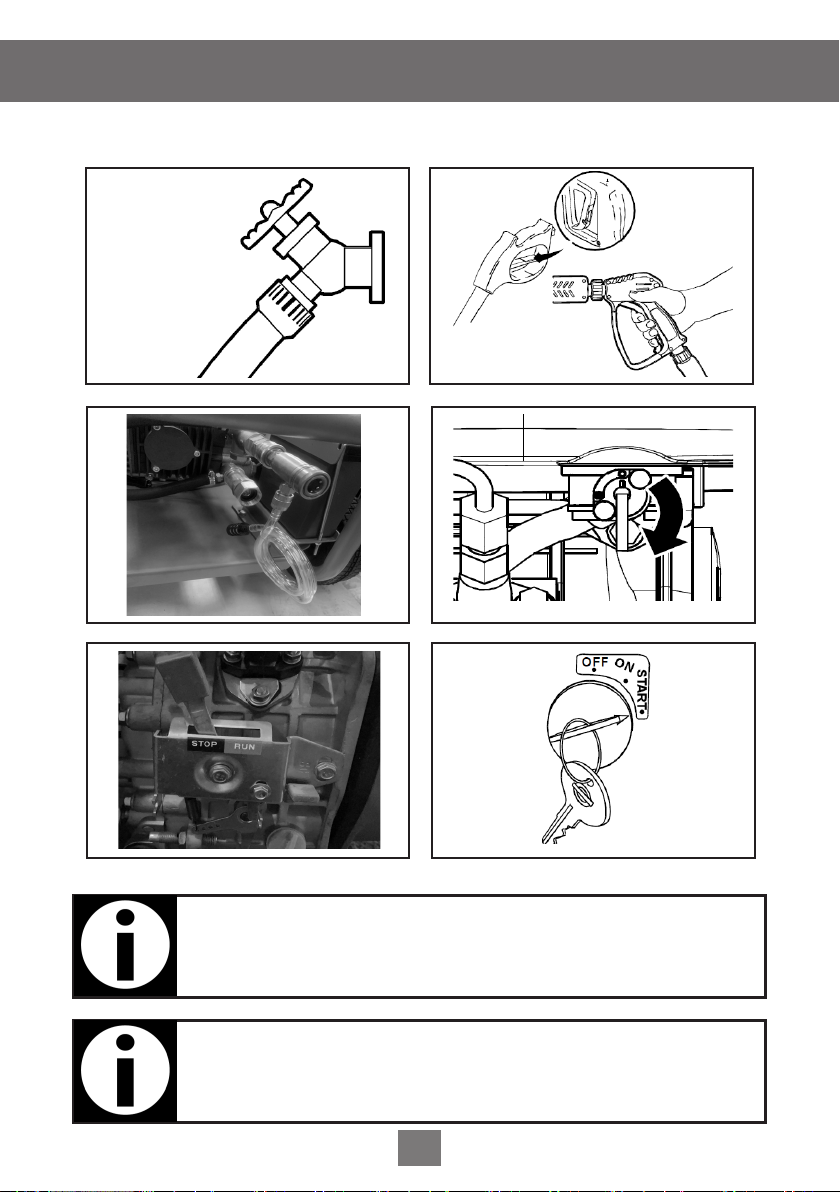
• Then, turn the mains water supply on. Fig.4
• Pull trigger to purge the system of air and impurities. Fig.5
• In case you want to draw detergent, attach the soap injector coupler to the inlet
of the pump. Fig.6
• Turn on the fuel valve. Fig.7
• Place the control lever in the RUN position. Fig.8.
• For electric start, turn the key clockwise to the start position. For the recoil start,
pull the cord. If the engine fail to start, allow 30 seconds before you attempt to
start the engine again. Fig.9
• Increase or decrease the water pressure using the large regulator knob locate on
the pump.
• Stop the engine by turning the control lever to the STOP position. Fig.8. Then,
turn the key OFF and close the fuel valve. Fig.9
• Pull the trigger to release the pressure on the system.
Fig. B
14
Page 15
OPERATING INSTRUCTIONS
Fig.4
Fig.5
Fig.6 Fig.7
Fig.8
NOTE: Always set the lance to low pressure and hold the pistols
trigger ‘open’ every time the engine is started. This will ensure that
the operator is not trying to start the engine against back pressure
Fig.9
NOTE: When changing the nozzles, always switch off the
machine, release the pressure and point to a safe direction.
Only use detergent recommended by the manufacturer
15
Page 16
MAINTENANCE
GENERAL RECOMMENDATIONS
Regular maintenance will improve the performance and extend the life of the
pressure washer.
The pressure washer's warranty does not cover items that have been subjected to
operator abuse or negligence.
NOTE: For help or advice on this product please contact with SIP
customer service.
• Some adjustments will need to be made periodically to properly maintain your
pressure washer. Check the spray gun and extension wand assembly for wear.
• All maintenance in this manual and the engine operator's manual should be
made at least once each season.
PRESSURE WASHER MAINTENANCE
Daily or before use, clean accumulated debris from the system. Keep area around
and behind muer free from any combusble debris and inspect cooling air slots
and openings on the pressure washer. These openings must be kept clean and
unobstructed.
All the inlets, outlets, hoses, nozzles and the gun must be checked in a daily. Do not
aempt to repair any of them, replace it and make sure the pressure rang exceeds
the indicated on the unit.
PUMP MAINTENANCE
Change pump oil aer rst 50 hours of use or rst season, then every 100 hours or as
needed.
Please use the Universal Pump Oil and follow the below steps:
1. Unthread the oil cap on the top of the pump.
2. Put a container under the pump, then unthread the drain plug on the boom of
the pump.
3. Aer oil drains away completely, screw the drain plug into the drain hole again,
make sure the o-ring is with the plug.
16
Page 17
MAINTENANCE
4. Rell pump oil via the top hole of the pump unl the oil level is halfway up the
sight glass.
5. Screw on the oil cap.
ENGINE MAINTENANCE
Regular checks and maintennce are very importante for normal operaon of the
machine. This will allow the machine to work under specicaons and extend the
product life cycle. For any further assistance, please contact SIP.
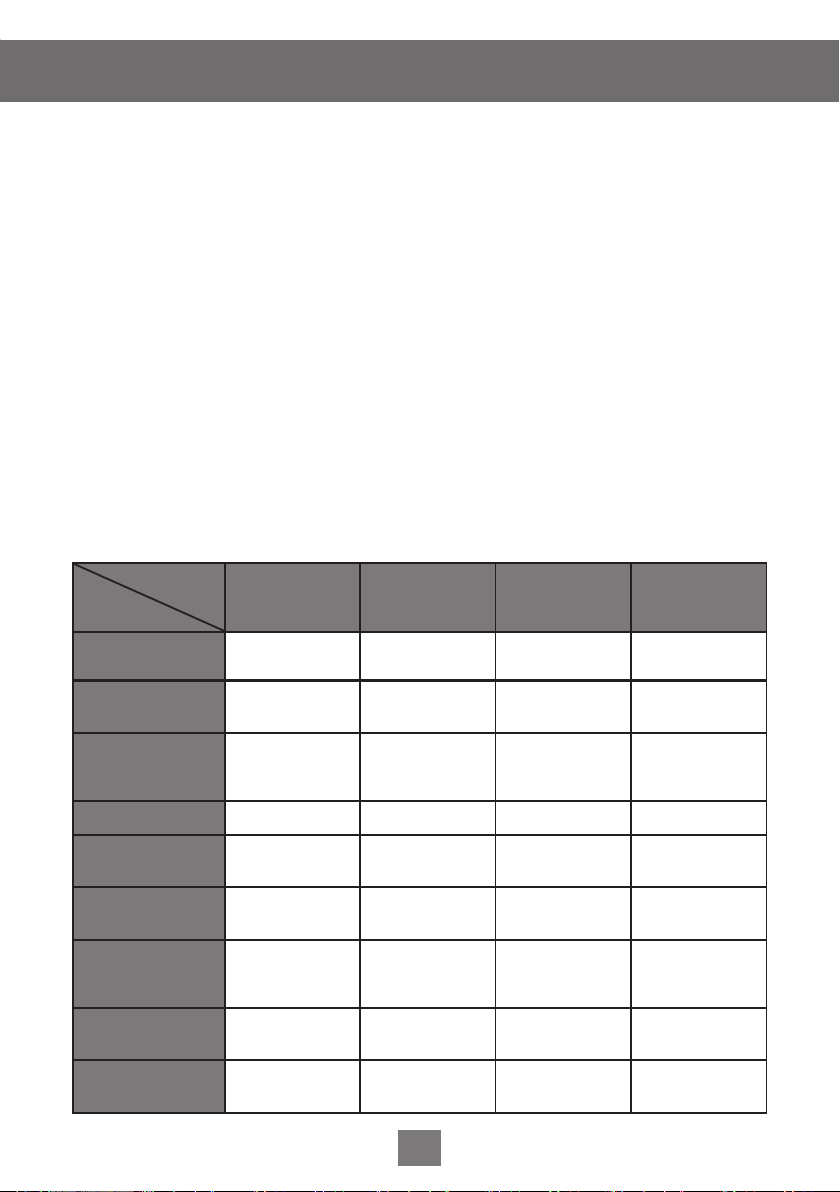
Daily Check Maintenance
• Check the oil level and ensure it is between ipper and low limit.
• Check there are no leaks and ensure all the nuts and bolts are ght.
• Keep the machine clean.
Regular Check Maintenance
Aer 20 hours or
1 month
Change oil
Check / Change oil
ter
Change air lter
Clean fuel tank X
Clean / Change fuel
ter
Check Nozzle/
Injecon Pump
Check fuel pipeline
Change piston ring X
Check accumulator
liquid
X
(First Time)
X
100 hours or
every 3 months
X
X
(Dusty
enviroment)
500 hours or
every 6 months
X
(Check)
X
X
(Clean)
X
X
(Change, if
necessary)
1000 hours or
every year
(Change)
(Change)
17
X
X
Page 18
TROUBLESHOOTING
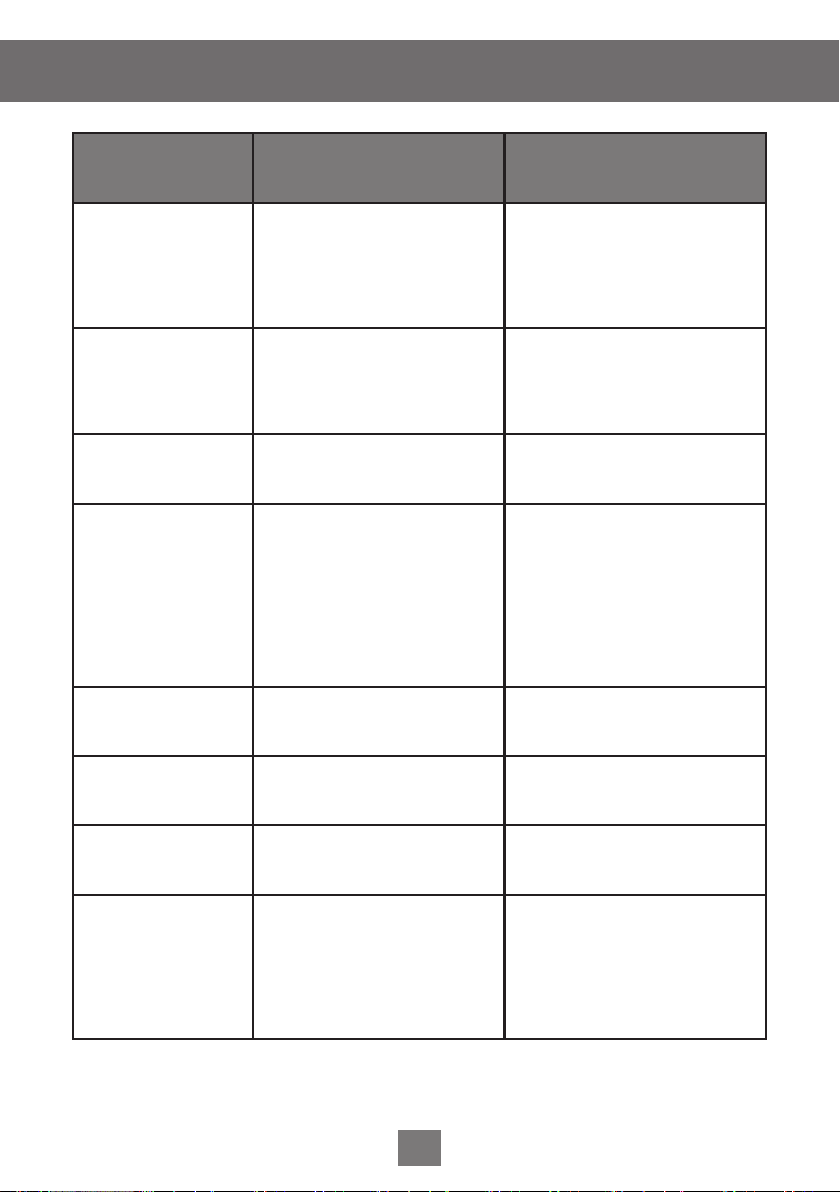
Problem Possible reason Soluon
1. Throle lever on/o switch in
Engine will not start.
Units with Oil Alert or Oil
Guard System.
Engine with low power.
Engine runs well at no
load but ‘bogs’ down
under full load.
OFF posion.
2. No fuel in engine.
3. Pressure build up in pump.
Engine not level or engine oil level
too low.
1. Possible internal engine problem.
2. Parally clogged gun nozzle.
1. Engine speed is too slow.
1. Turn throle lever to ON posion.
2. Fill fuel tank or turn on fuel supply.
3. Squeeze trigger on spray wand.
1. Return it to an authorized engine
repair centre. If engine is equipped
with throle lever, make sure engine
is running at full throle.
2. Clean nozzle of any blockage.
1. Contact your pressure washer
dealer.
1. Low oil level.
2. Dirty air lter.
Engine will not start; or
starts and runs rough.
Engine shuts down
during operaon.
Engine lacks power. 1. Dirty air lter. 1. Replace air lter.
Engine ‘hunts’ or falters. 1. Choke is opened too soon.
No low pressure
detergent delivery.
3. Out of fuel.
4. Stale fuel or water in.
5. Overchoking.
6. Intake valve stuck open or closed.
7. Engine has lot compression.
1. Out of fuel.
2. Low oil level.
1. Nozzle set on high pressure.
2. Detergent adjustment is closed
or soap hose is plugged.
3. Incorrect nozzle size.
1. Fill crankcase to proper level.
2. Clean or replace air cleaner.
3. Fill fuel tank.
4. Drain gas tank, ll with fresh fuel.
5. Open choke fully and crank engine.
6,7. Contact authorized pressure
washer dealer.
1. Fill fuel tank.
2. Fill with oil to proper level.
1. Move choke to halfway posion
unl engine runs smoothly.
1. Push nozzle forward for variable
nozzle units, or replace with brass
soaper nozzle.
2. Turn adjustment knob counter
clockwise to open, or unplug soap
hose.
3. Install correct brass soaper nozzle.
18
Page 19
TROUBLESHOOTING
1. Restricted or insucient water
supply, or pump sucking air.
2. Nozzle in low pressure mold, or
excessive wear pressure.
Unit does not reach
required pressure.
3. Low unloader. Regulator
pressure.
4. Water leak in high pressure
ngs, hose or gun
5. Water temperature is too high
6. Pump has operated more than
3 minutes without pulling trigger
1. Check supply hose, faucet and
inlet water lter. Must be connected
to water source which provides 20 l/
min. Check chemical/soap injecon
system.
2. Insert proper stainless steel high
pressure nozzle.
3. Adjust unloader/regulator to
desired seng.
4. Use Teon tape or pipe sealant
to ghten hose ng, replace hose
or gun.
5. Use cool water only, maximum
50°
6. Pull trigger at least 30 seconds
every 3 minutes
19
Page 20
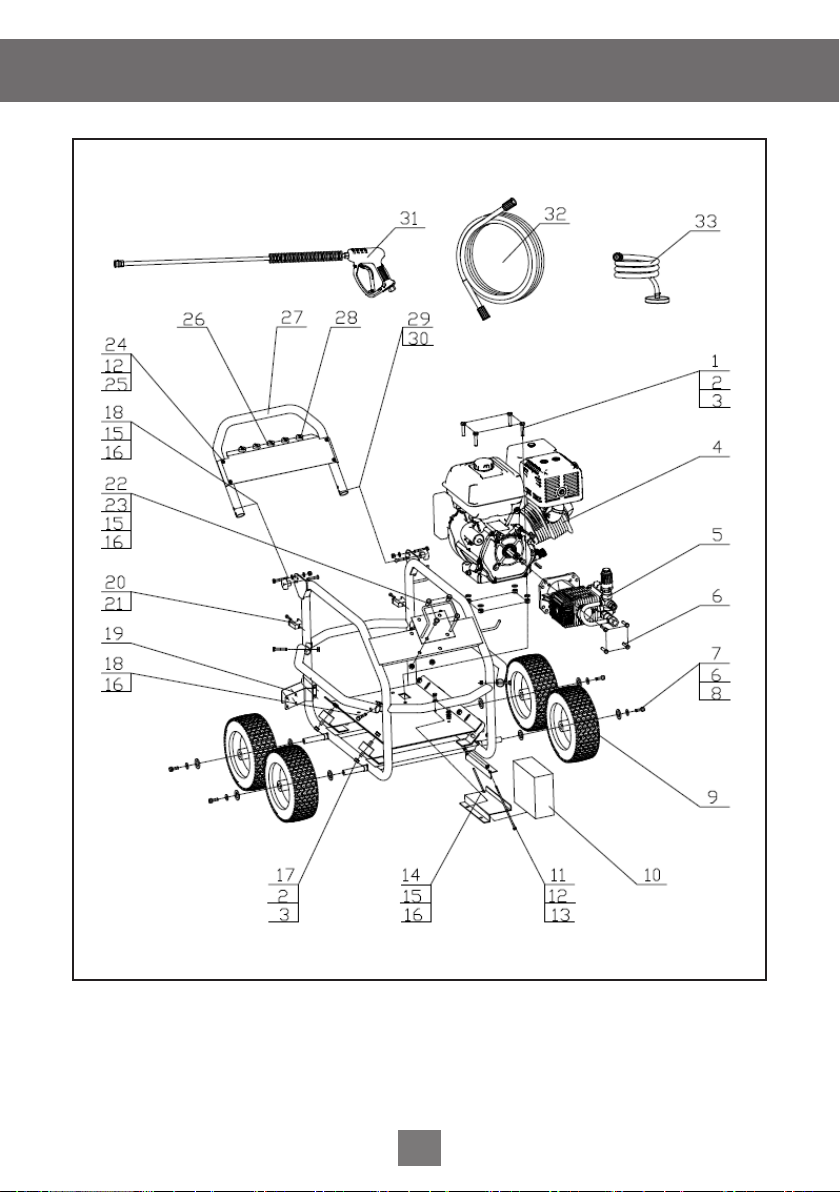
EXPLODED DRAWING
*For full exploded drawing & parts list for pump and engine contact:
- SIP Aer Sales 01509 500400
- Email: [email protected]
20
Page 21
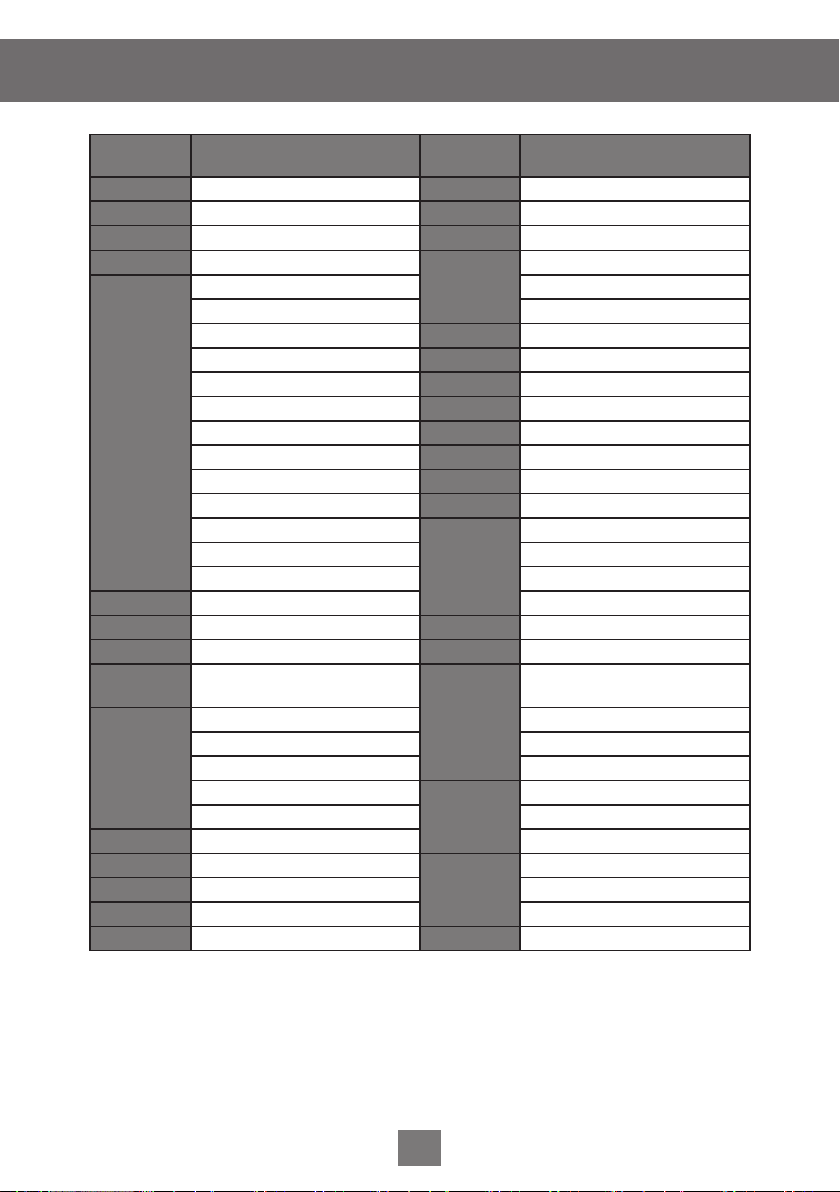
PART LIST
Ref. Descripon Ref. Descripon
1 Hex Bolt M10 16 Hex Nylon Lock Nut M8
2 Hex Nylon Lock Nut M10 17 Rubber Mount
3 Washer 18 Hex Socket Screw M8
4 Diesel Engine
Triplex Pump Hex Bolt M8
Detergent Hose Brake Bolt M8
Adjustable Detergent Injector 20 Hex Socket Screw M6
Unloader Valve 21 Pipe clamp
Thermal Valve Cap 22 Metal Hook
Thermal Valve 1/2" 23 Hex Socket Screw M8
5
6 Hex Bolt M8 Nozzle.black - Detergent
7 Washer 29 Nut M8
8 Washer 30 Handle Bolt
9 Foam Filled Tire tyre 13"
10
11 Bolt Plug 3/8"
12 Washer
13 Hex Nylon Lock Nut M6 Hose clamp
14 Hex Bolt M8*20 Sucon Inlet Filter
15 Washer NA. NA
Rubber Thread Braid Hose 24 Hex Socket Screw M6
Clamp 25 Nylon Lock Cap Nut M6
Hose 26 Nozzle Rubber Seat
Hose 27 Frame
Inlet Filter
Coupler 3/8" Nozzle.yellow
Coupler 3/8" Nozzle.green
Baery Cable Black Chromed Lance
Baery Cable Red Coupler 1/4"
Baery Wire Lug Plug 3/8"
Baery Wire Lug
Baery 12v20ah Coupler 3/8"
19
28
31
32
33
Hex Socket Screw M6
Nozzle.red
Pistol
High Pressure Hose x 16mtrs
Sucon Hose
21
Page 22
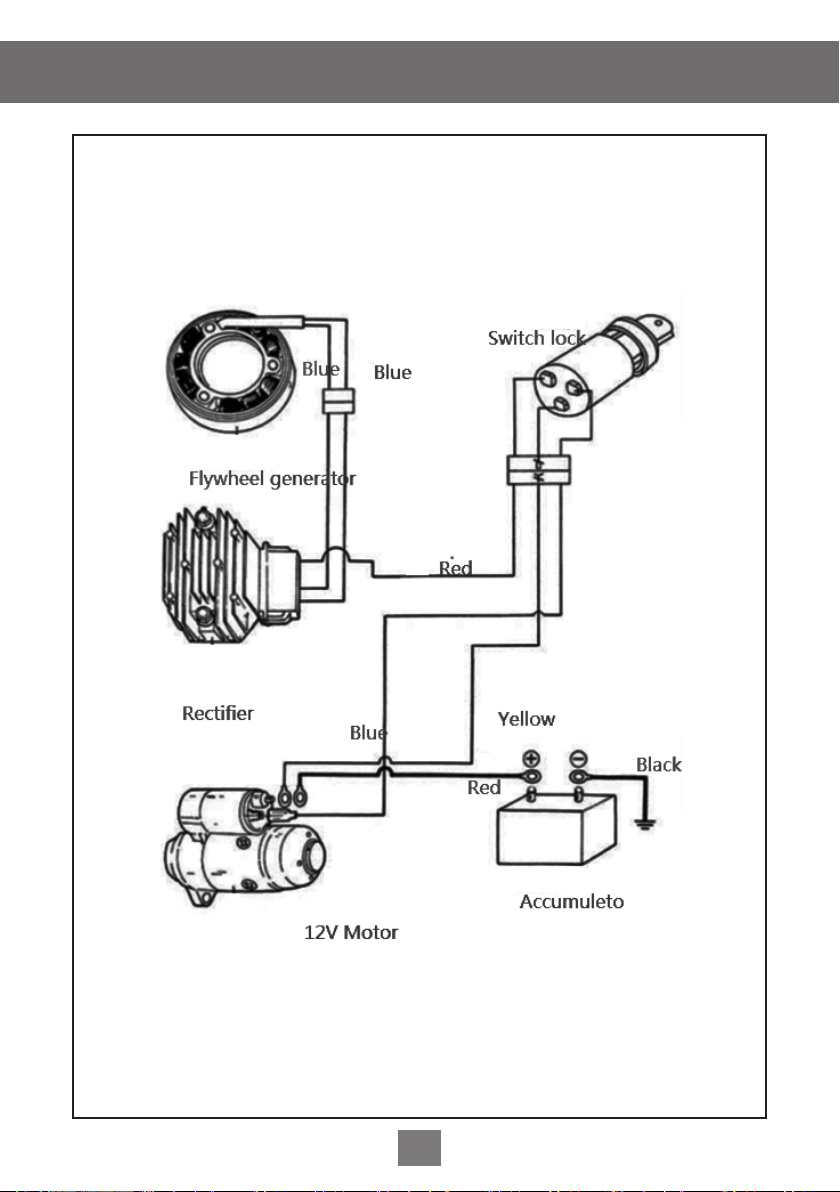
WIRING DIAGRAM NOTES
22
Page 23

NOTES
23
Page 24

NOTES
24
Page 25

NOTES
25
Page 26
UK - DECLARATION OF CONFORMITY
Declaration of Conformity
We
SIP (Industrial Products) Ltd
Gelders Hall Road
Shepshed
Loughborough
Leicestershire
LE12 9NH
England As the manufacturer within the UK, England, Scotland & Wales, declare that
SIP Tempest tͲD300TyDiesel Pressure Washer - SIP Part No. 089ϴ9
Conforms to the requirements of the following ƌĞŐƵůĂƚŝŽŶ(s), as indicated.
Supply of Machinery (Safety) Regulations 2008
Electromagnetic Compatibility Regulations 2016
Noise Emission in the Environment by Equipment for use Outdoors Regulations 2001
The Restriction of the Use of Certain Hazardous Substances in Electrical and
Electronic Equipment Regulations 2012
including regulation:EU 2016/1628
And including the relevant harmonised standard(s), including:-
BS EN 60335-1:2012 + A11:2014 + A13:2017+A1:
BS EN 60335-2-79 : 2012
BS EN ISO 14982 2012 : 2009
BS EN ISO 3744: 1995
BS EN ISO 3744:2010
BS EN ISO 22868:2021
Emission limits and type-approval for internal
combuson engines for non-road mobile machinery
2019+A2: 2019+A14:2019
* Noise measurements have been made in accordance with the internal control of production
(Annex V).
The declared noise values are as follows:
The Guaranteed Sound Power Level
110dB(A)
Signed:
Mr P. Ippaso - Managing Director - SIP (Industrial Products) Ltd
Date: 31/01/2022
Page 27
EU - DECLARATION OF CONFORMITY
Declaration of Conformity
We
SIP (Machinery Europe) Ltd
ASM Chartered Accountants First Floor Block One
Quayside Business Park
Dundalk
County Louth
Republic of Ireland
As the manufacturer's authorised representative within the EC
declare that the
Tempest CW-D 300TX Diesel Pressure Washer - SIP Part. No. 08989
Conforms to the requirements of the following directive(s), as indicated.
2006/42/EC
2004/30/EC
2016/1628/EC
2000/14/EC
And the relevant harmonised standard(s), including:
EN 60335-1:2012 + A11:2014 + A13:2017+A1:2019+A2: 2019+A14 :2019
EN 60335-2-79 : 2012
EN ISO 14982 2012 : 2009
EN ISO 3744: 1995
EN ISO 3744:2010
EN ISO 22868:2021
Machinery Directive
EMC Directive
Emissions From Non-road Mobile Machinery
Noise Emission Directive*
* Noise measurements have been made in accordance with the internal control of production (Annex
V).
The declared noise values are as follows:
The Guaranteed Sound Power Level
110dB(A)
Signed:
Mr P. Ippaso - Managing Director - SIP (Industrial Products) Ltd
Date: 31/01/2022
Page 28
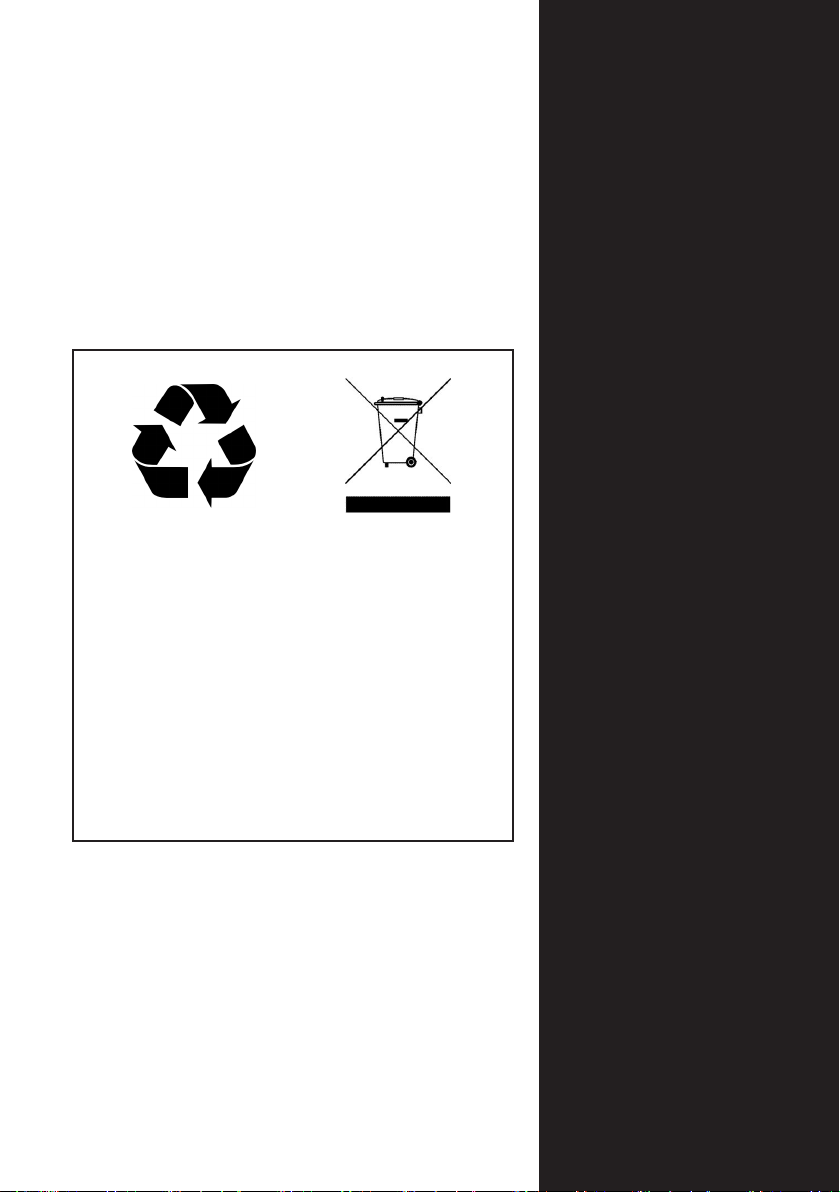
Please dispose of packaging for the product in a
responsible manner. It is suitable for recycling. Help
to protect the environment, take the packaging to
the local amenity p and place into the appropriate
recycling bin.
Never dispose of electrical equipment or baeries
in with your domesc waste. If your supplier oers
a disposal facility please use it or alternavely use
a recognised recycling agent. This will allow the
recycling of raw materials and help protect the
environment.
FOR HELP OR ADVICE ON THIS
PRODUCT PLEASE CONTACT
YOUR DISTRIBUTOR, OR SIP
DIRECTLY ON:
TEL: 01509 500400
EMAIL: [email protected] or
www.sip-group.com
Ref: 31012022
 Loading...