

Page 1
28
Please dispose of packaging for the product in a responsible
manner. It is suitable for recycling. Help to protect the
environment, take the packaging to the local amenity tip and
place into the appropriate recycling bin.
Never dispose of electrical equipment or batteries in with your
domestic waste. If your supplier offers a disposal facility please
use it or alternatively use a recognised re-cycling agent. This will
allow the recycling of raw materials and help protect the environment.
FOR HELP OR ADVICE ON THIS PRODUCT PLEASE CONTACT YOUR DISTRIBUTOR,
OR SIP DIRECTLY ON:
TEL: 01509500400
EMAIL: [email protected] or [email protected]
www.sip-group.com
1
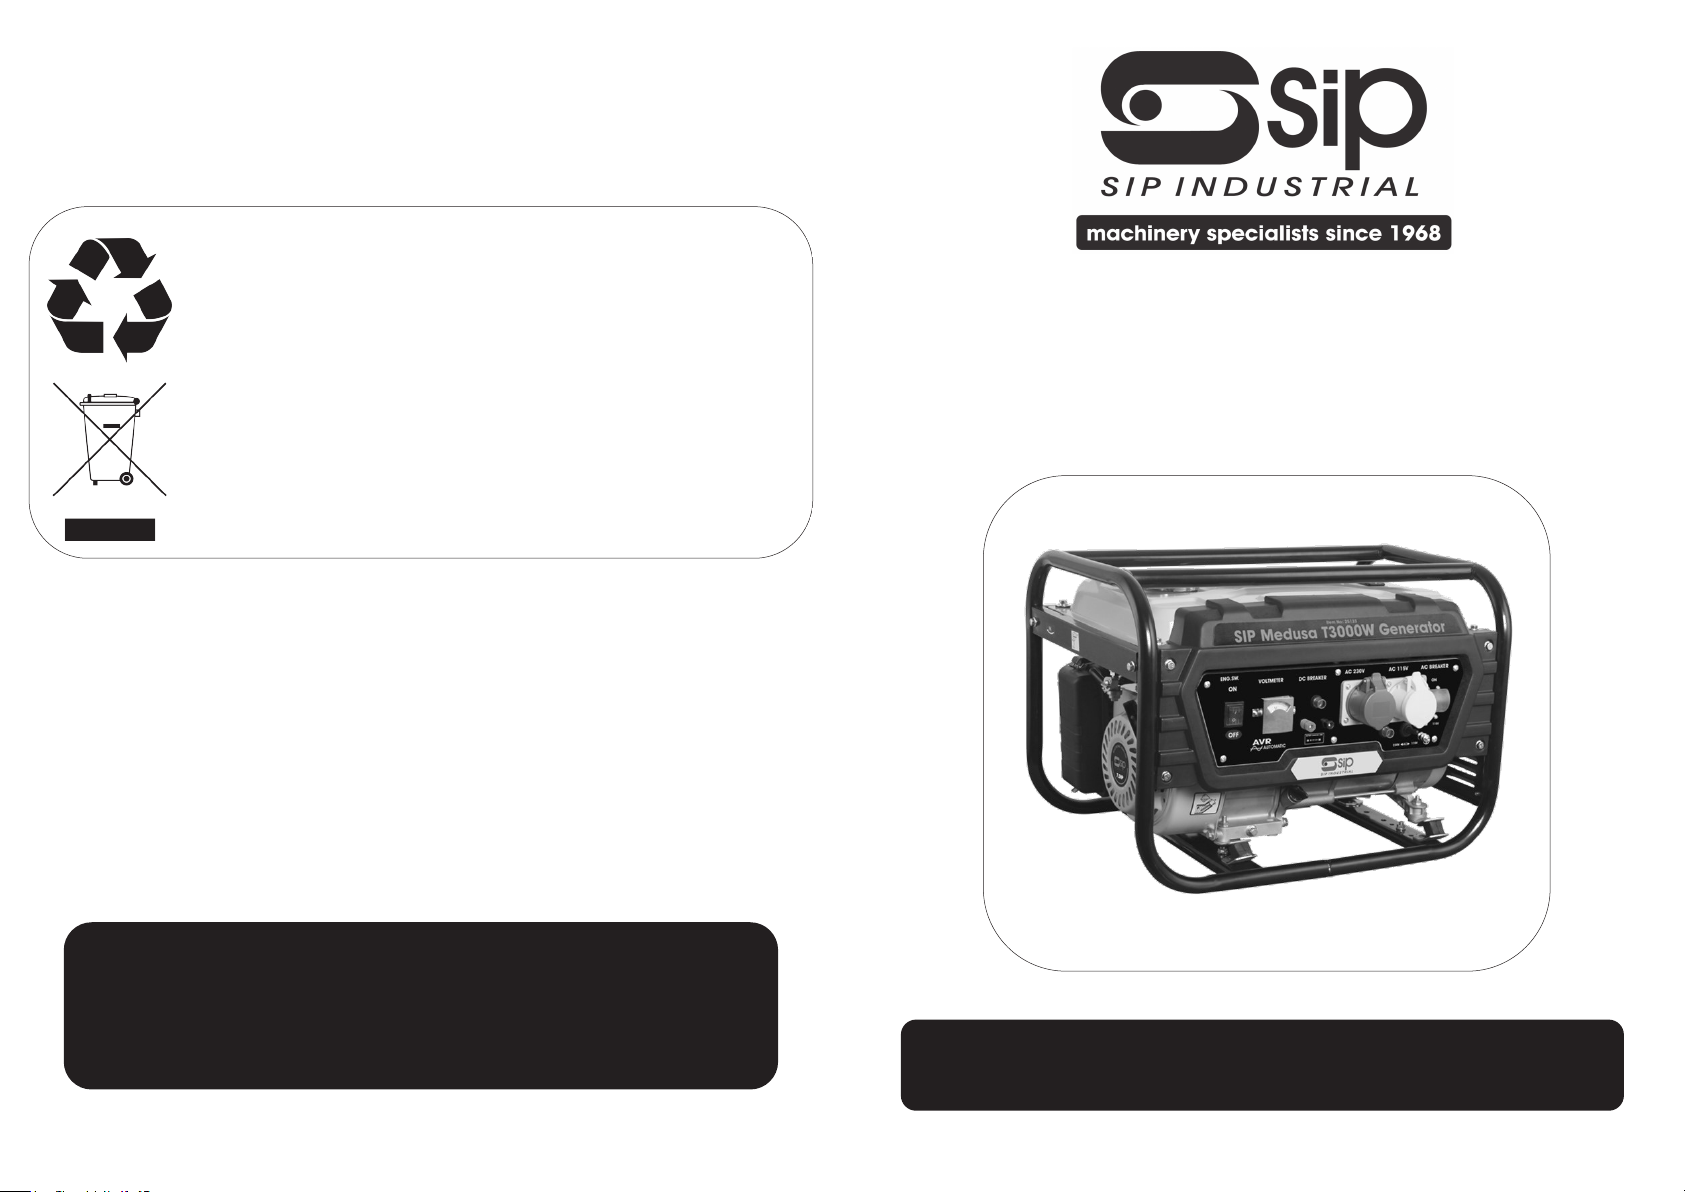
Medusa T3000W
Generator
Ref: 21JUN2021
25133
Please read and fully understand the instructions in this manual
before operation. Keep this manual safe for future reference.
Page 2
DECLARATION OF CONFORMITY
Declaration of Conformity
We
SIP (Machinery Europe) Ltd
ASM Chartered Accountants
First Floor Block One
Quayside Business Park
Dundalk
County Louth
Republic of Ireland
As the manufacturer's authorised representative within the EC declare
that the
SIP Medusa T3000W Compact Generator - SIP Part No. 25133
Conforms to the requirements of the following directive(s), as indicated.
2006/42/EC
2014/30/EU
2000/14/EC
As Amended By
As Amended By
As Amended By
* Noise measurements have been made in accordance with the internal control of production
(Annex VI).
Document Ref: EX 74160
2005/88/EC
2011/65/EU
(EU) 2015/863
(EU) 2016/628
(EU) 2018/989
And the relevant harmonised standard(s),
including:
EN ISO 8528-13:2016
EN 55012:2007+A1:2009
The declared noise values are as follows:
Machinery Directive
EMC Directive
Noise Emission Directive*
RoHS Directive
And regulations.
Emission limits and type-approval for internal combustion
engines for non -road mobile machinery
EN61000-6-1:2007
EN ISO 3744:1995
The Guaranteed Sound Power Level Measured Sound Power Level
96 dB(A) 93 dB(A)
Signed:
Mr P. Ippaso - Director - SIP (Industrial Products)
Ltd Date: 23/06/2021.
27
2
Page 3
26
3
CONTENTS
UK - DECLARATION OF CONFORMITY
Declaration of Conformity
We
SIP (Industrial Products Ltd
Gelders Hall Road
Shepshed
Loughborough
Leicestershire
LE12 9NH
England
As the manufacturer within the UK, England, Scotland & Wales, declare
that the
SIP Medusa T3000W Compact Generator - SIP Part. No. 25133
Conforms to the requirements of the following directive(s), as indicated.
Supply of Machinery (Safety) Regulations 2008
Electromagnetic Compatibility Regulations 2016
Noise Emission in the Environment by Equipment for use Outdoors Regulations 2001
The Restriction of the Use of Certain Hazardous Substances in Electrical and Electronic
Equipment Regulations 2012
And regulation
Emission limits and type-approval for internal combustion engines for non -road mobile
machinery
And the relevant harmonised standard(s), including
BS EN ISO 8528-13:2016
BS EN 55012:2007+A1:2009
BS EN61000-6-1:2007
BS EN ISO 3744:1995
Page 4 Safety Symbols Used Throughout This Manual
Page 4 Safety Instructions
Page 8 Technical Specifications
Page 8 Contents & Accessories
Page 9 Getting To Know Your Generator
Page 10 Guarantee
Page 11 Electrical Connections
Page 12 Operating instructions
Page 17 Maintenance
Page 19 Wiring Diagram
Page 20 Toubleshooting
Page 21 Parts List
Page 22 Notes
Page 23 Notes
Page
26 &
27
UK & EU -
Declaration of conformity
The Guaranteed Sound Power Level Measured Sound Power Level
Signed: …………………………………...
Mr P. Ippaso - Director - SIP (Industrial Products) Ltd
Date: 21/06/2021
96 dB(A) 93 dB(A)
Page 4
4
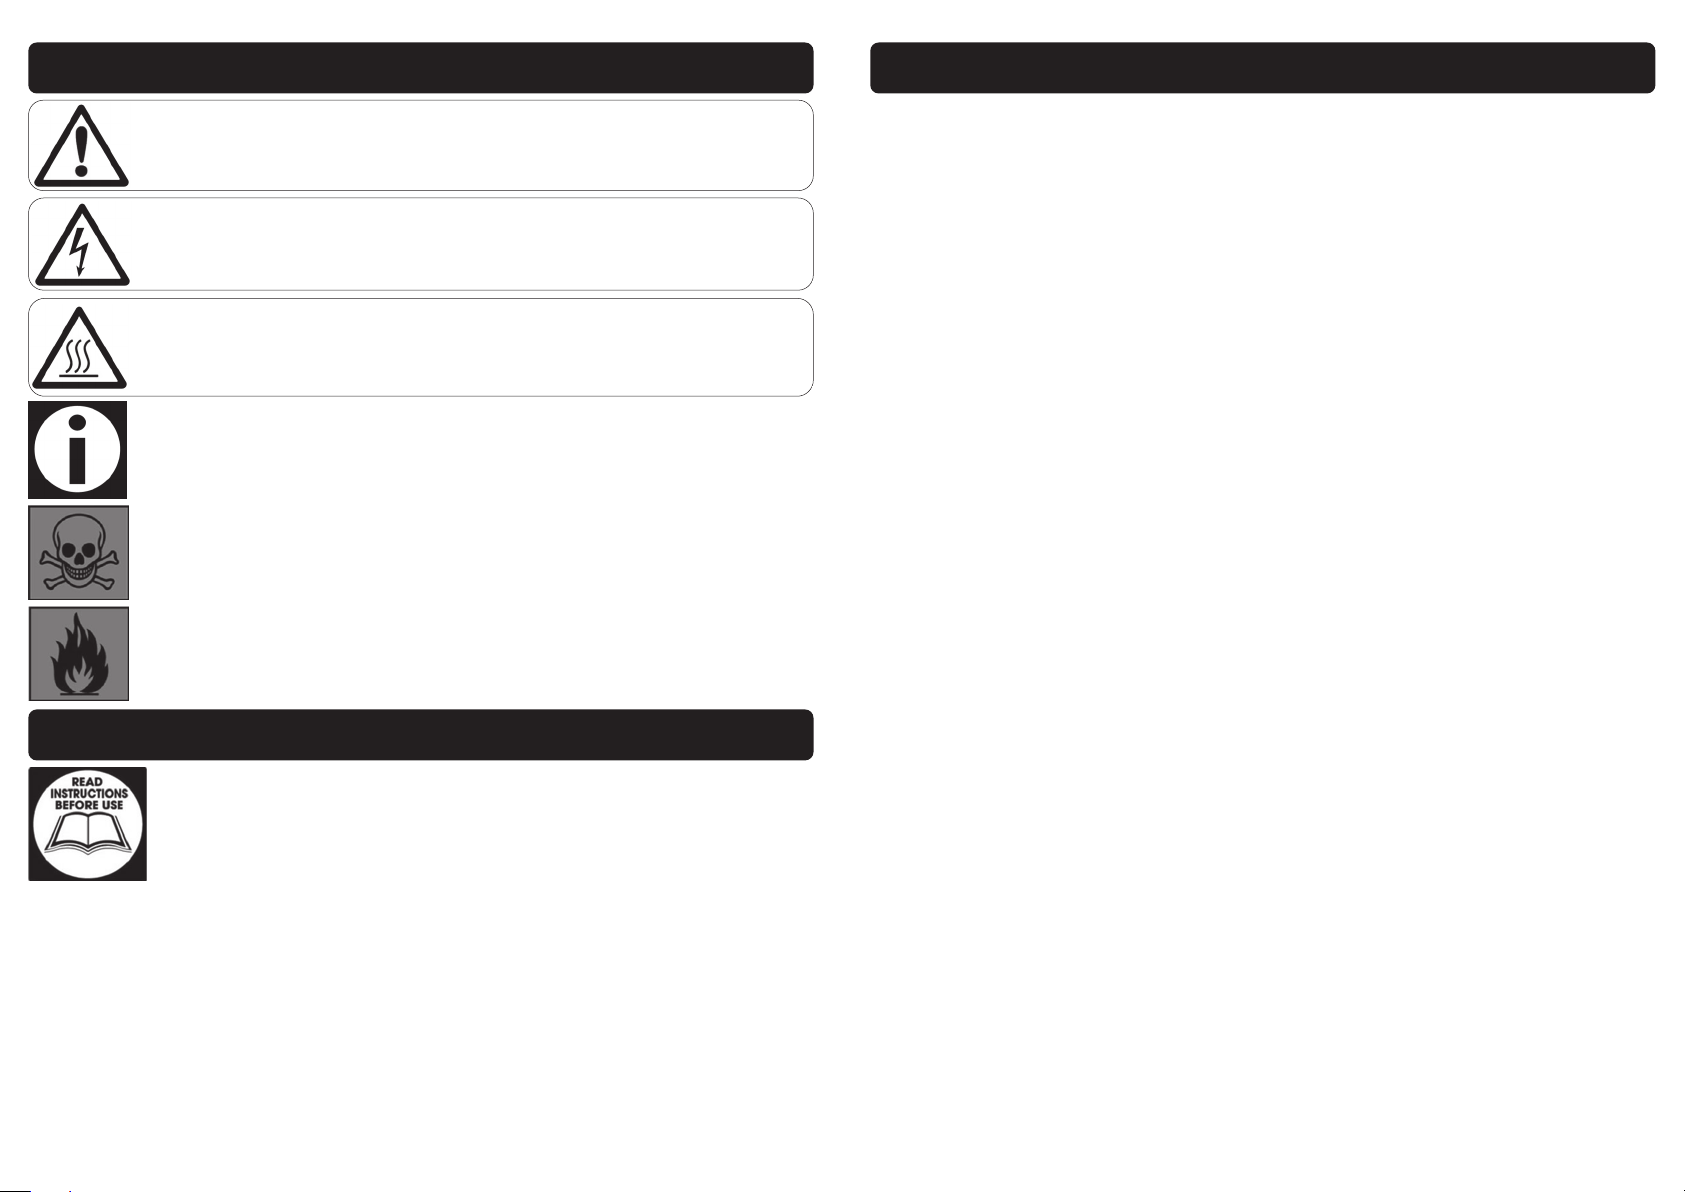
Danger / Caution: Indicates risk of personal injury and/or the possibility of
damage.
Warning: Risk of electrical injury or damage!
Poisonous Fumes: Indicates a risk of possible inhalation of harmful fumes if
care is not taken.
Flammable: Indicates possible risk of combustion if care is not taken.
Hot Surfaces: Indicates risk of possible burning due to hot surfaces creat-
ed during normal operation.
SAFETY SYMBOLS USED THROUGHOUT THIS MANUAL
SAFETY INSTRUCTIONS
IMPORTANT: Please read the following instructions carefully, failure to
do so could lead to serious personal injury and / or damage to the
heater.
Before starting or servicing any generator, read and understand all instructions. Fail-
ure to follow safety precautions or instructions can cause equipment damage and/
or serious personal injury. Retain all manuals for future reference.
Never use this generator for any application other than that specified by the manu-
facturer.
Never operate this generator under conditions not approved by the manufacturer.
Never attempt to modify this generator to perform in any manner not intended by
the manufacturer.
Use only products and parts recommended by the manufacturer for maintenance
and repairs.
Note: Supplementary Information.
25
NOTES:
Page 5

24
NOTES:
5
SAFETY INSTRUCTIONS….cont
Be sure that the generator is properly grounded to an external ground path prior to
operation. Refer to the section entitled “ Grounding Instructions “ for proper ground-
ing procedures.
Be sure that the generator is operated only by persons who have read and who un-
derstand these instructions.
Be sure that the generator is placed on a flat level surface prior to and during oper-
ation. The generator must not slide or shift during operation.
Keep all persons away from the generator during operation.
Do not allow persons wearing loose clothing or jewellery to start or operate the gen-
erator. Loose clothing or jewellery may become entangled in moving components,
causing equipment damage and/or personal injury.
Be aware of moving parts and hot surfaces that occur during normal operation of
this generator.
Be sure all devices are switched off prior to connecting them to the generator.
Be sure that all tools and appliances are in good working order and are correctly
grounded.
Only use devices that have standard three pin (16A) plugs; If an extension cord is
used, be sure that it has three pin plug/socket for proper grounding.
Never operate the generator with damaged, broken or missing parts, or with any
guards or covers removed.
Do not refill the fuel tank while the engine is running.
Be careful to prevent fuel spillage during refills.
Be sure the fuel tank cap is securely in place before starting the engine.
Allow engine to cool for at least two minutes before refuelling.
Never refuel whilst smoking or in the vicinity of a naked flame.
Take care not to spill any fuel on the engine, exhaust or any part of the generator.
Should any fuel make contact with your clothes; change and wash them immedi-
ately.
If any fuel makes contact with your skin wash with soap and water immediately.
If you swallow any fuel, inhale any vapour or allow contact with your eyes, seek
medical attention immediately.
Be sure to store petrol in clean containers that do not contain water, dirt or rust be-
cause this will reduce the life of the engine; ensure that all local fuel storage laws
are followed.
Never operate this generator in an explosive atmosphere or near any flammable
sources.
Always operate this generator in a well ventilated area to reduce the risk of suffoca-
tion.
Shut off the generator engine and disconnect the spark plug wire before performing
any service or maintenance to the unit.
Do not operate this generator on wet surfaces or in the rain.
Do not operate the generator or any electrical items with wet hands.
Page 6
6
SAFETY INSTRUCTIONS….cont
Never drag the generator with power cords or by any means to move it; only move
the generator with the carrying handles.
Never cover the generator or restrict the exhaust or air flow in any way.
Always ensure that the generator is at least 1m (3ft) away from any walls or buildings
to allow correct air flow.
Do not connect this generator to a commercial power supply.
Do not connect this generator in parallel with any other generator.
Understand the operating environment; Before each use the operator should assess,
understand and where possible reduce the specific risks and dangers associated
with the operating environment. Bystanders should also be made aware of any risks
associated with the operating environment.
Caution: Never attempt to connect the generator directly to the electrical
system of any building / structure which is connected to the main grid.
Caution: anyone who operates this generator should read and fully understand all of the instructions and warnings in this manual.
Electric Shock: There is a very real risk of electric shock if this generator is not
used in the correct manner. NEVER Use the generator or anything connected to
it in wet conditions.
Hot Surfaces: During normal operation certain parts of this generator will become hot. ALWAYS stay alert and be aware of hot components / surfaces. Allow
the engine to cool before attempting to move, clean or maintain the generator.
Poisonous Fumes: Exhaust fumes produced during normal operation are
poisonous. Do not operate this generator in enclosed areas.
Flammable: The fuel used to run this generator (unleaded petrol) is highly flammable. Never re-fuel the generator whilst it is still running. Store unused fuel safely and
away from children and in accordance with local regulations / laws.
Electrical current from the generator may "back feed" into the home's electrical system.
It could cause damage or fire to the building, the generator as well as anything connected to it.
Should a generator be required to be connected to any electrical system, it must be
23
NOTES:
Page 7
22
7
SAFETY INSTRUCTIONS….cont
installed by a suitably qualified electrician who can warn you of any dangers that may
occur.
Incorrectly installed generators can also cause personal injury. For example, if a power
company employee is working on an electrical line believing it to be "dead" and current created by the generator is in the line, shock or electrocution may occur.
The key to better safeguard against these dangers is professional installation by a
qualified electrician and the installation of a generator transfer switch.
Keep in mind a generator burns fuel and must be run in a well ventilated area, it must
not be run in a garage or other outbuilding.
Cords used to connect the generator to the lights and appliances must be correctly
sized to prevent overheating or damage to the equipment as well, again if you are
unsure ask a suitably qualified electrician.
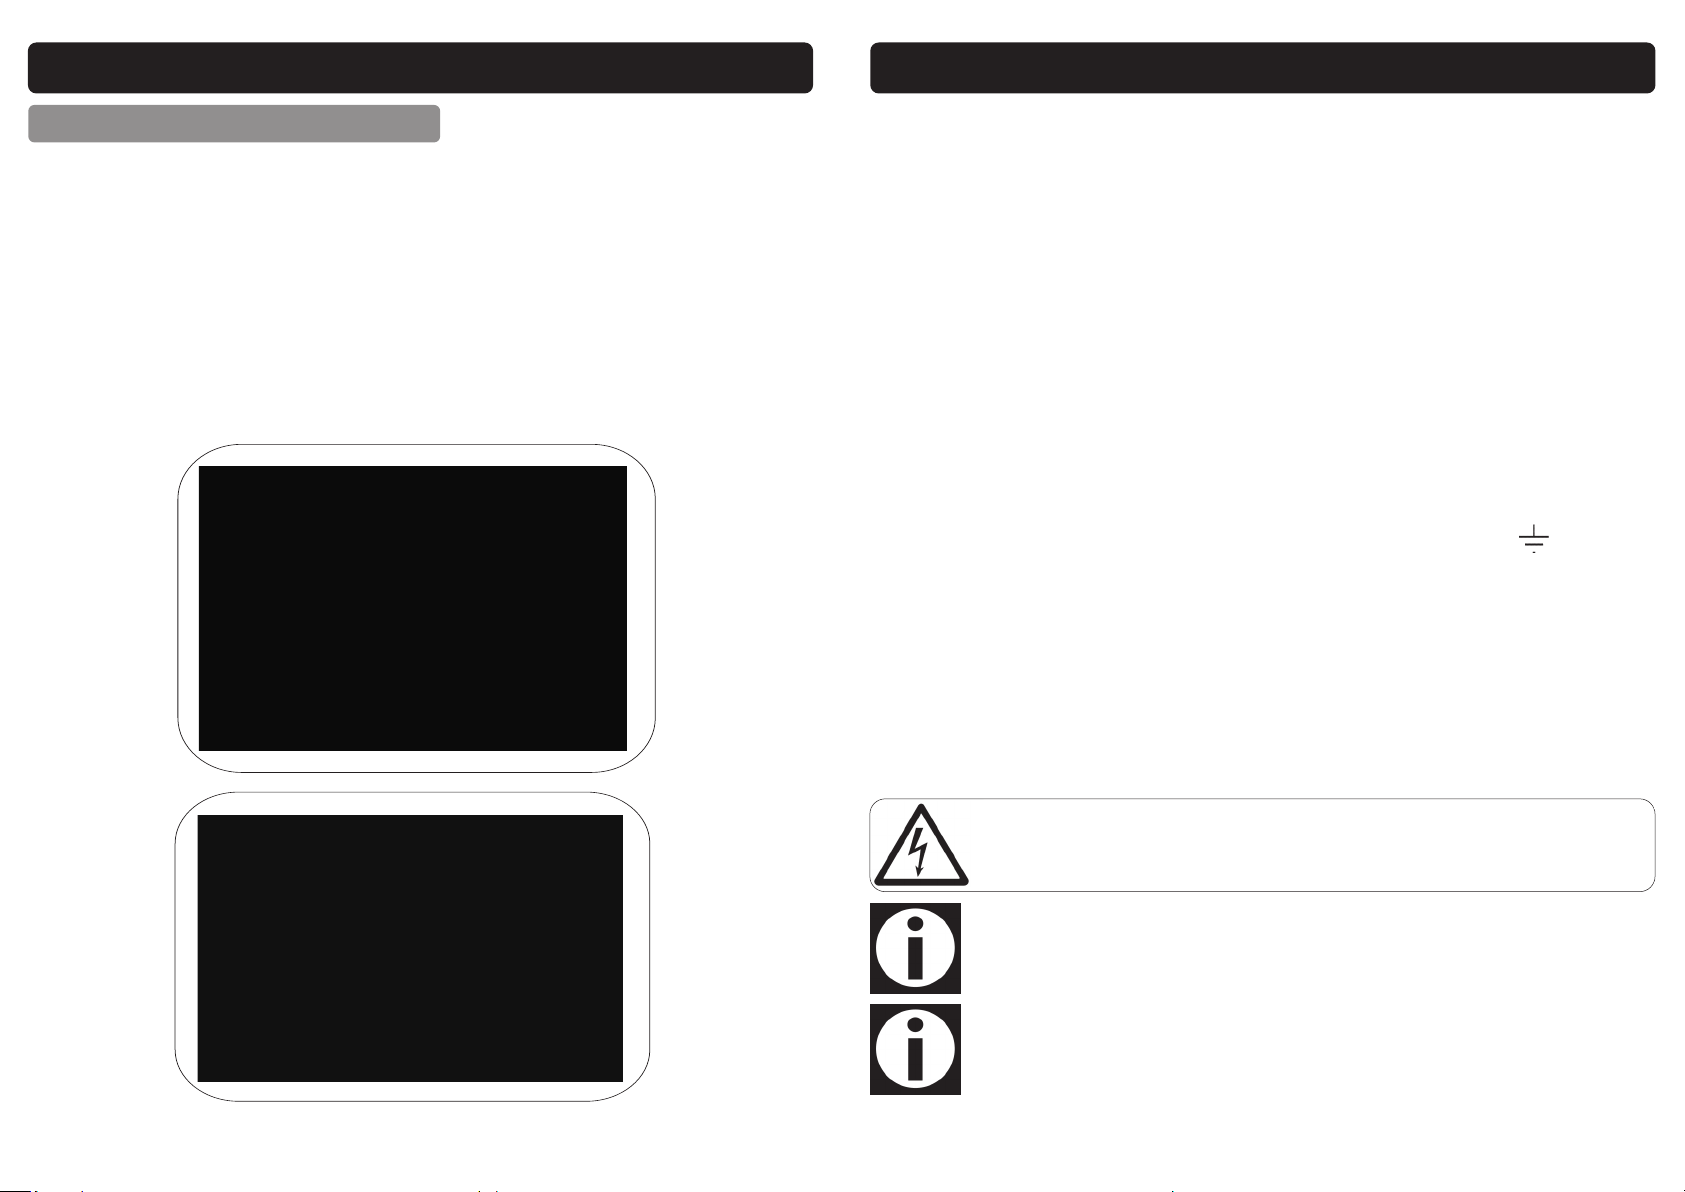
GROUNDING INSTRUCTIONS
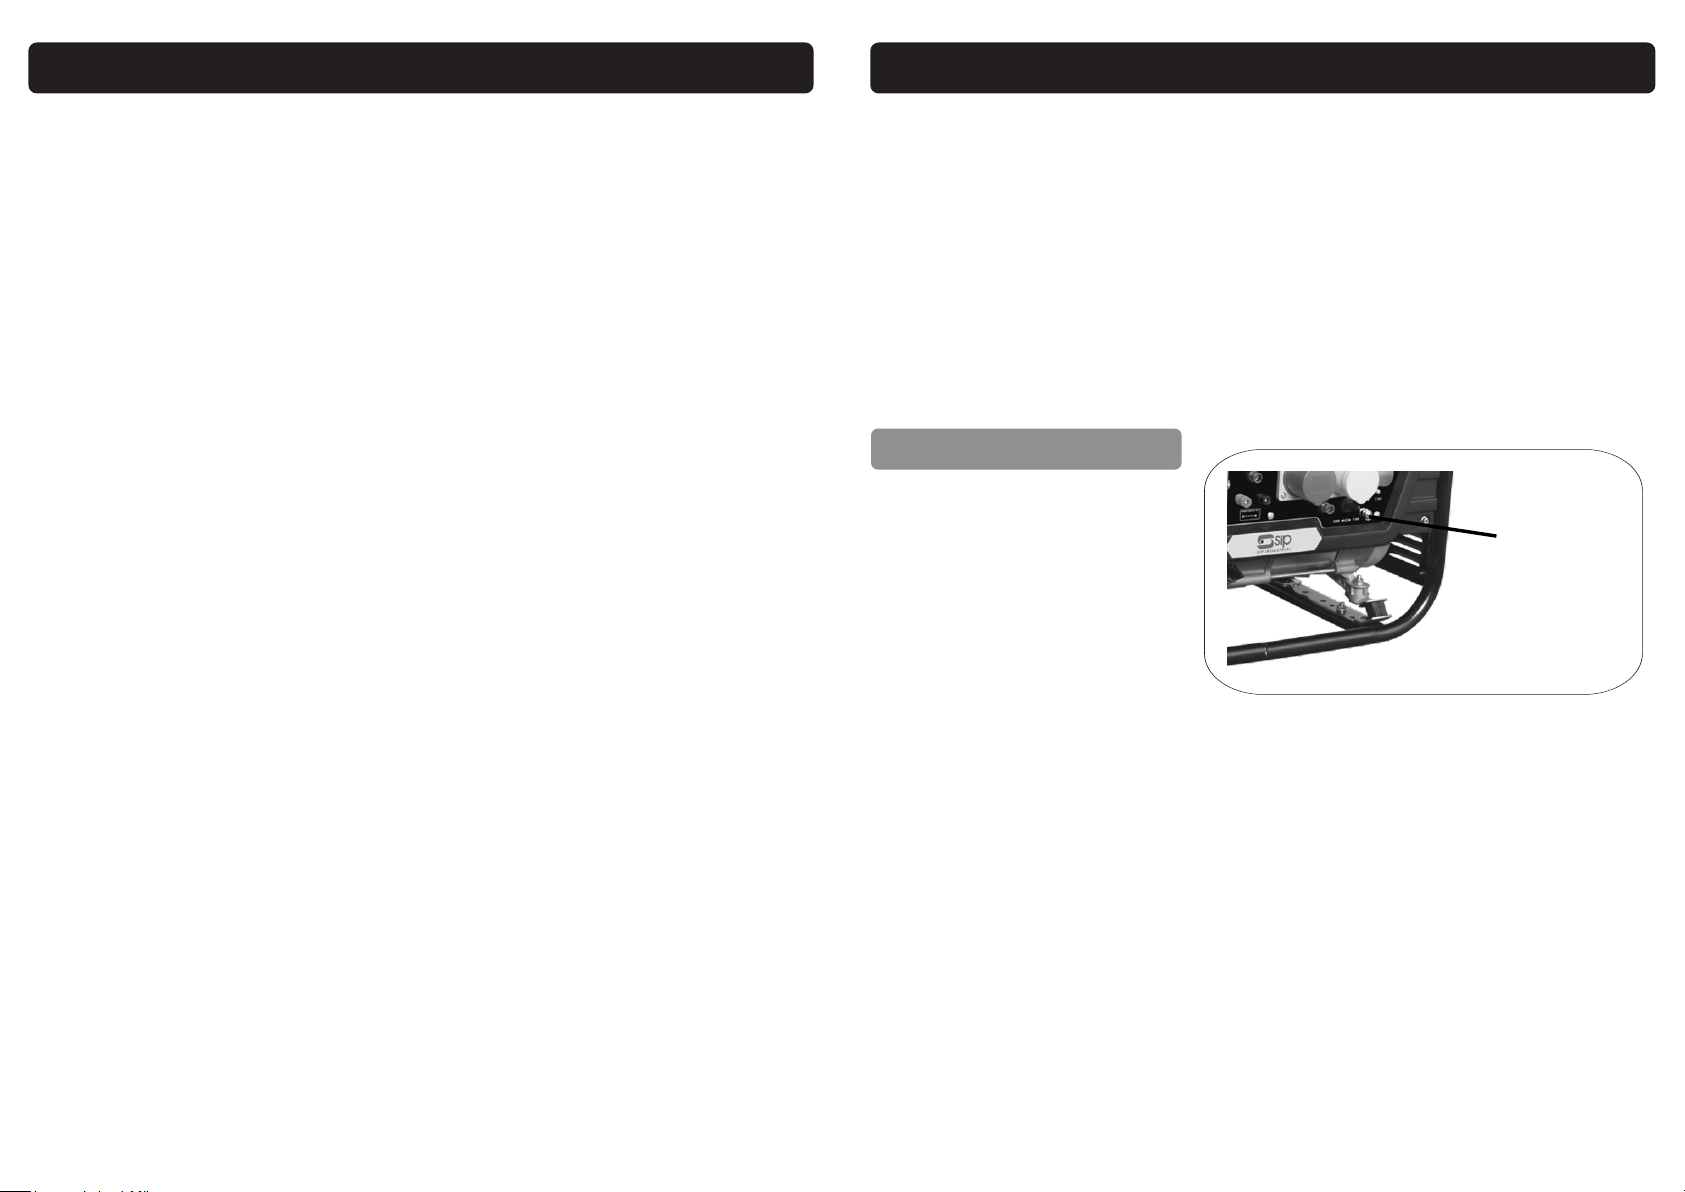
Grounding instructions:
1. Use the ground terminal (see picture above) on the generator to connect the unit
to a suitable ground source. Securely fasten the end terminal of the ground wire to the
ground terminal on the generator.
2. The ground wire should be made of more than 0.75 square millimetre wire. Too thin
wire may not provide an adequate ground path.
3. The other end of the ground wire must be securely fastened to an approved
ground source. Refer to the local regulations for ground source information. If not sure
of regulations or procedures, obtain assistance from a qualified (licensed or certified )
electrical technician.
NOTES:
Earth Point
Page 8
8
Main Generator Unit
Instruction Manual
Box Spanner (for spark plug removal)
12V DC Output lead
If any of these items are missing contact your distributor immediately.
TECHNICAL SPECIFICATIONS
CONTENTS & ACCESSORIES
21
PARTS LIST
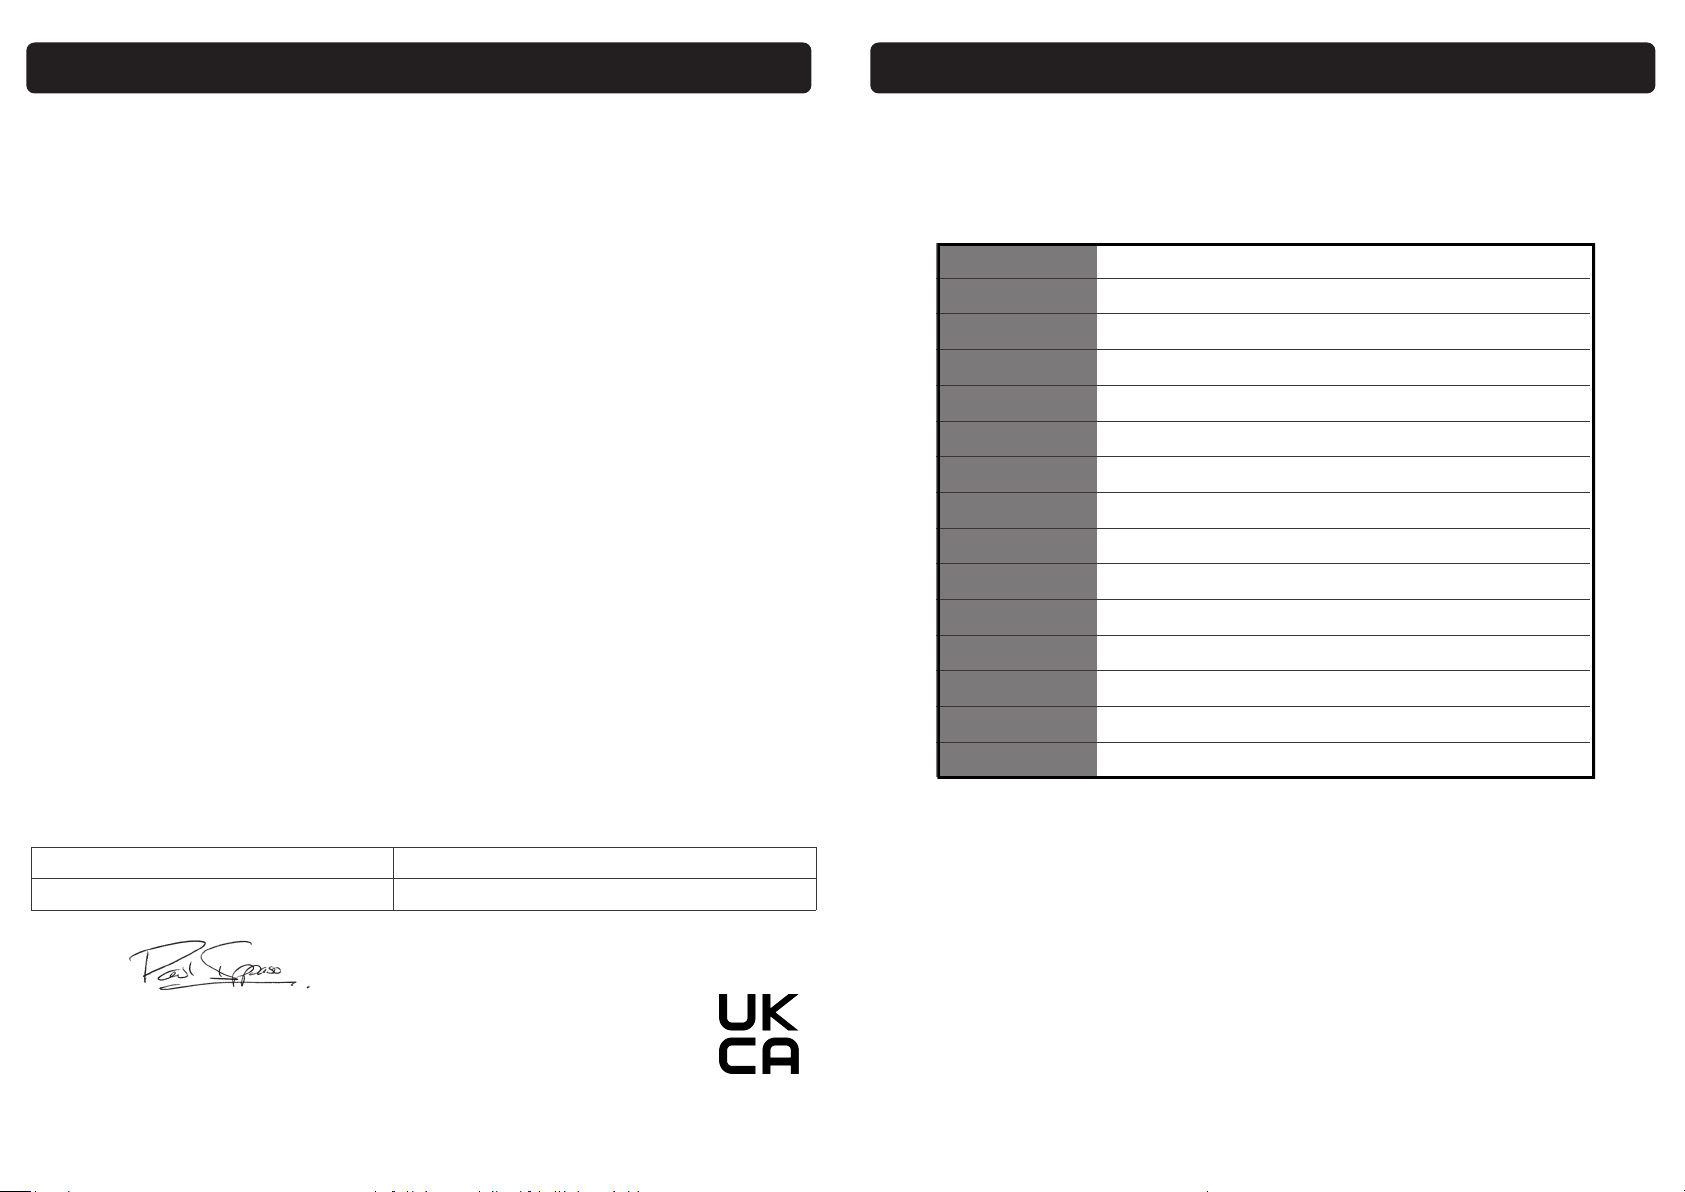
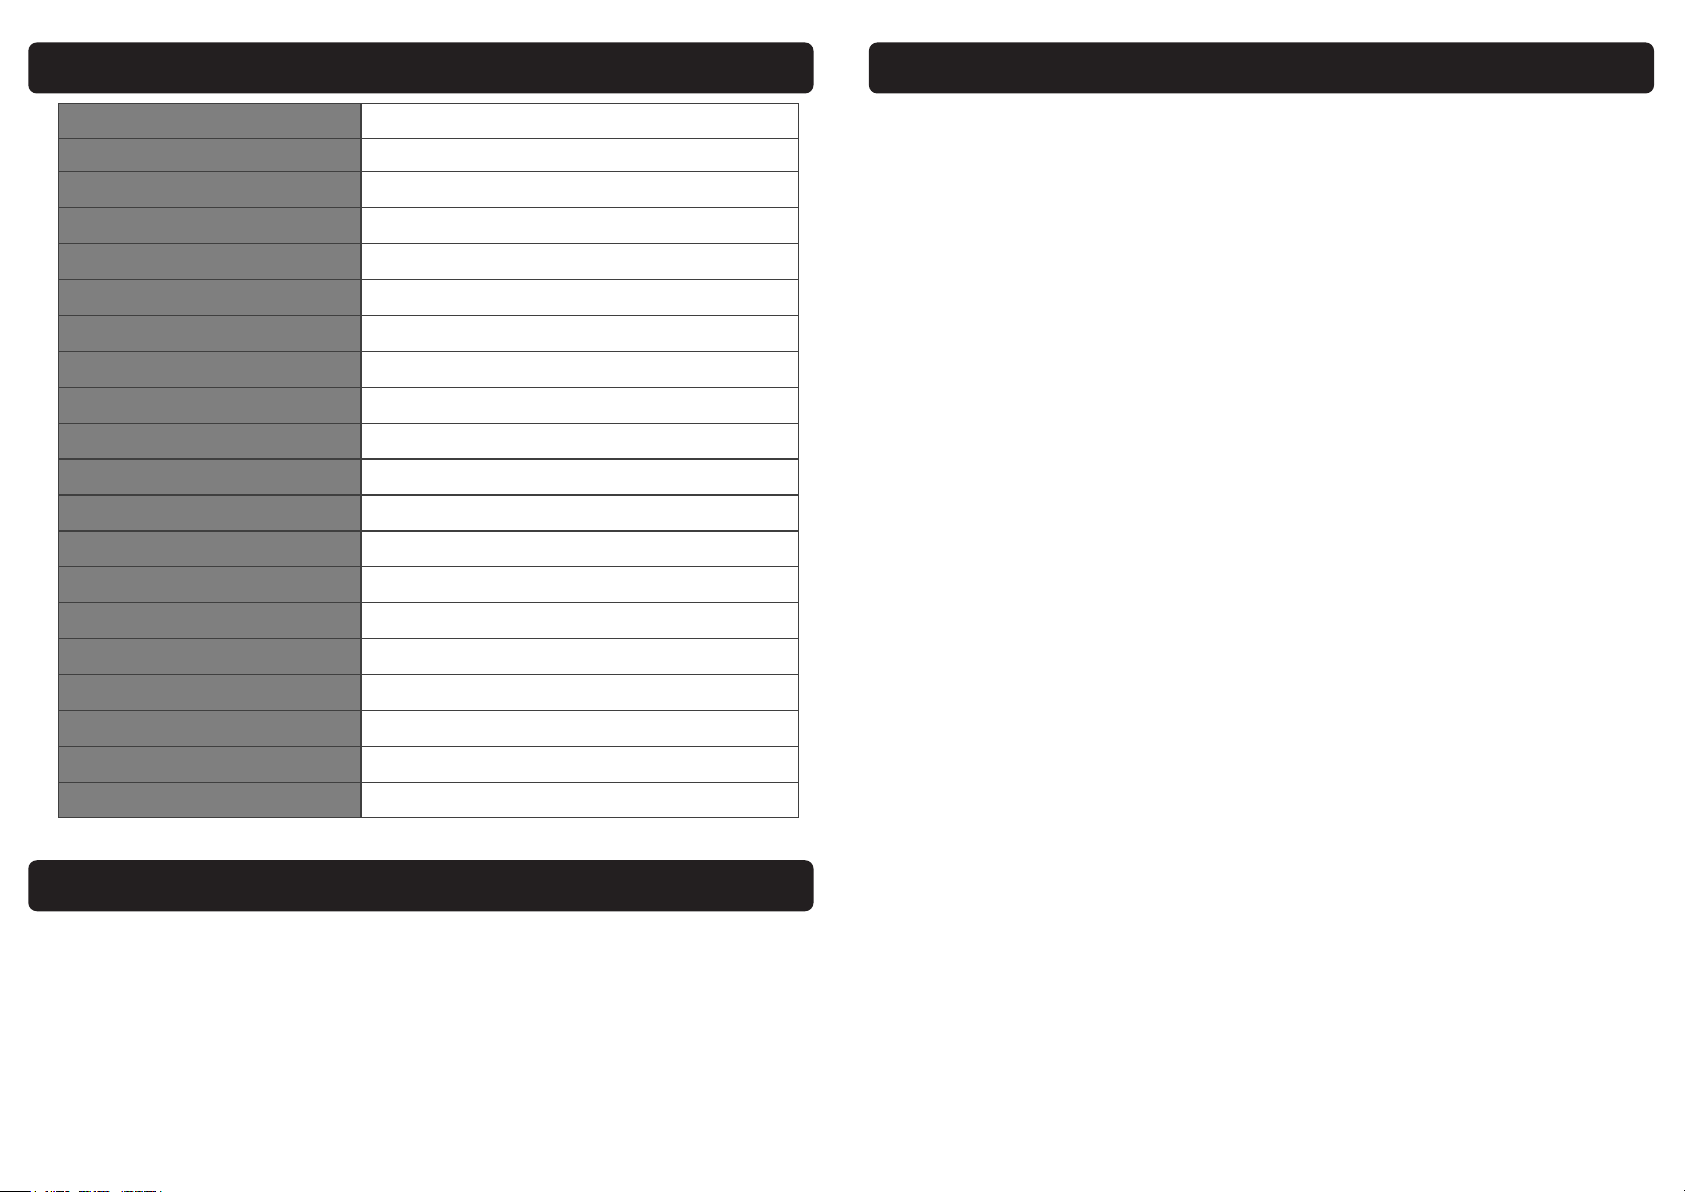
Model
SIP Code
Euro V Engine Type
Alternator
Pea k Output
Continuous Output
Rated Current
AC Voltage
DC Voltage
DC Current (Unregulate d)
DC Output Charge Capacity
Fuel Capacity
Sound Powe r (LWA)
Protection Class
Power Factor
Performance Cla ss
Qua lity Cla ss
Medusa T3000W
25133
4 Stroke Single Cylind er, air c ooled OHV Unleaded
Brushed with AVR (Automatic Vo lta ge Regula tor)
3000 watts
2700 watts
11.7A
1 x 230V 1 x 110V ~ 50Hz
12v
8.3A
40 Ah Batte ry
15 litres
95d B(A)
IP23M
1.0
G1
B
For spares parts list visit:- www.sip-group/techzone
Alternatively call SIP After Sales 01509 500400
Or
Email: [email protected]
Or
Web Chat: www.sip-group.com
Max Temperature
Max Altitude
Weight
40C
1000mtrs
42kg
Page 9
20
9
GETTING TO KNOW YOUR GENERATOR
TROUBLE SHOOTING
PROBLEM CAUSE SOLUTION
The generator fails to
start
The generator fails to
generate elec-tricity
The generator is
difficult to start
Ignition switch is off Set
Not enough oil in the generator Add more oil, See page 13
No fuel Add more fuel, See page 14
Spark plug not working correctly Change the spark plug
The device you are trying to
power is faulty
The AC breaker is switched off Switch the AC breaker on
The air filter is dirty Clean the air filter, See page 18
The fuel filter is blocked Clean the fuel filter
the ignition switch to ‘on’
Make sure the device you want to
power is working properly
C
B
A
D
M
E F G H I
L
K
J
If any or all of the above haven't resolved the problem
contact:SIP After Sales 01509 500400
Email: [email protected]
Web Chat: www.sip-group.c
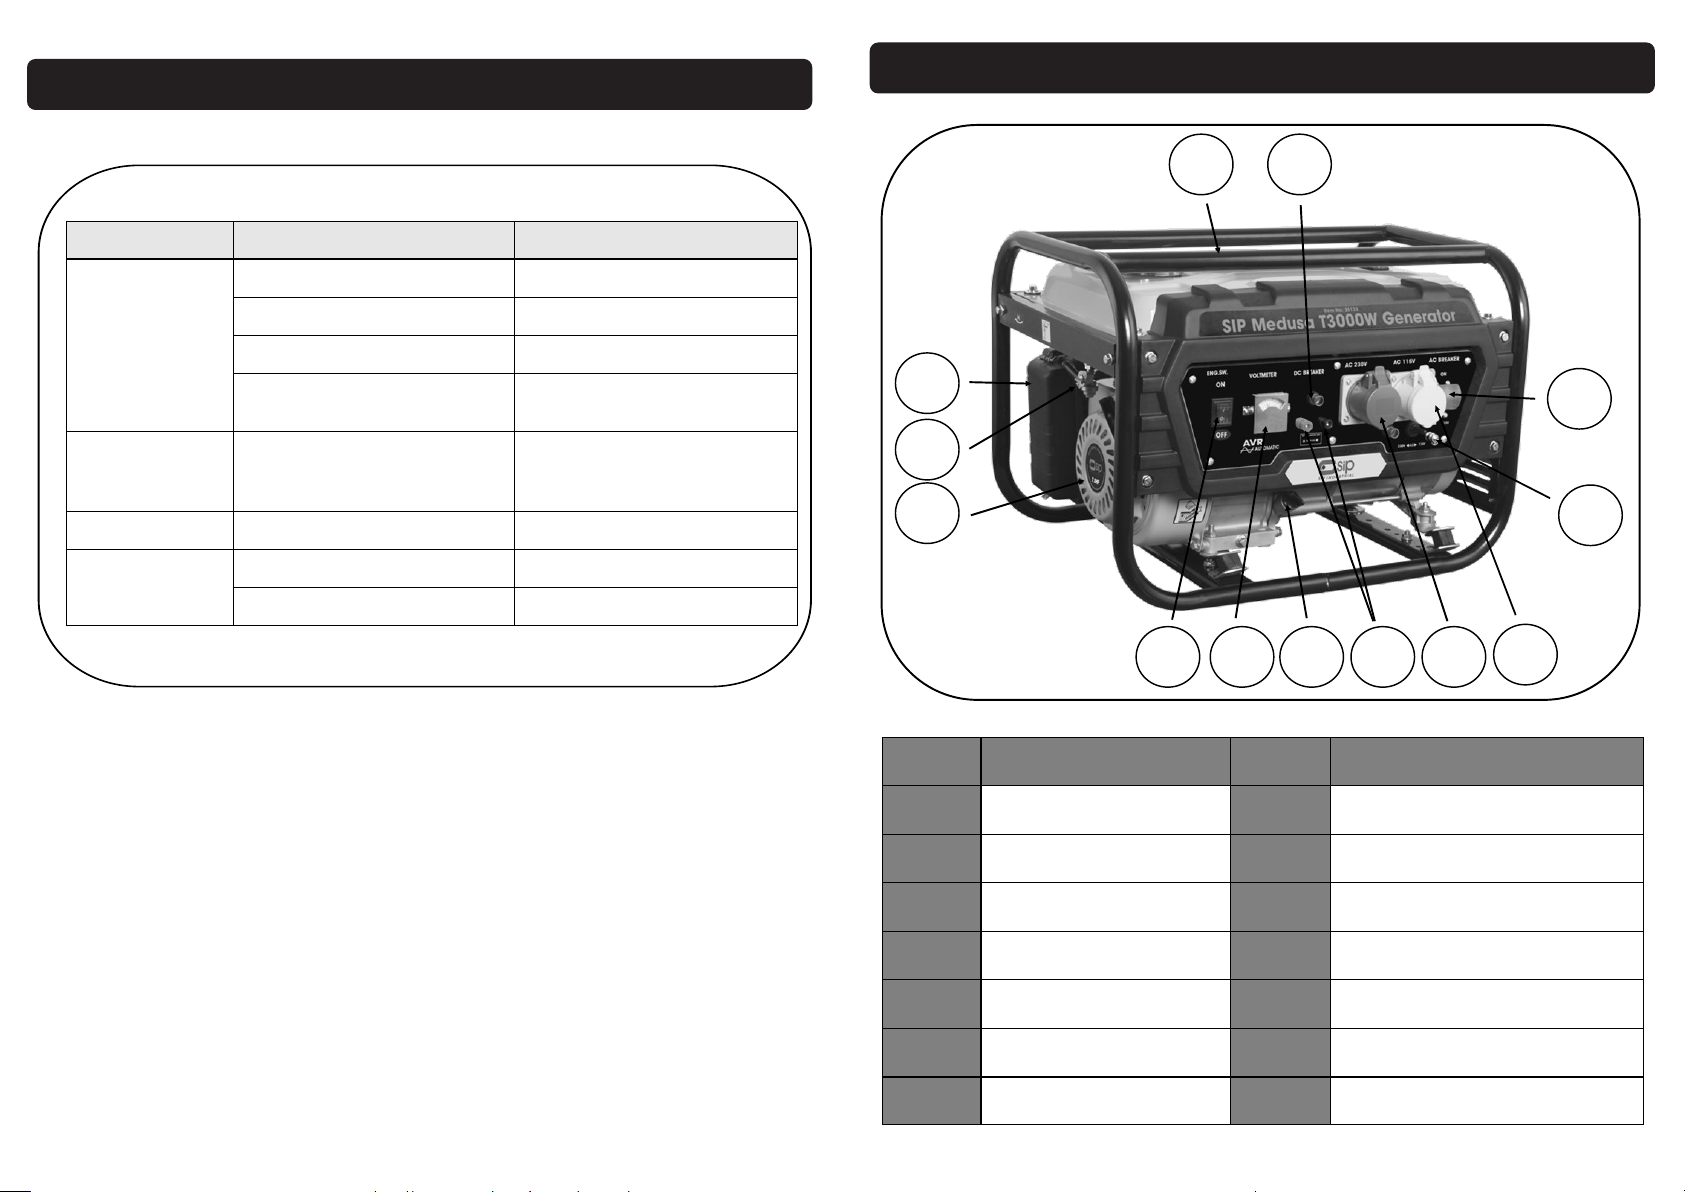
Item Description Item Description
A Recoil Starter H 12V DC Outlet
B Fuel ON / OFF Tap I AC ~ 230V 16A Outlet
C Air Filter Assembly J AC ~ 110V A6A Outlet
D Fuel Cap K Earth Point
E Engine ON / OFF Switch L AC ~ Overload
F Output Voltmeter M DC Overload
G Oil Filler Cap
Page 10
10
This generator is covered by a 12 month parts and labour warranty covering failure
due to manufacturers defects. This does not cover failure due to misuse or operating
the machine outside the scope of this manual - any claims deemed to be outside
the scope of the warranty may be subject to charges Including, but not limited to
parts, labour and carriage costs.
This guarantee does not cover consumables such as filters & spark plugs etc.
In the unlikely event of warranty claims, contact your distributor or contact our help line
on the back page of this manual. Proof of purchase will be required before any warranty can be honoured.
GUARANTEE
19
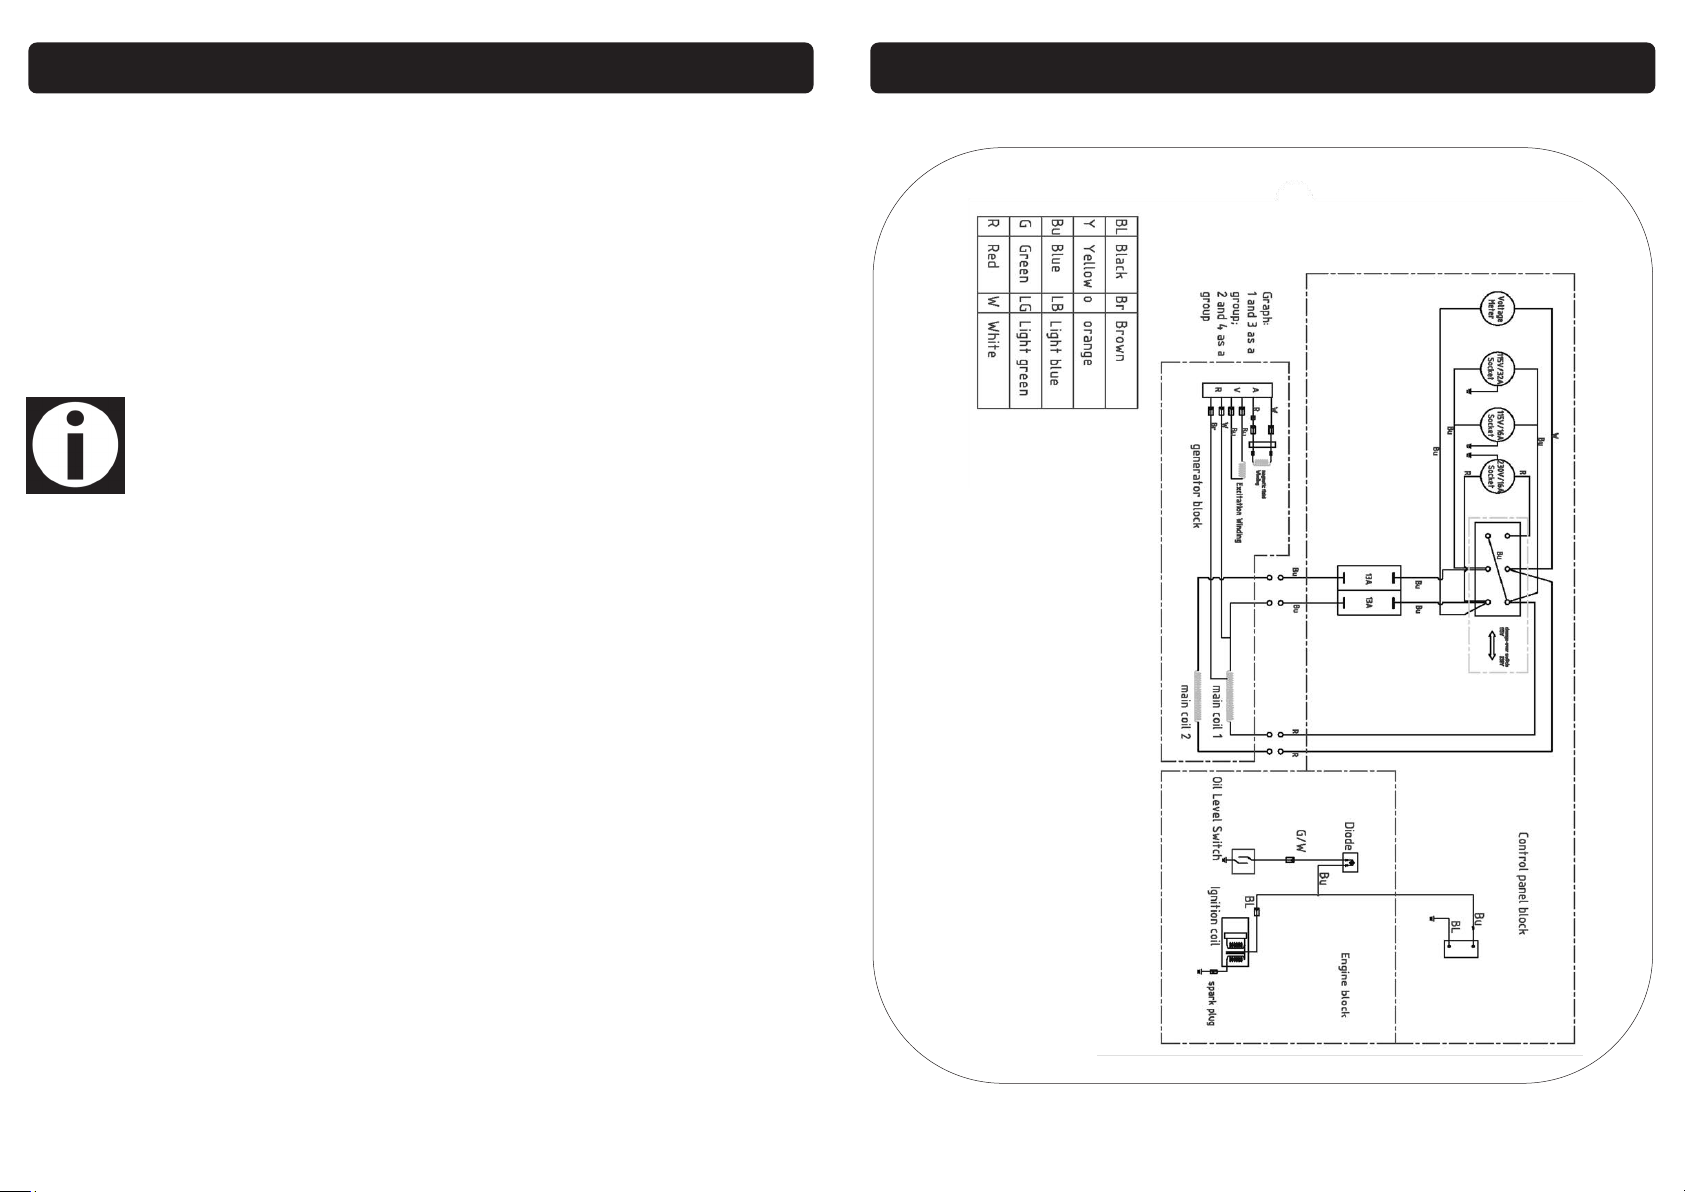
WIRING DIAGRAM
Note: The DC output is unregulated will not cut out once the battery is
charged and should not be left unattended for extended periods.
Page 11
18
To clean the air filter element:
MAINTENANCE….cont
CLEANING THE AIR FILTER
11
ELECTRICAL CONNECTIONS
Note: If an extension lead is required in order to reach the generator; en-
sure that this too is rated for the correct voltage and current.
Note: The cross section of the extension lead should be checked so that it is
of sufficient size so as to reduce the chances of voltage drops.
Warning: Never connect live or neutral wires to the earth terminal of the
plug. Only fit an approved plug with the correct rated fuse for the equipment. If in doubt consult a qualified electrician.
Unclip both the fasteners holding the front cover of the air filter.
Remove the front cover to expose the filter element (Fig. A).
Pull out the element (Fig. B) and carefully clean it with a mild solvent; squeeze
to remove the excess liquid.
Pour a small amount of motor oil over the filter element; squeeze to remove the
excess.
Follow these instructions in reverse to refit the element / cover etc.
Fig. A
Connecting tools etc. to the generator:
This generator is fitted with 1 230v 16A & 1 x 110v 16A type sockets.
Inspect them, and anything to be connected to the generator, to ensure that no
damage is present before every use.
If any damage is visible have the socket / equipment inspected / repaired by a
suitably qualified person.
The wires in the sockets are coloured in the following way:
Yellow / Green
Blue
Brown
Ensure any plug / equipment to be connected to the generator is also wired in
the same way.
The 16 plugs will be marked L1 - Live (Brown), N - Neutral (Blue) & Earth - Yellow
& Green
Always secure the wires in the plug terminal carefully and tightly. Secure the
cable in the cord grip carefully.
This generator is fitted with a 12v 8.3A DC Socket.
This can be used as a DC Power Supply or battery charging, the output current is
un-regulated.
This socket may not charge / recognize all batteries.
Max battery charge capacity 12v 40Ah
Earth
Neutral
Live
Fig. A
Page 12
12
This generator is shipped from the factory without oil in the engine crankcase.
Check the oil level in the crankcase of the engine before each start.
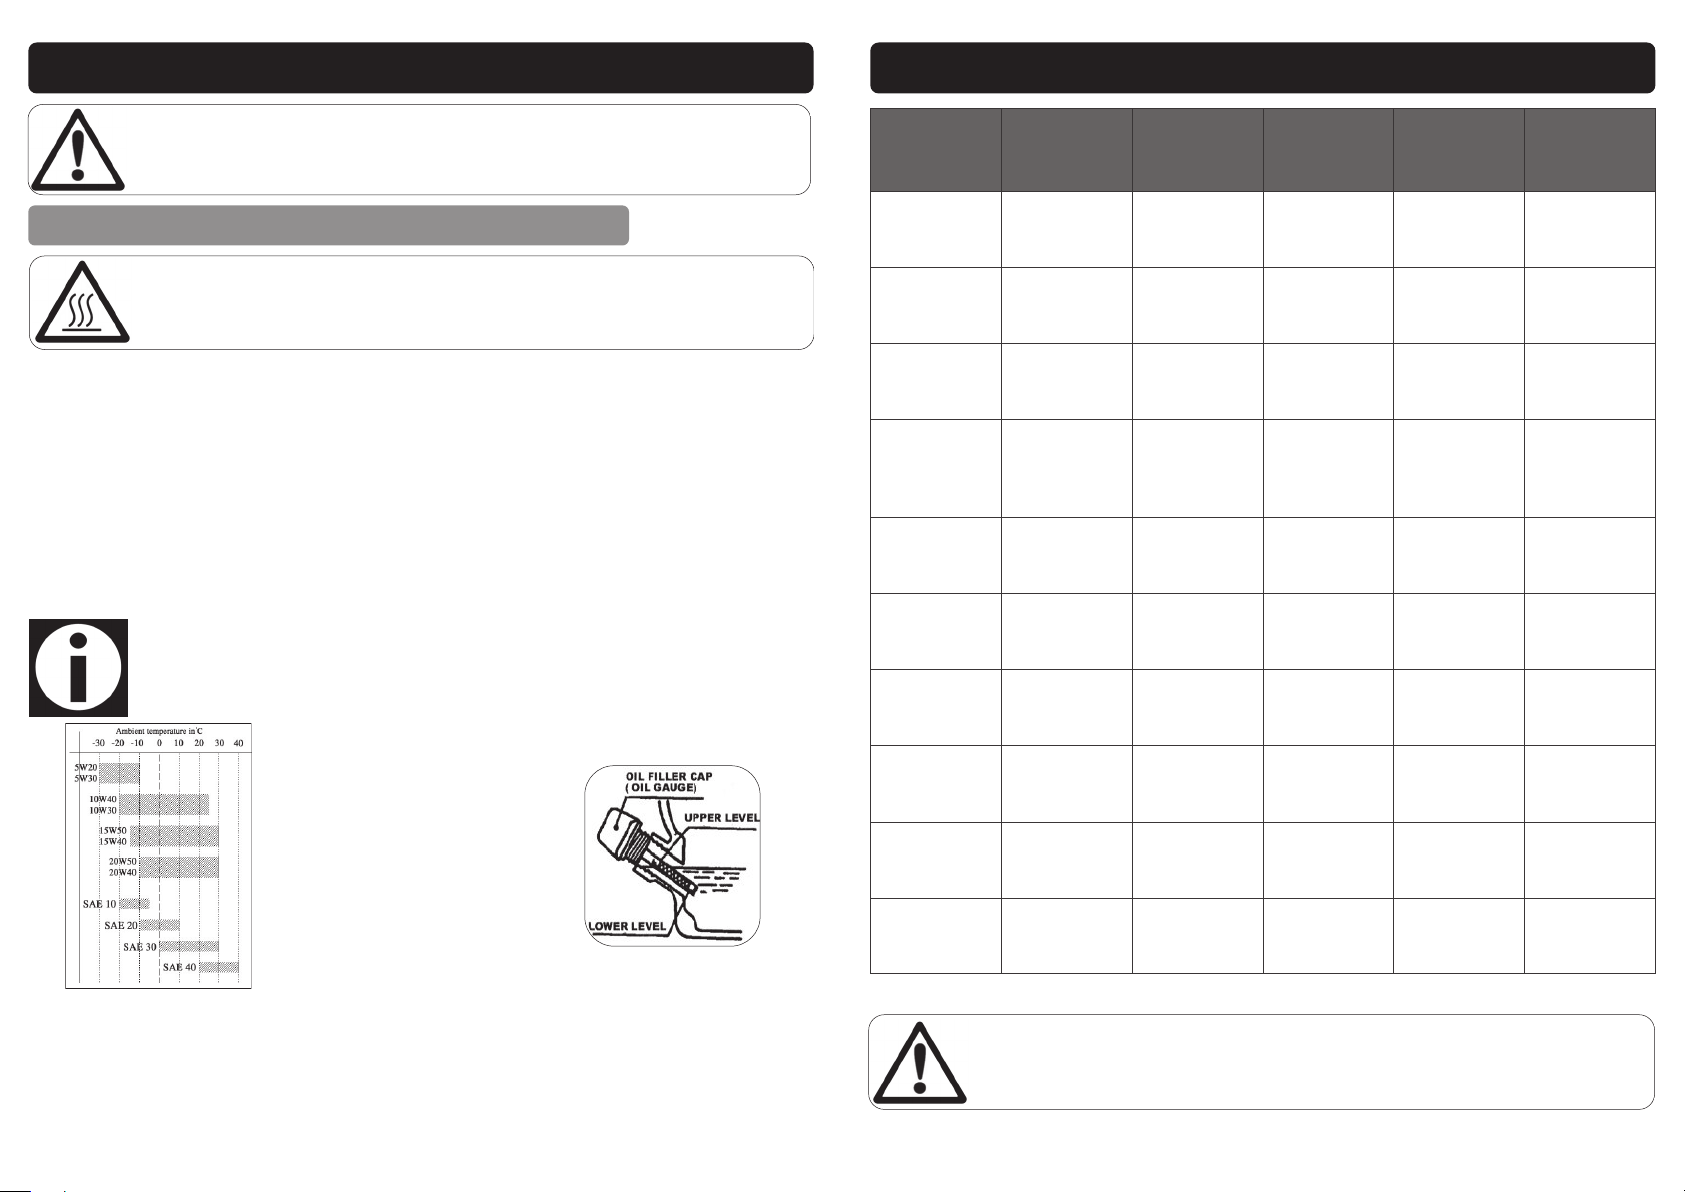
The oil level should be positioned between the lower and upper level marks on
the oil filler cap (oil gauge) (see above right).
OPERATING INSTRUCTIONS
FILLING THE CRANKCASE WITH OIL / CHECKING THE OIL LEVEL
CAUTION: Before you operate the generator ALWAYS check that no damage
is present and that everything that should be, is tight and secure.
Hot Surfaces: Always ensure that the generator is turned off and allowed to
fully cool before any refuelling or maintenance procedures are carried out.
Note: When checking the oil level; always ensure that the generator is
placed on a firm level surface.
17
Part Action
Before each
use
Every 3
months or
50 hours
Every 6
months or
100 hours
Every 12
months or
300 hours
Spark plug
Check condi-
tion / gap.
Oil
Check the oil
level / condi-
tion.
Valve clear-
ance
Check gaps.
Fuel line
Check fuel
line for
cracks / dam-
age.
Exhaust system
Check for
leaks.
Carburettor
Check choke
lever opera-
tion.
Cooling fan
Check for
damage.
Starting sys-
tem
Check for
correct oper-
ation.
Air filter
Check for
contamina-
tion.
Head bolts
etc.
Check and
tighten.
MAINTENANCE
Caution: Any repairs / adjustments should only be attempted by a suitably quali-
fied person; if you are unsure call the help-line number on the back page for
your nearest technician.
Engine oil is a major factor affecting engine performance and service life. Nondetergent oils and vegetable oils are not recommended.
Use premium quality 4-stroke motor oil.
Do not add commercial additives to the recommended oil and do not mix petrol with the oil.
SAE 10W30 / SAE 10W40 is recommended for general, all-temperature use.
Other viscosities shown in the chart (below left) may be used when the average
ambient temperature in your area is within the indicated range.
The Oil capacity is approximately 0.6L.
Page 13
16
OPERATING INSTRUCTIONS….cont
13
filler cap
(oil gauge)
To fill the crankcase with oil proceed as follows:
Ensure that the generator is on a flat level surface.
Remove the filler cap (oil gauge) by turning it anti-clockwise.
Slowly pour the oil into the crankcase.
Check the oil level by pushing the filler cap back into its hole up to the bottom
of the threads (do not screw the cap in).
Once the oil level is between the upper and the lower marks on the oil gauge
(see page 12), replace it and turn clockwise to fully tighten.
The oil should be changed after the first 8 hours of operation; thereafter change the
oil after 50 hours of operation or less if the generator is operated under constant
heavy loads or in high ambient temperatures.
OPERATING INSTRUCTIONS….cont
FUELLING / RE-FUELLING THE GENERATOR
Caution: Be sure oil level is maintained. Failure to do so will invalidate
any warranty you may have.
Caution: Petrol is highly flammable; never re-fuel the generator whilst it is running, or still hot. Do not re-fuel near naked flames or other possible ignition
sources.
Step 5:
Once the engine is running and warm
enough, push the choke lever to the run
position.
Note: Allow the engine to run with no load applied for a few minutes to allow the engine to come up to running temperature.
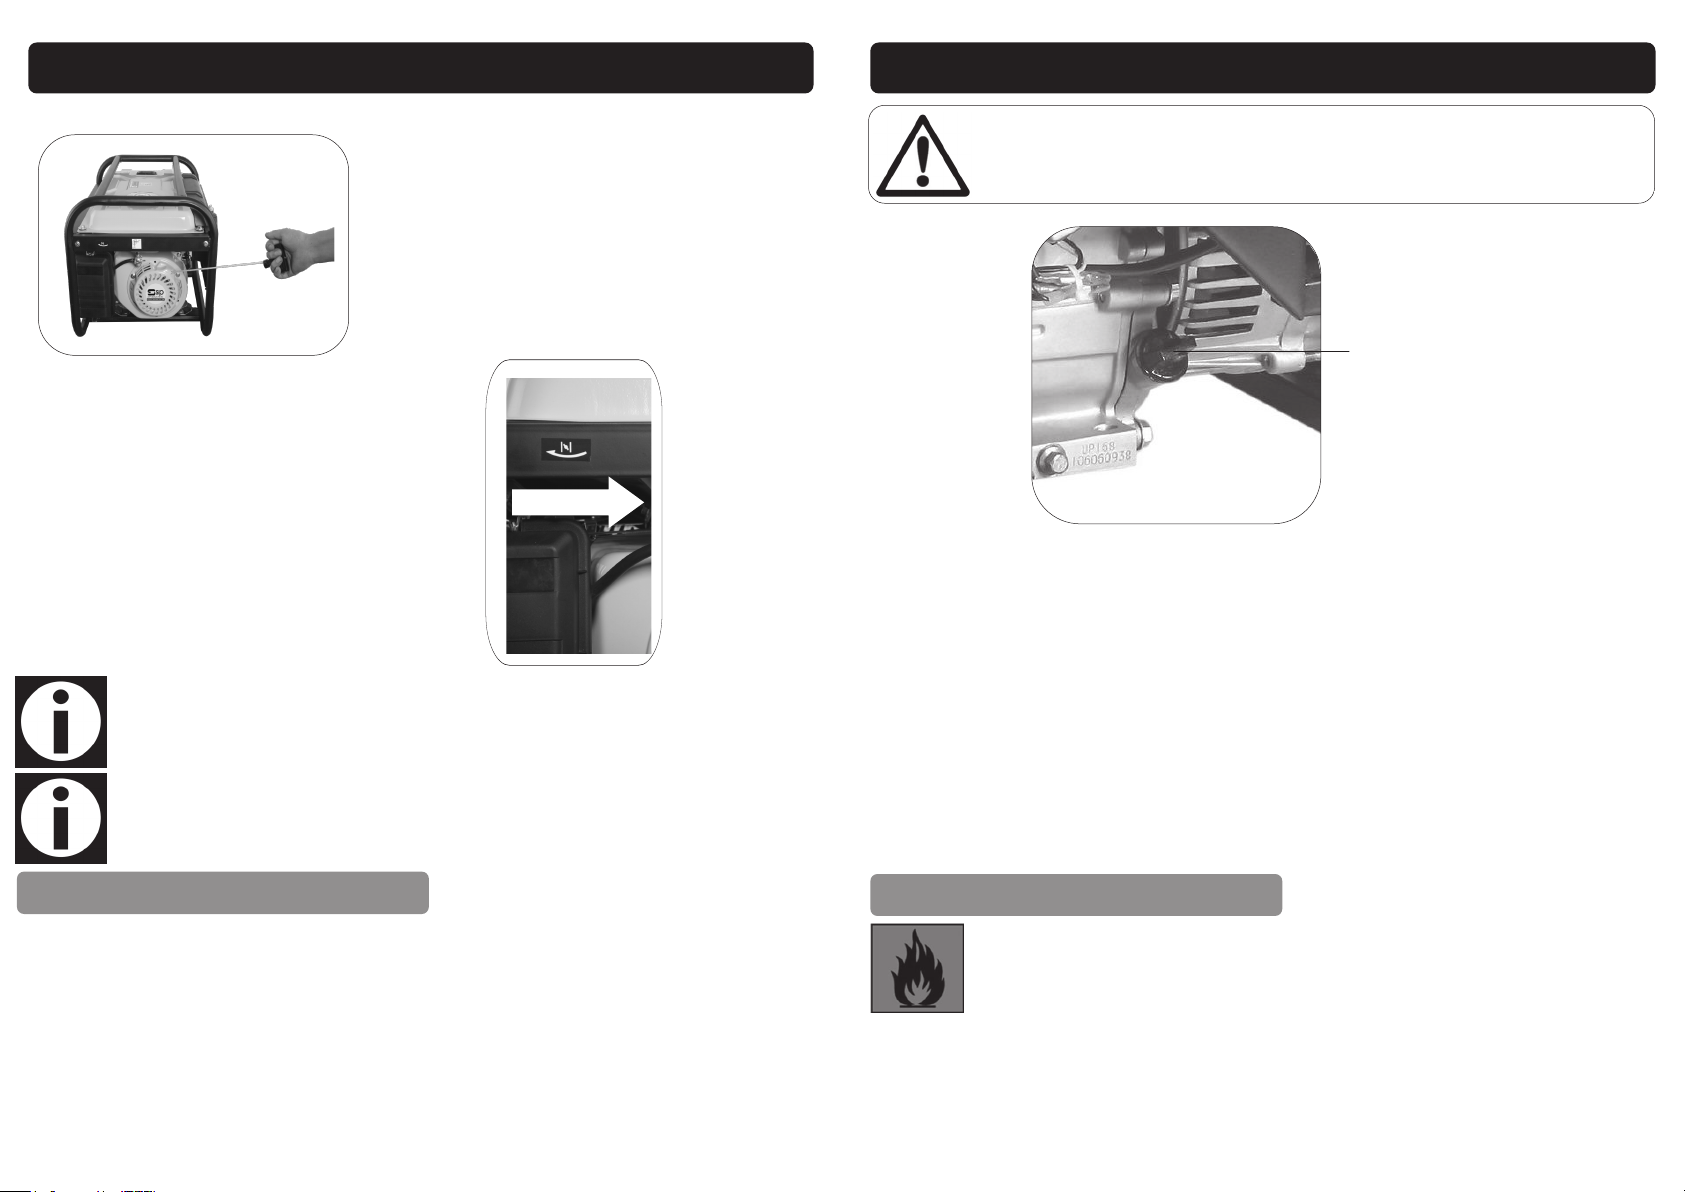
Step 4:
Slowly pull the recoil start cord until it engag-
es, then pull sharply until the engine starts.
Note: it may take a few sharp pulls to get the engine started.
TURNING THE ENGINE OFF
In an emergency:
Simply switch the main On/Off switch to the off (0) position.
In normal conditions:
Turn off and remove any load from the generator.
Switch the main On/Off switch to the off (0) position.
Turn the fuel tap to off.
Note: Breaking the engine in; The first 25 hours of operation is considered
the break-in period for the engine. During this time operate at less than
75% of the load limit.
Page 14
14
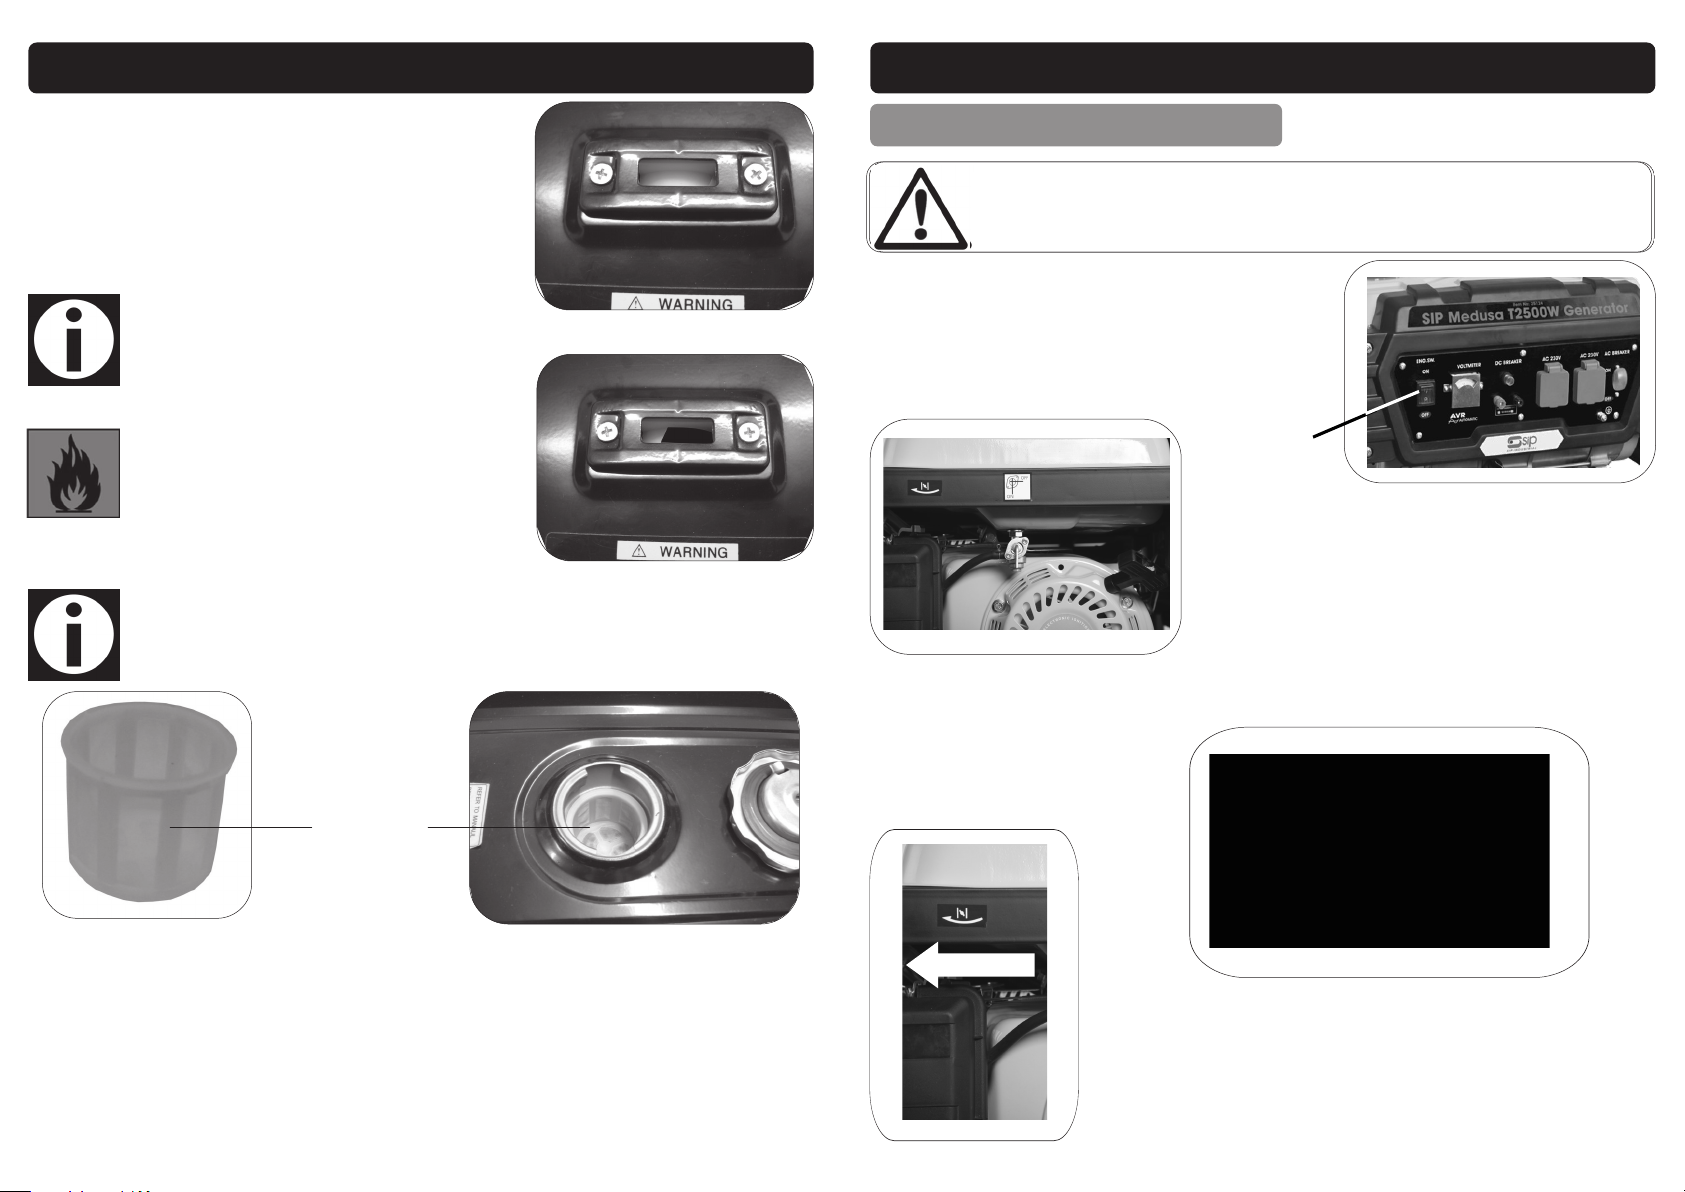
The amount of fuel can be checked by the fuel meter on the top of the tank.
When the tank is empty; the window will be all
white (see top right).
As the tank is filled; the orange indicator will
come across the indicator window (see bottom
right).
Fuel filter
Petrol is highly flammable. Never re-fuel
the generator whilst it is still running; allow it
to cool for a few minutes and avoid other
ignition sources that may be present. Only
re-fuel in a well ventilated area as petrol
fumes can be dangerous if inhaled or ignited.
To re-fuel the generator:
1. Remove the fuel cap.
2. Carefully pour the petrol into the tank to the desired level and replace the fuel cap.
3. Remove any spilt fuel from the generator and surrounding area to avoid any risk of
fire.
The generator should now be ready to run.
Never overfill the fuel tank; leave a small
air gap at the top.
Fuel capacity: approx. 15 Litres.
Note: When re-fuelling always ensure that the fuel filter (supplied) is in place
as foreign matter or debris will cause damage to the engine and greatly
reduce the life of the generator.
OPERATING INSTRUCTIONS….cont
15
OPERATING INSTRUCTIONS….cont
STARTING THE ENGINE
Caution:
Never start the engine with any load connected to the generator.
Step 1:
Turn the main engine switch to the on
position.
Engine ON/OFF
switch
Step 2:
Turn the fuel tap to the on position.
Step 3:
Turn the choke lever to the
“choke” position.
Note: The choke may not be needed if the engine
is already warm.
 Loading...