

Page 1
20
FOR HELP OR ADVICE ON THIS PRODUCT PLEASE CONTACT YOUR DISTRIBUTOR, OR
SIP DIRECTLY ON:
TEL: 01509500400
EMAIL: [email protected] or [email protected]
www.sip-group.com
Ref: 181113
Please dispose of packaging for the product in a responsible
manner. It is suitable for recycling. Help to protect the
environment, take the packaging to the local amenity tip and
place into the appropriate recycling bin.
1
Please read and fully understand the instructions in this manual
before operation. Keep this manual safe for future reference.
06771
Air Nailer / Stapler Kit
Page 2
2
19
Declaration of Conformity
We
SIP (Industrial Products) Ltd
Gelders Hall Road
Shepshed
Loughborough
Leicestershire
LE12 9NH
England
As the manufacturer's authorised representative within the EC
declare that the
Air Nailer Stapler Kit - SIP Part. No. 06771
Conforms to the requirements of the following directive(s), as indicated.
2006/42/EC Machinery Directive
Signed: …………………………………...
Mr P. Ippaso - Managing Director - SIP (Industrial Products) Ltd
Date: 15/12/2011.
And the relevant harmonised standard(s)
DECLARATION OF CONFORMITY
Page 3

18
NOTES
3
Page No. Description
4. Safety Symbols Used Throughout This Manual
4. Safety Instructions
6. Contents and Accessories
7. Getting to Know Your Air Nailer stapler
8. Technical Specifications
8. Guarantee
9. Operating Instructions
12. Maintenance Instructions
13. Troubleshooting
14. Exploded Drawing
15. Parts List
17. Notes
19. Declaration of Conformity
CONTENTS
Page 4
4
When using your nailer stapler, basic safety precautions should always be followed to
reduce the risk of personal injury and / or damage to the nailer stapler.
Read all of these instructions before operating the nailer stapler and save this user
manual for future reference.
The nailer stapler should not be modified or used for any application other than that
for which it was designed.
This air tool is designed to be used as a hand held, hand controlled tool for nailing
and stapling operations or similar.
If you are unsure of its relative applications do not hesitate to contact us and we will
be more than happy to advise you.
Always operate the nailer stapler safely and correctly.
KNOW YOUR NAILER STAPLER: Read and understand the owner's manual and labels
affixed to the nailer stapler. Learn its applications and limitations, as well as the potential hazards specific to it.
KEEP CHILDREN AND UNTRAINED PERSONNEL AWAY FROM THE WORK AREA: All visitors
should be kept at a safe distance from the work area; Never allow untrained persons
to operate the nailer stapler.
STAY ALERT: Always watch what you are doing and use common sense.
HAVE YOUR NAILER STAPLER REPAIRED BY A QUALIFIED PERSON: The nailer stapler is in
accordance with the relevant safety requirements. Repairs should only be carried out
by qualified persons using original spare parts, otherwise this may result in considerable danger to the user and void the warranty.
DANGER! Check that the nailer stapler is in sound condition and good working order;
Take immediate action to repair or replace damaged parts.
DO NOT dismantle or tamper with the nailer stapler, as this may be dangerous and will
invalidate the warranty.
SAFETY INSTRUCTIONS
IMPORTANT: Please read the following instructions carefully, failure to do
so could lead to serious personal injury and / or damage to the air
nailer stapler.
SAFETY SYMBOLS USED THROUGHOUT THIS MANUAL
Danger / Caution: Indicates risk of personal injury and/or the possibility of
damage.
Note: Supplementary information.
17
NOTES
Page 5
16
PARTS LIST….cont
Ref No. Description SIP Code Ref No. Description SIP Code
55. Inlay slice AI05-00592 69. Pin AI05-00606
56. Fixed magazine AI05-00593 70. Bolt M4x6 AI05-00295
57. Indicator label AI05-00594 71. Bolt M4x6 AI05-00295
58. Sticker plate AI05-00595 72. Support seat AI05-00607
59. Guide rail AI05-00596 73. Washer AI05-00608
60. Pipe AI05-00597 74. Bolt M4x20 AI05-00609
61. Fixed lever AI05-00598 75. Rubber handle case AI05-00610
62. Compressed spring AI05-00599 76. O-ring 36.3x3.55 AI05-00611
63. Pusher pipe AI05-00600 77. End cap AI05-00612
64. Pusher AI05-00601 78. Air inlet AI05-00613
65. Compressed spring AI05-00602 79. Protection cap AI05-00614
66. Washer AI05-00603 80. O-ring 2.4x1.6 AI05-00615
67. Fixed seat AI05-00604 81. Bolt M4x14 AI05-00616
68. Bolt M4x38 AI05-00605
5
If a problem with the nailer stapler is experienced or suspected stop using the nailer
stapler immediately and contact your distributor for repair.
Regularly inspect and lubricate the nailer stapler, ensuring that it is in good working
order and condition.
Always ensure that the work area is clean and tidy, free from unrelated materials and
has adequate lighting.
Clean and stow the nailer stapler correctly.
DO ensure that only compressed air is used to supply the air tool.
The compressed air supply MUST be at a suitable regulated pressure. Pipe work, regulators, hoses, isolation valves and connection devices MUST be suitable for the intended application correctly installed and maintained in good condition by a competent person.
Appropriate Personal protective equipment MUST be worn and MUST be designed to
protect against all hazards created. Severe permanent injury can result from using
inappropriate or insufficient protective equipment - eyes in particular are at risk.
Long hair MUST be tied back; Loose clothing MUST NOT be worn. There is a severe
risk of these being drawn in or trapped by the moving parts of the air tool.
Open or damaged compressed air lines present a significant ‘whip’ hazard; Isolate
the problem hose from the air supply and repair / replace the hose immediately.
This air tool is electrically conductive DO NOT allow it to come into contact with any
source of electrical supply.
When putting the air tool aside you MUST ensure that it placed in a stable position. To
avoid inadvertent operation DO NOT place the air tool where it can be knocked or
moved accidentally either directly or by the air connection hose.
If the air tool is not required or the air supply is interrupted, disconnect the air tool
from the air supply and place in secure storage to prevent unauthorised use.
Ensure the air valve (or trigger / throttle) is in the “off” position before connecting the
nailer stapler to the air supply.
Disconnect the nailer stapler from the air supply before making adjustments, changing nails or staples etc. and before servicing the tool.
Always keep your air tool clean and lubricated. Daily lubrication is essential to avoid
internal corrosion and possible failure.
Do not overload the tool. Allow the tool to operate at its optimum speed for maximum efficiency.
Do not increase the air pressure above the manufacturers recommended level, as
excessive pressure can cause the tool casing to split. This can also create excessive
wear on moving parts and possible failure.
Always ensure that the work-piece is firmly secured leaving both hands free to control
the nailer stapler.
Always wear safety goggles or glasses during operation.
Do not wear watches, rings, bracelets or loose clothing when using air tools.
Use as light weight a hose as possible from the tool to the wall or compressor cou-
SAFETY INSTRUCTIONS….cont
Page 6
6
CAUTION: The warnings and cautions mentioned in this user manual can not
cover all possible conditions and situations that may occur. It must be understood by the operator that common sense and caution are factors which cannot be built into this product, but must be applied.
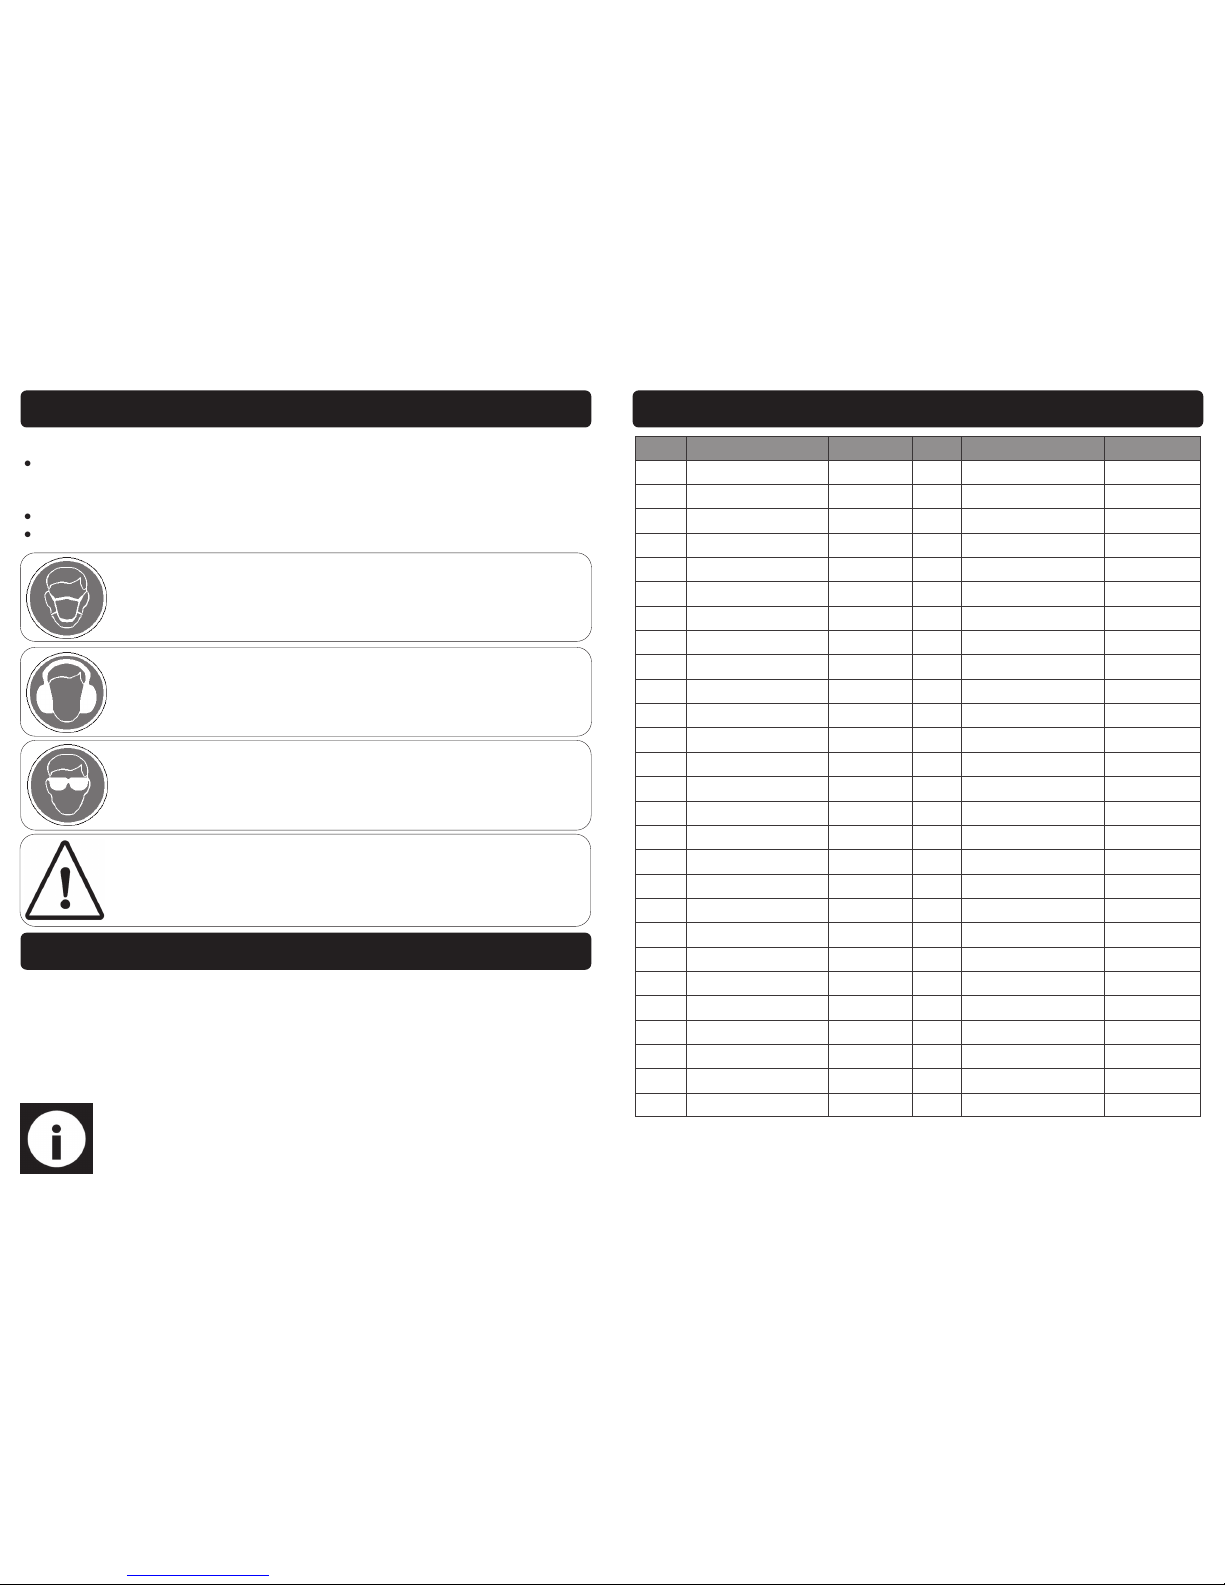
We recommend wearing ear protection - particularly during extended
periods of operation.
Some wood or wood composites have the potential to be harmful if
inhaled. A face or dust mask should be worn during these operations.
Always wear approved safety goggles / glasses when using or maintaining any air tool, everyday eyeglasses have only impact resistant lenses,
they are not safety glasses.
Note: If any of the above are missing or damaged, contact your distributor
immediately.
Nailer stapler Instruction Manual Quick Coupler (Euro type)
Blow Moulded Case Small Bottle of Oil 400 Nails & 300 Staples
SAFETY INSTRUCTIONS….cont
CONTENTS AND ACCESSORIES
pling.
Always ensure that the accessories such as nails and staples are rated / designed for
use with this nailer stapler as well as the required application, and are correctly and
securely installed before connecting the tool to the air supply.
Do not carry or move the air nailer stapler by its air hose.
Never allow the tool to come into contact with harsh solvents such as petrol.
15
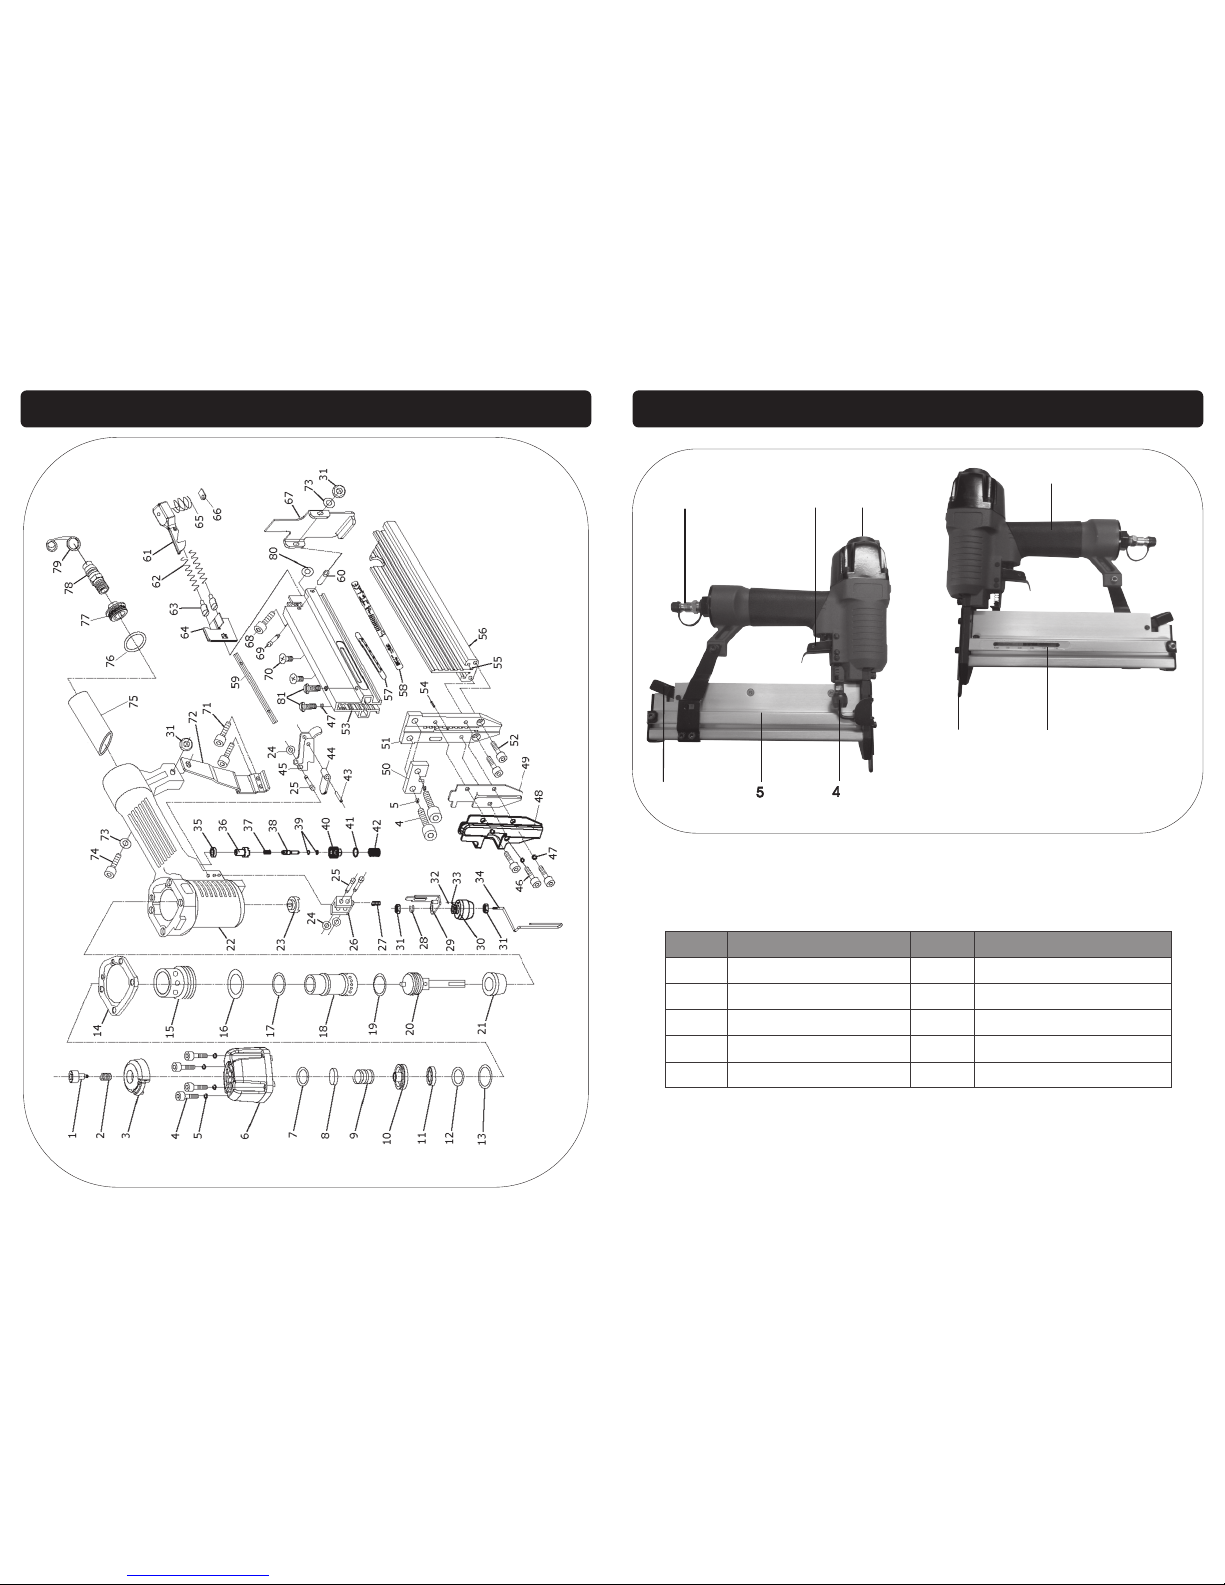
PARTS LIST
Ref No. Description SIP Code Ref No. Description SIP Code
1. Bolt AI05-00540 28. Snap retainer AI05-00566
2. Deflector spring AI05-00541 29. Crosshead AI05-00567
3. Air deflector AI05-00542 30. Nut AI05-00568
4. Bolt M5x20 AI05-00159 31. Nut M4 AI05-00569
5. Spring washer AI05-00543 32. Spring AI05-00570
6. Cylinder cover AI05-00544 33. Steel ball AI05-00571
7. O-ring 13.7x2.4 AI05-00545 34. Safety stem AI05-00572
8. Flat washer AI05-00546 35. Washer AI05-00573
9. Compressed spring AI05-00547 36. Valve seat AI05-00574
10. Switch valve AI05-00548 37. Compressed spring AI05-00575
11. Sealing washer AI05-00549 38. Trigger valve stem AI05-00576
12. O-ring 24.8x3.5 AI05-00550 39. O-ring 2.5x.5 AI05-00577
13. O-ring 31.2x2.5 AI05-00551 40. Trigger seat AI05-00578
14. Collar AI05-00552 41. O-ring 11.2X2 AI05-00579
15. O-ring 42.6x2.35 AI05-00553 42. Trigger spring AI05-00580
16. O-ring 30x1.8 AI05-00554 43. Pin AI05-00581
17. Sealing washer AI05-00555 44. Safety stand AI05-00582
18. Cylinder AI05-00556 45. Trigger AI05-00583
19. O-ring 29.7x3.55 AI05-00557 46. Bolt M4x10 AI05-00302
20. Main piston AI05-00558 47. Washer M4 AI05-00584
21. Bumper AI05-00559 48. Safety cover AI05-00585
22. Body AI05-00560 49. Driver guide cover AI05-00586
23. Rubber washer AI05-00561 50. Spacer AI05-00587
24. O-ring 1.7x2 AI05-00562 51. Driver guide AI05-00588
25. Pin AI05-00563 52. Bolt M4 AI05-00589
26. Frame AI05-00564 53. Movable magazine AI05-00590
27. Compressed spring AI05-00565 54. Pin 1.5x10 AI05-00591
Page 7
14
EXPLODED DRAWING
7
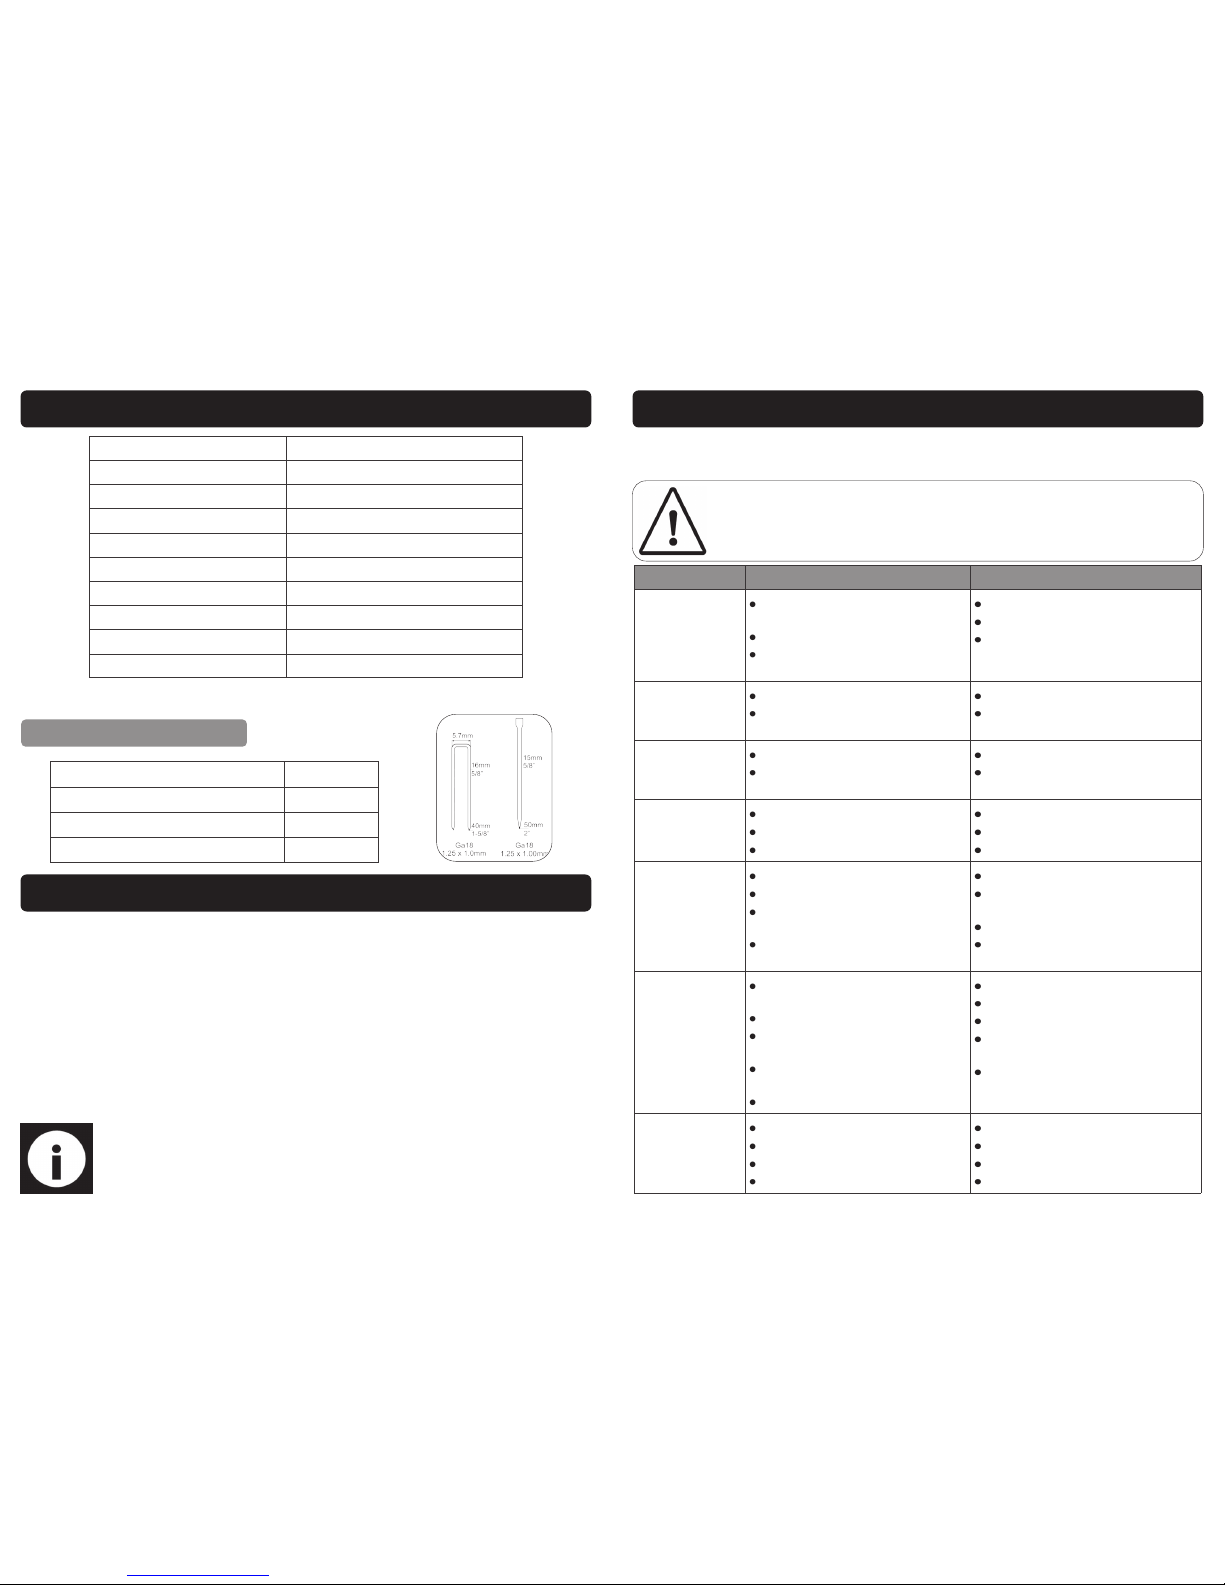
Ref. No. Description Ref. No. Description
1. Air Inlet 6. Magazine Release
2. Air Trigger 7. Main Handle
3. Exhaust 8. Magazine Indicator
4. Nail / Staple Depth Control 9. Safety Trigger Lock
5. Nail / Staple Magazine
GETTING TO KNOW YOUR NAILER STAPLER
5
4
3
2 1
6
7
9
8
Page 8
8
SIP Part No. 06771
Operating Pressure 3 - 7 bar (58 - 102psi)
Average Air Consumption 1.4 cfm (40 l/min)
Air Inlet 1/4” bsp
Nail Type 18 Gauge
Staple Type 18 Gauge, Narrow Crown (5.7mm)
Fastener Capacity (approx.) 100
Sound Pressure (LpA) * 88.7 dB(A)
Sound Power (LwA) * 101.7 dB(A)
Vibration ** 1.9 m/s2
This SIP air nailer stapler is covered by a 12 month parts and labour warranty covering
failure due to manufacturing defects. This does not cover failure due to misuse or operating the nailer stapler outside the scope of this manual - any claims deemed to be
outside the scope of the warranty may be subject to charges Including, but not limited to parts, labour and carriage costs.
This warranty does not cover consumable items such as oil, nails and staples.
Failure to lubricate your air tool will shorten its working life and reduce performance.
The warranty does not cover rusting air tools or tools that failed due to the lack of lubrication.
* Measured in accordance with EN ISO 4871; Level of uncertainty 2.5 dB.
** Measured in accordance with ISO 8662-11:1999; Level of uncertainty 0.509 m/s2.
TECHNICAL SPECIFICATIONS
GUARANTEE
Note: Proof of purchase will be required before any warranty can be honoured.
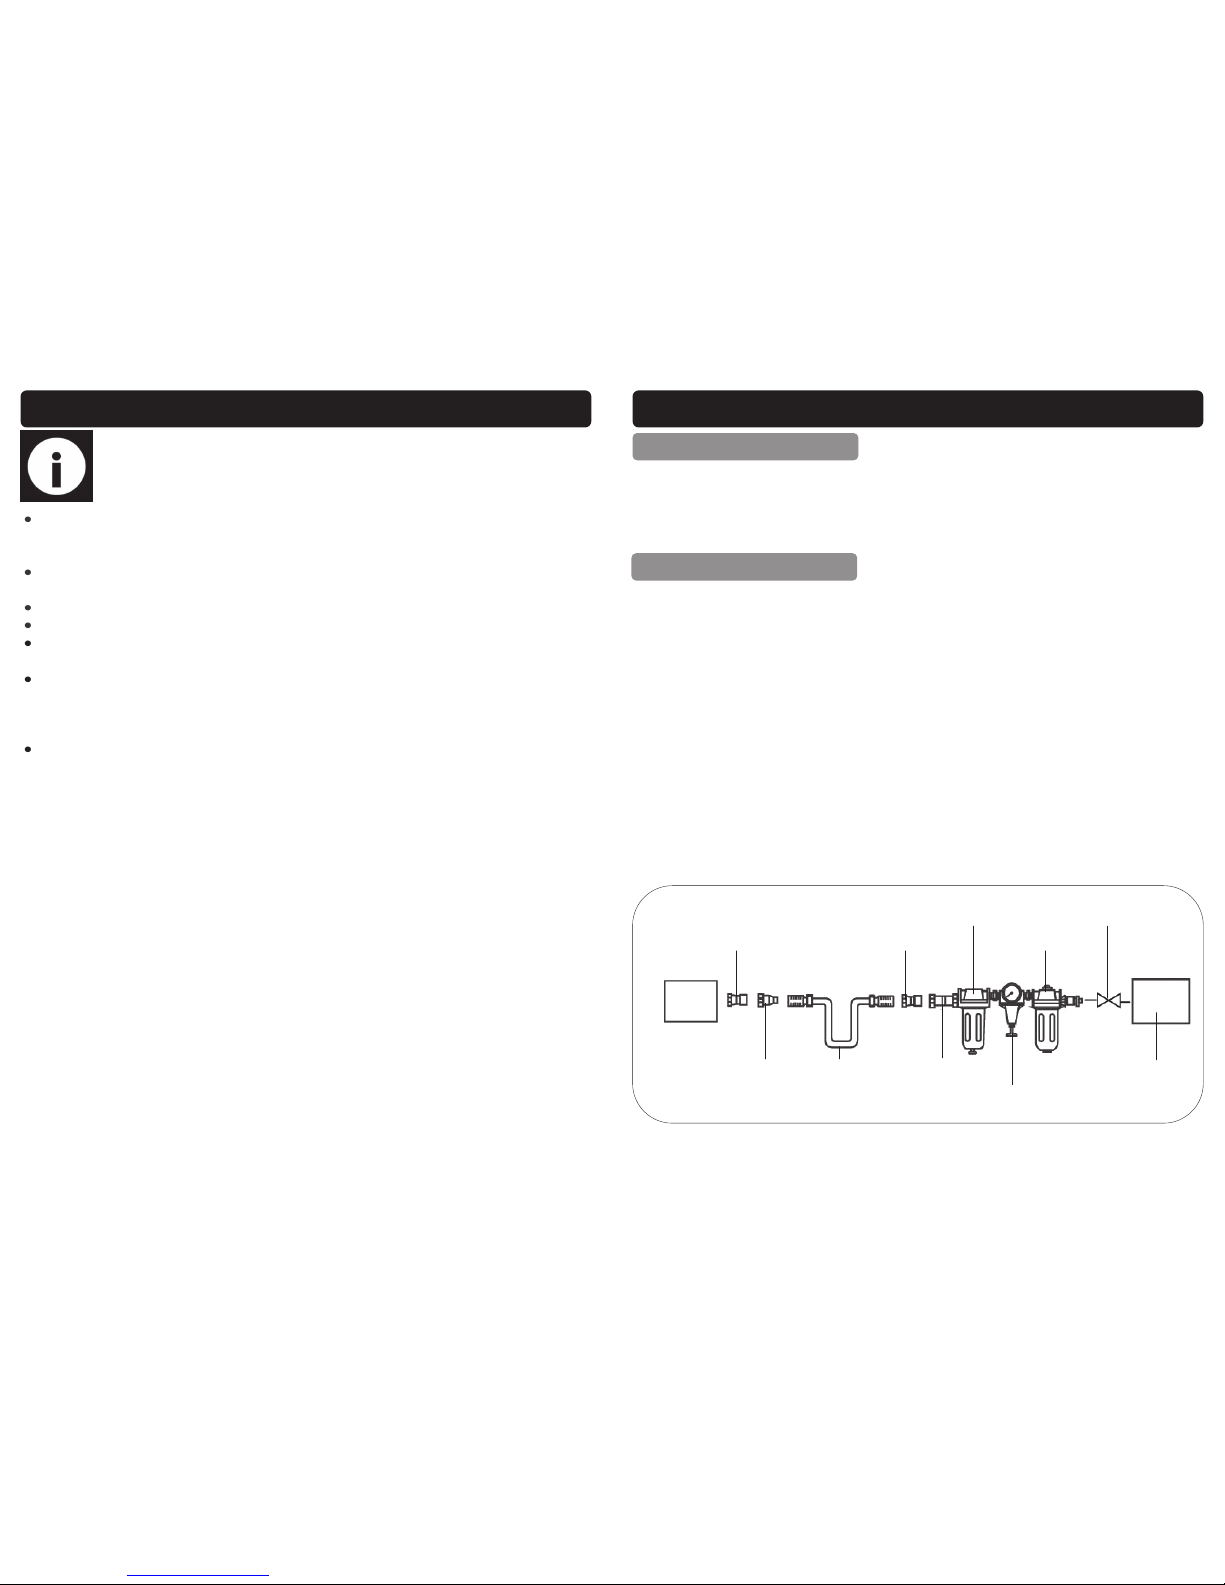
NAIL / STAPLE DIMENSIONS
Minimum Nail Length 15 mm
Maximum Nail Length 50 mm
Minimum Staple Length 16 mm
Maximum Staple Length 40 mm
13
The following form lists the common operating issues with problems and solutions.
Please read the form carefully and follow it.
If any of the following symptoms occurs during your operation, stop using the to ol immediately, or serious
personal injury could resu lt. Only a qualified person or an a uthorised service centre should perform repairs
of the tool. Disconnec t from the air supply before attempting repairs or adju stments. When replacing O rings etc. lubricate with air tool oil before assembly.
TROUBLESHOOTING
PROBLEMS POSSIBLE CAUSES REMEDIES
Air leak near top
of tool or in trigger
area.
O-ring in trigger valve are damage.
Trigger valve head are damage.
Trigger valve st em, seal or O-ring
are damaged.
Check and replace O-ring.
Check and replace.
Check and replace trigger valve
stem, seal or O-ring.
Air leak near bottom of tool.
Loose screws.
Worn or damaged O-rings or
bumper.
Tighten screws.
Check and replace O-rings or
bumper.
Air leak between
body and cylind er
cap.
Loose screws.
Worn or damaged O-rings or
seals.
Tighten screws.
Check and replace O-rings or
bumper.
Blade driving fastener too deep.
Worn bumper.
Air pressure is too high.
Depth adjuster is set incorrectly.
Replace bumper.
Adjust the air pressure.
Adjust the depth adjuster correctly.
Tool does not
operate well: can
not drive fastener
or operate sluggishly.
Inadequate air supply.
Inadequate lubrication.
Worn or damaged O-rings or
seals.
Exhaust port in cylinder head is
blocked.
Verify adequate air supply.
Place 2 to 6 drops of oil into air
inlet.
Check and replace O-rings or seal.
Replace damaged internal parts.
Tool skips fast en-
ers.
Wor n bump er or dam aged
spring.
Dirt in front plate.
Dirt or damage prevents fasteners
from moving freely in magazine.
Worn or dry O-ring on piston or
lack of lubrication.
Cylinder cover seal leaking.
Replace bumper or pusher spring.
Clean drive channel on front plate.
Magazine needs to be cleaned.
O-ring needs to be replaced and
lubricated.
Replace sealing washer.
Tool jams.
Incorrect or damaged fasteners.
Damaged or worn driver guide.
Magazine or nose screw loose.
Magazine is dirty.
Change and use correct fastener.
Check and replace the driver.
Tighten the magazine.
Clean the magazine.
Page 9
12
DO NOT use the tool if it is, or has parts that are worn, damaged or missing; Remove from service and have the parts repaired / replaced using original spare
parts.
Ensure that the air tool is lubricated with an inline lubricator or daily with a few
drops of air tool oil dripped into the air inlet.
Clean the air tool after each use.
Check hose and fittings for wear or damage before each use.
Drain the air tank / receiver of the compressor daily; Water in the air line will
damage the nailer stapler.
In the event that it becomes necessary to store the tool for an extended period
of time (overnight, weekend, etc.), it should receive a generous amount of lubrication at that time. The tool should be run for approximately 30 seconds to ensure oil has been evenly distributed throughout the tool.
The tool should be stored in a clean and dry environment.
Disconnect the air tool from the air supply before changing accessories, servicing
or performing maintenance. Replace or repair damaged parts. Use genuine parts
only. Non-authorised parts may be dangerous and will invalidate the warranty.
MAINTENANCE INSTRUCTIONS
9
1. Ensure the air trigger (2) is not depressed before connecting to the air supply.
2. You will require an air pressure of 3 - 7 bar (58 - 102psi), and an air flow according
to specification.
3. WARNING! Ensure the air supply is clean and does not exceed 102 psi while operating the nailer stapler. Too high an air pressure and unclean air will shorten
the product life due to excessive wear, and may be dangerous causing damage and/or personal injury.
4. Drain the air tank of the compressor daily; Water in the air line will damage the
nailer stapler.
5. Recommended hook-up procedure is shown in fig 1.
6. Line pressure should be increased to compensate for unusually long air hoses
(over 8 metres). The minimum hose diameter should be 3/8” I.D. and fittings
must have the highest flow rate that can be fitted to the tool.
7. Keep hose away from heat, oil and sharp edges. Check hose for wear, and
make certain that all connections are air tight and secure.
This nailer stapler is designed with a durable lightweight housing. It has an adjustable
exhaust to reduce noise and direct air flow away from the operators face. It is the ergonomic choice for nailing and stapling operations.
DESCRIPTION
AIR SUPPLY
OPERATING INSTRUCTIONS
Tool
Compressor
Quick Connector Quick Connector
Quick Coupler Quick Coupler Air Hose
Regulator
Lubricator
Filter
Cut Off Valve
Fig. 1
Page 10
10
CAUTION: If a filter/regulator/lubricator is not installed on the air system,
air operated tools should be lubricated at least once a day or after 2
hours work with 2 to 6 drops of oil, depending on the work environment,
directly through the male fitting in the tool housing.
LUBRICATION
An automatic in-line filter-regulator-lubricator is recommended (Fig.1) as it increases tool life and keeps the tool in sustained operation. The in-line lubricator
should be regularly checked and filled with air tool oil.
Proper adjustment of the in-line lubricator is performed by placing a sheet of
paper next to the exhaust port and firing the nailer stapler 10 - 15 times - the
magazine can be empty so as not to waste any nails or staples. The lubricator is
properly set when a light stain of oil collects on the paper. Excessive amounts of
oil should be avoided.
In the event that it becomes necessary to store the tool for an extended period
of time (overnight, weekend, etc.), it should receive a generous amount of lubrication at that time. Fire the nailer stapler 10 - 15 times to ensure oil has been
evenly distributed throughout the tool. The tool should be stored in a clean and
dry environment.
It is most important that the tool be properly lubricated by keeping the air line
lubricator filled and correctly adjusted. Without proper lubrication the tool will not
work correctly and parts will wear prematurely.
Use the proper lubricant in the air line lubricator. The lubricator should be of low
air flow or changing air flow type air tool oil, and should be kept filled to the correct level. Use only recommended lubricants, specially made for pneumatic
applications. Substitutes may harm the rubber compounds in the tools O-rings
and other rubber parts.
OPERATING INSTRUCTIONS….cont
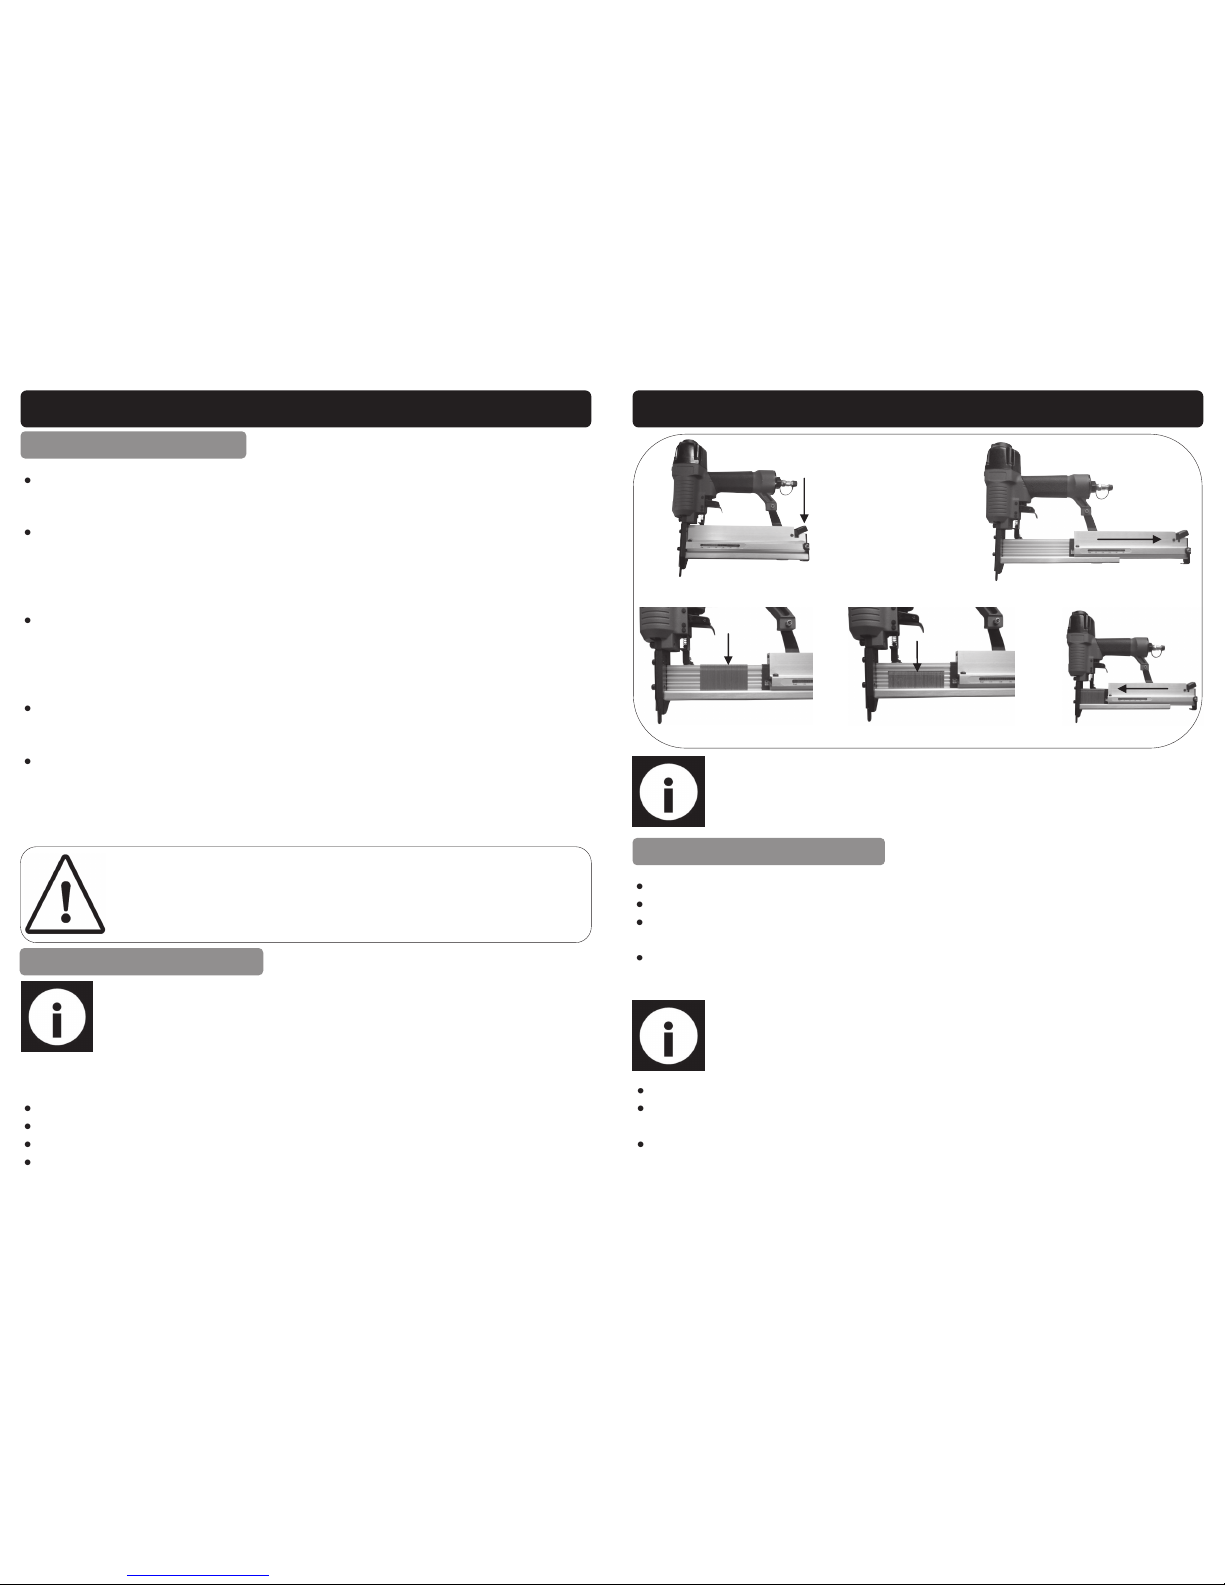
LOADING THE MAGAZINE
Note: Ensure that the nailer stapler is disconnected from the air supply before filling the magazine.
See pictures on page 11.
Press the magazine release (6) (Fig.1).
Slide the magazine (5) out backwards (Fig.2).
Fit the required nails / staples into the magazine (5) (Fig.3&4).
Slide the magazine (5) forwards until the magazine release (6) locks it into place
(Fig.5).
11
Load the required nails / staples.
Connect the Nailer stapler to the air supply via the air inlet (1).
Set how far the nails / staples will be driven into the workpiece by turning the
depth control (4).
Set the air pressure to match the workpiece; Harder woods may require a higher
air pressure, whereas softer wood may require less air pressure.
OPERATING THE NAILER STAPLER
OPERATING INSTRUCTIONS….cont
Note: The staples fit over the middle channel of the magazine, the nails fit
to the front of the channel.
Note: It is a good idea to practice on a scrap piece of wood which is the
same as the workpiece to fine tune depth and air pressure settings.
Press and hold the trigger lock (9) against the workpiece.
With the trigger lock (9) held against the workpiece, press the trigger (2); One
nail / staple will fire.
Move the nailer stapler to the next location and repeat the above.
Fig. 1
Fig. 2
Fig. 3
Fig. 4
Fig. 5
 Loading...