

Page 1
SIOGES/
pro
SIOGES/
one
2.4
Quick User
GUIDE
Page 2
Page 3Page 2
SIOGES
one pro
/
Copyright
This publication, including all photographs, illustrations and
software, is protected by international copyright laws, with
all rights reserved. No part of this manual or the materials
contained in this document may be reproduced without the
written consent of the author.
Clarication
The information contained in this document is subject to
change without notice.
Revision history
2.10 Version. Septiember 2010
2.30 Version. February 2011
Index
General Aspects 4
Setup Wizard 6
Login Screen 11
Sales Operations 12
Tender Operation 18
Search 19
Daily Cash 19
Documents 20
Reports 21
Information Backup 24
Exit Application 25
Page 3
Page 5Page 4
SIOGES
one pro
/
General Aspects
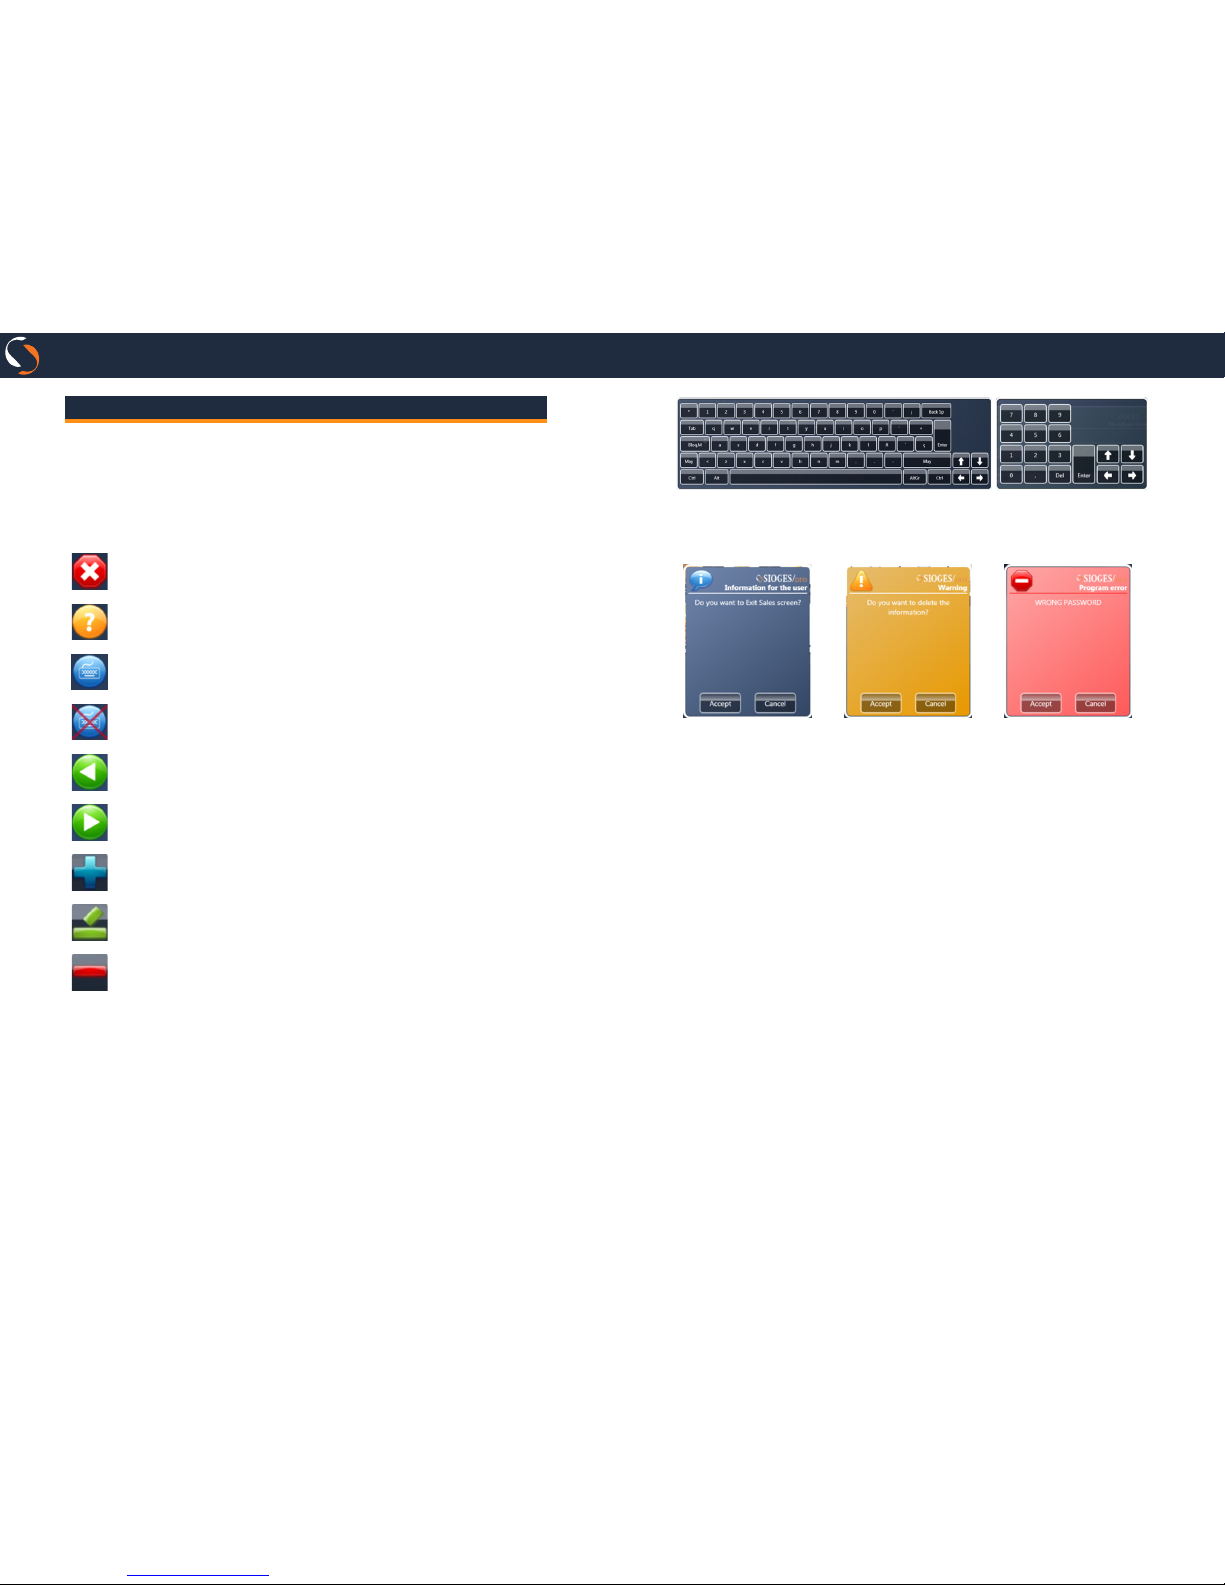
A) Action Buttons
In SIOGES you will nd a series of buttons that are repeated
on all screens:
Exit. This button allows you to go to the previous screen.
Help. This button displays the online help.
Keyboard ON. This button indicates that the onscreen
keyboard is active. Press to clear.
Keyboard OFF. This button indicates that the onscreen
keyboard is disabled. Press to activate.
Previous Page. Shows previous page.
Next Page. Shows next page.
Inserts new record.
Edit the selected record.
Delete the selected record.
B) Onscreen Keyboard
Whenever you have the keyboard button on, to be placed in a
text edit eld appears on screen virtual keyboard.
Depending on the type of information you can enter, display a
full keyboard or keypad.
C) NOTICE messages
Information message.
Warning message.
User must correct
something.
Program error message.
D) DATE Selector
If you click on the icon to the left of the lters by date, you can
select:
• No DATE lter
• Filter by year
• Filter by month
• Filter by day
• Filter between two dates
E) Screen grids
Clicking on a column header, you can sort the information by
the value of the selected column.
If you drag the column header to the upper grid data can be
grouped by the selected column.
Press the buttons above and below the scroll bar to move between records and to display a menu allowing you to print and
export the information from the grid.
Page 4
Page 7Page 6
SIOGES
one pro
/
Setup Wizard
When you rst start the program displays a wizard that guides
you through the setup process.
In the wizard, you can congure the following items:
A) Selecting program language
Select program language.
B) Entering the program registration key
Enter the activation key of the program. If you have internet
connection, the process is automatic. Otherwise, contact your
dealer.
C) Setting date and time
Check the date and time of the computer are correct.
Otherwise, enter the new values.
D) Region selection
Select the region of its business. This process automatically
creates the taxes associated with their region.
E) Business Model Selection
Select the most closely business model.
F) Device conguration
Congure the devices you want to work.
The devices able to congure are:
• Receipt printer
• Cash drawer
• Up to 3 Kitchen printer
• Magnetic stripe reader
• Barcode scanner
• Customer Display
• Scale
• NANO Device
G) Denition of business data and selecting the type
of ticket
Enter your business information, customize the ticket by
entering your logo and text of the foot of the ticket and choose
among the three models printed ticket.
Press the print button to get a sample print of the selected
format.
H) Conguring currency
Choose which is the currency you want to work.
I) Conguring tax
Check if the taxes have been created correctly.
You can modify or create new taxes.
J) Dene whether the prices include VAT
Indicate whether your prices include taxes.
K) Conguration of payment methods
Set up payment methods allowed in your business (by default
the program comes with the cash payment, credit card, deferred payment and ticket restaurant).
L) User Settings
Create the users allowed to use the program and set permissions for each user.
It is not mandatory but it is recommendable to assign each
user a password.
M) Have Differentiations?
Indicate if your business works with differentiations in pro-
ducts (eg sizes and colors).
N) Differentiations
If your business works with differentiation, believes in this
display various settings.
O1) Have Classications?
Indicate whether you need to associate classications to products.
Page 5

Page 9Page 8
SIOGES
one pro
/
O2) Classications
Create on this screen classications you can assign to products
in the future, to extract statistics for classication.
P1) Have Modiers?
Indicate whether you need to associate modiers to products.
P2) Modiers
Enter in the program modiers to assign product you want to
sell.
Q1) Have Production Groups?
If you will need to dene groups of production (needed to
manage production printers).
Q2) Production Groups
Dene production groups assign to products.
Each production group will be assigned a production printer.
R1) Have Pack Types?
Indicate if you are selling pack type products (eg menus).
R2) Pack Types
If your business works with packs (eg menus), dene the types
of pack.
S) Families & Items
Create the families and items.
T) Tariffs
Create, modify and delete tariffs.
Modify product prices in each tariff.
U) Consumer Areas & Tables?
Dene if your business has areas and consumption tables.
V) Tables
If your business have consumer areas and tables, create in
this screen.
You can dene the local levels in a completely visual way.
W) Discounts
Set ticket discounts available in your business.
X) Customers
Create customers and assign each a tariff and, optionally, a
discount.
Y) Suppliers
Create suppliers and assign each a tariff and, optionally, a
discount.
You can access this information again by pressing the
Settings button from the sale screen.
From the Settings button, you can also access:
a) Adv. Tariffs
From this option you can change the prices of items more
quickly (in screen will display a spreadsheet in order to change prices without having to modify article by article).
b) Change ADMIN password
In this option you can change the Admin password.
c) NANO Setup
In this option you can manage the program link with NANO
handheld devices.
You can do the following:
• Enter the license code from your NANO antenna.
• Pairing devices with NANO antenna.
• Synchronize data from the program to the antenna.
Page 6
Page 11Page 10
SIOGES
one pro
/
d) Utilities
As utilities you can:
• Backup Data
• Restore Data
• Erase all sales
• Erase ALL PROGRAM INFO
• Excel information EXPORT
• Excel information IMPORT
e) Additions parameters
As addional parameters you can:
• Group the receipt lines by item
• Prompt for covers number in any new receipt
• Prompt for user in any new receipt
• Compulsory tables
• Automatic item in any new receipt
• Show items stock in sales screen
• Print kitchen receipt if table is not assigned.
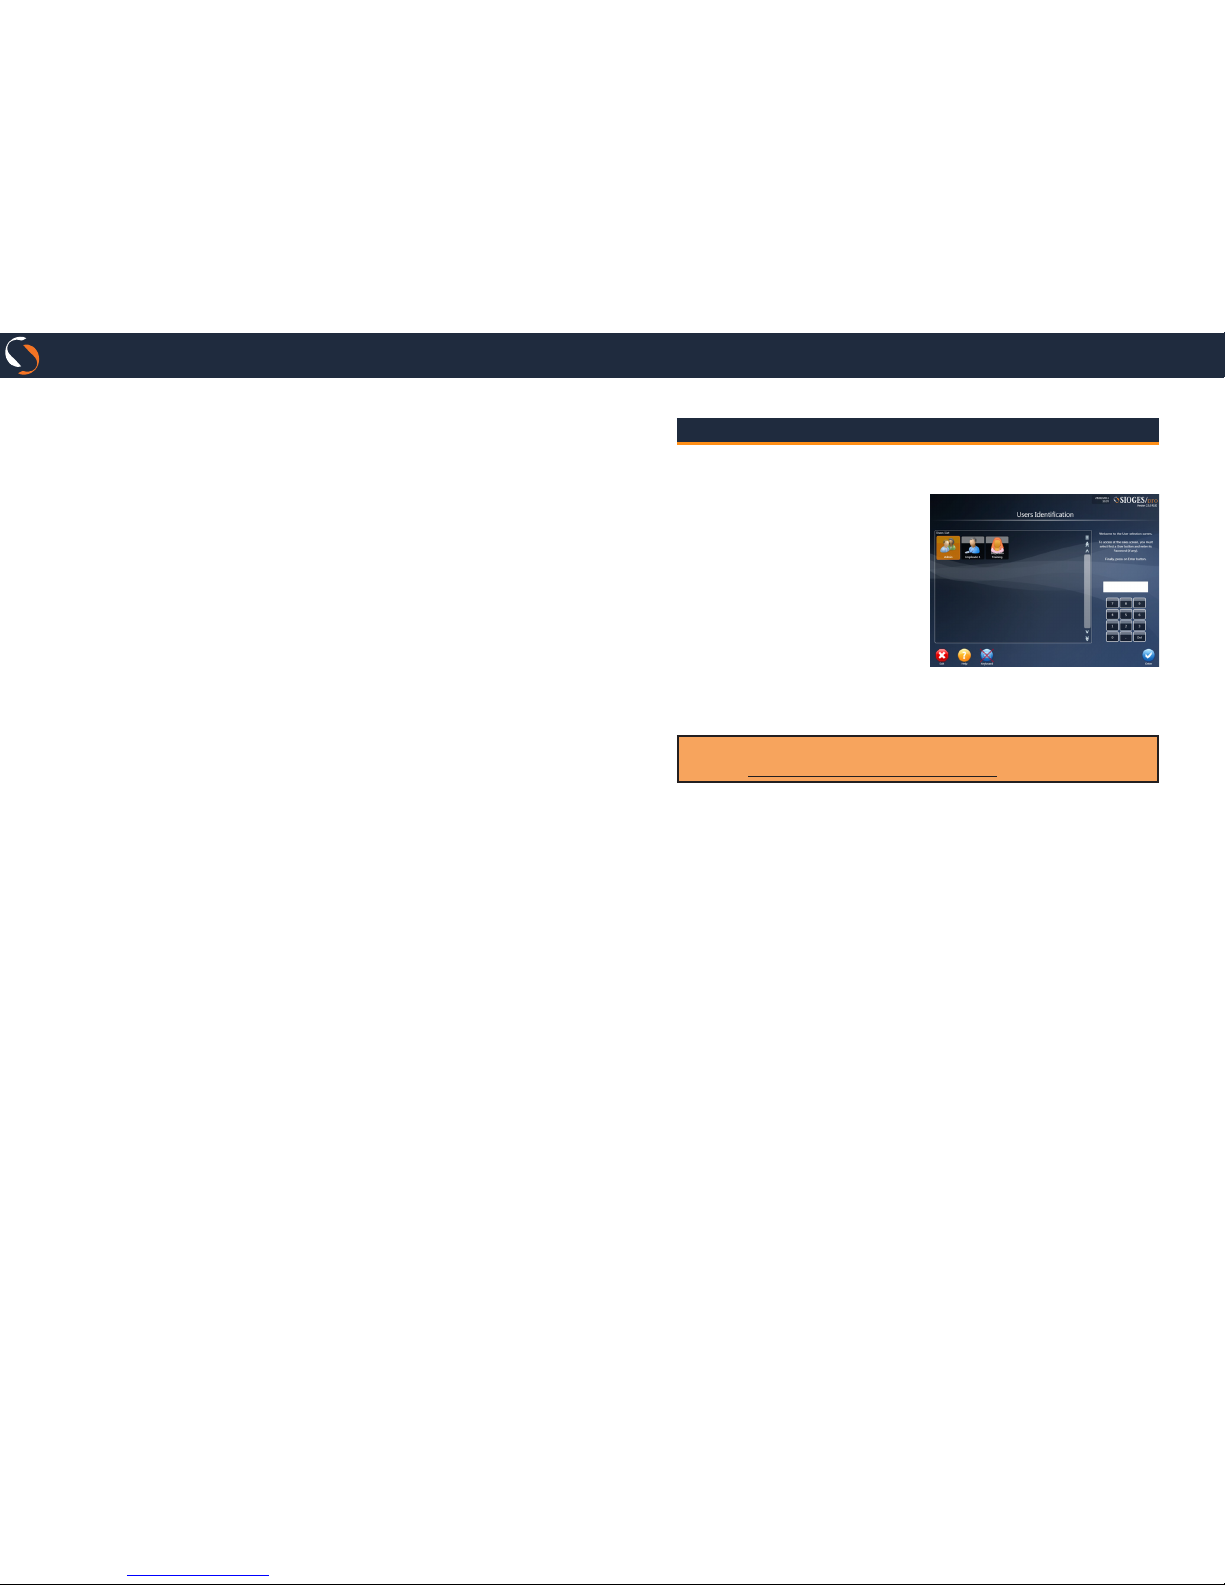
Login Screen
This screen will show you before entering the sale screen.
Select the user.
If the user does not have a
password, you will login automatically.
If the user has a password, mark
it on the numeric keypad on
the screen and press the Enter
button to access the sale screen.
From this screen you can also
update your version ONE license to PRO version.
By default, the Admin user0s password is 5555.
Use the Change Admin User Password to change it.
Page 7
Page 13Page 12
SIOGES
one pro
/
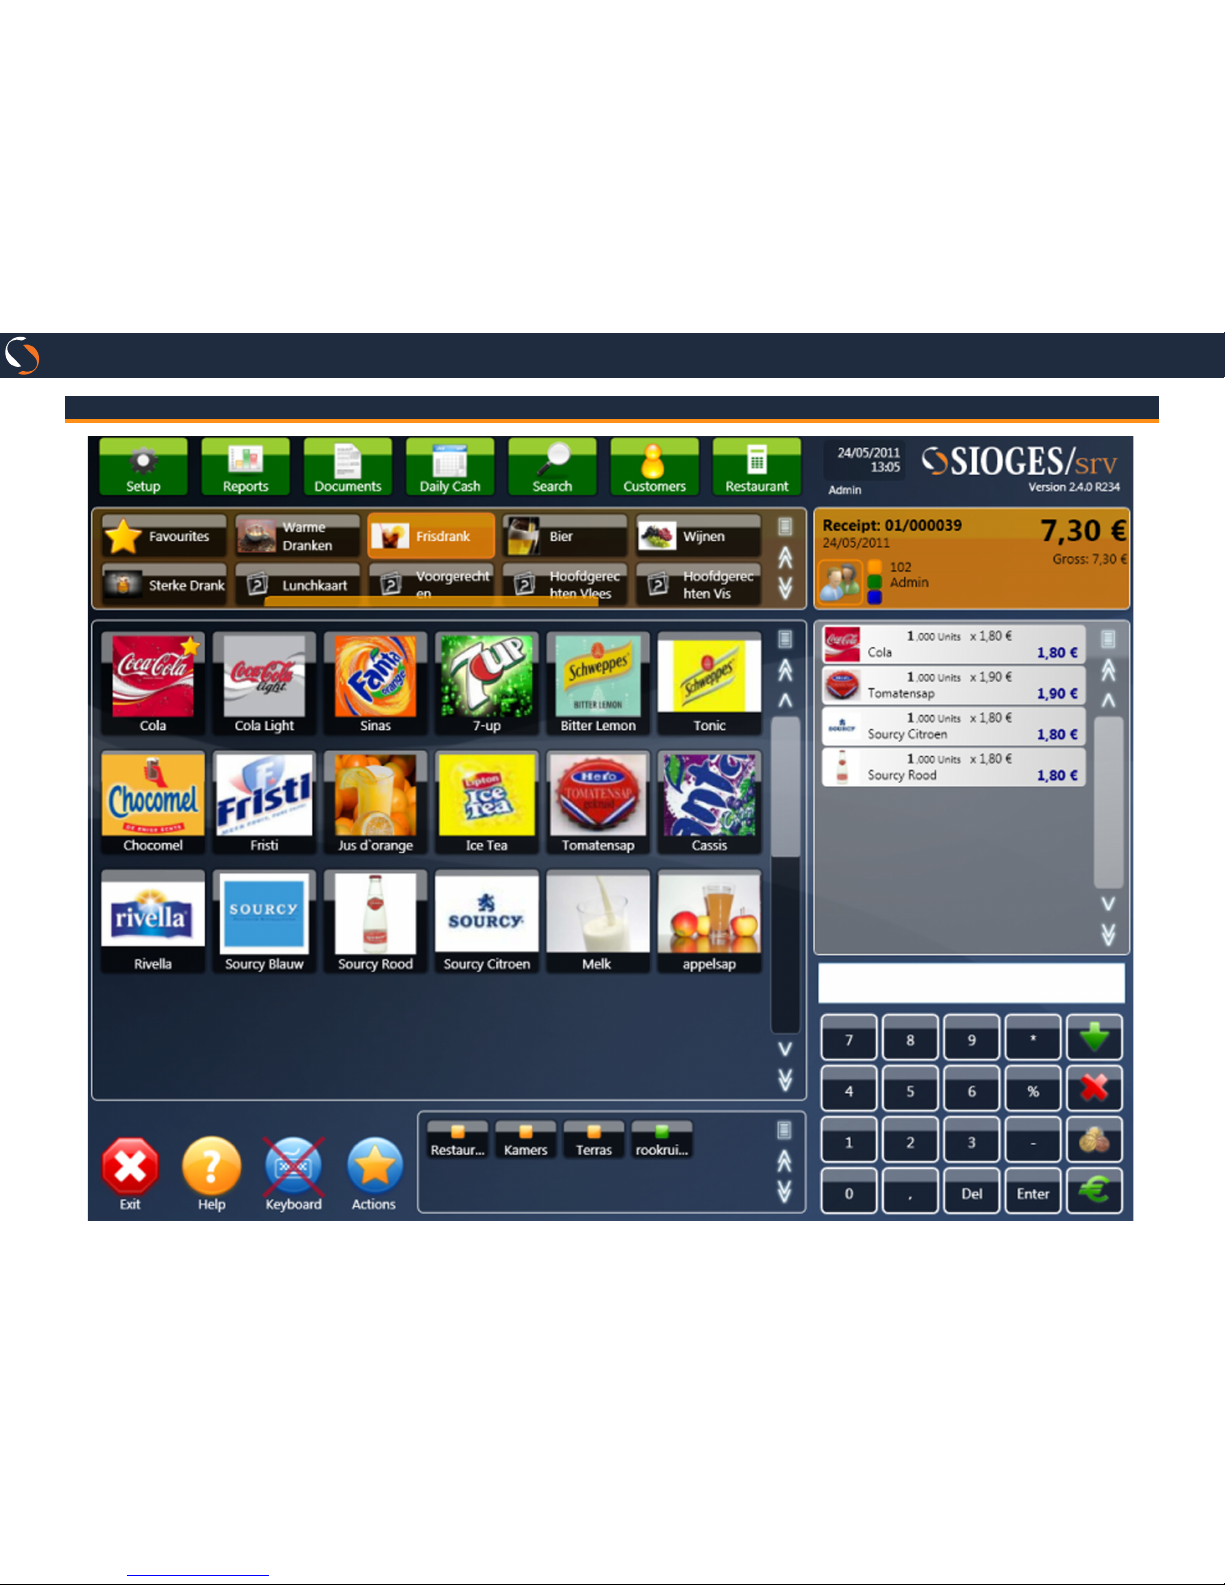
Sales Operations
Page 8
Page 15Page 14
SIOGES
one pro
/
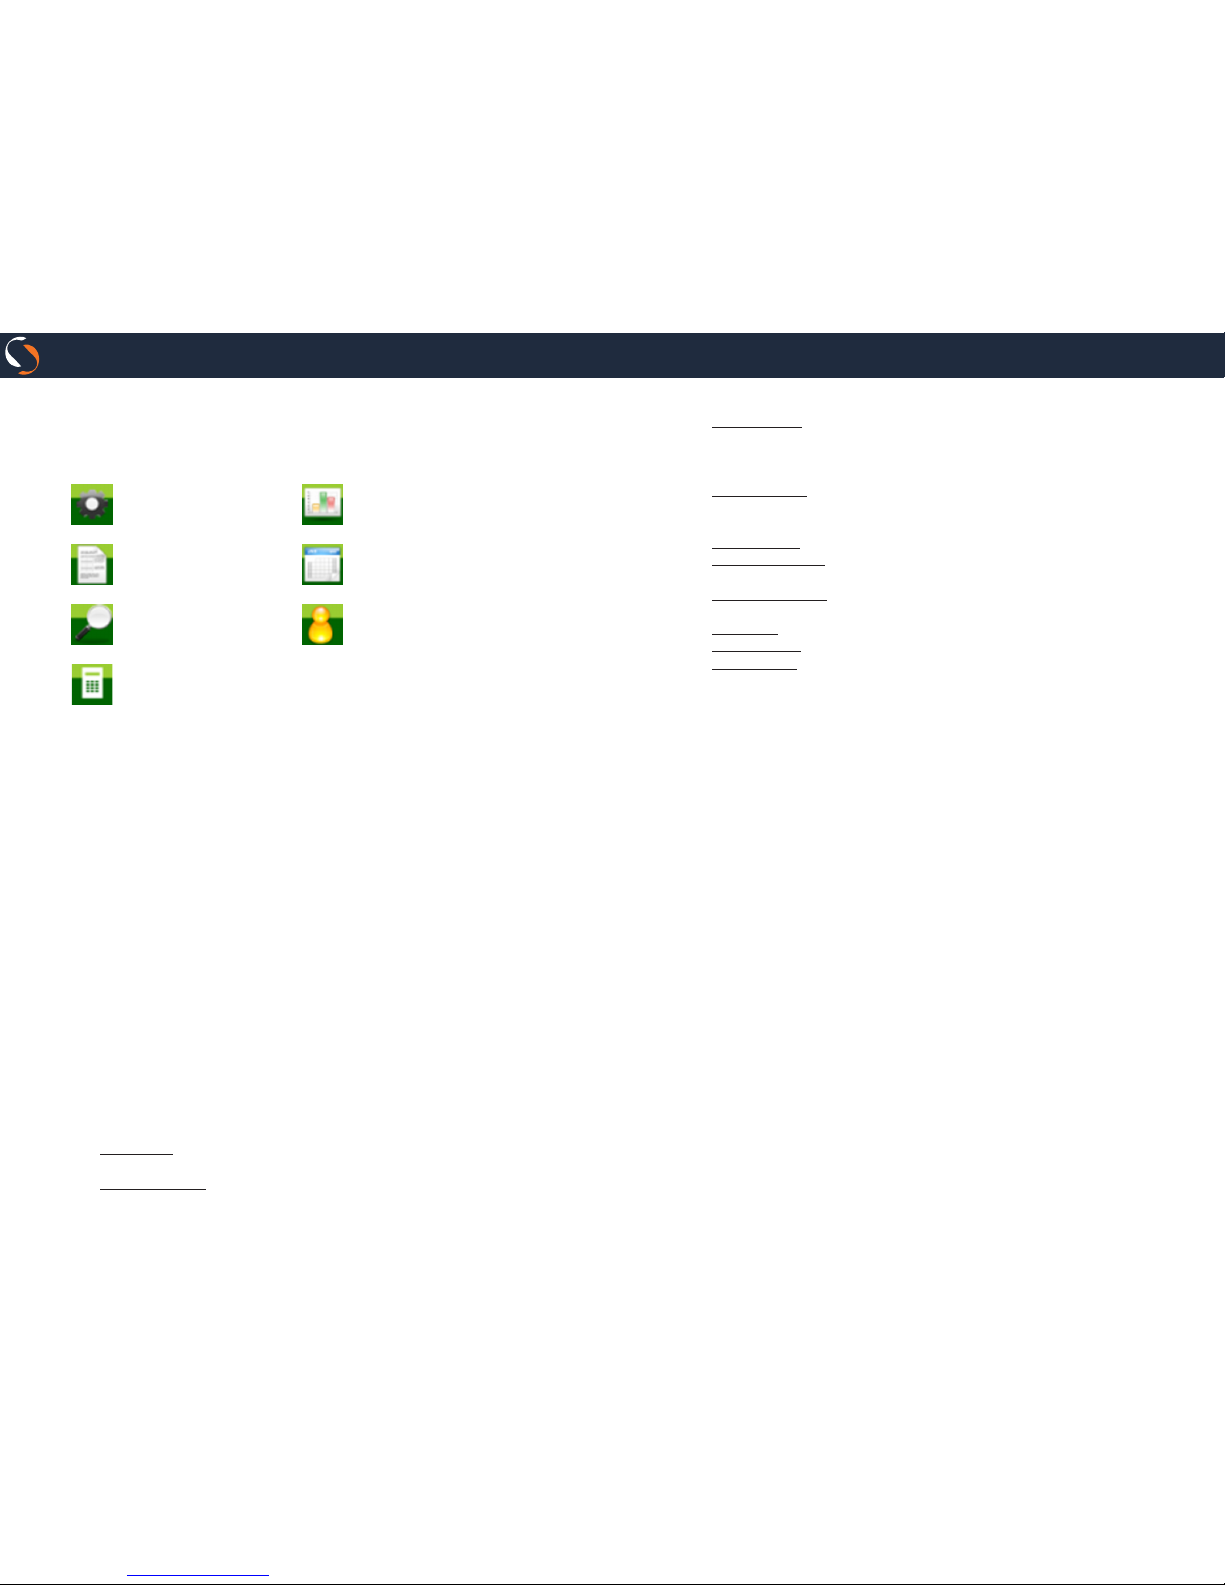
A) Actions Area:
This area shows all buttons related to program operations..
Setup.
Access the conguration screen.
Reports.
Show program reports.
Documents.
Access orders and
invoices.
Daily Cash.
Access to daily cash and
cash movements.
Search.
Seach items and
tickets.
Customers.
To assign customers to
tickets.
Tariffs.
Changes ticket tariff.
B) Families & Items Area:
Press over Familie button for select.
Press over Item to insert on receipt.
Press over and hold for over 1 second on item to show a special actions menu.
C) On screen ticket Area:
At the top is the head of the ticket with every ticket summary
information.
Below appears all the ticket lines. Green shading shows the
last item entered and displayed blue shading the articles that
have been renamed.
If you click on the header of the ticket on the user’s icon, you
can change the current user. If you click on any other part of
the ticket header may change the number of covers.
If you click on one of the product lines you will see a menu
with the following options:
• Delete line. This option allows you to delete the ticket line. Avai-
lable if the user has permission to delete lines.
• Delete discount. This option allows you to delete a discount
applied to a ticket line. Available if the user has permission to
apply discounts to the ticket lines.
• Change Price. This option lets you change the price of the item
on the ticket if the item is dened as free money or free price
provided by the user and the user has permission to change
prices for items.
• Change Name. This option allows you to edit the item name on
the ticket. Available if the user has permission to change the
name of the item.
• Delete Name. This option allows you to delete the name change.
• Apply Invitation. This option lets you apply a 100% invitation to
the line of ticket.
• Delete Invitation. This option allows you to delete the invitation
of the ticket line.
• Modiers Allows to set modiers in the ticket line.
• Supplements Allows to set supplements in the ticket line.
• Modify Pack. If the item is a Pack, this option let you modify the
pack.
• Increase or Decreate 1 unit.
D) On screen keyboard Area
Just below the ticket appears on screen keyboard.
• If you enter a number and press enter, the program will search
the number in the bar code and if found will introduce. If not
located, look for an item that matches the code number entered
and if he will introduce located. If the two mechanisms fail,
indicating that the article does not exist and ask the user if they
want to create.
• If you enter a number, the asterisk symbol and another number,
considers the number on the left of asterisk as quantity and
number to the right of the asterisk as a search code and apply
the previous item.
• If you enter a number and click on a product button, interpret
the number as amount.
• If you enter a number and click on a ticket line, replace the
amount of the ticket line for the number entered.
• If you enter a number and the percentage symbol and click on
the ticket line, apply the number as percentage discount.
• If you enter a table number, and click on the parked tickets area,
the ticket will be recovered or new one is created if the table
does not have assigned ticket.
Page 9
Page 17Page 16
SIOGES
one pro
/
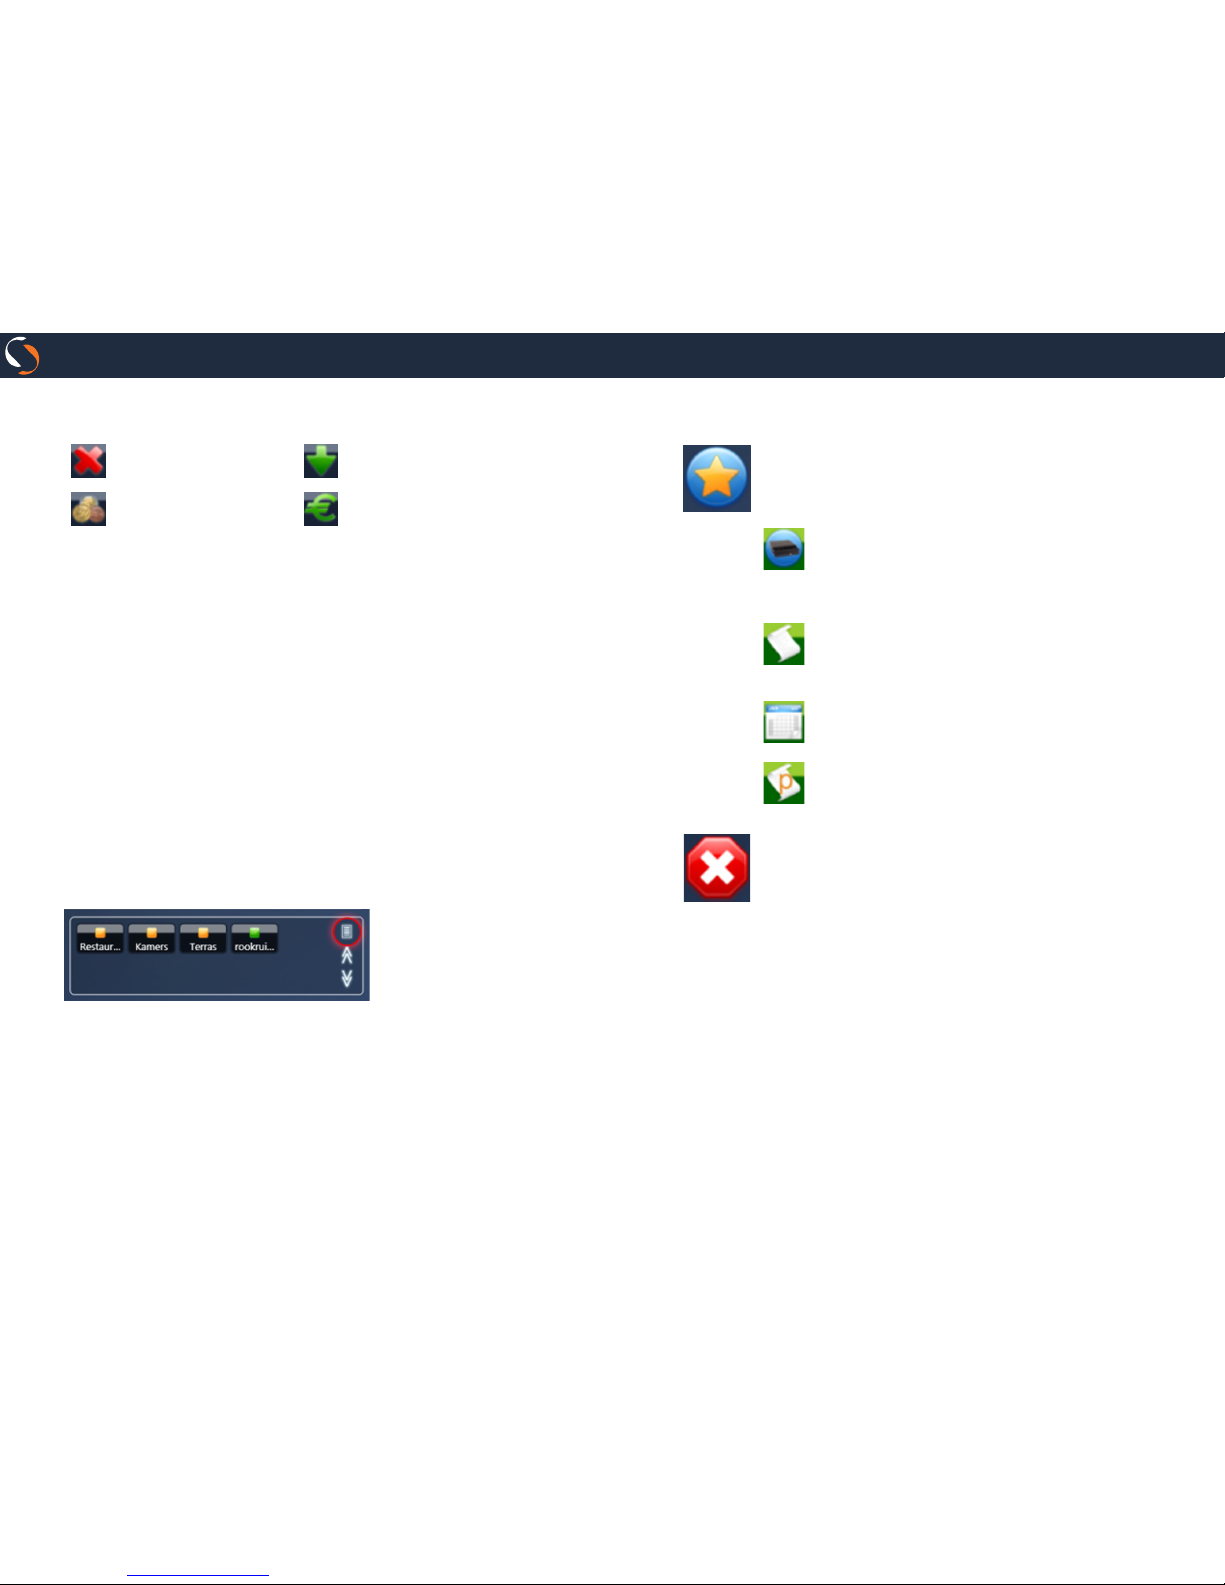
Other Options:
Press to delete ticket. Press to hold ticket.
Press to fast tender (*). Press to charge ticket.
(*) If you have a value entered on the keyboard, is used as the amount
paid, if not imply that the customer pays the exact amount. The
program will print the ticket (if the payment option is enabled on the
print button) and open the drawer displaying a message on screen if
there is change.
F) Parked tickets Area
If you have not congured the program to work with areas of
consumption and consumption tables, you will see a keypad
with numbers of parked tickets:
Click on one of them to recover.
If you have congured the program to work with areas of consumption and consumption tables, you will see a keypad with
the identied areas and color. If color is green, the area has no
tickets parked. If orange, the area has parked tickets.
If you press the red remarked button, you can access quick
ticket list screen.
G) Other Actions
Click the Actions button if you want to access special
actions.
This button will display a menu screen allowing you to
perform the following operations:
Press the cash drawer button if you want to open
the cash drawer. Can only open the drawer users who
have permission to open drawer.
Press Reprint the last ticket if you want to print
the last ticket charged.
Press todo enter quick cash movement.
Press to print a ticket proforma.
Press the Exit button if you want to close the sale screen
and return to the login screen. From the login screen,
you can close the program.
Page 10
Page 19Page 18
SIOGES
one pro
/
Tender Operation
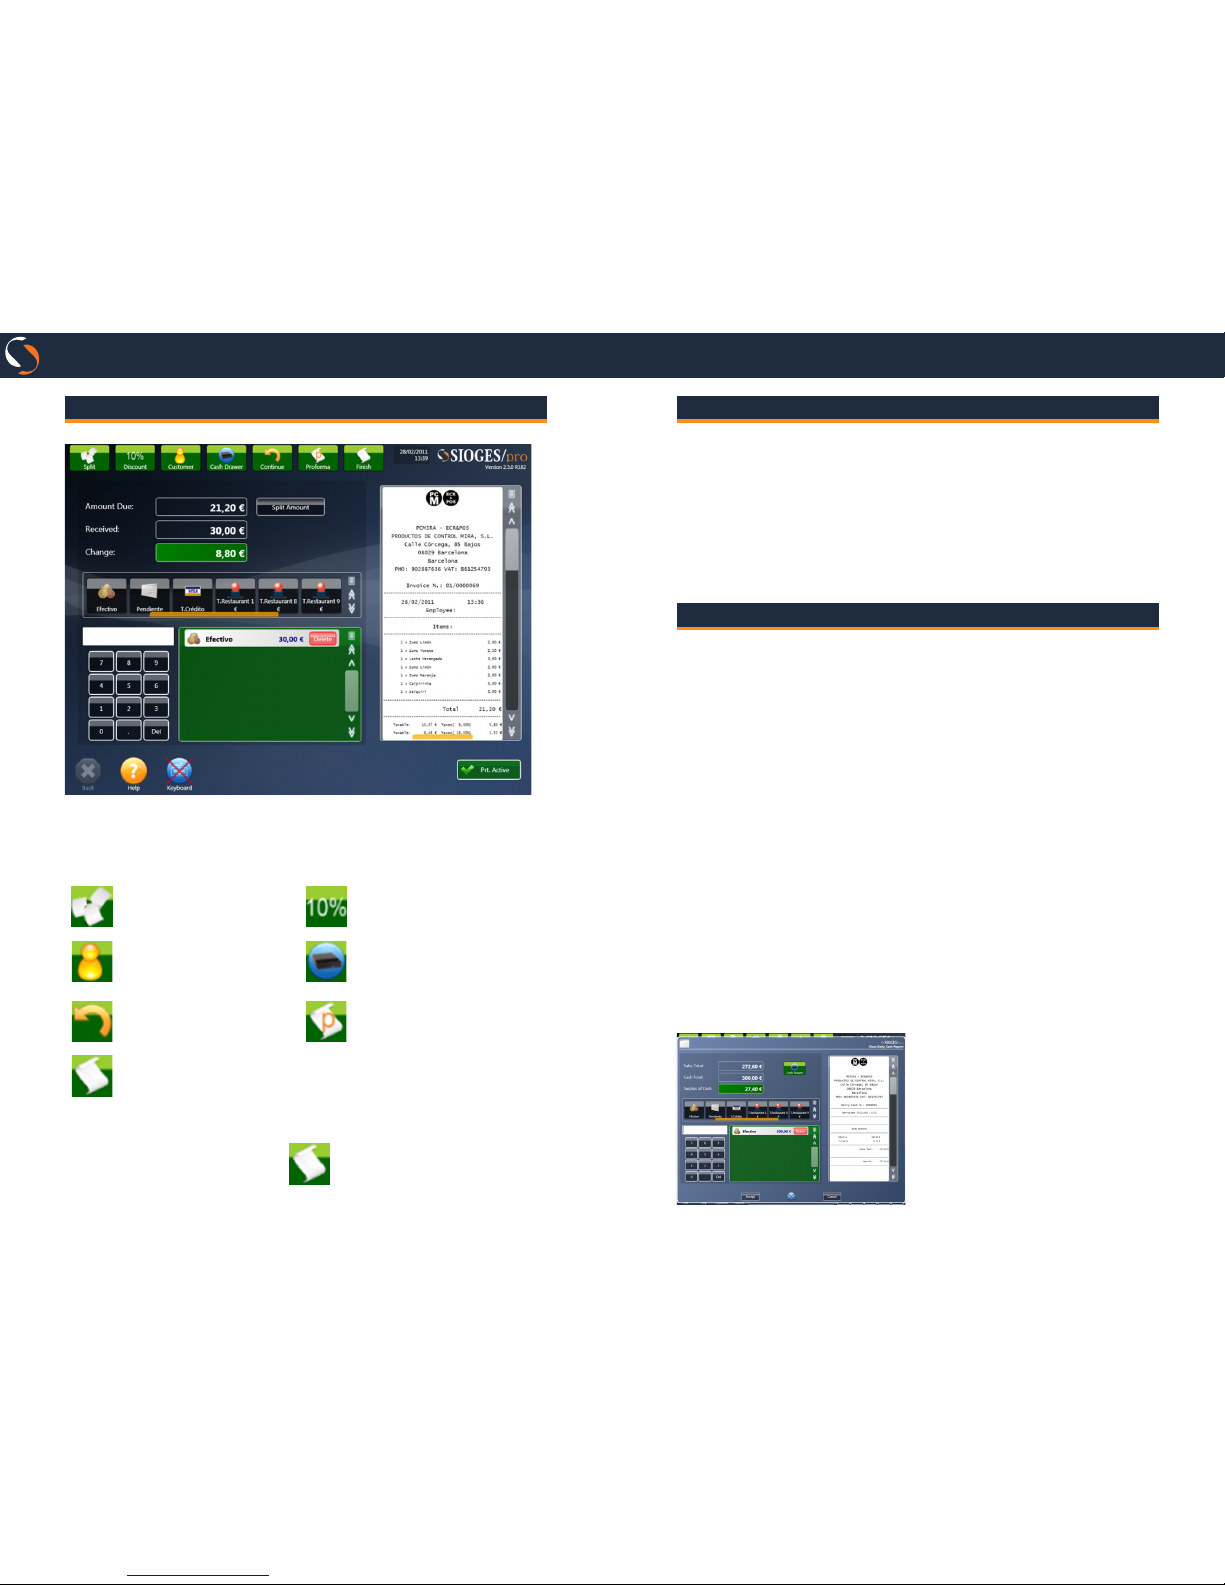
From the tender screen you can perform the following operations:
Press this button to
split the ticket.
Press this button to apply
a ticket discount.
Press this button to
assign a customer to
the ticket.
Press this button to open
Cash Drawer.
Press this button to
return to sales screen.
Press this button to print
a ticket proforma.
Press this button to
cash, print and close
ticket.
Enter the amount on the numeric keypad and click on a pay-
ment to insert the line. Press to nish tender.
Search
By accessing the search screen from the sale screen, you can
locate an item by entering the code, bar code or part of the
name, can check the current stock price and sales. Once you
have located the item, you can insert the ticket by pressing the
OK button.
You can also nd tickets earlier so that they can display on
screen, and even pay reprint.
Daily Cash
The Daily Cash button wil display the Daily Cash screen. On
this screen you can:
• Reviewing previous daily cash reports
• Enter charges and payments from current cash
• Print previous daily cash reports
• Close Daily Cash Report (cash count)
When you enter the screen, you will see a list of the Daily Cash
reports for the selected date range.
You can only edit (enter receipts and payments) and Close the
open Daily Cash Report (the current Daily Cash report).
Pressing the Edit button, you will see a screen with a list of receipts and payments entered. Press the right buttons to insert
new moves, modify or delete existing movements.
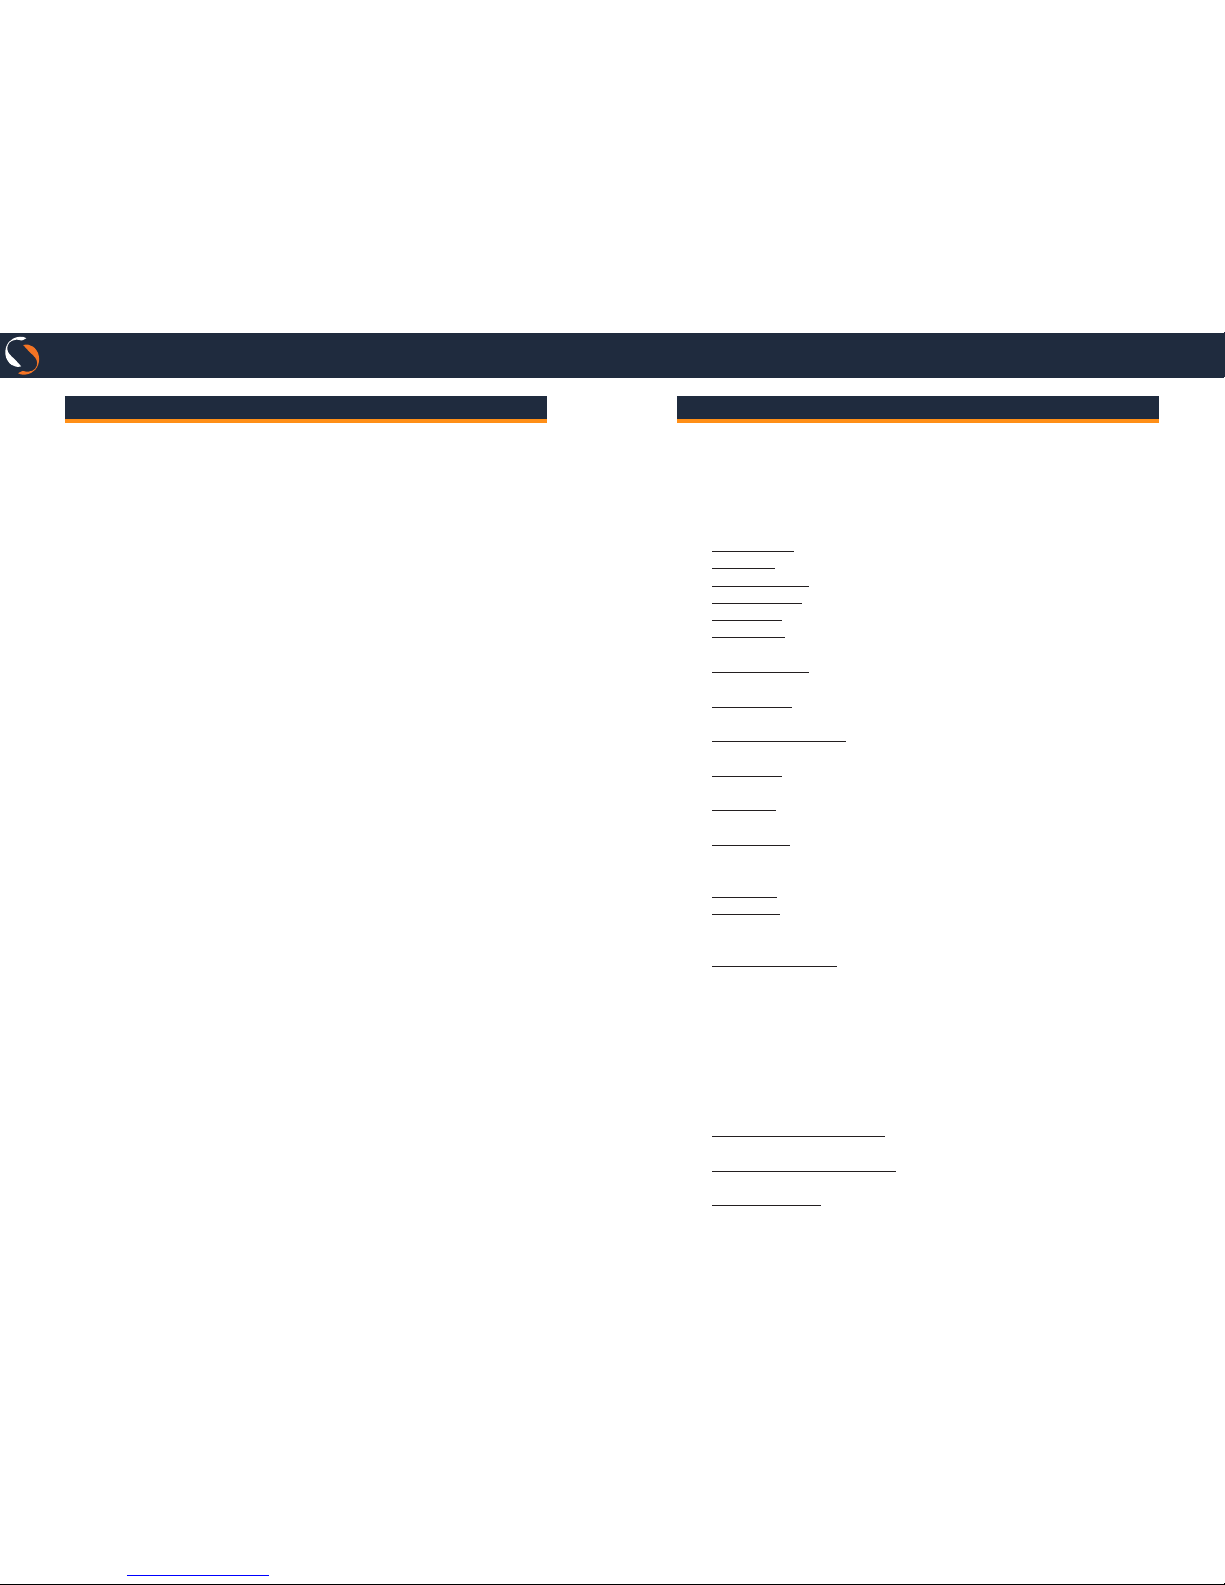
Pressing the Close button, access the Close Daily Cash Report
screen, (similar to the tender screen)
Enter the amounts and payment methods. Once completed, press the OK button and
will have completed the cash
count.
Page 11
Page 21Page 20
SIOGES
one pro
/
Documents
From this screen you are able to:
• Create and edit purchase order proposals
• Create and edit purchase orders
• Create and edit purchase invoices
• Stock inventories
• Print current stock
• Print stock movements
A) Order proposals, orders & invoices
The difference between order proposals and orders is that the
proposal does not take into account the dealer from whom
purchased.
Create order proposals and convert to orders (order will be
created for each provider).
Once you get your merchandise, you can convert a purchase
order on an purchase invoice to avoid having to enter it again.
B) Stock inventories
You can inventory your goods and then enter on the program.
The mechanism of introduction of an inventory is identical to
the introduction of orders and invoices.
C) Print current stock
This option will display the current stock of all products.
You can print, export to PDF and Export to EXCEL listing.
D) Print stock movements
This option will display the movements of stocks made in the
program (inputs and outputs) for the selected date range.
You can print, export to PDF and Excel export to the list.
Reports
SIOGES/one & SIOGES/pro, feature lists and statistics to mana-
ge your business eciently.
A) SIOGES/one Reports
• Families list. List of Families.
• Items list. List of Items.
• Customers list. Listst of customers.
• Suppliers list. List of Suppliers.
• Tariffs list. Listing of buying and selling rates.
• Tickets list. Summary of tickets for a period of time dened by
the user.
• Monthly Sales. Summary of sales grouped by month for a period
of time dened by the user.
• Items Dales. Summary of sales grouped by items for a period of
time dened by the user.
• Tender Media Sales. Summary of sales grouped by means of
payment for a period of time dened by the user.
• User Sales. Summary of sales grouped by user fee for a period of
time dened by the user.
• Tax Sales. Summary grouped by sales tax for a period of time
dened by the user.
• Fiscal Sales. Summary grouped by sales tax for a period of time
dened by the user with a picture of bases and taxes from total
sales.
• Daily Tax. Daily summary of sales grouped by type of tax.
• Z Repport. Summary of sales, sales of payment per item, per
household and tax for a day selected by the user. It is printed on
the ticket printer.
• Electronic Journal. Showing ticket to ticket for a period of time
dened by the user. Can be printed on the ticket printer or exported to a text le.
B) SIOGES/pro Reports
Addition to the lists and statistics of one version, the Pro version adds the following statistics:
• Yearly Sales Comparison. Shows a graph comparing the sales for
months of a year over previous year.
• Monthly Sales Comparison. Shows a graph comparing sales days
in a month over the previous month.
• Customer Debts. Displays customer debts. Lets get a detailed
Page 12
Page 23Page 22
SIOGES
one pro
/
billing and customer sales.
• Tariffs Comparison. Lets compare two rates for cash and margin
percentage.
• Prot. Displays a summary of benets for a period of time de-
ned by the user.
• Customer’s Sales. Shows the amount of sales per customer for a
period of time dened by the user.
• Recepipts per Customer. Shows the number of tickets per custo-
mer for a period of time dened by the user.
• Media Receipt. Shows the average ticket amount for a period of
time dened by the user.
• Invitations. Displays the units and the amount of invitations for
a period of time dened by the user.
• Hourly Sales. Shows sales per hour for a period of time dened
by the user.
• Classications Sales. Sample sales for a period of time dened by
the user grouping amounts by classifying items.
• Pending Coupons. A breakdown of the vouchers that are waiting
to be used.
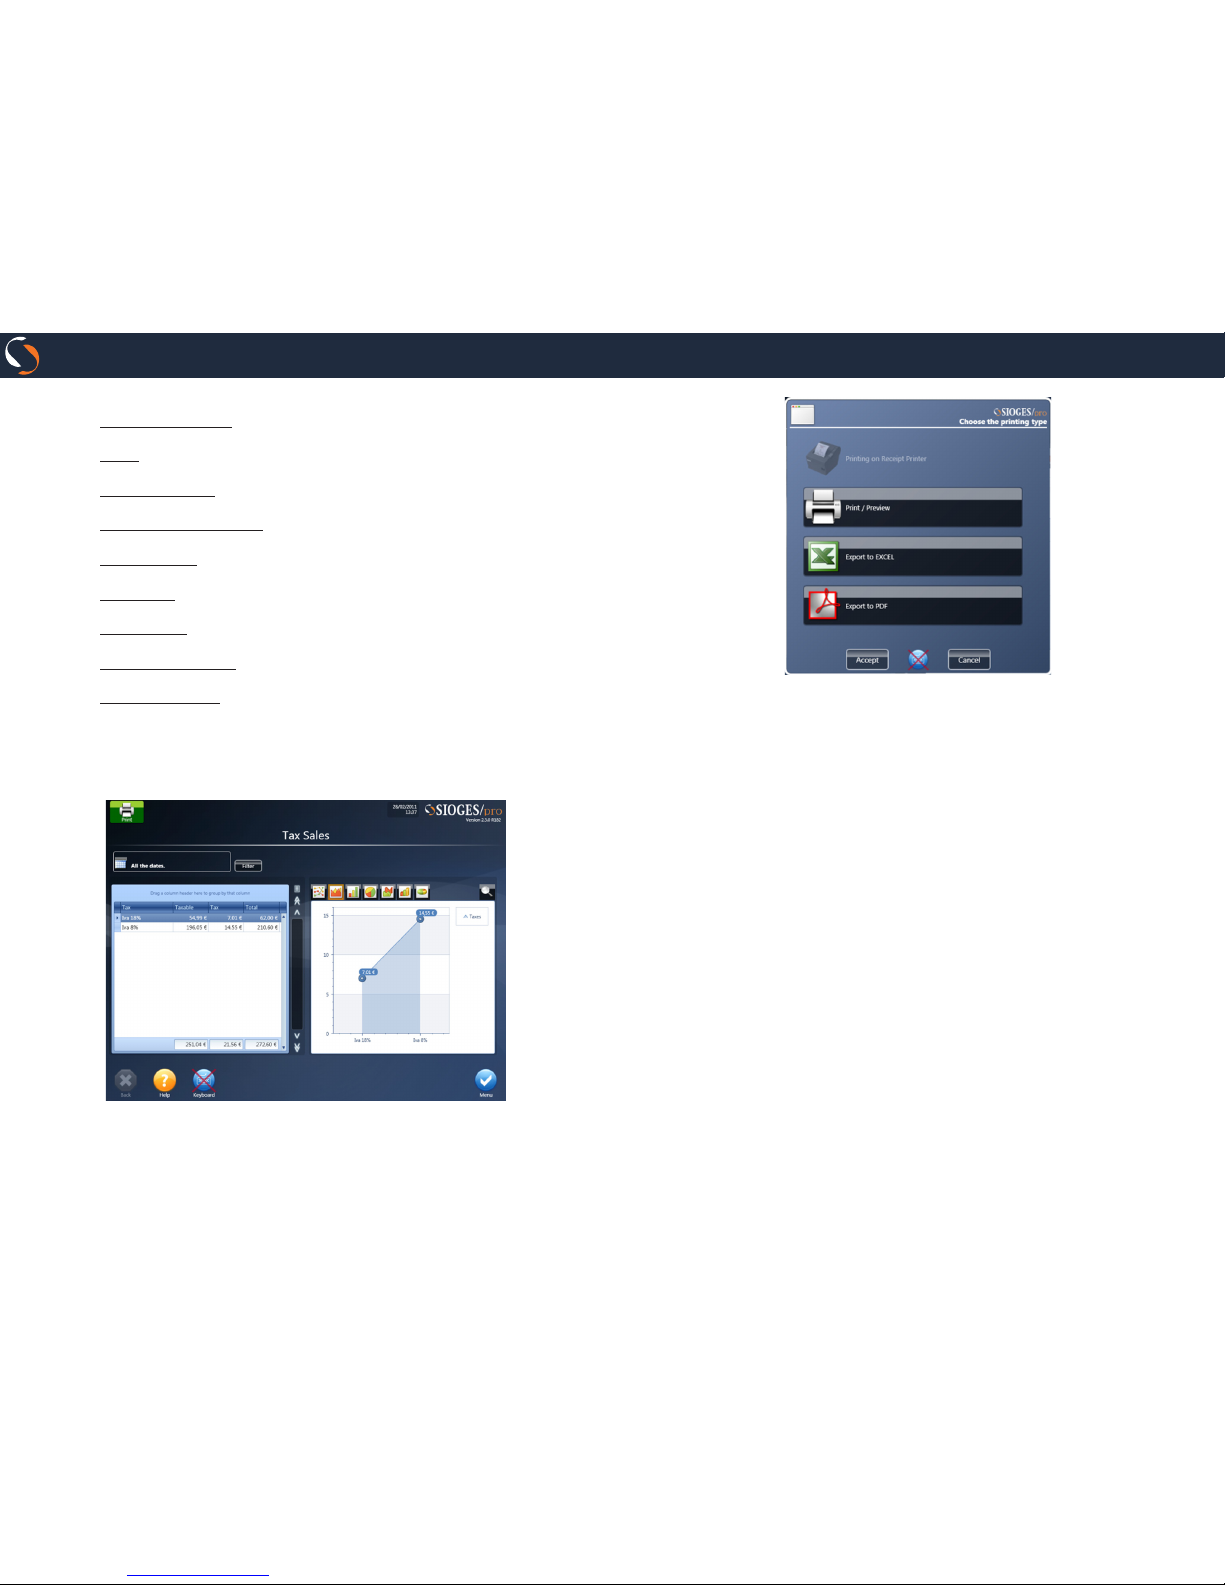
Some of the report show the results in grid format data and
other reports include a graphical display of data:
All reports can be printed by selecting the Print option.
In the PRO version, you can also export to PDF and EXCEL
format.
Page 13
Page 25Page 24
SIOGES
one pro
/
Information backup
It is very important to perform daily backups of data from the
program.
For backup process you can access the conguration screen,
choice of utilities, or to exit the program.
Selecting “Make Backup”, the program will display a window
where you can select the directory to save it. Whenever possible, store your backups on a USB key.
In order to recover a backup, access the setup screen, select
option prots and Restore Backup.
The program will display a window where you can select the
backup to restore. The restore process automatically restarts
the program.
Exit application
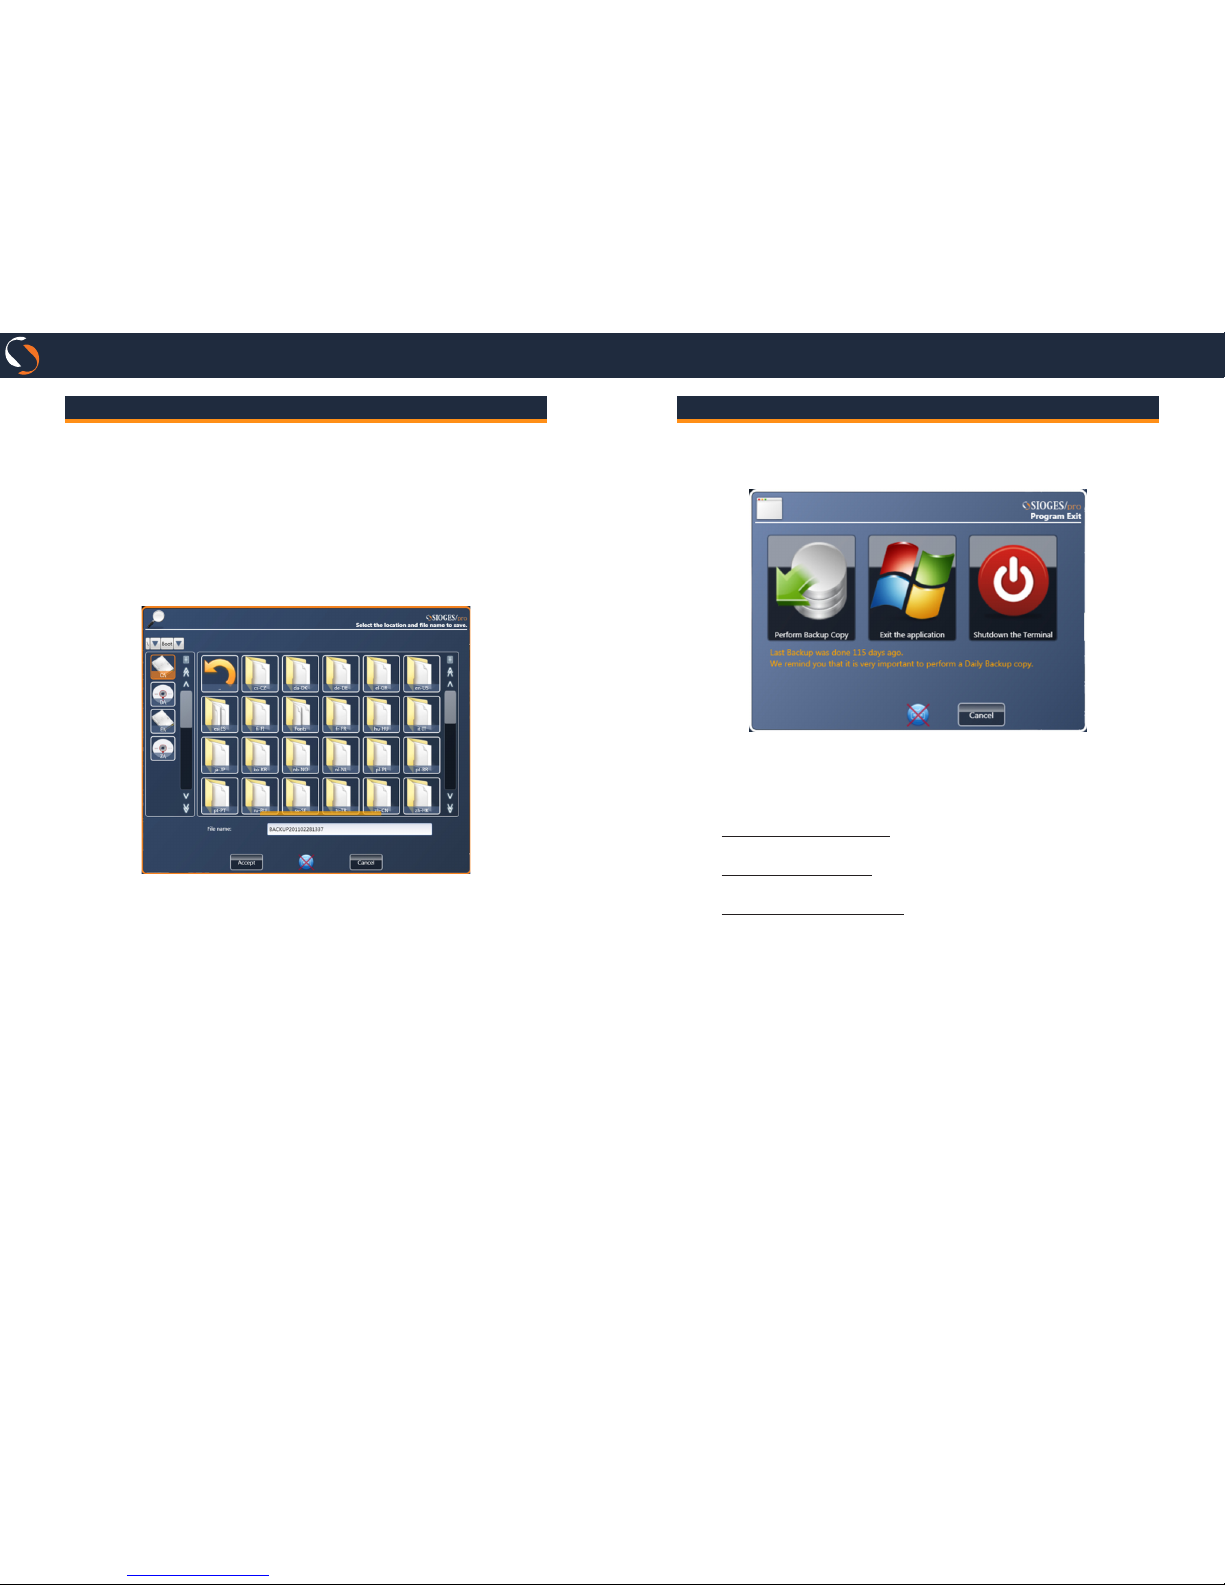
When you exit the program displays the following window:
This window tells you the date when you performed the last
backup.
Press Perform Backup Copy whether to make a backup before
exiting the program.
Press Exit the application if you want to close the program
and exit to Windows.
Press Shutdown the Terminal if you want to close the program
and shutdown your computer.
Page 14

For more information on the different features
offered by SIOGES/one and SIOGES/pro you
can go to web page:
www.sioges.com
You can also check the online version of the
full user manual by visiting the Web page:
www.sioges.com/manual24en
 Loading...