

Page 1
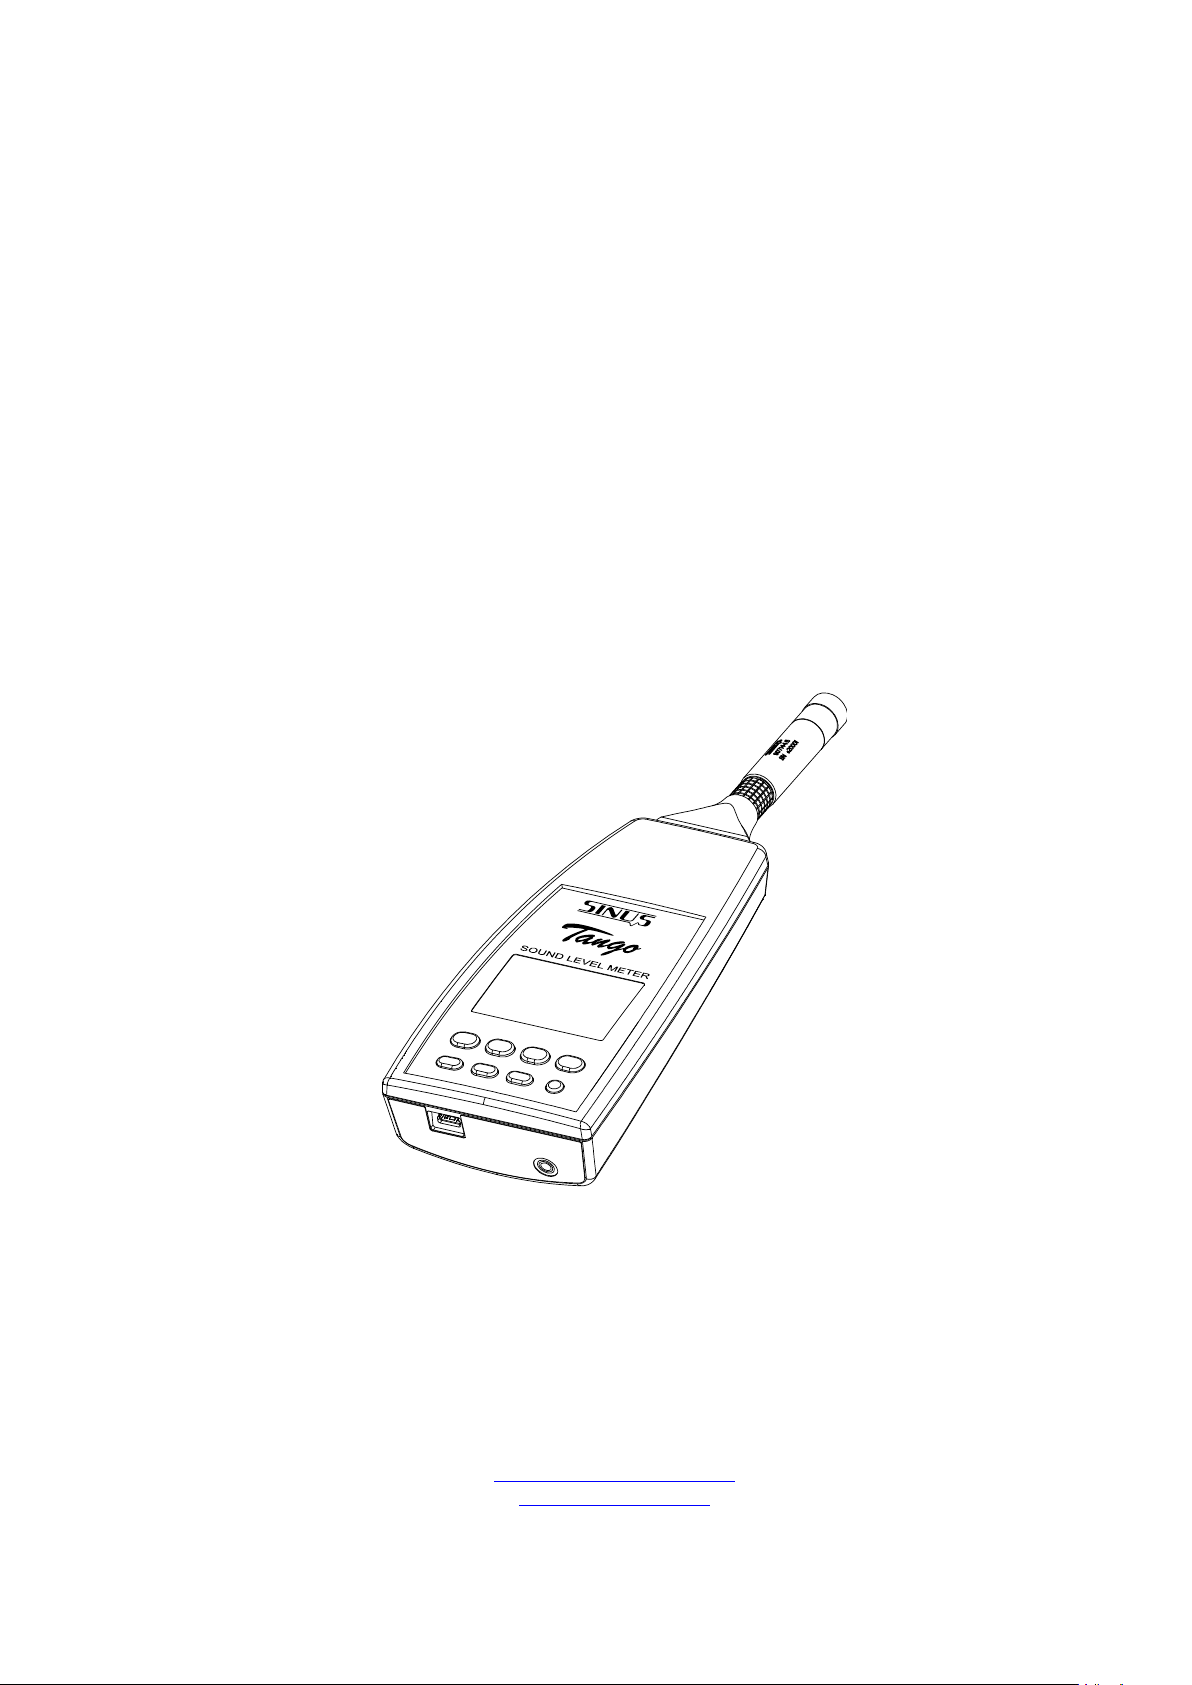
Tango
Sound Level Meter class 1 according DIN EN 61672-1:2003
Version 1.44
June 21, 2016
c
SINUS Messtechnik GmbH
Foepplstrasse 13, 04347 Leipzig, Germany
http://www.soundbook.de
info@soundbook.de
Page 2

c
SINUS Messtechnik GmbH
All rights reserved. No part of this manual may be reproduced, stored in a retrieval system or transmitted,
in any form or by any means, electronic, mechanical, photocopying, recording or otherwise, without the prior
written permission of SINUS Messtechnik GmbH. We reserve the right to alter the contents of this manual
without prior notice. SINUS Messtechnik GmbH accepts no responsibility for technical or typographical
errors or deficiencies in this manual. Furthermore, SINUS Messtechnik GmbH disclaims all liability for
damage occurring directly or indirectly as a result of the delivery, performance or usage of this material.
All products or services mentioned in this document are the trademarks or service marks of their respective
companies or organizations.
Manual Tango 2 of 34 SINUS Messtechnik GmbH
Page 3

CONTENTS
Contents
1 General information and design 6
1.1 Important notes . . . . . . . . . . . . . . . . . . . . . . . . . . . . . . . . . . . . . . . . 6
1.2 Power supply . . . . . . . . . . . . . . . . . . . . . . . . . . . . . . . . . . . . . . . . . 7
1.2.1 Replace batteries . . . . . . . . . . . . . . . . . . . . . . . . . . . . . . . . . . . 7
1.3 Design . . . . . . . . . . . . . . . . . . . . . . . . . . . . . . . . . . . . . . . . . . . . . 8
1.3.1 Keypad . . . . . . . . . . . . . . . . . . . . . . . . . . . . . . . . . . . . . . . . 9
1.3.2 Display . . . . . . . . . . . . . . . . . . . . . . . . . . . . . . . . . . . . . . . . 9
1.4 Software installation . . . . . . . . . . . . . . . . . . . . . . . . . . . . . . . . . . . . . . 10
1.4.1 Tango driver installation . . . . . . . . . . . . . . . . . . . . . . . . . . . . . . . . 10
1.4.2 Tango-Utilities installation . . . . . . . . . . . . . . . . . . . . . . . . . . . . . . 10
1.5 Calculated values . . . . . . . . . . . . . . . . . . . . . . . . . . . . . . . . . . . . . . . 11
2 Appliance 12
2.1 General information . . . . . . . . . . . . . . . . . . . . . . . . . . . . . . . . . . . . . . 12
2.2 First use . . . . . . . . . . . . . . . . . . . . . . . . . . . . . . . . . . . . . . . . . . . . 12
2.3 Device configuration . . . . . . . . . . . . . . . . . . . . . . . . . . . . . . . . . . . . . . 12
2.3.1 Configuration using Tango-Utilities . . . . . . . . . . . . . . . . . . . . . . . . . 12
2.3.2 Manual configuration . . . . . . . . . . . . . . . . . . . . . . . . . . . . . . . . . 14
2.4 Tango-Utilities . . . . . . . . . . . . . . . . . . . . . . . . . . . . . . . . . . . . . . . . 15
2.4.1 Setup-Tab . . . . . . . . . . . . . . . . . . . . . . . . . . . . . . . . . . . . . . . 15
2.4.2 Display-Tab . . . . . . . . . . . . . . . . . . . . . . . . . . . . . . . . . . . . . . 16
2.4.3 Data-Tab . . . . . . . . . . . . . . . . . . . . . . . . . . . . . . . . . . . . . . . 17
2.4.4 Data export . . . . . . . . . . . . . . . . . . . . . . . . . . . . . . . . . . . . . . 17
2.5 Measure . . . . . . . . . . . . . . . . . . . . . . . . . . . . . . . . . . . . . . . . . . . . 18
2.5.1 Measure low sound levels . . . . . . . . . . . . . . . . . . . . . . . . . . . . . . 19
2.5.2 Overload and Underrange . . . . . . . . . . . . . . . . . . . . . . . . . . . . . . 19
2.6 Calibrate . . . . . . . . . . . . . . . . . . . . . . . . . . . . . . . . . . . . . . . . . . . . 19
2.6.1 Calibrate using Tango-Utilities . . . . . . . . . . . . . . . . . . . . . . . . . . . . 19
2.6.2 Calibrate Tango directly . . . . . . . . . . . . . . . . . . . . . . . . . . . . . . . . 19
3 Testing information 21
3.1 Acoustic test . . . . . . . . . . . . . . . . . . . . . . . . . . . . . . . . . . . . . . . . . . 21
3.1.1 Microphone alignment for measuring the influence of mechanical vibra-
tions according to DIN EN 61672-1:2003. . . . . . . . . . . . . . . . . . . . . . . 21
3.2 Electrical test . . . . . . . . . . . . . . . . . . . . . . . . . . . . . . . . . . . . . . . . . 21
3.2.1 EMC test . . . . . . . . . . . . . . . . . . . . . . . . . . . . . . . . . . . . . . . 21
3.2.2 Level linearity . . . . . . . . . . . . . . . . . . . . . . . . . . . . . . . . . . . . . 21
4 Technical specifications 22
4.1 Level linearity range . . . . . . . . . . . . . . . . . . . . . . . . . . . . . . . . . . . . . . 23
4.2 Linear operating ranges . . . . . . . . . . . . . . . . . . . . . . . . . . . . . . . . . . . . 23
4.3 Self-generated noise . . . . . . . . . . . . . . . . . . . . . . . . . . . . . . . . . . . . . 23
4.4 Details on EMC . . . . . . . . . . . . . . . . . . . . . . . . . . . . . . . . . . . . . . . . 23
4.5 Frequency weighting . . . . . . . . . . . . . . . . . . . . . . . . . . . . . . . . . . . . . 24
4.6 Microphone . . . . . . . . . . . . . . . . . . . . . . . . . . . . . . . . . . . . . . . . . . 25
4.6.1 Random incidence and free-field correction . . . . . . . . . . . . . . . . . . . . . 25
4.6.2 Directional characteristics . . . . . . . . . . . . . . . . . . . . . . . . . . . . . . . 26
4.6.3 Frequency response of the microphone . . . . . . . . . . . . . . . . . . . . . . . 27
4.7 Effect of environmental conditions . . . . . . . . . . . . . . . . . . . . . . . . . . . . . . . 27
SINUS Messtechnik GmbH 3 of 34 Manual Tango
Page 4

CONTENTS
4.7.1 Mains frequency and high-frequency fields . . . . . . . . . . . . . . . . . . . . . . 28
4.7.2 Effect of mechanical vibration . . . . . . . . . . . . . . . . . . . . . . . . . . . . . 28
4.8 Connection assembly of the detachable microphone . . . . . . . . . . . . . . . . . . . . . 29
5 Accessories 30
5.1 Technical specifications of the calibrators . . . . . . . . . . . . . . . . . . . . . . . . . . . 30
5.2 Tango Outdoor kit . . . . . . . . . . . . . . . . . . . . . . . . . . . . . . . . . . . . . . . 30
6 Approved functions concerning legally binding measurements 32
7 Declaration of Conformity 33
INDEX 34
ATTENTION! The detachable microphone must be used only with Tango! Otherwise it
may be damaged.
Manual Tango 4 of 34 SINUS Messtechnik GmbH
Page 5
CONTENTS
Preface
Thank you for choosing the product TangoTMby SINUS Messtechnik GmbH. Please read this manual
carefully before using the measuring system. We recommend you to perform several test measurements
to get familiar with the instrument before using it for important measuring tasks. The manual includes the
following signs to indicate important information:
NOTICE! These are information on the efficient use and correct handling of the ana-
lyzer as well as additional information.
CAUTION! These instructions shall avoid any hardware damages or dangers for users.
ATTENTION! These instructions shall avoid any measurement mistakes, hardware dam-
ages etc.
Please feel free to contact us for any questions on the functionality and operation of the instrument. Direct
your questions or catalogue requests as well as requests on spare parts and accessories to the following
address:
Address: SINUS Messtechnik GmbH
Föpplstraße 13
04347 Leipzig, Germany
Telephone: +49-(0)341-24429-33
Fax: +49-(0)341-24429-99
E-mail: info@soundbook.de
Web: http://www.soundbook.de
SINUS Messtechnik GmbH 5 of 34 Manual Tango
Page 6
1 GENERAL INFORMATION AND DESIGN
1 General information and design
TangoTMis an integrating sound level meter designed according to DIN EN 61672-1:2003, accuracy class 1
and group Z. This manual refers to firmware version 1.44.
NOTICE! Tango may perform measurements that require an official verification of the
calibration and that are legally binding.
(type approval number: 21.21/12.04)
ATTENTION! If Tango is used for legally binding measurements, only original accessories
shall be used.
For performing legally binding measurements with Tango only the following accessories are admitted according to the type approval :
• Tango (907000.1)
• Calibrator Cal200 1/2” type1 PCB (800934.4)
• Calibrator Type 4231 B&K (800043.2)
• Windscreen W2 (800253.0)
Using Tango the following sound level values may be measured: LAF, L
L
, L
Aeq
Atm
, L
Atm-LAeq
, LAE, L
Cpeak>n
und L
. A detailed description of these values is given in table 1.2.
AFn
NOTICE! The number of the firmware version can be displayed (section 2.3.2).
AFmax
, L
AFmin
, LAS, L
ASmax
, L
ASmin
1.1 Important notes
When measuring with the device, please consider the following notes:
• Use the device as described in this manual only.
• Despite of its robust design, protect the device from any unnecessary bumps and vibrations as well
as humidity and dirt.
• Do not touch or moisten the sensitive microphone membrane during work.
• Pay attention to the permissible temperatures for using the device.
• Always switch off the device after using.
, L
Cpeak
,
• Do not expose the device to excess temperature as for example in a car with direct sunlight.
• If necessary, clean the device carefully without using solvents.
• Do not disassemble the device. Do not try to repair the device in case of malfuntion. Such manipulation
will always cause the loss of warranty and major damages. Make a note of the occuring errors and
send us the device for repair.
Manual Tango 6 of 34 SINUS Messtechnik GmbH
Page 7
1.2 Power supply
1.2 Power supply
The device is powered by two batteries of the type LR6A (nominal voltage 1.2 . . . 1.5 V, primary cell or
rechargeable). Via the according USB cable Tango can be powered by an external source. Therefor the
cable has to be connected to a PC or to the public power supply via the provided adapter. The USB access
is totally separated from the internal batteries, so that the batteries are not affected, but accumulators are
not recharged, too. For legally binding measurements Tango has to be powered by battery, disconnected
from the public power supply.
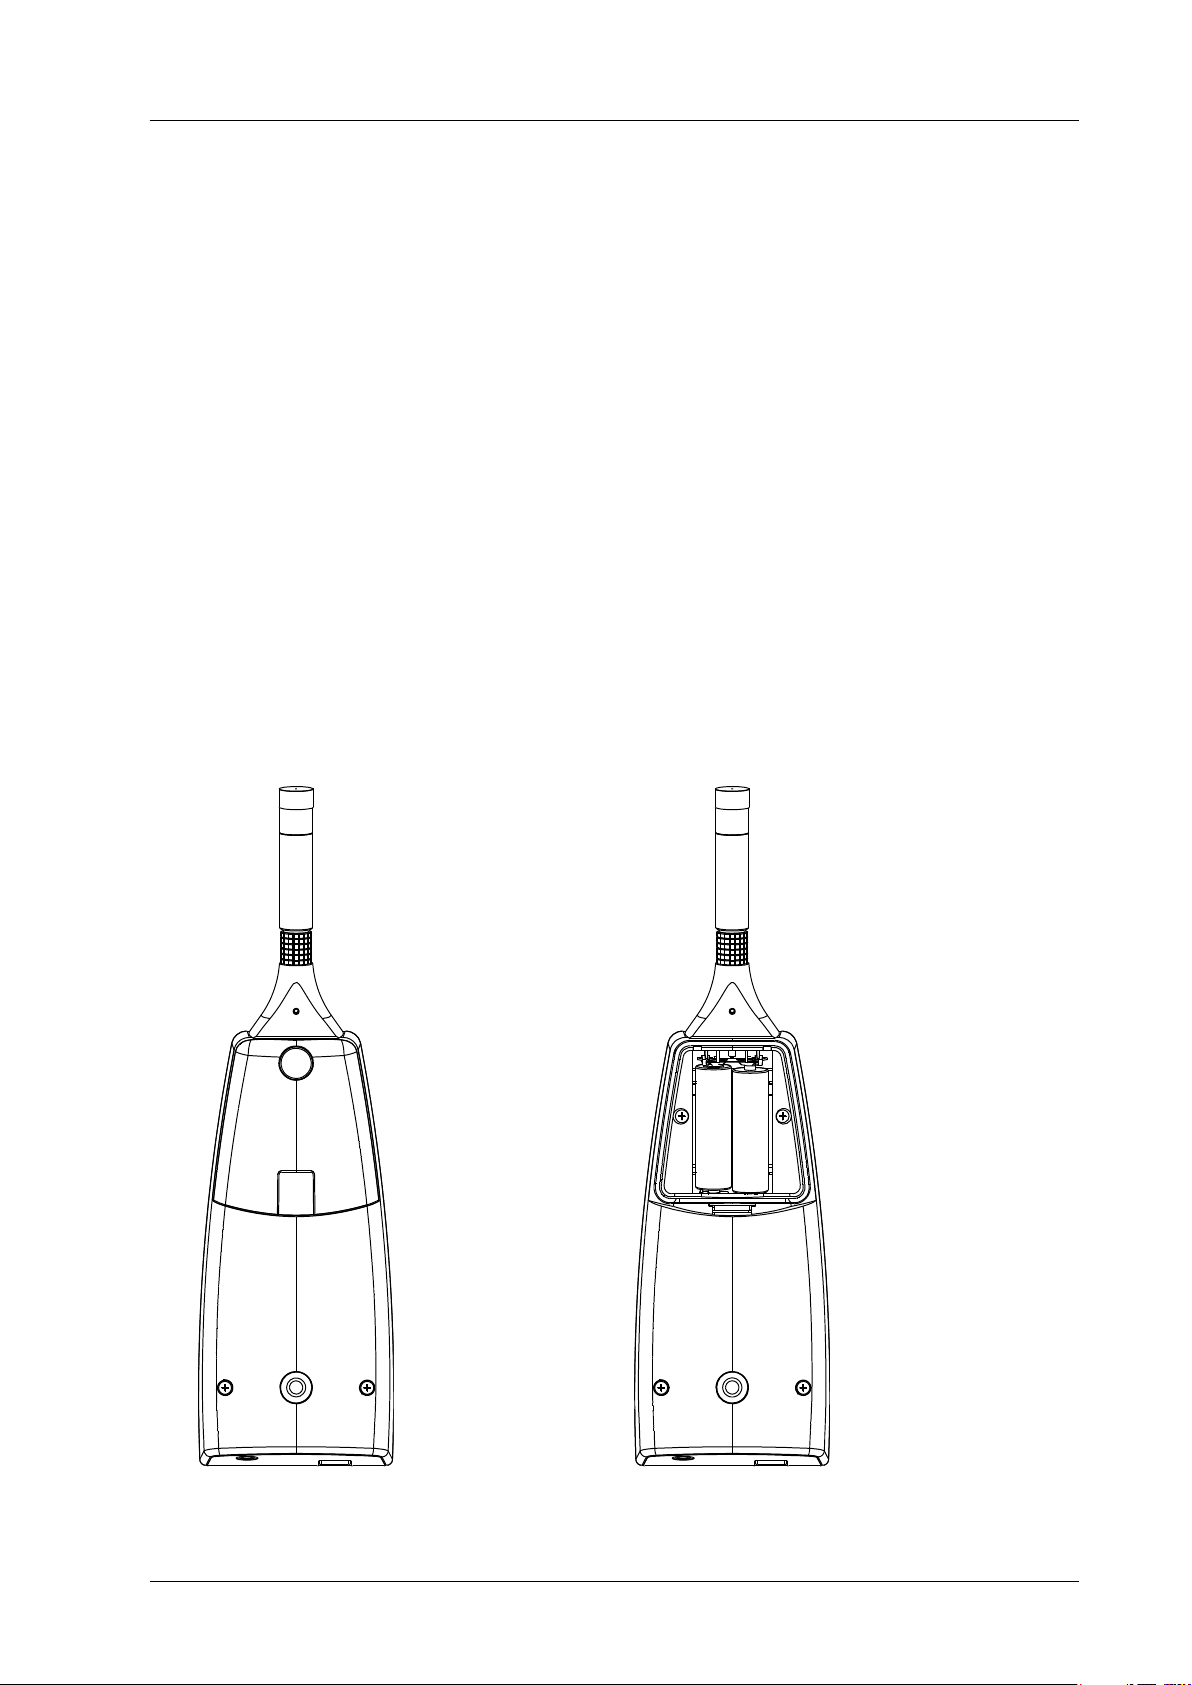
1.2.1 Replace batteries
The battery compartment is located on the back at the bottom of the device (figure 1.1 bzw. 1.2). Follow the
instructions below to replace the batteries:
• Move up the lock of the battery compartment.
• Remove the lid.
• Remove the discharged batteries.
• Insert the new batteries paying attention to the polarity (figure 1.2)
• Switch on the device and check the battery status on the display (figure 1.3.2).
Figure 1.1: Closed battery compartment Figure 1.2: Open battery compartment
SINUS Messtechnik GmbH 7 of 34 Manual Tango
Page 8
NOTICE! The device cannot be switched on without containing charged batteries,
ATTENTION! Changing the batteries causes loss of time and calibration data, if Tango is
1.3 Design
ATTENTION! For legally binding measurements Tango has to be powered only by battery.
1 GENERAL INFORMATION AND DESIGN
i.e. you may not switch on the device connected to a PC via USB without
batteries.
not connected to external power supply at the same time.
The monitoring output is not approved for this.
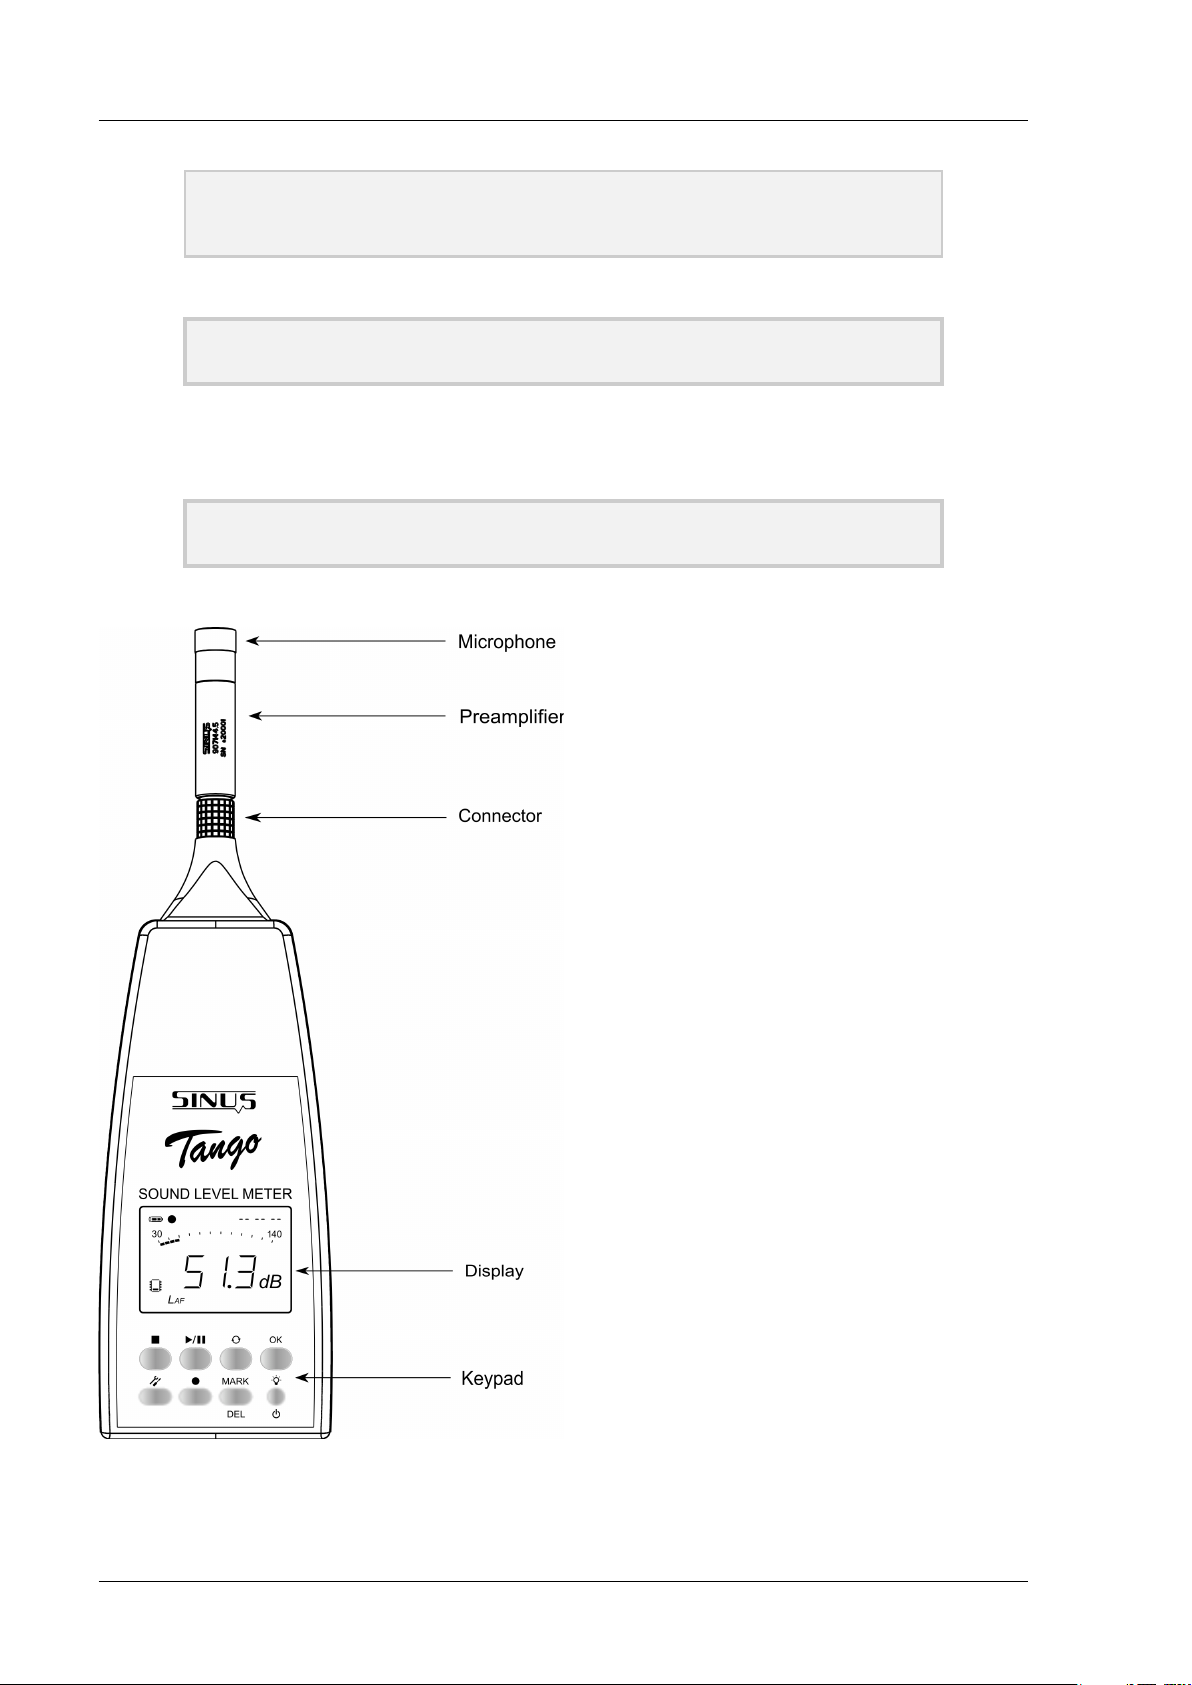
Tango contains the following parts: detachable microphone with preamplifier, casing, display, keypad and battery compartment. Opening the device is only
necessary for replacing the batteries (figure 1.2.1).
At the bottom of the device the USB
socket is located for connecting the device to a PC (type mini five-pole). Next
to it there is a socket for a 3.5 mm
stereo jack. This monitoring output is used
to connect a headset for example, it is
not approved for legally binding measurements.
A detailed description of the display and keypad is given in the paragraphs 1.3.2 and 1.3.1.
Pay also attention to the notes given in paragraph 1.1.
Figure 1.3: Design of the device
Manual Tango 8 of 34 SINUS Messtechnik GmbH
Page 9
1.3 Design
1.3.1 Keypad
If the device is not controlled via PC, you may also use the keypad for setup. Details on operating the device
with the keypad are given in section 2.3.2.
Key Name Description
Stop-Button Stop measurements.
Play/Pause-Button Start/pause/continue measurements. However, data is only saved if the Record-Mode is active.
Scroll-Button Change displayed value according to the boxes marked with * in figure 2.2.
OK-Button
Setup-Button Switch between Display-Mode and Setup-Mode.
Record-Button (De)-Activate the Record-Mode.
Mark-Button
On/Off-Button
Table 1.1: Description of keys/buttons
Confirm settings in the Setup-Mode. This key is only used in this mode, therefore it is not
described in detail.
If pressed during a measurement, a mark is saved for the corresponding time interval. This
mark may be captured by the software and represented in the level vs. time history. If the
device is in Pause-Mode, the last five seconds of the measurement may be deleted by pressing
the Mark-Button (back-erase feature).
Switch on/off device (key press > 3 seconds)
Switch on/off backlight (short key press)
1.3.2 Display
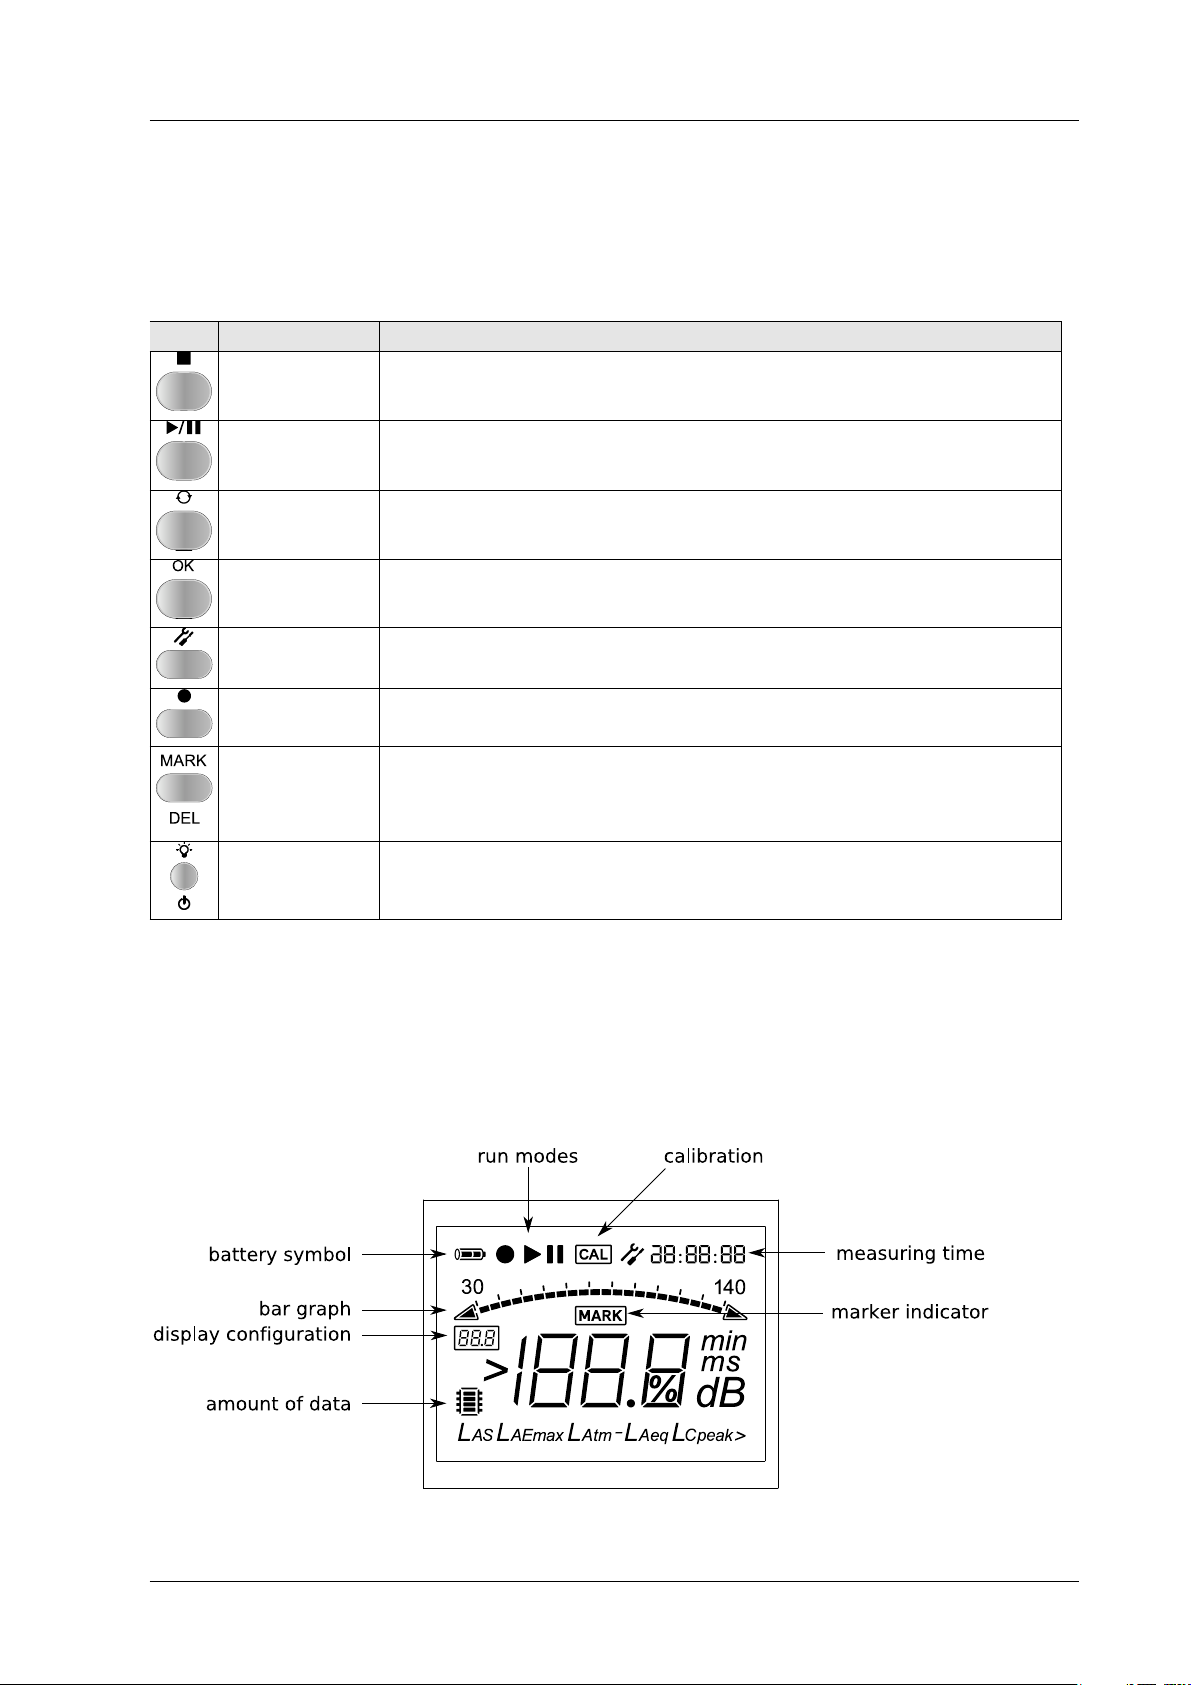
The diplay shows the measured values and is used for setting up the device. It is refreshed every 500 ms.
The individual sections of the display are described in the following paragraphs.
Figure 1.4: Display of the device
SINUS Messtechnik GmbH 9 of 34 Manual Tango
Page 10
1 GENERAL INFORMATION AND DESIGN
Battery symbol
The symbol on the display shows the battery status. The following three stauses may be displayed:
• The battery is fully charged. A legally binding measurement may be performed.
• The battery is charged half. A legally binding measurement may be performed.
• The battery is discharged. A legally binding measurement may not be performed. The device will
automatically turn off if the batteries are not replaced.
1.4 Software installation
First Tango driver must be installed for that Tango is recognized via USB connection. Second Tango-Utilities
should be installed for configuration of Tango settings and export of data.
1.4.1 Tango driver installation
Please follow the instructions below to install the SINUS driver on a PC. You find the file on the enclosed CD
or on the installation CD of the application software. Use the Windows Explorer to start the driver installation
programme. Perform the install setting and confirm always. Depending on the system performance this
procedure may take a few minutes.
1.4.2 Tango-Utilities installation
Installing the software Tango-Utilities resembles the installation procedure of most Windows applications.
Follow the instructions below:
• Run the installation program (Tango_Utilities_Version.exe).
• The first window shows the software version. Click on
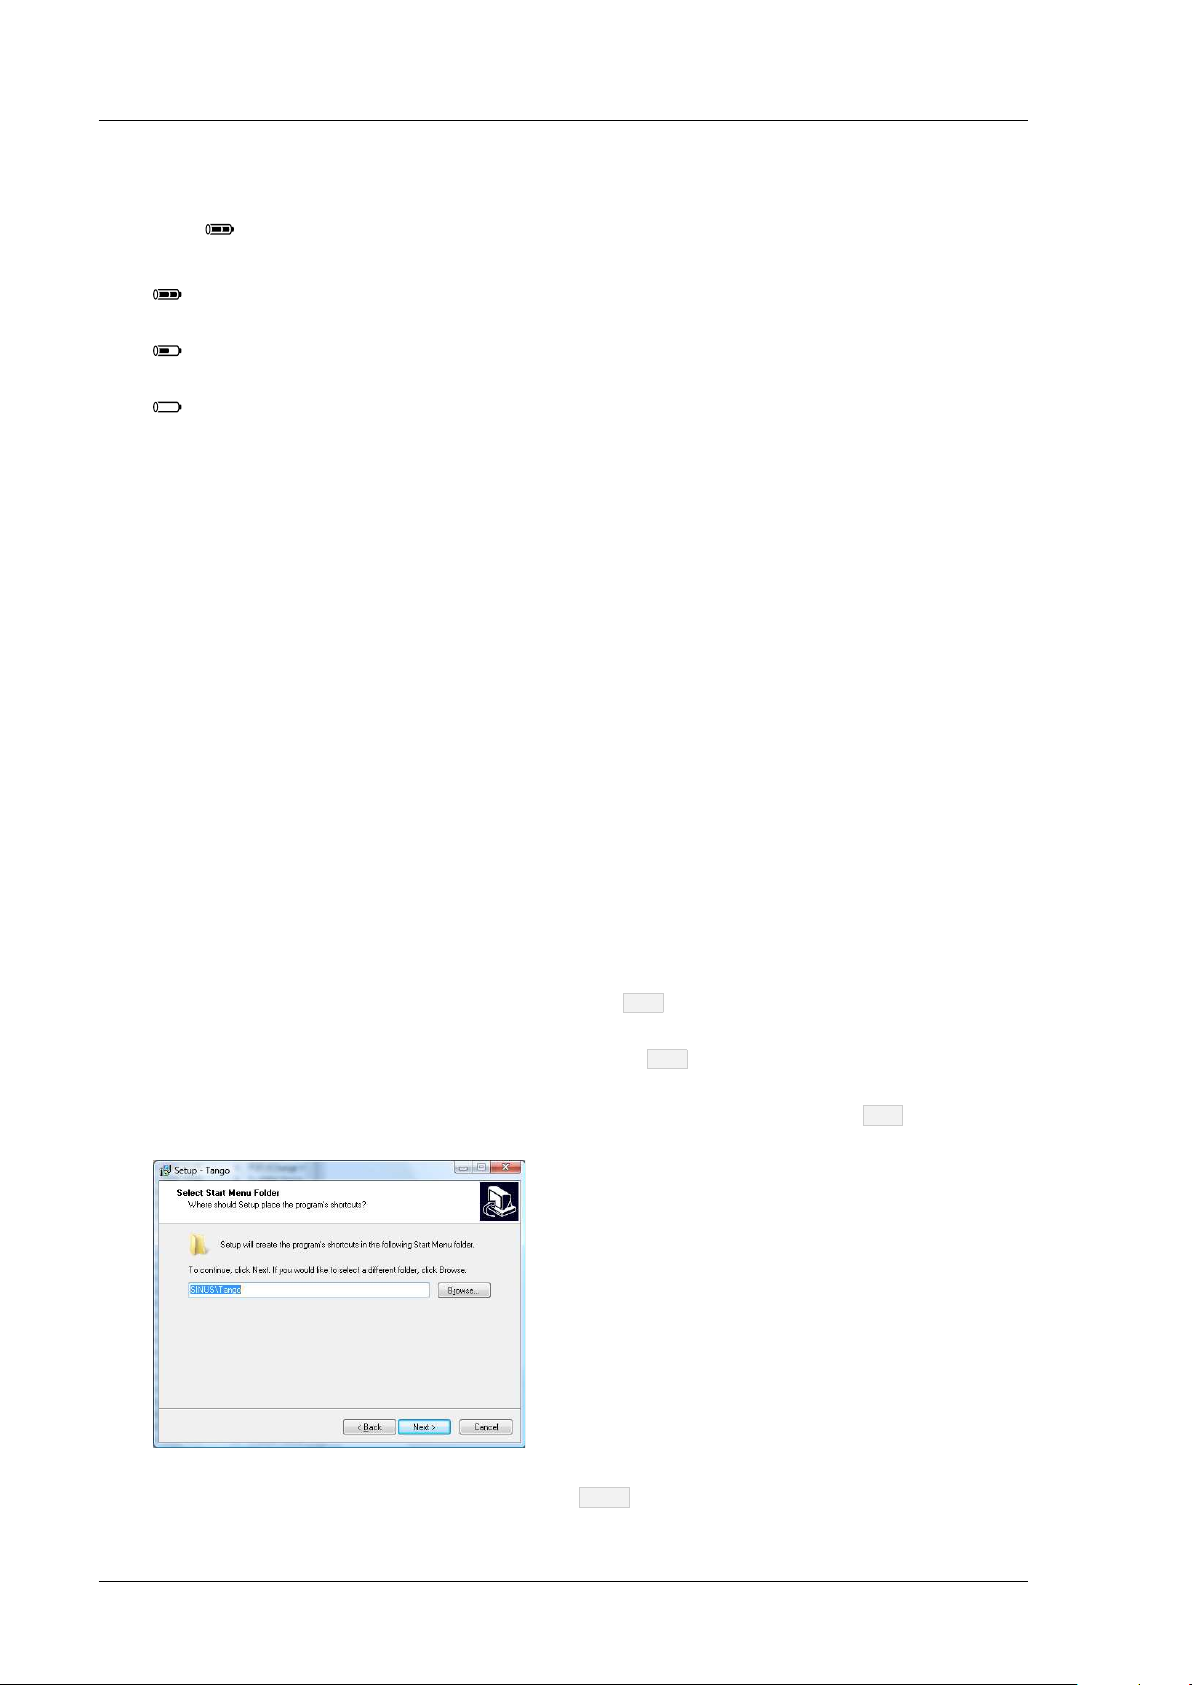
• Set the installation directory in the next window. Click on
• In this dialog you may specify the directory in the Windows Start Menu. Click on
the next dialog.
Next
to continue to the next window.
Next
to continue to the next dialog.
Next
to continue to
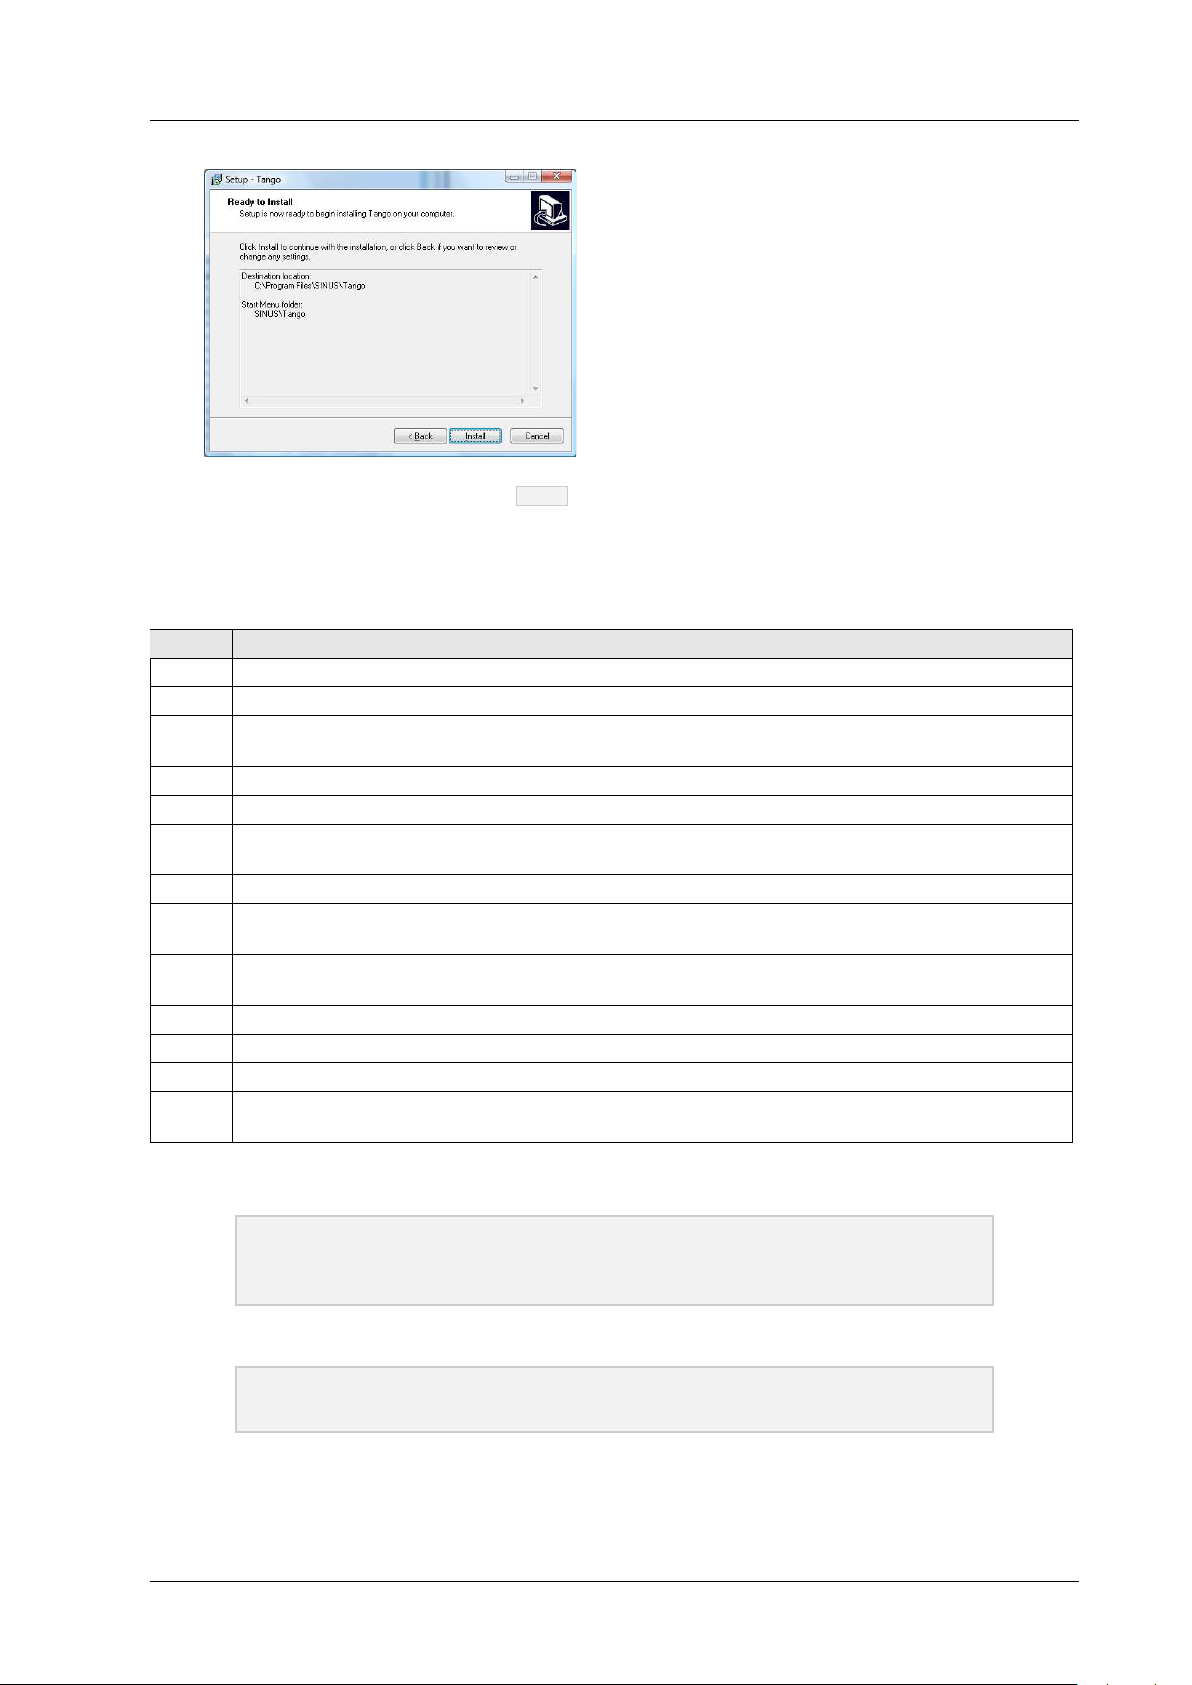
• This dialog summarizes your settings. Click on
dialog.
Manual Tango 10 of 34 SINUS Messtechnik GmbH
Install
to confirm these and to continue to the next
Page 11
1.5 Calculated values
• Finish the installation by clicking on
1.5 Calculated values
Level Description
L
AF
L
AFmax
L
AFmin
L
AS
L
ASmax
L
ASmin
L
Cpeak
L
Aeq
L
Atm
L
Atm
L
AE
L
Cpeak>n
L
AFn
Table 1.2: Calculated sound levels
Sound pressure level, frequency weighting A, Fast (125 ms time constant)
Level maximum of LAFfor the entire measuring period (on the display) or of the last storing interval (stored data).
Level minimum of LAFfor the entire measuring period (on the display) or of the last storing interval (stored data). This
value is only available by Tango-Utilities.
Sound pressure level, frequency weighting A, Slow (1 s time constant)
Level maximum of LASfor the entire measuring period (on the display) or of the last storing interval (stored data).
Level minimum of LASfor the entire measuring period (on the display) or of the last storing interval (stored data). This
value is only available by Tango-Utilities.
Peak value of the C-weighted sound pressure level
Equivalent continuous sound pressure level for the entire measuring period (on the display) or of the last storing
interval (stored data), frequency weighting A.
Equivalent continuous sound pressure level calculated from the Taktmaximal levels during the entire measuring period
according to DIN 45645-1, maximum sound pressure level of the last 5 s.
- L
Difference of the values L
Aeq
Atm
Sound exposure level, frequency weighting A
Time in which the L
exceeded n dB.
Cpeak
Percentile levels can be calculated from the LAF(n = 1, 2, 3). Data can be stored up to an amount of 8 MB. There are
7 standard percentiles (1, 5, 10, 50, 90, 95, 99).
and L
Aeq
Finish
.
NOTICE! All sound level values may only be reset by manual Start/Stop operation
and the integration time for the equivalent continuous sound pressure levels
may only be set with this operation.
NOTICE! All integrated sound levels listed in table 1.2 will be displayed on the device
immediately after finishing a measurement/integration.
SINUS Messtechnik GmbH 11 of 34 Manual Tango
Page 12

2 APPLIANCE
2 Appliance
2.1 General information
Tango offers different operating modes:
OFF The device is off and no measurements can be performed. Only the clock is running inside.
Stop The device is running. The LAFand the LASare measured and displayed, if these values have been
selected for display. With the Record button is defined whether the data of the next measurement
should be stored. If yes, the circle symbol must be displayed.
Run The device is on and measuring ( is blinking). If data recording has been activated, data will be
stored ( is blinking). You may read the instantaneous measurement values on the display and move
between the values using the Scroll-Button.
Pause A running measurement is paused ( is displayed) and so the measuring time. The measurement
can be stopped or proceeded any time.
Display Description
The device is in Pause-Mode. The measurement has been paused and the measuring time
has been stopped.
Data recording is active. The measured data will be stored in Run-Mode.
The device is in Run-Mode (Symbol blinks). The measurement has been started. If data
recording is active, the measured data are stored. If data recording is inactive, no data will
be stored.
Table 2.1: Display of run modes
2.2 First use
Pay attention to the following notes before using the device for the first time:
• Read carefully the manual and follow the instructions before using the device!
• Insert the batteries as described in paragraph 1.2.1.
• Install the required software on a PC (driver and Tango-Utilities).
• Connect the device with the PC using the supplied USB cable.
• Switch on the device by pressing the On/Off-Button (minimum 3 seconds, see table 1.1).
2.3 Device configuration
You may configure the device via PC using the software Tango-Utilities or manually.
2.3.1 Configuration using Tango-Utilities
For configuring the device via PC, you have to install drivers and Tango-Utilities software first (section 1.4).
Possible settings in Tango-Utilities are adjusted in the Setup tab.
Manual Tango 12 of 34 SINUS Messtechnik GmbH
Page 13

2.3 Device configuration
Figure 2.1: Tango-Utilities- Setup Tab
Use the check boxes in the column Display to (de-)select individual values for display on the device and on
your PC. Several values offer optional parameters, which you may set in the column Options. By the buttons
Open
and
Save
you may open a configuration from the PC or save the current one to it. The same can be
done by using the menu points File → "‘Open Configuration"’ and File → "‘Save Configuration As"’.
The current configuration is transmitted to Tango by clicking on
Apply
.
In the column Storage the correspondig storage conditions are adjusted. The storage can be turned off,
limited to one finish result or done in regular intervals. For the interval time span several values are provided
from 62, 5 ms up to 60 min depending on the measurement value. Even if the interval storage is selected
a finish result over the whole measurement time is calculated and stored additionally. This would always be
saved, even if the intervall storage would have been aborted because of full memory. In this case the record
symbol would stop blinking.
NOTICE! For the interval storage of the percentiles only the same interval time span
can be selected.
If Synchronisation is enabled, the interval storage will be synchronised with the full hours of day time. So
every full hour the current interval is closed and a new one is started. The clock is set every time, when
connecting Tango to Tango-Utilities.
SINUS Messtechnik GmbH 13 of 34 Manual Tango
Page 14

2 APPLIANCE
2.3.2 Manual configuration
The manual configuration of the device without PC is shown in the following diagram (figure 2.2):
Figure 2.2: Configuration menu
Press the Setup-Button to toggle between Display- and Setup-Mode. The first menu item in the Setup-Mode
is Calibration (for details see section 2.6). Use the Scroll-Button to move between the items of the individual
menu. Press the OK-Button to open the corresponding sub-menu. During configuration the parameter which
is being adjusted is blinking. In figure 2.2 the blinking is represented by .
The firmware version is displayed as long as the Setup button is pressed at the same time Tango is switched
on.
Manual Tango 14 of 34 SINUS Messtechnik GmbH
Page 15

2.4 Tango-Utilities
2.4 Tango-Utilities
The structure of Tango-Utilities resembles that of other Windows applications. It contains a main menu, a
working section and a status bar (see following figures). In the main menu you may select various items (e.
g. Firmware Update, Program Settings, Save as). You may view the software version of Tango-Utilities
in the main menu selecting Help -> About (figure 2.4). The firmware version of the dive is displayed in the
Info-Tab (figure 2.3).
Figure 2.3: Tango-Utilities - Info Tab Figure 2.4: Tango-Utilities - About-Box
NOTICE! Using Tango-Utilities you can adjust all settings. Configuring manually
you may only adjust a restricted selection of parameters.
2.4.1 Setup-Tab
In the Setup tab the configuration is done with Tango-Utilities (section 2.3.1).
The status bar displays various status information from left to right:
Connection Status: disconnected, connected, but Tango off, connected, Tango on;
Virtual COM Port; Measurement Status;
Record Status: Record-Mode off, Record-Mode on,
Marker Status: MARK; Storage Requirement/(Overflow Underrange)/Storage Status.
Program settings
Via the main menu Settings->Program. . . the following settings are available (figure 2.5.): selection of the
connected device Tango (Connected Device), default export directory (Default Export Directory) and the
default directory for configuration data.
blinken
←→ Record-Mode on (Recording);
Extended device settings
NOTICE! The changes you apply will be saved on the device until you adjust them
again using Tango-Utilities.
SINUS Messtechnik GmbH 15 of 34 Manual Tango
Page 16

2 APPLIANCE
These settings cannot be adjusted manually without PC.
Parameter Description
Disable Device Calibration Select this parameter to disable calibration feature on the device.
Disable display setup changes Select this parameter to lock the display settings.
Disable measurement setup changes Select this parameter to lock measurement recording settings.
Enable fixed record mode Select this parameter to activate the Record-Mode permanently.
Enable backlight permanently Enables background light of the display permanently.
Startup after battery replacement Automatic start of Tango after changing the batteries.
Table 2.2: Extended progam settings
Figure 2.5: Tango-Utilities - Program settings Figure 2.6: Tango-Utilities- Extended device settings
2.4.2 Display-Tab
In the Display-Tab the values are shown, which are calculated by the device during a measurement (according to the settings in the Setup-Tab). On the left side you will find a table of values which are available for
display in the graph on the right side.
Figure 2.8: Tango-Utilities - Graph
Figure 2.7: Tango-Utilities- Display Tab
Properties
Manual Tango 16 of 34 SINUS Messtechnik GmbH
Page 17

2.4 Tango-Utilities
To select a value for graphical display click on the individual values in the header of the graph. You may
select a maximum of four values for simultaneous display. You may change the axis settings by right-clicking
on the graph. A context menu will open in which you will find the item Properties. A click on this item will
open the window in figure 2.8. The context menu also contains controls for zooming in and out.
2.4.3 Data-Tab
On the right side of the Data-Tab a table containing the recorded data is displayed. On the left side a
summary of the selected measurement is displayed. By right-clicking on an entry in the table you will open
a context menu in which you may delete the measurement (Delete) or save data to the PC (Export).
Figure 2.9: Tango-Utilities - Data Tab
2.4.4 Data export
Measured data are saved to the internal storage of the device (8 MB). The data sets are listed in the DataTab (section 2.4.3). By right-clicking you may open a context menu. The item Save as may be used to
export/store data to the PC. Specify the name of the file containing the final values of a measurement in the
Result tab(figure 2.10).
Specify the name for the file containing interval values in the other tabs, csv compatible with Excel (figure 2.11) or smr compatible with Auditor. This tabs also include two lists. The left list shows the values which
are part of the measurement, but which have not been selected for export yet. The right list shows the val-
SINUS Messtechnik GmbH 17 of 34 Manual Tango
Page 18

2 APPLIANCE
ues which have been selected for export already. To add or remove values from these lists use the buttons
Include
Figure 2.10: Tango-Utilities - Export window 1 Figure 2.11: Tango-Utilities- Export window 2
and
Exclude
. To add new files for export use the button
Add File
, to remove files use
Remove File
.
Measurement file: File7
Start time: 02.06.2009 08:45:09
Duration: 2:57
Overflow: no
Underrange: no
LAFmax: 77,4 dB
LASmax: 68,5 dB
LCpeak: 103,3 dB
LAeq: 48,4 dB
LAE: 70,9 dB
LAtm5: 62,7 dB
LAtm5-LAeq: 14,3 dB
LCpeak >90dB: 0:01 min:sec
LCpeak >135dB: 0:00 min:sec
LCpeak >140dB: 0:00 min:sec
LAF90: 40,3 dB
LAF95: 40,0 dB
LAF99: 39,7 dB
Figure 2.12: Tango-Utilities - Example Result.txt from
fig. 2.10
Figure 2.13: Tango-Utilities- Example Filename_1.csv
from fig. 2.11
2.5 Measure
For legally binding measurements the device must run on batteries/rechargeables. Therefore the device has
to be controlled with the keypad. Follow the instructions below to perform a binding measurement:
1. Position the device (held in the hand or mounted upon a tripod).
2. Switch on the device.
3. Check the battery charge status (see paragraph 1.3.2).
4. Use the Record-Button to enable/disable data recording.
5. Press the Start-Button to start the measurement.
6. Press the Stop-Button to stop the measurement.
Manual Tango 18 of 34 SINUS Messtechnik GmbH
Page 19

2.6 Calibrate
2.5.1 Measure low sound levels
You do not have to make special preparations for measuring low level sounds.
2.5.2 Overload and Underrange
The display for overload and underrange is arranged left and right of the bar graph (figure 1.4). It is displayed,
when the linearity range is left. The representation on the display is explained in the following table 2.3.
Tango-Utilities Display Description
No overload has occured in current measurement.
Overload has occured in current measurement.
Currently an overload occurs.
No underrange has occured in current measurement.
Underrange has occured in current measurement.
Currently an underrange occurs.
Table 2.3: Display of overload and underrange
NOTICE! A reset of the overload or underrange display is only possible by stopping
and restarting the measurement.
2.6 Calibrate
A list of the approved calibrators and the accuracy classes achieved is given in section 5. Follow the instructions below to calibrate the device at 1 kHz:
2.6.1 Calibrate using Tango-Utilities
1. Connect Tango to the PC.
2. Start Tango-Utilities.
3. Insert the microphone into the calibrator and activate the calibration signal. The reference calibration
level is 94 dB for this methode.
4. Press the
the calibration procedure, press the stop button.
5. Having finished you are asked to adopt the new calibration values. If something went wrong, an error
message appears.
2.6.2 Calibrate Tango directly
1. Switch on the device.
2. Press the Setup-Button. The configuration menu will be displayed (figure 2.2) and is blinking.
CAL
button in Tango-Utilities. “Calibration activated” appears in the status bar. To cancel
3. Press the OK-Button. The reference calibration level will be blinking on the display (e.g. 94 dB). You
may adjust this value with the Scroll-Button (94 dB, 104 dB or 114 dB).
4. Switch on the calibrator (select the correspondig level on the calibrator, if necessary) and insert the
microphone into the calibrator.
SINUS Messtechnik GmbH 19 of 34 Manual Tango
Page 20

2 APPLIANCE
5. Press the OK-Button. Calibration starts. First, the noise level of the device is measured and second
the calibrator signal. During calibration, is blinking on the display. When stops blinking, the
calibration is finished. The measured level is displayed enabling you to check the calibration result.
6. Press the OK-Button to save the new sensitivity value or press the Setup-Button to reject.
7. You have left the calibration menu and the device is in STOP-Mode.
If the calibration has been affirmed the symbol is shown on the display until the next start of Tango. The
calibration data is stored until the next change of the batteries. This will reset Tango to factory defaults.
NOTICE! If the new value deviates more than 3 dB from the old one, it is not ac-
cepted. The message “Error” is displayed in this case.
Manual Tango 20 of 34 SINUS Messtechnik GmbH
Page 21

3 Testing information
3.1 Acoustic test
3.1.1 Microphone alignment for measuring the influence of mechanical vibrations according to DIN EN 61672-1:2003.
For this test you need a second sound level meter with officially verified calibration as reference device.
The microphone of the reference device has to be positioned in a maximum distance of 0.2 m from the
microphone of the tested device and must not be exposed to the mechanical vibrations of the exciter.
Figure 3.1: Alignment for vibration test
3.2 Electrical test
For eletrical testing use the equivalent electrical impedance device K65 only (section 5) (manufacturer specifications: 22 pF ±12% with a parallel resistance of 81 MΩ ±12%).
3.2.1 EMC test
The measurement is performed for the following configurations:
Low interference immunity: USB cable linked to public power supply and microphone extension cable
connected
Maximim interference immunity: USB cable and microphone extension cable disconnected
3.2.2 Level linearity
The starting values for the level linearity tests are listed in the last column of table 4.3.
SINUS Messtechnik GmbH 21 of 34 Manual Tango
Page 22

4 TECHNICAL SPECIFICATIONS
4 Technical specifications
Property Value
Software Tango-Utilities
Number of channels 1
Accuracy Class 1 according to DIN EN 61672-1:2003
Display of measured values LCD display
Frequency weighting A, C
Time weighting Fast, Slow, Peak (simultaneously)
Data storage Yes
Self-generated noise ≤19 dB(A)
Max. Sound Pressure Level see table 4.5
Linearity range 25. . .140 dB(A) (at 1 kHz)
Nominal measuring range for L
Max. electr. measuring range ± 2 V
Max. input voltage at
the input of the feeding device
U
at input ± 2,5 V
max
Integration response immediate
Time weighting F Rise or decay time constant = 0.125 s
Time weighting S Rise or decay time constant = 1 s
Time weighting Peak Rise time constant = 20 µs
Shortest integration time 16 ms
Longest integration time 194 days (100 h running on rechargeables)
Interfaces USB
Stabilizing time after switch-on 1 min
Warm-up time 1 min
Calibration frequency 1 kHz
Max. time of day drift max. 1.73 s in 24 h
Battery 2xLR6A, >100 operation hours without display backlight
External power supply via USB (see accessories)
Dimensions 266 mm x 76 mm x 38 mm
Weight 320 g (batteries inserted)
Reference conditions
Reference direction Along the microphone axis
Reference sound pressure level 94 dB
Reference frequency 1 kHz
Reference measuring range 25. . .140 dB(A)
Reference air temperature 23◦C
Reference air pressure 101.325 kPa
Reference relative humidity 50 %
Table 4.1: Technical data Tango
Cpeak
(simultaneously), no optional frequency weightings
peak
37. . .140 dB(C)
± 2,5 V
Manual Tango 22 of 34 SINUS Messtechnik GmbH
Page 23

4.1 Level linearity range
4.1 Level linearity range
The following table 4.2 contains the measurement ranges for A-weighted sound levels and the C-weighted
peak sound level.
Fast/Slow/Leq dB(A) L
25. . .140 ab 30 37. . .140
Data in dB and for a mircophone sensitivity of 50 mV/Pa
Table 4.2: Level linearity ranges for A-weighted sound levels
AE
dB(A) L
Cpeak
dB(C)
4.2 Linear operating ranges
The operating ranges given below are only valid for calibrated devices! The last column shows the starting
values for the level linearity tests.
f max in dB(A) min in dB(A) Range in dB(A) Starting values
16 Hz 84 30 54 74
31,5 Hz 100 30 70 84
1 kHz 140 25 115 94
4 kHz 141 30 111 94
8 kHz 140 30 110 94
12,5 kHz 137 30 107 94
Table 4.3: Linear operating ranges (f is the frequency of the sine burst.) and starting values for the level linearity tests.
4.3 Self-generated noise
The self-generated electrical noise of the device including preamplifier (measured with equivalent electrical
impedance and 50Ω at the input) amounts to approx. 16 dB(A) on the display. The acoustic noise is 16 dB.
This is a total noise level of 19 dB. The highest noise level may be expected when externally powered.
ATTENTION! Legally binding measurements must not be performed, if the device is con-
nected to public power supply.
4.4 Details on EMC
When the device is exposed to electromagnetic emissions the lower limits of the ranges in table 4.2 are
increased by 5 dB. Within these changed ranges the error limits according to DIN EN 61672-1:2003 are
maintained. The level linearity range changes to 40. . . 107 dB(A) when the device is exposed to electromagnetic emissions. There will be no performance loss in the device after electrostatic discharges (touch
discharge up tp 4 kV and air discharge up to 8 kV).
SINUS Messtechnik GmbH 23 of 34 Manual Tango
Page 24

4.5 Frequency weighting
4 TECHNICAL SPECIFICATIONS
f A Tango C Tango A Standard C Standard Diff A Diff C
10 -67,93 -13,76 -70,00 -14,30 2,07 0,54
12,5 -62,56 -10,84 -63,40 -11,20 0,84 0,36
16 -55,90 -8,12 -56,70 -8,50 0,80 0,38
20 -50,00 -5,94 -50,50 -6,20 0,50 0,26
25 -44,54 -4,20 -44,70 -4,40 0,16 0,20
31,5 -39,36 -2,90 -39,40 -3,00 0,04 0,10
40 -34,36 -1,88 -34,60 -2,00 0,24 0,12
50 -30,14 -1,22 -30,20 -1,30 0,06 0,08
63 -26,12 -0,78 -26,20 -0,80 0,08 0,02
80 -22,32 -0,46 -22,50 -0,50 0,18 0,04
100 -19,06 -0,28 -19,10 -0,30 0,04 0,02
125 -16,12 -0,18 -16,10 -0,20 -0,02 0,02
160 -13,22 -0,10 -13,40 -0,10 0,18 0,00
200 -10,82 -0,06 -10,90 0,00 0,08 -0,06
250 -8,66 -0,04 -8,60 0,00 -0,06 -0,04
315 -6,62 0,00 -6,60 0,00 -0,02 0,00
400 -4,74 0,00 -4,80 0,00 0,06 0,00
Table 4.4: A- and C-weighted frequency response
f A Tango C Tango A Standard C Standard Diff A Diff C
500 -3,22 0,00 -3,20 0,00 -0,02 0,00
630 -1,92 0,00 -1,90 0,00 -0,02 0,00
800 -0,78 0,00 -0,80 0,00 0,02 0,00
1000 0,00 0,00 0,00 0,00 0,00 0,00
1250 0,58 -0,06 0,60 0,00 -0,02 -0,06
1600 0,98 -0,06 1,00 -0,10 -0,02 0,04
2000 1,20 -0,18 1,20 -0,20 0,00 0,02
2500 1,28 -0,28 1,30 -0,30 -0,02 0,02
3150 1,26 -0,40 1,20 -0,50 0,06 0,10
4000 1,10 -0,68 1,00 -0,80 0,10 0,12
5000 0,78 -1,06 0,50 -1,30 0,28 0,24
6300 0,20 -1,64 -0,10 -2,00 0,30 0,36
8000 -0,60 -2,46 -1,10 -3,00 0,50 0,54
10000 -1,74 -3,62 -2,50 -4,40 0,76 0,78
12500 -3,30 -5,14 -4,30 -6,20 1,00 1,06
16000 -5,48 -7,32 -6,60 -8,50 1,12 1,18
20000 -7,90 -9,74 -9,30 -11,20 1,40 1,46
Figure 4.1: A-weighted frequency response
Figure 4.2: C-weighted frequency response
Manual Tango 24 of 34 SINUS Messtechnik GmbH
Page 25

4.6 Microphone
4.6 Microphone
Only the original microphone capsule MK255 by MICROTECH GEFELL is approved for measurements with
Tango. The directional characteristics of the microphone correspond to the limits specified in DIN EN 616721:2003. The effect of the windscreen on the directional characteristics of the microphone is negligible. As
a result all corresponding correction values are specified with pm0.1 dB. The acoustic center point and
microphone reference point are located at the middle of the microphone membrane.
Property Value
Model Transducer type Capacitive pressure transducer
Polarization backelectret
Frequency range free-field 3.5 Hz . . .20 kHz (±2 dB)
Sensitivity ca. 50 mV/Pa
Max. SPL for 3 % , distortion at 1 kHz 146 dB
Self-generated noise with preamplifier 15 dBA
Capacitance 17 pF
Operating temperature range -50 . . .+100◦C
Ambient temperature coefficient leq0.01 dB/◦C
Ambient pressure coefficient -0.01 dB/kPa
Diameter 1/2”
with protection lid 13,2 ± 0,02 mm
without protection lid 12,7 ± 0,02 mm
Length 16,4 mm
Weight 7,5 g
Thread for preamplifier 11,7 mm 60 UNS
Thread for protection 12,7 mm 60 UNS
Table 4.5: Technical data MK255
4.6.1 Random incidence and free-field correction
f Freifeldkorr. Diffusfeldkorr.
in Hz in dB in dB
25 0 0
31.5 0 0
40 0 0
50 0 0
63 0 0
80 0 0
100 0 0
125 0 0
160 0 0
200 0 0
250 0 0
315 0 0
400 0 0
500 0 0
630 0 0
Table 4.6: Free-field and random incidence corrections (manufacturer’s specification: measurement uncertainty at 95% certainty ±0.6 dB)
f Freifeldkorr. Diffusfeldkorr.
in Hz in dB in dB
0.8 k 0 0
1 k 0 0
1.25 k -0.03 0
1.6 k 0.03 0
2 k 0.21 -0.1
2.5 k 0.36 -0.1
3.2 k 0.56 0
4 k 0.88 0.1
5 k 1.36 0.2
6.3 k 2.01 0.4
8 k 2.99 0.7
10 k 4.25 0.9
12.5 k 6.14 1.8
16 k 8.77 3.4
20 k 9.9 3.2
SINUS Messtechnik GmbH 25 of 34 Manual Tango
Page 26

4 TECHNICAL SPECIFICATIONS
4.6.2 Directional characteristics
Figure 4.3: Mikrofonachse
90
105
120
135
150
165
180
195
210
225
240
10 Hz 50 Hz 100 Hz 160 Hz
120
135
150
165
180
−20 −15 −10 −5
255
270
90
105
−20 −15 −10 −5
75
285
75
60
300
60
45
315
45
30
0
330
30
0
15
0
345
15
0
90
105
120
135
150
165
180
195
210
225
240
255
250 Hz 400 Hz 500 Hz 630 Hz
105
120
135
150
165
180
75
−20 −15 −10 −5
285
270
90
75
−20 −15 −10 −5
60
300
60
45
315
45
0
0
30
15
0
345
330
30
15
0
195
210
225
240
255
800 Hz 1 kHz 1250 Hz 1,6 kHz
105
120
135
150
165
180
195
210
225
240
255
4 kHz 5 kHz 6,5 kHz
285
270
90
75
−20 −15 −10 −5
285
270
300
60
300
315
45
315
330
30
0
330
345
15
0
345
195
165
180
195
210
150
210
225
240
255
270
2 kHz 2,5 kHz 3 kHz
90
105
120
135
−20 −10
225
240
255
270
8 kHz 9 kHz 10 kHz
285
75
285
300
60
300
315
45
315
0
345
330
30
15
0
345
330
Manual Tango 26 of 34 SINUS Messtechnik GmbH
Page 27

4.7 Effect of environmental conditions
90
165
180
195
150
210
105
120
135
225
240
255
11 kHz 12,5 kHz 14 kHz
75
60
−20 −15 −10 −5
300
285
270
45
315
30
0
330
15
0
345
4.6.3 Frequency response of the microphone
4
MK255 Tolerance
2
0
165
180
195
150
210
90
105
120
135
−20 −15 −10 −5
225
240
255
270
16 kHz 18 kHz 20 kHz
75
285
60
300
45
315
0
30
15
0
345
330
−2
Amplitude / dB
−4
10 100 1k 10k
f / Hz
4.7 Effect of environmental conditions
In order to avoid the effect of sound reflections from the body of the operator interfering with the measurement, Tango should be located as far as possible from the body. Thus, when actually performing the
measurement, the operator should place himself at a distance behind the tripod-mounted meter, or extend
the hand-held meter as far from the body as is comfortable.
Property Value
Temperature Calibration deviation < 0,3 dB within a temperature range from -20◦C to + 50◦C and at a relative
humidity of 65 %
Humidity calibration deviation < 0,1 dB within a humidity range from 25 % to 90 % and at a temperature of 40
Pressure calibration deviation < 0,1 dB within a range from 65 kPa to 108 kPa
Magnetic fields A field of 80 A/m (50 Hz) causes a reading of < 28 dB(A)
Vibration see paragraph 4.7.2
Storage conditions -20◦C . . . +60◦C, humidity max. 95 %
Electromagnetic compatibility
Emission complies with EN 50081-1 (1992)
Immunity complies with EN 50082-1 (1997)
◦
C
Table 4.7: Environmental conditions for the device
SINUS Messtechnik GmbH 27 of 34 Manual Tango
Page 28

4 TECHNICAL SPECIFICATIONS
NOTICE! When the temperature changes by more than 15
of 30 min must be safeguarded.
◦
C an acclimatization time
4.7.1 Mains frequency and high-frequency fields
Tango complies with DIN EN 61672-1:2003 with respect to interference immunity to mains frequency and
high-frequency fields. The interference immunity to mains frequency and high-frequency fields is highest
when the device is running on batteries/rechargeables without USB cable connected.
If Tango is connected to a PC and measuring high-frequency emissions are highest. Additionally, the interference immunity to mains frequency and high-frequency fields is lowest in this configuration (alignment see
fig. 4.4). The next lowest emission level is reached in the same configuration, but in STOP-Mode.
In compliance with paragraph 6.6.9 of DIN EN 61672-1:2003 Tango is not appropriate to measure levels
lower than 74 dB for an electric field strength exceeding 10 V/m.
Figure 4.4: Alignment measurement HF immunity
4.7.2 Effect of mechanical vibration
If the device is exposed to mechanical vibration with an acceleration of 1 m/s2perpendicular to the membrane plane of the microphone, the lower limit of the linear operating range increases to 75 dB for the
frequencies 31,5 Hz, 63 Hz, 125 Hz, 250 Hz, 500 Hz, 630 Hz, 800 Hz and 1000 Hz, frequency weighting A.
Manual Tango 28 of 34 SINUS Messtechnik GmbH
Page 29

4.8 Connection assembly of the detachable microphone
If the device is exposed to mechanical vibration with an acceleration of 1 m/s2parallel to the membrane
plane of the microphone, the lower limit of the linear operating range increases to 58 dB for the frequencies
31,5 Hz, 63 Hz, 125 Hz, 250 Hz, 500 Hz, 630 Hz, 800 Hz and 1000 Hz, frequency weighting A.
4.8 Connection assembly of the detachable microphone
ATTENTION! The detachable microphone must be used only with Tango! Otherwise it
may be damaged.
The microphone of Tango is detachable
and connected to the analyser via LEMO
FGG.1B.307. The pin assignment is shown in
figure 4.5.
Figure 4.5: Pin assignment for the detachable microphone
SINUS Messtechnik GmbH 29 of 34 Manual Tango
Page 30

5 ACCESSORIES
5 Accessories
Tango achieves accuracy class 1 of DIN EN 61672-1:2003 in all possible device-accessories-alignments
without the necessity of applying any correction values.
Accessory Manufacturer Item number
Cal200 PCB, 1 kHz, 94 dB or 114 dB 800934.4
Type 4231 B&K, 1 kHz, 94 dB bzw. 114 dB 800043.2
Windscreen W2 MICROTECH Gefell 800253.0
USB cable A-Bmini 5 Pol 1.8 m SINUS Messtechnik GmbH 801038.7
USB power supply adaptor SINUS Messtechnik GmbH 601092.6
Equivalent electrical impedance K65 MICROTECH Gefell 800030.3
Table 5.1: Available accessories for Tango
The Windscreen W2 is black coloured and spherically with a diameter of 69 mm.
5.1 Technical specifications of the calibrators
Feature Value
Standards IEC 60942:2003 and
ANSI S1.40-1984, Class 1
Sound pressure level 94 dB, 114 dB ±0.1 dB
Supported microphone types 1/2”, 1/4”, 3/8”
Weight 156 g
Sound pressure stability <0.1 dB
Surrounding conditions each for ±0.3 dB tolerance
Static pressure 65 kPa . . . 108 kPa
Humidity 10% . . .90% RH
Temperature -10◦C . . .+ 50◦C
Table 5.2: Technical specifications Cal200
Feature Value
Standard IEC 60942:2003, Klasse 1
Sound pressure level 94 dB, 114 dB ±0.2 dB
Supported microphone types 1”,1/2”
Weight approx. 150 g
Sound pressure stability <0.05 dB
Surrounding conditions
Static pressure 65 kPa .. . 108 kPa
Humidity 10 % . . .90 %RH
Temperature -10◦C . . .+ 50◦C
Table 5.3: Technical specifications Type 4231
5.2 Tango Outdoor kit
With the optional outdoor kit Tango can be used as temporary monitoring station for environmental noise.
The runtime from the external battery depends on the measurement configuration, a typical value is 2 month.
The data are stored locally. The following items are included in the outdoor kit (figure 5.1):
• Peli Case 1500 with foam insert and LEMO7 Cable intern
• V-Mount Li-Accu 14.8V/6.1A
• BSV1TV Li-Ion Travel Charger
• DC/DC-Adapter
• LEMO7 Extension Cable 3m
• WS1 Microphone Weather Protector
• Tripod
Manual Tango 30 of 34 SINUS Messtechnik GmbH
Page 31

5.2 Tango Outdoor kit
Figure 5.1: Optional accessorie “Outdoor kit” (Tango itself not included)
SINUS Messtechnik GmbH 31 of 34 Manual Tango
Page 32

6 APPROVED FUNCTIONS CONCERNING LEGALLY BINDING MEASUREMENTS
6 Approved functions concerning legally binding mea-
surements
The following functions are approved:
• Start/Stop/Pause function (section 1.3.1)
• Sound levels (table 1.2 in section 1.5)
– Taktmaximal level
– Percentile levels: L
– Time weightings (Fast, Slow, Peak)
– Frequency weightings (A, C
– Level linearity
– Inherent noise level
AF90
, L
• Kalibration (section 2.6)
• Overload (section 2.5.2)
AF95
, L
peak
AF99
)
Manual Tango 32 of 34 SINUS Messtechnik GmbH
Page 33

7 Declaration of Conformity
# 01000
We, SINUS Messtechnik GmbH, Foepplstrasse 13, 04347 Leipzig, Germany, declare that the product
Sound Level Meter Tango
Part Number: 907000
Serial Number:
to which this CE-declaration relates, is in conformity with the following standards and other documents:
Technical Parameters Sound Level Meter: IEC 61672 or DIN EN 61672 class 1
DIN 45657
Electromagnetic Compatibiliy: Emission IEC 61000.6.3 or DIN EN 61000-6-3
IEC 61672 or DIN EN 61672
Immunity IEC 61000.6.2 or DIN EN 61000-6-2
IEC 61326 or DIN EN 61326
IEC 61672 or DIN EN 61672
Safety IEC 61010.1 or DIN EN 61010-1
The measuring system is intended for use with measuring microphones according to IEC 1094-1. This product has been manufactured and tested in compliance with the following binding internal documentation from
SINUS Messtechnik GmbH:
Manufacturing and Testing documents: - Quality assurance manual
- Manufacturing documents for Tango
- Testing rules for Tango
This product was tested and found to comply with all specifications.
Gunther Papsdorf
Managing Director
SINUS Messtechnik GmbH 33 of 34 Manual Tango
Page 34

Index
INDEX
C
Calibrate. .. . . .. . . .. . . . .. . . .. . . .. . . . .. . . .. . . .. . . . .19
Calibrator . .. . . . .. . . .. . . .. . . . .. . . .. . . .. . . . .. . . .. . . 30
D
Directional characteristics . .. . . . .. . . .. . . .. . . . .. . . .26
E
EMC. . . . .. . . .. . . .. . . . .. . . .. . . .. . . . . . . . .. . . .. . . . . . 23
Environmental conditions .. . . .. . . .. . . . .. . . .. . . .. . 27
Export directory. . .. . . .. . . . . . . . .. . . .. . . . . . . . .. . . ..15
F
First use . . . .. . . .. . . .. . . . .. . . .. . . .. . . . . . . . .. . . .. . . 12
Frequency weighting. .. . . .. . . .. . . . . . . . .. . . .. . . . . . 24
L
Level linearity range .. . . .. . . .. . . . .. . . .. . . .. . . . .. . 23
M
Measure . .. . . . . . . . .. . . .. . . .. . . . .. . . .. . . .. . . . .. . . .18
low sound levels . . .. . . .. . . .. . . . .. . . .. . . .. . . . 19
O
Operating range .. . . .. . . . . . . . .. . . .. . . . . . . . .. . . .. . 23
Outdoor kit. .. . . .. . . .. . . . .. . . .. . . .. . . . .. . . .. . . .. . . 30
P
Power supply . . . .. . . . .. . . .. . . .. . . . .. . . .. . . .. . . . .. . 7
R
Reference conditions . . . . .. . . .. . . . . . . . .. . . .. . . . . . 22
S
Self-generated noise. . . .. . . . . . . . .. . . .. . . . . . . . .. . . 23
Software installation . . . .. . . .. . . .. . . . . . . . .. . . .. . . . 10
Sound level values . . . .. . . .. . . .. . . . .. . . .. . . .. . . 6, 11
Sound levels
calculated . .. . . . . . . . .. . . .. . . . . . . . .. . . .. . . .. . . 11
low. . . . .. . . .. . . .. . . . .. . . .. . . .. . . . .. . . .. . . .. . . 19
Storage Requirement . . .. . . .. . . . .. . . .. . . .. . . . .. . . 15
T
Testing information .. . . .. . . .. . . . .. . . .. . . .. . . . .. . . .21
acoustic test . .. . . .. . . .. . . . .. . . .. . . .. . . . .. . . . 21
electrical test . .. . . . . . . . .. . . .. . . .. . . . .. . . .. . . .21
EMC test. . . .. . . .. . . . .. . . .. . . .. . . . . . . . .. . . .. .21
level linearity . .. . . . . . . . .. . . .. . . .. . . . .. . . .. . . .21
Type approval
admitted accessories . . .. . . . .. . . .. . . .. . . . . . . . .6
Manual Tango 34 of 34 SINUS Messtechnik GmbH
 Loading...