

Page 1

-1-
Contents
Cauti on . ..... ..... ..... ..... ..... ..... ................. ..... ..... ..... ..... ..... ..... ..... ... 2
Safet y I nform ation .. ..... ..... ..... ..... ..... ..... ..... ..... ..... ..... ..... ..... ..... ... 3
Anten na con necti on ... ..... ..... ..... ..... ................. ..... ..... ..... ..... ..... ... 5
ON-OF F Power ...... ..... ..... ..... ..... ..... ..... ..... ..... ..... ..... ..... ..... ..... ... 5
Multi media Termina l Conn ectio n .... ..... ..... ..... ................. ..... ..... .... 6
Front View .... ..... ..... ..... ..... ..... ..... ..... ..... ..... ..... ..... ..... ..... ..... ..... .. 8
... ..... ..... ..... ..... ..... ..... ..... ..... ..... ..... ..... ..........9The R emote Cont rol
Menu Ope ratio n .... ..... ..... ..... ..... ..... ..... ..... ..... ..... ..... ..... ..... ..... ... 11
..... ..... ..... ..... ..... ..... ..... ..... ..... ..... ..... ..... ..... ...... Media Opera tion 14
Speci ficat ions .. ..... ..... ..... ................. ..... ..... ..... ..... ..... ..... ..... ..... . 16
Simpl e Tro ubles hooti ng . ..... ..... ..... ..... ..... ..... ..... ..... ..... ..... ..... ..... 17
Page 2

-2-
Caution
The flash w ith t he arro whead symb ol, ins ide a n equil ate ral tri ang le is int end ed to ale rt light ning
the use r of th e prese nce of un-in sulat ed Јd anger ous v oltag e wit hin the p rod uct’s e ncl osure
that ma y be of s ufficien t magnitud e to cons tit ute a ris k of shock t o the u ser.elect ric
The exc lam ation m ark inside a n equil ate ral tri ang le is to ale rt th e user of t he pr esenc e inten ded
of impo rta nt oper ating and ma inten anc e (serv ici ng) ins tru ction s.
Safet y Inf ormat ion
To ensure r eliable an d safe op era tion of t his e quipm ent , pleas e rea d all the
instr uct ions in t his user gui de, esp eci ally th e saf ety inf orm ation b elo w.
Elect ric al safe ty
The TV set sho uld only be co nnect ed to a on the la bel mains p ower suppl y as stated
on the ba ck of t he prod uct.To preve nt over loa d, don' t sha re the sa me ma ins sup ply s ocket w ith
too man y ite ms.
Do not pl ace any conn ecting wir es wher e the y may be st epp ed on or tr ipp ed over.
When re mov ing the p lug from the w all soc ket , make su re to p ull the p lug a nd not th e wir es.
Durin g a thunders torm or whil e leavi ng th e TV fo r long pe rio ds, dis con nect th e aer ial
(if out doo r) and ma ins from the p ower su ppl y.
Do not al low water or m oisture to e nter th e TV or m ain s adapt or. Do N OT us e in wet or m ois t
areas s uch a s bathr ooms, stea my kitc hen s or near s wim ming po ols .
Pull th e plu g out imm ediately, a nd se ek prof ess ional h elp i f:
●The mai ns pl ug or cab le is damage d
●Liqui d is spilt ont o the set, or if i t is acci den tally e xpo sed to wa ter o r moist ure
●Anyth ing a ccide ntally pen etrat es th e venti lat ion slo ts
●The set d oes n't fun ction prop erly.
●Do not re mov e the saf ety covers . The re are no u ser s ervic eab le part s ins ide.
You ma y inv alida te the warra nty. Only qua lif ied per son nel can s erv ice thi s app aratu s.
●Remov e exh auste d batterie s from th e rem ote con tro l hands et to a void ba tte ry leak age
or when n ot using it fo r a long perio d.
Physi cal s afety
●Do not bl ock v entil ation slot s in the ba ck co ver. You may pl ace the TV in a cabin et,
but least 5 cm (2 '') cle arance all a round .ensur e tha t there i s at
●Do not ta p or sh ake the TV scr een. You ma y dam age the i nte rnal ci rcu its. Take good c are o f
the rem ote c ontro l, do not drop i t.
●To clean th e TV us e a soft dry clo th. Do NOT use s olv ents or p etr ol base d flu ids.
For stu bbo rn stai ns, you may us e a damp so ft cl oth wit h dil uted de ter gent.
A warnin g that an appa ratus with C LASS I co nst ructi on sh all be co nne cted to a M AIN S socke t
outle t wit h a prote ctive eart hing co nne ction .
Where t he MA INS plu g or an applia nce cou ple r is used a s the d iscon nec t devic e,
the dis con nect de vice shall r emain r ead ily ope rab le.
Page 3
-3-
Safety Information
WARNING :
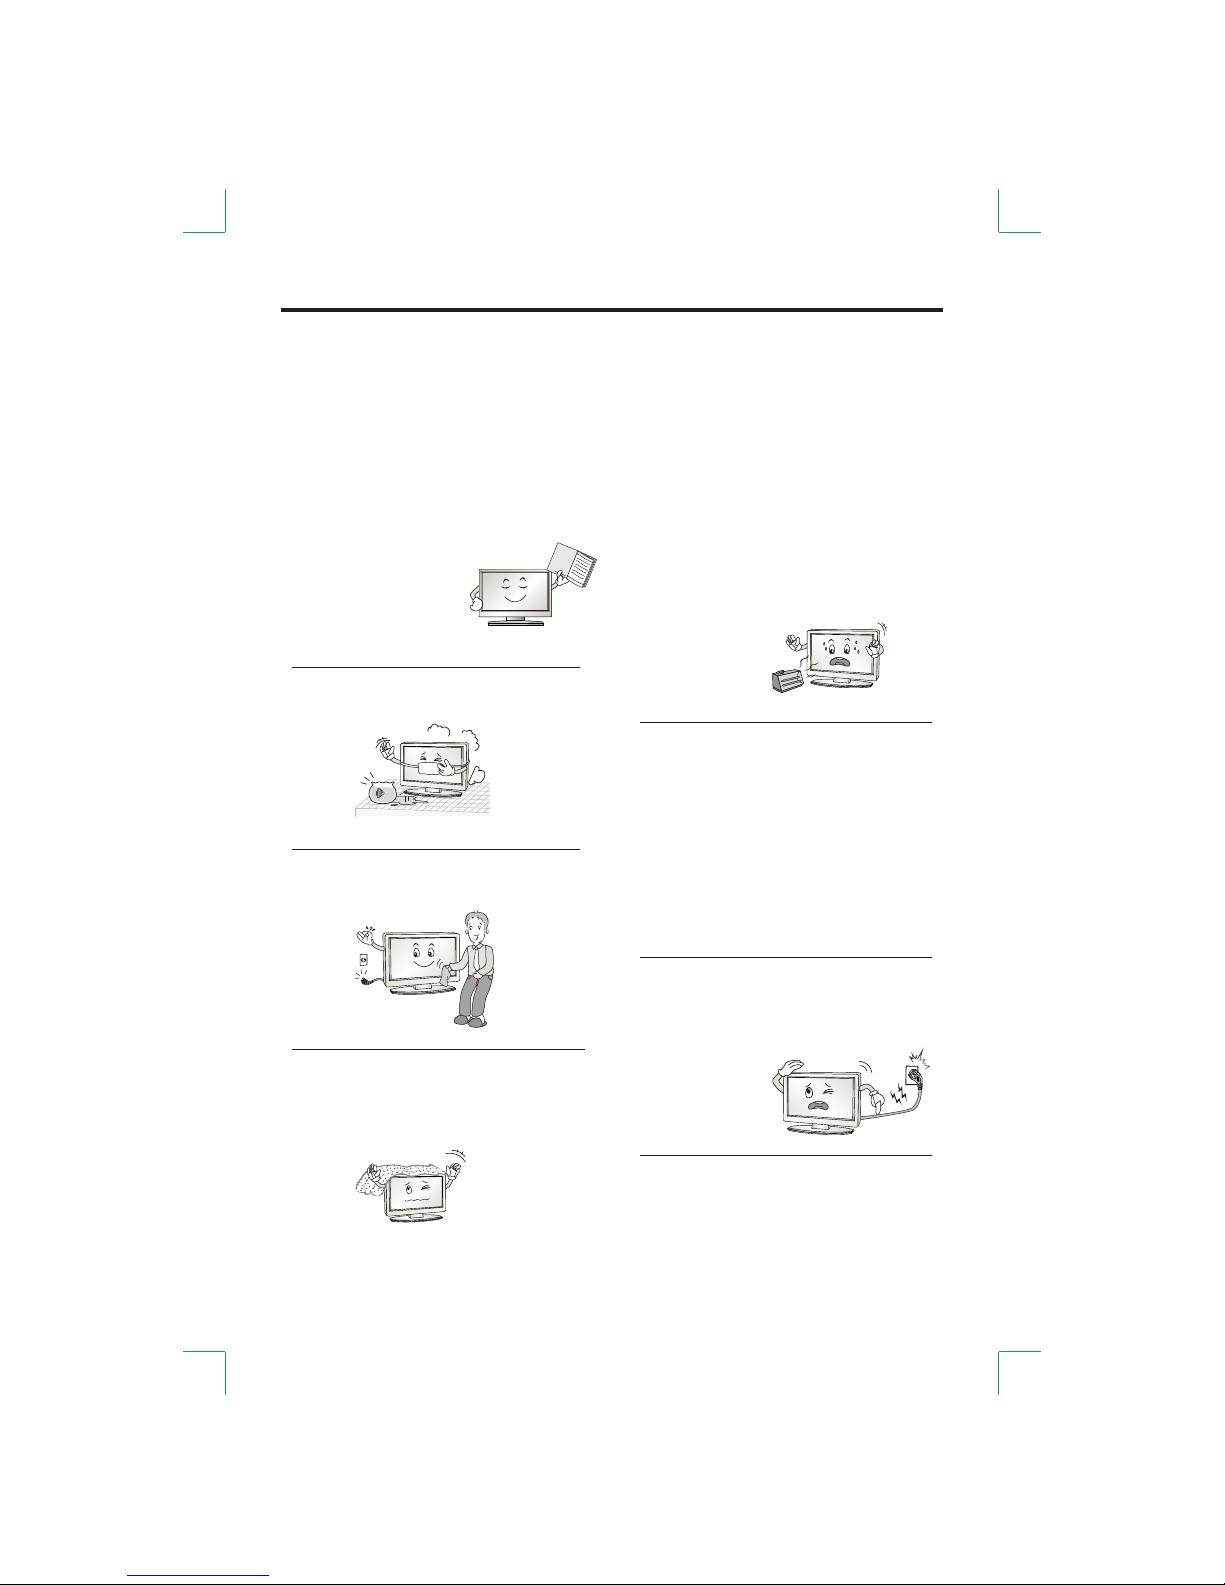
To reduce the risk of fire or electric shock, do not expose this apparatus to rain or moisture.
The apparatus not be exposed to dripping or splashing liquids and no objects filled with liquids, should
such as vases, be placed on the apparatus. should
IMPORTANT SAFETY INSTRUCTIONS
O
w
n
e
's
r
M
a
n
u
a
l
1. Read these instructions.
2. Keep these instructions.
3. all warnings.Note
4. Follow all instructions.
5. Do not use this apparatus near water.
6. Clean only with a dry cloth.
7. Do not block any of the ventilation openings.
Install in accordance with the manufacturers
instructions.
8. Do not install near any heat source such as
radiators, heat registers, stoves, or other
apparatus (including amplifiers) that produce
heat.
9. Do not defeat the safety purpose of the
polarized or grounding type plug. A polarized
plug has two blades with one wider than other.
A grounding type plug has two blades and a
third grounding prong. The wide blade or the
third prong is provided for your safety. When
the provided plug does not fit into your outlet,
consult an electrician for replacement of
the obsolete outlet.
10. Protect the power cord from being walked
on or pinched particularly at plugs.
11. Only use the accessories specified by the
manufacturer.
Page 4
-4-
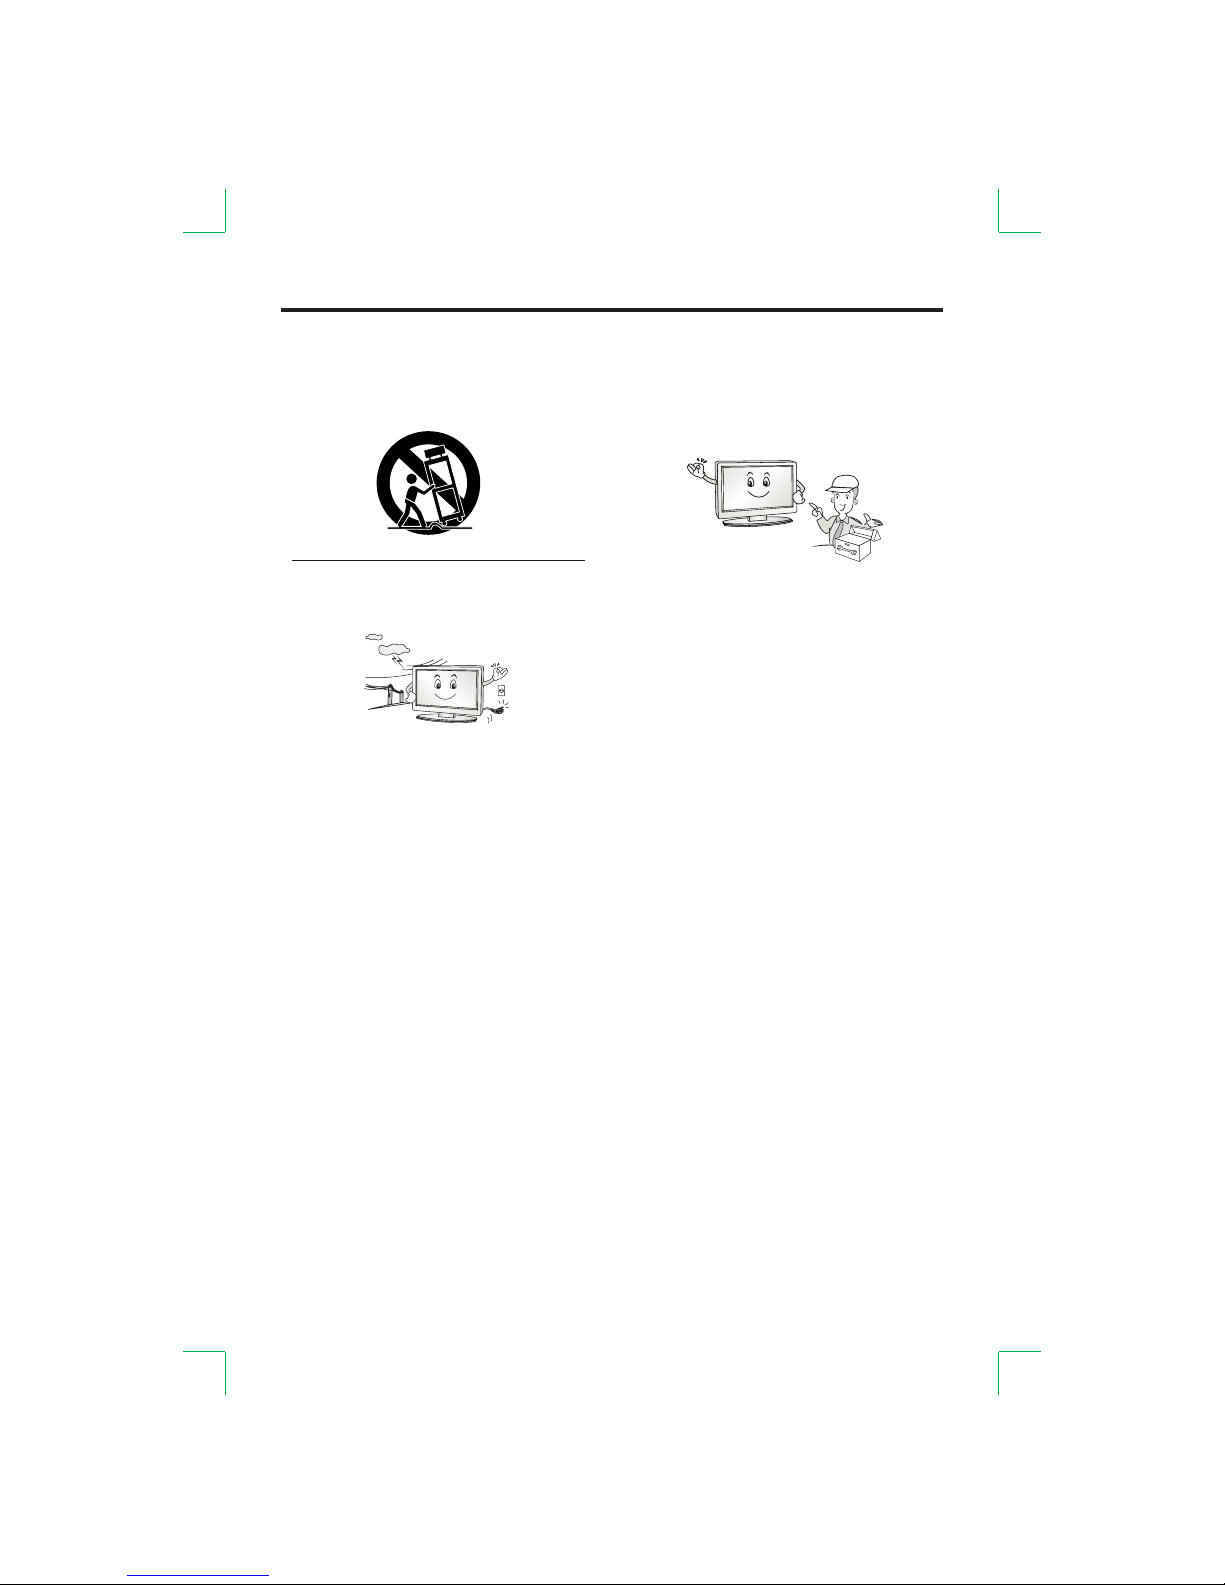
12. Only use a cart, stand, tripod, bracket,
or a table specified by the manufacturer
or which is sold with the apparatus.
13. Unplug this apparatus during lightning
storms or when it is unused for a long time.
14. Refer all servicing to qualified service
personnel. Servicing is required when
the apparatus has been damaged in
any way.
Note
- If the TV is cold, there may be a small flicker when you turn it on.
- Avoid touching the LCD screen or holding your finger(s) against it.
CAUTION connecting the Power Cord
Do not overload wall outlets. Overloaded wall outlets could damage the TV and could result in electric
shock or fire. examine the cord of your appliance. If its appearance indicates damage or Frequently
deterioration, unplug it. Stop using it until you have it replaced with a cord authorized by your dealer.
Protect the power cord from physical or mechanical abuse, such as being twisted, kinked or pinched.
Safety Information
On Disposal
- The fluorescent lamp used in this product contains a small amount of mercury.
- Disposal of this product must be carried out in accordance of the regulations of your local authority.
Page 5
An te nn a co nn ec ti on
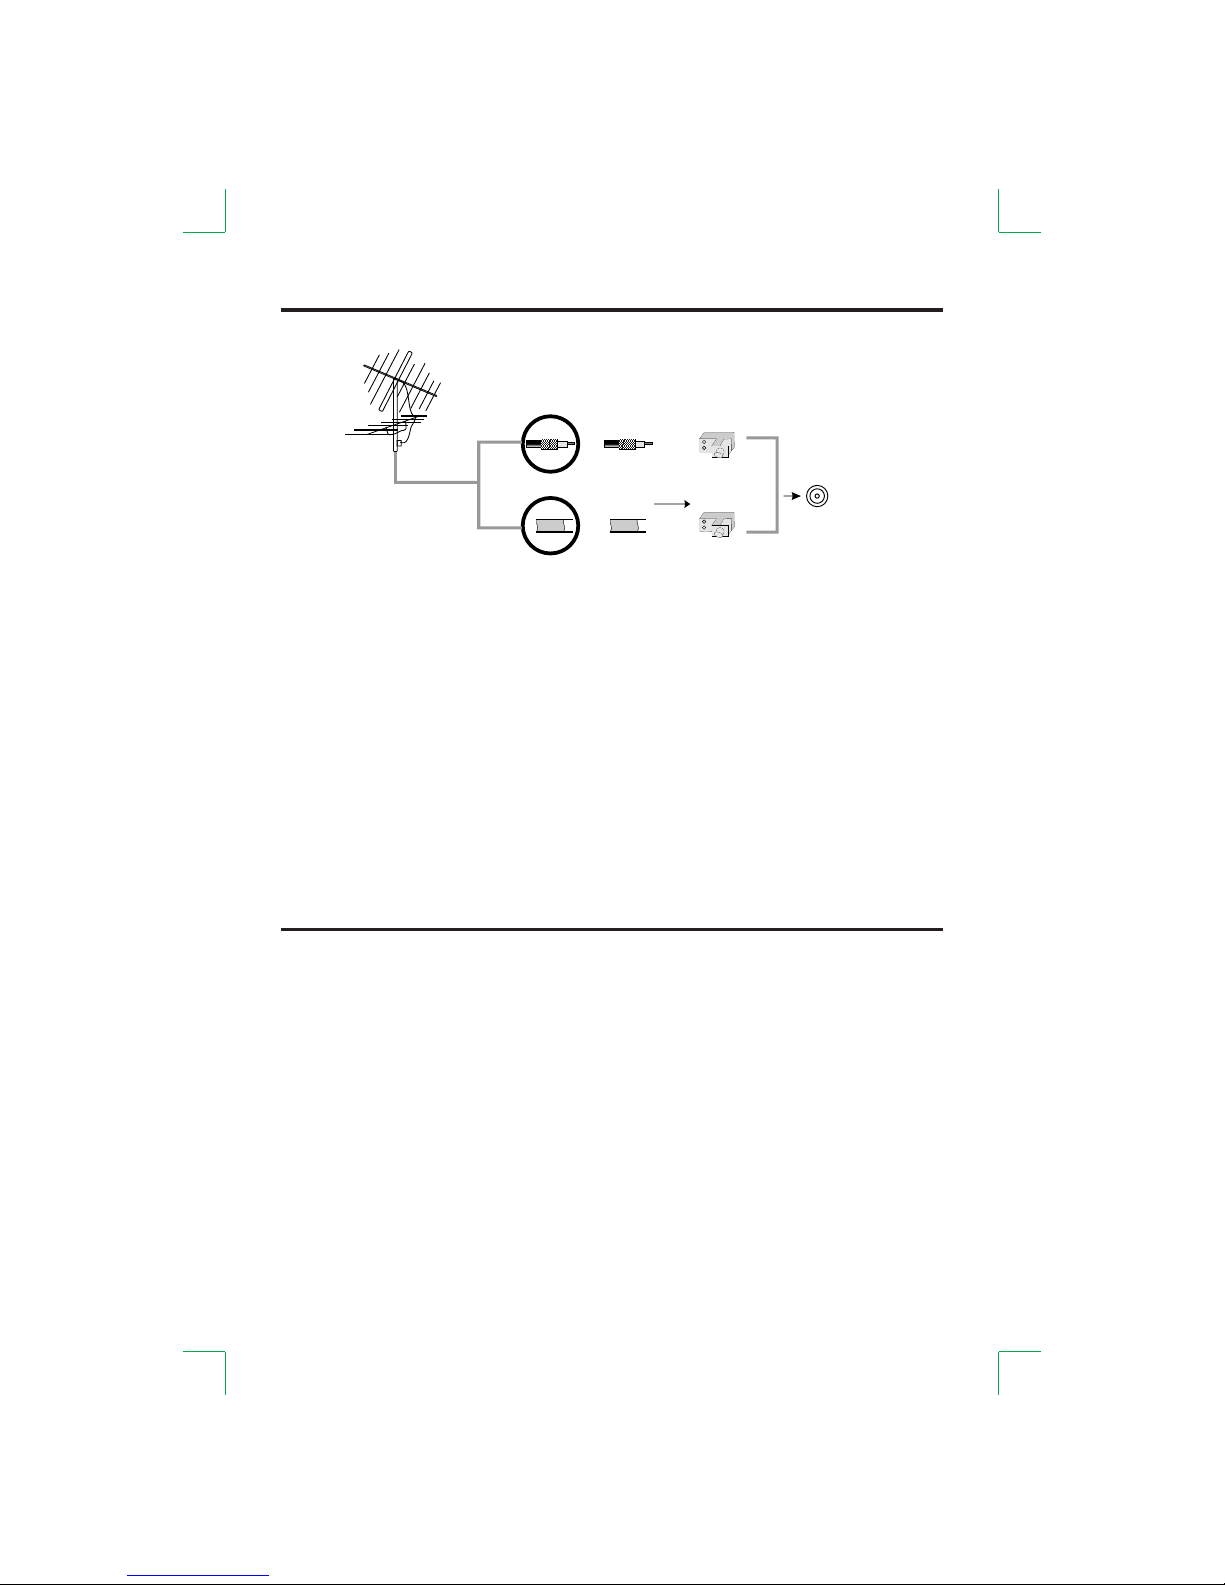
VHF TV ANTENNA
UHF TV ANTENNA
75 OHM COAXIAL CABLE
300 OHM FLAT CABLE
To TV ANTENNA JACK
300 OHM
75 OHM ADAPTOR
75 OHM DIN
-5-
ON-OFF Power
Conne ct the AC ad apter t o the house hold po wer out let.
Press t he main p ower sw itch on the set boar d. Th e indic ator wi ll swit ch on.
There after p ress th e [STAND BY] but ton to op en or swi tch the r eceiv er off.
NOTE:
Switc h the rec eiver o ff and un plug th e AC ad apter f rom the
power o utlet w hen not u sing it f or a long p eriod o f time.
Connect the 75 OHM coaxial cable from the antenna to the antenna socket on the rear
panel, as shown above.
NOTES:
For better reception, especially in outlying areas or where ghost effect or interference occur,
an external roof-mounted antenna is recommended.
For UHF TV reception, use the specified UHF antenna. Consult a local AV technician.
When using 300 OHM flat cable, a 300 OHM-75 OHM adapter should be used for a
proper connection to the antenna jack (The adaptor is not supplied).
Page 6
-6-
Multimedia Terminal Connection
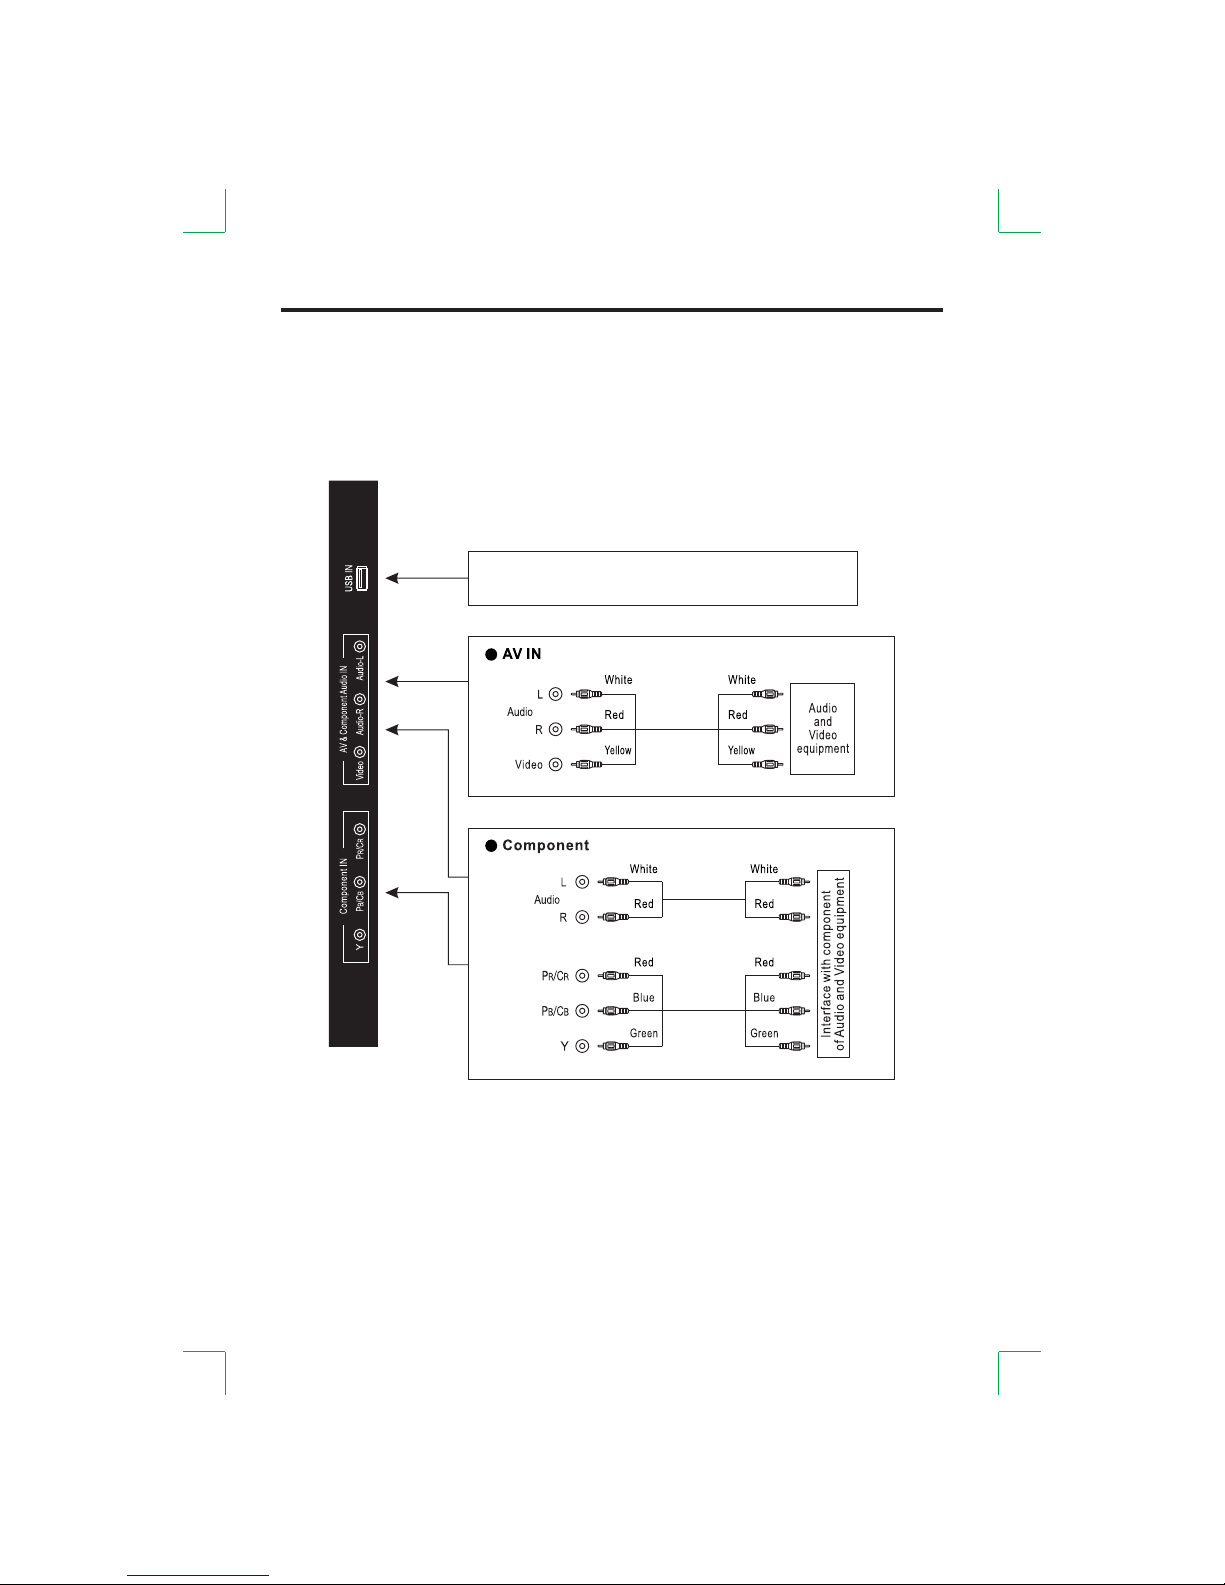
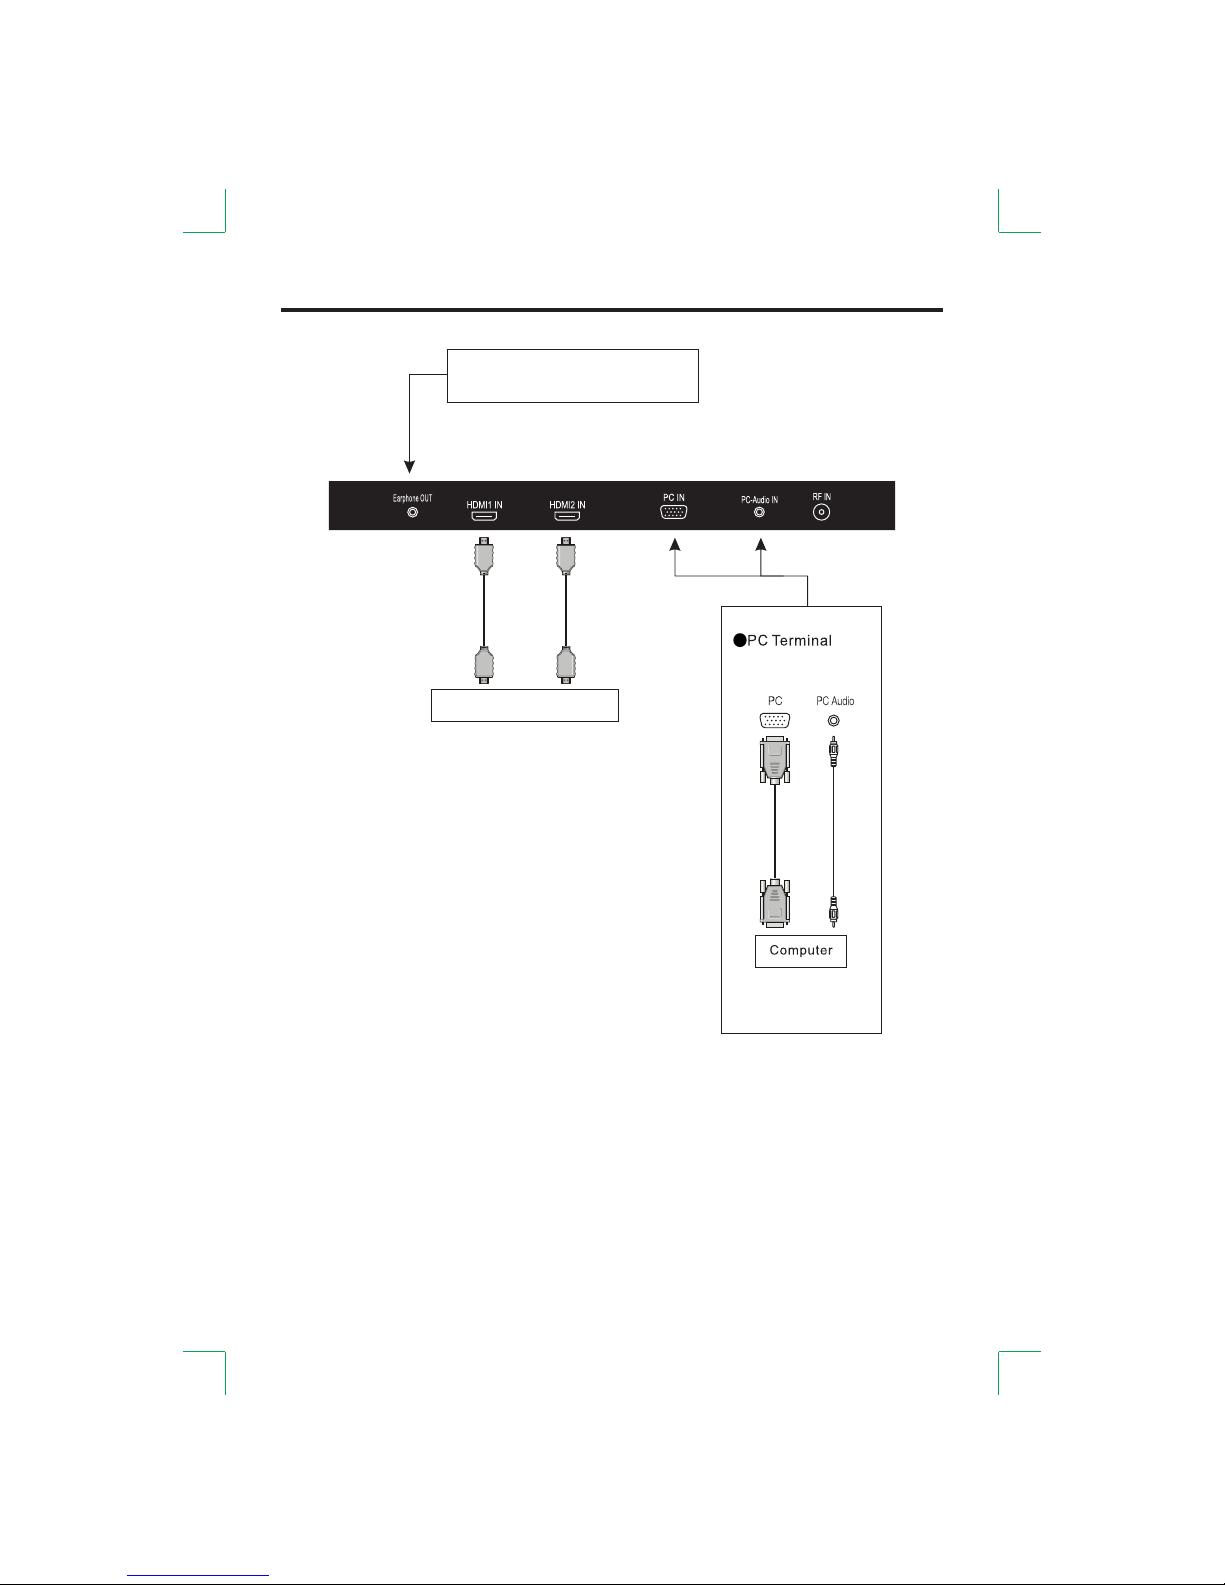
Pleas e switc h off the p ower wh en conn ectin g the TV to an ext ernal d evice.
The TV ca n play di ffe rent mu ltime dia sou rces by c onnec ting di ffere nt term inals w ith
multi media d evice s such as DVD P layer s, PC’s, etc . and sel ectin g a corre spond ing inp ut
sourc e.
USB storage devices can be inserted into the U SB te rmi nal .
Select USB under source selection to vi ew th e mul tim edi a fil es.
Page 7
Multimedia Terminal Connection
-7-
Inser t the H DMI Audio
and Video eq uip ment
Use headphone s to li ste n to th e cur ren t
show scenes on th e aud io si gna l.
Page 8
Front View
-8-
①
②
③
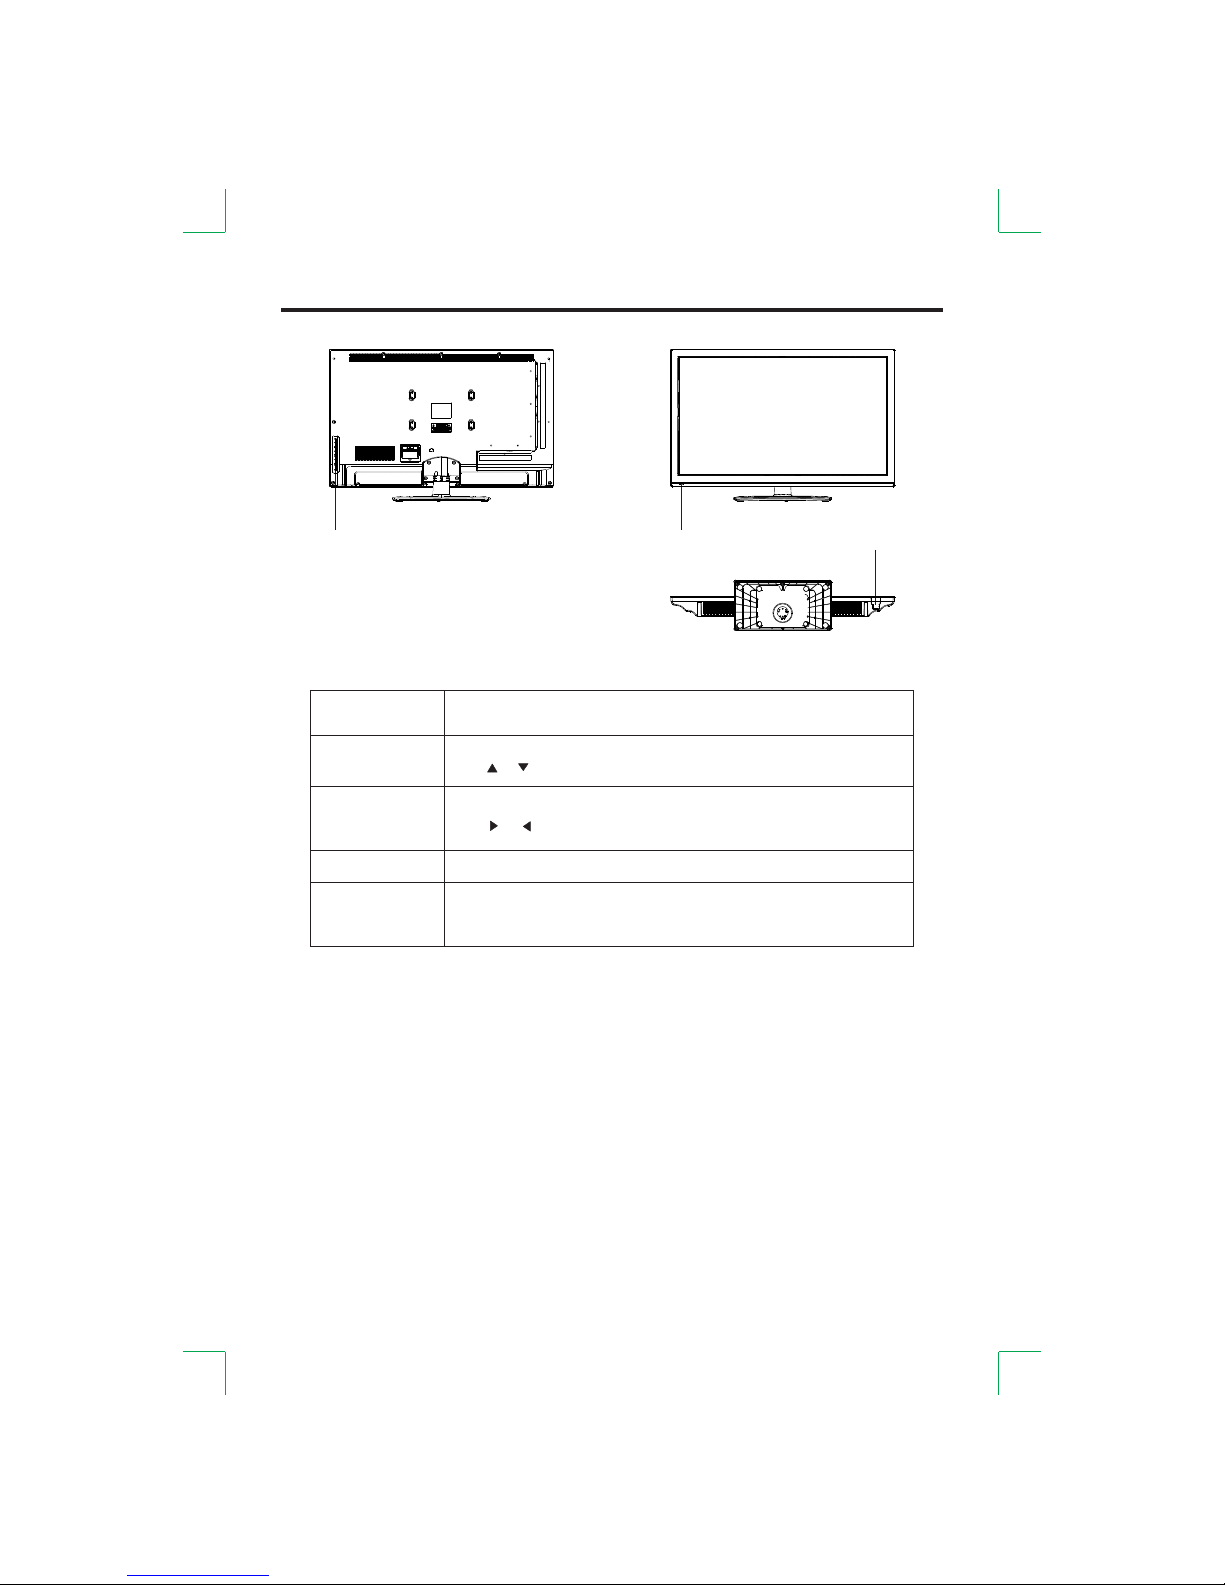
① Remot e contr ol rece iving win dow ind icato r.
Switc h the pow er on or of f.②
③ The fun ction s of the bu ttons a re descri bed bel low:
Switc h on an d off ;
Carry o ut th e fun cti on of s tandby and s wit ch- on.
Show me nu or e xit m enu .
STAN D BY
VOL+/ -
CH+/-
Chann el up /do wn;
Use butto ns on t he re mot e con trol to chan ge th e cha nne ls[ ]/[ ] .
Volume i ncr eas e/d ecr ease;
Use b utt ons o n the remote c ont rol t o adj ust volume[ ]/[ ] .
Press t his b utt on to d isp lay the inpu t sou rce l ist ; continue p res sin g thi s
butto n to se lec t the s our ce you want. P res s the button to sel ect [VOL+ ]
the des ire d sou rce .
MENU
SOURC E
NOTE:
Diffe rent mo dels ma y have di fferent b utton p ositi oning ,
but all accor ding to w hat was b een des cribe d abovefun ction s stay th e same .
Page 9
-9-
The Remote Control
CAUTI ON : Dang er of exp losion if batter y is inco rrect ly repl aced.
● If the re mote co ntrol i s not goi ng to be used f or a long p eriod o f time, r emove t he
batte ries to a void da mage ca used by bat tery le akage o r corro sion.
● Do not mi x old and n ew batt eries or AL KALIN E on stan dard
(CARB ON-ZI NC) or re charg eable (NI CKEL- CADMI UM) bat terie s.
● Alway s remov e batte ries as soo n as they b ecome w eak.
● Weak ba tteri es can le ak and se verel y damag e the rem ote con trol.
● Do not di spose o f batte ries in a fire. Batt eries m ay expl ode or le ak. Bat terie s
not be ex posed t o exces sive heat such as su nshin e, fire o r the lik e.shoul d
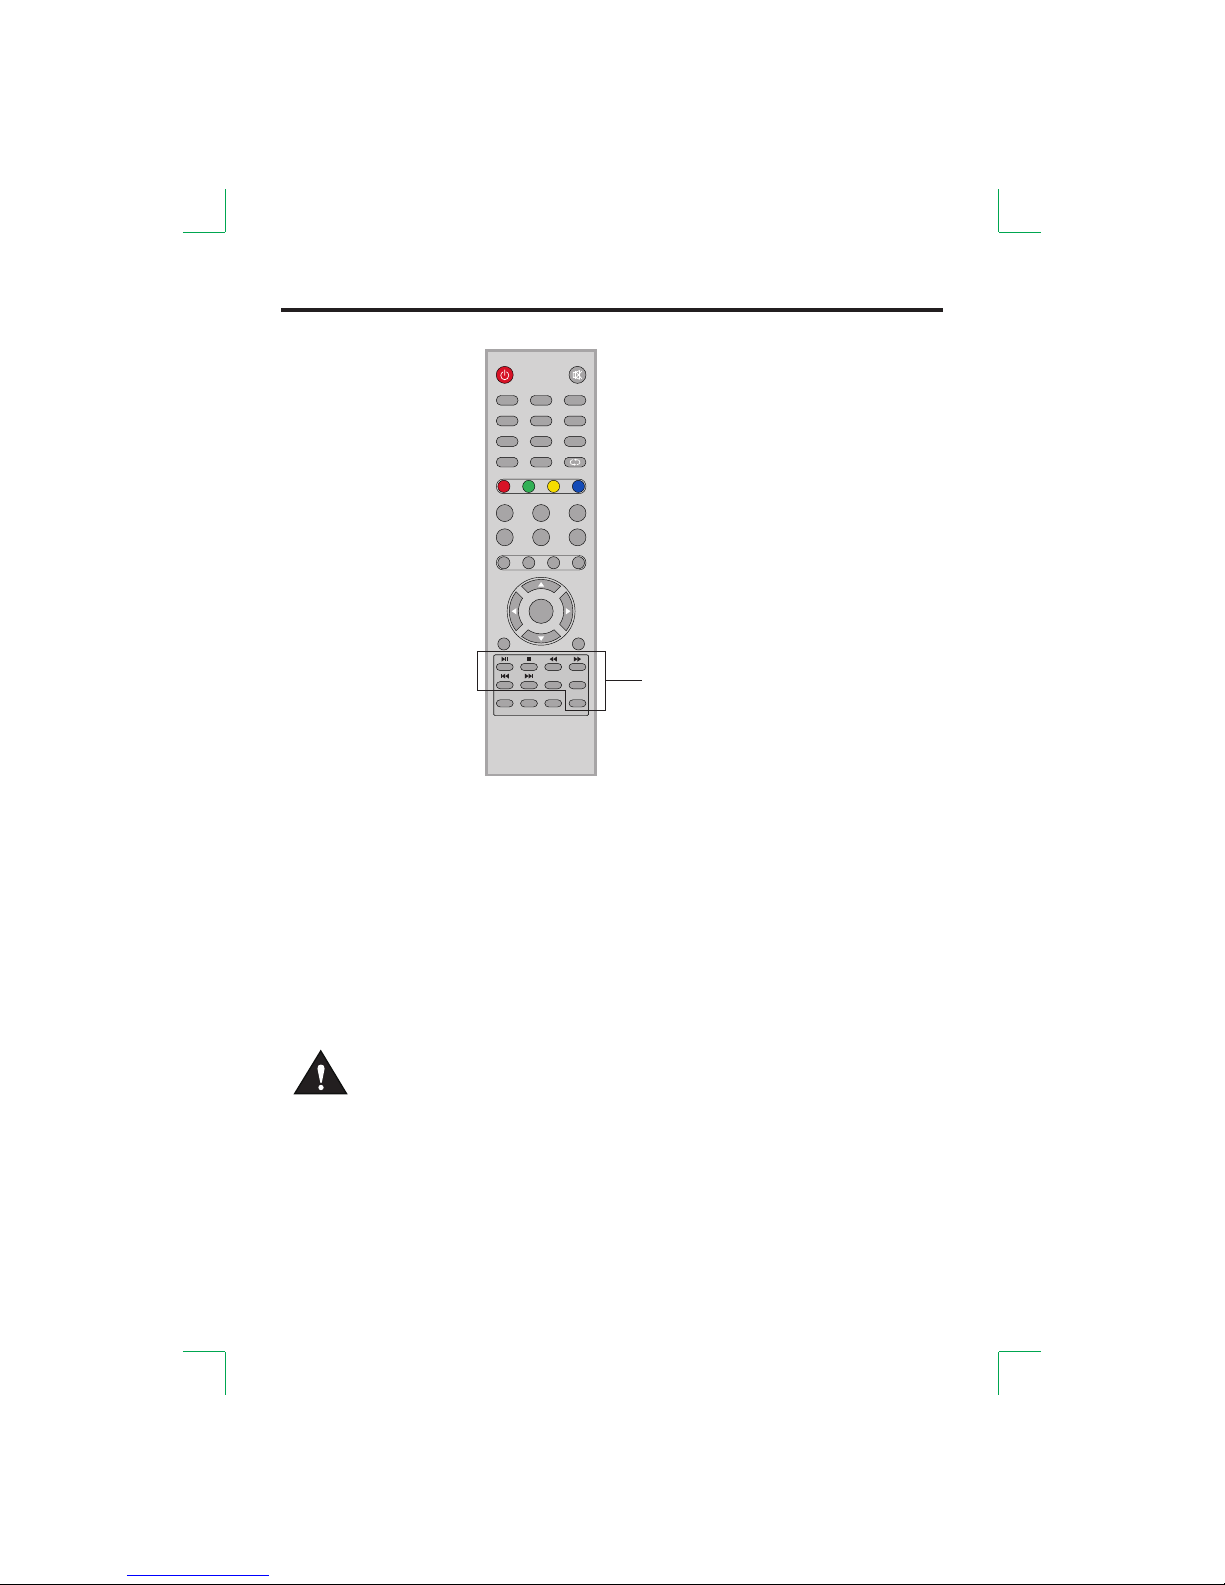
● Open th e batte ry door a nd inse rt 2 "AAA" ba tteri es.
● Point t he remo te cont rol at th e remote se nsor lo cated o n the uni t.
● When th ere is a st rong am bient light sour ce, the p erfor mance o f the inf rared r emote s ensor
may be de grade d, caus ing unrel iable o perat ion.
● The rec ommen ded eff ectiv e dista nce for r emote o perat ion is ab out 16 fe et (5 met ers).
● When th e batte ries be come we ak and the op erati ng dist ance of t he remo te cont rol is
great ly redu ced, yo u will need to repla ce the ba tteri es.
Using t he remo te cont rol
Media Operation
STANDBY
SOURCE
MENU
EXIT/ROOT
ASPECT
CH-
CH+
VOL-
VOL+
FAV FAV- FAV+
GOTO
REPEAT A-B
ENTER
DISPLAY FREEZE
PMODE SMODE
SLEEP
1 2
3
4
5
6
7
8 9
0
MUTE
Page 10
-10-
The Remote Control
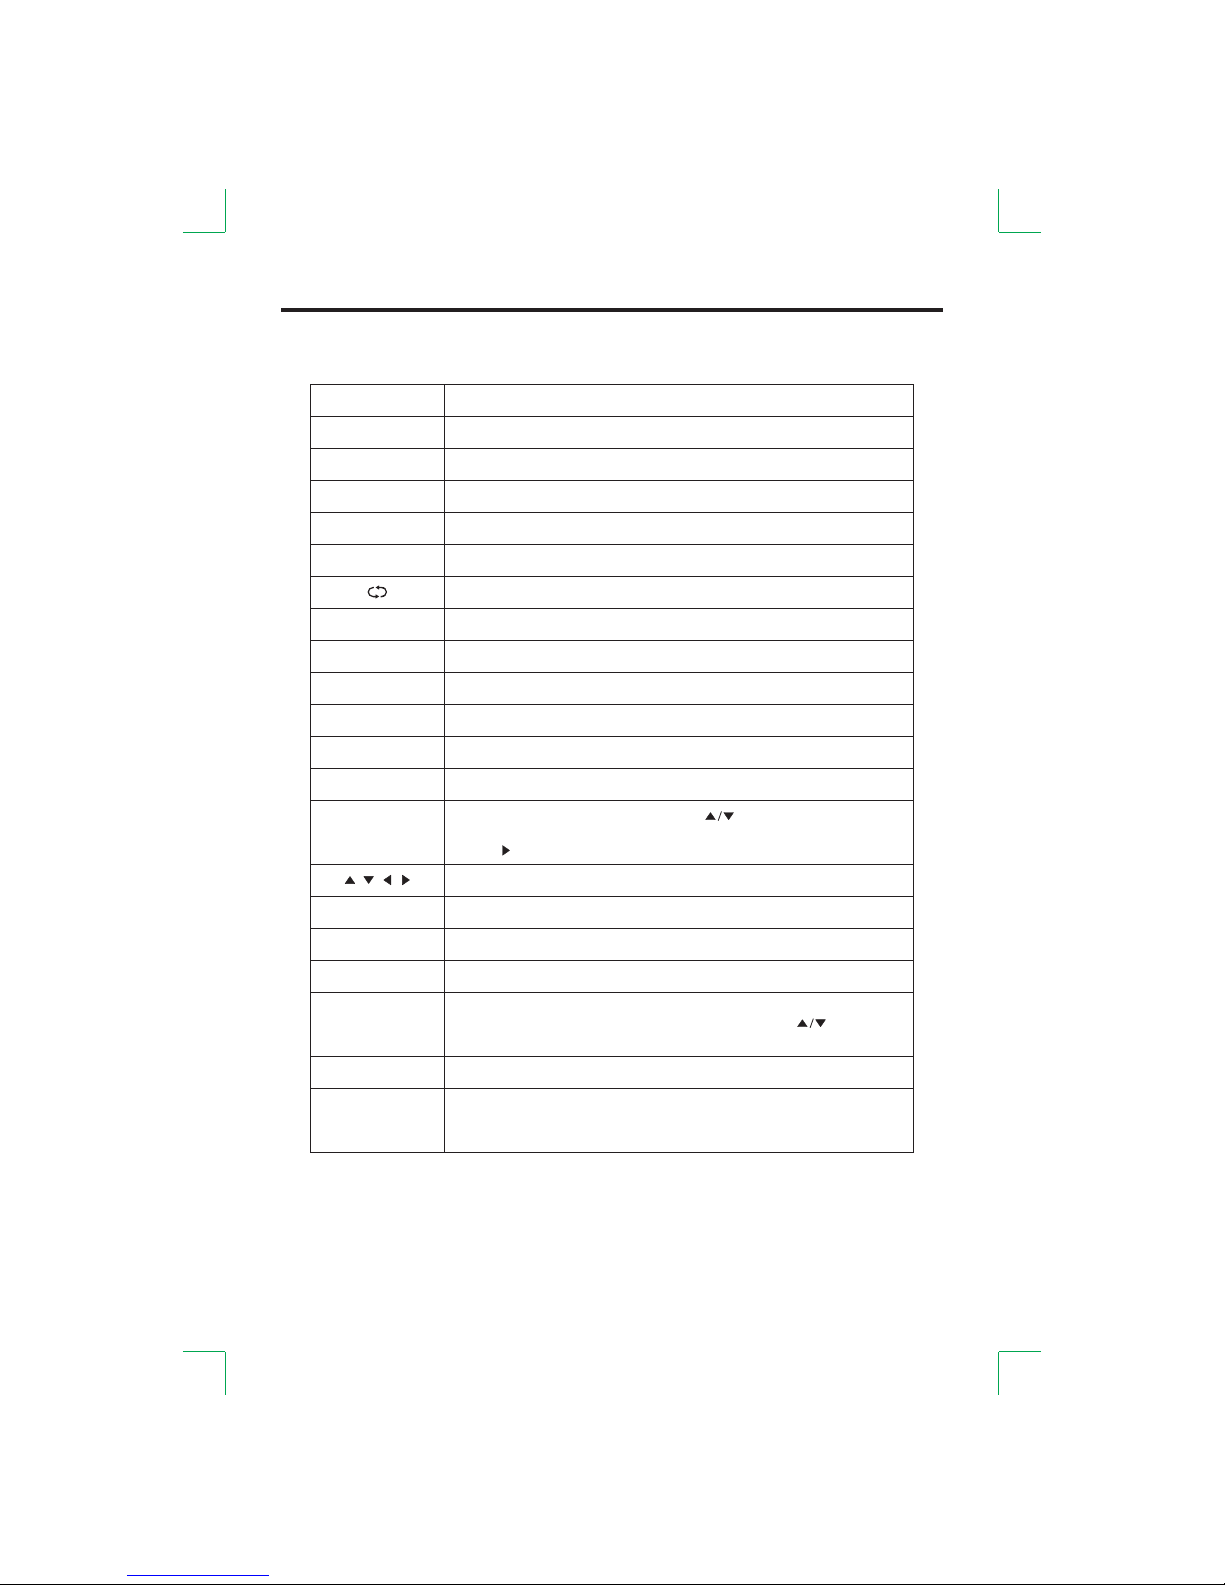
●Intr oduct ion to th e remot e contr ol func tion
Bu tto n
Carry out the function of standby and switch-on.
Set to mu te or r etu rn to p rev ious sound l eve l.
Select the TV channel you want to view by using the number buttons.
Fu nct ion
STAND BY
MUTE
ASPECT
SLEEP
FREEZE
DISPLAY
PMODE
SMODE
CH+/-
VOL+/-
SOURC E
FAV
FAV+/-
0-9
Chann el Ed it wh en se tti ng up you r TV.
RED/G REE N/
YELLO W/B LUE
EXIT/ ROO T
MENU
ENTER
Up/Do wn/ Lef t/R igh t.
Enter b utt on(us ed to select )
Show ME NU or e xit .MENU
Exit th e MEN U or re tur n to th e root of the mu lti med ia so urce.
Controls the automatic turn off time.
Static or picture (This function is action only in part of the signal source).restoration
Return to the previous channel after channels have been changed.
Display info of the current channel.
Select the aspect ratio of the screen.
Cycle through available video picture modes.
Cycle through different sound settings.
Channel up/down.
Increase/decrease the volume level.
Change favourite channel up or down.
Displ ay th e inp ut so urc e list. Pres s [ ] butto n or th e [SO URC E] the
butto n to se lec t the i npu t source you w ant . Pre ss th e butto n [ENTE R]
or the [ ] bu tto n to se lec t the d esired sou rce .
Displ ay or c anc el th e fav orite list . W hen y ou se t up a fa vor ite cha nne l,
press t his b utt on to d ispla y the f avo rit e lis t. Press the [ ] b utt ons t o
selec t the . Press t he bu tto n to pl ay.chann el [ENTE R]
Page 11
-11-
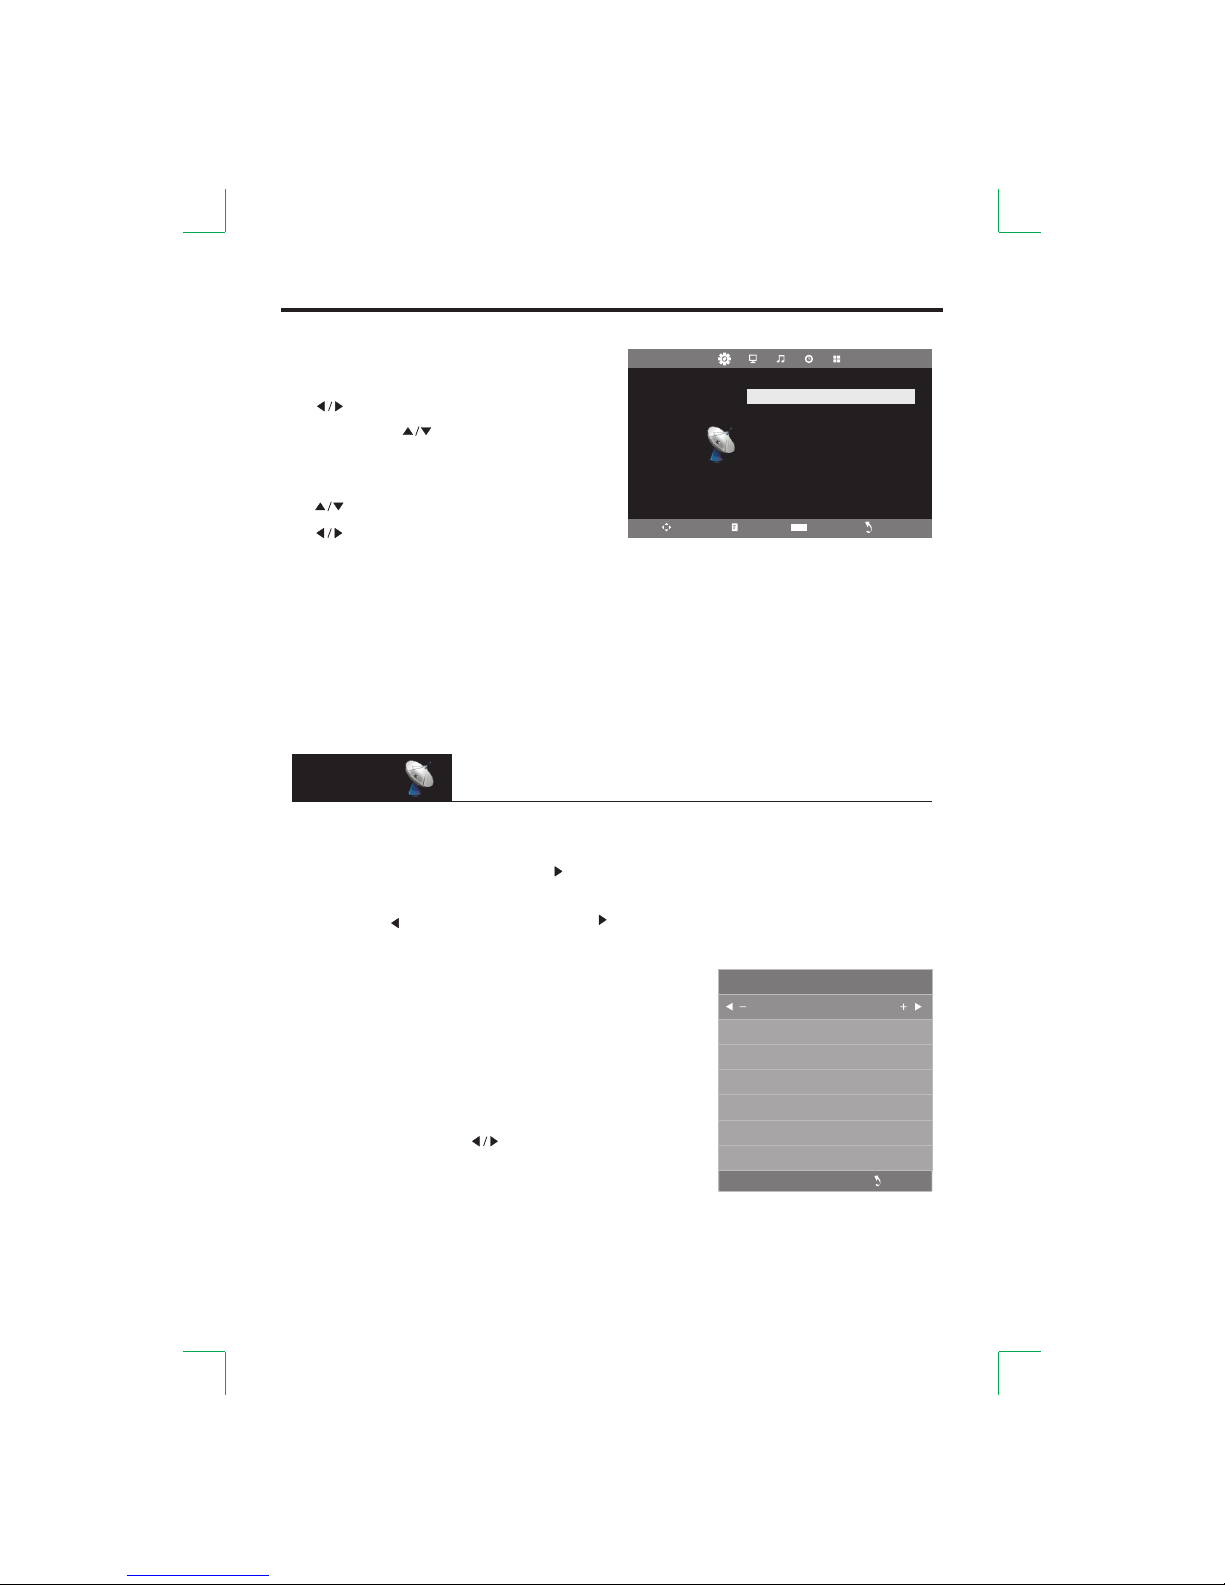
Menu Operation
● Aut o Tuni ng
[ ENTER ] the [ ] Pre ss the butto n butto n to star t Auto Se arch.or
butto n . [MENU ] [EXIT ] butto nIf you wa nt to sto p searc hing, p ress the or the
ress to conf irm or cance l. th e [ ] butto n the [ ] but ton to P
Men u
Cur rent CH
1
Col or Syst em
SEC AM
Sou nd Syst em
BG
Fin e-Tune
49. 75MHZ
AFC
On
Sea rch
ATV Ma nual Tun ing
Aut o Tuning
ATV Ma nual Tun ing
Pro gramm e Edit
CHA NNEL
Mov e Men u E nter Exi t
Enter
● Enter M enu
[MENU ]: Disp lay men u.
[ ]: Sele ct menu .
[ENTE R] or [ ]: En ter men u.
Menu Op erati on●
[ ]: Sele ct.
[ ]: Adjus t or ente r the sub m enu.
[ENTE R]: Ent er the su b menu or c onfir m.
● Exit Me nu
Press t he [MEN U] butt on to ret urn to th e previou s menu or e xit the c urren t menu;
or pres s the [EX IT] but ton to ex it menu .
This me nu only f uncti ons in TV m ode.
CHANNEL
● ATV Manua l Tuning
● Curre nt CH: Se t the cha nnel nu mber.
● Color S ystem : Selec t the col or syst em.
● Sound S ystem : Selec t the sou nd syst em.
● Fine- Tune: Adj ust the f reque ncy of th e chann el fine ly.
● AFC : Automa tic fin e tunin g.
● Searc h: Pres s the [ ] but ton to se arch.
Page 12
-12-
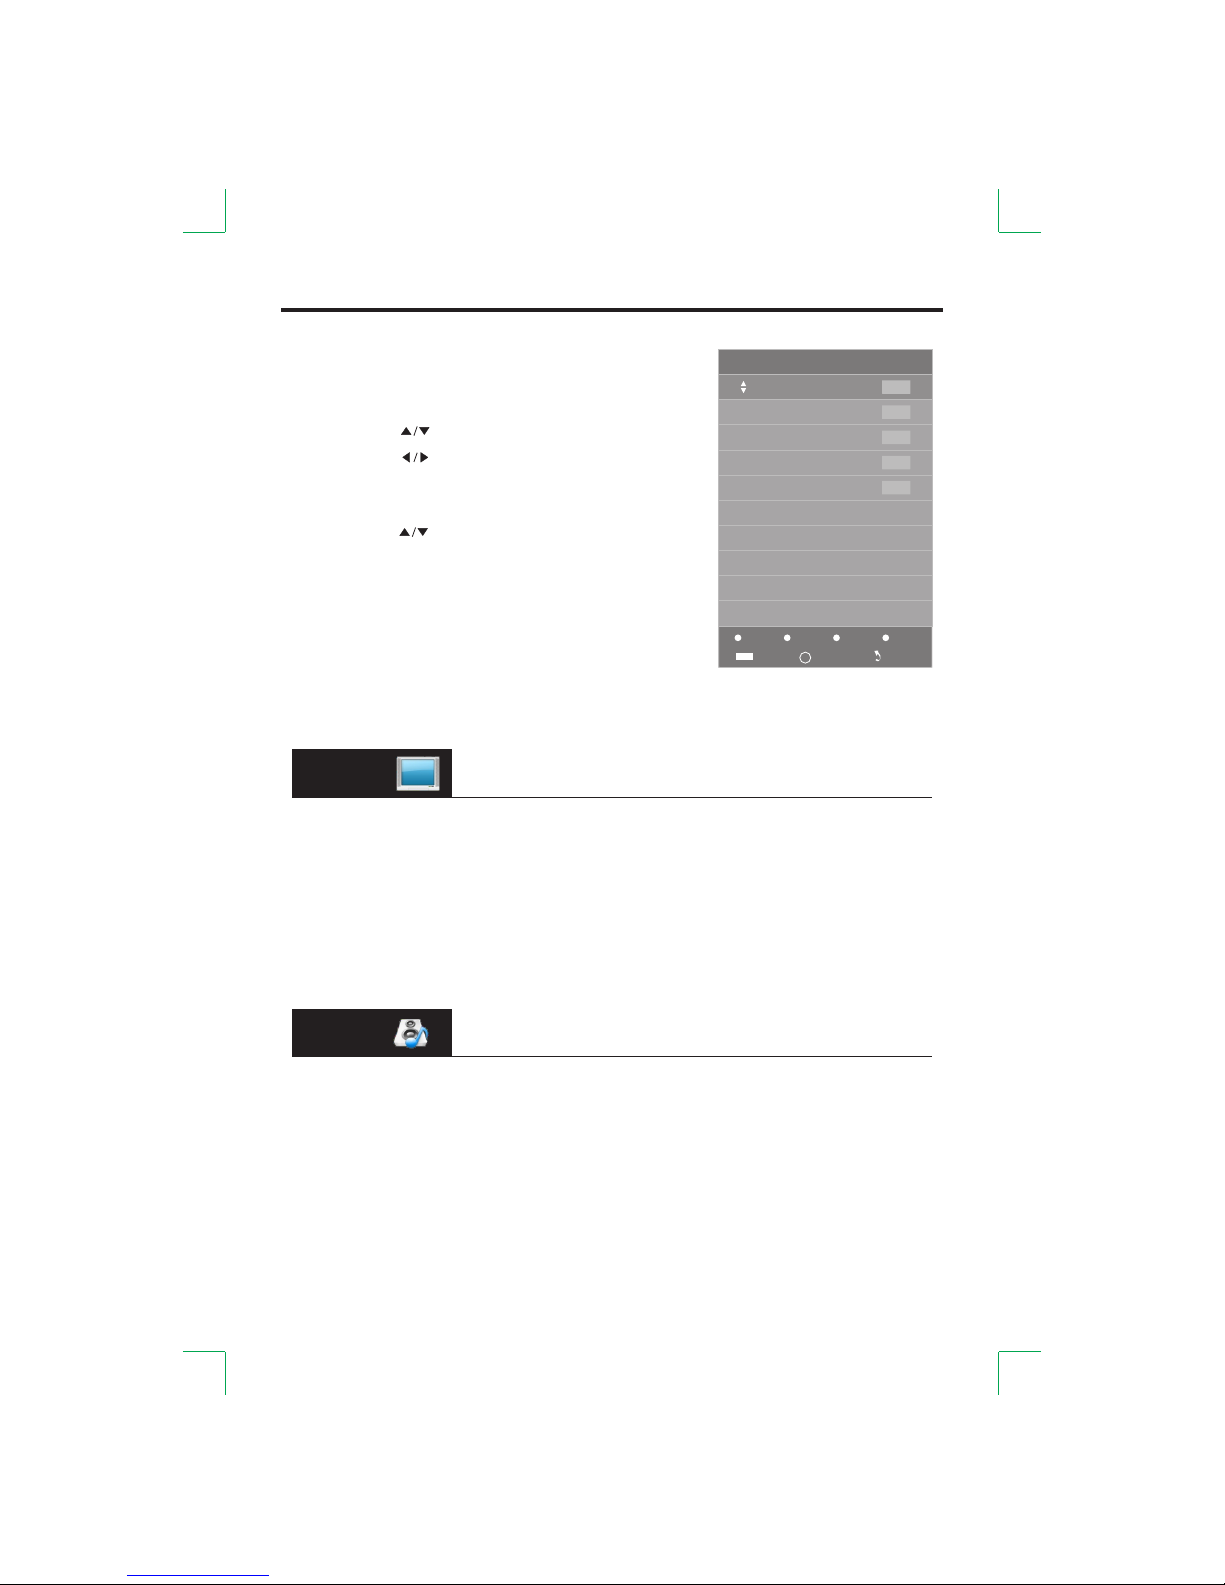
● Progr amme Ed it
[ RED]: D elete the c urren t chann el.●
[G REEN] : Renam e.●
Press t he [ ] butt on to sel ect the c harac ter.
Press t he [ ] butt on to sel ect the f igure .
Press t he [ENT ER] but ton to co nfirm .
[ Move.● YELL OW]:
Press t he [ ] butt on to sel ect the p ositi on.
Press t he [ ] b utton t o confi rm. YELLO W
[B LUE S● ]: kip the s elect ed chan nel.
Your TV set w ill ski p the cha nnel auto matic ally
when us ing the [ CH+/- ] to vie w the cha nnels. butto n
Fa v●
Add or De lete th e chann el to you r favorite list.
Menu Operation
Men u
1
2
3
4
5
ATV
ATV
ATV
ATV
ATV
Del ete
Ren ame
Mov e Ski p
Pro gramm e Edit
Ent er
Fav
FAV
ENTER
Optio ns avai lable f or adjust ment ma y be differe nt in differ ent
signa l sourc es, but f uncti on s of the sa me opti on will b e the sam e.
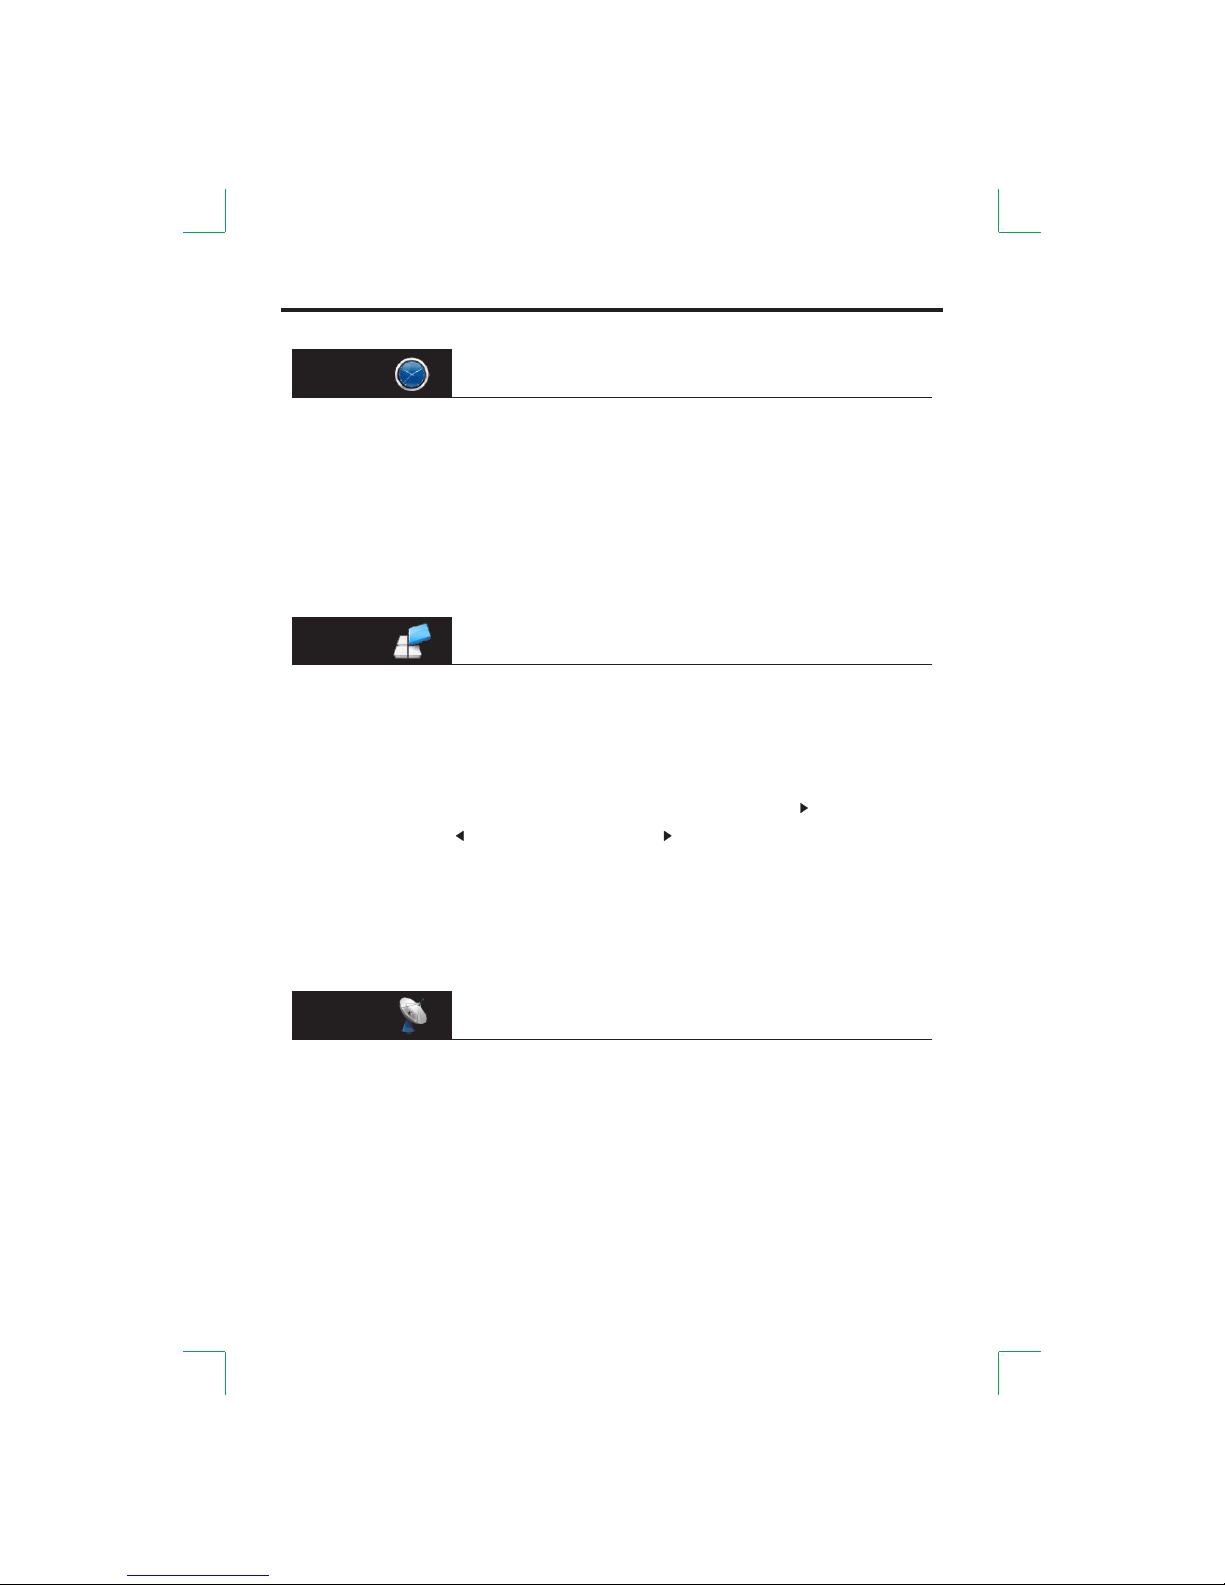
PICTURE
●Pictu re Mode : Selec t the pic ture mode t hat you f eel com forta ble wit h.
(NTSC o nly)●Cont rast/ Brigh tness /Colo r/Tint /Shar pness :
These s ettin gs can on ly be adj usted whe n the Pic ture Mo de is set t o User.
●Color Te mpera ture: S elect t he colo r tempe ratur e that yo u feel co mfort able wi th.
Noise R educt ion: You ca n clear up th e input s ignal b y setti ng the it em.●
SOUND
●Sound M ode: Se lect th e sound m ode tha t you feel co mfort able wi th.
●Treble /Bass : These s ettin gs can on ly be adj usted w hen the S ound Mo de is set t o User.
●Balan ce: Adju st the le vel of so un d comin g from th e left an d right s peake rs.
●Auto Vol ume: Wh en Auto Vo lume is O n, it wil l level o ut sudd en chan ges in th e volum e
when it o ccurs d uring c ommer cial brea ks or cha nnel ch anges .
Page 13
-13-
Menu Operation
● OSD Lan guage : Set the O SD disp lay lan gu age.
Aspec t Ratio : ● Set the As pect Ra tio of th e scree n.
● when th ere is no i nput si gnal to eit her blu e or blac kBlue Sc reen: S et the ba ckgro und color .
Key Loc k: When s et On, the c ontro l panel f uncti on key is loc ked.● to
● [ENTE R] butt on the [ ] Re set: Re call th e defau lt sett ing. orPress t he butto n to ente r,
and the n press to con firm or canc el. the [ ] b utton the [ ] but ton to
Note:
When yo u play te xt in TEX T med ia, you c an adju st Regi on Lang uage/
Encod ing Sta ndard .
Conne ct the PC t to com puter, a nd sele ct PC sou rce.ermin al
TIME
● Sleep T imer: S elect t he time i n minut es that y ou want t he TV t o shut of f
autom atica lly. Can cel it by s ettin g it to Off.
Auto Sl eep: Se lect th e time in h ours that you want t he TV t o remai n on afte r your●
last op erati on. Can cel by se tting it to O ff.
OSD Tim er: ● Set th e OSD dis play ti me.
OPTION
SCREEN
● Aut o Adj ust : Autom atica lly adj ust.
● Horiz ontal P os. : Shi ft the sc reen le ft or right .
● Vertic al Pos. : S hift th e scree n up or down.
● Clock : Adjust t he scal ing of im age in hori zonta l.
● Phase : Ad just th e inter nal sig na l phase .
Page 14
-14-
Media Operation
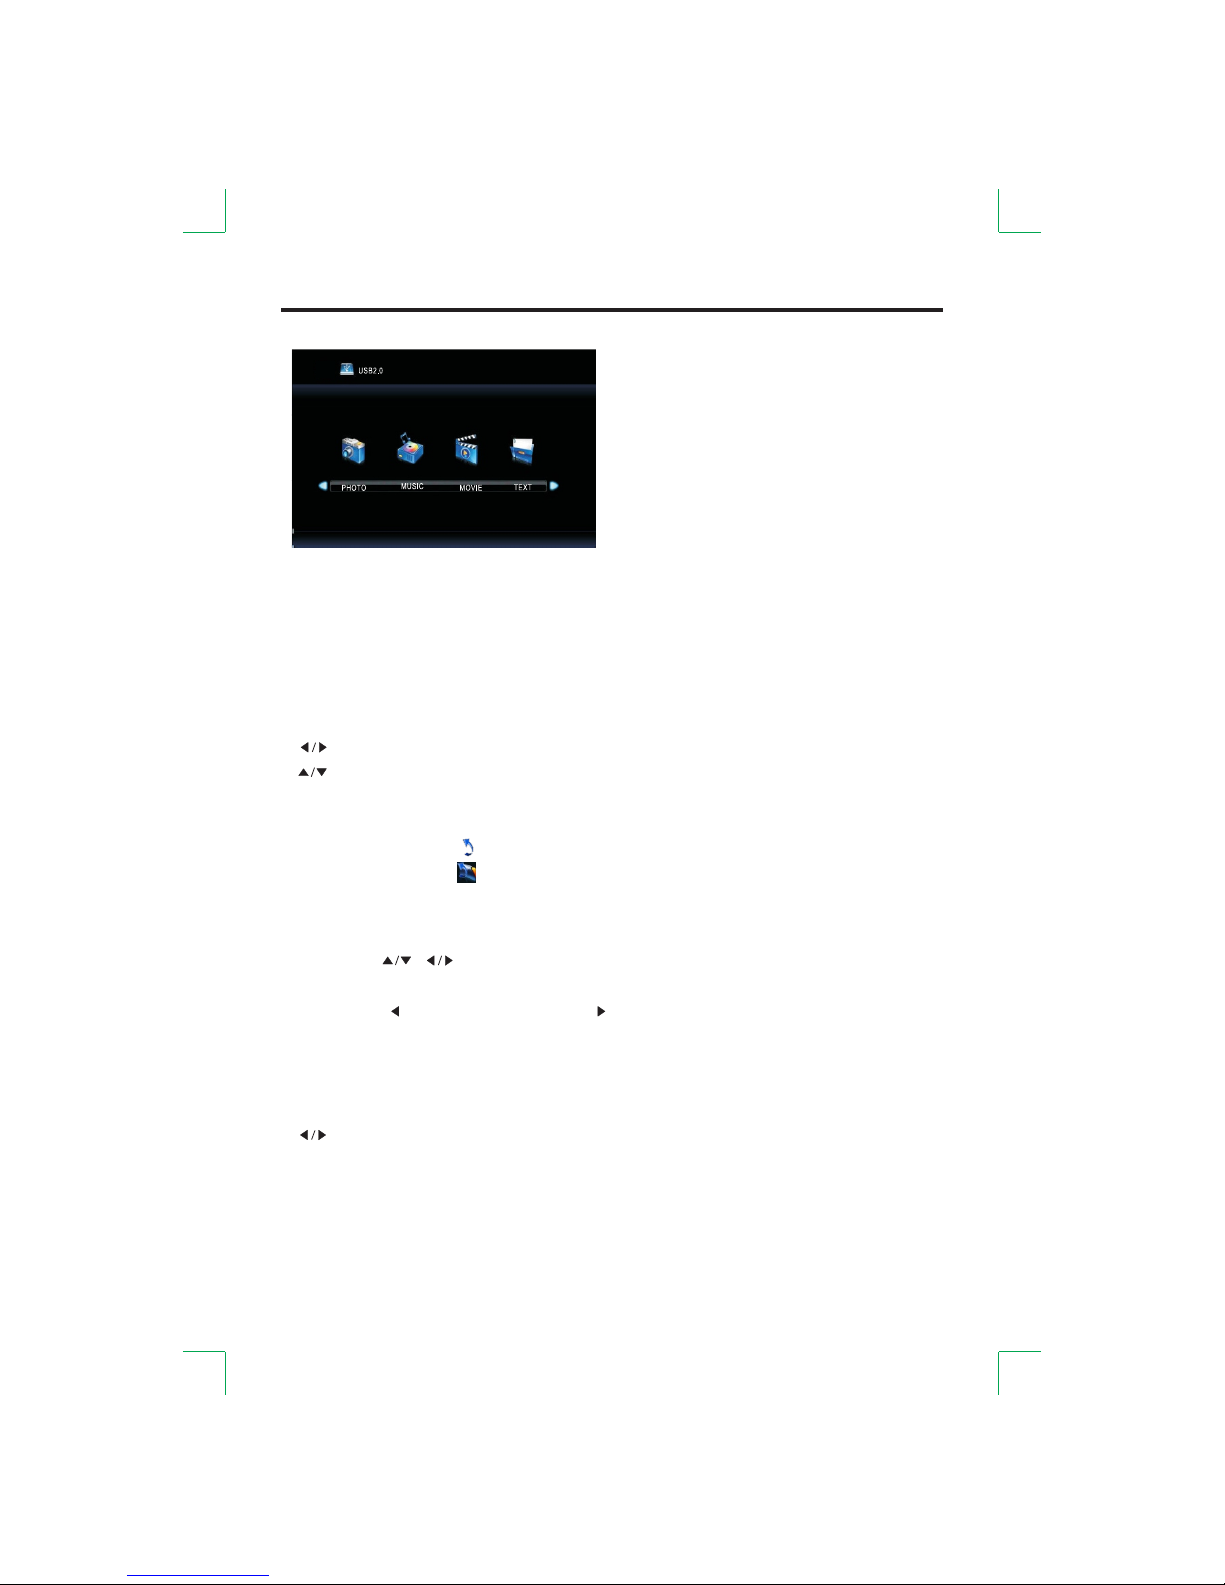
The USB s torag e devic es be inser ted int o the ter minal .shoul d
Selec t the med ia sour ce and view t he mult imedi a.
If you wa nt to exi t the other s ource s.multi media y ou can ch oose
● Delet e
●Pres s the button s to sele ct the fi le that y ou want t o delet e.[ ]/[ ]
●Pres s the b utton t o enter. [RED]
●Pres s the [ ] but ton the [ ] b utton t o to co nfirm o r cancel .
● MENU Op erati on
[ ]: Sele ct medi a or sele ct file .
elect f ile.[ ]: S
C .[ENTE R]: onf irm or pl ay
[ R eturn t o root.ROOT] :
The ico n of the me nu [ Return t o root. ]:
The ico n of the me nu [ Return t o previ ous. ]:
●M ENU Ope ratio n Durin g Play
elect m enu whe n playi ng a file.[DISP LAY]: S
elect .[ ]: S
C .[ENTER ]: on firm
uit the e ntire m enu.[ROOT ]: Q
Page 15
-15-
Media Operation
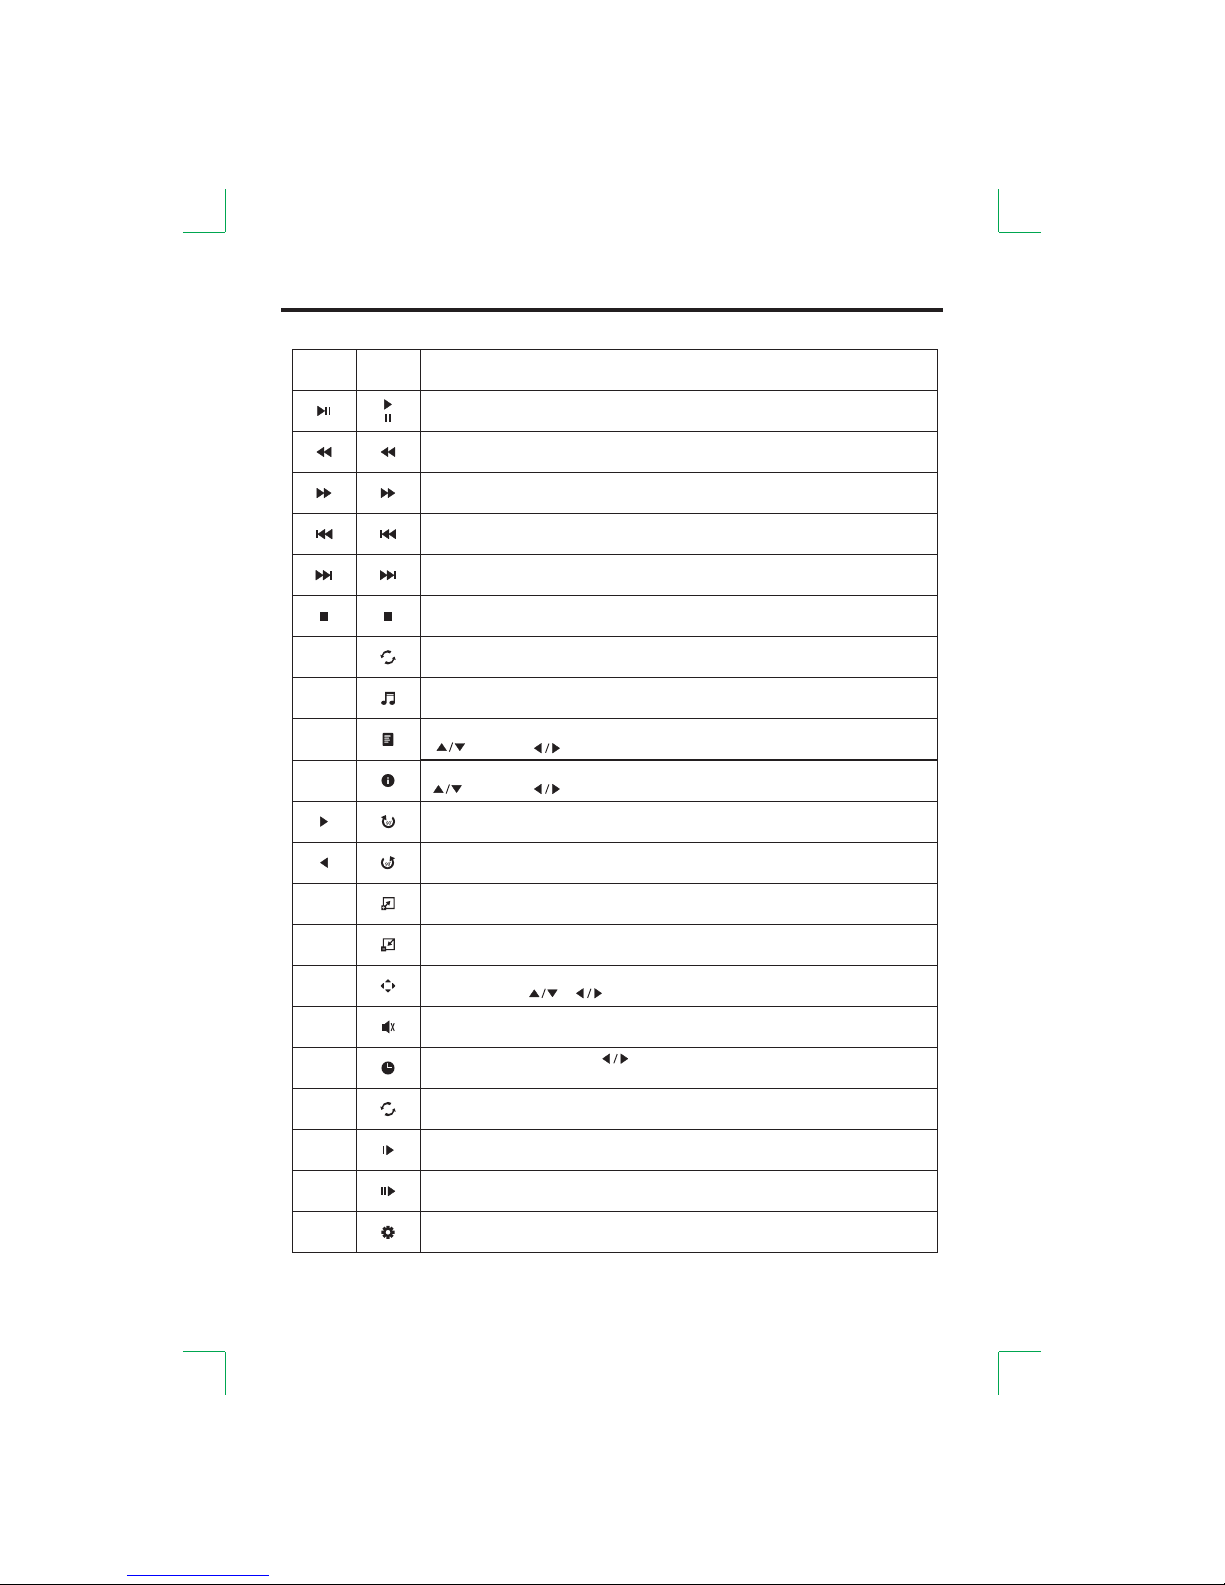
Play or s top t he ba ckg rou nd musi c.(Mu sic f ile a nd pl aying file i n one f old er.)
Rotat e clo ckw ise .
Rotat e cou nte rcl ock wise.
Selec t to en lar ge pi ctu re size.
Selec t the r epe at mo de.
Stop an d bac k to th e fol der i nterface .
Play or p aus e.
Play pr evi ous .
Play ne xt.
Play ba ck fa ste r / Pla y the p revious pa ge in t he TE XT Media .
Play fo rwa rd fa ste r / Pla y the next pag e in th e TEX T Media .
Selec t to re duc e pic tur e size.
Play th e mov ie st ep by s tep .
Play sl owe r.
Mute or c anc el.
Menu
Displ ay or c anc el th e inf ormat ion o f the c urr ent f ile. n the MO VIEI Media , pre ss
[ ] se lect [ ] a selec t cl ose res s the [ENTER ] but ton t o exi t. to / to / to . Pdj ust
Show pl ayl ist .
[ ]: sele ct [ ]: s wit ch [ENT ER] : con fir m. / /
Selec t A-B t o pla y rep eat edly.Pr ess once to se t to A, a nd pr ess a gai n to set to
B, then p res s a thi rd ti me to c ancel.
AB
Zoom ou t the p ict ure f irs t. Highlig ht th e ico n and p ress the [EN TER ] but ton ,
then pr ess t he [ ]/ [ ] but ton t o move the pic tur e.
Selec t pla yin g tim e. 0-9]Pres s [ ] to se lect; [ to ad just. Pres s the [ ENT ER]
butto n to se lec t pla yin g time.
Fu nct io n
Select aspect ratio.
Butto n
GOTO
REPEAT
A-B
ASPECT
Page 16
-16-
Specifications
Note:
Design and specifications are subject to change without notice.
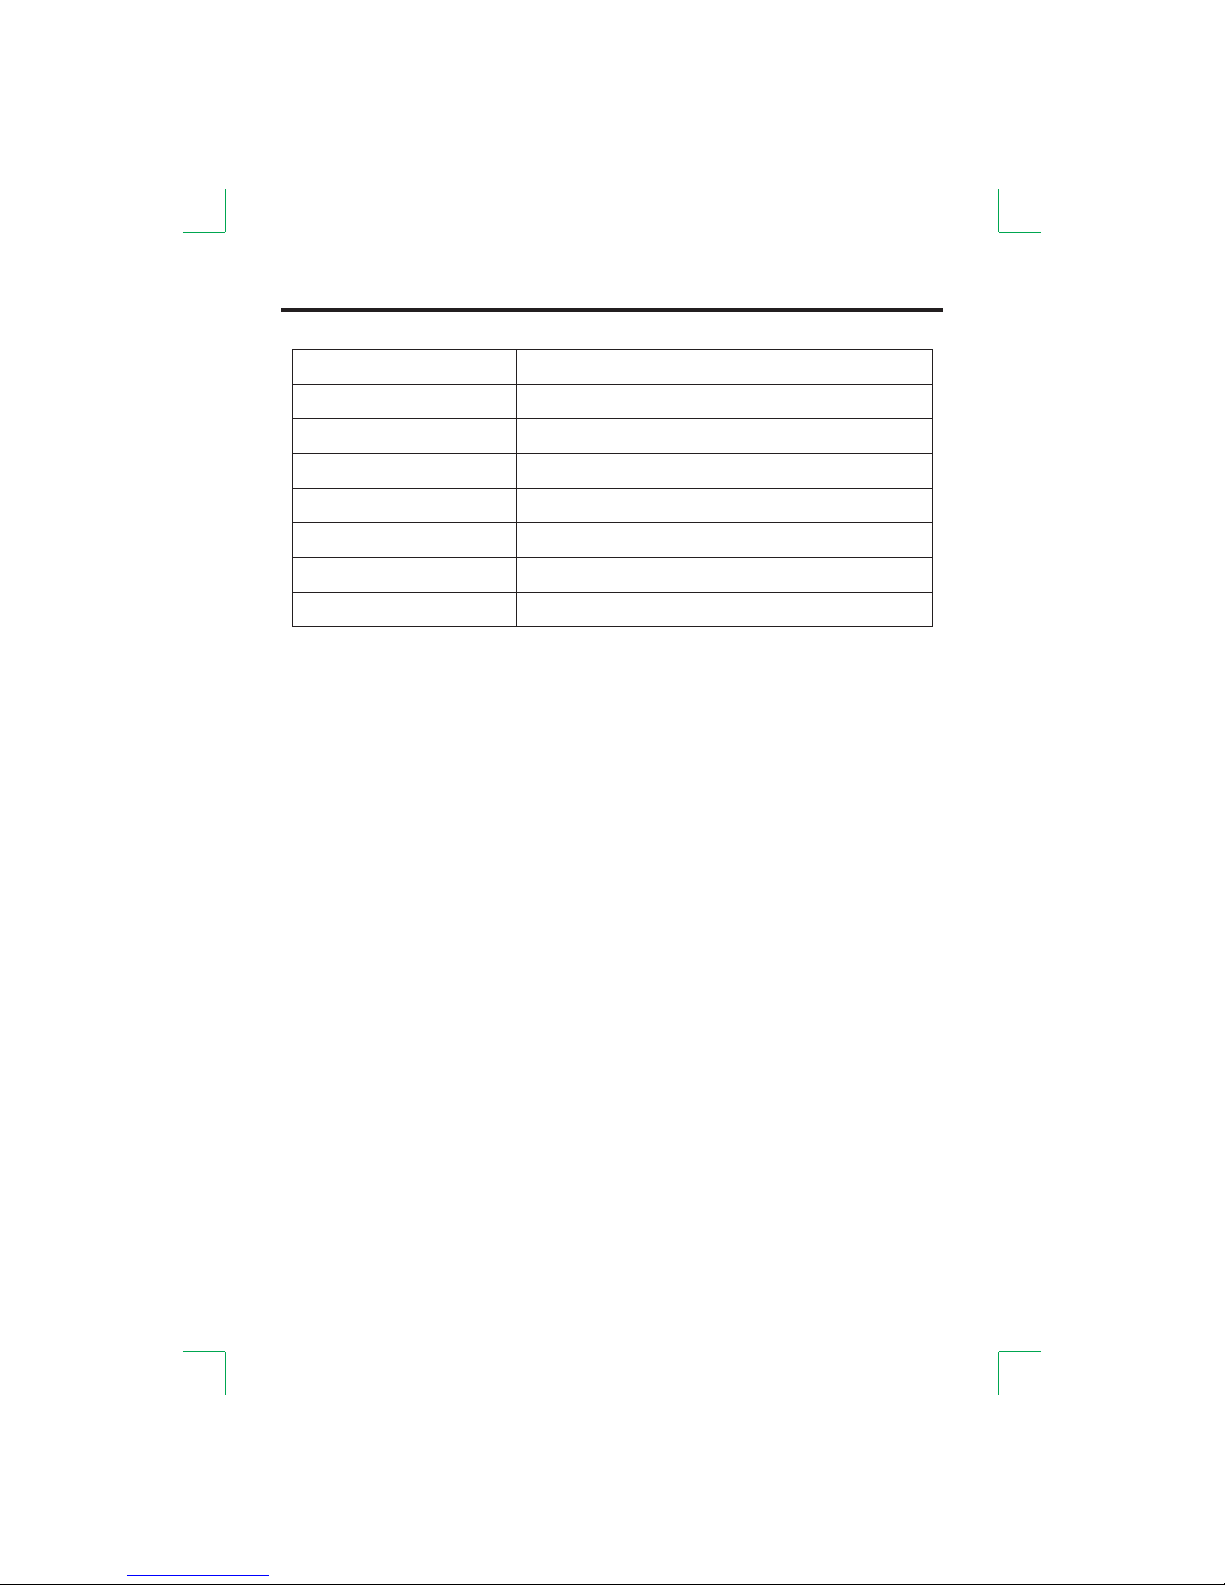
Supply Voltage
Standby Power Consumption
Power Consumption
Video System
Sound System
Max Storage Channels
≤0.50W
see the r ati on la bel
see the r ati on la bel
PAL、SECAM
B/G、D/K、I
199CH
Max Output Power (Audio)
Input I mpe dan ce
2×6W (8Ω)
75Ω
Page 17
-17-
If the di splay f ails or t he perf ormance d ramat icall y chang es, che ck the di splay i n
accor dance w ith the f ollowin g instr uctio ns. Rem ember t o check t he peri phera ls to
pinpo int the s ource o f the fai lu re. If th e displ ay stil l fails t o perfo rm as exp ected ,
conta ct the de aler fo r assis tance.
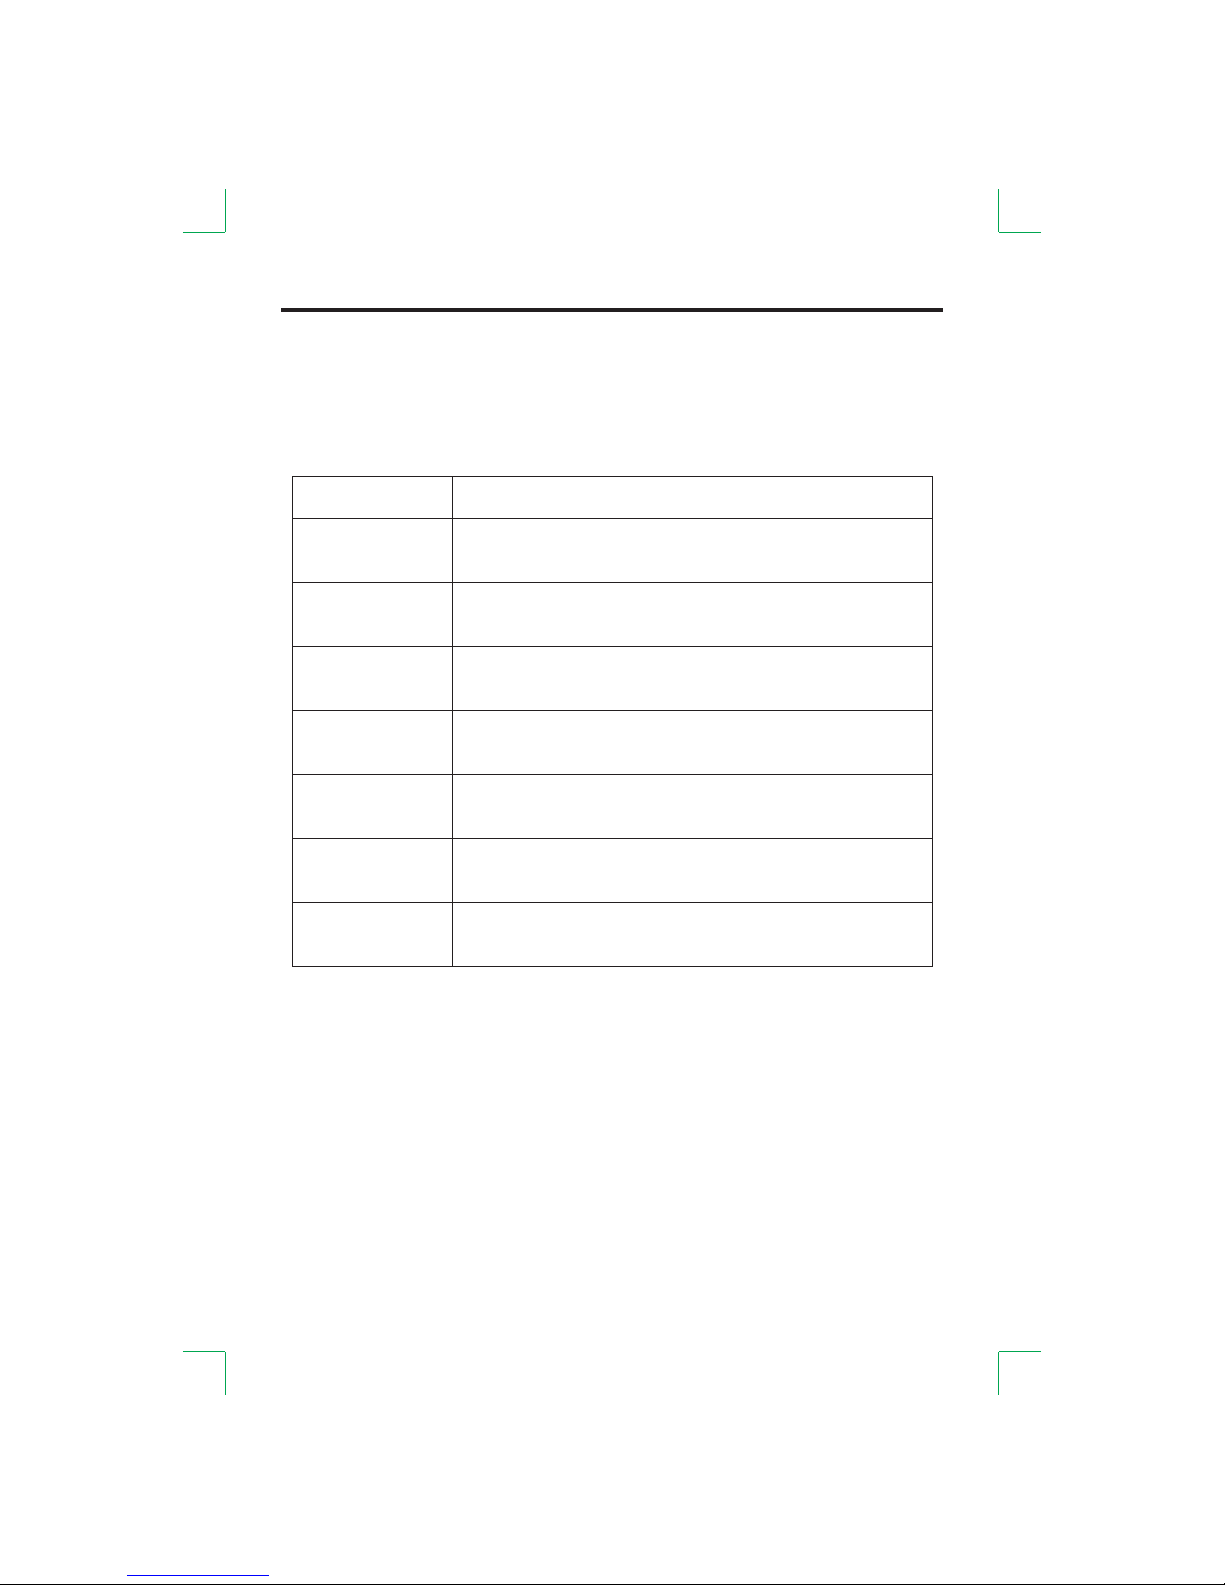
No Powe r
No Soun d
Remot e No Re spo nse
Sympt om
DEALI NG ME THO D
TV set ne eds t o
be clea ned
Some In ter fer enc e In
The VGA Mo de
Abnor mal C olo r
The Scr een F las hes
In VGA Mod e
Check t he po wer c onn ect ion.P ull t he pl ug ou t, wa it for 60 seco nds ,
then re con nec t the p owe r and tur n on th e set .
Incre ase t he vo lum e. Ch eck if the set i s on th e mut e sta te or not.
Check t he vo ice s ett ing c ondition . Che ck th e voi ce mode sett ing
condi tio n.
Check t he effec t of th e bat ter ies . If necessa ry, r epl ace t he
batte rie s or cl ean t he re mote contr ol se nso r win dow. The di stance
betwe en th e set a nd th e rem ote con tro l sho uld b e les s than 6 meter s.
The par ame ter i s too b ig. Please use s afe ty mo de wh en restart ing t he PC
and set t he pa ram ete r of th e monitor ac cor din g to th e instruct ion s.
Modif y the p ara met er of t he monitor a cco rdi ng to t he instruc tio n man ual .
Check t he an ten na co nne ction .
Pleas e pul l the p lug o ut wh en clea nin g the L CD sc ree n. Using sof t,
clean c lot h to wi pe it o ff. I f nee ded t o clean furt her, p lea se us e dry cloth,
do not us e nap hth a or ot her t hinne rs li qui ds.
Simple Troubleshooting
 Loading...