

Page 1
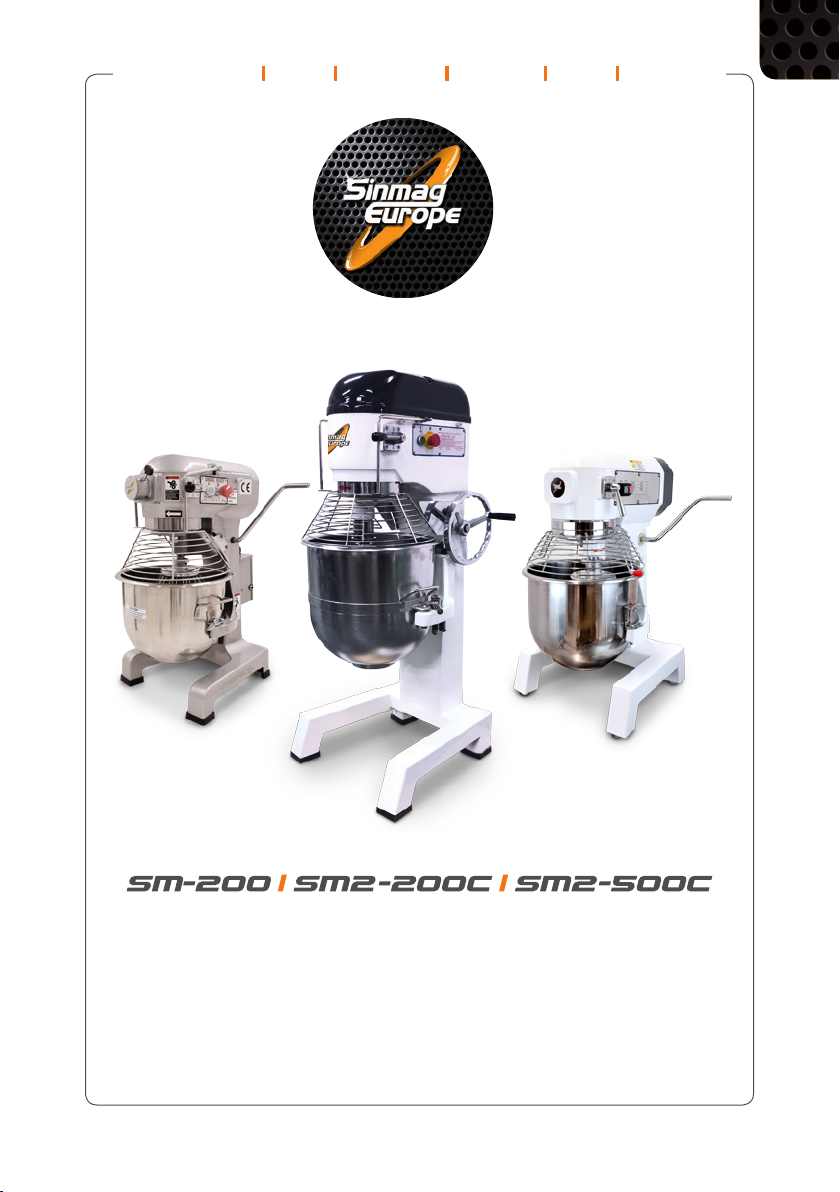
Mode d’emploi Manual Handleiding Handbuch Manual Istruzione
FR
Batteur-melangeur
Planetary mixer
Klopper-menger
Planetenrührmaschine
Batidoras
Mascolatrici planetarie
Page 2

FR
Nous vous félicitons pour l’achat de votre batteur-mélangeur.
Avant l’expédition, cette machine a été contrôlée dans notre dépôt en
Belgique. De cette façon, nous pouvons vous assurer une livraison d’une machine prête à
l’installation.
Pour un bon emploi et une longue durée de vie de la machine, nous vous recommandons
de lire ce mode d’emploi avec attention avant d’employer la machine.
Sinmag Europe vous remercie pour la conance et l’intérêt et nous vous souhaitons
beaucoup de joie au travail avec cette machine
Sinmag Europe Team.
2 3
Page 3
FR
REMARQUE : L’utilisation de ce matériel ou de tout équipement industriel peut
comporter des dangers comme une surface chaude, des bords tranchants,
un risque de choc électrique. Ce manuel est destiné à vous aider pour une
utilisation efcace et en toute sécurité de notre appareil.
Toute machine, qu’elle soit considérée comme dangereuse ou non, doit être utilisée selon
les principes des bonnes pratiques de fabrication.
L’utilisateur de cet appareil doit avoir atteint l’âge de la majorité. Avant d’utiliser la machine,
veuillez lire attentivement et respecter les instructions de ce manuel pour travailler en toute
sécurité et pour faire un usage optimal de votre équipement.
1. INTRODUCTION
1.1 BRÈVE INTRODUCTION
Ce manuel a pour but de vous présenter comment installer, utiliser et entretenir le batteurmélangeur SM-200 SM2-200C SM2-500C.
Nous vous remercions d’avoir choisi comme fournisseur.
Pour toute question, veuillez contacter notre agent ou distributeur local qui vous fournira un
service parfait et rapide.
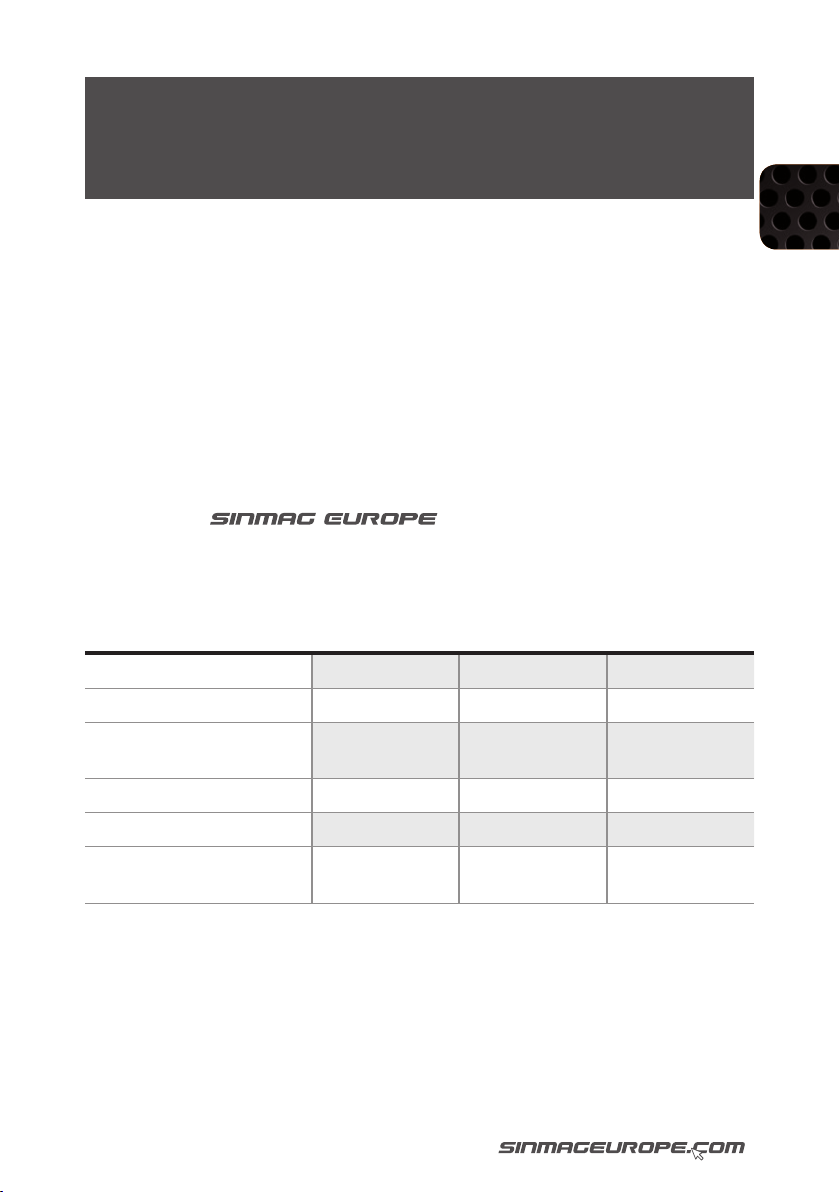
1.2. SPÉCIFICATIONS
MODEL SM-200 SM2-200C SM2-500C
CAPACITÉ
PUISSANCE MOTEUR
Trs/Min à 50 Hz
20 (10 opt.) 20 40 (20 opt.)
0,9 kW 1,1 kW 1,1 kW
158/293/535 158/293/535 116/208/464
POIDS NET MACHINE
VOLTAGE
OPTION RÉDUCTION DE CUVE
110 kg 60 kg 190 kg
220V 1Ph 50Hz 220V 1Ph 50Hz 220/380V 3Ph 50Hz
✓ 10 L ✘ ✓ 20 L
3
Page 4

FR
2. CONSIGNES DE SÉCURITÉ
2.1 SYMBOLES DE SÉCURITÉ
Pour votre sécurité, veuillez prêter attention au symbole suivant inscrit sur la machine :
Cette étiquette prévient que seul un personnel de service qualié peut accéder
à cet élément /endroit et que l’agent doit débrancher l’alimentation électrique
avant d’effectuer un nettoyage ou l’entretien.
2.2 CONSIGNES DE SÉCURITÉ POUR LE TRAVAIL
La machine doit être utilisée uniquement par un personnel formé valablement à cet effet et
qui a été formé au sujet du contenu de ce manuel.
Pour garantir un travail en toute sécurité, respecter impérativement les instructions
suivantes :
1. Installer la machine en respectant les exigences en matière de sécurité dans le lieu de
travail.
2. Ne pas placer la machine à côté d’une source de chaleur et ne pas utiliser la machine
dans un environnement qui présente un risque d’explosion.
3. Utiliser la machine avec une grande attention et ne vous laissez jamais distraire.
4. Ne pas porter de vêtements amples ni de manches larges ou ouvertes.
5. Ne pas enlever, recouvrir ni modier les plaques signalétiques disposées sur la structure
de la machine.
6. Ne pas utiliser la machine comme une surface de travail et ne pas placer d’objets qui ne
sont pas nécessaires pour les opérations normales de travail.
7. Ne pas utiliser la machine avec des connexions électriques provisoires ou des câbles
non isolés.
8. Vérier périodiquement l’état du câble d’alimentation électrique et du serre-câble sur le
corps de la machine, et le faire remplacer dès que cela est nécessaire par un personnel
qualié.
9. En cas de fonctionnement défaillant ou anormal, de casse, de déplacement incorrect ou
de bruit inhabituel, arrêter immédiatement la machine.
10. Avant d’effectuer le nettoyage ou la maintenance, débrancher la machine du secteur.
11. Porter des gants de protection pour effectuer le nettoyage et la maintenance.
12. Pour toute maintenance extraordinaire, s’adresser au fabricant ou à un personnel
qualié ou agréé.
13. Ne pas utiliser de jet d’eau ni pulvériser de l’eau pour nettoyer la machine.
14. Pour manipuler des accessoires tranchants, porter des gants résistants aux coupures.
3. INSTALLATION
3.1 EXIGENCES GÉNÉRALES POUR L’INSTALLATION
REMARQUE : Il est capital d’installer cette machine correctement et de s’assurer de
son fonctionnement correct avant son utilisation. L’installation doit être conforme aux
exigences locales électriques, en matière d’incendie, de santé et de sécurité.
Cette machine est conçue pour vous assurer un service satisfaisant pendant de
nombreuses années. Une installation correcte est essentielle pour obtenir les meilleures
performances, un fonctionnement efcient et sans failles.
4 5
Page 5

FR
3.2 INSTALLATION
Cette machine doit être installée dans une pièce aérée pour empêcher la concentration de
substances nocives pour la santé dans le local.
Les installations doivent être effectuées uniquement par des agents qualiés. Le nonrespect des normes applicables et des spécications du fabricant dans cette section pour
installer la machine annulera la garantie.
Des composants comportant des éléments de réglage protégés (par ex. scellés à la
peinture) par le fabricant doivent être réglés uniquement par un agent de service agréé. Ils
ne doivent pas être réglés par la personne qui installe la machine.
Il incombe au propriétaire de prendre les dispositions pour toutes les alimentations
necessaires de la machine.
3.3 DÉBALLAGE
A la réception de la machine, enlever tout l’emballage et les protections pour le transport, y
compris les bâches de protection en plastique des panneaux extérieurs.
Vérier si la machine et les pièces ne sont pas endommagées. Signaler tout dommage
immédiatement au transporteur et au distributeur. Ne jamais essayer de faire fonctionner la
machine avec des pièces endommagées.
Signaler toute carence au distributeur qui a livré cette machine.
3.4 EMPLACEMENT
1. Sélectionner un emplacement pour la machine de façon à disposer d’un espace libre
autour de la machine d’au moins 0,6 m pour utiliser, nettoyer et entretenir la machine.
2. Positionner la machine dans sa position correcte de travail. La machine doit être posée
sur un sol plat, solide et sec.
3. Il est recommandé que la machine soit de niveau de l’avant à l’arrière et d’un côté à
l’autre. Cela garantira une grande stabilité.
3.5 BRANCHEMENT ÉLECTRIQUE
1. Une alimentation électrique doit être accessible à portée du câble électrique inclus. Ne
pas utiliser de rallonges pour raccorder le câble électrique de la machine au secteur.
2. Avant d’effectuer les branchements électriques, lire les spécications sur la plaque
signalétique an de s’assurer qu’elles sont conformes à celles de l’alimentation
électrique. Le branchement électrique doit être effectué par un technicien de
maintenance qualié qui respectera toutes les normes de sécurité applicables et les
normes électriques nationales.
3. Vérier que la machine est correctement branchée (rotation). Si nécessaire, vous devrez
inverser la position des 2 ls de phase.
Lors du branchement de la machine au secteur, assurez que les éléments suivants sont
bien présents :
1. Un disjoncteur isolant est installé à 2 m au maximum de la machine.
2. Un passe-câble /presse-étoupe est installé autour de l’orice d’entrée du câble
d’alimentation électrique dans la machine.
3. Toutes les connexions de câblage doivent être vériées et étanches.
Une fois que le branchement électrique a été effectué, la machine est prête à l’emploi.
5
Page 6
FR
4. INSTRUCTIONS D’UTILISATION
4.1. SÉLECTION DE L’OUTIL
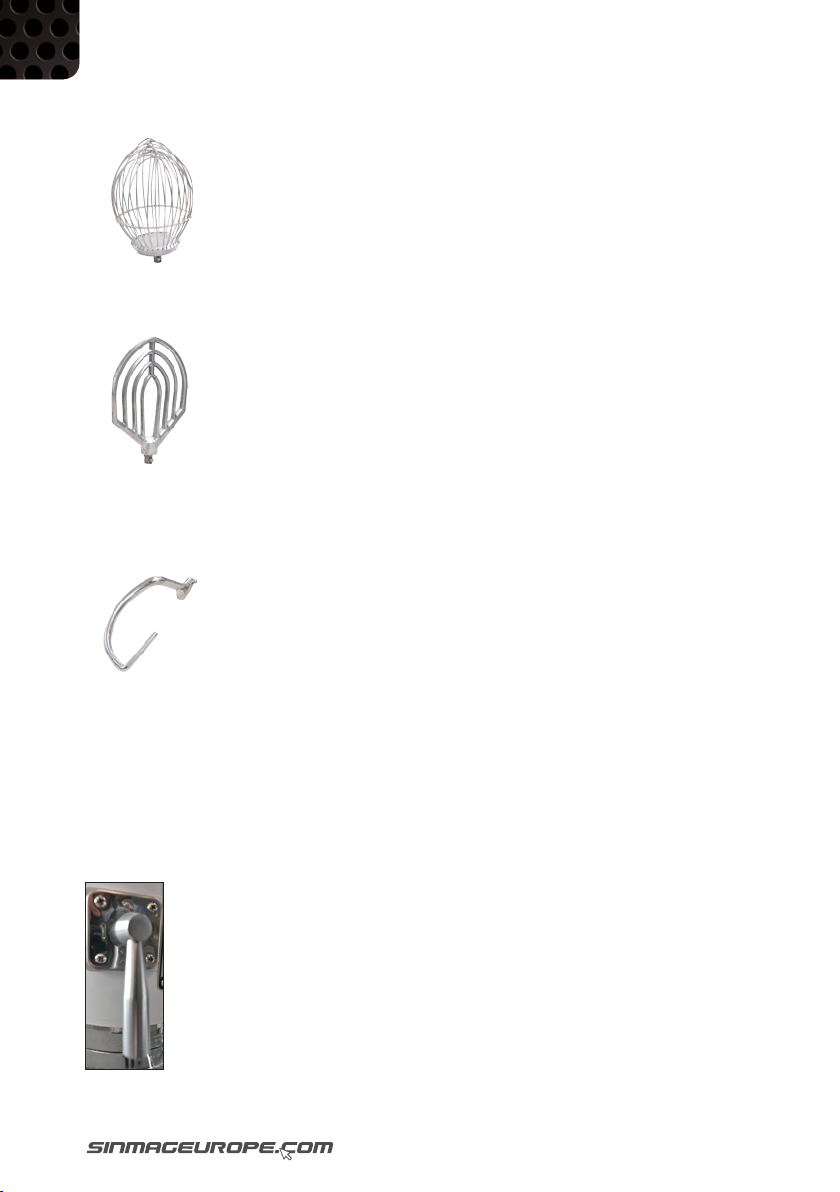
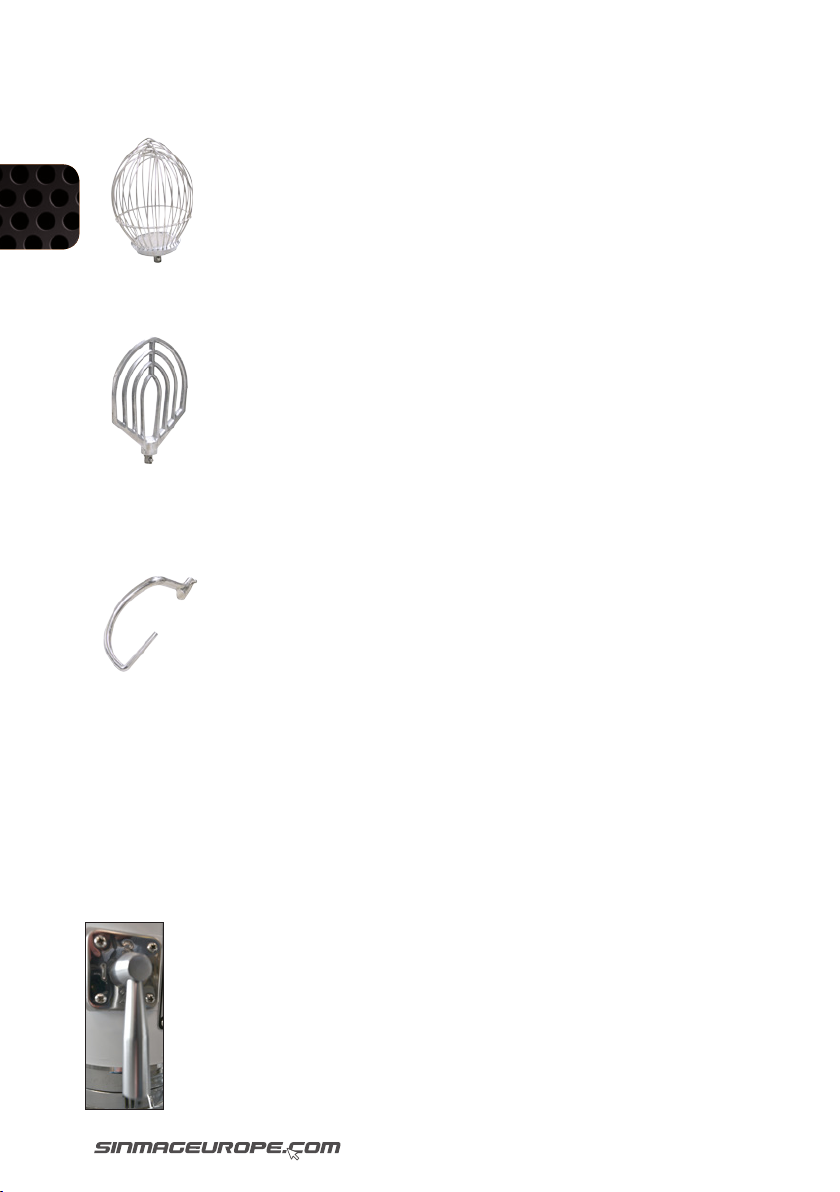
Fouet : pour des mélanges légers comme de la crème fouettée, mayonnaise, œufs en
neige, pâtes à crêpes ou meringue.
Palette: pour des mélanges plus fermes comme de la pâte pâtissière, à gâteaux, biscuits,
glace ou purée de légumes.
Crochet: pour des mélanges plus lourds en boulangerie ou pâtisserie.
4.2. LEVAGE DE LA CUVE
Tournez la manivelle (ou poussez le levier) dans le sens contraire des aiguilles d’une montre
pour abaisser la cuve. Et ainsi garantir un accès aisé pour remplir et vider la cuve. Pour
relever la cuve, tournez la manivelle (ou tirez le levier) dans le sens des aiguilles d’une
montre jusqu’à ce qu’elle atteigne la butée supérieure.
4.3. RÉGULATEUR DE VITESSE:
Pour changer de vitesse, d’abord arrêter le batteur ensuite seulement changer
le sélectionneur de vitesse. La vitesse 1 est la plus lente et la vitesse 3 la plus
haute. On utilise les vitesses inférieures pour des mélanges plus lourds type
pâte. On utilise la vitesse la plus haute pour des mélanges légers comme la
crème fouettée, les œufs ou des substances assez nes.
6 7
Page 7

FR
5. OPÉRATION
• Mettez les ingrédients dans la cuve ensemble avec l’outil choisi.
Fixez la cuve dans les bras de cuve.
• Fixez l’outil dans la tête planétaire.
• Levez la cuve à la position supérieure avec la roue d’élevation de cuve
(ou le levier).
• Mettez le levier de vitesse dans la vitesse souhaitée et mettez la machine en marche. Vous
devrez fermer la grille de sécurité pour pouvoir mettre la machine en marche.
• Arrêtez la machine après l’opération et descendez la cuve avec la manivelle (ou le levier).
Enlevez l’outil.
• Sortez la cuve et l’outil et enlevez le produit melangé.
6. SÉCURITÉ
• Déconnectez la machine avant de nettoyer ou faire l’entretien de la
machine.
• Ne jamais essayer de nettoyer la machine quand elle fonctionne sous peine de blessure
sérieuse.
• Ne jamais mettre ses mains ou un ustensile de cuisine dans la cuve quand celle-ci est en
mouvement.
• Ne jamais utiliser la machine quand la grille de sécurité est enlevée ou le switch non
fonctionnel.
• La plupart des mélanges devraient être fait en démarrant la machine lentement et en
augmentant la vitesse au fur et à mesure.
7. NETTOYAGE ET ENTRETIEN
• Nettoyez la surface de la machine avec un tissu après chaque utilisation. Utiliser un
chiffon humide avec un détergeant doux.
• Lubriez les glissières de levage avec de l’huile. Levez et descendez la cuve plusieurs
fois de suite pour bien lubrier les glissières. Si vous éprouvez des difcultés, enlevez
d’abord les résidus de pâtes dans les glissières et lubriez à nouveau. Aidez le
mouvement de la cuve si malgré tout vous éprouvez encore des difcultés à faire monter
et descendre la cuve.
• Si après avoir lubrié les glissières, vous éprouvez toujours des difcultés, vous pouvez
ajustez la vis sous le ressort pour renforcer la résistance du ressort et ainsi la force de
l’élévateur.
• Vériez le niveau d’huile dans la boite à vitesse au moins une fois par mois.
7
Page 8
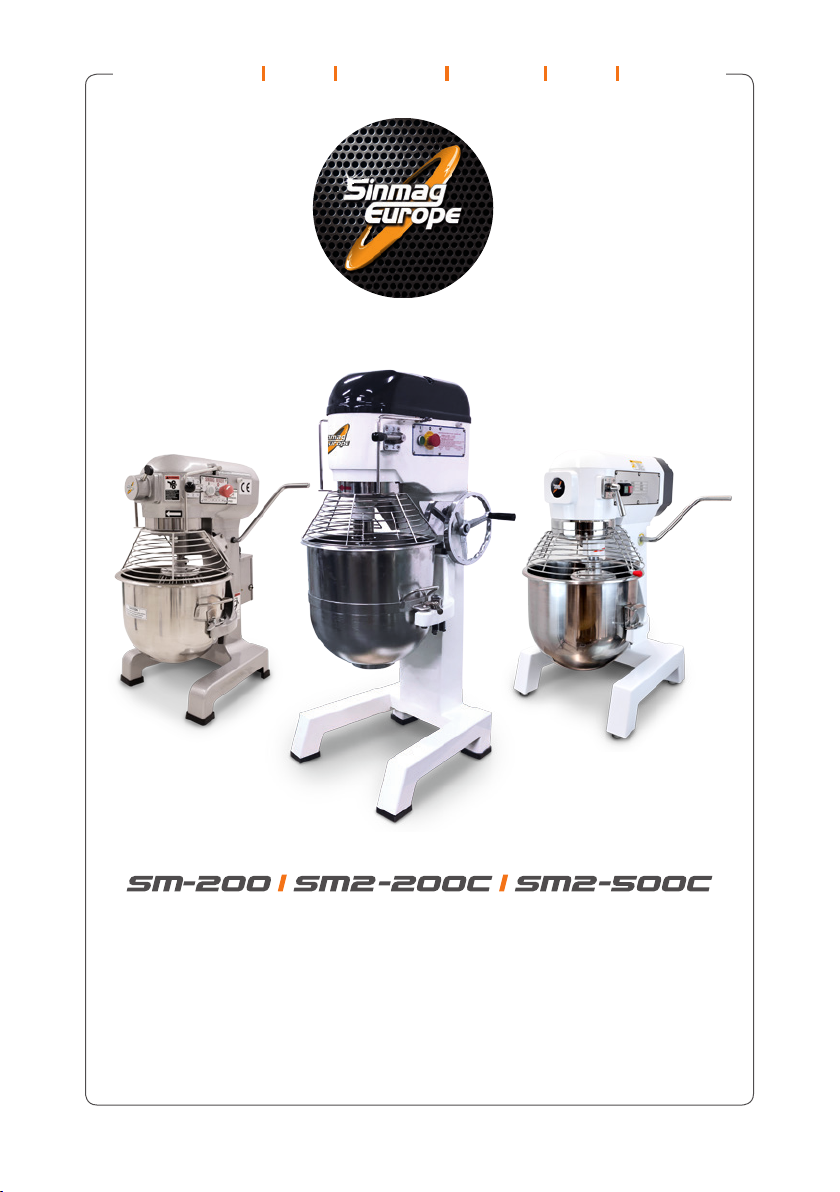
Mode d’emploi Manual Handleiding Handbuch Manual Istruzione
Batteur-melangeur
Planetary mixer
Klopper-menger
Planetenrührmaschine
Batidoras
Mascolatrici planetarie
Page 9
Congratulations with the purchase of this planetary mixer.
This machine has been tested thoroughly in our warehouse in Belgium before delivery.
This way, Sinmag Europe is able to guarantee delivery of a machine ready for installation.
For correct use and long service life of your machine, we recommend that you read this
manual attentively before starting to use the machine.
Sinmag Europe thank you for your trust and wish you much job satisfaction with this
machine.
Sinmag Europe Team.
ENG
9
9
Page 10
ENG
NOTICE
The use of this or any industrial equipment may involve hazards such as hot
surface, sharp objects, or danger from exposure to the electrical power. This
manual is provided to assist you in the safe and efcient use of our equipment.
All equipment, whether considered hazardous or not, should be used in accordance with
principles of good manufacturing practice.
The operator of this equipment must be of a legal age. Before operation, please read
and follow the instructions carefully for maximum safety, and to obtain the best use of our
equipment.
1. INTRODUCTION
1.1 BRIEF INTRODUCTION
This handbook aims at introducing you on how to install, operate and maintain the planetary
mixer SM-200 SM2-200C SM2-500C
Thanks for choosing as your supplier. Any question, please
contact our local ofce or dealer that will provide you with instant and ideal service.
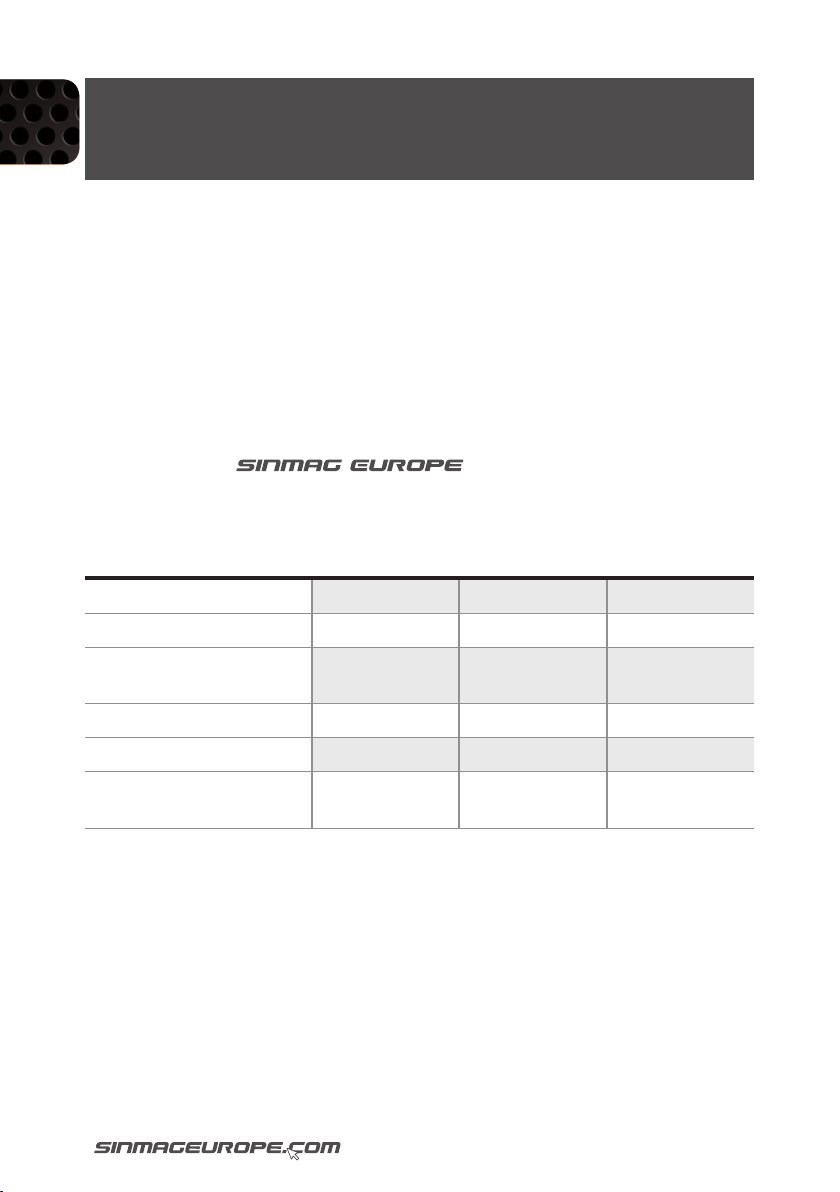
1.2. SPECIFICATION
MODEL SM-200 SM2-200C SM2-500C
CAPACITY
MOTOR POWER
R.P.M. at 50 Hz
1st/2nd/3d gear
NET WEIGHT MACHINE
VOLTAGE
OPTION BOWL REDUCTION
20 (10 opt.) 20 40 (20 opt.)
0,9 kW 1,1 kW 1,1 kW
158/293/535 158/293/535 116/208/464
110 kg 60 kg 190 kg
220V 1Ph 50Hz 220V 1Ph 50Hz 220/380V 3Ph 50Hz
✓ 10 L ✘ ✓ 20 L
10 11
Page 11

2. SAFETY INFORMATIONS
2.1 SAFETY SYMBOLS
For your safety, please pay attention to the following symbol as marked on the machine:
This label warns that only qualied service personnel can access this position and the
operator must disconnect the power before carrying out any cleaning or servicing.
2.2 WORKING SAFETY INFORMATION
The machine must only be used by personnel suitably trained for the purpose and who have
been trained in the contents of this publication.
TO ENSURE SAFE WORK, COMPLY WITH THE FOLLOWING INSTRUCTIONS:
1. Install the machine in compliance with workplace safe work requirements.
2. Don’t place the machine near a source of heat and this machine must not be used in a
place where the surrounding environment may have a potential risk of explosion.
3. Use the machine with great care and never be distracted.
4. Do not wear loose tting clothing or clothing with wide or open sleeves.
5. Do not remove, cover or modify the identication plates placed on the machine body.
6. Do not use the machine as a working surface or area and do not place any objects on it
that are not required for normal working operations.
7. Do not use the machine with temporary electrical connections or non-insulated cables.
8. Periodically check the state of the power cable and the cable clamp on the machine
body, have it replaced as soon as is necessary by qualied personnel.
9. Stop the machine immediately as soon as there is any defective or abnormal operation, a
breakage, any incorrect movements, or unusual noises.
10. Before cleaning or carrying out maintenance, disconnect the machine from the
electricity mains.
11. Use protective working gloves for cleaning and maintenance.
12. For all extraordinary maintenance, consult the manufacturer or qualied and
authorised personnel.
13. Do not use water jets or spray to clean the machine.
14. When sharp accessories are manipulated, use cut-resistant gloves.
ENG
3. INSTALLATION
3.1 GENERAL INSTALLATION REQUIREMENTS
NOTE:
It is most important that this machine is installed correctly and that the operation
is correct before use. Installation shall comply with local electrical, re, health
and safety requirements.
This machine is designed to provide years of satisfactory service. Correct installation is
essential to achieve the best performance, efciency and trouble-free operation.
3.2 INSTALLATION
This appliance shall be installed with sufcient ventilation to prevent the occurrence of
unacceptable concentrations of health harmful substances in the room.
Installations must be carried out by qualied service persons only. Failure to install equipment
to relevant codes and manufacturer’s specications in this section will void the warranty.
11
Page 12

ENG
Components having adjustments protected (e.g. paint sealed) by the manufacturer are
only to be adjusted by an authorised service agent. They are not to be adjusted by the
installation person.
It is the responsibility of the owner to supply and arrange for the connection of all services to
the machine.
3.3 UNPACKING
On receipt of the machine, carry out the following: Remove all packaging and transit
protection including all protective plastic coverings from outer panels.
Check equipment and parts for damage. Report any damage immediately to the carrier and
dealer. Never attempt to operate the machine with damaged parts.
Report any deciencies to the dealer that supplied the machine.
3.4 LOCATION
1. Select a location for the machine with a minimum of 0.6m space around the machine for
operating, cleaning and servicing.
2. Position the machine in its proper working position. The machine must be installed on a
at, solid and dry oor.
3. It is recommended that the machine is level from front to back and from side to side. This
will ensure the greatest stability.
3.5 ELECTRICAL CONNECTION
1. An electrical supply should be available within the reach of the included power cord. Do
not use extensions to connect the machine’s power cord to the electrical supply.
2. Before making the electrical connections, read the specications on the rating plate to
ensure that they comply with those of the electrical supply. Electrical connection should
be made by a qualied service technician who will observe all applicable safety codes
and the national electrical codes.
3. Check the correct connection (rotation) of the machine. If necessary, you will have to
exchange the position of 2 phase wires.
When connecting this machine to the mains supply, ensure that the following is carried out:
1. An isolating switch is tted within 2m of the machine.
2. A grommet/gland is tted around the power supply cord entry hole into the machine.
3. All wiring connections must be checked and tight.
Once the electrical connection has been made, the machine is ready for use.
12 13
Page 13
4. OPERATING INSTRUCTIONS
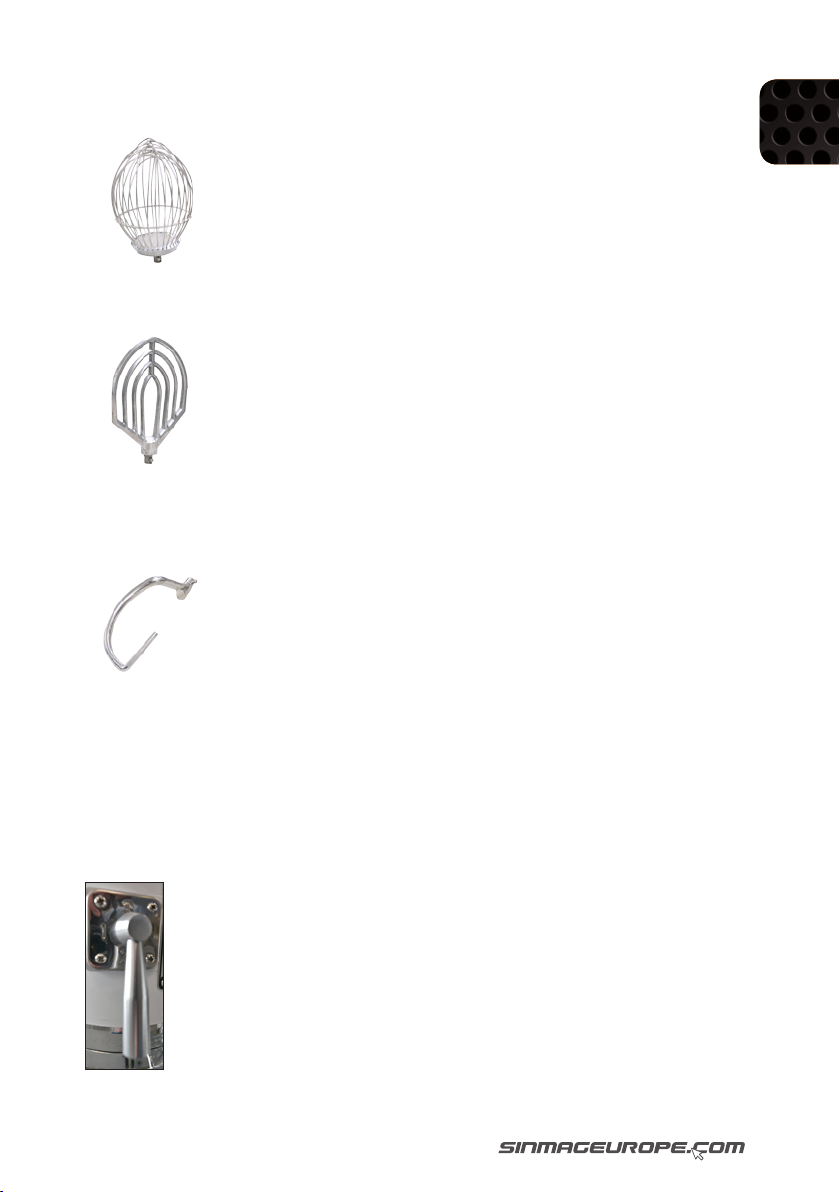
4.1. TOOL SELECTION
ENG
WHIPPING BALL: Light mixes such as whipped cream, mayonnaise, egg , white, pancakes
and meringue.
BEATER: Firm mixes such as light pastry, cakes, biscuits, icing, llings and mashed
vegetables.
HOOK: Heavy mixes such as dough and pastry.
4.2. BOWL LIFT
Turn the lift wheel counterclockwise (or push the lever) to lower the bowl. It is necessary to
lower the bowl to change the tools, and to provide better access for lling and emptying the
bowl. To raise the bowl, turn the lift wheel clockwise (or pull the lever) until it hits the upper
stops.
4.3. SPEED CONTROL:
To change speeds, rst turn off mixer, then move the shifter handle to the
desired speed. Number 1 is the slowest speed and number 3 is the highest
speed.
Slow Speed: for heavy mixtures such as dough, biscuits, etc.
High Speed: for fast, light work, such as whipping cream, beating eggs, and
mixing thin substances.
13
Page 14

ENG
5. OPERATION STEPS
A. Put the mixing materials into the bowl together with the agitator.
Then x the bowl into the bowl bracket.
B. Fix the agitator onto the mixing head.
C. Lift the bowl to the topnotch by lift handle/lever.
D. Place the shifter handle to the required speed, then turn on the machine. You will have to
close the safety grid and lift the bowl before you will be able to start the machine.
E. Turn off the machine and lower the bowl by lift handle/lever then take off the agitator when
mixing work is nished.
F. Take out the bowl together with agitator.
Finally take out the mixed materials.
6. WORKING SAFETY
A. Disconnect from the power source when cleaning or servicing this machine.
B. Never attempt to clean this machine while it is in motion, serious injury could result.
C. Never place your hand or any kitchen utensil in the bowl whilst the mixer is in operation.
D. Never operate this machine with safety covers removed or with safety switches
inoperative.
E. Many mixer operations should be started at the low speed then advanced to a higher
speed as the mixing progresses.
7. CLEANING AND MAINTENANCE
A. Clean the surface of the machine with a cloth after everyday use. Use a damp cloth with a
mild washing soap.
B. Wipe some lubricating oil on the bowl lift gliding track. Lift the bowl up and down for
several times to fully lubricate the track. If you have difculty in lifting the bowl, please
scrape off the dough residue from the track then wipe the lubricating oil. Please help to
lift the bowl up and down to make full lubrication when the bowl still has difculty to be
lifted up and down.
C. If it is still difcult to lift the bowl up and down by lift handle after full lubrication, please
adjust the inner screw under the spring to strengthen the strain of the spring as to
strengthen the lifting force.
D. Check the gear oil level to avoid oil leak every month.
14 15
Page 15
Mode d’emploi Manual Handleiding Handbuch Manual Istruzione
Batteur-melangeur
Planetary mixer
Klopper-menger
Planetenrührmaschine
Batidoras
Mascolatrici planetarie
15
Page 16
Prociat met de aankoop van uw klopper-menger.
De machine werd alvorens te leveren getest in het magazijn te België.
Zo kan Sinmag Europe garant staan voor de levering van een
machine die klaar is voor installatie.
Voor een goede werking en lange levensduur van uw klopper-menger, raden wij u aan deze
handleiding grondig door te nemen alvorens aan de slag te gaan met uw machine.
NL
Sinmag Europe dankt u voor het vertrouwen en interesse en wenst u veel werkgenot.
Het Sinmag Europe Team.
16 17
Page 17
NOTA
Het gebruik van deze of elk andere industriële machine houdt risco’s in zoals
verhitte oppervlakken, scherpe voorwerpen of de blootstelling aan elektrische
stroom. Deze handleiding wordt U ter beschikking gesteld om U te begeleiden
in het veilig en efciënt gebruik van onze machines.
Alle benodigdheden, beschouwd als gevaarlijk of niet, moeten in overeenstemming met de
NL
principes van een correcte werkmethode gebruikt worden.
De bediener van deze machine moet meerderjarig zijn. Lees en volg de instructies grondig
om deze machine in veiligheid te gebruiken en een optimaal gebruik van de machine te
verzekeren.
1. INLEIDING
1.1 KORT OVERZICHT
Deze handleiding is bedoeld om u op de hoogte te brengen van de plaatsing, bediening en
onderhoud van de klopper-menger SM-200 SM2-200C SM2-500C.
Wij danken u om als leverancier te kiezen. Heeft u een
vraag, aarzel dan niet om ons of uw lokale verdeler te contacteren. Wij garanderen u een
snelle respons en service.
1.2. SPECIFICATIES
MODEL SM-200 SM2-200C SM2-500C
CAPACITEIT (L)
MOTORVERMOGEN
Omw/min bij 50 Hz
1ste/2e/3e snelheid
NETTOGEWICHT MACHINE
SPANNING
OPTIE REDUCTIEKUIP
20 (10 opt.) 20 40 (20 opt.)
0,9 kW 1,1 kW 1,1 kW
158/293/535 158/293/535 116/208/464
110 kg 60 kg 190 kg
220V 1Ph 50Hz 220V 1Ph 50Hz 220/380V 3Ph 50Hz
✓ 10 L ✘ ✓ 20 L
17
Page 18

2. VEILIGHEIDSVOORSCHRIFTEN
2.1 VEILIGHEIDSSYMBOLEN
Voor uw veiligheid houdt u rekening met het volgende symbool als u het aantreft op de
machine.
Dit label betekent dat enkel een gekwaliceerde technicus toegang tot deze
NL
2.2 WERKVEILIGHEID
Deze machine mag enkel bediend worden door personeel dat voldoende is opgeleid in het
gebruik van de machine en op de hoogte is van de informatie in deze handleiding.
OM EEN VEILIGE WERKOMGEVING TE VERZEKEREN, MOET U AAN VOLGENDE
INSTRUCTIES VOLDOEN:
1. Installeer de machine in overeenkomst met de veiligheidsvoorwaarden op de werkvloer.
2. Plaats de machine niet in de buurt van een warmtebron of in een omgeving waar een
potentieel ontplofngsgevaar heerst.
3. Wees aandachtig en laat u niet aeiden tijdens het gebruik van de machine.
4. Draag geen loszittende kleding bij het gebruik van deze machine.
5. Verwijder, bedek of wijzig de identicatieplaatjes die op de behuizing van de machine zijn
aangebracht niet.
6. Gebruik de machine niet als werkoppervlak, en plaats geen voorwerpen op de machine die
niet nodig zijn voor normaal gebruik van de machine.
7. Gebruik de machine niet met tijdelijke stroomtoevoer aansluitingen of onvoldoende
geïsoleerde kabels.
8. Controleer regelmatig de stroomkabel en de kabelklem op het frame van de machine, indien
nodig, laat de kabel zo snel mogelijk vervangen door gekwaliceerd personeel.
9. Stop de machine onmiddellijk in geval van foutieve of abnormale werking, hapering of
eender welke ongewone werking of geluid van de machine.
10. Ontkoppel de machine van het stroomnet vooraleer onderhouds- of herstelwerken uit te
11. Draag beschermende handschoenen tijdens het onderhoud van de machine.
12. Laat uitzonderlijk onderhoud of herstellingen enkel uitvoeren door gekwaliceerd personeel.
13. Gebruik geen stromend water of water onder druk om de machine schoon te maken.
14. Draag beschermende handschoenen als u met scherpe onderdelen van de machine werkt.
plaats heeft. De machine moet losgekoppeld worden van het elektriciteitsnet
vooraleer onderhoud of herstellingen uit te voeren.
voeren.
3. INSTALLATIE
3.1 ALGEMENE INSTALLATIEVOORWAARDEN
NOTA:
Het is zeer belangrijk dat deze machine correct wordt geïnstalleerd en correct
is afgesteld voor gebruik. De installatie moet gebeuren in overeenstemming met
lokale elektriciteits-, brand-, gezondheids- en veliligheidsvoorwaarden.
Deze machine is ontworpen om jarenlange diensttevredenheid te leveren. Een correcte installatie
is essentieel om de beste prestaties, doeltreffendheid en probleemloze werking te bereiken.
18 19
Page 19

3.2 INSTALLATIE
Deze machine moet in een voldoende geventileerde ruimte geïnstalleerd worden om de
ophoping van onaanvaardbare concentraties van schadelijke deeltjes voor de gezondheid te
voorkomen.
De installatie mag enkel door gekwaliceerd personeel worden uitgevoerd. Installatie die afwijkt
van toepasselijke voorschriften of specicaties van de fabrikant zullen de garantie opheffen.
Onderdelen beschermd tegen manipulatie (bijv. verfverzegeld) door de fabrikant mogen enkel
NL
door een geautoriseerde onderhoudstechnieker bijgesteld worden. Deze mogen niet door de
installateur worden gemanipuleerd.
De verantwoordelijkheid voor alle aansluitingen voor een correcte werking van de machine ligt
bij de gebruiker.
3.3 UITPAKKEN
Bij ontvangst van de machine. Verwijder alle verpakkings- en transportmateriaal inclusief
alle plastic beschermlagen op de behuizing.
Behoud alle verpakkings- en transportmateriaal tot u er zeker van bent dat er geen schade
(buiten- en binnenkant) aan de machine is aangebracht tijdens het transport. Het is de
plicht van de aankoper om eventuele schade onmiddellijk te melden aan de transportrma.
3.4 LOCATIE
1. Kies een locatie voor de machine met rondom een vrije ruimte van minimum 0,6 m voor
bediening, onderhoud en eventuele herstelwerken.
2. Plaats de machine in zijn correcte werkpositie. Plaats de machine op een vlakke, stevige
en droge ondergrond.
3. Om een optimale stabiliteit te verzekeren, is het ten zeerste aanbevolen dat de machine
in de breedte en de diepte waterpas staat.
3.5 ELEKTRISCHE AANSLUITING
1. De aansluiting op het elektriciteitsnet moet worden voorzien binnen het bereik van
de stroomkabel van de machine. Gebruik geen verlengkabels om de machine op het
elektriciteitsnet aan te sluiten.
2. Lees de gegevens op het identicatieplaatje en zorg ervoor dat de aansluitingen in
overeenstemming worden gemaakt met de specicaties van de stroomtoevoer. De
elektrische aansluitingen worden door een gekwaliceerde sevicetechnieker uitgevoerd,
die de veiligheids- en lokale elektriciteitsvoorschriften respecteert.
3. Controleer de correcte aansluiting (draaizin) van de machine. Bij foute draaizin zal de
motor draaien, maar de messen en de drukplaat zullen niet bewegen. Indien nodig
moeten 2 fase kabels van plaats worden verwisseld.
Vooraleer de machine op het elektriciteitsnet aan te sluiten, zorg ervoor dat:
1. Een zekeringschakelaar geplaatst is binnen 2 m van de machine.
2. Er een wartel en spanring rond de stroomtoevoerkabel zit bij invoeropening in de
machine.
3. Alle kabelaansluitingen gecontroleerd worden en vast zitten.
Eens de elektrische aansluiting is gemaakt, is de machine klaar voor gebruik.
Stroomtoevoer voorschriften 380VAC, 50Hz, 3PH+E.
19
Page 20
4. BEDIENINGSINSTRUCTIES
4.1. WERKTUIGKEUZE
NL
Draadgard : dit is het beste werktuig om luchtige mousses zoals slagroom, mayonaise,
eiwit, pannenkoekendeeg of meringue op te kloppen.
Vlinder: wordt meestel gebruikt voor het mengen van cake, aardappelpuree, zachte
vullingen en andere zachte beslagen.
Haak: wordt hoofdzakelijk gebruikt voor het kneden van brood- en andere gistdegen.
4.2. KUIP OMHOOG BRENGEN
Vooraleer de machine te starten moet de kuip op de juiste wijze in de armen van de
machine geplaatst en met de vleugeltjes vastgezet worden; ook het werktuig (kneedarm,
vlinder of draadgard) moet goed in de kop van de machine vastgezet worden.
De kuip wordt met de hendel (of liftwiel) omhoog gebracht; de hendel moet daarbij een
kleine weerstand overwinnen vooraleer hij in zijn vaste stand komt.
Het veiligheidsrooster moet gesloten zijn vooraleer u de machine zal kunnen starten..
4.3. SNELHEIDSCHAKELAAR:
De machine heeft 3 versnellingen.
Indien u naar een versnelling hoger of lager wil schakelen, dient u de machine
eerst uit te schakelen en te veranderen van versnelling alvorens u ze opnieuw
inschakelt.
De machine mag niet overbelast worden. Indien zwaardere degen of
producten gemengd worden, moet men de machine op een laag toerental
laten draaien, anders kan de transmissie beschadigd worden.
20 21
Page 21

5. BEDIENING
A. Doe de ingrediënten volgens het recept in de mengkuip samen met het werktuig. Zet de
kuip vervolgens in de kuiparmen. en zet ze vast met de
vleugeltjes op de kuiparmen.
B. Bevestig ook het werktuig in de machine.
C. Breng de kuip met het liftwiel (of met de hendel) omhoog tot aan de stop.
D. Kies de juiste versnelling met de snelheidschakelaar en druk op de startknop. Het
veiligheidsrooster moet gesloten worden vooraleer u de machine zal kunnen starten.
E. Na het voltooien van het mixproces, schakelt u de machine uit met de stopknop en
brengt u de kuip naar omlaag. Neem ook het werktuig uit de machine.
F. Haal de kuip uit de machine samen met het werktuig. Haal de producten uit de kuip.
NL
6. VEILIGHEIDSMAATREGELEN
A. Schakel de machine uit en koppel ze los van de stroomvoorziening
alvorens de machine te reinigen of onderhoud uit te voeren.
B. Probeer nooit de machine schoon te maken terwijl ze in werking is.
Dit kan ernstige kwetsuren tot gevolg hebben.
C. Steek nooit uw hand of enig keukengereedschap in de kuip terwijl de machine in werking
is.
D. De machine mag niet bediend worden zonder de veiligheidsroosters of met overbrugde
veiligheidsschakelaars.
E. Bij bepaalde recepten en / of ingrediënten kan het nodig zijn in een trage snelheid
te starten om dan naar een hogere snelheid over te gaan naarmate de ingrediënten
gemengd worden. Bij het kneden van (brood)deeg raden wij aan enkel in eerste snelheid
te werken.
F. Stop de machine ALTIJD indien u naar een andere versnelling wil
schakelen!
7. REINIGING EN ONDERHOUD
A. Reinig de buitenkant van de machine met een vochtige doek met een mild
vaatwasproduct na het dagelijkse gebruik.
B. Wrijf wat smeerolie op de geleidingsrails van de kuiplift. Breng vervolgens de kuip enkele
keren omhoog en omlaag om de rails goed te smeren. Als u moeilijkheden heeft bij het
omhoogbrengen van de kuip, verwijder dan mogelijke deegresten van de rails en wrijf
vervolgens in met smeerolie.
C. Als u daarna nog steeds moeilijkheden ondervindt bij het omhoogbrengen van de kuip
na volledige smering, stel dan de binnenste schroef onder de veer bij om de spanning
van het liftmechanisme te verhogen.
D. Controleer de smering van de tandwielkast maandelijks om te zien of de tandwielen
voldoende gesmeerd blijven.
21
Page 22
GER
Mode d’emploi Manual Handleiding Handbuch Manual Istruzione
Batteur-melangeur
Planetary mixer
Klopper-menger
Planetenrührmaschine
Batidoras
Mascolatrici planetarie
22 23
Page 23
Wir gratulieren Ihnen mit dem Ankauf dieser Planetenrührmaschine.
Diese Maschine wurde vor der Lieferung gründlich in unserem Lager in Belgien geprüft. Auf
dieser Weise können wir die Lieferung einer zur Installation fertigen Maschine garantieren.
Für eine korrekte Wirkung und eine lange Lebensdauer der PlanetenRührmaschine, raten
wir Ihnen diese Anleitung aufmerksam zu lesen, bevor Sie mit dem Gebrauch der Maschine
anfangen.
Sinmag Europe dankt Ihnen für das Vertrauen und das Interesse und wünscht Ihnen viele
Arbeitsfreude mit der Maschine.
GER
Sinmag Europe Team.
23
Page 24
HINWEIS
Die Verwendung dieser oder anderer Industrieanlagen kann Gefahren, etwa
durch heiße Oberächen, scharfe Gegenstände oder elektrischen Strom
mit sich bringen. Diese Anleitung soll Ihnen bei der sicheren und efzienten
Benutzung unserer Maschine helfen.
Alle Maschinen, ob als gefährlich eingestuft oder nicht, sollten gemäß den Grundsätzen der
guten Herstellungspraxis benutzt werden.
GER
Der Benutzer dieser Maschine muss volljährig sein. Bitte lesen und befolgen Sie vor
Inbetriebnahme die Anweisungen sorgfältig, um maximale Sicherheit zu gewährleisten und
unsere Maschine optimal zu nutzen.
1. EINFÜHRUNG
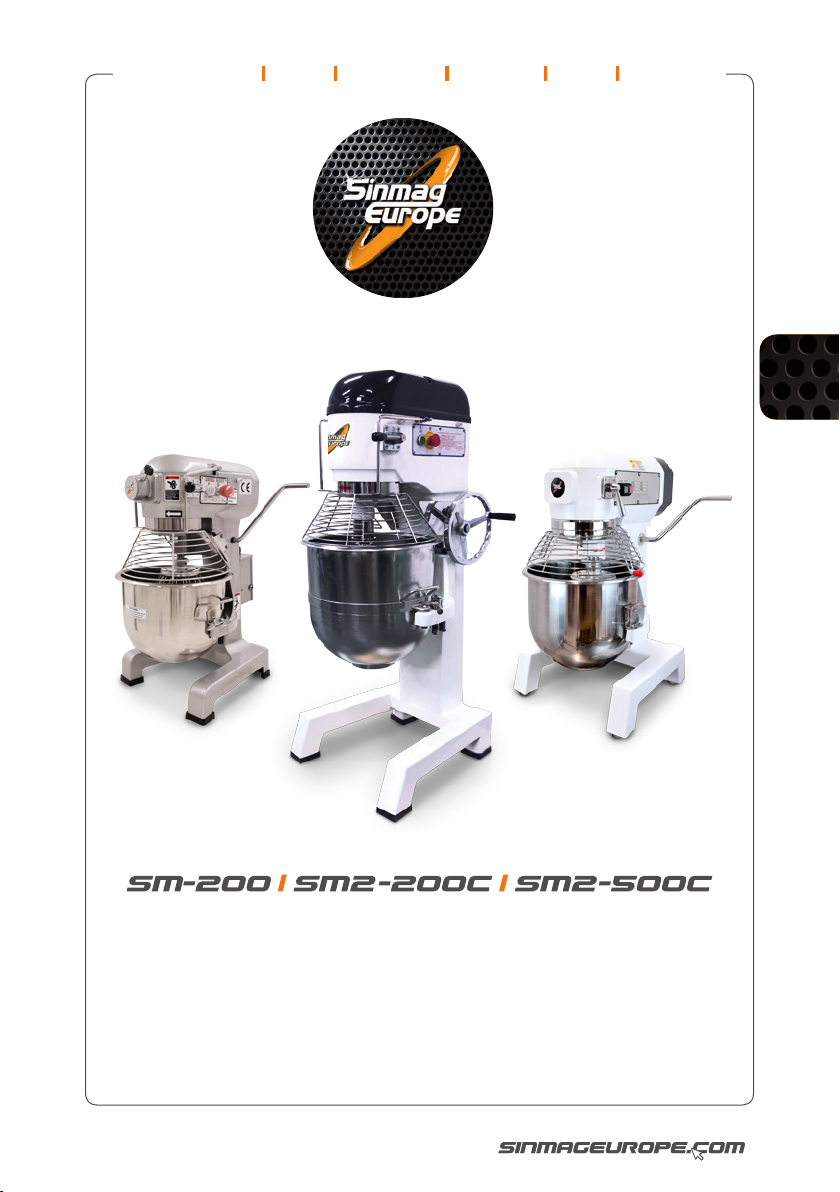
1.1 KURZE EINFÜHRUNG
Diese Anleitung dient der Einführung in Installation, Betrieb und Wartung des
Planetenrührmaschine SM-200 SM2-200C SM2-500C.
Vielen Dank, dass Sie sich für entschieden haben. Bei
Fragen wenden Sie sich bitte an unsere lokale Niederlassung oder unseren Vertreiber, wo
man Ihnen umgehend den optimalen Service bietet.
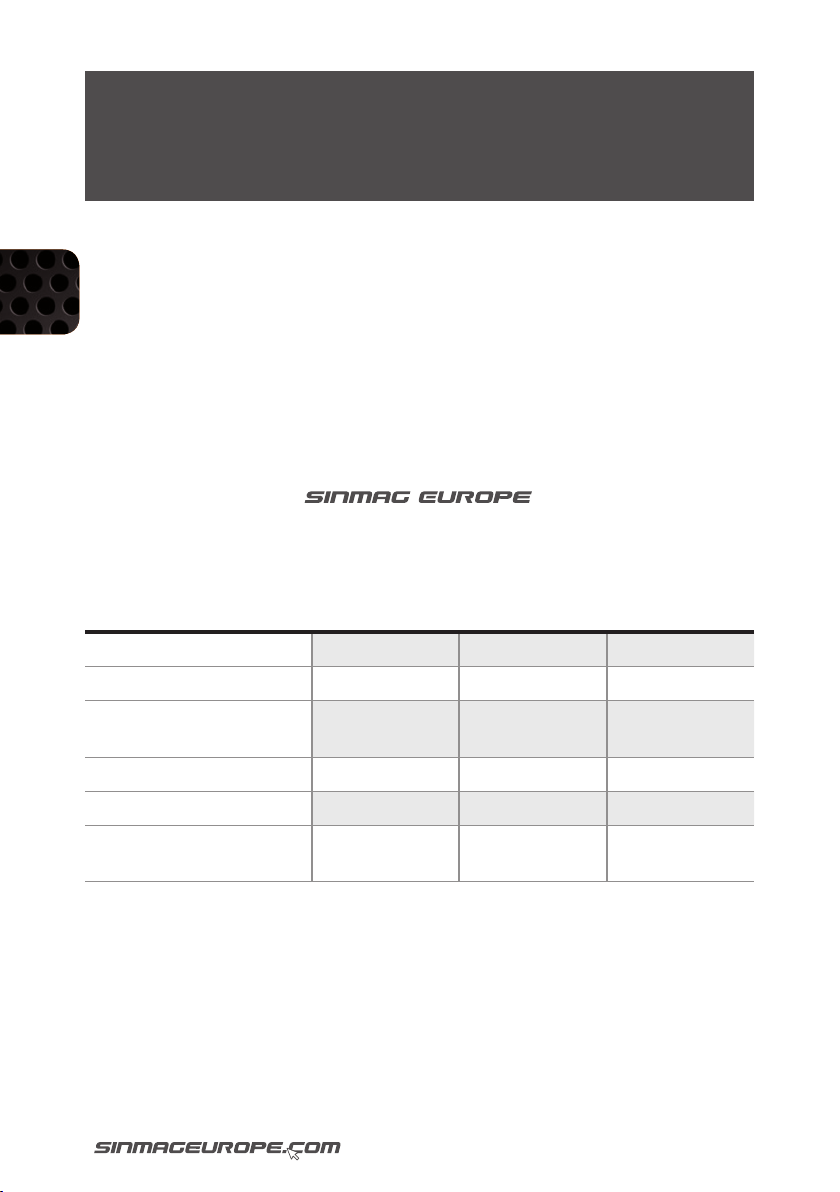
1.2. TECHNISCHE DATEN
MODEL SM-200 SM2-200C SM2-500C
KAPAZITÄT
MOTORLEISTUNG
U/min bei 50 Hz
1./2./3. Geschwindigkeit
NETTOGEWICHT MASCHINE
SPANNUNG
OPTION KLEINERER KESSEL
20 (10 opt.) 20 40 (20 opt.)
0,9 kW 1,1 kW 1,1 kW
158/293/535 158/293/535 116/208/464
110 kg 60 kg 190 kg
220V 1Ph 50Hz 220V 1Ph 50Hz 220/380V 3Ph 50Hz
✓ 10 L ✘ ✓ 20 L
24 25
Page 25

2. SICHERHEITSHINWEISE
2.1 SICHERHEITSSYMBOLE
Beachten Sie zu Ihrer eigenen Sicherheit bitte das folgende Symbol auf der Maschine:
Dieser Aufkleber weist darauf hin, dass nur qualiziertes Wartungspersonal an
dieser Stelle Arbeiten vornehmen darf und dass der Bediener das Gerät vom
Netz trennen muss, bevor er Reinigungs- oder Wartungsarbeiten durchführt.
2.2 INFORMATIONEN ZUR ARBEITSSICHERHEIT
Die Maschine darf nur von Personal benutzt werden, das zu diesem Zweck angemessen
geschult wurde und mit dem Inhalt dieser Anleitung vertraut ist.
UM SICHERE ARBEIT ZU GEWÄHRLEISTEN, MÜSSEN FOLGENDE ANWEISUNGEN BEFOLGT WERDEN:
1. Erfüllen Sie bei der Installation der Maschine die Anforderungen bezüglich der Sicherheit
am Arbeitsplatz.
2. Stellen Sie die Maschine nicht in der Nähe einer Wärmequelle auf, außerdem darf die
Maschine nicht an Stellen eingesetzt werden, an denen eine potentielle
Explosionsgefahr besteht.
3. Benutzen Sie die Maschine mit großer Sorgfalt und lassen Sie sich nicht ablenken.
4. Tragen Sie keine weite Kleidung oder Kleidungsstücke mit weiten oder offenen Ärmeln.
5. Die Typenschilder am Maschinengehäuse dürfen nicht entfernt, verdeckt oder modiziert
werden.
6. Benutzen Sie die Maschine nicht als Arbeitsäche und stellen oder legen Sie keine
Gegenstände darauf, die für den normalen Betrieb nicht benötigt werden.
7. Benutzen Sie die Maschine nicht mit provisorischen elektrischen Anschlüssen oder nicht
isolierten Kabeln.
8. Überprüfen Sie regelmäßig den Zustand des Netzkabels und der Kabelklemme am
Maschinengehäuse, lassen Sie beides bei Bedarf durch qualiziertes Personal ersetzen.
9. Stellen Sie die Maschine sofort ab, wenn Mängel oder Funktionsstörungen, ein Defekt,
fremde Bewegungen oder ungewöhnliche Geräusche festgestellt werden.
10. Trennen Sie vor der Durchführung von Reinigungs- oder Wartungsarbeiten die Maschine
vom Netz.
11. Tragen Sie bei Reinigungs- und Wartungsarbeiten Schutzhandschuhe.
12. Wenden Sie sich zwecks Durchführung außergewöhnlicher Wartungsarbeiten an den
Hersteller oder an qualiziertes oder befugtes Personal.
13. Reinigen Sie die Maschine nicht mit einem Wasserstrahl.
14. Tragen Sie bei der Handhabung scharfer Zubehörteile schnittfeste Handschuhe.
GER
3. INSTALLATION
3.1 ALLGEMEINE INSTALLATIONSANFORDERUNGEN
HINWEIS: Es ist äußerst wichtig, dass diese Maschine korrekt installiert und
bedient wird. Die Installation muss den geltenden Elektro-, Brandschutz-,
Gesundheits- und Sicherheitsanforderungen entsprechen.
Dieser Machine ist für jahrelangen einwandfreien Betrieb ausgelegt. Korrekte Installation ist wesentlich,
um optimale Leistungsefzienz und störungsfreien Betrieb zu erreichen.
25
Page 26

GER
3.2 INSTALLATION
Bei der Installation dieser Maschine muss auf ausreichende Belüftung geachtet werden, um das
Auftreten nicht akzeptabler Konzentrationen gesundheitsschädlicher Substanzen im Raum zu
verhindern.
Installationen dürfen nur von qualiziertem Personal durchgeführt werden. Wenn die Installation der
Maschine nicht unter Befolgung der entsprechenden Vorschriften und Herstellerspezikationen in
diesem Abschnitt erfolgt, erlischt die Garantie.
Komponenten, deren Einstellung vom Hersteller geschützt wurde (beispielsweise mit einem
Farbsiegel), dürfen nur von einem befugten Servicetechniker eingestellt werden. Sie dürfen nicht vom
Installationspersonal eingestellt werden.
Der Inhaber muss für den Anschluss der erforderlichen Versorgungsleitungen an die Maschine
sorgen.
3.3 AUSPACKEN
Verfahren Sie nach dem Eintreffen der Maschine wie folgt: Entfernen Sie die gesamte Verpackung und
alle Transportschutzvorrichtungen, einschließlich aller Kunststoffschutzfolien, von den äußeren Blechen.
Überprüfen Sie Maschine und Teile auf Beschädigungen. Melden Sie etwaige Schäden umgehend
dem Spediteur und dem Vertreiber. Versuchen Sie auf keinen Fall, die Maschine mit beschädigten
Teilen zu betreiben. Melden Sie etwaige Mängel dem Vertreiber, der die Maschine lieferte.
3.4 AUFSTELLUNGSORT
1. Wählen Sie für die Maschine einen Aufstellungsort mit mindestens 0,6 m Platz auf allen
Seiten für Bedienung, Reinigung und Wartung.
2. Stellen Sie die Maschine an ihrer geeigneten Betriebsposition auf. Sie muss auf einem
ebenen, festen und trockenen Boden installiert werden.
3. Die Maschine sollte in Längs- und Querrichtung möglichst waagerecht stehen. Dies
gewährleistet die größte Stabilität.
3.5 ELEKTROANSCHLUSS
1. Ein Stromanschluss sollte innerhalb der Reichweite des mitgelieferten Netzkabels vorhanden sein.
Verwenden Sie zum Anschließen der Maschine an die Stromversorgung keine Verlängerungskabel.
2. Lesen Sie vor der Herstellung der Stromverbindung die Angaben auf dem Typenschild, um zu
gewährleisten, dass sie den Werten der Stromversorgung entsprechen. Der Elektroanschluss sollte
von einem qualizierten Servicetechniker hergestellt werden, der alle geltenden Sicherheitsvorschriften und die nationalen Vorschriften für Elektroanschlüsse befolgt.
3. Prüfen Sie den korrekten Anschluss (Drehsinn) der Maschine. Wenn die Maschine falsch ange-
schlossen wurde, wird der Motor wirken, aber die Bänder werden in der Falschen Richtung drehen.
Wenn nötig werden Sie die Position von zwei Phasenkabeln umwechseln müssen.
Beachten Sie beim Anschließen dieser Maschine ans Stromnetz unbedingt Folgendes:
1. Ein Isolierschalter muss im Abstand von höchstens 2m zur Maschine angebracht werden.
2. Die Öffnung für das Netzkabel in der Maschine ist mit einer Kabeldurchführung versehen.
3. Alle Kabelverbindungen müssen fest sein.
Sobald der Elektroanschluss hergestellt ist, ist die Maschine betriebsbereit.
26 27
Page 27
4. BEDIENUNG
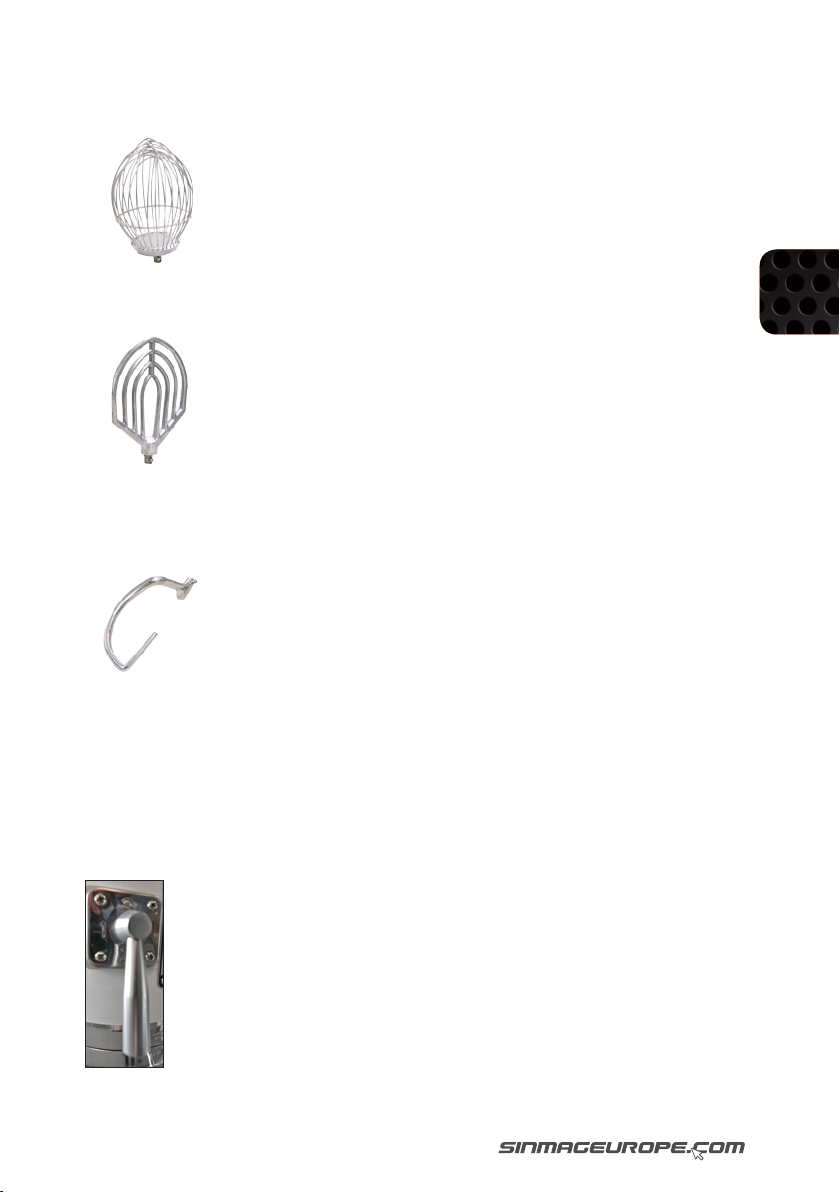
4.1. WERKZEUGWAHL
RÜHRBESEN: Leichte Massen, wie Sahne, Mayonnaise, Eier, Eiweiß, Pfannküchen und
Meringue.
FLACHRÜHRER: Feste Massen wie leichte Konditorwaren, Kuchen, Torten, Keks,
Zuckerguss, Füllungen und Brei von Gemüsen.
KNETHAKEN: Schwere Massen wie Teig und Konditorwaren
4.2. KESSELHEBUNG
Senken Sie den Hebel oder drehen Sie das Rad im Gegenuhrzeigersinn um den Kessel zu
senken. Der Kessel muss gesenkt werden, um das Werkzeug zu ändern und um den Kessel
besser füllen oder leeren zu können. Um den Kessel zu heben, drehen Sie das Rad im
Uhrzeigersinn oder setzen Sie den Hebel hoch, bis zum Stopp.
4.3. GESCHWINDIGKEITSREGELUNG:
Um die Geschwindigkeit zu ändern, schalten Sie die Planetenrührmaschine
aus und setzen die den Geschwindigkeitshebel in die erwünschte
Geschwindigkeit. Nummer 1 ist die Tiefstgeschwindigkeit, Nummer 3 die
Höchstgeschwindigkeit.
Tiefstgeschwindigkeit: für schwere Massen wie Teig, Keks, usw.
Hohe Geschwindigkeiten: für schnelle, leichte Arbeit, wie Sahne, das
Schlagen von Eier und das Mischen von leichten Massen.
GER
27
Page 28

GER
5. BEDIENUNGSVERFAHREN
A. Bringen Sie die Zutaten zusammen mit dem Werkzeug in den Kessel. Setzen Sie dann
den Kessel in die Kesselarmen.
B. Setzen Sie das Werkzeug im Kopf fest.
C. Bringen Sie den Kessel nach oben mit dem Rad / Hebel.
D. Stellen Sie den Geschwindigkeitshebel in die erwünschte Geschwindigkeit und schalten
Sie die Maschine ein. Bitte achten Sie darauf, dass das Sicherheitsschirm geschlossen
und der Kessel gehoben sein müssen bevor man die Maschine starten kann.
E. Nach Beendung der Arbeit schalten Sie die Maschine aus und senken Sie den Kessel mit
dem Hebel / Rad. Entfernen Sie auch das Werkzeug aus dem Maschinenkopf.
F. Nehmen Sie den Kessel mit dem Werkzeug aus der Maschine. Jetzt kann der Kessel
einfach entleert werden.
6. SICHERHEITSMASSNAHMEN
A. Trennen Sie die Maschine von der Stromversorgung ab wenn Sie sie warten oder
reparieren wollen.
B. Versuchen Sie nie die Maschine während der Wirkung zu reinigen, Sie können sich
schwer verletzen.
C. Bringen Sie nie die Hände oder ein Küchengerät in den Kessel während der Wirkung der
Maschine.
D. Bedienen Sie die Maschine nie ohne die Sicherheitsgitter oder mit defekten
Sicherheitsschaltern.
E. Viele der Mischverfahren müssen in tiefer Geschwindigkeit anfangen um dann im Laufe
des Mischverfahrens in eine höhere Geschwindigkeit zu schalten.
7. REINIGUNG UND WARTUNG
A. Reinigen Sie die Oberächen der Maschine mit einem Tuch nach dem täglichen
Gebrauch. Verwenden Sie einen feuchten Tuch mit einer milden Seife.
B. Reiben Sie ein wenig Schmiermittel auf die Gleitscheine der Kesselhebung. Heben und
senken Sie den Kessel einige Male um die Gleitscheine völlig zu schmieren. Wenn Sie
Schwierigkeiten dabei haben, den Kessel zu heben, bitte entfernen Sie die Teigreste
der Gleitscheine und schmieren Sie danach. Begleiten Sie den Kessel bei der Hebung
und der Senkung, um eine gute Schmierung zu versorgen wenn Sie noch immer
Schwierigkeiten haben bei der Hebung / Senkung.
C. Bei weiteren Schwierigkeiten bei der Hebung und Senkung, passen Sie bitte die
Spannung des Kesselaufzugs an, indem Sie die innere Schraube unter dem Feder
anspannen.
D. Prüfen Sie den Ölstand im Getriebe jeden Monat um etwaige Öllecks nachzuweisen.
28 29
Page 29
Mode d’emploi Manual Handleiding Handbuch Manual Istruzione
ES
Batteur-melangeur
Planetary mixer
Klopper-menger
Planetenrührmaschine
Batidoras
Mascolatrici planetarie
2929
Page 30

Felicidades con la compra de esta batidora!
Esta máquina ha sido controlada profundamente en nuestro almacén en Bélgica para
garantirle la entrega de una máquina lista a la instalación.
Para un funcionamiento correcto y una larga vida útil, es aconsejable de leer este modo de
empleo con atención antes de poner la máquina en uso.
Sinmag Europe agradece a Usted por Su conanza y interés y le desea mucho gozo en el
trabajo con la máquina.
ES
Sinmag Europe Team.
30 31
Page 31
AVISO
El uso de este o cualquier equipo industrial puede conllevar riesgos por
supercies calientes, objetos alados o peligros derivados de la exposición a
la alimentación eléctrica. Este manual le facilitará el uso seguro y eciente de
nuestro equipo.
Todos los equipos, tantos si se consideran peligrosos como sid no, deben utilizarse
conforme a los principios de buenas prácticas de fabricación.
El operador de este equipo debe ser mayor de edad. Antes del funcionamiento, lea y siga
las instrucciones atentamente para una máxima seguridad, y para obtener el mejor uso de
nuestro equipo.
1. INTRODUCCIÓN
1.1 BREVE INTRODUCCIÓN
Este manual pretende presentar cómo instalar, operar y mantener la batidora SM-200 SM2200C SM2-500C.
Gracias por elegir como Su proveedor. Para cualquier
pregunta, contacte con su ocina o distribuidor local, que le ofrecerá un servicio
instantáneo e ideal.
1.2. ESPECIFICACIONES
MODEL SM-200 SM2-200C SM2-500C
CAPACIDAD
POTENCIA MOTOR
Rev./min a 50 Hz
1ª/2ª/3ª velocidad
PESO NETO MÁQUINA
VOLTAJE
OPCIÓN REDUCCIÓN TINA
20 (10 opt.) 20 40 (20 opt.)
0,9 kW 1,1 kW 1,1 kW
158/293/535 158/293/535 116/208/464
110 kg 60 kg 190 kg
220V 1Ph 50Hz 220V 1Ph 50Hz 220/380V 3Ph 50Hz
✓ 10 L ✘ ✓ 20 L
ES
31
Page 32
2. INFORMACIÓN DE SEGURIDAD
2.1 SÍMBOLOS DE SEGURIDAD
Para Su seguridad, preste atención al símbolo siguiente tal como está marcado en la
máquina:
Esta etiqueta advierte de que solo el personal de servicio cualicado puede
acceder a esta posición y el operador debe desconectar la alimentación antes
de llevar a cabo tareas de limpieza o servicio.
2.2 INFORMACIÓN SOBRE SEGURIDAD LABORAL
La máquina solo debe ser utilizada por personal que haya recibido la formación adecuada
para su nalidad y sobre el contenido de esta publicación.
Para garantizar un trabajo seguro, siga las instrucciones siguientes:
1. Instale la máquina conforme a los requisitos de trabajo seguro en el lugar de trabajo.
ES
2. No coloque la máquina cerca de una fuente de calor y no la utilice en un lugar donde el
entorno pueda presentar riesgo de explosión.
3. Utilice la máquina con mucho cuidado y sin distraerse nunca.
4. No lleve ropa holgada ni ropa con mangas anchas o abiertas.
5. No retire, cubra ni modique las placas de identicación situadas sobre la estructura de
la máquina.
6. No utilice la máquina como supercie de trabajo y no coloque ningún objeto sobre la
misma que no sea necesario para las operaciones de trabajo normales.
7. No utilice la máquina con conexiones eléctricas temporales ni cables no aislados.
8. Compruebe periódicamente el estado del cable eléctrico y la abrazadera para cables
en la estructura de la máquina; sustituir cuando sea necesario por parte de personal
cualicado.
9. Pare la máquina inmediatamente cuando se produzca algún funcionamiento defectuoso
o anómalo, alguna rotura, algún movimiento incorrecto o ruidos no habituales.
10. Antes de realizar las tareas de limpieza o mantenimiento, desconecte la máquina de la
red eléctrica.
11. Utilice guantes de trabajo de protección para realizar las tareas de limpieza y
mantenimiento.
12. Para todas las tareas de mantenimiento extraordinarias, consulte con el fabricante o con
personal cualicado o autorizado.
13. No utilice pulverización ni chorros de agua para limpiar la máquina.
14. Cuando se manipulen accesorios alados, utilice guantes resistentes a los cortes.
3. INSTALACIÓN
3.1 REQUISITOS GENERALES DE INSTALACIÓN
NOTA: Es sumamente importante que esta máquina se instale correctamente y
que el funcionamiento sea correcto antes del uso. La instalación cumplirá con
los requisitos eléctricos, de incendios y de seguridad e higiene locales.
Esta máquina está diseñada para ofrecer muchos años de servicio satisfactorio. La correcta
instalación es fundamental para obtener el mejor rendimiento, eciencia y funcionamiento
sin problemas.
32 33
Page 33

3.2 INSTALACIÓN
Esta máquina se instalará con un nivel de ventilación suciente para evitar que se produzcan
concentraciones inaceptables de sustancias nocivas para la salud en la sala.
Las instalaciones deben ser realizadas exclusivamente por personal de servicio cualicado.
La instalación del equipo debe hacerse según las especicaciones de los fabricantes y los
códigos pertinentes de esta sección, en caso contrario se invalidará la garantía.
Los componentes con ajustes protegidos (por ejemplo, sellados con pintura) por el fabricante
solo tienen que ser ajustados por un agente de servicio autorizado. No deben que ser
ajustados por el instalador.
Es responsabilidad del propietario suministrar y disponer la conexión de todos los servicios
en la máquina.
3.3 DESEMBALAJE
Al recibir la máquina, lleve a cabo lo siguiente:
Retire todo el embalaje y la protección para el transporte, incluyendo todo el revestimiento de
plástico de protección de los paneles exteriores.
Compruebe el equipo y las piezas para ver si hay presencia de daños. Comunique cualquier
daño inmediatamente al transportista y al distribuidor. No ponga en marcha nunca la máquina
si hay piezas dañadas.
Comunique cualquier deciencia al distribuidor que suministró la máquina.
3.4 UBICACIÓN
1. Seleccione una ubicación para la máquina con un espacio mínimo de 0,6 m alrededor de la
máquina para el funcionamiento, la limpieza y el servicio.
2. Coloque la máquina en su posición de trabajo aproximada. La divisora debe instalarse
sobre un suelo plano, rme y seco.
3. Se recomienda que la máquina esté nivelada de delante a atrás y de lado a lado. Esto
asegurará la máxima estabilidad.
3.5 CONEXIÓN ELÉCTRICA
1. Debe disponerse de un suministro eléctrico al alcance del cable eléctrico incluido. No
utilice alargos de cable para conectar el cable eléctrico de la máquina al suministro
eléctrico.
2. Antes de realizar las conexiones eléctricas, lea las especicaciones de la placa de datos
para garantizar que se correspondan con las del suministro eléctrico. La conexión eléctrica
debe ser realizada por un técnico de servicio cualicado que tendrá en cuenta todos los
códigos de seguridad aplicables y los códigos eléctricos nacionales.
3. Vericar la conexión correcta (sentido de rotación) de la máquina. Cuando la máquina está
conectada incorrectamente, el motor funcionará, pero las cuchillas y la placa de presión no
se moverán. Si necesario, hay que cambiar la posición de dos cables de fase.
ES
Al conectar esta máquina al suministro de red, asegúrese de que se lleve a cabo lo siguiente:
1. Se dispone de un interruptor de aislamiento a 2 m de la máquina.
2. Se dispone de un prensaestopas en la entrada del cable eléctrico a la máquina.
3. Todas las conexiones del cableado deben estar bien apretadas.
Una vez que se haya realizado la conexión eléctrica, la máquina está preparada para el
uso.
33
Page 34
4. INSTRUCCIONES DE USO
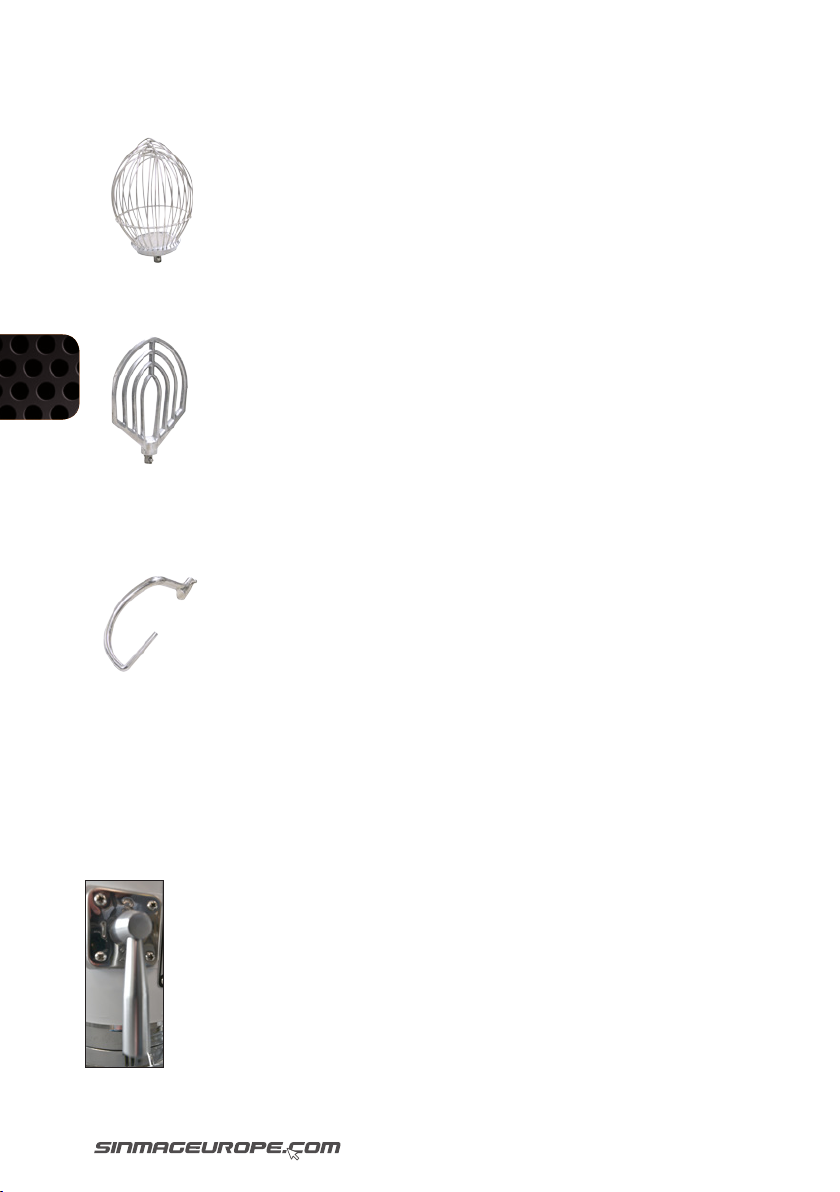
4.1. SELECCIÓN DE HERRAMIENTAS
BATIDAR: mezclas ligeras como nata, mayonesa, huevo, claras,
tortitas y merengue.
ES
PALA: mezclas rmes como pastas ligeras, tartas, galletas, cobertura, rellenos y verduras
procesadas.
GANCHO AMASADOR: mezclas pesadas como pastas y masas
4.2. CÓMO SUBIR EL PEROL
Gire la rueda de la tapa en sentido contrario a las agujas del reloj (o empuje la palanca)
para bajar el perol. Es necesario bajar el perol para cambiar las herramientas y poder
llenarlo y vaciarlo. Para subir el perol, gire la tapa en el sentido de las agujas del reloj (o tire
de la palanca) hasta que toque los topes superiores.
4.3. CONTROL DE VELOCIDAD
Para cambiar la velocidad, apague primero la batidora y luego mueva el
variador a la velocidad que desee. El número 1 corresponde a la velocidad
más baja y el 3 a la más alta.
Velocidad baja: para mezclas pesadas como masas, galletas, etc.
Velocidad alta: para trabajos ligeros y rápidos como la nata, huevos batidos y
mezclas de sustancias poco densas.
34 35
Page 35

5. PASOS DE FUNCIONAMIENTO
A. Coloque los ingredientes que desee mezclar en el perol junto con el agitador. Fije luego
el perol en el soporte.
B. Fije el agitador en el cabezal de mezclado.
C. Suba el perol hasta el tope superior con el asa/palanca de elevación.
D. Sitúe el variador en la velocidad que desea y encienda la máquina. Tendrá que cerrar la
rejilla de seguridad y subir el perol para poder poner en marcha la máquina.
E. Apague la máquina y baje el perol con el asa/palanca de elevación y retire luego el
agitador cuando haya terminado de mezclar los ingredientes.
F. Retire el perol junto con el agitador. Por último, saque del perol los
ingredientes mezclados.
6. SEGURIDAD DE USO
A. Desconecte la máquina de la alimentación cuando vaya a limpiarla o
realizar un mantenimiento.
B. No intente nunca limpiar la máquina en movimiento, ya que podría sufrir lesiones graves.
C. No introduzca nunca la mano ni ningún utensilio de cocina en el perol con la batidora en
funcionamiento.
D. No utilice nunca la máquina sin las cubiertas de seguridad colocadas o si los
interruptores de seguridad no funcionan.
E. Muchas operaciones de mezclado deben empezar a baja velocidad e ir aumentándola
progresivamente a medida que avance el proceso.
ES
7. LIMPIEZA Y MANTENIMIENTO
A. Limpie la supercie de la máquina con un paño después de cada uso. Utilice un paño
húmedo con detergente lavavajillas suave.
B. Lubrique con un paño el carril de deslizamiento de elevación del perol. Suba y baje el
bol varias veces para lubricar el carril. Si tiene problemas para subir el perol, retire los
restos de masa del carril y lubríquelo con un paño. Acompañe la subida y bajada del
bol asegurándose de lograr una lubricación completa si sigue teniendo problemas para
subirlo y bajarlo.
C. Si sigue siendo difícil subir y bajar el bol con el asa de elevación tras una lubricación
completa, ajuste el tornillo interior que encontrará debajo del muelle para reforzar la
tensión del muelle y, con ello, la fuerza de elevación.
D. Compruebe cada mes el nivel de aceite de los engranajes para evitar fugas.
35
Page 36
IT
Mode d’emploi Manual Handleiding Handbuch Manual Istruzione
Batteur-melangeur
Planetary mixer
Klopper-menger
Planetenrührmaschine
Batidoras
Mascolatrici planetarie
36 37
Page 37
Congratulazioni per l’acquisto di questa mescolatrice planetaria Questa macchina è stata
controllata a fondo en nuestro almacén en Bélgica al ne di garantirVi la consegna di una
macchina pronta all’installazione.
Per un funzionamento corretto e una lunga durata di vita della
macchina,Vi raccomandiamo di leggere attentamente queste istruzioni prima di metterla in
funzione.
Sinmag Europe Vi ringrazia per la Vostra ducia e interesse e
Vi augura un buon lavoro con questa macchina.
IT
Sinmag Europe Team.
37
Page 38
ATTENZIONE
L’uso della presente apparecchiatura o di qualsiasi apparecchiatura industriale
può generare pericolo di superci calde, oggetti appuntiti o esposizione ad
energia elettrica. Il manuale viene fornito per un utilizzo sicuro ed efciente
dell’apparecchiatura.
Tutte le apparecchiature, che siano ritenute pericolose o meno, devono essere utilizzate
secondo i principi delle buone prassi di fabbricazione
Questa apparecchiatura deve essere utilizzata da un operatore maggiorenne. Prima
dell’uso, leggere attentamente e rispettare le istruzioni per lavorare in massima sicurezza e
per utilizzare al meglio l’apparecchiatura.
1. INTRODUZIONE
1.1 BREVE INTRODUZIONE
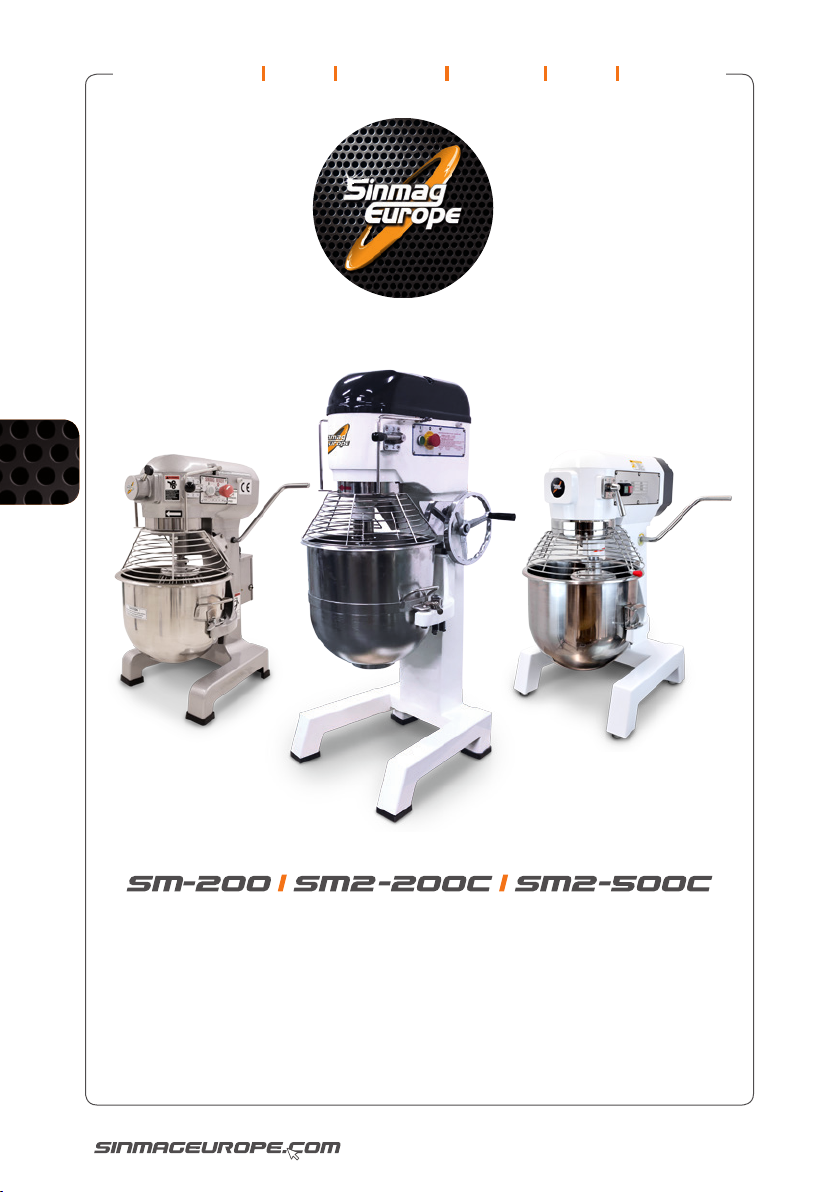
Lo scopo di questo manuale è presentare le modalità di installazione, uso e manutenzione
della mescolatrice planetaria SM-200 SM2-200C SM2-500C.
IT
Grazie per aver scelto come Vostro fornitore.
Per qualsiasi dubbio, contattate il nostro ufcio o il distributore di zona che Vi fornirà un
servizio immediato e soddisfacente.
1.2. CARATTERISTICHE TECNICHE
MODEL SM-200 SM2-200C SM2-500C
CAPACITÀ (L)
POTENZA MOTRICE
Giri/min a 50 Hz
1ª/2ª/3ª velocità
PESO NETTO MACCHINA
VOLTAGGIO
OPZIONE VASCA RIDOTTA
20 (10 opt.) 20 40 (20 opt.)
0,9 kW 1,1 kW 1,1 kW
158/293/535 158/293/535 116/208/464
110 kg 60 kg 190 kg
220V 1Ph 50Hz 220V 1Ph 50Hz 220/380V 3Ph 50Hz
✓ 10 L ✘ ✓ 20 L
38 39
Page 39
2. INFORMAZIONI DI SICUREZZA
2.1 SIMBOLI DI SICUREZZA
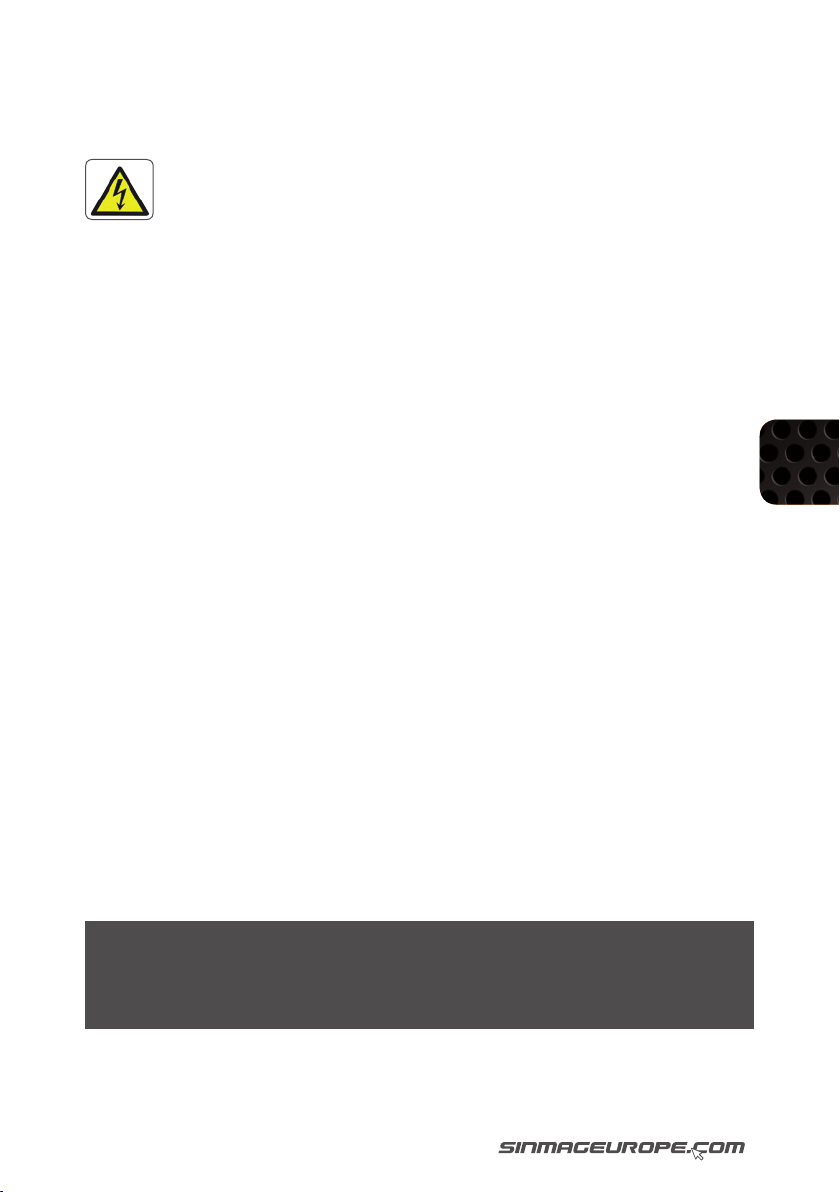
Per ragioni di sicurezza, fare attenzione al seguente simbolo presente sulla macchina:
L’etichetta avverte che solo il personale qualicato può accedere alla posizione
e l’operatore deve scollegare l’energia elettrica prima di effettuare qualsiasi
operazione di pulizia o manutenzione.
2.2 INFORMAZIONI DI SICUREZZA SUL LAVORO
La macchina deve essere utilizzata solo da personale adeguatamente addestrato allo
scopo secondo il contenuto di questa pubblicazione
Per garantire la sicurezza sul lavoro, è necessario rispettare le seguenti istruzioni:
1. Installare la macchina in conformità con i requisiti di sicurezza sul posto di lavoro.
2. Non porre la macchina vicino a una fonte di calore; la macchina non deve essere
utilizzata in un luogo dove l’ambiente circostante può presentare un potenziale rischio di
esplosione.
3. Utilizzare la macchina con grande cura e non distrarsi mai.
4. Non indossare indumenti svolazzanti o indumenti con maniche larghe o non allacciate.
5. Non rimuovere, coprire o modicare le targhe di identicazione poste sul corpo
macchina.
6. Non utilizzare la macchina come piano di lavoro e non appoggiarci oggetti che non sono
necessari alle normali operazioni di lavoro.
7. Non utilizzare la macchina con collegamenti elettrici temporanei o con cavi non isolati.
8. Vericare periodicamente lo stato del cavo di alimentazione e del morsetto sul corpo
della macchina; La sostituzione va effettuata non appena necessario da personale
qualicato.
9. Arrestare immediatamente la macchina appena si riscontra un funzionamento difettoso o
anomalo, una rottura, un qualsiasi movimento errato o rumori inconsueti.
10. Prima di effettuare operazioni di pulizia o manutenzione, scollegare la macchina dalla
rete elettrica.
11. Utilizzare guanti di protezione per la pulizia e la manutenzione.
12. Per tutte le operazioni di manutenzione straordinaria, consultare il fabbricante o
personale qualicato o autorizzato.
13. Non utilizzare getti o spruzzi d’acqua per pulire la macchina.
14. Quando si manipolano accessori taglienti, utilizzare guanti antitaglio.
IT
3. INSTALLAZIONE
3.1 REQUISITI GENERALI DI INSTALLAZIONE
NOTA: È importante che la macchina sia installata e che funzioni correttamente
prima del suo utilizzo. L’installazione deve essere conforme ai requisiti della
normativa locale in materia elettrica, di prevenzione incendi, di sicurezza e
tutela della salute.
Questa macchina è stata progettata per garantire un servizio soddisfacente negli anni.
Una corretta installazione è essenziale per ottenere migliori prestazioni, efcienza ed un
funzionamento senza difcoltà.
39
Page 40
3.2 INSTALLAZIONE
La macchina deve essere installata in un ambiente con sufciente aerazione, al ne di evitare un’eccessiva
concentrazione di sostanze nocive.
L’installazione deve essere eseguita esclusivamente da manutentori qualicati. La mancata installazione
dell’apparecchiatura secondo le norme e le speciche del fabbricante esposte in questo paragrafo rende
nulla la garanzia.
I componenti la cui regolazione è protetta dal fabbricante (es. con sigillo) possono essere regolati solo da
un manutentore autorizzato. Non possono essere regolati dalla persona che esegue l’installazione.
È responsabilità del proprietario fornire e predisporre il necessario per il collegamento della macchina alle
utenze di servizio
3.3 DISIMBALLAGGIO
Al momento della ricezione della macchina, eseguire le seguenti operazioni:
Rimuovere l’imballo e le protezioni per il trasporto, comprese le plastiche di protezione, dai pannelli di
rivestimento.
Vericare che l’apparecchiatura ed i componenti non abbiano subito danni. Segnalare immediatamente
eventuali danni al trasportatore e distributore. Mai utilizzare la macchina con parti danneggiate.
Segnalare eventuali difetti al distributore che ha fornito la macchina.
IT
3.4 POSIZIONAMENTO
1. Scegliere un luogo nel quale la macchina possa avere almeno uno spazio di 0,6 m attorno per il
funzionamento, la pulizia e la manutenzione.
2. Collocare la macchina approssimativamente nella sua posizione di lavoro. La spezzatrice deve essere
installata su un pavimento piano, solido e asciutto.
3. Si raccomanda che la macchina sia livellata da davanti a dietro e da un lato all’altro. Questo garantisce la
massima stabilità.
3.5 COLLEGAMENTO ELETTRICO
1. Una presa elettrica deve essere raggiungibile dal cavo di alimentazione fornito. Non utilizzare prolunghe
per collegare il cavo di alimentazione della macchina alla rete di alimentazione elettrica.
2. Prima di eseguire i collegamenti elettrici, leggere le caratteristiche di targa per assicurarsi che siano
conformi a quelle dell’alimentazione elettrica. Il collegamento elettrico deve essere effettuato da un
manutentore qualicato che dovrà rispettare tutte le norme locali applicabili in materia di sicurezza ed
elettricità
3. Vericare il collegamento corretto (senso di rotazione) della macchina. Quando la macchina è collegata
scorrettamente, il motore funzionerà, ma i coltelli e la piastra di pressione non si moveranno. Se
necessario, ci vuole cambiare la posizione di due cavi di fase.
Quando si collega la macchina alla rete di alimentazione, assicurarsi che siano soddisfatte le seguenti
condizioni:
1. A 2 m dalla macchina è installato un interruttore generale.
2. In corrispondenza del foro di entrata nella macchina del cavo di alimentazione è montato un pressacavo.
3. Tutti i collegamenti elettrici debbono essere serrati
Una volta effettuato il collegamento elettrico, la macchina è pronta per l’uso.
40 41
Page 41
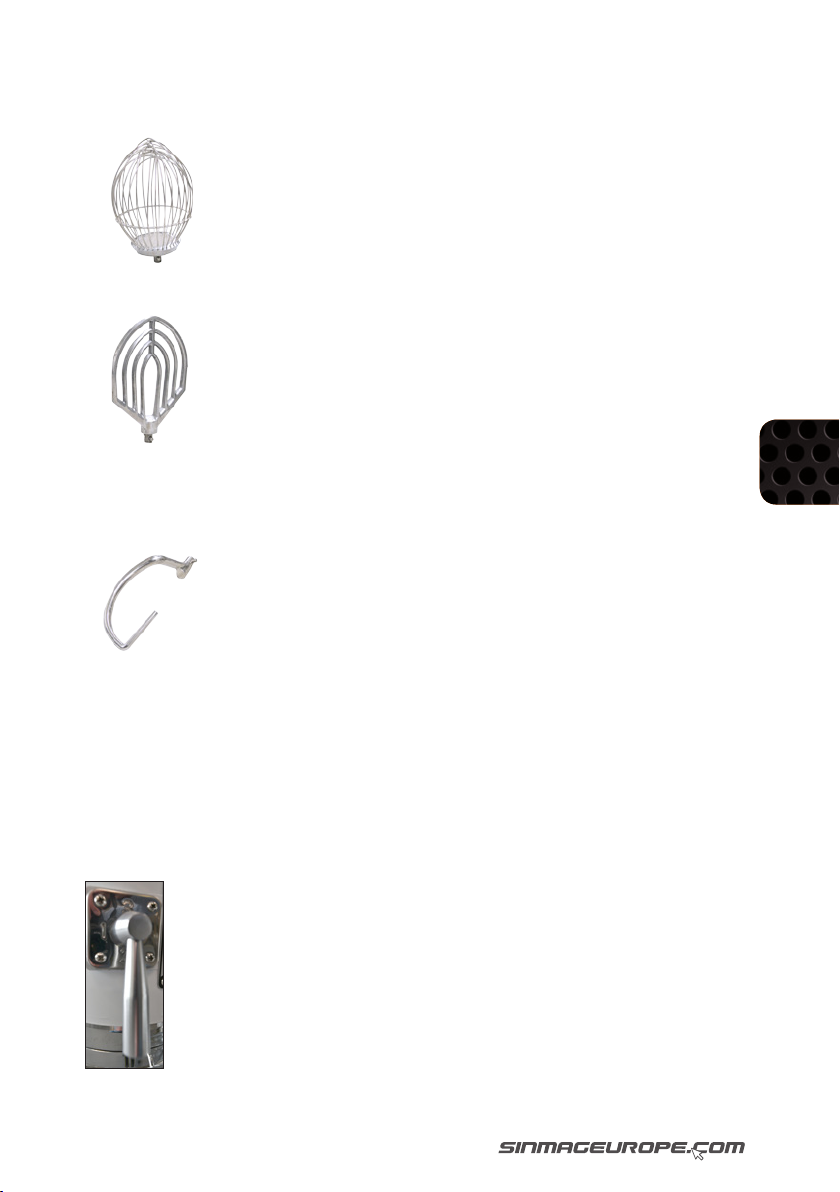
4. ISTRUZIONI PER L’USO
4.1. SELEZIONE DEGLI UTENSILI
FRUSTA: per miscele leggeri come panna, maionese, uova, albumi, pancake e meringhe.
SPATOLA: miscele dense come impasti leggeri, torte, biscotti, glasse, farce e verdure
schiacciate.
GANCIO: miscele pesanti come impasti e sfoglie.
4.2. SOLLEVAMENTO DELLA VASCA
Girare la ruota di sollevamento in senso antiorario (o premere la leva) per abbassare
la vasca. Per cambiare gli utensili e avere un migliore accesso per riempire e svuotare
la vasca, è necessario abbassare la vasca. Per sollevare la vasca, girare la ruota di
sollevamento in senso orario (o premere la leva) no ad arrestarla in corrispondenza dei
fermi superiori.
4.3. CONTROLLO DELLA VELOCITÀ
Per cambiare le velocità, spegnere innanzitutto la mescolatrice, quindi
spostare la leva del cambio sulla velocità desiderata. Al numero 1 corrisponde
la velocità minima, mentre al numero 3 corrisponde la velocità massima.
Velocità minima: per miscele pesanti come impasti, biscotti, ecc.
Velocità massima: per lavori veloci e leggeri come montare la panna, sbattere
le uove e miscelare sostanze poco dense.
IT
41
Page 42
5. PASSAGGI OPERATIVI
A. Inserire gli ingredienti da miscelare nella vasca insieme all’agitatore. Quindi, ssare la
vasca all’apposita staffa.
B. Fissare l’agitatore sulla testa miscelante
C. Sollevare la vasca in corrispondenza della tacca superiore con la maniglia/leva di
sollevamento.
D. Posizionare la leva del cambio sulla velocità desiderata, quindi accendere la macchina.
Per poter azionare la macchina, è necessario chiudere la griglia di sicurezza e sollevare
la vasca.
E. Spegnere la macchina e abbassare la vasca con la maniglia/leva di
sollevamento, quindi estrarre l’agitatore a lavoro nito.
F. Estrarre la vasca insieme all’agitatore. Inne, estrarre gli ingredienti
miscelati.
6. ANTINFORTUNISTICA
A. Scollegare la macchina dall’alimentazione elettrica prima della pulizia o della
manutenzione.
B. Non tentare di pulire la macchina mentre è in movimento. In caso contrario, posso
IT
vericarsi infortuni gravi.
C. Non inserire le mani o utensili da cucina nella vasca mentre la mescolatrice è in funzione.
D. Non utilizzare la macchina con i coperchi di sicurezza rimossi o gli interruttori di
sicurezza non operativi.
E. Molte operazioni della mescolatrice devono essere iniziate a bassa velocità,
aumentandola progressivamente durante la miscelazione.
7. PULIZIA E MANUTENZIONE
A. Dopo l’uso quotidiano, pulire la supercie della macchina con un panno. Utilizzare un
panno inumidito con detergente delicato.
B. Lubricare con olio la guida di scorrimento per il sollevamento della vasca. Sollevare
e abbassare la vasca diverse volte per lubricare completamente la guida. In caso di
difcoltà a sollevare la vasca, rimuovere i residui di impasto dalla guida, quindi lubricare
con olio. Se il sollevamento o l’abbassamento della vasca risultano ancora difcoltosi,
richiedere aiuto per sollevare o abbassare la vasca e procedere a una lubricazione
completa.
C. Se è ancora difcile sollevare o abbassare la vasca con la maniglia di
sollevamento dopo la lubricazione completa, regolare la vite interna sotto la molla per
aumentare la spinta della molla e quindi la forza di sollevamento.
D. Controllare mensilmente il livello dell’olio degli ingranaggi per evitare
perdite.
42 43
Page 43

SINMAG EUROPE ❙ BLANKENBERGSESTEENWEG 44A ❙ 8377 ZUIENKERKE - BELGIUM
 Loading...