

Page 1
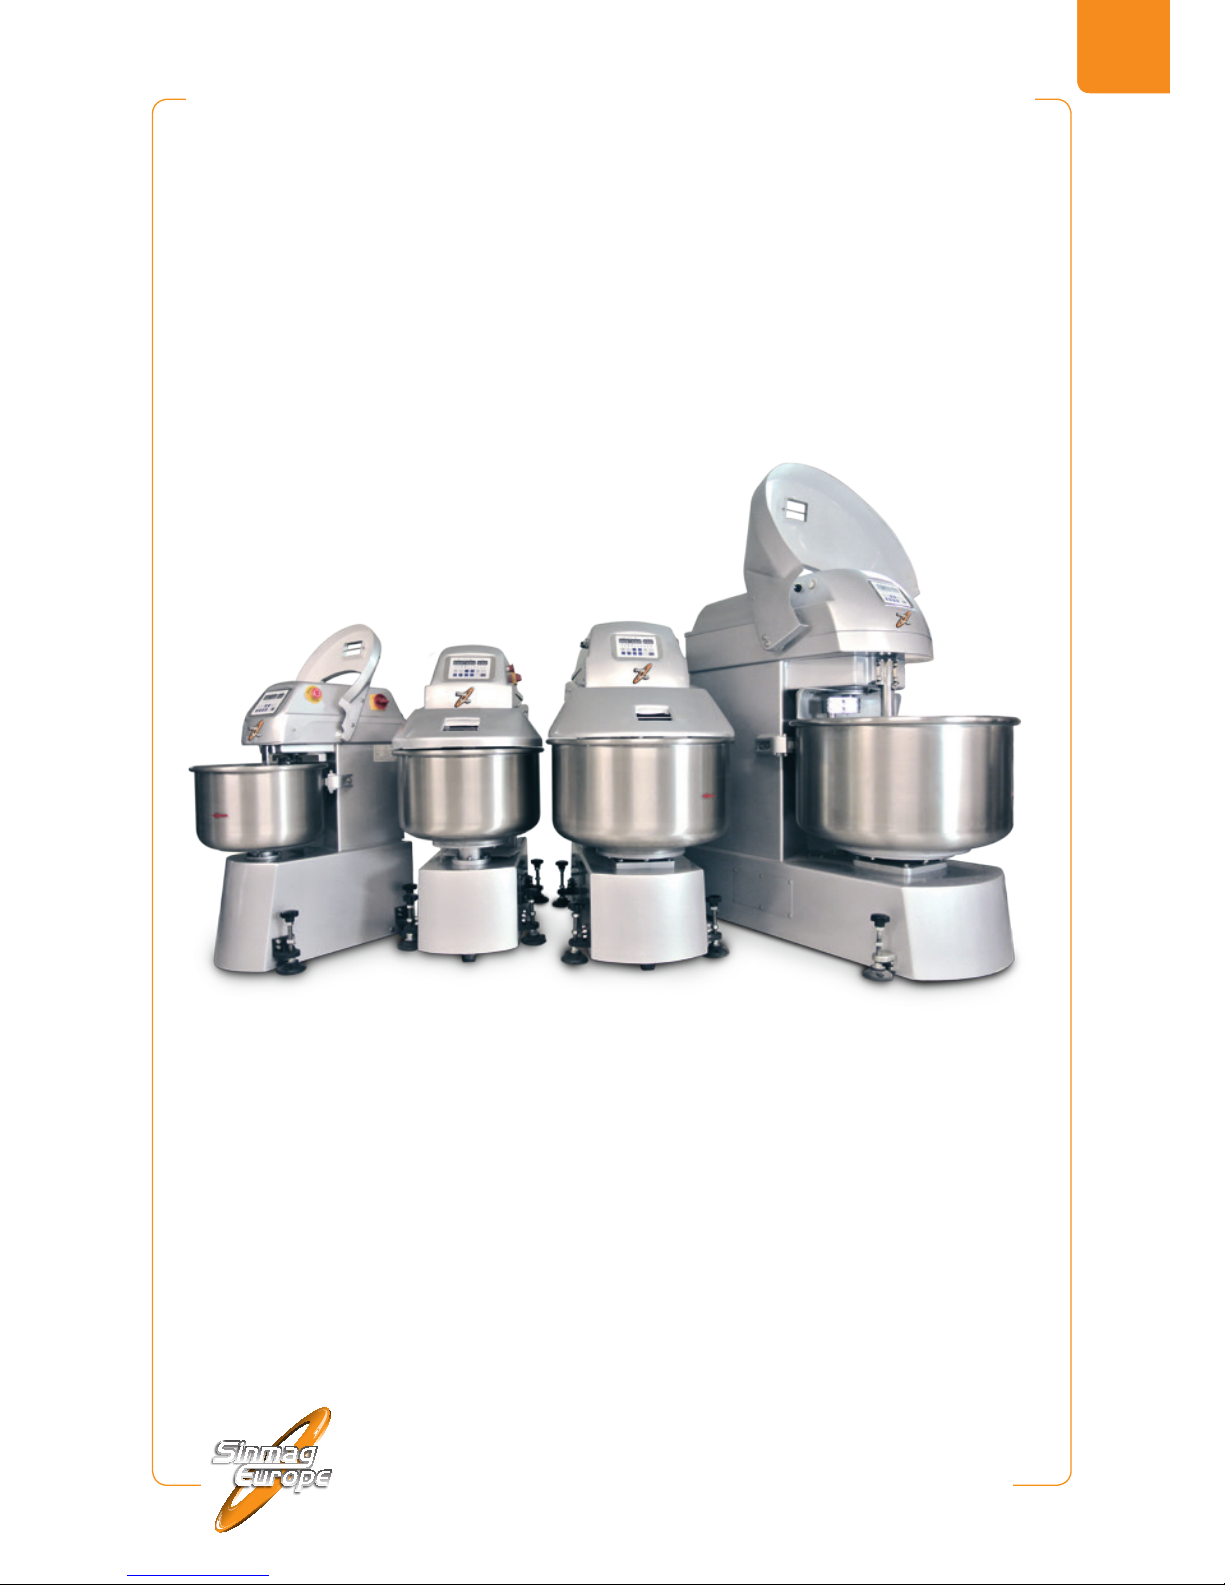
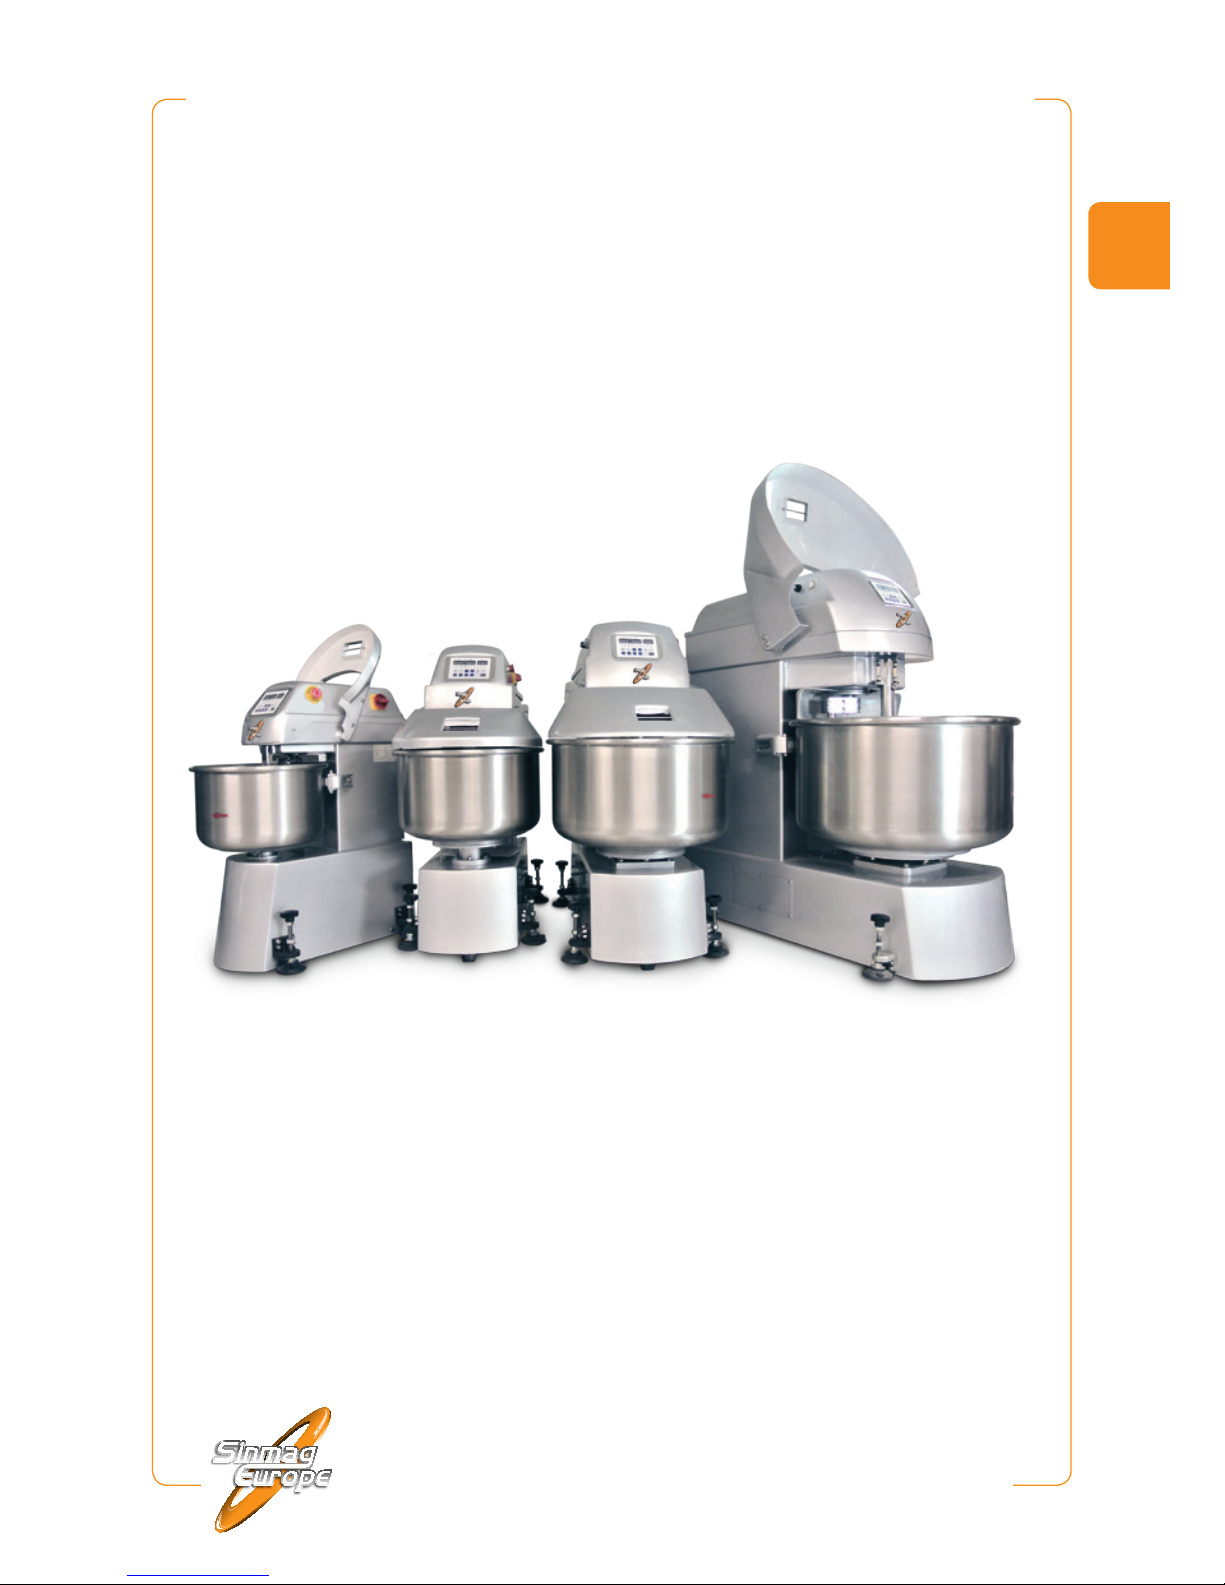
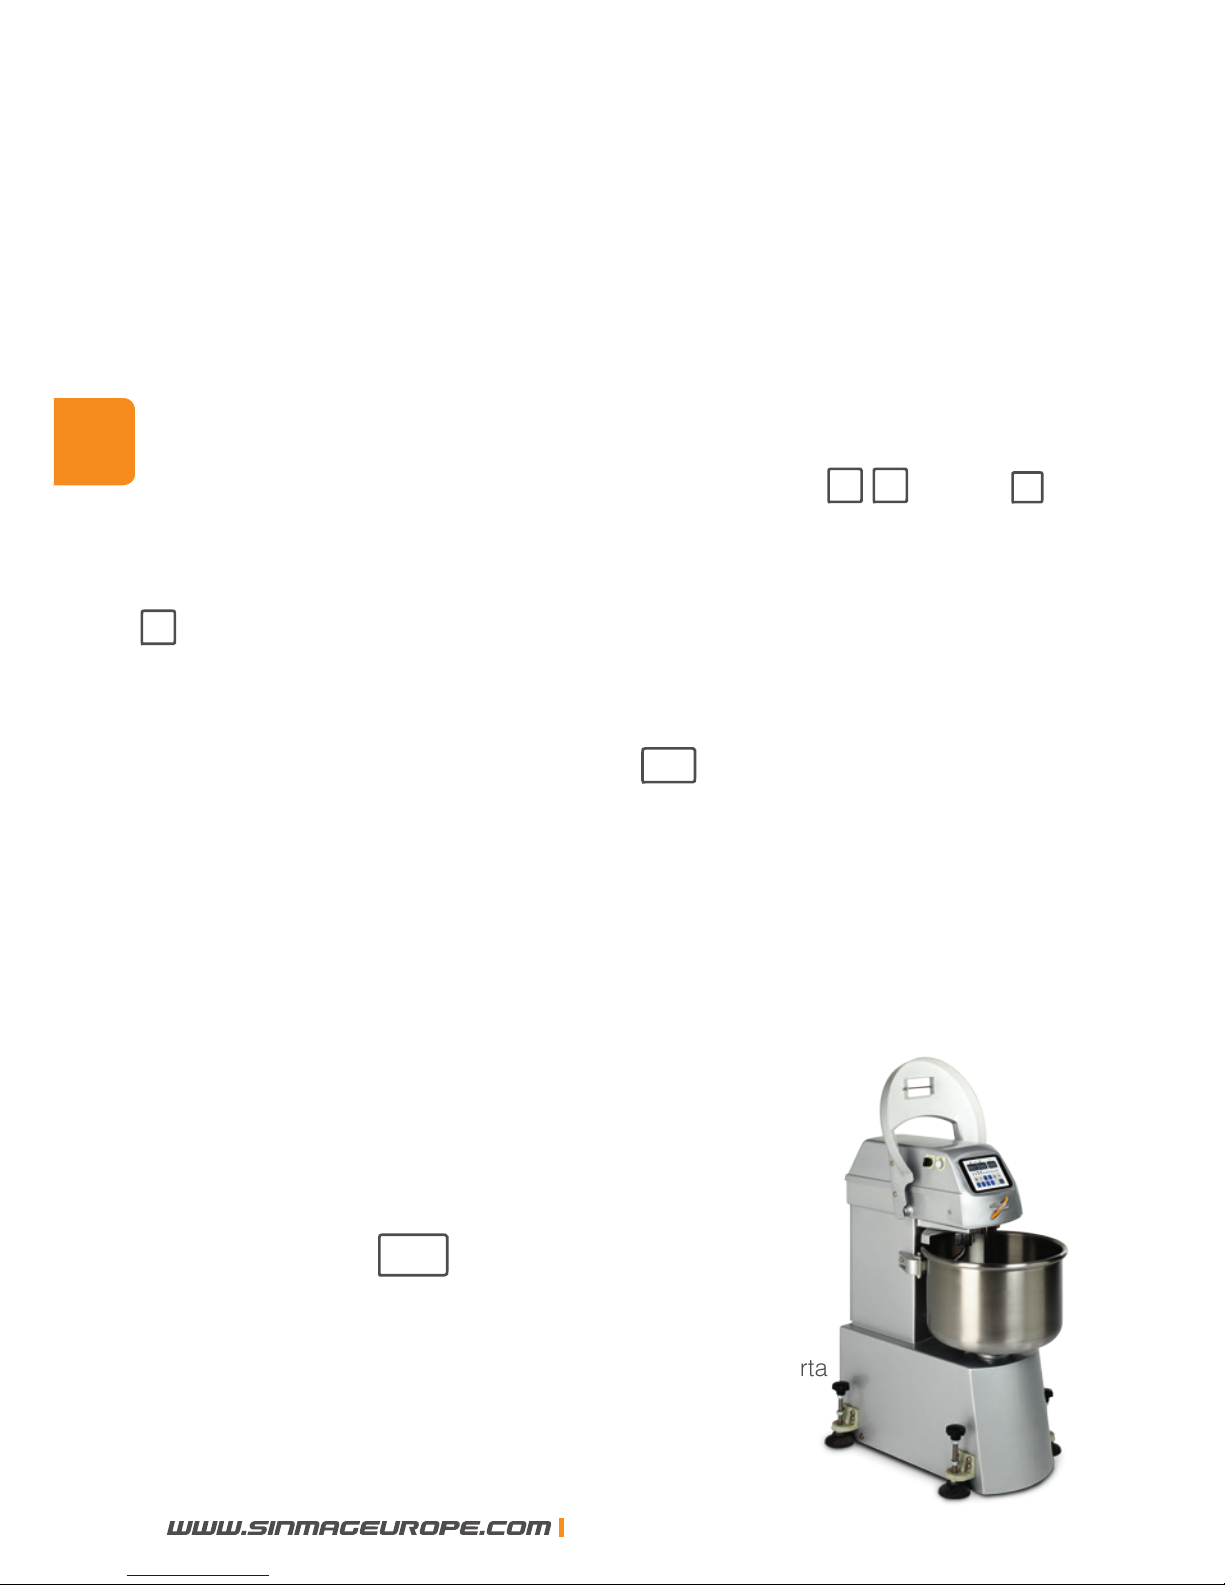
Spiral mixer
.
Pétrin à spirale. Spiraalkneder
Spiralkneter
.
Amasadora. Impastatrice
KM-25
.
KM-50T . KM-80T . KM-120T
Manual. Mode d’emploi. Handleiding. Handbuch. Manuale
ENG
Page 2

Congratulations with the purchase of this spiral mixer.
This machine has been tested thoroughly in our warehouse
in Belgium before delivery.
This way, Sinmag Europe is able to guarantee delivery of a
machine ready for installation.
For correct use and long service life of your spiral mixer,
we recommend that you read this manual attentively before
starting to use the machine.
Sinmag Europe thank you for your trust and wish you much
job satisfaction with this spiral mixer.
Sinmag Europe Team.
ENG
2
SINMAG EUROPE BVBA
Page 3
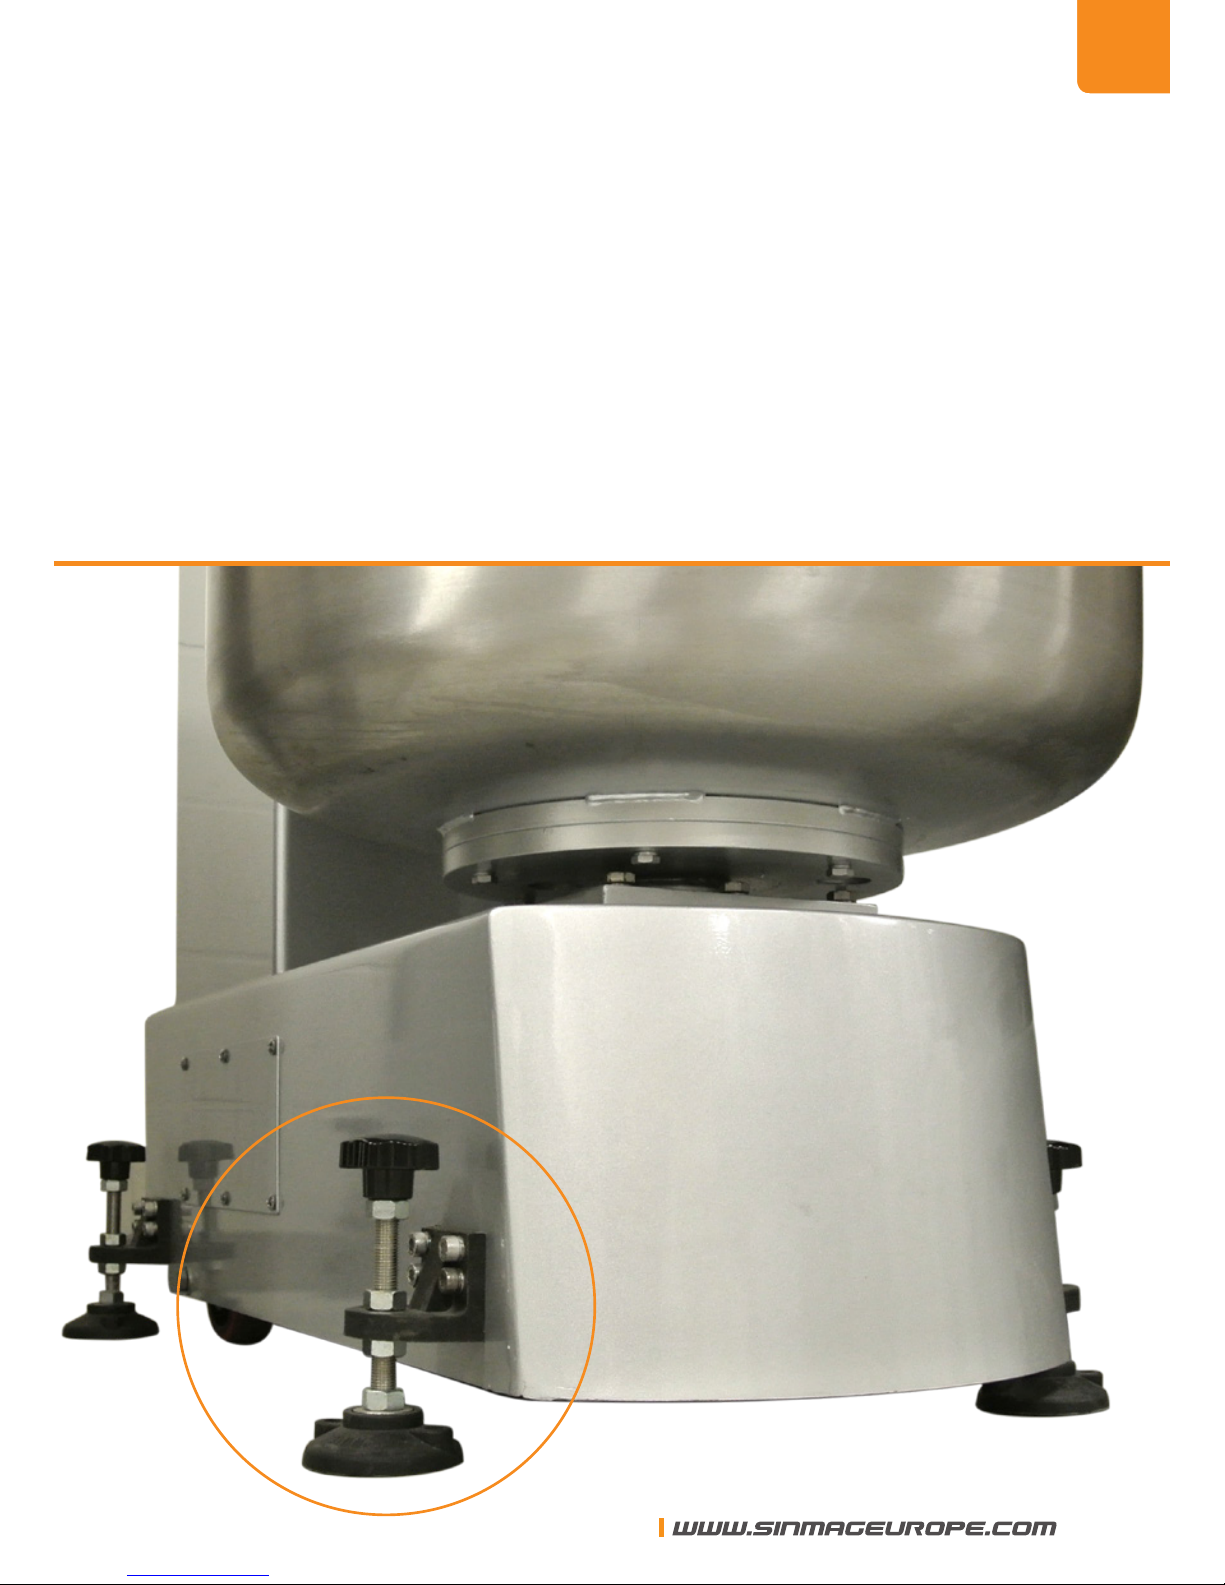
1. Installation
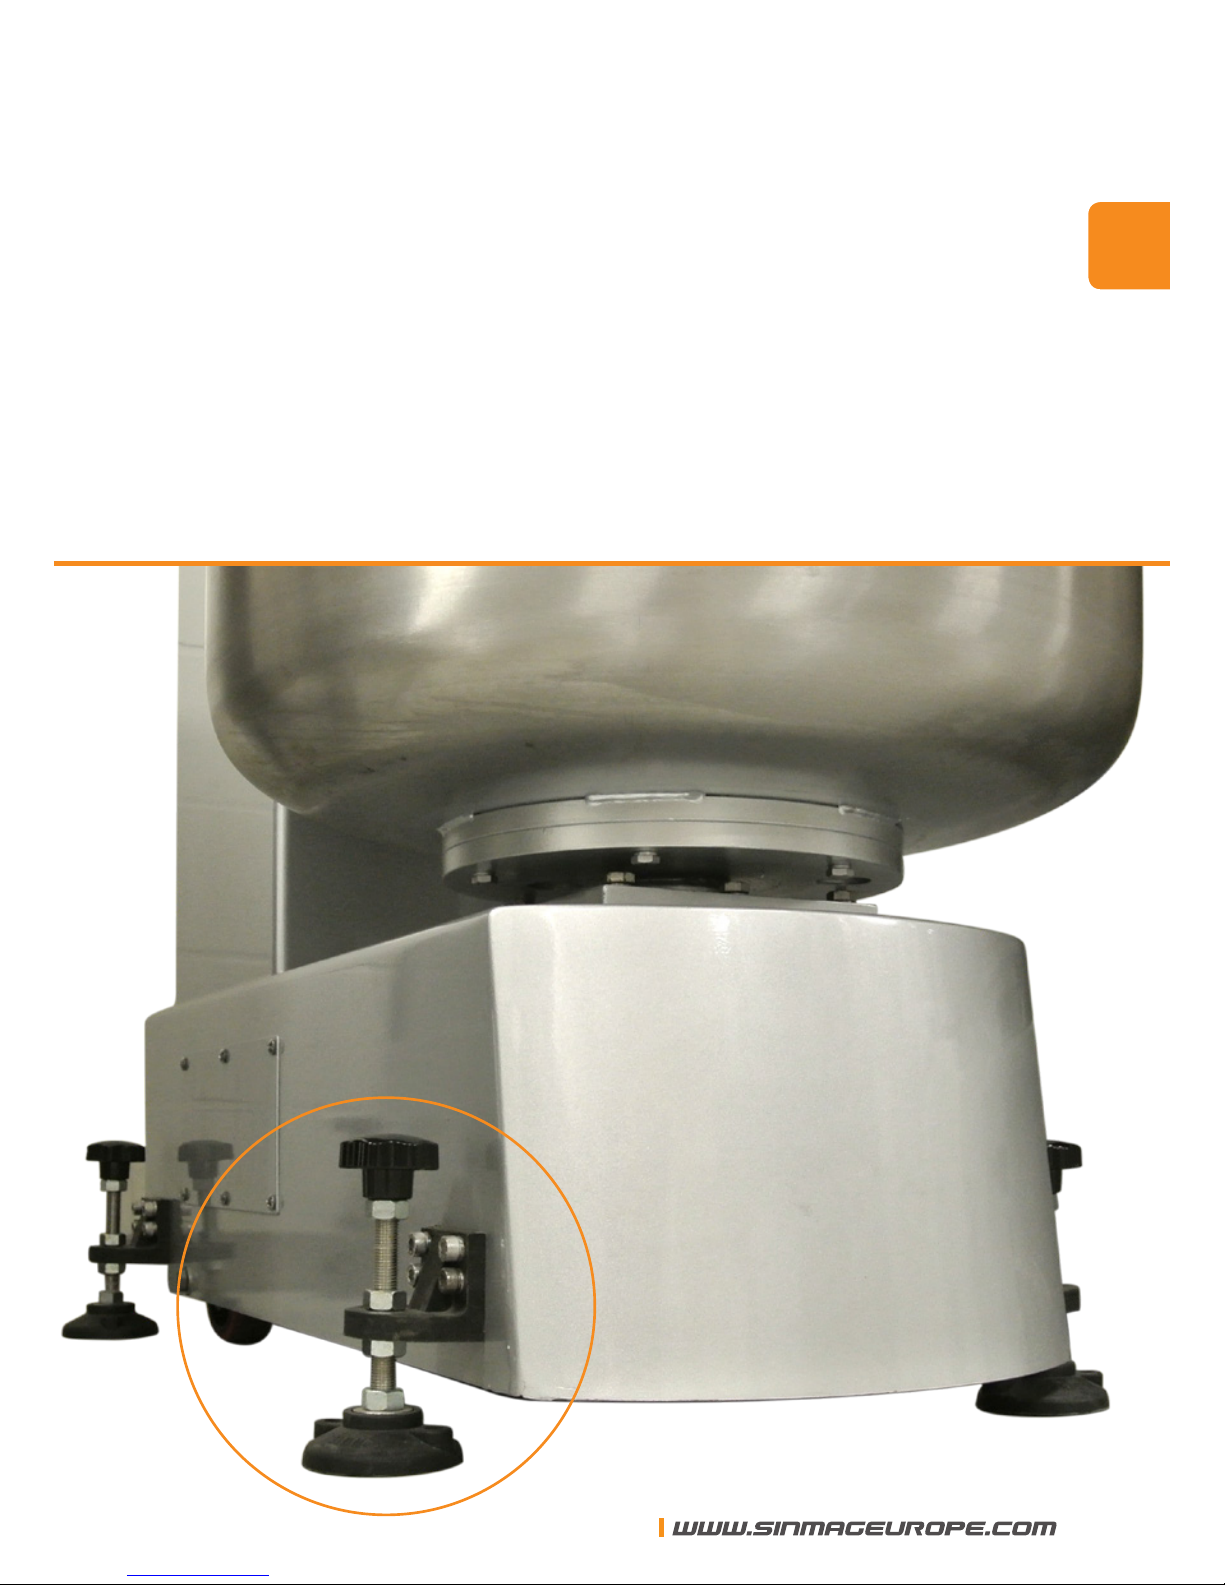
The machine has to be installed on a horizontal and smooth
surface.
Adjust the four screws to make
sure the machine seats rmly
on its four corners.
ENG
SINMAG EUROPE BVBA
3
Page 4
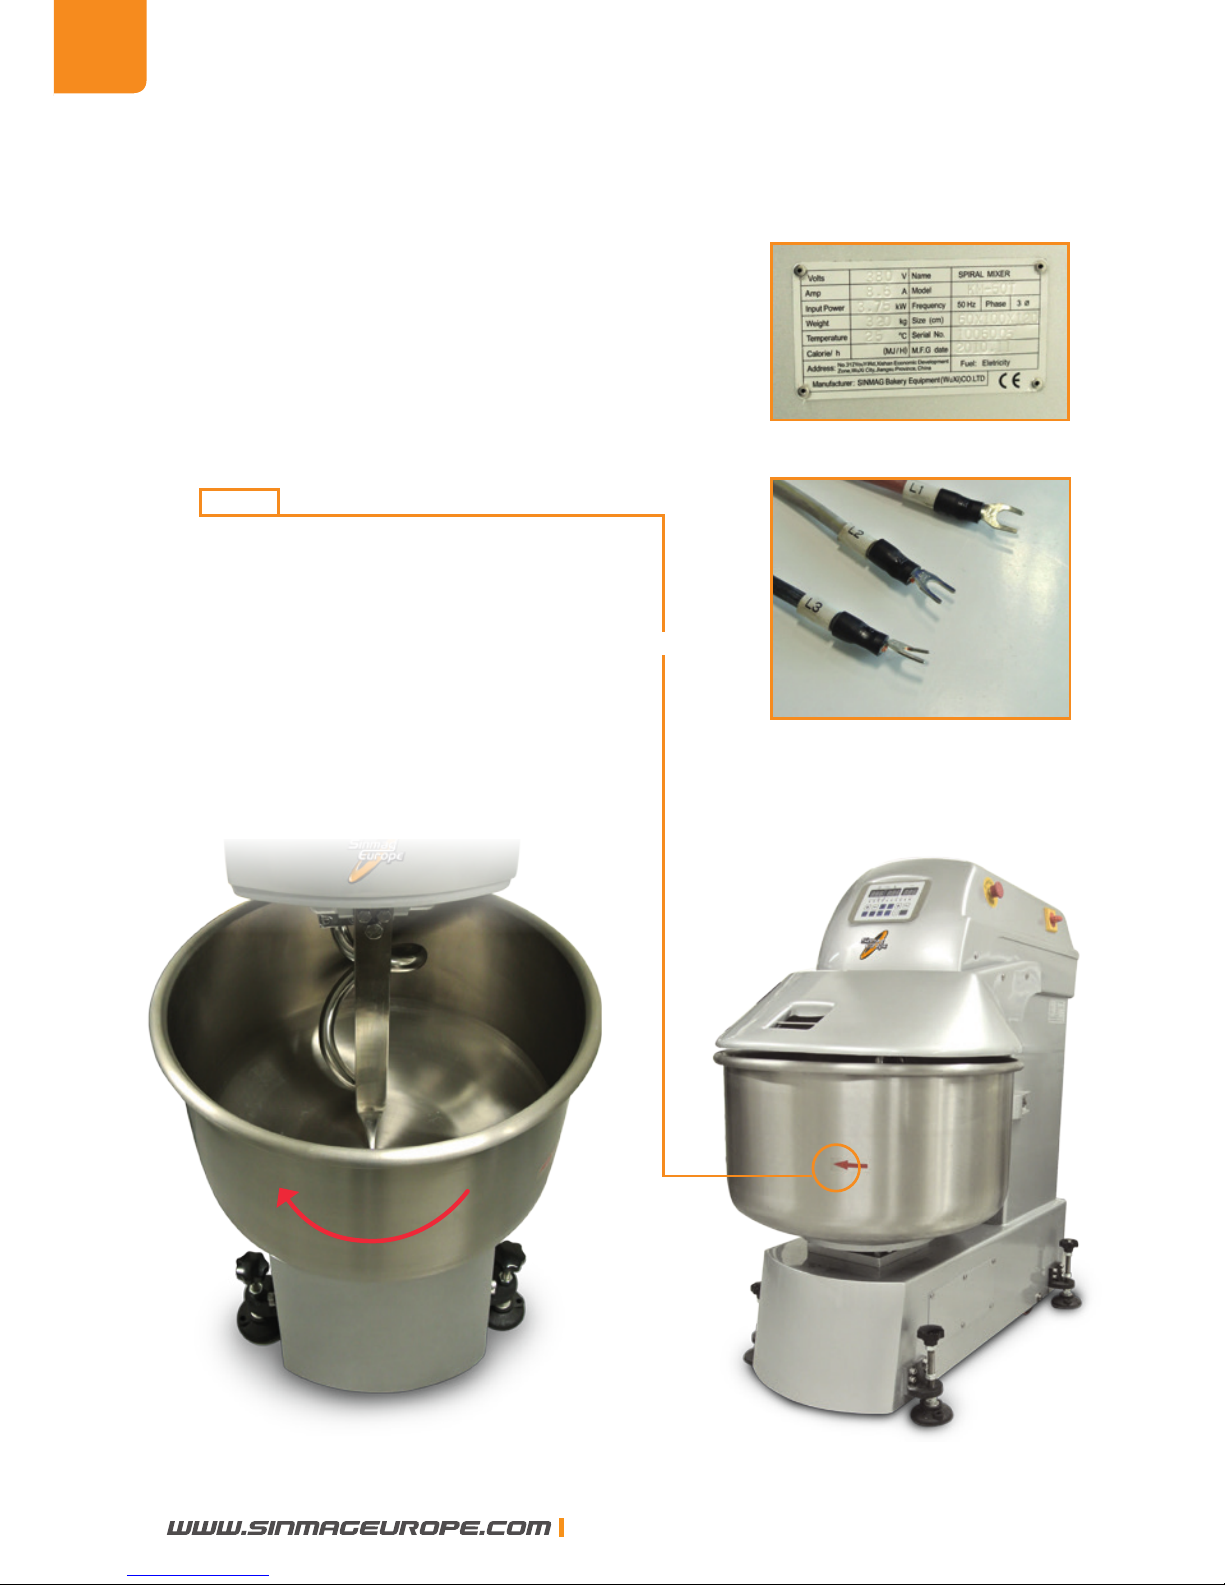
2. Electrical supply
Please connect the machine to the correct electrical supply, as indicated on the
identication plate.
After the machine has been connected to the
electrical supply, rst of all check the direction
of rotation of the kneading spiral and the bowl.
Seen from above, both kneading
spiral and bowl should rotate clockwise.
The arrow on the bowl indicates the
rotating direction of the bowl.
If the rotating direction is wrong, please
exchange any two of the electrical phase
cables to reverse the rotating direction.
ENG
4
SINMAG EUROPE BVBA
Page 5
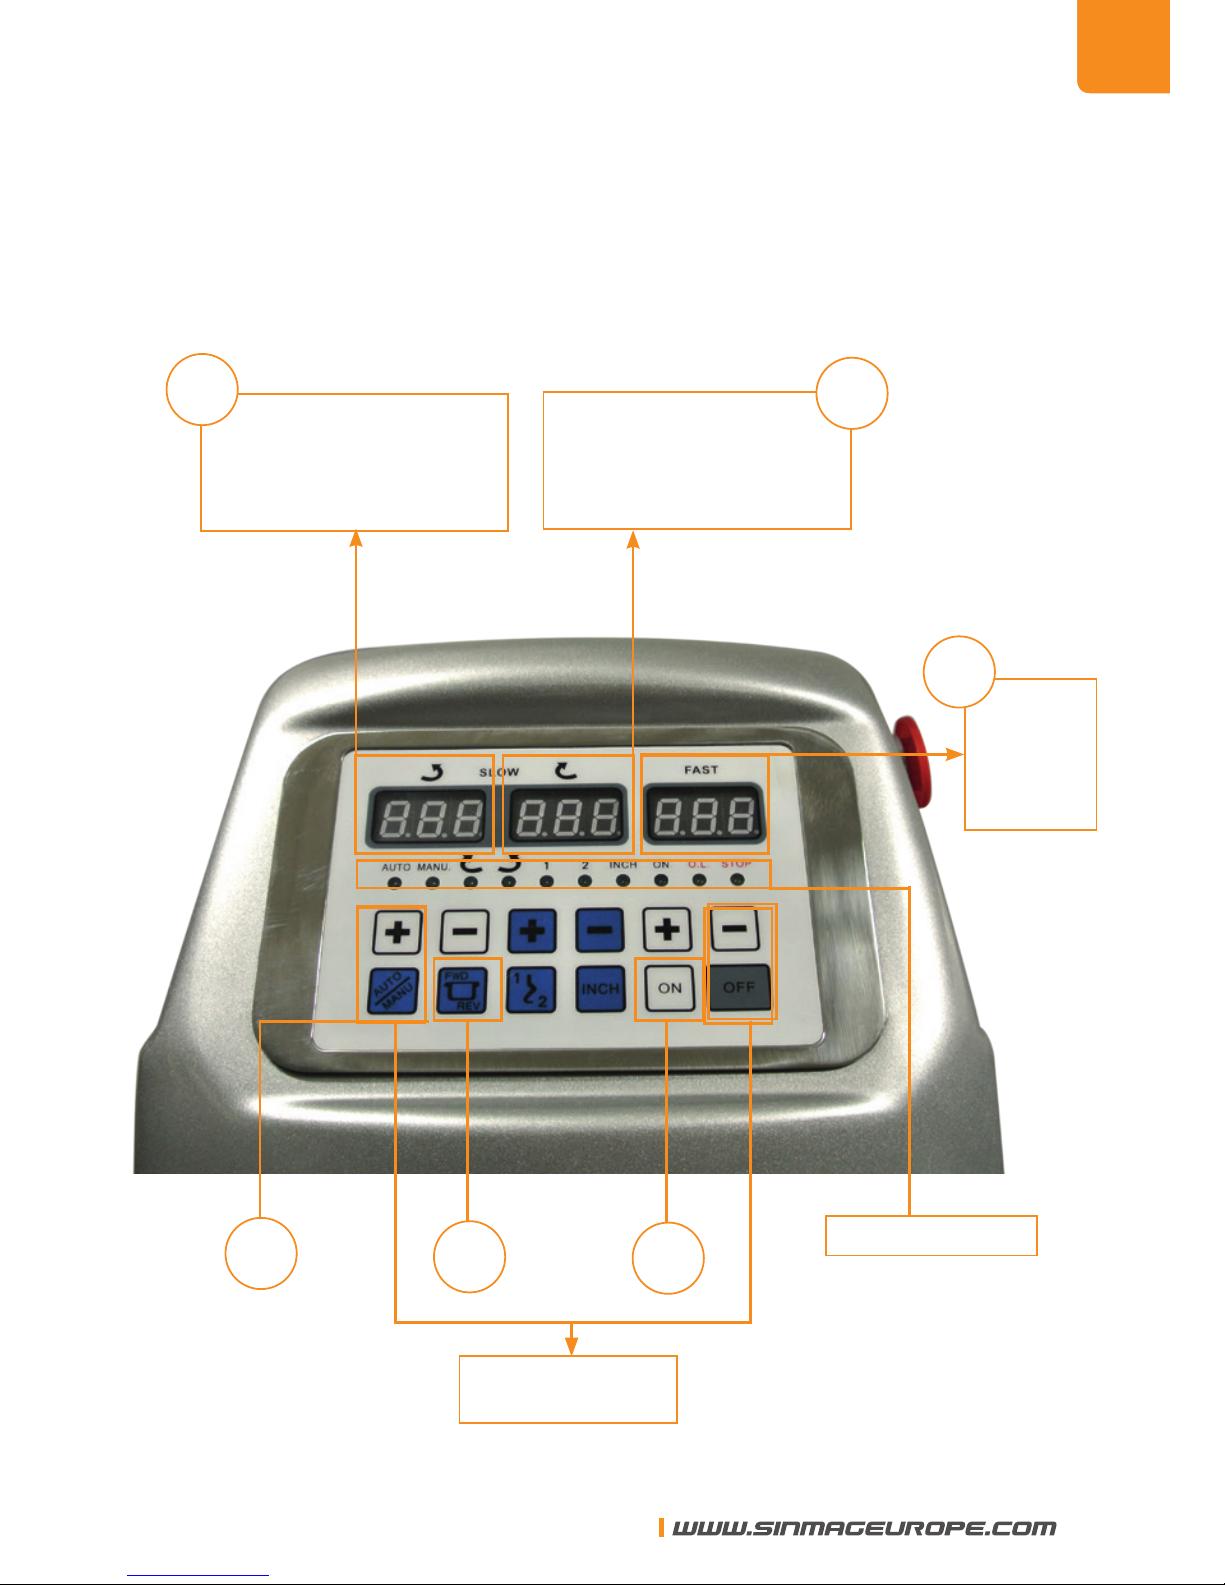
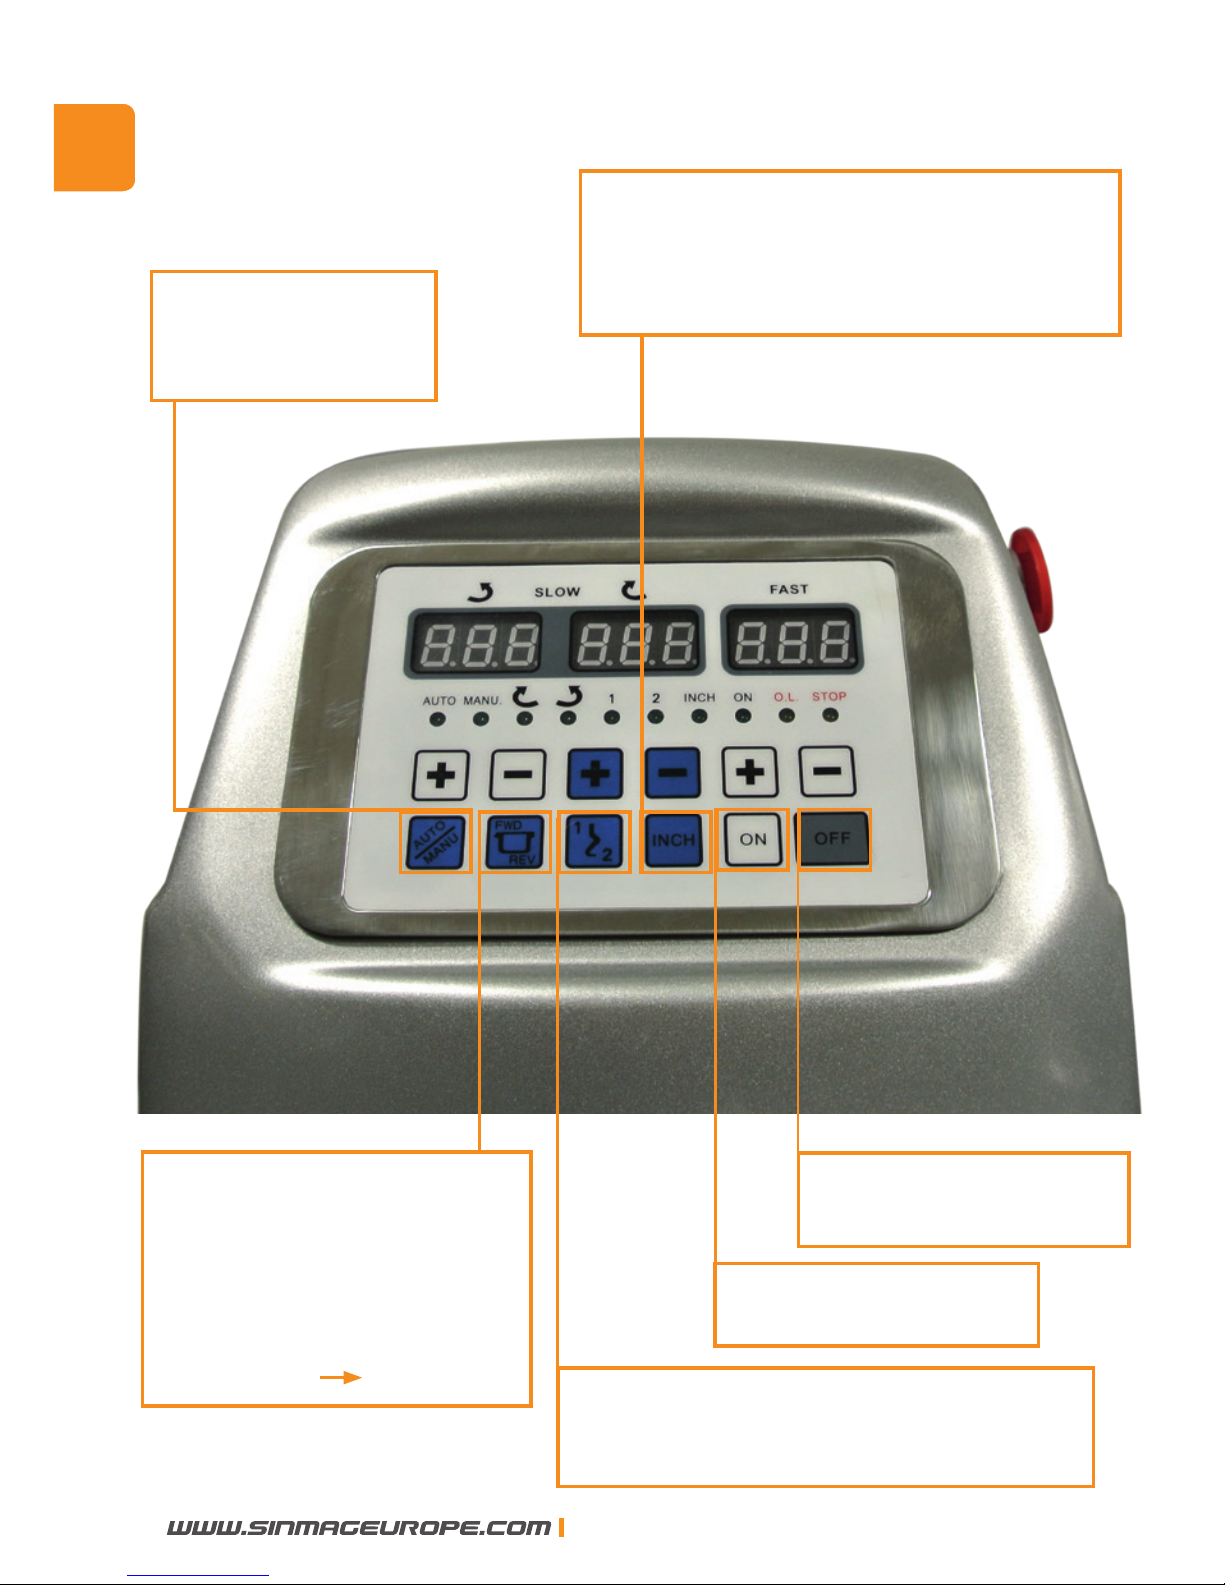
3. Control panel
Function keys
Timer I for reverse
direction
Timer II for rst
speed
A
B
Timer
III for
second
speed
F
E
D
Indication LED
C
ENG
SINMAG EUROPE BVBA
5
Page 6
ENG
4. Operation of the spiral mixer by means of the
touch digital panel
4.1 Description
4.1.1 Timers
The timers are located at the upper side of the panel. Timer I is for
reverse direction, timer II for rst speed, timer III for second speed.
The timers are set by means of the + and --keys. If you press the
+
once, the set time will increase by 10 seconds. The maximum time
that can be set is 20 minutes. After 20 minutes, the timer will start from
0 minutes again.
Press the - key for reducing the set time by 10 seconds.
When the spiral mixer is switched ON , the timers will indicate the set
time. When the timer starts to work, the time indicated on the timer will
be reduced 10 seconds at a time until it reaches 0.
When the safety cover is raised during AUTOMATIC operation, the
timer will stop at the current position. When the spiral mixer restarts
after such a stop, the timer will continue from the current position to
nish the remaining time.
During MANUAL operation, the timer will
not work.
When the
OFF
-key is pressed, the timers
will return to the set time.
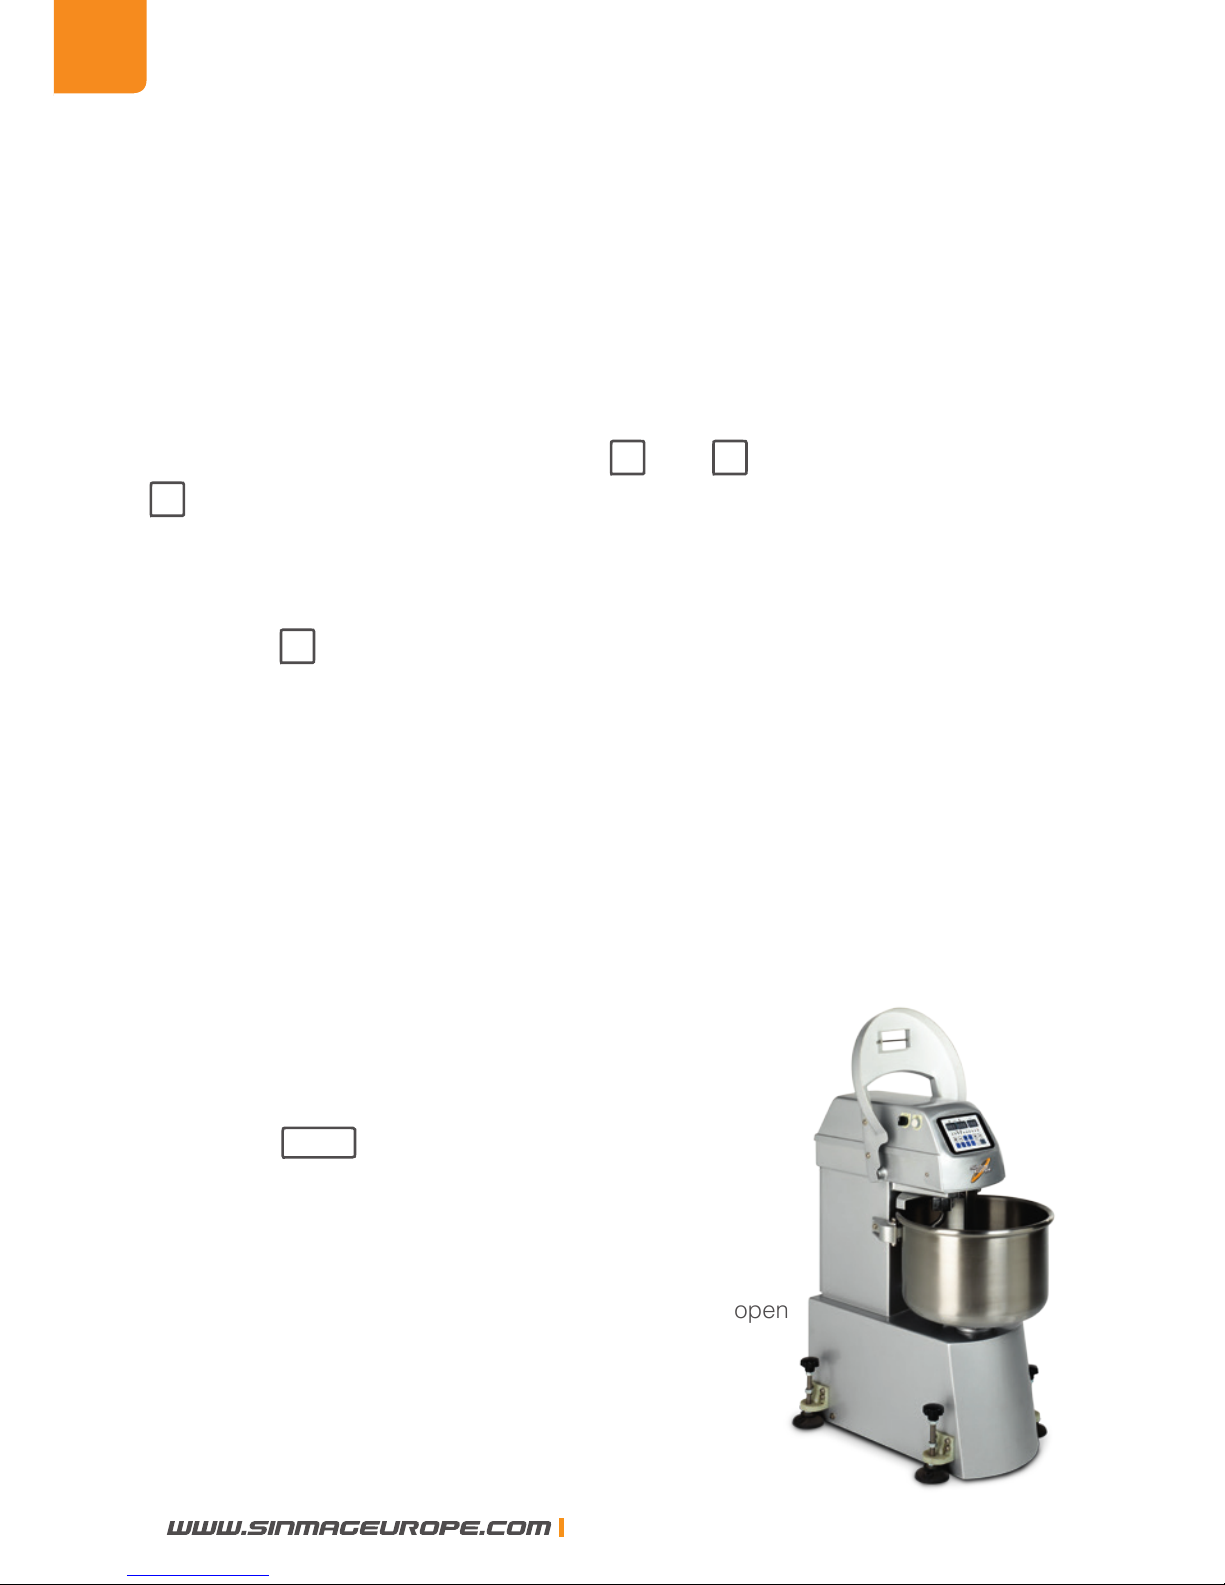
Safety cover open
ENG
ENG
6
SINMAG EUROPE BVBA
Page 7

4.1.2 Indication LEDS
These LEDS show the operation mode in which the spiral mixer is
functioning:
A. “AUTO/MANUAL” operation:
When the “AUTO”LED lights up, the spiral mixer is functioning
in AUTOMATIC mode.
When the “MANU” LED lights up, the spiral mixer is functioning
in MANUAL mode.
B. Bowl direction:
When the -LED lights up, the bowl will rotate in FORWARD
direction (clockwise).
When the -LED lights up, the bowl will rotate in REVERSE
direction. (counterclockwise)
C. The “ON”-LED lights up when the machine is functioning.
D. Speed:
When the “I”-LED lights up, the spiral mixer is operating in
rst speed.
When the “II”-LED lights up, the spiral mixer is operating in
second speed.
E. The “INCH”-LED indicates the inching
mode. When neither the “INCH”, nor the “ON”-LED lights up,
the machine is in “STOP”.
F. The “STOP”-LED lights up only when the
safety cover is raised during operation of the machine.
G. “O.L.” (Over-Load): This LED lights up when
the overload relay is on. After the fault (voltage drop,
mixer overload or one of the cable connections has
come loose) has been removed, this LED will turn off.
ENG
SINMAG EUROPE BVBA
7
Page 8
ENG
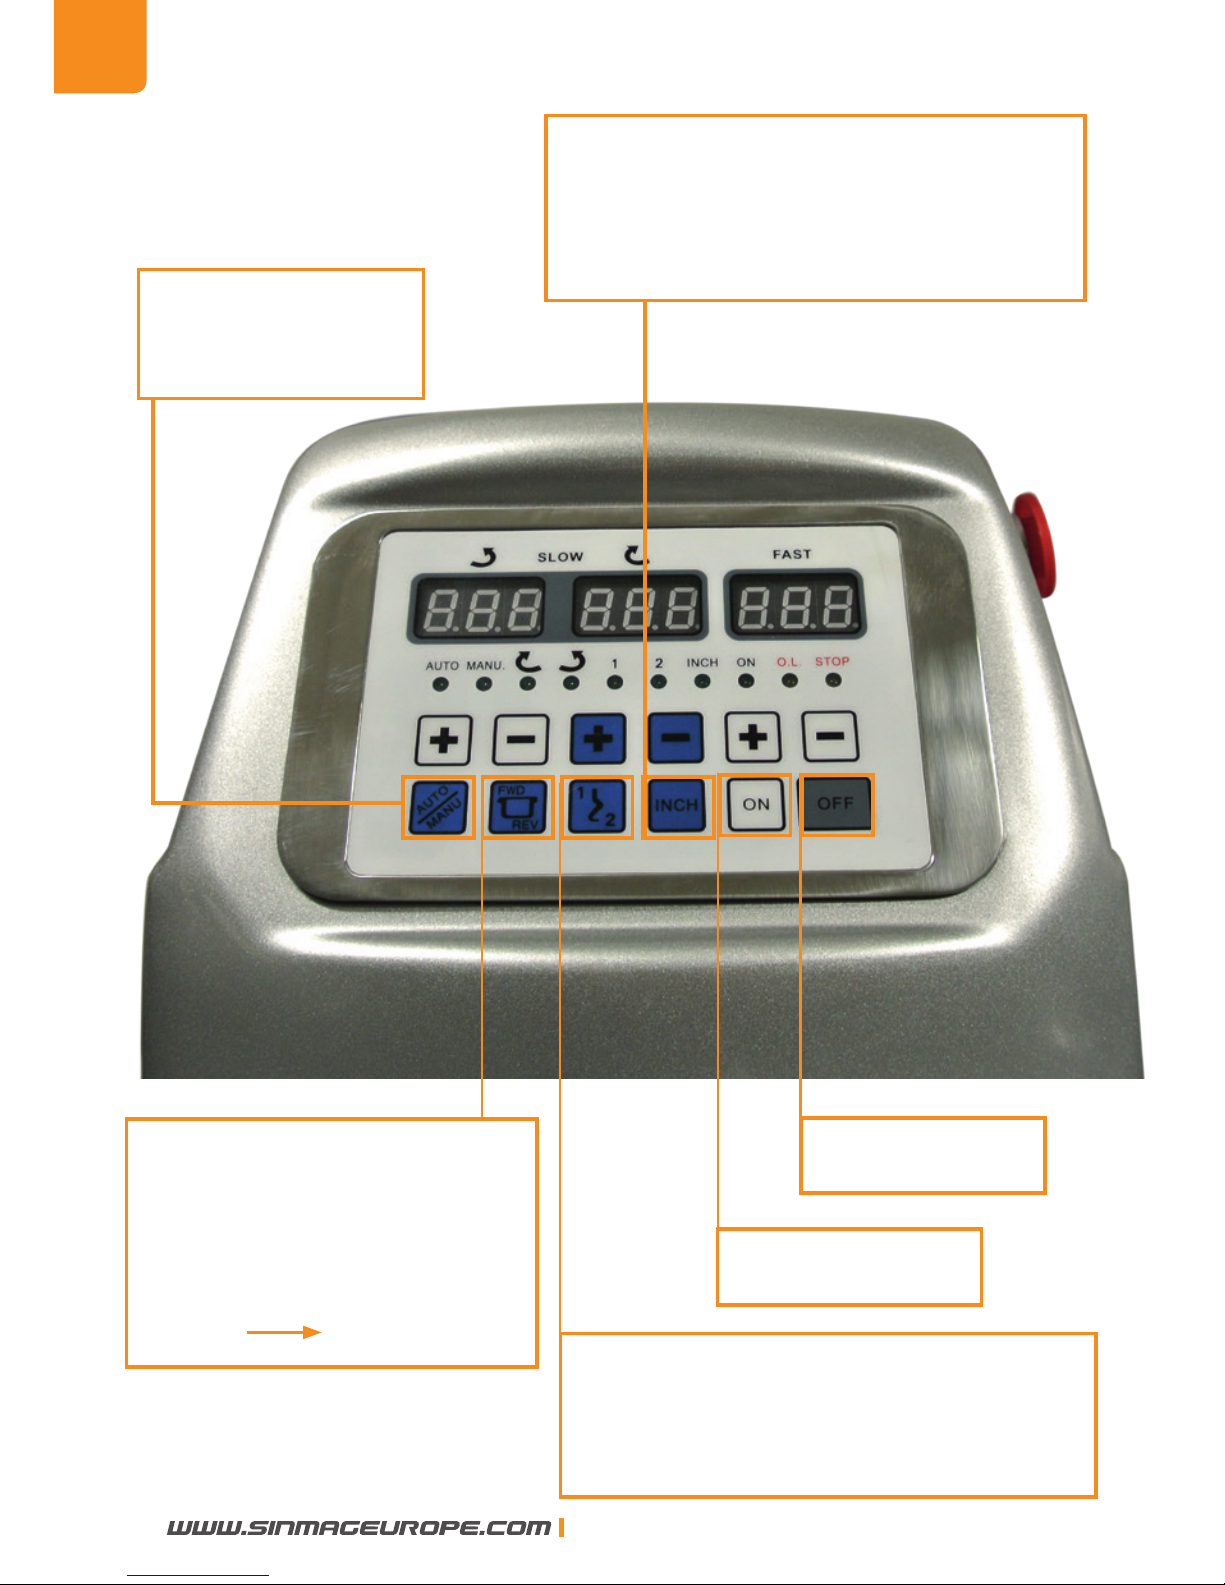
4.1.3 Function keys
AUTO/MANUAL
operation mode
Button for the selection of the speed in
which the spiral mixer should operate.
Seen from above, the spiral should run
in clockwise direction.
Button for the selection
of the bowl direction
(Forward-0-Reverse).
The bowl should rotate in the
same direction as the arrow
mark “ “ on the bowl.
START button
STOP button
Inching button. Only the bowl will run
while you press this key. This button’s
function is to bring the dough to the front
after operation, in order that it can be
taken out.
ENG
ENG
8
SINMAG EUROPE BVBA
Page 9

ENG
4.2 Automatic operation
A. Press the + and - -buttons below timer I to set desired
time for reverse direction.
B. Press the + and - - buttons below timer II to set the
desired time for rst speed.
C. Press the + and - buttons below timer ||| to set the
desired time for second speed.
D. Press the AUTO / MANU -button until the “AUTO”-LED
lights up.
E. Press the -button until the -LED lights up.
F. Press the ON -button to start the machine.
After completing the above procedure, the machine will start operating. It will work in reverse direction until timer I reaches 0. Then ,
the machine will start operating in rst speed until timer II reaches 0.
Finally the machine will start operating in second speed until timer |||
reaches 0. The machine will now stop automatically.
During the “AUTOMATIC” operation, the machine will stop when you
lift the safety cover.
The timer will stop at its current position. The timer will restart from that
position after you have closed the safety cover and pressed the ON
-button.
Upon pressing the OFF -button, the timer will return to the set position and restart.
F
R
ENG
SINMAG EUROPE BVBA
9
Page 10
4.3 Manual operation
A. Press the AUTO/MANU-button until the “MANU”-LED lights
up.
B. Press the and -buttons to select the desired speed
and rotation direction.
C. Press the ON -button to start the machine.
D. Press the OFF -button to stop the operation.
The timers will not function during manual operation. The bowl direction cannot be reversed in second speed. The mixer will always start in
rst speed, even if you select “II” to start. When the mixer is running in
rst speed, you can then press to switch to second speed.
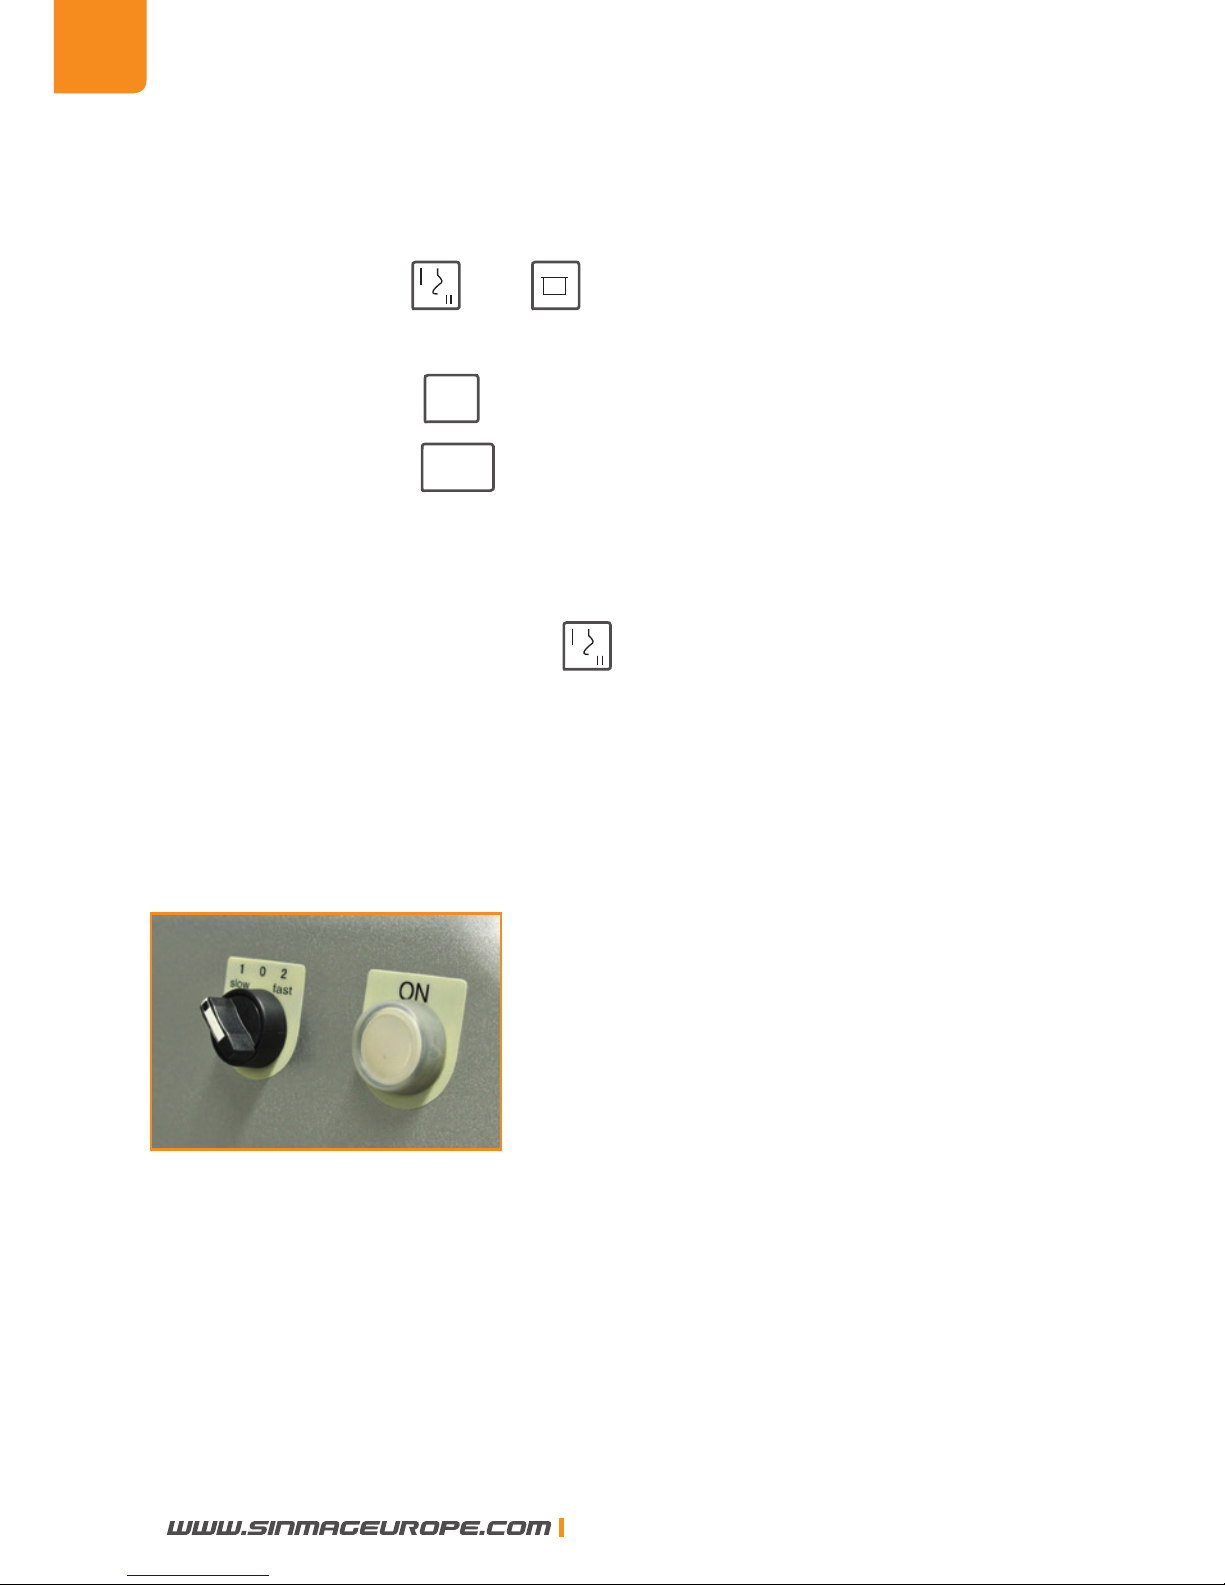
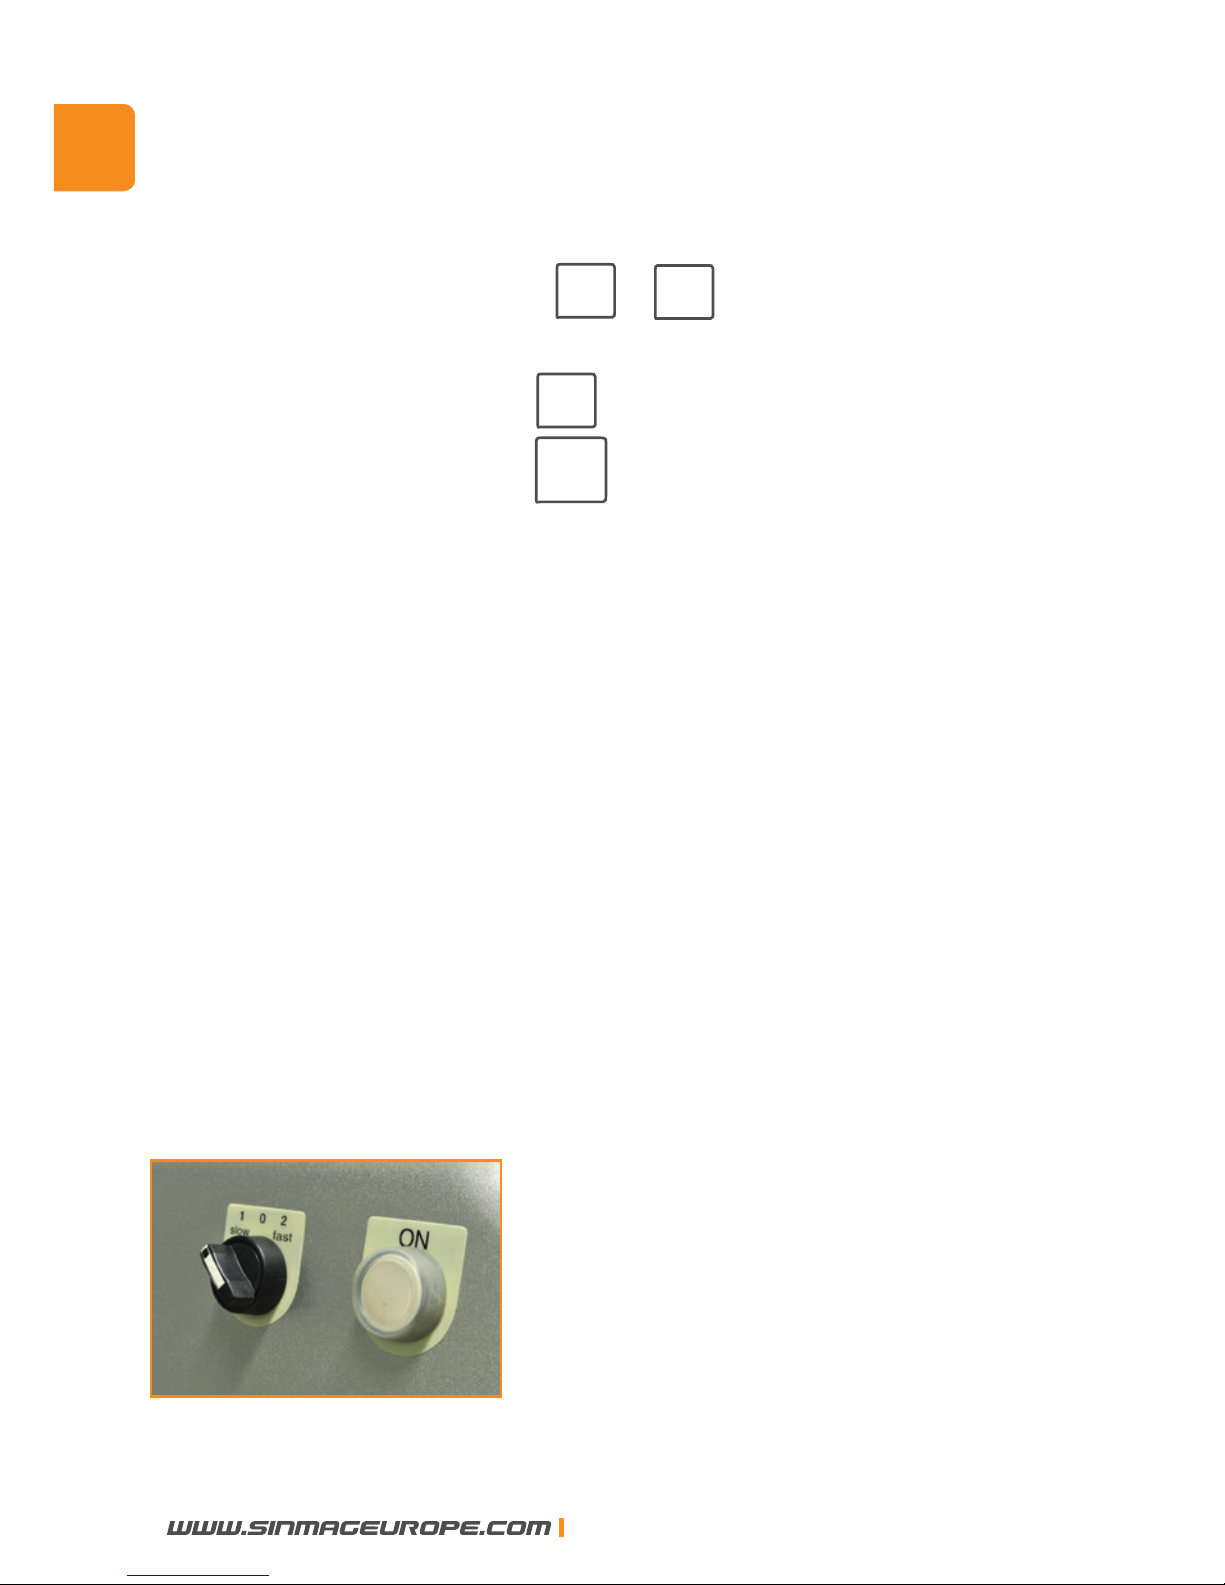
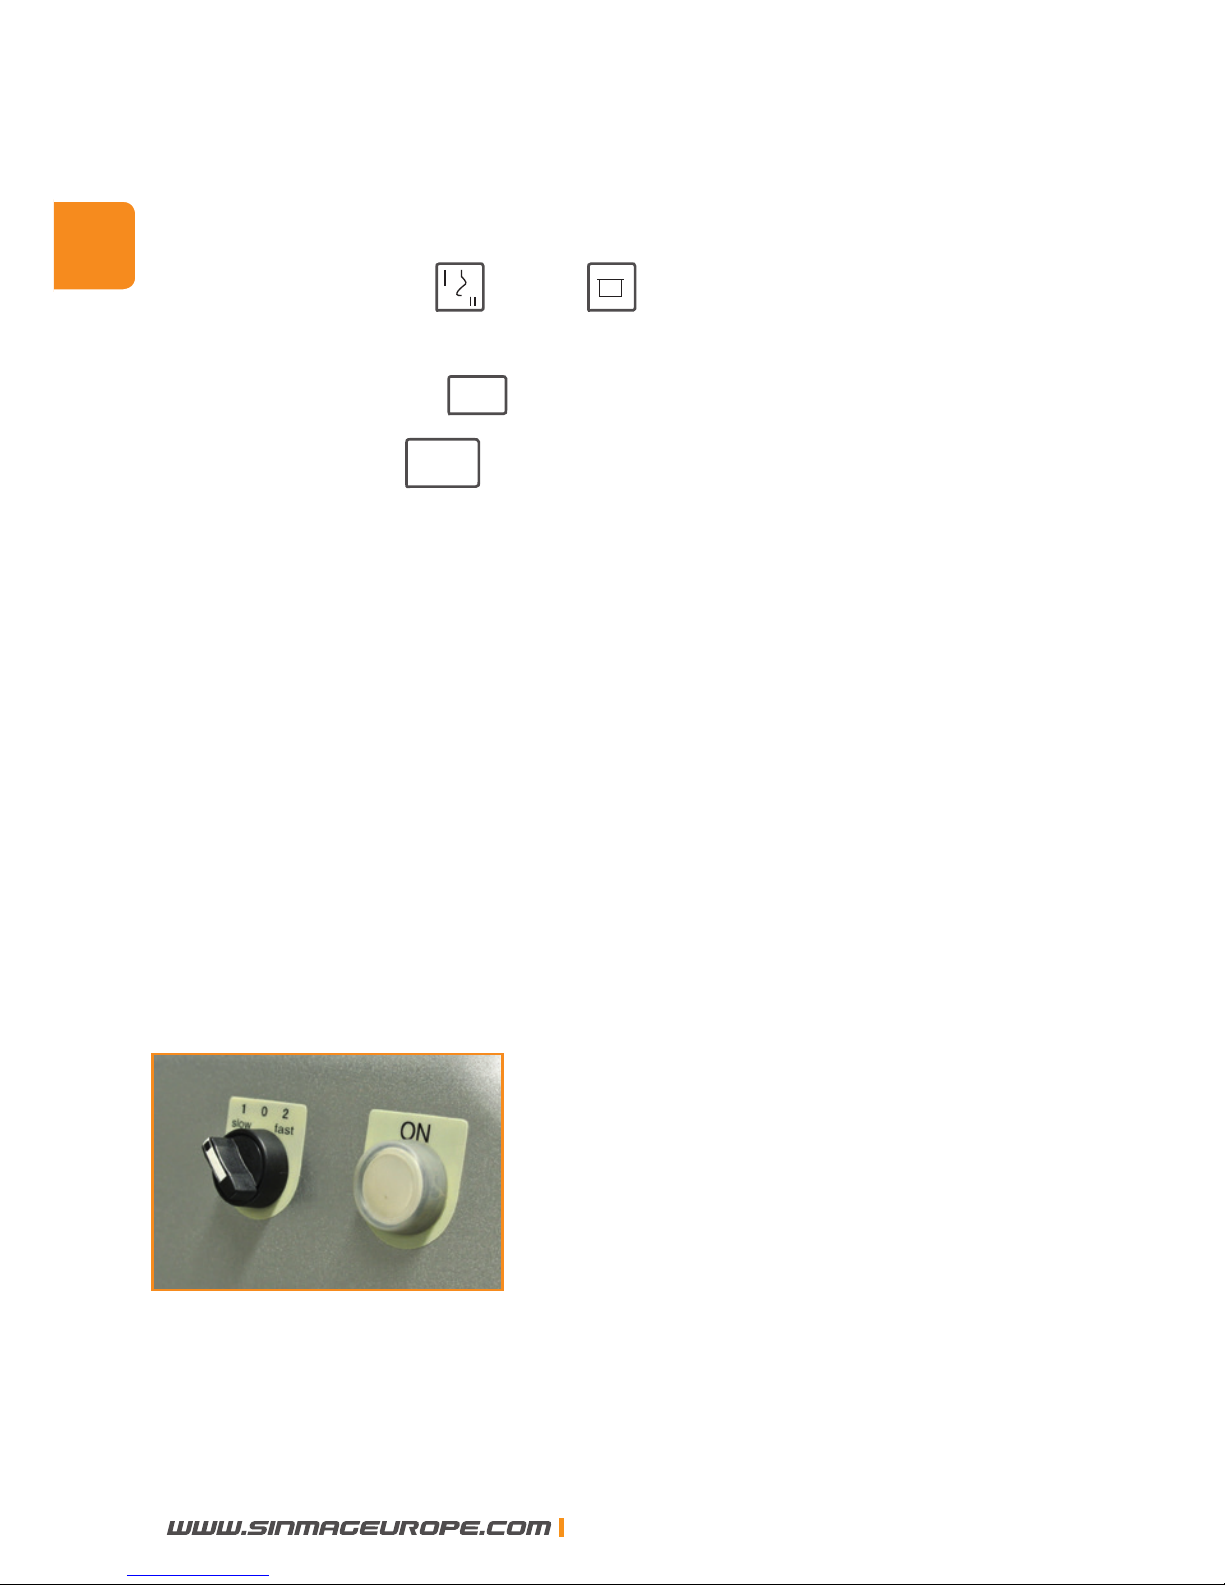
4.4 Manual switch
When the digital panel is damaged, the mixer can be operated with
the manual switch that is located at the left side of the top cover. You
can select rst or second speed manually without timer.
F
R
ENG
ENG
10
SINMAG EUROPE BVBA
Page 11
Spiral mixer
.
Pétrin à spirale. Spiraalkneder
Spiralkneter
.
Amasadora. Impastatrice
KM-25
.
KM-50T . KM-80T . KM-120T
Manual. Mode d’emploi. Handleiding. Handbuch. Manuale
Page 12

Nous vous félicitons pour l’achat de votre pétrin à spirale.
Avant l’expédition, cette machine a été contrôlée dans notre dépôt en Belgique. De cette façon, nous pouvons vous
assurer le livraison d’une machine prête à l’installation.
Pour une bonne utilisation et une longue durée de vie de la
machine, nous vous recommandons de lire ce mode d’emploi avec attention avant d’utiliser la machine.
Sinmag Europe vous remercie pour la conance et l’intérêt
et nous vous souhaitons beaucoup de joie au travail avec
cette machine
L’équipe de Sinmag Europe.
FR
12
SINMAG EUROPE BVBA
Page 13
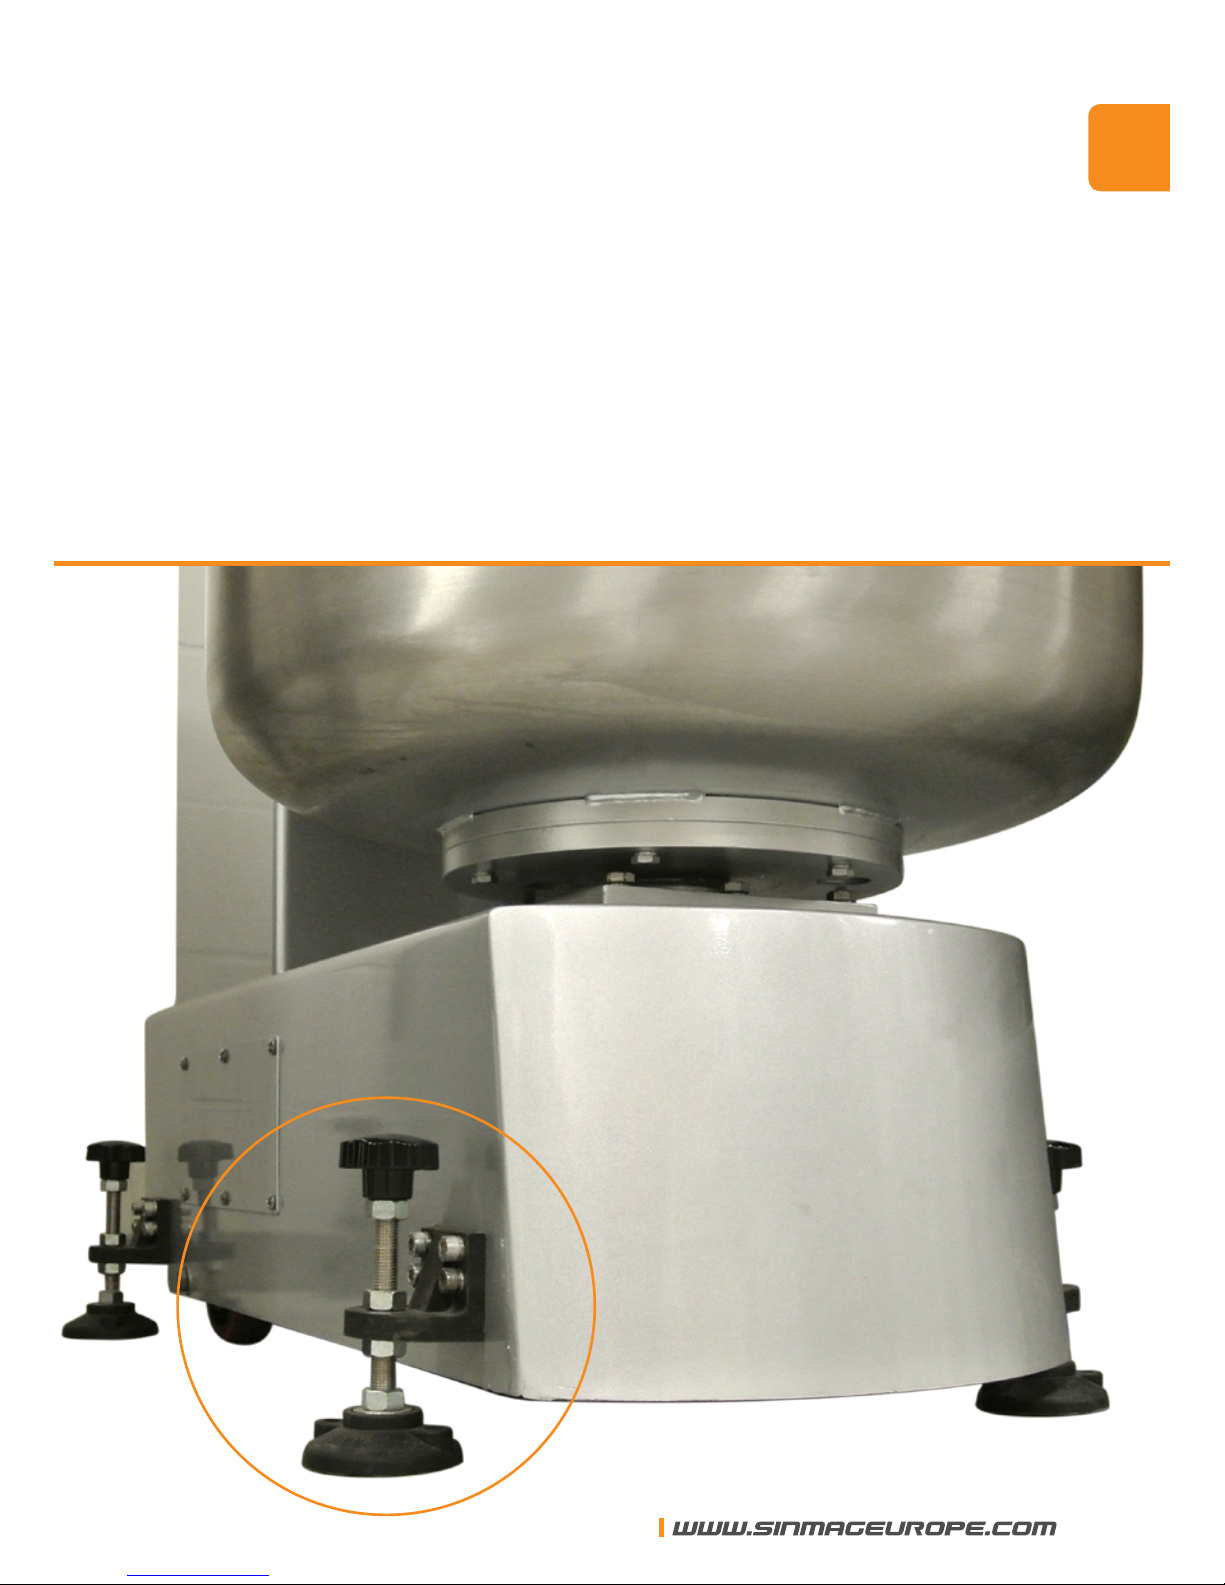
1. INSTALLATION
La machine est prête à être installée.
Elle doit être installée sur une surface horizontale et égale.
Adaptez les vis de manière à ce que la machine soit
placée solidement sur ses quatre pieds.
FR
SINMAG EUROPE BVBA
13
Page 14
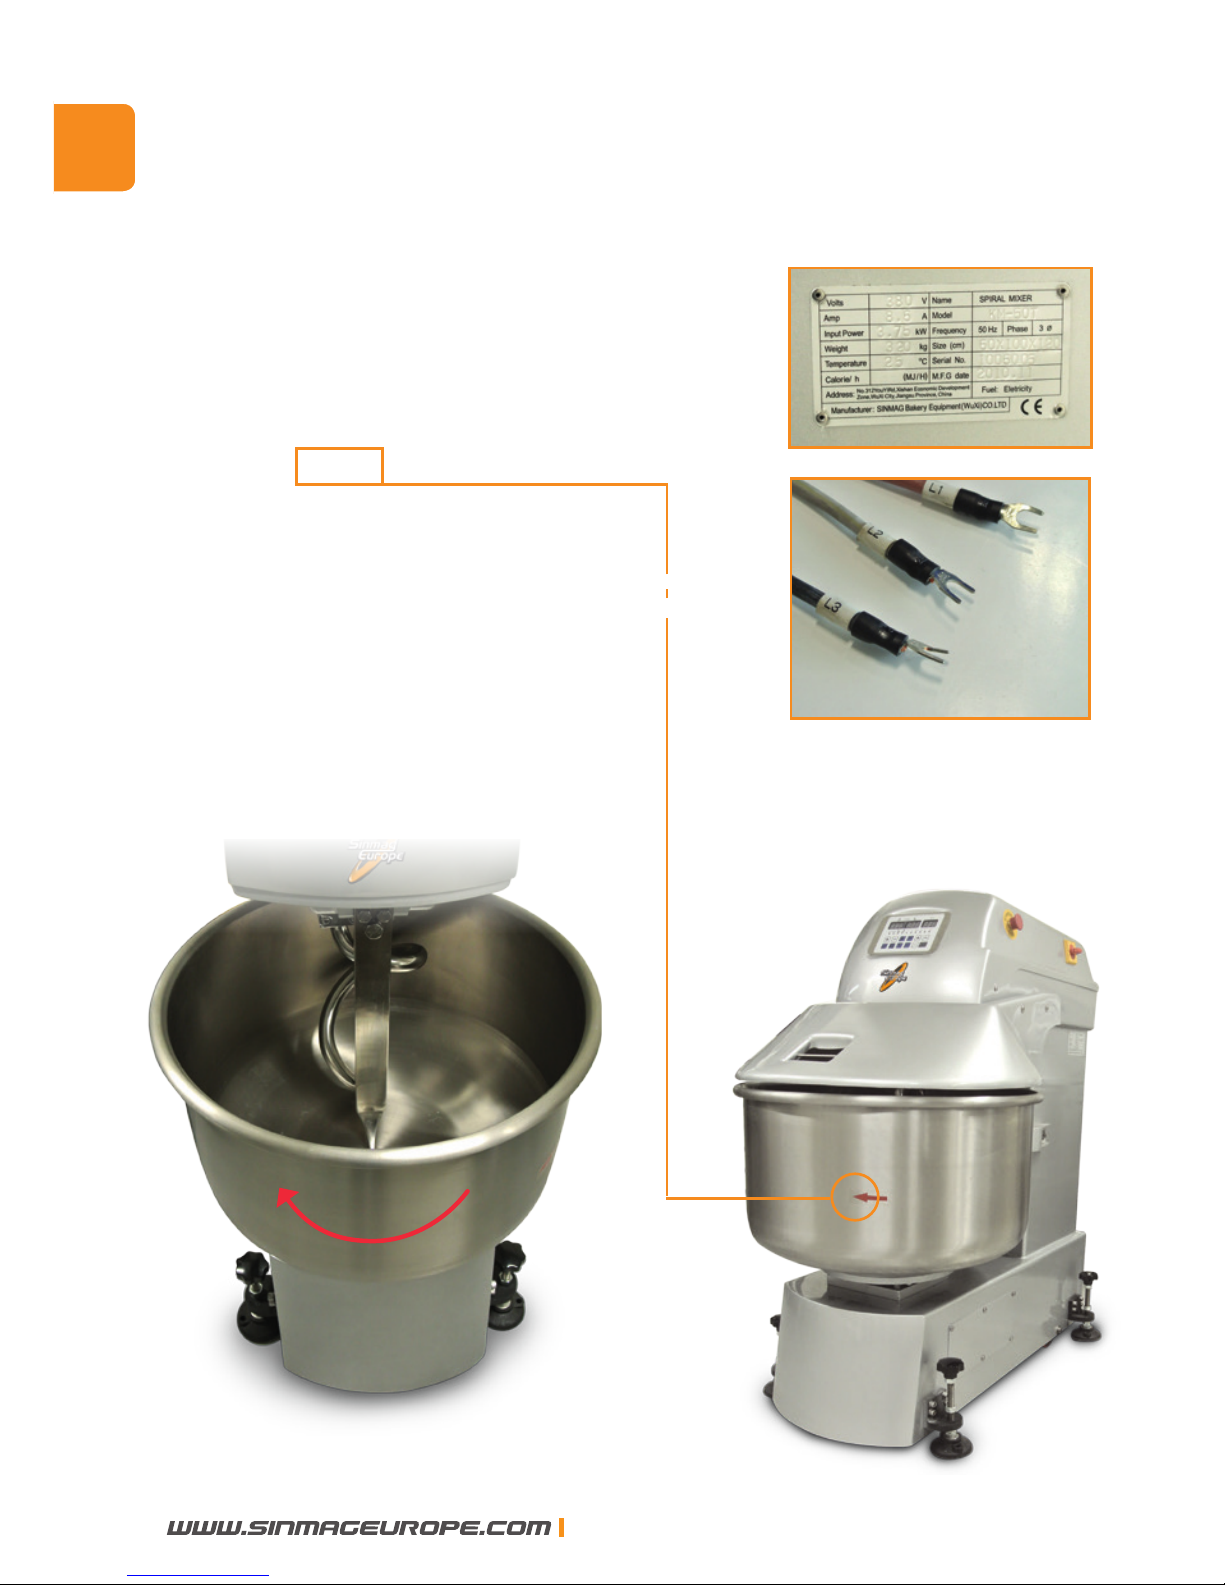
2. ALIMENTATION ELECTRIQUE
Prenez soin d’alimenter la machine avec la tension
électrique correcte, comme elle est indiquée sur la
plaque signalétique du fabricant.
Après avoir branché la machine, vous devez
contrôler d’abord la direction de la spirale et de
la cuve. Vu du haut, la spirale ainsi que la cuve
doivent tourner dans le sens des aiguilles d’une
montre. La êche indique la direction de rotation
de la cuve.
Si la direction de rotation est incorrecte, vous
devez échanger les deux cables de phase an
d’inverser la direction de rotation.
FR
14
SINMAG EUROPE BVBA
Page 15
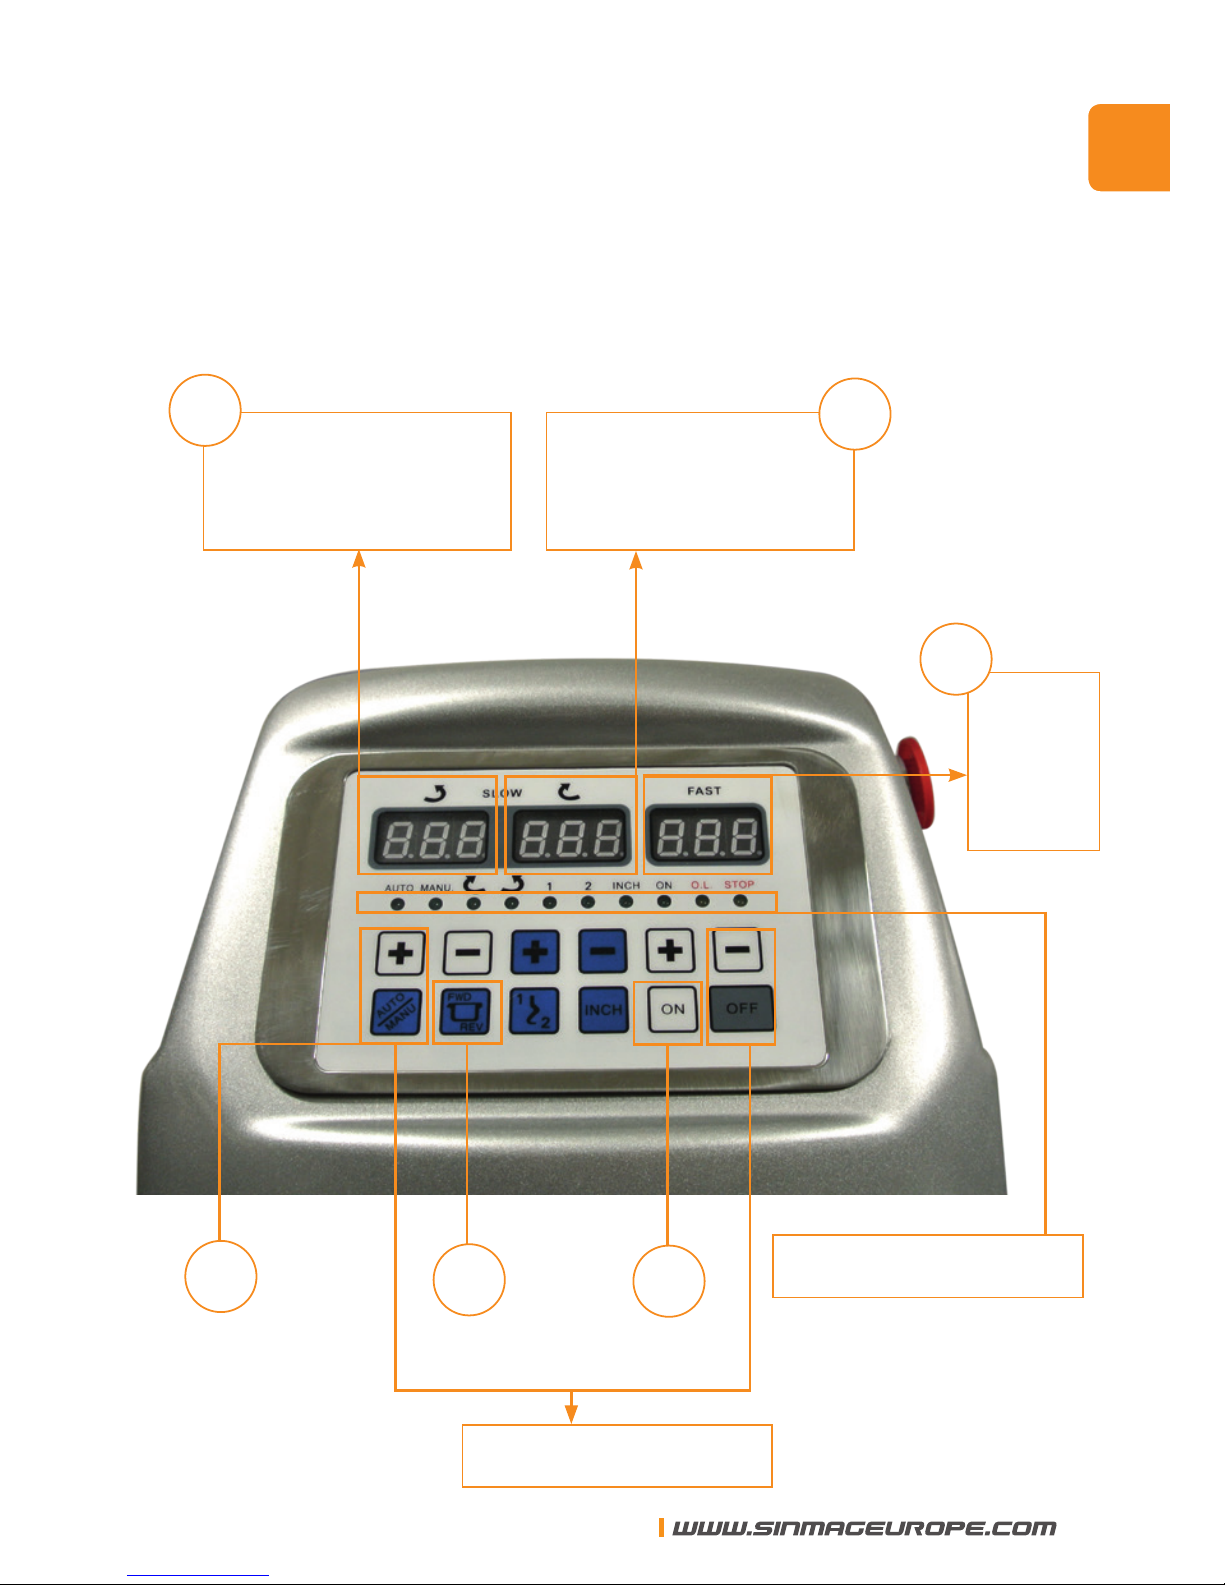
3. CLAVIER DIGITAL
Boutons de fonction
Minuterie | pour la
direction inverse de la
cuve
Minuterie || pour la
première vitesse
A
B
Minuterie
||| pour la
deuxième
vitesse
C
F
E
D
LED d’indication
FR
SINMAG EUROPE BVBA
15
Page 16
4. UTILISATION DU PETRIN
4.1 Description
4.1.1 Les minuteries
En haut de l’afcheur, vous trouvez la minuterie I pour la direction
inverse de la cuve, la minuterie II pour la vitesse basse et la minuterie
III pour la vitesse haute. Les trois minuteries indiquent le temps en
minutes.
Les minuteries sont réglées par les boutons + et -. Si vous poussez
le bouton + une fois, le temps montera de dix secondes. Le temps
maximum qui peut être déni, est 20 minutes. Après 20 minutes, la
minuterie recommencera à 0 minutes. Pressez le bouton - pour
diminuer le temps par dix secondes.
Quand le pétrin à spirale est mis en marche, les minuteries indiqueront
le dernier temps programmé. Quand la minuterie commence à travailler, le temps indiqué diminuera par dix secondes à la fois, jusqu’au
moment où la minuterie atteint 0.
Quand le couvercle de sécurité est levé pendant l’opération
automatique (« AUTOMATIC »), la minuterie s’arrête à la position où
elle se trouve. Quand le pétrin à spirale recommence à travailler, la
minuterie reprend son travail de cette position jusqu’au moment où
elle atteint la n du temps déni.
Pendant l’opération manuelle, la minuterie ne
fonctionne pas.
Quand vous poussez le bouton
OFF
, les
minuteries retournent au dernier temps.
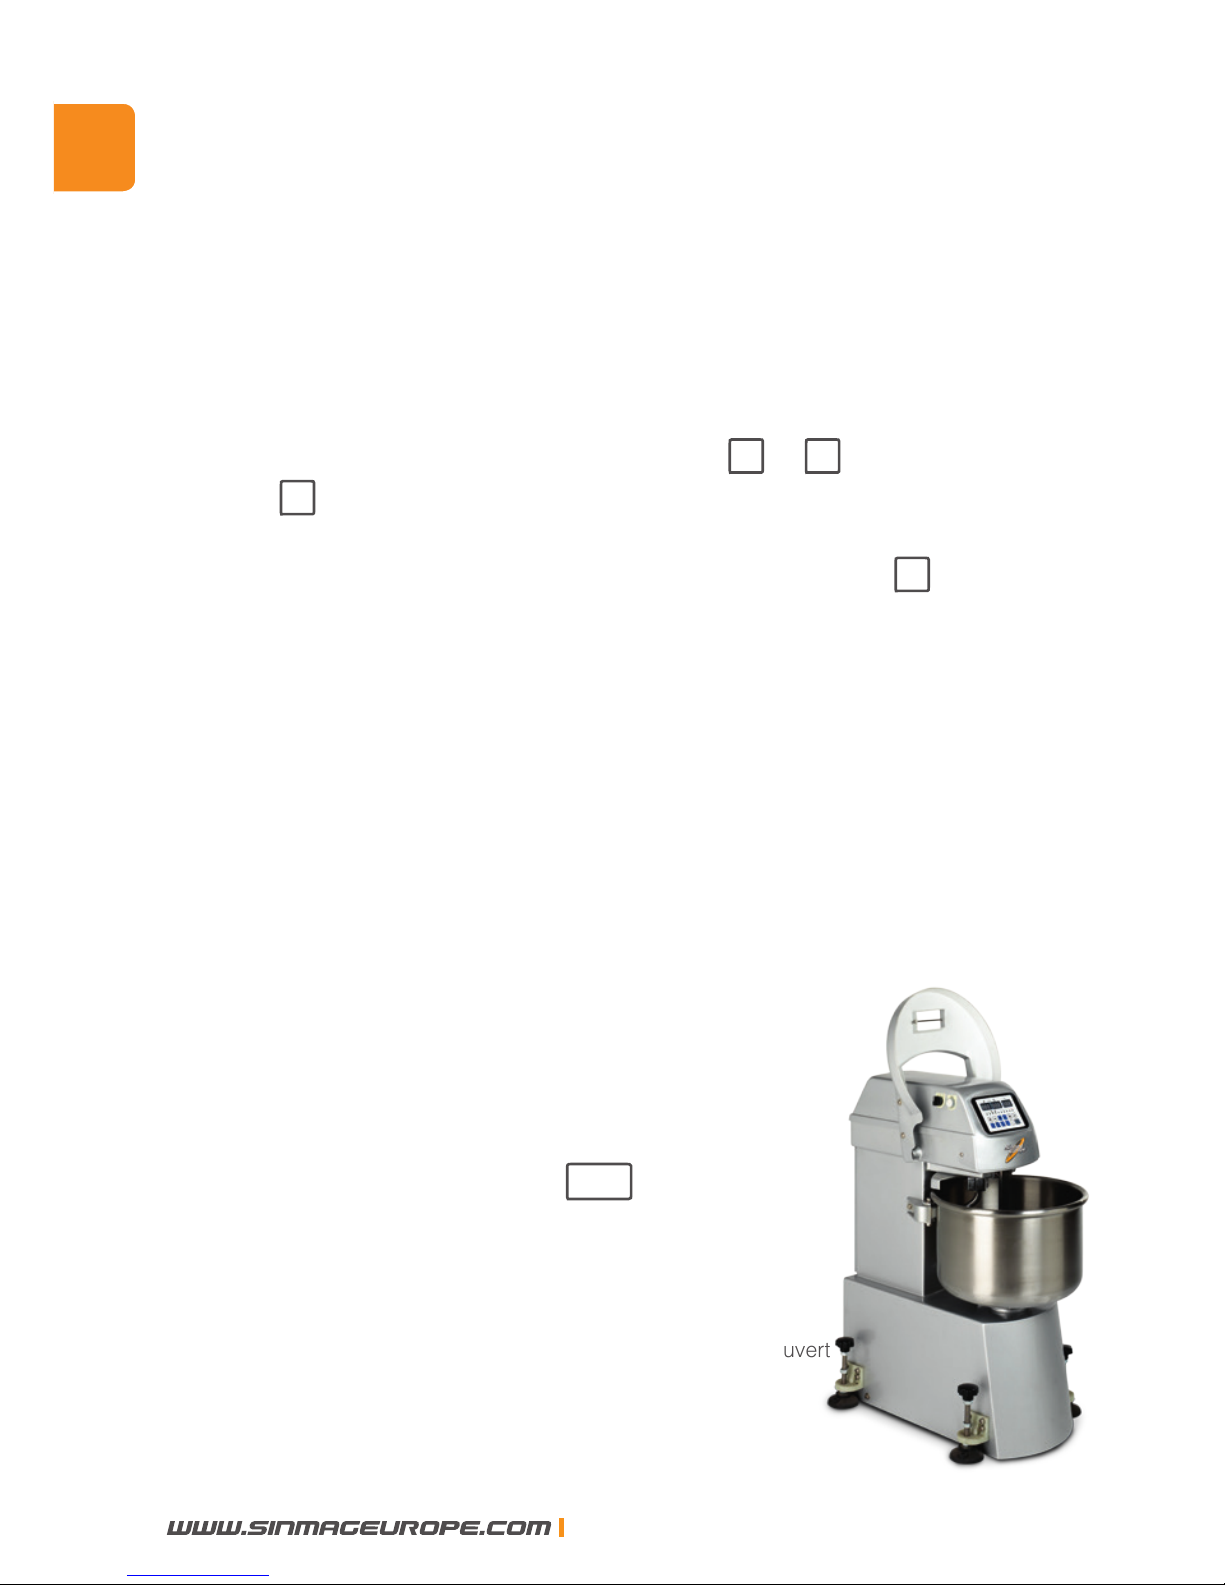
l’écran de sécurité ouvert
FR
16
SINMAG EUROPE BVBA
Page 17

4.1.2 LES LAMPES D’INDICATION
Ces lampes indiquent le mode dans lequel le pétrin à spirale
fonctionne:
A. Opération “AUTO/MANUAL”:
Quand le lampe AUTO s’illumine, la machine est en
fonctionnement automatique.
Quand la lampe MANU s’illumine, la machine est en
fonctionnement manuel.
B. Direction de la cuve:
Quand la lampe s’illumine, la cuve tourne en avant.
Quand la lampe s’illumine, la cuve tourne inversement.
C. Vitesse: Quand la lampe “I” s’illumine, la machine tourne à
vitesse basse.
Quand la lampe “II” s’illumine, la machine tourne à vitesse
haute.
D. La lampe INCH permet de fonctionner en pas-à-pas.
Ce bouton vous permet de facilement sortir la pâte, en
avançant la cuve.
Quand ni la lampe INCH, ni la lampe ON ne s’illuminent, la
machine est en mode STOP.
E. La lampe ON s’illumine quand la machine est en marche
F. La lampe STOP s’illumine seulement quand le couvercle de
sécurité est levé pendant que la machine est en marche.
G. O.L. (Over-load) : Cette lampe s’illumine quand le relais de
surtension est mis en marche. Essayez d’éliminer la cause du
problème (un manque de voltage, surcharge du pétrin ou une
mauvaise connexion de câble). Puis la lampe s’éteindra.
FR
SINMAG EUROPE BVBA
17
Page 18
Bouton pour la sélection du
sens de rotation de la cuve
(Forward – 0 – Reverse).
Quand ce bouton-ci est en
position « F », la cuve devrait
tourner dans la même direction
que la êche « » sur la cuve.
4.1.3 Les boutons de fonction
Boutons pour la
sélection du mode
AUTO/MANUAL
Bouton pour la sélection de la vitesse
Vu du haut, la spirale devrait tourner dans le
sens des aiguilles d’une montre.
Bouton pour la mise en
marche
Bouton pour l’arrêt de la
machine
Bouton pour la sélection du mode pas-à-
pas.
La cuve tournera seulement quand vous
poussez ce bouton.
FR
18
SINMAG EUROPE BVBA
Page 19

4.2 MODE AUTOMATIQUE
A. Poussez les boutons + et - sous la minuterie I pour mettre
au point la durée voulue pour la direction inverse de la cuve.
B. Poussez les boutons + et - sous la minuterie II pour mettre
au point la durée voulue pour la vitesse basse.
C. Poussez les boutons + et - sous la minuterie III pour mett-
re au point la durée voulue pour la vitesse haute.
D. Poussez le bouton AUTO/MANU, la lampe AUTO/MANU
s’illumine.
E. Poussez le bouton
F
R
la lampe s’illumine.
F. Poussez le bouton
ON
pour mettre la machine en marche.
Après avoir suivi la procédure mentionnée ci-dessus, la machine commencera à fonctionner. Elle fonctionnera en direction inverse, jusqu’au
moment où la minuterie I atteint 0. Puis, la machine fonctionnera à
vitesse basse, jusqu’au moment où la durée indiquée sur la minuterie
II est nie. Enn, la machine fonctionnera à vitesse haute. La machine
s’arrêtera automatiquement après.
En mode automatique, la machine s’arrêtera quand vous levez le
couvercle de sécurité. La minuterie aussi s’arrêtera à ce moment-là.
La machine et la minuterie ne recommenceront à fonctionner qu’après
avoir poussé le bouton
ON
.
Quand vous poussez
OFF
, la minuterie retournera au temps que vous
avez mis au point et la machine recommencera son travail.
FR
SINMAG EUROPE BVBA
19
Page 20
4.3 MODE MANUEL
A. Poussez le bouton AUTO/MANU jusque la lampe MANU
s’illumine.
B. Poussez les boutons I / II et F/R pour sélectionner la
vitesse et la direction de la cuve voulue.
C. Poussez le bouton ON pour mettre la machine en marche.
D. Poussez le bouton OFF quand vous voulez terminer
l’opération.
La minuterie ne fonctionnera pas pendant l’opération manuelle.
La direction de la cuve ne peut pas être inversée pendant que la machine fonctionne à vitesse haute.
Le pétrin se mettra toujours en marche à vitesse basse, même si vous
avez sélectionné « II » pour commencer. Quand le pétrin fonctionne à
vitesse basse, vous pouvez ensuite pousser II pour faire fonctionner le
pétrin à vitesse haute.
4.4 INTERRUPTEUR MANUEL
Si le clavier digital est endommagé, le pétrin peut fonctionner avec un
interrupteur manuel qui se trouve à
gauche sur le côté supérieur de la
machine. Vous pouvez ainsi sélectionner la vitesse basse ou haute
manuellement sans avoir besoin du clavier digital.
FR
20
SINMAG EUROPE BVBA
Page 21
Spiral mixer
.
Pétrin à spirale. Spiraalkneder
Spiralkneter
.
Amasadora. Impastatrice
KM-25
.
KM-50T . KM-80T . KM-120T
Manual. Mode d’emploi. Handleiding. Handbuch. Manuale
NL
Page 22

Prociat met de aankoop van uw spiraalkneder.
De machine werd alvorens te leveren getest in het
magazijn te België.
Zo kan Sinmag Europe garant staan voor de levering van
een machine die klaar is voor installatie.
Voor een goede werking en lange levensduur van uw spiraalkneder, raden wij u aan deze handleiding
grondig door te nemen alvorens aan de slag te gaan met
de machine.
Sinmag Europe dankt u voor het vertrouwen en interesse
en wenst u veel werkgenot.
Het Sinmag Europe Team.
NL
22
SINMAG EUROPE BVBA
Page 23
1. Installatie
Plaats de machine op een horizontale, egale vloer.
Zet de machine vast door de vier schroeven bij te draaien
tot deze alle vier de grond volledig raken.
De wielen mogen de grond niet meer raken.
Zo staat uw spiraalkneder vast op de grond.
NL
SINMAG EUROPE BVBA
23
Page 24
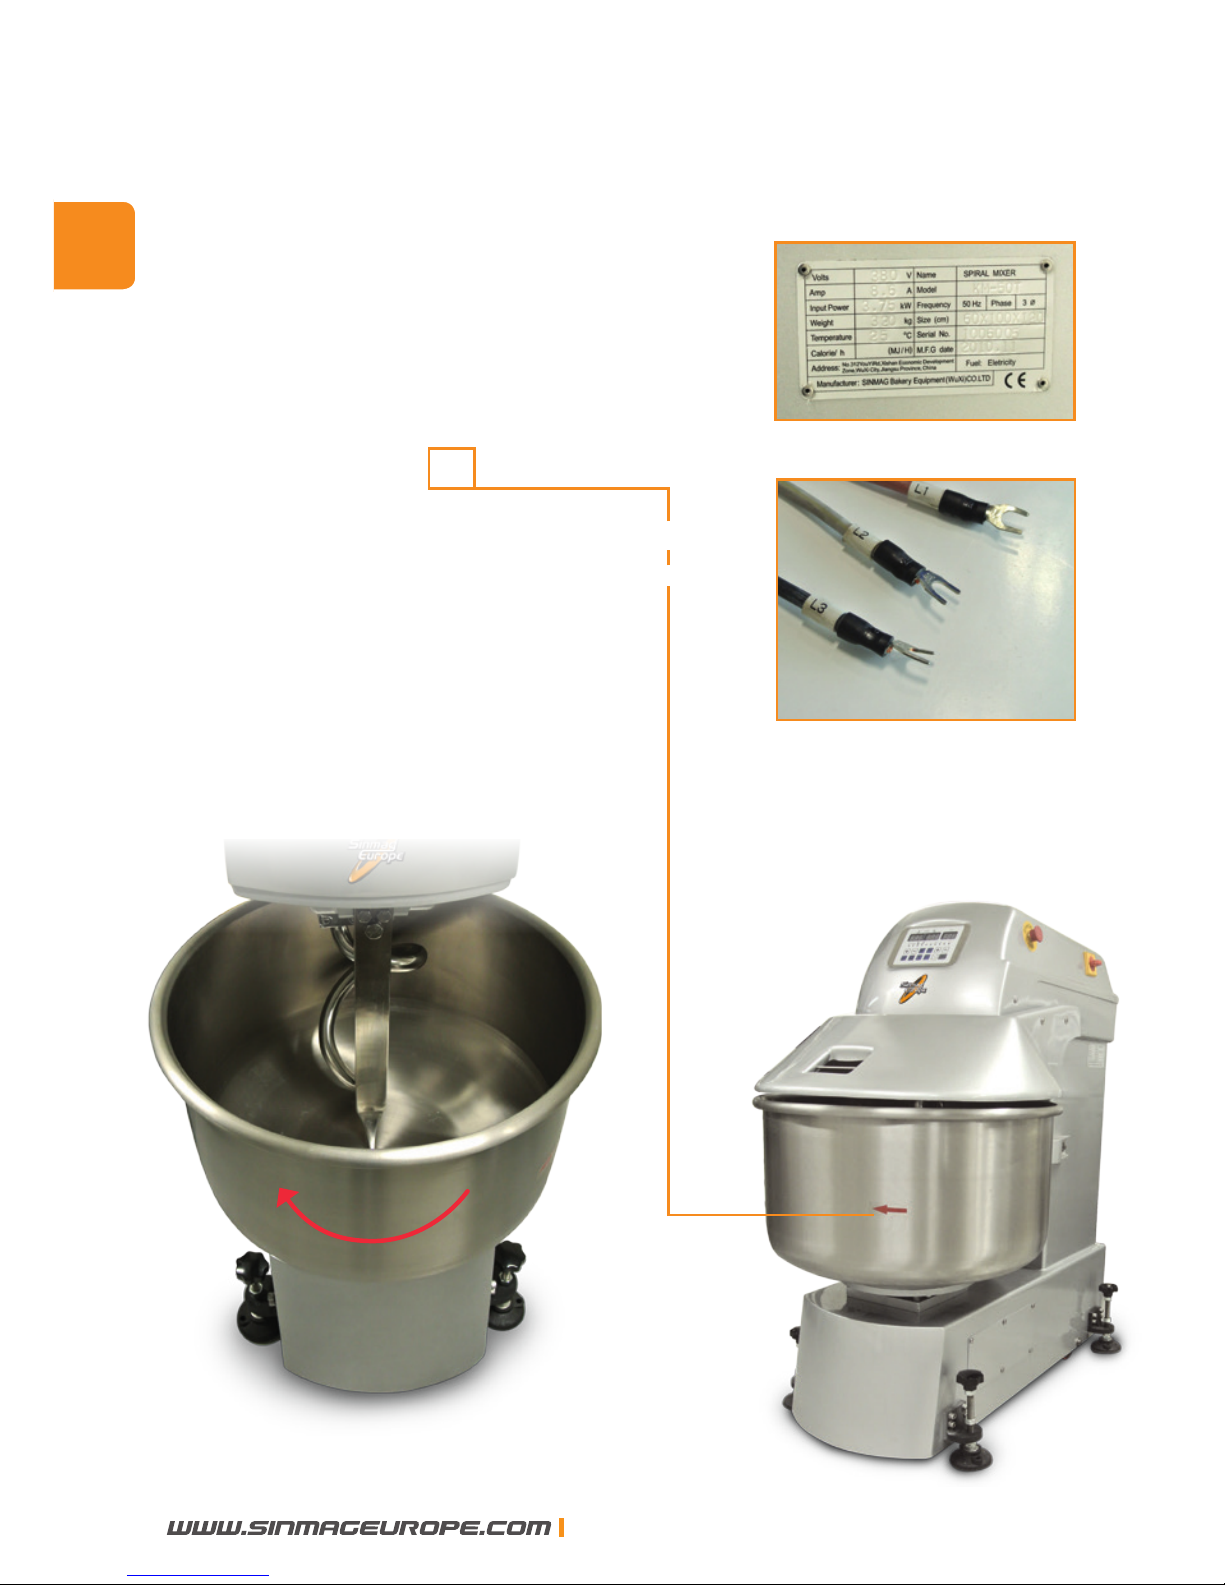
2. Elektrische voorzieningen
Voorzie de correcte stroomtoevoer voor de machine.
Deze staat omschreven op het
fabricageplaatje, bevestigd op de machine.
Controleer na het aansluiten op het
elektriciteitsnet de draairichting van de
kneedspiraal en de kuip. Van bovenuit gezien
moet zowel de kneedspiraal als de kuip in
wijzerzin draaien. De pijl op de kuip geeft
tevens de draairichting aan.
Draaien de kuip of de spiraal in tegenwijzerzin;
wissel dan de twee elektrische draden van
plaats om de draairichting aan te passen.
NL
24
SINMAG EUROPE BVBA
Page 25
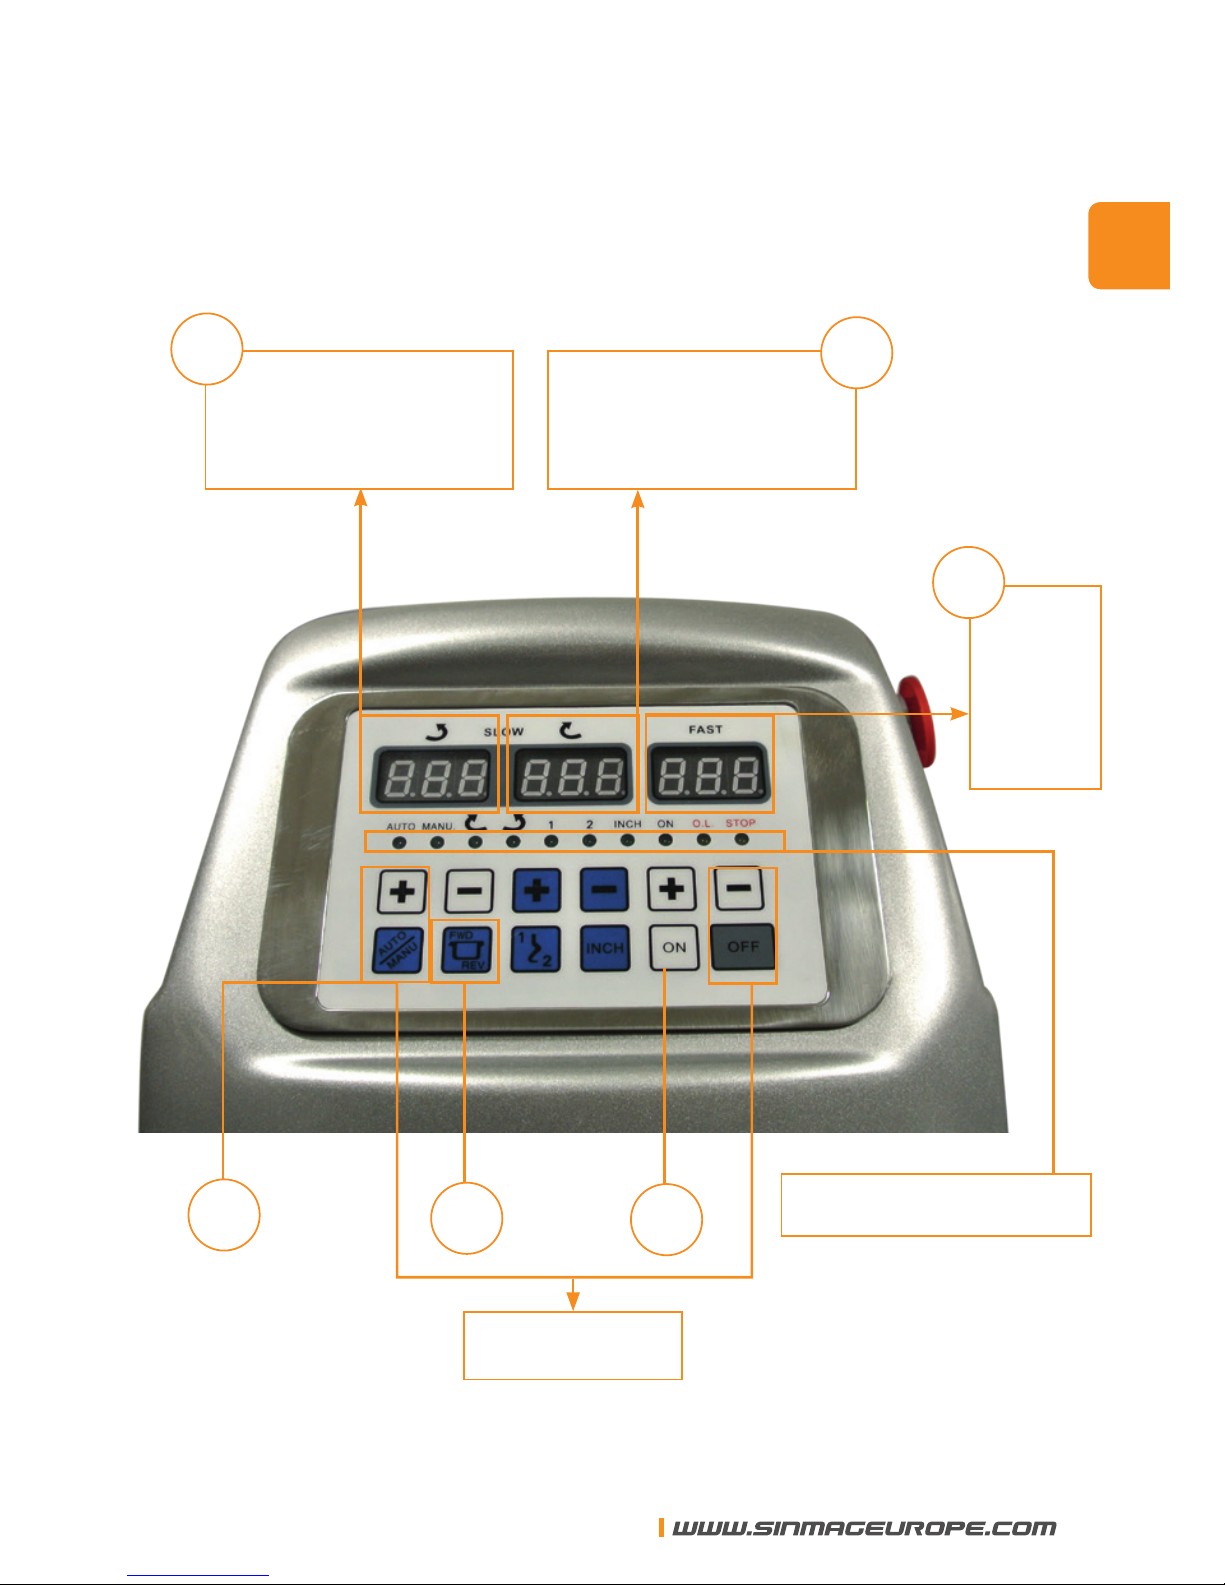
3. Bedieningsbord
Functietoetsen
Timer | voor de
omgekeerde
draairichting
Timer || voor de
eerste snelheid
A
B
Timer |||
voor de
tweede
snelheid
Signaallampjes
C
F
E
D
NL
SINMAG EUROPE BVBA
25
Page 26
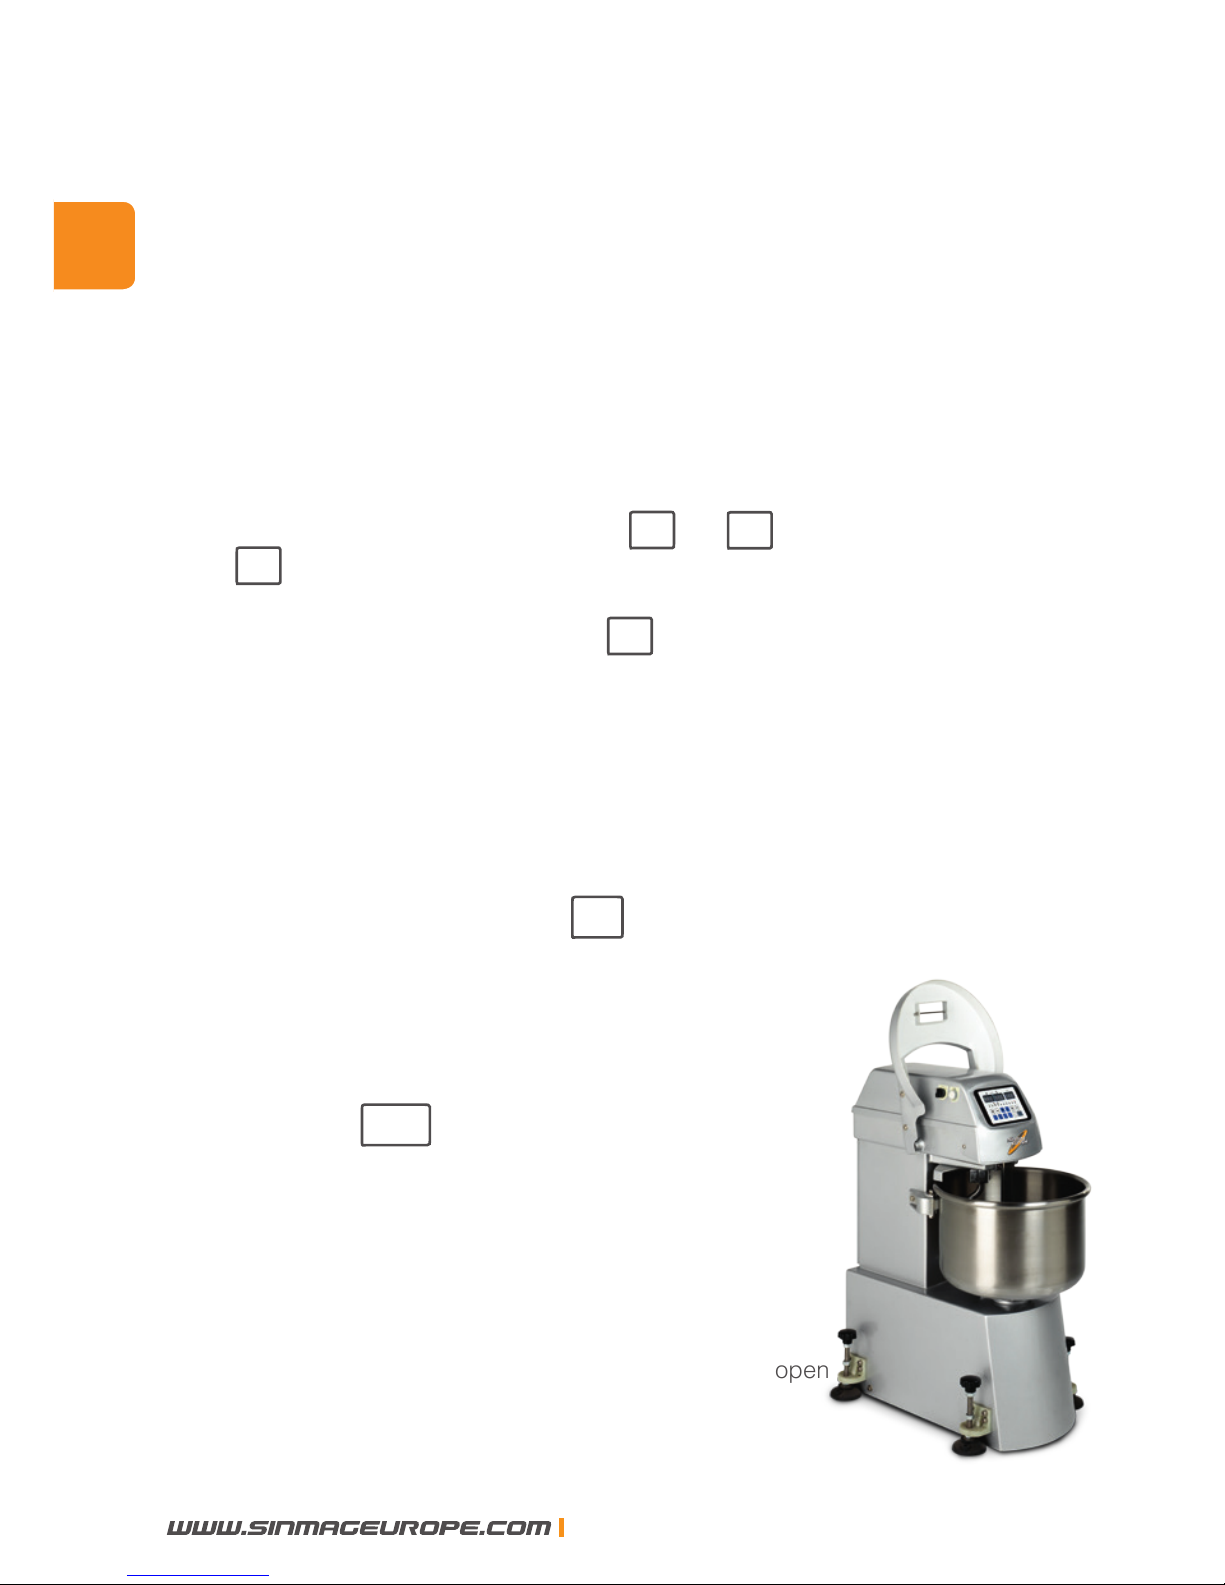
4. Bediening van de spiraalkneder met digitaal
toetsenbord
4.1 Beschrijving
4.1.1 Timers
Bovenaan het toetsenbord bevinden zich drie timers. Timer 1 geeft
de tijdsduur aan voor de omgekeerde draairichting. Timer 2 geeft de
tijdsduur aan voor de lage snelheid en timer 3 voor de hoge snelheid.
Alle timers geven de resterende tijd aan in minuten.
De timers worden ingesteld door de + en - toetsen. Eén druk
op de + toets zal de tijd met 10 seconden verlengen. De maximale instelbare tijd is 20 minuten. Voorbij de 20 minuten start de timer
opnieuw op 0 minuten. Druk op de - toets om de ingestelde tijd met
telkens 10 seconden te verminderen. Wanneer de spiraalkneder ingeschakeld wordt, zullen de timers de ingestelde tijd weergeven. De tijd
op de timer zal daarna per 10 seconden verminderen tot op 0.
Wanneer het veiligheidsscherm omhoog gebracht wordt gedurende
de “AUTOMATIC” werking, zal de timer op de huidige positie stoppen.
Later, wanneer het scherm opnieuw gezakt wordt en de spiraalkneder
verder werkt, na een druk op de ON toets, loopt de timer verder om
de resterende tijd af te werken.
Gedurende “MANUAL” (handmatige)
bediening zal de timer niet werken.
Een druk op de OFF toets zal de timers opnieuw op de vooraf ingestelde tijd brengen.
Veiligheidsscherm open
NL
26
SINMAG EUROPE BVBA
Page 27

4.1.2 Signaallampjes
De signaallampjes duiden de verschillende operatiemodi van de spiraalkneder aan:
A. “AUTO/MANUAL”-functie:
Wanneer het “AUTO”-lampje oplicht, is de machine in
“AUTO”-werking (d.i. automatische werking)
Wanneer het “MANU”-lampje oplicht, is de machine in
“MANU”-werking (d.i. handmatige werking)
B. Functie voor de kuiprichting:
Wanneer het lampje oplicht, draait de kuip in wijzerzin.
Wanneer het lampje oplicht, draait de kuip in
tegenwijzerzin.
C. Het “ON”-lampje licht op wanneer de machine is
ingeschakeld.
D. Snelheidsfunctie:
Wanneer lamp “I” oplicht, staat de machine op lage snelheid.
Wanneer lamp “II” oplicht, staat de machine op hoge snelheid.
E. Het “INCH”-lampje toont de stap voor stap modus. Deze func-
tie wordt gebruikt om het deeg naar voren te brengen.
Als noch het “INCH”-, noch het “ON”-lampje oplicht, is de
machine uitgeschakeld, d.i. de “STOP”-modus.
F. Het “STOP”-lampje licht alleen op als het
veiligheidsscherm omhoog gebracht wordt terwijl de machine
in werking is.
G. “O.L.” (Over-Load) licht op wanneer de
overgewichtschakelaar ingeschakeld is. Het lampje dooft als
het probleem: (te weinig stroomtoevoer, overladen kneder of
losgekomen kabel) opgelost is.
NL
SINMAG EUROPE BVBA
27
Page 28
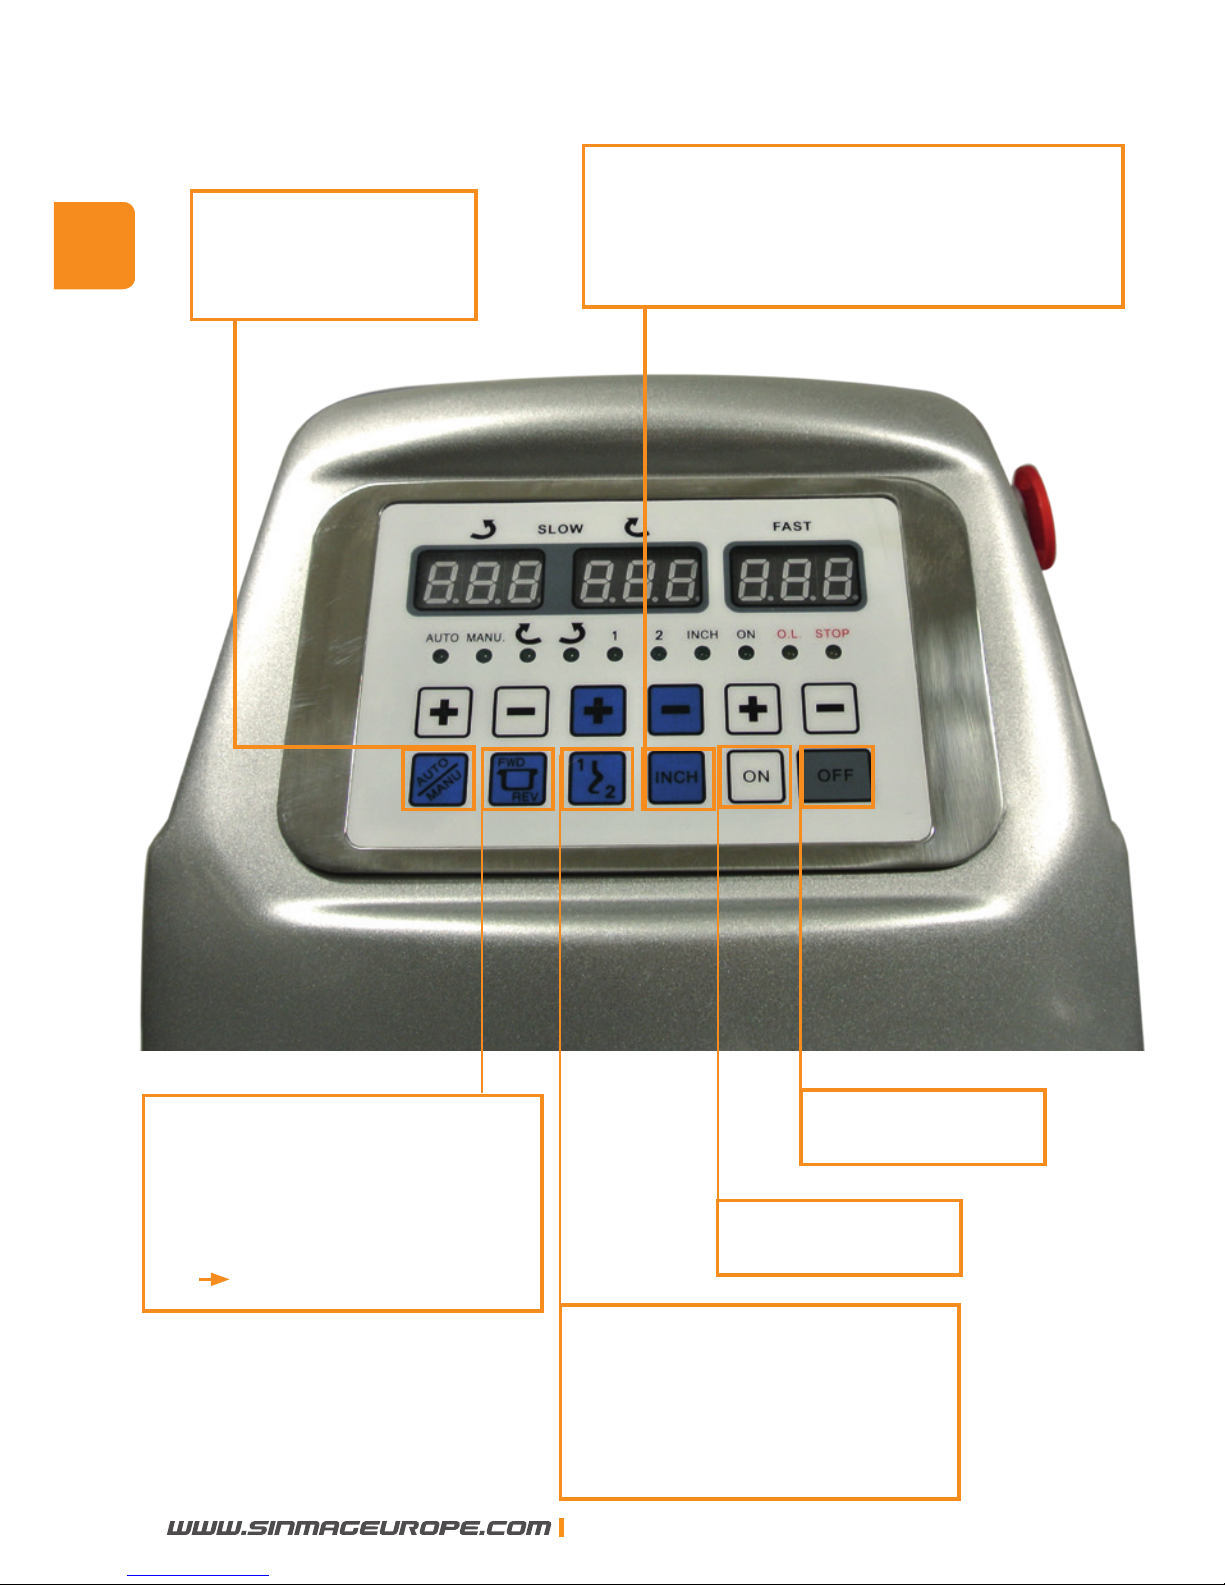
4.1.3 Functietoetsen
AUTO/MANUAL
bedieningstoets
bedieningstoets voor
de spiraalsnelheid.
De spiraal moet van bovenuit
gezien in wijzerzin draaien.
Draairichting kuip
(forward - 0 - Reverse)
F-toets ingedrukt = kuip
draait in zelfde richting als
pijl op kuip.
START toets
STOP toets
Inch, stap voor stap toets
alleen de kuip zal draaien
wanneer u deze toets indrukt.
NL
28
SINMAG EUROPE BVBA
Page 29

4.2 Automatische werking
A. Druk op de + of - toets onder timer I om de gewenste
tijd voor de omgekeerde kuiprichting in te stellen.
B. Druk op de + of - toets onder timer II om de gewenste
tijd voor de lage snelheid in te stellen.
C. Druk op de + of - toets onder timer ||| om de gewenste
tijd voor de hoge snelheid in te stellen.
D. Druk op de AUTO/MANU toets tot de “AUTO”-lamp oplicht.
E. Druk op de toets tot de lamp oplicht.
F. Druk op de ON toets om de machine te starten.
Nadat de verschillende stappen doorlopen zijn, start de machine.
De spiraalkneder zal eerst in omgekeerde draairichting werken tot
timer | stopt op 0. Dan zal de machine op lage snelheid vooruit beginnen werken tot timer || stopt op 0. Tot slot schakelt de machine over
op de hoge snelheid en houdt deze aan tot timer ||| op 0 komt. Hierna
stopt de machine automatisch.
In “AUTO”-stand zal de machine automatisch stoppen wanneer u het
veiligheidsscherm optilt. De timer zal ook stoppen op dat punt. Enkel
nadat u het scherm hebt gesloten en op de ON toets hebt gedrukt,
zal de timer verder lopen en de machine opnieuw beginnen werken.
Als u op de OFF toets drukt, zal de timer terugkeren naar de vooraf
ingestelde tijd en opnieuw starten.
F
R
NL
SINMAG EUROPE BVBA
29
Page 30
4.3 Handmatige bediening.
A. Druk op de AUTO/MANU toets tot het “MANU”-lampje
brandt.
B. Druk op de en de toets om de gewenste snelheid
en kuiprichting in te stellen.
C. Druk op de ON toets om te starten.
D. Druk op OFF om de machine uit te schakelen.
Bij handmatige bediening werkt de timer niet. Bij hoge snelheid kan
de kuip niet omgekeerd worden.
De kneder zal altijd op een lage snelheid starten, ook al is snelheid II
ingesteld om te starten. Wanneer de kneder op lage snelheid draait,
kunt u de kneder op hogere snelheid doen draaien door in te
drukken.
4.4 Handschakelaar
Wanneer het digitale bedieningsbord beschadigd is, kan de kneder
bediend worden met een handschakelaar die links boven geplaatst is.
U kunt tevens handmatig een hoge of lage snelheid selecteren. Wel
eerst de ON-knop indrukken.
F
R
NL
30
SINMAG EUROPE BVBA
Page 31
Spiral mixer
.
Pétrin à spirale. Spiraalkneder
Spiralkneter
.
Amasadora. Impastatrice
KM-25
.
KM-50T . KM-80T . KM-120T
Manual. Mode d’emploi. Handleiding. Handbuch. Manuale
D
Page 32

Wir gratulieren Ihnen mit dem Ankauf dieses Spiralkneters.
Diese Maschine wurde vor der Lieferung gründlich in unserem Lager in Belgien geprüft. Auf dieser Weise können
wir die Lieferung einer zur Installation fertigen Maschine
garantieren.
Für eine korrekte Wirkung und eine lange Lebensdauer
des Spiralkneters, raten wir Ihnen diese Anleitung aufmerksam zu lesen, bevor Sie mit dem Gebrauch der
Maschine anfangen.
Sinmag Europe dankt Ihnen für das Vertrauen und das
Interesse und wünscht Ihnen viele Arbeitsfreude mit der
Maschine.
Sinmag Europe Team.
D
32
SINMAG EUROPE BVBA
Page 33
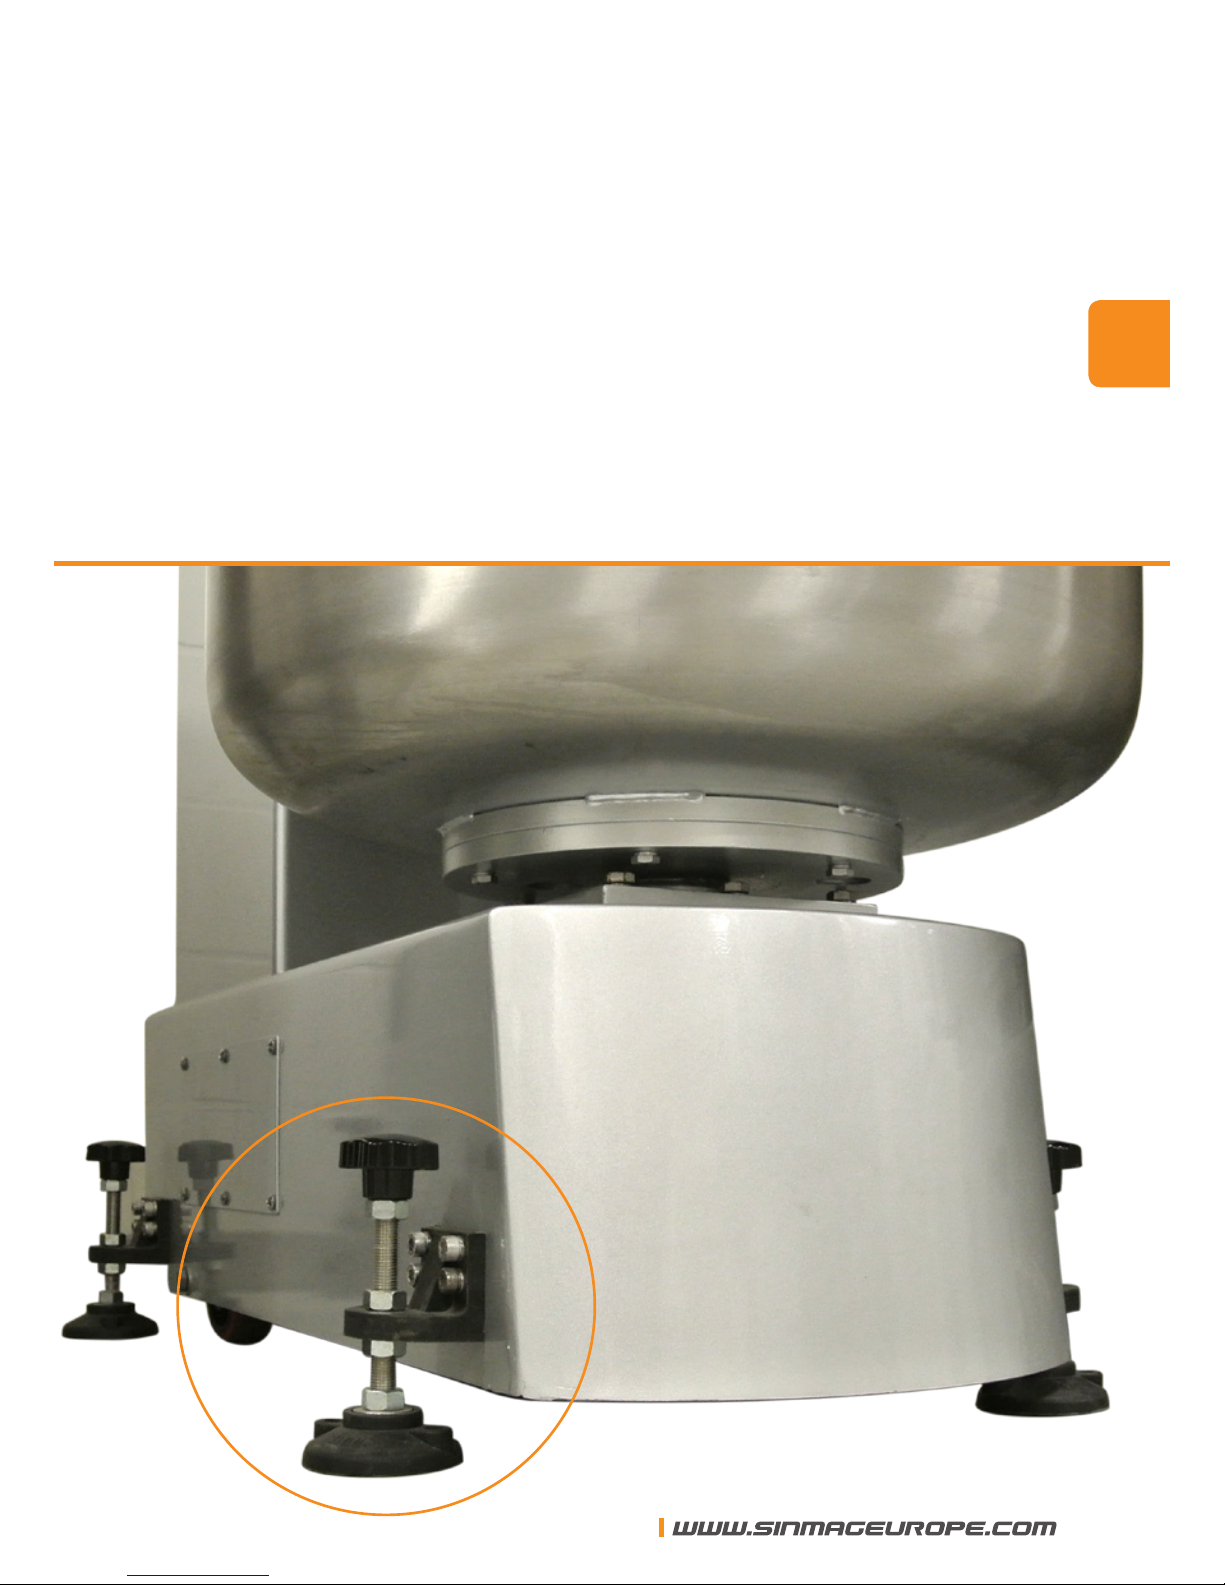
1. Installation
Die Maschine muss auf einen horizontalen und egalen Boden gestellt
werden. Stellen Sie die vier Schrauben bitte auf einer derartigen Weise
nach, dass die Maschine mit den vier Ecken fest am Boden steht.
D
SINMAG EUROPE BVBA
33
Page 34
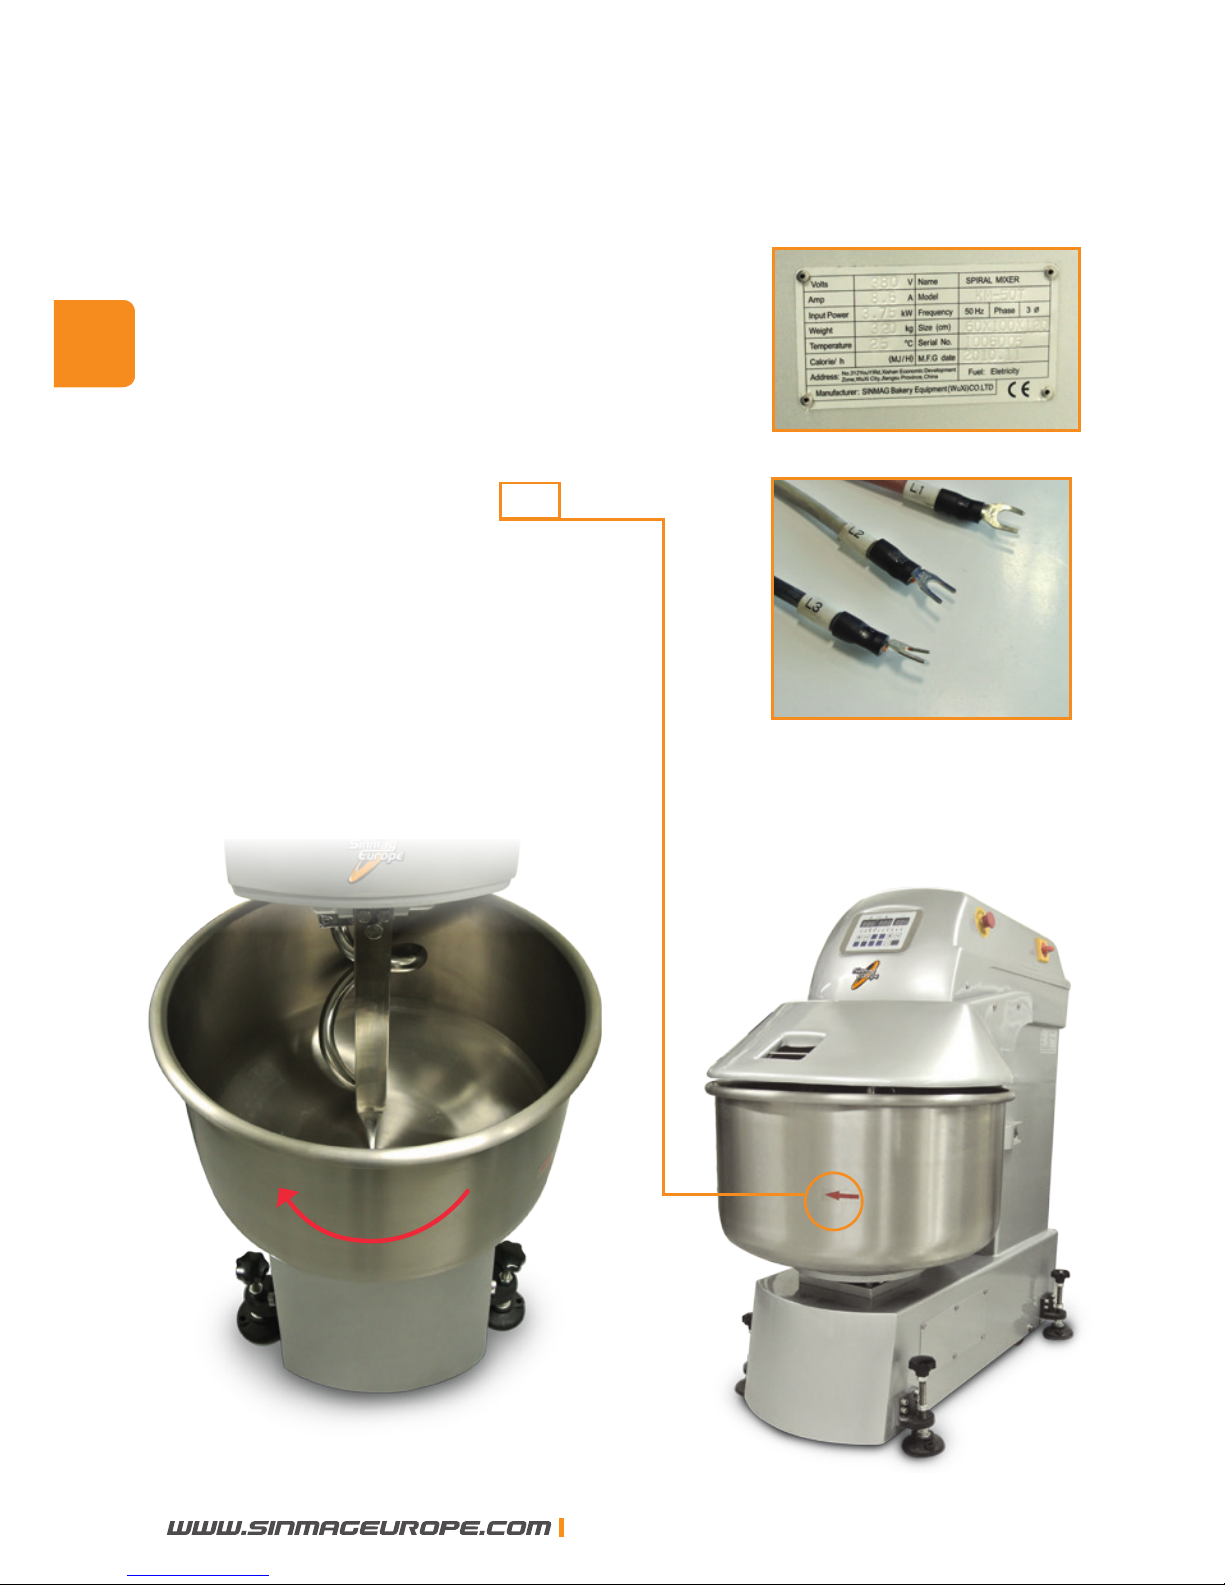
2. Elektrische Versorgung
Versorgen Sie die Maschine bitte mit der korrekten
Stromversorgung, wie diese auf dem Namenschild
des Herstellers angegeben ist.
Nachdem Sie das Gerät an das Elektrizitätsnetz angeschlossen haben, prüfen Sie bitte
zunächst die Drehrichtung der Knetspirale
und des Kessels nach. Von oben her gesehen,
muss sowohl der Kessel wie auch die Spirale im
Uhrzeigersinn drehen. Der Pfeil auf dem Kessel
gibt die Drehrichtung an.
Falls der Kessel oder die Spirale in der
falschen Richtung drehen, müssen Sie die
Kupplungen von Zwei Phasenkabel umtauschen.
D
34
SINMAG EUROPE BVBA
Page 35
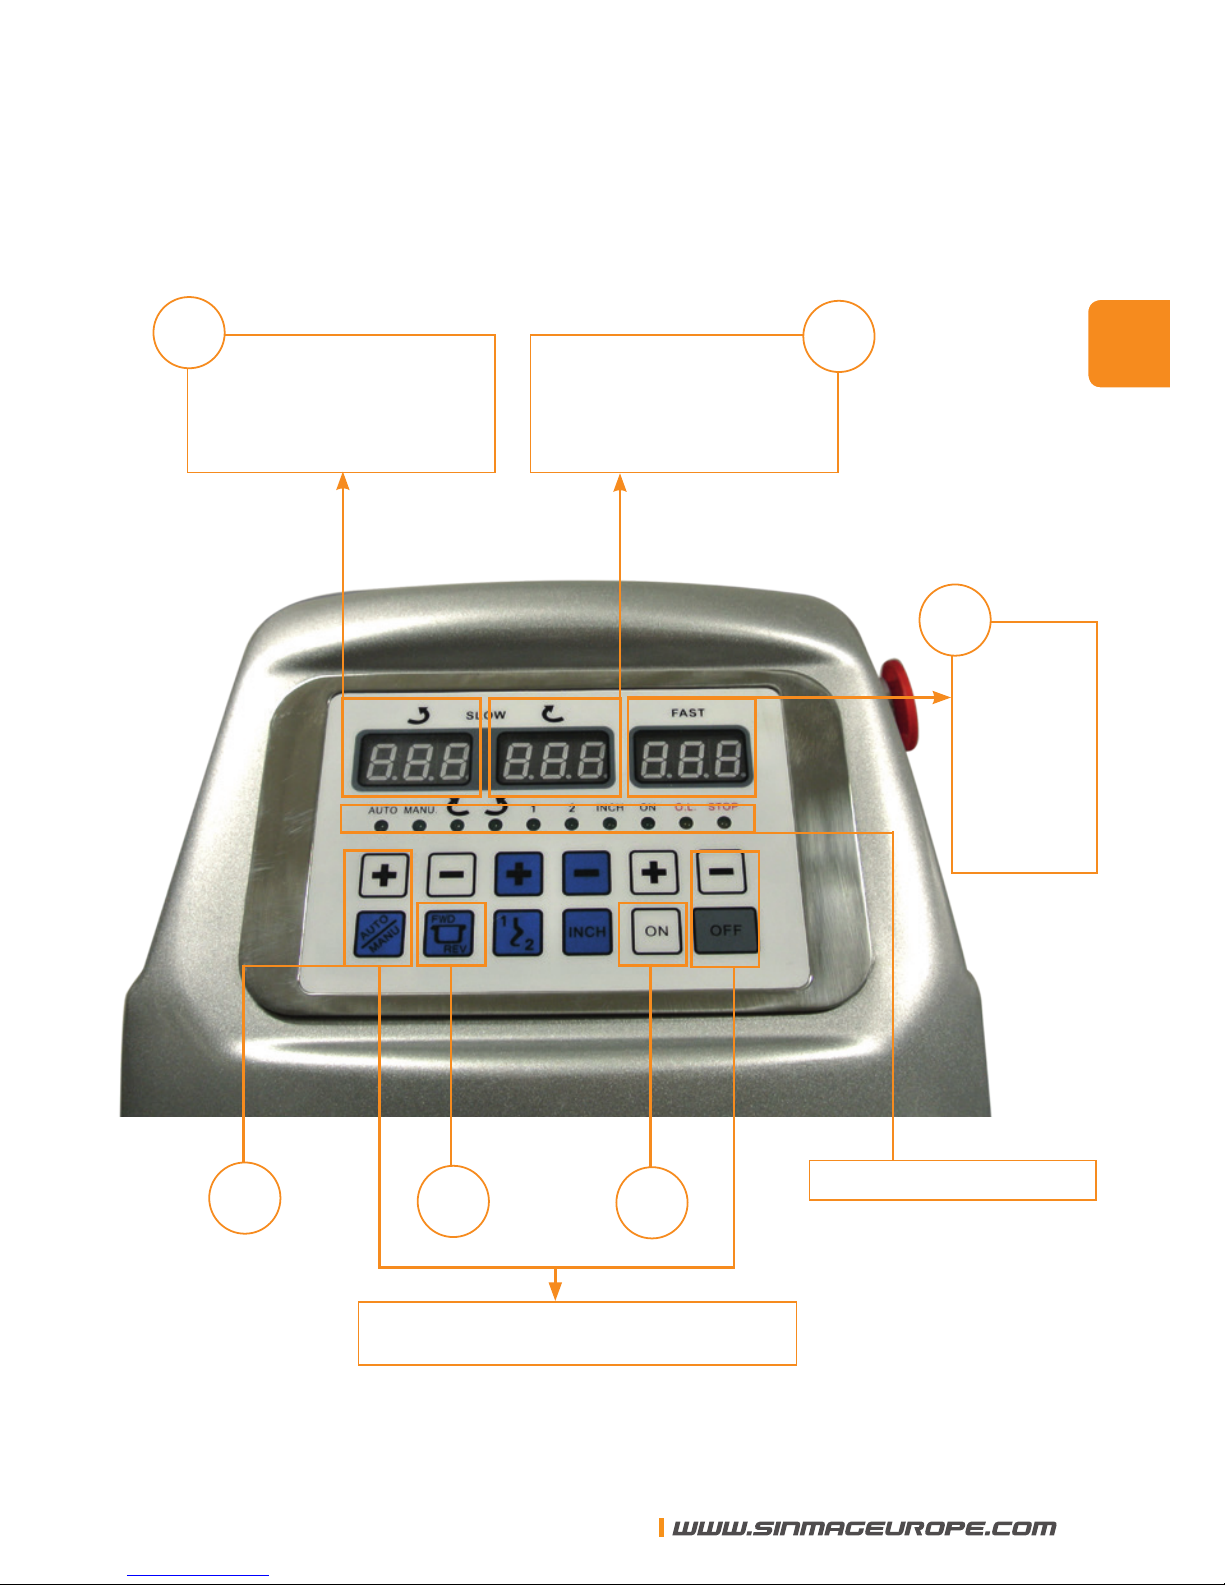
3. Bedienungstafel
Funktionstasten
Zeituhr I rückwärtse
Drehrichtung
Zeituhr II
1. Geschwindigkeit
A
B
Zeituhr III
2. Gesch-
windigkeit
F
E
D
C
Funktionslampen
D
SINMAG EUROPE BVBA
35
Page 36
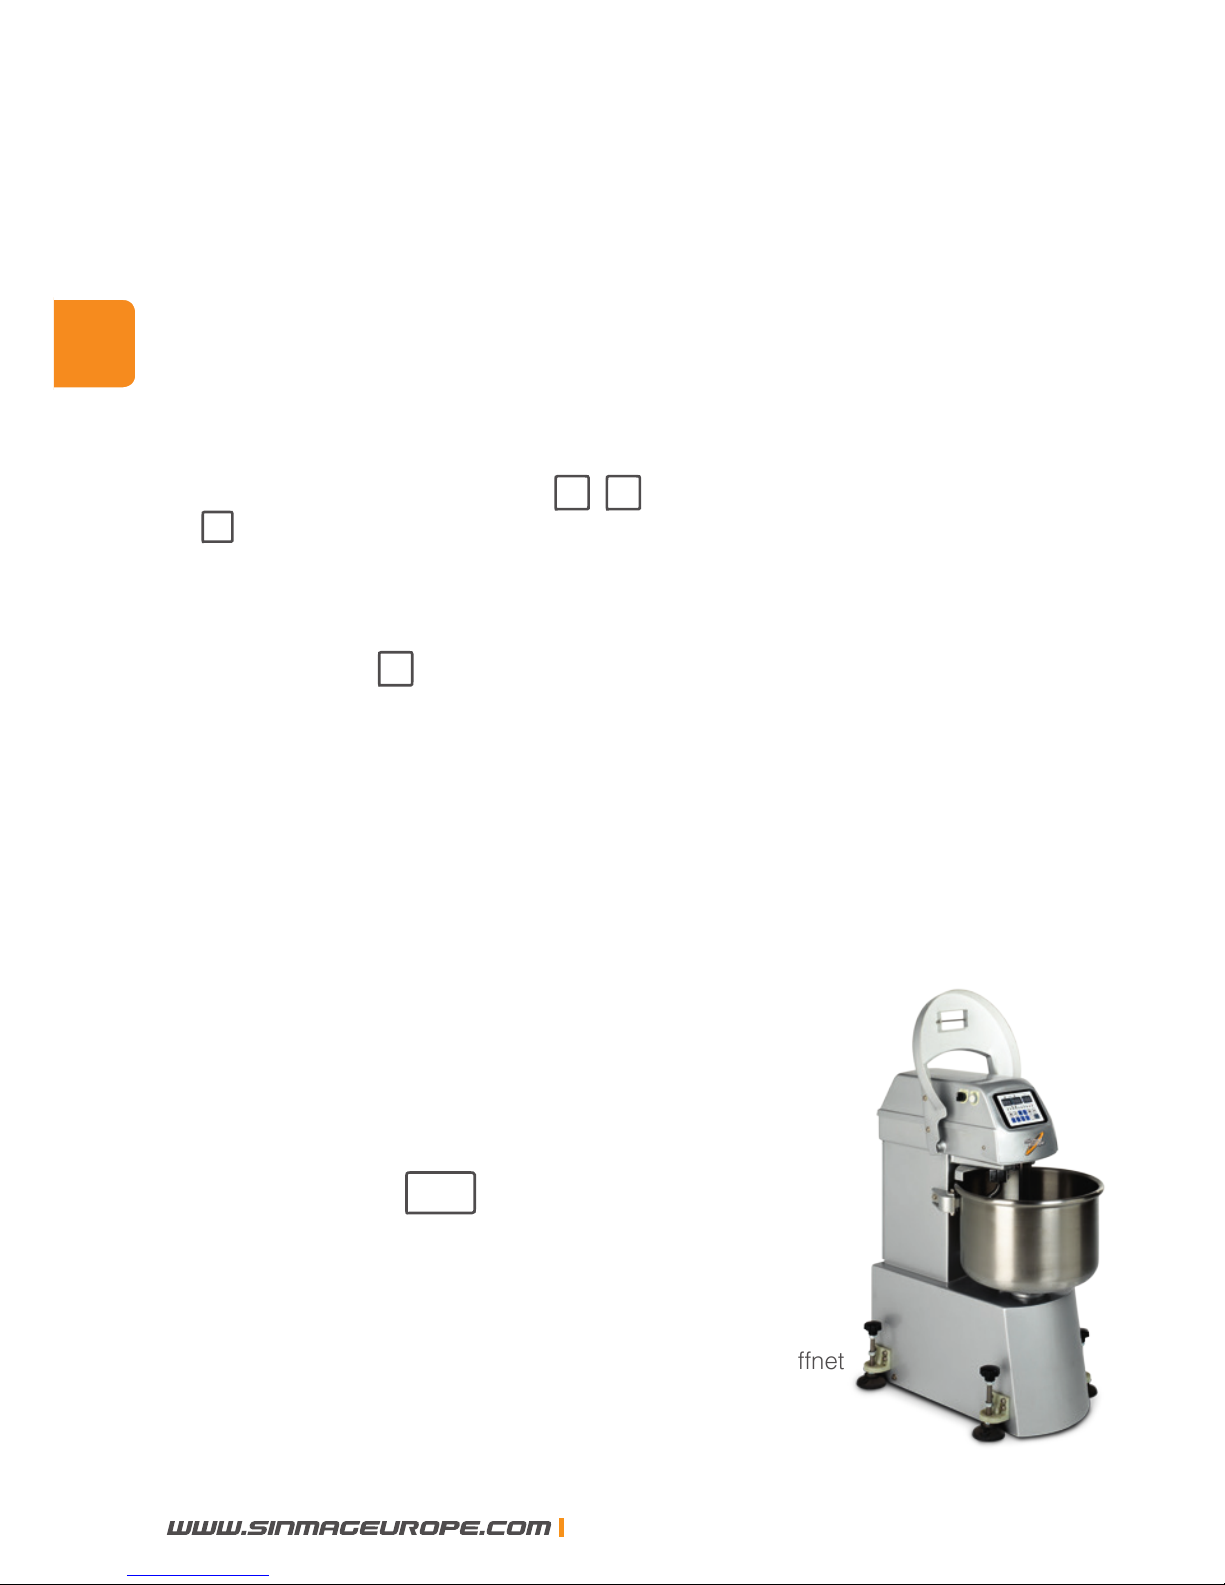
4. Bedienung des Spiralkneters mit der digitalen
Tastatur
4.1 Beschreibung
4.1.1 Die Zeituhren
Oben in der Tastatur benden sich Zeituhr I für die rückwärtse
Drehrichtung, Zeituhr II für den 1. Gang und Zeituhr III für den 2. Gang
Alle geben die Zeit in Minuten an.
Die Zeituhren werden mit den + - Tasten bedient. Ein Druck auf
die + Taste erhöht die Zeit um 10 Sekunden. Die höchst mögliche
Zeit ist 20 Minuten. Wenn man eine Zeit höher als 20 Minuten einstellen will, wird die Zeituhr erneut ab 0 anfangen.
Ein Druck auf die - Taste wird die Zeit um eine Minute reduzieren.
Wenn der Spiralkneter eingeschaltet ist (d.h. wenn man die “ON” Taste
bedient hat), wird die Zeit jeweils um 10 Sekunden abnehmen, bis sie
zu 0 ankommt.
Während der AUTOMATIC Funktion wird die Zeituhr an der heutigen
Position halten wenn das Sicherheitsschirm gehoben wird. Wenn der
Spiralkneter erneut zu funktionieren anfängt,
wird die Zeituhr aufs Neue ab dieser Position
anfangen um die vestliche Zeit zu beenden.
Die Zeituhr wird nicht funktionieren während der
MANUAL Funktion.
Wenn man auf die OFF Taste drückt, werden
die Zeituhren zu der eingestellten
Zeit zurückgehen.
Sicherheitsschirm geöffnet
D
36
SINMAG EUROPE BVBA
Page 37

4.1.2 Bezeichnungslampen
Die Bezeichnungslampen bezeichnen jeweils die eingeschaltene
Funktion des Spiralkneters:
A. “AUTO/MANUAL” Funktion:
Wenn die “AUTO”- Lampe aufhellt, arbeitet die Maschine in
AUTO-Funktion.
Wenn die MANU-Lampe aufhellt, arbeitet sie in MANU-Funktion.
B. Drehrichtung des Kessels:
Wenn die Lampe aufhellt, dreht der Kessel im Uhrzeigersinn.
Wenn die Lampe aufhellt, dreht der Kessel im Gegenzeigersinn.
C. Die “ON “ Lampe hellt auf wenn das Gerät eingeschaltet ist.
D. Geschwindigkeitsfunktion:
Wenn die “I” Lampe brennt, arbeitet das Gerät mit kleiner
Geschwindigkeit.
Wenn die “II” Lampe brennt, arbeitet das Gerät mit grosser
Geschwindigkeit.
E. Die “INCH” Lampe bezeichnet die Schritt für Schritt
Prozedur.
Wenn weder die “INCH” lampe, noch die “ON” Lampe brennt,
bedeutet dies, dass das Gerät sich in “STOP”-Funktion bendet.
F. Die “STOP” Lampe hellt nur auf wenn das Sicherheitsschirm
gehoben wird wahrend der Wirkung der Maschine.
G. “O.L.” (Over-Load): Diese Lampe hellt auf wenn der
Übergewichtschalter eingeschaltet worden ist. Um dieses
Problem zu lösen, müssen Sie zunächst den Fehler (Mangel an
Stromversorgung, Übergewicht des Teigs oder ein Kabel das sich
abgelöst hat) beseitigen. Danach wird die Lampe erlöschen.
D
SINMAG EUROPE BVBA
37
Page 38
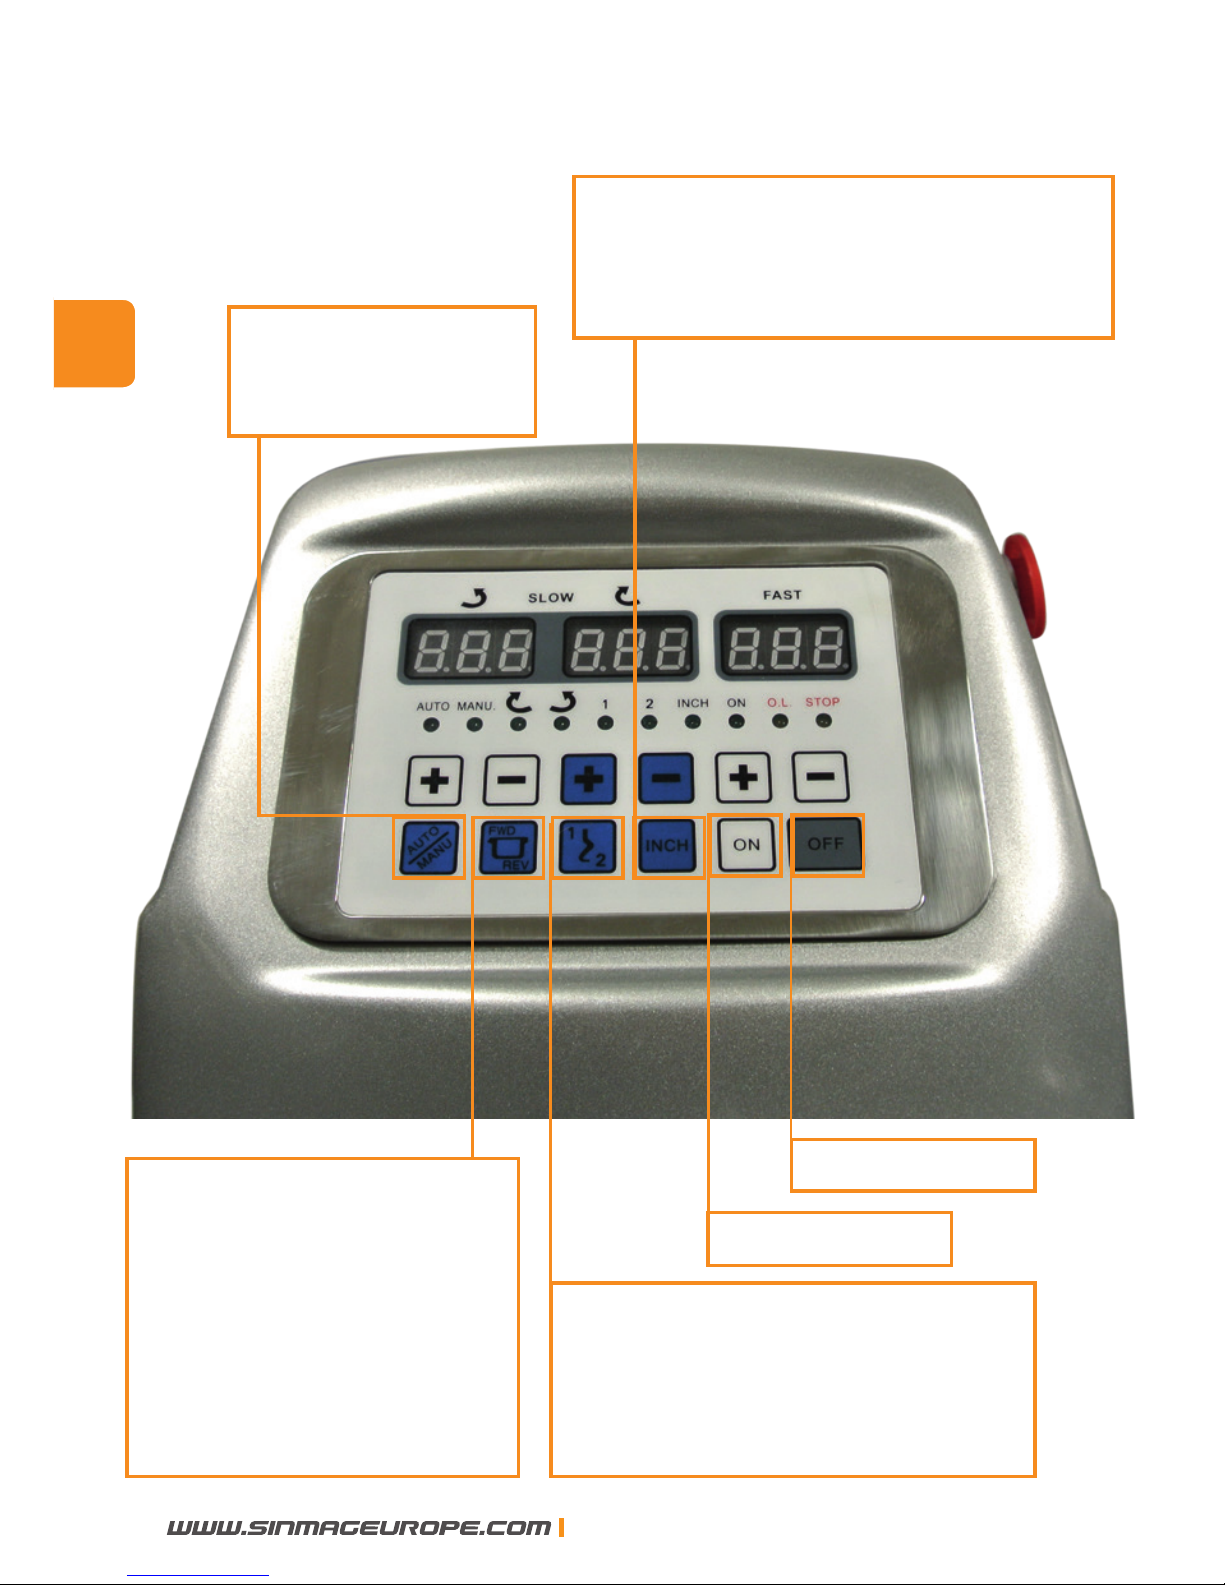
4.1.3 Funktionstasten
AUTO/MANUAL
Bedienungstaste
Bedienungstaste für die Festsetzung
der Geschwindigkeit in manueller
Funktion. Die Spirale muss von
oben her gesehen im Uhrzeigersinn
drehen.
Bedienungstaste für die
Drehrichtung des Kessels
(Forward - 0 - Reverse) in
manueller Funktion. Wenn
das Gerät in die “F”-Richtung
gestellt wird, muss der Kessel
im Uhrzeigersinn drehen.
Starttaste
Stoptaste
Schritt für Schritttaste.
Nur der Kessel wird drehen wenn man auf
diese Taste drückt.
D
38
SINMAG EUROPE BVBA
Page 39

4.2 Auto Wirkung
A. Drücken Sie auf die + und - Tasten unter Zeituhr I um
die erwünschte Zeit für die rückwärtse Drehrichtung
einzustellen.
B. Drücken Sie auf die + und - Tasten unter Zeituhr II um
die erwünschte Zeit für den 1. Gang einzustellen.
C. Drücken Sie auf die + und - Tasten unter Zeituhr III um
die erwünschte Zeit für den 2. Gang einzustellen.
D. Drücken Sie auf die AUTO/MANU Taste bis die AUTO-
Lampe aufhellt.
E. Drücken Sie auf die Taste bis die Lampe aufhellt.
F. Drücken Sie auf die ON Taste um die Maschine
einzuschalten.
Wenn Sie dieses Verfahren erledigt haben, wird die Maschine zu
arbeiten anfangen. Zunächst wird sie in rückwärtser Drehrichtung
arbeiten, bis Zeituhr I zu 0 ankommt, danach in kleiner Geschwindigkeit, bis Zeituhr II zu 0 ankommt. Schliesslich wird die Maschine in
hoher Geschwindigkeit arbeiten bis die eingestellte Zeit auf Zeituhr III
beendet wird. Jetzt wird die Maschine automatisch halten.
Während der “AUTO” Arbeit hält die Maschine automatisch wenn man
das Sicherheitsschirm hebt. Die Zeituhr wird auch an dieser Stelle
halten. Die Zeituhr und die Maschine fangen erneut zu arbeiten an,
wenn man das Schirm senkt und auf die ON drückt.
Wenn Sie auf die OFF Taste drücken, wird der Timer zu der
ursprünglich eingestellten Zeit zurückkehren und die Maschine wird
aufs Neue anfangen.
F
R
D
SINMAG EUROPE BVBA
39
Page 40
4.3 Manuelle Wirkung
A. Drücken Sie auf die AUTO / MANU Taste bis die MANU
Lampe aufhellt.
B. Drücken Sie auf die und Tasten um den
erwünschten Gang und die Drehrichtung des Kessels
einzustellen.
C. Drücken Sie auf die ON Taste um die Maschine
einzuschalten.
D. Drücken Sie auf die OFF Taste wenn Sie die Arbeit
beenden wollen.
Die Zeituhr funktioniert nicht bei der manuellen Funktion.
Die Drehrichtung des Kessels kann nicht umgedreht werden in
zweitem Gang. Der Kneter wird immer im ersten Gang anfangen,
sogar wenn Sie “II” als Startposition gewählt haben. Einmal der Kneter
in erstem Gang dreht, können Sie auf drücken um die Geschwindigkeit zu erhöhen.
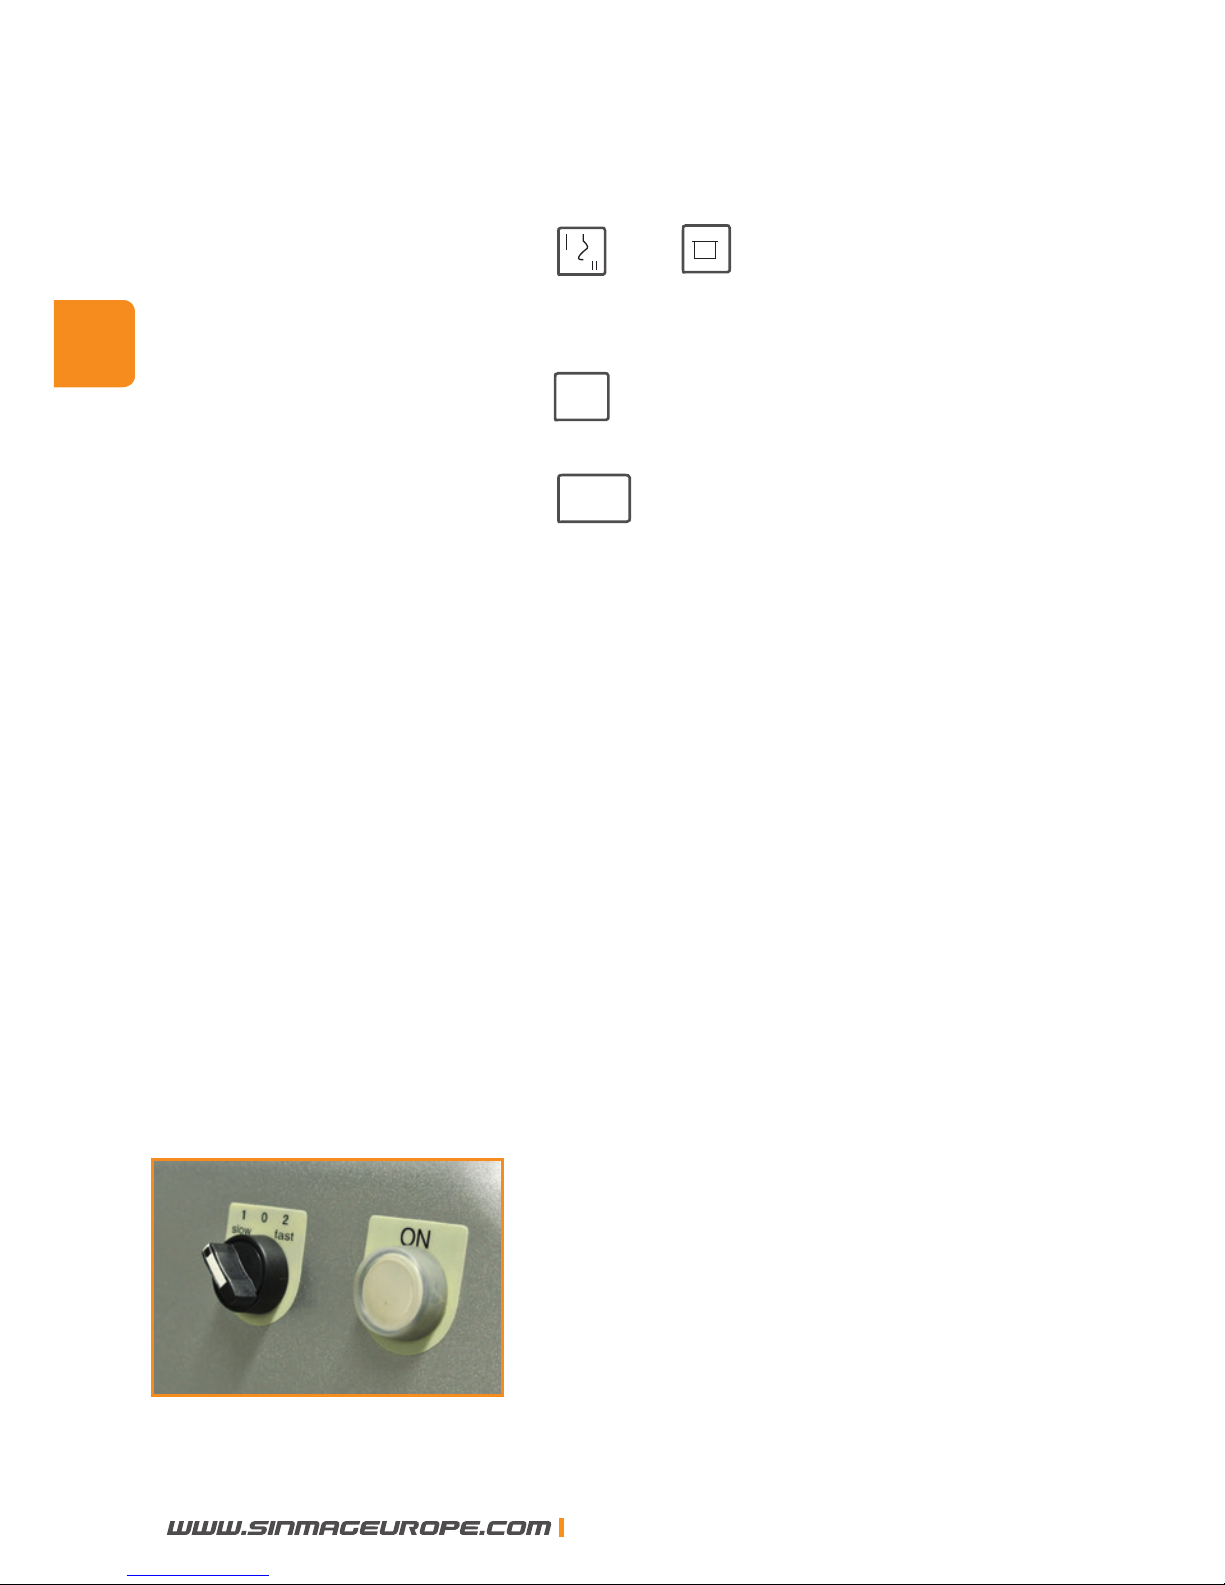
4.4 Manueller Schalter
Wenn die digitale Tastatur beschädigt worden ist, kann der Kneter
noch immer mit dem manuellen Schalter bedient werden. Dieser
Schalter bendet sich
oben links auf der Machine. Sie können auch manuell den ersten oder
zweiten Gang wählen.
F
R
D
40
SINMAG EUROPE BVBA
Page 41
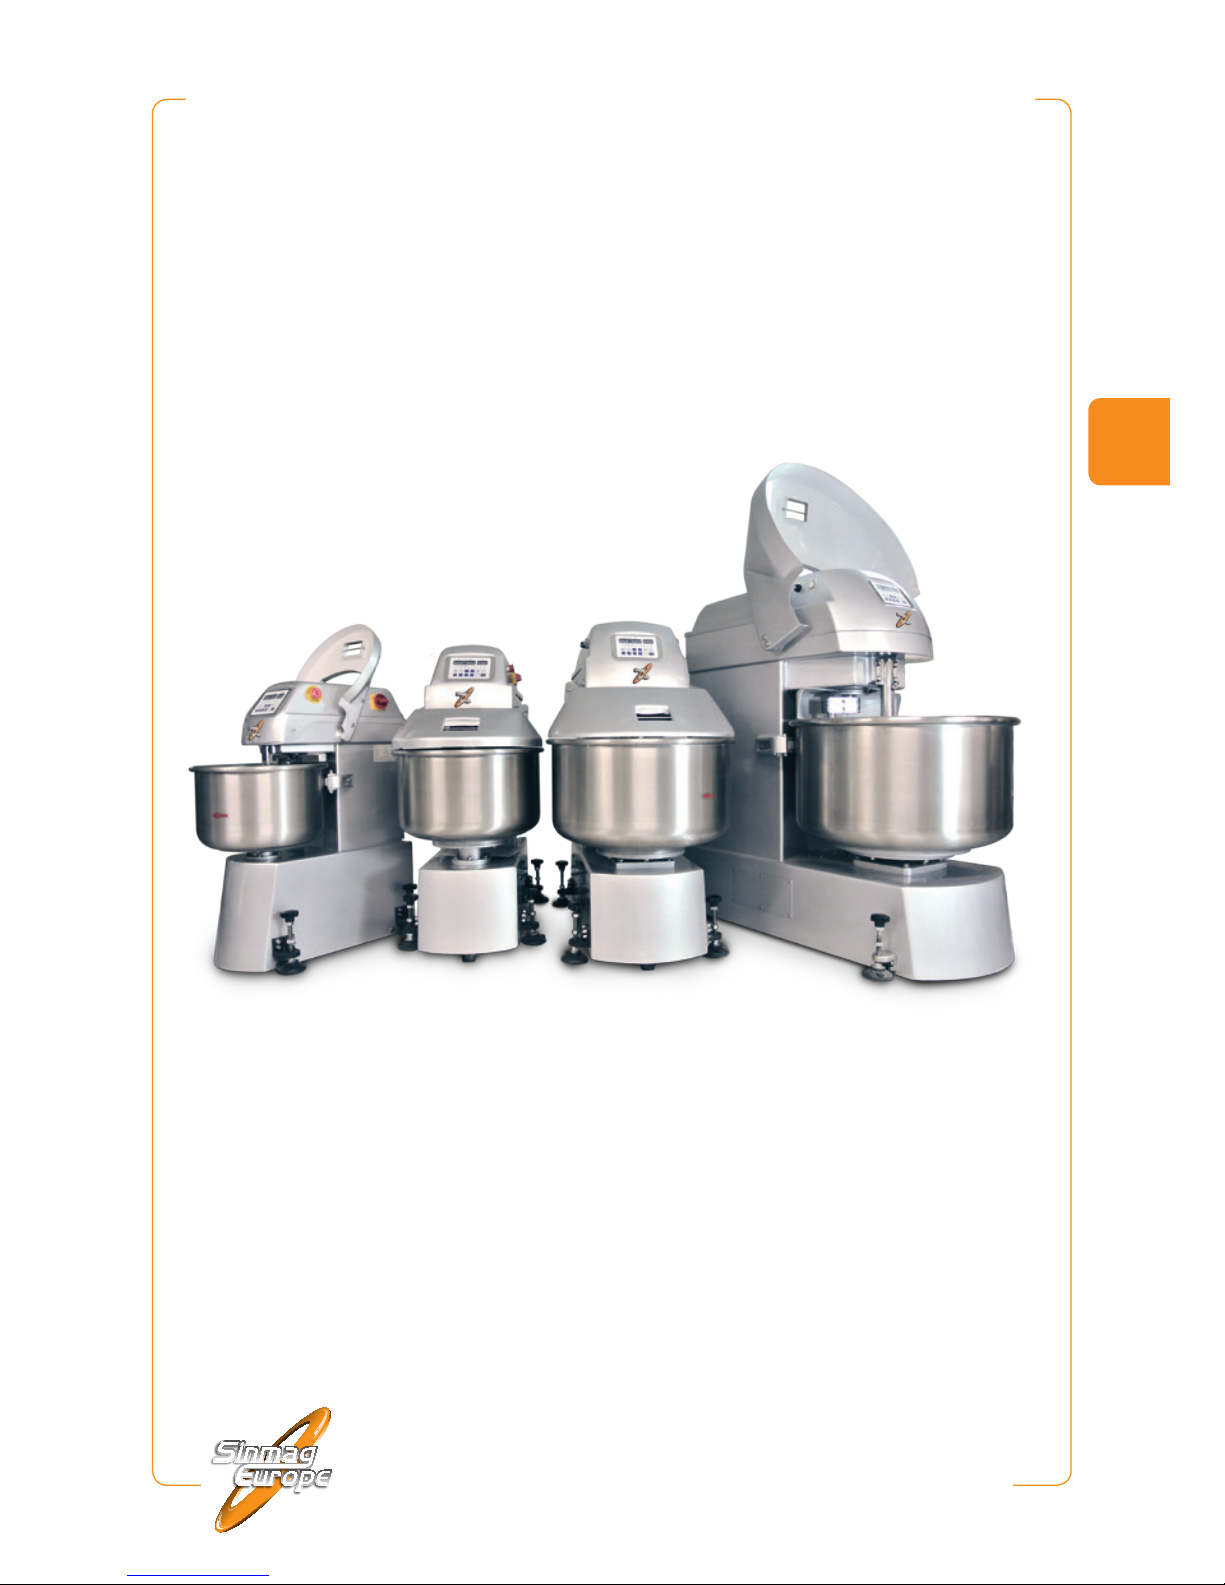
Spiral mixer
.
Pétrin à spirale. Spiraalkneder
Spiralkneter
.
Amasadora. Impastatrice
KM-25
.
KM-50T . KM-80T . KM-120T
Manual. Mode d’emploi. Handleiding. Handbuch. Manuale
ES
Page 42

¡Felicidades con la compra de esta amasadora espiral!
Esta máquina ha sido controlada profundamente en
nuestro almacén en Bélgica para garantirle la entrega de
una máquina lista a la instalación.
Para un funcionamiento correcto y una larga vida útil, es
aconsejable de leer este modo de empleo con atención
antes de poner la máquina en uso.
Sinmag Europe agradece a Usted por Su conanza y interés y le desea mucho gozo en el trabajo con la máquina.
Sinmag Europe Team.
ES
42
SINMAG EUROPE BVBA
Page 43
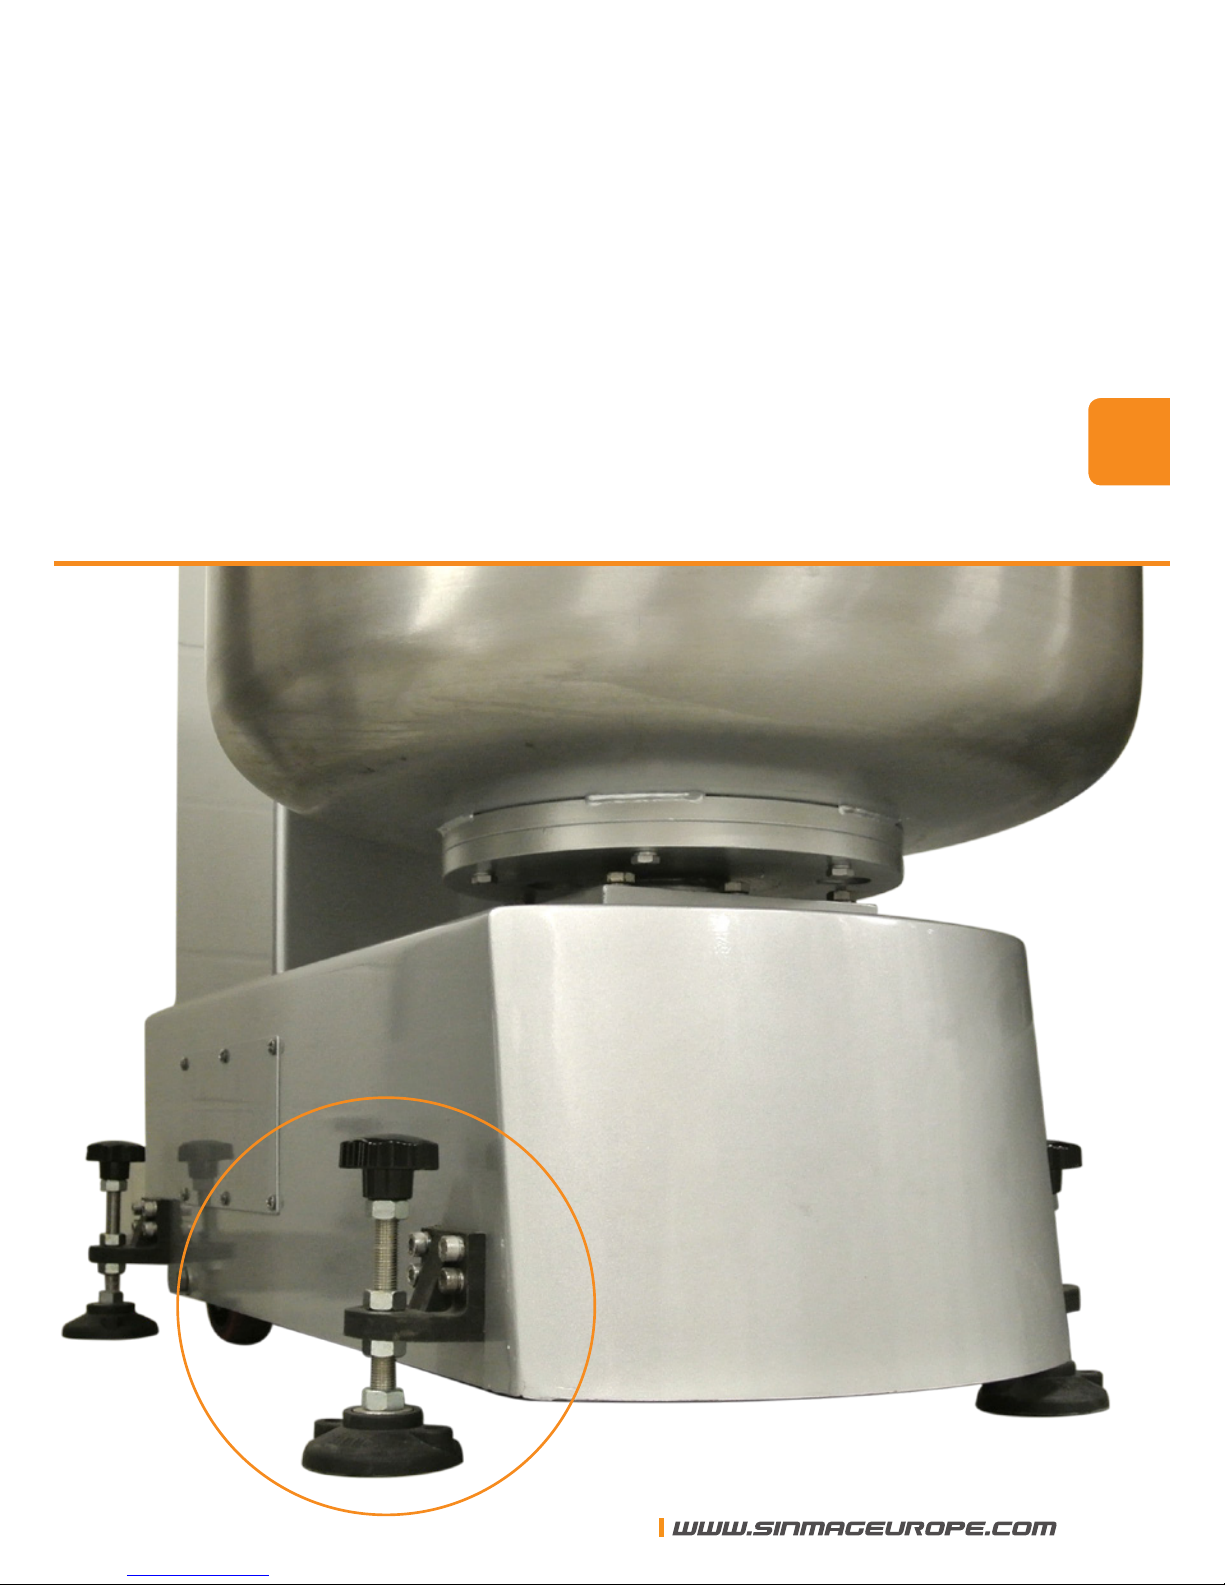
1. Instalación
La máquina debe ser instalada en un fondo horizontal y
plano.
Ponga los tornillos en posición de modo que la máquina
está apoyada sólidamente sobre sus cuatro artistas.
ES
SINMAG EUROPE BVBA
43
Page 44
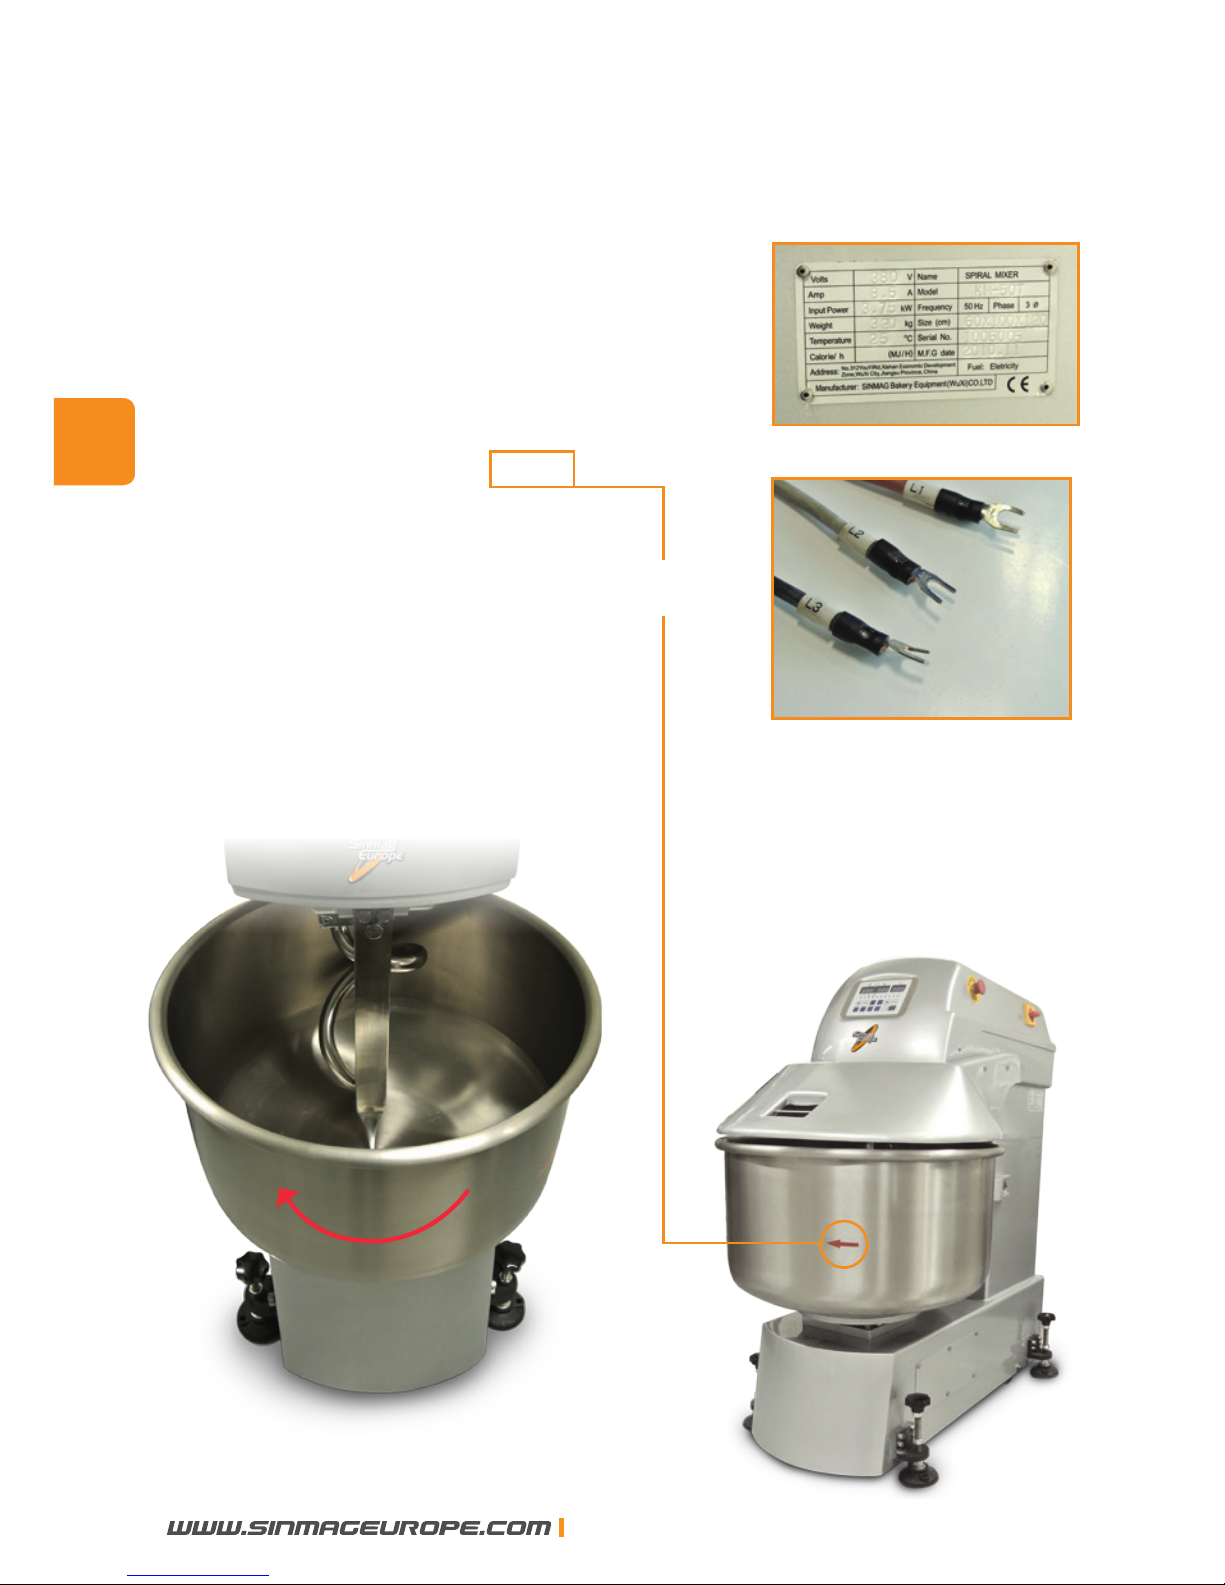
2. Alimentación eléctrica
Prevea la alimentación eléctrica correcta como
indicada en la placa de identicación.
Después de haber conectado la máquina a la
alimentación eléctrica, en primer lugar hay que
controlar la dirección de rotación de la espiral
y de la cuba. Visto de arriba, la
espiral como la tina deben girar en el sentido
de las agujas del reloj. La echa en la cuba
indica la dirección de girar de la cuba.
Si la dirección de rotación es errónea, hay que
cambiar dos de los cables eléctricos de fase
para invertir el sentido de rotación.
ES
44
SINMAG EUROPE BVBA
Page 45
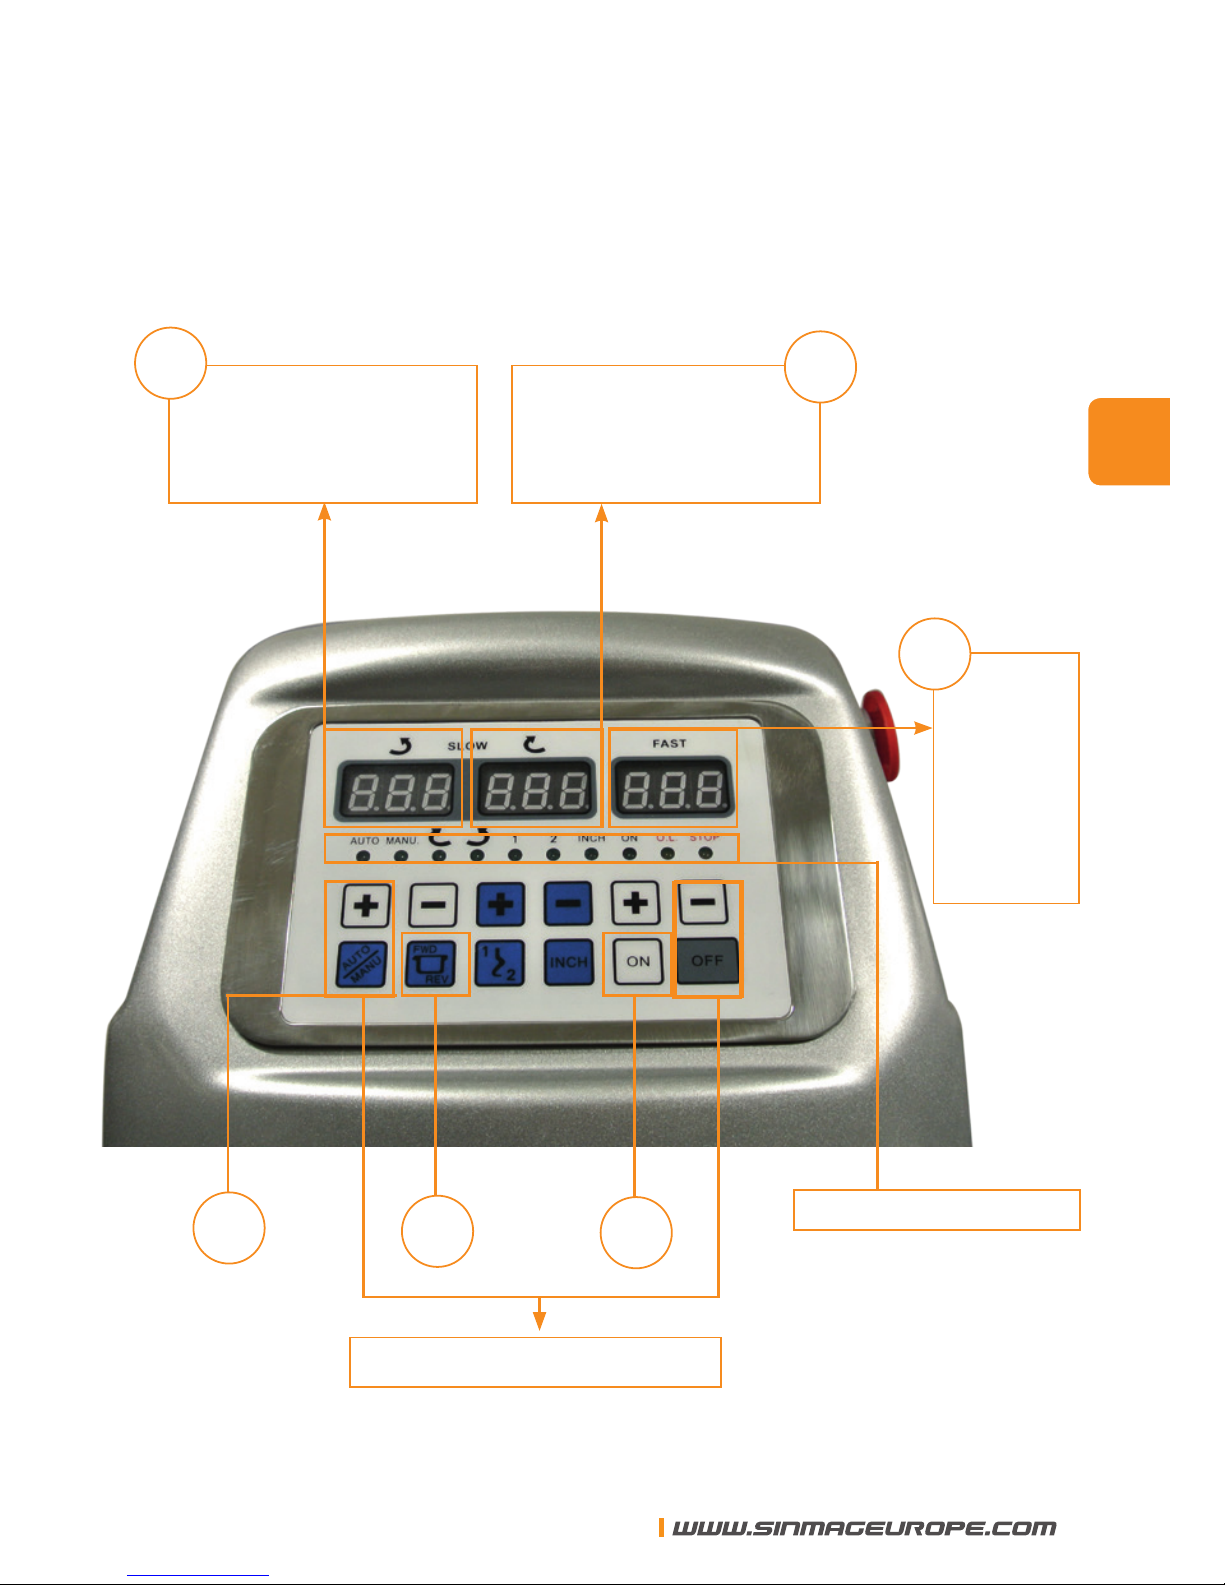
3. Panel de control
Botones de función
Temporizador para el
sentido inverso
Temporizador para la
velocidad baja
A
B
Tempori-
zador
para la
velocidad
alta
F
E
D
lámpara de función
C
ES
SINMAG EUROPE BVBA
45
Page 46
4. Manejo de la amasadora con el tablero de control
4.1 Descripción
4.1.1 Temporizadores
Los temporizadores están arriba en el tablero. Temporizador I sirve
para el sentido inverso, temporizador II para la velocidad baja y temporizador III para la velocidad alta. Todos los temporizadores indican
el tiempo en minutos.
Los temporizadores son regulados con los botones + - . Si el +
es apretado una vez, el tiempo puesto aumentará con diez segundos.
El tiempo máximo que puede ser puesto es 20 minutos. Después 20
minutos, el temporizador empezará de nuevo de 0 minutos. Apriete el
- para disminuir el tiempo regulado con diez segundos.
Cuando la amasadora es arrancada ON , los temporizadores
indicarán el tiempo puesto. Cuando el temporizador empieza a operar,
el tiempo indicado decrecerá con diez segundos a la vez hasta que
llega a 0.
Cuando la cubierta protectora es alzada durante la operación automática (AUTOMATIC), el temporizador se parará a la posición donde es
llegado. Cuando la amasadora es arrancada de nuevo después de
una tal parada, el temporizador continuará desde
esta posición para nir el tiempo restante.
Durante la operación manual (MANUAL), el temporizador non funcionará.
Cuando el botón OFF es apretado, los temporizadores volverán al tiempo puesto.
Cubierta protectora abierta
ES
46
SINMAG EUROPE BVBA
Page 47

4.1.2 Lámparas de señalización
Estas lámparas muestran la función en cuya la amasadora está
funcionando:
A. Operación “AUTO/MANUAL”:
Cuando la lámpara “AUTO” se ilumina, la amasadora está
funcionando en la función automática.
Cuando la lámpara “MANU” se ilumina, la amasadora está
funcionando en la función manual.
B. Dirección de rotación de la tina:
Cuando la lámpara se ilumina, la cuba girará en el sentido
de las agujas del reloj.
Cuando la lámpara se ilumina, la cuba girará en el sentido
contrario al de las agujas del reloj.
C. La lámpara ON se ilumina cuando la máquina está
funcionando.
D. Velocidad:
Cuando la lámpara “I” se ilumina, la amasadora está
funcionando en la velocidad baja.
Cuando la lámpara “II” se ilumina, la amasadora está
funcionando en la velocidad alta.
E. La lámpara INCH indica la función ‘paso a paso’ y sirve a traer
hacia adelante la masa en la tina.
Cuando ni la lámpara INCH , ni la lámpara ON se ilumina, la máquina
está en STOP .
F. La lámpara STOP se ilumina solamente cuando la cubierta
protectora es alzada durante la operación de la máquina.
G. “O.L.” (Over-Load):
Está lámpara se ilumina cuando el relé de sobrecarga está puesto.
Después eliminación del defecto (caída de tensión, amasadora
sobrecargada o una de las conexiones de cables se ha soltada),
esta lámpara se apagará.
ES
SINMAG EUROPE BVBA
47
Page 48
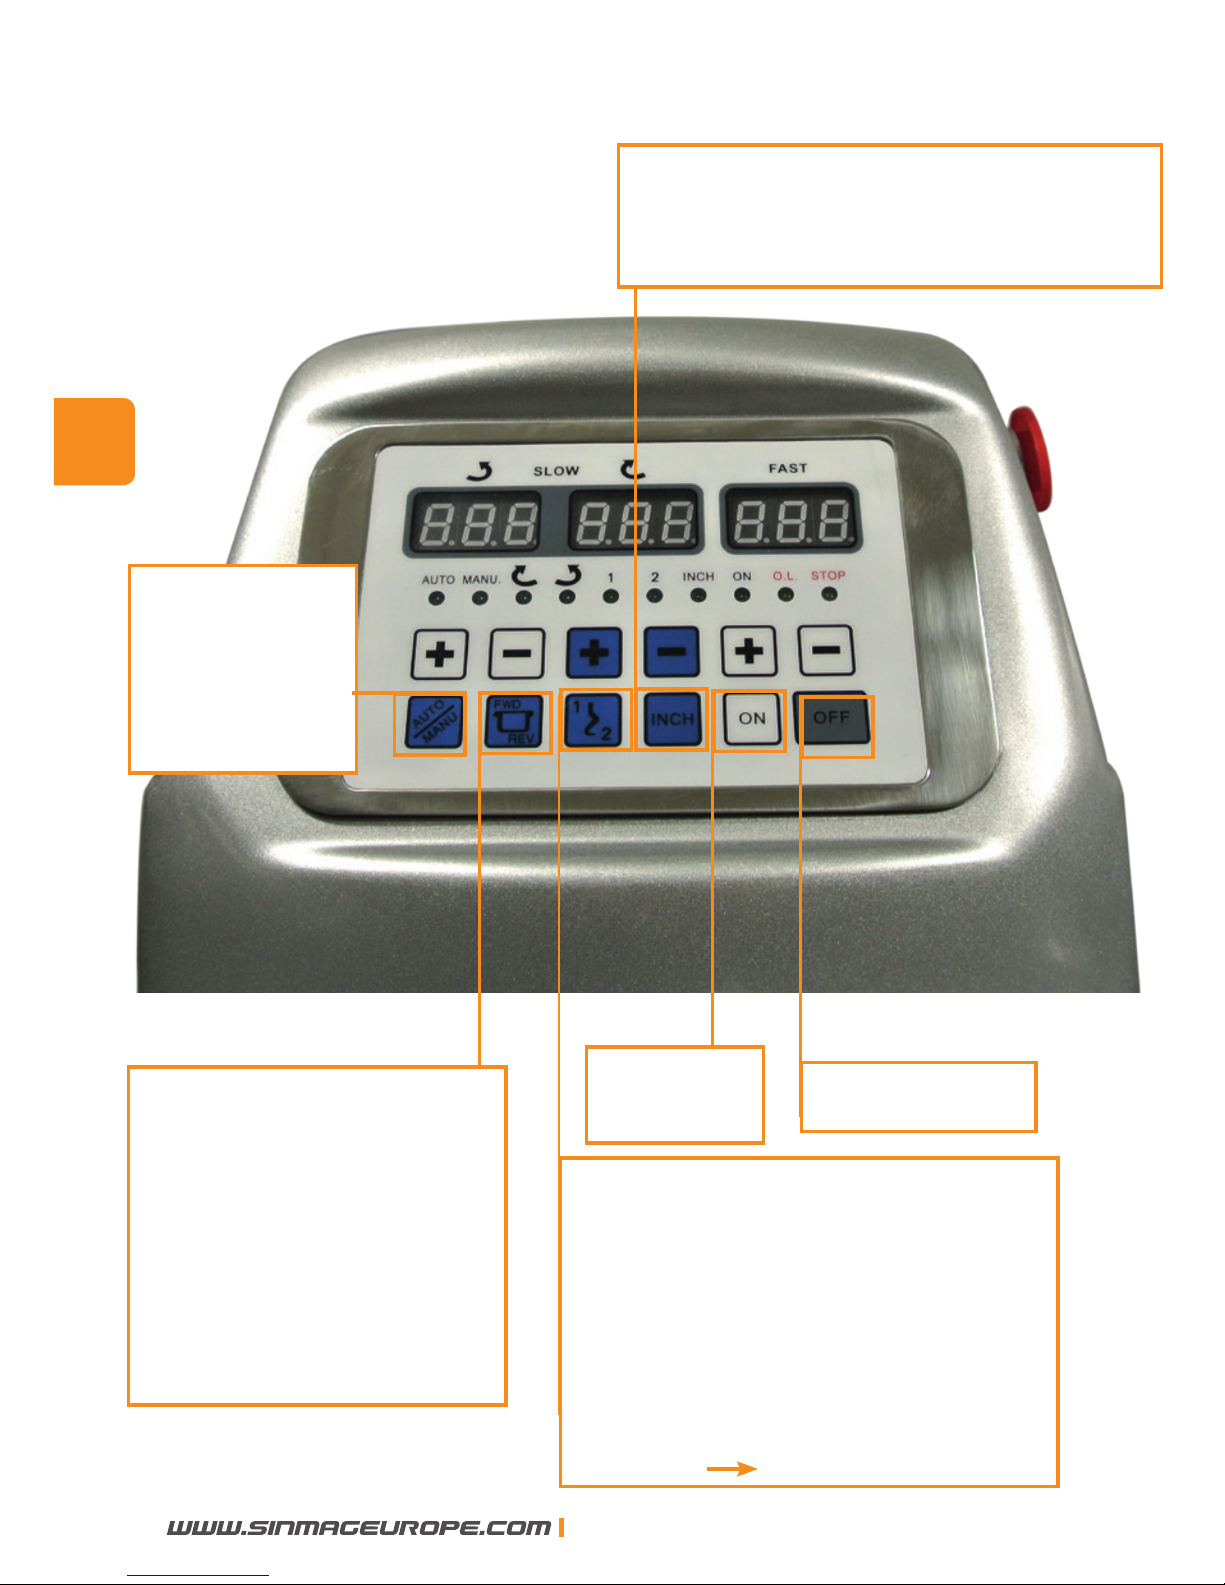
4.1.3 Botones de función
Botón para la
selección de
la función
automática o
manual
Botón para la selección
de la velocidad en cuya
la amasadora tiene que
funcionar. Visto de
arriba, la espiral debe
funcionar en el sentido
de las agujas del reloj.
Botón para la selección del
sentido de la tina (hacia adelan-
te FORWARD - 0 - contrario
REVERSE). Cuando la
máquina funciona en “F”,
la cuba tiene que girar en el
mismo sentido como la echa
en la tina.
Botón de
arranque
Botón de paro
Bóton ‘paso a paso’ Solamente
la cuba funcionará mientras que
aprieta este botón.
ES
48
SINMAG EUROPE BVBA
Page 49

4.2 Operación automática
A. Apriete los botones + - debajo del temporizador
“I” para poner el tiempo deseado para el sentido inverso.
B. Apriete los botones + y - debajo del temporizador
“II”para poner el tiempo deseado para la velocidad baja.
C. Apriete los botones + y - debajo del temporizador
“III” para poner el tiempo deseado para la velocidad alta.
D. Apriete el botón “AUTO/MANU” hasta la lámpara
“AUTO” se ilumina.
E. Apriete el botón hasta que la lámpada se
ilumina.
F. Apriete el botón ON para arrancar la máquina.
Después que ha terminado el procedimiento mencionado arriba, la
máquina arrancará. Funcionará en el sentido inverso hasta que temporizador “I” llega a 0. Luego, la máquina empezara a funcionár en
la velocidad baja hasta que temporizador “II” llega a 0. Finalmente,
funcionará en la velocidad alta hasta que temporizador “III” llega a 0.
Ahora, la máquina se parará automáticamente.
Durante la operación automática (AUTOMATIC), la máquina se parará
cuando la cubierta protectora es alzada. El temporizador se parará
en la posición actual. El temporizador continuará desde está posición
para nir el tiempo restante después que ha cerrado la cubierta protectora y apretado el botón ON .
Cuando aprieta el botón OFF , el temporizador volverá a la posición
puesta y arrancará de nuevo cuando aprieta el botón ON .
F
R
ES
SINMAG EUROPE BVBA
49
Page 50
4.3 Operación manual
A. Apriete el botón AUTO/ MANU hasta que la lámpara
“MANU” se ilumina.
B. Apriete los botones y para seleccionar la
velocidad deseada y el sentido de rotación.
C. Apriete el botón ON para arrancar la máquina.
D. Apriete el botón OFF para parar la operación.
El temporizador no funcionará durante la operación manual. La dirección de la tina no puede ser invertida en la velocidad alta.
La amasadora siempre arrancará en la velocidad baja, también cuando selecciona “II” para arrancar. Cuando la amasadora está funcionando en la velocidad baja, puede después apretar para cambiar
en la velocidad alta.
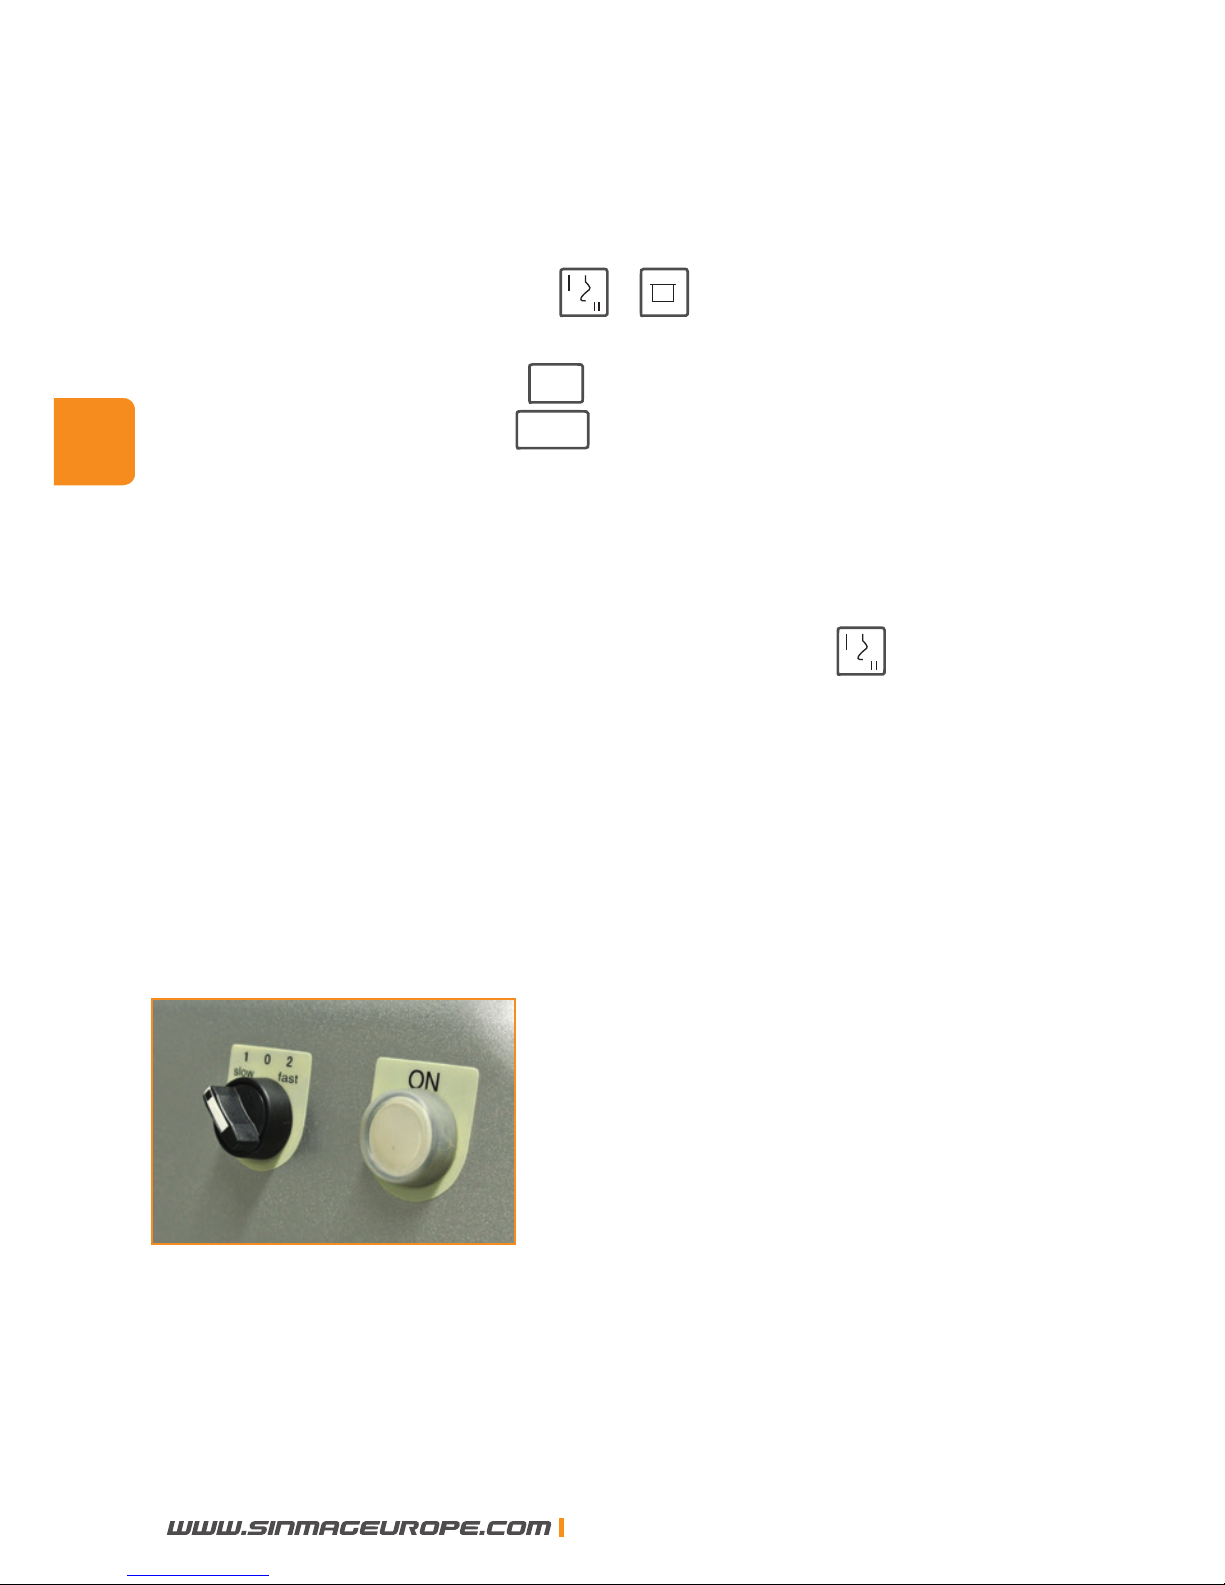
4.4 Interruptor manual
Cuando el tablero de control es
dañado, la amasadora puede ser manejada con el interruptor manual
que se halla al lado izquierdo del cubierto superior. Puede seleccionar la velocidad baja o alta manualmente sin el temporizador.
F
R
ES
50
SINMAG EUROPE BVBA
Page 51
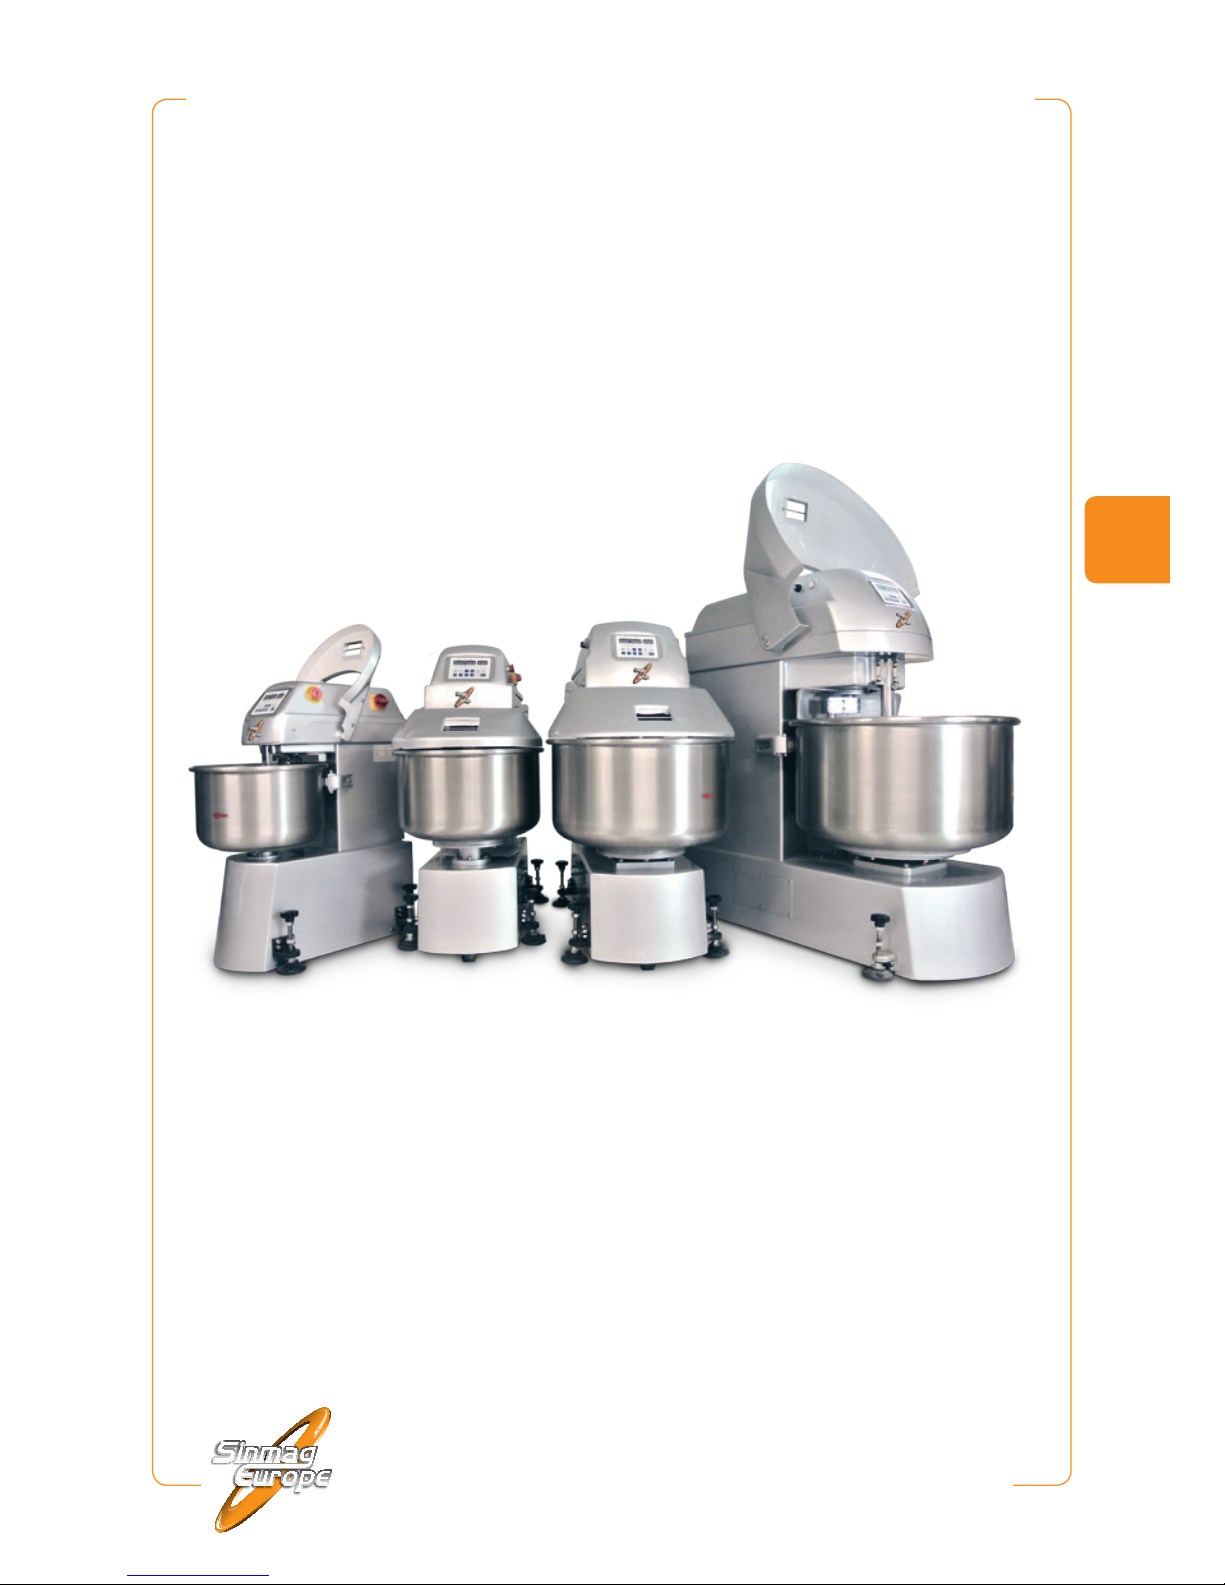
Spiral mixer
.
Pétrin à spirale. Spiraalkneder
Spiralkneter
.
Amasadora. Impastatrice
KM-25
.
KM-50T . KM-80T . KM-120T
Manual. Mode d’emploi. Handleiding. Handbuch. Manuale
IT
Page 52

Congratulazioni per l’acquisto di questa impastatrice a spirale.
Questa macchina è stata controllata a fondo al ne di
garantirVi la consegna di una macchina pronta all’installazione.
Per un funzionamento corretto e una lunga durata della
impastatrice, Vi raccomandiamo di leggere attentamente
queste istruzioni prima di metterla in funzione.
Sinmag Europe Vi ringrazia per la Vostra ducia e interesse e
Vi augura un buon lavoro con questa macchina.
Sinmag Europe Team.
IT
52
SINMAG EUROPE BVBA
Page 53
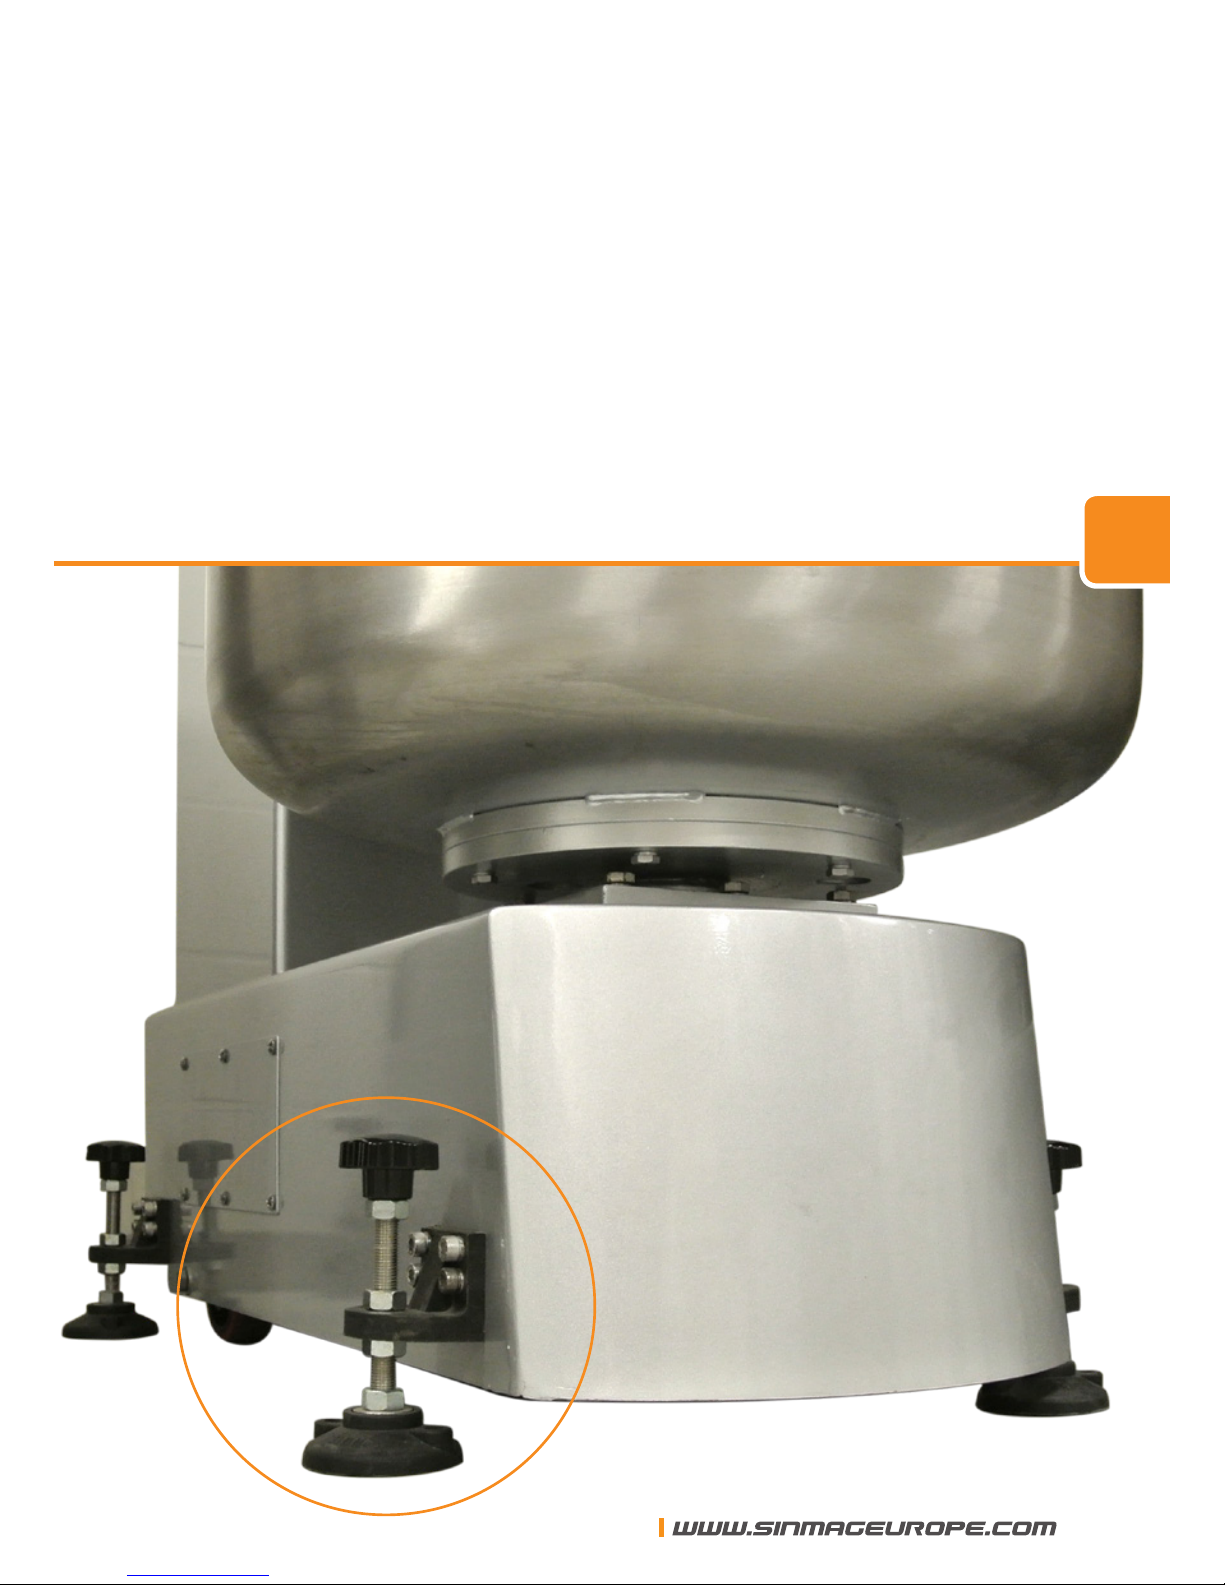
1. Installazione
La macchina è pronta per essere installata. Deve essere
installata su una supercie orizzontale e piatta. Adatti le viti
in modo tale che la macchina è posizionata solidamente
sulle quattro estremità.
IT
SINMAG EUROPE BVBA
53
Page 54
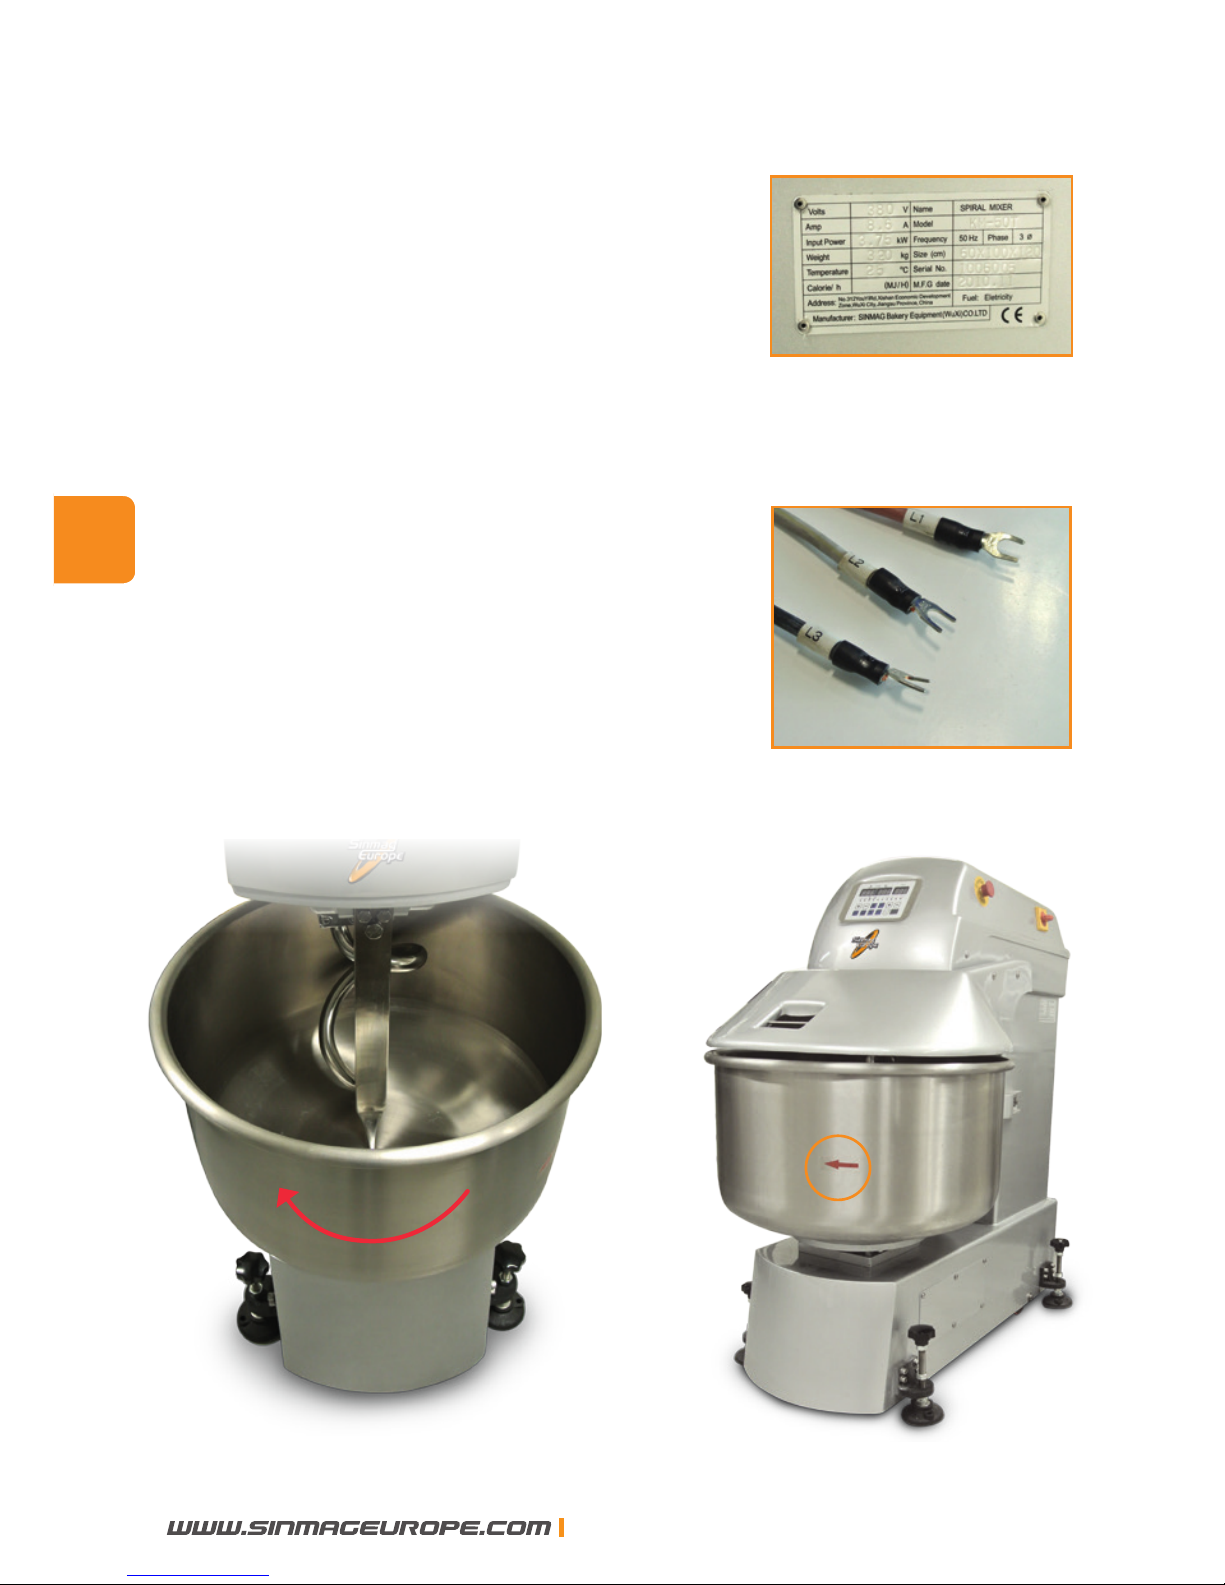
2. Fornitura d’elettricità
Provveda che la macchina abbia la fornitura
d’elettricità corretta, prima di controllare la
direzione della spirale e della vasca. Vista da
sopra, la spirale cosí come la vasca, devono
girare nella direzione delle lancette dell’orologio. La freccia indica la direzione di rotazione
della vasca.
Se la direzione di rotazione è scorretta, bisogna
scambiare i due cavi elettrici di fase per
invertire la direzione di rotazione.
IT
54
SINMAG EUROPE BVBA
Page 55
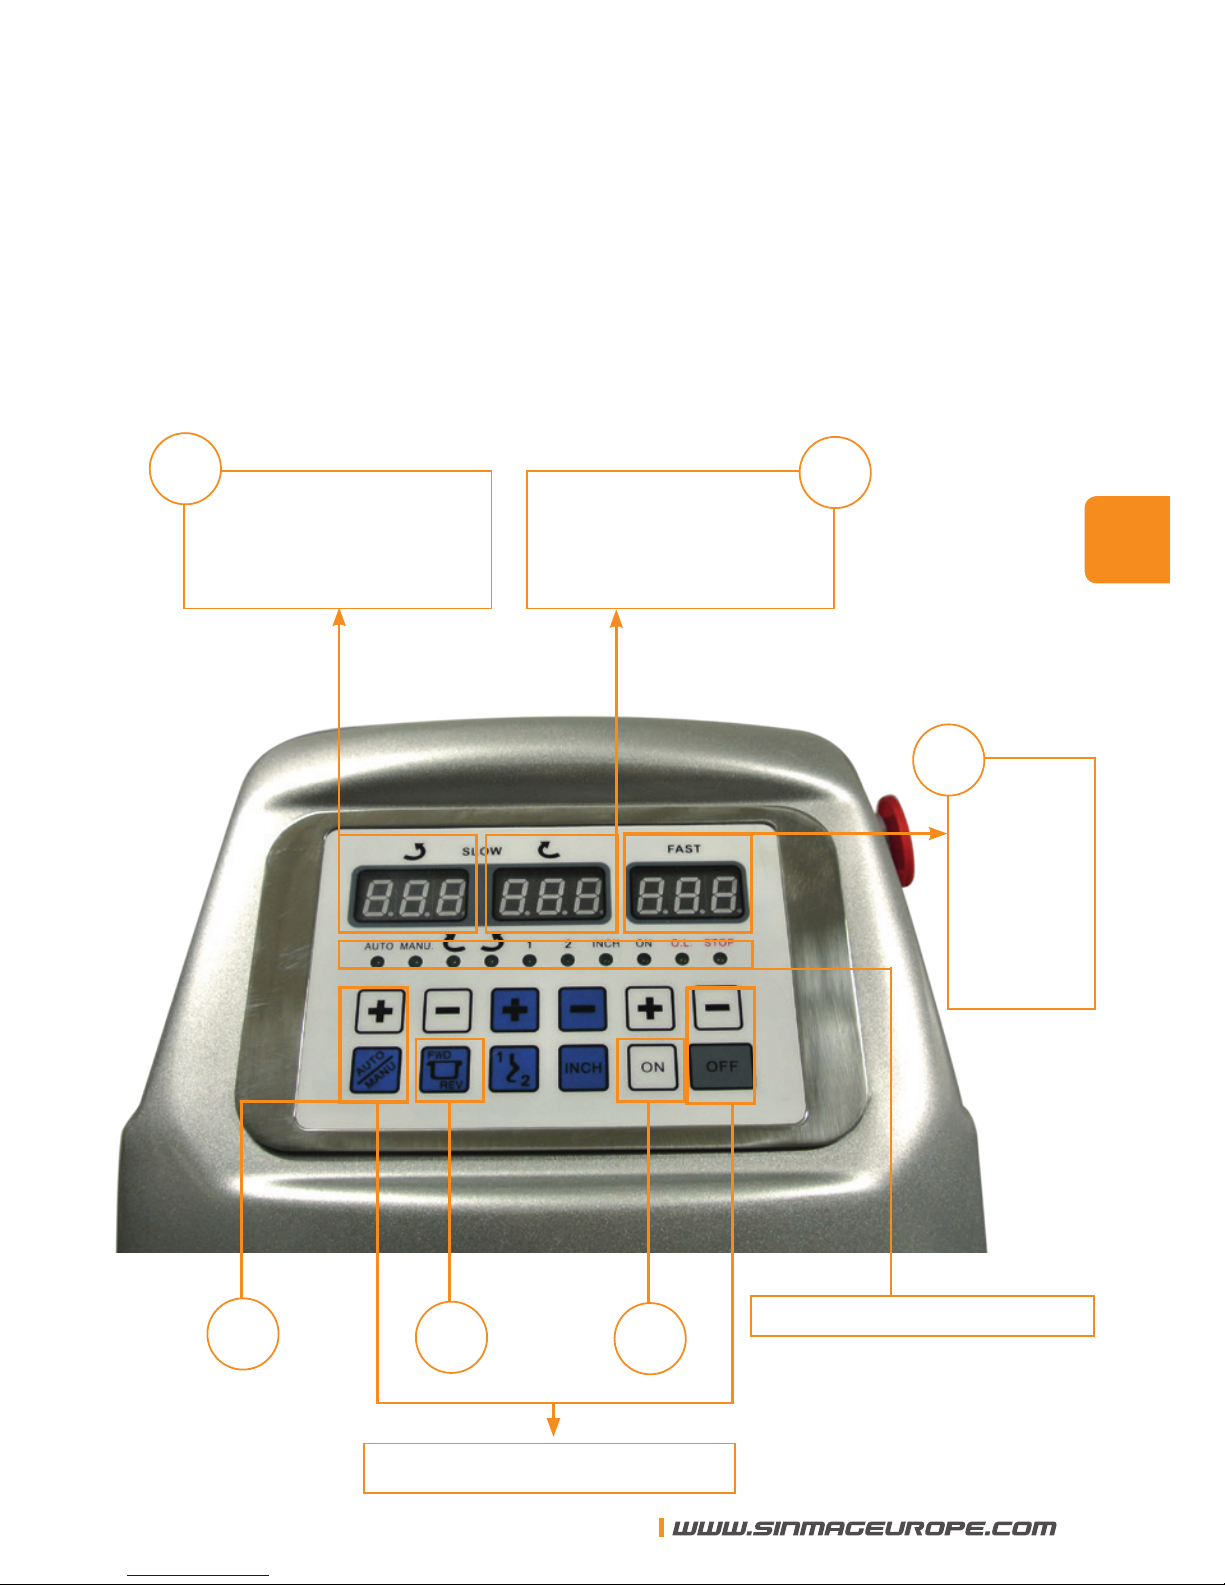
3. Pannello di comando
Temporizzatore I per la
direzione inversa
Temporizzatore II
per la prima velocità
A
B
Tempo-
rizzatore
III per la
seconda
velocità
Tasti di funzione
F
E
D
spia di segnalazione
C
IT
SINMAG EUROPE BVBA
55
Page 56
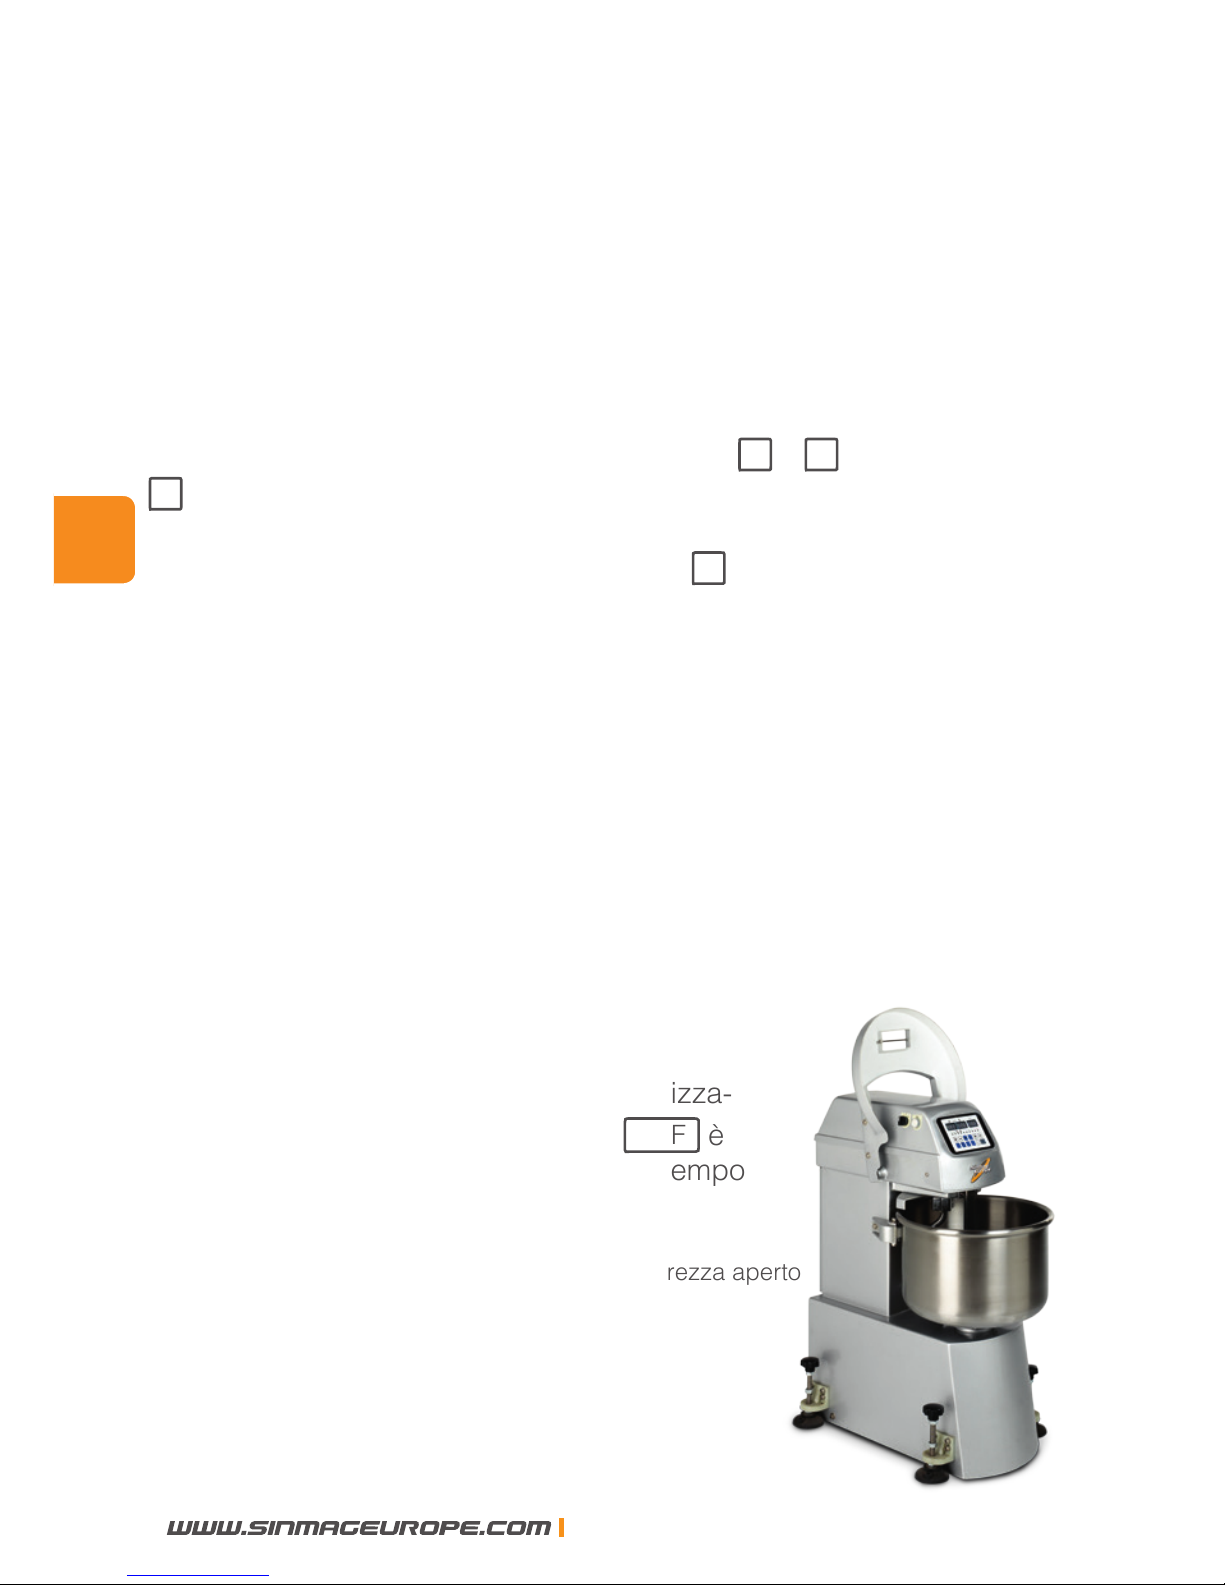
Coperchio di sicurezza aperto
4. Uso dell’impastatrice con il pannello di comando
4.1 Descrizione
4.1.1 Temporizzatori
In testa al pannello, c’è il temporizzatore I per la direzione inversa, il
temporizzatore II per la prima velocità ed il temporizzatore III per la
seconda velocità. I tre temporizzatori indicano il tempo in minuti.
I temporizzatori sono programmati con i tasti + e -. Se preme il tasto
+
una volta, il tempo salirà di dieci secondi. Il tempo massimo che
può essere programmato è 20 minuti. Dopo 20 minuti, il temporizzatore ricomincerà da 0 minuti. Prema il tasto - per diminuire il tempo di
10 secondi.
Quando l’impastatrice è accesa, i temporizzatori indicheranno il tempo
programmato. Quando il temporizzatore comincia a lavorare, il tempo
diminuirà di dieci secondi alla volta, no a quando il temporizzatore
raggiunge 0.
Quando il coperchio di sicurezza è alzato durante l’operazione automatica “AUTOMATIC”, il temporizzatore si fermerà alla posizione dov’è
arrivato. Quando l’impastatrice ricomincia a lavorare, il temporizzatore
riprenderà il suo lavoro da questa posizione
no a quando arriva alla ne del te mpo programmato.
Durante l’operazione manuale, il temporizza-
tore non funzionerà. Quando il tasto
OFF
è
premuto, i temporizzatori torneranno al tempo
programmato.
IT
56
SINMAG EUROPE BVBA
Page 57

4.1.2 Le spie di segnalazione
Queste spie indicano il modo in cui l’impastatrice sta
funzionando:
A. Operazione “AUTO / MANUAL”: Quando la spia AUTO è illuminata,
la macchina è nell’operazione automatica. Quando la spia MANU è
illuminata, la macchina è nell’ operazione manuale.
B. Direzione della vasca: Quando la spia è illuminata, la vasca
gira in avanti. Quando la spia è lluminata, la vasca gira
inversamente.
C. Velocità: Quando la spia “I” è illuminata, la macchina sta
funzionando a velocità bassa. Quando la spia “II” è illuminata, la
macchina sta funzionando a velocità alta.
D. La spia
INCH
mostra l’operazione “passo a passo” e serve a
togliere la pasta della vasca. Quando né la spia
INCH
, né la spia
ON sono illuminate, la macchina è in posizione
STOP
.
E. La spia
ON
si illumina quando la macchina sta funzionando.
F. La spia
STOP
si illumina solamente quando il coperchio di
sicurezza è alzato mentre la macchina sta funzionando.
G. O.L. (Over Load): Questa spia si illumina quando l’interruttore
di sovraccarico entra in funzione. Provare a capire la causa del
guasto (una mancanza di voltaggio, sovraccarico dell’impastatrice
o un collegamento di un cavo che si è scollegato). Dopo
l’eliminazione del guasto la spia si spegnerà.
IT
SINMAG EUROPE BVBA
57
Page 58
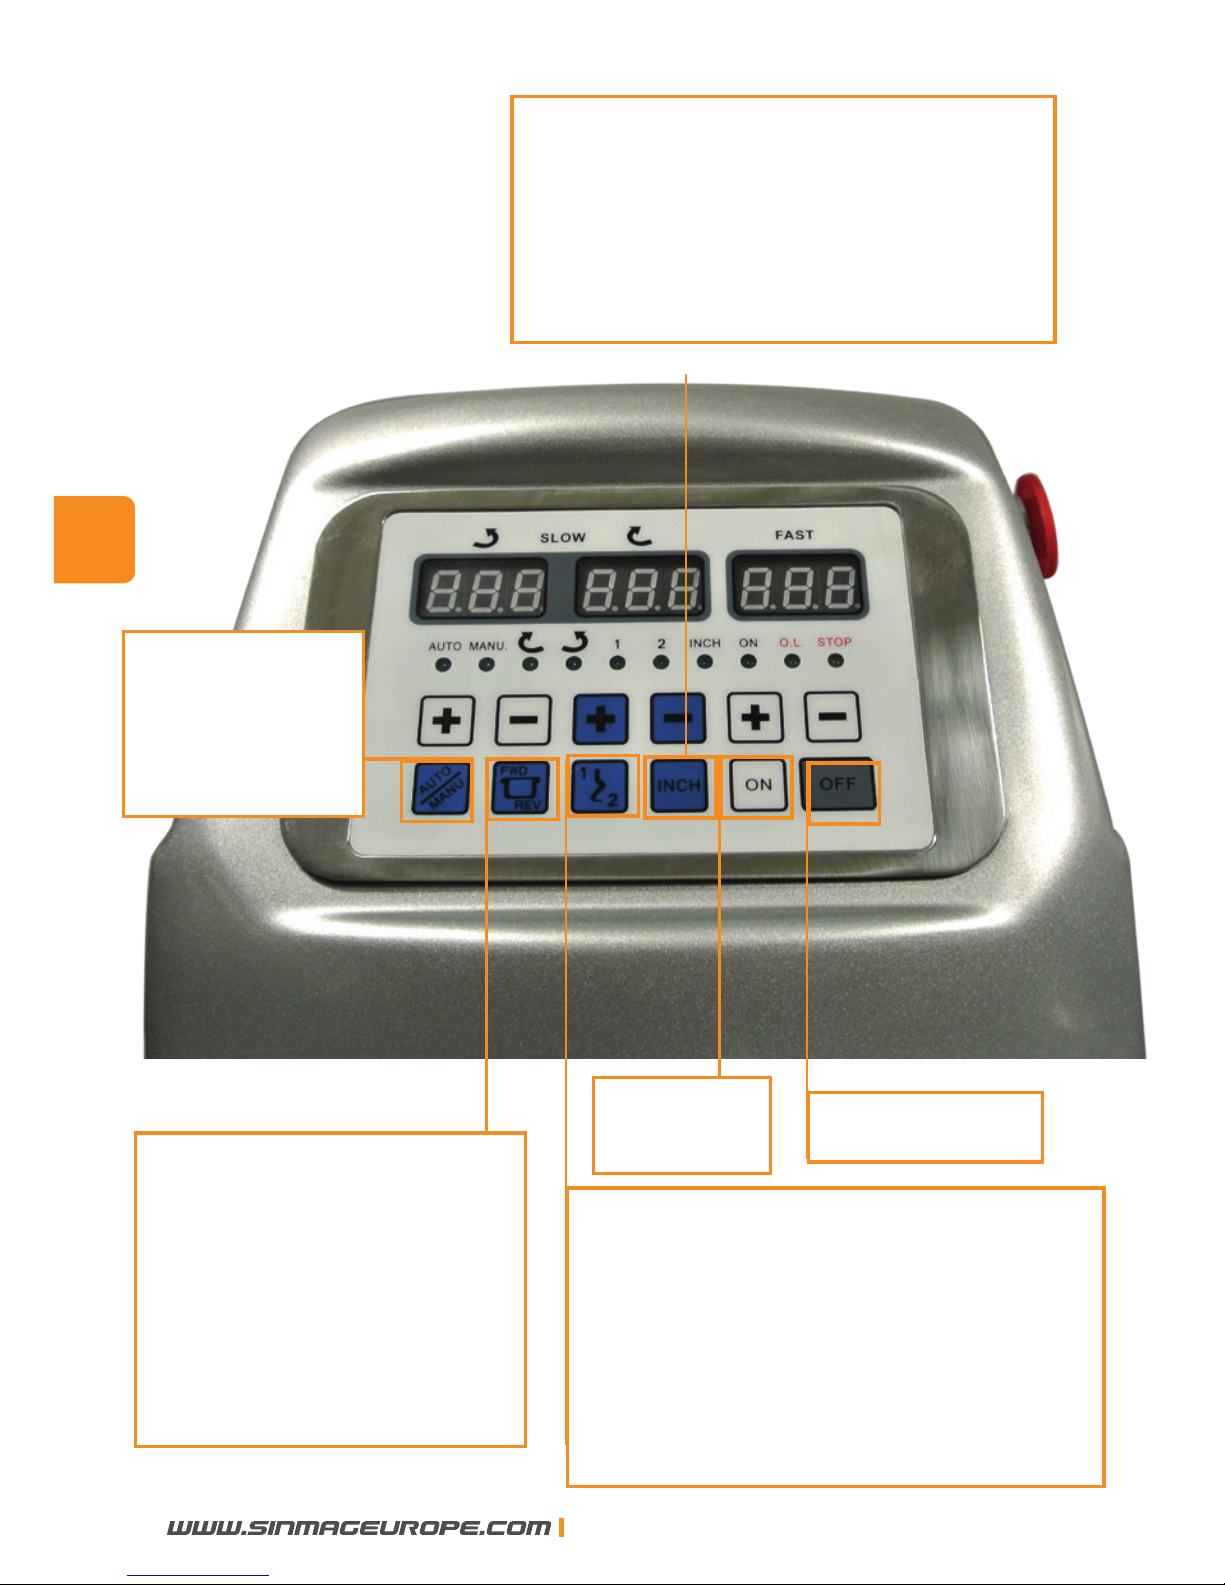
4.1.3 Tasti di funzione
`
Tasto per la
selezione dell’
operazione
AUTO/MANUAL
Tasto per la selezione
della direzione di rotazi-
one vasca (Forward - 0 Reverse ). Vista da sopra,
la spirale dovrebbe girare
nella direzone delle
lancette dell’orologio.
Tasto per la selezione del senso di
rotazione della vasca (avanti FOR-
WARD – 0 – inverso REVERSE).
Quando la macchina sta
funzionando in “F”, la vasca deve
girare nello stesso senso della
freccia sulla vasca.
Tasto per la selezione dell’
operazione”passo a passo”:
quando preme questo tasto, sola-
mente la vasca girerà. Questo tasto
serve ad avanzare la pasta,
cosicché può essere tolta.
Tasto di
accensione
Tasto di stop
IT
58
SINMAG EUROPE BVBA
Page 59

4.2 Operazione automatica
A. Prema i tasti + e - sotto il temporizzatore I per programmare il
tempo desiderato per la direzione inversa.
B. Prema i tasti + e - sotto il temporizzatore II per programmare il
tempo desiderato per la prima velocità.
C. Prema i tasti + e - sotto il temporizzatore III per programmare il
tempo desiderato per la seconda velocità.
D. Prema il tasto “AUTO/MANU” nché la spia AUTO si illumina.
E. Prema il tasto
F
R
nché la spia si illumina.
F. Prema il tasto
ON
per accendere la macchina.
Dopo che ha terminato la procedura menzionata sopra, la macchina
si avvierà. Funzionerà nel senso inverso no a quando il temporizzatore ‘I’ arriva a 0. Poi, la macchina funzionerà in prima velocità nché il
temporizzatore ‘II’ arriva a 0. Finalmente, funzionerà in seconda velocità per terminare il tempo programmato sul temporizzatore ‘III’. Poi, la
macchina si fermerà automaticamente.
Durante l’operazione automatica (AUTOMATIC), la macchina si fermerà quando il coperchio di sicurezza è alzato. Il temporizzatore si
fermerà nella posizione attuale. Continuerà in quella posizione per
nire il tempo restante quando il coperchio di sicurezza è sceso e si
preme il tasto
ON
.
Quando si preme il tasto
OFF
, il temporizzatore tornerà alla posizione
programmata e ricomincerà quando preme il tasto
ON
.
IT
SINMAG EUROPE BVBA
59
Page 60
4.3 Operazione
Prema il tasto AUTO / MANU nché la spia MANU s’illumina.
Prema i tasti e
F
R
per scegliere la velocità e la direzione della
vasca desiderata.
Prema il tasto
ON
per accendere la macchina.
Prema il tasto
OFF
quando vuole fermare l’operazione.
Il temporizzatore non funzionerà durante l’operazione manuale.
La direzione della vasca non può essere invertita mentre la macchina
funziona in seconda velocità.
L’impastatrice comincerà sempre a lavorare a bassa velocità, perno se ha scelto “II” per cominciare. Quando l’impastatrice funziona a
bassa velocità, può poi premere per fare funzionare l’impastatrice
a velocità alta.
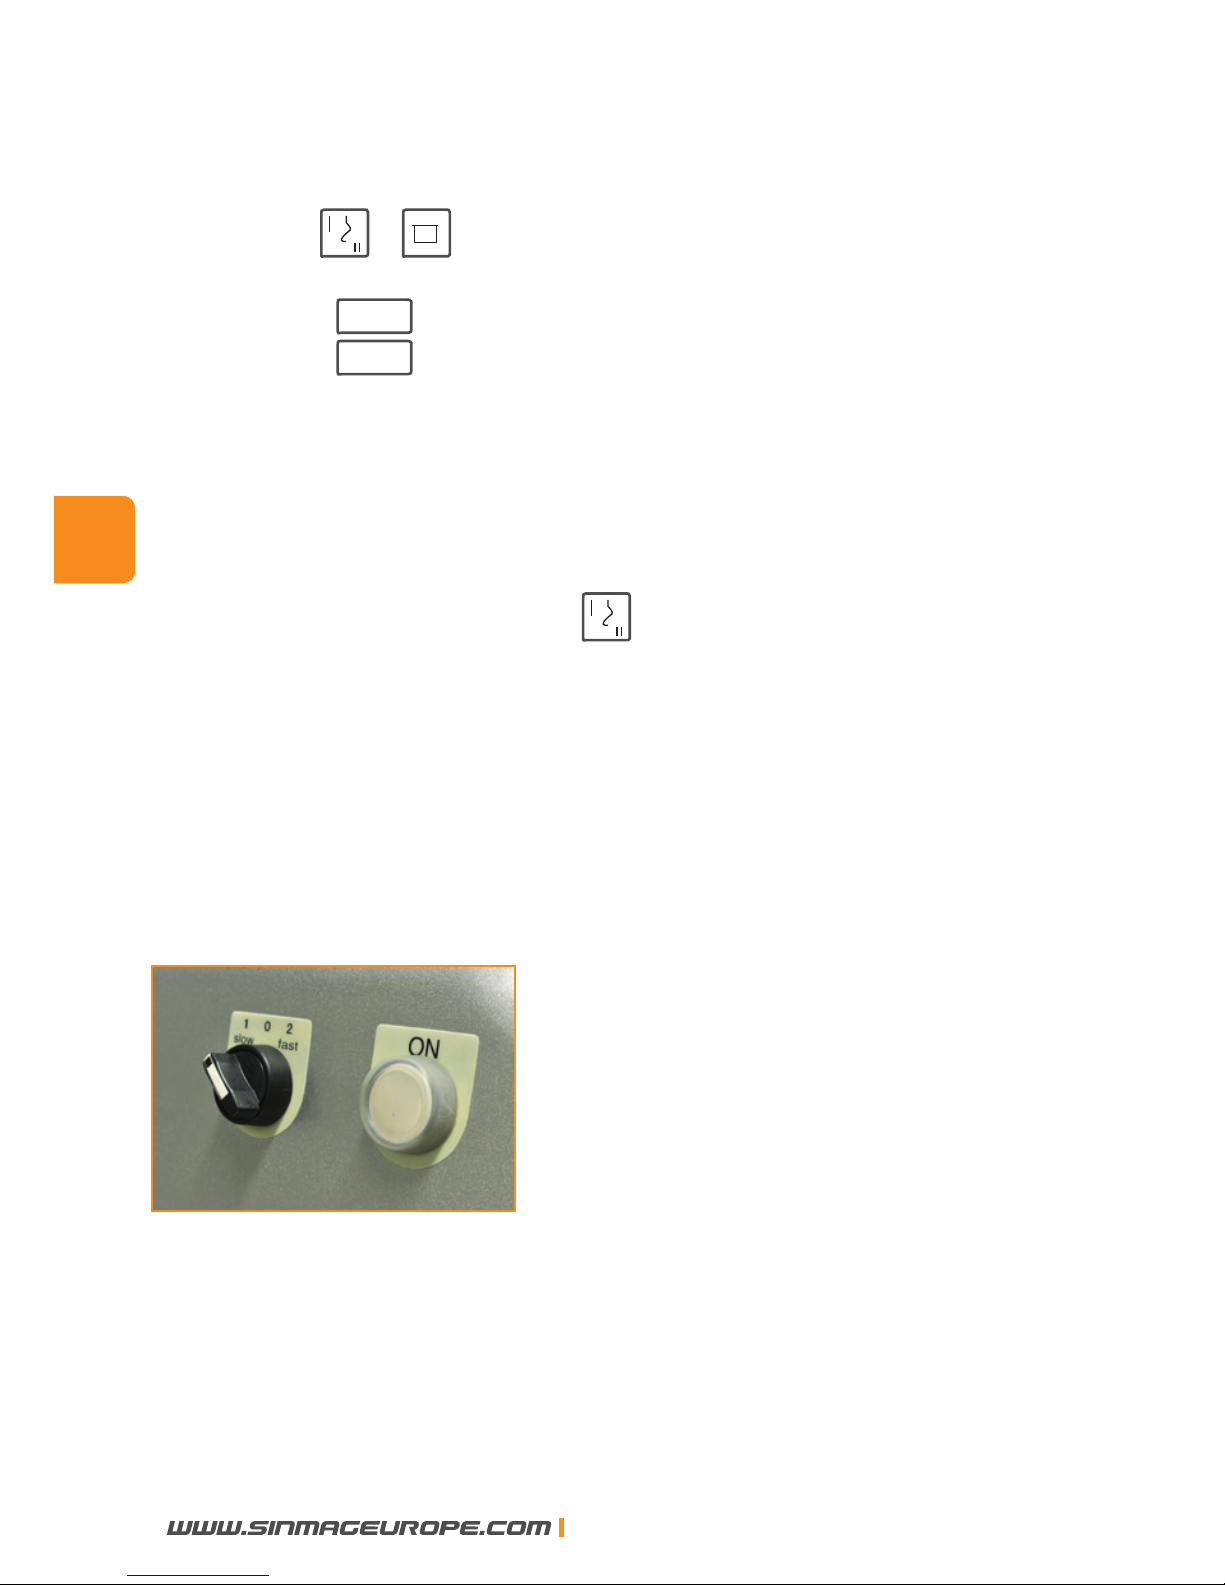
4.4 Interruttore manuale
Quando il pannello è danneggiato, l’impastatrice può funzionare con
l’interruttore che si trova a sinistra nella testa della macchina. Si può
selezionare la velocità bassa o alta manualmente senza il temporizzatore.
IT
60
SINMAG EUROPE BVBA
Page 61

SINMAG EUROPE ❙ BLANKENBERGSESTEENWEG 44A ❙ 8377 ZUIENKERKE - BELGIUM
 Loading...