

Page 1
SingNet BroadBand • mio Voice
Page 2

Contents
STEP 1: Equipment Check
STEP 2: Setting Up Your BroadBand Connection
STEP 4: Logging in to Your SingNet BroadBand
STEP 5: Connecting Wirelessly to SingNet BroadBand (Optional)
STEP 6: Setting Up Your mio Voice
Technical Support Contact Numbers
STEP 3: BroadBand Connection Settings for Fibre (Optional)
Page 3
3
Dear Customer, this guide has been prepared to help you to install SingNet BroadBand
(ADSL) service.
STEP 1: Equipment Check
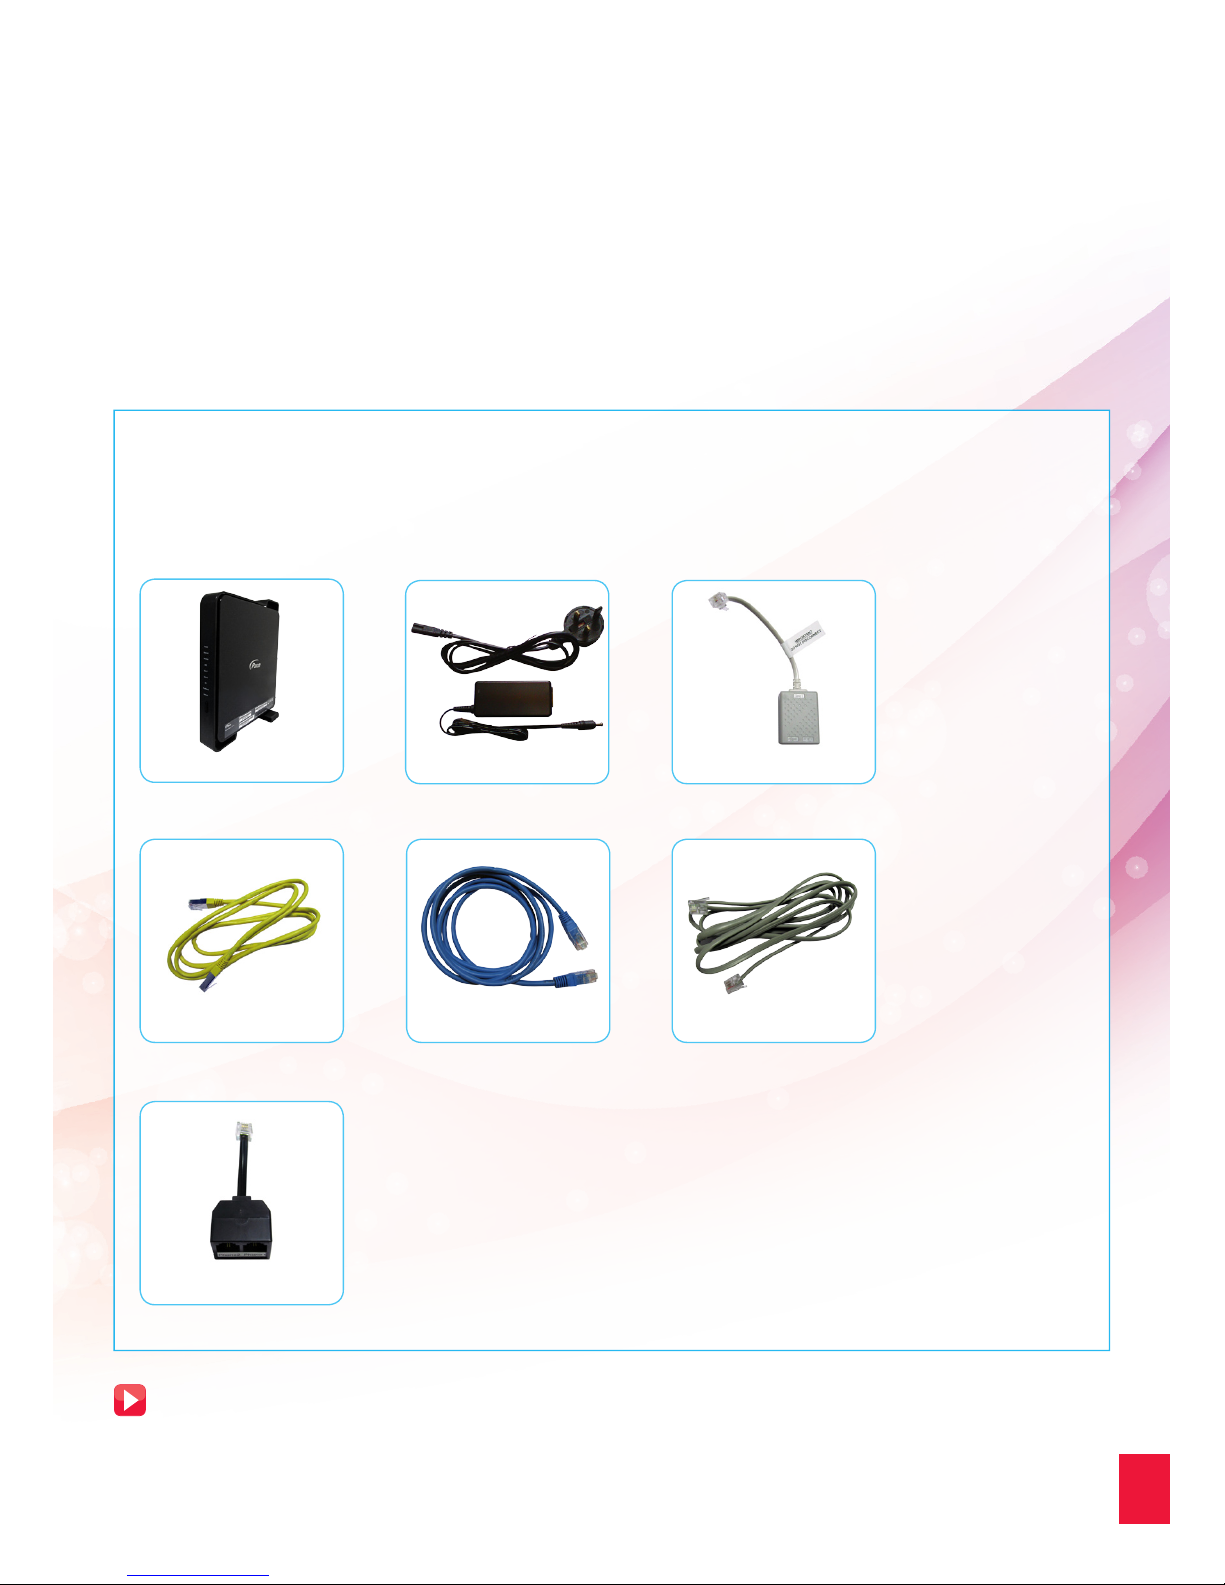
The following items are pre-packaged in your Residential Gateway.
Note: Existing SingNet BroadBand, mio Plan or mio Home subscribers should already have these items connected to their
Residential Gateway.
Please proceed to STEP 2
Residential Gateway
Ethernet Cable (RJ45)
FXS Splitter
DSL Microfilter
Ethernet Cable (Blue) Phone Cable (RJ11)
Power Adaptor
Page 4
STEP 2: Setting Up Your BroadBand Connection
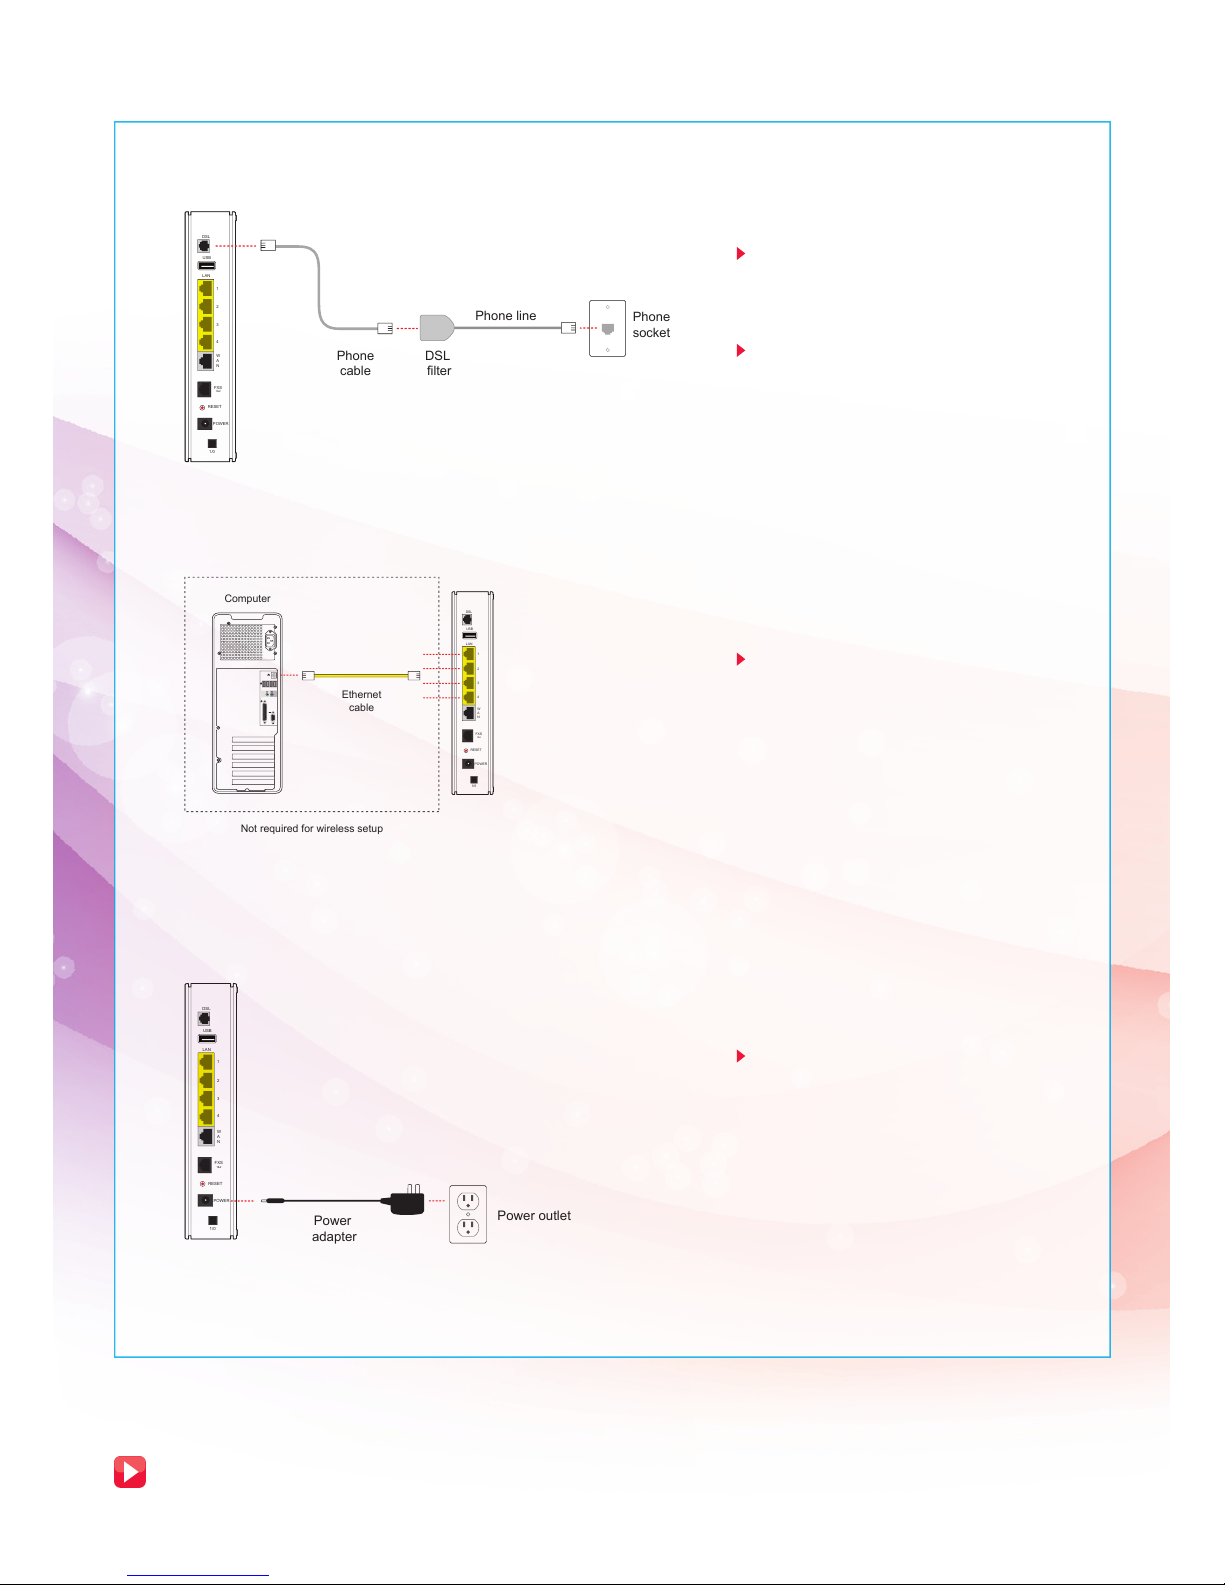
2.1. Connecting Residential Gateway to Telephone wall socket
2.2 Connecting Residential Gateway to PC
2.3 Connecting Residential Gateway to electrical outlet
Please proceed to STEP 4, if you are a SingNet BroadBand subscriber
STEP 6, if you are a mio Voice subscriber
Using the Telephone Cable (RJ11),
connect the Residential Gateway “DSL”
port to the DSL Microfilter‘s “DSL” port.
Insert the head of the DSL Microfilter
into your telephone wall socket.
Note: You can connect your telephone into the DSL
Microfilter’s “PHONE” port to use your fixed Phoneline.
Using an Ethernet Cable (RJ45),
connect to any of the available
Residential Gateway “LOCAL
ETHERNET” ports to your PC’s
“Ethernet” port.
Connect Power Adapter to your
Residential Gateway “POWER” port and
the nearest electrical outlet. Turn on
the power at the electrical outlet and
the Residential Gateway.
USB
LAN
1
2
3
4
W
A
N
DSL
FXS
1&2
RESET
POWER
1/0
Phone
socket
Phone
cable
DSL
filter
Phone line
USB
LAN
1
2
3
4
W
A
N
DSL
FXS
1&2
RESET
POWER
1/0
Ethernet
cable
Computer
Not required for wireless setup
Power outlet
Power
adapter
USB
LAN
1
2
3
4
W
A
N
DSL
FXS
1&2
RESET
POWER
1/0
Page 5
5
STEP 3: BroadBand Connection Settings for Fibre
(Optional)
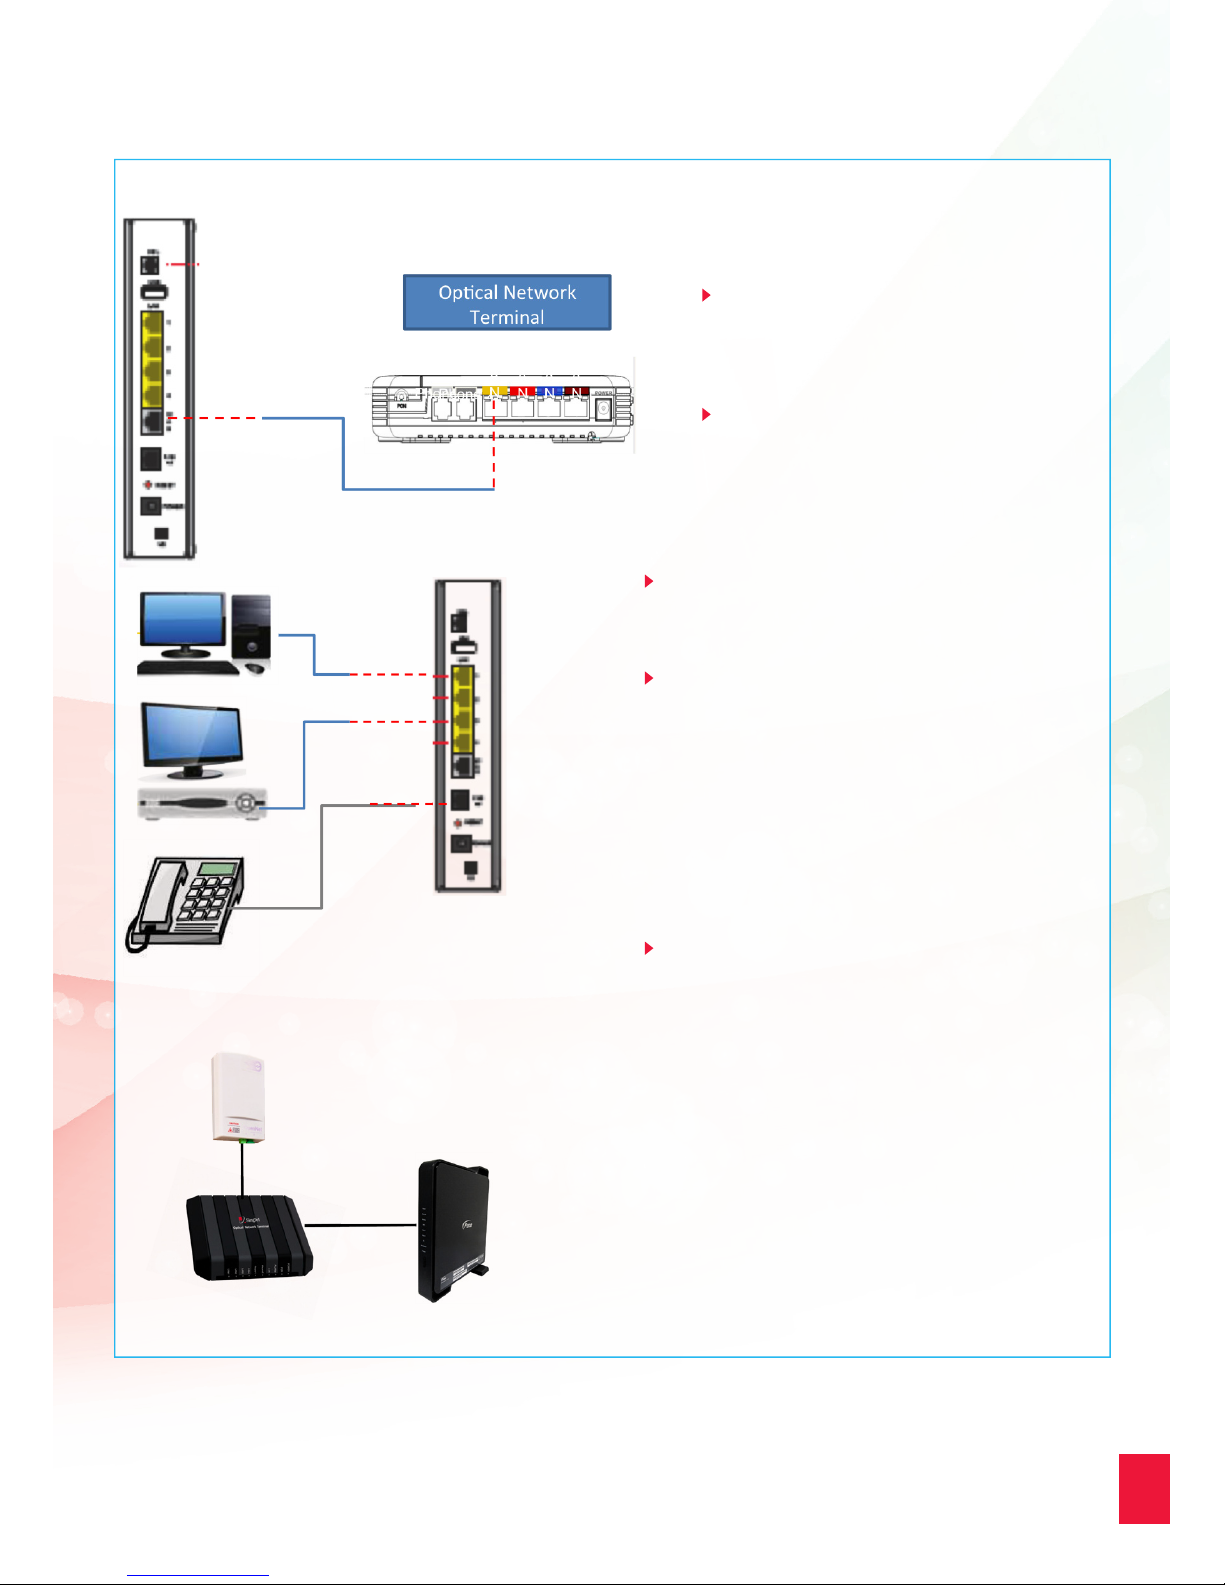
Connect the Residential Gateway
Broadband Port to the ONT LAN 1 Port
highlighted in Yellow using the Ethernet
Cable (RJ45).
Switch off the ONT Power before you do
the set up.
For mio TV Set Top Box, personal
computer or laptop, please connect it to
the Lan Port highlighted in Yellow.
For Mio Voice service, please connect
your phone using a Phone Cable (RJ11)
to the Residential Gateway Voice 1&2
Port.
Once Power is adapter is connected, follow the
power up sequence as below.
1. Power up the Optical Network Terminal (ONT).
Wait for POWER and PON LEDs to turn to
stable green light.
2. Power on the Residential Gateway. Wait
for POWER, ETHERNET, BROADBAND,
INTERNET, IPTV (If applicable) and Voice 1 (If
applicable) to turn to stable green light.
3. Power up your mio TV Set Top Box and your
computer.
Note: For exStream serivce, there is no need to key in user
ID and Password. All services credential will be auto push
down to your Residential Gateway.
Fibre TP
(installed by OpenNet)
Optical Network
Terminal
Residential Gateway (RG)
Page 6
Please confirm that you have the following item on hand before attempting this section:
SingNet BroadBand Service Letter – this contains your Username and Password which will be used for setting up
the SingNet BroadBand.
Congratulations! You can now use SingNet BroadBand!
STEP 4: Logging in to SingNet BroadBand
Please proceed to STEP 5, for Connecting Wirelessly to SingNet BroadBand (optional)
STEP 6, if you are a mio Voice subscriber
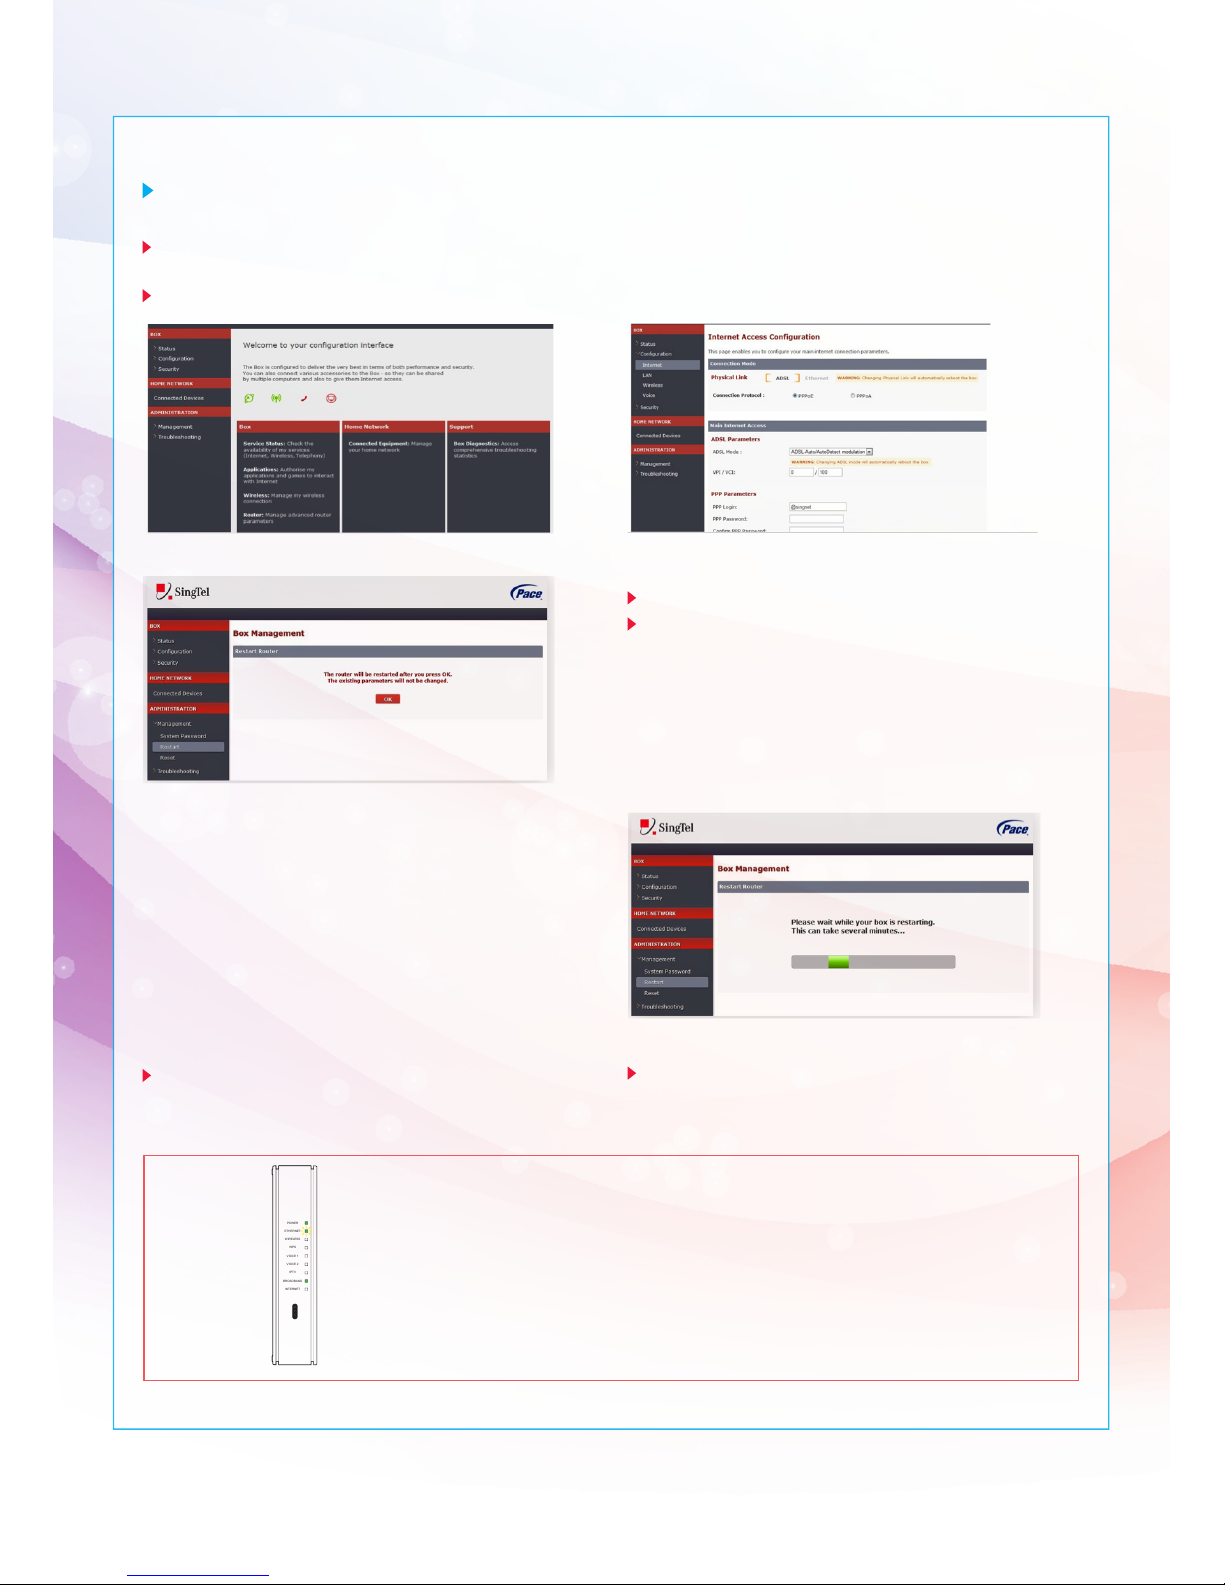
Open your web-browser (e.g. Internet Explorer) and type the URL http://app.singnet.com.sg or
http://192.168.1.254 for changing the WAN mode and configuring PPP.
Click on Internet under the Configuration tab.
Residential Gateway is rebooting. Hold on till
reboot completes & Residential Gateway comes
up. After reboot your Residential Gateway is ready
for use.
The Default WAN mode is Ethernet.
In order to change the WAN mode from Ethernet to
ADSL please follow the below steps:
a. Select ADSL in the physical link. PPPOE protocol will
be selected automatically
b. ADSL Modulation is selected by default- No need to
change it
INTERNET
BROADBAND
IPTV
VOICE 2
ETHERNET
WIRELESS
WPS
VOICE 1
POWER
W
P
S
LED Check:
Please wait for approximately 5 minutes.
The “POWER” and “BROADBAND” LEDs should now be stable GREEN (not blinking),
except the “ETHERNET” LED, it should be GREEN and blinking.
If not, please check connections in STEP 2.
Do NOT proceed to the next section until you have done so.
1. Residential Gateway home page
c. Type your UserID as stated in your Service Letter in
the “Username:” field
Note: The text behind @ maybe different. Please ensure that you have entered
the correct one as stated in your service letter before proceeding.
d. Type in your Default Login Password as stated in
your Service Letter in the “Password:” and “Confirm
Password:” fields
Note: If you have changed your default password, please use the current
password.
e. After setting PPP parameters, click OK to save.
After changing WAN mode from Ethernet to ADSL or
vice versa, Residential Gateway restarts.
2. Internet Access Configuration
3. Box Management
4. Box Management
5. LED
Status
Page 7
7
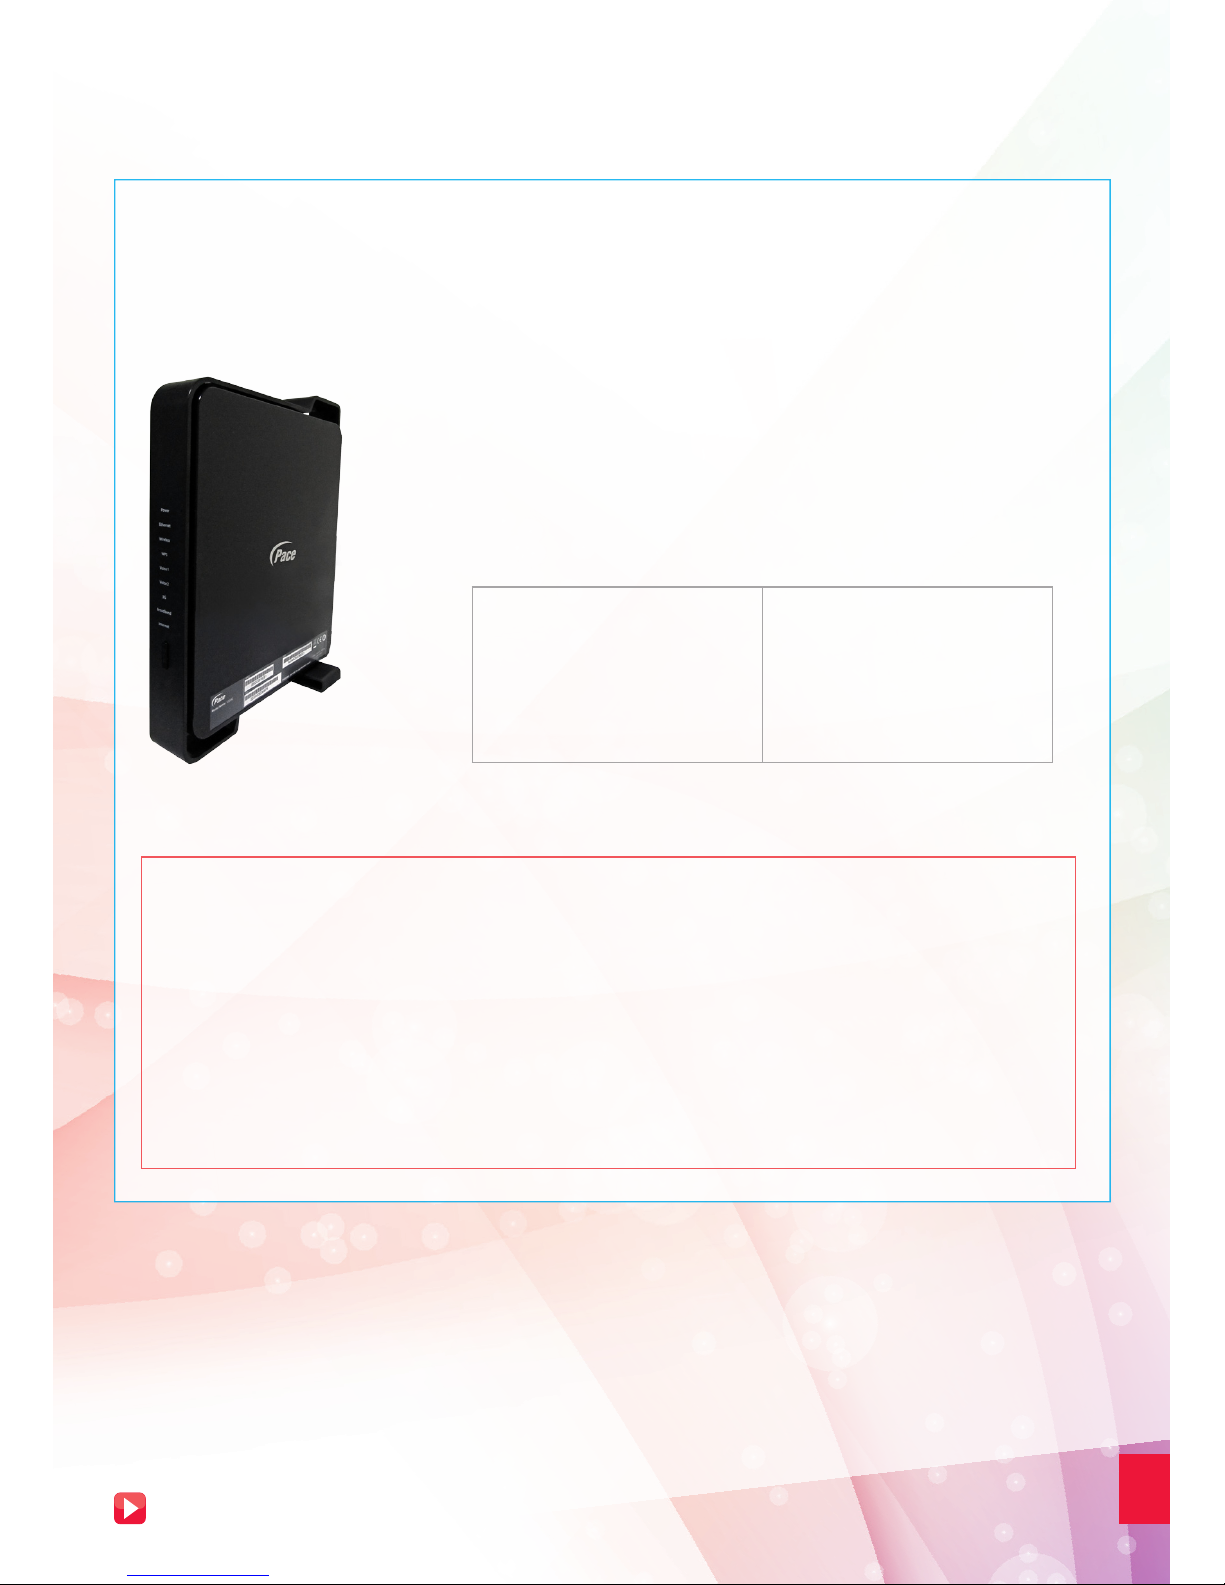
Section A: Your Network Name and Key
Please take note of two numerical codes which are your Network Name and Key with this diagram as a guide.
You may fill in these details on the box below for future references.
Note: The default wireless encryption option is WPA/WPA2.
IMPORTANT!
You will need a wireless adapter (wireless PC card or wireless USB adapter) or a wireless-enabled
Notebook before you can proceed to the next section.
Please refer to your operating system’s instructions:
Section B. if you are using Windows XP
Section C. if you are using Windows Vista
Section D. if you are using Windows 7
Section E. if you are using another wireless manager other than Windows
Network Name (SSID):
SINGTEL-_______________
Insert last 4 numbers of your Serial
Number (S/N) here.
Network Key:
_______________________
Write the 10 digit of Wireless Key here.
STEP 5: Connecting Wirelessly to SingNet BroadBand
(Optional)
Page 8
STEP 5: Connecting Wirelessly to SingNet BroadBand (Continued)
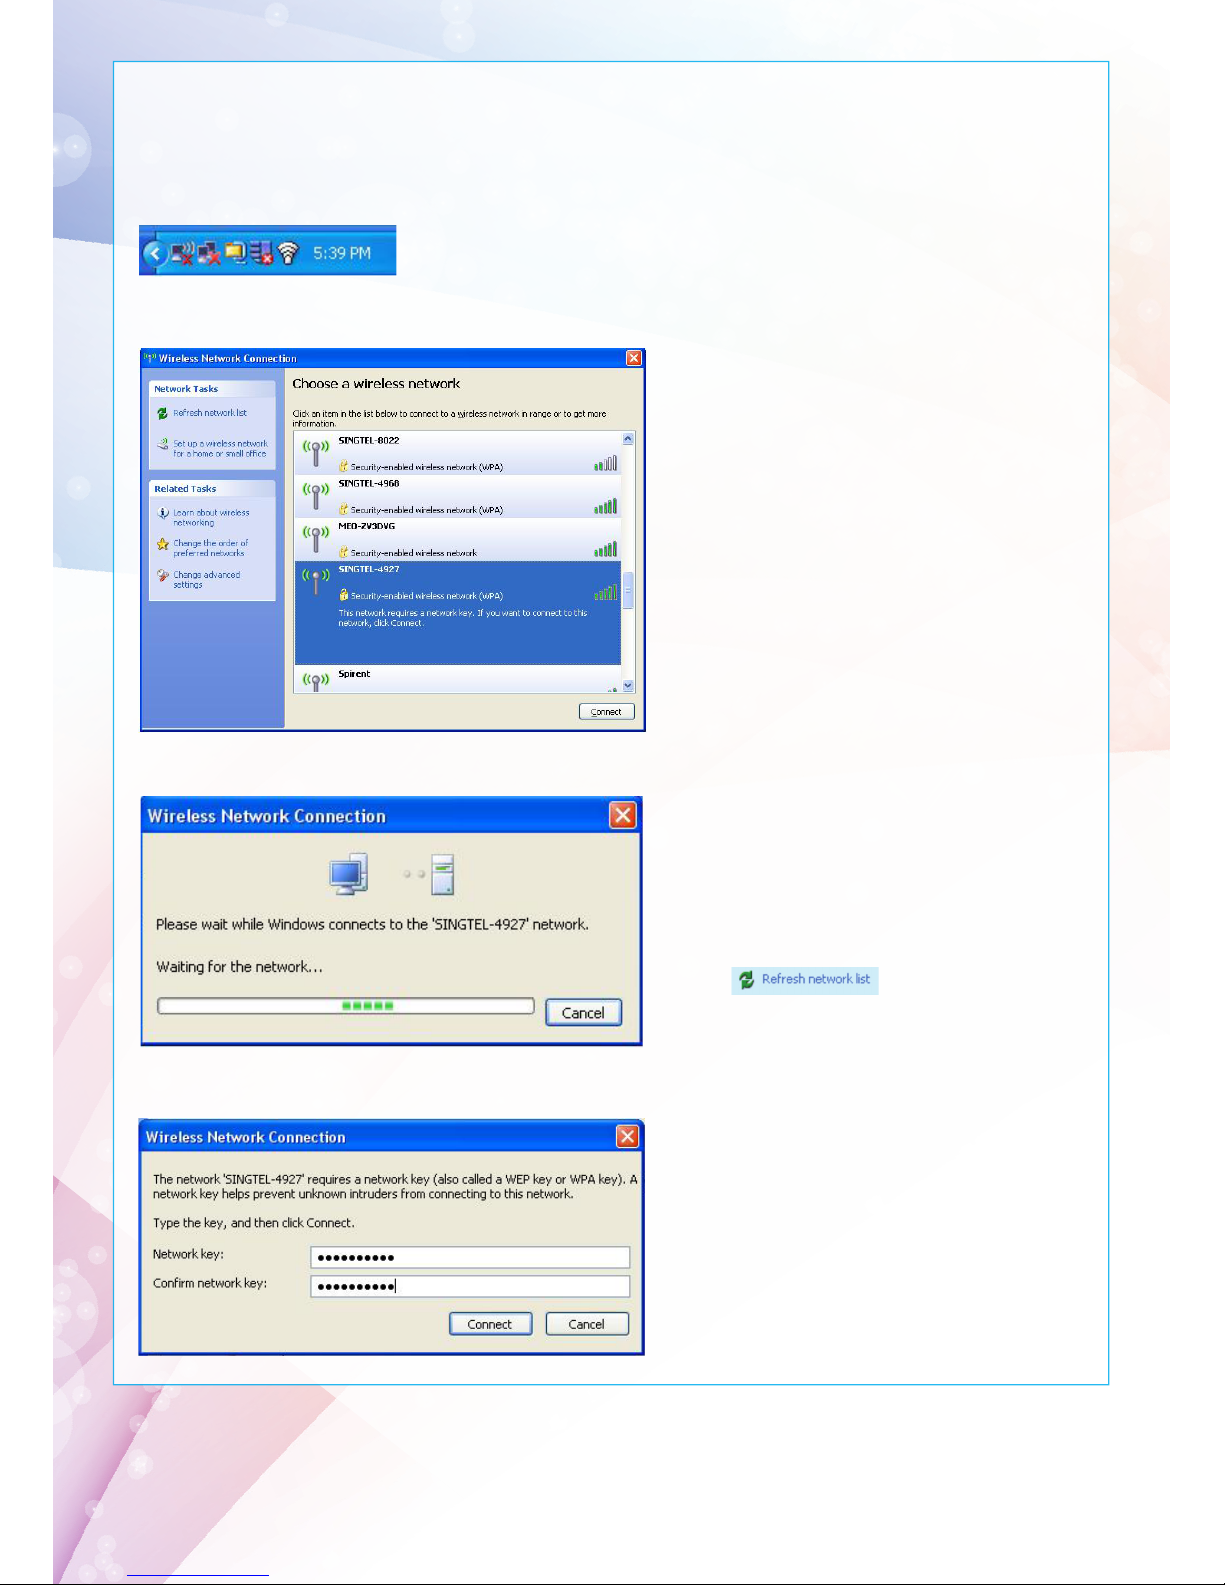
Section B: If you are using Windows XP
1
Double Click on the wireless icon on your taskbar.
2
You should see the wireless networks
available. If you are prompted to use
another wireless manager, please
refer to Section E.
3
Double click on the correct Network
Name of your wireless network (e.g.
SINGTEL-0110) and wait for the
network to be detected.
Note: Please refer to Section A if you are unsure of your
Network Name or try refreshing your Network list if you
do not see it.
4
Type the 10-Digit Network Key into
the “Network Key” and “Confirm
Network Key” fields. Click on the
“Connect” button to complete the
setup and wait for the network
address to be acquired.
Note: Please refer to Section A if you are unsure of
your Network Key.
Page 9
9
STEP 5: Connecting Wirelessly to SingNet BroadBand (Continued)
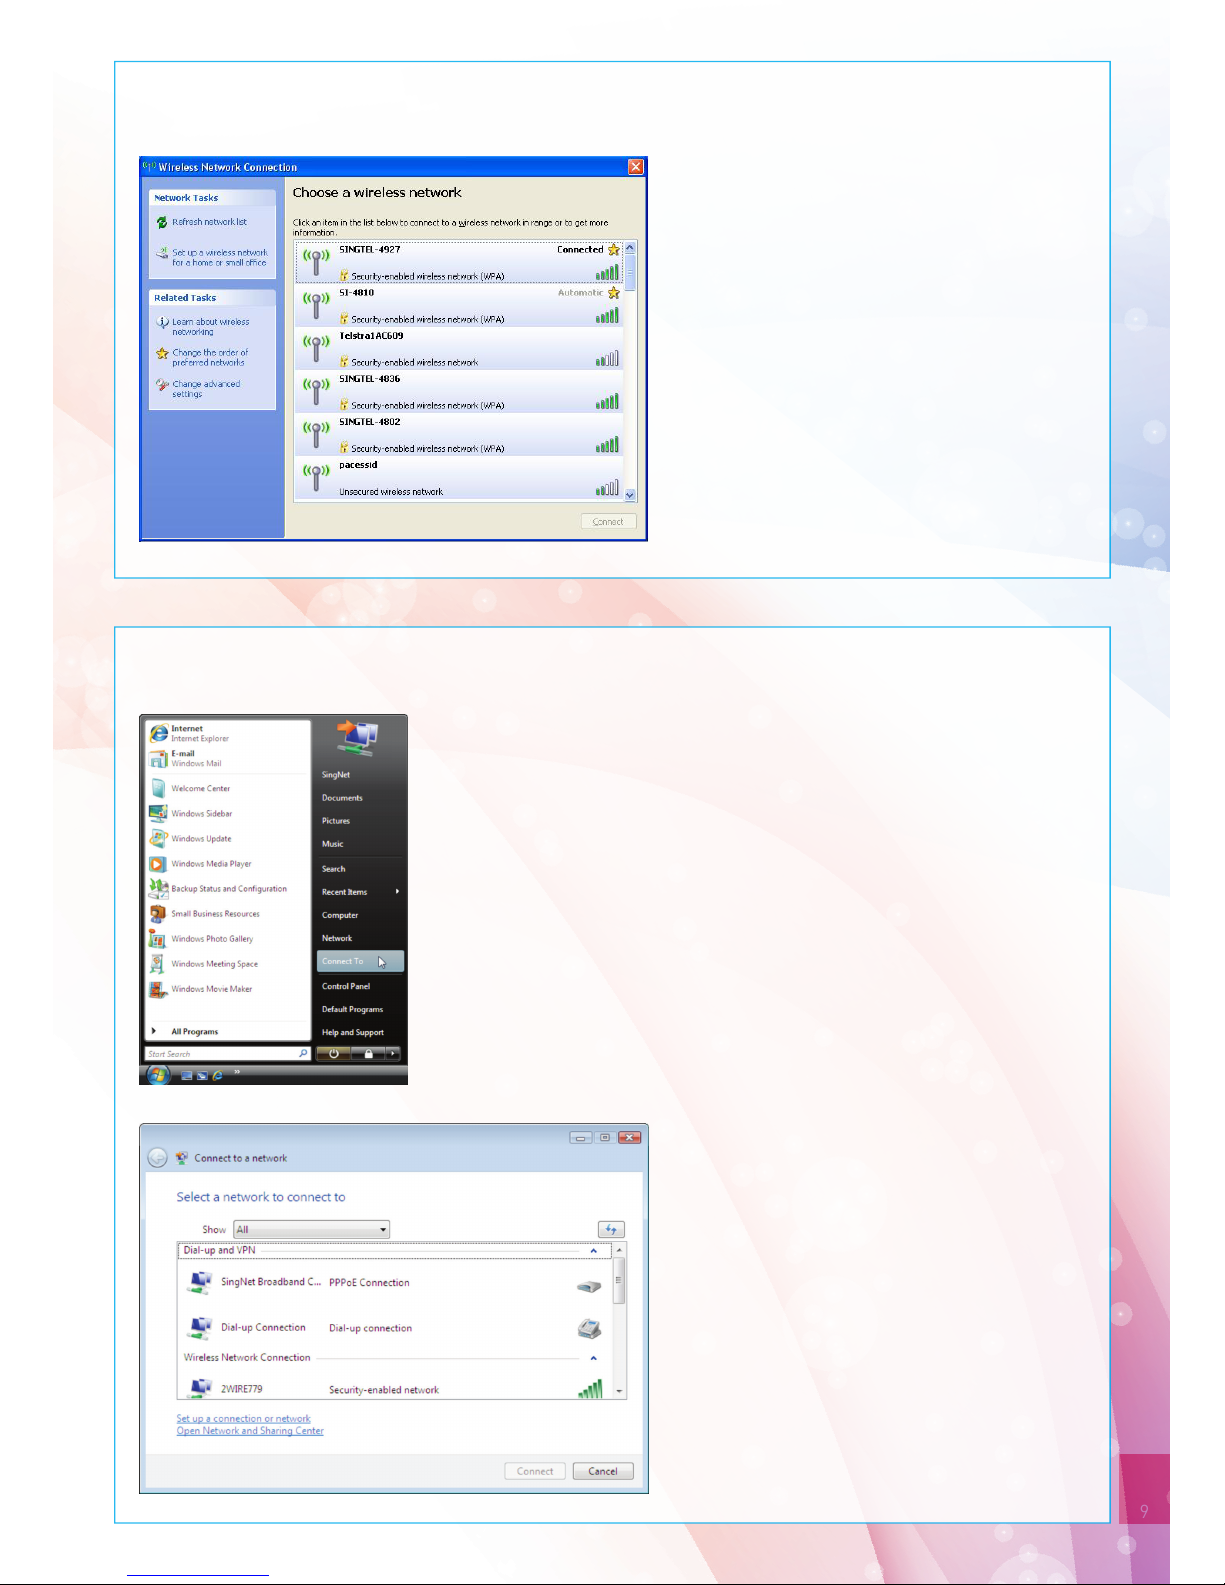
5
You will see the following screen if
you were successful.
Section C: If you are using Windows Vista
1
In Windows Vista, click on the Start button.
2
Click on Connect To
3
You will see the following screen.
Page 10
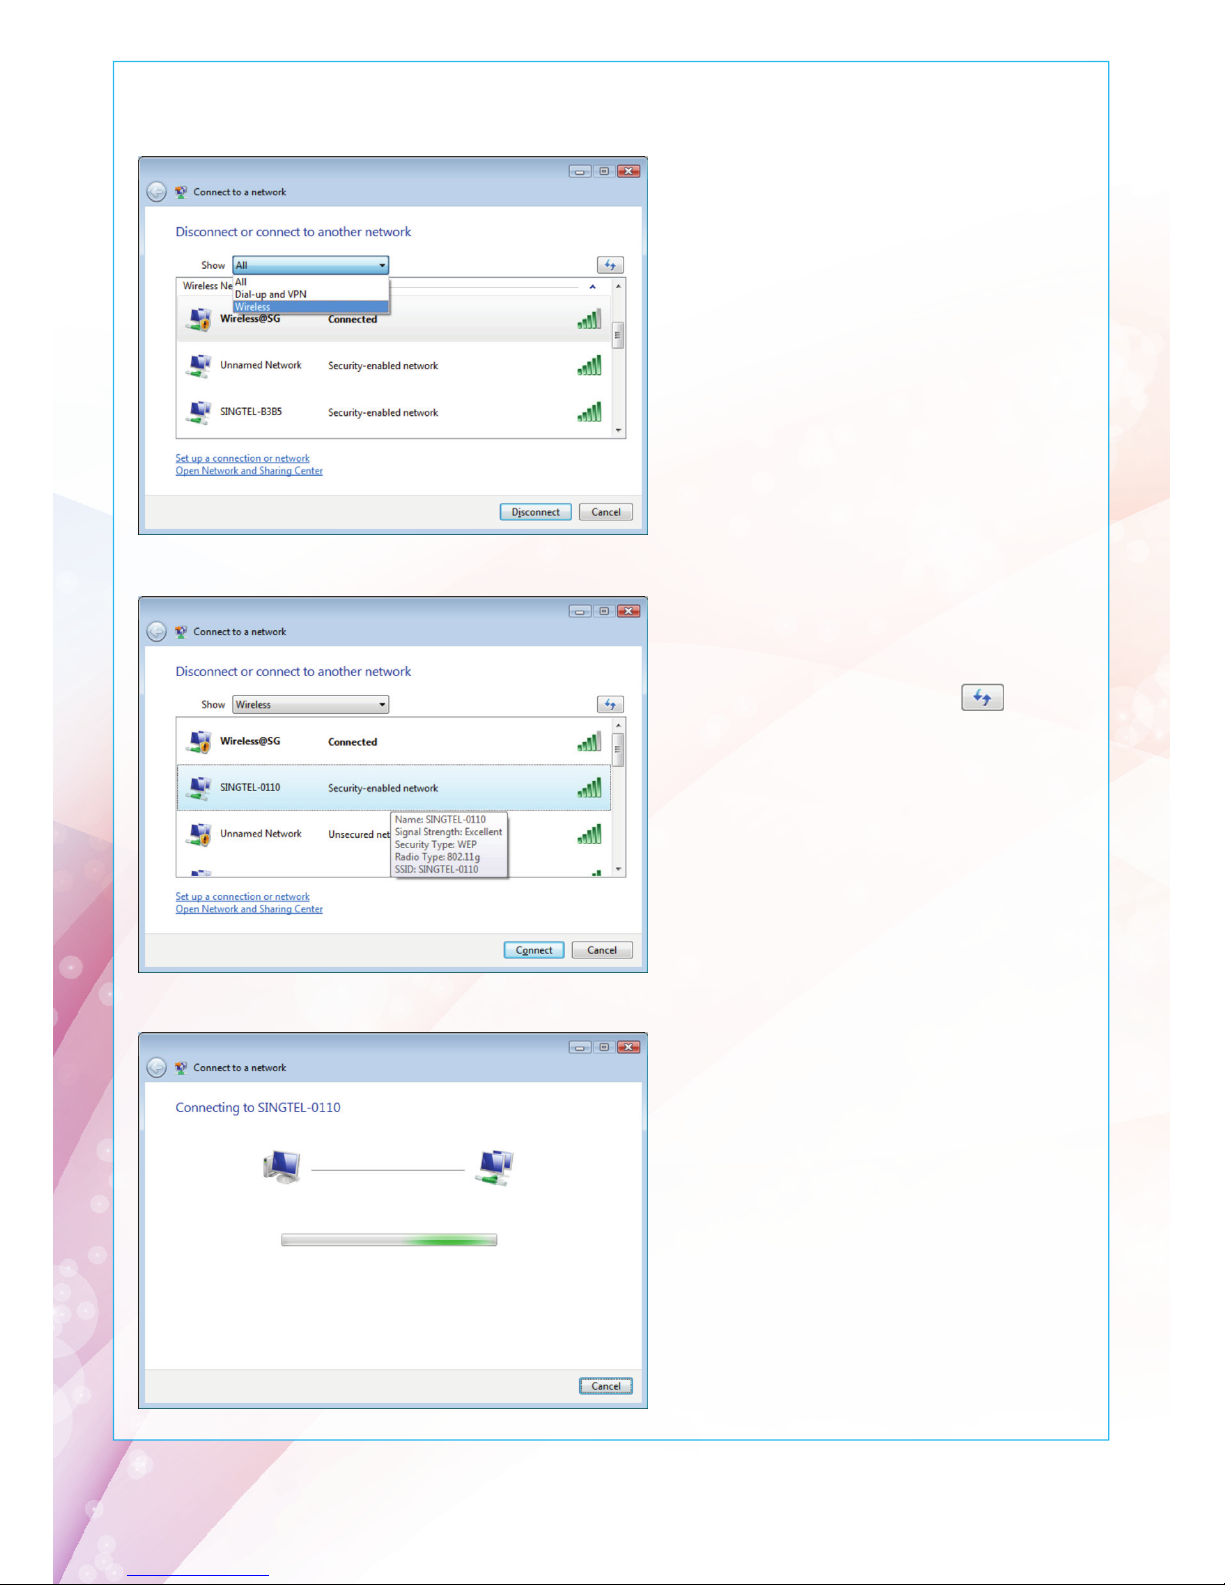
STEP 5: Connecting Wirelessly to SingNet BroadBand (Continued)
4
Under Show, select “Wireless”
5
Find the correct Network Name
of your wireless network (e.g.
SINGTEL-0110).
Note: Please refer to Section A if you
are unsure of your Network Name or try
refreshing your Network list if you do
not see it.
6
Click on the Connect button.
7
Please wait while your computer
tries to connect to the Residential
Gateway.
Page 11
11
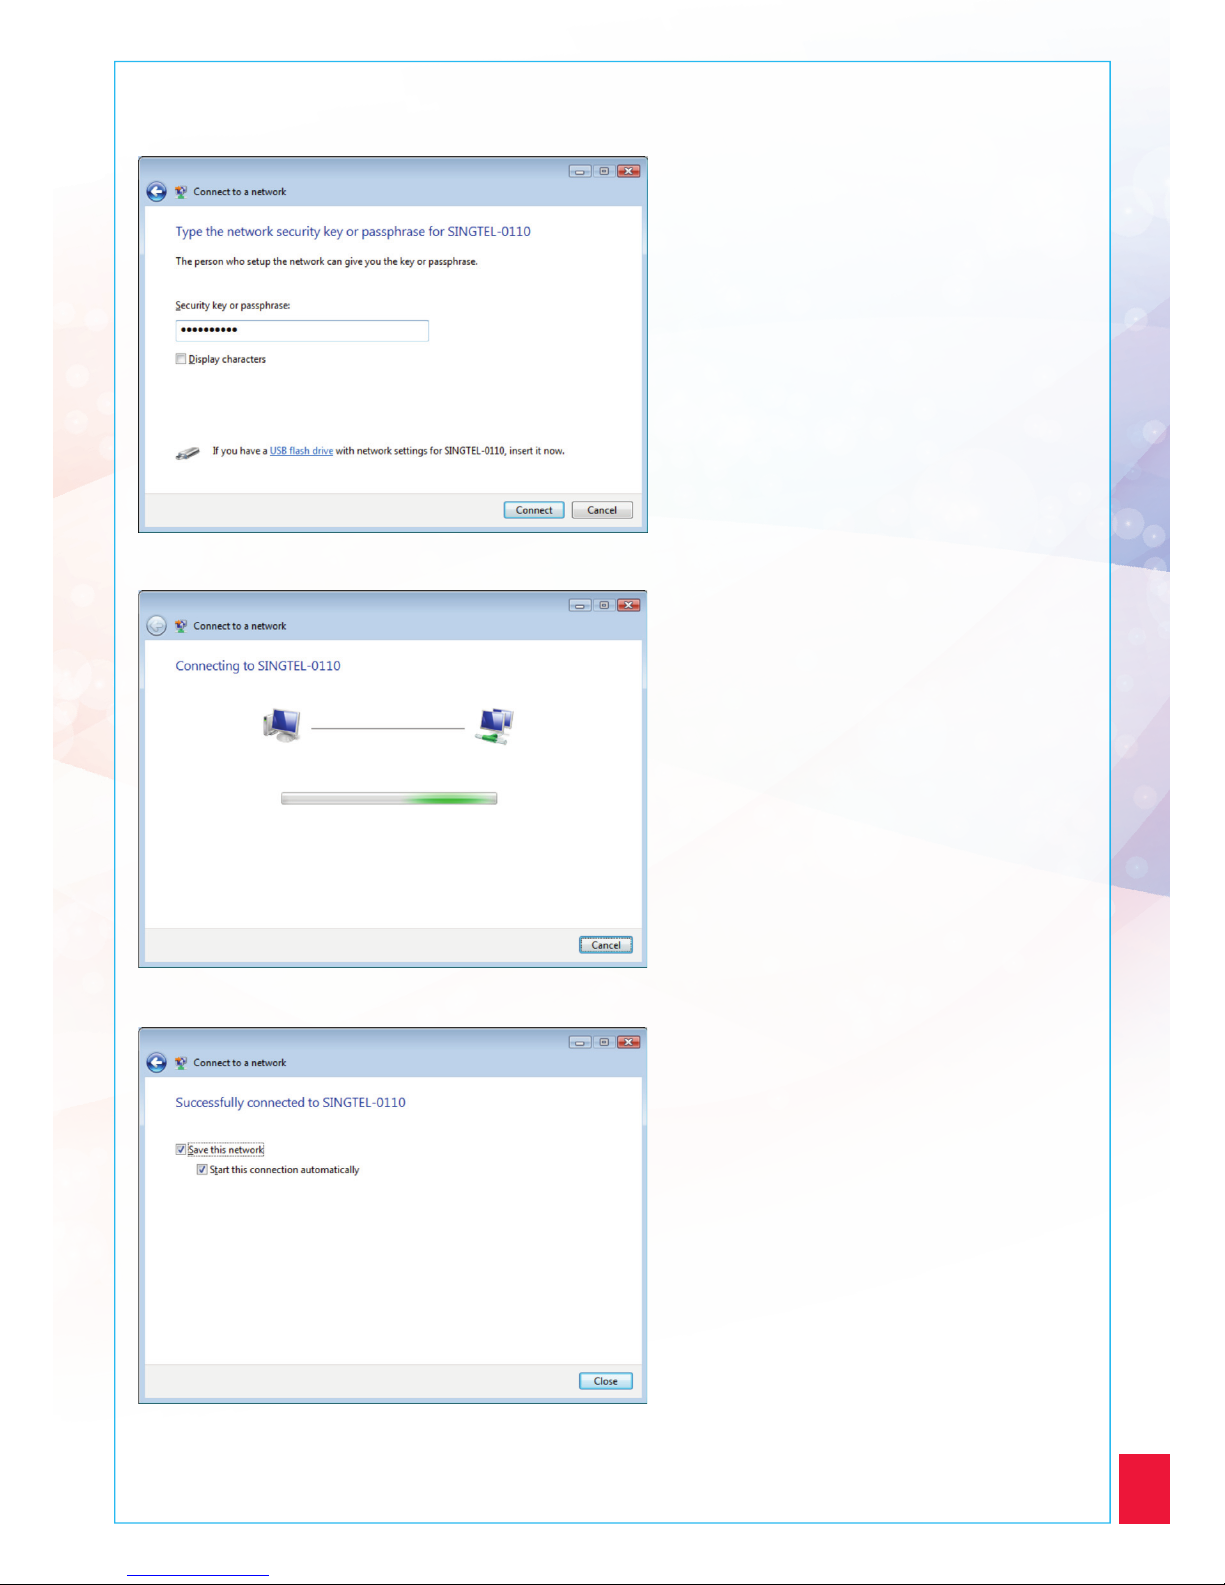
8
You will now be prompted to enter
your Network Key.
Note: You will see this when:
(i) You are connecting to the Residential Gateway for
the first time
(ii) You have unselected the option to save the Network
Key
9
Type in your Network Key in the
“Security key or passphrase” field.
Note: Please refer to Section A if you are unsure of
your Network Key.
10
Click on the Connect button.
STEP 5: Connecting Wirelessly to SingNet BroadBand (Continued)
11
Please wait while your computer
authenticates your wireless network.
12
Your wireless connection is
successfully configured when you see
this screen.
13
Make sure that “Save this network”
is selected.
Note: This option will save your Network Key. If you do
not enable this option, you will always be prompted to
enter the key.
14
Ensure that you have “Start this
connection automatically” selected.
Note: This option will connect your computer to the
Residential Gateway automatically. If you do not enable
this option, you will be required to connect to the
wireless network manually.
15
You have successfully configured
your wireless connection on Windows
Vista.
16
Click on “Close” to exit the window.
Page 12
STEP 5: Connecting Wirelessly to SingNet BroadBand (Continued)
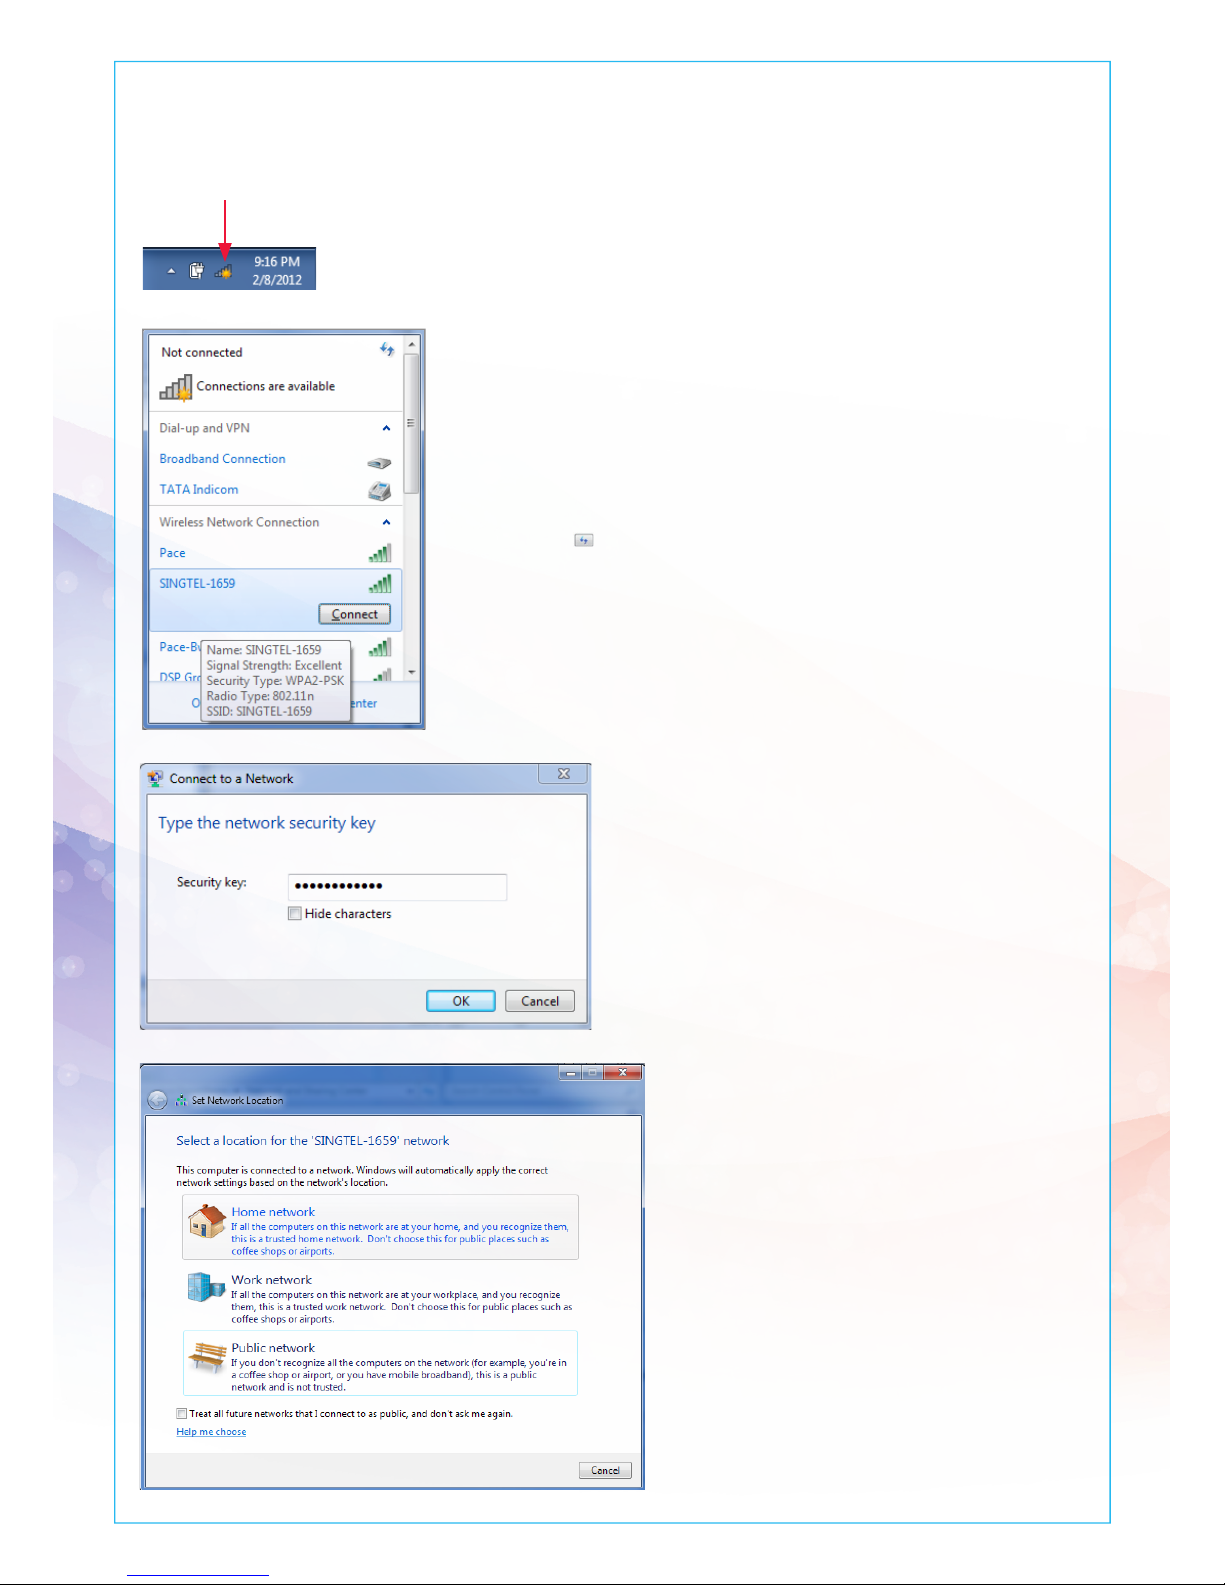
Section D: If you are using Windows 7
1
On the right hand side of the task bar, click on the
wireless network icon like the one on the left.
3
Input your wireless network key on
the “Security Key” field.
Note: Please refer to Section A if you are unsure of your
Network Key.
You will see this when:
(i) You are connecting to the Residential Gateway for the
first time
(ii) You had unselected the option to save the Network Key
4
On the Select Network Location click
on “Home Network”.
2
You will see a window of the available networks,
locate and select your own wireless network. e.g.
SINGTEL-0110.
Note: Please refer to Section A if you are unsure of your Network Name or try
refreshing your Network list if you do not see it.
Page 13
13
1
Open your default or preferred Wireless Manager.
2
Find the Network Name for you Residential Gateway and double-click on it.
Note: Please refer to Section A if you are unsure of your Network Name or try refreshing your Network list if you do not see it.
3
Enter your Network Key when prompted.
Note: Please refer to Section A if you are unsure of your Network Key.
Section E: If you are using another wireless manager
Configuration of most Wireless Managers requires your Network Name and Key. Follow the below steps to configure
this or refer to the user manual of your Wireless Adapter for advanced instructions.
STEP 5: Connecting Wirelessly to SingNet BroadBand (Continued)
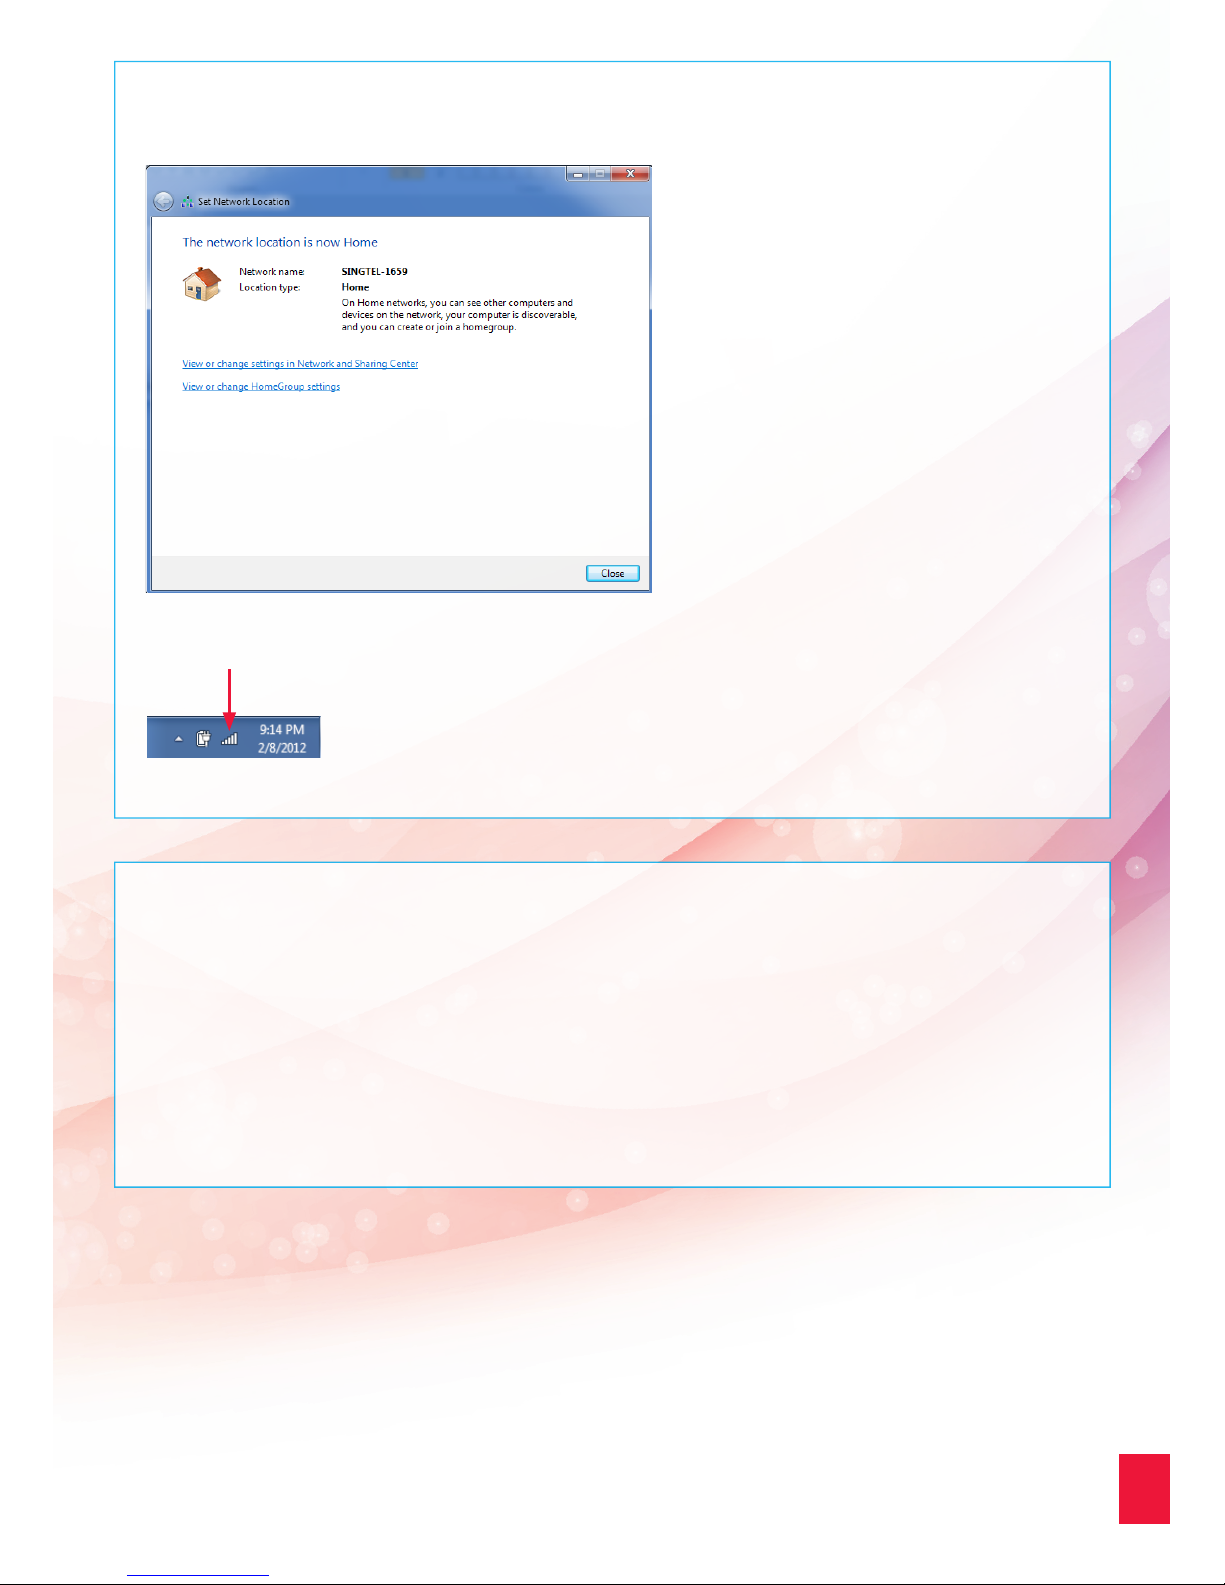
5
Click on the “Close” button to
complete the setup and close the
window.
6
You will see the wireless icon on the taskbar, like the one
on the left, once the wireless is successfully connected.
Page 14
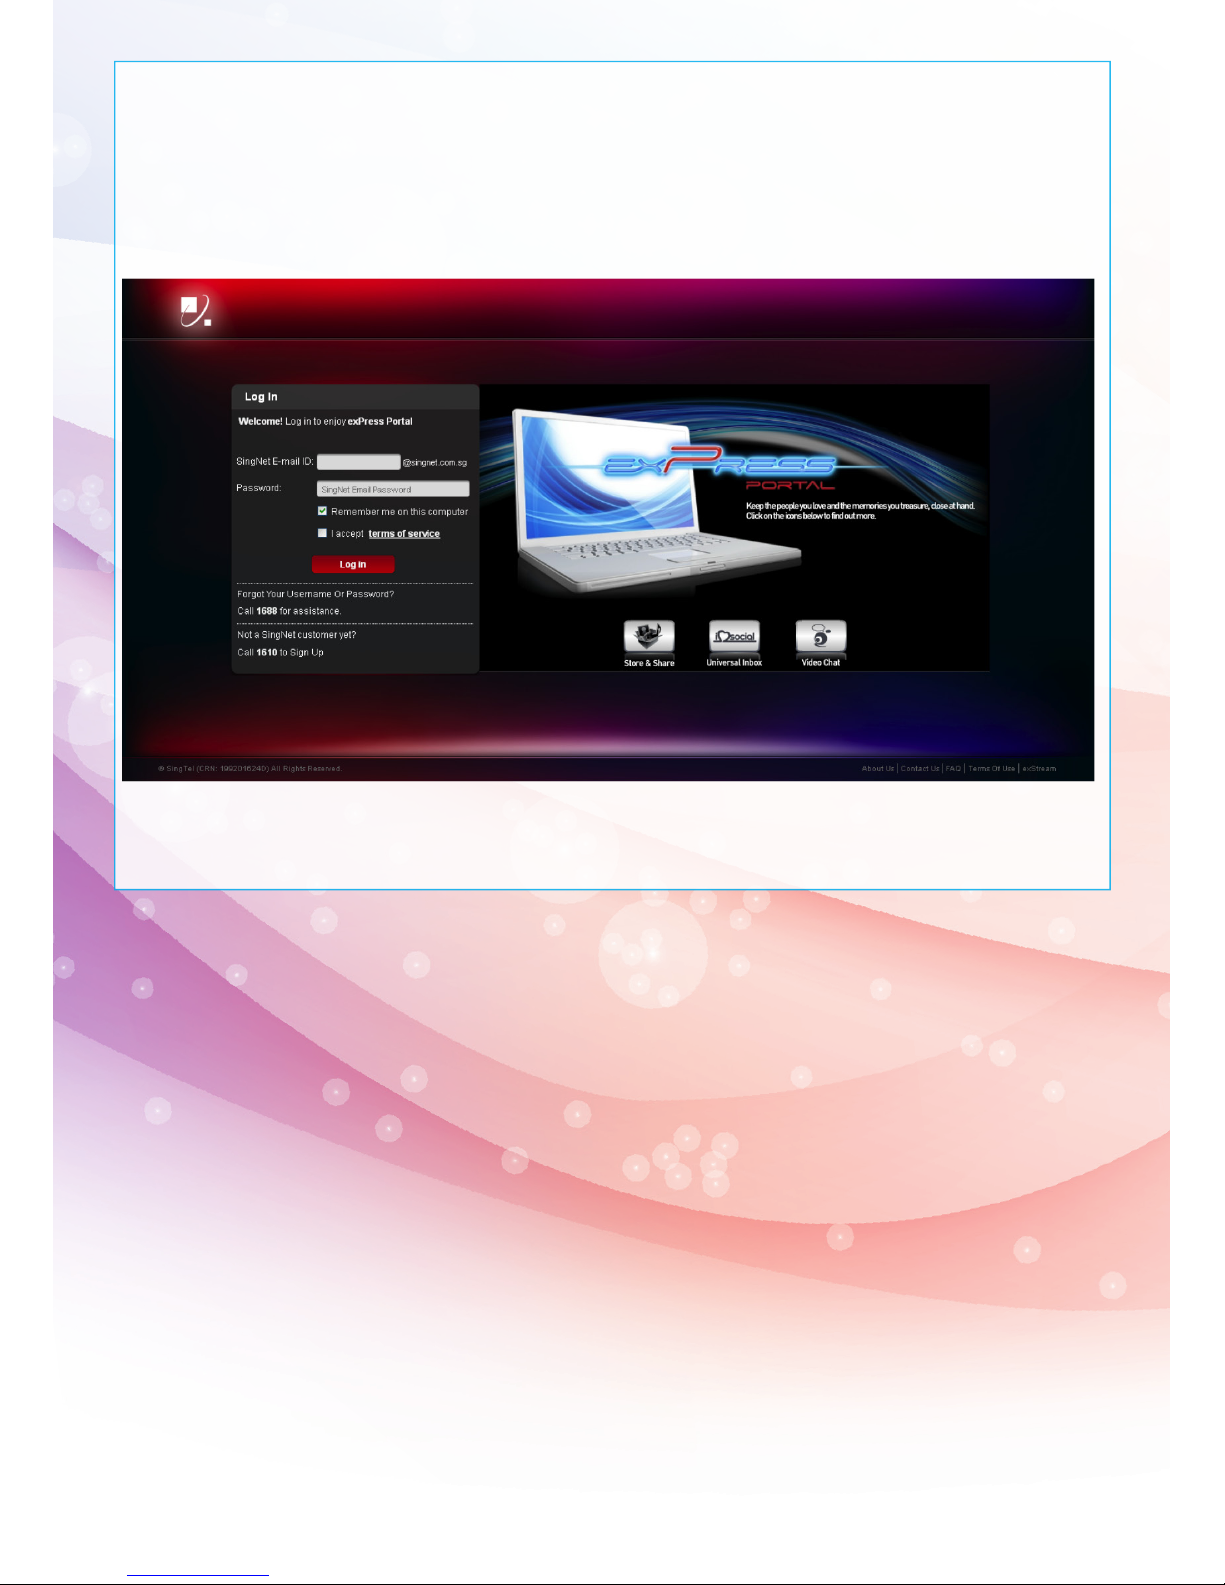
Section F: Welcome to your FREE exPress Portal!
Stay close to the people and memories that matter most to you.
Visit www.express.singtel.com and log in with your SingNet email and password. First time users will see a
guided tour.
Page 15
15
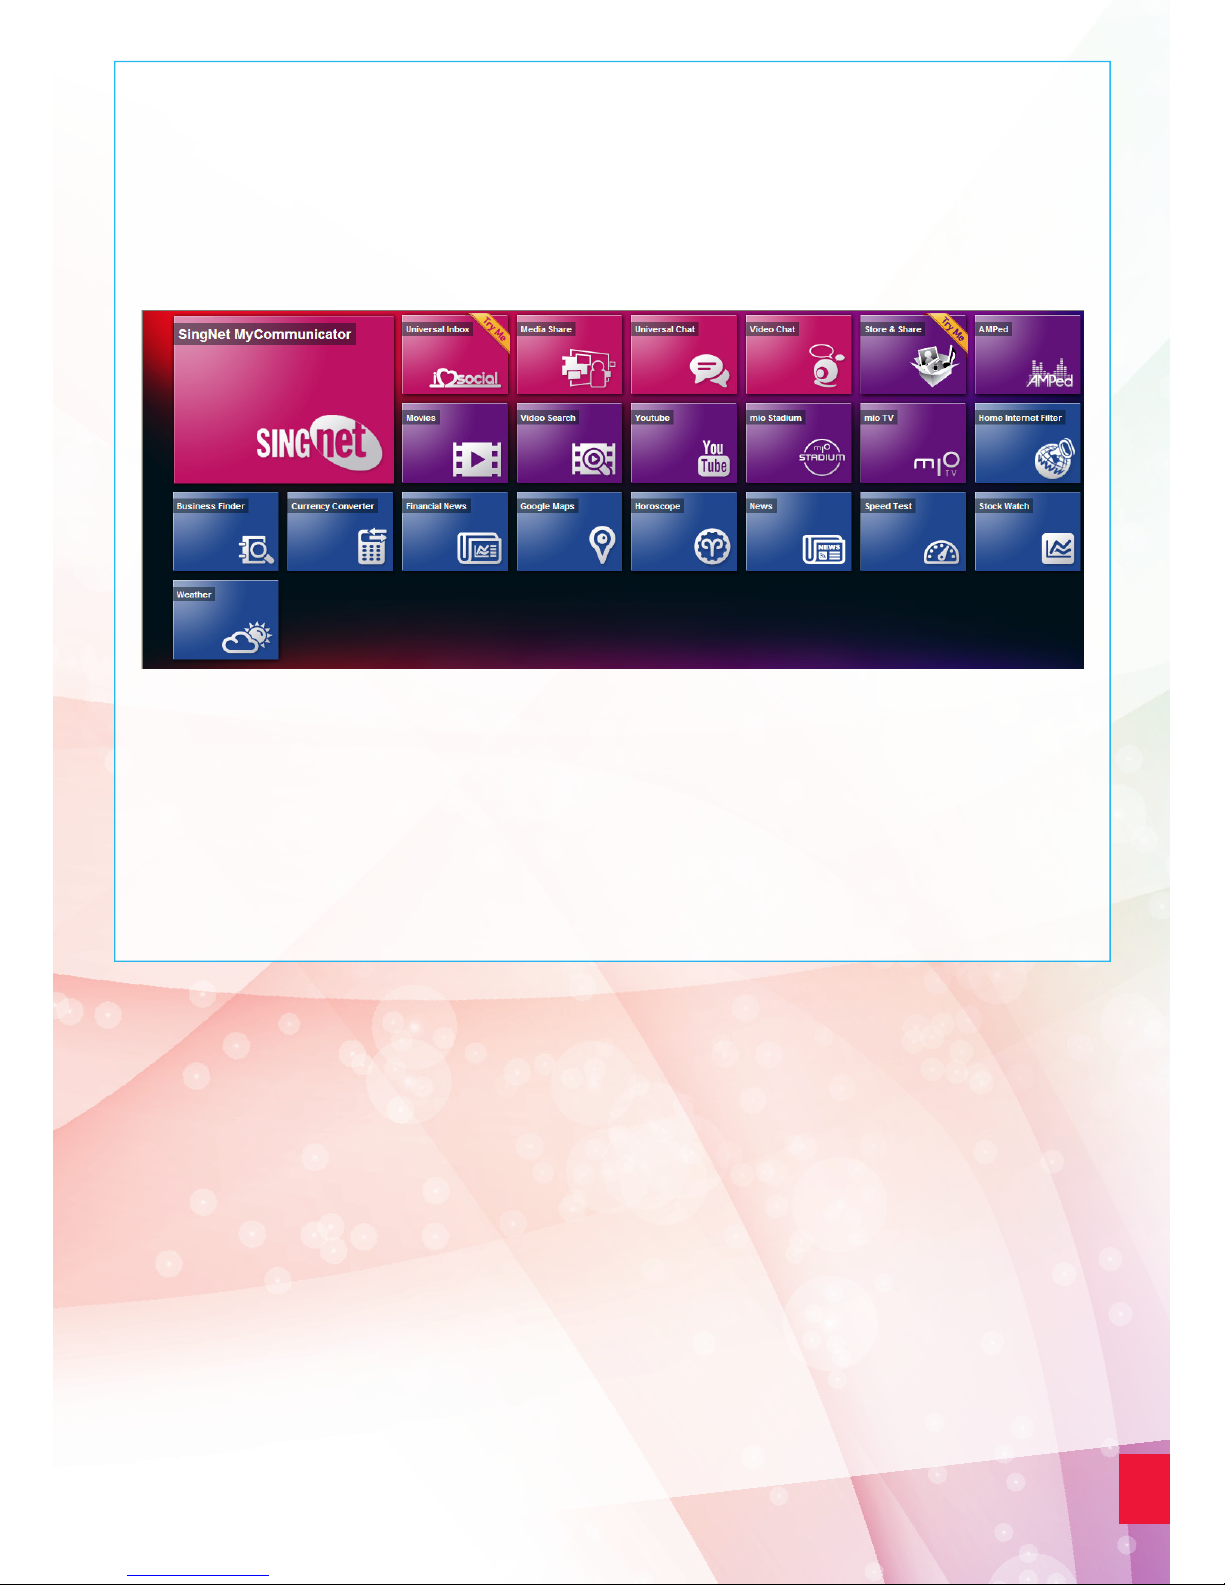
Your home screen - Play and discover new possibilities
Once logged in, non-Fibre customers will see the below screen. If you are a Fibre customer, you’ll see a slightly
different interface (refer to the “Quick Quide to exStream” leaflet).
To start a service, double-click on the service’s icon to open up the widget. Let’s check out Store & Share.
Page 16
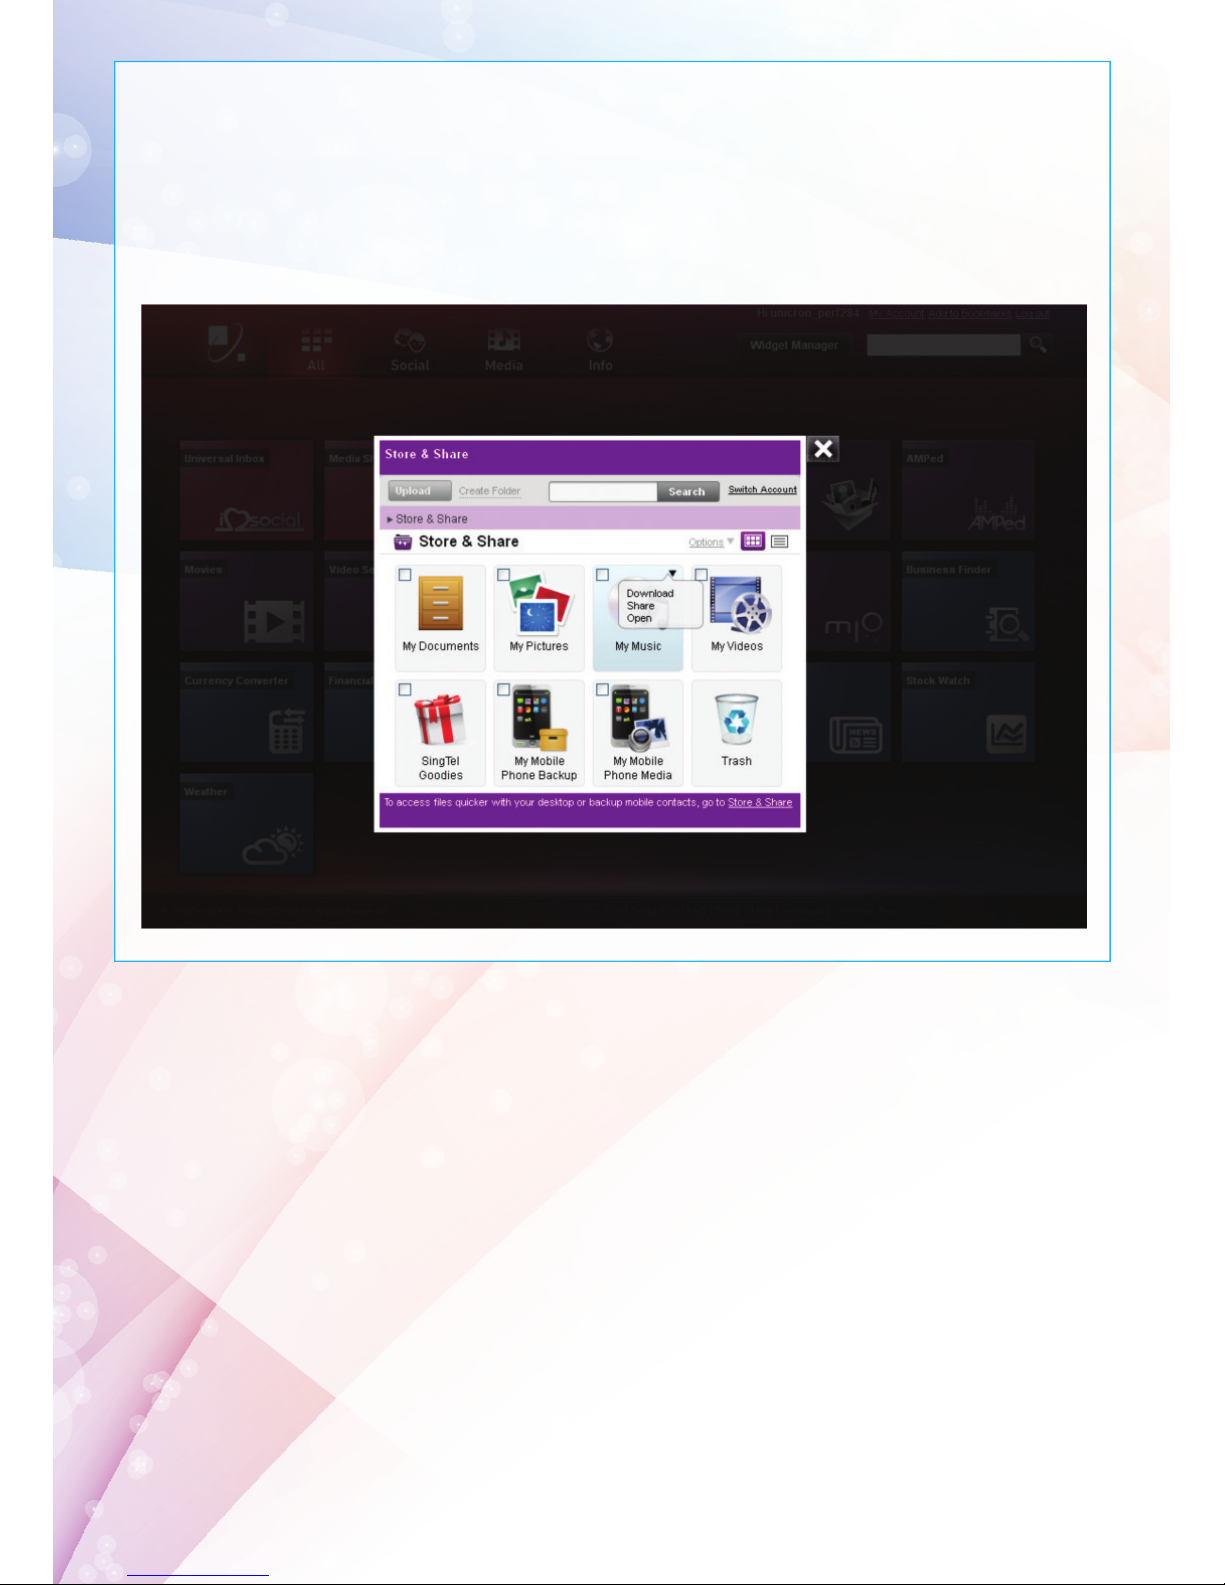
Using Widgets
You can start using the widget once it’s opened. Store & Share allows you to store, share and retrieve files online,
anywhere you are. You can also back up your phone contacts and computer files. If you’ve signed up for this service,
you can start using it immediately.
When you’re done, click on the ‘x’ button to close the widget. You’ll return to the home screen where you can continue
to check out the other exciting services.
Page 17
17
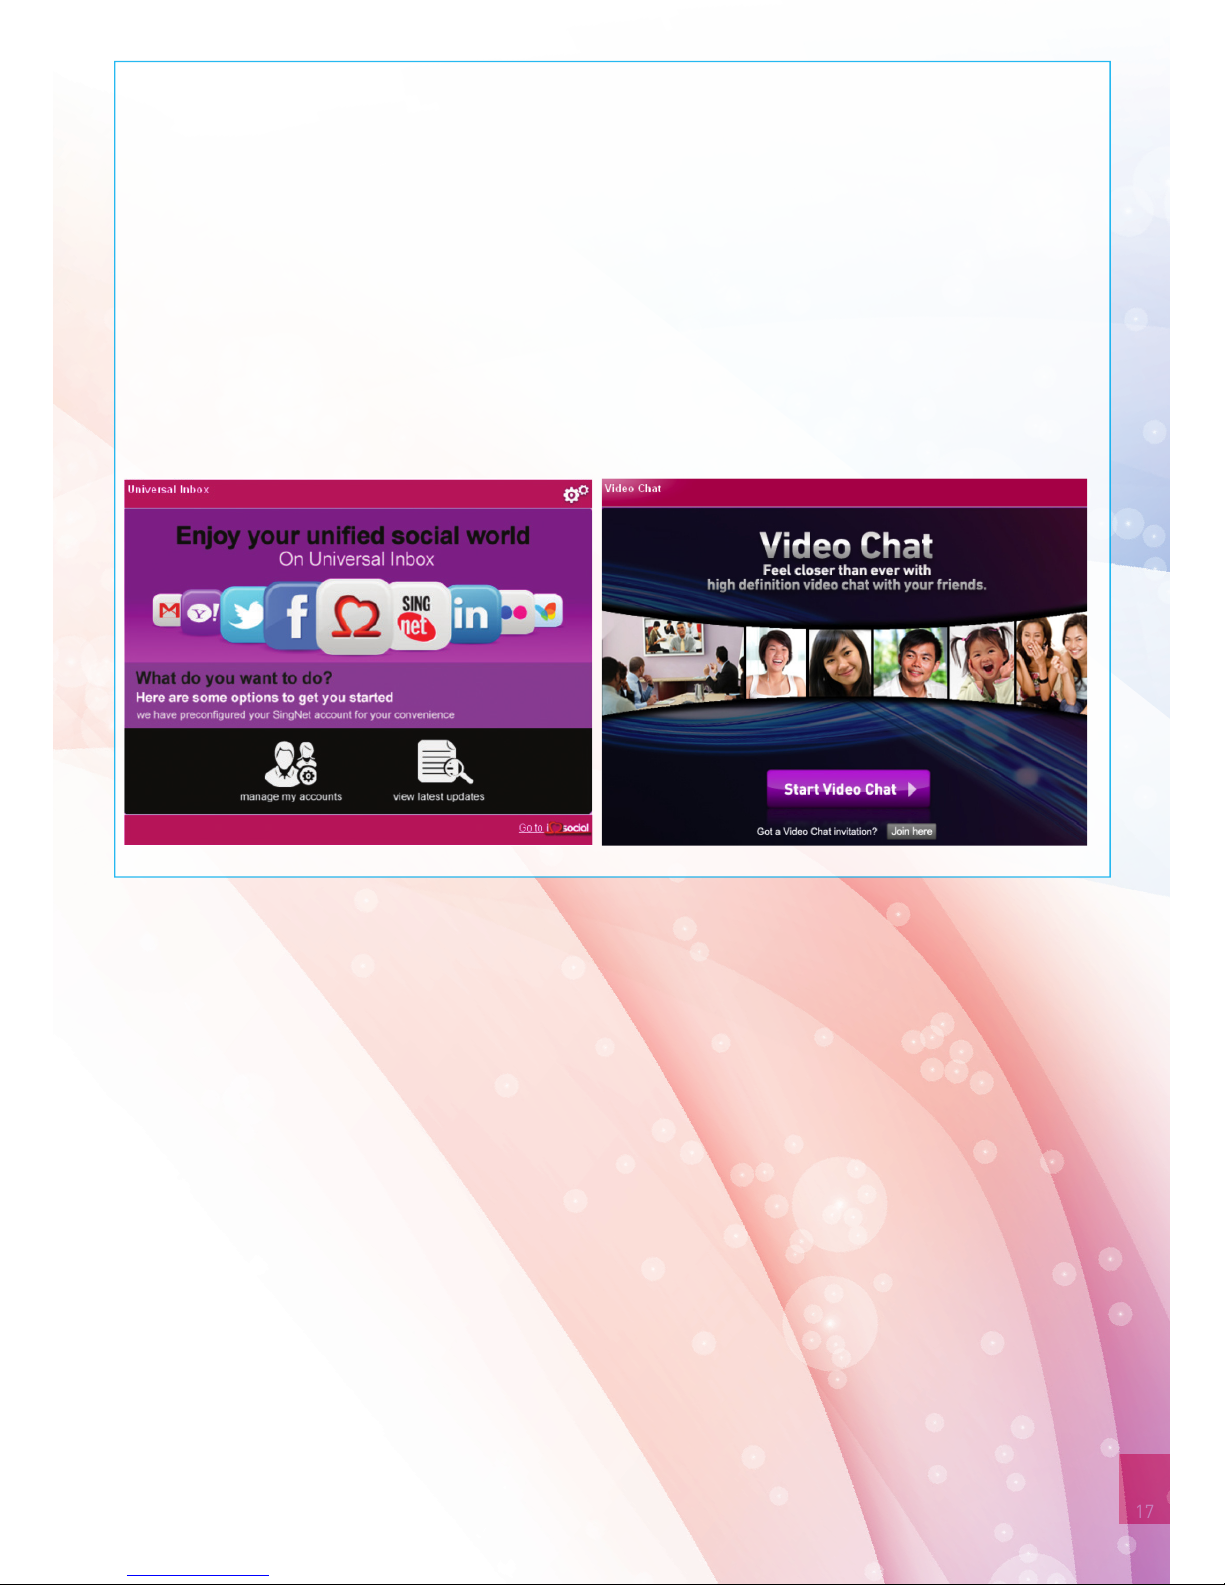
More fun services
Check out these other interesting widgets to help keep your friends close!
Universal Inbox
Pull together your social networks and emails all in one page. Check out your friend’s latest updates and pictures.
Update your status or upload photos to multiple social networks at once. Save pictures you like directly into Store
& Share.
Video Chat
Enjoy high quality video chats, with up to 6 parties for Fibre customers.
Page 18
USB
LAN
1
2
3
4
W
A
N
DSL
FXS
1&2
RESET
POWER
1/0
Telephone
cable
FXS phone
splitter
Two phones
STEP 6: Setting Up Your mio Voice
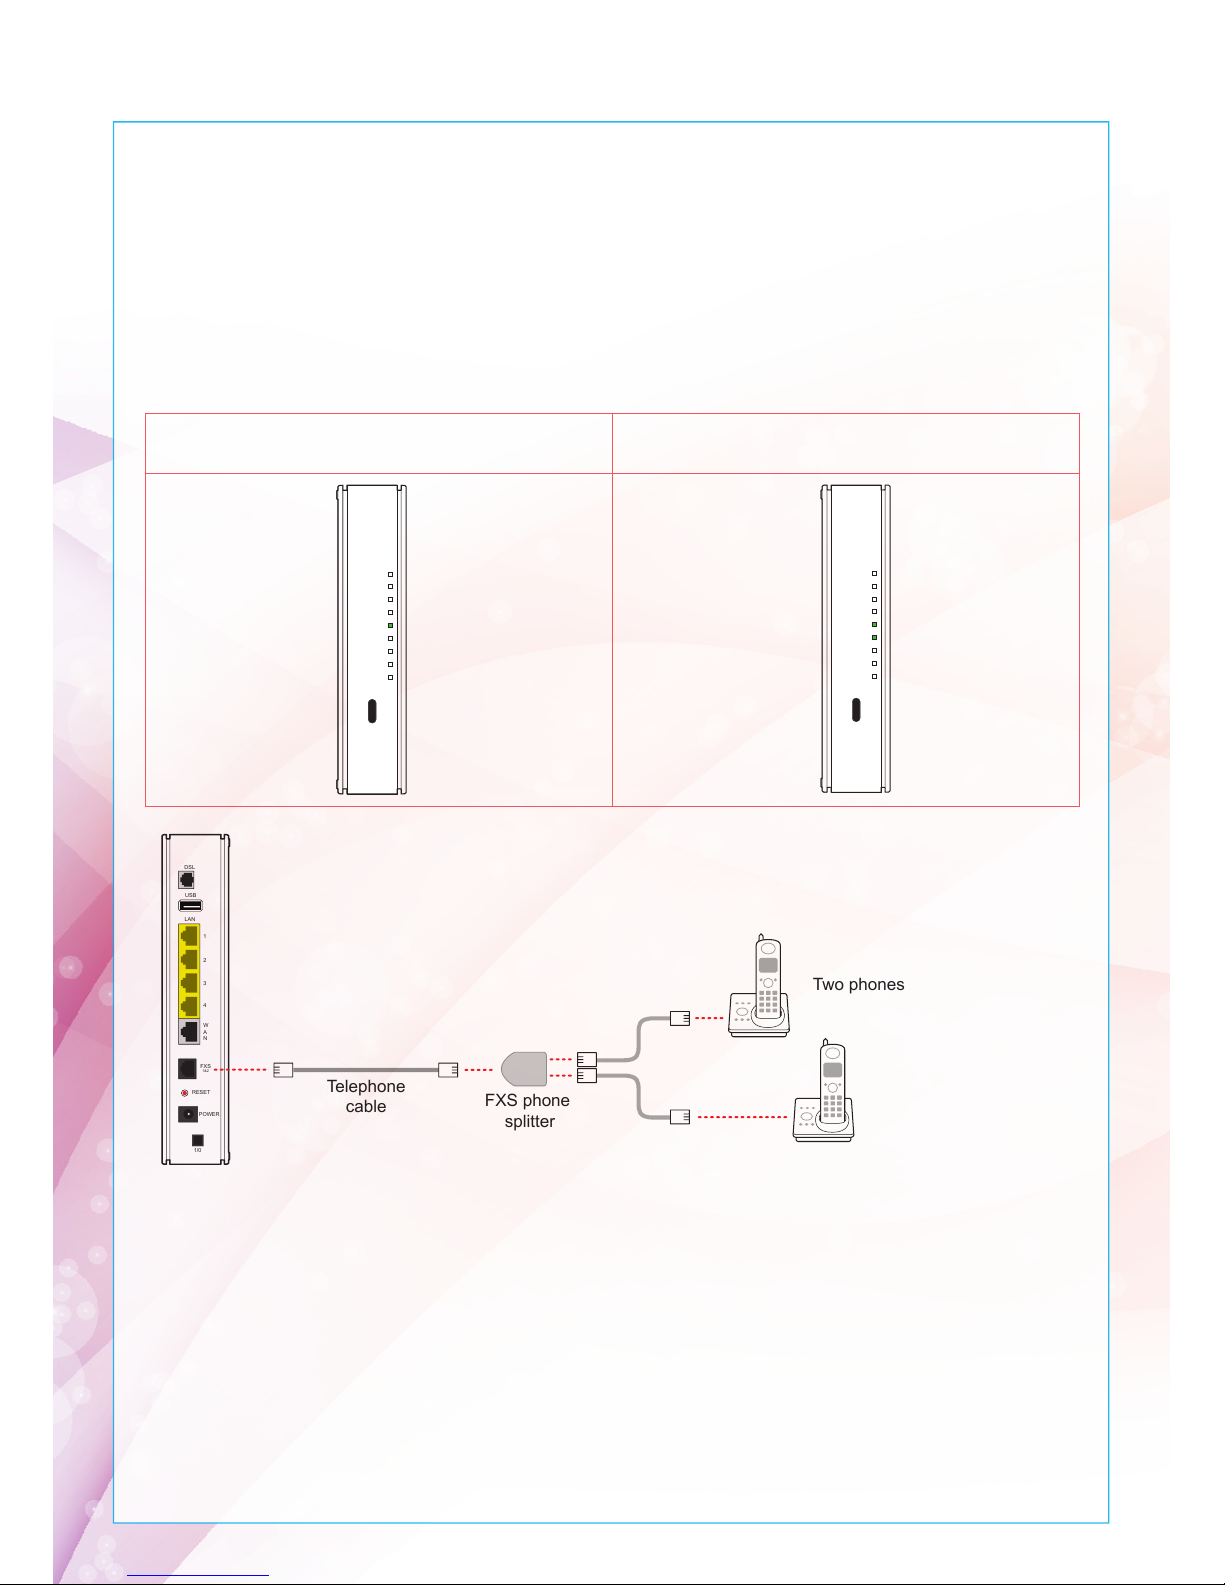
1 mio Voice, only the “VOICE 1” LED will be GREEN 2 mio Voice, both “VOICE 1” and “VOICE 2” LEDs will
be GREEN
IMPORTANT
Please ensure that ALL analogue devices i.e., telephones are disconnected from wall
sockets to optimise the performance
New subscribers for mio Voice will automatically be configured with the service. The
“VOICE” LED on the Residential Gateway will turn on after 10 minutes upon successful
configuration of your BroadBand service. Thereafter, customers may proceed to connect
their supported telephones following the steps below.
A
Connect your supported telephone to the Telephone port on the Residential
Gateway using a Phone Cable (RJ11).
B
Please insert a FXS Phone Splitter to the Phone Cable (RJ11) before inserting
to the Telephone port of the Residential Gateway.
C
Connect your supported telephones to P1 and P2 ports respectively for both
mio Voice lines.
Congratulations! You have successfully installed mio Voice.
Continue with (B) and (C) only if you have 2 mio Voice subscriptions
INTERNET
BROADBAND
IPTV
VOICE 2
ETHERNET
WIRELESS
WPS
VOICE 1
POWER
W
P
S
INTERNET
BROADBAND
IPTV
VOICE 2
ETHERNET
WIRELESS
WPS
VOICE 1
POWER
W
P
S
Page 19

19
IMPORTANT TIPS:
1. Ensure that all active telephone extensions are fixed with DSL microfilters for stable and reliable Internet
experience. The DSL microfilter can be seen in Step 1 – Equipment Check.
2. Remember the Network Name (SSID) and the Network key of the wireless setup. For more information, please
refer to Step 4 – Section A - Your Network Name and Key. Please note that your Network Name (SSID) and Network
Key may not be the same if you have changed your wireless settings.
3. Please place the Residential Gateway on a flat surface and ensure the following:
a) It is not near blockades such as building structure and natural or artificial barriers.
b) It is not kept in an enclosed area that will affect signal coverage.
c) It is not near any electronic device such as microwave oven, bluetooth device and/or cordless phone so as to
reduce interference of the same frequency.
d) It is not near water-containing equipment filled with water to optimise wireless signal.
4. Note that the signal strength may vary or fail due to any of the above mentioned factors which are not within
SingNet’s control. SingNet shall not be liable for any loss or damage arising from such interference or failure.
Customer shall be solely responsible for providing all equipments necessary such as repeaters, at his/her own
expense, to extend wireless coverage should the need arise.
Technical Hotlines
BroadBand & mio:
1688
Monday to Sunday & Public Holidays:
8am - 12mn
For Biz ADSL customers:
1606, then select option 2
(Available at all times)
Residential Gateway Technical Support Information
Malifax Technologies (S) Pte Ltd
Hotline: 6287 5033
Email: [email protected]
Address: 76 Playfair Road #06-03,
LHK2 Building Lobby 2, Singapore 367996
Service Centre Operating Hours
Monday to Friday (except Public Holidays) 9am - 7pm
Helpdesk Operating Hours
Monday to Friday (except Public Holidays) 9am - 9pm
Saturday (except Public Holidays) 9am - 1pm
Page 20

Copyright © 2012 Singapore Telecommunications (CRN: 199201624D) and SingNet Pte Ltd (CRN: 199802130W). All rights reserved.
 Loading...