

Page 1
'.J7i^,
w
MOD^O^
FREEARM, LIGHTWEIGHT,
SUPER-AUTOMATIC WITH BUILT-IN PRACTICAL STITCHES
AND STRETCH STITCHES
INSTRUCTION
MANUAL
XXXXXXXXXXXXXXXXXXXXXD
Page 2

I his booklet has been written for you, to help you use and
enjoy fully your sewing machine. ,
Before you start to use this machine, please take a few
minutes to study this booklet. You will find it will be time
well spent in understanding your machine.
If you have any questions regarding the use of your
overlocking machine please do not hesitate to contact
your dealer or ourselves.
WHITE SEWING MACHINE
Record in space provided below the Serial No. and Model
No. of this appliance.
The Serial No. is located Rear of arm.
The Model No. is located Rear of arm.
Serial No.
Model No.
________;_________________________
...
ET-6 or ET-10 '
Retain these numbers for future reference.
WHITE SEWING MACHINE CO.
Cleveland, Ohio
U.S.A. 44111
Scarborough, Ontario
Canada MIP 2G1
____
Page 3

'A31JE CF CONTENTS
1. KNOWING YOUR MACHINE, Pages..2-17
Acc8Ssori^,1ist of.....................................4-5
Accessory Box
Bobbin,-To insert into Bobbin Case
Bobbin Case, To insert into Shuttle
Bobbin Case, To remove from Shuttle... 9
Bobbin Thread, To pick up........................13
Bobbin Winding
Converting to free-arm sewing
Darning Plate..............................................15
Finger Guard............................................. 11
Free-Arm Sewing and to Convert
Knowing your Machine
Machine Identification
Needle and Thread Table
Needles, to Change...................................11
Power/ Light Switch
Presser Feet, Selection
Presser Feet, to Change............................15
Presser Foot Lever
Reverse Stitch Lever
Seaming Guide Lines
Setting up your Machine
Spool Pins
Stitch Length Control
Stitch Selection Control
Threading Top of Machine
Thread Tensions, Top and Bottom
............................................
........
.........
..........................................
..................
..............
...........................
..............................
.........................
...................................
.............................
.....................................
.................................
................................
............................
...................................................
................................
............................
........................
............
4
10
10
8
7
7
2 - 3
2-3
11
6
15
6
17
17
6
7
16
16
12
14
Lingerie Stitch
Mending.......................................................26
Overcasting, Simple Zig-zag
Overcasting, Three Step Zig-zag
Pin Basting
Piping .........................................................
Ric-Rac Stitch.............................................29
Rolled Hemming....................................... 25
Satin Stitch
Smocking Stitch
Starting to Sew
Straight Stitching
Stretch Overlock Stitch
Stretch Stitches, General Information ...28
Three Step Zig-zag
Top Stitching.
Triple Straight^titch
Turning a Square Comer, Single
Needle
Zig-zag Stitching........................................ 23
Zips, to Insert..............................................22
3. CARING FOR YOUR MACHINE,
Pages
Cleaning the Machine
Cleaning the Shuttle, Feed Dogs ....34-35
Light Bulb, to Change................................34
Sewing Light...............................................34
.........................................................
....................................................
............................................
.....................
..............
.................................................
.................................................
.........................................
...........................................
.......................................
.............................
.....................................
...........................................
...................................
................................
25
24
26
21
22
23
29
18
19
30
26
20
29
20
34 - 35
34
2. STARTING TO SEW, Pages.................18 - 33
Applique......................................................24
Basting
Blind Hems...,
Button Sewing...........................................
Buttonhole Making, Automatic
Buttonholes, Corded
Buttonholes, Tips On
Cording
Darning
Foot Control
Gathering
.......................................................
.............................................
...........
.................................
................................
.......................................................
.......................................................
...............................................
...................................................
31 - 32
21
27
24
33
33
22
20
18
21
4. CHECK CHART FOR PERFORMANCE
PROBLEMS Page
Problem Chart
5. OPTIONAL EXTRA Pages
Even Feed Foot (Optional Extra)
Overcasting Foot (Optional Extra)............38
Rolle Foot (Optional Extra)........................38
Tufting Foot (Optional Extra)
Twin Needle (Optional Extra)
.......................................
............................................
.....................
..............
....................
..............
36
36
37 -40
37
37
39-40
Page 4
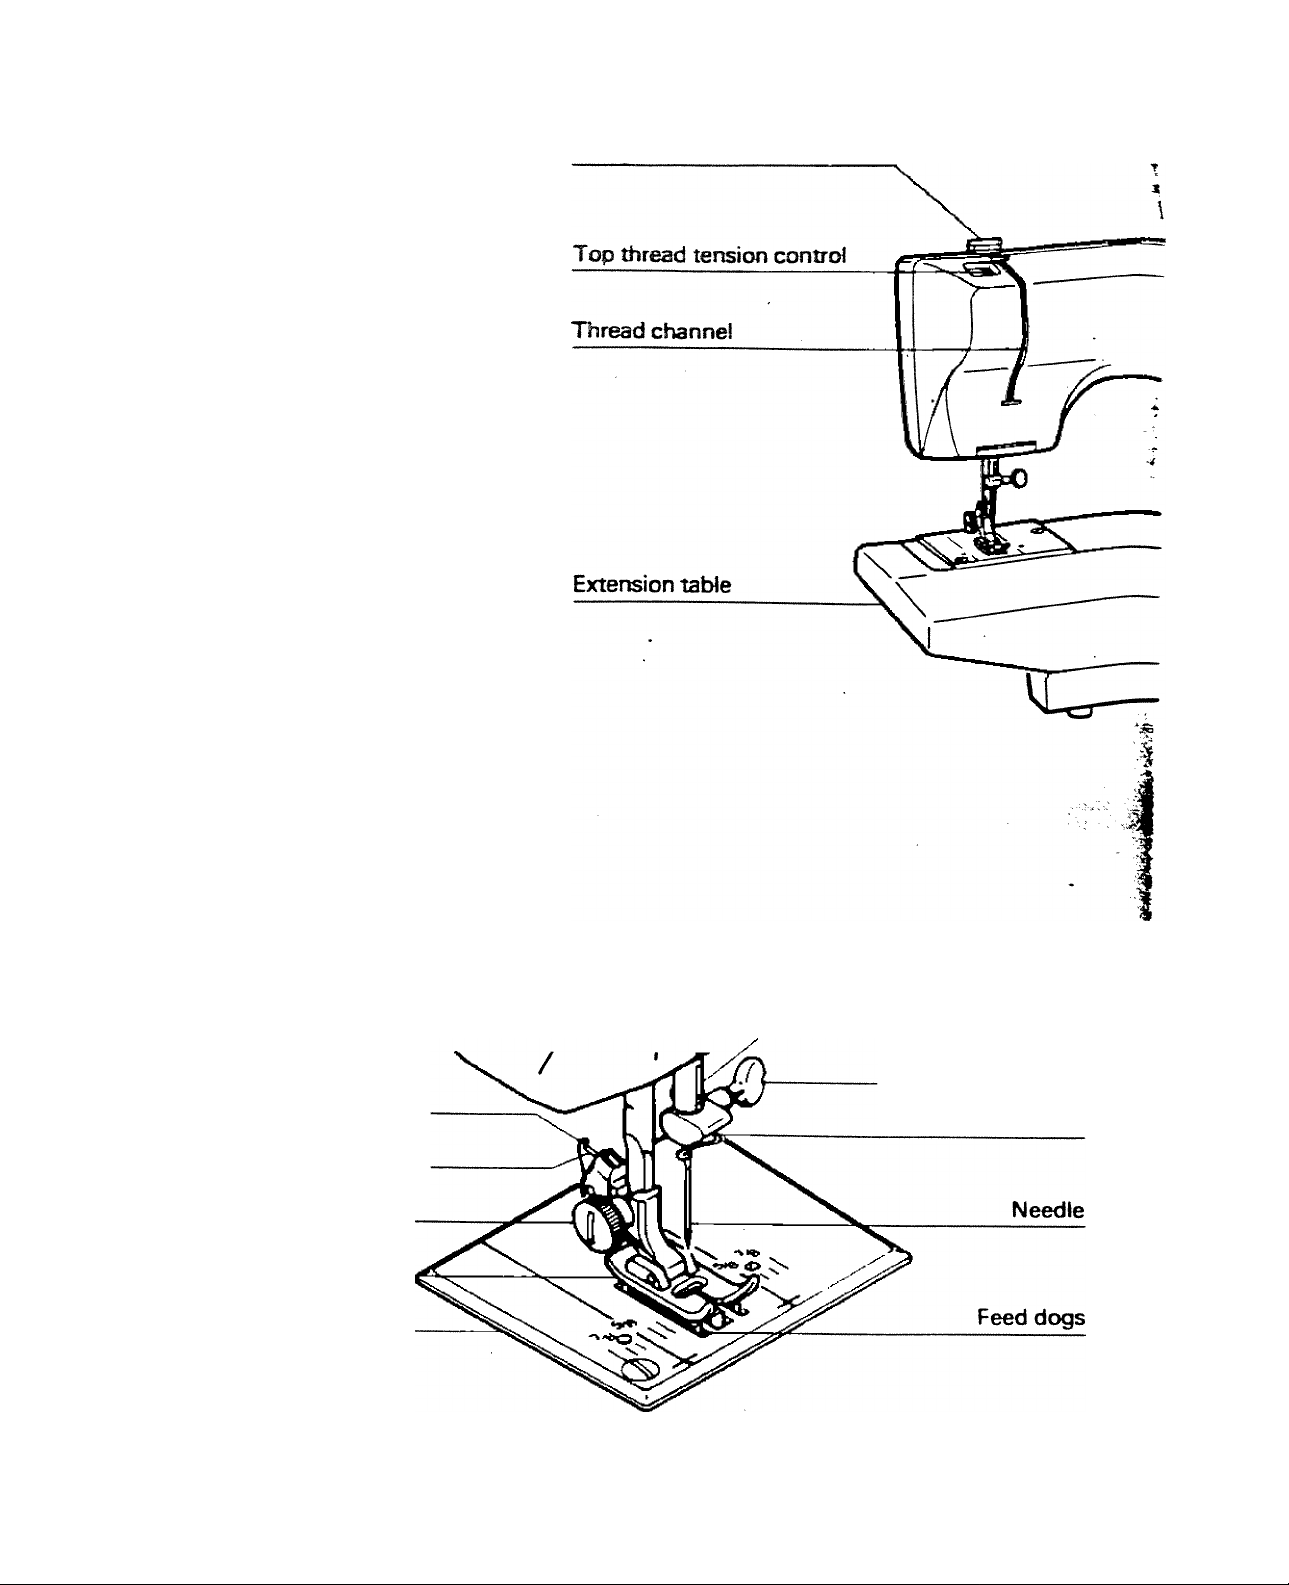
31. KNOWING YOUR SEWING MACHINE
7J1ACHIM1 IDENTIFICATION
Thr^ guide
After unpacking your Sewing
Machine, stand it on a fiat
sturdy surface and study the
diagram to get to know the
various working parts and
their names.
It will be found useful to refer
back to these two pages as
you progress through the
Book to be sure which part b
being referred to.
Needle bar
Needle clamp screw
Presser foot release lever
Thread guide
Thread cutter
Presser foot thumb screw
Presser foot
Needle plate
NOTE: A detailed drawing which shows the parts of the shuttle and bobbin is on page 9.
2
Page 5
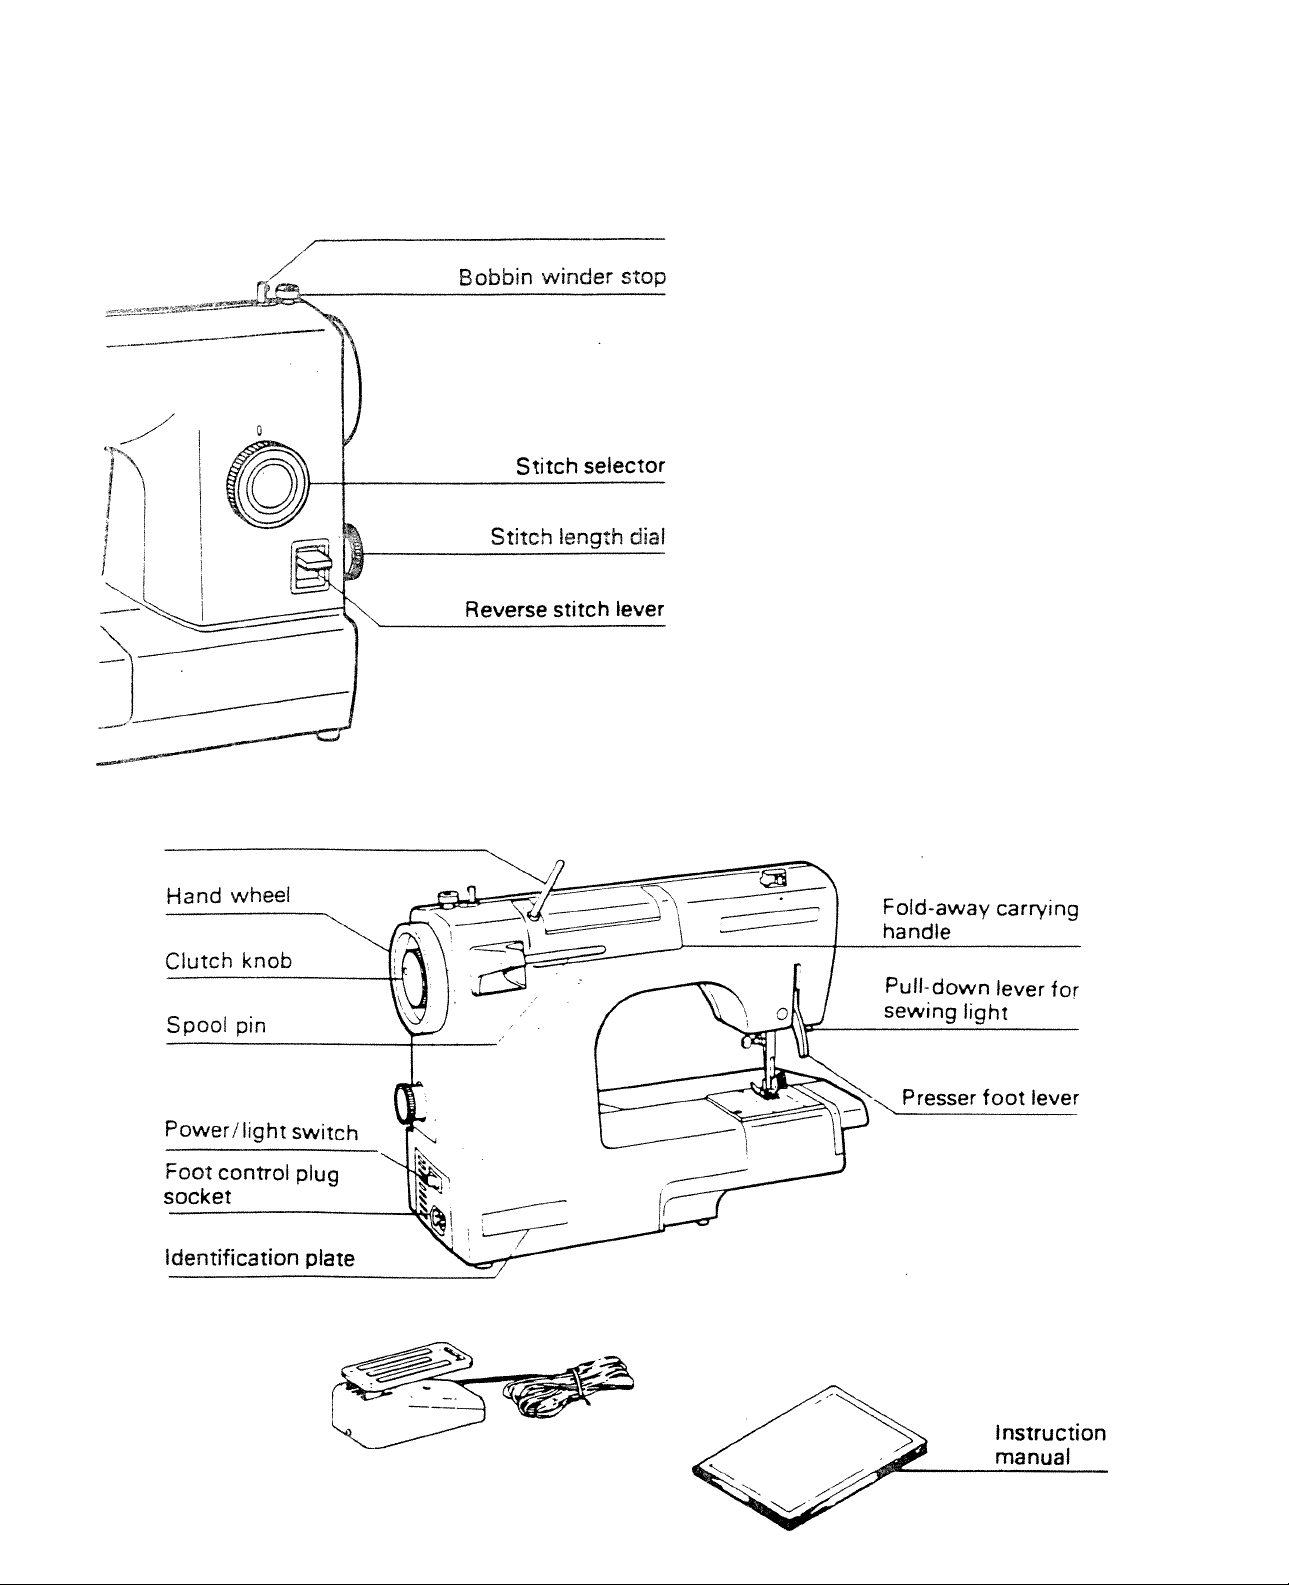
Bobbin winder shaft
Extra spool pin
Foot control
Page 6
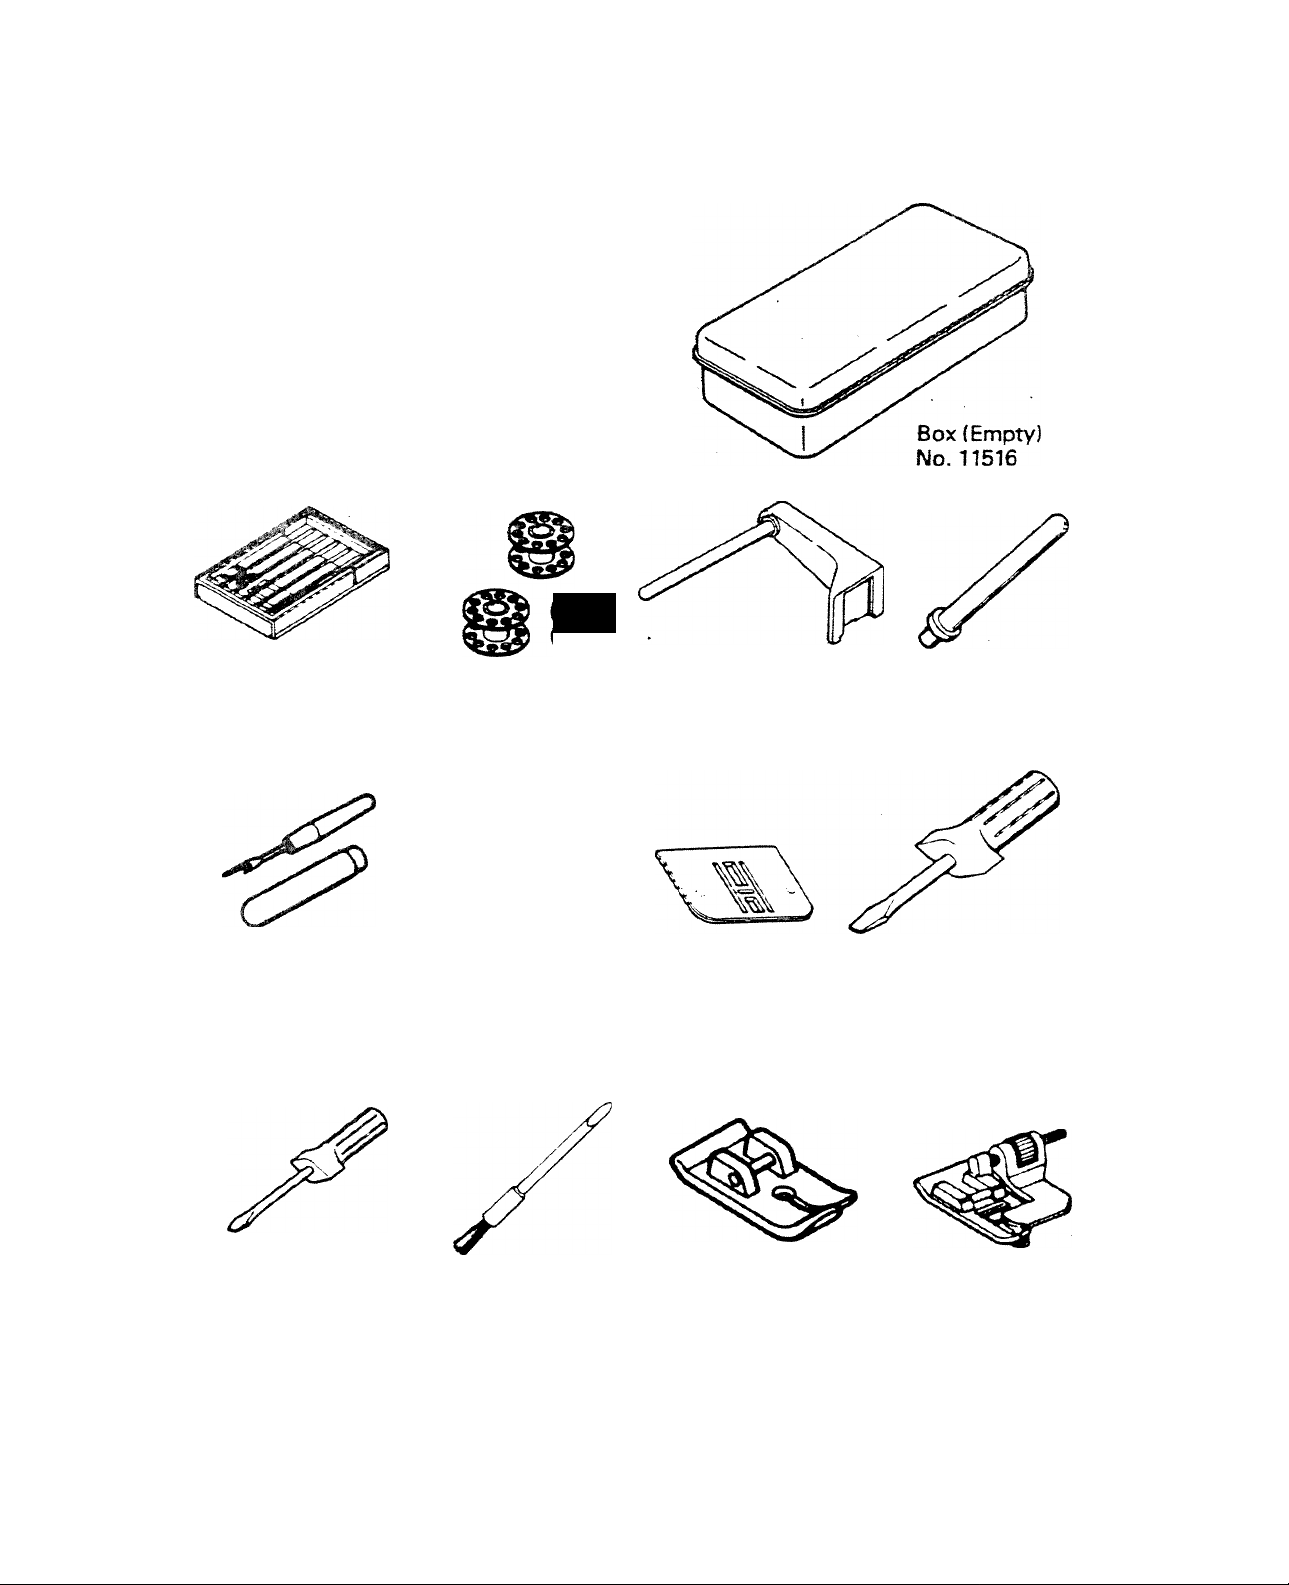
ACCES3fDR!IS
Open the Accessory Box. Inside you will
find a wide* range of acetones and
attachmenis %¥hich will be found useful
for the various sewing -operations that
wil! be described in later pages.
m
Spare needles
N0.7CM3
Seam ripper/
buttonhole opener
No. 7086
Bobbins
No. 100^
Spool pin disc
No. 7056
Spool stand
No. 7053
Darning cover
plate
No. 7057
Extra spool pin
No. 7054
Screwdriver (large)
No. 1627
Screwdriver (small)
No. 1628
Lint brush
No. 7079
Straight stitch
No. 4312
Blind stitch foot
No. 6219
Page 7
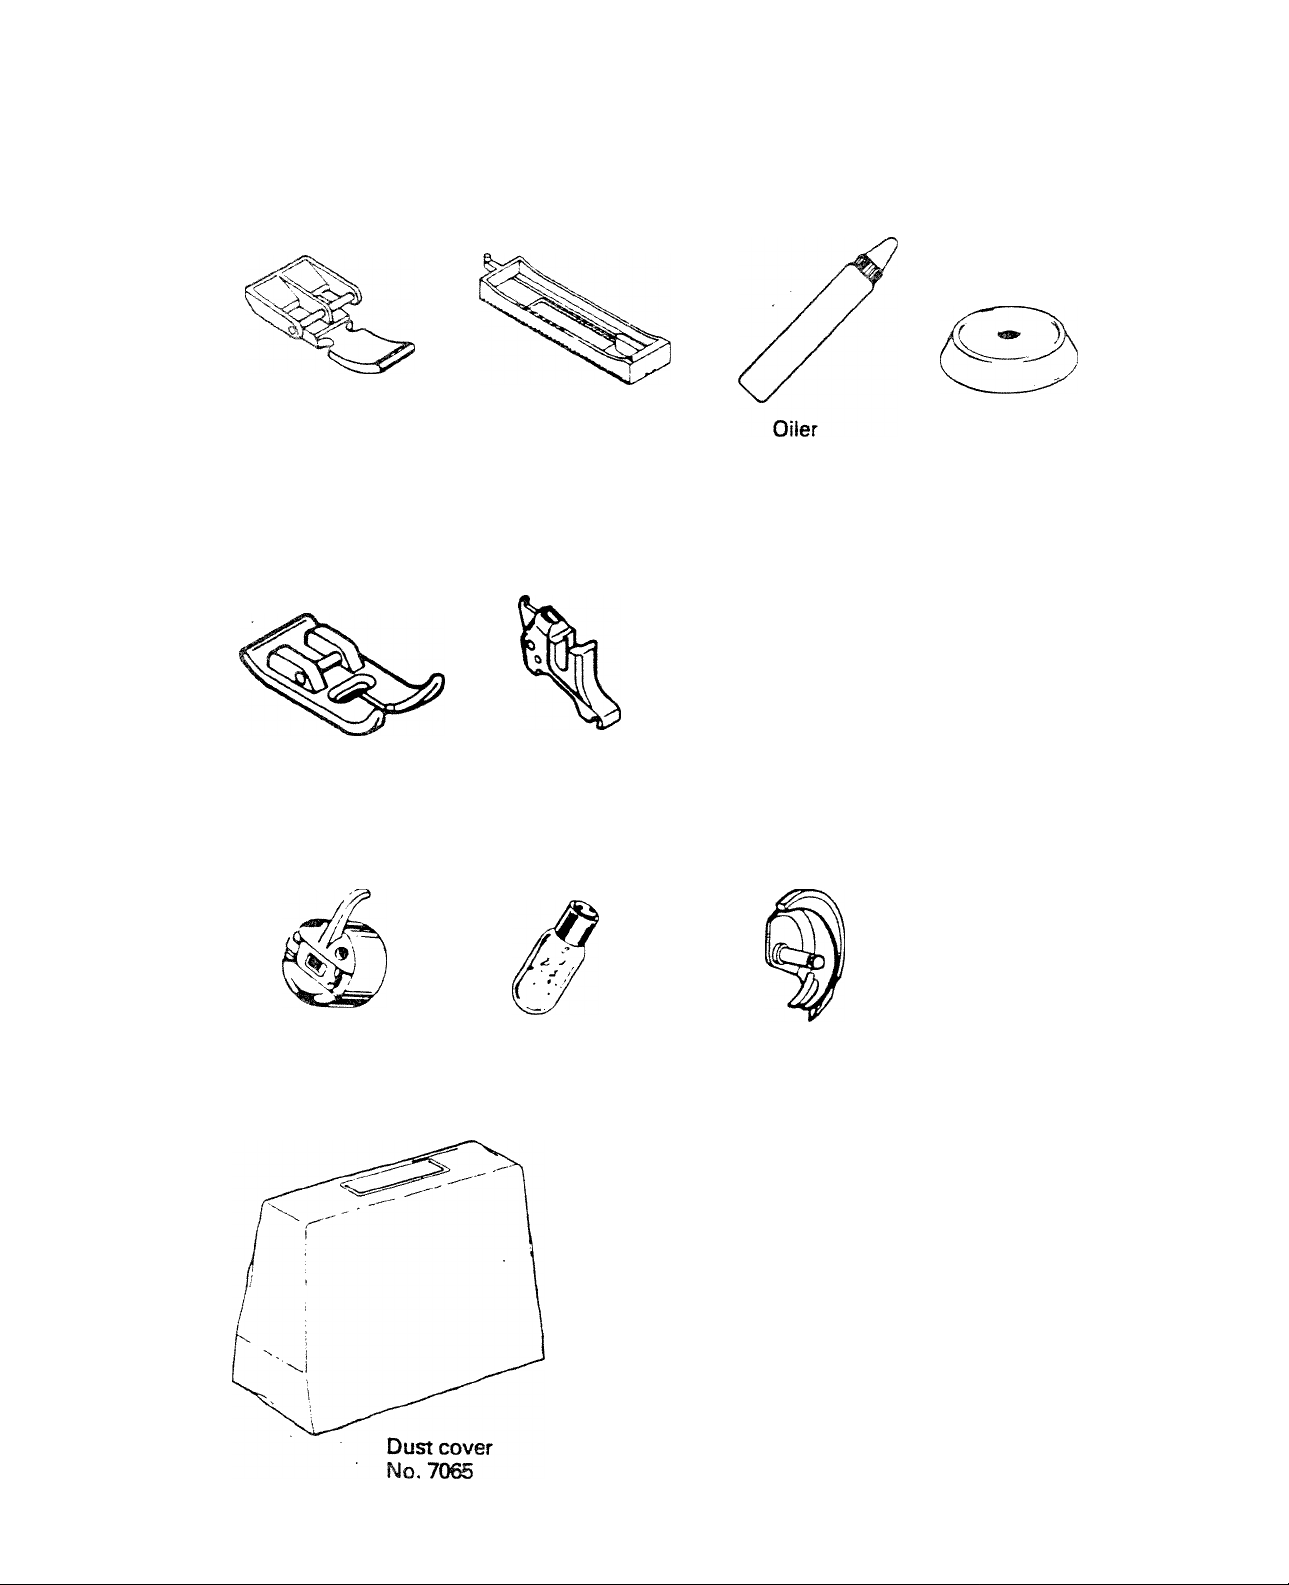
Z3S
Zipper foot
No. 3589
Buttonhole guide
No. 7052
Parts and accessories fitted on the machine
Standard zig-zag
foot No. 3550
Presser foot holder
No. 7048
Presser foot thumb
screw No. 76957
No. 7073
Spool pin cap
No. 11423
Needle clamp
screw No. 76061
Bobbin case
No. 77964
Light bulb
No. 3478
Shuttle
No. 7055
Page 8
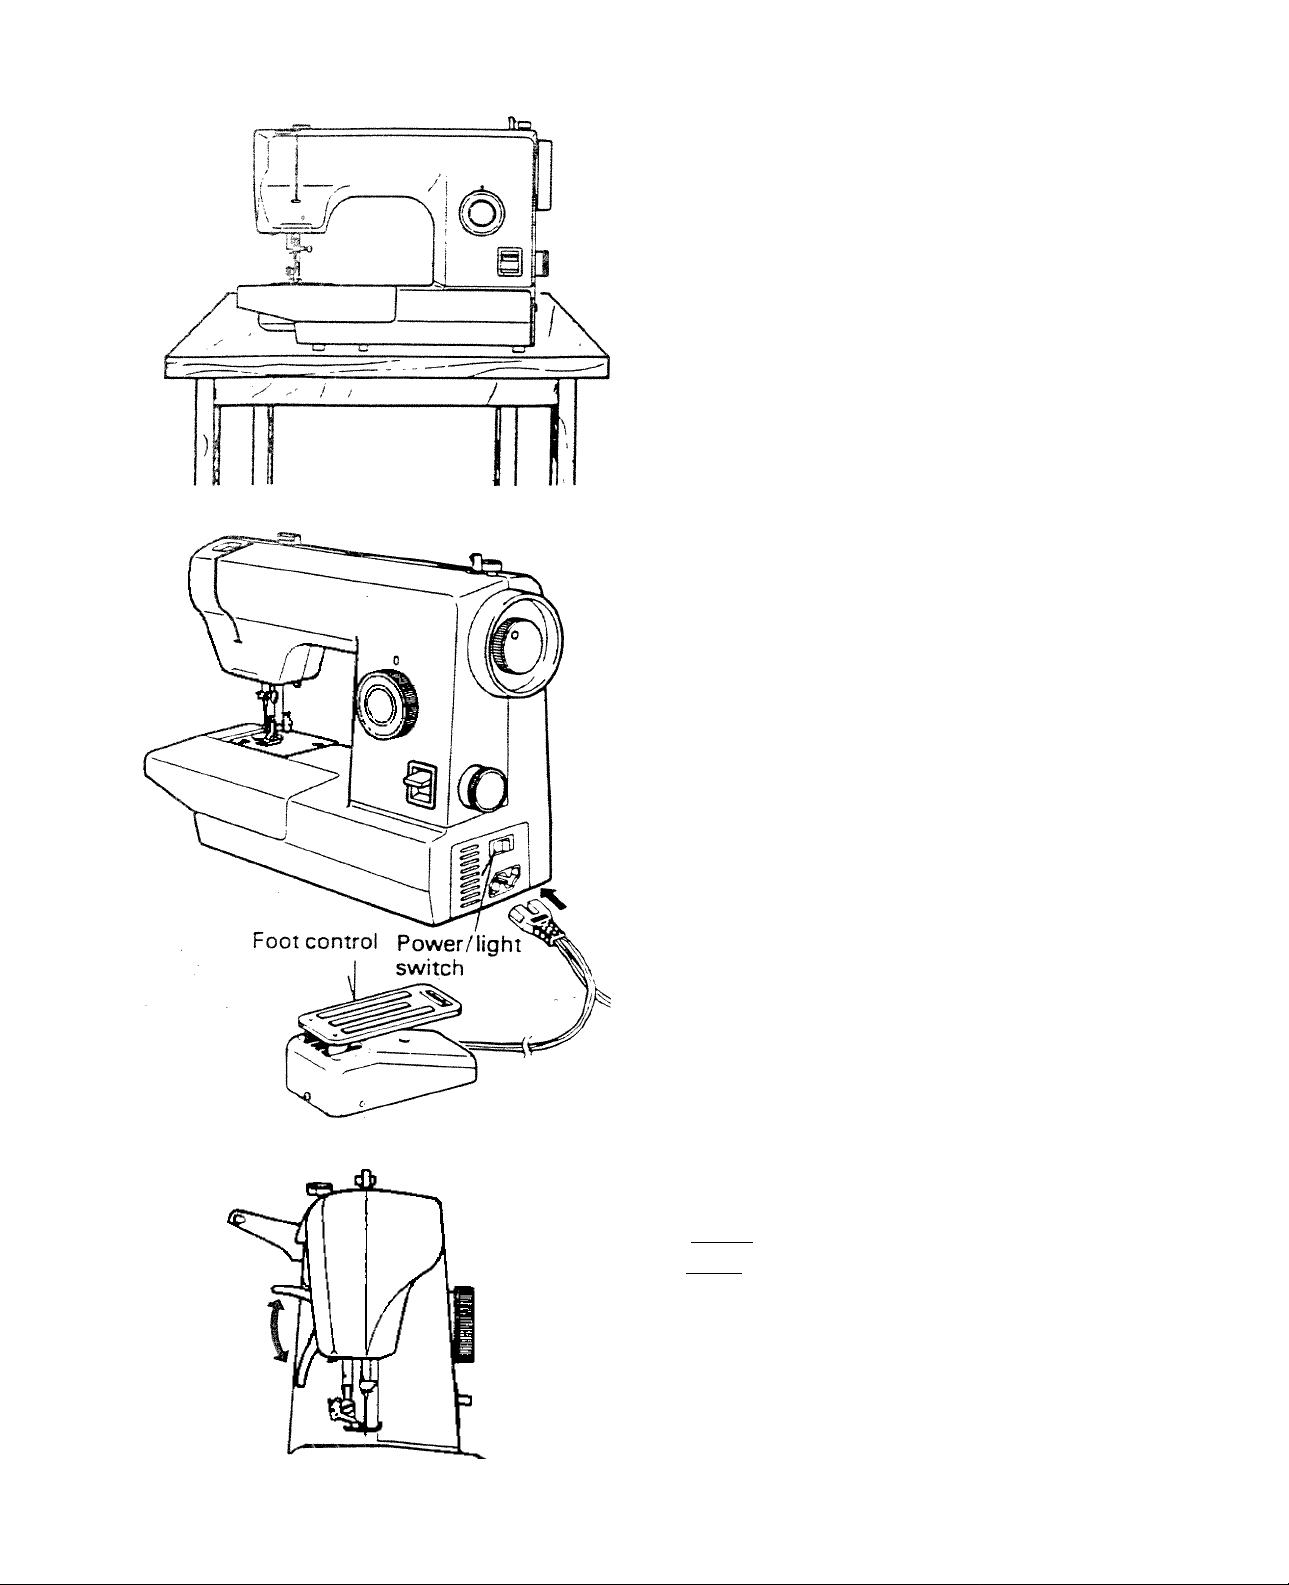
SETTING UP YOUR MACHINE
1. Be sure your machine is resting securely on
a sturdy, flat surface.
2. Before using your machine the first time be
sure to wipe off any surplus oil from around
the needle plate area that may have remained
during transit.
It is also advisable to run the machine
unthreaded with some spare material under
the presser foot, to absorb any excess oil.
FOOT CONTROL
Push foot control plug into the connector
socket at the bottom right-hand side of the
machine. (See also page 18).
POWER/LIGHT SWITCH
Your machine will not operate until the power
switch is turned on. The same switch controls
both the power and the light.
If you are interrupted, or stop sewing, or leave
the machine unattended, the power light switch
must be switched off or the plug must be
removed from the socket-outlet.
When servicing the machine, or when removing
covers or changing needles or lamps, the
machine must be disconnected from the mains
by removing the plug from the socket-outlet.
PRESSER FOOT LEVER
The presser foot lever raises and lowers your
presser foot.
1 • Lower the presser foot lever to sew.
2. Raise the presser foot lever and the pressure
of the presser foot will be released to insert or
remove thin or thick fabrics.
3. Extra height of the presser foot can be
obtained by lifting the presser foot thumb
screw by finger to allow insertion of thicker
material.
NOTE; Presser foot pressure is set at the
factory. No adjustment is required.
Page 9
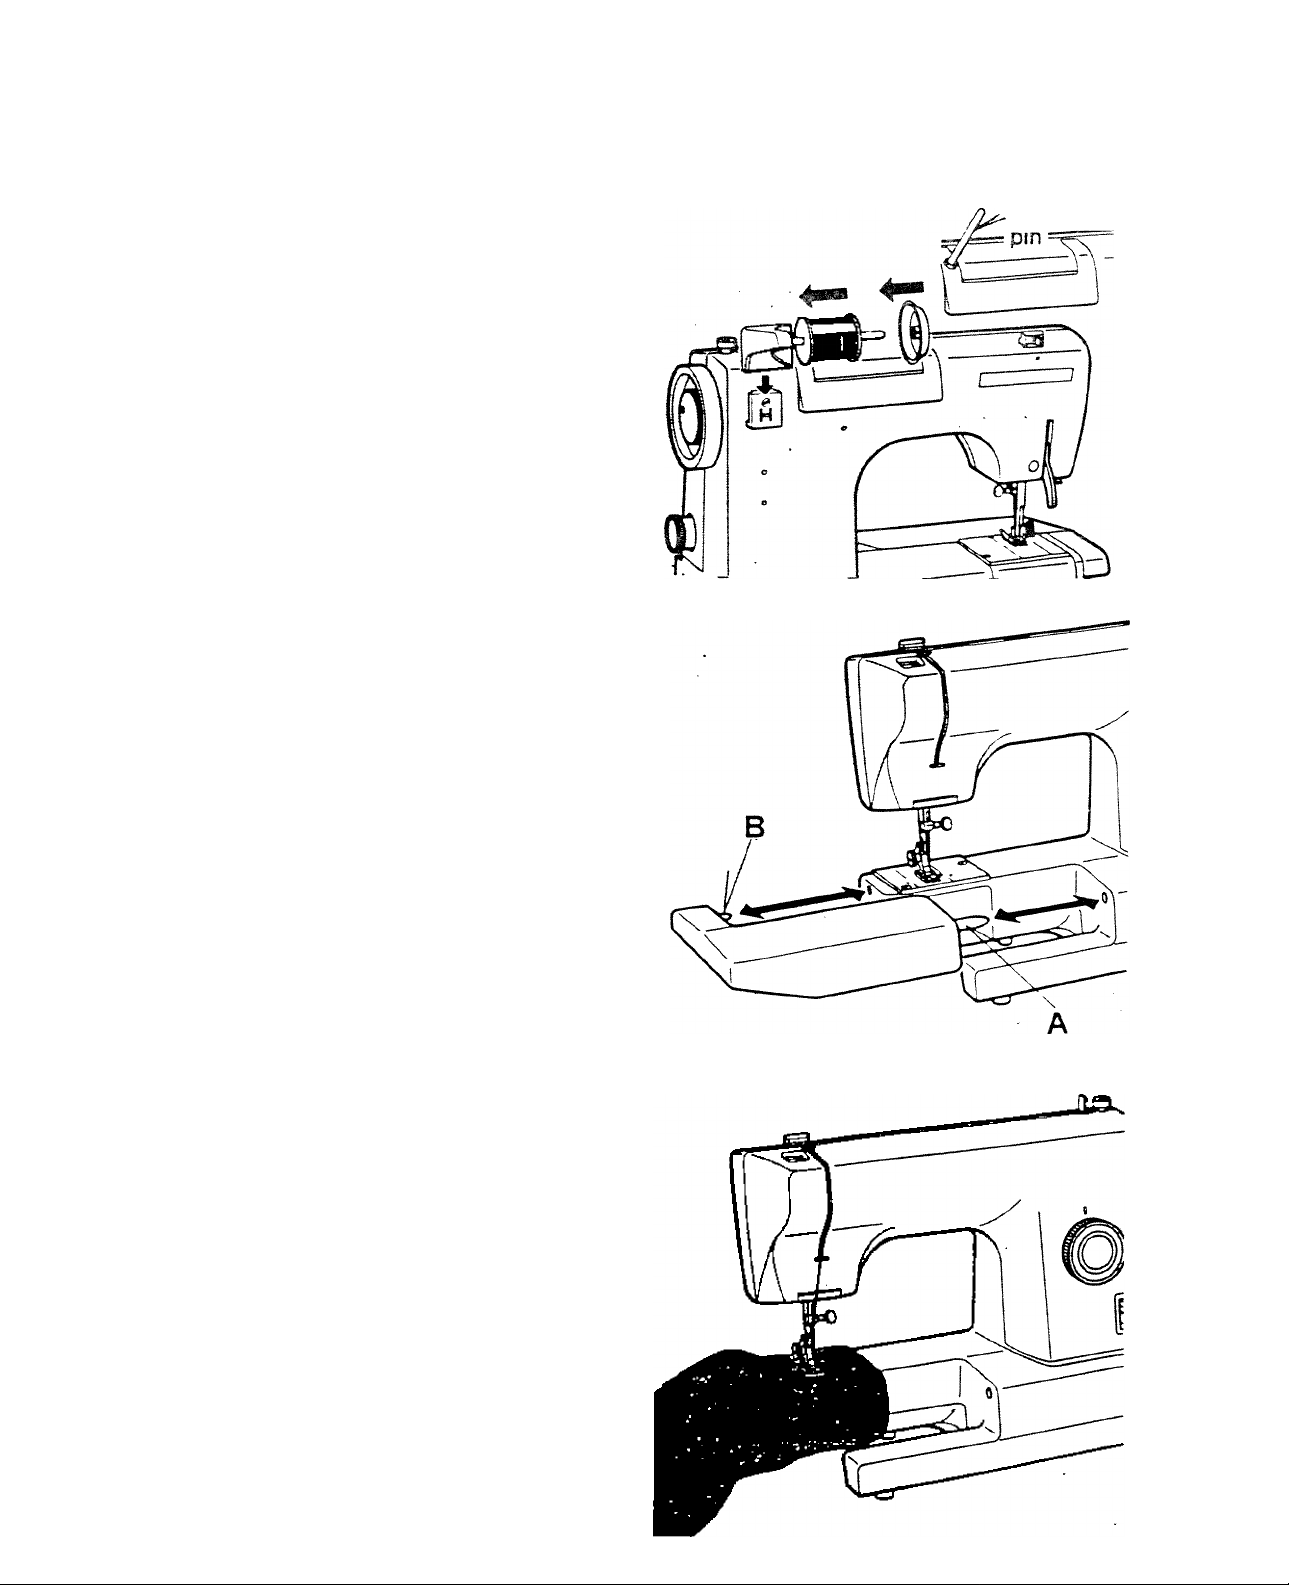
SPOOL PINS
1. Fit the spool stand in the accessory box in
the direction shown by arrow as illustrated.
NOTE: Remember to take off the spool pin
2. Attach the extra spool pin on the right end
of the carrying handle, when sewing with
a twin needle.
#
for storage.
CONVERTING TO FREE-ARM
SEWING
Your machine can be used either as a flat-bed
or as a free-arm model.
With the extension table in position it
becomes a fiat-bed with a large working
surface, which slopes gently towards you to
help the smooth flow of the fabric when
sewing.
By removing the extension table, the
machine converts into a free-arm model
which will be found ideal for sewing ail those
awkward, tight corners especially for small
articles for babies and small children.
The free-arm is easily obtained by simply
pulling the extension table to the left as
shown in the illustration. To replace, reverse
this operation ensuring the lugs A and B are
correctly located into their respective holes.
Extra spool
Other advantages of free-arm sewing are as
follows: —
1. Sewing of any 'tubular' article such as
sleeves, cuffs, trousers, shorts, legs of
almost all garments.
2. Easier mending of worn elbows or knees
of clothes.
3. Sewing-in sleeves, particularly on small
garments.
4. Appliqué, embroidery or hemming around
the edges of cuffs etc.
5. Sewing-in elastic casing at the waistline.
Page 10
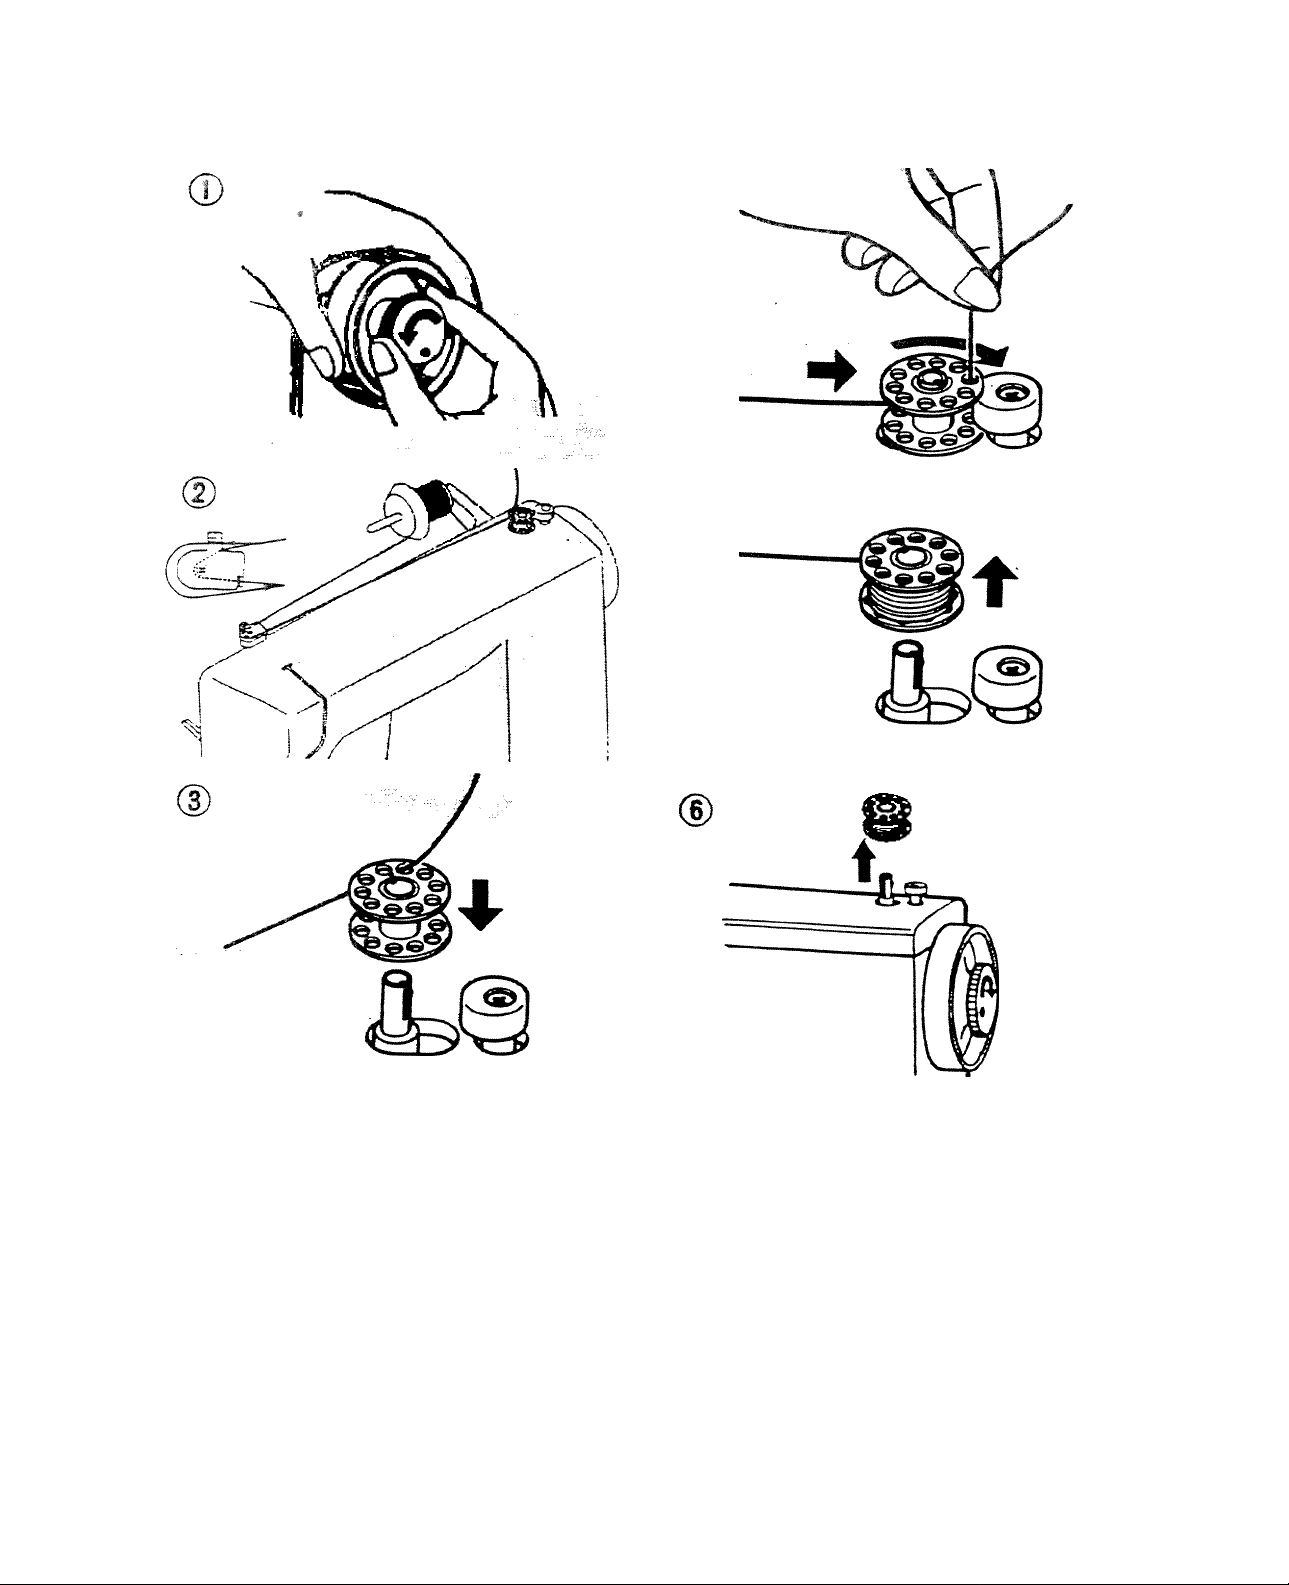
WlilPlMS BCB8IN
1.
Release clutch holding hand wheel and
turning clutch knob towards you.
Draw thread from spool through thread
guide as shown.
3.
Pull end of thread through hole In bobbin
as shown.
4.
Push bobbin winder shaft to far left
position, if it is not already there. Place
bobbin onto shaft with end of thread
8
coming from top of bobbin. Push bobbin
winder shaft to right until it clicks. Hold
onto end of thread.
5. Stert machine. The thread that is held
will snap. Bobbin will cease turning when
completely filled. Push shaft to left to
remove bobbin.
6. Tighten clutch knob and remove bobbin.
Page 11
..
..................................
■ •.«... ..^^1., '^.. A4M.I. .a, %.iu.fi ditinJlk-t.
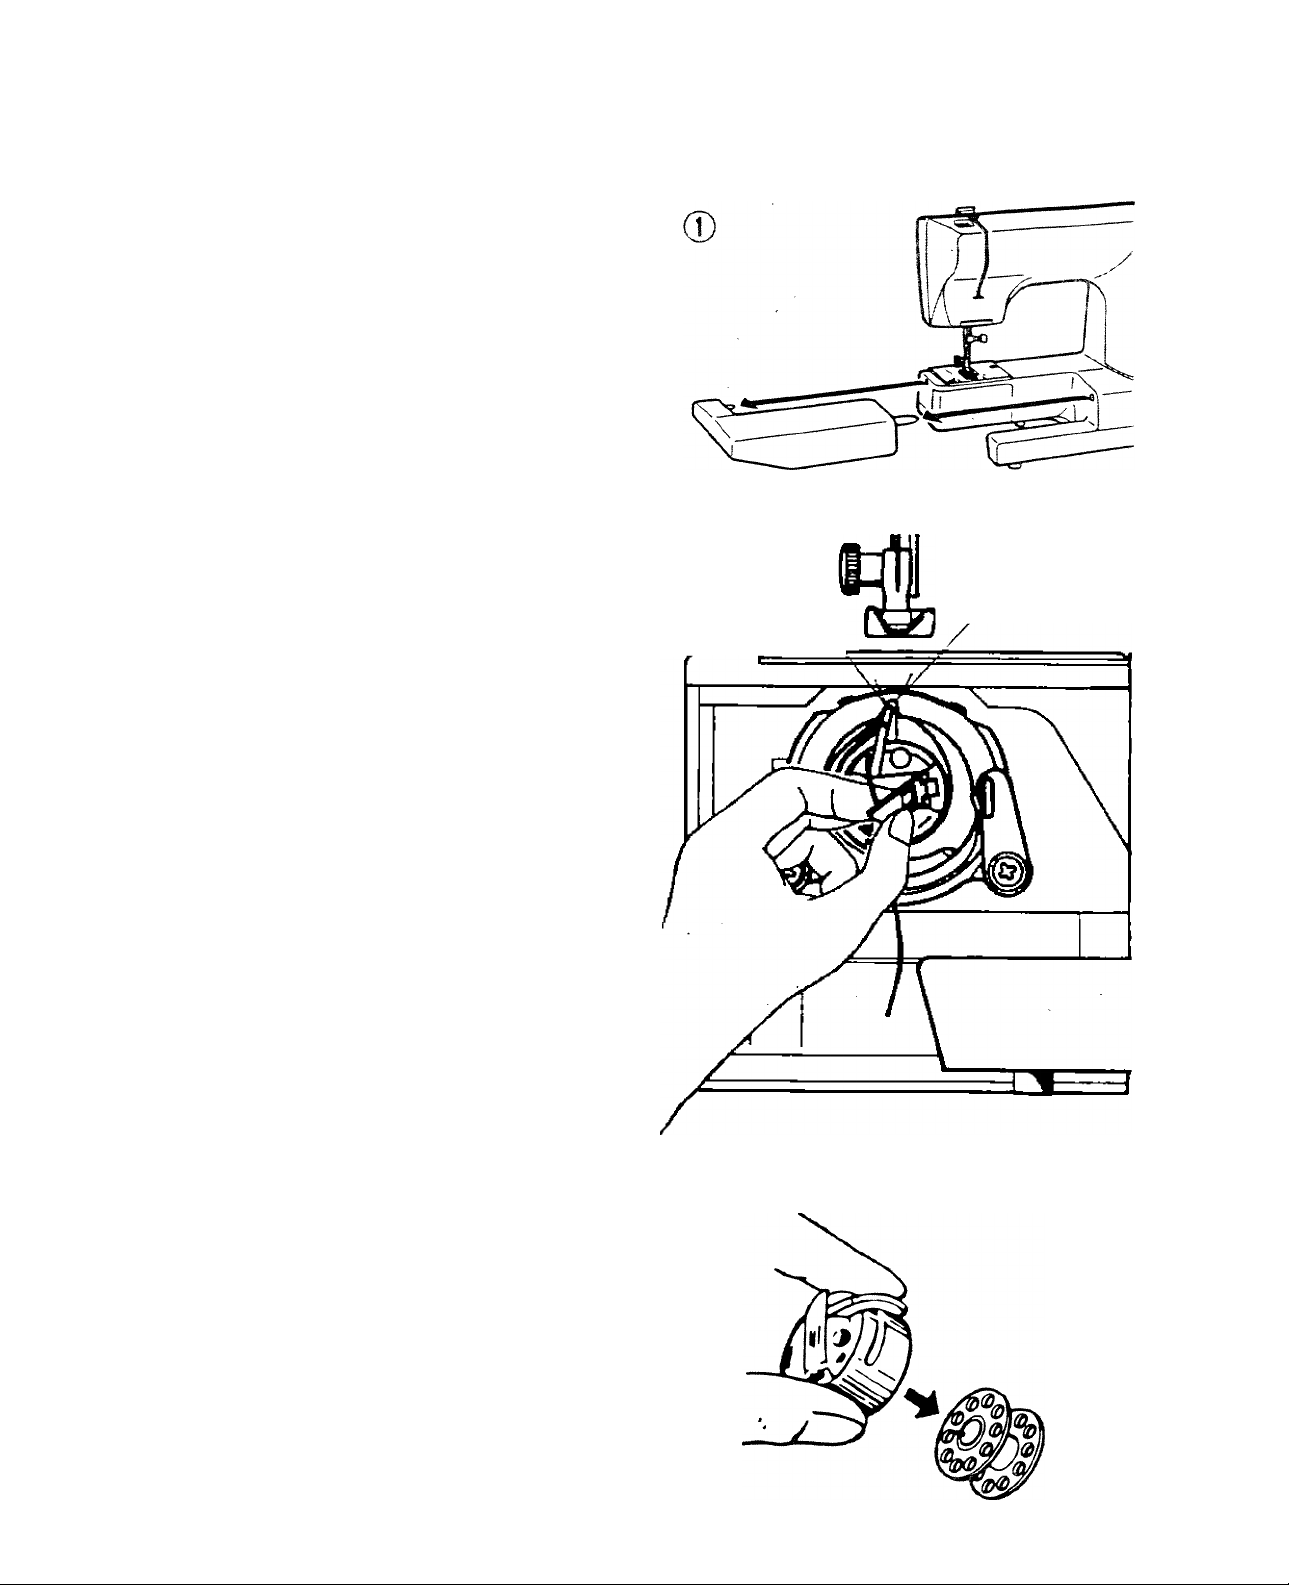
RBimovmQ BOBBIN case
3;-PJTTLl
1. Remove the extension table from the
machine by puiling it to the left.
ha. Open the bobbin access cover by
pulling it down at the notch.
b. With your forefinger and thumb, pull
up the latch on the bobbin case.
c. Using this latch, lift the bobbin case out
of the shuttle.
Locating pin
Locating groove
A
3. Turn the bobbin case upside down and the
bobbin will drop out of the case.
Page 12
la
......
. " ■ '. •
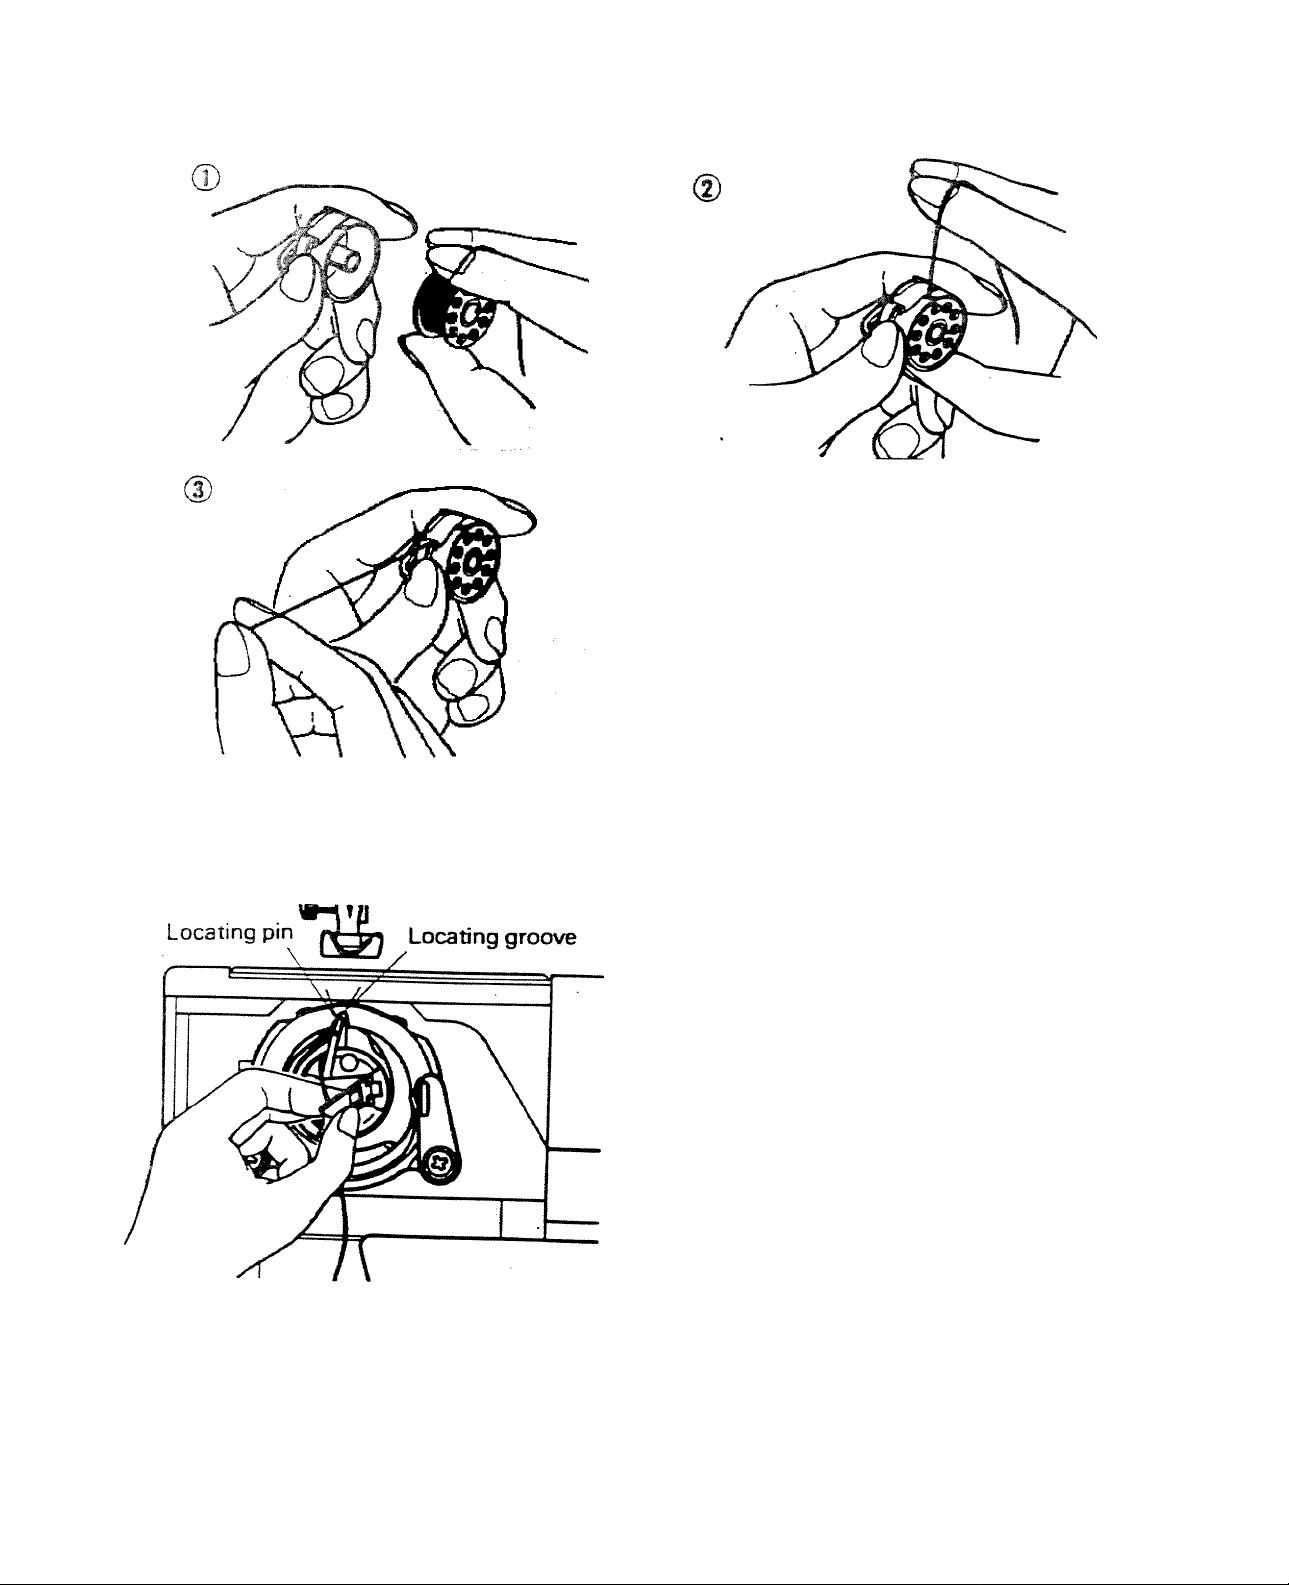
IWSEHTIMG BOBBIN INTO BOBBIN CASE
1. Insert the bobbin into the bobbin case with
the thread running clockwise.
2. Pull the thread through the slit in the
bobbin case.
3 a. Pull the thread underneath the flat
tension spring. It will click when it is in
place.
b- Pull about 6” (15 cm) of the thread from
the bobbin case, to be used later.
INSERT THE BOBBIN CASE INTO THE SHUTTLE
1. -Hold the latch open, with the locating pin
straight up.
2. Slide the bobbin case onto the centre
spindle of the shuttle, keeping the thread
towards you.
NOTE; Be sure the locating pin fits into
3. Release the latch to lock the bobbin case
in place.
the locating groove at the top of
the shuttle.
10
Page 13
■ ■■
NEEDLE AND THREAD TABLE
Use System 705 needles. The size of the
needle should conform to the size of the
thread and both should be suitable to the
material. The same size and type thread
should be used in the bobbin as on the upper
part of the machine for ordinary sewing.
Thread Size
Cotton 60-100
Synthetic
Machine embroidery
Cotton
Synthetic
Silk A
Machine embroidery
Cotton 60 80
Mercerized 50-60
Synthetic
Cotton 30-60
Mercerized heavy
duty
Needle Size Fabric
Continental / American
Blue shank needle
70(7) 11
or
80(8) 12
80(8)
or
90(9)
100 (10) 16 medium to heavy
or
12
or
14
Never use a bent needle nor one with a blunt
point.
For successful sewing of stretch fabrics use
the stretch stitch needles with blue shank.
All stretch fabrics.
Sheer cottons, silk, .
synthetics, fine laces.
batiste, dimity.
Medium weight cottons.
medium weight synthetics.
poplin, seersucker.
gingham, velvet, light
weight woollens, linen.
Heavy weight cottons.
weight woollens, denim.
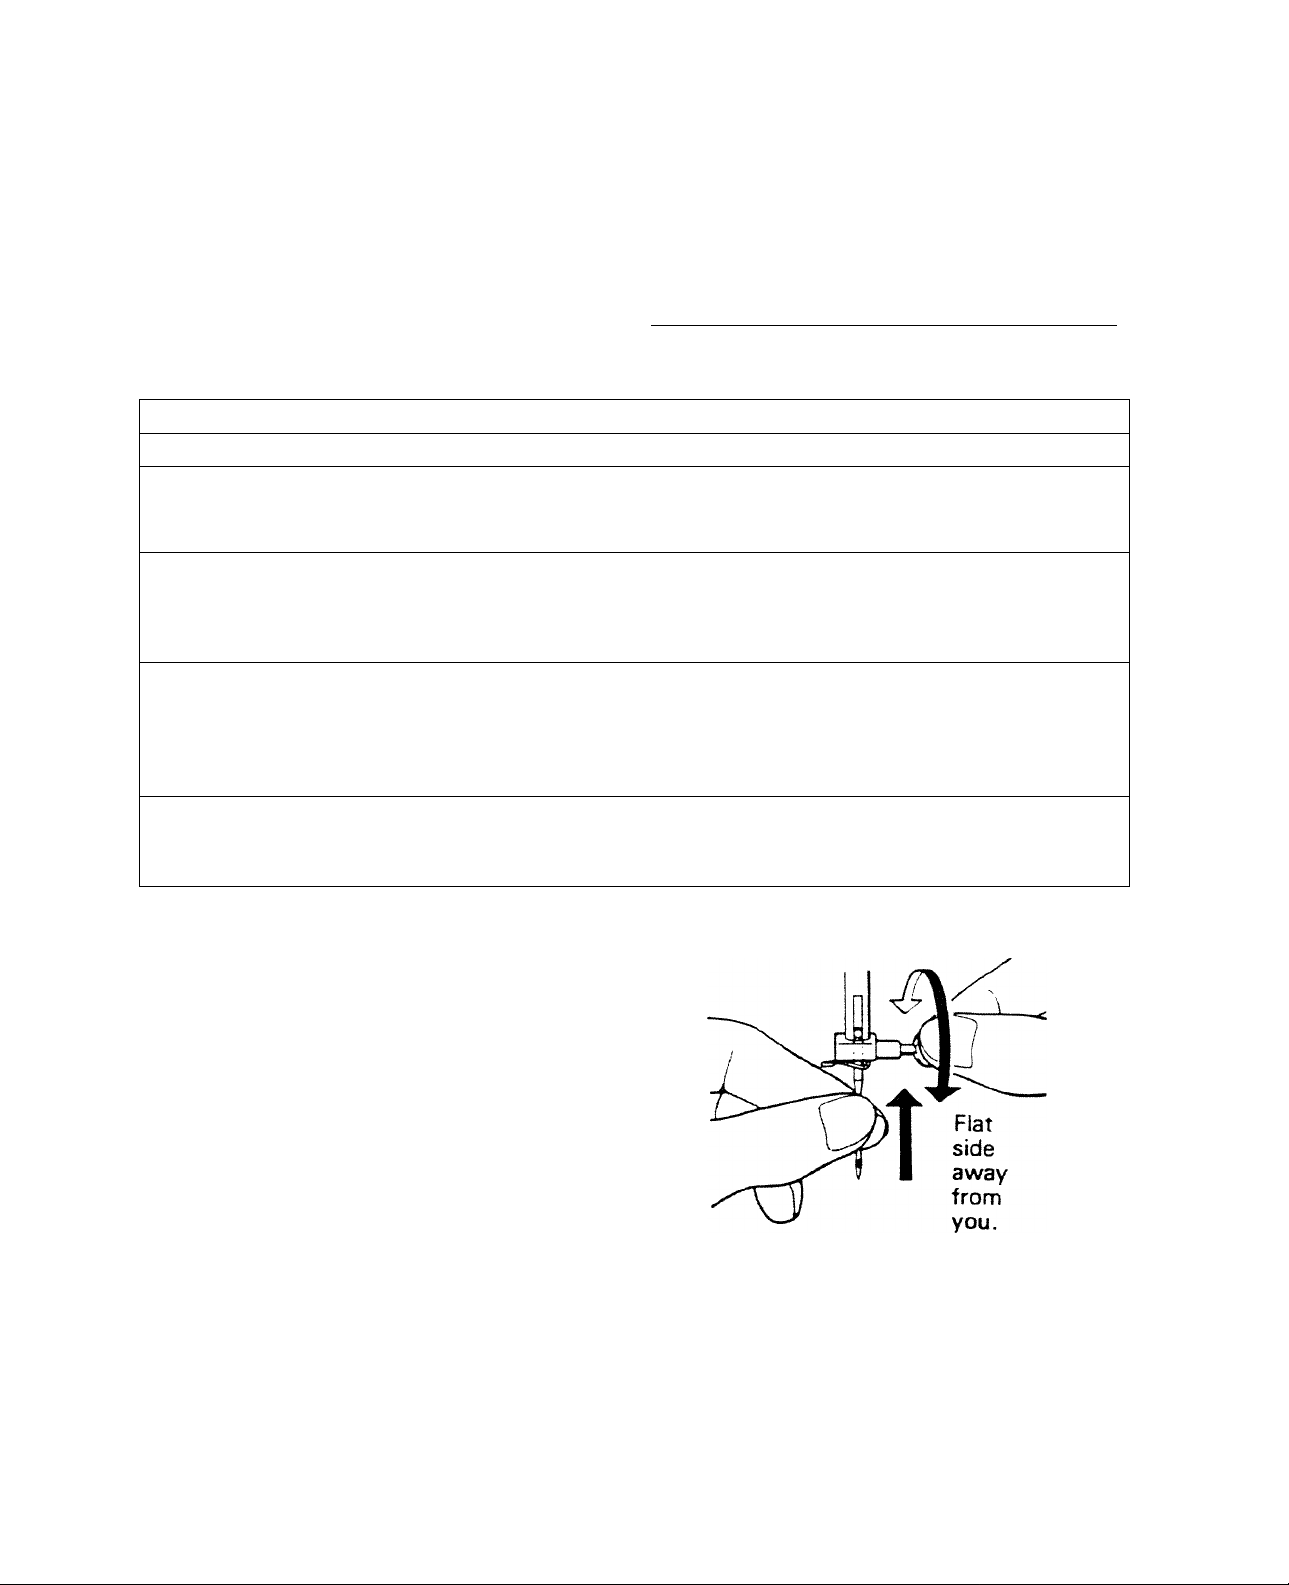
CHANGING NEEDLES
Raise needle bar to its highest position by
turning the hand wheel towards you. Loosen
the needle clamp screw, and remove old or
damaged needle.
Holding the new needle with the flat side
away from you, slip it up into the needle bar
as far as it will go. Tighten the needle clamp
screw.
11
Page 14

THIilADIPJG TOP THREAD
Thread the machine in the follcjwing
order as'illustrated.
Raise the presser foot lever. Raise the
needle to its highest position by rotating
the hand wheel towards you.
1.
Draw the thread from the spool passing
through the top thread guide, and pull it
towards you.
2.
Holding the thread from spool with your
right hand, pull it downward positively
through the tension slot.
12
3.
Slip the thread through the .thread guide
below needle clamp.
Thread the needle from front to back, and
draw about 4" (10 cm) of thread through
the needle eye towards the back of the
machine. .
Page 15

PICKIWG UP BOBBIN THREAD
1. Raise the presser foot lever.
Holding the top thread loosely in the left
hand, turn the hand wheel towards you
with your right hand and bring the needle
to its highest position.
3. Lightly pulling the top thread, pick up the
bobbin thread appearing through the
needle plate slot.
4. Pull both top and bobbin threads
together, passing under the presser foot
towards the rear of the machine, leaving
about 6" (15 cm| clear.
If you cannot pick up the bobbin thread by
following the above steps, check the
following points.
1. Is the needle correctly threaded ?
2. Is the thread tangled around the needle ?
3. Is there about 6” (15 cm)of thread com
ing out from the bobbin case ?
4. Is the thread from bobbin case tangled ?
Page 16

STRAIGHT STITCHING
ADJUSTING TOP THREAD
TENSION
Straight Stitching
The good appearance of your stitching is
largely dependent on the balanced tension of
top and bobbin threads. The tension is well
balanced when these two threads lock in the
middle of layers of fabric. You can adjust the
tension of the top thread with the thread
tension control. If the top thread is too tight,
turn this control away from you to reduce the
tension. If the top thread is too loose, turn it
towards you to increase the tension.
Fabric
puckers
Zig-zag Stitching
The top thread may appear on the underside
of the fabric depending upon the thread,
fabric, type of stitch and sewing speed, but
the bobbin thread must NEVER appear on the
top of the fabric.
ADJUSTING BOBBIN THREAD TENSION
It the straight stitches do not appear satisfac
tory, adjust the tension of top thread, as bobbin
thread tension requires adjustment less fre
quently than the top thread tension.
If the tension looks well balanced, but the
fabric puckers badly, both top and bobbin
thread tensions have to be adjusted.
To check and see if the bobbin thread tension
is correct, suspend the bobbin case by the
thread and jerk it once. The correct bobbin
tension will result in the thread unwinding
only 1 inch.
Use a screwdriver to adjust tension on the
bobbin case.
Page 17

PRESSER FEET
This machine is fitted with a zigzag presser
foot for general sewing purposes. In the
accessor/ box are the following additional
presser feet;
1. Straight stitch foot
2. Zipper foot
3. Blind hem foot
CHANGING PRESSER FEET
Be sure needle is in the up position. Raise
presser foot lever.
Snap-on presser feel
1. Raise foot release lever to remove the
foot. (Fig. 1)
2. Place the desired foot on the needle plate
aligning needle holes. (Fig. 1 )
3. Lower the presser foot lever so that the
foot holder snaps on the foot. (Fig. 2)
DARNING PLATE
There are a few times when you want to
control the feeding of the fabric yourself.
Raise needle to its highest position and raise
presser foot., Attach darning plate over
needle plate aligning two pins of darning
plate with holes of needle plate. You may
then determine the movement of the fabric
yourself.
Fig. 1
Fig. 2
Page 18

STlTC¡’j SSLSCTOR
Your sewing machine can sew a variety of
stitches, and these are shown on the Stitch
Selector Dial’. In addtion, there are three
buTtonhoie Slaps pictured on the dial also.
Straight stitch
NOTE: Beginning on page 19, you will find
detailed instructions on the use of
each stitch.
STITCH LENGTH CONTROL
To lengthen a stitch, turn the dial towards
you. To shorten a stitch, you turn the dial
away from you. THE HIGHER THE NUMBERTHE LONGER THE STITCH.
NOTE; Study the orange, green, yellow and
blue sections on this control. These
are recommended ranges of stitch
Orange zone
j
I Green zone
Yellow zone
Blue zone
•Model ET-10 only.
length and colour-coded to the
stitches pictured on the • Stitch
Selector.
The orange line between 0 and 1 is the sening
used for the shonest stitches such as in satin
stitch.
— Straight stitch
Zig-zag stitch
— Three-step zig-zag
stitch
BBnd tern stitch
* Lingerie stitch
— Ric-tac stitch .
Triple straight stitch
* Stretch overlock stitch li
* Overlook stitch
* Smocking stitch
— Buttonhole stitch
1
1
M'M$
5: . .
J ■
1 .
■
■
s
a fl <D
16
* Model ET-10 only.
Page 19

SEWEiSE STITCH LEVEH
It is best to begin and end seams with a few
stitches made in reverse. This is called
'backtacking', which fastens the ends of the
seams and prevents unravelling.
To achieve reverse sewing, push down the
(Over as shown, and hold there during sewing.
I he fabric will feed backwards until you
release the lever, when it will feed forward
again.
SEAM .3UIDE LIMES
To help you sew straight seams and seams of
uniform width, guide lines have been printed
on the needle plate either side of the needle.
As a standard seam is 5/8” (16 mm) these
lines have been extended in front of, and
beyond the needle. ’
\
Reverse stitch lever
The 'cross lines' are 'cornering guides' which
help when turning a square corner 5/8”
(16 mm) from the fabric edge. Further details
of this can be found on page 20.
17
Page 20

2wmm
,^ow that yoy are familiar with the controls on your sewing machine and with the m:c8s«>rm
provided for the machine, you are ready to start to saw. Mow are some good habits to follow
sach time you sit down at your machine.
TO SEW
Check the needle-it should be straight,
properly set and sharp on the point.
It should be the correct size for the fabric
and thread being used. Do not be afraid
to change your needle frequently. Many
of the new fabrics made of synthetic
blends tend to dull the needles more
easily than fabrics made of natural fibres.
2. Before placing the material on the
machine, see that the ends of the threads
have been drawn about 6" (15 cm) to the
rear of the machine. Hold on the threads
during the sewing of the first 3 or 4
stitches of the seam.
5. Run the machine at a slow, even speed.
The more pressure you put on the foot
control, the faster the machine will sew.
Fasten each seam by back tacking at the
beginning and end of the seam.
fabric you plan to use. The fabric should
be double thickness. Adjust the machine
for the length of stitch and tension
suitable to your fabric.
Fabric should be placed under the presser
foot with the bulk of the material to the
left of the needle and the right edge of the
material placed on the 5/8" (16 mm) seam
marking on the needle plate when making
a simple seam.
needle at its highest point.
8. Guide the fabric gently with your hand in
front of the needle. Never pull or hold the
fabric in such a way that the normal
feeding is altered.
9. When turning the hand wheel manually,
always turn it towards you.
Page 21

37HA3GHT STITCHING
Tc^J thread tersion contrd
Stitch selector
-X----------1
*NOTE; For most straight stitching, the
straight foot will give your best control, but
you may use the zig-zag foot if you prefer.
Straight stitch is probably the most frequently
used of all stitches. Apart from seaming, its
many uses include tacking, basting, top
stitching, gathering, inserting zips etc. It can
be used with single or twin-needles.
FASTENING A SEAM
Be sure both threads are drawn back under
the presser foot. Lower needle into fabric
about 1/2” !1 cm) from beginning of seam.
Depress the reverse stitch lever and stitch in
reverse until needle reaches beginning of
seam. Release control and complete seam.
When you reach the end, depress the reverse
stitch lever and sew back (backtack) over
1/2” (1 cm) of completed seam.
^1
i
mi
£=S }
r>
REMOVING FABRIC
First turn the handwheel toward you until the
needle is at its highest position, then raise the
presser foot, draw materials to the rear and
cut off excess thread with the thread cutter
located on the foot release lever as shown.
Page 22

-^-23
.Ccjmering
Guide
TURNING A SQUARE CORNER
To turn a square comer 5/8" {16 mm) from
the fabric edge, stop stitching with the
needle tip piercing the fabric, when reaching
the cornering guide as shown. Raise the
presser foot, turn fabric. New stitching line
will align with 5/8" (16 mm) seam guide on
side of needle plate. Lower the presser foot
and begin stitching in new direction.
TOP-STITCHING
This is a seam you may want to show off. It's
on the front side of the garment, possibly at
the top of a "kick pleat" or on a lapel, both
functional and decorative. Usually, it's a
simple, forward stitch — with an extra-long
stitch length, or with special thread, match
ing or contrasting.
20
DARNING
SETTINGS
Darning plate
No Presser Foot
Remove presser foot, stretch fabric between
embroidery hoops with hole centred. Draw
the bobbin thread up through the fabric by
holding the top thread and making one stitch
at the spot where you wish to start darning.
Lowering the presser bar, start sewing at a
slow to medium speed. Move the fabric back
and forth with a steady rhythm to cover the
darning area. When it is covered, turn the
fabric and sew another layer of stitching
across the first layer of stitching.
Page 23

TEMPORARY SEWING BY
MACHINEjBASTING)
No longer do you need to baste by hand.
Basting by machine is easy —simply use
straight stitching with longest available
length setting.
PIN BASTING
Sewing over pins is possible as shown
because the presser foot is 'hinged' -and will
'ride' over the pin points. These must be
inserted at right angles to the seam line. They
must always be on the top side of the fabric
NEVER beneath. Sew slowly, and if in doubt,
remove each pin as you approach it.
GATHERING
Set the stitch length at 4 and the top thread
tension at 1 - 2. Sew one or as many as rows
of parallel stitches as required, but do not
backtack at the beginnings and ends of the
rows.
Remove the fabric and draw up the bobbin
thread to gather the fabric to the required
length or fullness. Re-set top thread tension
control to its normal position. .
21
Page 24

INSERTING ZIPPERS AND PIPING
Use zipper foot which allows you to sew to
the right or left of the zipper (or close to a
cord).
Needle to left
of foot
Needle to right
of foot
INSERTING ZIPPERS
To sew down the right side, attach left side
of zipper foot to presser foot holder so that
the needle passes through the opening on the
left side of the foot.
To sew down the left side, attach right side of
foot to foot holder.
PIPING OR CORDING
To pipe soft furnishings, cover cord with a
bias strip of fabric and pin or tack it to the
main piece of fabric. . ‘
Attach right side of zipper foot to foot holder
so that needle passes through the opening on
the right side of the foot.
'22
Page 25

Zm-ZfAQ STJTCHING
Top thread tansion control
Stitch selector
SELECT ZIGZAG WIDTH
By rotating the stitch selector, it is possible to
choose eight different widths of zigzag.
These are illustrated on the dial which will
produce the various zigzag widths as shown in
the diagram.
The stitch selector can be turned in succession
with ease within the zigzag stitch range. Use
this feature to make decorative patterns.
SATIN STITCH
Closely spaced zigzag stitches are called satin
stitches.
Use this stitch for bar tacking, appliqueing,
embroidery and monogramming.
NOTE: You may need to loosen the top thread
tension to prevent puckering. The wider
the stitch, the looser the tension should
be.
Use tissue paper or interfacing beneath a soft
fabric to improve the appearance of this stitch.
:
wiy mtitl
23
Page 26

OVERCASTING STITCH
Use this stitch to keep seams or fabric from
raveling.
NOTE: To reinforce seams with overcasting,
it is recommended to use the three-
step zigzag (see page 26).
1. Stitch so that the point of the zigzag clears
the raw edge of the fabric.
BUTTON SEWING
SETTINGS
Stitch Selector - Zig-zag Stitch
Use Darning Plate.
1. Fix the button on fabric at desired
position with clear tape.
2. Align two holes of button with slot of
presser foot and lower foot to hold the
button securely.
3. Turn hand wheel manually until needle
point is just above button.
4. Set stitch selector at desired zigzag stitch
position so needle will enter one hole of
the button.
5. Turn hand wheel again by hand so needle
enters second hole. Reset stitch selector
if necessary. Make 5 or 6 stitches. ■
6.
Finish sewing with an extra two inches of
thread remaining. Draw these threads to
reverse side of garment and tie.
When sewing a flat button, place needle or
pm between holes of button as shown to
provide flexibility for buttoning.
APPLIQUE
To applique a design on a sewing project or
garment:
1. Baste the applique to the top of your fabric.
2. Then use satin stitch to attach permanently.
You may want to use a contrasting color
thread.
NOTE. For best results, be sure your satin stitch
covers the bottom fabric and the top
fabric.
24
Page 27

jmgee:2 stitch
Top thirad terelon control
(Mode! ET-10 only)
( ^ f Л
Чз
--------о—-------------------------
Stitch sdector
/ ^ ^
В
J
SEAM AND OVERCAST IN ONE
and overcasting
sheer, soft fabrics in one operation It also
prMuces a delicate shell hem on lingerie and
Other fine garments.
P^ce the right sides of the fabric together
and position under the presser foot ^ that
he zig-z^ part of the stitch sews just over
the raw edge.
SHELL HEM
Turn under the raw edge and press. Place the
fabric right side up so that the zig-zag part of
the stitch sews just over the folded edge
pulling the fabric in to form a shell hem ТИгт^
away excess fabric close to the stitching line.
Regular
lingerie stitch
25
Page 28

'THREi-S'TS? ZIG-ZAG STITCH
thi^d COTtrd
Stitch
■«•a:-»:*;!-!:*-*,'*»:.***! :
-iwnwmuwwwii
This IS a strong stitch because as its name
implies, it makes three short stitches where
the normal zig-zag makes only one.
For this reason it is highly recommended for
overcasting all types of fabrics
It IS also ideal for mending tears, patching,
sewing towelling, patch-work and attaching
flat elastic.
MENDING A TEAR
Place beginning of tear under presser foot
and sew, ensuring stitches catch either side
of tear. When repairing three-cornered tears,
stitch down each side to the centre.
OVERCASTING
Place fabric under the presser foot so that the
needle just sews over the raw edge — see
also page 24.
26
Page 29

Bumo HEM
Top thread tension confl-ol
Stitch selector
Blind stitch hems provide a durable hem finish
that is almost invisible and saves hours of
tedious hand sewing.
The important thing to remember is the folding
of the material. Follow the instructions carefully,
studying the diagrams below. It is advisable to
practise first on a waste piece of the same
material you intend using.
CD
First neaten the raw edge. For lightweights turn up and
baste about 3/8 ilOmm). For heavyweights Over
cast, see Page 24 or 26.
Inside
of dress
Final
hem
length
Neatened
raw edge
Screw
Work with the 'wrong side' of the fabric
uppermost and allow about 2li" 165 mm) in
excess of your final desired length. Also use a
closely matching coloured thread.
Set your machine as illustrated above, adjusting
slightly according to the thickness of the
material. Also loosen the top thread tension.
@
Final
hem
length-------
Fold garment away from hem leaving about 1 /8'
14 mm) of hem edge extending.
Neatened
raw edge
0
iuide
Place garment under blind stitch foot with the fold of
the garment against guide and slide it by turning screw
so that the zig-zag just catches the fold.
Press both sides of the finished hem. The right side of
the garment will show only the blind stitches.
27
Page 30

STRETCH STITCHES
Top thread tension cono'ol
Stitch seiector
When sewing stretch stitches on stretch
fabric, use the stretch stitch needle with a
blue shank. When sewing stretch stitches on
non-stretch fabrics, use normal needles.
Stretch stitches, as their names imply, are
mainly for use on stretch and knit fabrics
. ■. . ■! ‘ ' ' • - • : ■ .* * • . ■ ■ ;:: I, »':
such as stretch nylon, stretch towelling,
jersey and cotton jersey; and for sewing
together knitted garments. Stretch stitches
can also be used on non-stretch fabrics.
1. Triple straight stitch
• )\y\
2. Ric-rac stitch
3. Smocking stitch (Model ET-10 only)
4. Overlockstitch (Model ET-10 only!
5. Stretch overlook stitch (Model ET-10 only)
ADJUSTING STITCH LENGTH
Depending upon your preference in stitch
patterns, you may make stretch stitches
closer together without changing the balance
of stitches by turning stitch length dial away
from you within yellow range.
28
Page 31

TRIPLE STRAIGHT STITCH
SETTINGS .
Stitch Selector - il!
Stitch Length - Yellow Range
1 ripie straight stitch is far stronger than
ordinary straight stitch because it locks three
times — forwards, backwards and forwards.
It is particularly suitable for reinforcing the
seams of sportswear in stretch and non
stretch fabrics, and for curved seams which
take a lot of strain.
Use this stitch also to top-stitch round lapels,
collars and cuffs to give a professional finish
TO your garments.
RIC-RAC STITCH
Stitch Selector - %
Stitch Length - Yellow Range
Ric-rac is a quick method of finishing a raw
edge and providing a decorative top-stitch in
one operation. It is ideal for edging neck
bands, armholes, sleeves and hems.
SMOCKING STITCH
Stitch Selector - ^
Stitch Length - Yellow Range
1. Sew rows of straight stitches 1 /2" (1 cm)
apart. Draw up the bobbin thread to
gather the fabric to the required lingth.
If required, back the gathering with a strip
of fabric or bias binding.
2. Sew smocking stitch between the rows of
gathering. When complete, remove the
gathering stitches.
Note; When smocking a garment, the stitch
ing should be done before the piece is
sewn into the garment.
» (Model ET-10 only)
29
Page 32

STRETCH OVERLOOK STITCH
^ (Model ET-10 only)
Stitch Selector - K
Stitch Length - Yellow Range
Designed to produce a narrow, supple seam,
particularly suited to swimwear, sportswear,
T-shirts, babywear in stretch nylon, stretch
towelling, jersey and cotton jersey.
Hand and machine knitted clothes can be
seamed or altered using this stitch, which will
also attach neckbands and sleevebands.
OVERLOOK STITCH
^ (Model ET-10 only)
Stitch Selector - ^
Stitch Length - Yellow Range
This is the same type stitch used by the
garment industry in making sportswear—it
forms and finishes the seam in one operation.
It's very effective for use in repairing raw or
worn edges of older garments.
30
Page 33

3UT1*C?J>10LE ^AlCiWG
Tcp t»«on comrd
Stitch setectcsr
** ADJUSTING STITCH LENGTH
Depending upon your fabric or your own
preference in buttonholes, you may alter the
buttonhole stitch density within the blue
buttonhole range on the stitch length control.
^ turn the control towards
2. For less density, turn the control towards
O .
PREPARATION
Carefully mark the buttonhole length on your
garment. Mount the buttonhole guide onto
the presser foot so that rear edge of presser
foot is at the rear end of the guide as shown
right. Place the fabric with the buttonhole
marked under the buttonhole guide. Slide the
guide forward so that the needle pierces the
fabric at the beginning of the buttonhole.
You have been provided with a standard
buttonhole guide for making buttonholes.
Reproduction of the identical size button
holes is facilitated with the aid of the
graduations on the guide. Graduations act as
reference mark.
(D
31
Page 34

0
1. Set stitch selector at . Stitch forward
until you reach the front markir^ of your
buttonhole. Stop seywng at the left stitch
and then raise needle to Its highest
position.
2. Set stitch selector at Li and bartack
4 or 5 stitches. Stop sewing at the right
stitch. Raise needle to its highest position
as in step 1. ,
0
Set stitch selector at i.lf and continue
sewing until needle reaches beginning of
your buttonhole. Stop sewing at the right
stitch and then raise rieedle as in steps
1 and 2.
Set stitch selector at jj again and bartack
to complete buttonhole.
To make firm well stitched buttonholes in
heavier fabrics, repeat steps 1 and 3.
32
Page 35

CORDED BUI rONHOLES
Hook filler cord (crochet thread or button
hole twist) to the spur, pull both ends of cord
forward under the guide. Sew buttonhole in
such a way that zig-zag stitches cover the
cord. ,
When stitching is completed, release cord'
from foot, pull ends of cord and snip off extra
length.
TIPS ON BUTTONHOLING
scrap of fabric you plan to use Try the
buttonhole with the button you will use.
Always use an interfacing in area of garment
where buttonholes are placed. Tissue paper
or regular interfacing can be used. Tear papj
away after stitching, if it is used.
For heavier weight fabrics, loosen your top
thread tension slightly. ^
‘'“'“"foie on a
33
Page 36

3. CARING FOR THE MACHINE
CHANGE THE LIGHT BULB
1. Unplug the machine.
I
2. a. Using the screw driver, push down the
lever located behind the presser bar and
the bulb will come out.
b. Push the lever to the right to lock.
3. a. Push up the bulb and turn slightly to the
left.
b. Pull down to remove it.
4. a. Insert the new bulb and turn it with
some upward pressure until it stops.
b. Push up the bulb and turn to the right to
lock into place.
5. Push the lever back to the left and then up
into the machine.
CLEANING YOUR MACHINE
Remove mains plug before carrying out any
of the maintenance operations described
below.
Your machine will offer years of household
sewing service, if you clean the machine
regularly, by just removing dusts and lints.
Note: Your machine is produced with the
quality components that are per
manently lubricated, so oiling is not
necessary under the normal use of
household sewing.
CLEANING FEED DOGS
1. Unplug the machine and remove the
presser foot.
2. Remove the needle plate with the large
screwdriver.
3. Use the brush to remove the lint that may
have accumulated around the feed dogs
and in the shuttle area.
34
Page 37

CLEANING SHUTTLE
Shuttle driver
Shuttle
Shuttle cover
Bobbin
case
1. Raise needle to its highest position.
2. a. Take , out the bobbin case from the
shuttle.
b. Turn the two shuttle cover latches
outwards.
c. Take out shuttle cover and thè shuttle.
3. Clean feed dogs and shuttle with brush.
Note: Apply a drop of sewing machine oil
onto the centre stud of shuttle race
as indicated by an arrow
4. a.
Be sure the shuttle driver looks as a half
moon on the left side.
Inserting the shuttle in the centre it
should form the other half moon on the
right side.
35
Page 38

4. CHECK CHART FOR PERFORMANCE PROBLEMS
Your sewing machine is a precision instrument, designed to give you many years of trouble-free
sewing with mmumum maintenance. If you have any performance problem, check the list
anc m many cases you will be able to solve the problem yourself.
GENERAL PROBLEMS
Machine does not sew.
■“Hand wheel is not returned to stitching
position. — Tighten clutch knob (see page 8).
■“Power line cord is not connected. — Check
plug. ■
“Power/light switch turned off. - Turn on the
switch.
Machine jams/knocks.
“Thread is caught in shuttle. - Clean shuttle
(see page 35).
“Needle is damaged. — Replace needle (see
page 11).
Fabric does not move.
Presser foot not lowered. — Lower presser
foot.
“Stitch length control is set at 0. — Set it at 1
to 4.
Darning plate is attached. — Remove darning
plate.
“Thread is knotted under fabric.
STITCHING PROBLEMS
Machine skips stitches.
“Needle size is not correct for thread and fabric
— See page 11.
“Fabric is a ceaain knit or synthetic. — Use
stretch stitch needle.
.Needle is bent or blunt. — Replace needle
(see page 11).
Needle is not all the way up into needle clamp
— — See page 11. “Top thread tension is too tight. - Decrease
top thread tension.
“Machine is not threaded correctly. - See pages
lu and i2.
“Thread is caught in shuttle. - Clean shunie
(see page 35).
Stitches are irregular.
“Needle size is not correct for thread and fabric
— See page 11.
'l^^a^ridT^^ not threaded correctly. - See pages
Top thread tension is too loose. — Increase
top thread tension.
•Fabric is being pulled or pushed against
machine feeding action. - Guide it gently.
Bobbin has not been wound evenly.— Rewind
bobbin.
“There are nicks or burrs at needle plate opening.
— Replace needle plate or smooth out burrs.
Needle breaks.
“Fabric is being pulled or pushed against
^machine feeding action. — Guide it gently.
“Needle size is not correct for thread and fabric
— See page 11.
“Needle is not all the way up into the needle
clamp (see page 11).
“Presser foot holder is not fastened securely.
— Retighten presser foot thumb screw.
THREAD PROBLEMS
Thread bunches.
“Top and bobbin threads are not drawn back
under presser foot before starting seam.
- Draw both threads back under presser foot
. about 6" (15 cm) and hold until a few stitches
are formed.
Needle thread breaks.
“Machine is started too fast. - Start to sew at
a slower speed.
“Machine is not threaded correctly — See
page 12.
“Top thread tension is too tight. - Decrease
top thread tension.
Needle size not correct for thread and fabric
-See page 11. '
Eye of needle has sharp edges. - Replace
needle.
Tfiere are nicks or burrs at needle plate opening.
- Replace needle plate or smooth out burrs.
Bobbin thread breaks.
“Bobbin case is not threaded correctly. — See
page 10.
Lint acumulated in bobbin case or shuttle
- Remove lint (see page35). '
Fabric puckers.
Top and bobbin thread tensions are too tight.
^ — Adjust thread tensions (see page 14)
Two different sizes or types of thread are used
~ thread on top
and in bobbin.
•Needle is bent or blunt. - Replace needle.
Stitch length is too long for sheer or soft
tabric. - Shorten stitch length or use underlay
of tissue paper.
Presser foot holder is not fastened securely
- Retighten presser foot thumb screw.
36
Page 39

3 5. CPTIOWAL EXTRA
On the foliowing pages you will find
illustrated and described a number of
'optional extra' to increase still further its
sewing performance.
' E¥EW FEED FOOT
Even Feed Foot enables you to sew hard-to-sew
fabrics without sliding or slipping and with
perfect matching. Use it for sewing leather,
ultra suede, shiny fabrics (vinyls, patents and
satins), bonded fabrics, pile fabrics and
matching stripes, plaids and patterns. It is not
recommended for use when stretch stitching.
To attach the even feed foot;
I Raise the needle to its highest position. Raise
the presser foot lever.
2. Loosen the presser foot thumb screw and
remove the presser foot holder.
3. Guide the even feed foot into position from
the rear of the machine.
4. Attach the presser bar clamp to the presser
bar and tighten the presser foot screw with
the screwdriver.
5. Attach the screw (A) provided with the foot
to the needle clamp through the fork arm and
tighten securely.
Further details of their availability, together
with the current price can be obtained from
the place from which you purchased your
machine, or in case of difficulty direct from
ourselves.
Presser bar
Needle
clamp
Presser foot
thumb screw
Presser bar
clamp
Fork arm
TUFTING FOOT
This special presser foot is designed to make
Thread loops or tufts which can be utilized for
embroidery sewing or tailor's tacks.
Machine settings:
Stitch selector - 2nd or 3rd of the narrow
zig-zag stitches
Thread tension control - 0
EMBROIDERY
Attractive embroidery designs decorated with
thread tufts are produced by using this foot with
stitch length control between 0 and 1.
TAILOR'S TACKS
Tailor's tacks are used to transfer construction
marking from paper pattern onto double layers
of fabric. Set stitch length control between 0
and 1 or use darning plate. Sew several stitches
and then guide the fabric with your hands
Repeat this process. To remove pattern, cut top
thread loops and thread between tacks.
Separate the layers of fabric clipping thread
between them.
37
Page 40

OVERCASTliye TOOT
This special foot is used to guide the fabric
when overcasting. Use a zig-zag width so
that the needle will span the metal spring on
the foot.
Place the fabric so that the metal spring on
the foot rides on the right edge of the fabric.
Zig-zag stitch around the raw edge of the
fabric so that it is completely covered.
ROLLER FOOT
V- - ■■■I
m i
m
When sewing leather, suede, plastic and
velvet, fit the roller foot to aid the smooth
flow of fabric. However, especially when
sewing softer leather and suede, better
results may be achieved by using the normal
zig-zag foot.
LEATHER/SUEDE
It is easy to sew leather and suede with this
machine to make clothes, bags, belts, purses
etc, but remember that a longer stitch length
IS usually required. You can seam, top-stitch,
satin stitch, embroider, monogram, appliqué,
patchwork, and apply decorative stitches
-just as you can with other fabrics.
PLASTIC
For good results, use a longer stitch length
and use only straight stitch or zig-zag.
VELVET
Use the roller foot to prevent presser foot
marks appearing on velvet. Otherwise sew as
other fabrics.
Page 41

rmm MEEDLE
Twin neaiie is available as an optional extra. Tc^ thread Vision contrd
A twin-needle produces two rows of parallel
stitches for pin tucks, double top stitching
and decorative sewing.
Use only the following stitches when sewing
with twin-needles.
1. Straight stitch
2. First of the 5 narrow zig-zag stitches
3. Blind stitch
4. Triple straight stitch
Never use a twin-needle wider than 1/12''
(1.8 mm).
Never set zig-zag width with twin-needles
beyond the range illustrated alongside.
THREADING TWIN-NEEDLES
1. Fit the extra spool pin as shown in page 7.
Place a spool on each spool pin. Thread
the two threads as one using the double
thread guides provided. Draw one thread
through each of these and then through
each needle from front to back.
2. Pick up bobbin thread as for single needle
sewing. Pull the three threads together
under the presser foot to the back of the
machine, leaving about 6” (15 cm) clear.
39
Page 42

2.; ■ . .. ■:
....................................
V / I
TURNING A CORNER USING A
TWIN NEEDLE
1. Use the hand wheel to stop stitching with
the right-hand needle (the longer of the
two) just piercing the fabric. Turn the
fabric through 45°
Take one stitch, leaving the right-hand
needle piercing the fabric again, and turn
the fabric through another 45°. Continue
sewing.
PIN TUCKS
SETTINGS
Stitch selector Stitch length -
For making pin tucks on shirts and dresses in
fine fabrics, set your machine as above.
Sew one row of double stitches and remove
the fabric. Sewing in ihe same direction,
make parallel rows of double stitches 1 /12” -
3/12" (2-6 mm) apart.
TWIN TOP-STITCHING
For twin lop-stitching of lapels, collars, cuffs
etc., set your machine as follows:
Stitch selector - |
Stitch length - 3-4
2-3
I
40
*>-*• < '.r*- '■‘-r
 Loading...