

Page 1
OPERATORS
INSTRUCTIONS
Page 2

WHITE SEWING MACHINE
Record in space provided below the Serial No.
and Model No. of this appliance.
The Serial No. is located Rear of arm.
The Model No. is located Rear of arm.
Serial No._________^
Model No. 3 1 0
Retain these numbers for future reference.
Page 3

CONTENTS
Page Page
§ I: PRELiMiNARY INFORMATION
Parts Identification
Mam Parts......................................2
Accessories....................................... 4
Electrical Connections
Attaching the Extension Plate
ynr*?REPARATI0¥l3^^
_____
MACHINE
Choosing the Right Needle
Needle, Thread, Fabric and Stitching
Guide................................................. 7
Changing the Needle
Changing the Needle Plate
Changing the Foot.................................. 9
Winding the Bobbin
Adjusting the Bobbin Winder
Upper Threading...................................11
Threading the Bobbin Case
Placing the Bobbin Case in the Shuttle
Hook......................................................12
~§IiF GETTiN¥lranajo¥¥ouR
MACHINE
Selection of the Stitch
Stitch Length Dial
Reverse Button
Stitch Pattern/Buttonhole Dial. . . 14
Relating Stitch Length to Stitch
Width
Controls
Adjusting the Thread Tensions. . . 15
Adjusting the Pressure on the
Fabric and the Feed Dog Height. . 16
Sewing Light
§1V: HOW TO SEW
Preparing to Sew...................................18
Guide the Fabric....................................18
Turning Corners
Curved Seams
Sewing Across Heavy Seams
Free-Arm Sewing
Remnuinn the Work
______________
_______________________
................................................
...........................
................
__________
....................
.............................
....................
...
...........................
.................
..................
.............................
................................
....................................
....................................
......................................
...............
..................................
..............................
...
10
10
12
13
13
14
17
18
18
19
19
19
§V: APPLICATIONS OF THE
STITCHES
3
5
5
6
8
8
Straight Stitch
Seams..............................................20
Basting/Topstitchmg
Darning.......................................... . 20
Cording and Zipper Foot
Quilting Guide..................................21
Zigzag Stitch
Overcasting......................................22
Sewing Knits
Sewing on Buttons
Satin Stitching..................................23
Freehand Monogramming
Appliqué Work..................................24
Gathering over a Cord
Lace Application
Flutter Hem
Sewing Tips
Multiple Stitch Zigzag
Twin Needle Sewing
Buttonholes
Preparation
Builtin Buttonhole.............................29
Turn-Around Buttonhole
Corded Buttonhole
Blind Hem Stitch...................................31
Straight Stretch Stitch...........................32
Stitch-and-Overcast
§VI: CARE AND MAINTENANCE ^
OF YOUR MACHINE
Oiling the Machine
Cleaning and Oiling the Shuttle Race
Area.......................................................34
Problem and Remedies
______________________
................... . . 20
....................................
...........................
with a Thread Shank
..............................
......................................
.....................................
...........................
.............................
......................................
...........................
..............................
................................
.......................
.................
...................
...............
.....................
..................
______________
21
22
22
23
24
25
25
25
26
26
27
28
30
30
32
33
35
_
Page 4
SECTION I
PARTS IDENTIFICATION
MAIN PARTS
PRELIMINARY INFORMATION
Page 5

1. Take-up Lever
2. Pressure Control
3. Top Thread Guides
4. Stitch Pattern/
Buttonhole Dial
5. Bobbin Winder
6. Hand Wheel
Always at its highest position when beginning or ending sewing.
For regulating the pressure on the fabric.
For leading the thread to the tension dial for sewing.
For selecting the stitch pattern and setting the zigzag
width, as well as for easy four-step buttonholes.
For winding thread on a bobbin.
7. Stitch Length Dial
8. Reverse Button
9. Needle Plate
10. Presser Foot
11. Feed Dog
12. Feed Dog Height
Button iinside cover)
13. Access Cover
14. Presser Foot Screw
15. Needle Clamp Screw
16. Tension Dial
17. Check Spring
18. Face Plate
19. Spool Pins
20. Bobbin Winder
Tension Disc
21. Presser Foot Lever
22. Thread Cutter
23. Extension Plate
24. Light Switch
25. Coupling Wheel
For selecting the stitch length between 0 and 1/6" per stitch.
Push the button for easy backtacking to lock the thread ends.
With guide lines for accurate sewing.
For holding the fabric when sewing.
Diamond point to feed fabric accurately.
For regulating the feed dog height for various types of sewing.
Access to the bobbin, the bobbin case and the feed dog height
button.
For clamping the presser foot in place on the presser bar.
For holding the needle in place in the slot of the needle bar.
For regulating, the amount of tension on the upper thread.
For automatic precise flow of the upper thread.
Hinge type. Opened for replacement of the light bulb and
for oiling.
For providing the proper tension on the thread when bobbin
winding.
For raising or lowering the presser bar and the presser foot.
For changing to the flat sewing surface.
For turning on or off the light.
For stopping the movement of the needle bar in order to wind a
bobbin.
Page 6
i X i ( \ \ ' . t ' M M
wnh the following set of accessories to
Buttonhole Foot
Use for buttonhoU
ing
*4- ••»Cl
Two Felt Washers
Pldce the telt
vwiishers under the
spools for best
stitching results.
Quilting Guide
Button Sewing Foot
hold button in place
for stitching. fs
Cording and Zipper Foot
for stitching very
close to the edge of
a cord or zipper.
Screwdrivers
Small one for use
on bobbin tension.
Large one for use on
thumb screw, needle
clamp screw, etc.
Tubed Oiler
lì
a
Straight Stitch Foot and Plate
for straight sewing
on sheer and very
light weight materi
als where extra
support is needed.
Page 7
ELECTRICAL
CONNEC-
TIOISIS
Insert the plug with the inden^
tations on the underside into
the socket on the right side of
the machine. The plug will
only go in one way. Place the
foot control in such a position
that your foot rests comfort
ably on it. Insert the plug into
a wall outlet, 110^120V.
A/hen not in use, keep the plug
iisconnected from machine.
ATTACHING
EXTEN-
SION PLATE
To change to flat sewing
surface, place extension plate
as follows.
1. Turn down the extension
plate support legs (A) with
the left hand.
2. Pull the lock lever (B) and
turn it up to the left.
3. Tilt the extension plate
down to enter the pin |C)
in the corresponding hole
ID) at the rear side free
arm.
i. Turn the lever (B) down to
the right to set the pin
into front hole |E).
\|ote: In case of sewing
tubular areas, detach
the extension plate
for free arm sewing.
Page 8
SECTION II
__
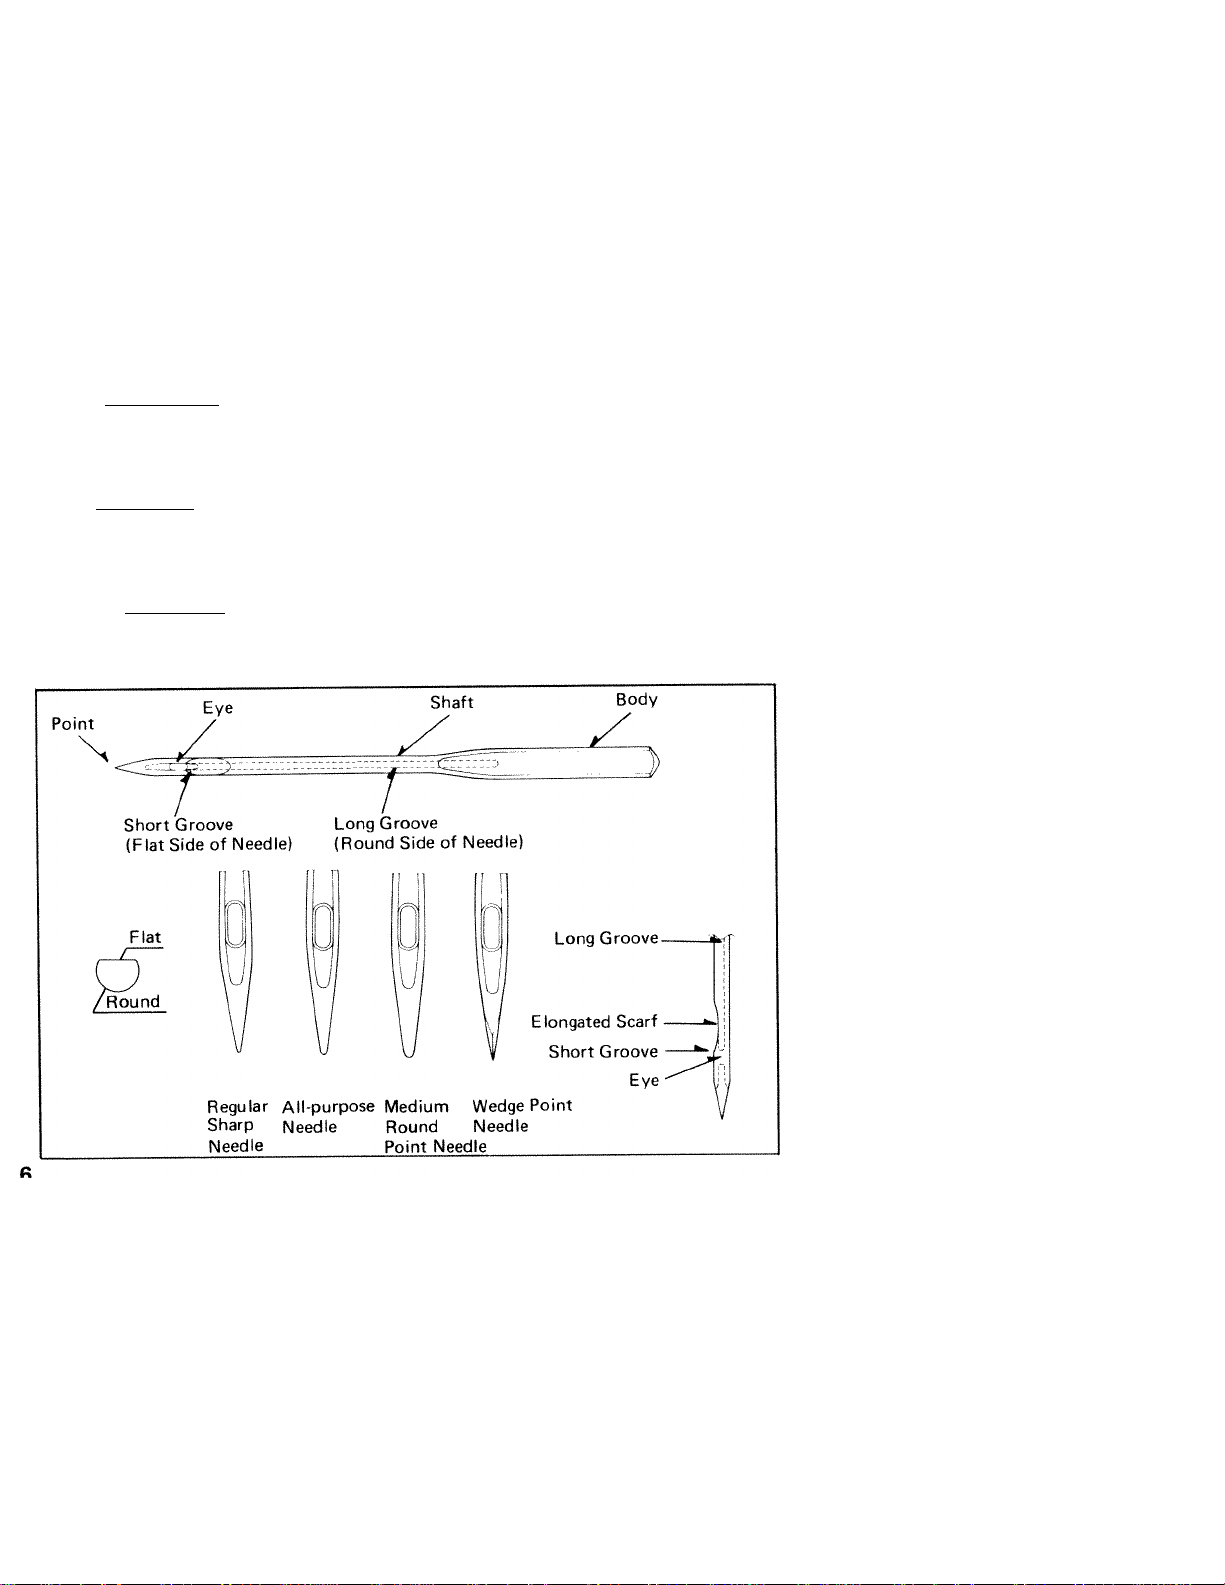
CHOOSING THE RIGHT NEEDLE
TYPES OF NEEDLES
The correct selection of needle to suit the thread and fabric being sewn gives the best
stitching results. Fine fabric should be sewn with fine needles, heavier fabrics with heavier
needles. For best results, sewing machine needles should be replaced when they become
even slightly dull or bent or at the completion of every other garment.
A regular needle is suggested for use with woven fabrics. Needles style 15 x 1, lEuropean
equivalent System 705) are used on the majority of household sewing machine. They
range in sizes from 8 to 20 with the lower number indicating the finer needle. The most
commonly used sizes are 11 and 14.
An all purpose needle is designed to handle knits as well as woven fabrics. It eliminates
skipped stitches and the slight ball will not damage delicate fabrics. This is the needle
provided with your sewing machine and will be used for most of your sewing. A larger
ball point may still be necessary for certain knits, such as bathing suit fabric or power net.
A ball point needle is recommended for use with tricots, jerseys, lingerie and power nets.
Unlike sharp, pointed needles, which pierce fibers of knit fabrics, destroying elasticity, the
ball point slips between fibers, preventing damage to fabric and skipped stitches. These are
available in fine, medium, and heavy ball points.
A wedge point needle is recommended for use with leather and leather look vinyls. A
wedge cutting point pierces leather more easily than ordinary sewing machine needles,
resulting in more satisfactory stitching.
Page 9

MEEDLE, THREAD, FABRIC & STITCHING GUIDE
The correct selection of needle and thread to suit the fabric will result in more satisfactory
stitching. Fine fabrics should be stitched with fine needles, fine thread and short stitches.
For the best results on heavier fabrics, use coarser needles, heavier threads and longer
stitches. Replace the machine needle when it becomes even slightly dull or bent.
Fabric
Extremely heavy
tarpaulin, sacking,
canvas, duck, etc.
Heavy upholstery
fabric, ticking,
denim, leatherette.
Medium heavy drapery
fabric, velveteen,
suiting, felt, terry cloth, etc.
Medium broadcloth,
percale, gingham, linen,
chintz, taffeta, sheer
wool, shantung, etc.
Sheer voile, lawn,
dimity, crepe,
handkerchief linen,
plastic film, etc.
Very sheer chiffon,
batiste, lace, organdy,
nylon net, marquisette, etc.
Needle
No.
18
18
16
14
11
9
Madiiiw
Stitches
PerIndh
6
to
8
8
to
10
10
to
12
12
to
14
14
to
16
(plastic film)
8 to 10
16
to
20
Mercerized
Thread
Heavy Duty
Heavy Duty
Heavy Duty
50
50
60
Syntfietic
Thr^
o
o
o
Page 10
CHANGING THE NEEDLE
Always change the needle after every
othtr garment, especially when sewing on
ijolyester and nylon fabrics which dull
iMMidles much faster. When needles are
dull or bent, they damage both your
fabric and the machine. A general rule
when placing sewing machine needles is
that the flat side of the needle is placed
to the back of the machine, when the
bobbin is put in from the front. If the
needle is inserted incorrectly, the stitches
will not form.
To change the needle:
1. Raise the needle bar to its highest
position by turning the hand wheel
toward you.
2. Loosen needle clamp to remove the
needle.
3. Place needle (flat side to the back and
long groove to the front) in the needle
clamp and push it upward as far as it
will go, tighten needle clamp.
4. After changing the needle, make one
complete turn of the hand wheel by
hand to be sure the needle is clearing
the needle plate.
CHANGING NEEDLE PLATE
Although an all-purpose utility needle
plate is fixed on your machine, for
straight sewing on fine fabric or soft or
very stretchy fabric, you may want to use
the straight stitch needle plate together
with the straight stitch foot, both of
which are included in your accessory box.
To change the needle plate, remove the
two screws holding the plate in place.
Lift the needle plate and replace.
The needle plate is removed for cleaning
the lint which may pile up between
needle plate and feed dogs.
Page 11
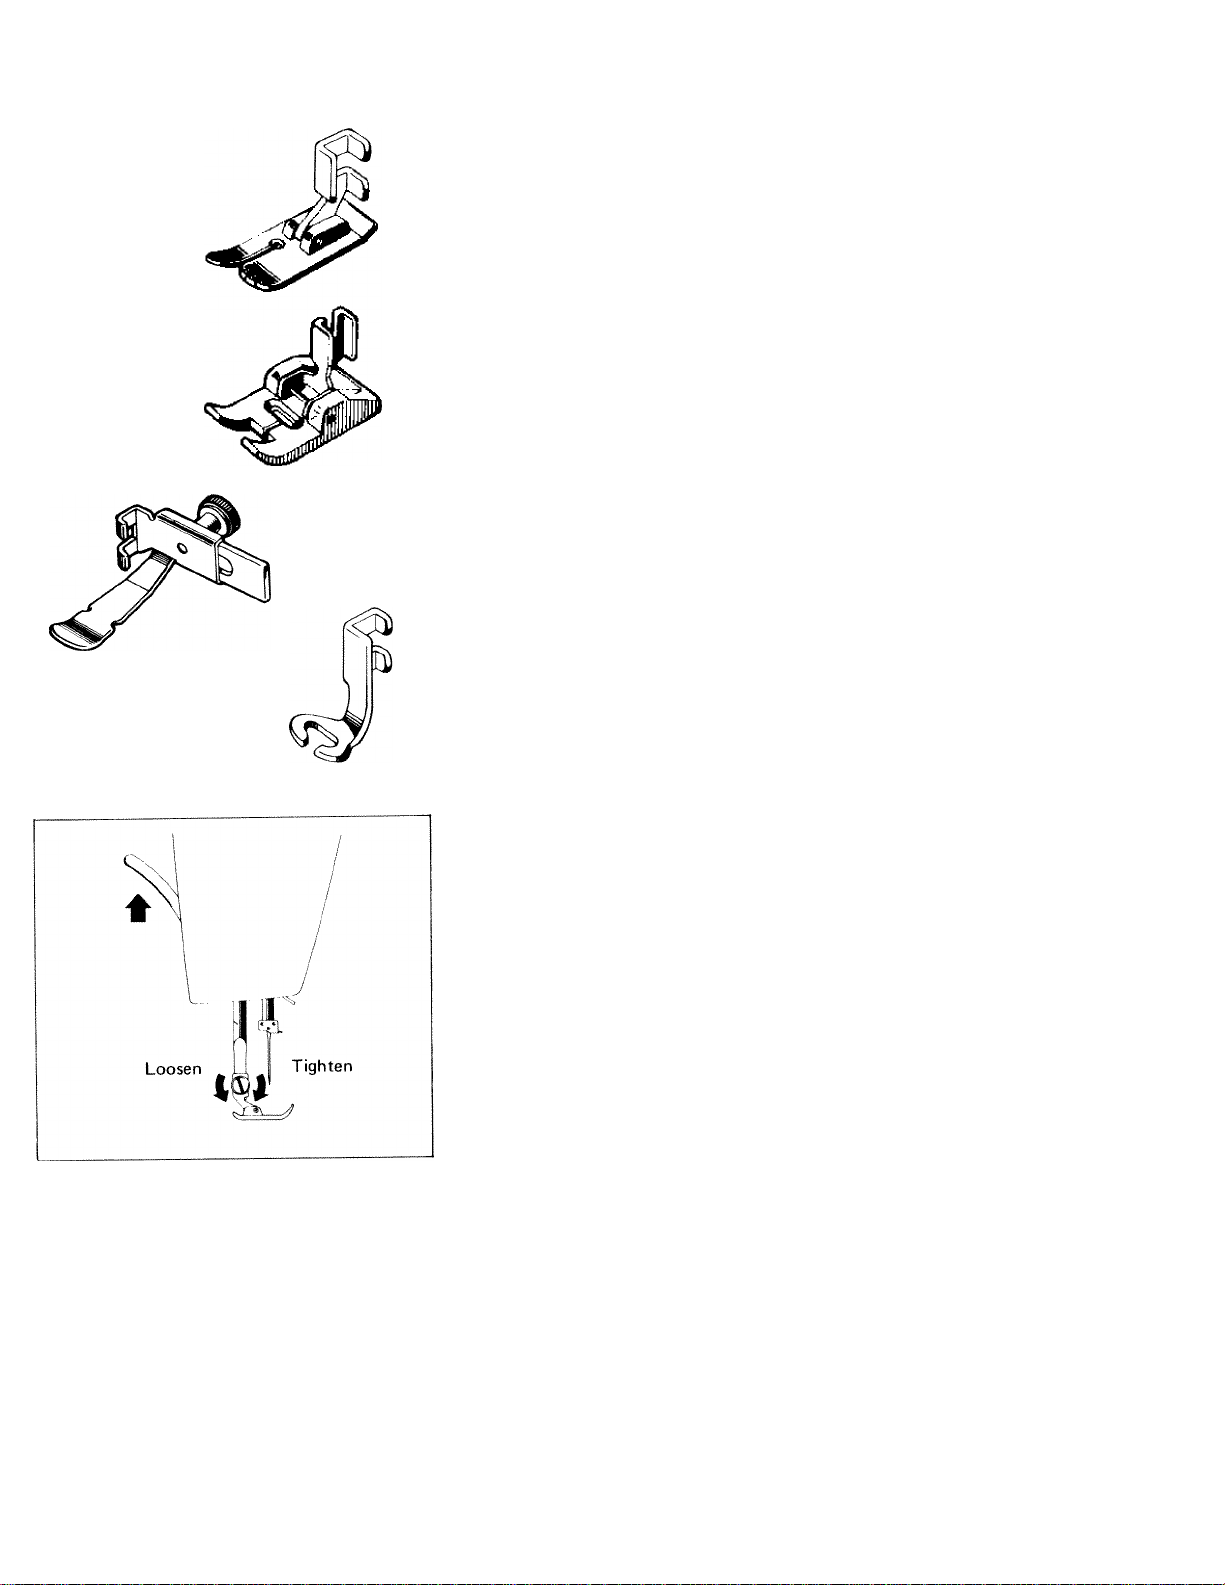
CHANGING THE FOOT
For most ordinary sewing the original
all-purpose foot can be used. How
ever, it is recommended to use the
following special feet in your
accessory box whenever you want a
better stitching result.
Straight Stitch Foot
This has only a narrow hole to accom
modate only straight stitching. It may
be used on sheer or soft fabrics for
more control.
Buttonhole Foot
This foot has a groove underneath, to
allow the narrow satin stitch or
buttonhole to form evenly. However,
if skip stitches occur on sheer fabrics
with this foot, it may be necessary to
use thin paper underneath.
Cording & Zipper Foot, and Button
Foot
Use for sewing very close to the edge
of a cord or zipper, and sewing on
buttons respectively.
Use the large screwdriver to loosen
thumb screw. Turn the screw back
ward until the foot becomes loose.
Then, lift up on presser foot lever until
it is in its highest position in order to
remove the foot. Replace with desired
foot and tighten thumb screw
securely.
Page 12
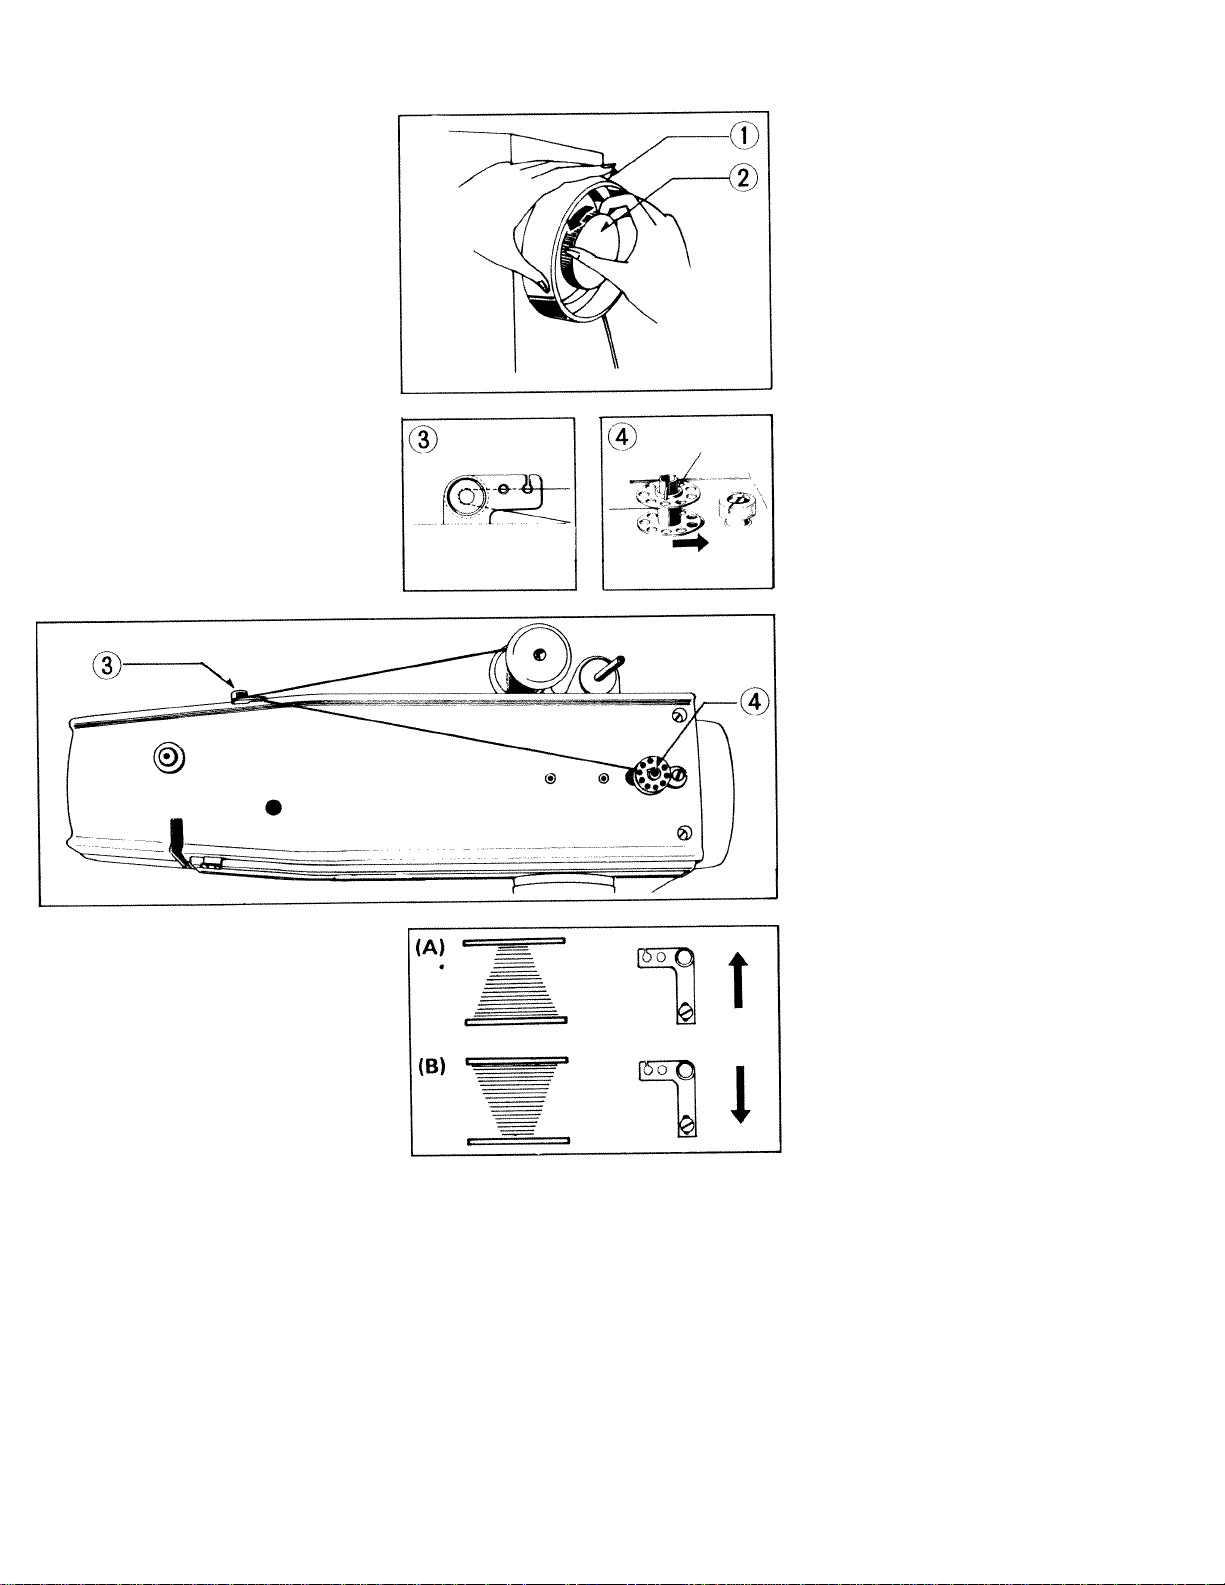
WINDING THE BOBBIN
Disengage the hand wheel (1) from the
stitching mechanism by turning the
coupling wheel (2) towards you or
counterclockwise.
Place a spool of thread on one of the
spool pins and lead the thread through
the rear Top Thread Guide (3) after wind
ing it around the Bobbin Widner Tension
Disc. Slip the end of the thread through
a hole in the rim of the bobbin and place
the bobbin on the spindle of the bobbin
winder (4), fitting the notch on the
bobbin over the small spring on the
spindle.
Push the bobbin winder to the right, and
hold the thread end loosely, then run the
machine slowly. The bobbin will stop
turning when the bobbin is full.
Cut the thread and push the bobbin
winder to the left. Remove the bobbin
from the bobbin winder.
Turn the coupling wheel away from
you until the sewing mechanism is
again engaged so that the needle moves
when you turn the hand wheel.
ADJUSTING THE BOBBIN WINDER
It may be necessary to adjust the rear
top thread guide if the bobbin winds
unevenly.
If the bobbin winds unevenly as shown
in Fig. (A), loosen the set screw of the
rear top thread guide and move the
thread guide up slightly. If the bobbin
winds as shown in Fig. (B), move the
thread guide down slightly.
in
Page 13

UPPER THREADING
1. Turn the hand wheel toward
you to raise the take up lever
to its highest position.
2. Place a spool of thread on the
spool pin,
3. Lead the thread through the
top thread guides.
4. Down and between the tension
discs, from right to left.
5. Draw the thread up through the
check spring and with a slight
tug into the hook.
6. Up and through the eye of take-
up lever from right to left.
7. Lead thread down through the
thread guide at the bottom of
the threading slot, then, through
the thread guide on needle
clamp.
8. Thread the needle FROM
FRONT TO BACK, drawing it
through about 3 or 4 inches.
Flold the end of the upper
thread loosely and turn the
hand wheel toward you until
the needle goes all the way
down and comes back up. A
thread loop will form over the
upper thread which then can be
pulled out straight. Place both
thread ends under presser foot
and draw toward the back of
the machine, leaving both
threads three or four inches
long.
In case of twin needle sewing, place
two spools of thread, matching or
contrasting in color, one on each
spool pin, lead both threads
through top thread guides, bring
threads down and pass one thread
between the back discs and the
other between the front discs, then
treat both thread as one until
threading each thread through each
needle eye of twin needle.
11
Page 14

THREADING BOBBIN CASE
1. Hold bobbin case between thumb and
forefinger of left hand, so that the slot in
the edge of the bobbin case is on top.
Take the bobbin between thumb and
forefinger of right hand so that the thread
on top leads from left to right.
2. Insert bobbin into bobbin case, pull the
thread into the slot of the bobbin case
and draw it under tension spring and into
the fork shaped opening of the spring.
Slot
Slot
Tension
Spring
PLACING BOBBIN CASE IN SHUTTLE
Raise needle bar to its highest position, and
swing open the access cover down. Hold the
bobbin case latch (D) between the thumb
and forefinger of the left hand, with at least
three inches of thread running from the top
of the bobbin case to the right. Insert and
center the bobbin case on the stud of the
shuttle body |C). Be sure the bobbin case
finger (E), is opposite the shuttle race notch
(A). Press the bobbin case IB) into the
shuttle as far as possible until the latch
catches on the center post of the shuttle.
Then release the bobbin case latch |D).
Press the bobbin case again after the latch
has been released to make sure the bobbin
case is locked securely in place. Close the
access cover.
1?
Page 15

SECTION III
GETTING TO KNOW YOUR MACHINE
SELECTION OF THE STITCH:
STITCH LENGTH DIAL
This dial controls the forward feeding of the
fabric. At 0, the fabric is not fed at all. As
the numbers increase, so does the length of
the stitch. Turn the dial so that the
desired number is below the white guide
mark.
Note: Always set at 5 or the ^ mark when
the pattern selector is set at one of the
^ marks.
REVERSE BUTTON
If you wish to sew backwards to fasten the threads at the beginning or end of a seam, when
doing ordinary sewing, press in the Reverse Button as far as it will go so that your machine
sews in reverse at approximately the same stitch length as the forward stitch length. The
machine will sew in reverse as long as the button is held in.
Table showing the numbers on the stitch length dial and the actual number of stitches per
inch or length per stitch.
4
Numeral on the dial
Number of stitches per inch (approx.)
0
No Feeding
30
3
2
1
15
25
5
8 6
13
Page 16

STITCH PATTERN/BUTTONHOLE DIAL
This dial is used for selecting the stitch pattern, for adjust
ing the zigzag width and for sewing the easy, built-in, fourstep buttonhole.
• Stitch Pattern Selector:
Including straight and zigzag stitches, 6 kinds of the stitch
patterns, as shown on the dial, can be selected. Turn this
dial in any direction and the pattern of the stitch chosen is
indicated by the white guide mark above the dial.
......
•
*
Straight Stitch
Blind Stitch
Stitch-and-Overcast
vvu
Zigzag
m
A * A
Multiple Stitch Zigzag
ft»»
Straight Stretch Stitch
====
Note: When sewing with the dial at the mark, the
stitch length dial should be at the mark.
• Zigzag Width Control: ,
At the straight stitch symbol ( j ), the needle does not
swing and, therefore, a straight stitch seam is sewn. With
the dial at the narrow zigzag symbol ( | ), the needle takes
a narrow swing resulting in a narrow column of stitching.
At the widest zigzag symbol ( ^ j, the needle takes a large
swing resulting in a wide column of stitches. The dial may
be set at any position desired between the straight stitch
and the widest zigzag positions for a variety of widths.
Note: When sewing with twin needle, the dial should be
set in the white zone.
• Buttonhole Control:
When set at the first buttonhole symbol (step 1),
your machine sews, forward, the left side of the
buttonhole. With the dial at the next buttonhole
symbol (2—4|, your machine feeds the fabric for
bartacking the buttonhole ends and, set at the
third buttonhole symbol (3), it feeds the fabric in
reverse to sew the right side of the buttonhole.
RELATING STITCH LENGTH TO STITCH
WIDTH
When the stitch width dial is set at one particular
width (such as the widest zigzag) the stitch length
dial will then determine how closely the stitches
are sewn together. At length 0, the fabric does not
move so that the stitches are formed one on top of
the other, as is used when sewing on buttons. At
the symbol Q or near 0, the fabric is fed through
slowly resulting in a dense column of stitches
known as a satin stitch. At length 5, a very long,
open zigzag is sewn.
14
W • Narrowest Narrow Wide Widest
L2-1/2 2-1/2 2-1/2 2-1/2 2-1/2
W
------------------
L
0 1/2 1 2 3 4
Widest
-----------
Page 17

CONTROLS:
ADJUSTING THE THREAD TENSIONS
Always adjust the upper thread
tension with the presser foot
lowered, as the tension is released
when it is raised. To increase the
tension on the upper thread, turn
the tension dial to the right. To
decrease the tension, turn it to the
left. Before adjusting the tension,
make sure that the machine is
threaded correctly. Normal upper
tension is usually between 4 —6 .
The bobbin thread tension seldom
requires adjustment. However,
when the bobbin thread tension has
to be changed, turn the small screw
on the side of the bobbin case
clockwise to tighten and counter
clockwise to loosen.
When both tensions are properly
balanced, a perfect stitch will be
formed with both threads interlock
ing in the fabric {A).
When the upper tension is too tight,
the bobbin thread is pulled up over
the upper thread which lays flat on
the fabric (B).
When the upper tension is too
loose, the upper thread forms loops
over the bobbin thread lying flat
on the fabric {C).
When the upper and bobbin thread
tensions are balanced but the fabric
is puckered in sheer fabrics, both
tensions are too tight. Slightly
loosen both tensions evenly.
(Ci
Upper tension too weak
It is recommended to adjust the
tension balance with a medium
stitch length. In the case of satin
stitching for buttonholes and
embroidery slightly loosen the
upper thread tension.
15
Page 18

ADJUSTING THE PRESSURE ON
FABRIC AND THE FEED DOG HEIGHT
• General Sewing
For normal sewing, except when sewing on very
heavy and bulky fabrics, the center pin (A) of
the pressure control should be at its lowest posi
tion, with the feed dog height at the UP position,
obtained by pressing the part of the feed
dog height button to the right of the rotary
hook. For special fabrics, as mentioned above,
reduce the pressure by half. To do so, press the
outer ring (B) of the pressure control, then press
the centre pin (A) down again, to the half-way
position.
THE
Fabric
Ordinary fabric with little elasticity:
Heavy and bulky fabrics
Medium and light weight fabrics
Very stretchy fabrics and knits;
Heavy and bulky fabrics
Medium, light weight and
sheer fabrics.
• Mending and Darning
So as to be able to move the fabric freely in any direction for darning and mending, release
the center pin (A) completely by pressing down on the outer ring (B). Press the mark
on the feed dog height button so that the feed dog drops well below the needle plate. To
raise the feed dog to its normal height, press the AA (up) mark on the button.
Pressure on
fabric height
Half
Full
Half
Full
Feed dog
(Up)
. .. .
(Up)
16
Page 19

SEWING LIGHT
The sewing light is located in
face cover directly over the
needle so as to better illumi
nate the stitching area.
Turn the light on and off by
pressing the button located at
the back side of face cover.
To replace bulb, disconnect the
plug and open the face cover to
the left. Unscrew the bulb as
you do a conventional light
bulb. Place new bulb in socket
and screw in place.
17
Page 20

SECTION IV
PREPARING TO SEW
Have take-up lever at highest position before starting to sew. Pinning may be used as a
time saver instead of hand basting. It is possible to sew over pins when placed at right
angles to the edge of fabric with the pin head at the raw edge, but for best results it is
recommended that the pins be removed as you approach the presser foot. Sewing over pins
can result in damaged needles.
Place material and threads under presser foot and lower the presser foot. Lower the needle
by turning hand wheel by hand to check if the needle will pierce the stitching line you
want to sew. You are now ready to begin sewing. Press the speed control. The speed of
the machine is regulated by increasing or decreasing the amount of pressure exerted on the
control. Never run machine without material under presser foot.
GUIDING FABRIC
The scale is etched with every 1/8 inch distance measured from the center of needle plate.
Let the edge of fabric follow the line selected for the seam, and let your eyes follow the
etched line you selected for the seam, not the needle, during sewing. To help you guide
the fabric, place cloth guide attachment securing it by the extra thumb screw onto machine
bedplate. Cloth guide and extra thumb screw are included in your accessory box.
Do not try to help the feeding by pulling the material as this may deflect the needle and
cause it to break.
TURNING CORNERS
To pivot at a corner, leave the
needle in the fabric in its
upward stroke. Lift the presser
foot, turn the fabric, then
lower the presser foot and
continue sewing.
]
18
CURVED SEAMS
Use slightly shorter stitch
length than that of the rest of
the seams. On the part where
elasticity is required on the
seam, sew by stretch stitch.
The cloth guide may be used
on angle as shown.
Page 21

SEWING ACROSS
HEAVY SEAMS
When approaching heavy seam,
hold the fabric upward on an
angle so that the heavy seam
falls under the front curve of
presser foot.
FREE-ARM SEWING
For sewing tubular and hard^
to-reach areas, use your
machine as a free arm. Stitch
ing buttonholes or sewing
buttons on a cuff or neckband;
topstitching a sleeve; edge
finishes on sleeves, pantlegs
and waistlines; darning and
patching knees, elbows; and
other areas of wear on
children's clothing become as
easy as sewing a common seam
when you have the free-arm at
your fingertips.
REMOVING THE WORK
Be sure to stop the machine
when the thread take-up lever
or needle bar is at the highest
position.
Now raise the presser foot and
draw the fabric back and to the
left and pass the threads over
the thread cutter.
Pull down slightly, holding
thread in both hands, so as not
to bend the needle.
Leave the ends of threads
under the presser foot.
19
Page 22

SECTION V
STRAIGHT STITCH:
SEAMS
The normal stitch length for most fabrics
is between 2—3 but the length chosen
should depend on the fabric and area of
usage. Usually, heavier fabrics require
longer stitches, and lighter weight fabrics
require shorter stitches. For curved seams
and bias cut areas use a shorter stitch
length.
Pattern:
Length; 2—3
Feed Dog: Up AA
Pressure: Full
Foot: Straight Stitch or All-Purpose
BASTIIMG/TOPSTITCHING
Sewing a seam with a longer stitch is useful
for temporary seams prior to fitting.
Basting stitches also may be used when
gathering in fullness.
Topstitching can be done very effectively
with the long straight stitch. For a bolder
stitch, two threads of the same type can
be threaded through one needle (size 14
or 16). A heavier thread such as button
hole twist may be used for topstitching,
but be sure to use a larger needle (size 16
or 18).
DARNING
Worn spots or small holes can be darned
very easily. Use of an embroidery hoop is
optional depending on the fabric. A fine
thread is recommended so that the fabric
and thread will blend together invisibly.
Trim the ragged edges from the area to be
darned. Hold the threads to start, then
move the fabric slowly backwards and
forwards while running the machine very
fast to fill the area. Professional results
will be attained by moving the fabric in
a figure eight pattern while sewing. After
filling in the area lengthwise, reweave
with crosswise stitches in the same manner.
Pattern: |
Length: 0
Feed Dog: Down A/A
Pressure: 0
Foot: Straight Stitch or All-Purpose
20
Pattern:
Length: 4—5
Feed Dog: Up z5sA
Pressure; Full
Foot: Straight Stitchor All-Purpose
Page 23

CORDING AND ZIPPER FOOT
• Insert Cording
(A) Fold bias strip of fabric over cord.
Loosen the adjusting screw on the
back of cording/zipper foot and set
the foot to the left of needle.
(B) Sandwich the welting between two
layers of fabric with right sides
together. Stitch a second time with
cording/zipper foot to the right of
needle so that the needle stitches close
to the cord through all thicknesses.
• Zippers
Swing the foot to left or right of the needle
as needed so that the foot sews very close
to zipper teeth.
QUILTING GUIDE
Parallel straight lines are easy to sew with
the quilting guide. To attach the guide,
loosen thumb screw and slip the U-shaped
holder of the guide between presser foot
and thumb screw. Tighten the thumb
screw securely. Adjust the curved bar to
the desired distance from the needle. Sew
the first line of stitching as desired, then,
for the succeeding rows let the guide
follow along the previous stitch line. A
straight stitch, zigzag, or any other stitch
may be used.
21
Page 24

ZIGZAG STITCH:
OVERCASTING
Place the edge of the material underneath
the opening of the sewing foot and guide
the raw edge along the centre slot of the
foot allowing the stitch to form half on
and half off the fabric.
The multiple stitch zigzag is a wiser choice
for most fabrics. See Page 26.
SEWING KNITS
The narrow zigzag can be used for seams in
firm knits for added strength. After sew
ing, open the seam and press it flat. Tiny
zigzag stitches can hardly be seen and the
seam will give when stretched.
Generally on knits, however, try the
straight stretch stitch or the stitch-andovercast. See page 32.
SEWING ON BUTTONS
Place the button so that the hole is at the
center of the foot.
Turn the hand wheel by hand until needle
point is close to the face of the button.
Turn the stitch pattern dial to the right until
the needle comes just above the hole of
button. Turn the hand wheel slowly to
check if the needle clearly enters the second
hole of button. If necessary readjust the
button position below the foot.
Pattern: ^
Length: 0
Feed Dog:Down 32
Pressure: Full
Foot: Button Foot
Note: Be sure the needle clears the holes of
button by moving the wheel by hand
before running the machine fast.
Usually 6 to 8 stitches are adequate for
securing a button in place. To lock the
threads, set the stitch pattern dial at the
straight stitch position, readjust the button
position so ■ that a hole of the button is
just below the needle, and make a few
stitches in the hole.
22
Page 25

• With a Thread Shank
Buttons sewn on coats or jackets should
have a thread shank to make them stand
away from the fabric. To form a thread
shank, sew over a pin or rounded tooth
pick.
After stitching the button to the fabric,
remove work from under the presser foot
leaving threads about six inches from
fabric. Remove pin or toothpick. Pull
the threads to back of button and form a
shank between button and fabric by
winding threads tightly around the
attaching stitches. Pull threads to back of
the fabric and tie thread ends securely.
SATIN STITCHING
This is useful for decoration such as
tapering, manual designed embroidery,
monogramming and applique.
The satin stitch, which is really just a
very close zigzag stitch, is obtained by
setting the stitch length as near to "0"
as possible without stopping the feeding
action or at the symbol □ . The setting
will vary for different fabrics. It may be
desirable to loosen the upper tension
slightly to cause the threads to lock
underneath in order to make the top
surface look especially smooth. For
lightweight fabrics, place a paper
underneath the fabric for best results.
Pattern: ^
Length: □ or near 0
Feed Dog: Up lAA)
Pressure: Full
Foot: All-Purpose
23
Page 26

FREEHAND MONOGRAMMING
For giving garments and linens a personaliz
ed touch, first transfer the design to the
right side of the fabric. An embroidery
hoop is recommended especially for soft
fabrics and toweling.
In order to monogram, you must move
the fabric slowly and run the machine
rapidly. Monogramming is like writing by
moving the paper under a stationary pen.
Guide the fabric slowly so that the zigzag
falls close together like a satin stitch, but be
careful that the stitches do not pile up.
When guiding from side to side, move
fabric slightly faster to avoid a heavy area.
Practice by forming loops. Once this is
accomplished any letter is easy.
Sometimes the use of paper or non-woven
interfacing under the fabric may make
guiding the fabric easier. The paper or
interfacing may be torn or cut away at the
completion of the monogram. When mono-
gramming towels, plastic film placed on the
top will help cover loops and make the
monogram smooth. Pull or cut away
remaining plastic film when finished.
Pattern: |
Length: 0
Feed Dog: Down Z
Pressure: 0
Foot: All Purpose
APPLIQUE
Applying decorative shapes of fabric scraps
to household articles and clothing is a very
interesting way of trimming an otherwise
plain article. First, trace the design on
fabric to be appliqued, then pin or baste it
securely in place on garment. With a small
straight stitch or narrow zigzag, sew around
the traced design.
At the excess fabric is trimmed away, sew
around the applique with a satin stitch. For
a smooth curve, stop frequently at the inside
edge of the curve to pivot the fabric slightly.
Corners look much better when the point is
stitched by pivoting rather than just turned.
As with all decorative stitches, paper may be
used to give more body to the fabric when
stitching and can be torn away when the
applique is completed.
OA
Step 1: ^
Pattern: ; or |
Length: 1
Feed Dog: Up ZsA
Pressure: Full
Foot: All-Purpose
Page 27

GATHERING OVER A CORD
Ordinary gathering with a basting stitch
often breaks thread while pulling in full
ness. A small zigzag across a cord such as
crochet thread or carpet thread, gives a
much stronger cord for gathering fullness
into fabrics. Once the gathers have been
stitched in place, the cord can be pulled
out in order to eliminate bulk.
Pattern: |
Length: 2
Feed Dog: Up aA
Pressure: Full
Foot: All-Purpose
LACE APPLICATION
Attaching laces or trims adds a special
touch to lingerie, dresses, or linens. Pin
or baste lace in place easing or mitering
corners where necessary.
A straight edged lace or braid has a
convenient line to follow when sewing.
When using a scalloped edged lace, follow
the design of the lace for an almost
invisible application.
Pattern: |
Length; Ц —1
Feed Dog: Up AA
Pressure: Full
Foot: All-Purpose
FLUTTER HEM
An unusual way of hemming or finishing
edges of tricot or soft knits is by a flutter
edge. Hemming in this manner is just like
overcasting an edge, but the fabric is
stretched in back and in front of the
needle as you sew. For best results, pull
the fabric equally, making sure the needle
goes over the edge. When you stop to
reposition your hands, keep the needle in
the fabric.
Pattern: %
Length:Ц
Feed Dog: Up
Pressure: Full
Foot: All-Purpose
OK
Page 28

SEWING TIPS
When a dainty hair line finish is
particularly desirable for the inside seams
of sheer collars, facings, and yokes, seam
allowance that would ordinarily show
through is eliminated by following the
seam outline with a narrow zigzag stitch.
Trim seam allowance close to line of
stitching. Turn and press.
Pattern: |
Length: 1/2 — 1
Feed Dog: Up 'AA:
Pressure: Full
Foot: All-Purpose
MULTIPLE STITCH ZIGZAG
The multiple stitch zitzag can be used for
hundreds of various kinds of sewing appli
cations, such as replacing worn blanket
bindings for both a decorative and
durable finish, overcasting an edge to
prevent fraying, applying elastic waist
bands to ¿irts and dresses, sewing a
zigzag stitch on soft or sheer material
preventing puckering, etc.
Just sew like ordinary zigzag stitching.
Pattern:
Length: 14—2
Feed Dog: Up 'AA)
Pressure: Full
Foot: All-Purpose
Page 29

TWIN NEEDLE SEWING
Attractive parallel straight stitch effects
and decorative zigzag patterns can be
made easily by sewing with the twin
needle .
They are very effective for various kinds
of garment finishes, such as topstitching,
borders, etc.
When sewing with the twin needle, the
stitch pattern dial should be set in the
white zone.
The use of colour-matched or contrasting
threads will result in a more attractive
finish.
Note; Use the zigzag needle plate when
sewing with the twin needle.
27
Page 30

BUTTONHOLES:
Various fabrics require various methods of sew
ing buttonholes. Three different methods are
given below, with suggested uses. If you are in
doubt as to which method is best for your fabric,
test the methods in question and choose the best
according to the finished appearance.
PREPARATION
For the best results, a good quality mercerized
cotton thread should be used. Polyester threads
often result in puckered or heavy unattractive
buttonholes. The finer your fabric is, the finer
your cotton thread should be.
An interfacing should be used under the button
holes to give body, to strengthen, and to help
them withstand wear.
To establish the correct length of the buttonhole,
add the length of the button (A), plus the
thickness of the button (B), plus 1/32 inch for
the bartacks. The length may be marked on the
garment with a basting stitch, tailor's chalk, or an
invisible cellophane tape, as shown. Horizontal
buttonholes should extend 1/8 inch beyond the
centerline of the garment. Vertical buttonholes
are placed so that the cutting space of the
buttonhole is directly on the center line.
Always make a practice buttonhole on a scrap
of the garment fabric before making any button
holes on your garment. On your test sample,
duplicate the thicknesses found in the garment
and be sure to include the interfacing. The test
sample should help determine the length needed
for the button to pass through the hole easily,
as well as the stitch length needed for the
particular fabric. As with the satin stitch, the
stitches should be close together, but not so close
that they pile up. Be sure to use the buttonhole
foot.
Page 31

BUILT-IN BUTTONHOLE
This buttonhole makes it unnecessary to pivot
the fabric. It is used most often on light and
medium weight woven fabric. The stitch
length dial should be turned to the Pmark or
near 0 so as not to stop the feeding action. A
buttonhole with a width of 3/16" can be
made simply by turning the stitch pattern dial
from buttonhole position 1 to 2, 3 and 4
consecutively.
1. Set the dial at the red square marked (1j
buttonhole position. Lower the needle
into the mark indicating the top left end of
the buttonhole. Lower the presser foot
and sew the left side of the buttonhole
until the bottom is reached.
2. With the needle out of the fabric and the
dial set at the (2—4) position, sew a few
stitches to bartack the bottom end of the
buttonhole.
3. With the needle out of the fabric, turn the
dial to the (3) position. Sew the right side
of the buttonhole. At this position the
machine is feeding in reverse.
4. With the needle out of the cloth, turn the
dial again to the (2—4) position and
complete the buttonhole by bartacking the
top edge.
5. To lock the stitches, make sure that the
needle is out of the fabric, set the dial at
the straight stitch position and the feed
dog at the down position. Then sew a few
stitches.
6. To prevent cutting through the bartack
accidentally, insert a pin through the bar
tack. Cut open the buttonhole.
Pattern: f ~ ~ | ~ H~ 1
Length: Buttonhole
Feed Dog: Up AA
Pressure: Full
Foot: Buttonhole Foot
OfX
Page 32

TURN-AROUND BUTTONHOLE
It is possible to make small and dainty button
holes if you desire, or to repair damaged
buttonholes. This entails slightly moving the
cloth but, with some practise, good button
holes can be achieved.
1. Set the stitch length dial at the D mark,
or density you desire.
2. Choose the desired width of your button
hole.
Example; If you want a buttonhole with a
width of 1/8" , set the stitch
width dial on half this width, i.e.
1/16".
3. Start at your marked position, sew down
on the left side of buttonhole to the other
end of the marking. Leave the needle in
the cloth at the right side of stitches and
rotate your cloth. Sew down on the right
side of buttonhole to other end.
4. Reset the stitch pattern dial to bartack, in
this case, at the position of the width of
1/8',' set your feed dog atZSS, align your
stitch width with the end of buttonhole,
sew several stitches, repeat for the other
end. i _ i
Pattern: { f
Length: a
Feed Dog: Up &&) Down :/V\.
Pressure: Full
Foot: Buttonhole Foot
CORDED BUTTONHOLE
Cording gives a reinforced, raised buttonhole.
It is excellent for use on bulky, woven fabrics,
or knits in which the stitching often gets
buried and makes cutting difficult. On knits,
a corded buttonhole will help keep the fabric
from stretching out of shape.
Choose a heavy cotton crochet thread or
buttonhole twist for the cording. Proceed as
for either the built-in buttonhole or the turn
around buttonhole, placing the cord under the
foot in such a way that the zigzag stitch
covers the cord.
After completing the buttonhole, snip the
excess cord close to the bartack on woven
fabrics. For knitted garments, always pull the
cords through to the wrong side, using a
darning needle or needle threader, and knot
cord ends before clipping.
Page 33

BLIND HEM STITCH
The blind hem provides a durable hem finish
that is almost invisible on garments, drapes,
and curtains. It is sewn easily on straight or
slightly curved hems. With a little practice,
hems will be sewn quickly and easily and will
never need repairing.
Procedure:
(1) Prepare the raw edge of the hem in the
desired manner, such as overcasting,
1/4 inch stitched under, pinked, hem
tape, or just plain. (Step 1)
(2) Fold the hem up to the desired length.
Baste or pin 1/2 inch from the upper
edge. Press in place. (Step 2)
(3) Fold the hem back towards the right
side of the fabric, leaving an overlap of
about 1/4 inch. (Step 3)
(4) Guide the fold of the fabric slightly left
of the center cut of the presser foot so
that the wide zigzag bite of the stitch
just catches the fold of the fabric.
The narrow zigzag stitches of the
blind stitch should be formed on
the single thickness of fabric, and the
wide zigzag width bite should just catch
the fold of the fabric at the left.
(5) When stitching is completed, remove the
fabric from the madhine and turn to the
right side. Press the completed hem.
Step 5
When hemming an A-line skirt, place a
machine basting stitch along the raw edge of
the hem. Fold up the hem on an ironing
board, matching the seams. Ease in the
excess fabric by pulling on the basting
thread. Press with steam, then apply a hem
tape. Baste or pin the hem 1/2 inch from
the taped edge, then continue into step 3.
Pattern: ^
Length: 2—3
Feed Dog: Up
Pressure: Full
Foot: All-Purpose
31
Page 34

STRAIGHT STRETCH STITCH
SEAMS
This stitch may be used on knits and woven
fabrics, in areas of stress, as a reinforcement
stitch. It is excellent for curved seams such as
armholes and crotch seams. For active wear such
as ski pants and girdle fabrics which endure a lot
of stress in bending and stretching, this stitch
may be used for seaming throughout the
garment.
CAUTION: It is difficult to remove this stitch
from the fabric. Pre-fit a garment
before using this stitch.
TOPSTITCHING
Because this stitch is heavier than an ordinary
straight stitch, it is ideal for topstitching
particularly on knits.
STITCH-AND-OVERCAST
SEAMS
On most knits, a 1/6" finished seam, the stitch-
and-overcast is more desirable than a 1/2"
open seam. These stitches can create a neater,
more professional finish, eliminate bulky seams,
prevent curling, permit the garment to give under
stress, and at the same time they cut down on
the amount of work involved in making a
garment.
Pattern: ijj
Length: ^
Feed Dog: Up Ak-.
Pressure: Full
Foot: All-Purpose
—7)
t
- ¿if
1 1
i!!i
\
1
III III!
K
k'
1^
K"
K"
K
j:;
The stitch-and-overcast stitch is excellent for
stretch fabrics such as sweater knits, bathing suit
knits and cotton knits. It has the greatest
strength and elasticity of all.
For patterns with 1/6" seam allowances;
Feed the fabric in such a way that the needle
goes over the raw edge of the fabric when it
swings to the right.
For patterns with 1/2" seam allowances:
Feed the raw edge of the fabric along the etched
guide line 1/2, then trim away the excess fabric
close to the stitching.
32
Pattern: ^ Pressure; Full
Length:
Feed Dog: Up A&)
Foot; All-Purpose
Page 35

I SECTION VI
cXre and maintenance of youh machine
OILING MACHINE
Use only a good sewing machine oil, do not use any common household oils.
Your machine should be oiled occasionally to keep it operating smoothly. How often
depends on the amount of sewing you do. Once a month oil your machine thoroughly as
indicated by the arrows on illustrations, specifically those point marked in red on your
machine.
Place a single drop to avoid over oiling.
Page 36

CLEANING AND OILING THE SHUTTLE AREA
The stitch forming mechanism occasional
ly becomes clogged with loose threads
and lint. This will interfere with the
efficient operation of the machine.
Cleaning and removal of the lint will
safeguard the performance.
To remove the shuttle assembly, proceed
as follows:
1. Turn hand wheel until the needle
reaches its highest position. Tilt head
back on its hinges.
2. Remove bobbin case (A).
3. Turn the two shuttle race cover clamps
(f) outward and remove the shuttle
race cover (C) and the shuttle body
(E) and the lint cleaner (D).
4. Clean the shuttle race, the shuttle, and
shuttle race cover by removing all
threads, lint, etc.
When the cleaning has been completed, proceed as follows to replace the shuttle assembly:
1. Turn hand wheel until the needle reaches its highest position.
2. Place lint cleaner (D) to shuttle driver and shuttle body (E) in race (F) against shuttle
driver and adjust into position.
3. Replace shuttle race cover (C), fitting pin at lower edge into notch, and lock into
position with shuttle race cover clamps (f), making certain the clamps have been
snapped securely into position.
4. Put bobbin (B) into bobbin case (A).
5. Put the bobbin case into the shuttle, fitting tongue (a) into notch (c) of race cover (C).
6. Place a single drop of oil on shuttle body as indicated by arrow on illustration.
Page 37

PROBLEM AND REMEDIES
Trmible
The machine sticks Thread or lint in the shuttle
Skipped stitches Bent needle
Irregular stitches
Uneven stitches
Upper thread breaks
Prd^able Cause
hook.
Needle placed incorrectly
in the clamp.
Too fine a needle for the
thread being used.
Too stretchy fabric.
Upper thread tension too
loose.
Incorrect threading
Bobbin not wound evenly.
Material is being held back
or pulled.
Upper thread tension not
tight enough.
Poor quality thread.
Needle too fine for the
thread being used.
Incorrect threading.
Tension too tight.
Sewing is started with the
take-up lever in the wrong
position.
Needle fitted incorrectly.
Eye of the needle bent or
too sharp.
Bent or blunt needle.
------------------
Material puckers
Machine is noisy
and material is not
fed when stretch
stitches are sewn.
Incorrect feeding. Lint in the feed dog.
Tensions too tight.
Dull needle.
Stitch length too long.
Stitch length control is set
at other than the if; mark.
Remedies
Clean and oil the machine and the shuttle
area (see page 341.
Replace with new needle (see page 8).
Fit the needle correctly (see page 8i.
Replace the needle or thread so that they
are correctly matched (see page 7i.
Place a piece of paper beneath the fabric,
or use the Ball Point Needle.
Tighten the upper tension
See threading instructions, page 11.
Adjust the bobbin winder (see page 101.
Avoid pulling or holding the material just
guide it.
Increase the tension.
Try a different thread.
See the needle and thread chart, page 7.
Refer to the threading instructions on
page 11 and rethread the machine.
Loosen the upper thread tension (see
page I5i.
Always start sewing with the take-up
lever in its highest position.
Refer to the needle fitting instructions
on page 8.
Try a new needle.
Throw away all blunt or bent needles and
replace with new needles.
See tension adjustment recommendations
on page 15.
Change the needle.
Reduce the stitch length.
Set stitch length control at the jfc mark.
Remove the needle plate and clean lint
from the feed dog.
35
Page 38

If your machine skips stitches only on certain fabrics,
try all of the procedures on the previous page before
calling a repair-man.
Check the needle plate area, if there are scratches and
marks around the needle hole opening, your machine is
not being cleaned properly. Always remove the needle
plate and clean the feed dogs periodically. Improper and
lack of cleaning will cause an accumulation of lint which
hampers the feeding mechanism, this in turn will cause
the operator to impatiently pull or push the cloth
causing the needle to bend and strike the plate, foot or
hook, causing a slip in the timing mechanism.
Continuous striking will cause defects making it
necessary to call a serviceman.
'ify
Page 39

11750 BEREA ROAD-CtSViLANO, OHIO 44111
1470 BtRCHMOUNT ROAD. SOAfOtORbUGH. OMTARIO, CANADA
■ -■■r . . n
10
I
Pan No 564206
 Loading...