


HOW TO USE AND CARE FOR YOUR
UJHITgDe LWM© ZIG-ZAG
MODEL 3051
seming machine

mm
GanteMti.
‘’mi
CONTENTS
NAME OF EACH PART
SPECIAL FEATURES ................................................................... 3
1. TO WIND THE BOBBIN ........................................... 4~5
2. TO THE SET NEEDLE ................................................... 5
3. TO THREAD THE BOBBIN CASE ... 6
4. TO REPLACE AND REMOVE
5. TO CLEAN THE SHUTTLE RACE ... 8
6. TO THREAD THE
7. TO PREPARE FOR SEWING................................ 10
8. TO COMMENCE SEWING .......................................... 10
9. TO REMOVE THE WORK
10. TO REGULATE
n. TO REGULATE THE
...............................................................................
..............................................................
THE BOBBIN CASE
MACHINE &■ NEEDLE
STITCH LENGTH
....................................
...........................
...................................
THE THREAD TENSION ... 11~12
........................................
9
11
Page
1
2
7
12
12. TO REGULATE THE PRESSURE
ON THE PRESSER FOOT
13. TO USE THE DROP FEED
14. TO OIL SEWING MACHINE
15. SOME USEFUL SEWING HINTS
16. CAUSES OF TROUBLES
17. ZIGZAG SEWING ..................................................
18. HOW TO OPERATE AUTMATIC 19
19. SEWING ON BUTTONS ..............................................
20. MAKING BUTTONHOLES
21. DARNING AND EMBROIDERY
22. QUILTING ....................................................................
23. SEWING BRAIDS
24. NARROW HEMMER
25. HOW TO DO FELLING
26. CLOTH GUIDE <&- THUMB SCREW...
26. NEEDLE THREAD SIZES
......................................
...................................
........................................
....................................
...................................
.........................................................
....................................................
.................................................
..................................................
22
^age
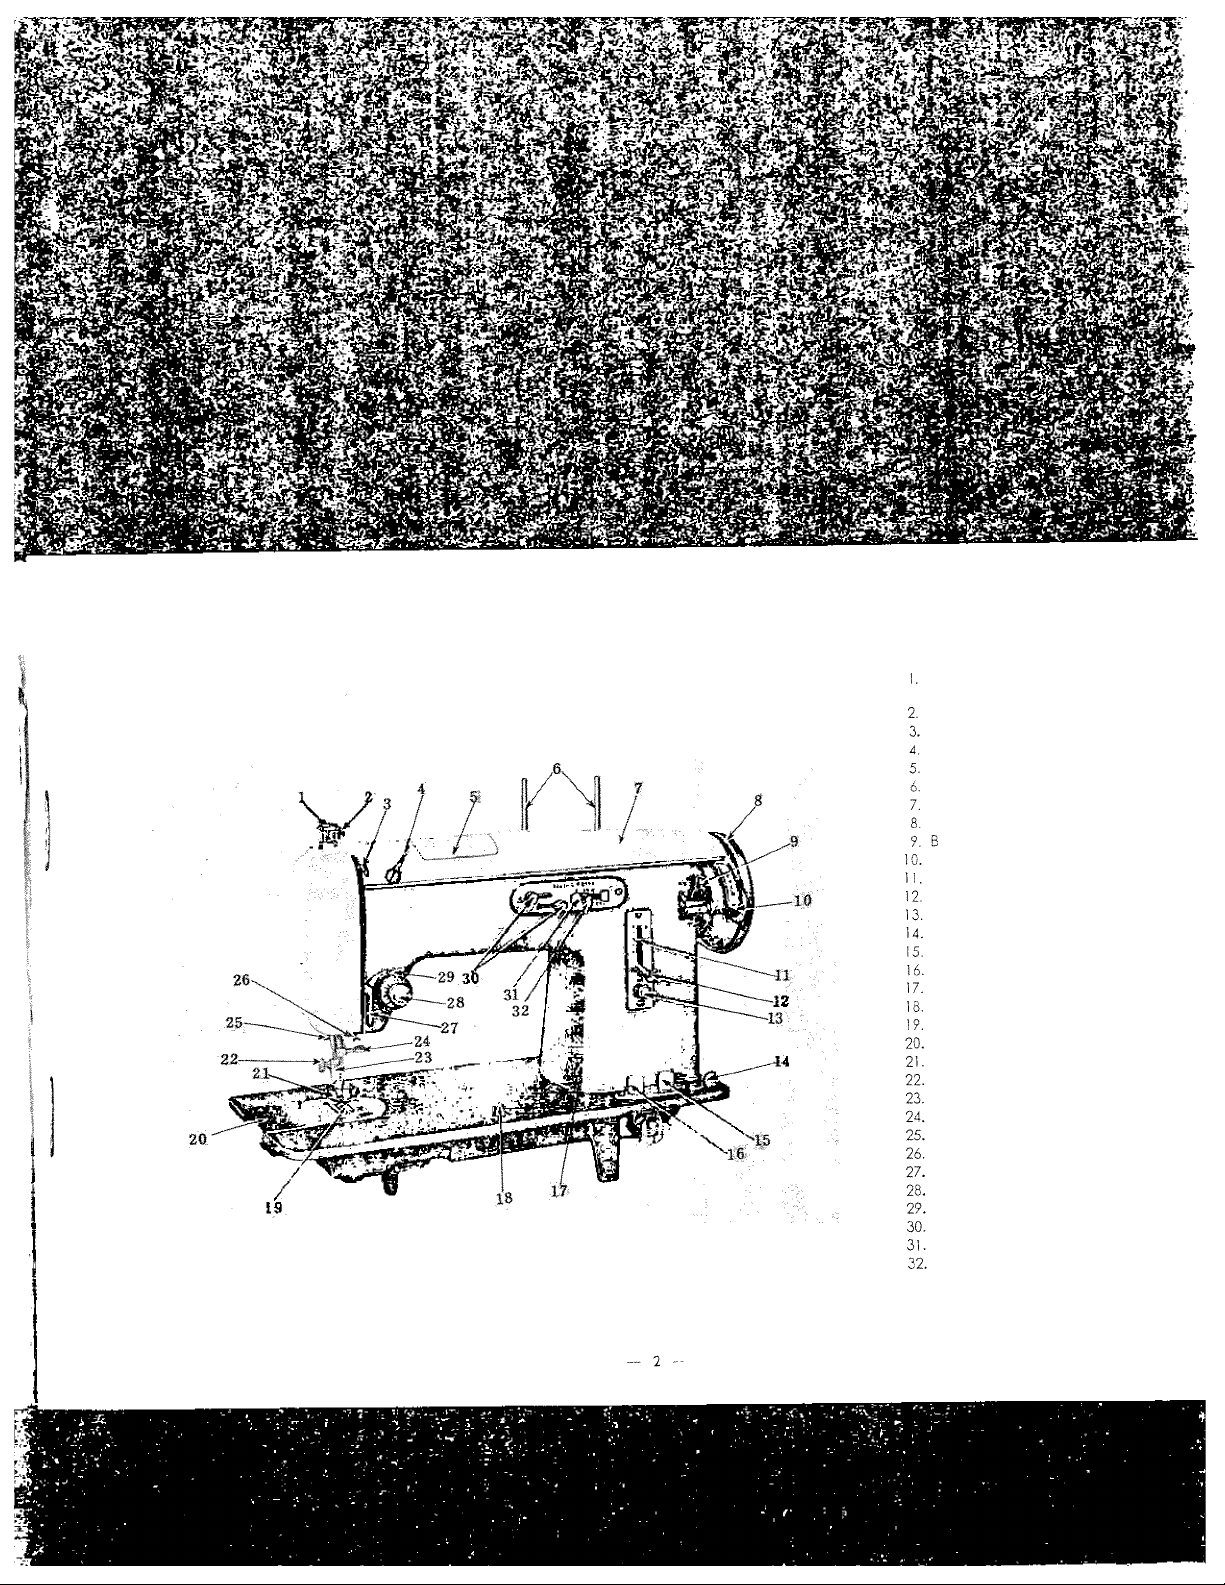
f^ame. S’OcU poAt
Automatic darner
(Pressure regulator)
Pressure release lever
Take-up lever
Upper arm thread guide
Zigzag disc chamber
Spool pins
Top plate
Balance wheel
bbin winder release
Bobbin winder
Stitch length indicating window
Stitch length regulating lever
Stitch length regulating dial
Bobbin winder thread guide
Drop Feed push button
Drop Feed release button
Arm
Bed
Feed dog
Slide plate
Hinged presser Foot
Pressure Foot thumb screw
Needle
Needle clamp
Thread cutter
Arm thread guide
Thread guide tension arm
Thread tension indicator
Check spring
Lock screw For indicator ¿31
Zigzag indicator
Zigzag width adjusting lever

fW-;',-! ■‘--=.»tir f.^i TS4ii 'it Ci'.l
iira
l'^
, \r^*-
mm
S’liifAii
W*i
0M:.
*-i3iii
j'-Sy’
mm
. a' *''.
Sfwdal ^e<iti4/i^
AUTOMATIC DARNER (PRESSURE REGULATOR) - enables you to select the exact pressure
according to the kind of material you are sewing,
STITCH REGULATOR - regulates the stitch length and helps you to select the stitch size
with ease and accuracy.
AUTOMATIC BOBBIN WINDER-winds your bobbin and stops automatically when your bobbin is
filled.
CALIBRATED UPPER THREAD TENSION REGULATOR - allows the tension of the upper
thread to be easily and accurately adjusted according to thread and material weight differences.
DROP FEED PUSH BUTTON - regulates the height of your feed for embroidering or darn
ing and for different weights of fabrics,
SNAP-OUT RACE - is so constructed that cleaning and eliminating tangled threads are very
simple and quick.
FLOATING PRESSER FOOT- glides over pins.
automatic sew discs - enable you to embroider automatically
/. *7a
1. To wind the bobbin the balance wheel must be disconnected from the stitching mechanism. Hold the balance
wheel with your left hand and turn the clotch (Fig. 1 ( toward you with your right hand. This will permit
the hand wheel to turn freely while the needle bar remains motionless. The balance wheel is now
disconnected for the bobbin winding operation.
2. Place a spool of thread on the spool pin ».Fig. 1).
Draw thread from spool over guides, then down
ward across machine from left to right.
3. Pass the thread through the tension discs at the
right corner of the base of the machine.
4. Now wind the end of the thread around an empty
bobbin seven or eight times and place the threaded
bobbin on the spindle of the bobbin winder.
5. By pressing on the bobbin winder lever, the small
rubber wheel is brought in contact with the balance
wheel. To lock into position, press bobbin winder
lever until a click is heard. The bobbin winder
release latch is now touching the shaft of the bobbin.
It holds the bobbin in place.
Wind tUe BoMm
Pig. 1

6. operate the foot control or knee
control in the same manner as far
sewing and when the bobbin is
completely full it will stop turning
automatically.
Remove bobbin from spindle. Hold
balance wheel firmly v/ith the left
hand and with the right hand turn
clutch away from you until it can
not be moved any farther. The
needle bar now moves with the
tuning of the balance wheel.
»
^¿1^1
£
NfEDLE BAg_
THBEAD GUW?D
NEEOLE
HOLE
•needle
BAR
--CUMP
SCREW
'''NEEDLE
CLAMP
-NEEDLE
^,'THREAD
Fig. 3
.NEEDLE
---FLAT
Fig. 2
<2. *7o ¿/ie Set f^eed-le
SURFACE
1. Turn the balance w-heel toward you, raising needle be
its highest position, and loosen the needle clamp scre^
2. Hold the needle in the left hand with the point down,
insert the needle up into the needle clamp as far as it
go, with its flat surface to the right ; then retighten
clamp screw (Fig. 3.(
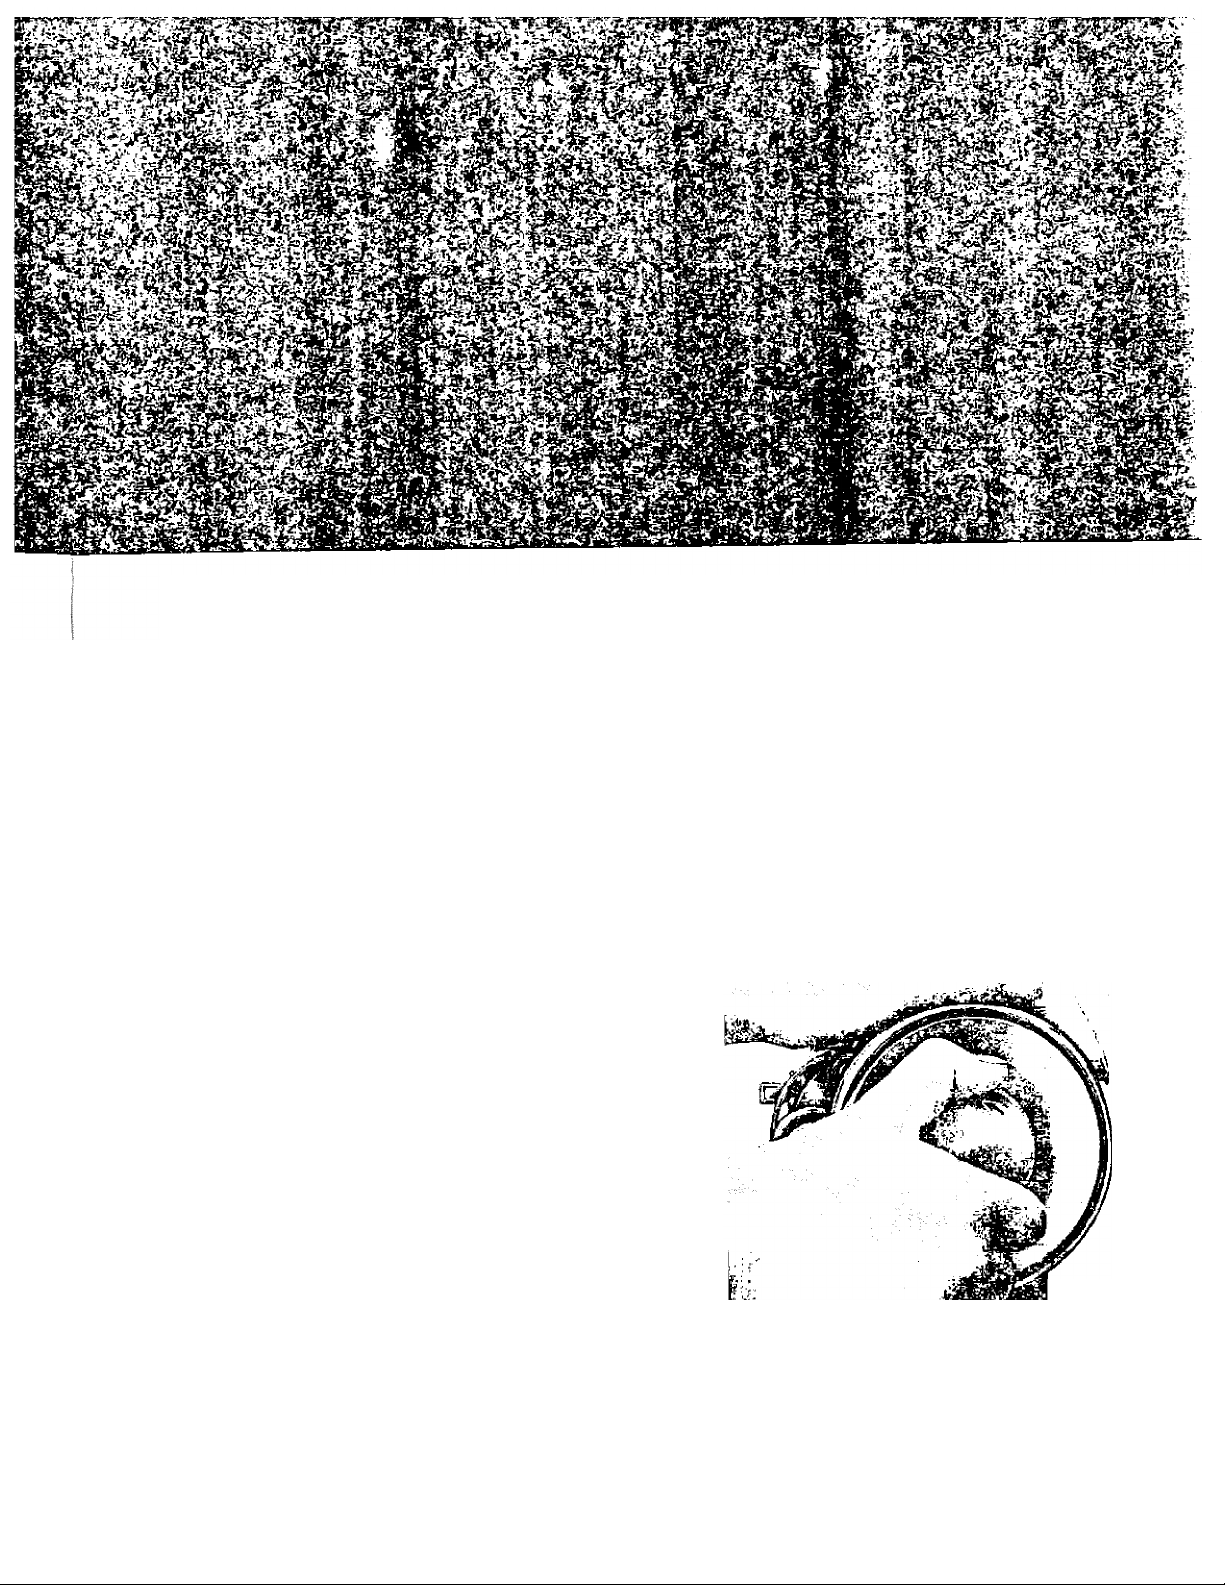
3. *^0- *HiAe<jA tlte. BoMJUn GcUe.
Before threading the bobbin case, study Fig. 4, 5, and 6 to
aet a general idea as to how it is done.
1. Hold the bobbin case with your left hand and put the bobbin into
the bobbin case with your right hand, leaving about two inches
of the thread end unwound
(Fig. 4). As the bobbin is being
inserted in the bobbin case
the thread flow is clockwise.
F!g. 5
2. While holding the bobbin case
as before, grasp the thread end
with your right hand, and guide
it into the cross slot (Fig. 5).
Fig. 4
3. Then pull it through under the tension spring of the
bobbin case (Fig. S) until it enters the delivery
eye (Fig. 6).

J№ifi
Efts.
Sf^-V
£V,'
Mi
4. Replace and Hemmjte the. BaUUn. Cade.
-rS\
m
1. Raise the presser foot by lifting the presser bar lifter.
2. Raise the needle bar to its highest point, by turning the
balance wheel toward you.
3. Open hinged slide plate to its highest point (Fig. 7f.
4. After threading the bobbin case, hold it by the latch with
its position finger opposite the notch at the top of the
shuttle race. Replace it on the center stud of the shuttle
, ,
.....
..... (Fig- 8).
5. Then release ¡-34IC
the latch and ■ .-2-,
press the bob- (avT;bin case in , '
until the latch
catches the
groove near
the end of the
stud and click into potion.
6. Allow the end of the thread to hang free abo
7. Pull back slide plate.
Fig. 8
To remove the bobbin case do all the above in
Fig. 7
ut 2 to 3
reverse o
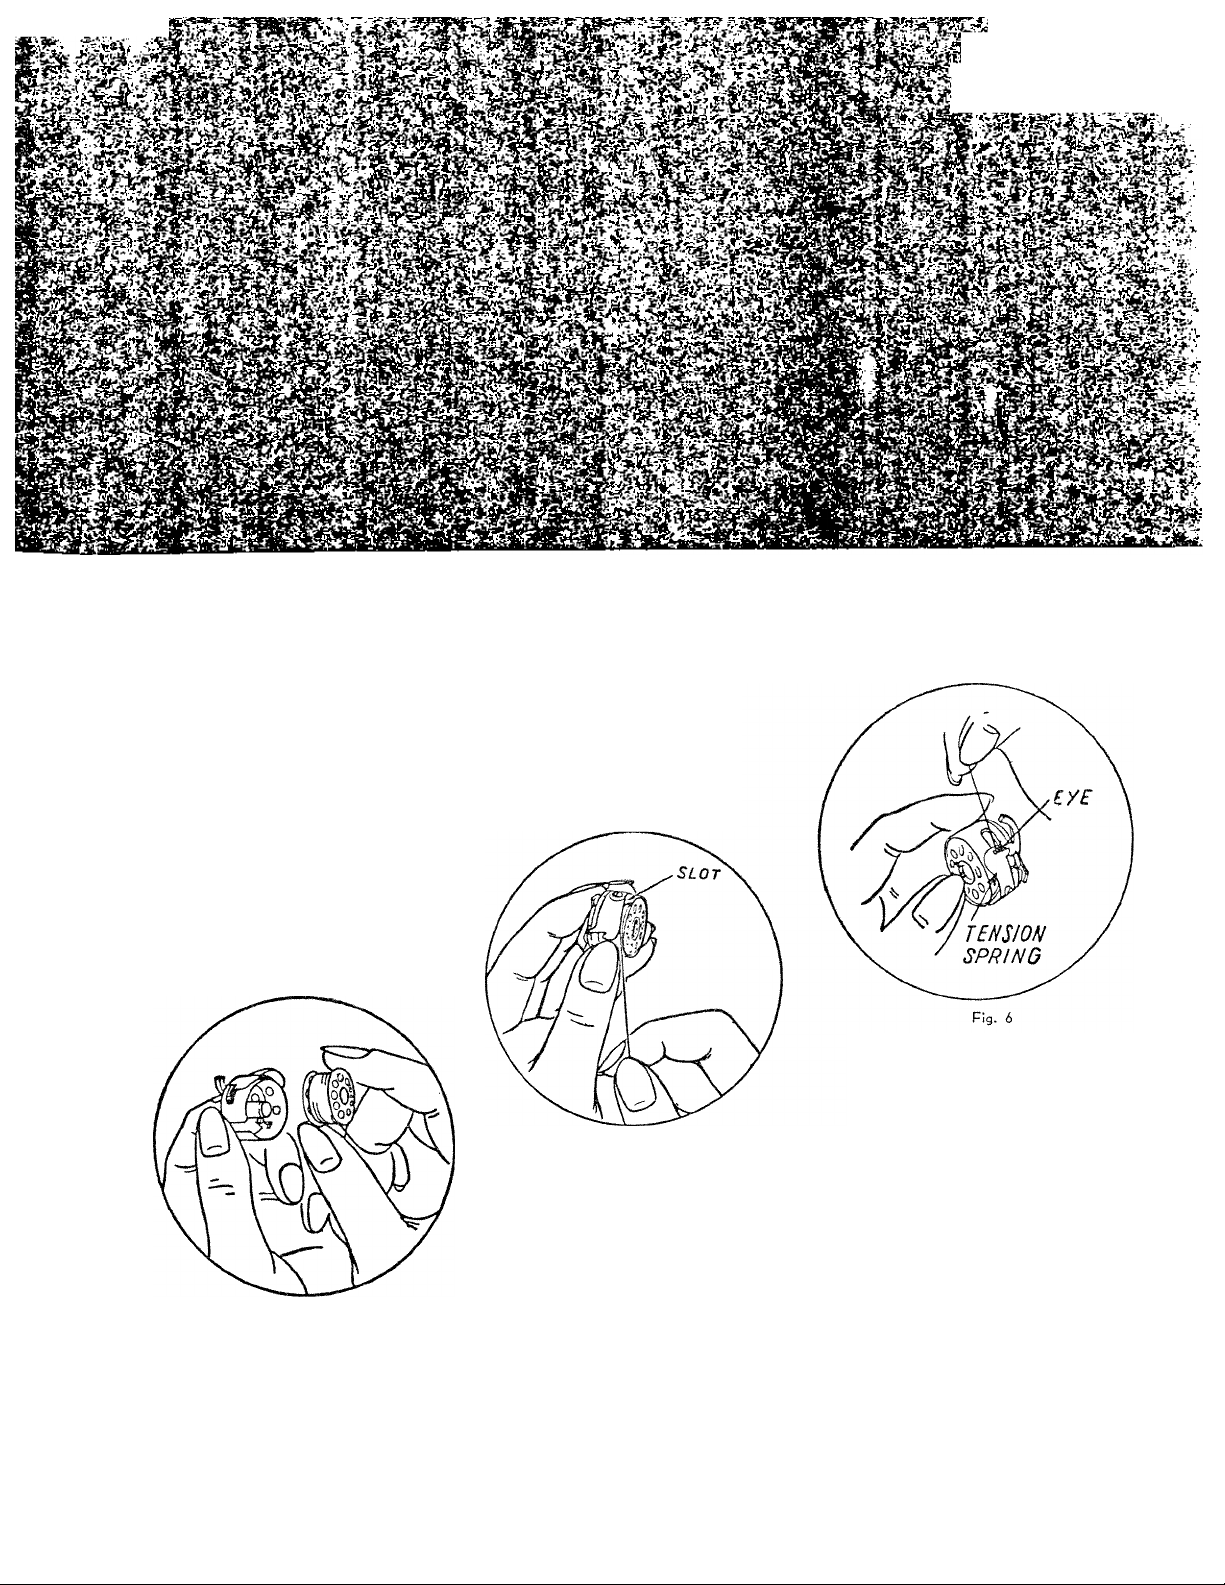
5. ^o. Qleatt Shutti^ Race
When the thread is tangled in the race or dust gets into
the space between the shuttle and shuttle race, follow this
procedure
1. Raise the needle bar to its highest position and take out
the bobbin case.
m
!
?S.
Fig. 10
Fig. 9
2. Release the KNOBS (A) on both sides of shuttle race by
pulling them sidewise, then take out the race cover B
and the shuttle. (Fig. 9, 10
3. After shuttle race and bobbin case have been cleaned, put
all of them back in reverse order.
4. Snap knobs into place as seen in Fig. 9.

6. *7b *7U^ead Um MacUine & Needle
1. Turn the balance wheel toward you to raise the needle bar
to its highest position,
2. Place a spool of thread on the spool pin.
3. Lead the thread through the arm thread-guides (Fig. 11).
4. Run the thread down through the thread-guide to the
tension discs From right to left and up.
Then draw the thread up through the deck spring.
5. Take the thread up, through the thread guide and run the
end through the eye of the thread take-up lever from right
to left,
6. Now run the thread down through the face plate guides
and then through the loop of the needle bar guide from
the back.
7. Finally, run the end of the thread through the eye of the
needle FROM LEFT TO RIGHT, drawing it through about
3 or 4 inches.
Fig. n

7.
1. Hold the end of the upper thread with the left hand, leaving
it slack from the hand to the needle.
2. Turn the balance wheel toward you as the needle goes
down and rises to its highest position.
3. Hold the upper thread and the lower thread will be brought
up with it through the hole in the needle plate, as shown
(Fig. 12). ^ ^
4. Place both ends of the upper and lower thread behind the
presser foot (Fig. 13)
*7a Pn£f4S/m jpn,
Fig. 12
S. *7c Seminif
1. Place the Fabric to be sewn beneath the presser foot.
2. Lower the presser foot, by lowering the presser bar lifter
(Fig. n).
3. Commence sewing by slowly turning the balance wheel
towards you while gradually pressing the lever of the foot
or knee control.
Always turn balance wheel toward you and not away from you.
10

9. flemme, ike Q4Joàk
1. Raise the needle bar to its highest position by turning the balance
wheel toward you,
2. Raise the presserò foot by lifting the presser bar lifter.
3. Move the fabric back to the left and cut off the thread by passing
it over the thread-cutter above the presser foot.
4. Leave both ends of the thread a few inches long, under and to the
back of the presser foot.
Fig. 14 Correct Stitch
Needle Threed Tension too strcn
fO, a (lecfddJxUe ike *7knead *7etfdia*i.
For ordinary stitching the tension of the upper and
lower threads should be equal so as to lock both
threads in the center of the material (Fig. 14). If one
tension is stronger than the other, imperfect stitching
will result. Fine materials require a light tension,
while heavy materials require more tension to obtain
a perfect stitch.
To INCREASE the tension, turn the thread tension
indecator (Fig. 15) clockwise.
TO LESSEN the tension, turn the thread tension
indicator to the opposite direction. (When regulating
tension always have the presser foot down).
Needle Thread Tension too weal
Fig. 15
H

J
As all machines are correctly adjusted before leaving the factory and readjusted
dealer delivers them to you, the lower tension seldom requires to be altered,
becomes necessary, tighten the screw in the tension spring on the outside of
case for more tension, or loosen the screw slightly for lesser tension (Fig. 161.
//. *7o. the. ^¿titch Jle4ix^.th
The length of stitch can be changed by adjusting the stitch
length regulating lever "L" (Fig. 17),
When the lever is at 0 the material is not being fed through
the machine.
To change stitch length, loosen lock screw "S” by turning it
to the left.
Now move the lever gradually downward to feed material for
ward and to lengthen stitch.
The indicattes the length of stitch. Set lever to desired
length of stitch and lock the screw by turning to the right.
To sew backward move stitch regulating lever upward past
0 until it stops.
Machine will automatical! maintain same length of stitch for
ward and backward.
before the
but, if this
the bobbin
\
f
I
^ ,
I
i
Fig. 17
12

/=2. */a
Light material will not sew well under too much pressure, nor will heavy Fabrics under too little.
To adjust for correct pressure, use your automatic darner. When used right in co-ordination with t
thread tension regulator and the drop feed dial, this automatic darner becomes an effective tool for
good sewing results.
To regulate the pressure for darning and enbroidering press release lever dcwn there by releasing pressure
Make sure presser foot is down when pressing lever. For ordinary sewing, push automatic darner dcwn
Re<^44iate the P^eddu^ a^ the. P^mM-e/i. ^aat

/3. Vo the-
'per
ling
8).
9).
By using the drop feed device you may adjust the feed dog for sewing different types of materials
and for embroidering or darning (Fig. 20).
1. For sewing very light fabrics, push the drop feed button "DOWN" half-way; for heavier cloth push
the button marked "UP" to return feed to highest level.
2. When the d,op feed bu.lon "DOWN" Is pushed down conspletely, .he feed will lowered below
the surface of the needle plate.
This is for embroidering and darn
ing, and you will be able to move
your work freely about in any
direction you choose.
3. For embroidering and darning,
first release pressure of presser
foot (Page 19'i.
Fig. 20
14

ps%
i^. ^o. 0il MedAM-Hc^ Mcu^ltidte.
To have your machine always in smooth running condition
you must keep it oiled at all times.
No grease is necessary. Just a drop of oil is sufficient
at each time. Oiling points are illustrated in Fig. 21,22. Tilt
the machine over to get oiling points underneath the bed.
After oiling, run the machine at high speed for a few
minutes to get oil to penetrate to all parts.
S ■ * TV'.^iif •^-, .'.
■rir'f;,
s
d=
■ -v',
f
U'AvSS
Fig. 21
SriFV
Fig- 22
NT I
15

So4^m ^4^«/ Se44M4tq, cMi4ii6.
TO TURN CORNERS :
1. Stop the machine while the needle is still in the material.
2. Raise the presser foot and turn the fabric using the needle as a pivot.
3. Lower the presser foot and resume sewing.
TO SEW ELASTIC FABRICS:
In sewing such elastic materials as jerseys, bias cut cloth, etc., it is advisable to sew them with reduced
upper thread tension, otherwise the thread will break when the sewn materials are stretched.
TO SEW VERY THIN CLOTH :
When sewing very thin cloth which tends to gather as you sew, place a sheet of newspaper or any other
thin paper underneath the material and sew with the shortest stitch possible. This will keep your work
from gathering.
BASTIN6 :
1. Reduce the tension of the upper thread and employ the longest stitch possible.
2. The stitches may then be easily removed by pulling the lower thread.
TO KEEP YOUR MACHINE IN PERFECT CONDITION :
1. Keep all moving parts of the machine constantly oiled and clean.
2. Always turn balance wheel toward you, even when by hand.
3. Do not run machine without doth.
4. When sewing, do not pull the material because you will bend the needle. The machine is designed
to feed the material automatically.
5. Do not operate machine when the presser bar lifter is raised.
16
mm

/6, QoHie. ajf "^fiauâle.
BREAKING OF THE UPPER THREAD:
1. Incorrect threading, 2. Upper thread tension too tight.
3. Defective needle, or needle set incorrectly.
4. Needle rubbing against presser foot or other attachments.
5. Needle eye too small for thread used. 6. Imperfections in sewing thread.
7. Stitch hole in needle plate damaged and rough.
BREAKING OF THE LOWER THREAD:
1. Incorrect threading of the bobbin case. 2. Lower thread tension too tight.
3. Bobbin being wound too fully.
BREAKING OF THE NEEDLE:
1. Pulling the fabric while machine is sewing thus causing the needle to strike the needle plate
2. Using bent needle.
SKIPPING STITCHES:
1. Using bent or blunt needles. 2. Needle inserted incorrectly.
3. Needle threaded improperly. 4. Using wrong size needle.
5. Pressure on presser foot insufficient, especially when sewing heavy material.
UNEVEN STITCHES:
1. Presser foot not resting evenly on material. 2. Feed dog not adjusted high enough.
3. Too short stitches used. 4. Pulling the cloth while the machine is sewing.
5. Needle too fine for material or thread too coarse.
17

17. SedAAiHtf
Your Zig-Zag Sewing Machine, by virtue of its design, permits
you to do zig-zag sewing and numerous other kinds of worK
requiring a similar stitch. The controls for the zig-zag stitch
are located on the arm of the machine, as may be seen on
Fig. 23, Notice lever "B” which adjusts the width of the zig
zag seam. For ordinary straight sewing this lever must be set
to the left of marking 0 in the indicator. By moving this
lever gradually to the right toward 5 the machine will sew a
zig-zag seam of increasing width, depending on the position of
the lever. For the purpose of reverting to a previously used
width of zig-zag stitch after having done some straight sewing, ^
or for special types of work such as sewing buttons or making tacks, indicator A will be found useful. Thi^s
indicator serves as a stop for dial "B”, To set indicator "A”, loosen lockscrew "D”, turning it to the left.
You then will be able to turn same sideways which, at the same time, moves indicator TA” to the desired marking.
Tighten lockscrew "D” by turn-ing it to the right. The lockscrew also tightens slide "C”. The purpose of this
slide is to make possible a second setting of zig-zag width. Thus, when you want to alternate between a narrow
and a wide zig-zag stitch, you use both indicator "A” and slide “Ch For example, set indicator “A” at marking
4 and slide "C at marking 1, tightening the lock screw. This will assure you of being able to always revert
to the same narrow and wide zig-zag seams. You will find this feature especially convenient when making
ZI52AG SU№
Fig. 23
buttonholes. Refer to chapter on Buttonhole Sewing .
18
m

fS. afiom ¿a Ofxe^Kite /luiomaicc
1. Open the small lid of top plate.
2. Move limiter knob (A) to the right end.
3. Set lever to the extreme right with right hand and keep it holding
at its position, while with left hand match automatic cam shaft pin
(B) and automatic cam pin hole (C), and slide the cam in.
— 19 —


/9- SeufiH^ an ß44Üom
Turn balance wheel toward you to raise needle to its highest position. Raise
presser bar and remove regular presser foot. Attach button sewing Foot
shown in Fig. 25. Drop the feed as required for darning and embroidery.
Upper and lower thread tensions remain the same as for ordinary sewing.
Place material or garment with button under the presser foot, so that
holes in button line up with oblong opening in presser foot.
With zigzag stitch (ever “B” (Fig. 23) adjust width of zig zag stitch to
permit needle to pass through center of holes in button. Before sewing
with power, turn balance wheel by hand (toward you) making one stitch
into each hole in the button, to be sure that needle clears. Then sew
five to six stitches to attach button. Move zigzag stitch lever "B” (Fig.
23) to 0 and take two or three stitches through the same hole to lock thread,
machine and snip threads.
When attaching four-hole buttons, follow above procedure twice.
Fig. 25
Remove garment fror
21

3.0. But¿ai^alг¿.
I
I
From
1. Set the zigzag stitch locking dial “S" (Fig. 23) at 2.
2. Raise presser foot and turn balance wheel toward you to bring needle to its highest position. Remove regular
presser foot from presser bar by loosening thumb screw, and attatch special buttonhole foot shown in
fig. 26. Tighten thumb screw.
3. Set stitch length regulator knob "L” to obtain closely spaced forward stitches. Best length of stitch for
buttonholes is when the knob "L” (Fig. 17) is placed between 0 and 1. Adjust length of stitch, if
necessary, to get best possible appearance of buttonhole.
4. Slightly tighten needle thread tension, turning tension
regulator to the right. If appearance of buttonhole
should not prove satisfactory, slightly vary tension
until the desired results are obtained.
NOTE : It is suggested that you make one or two sample
buttonholes on a scrap of your garment fabric, to test
adjustments of machine and to make corrections, if
needed. Also mark with pencil or chalk the position
and exact length of buttonhole on garment.
To sew buttonhole, place garment under the button
hole presser foot with the start of pencil or chalk
marking showing in center of presser foot opening.
— 22 —

Stitch left side of buttonhole to end of marking. Stop machine with needle to the right of stitching.
Leave needle in fabric, raise presser foot and turn garment half-way around in clockwise direction. Let
presser foot down, raise needle and turn zigzag lever "B” (Fig. 23} to 4 width. Sew four or five stitches
to make the bar at one end of the buttonhole. Return zigzag stitch lever to the left position at 2 and
sew the other side of buttonhole. When arriving at end of buttonhole, again move zigzag stitch lever
to the right for making second bar with four to five stitches. Remove garment from machine and open
buttonhole with cutter or buttonhole scissors. Be careful to avoid cutting the buttonhole- stitching. To
make reinforced buttonholes introduce gimp of proper size into the small hole at the front of the button
hole foot. Sew over gimp as machine makes buttonhole seams. For flat buttonholes leave thread tension
pretty much the same as for ordinary sewing. Pearl stitch buttonholes require a tight tension of the
needle thread. For better appearance, use needle thread of the next heavier size.
<2/. and
Push the drop feed button "DOWN” all the way down to permit the fabric to be moved in any direction.
Remove presser foot and release button as shown in Fig. 20.
Embroidery is most successful when fabric is stretched in a hoop. Flold hoop on machine bed with both
hands, operating machine at a fairly high speed while moving the work slowly. Slightly increase the
bobbin thread tension to prevent the lower thread being pulled up.
— 23

o2<2.
The quilting attachment (Fig. 27) will enable you to sew evenly spaced
lines on padded fabrics without marking them in advance.
To attach the quilter to the presser bar of the machine, first pull long
curved bar out of horse-shoe shaped clamp. Place the clamp on the
presser bar above presser foot, and push the bar through holes in
clamp.
Adjust curved end of bar to desired distance from needle so that it
presses into fabric. Then tighten thumb screw to lock quilter attach
Fig. 27
ment into place. When sewing, quilter bar should follow preceding
line of stitching.
Zigzag stitch quilting is done the same as straight stitch quilting with
the zigzag stitch dial set for any desired width.
3.3. SenuHif B^uuJU.
Remove regular presser foot from the machine and attach braiding foot,
as shown in Fig. 28. Thread braid through small hole at front of foot.
Adjust width of zigzag seam and length of stitch to obtain a covering of
the braid which appears most desirable for the material you are sewing.
Using needle thread of a contrasting color will enhance the beauty of
your braiding.
_ 24 —
Fig. 28

3.4. Man/ma* eMe4ftmen.
Turn balance wheel toward you until needle reaches its highest
point. Raise presser bar and remove regular presser foot.
Attach hemmer foot (Fig. 29). Now handle material as
follows :
1. Fold over edge of material approximately then fold
it over again for about 2". Insert this folded end into
spiral formed opening (scroll) of hemmer foot.
Move material back and forth until the hem forms itself
in the scroll.
Fig. 29
2. Pull material toward you until the beginning of the hem is
just below the needle.
3. Lower presser foot and begin to sew.
Guide material into hemmer foot while proceeding with work
Fiq. 29'.
NOTE : Do not crowd material into scroll and do not leave scroll only partly filled by material. Feed just
enough material into the hemmer foot to fill out the scroll.
Instead of a straight stitch^ you can also use a zigzag stitch for this hemming operation. Be sure,
however, to adjust the width of the zigzag stitch to the width of the hem. Using a very long stitch
and tight tensions will produce a shell stitch.
25

2.5. eMcMAA ¿a do.
The hemmer foot can also be used for doing felling. Proceed in the
following manner :
1. Lay two pieces of cloth one on top of the other with their RIGHT
sides facing each other. The right edge of the bottom piece must ex
tend about Vs inch beyond the right edge of the top piece. See fig. 30.
2. Sew both pieces of cloth together, using the hemmer foot like a regular
presser foot. Use the right edge of long toe of hemmer foot to guide
the bottom piece of material, while the left edge of the same toe
serves as a guide for the top piece of material
3. Open and spread out material and put back on machine right side down
ward. Make sewn edges of material stand up.
4. Fold over the edges to the left
and insert them into the scroll
of the hemmer foot. Sew as
you would do ordinary hemming.
Use left edge of long toe of
hemmer foot as guide, having
original seam run alongside of it
(Fig. 31).
Fig. 30 shows this detail.
<2<5. QUUt Quide & *^Uumk Sc^eiu
This is an attachment designed as a guide for straight stitching
when making wide hems, deep tucks, or seam width which are
greater than presser foot allows. (Fig. 28)
It is attached to machine as illustrated...a very simple operation.
26
Fig. 32

27. NEEDLE - THREAD - FABRIC - STITCHIN© GUIDE
Fabric
Extremely heavy tarpaulin, sacking,
canvas, duck, etc.
Heavy upholstery fabric, ticking,
denim, leatherette, etc.
Medium heavy drapery fabric, velveteen,
suiting, felt, terry, etc.
Medium broadcloth, percale, gingham,
linen, chintz, taffeta, sheer wool,
shantung, etc.
Sheer voile, lawn, dimity, crepe,
handkerchief linen, plastic film, etc.
Very sheer chiffon, batiste, lace,
organdy, ninon, net, marquisette, etc.
Needle No.
4
......^ ..............
3
2
1
0
00
i Machine
I Stitches
j per Inch
6
to
; 8
i 8
; to
1 10
i 10
; to
; 12
; 12
i to
: ''4
i 12 to 14
i (Plastic Film
5 8 to !0)
i 16
: to
^ 20
• Cotton
i Thread
. 10
‘ to
! 30
^ 30
' to
1 40
: 40
; to
i 60
^ 60
^ to
; 80
i 80
: to
i 100
! 100
i to
i 150
Mercerized :
Thread
Heavy Duty ;
1 Heavy Duty '
: Heavy Duty ■
i
............
............. ■
I 50 1
! 50
; 50
Silk or
Nylon
—
/
.......-...
A
A
—
-
A
27
 Loading...