

Page 1
^ ' í'i •r-.’":.cjL:-L : . - nr^- • - ,*, •
' ÍC. . .-■>'i. - . ‘. :,. Г-- ‘;’'
^■£
: ; '■ ■ f 'Ж->
■ ■■.■ :■ ¿ ;-Iti-- b'■■: ' f ^ ,r '. '^;-‘
f rí^v-Síá'-' '
‘ ''b
I 1 ' ' '1
<i <> O
' .1,' .- - -’’ -il-'^,;' .-U/S r'í.í * É
• <- ,’ ■-- ■■ '^iirbh
^ ' _^. ---..'¿Л'¿ít' ' •
ч=¥г^:
-i
' -А’Ч-
I’’-'”' i 'ifii и
, S' '
Page 2

INDEX
Accessories
How to Use
Hemmers
Seam Gauge or Cloth Guide
Quilting Guide
Attachments
Adjustable Cord and Zipper Foot
Attachment Foot
Binder
Edgestitcher
Hemmers
Rüffler
Blind Hem
Bobbin
Placing in Shuttle
Threading
Winding
Buttonholes
Bound
Buttons Sew - On
Charts
Needle-Thread-Fabric-Stitching 4
Stitch Length 9
Trouble 30-31-32.
Pages
23
24
25
26
26
34
40
35
37
35
38
42
16
7
6
5
20
47
22
Pages
Darning and Mending 11
Embroidery
Creative 18
Hoop 19
Features and Parts (Front View) 2
(Back View) 3
Installation - Head in Cabinet 50
Head in Portable case 48
Maintenance and Care 27
Cleaning and Oiling the Shuttle 28
Needle Setting ' 6
Pressure and Feeding of Fabric 11
Thin and Lightweight Fabrics 11
Reverse Sewing 9
Sewing Preparation 12
Sewing Tips 44
Straight Stitching 13
Tension Adjustment 10
Threading-Upper 8
Page 3
J
м.
Thread Take-up Laver
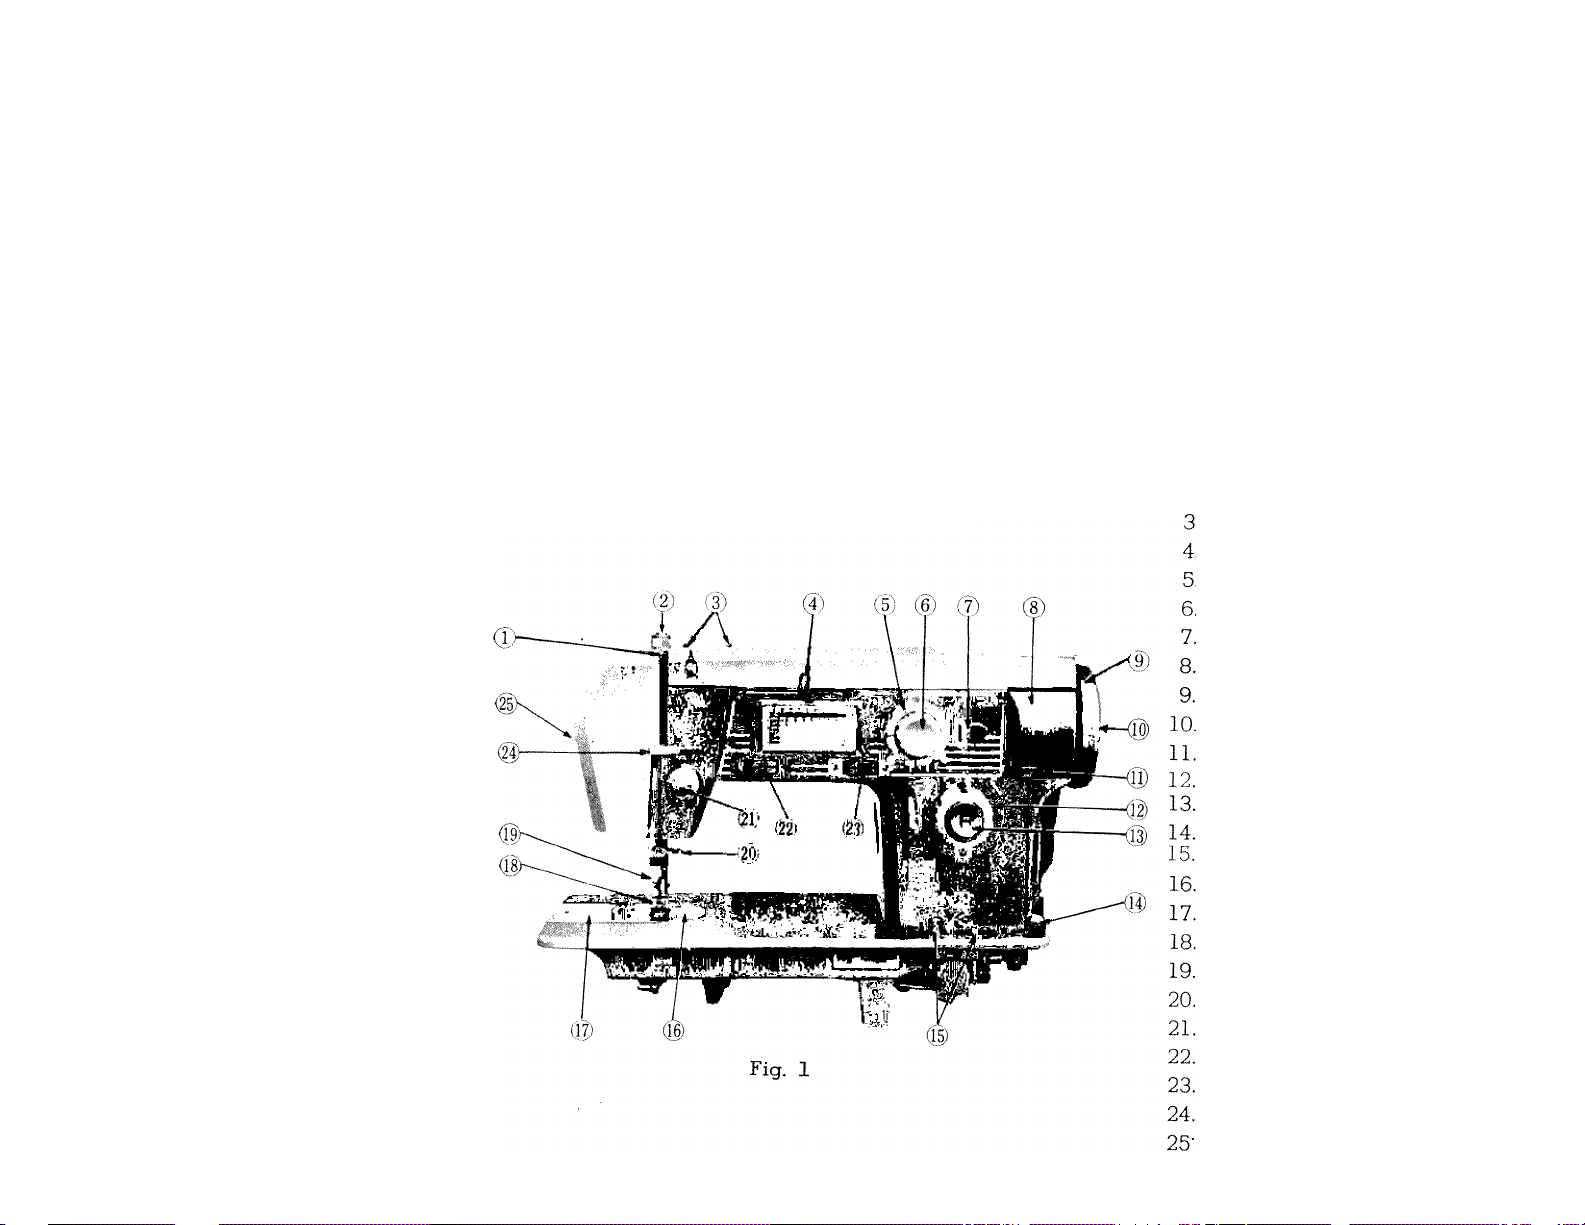
FEATURES AND PARTS
(Front View)
■
Pressure. Release
(Darning)
Arm Thread Guides.
Mechanism Releasing Lever.
Buttonhole Control Knob.
Zigzag Width Control Knob
Zigzag Stitch Width Stop
Bobbin Winder Cover Door
Hand Wheel
Clutch
Cover Release Button
Stitch Length Control
Push Button Reverse
Bobbin Winding Tension
Drop Feed Buttons
Needle Plate
Cover Plate
Presser Foot
Presser Foot Thumb Screw
Needle Clamp
Tension
Pattern Selector Control 1 to 8
Pattern Selector Control A to J
Thread Bar and Face Latch
Sew Lite Switch
Page 4
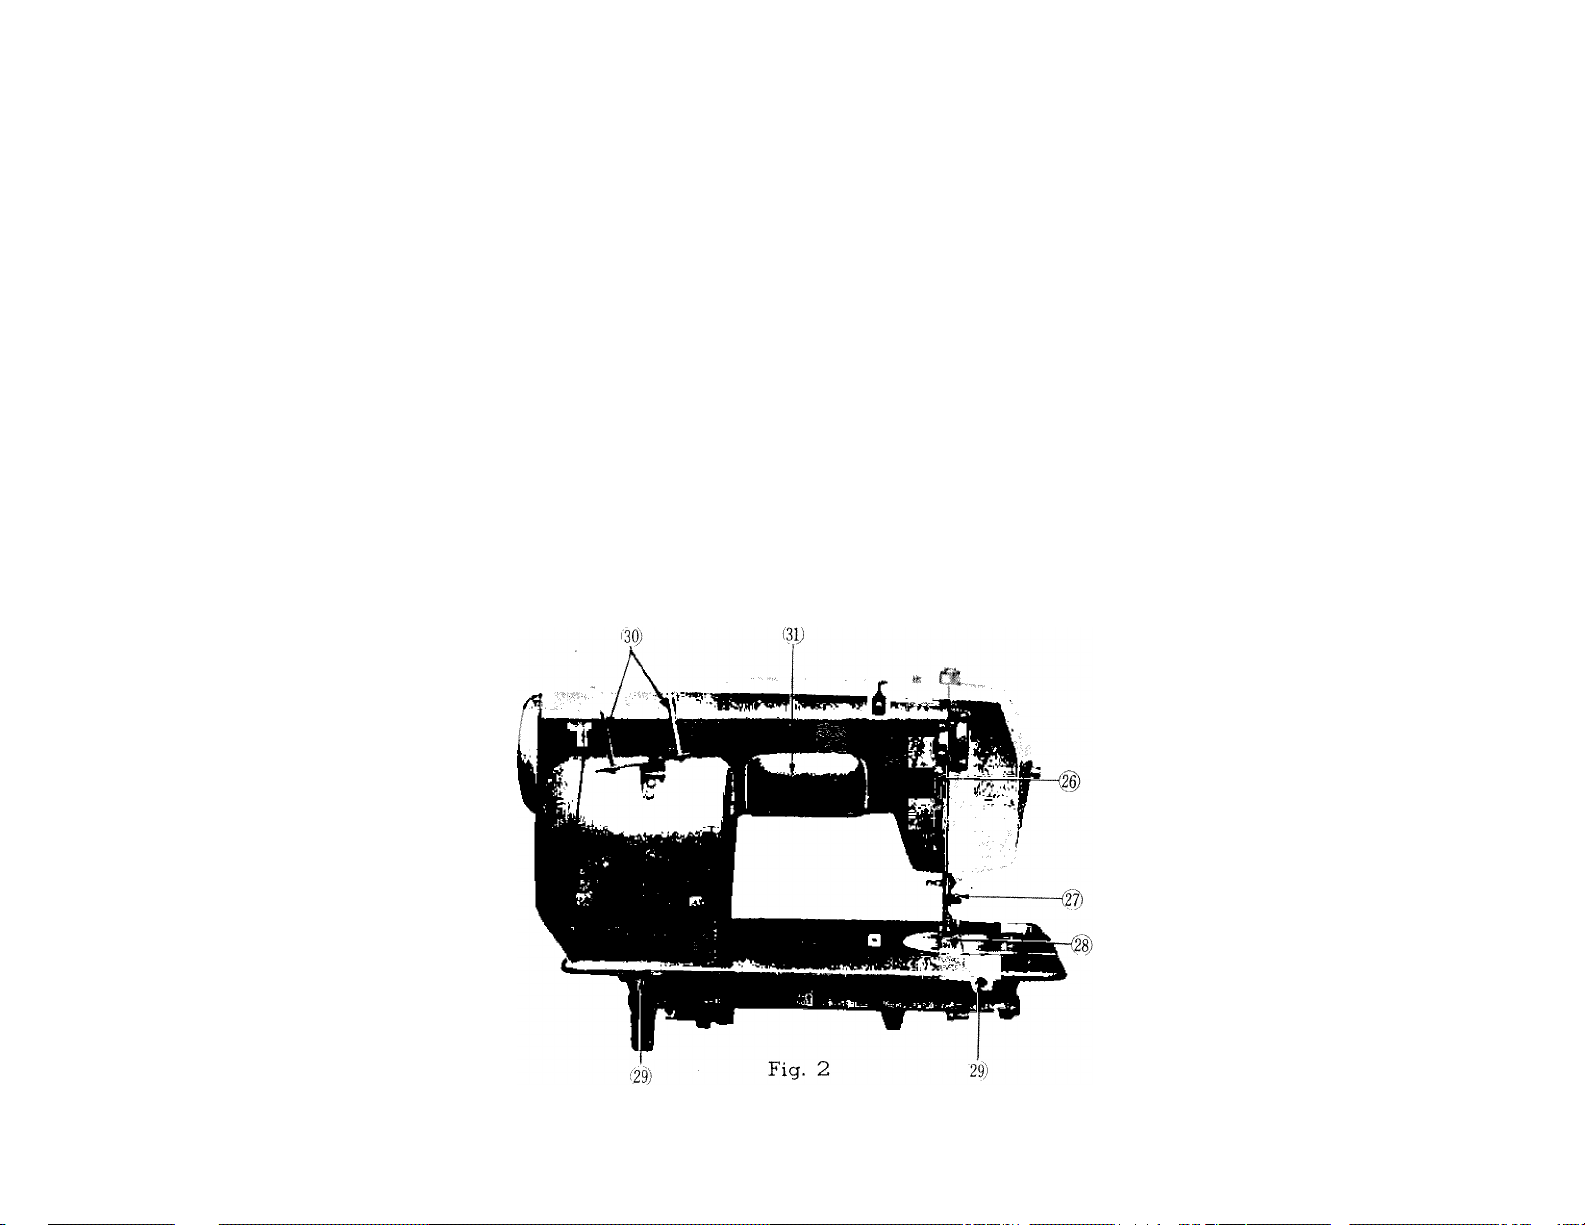
FEATURES AND PARTS
(Back View)
Presser Bar Lifter
26.
Thread Cutter
27.
Feed
28.
29.
Head Hinge Mounting
Holes
30.
Spool Pins
31.
Handle
Page 5

NEEDLE - THREAD - FABRIC - STITCHING GUIDE
Fabric
Extremely heavy
tarpaulin, sacking,
canvas, duck, etc.
Heavy upholstery
fabric, ticking,
denim, leatherette
Medium heavy drapery
fabric, velveteen,
suiting, felt, terry, etc.
Medium broadcloth.
percale, gingham, linen.
chintz, taffeta, sheer
wool, shantung, etc.
Sheer voile, lawn.
dimity, crepe.
handkerchief linen.
plastic film, etc.
Very sheer chiffon.
batiste, lace, organdy.
ninon, net, marquisett, etc.
Needle
No.
4
3
1
0
00
Machine
Stitches
Per Inch
6
to
8
8
to
10
10
to
12
12
to
14
14
to
16
(Plastic film)
8 to 10
16
to
20
Cotton
Thread
10
to
30
30
to
40
40
to
60
60
to
80
80
to
lOO
100
tc
150
Mercerized
Thread
Heavy Duty
Heavy Duty
Heavy Duty
50
50
50
Silk
or
Nylon
A
A
A
Page 6
/1, 3
^^■=9515*
Fig. 3
Fig. 4
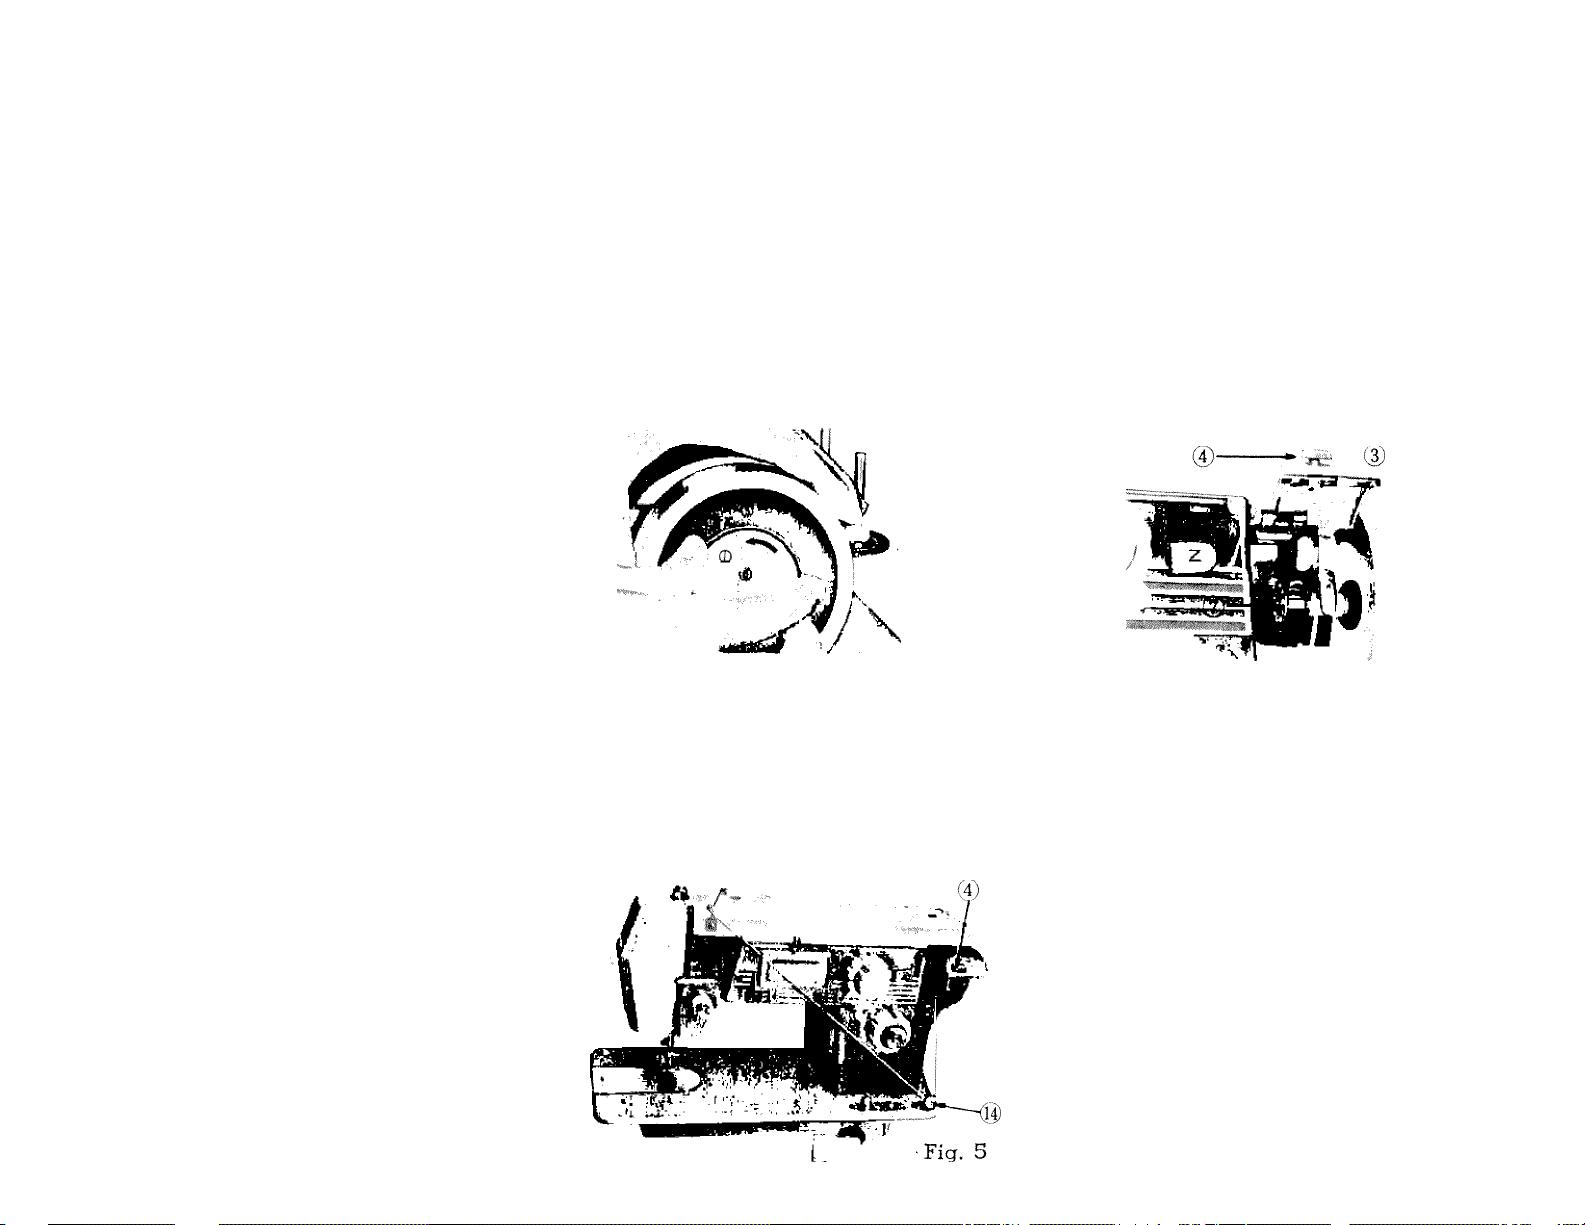
WINDING THE BOBBIN
yo„°rc”„''u^Lr'‘otciw!si.'^ ^ by turning clutch 6 toward
“Slide latch 4 to the right (Fig. 4) to spring open cover 3 of the recessed winder”
Place a yool of thread on one of the spool pins, lead thread through the upper thread guide
on arm and down through terision disc 14 Fig. 5 at base of machine. Run end of thread throuS
a hole in bobbin edge < left flange and from inside out) and place bobbin B on spindle of bobbin
winder 7 Fig. 4 fitting the notch bobbin
over small pm on Spindle. Push bobbin
winder against hand wheel. Hold thread
end loosely and start machine slowly
Bobbin will stop winding when it is
filled. Turn clutch away from you until
sewing mechanism is again engaged so
that needle moves when you turn the
hand wheel.
Break off loose thread end used to
start the winding and thread bobbin as
stated on Page 6.
Page 7
6
SETTING THE NEEDLE
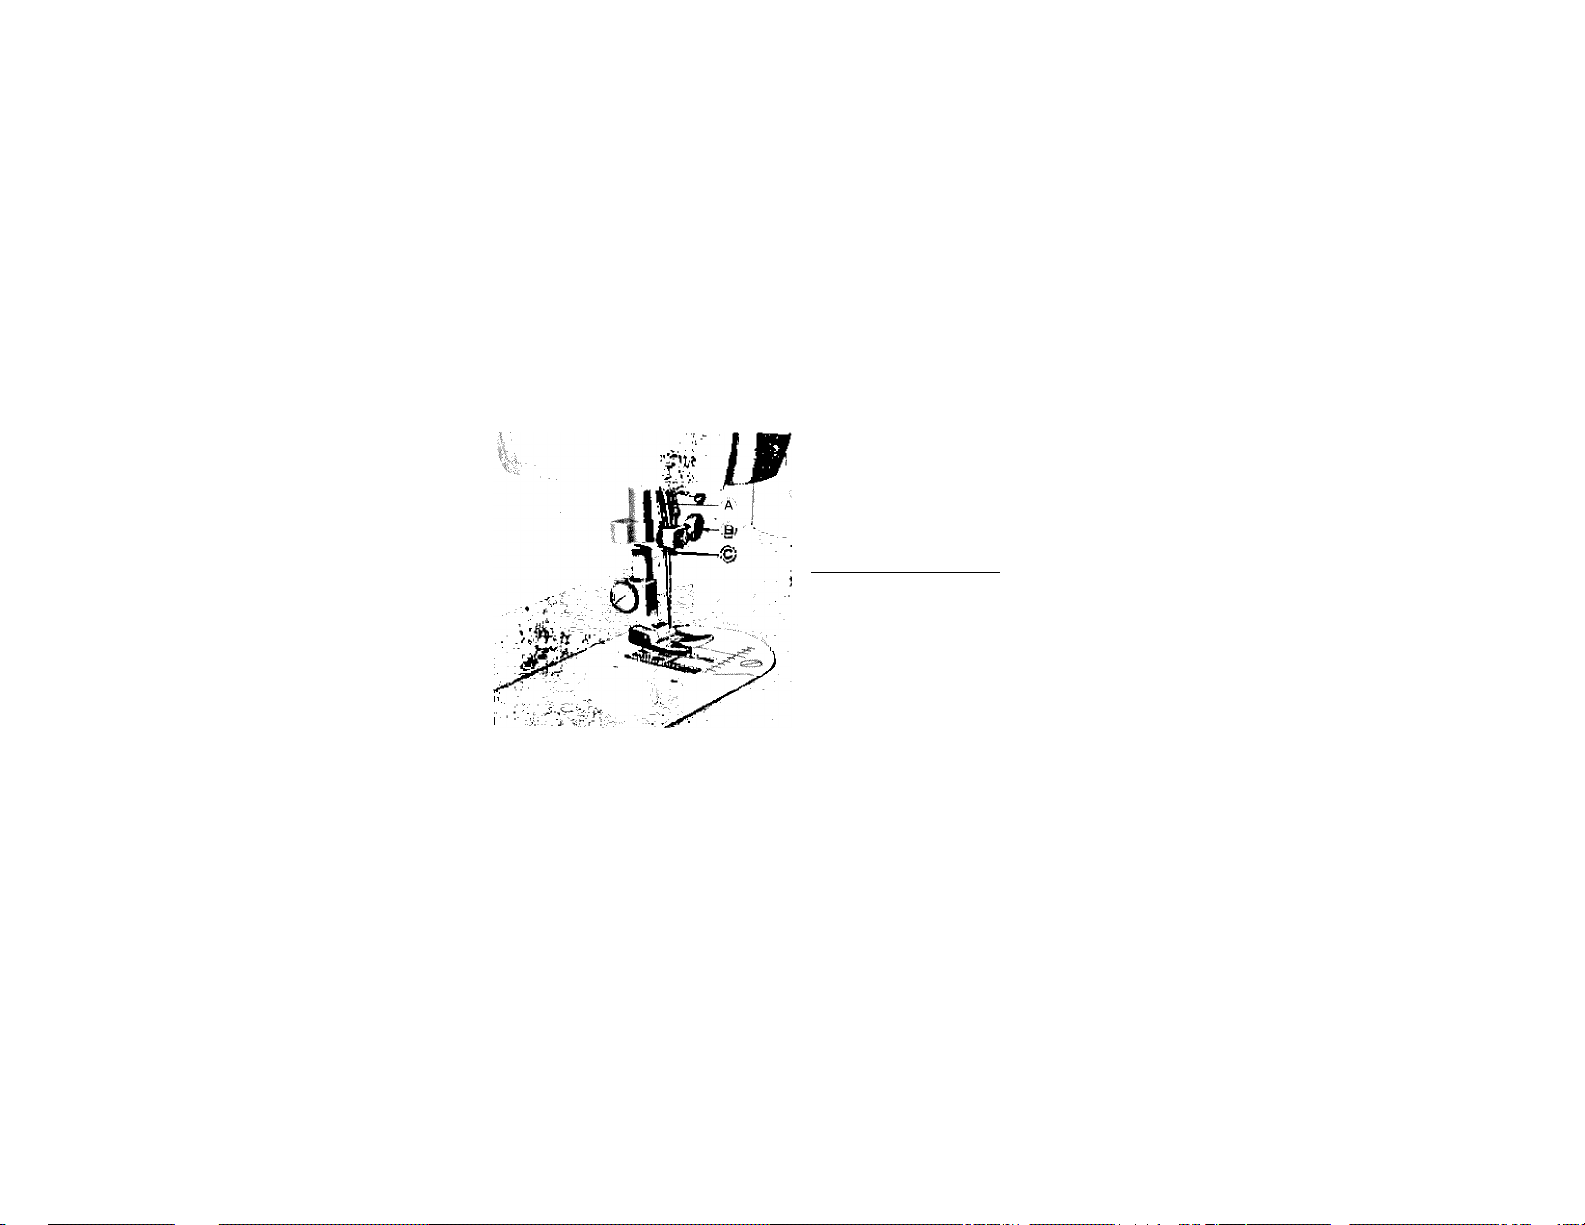
See Fig. S. Reise the needle bar A to its highest
point, turning wheel toward you by hand.
Then loosen the needle clamp screw B and the
Flat surface
of needle
shank
needle can be inserted into clamp C. Place needle
(flat side to right) m the needle clamp and push it
upward as far as it will go into the needle clamp
xiole, tig'htening' the needle clamp screw securely
with a screw driver.
After changing the needle make one com
plete revolution of the balance wheel by
hand to be sure the needle is in the correct
position.
Fig. 7
Fig. 6
THREADING THE BOBBIN CASE
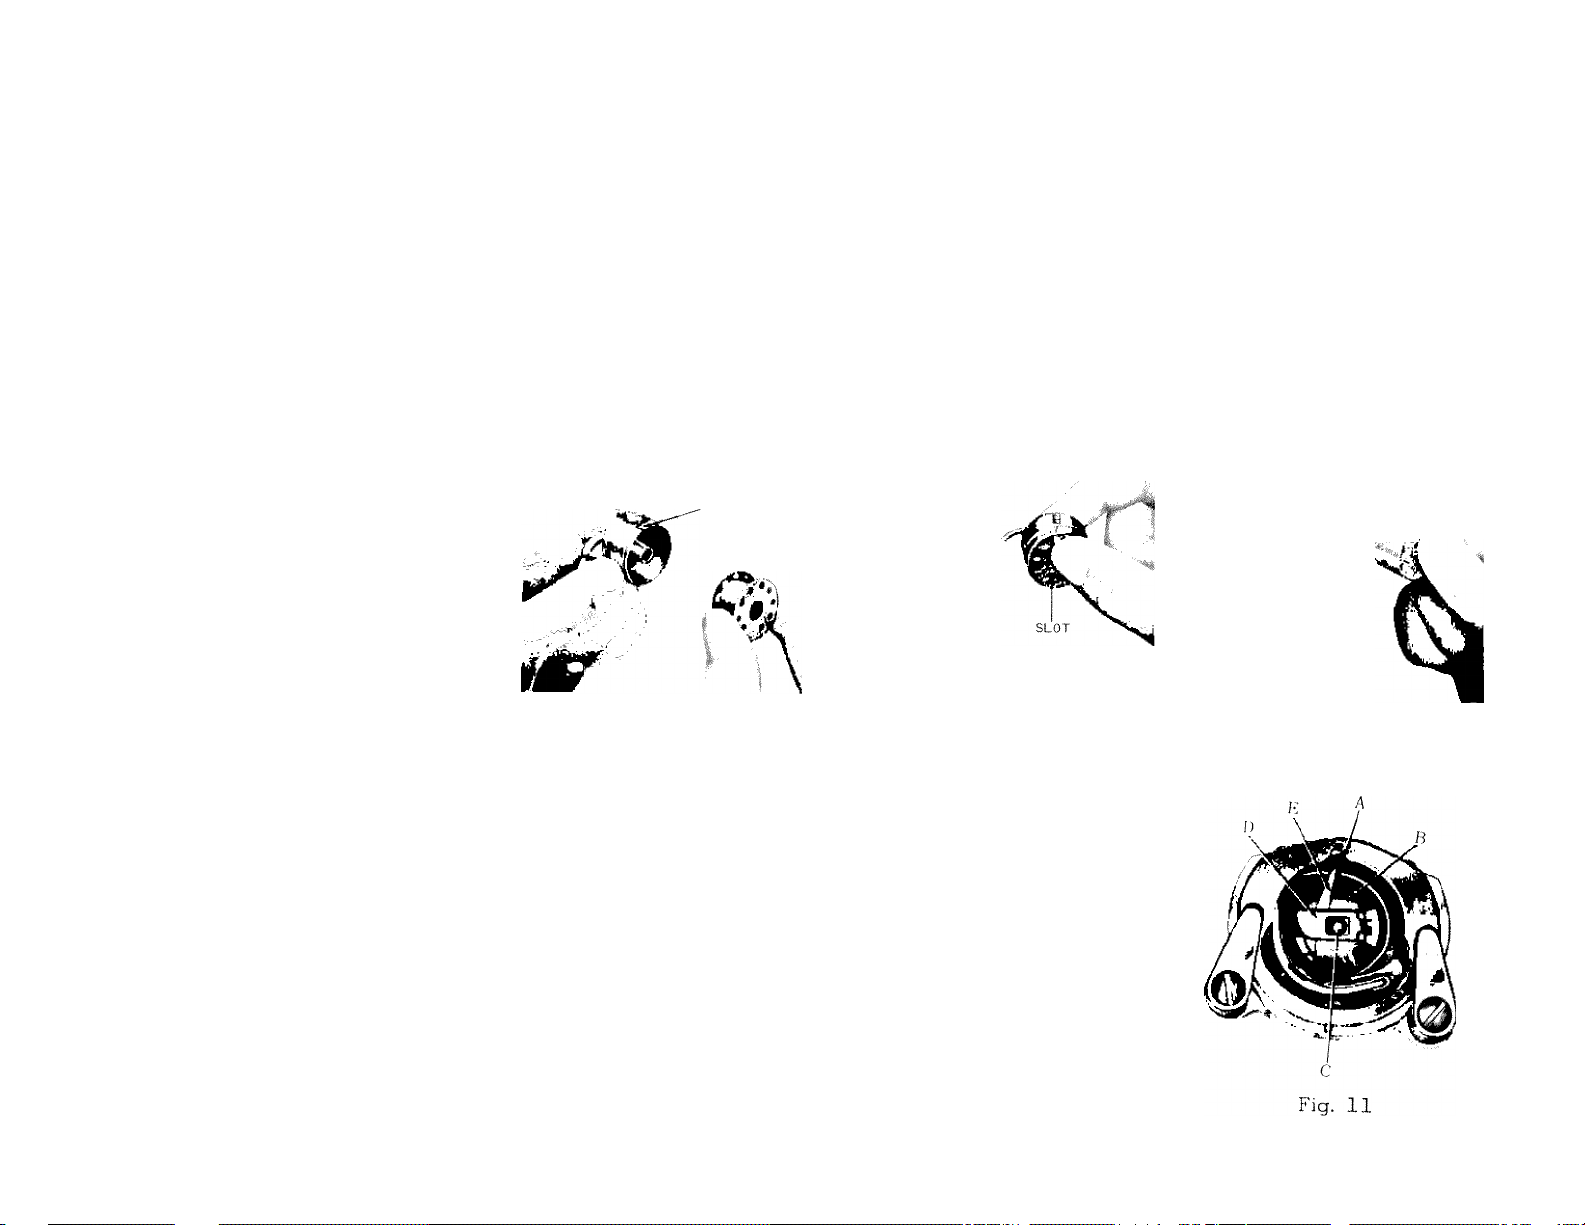
p illustrated in Fig. 8;. Hold bobbin case between thumb and forefinger of left hand,
so that the slot in the edge of the bobbin case is on top. Take the bobbin between thumb and
orefinger of right hand so that the thread on top leads from left to right.
Step 2 Insert bobbin into bobbin case, pull the thread into the slot of the bobbin case as
shown m Fig. 9, and draw it under tension spring and into the fork-shaped opening of the spring
as shown in Fig. 10,
Page 8
7
SLOT
Fig. 8
Fig. 9
PLACING BOBBIN CASE IN SHUTTLE
Raise needle bar to highest position, and Slide cover plate to
the left, (See 17, Fig. 1) Hold the bobbin case latch, (D),
Fig. 11, between the thumb and forefinger of the left hand,
with at least three inches of thread running from the top of
the bobbin case to the right. Insert and center the bobbin
case on the stud of the shuttle body, (Cj. Be sure the
bobbin case finger, (E), is opposite the shuttle race notch (A).
Press the bobbin case (B) into the shuttle as far as possible
until latch catches on the center post of the shuttle. THE.N
release the bobbin case latch, (D). Press bobbin case again
after latch has been released to make sure the bobbin case
is locked securely in place. Close the cover plate.
TENSION SPRING
Fig. 10
-----------------
3^
■iff.
Page 9
8
UPPER THREADING
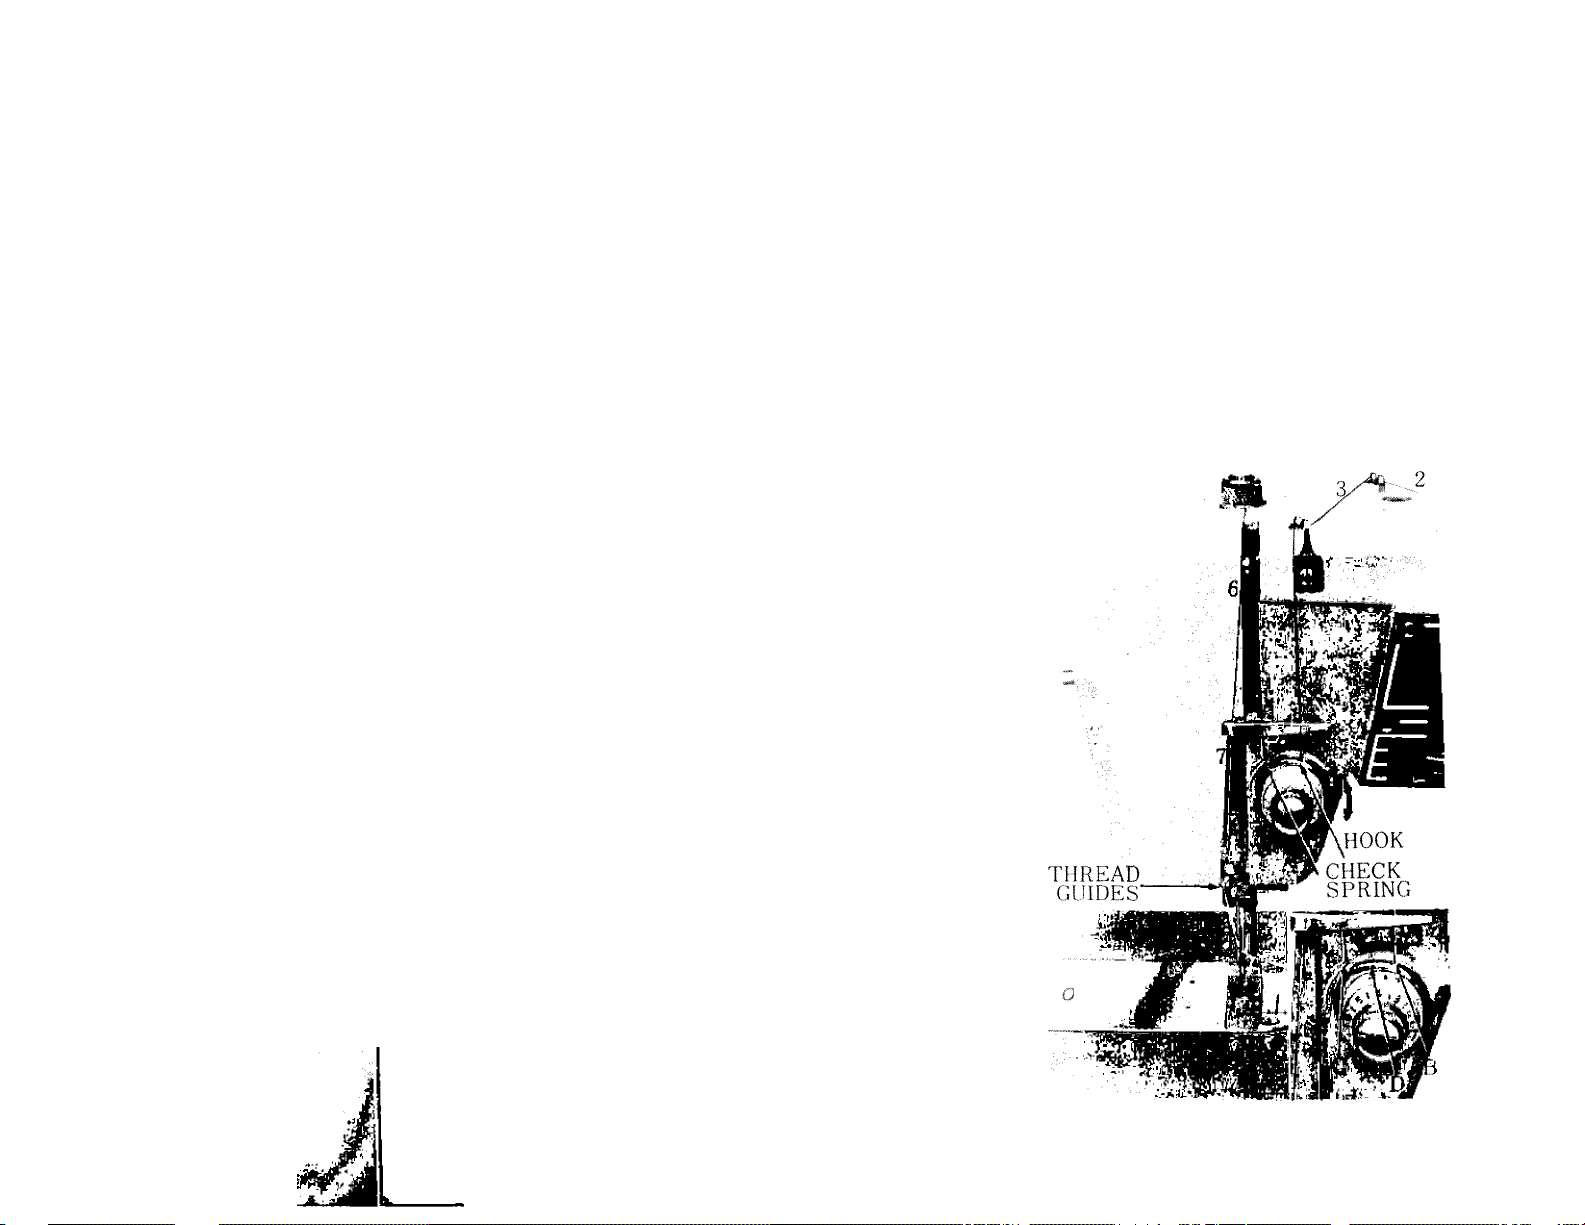
1. Turn the balance wheel toward you to raise
the take-up lever to its highest position.
2. Place a spool of thread on the spool pin.
3. Lead the thread through the upper arm thread
guides.
4. Run the thread through the thread guide bar
to the tension discs, then around and be
tween them from right to left.
5. Draw the thread up through the check spring
and with a slight tug into the hook. (See
insert, Fig. 12)
6. Pass the thread under the bar and up through
the eye of the take-up lever from right to
left.
7. Lead thread down under bar, through the
face plate guide and then through the needle
bar guide from the back.
8. Thread needle FROM LEFT TO RIGHT,
drawing it through about 3 or 4 inches.
Hold the end of upper thread loosely and
turn hand wheel toward you until the needle
goes all the way down and comes back up.
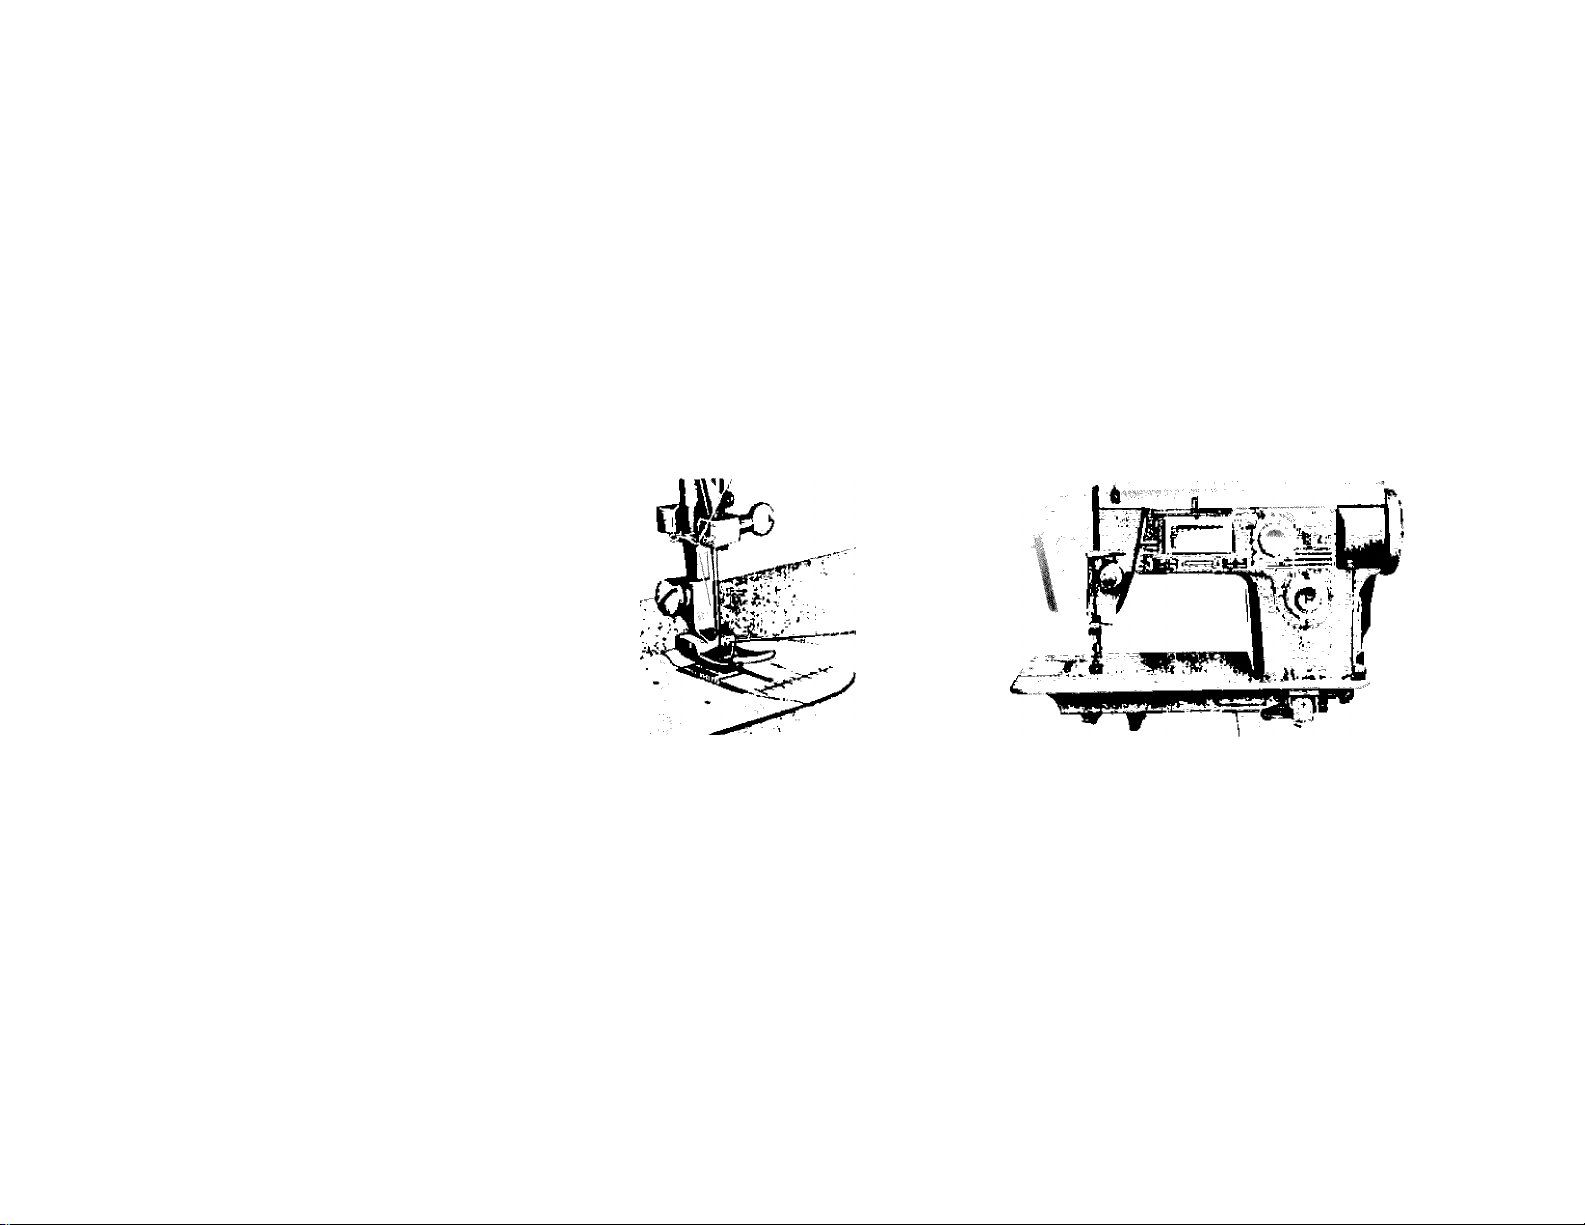
A loop (Fig. 13) will be formed over the
upper thread which then can be pulled out
straight. Place both thread ends under the
slot of the presser foot and draw toward the
back of the machine, leaving both threads
three or four inches long.
Fig. 12
Page 10
, «Jfcl
'-"I
1
.1 ’
*
.4 •
4 •
,1 -
4 *
I 5
/1 •>
/■* *
,i ;
,1 ;
<! »
4 ;
9
r ■,
9
9
Fig. 13 Fig. 14
SETTING THE STITCH LENGTH
The length of the stitch is regulated by the dial, shown in Fig. 14. Near 0 is the shortest
stitch and 5 is the longest, but the dial may be set at any spot between the markings for a
variety of lengths. Turn the dial to the right to lengthen and to the left to shorten the stitch.
The number stitch length you choose is indicated by the pointer.
STITCH LENGTH CHART (APPROXIMATE)
Figures on indicator
Number of stitches per inch
0
No Feeding
^30
1
2
25
3
15 8
5
6
1 '
i:
SEWING IN REVERSE
When you wish to sew backward to tie the threads at the beginning or end of a seam, press
in the button R, Fig. 14, as far as it will go.
The machine will sew backward as long as the
button is held in.
Page 11
10
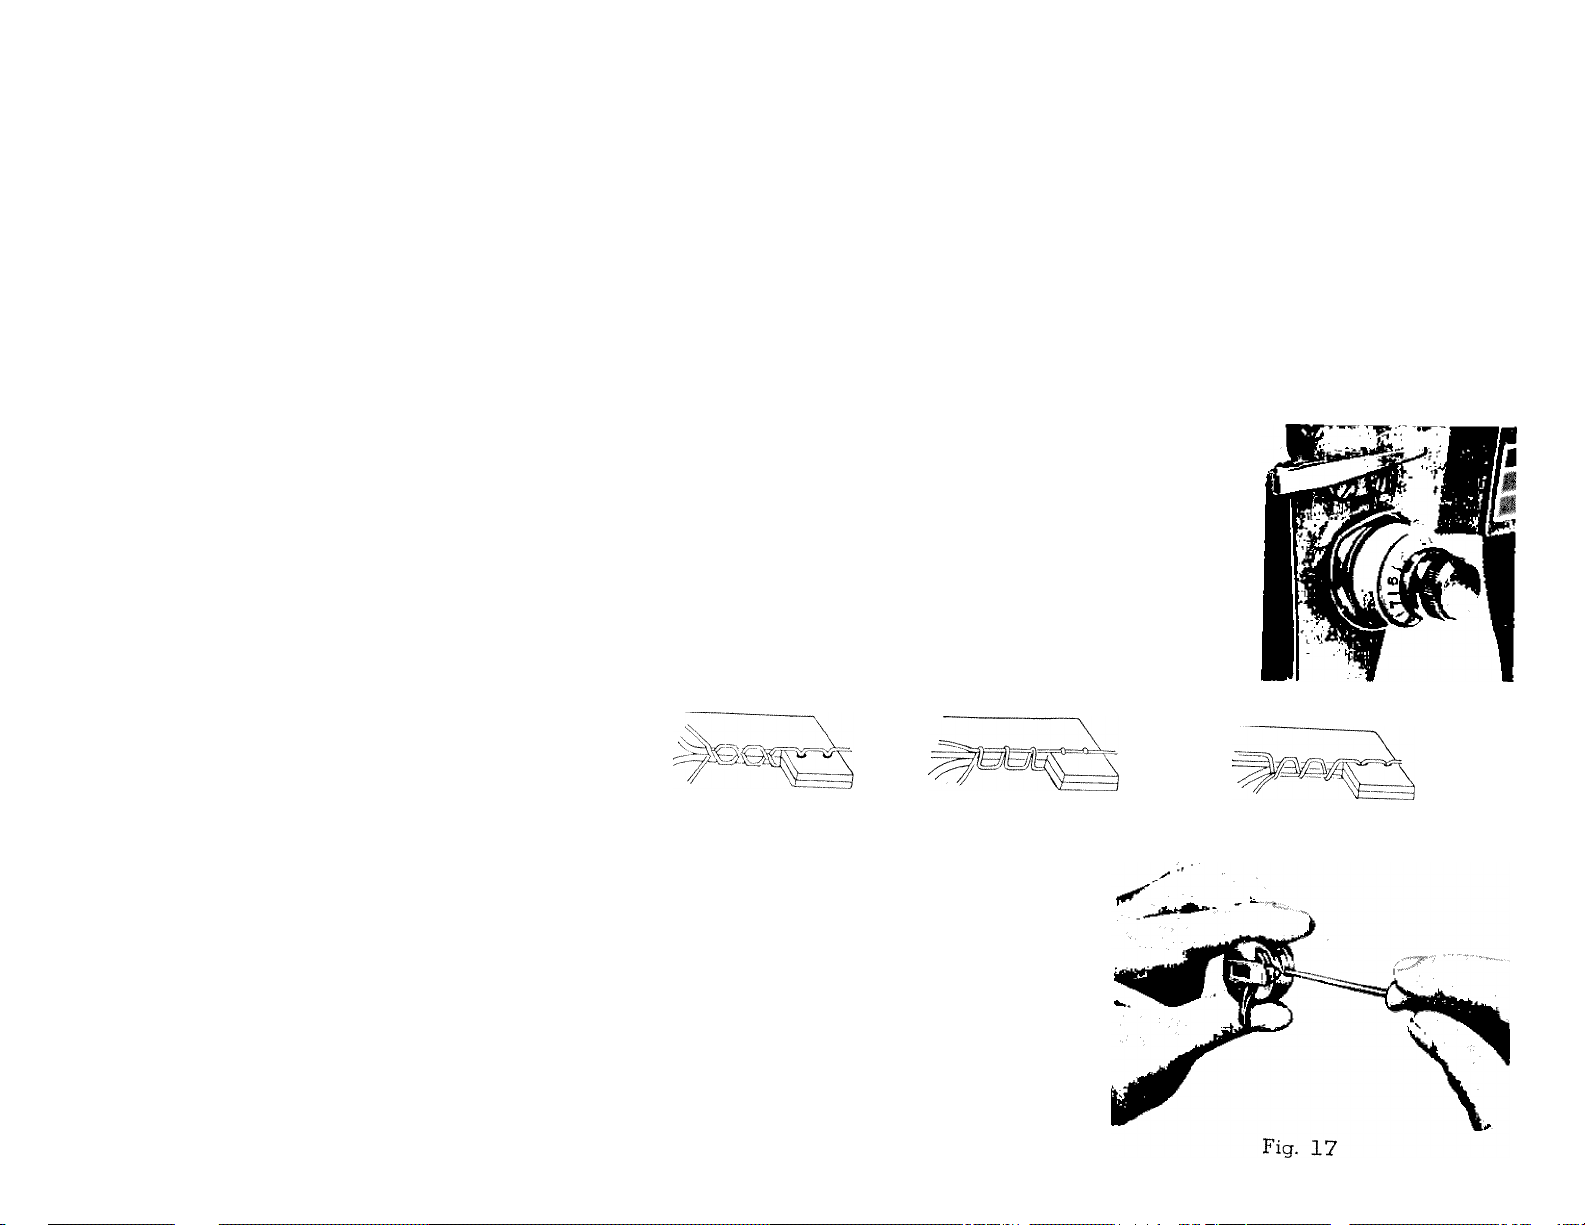
ADJUSTING THE TENSIONS
Always adjust the upper tension with the presser foot down,
as the tension is automatically released when it is raised. To
increase the tension on the upper thread, turn dial (Fig. 15 ) to
the right, or clockwise. To decrease, turn to the left. The higher
the number on the dial the tighter the tension. Before adjusting
lower tension be sure that the machine is threaded properly.
When necessary to change the bobbin tension, turn small
screw (Fig. 17) on side of the bobbin case clockwise to tighten,
counterclockwise to loosen.
Fig. 15
Fig. 16A Fig. 16B
When the upper and under tensions are properly
balanced, a perfect stitch will be formed with both
threads interlocking in fabric (Fig. 16-A).
When the upper tension is too tight, the lower
thread is pulled up over the upper thread which is
lying flat on the fabric (Fig. 16-B).
When the upper tension is too loose the upper
thread forms loops over the lower thread lying flat
on the fabric (Fig. 16-C).
Fig. 16C
Page 12
,i
/f
,,..l
i
■ ■ 1
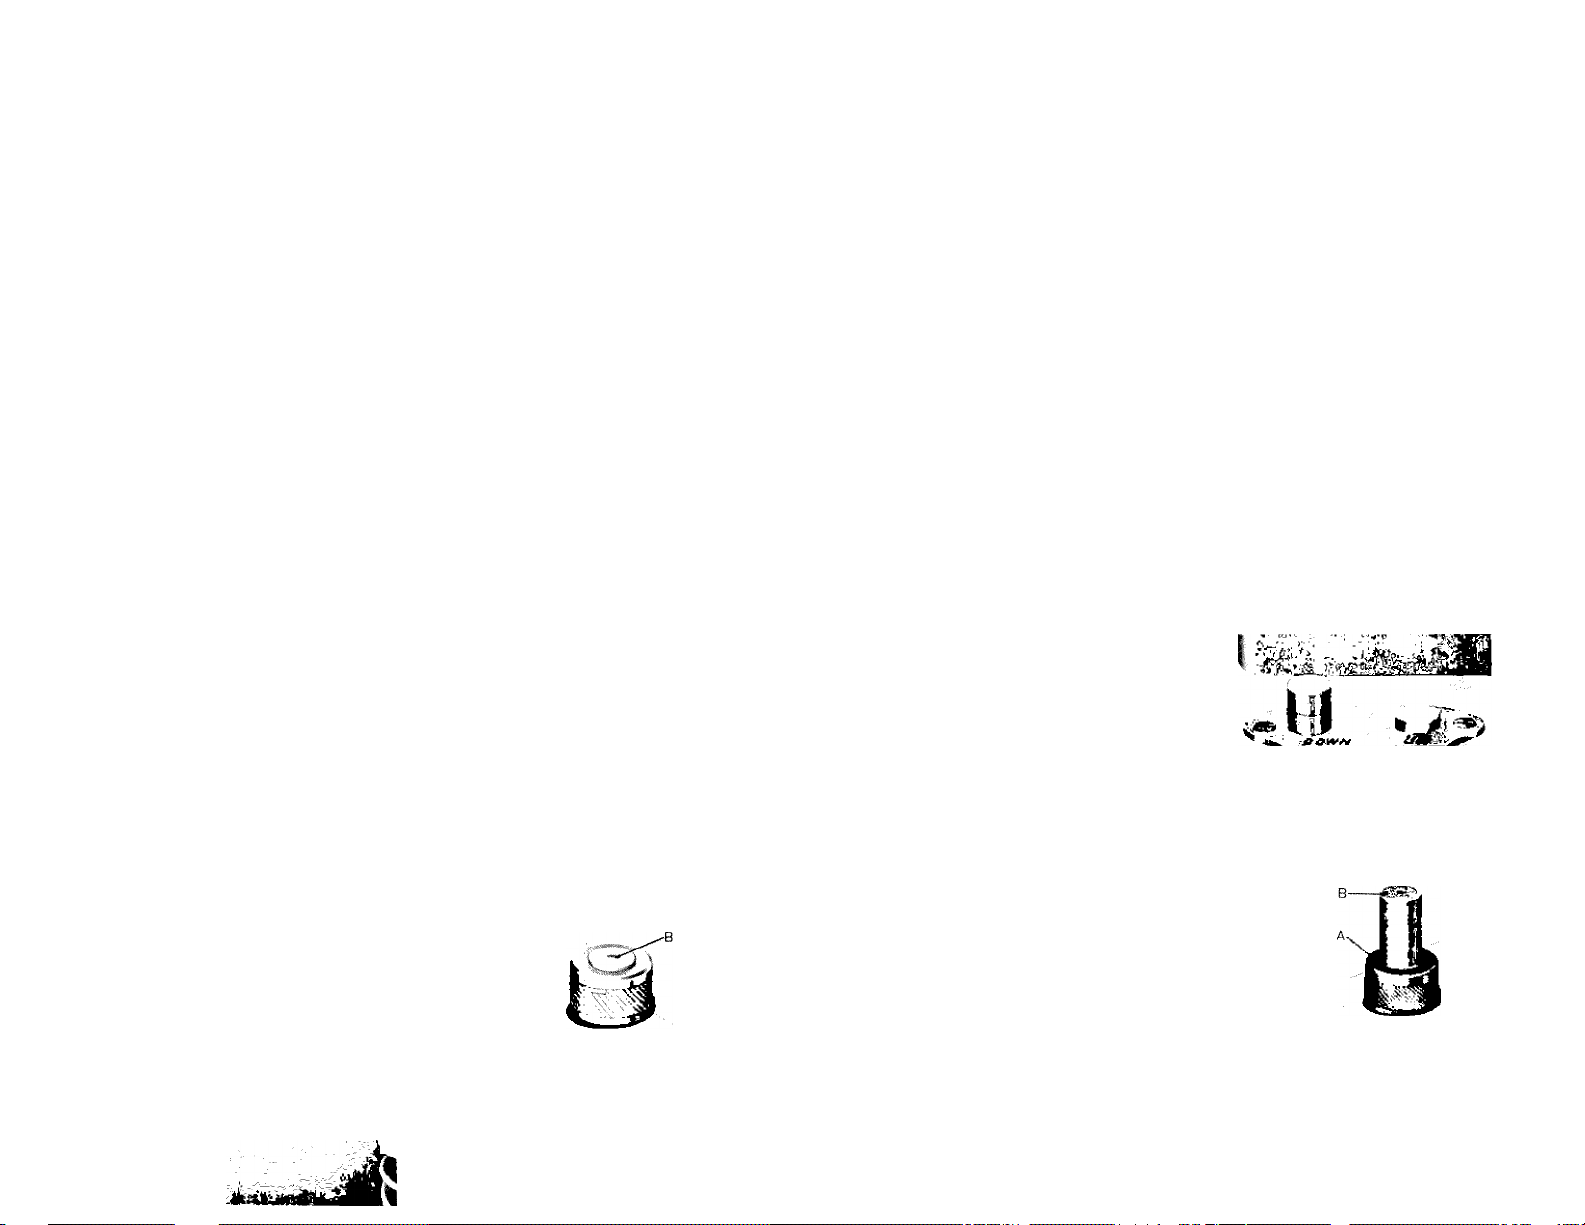
ADJUSTING PRESSURE AND FEEDING OF FABRIC
GENERAL SEWING. Usually for straight sewing and various embroidery work, the pressure
bar cap or darning release Fig. 19 is at its lowest position and the feed at its highest level-with
the drop feed button marked UP pressed all the way down. Fig. 18.
SEWING THIN OR LIGHT WEIGHT FABRICS
When lighter pressure is required to sew satisfactorily on thin
silk or filmy material, the pressure cap should be about halfway
down. Release all the way by pressing the snap lock. A, Fig.
20, and then press cap B down again to half-way spot. Lower
the feed slightly by pressing the down button (Fig. 18) to the
Fig. 18
red line.
DARNING AND MENDING
11
/!
In order to move the fabric freely in any
direction for darning and mending, release
1
the pressure cap B completely by pressing
down on the snap lock. A, Fig. 20. Press
down button (Fig. 18) all the way down,
which drops the feed well below the needle
Fig. 19
A
plate. To return feed to normal, press the
up button all the way down.
Fig. 20
Page 13
12
PREPARING TO SEW
Have take-up lever at highest point before starting to sew. Do not try to help the feeding
by pulling the material as this may deflect the needle and cause it to break.
NEVER run machine without material under presser foot.
Place material and threads in position under the presser foot and lower the ptesser foot. You
are now ready to begin sewing. By having the needle at its highest point, it is not necessary
to touch the hand wheel to start the machine. You merely press the control. The speed of the
machine is regulated by increasing or decreasing the amount of pressure exerted on the control.
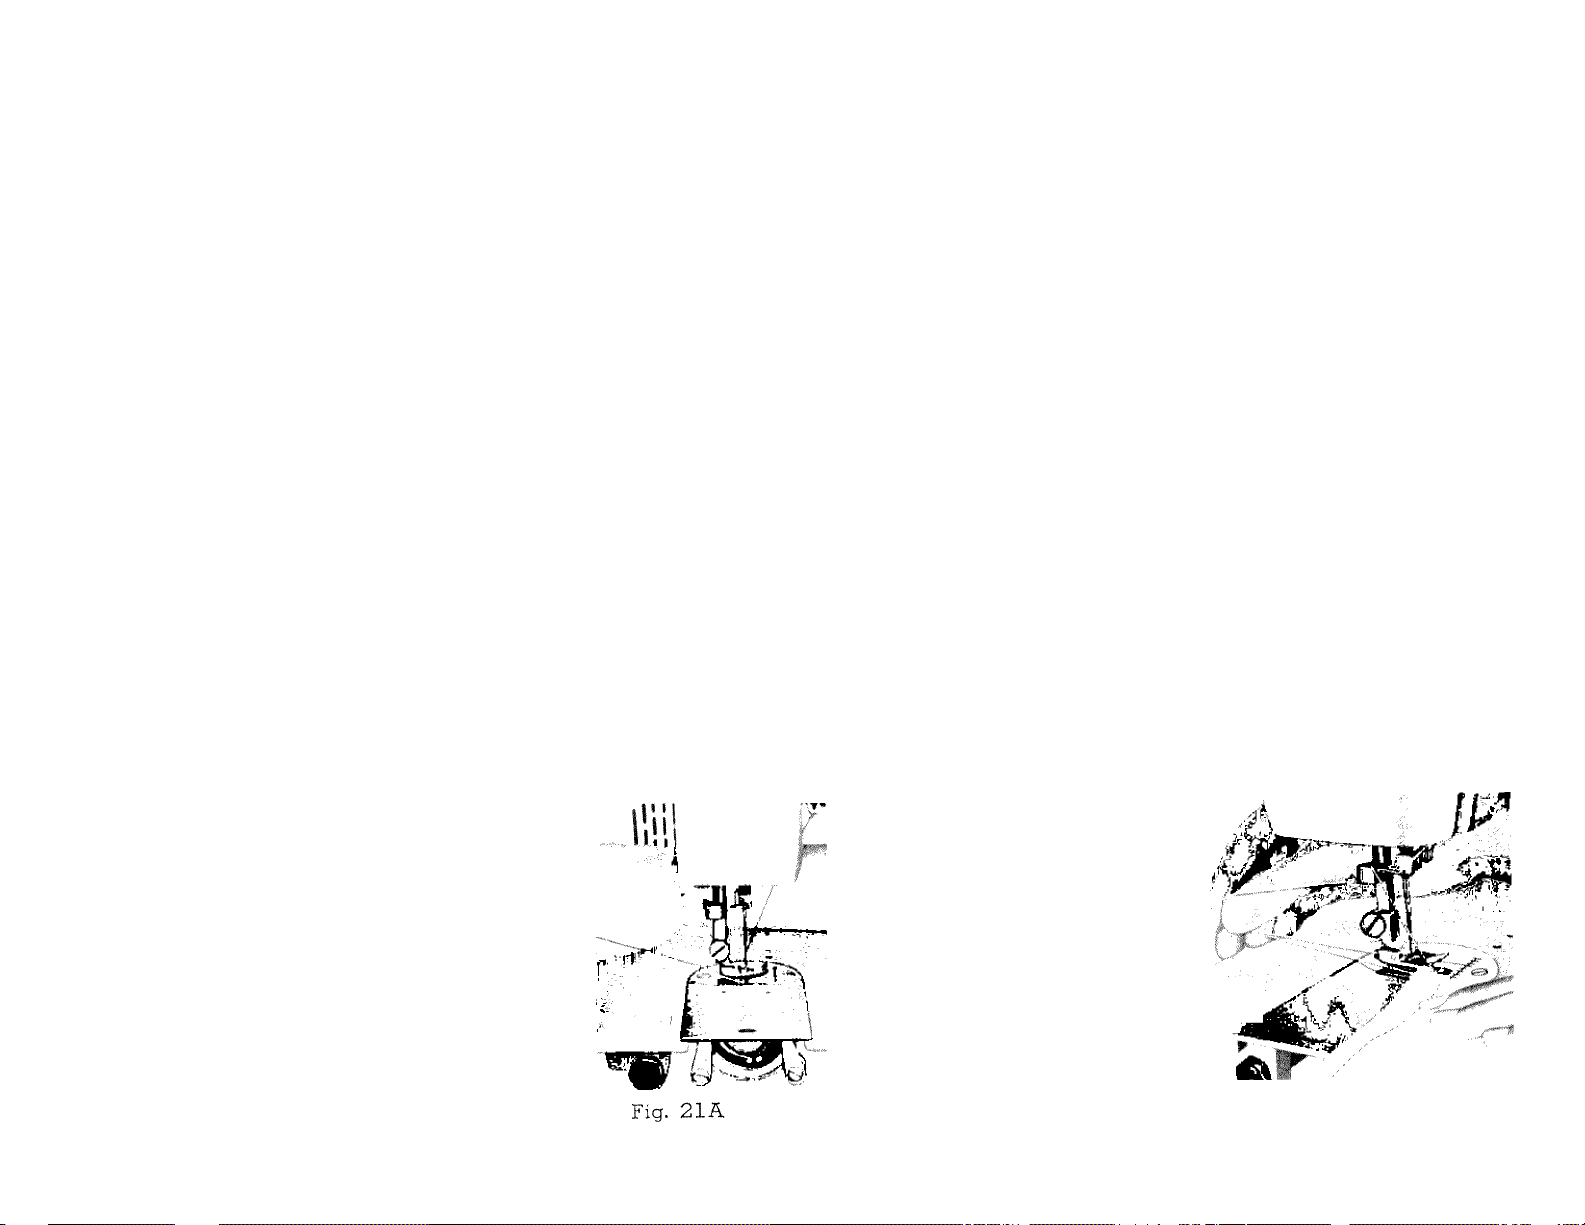
REMOVING THE WORK
Be sure to stop the machine
when the thread take-up lever
and needle bar are at the highest
position.
Now raise the presser foot
and draw the fabric back and to
the left, Fig. 21 A and B, and pass
the threads over the thread cutter.
Pull down slightly, holding
thread in both hands, so as not
to bend the needle.
Leave the ends of thread un
der the presser foot.
' . , ).P,' .
Fig. 21B
Page 14
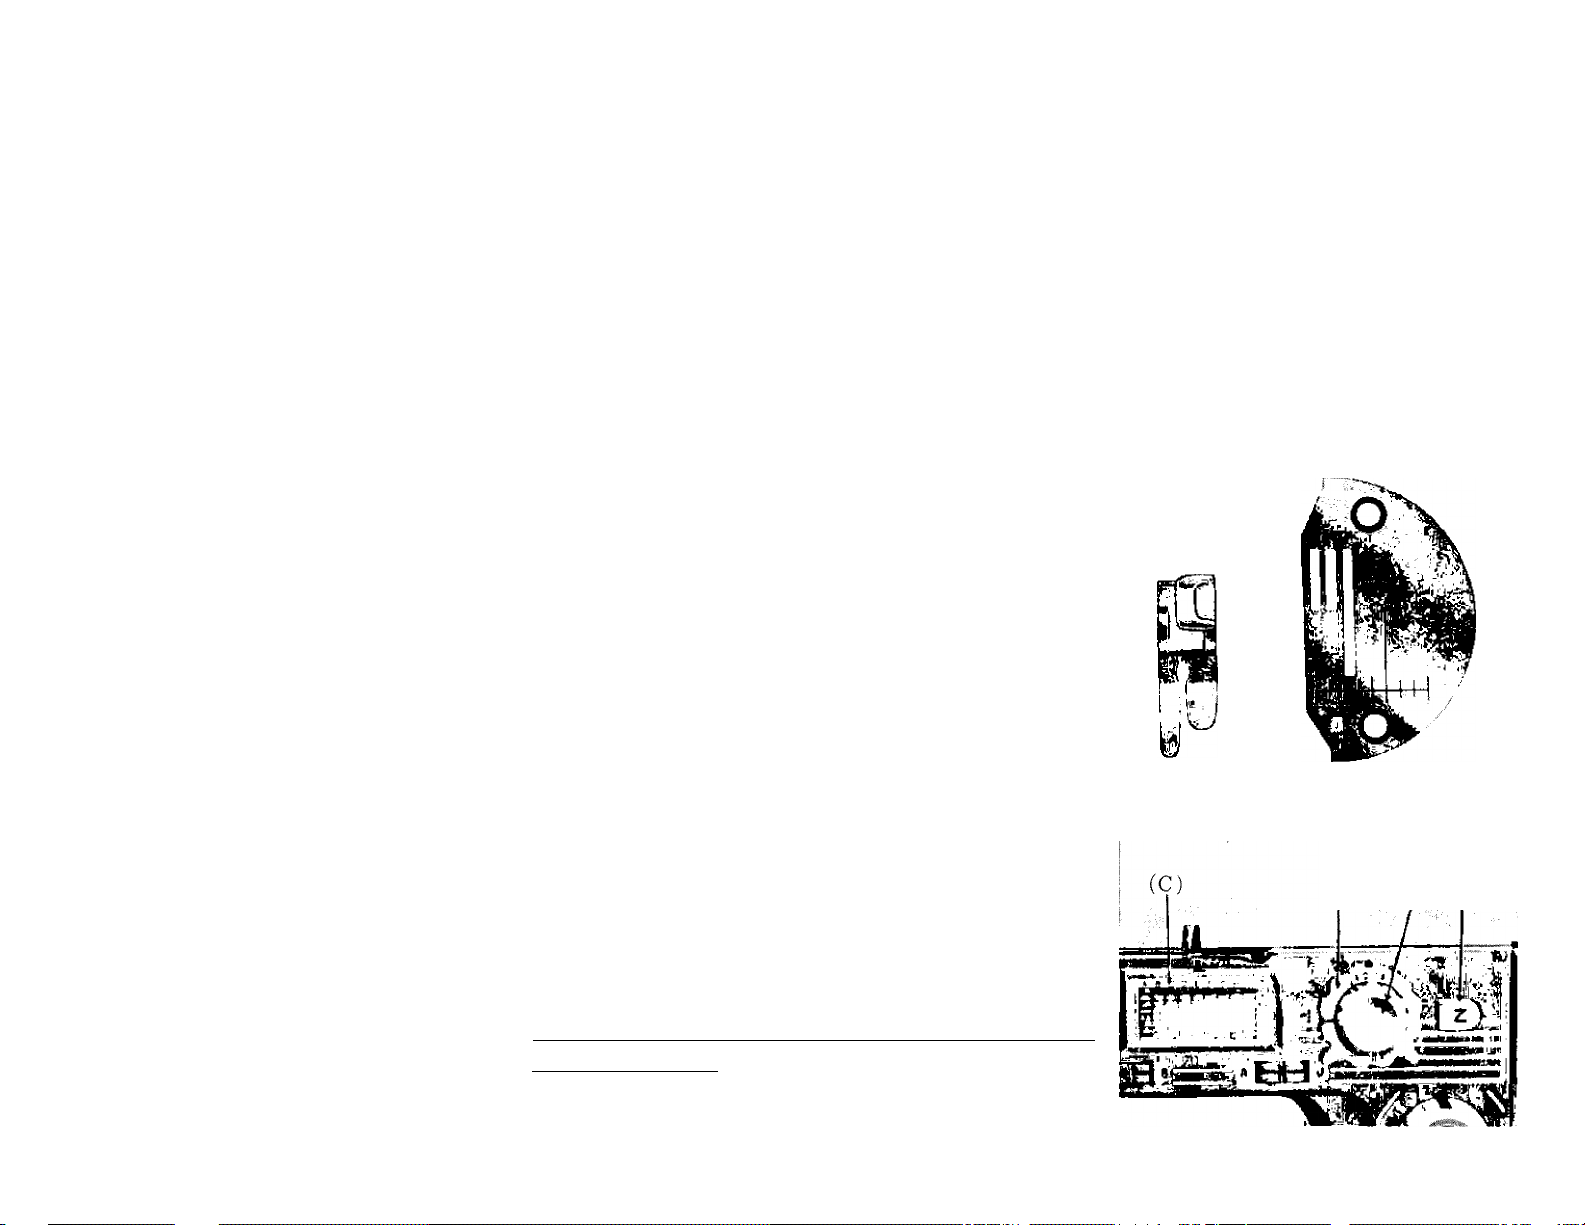
STRAIGHT STITCHING
For straight sewing on fine fabric or very soft ma
terial, you may want to use the straight stitch presser
foot and the straight stitch needle plate which are in
cluded in your accessory box. Both have narrow needle
slots.
Changing the Presser Foot and Needle Plate:
Cl) Presser Foot
(A) Loosen thumb screw 19, Fig. 1, and remove
zigzag presser foot.
(B) Replace with straight stitch presser foot,
Fig. 22A.
(2) Needle Plate
(A) Slide cover plate 17, Fig. 1, to the left as
far as possible.
(B) Remove screws holding needle plate 16,
Fig. 1, to bed plate.
(C) Remove zigzag needle plate.
(D) Replace with straight stitch needle plate
22B.
Be sure the machine controls are set as follows or you
will break the needle.
Fig. 22A
13
Fig. 22B
(A) iB),:.(Z)
^ 1
(1) Buttonhole control knob A, set at 0
3
(2) Zigzag Stitch Width control knob “B”, set at 0
(3) Decorative Stitch Design Dial at 'A-l’
Fig. 23
Page 15
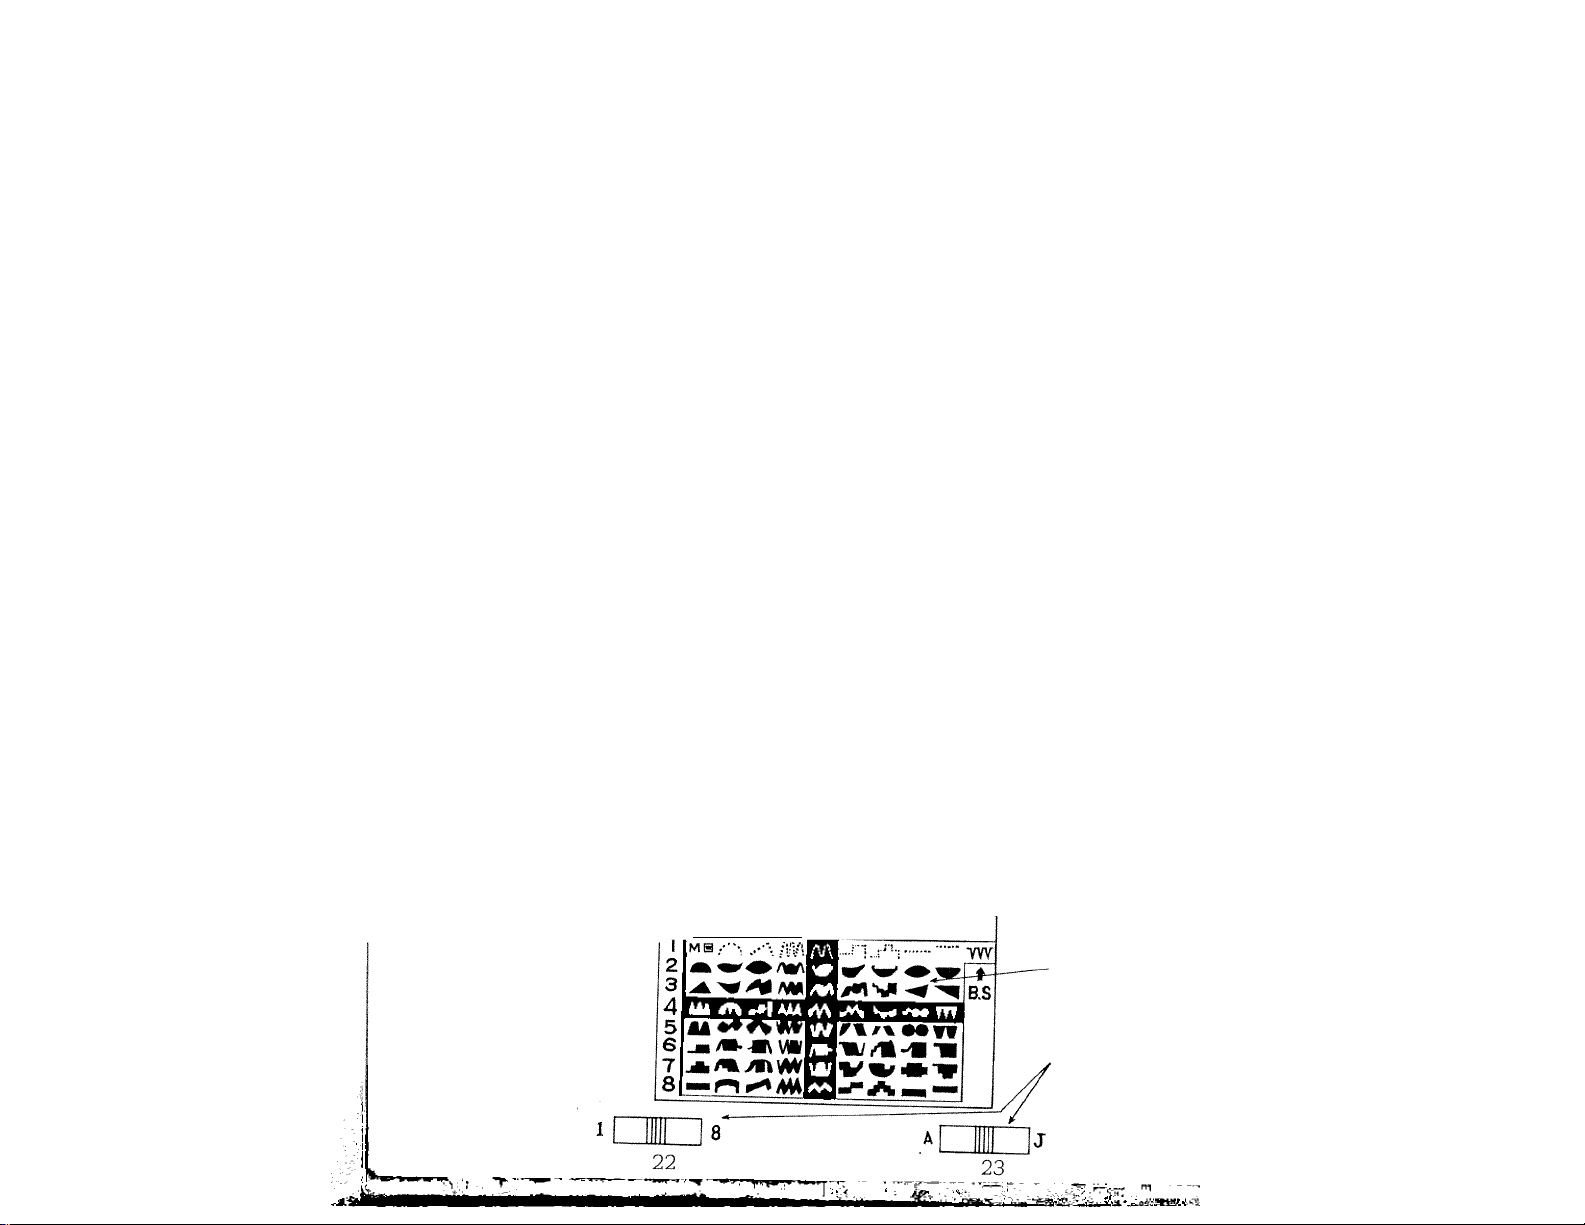
14
AUTOMTIC EMBROIDERY SEWING
Any one of the stitch designs illustrated on the Decorative Stitch Dial (32 Fig.
24) can be made automatically. The pattern located in the black area where the
two lines cross is the one produced.
To select a pattern,
(1) move mechanism release lever to the right
as far as it will go
(2) turn pattern selector control 22 to place
horizontal black line over pattern desired
(3) turn pattern selector control 23 to place
vertical black line over pattern desired
(4) release mechanism lever by raising it slightly so it wll spring back to its left
hand position
(5) set buttonhole control knob A at 0 (Fig^23)
(6) set zigzag width control knob B at 0 (Fig-23)
(7) Set stitch length control as close to 0 as possible without stopping the feeding
for a very compact design. By increasing the feed the design will be longer
but not quite so compact.
A B C D E F G H I J
n_T
- Release lever
Decorative stitch dial plate 32
Pattern selector control Knob
Fig. 24
JÈtSSi
Page 16
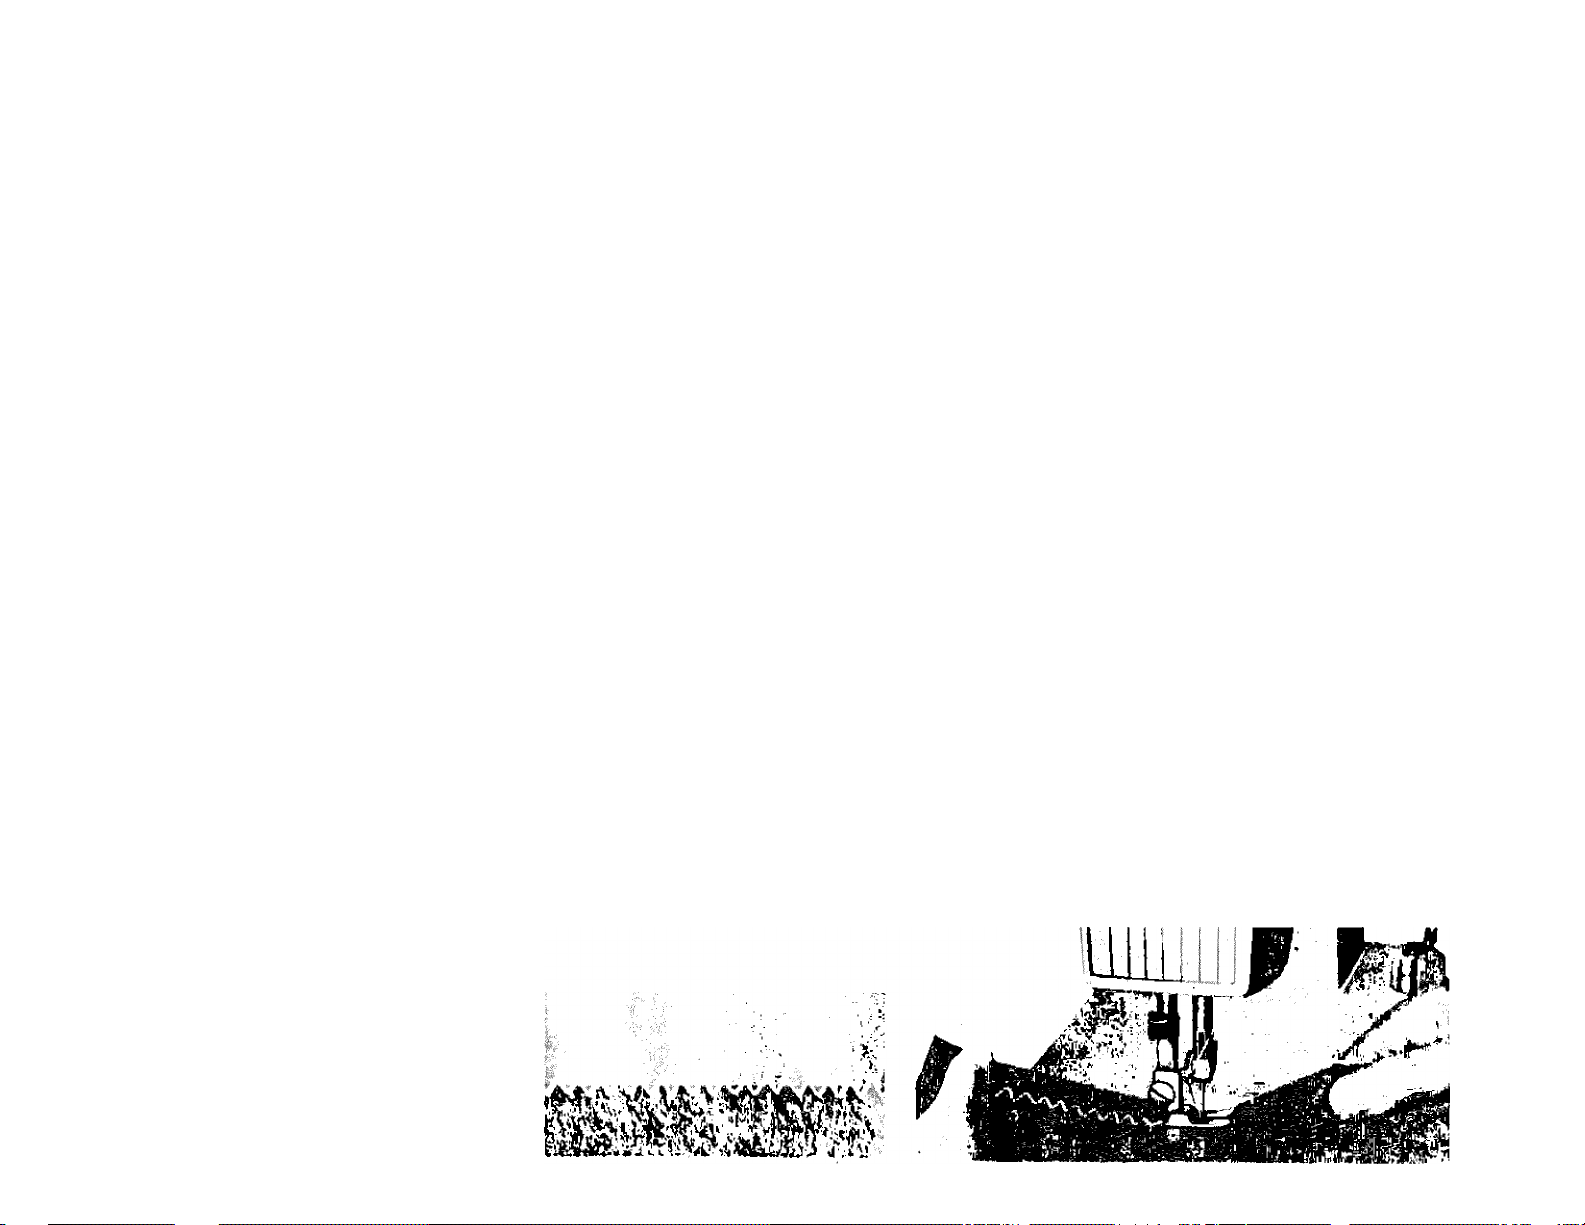
ELASTIC STITCH
Two types available on your machine. One the multiple zigzag stitch and the
other the serpentine stitch. Use the one most suited for the type of material and
work you are doing.
For multiple zigzag stitch set your machine for decorative stitch design number
D-1, for the serpentine stitch E-1 and zigzag stitch width and buttonhole control knobs
at 0 and stitch lenght to suit.
Use these stitch designs for :
(1) When applying elastic waist bands to skirts and dresses being sure to
stretch the elastic as it is applied to insure fullenss required in the garment.
(2) When replacing worn blanket bindings as they afford both a decorative
and durable finish,
C3) When sewing on jersey or any material that has a tendency to stretch,
C4) Many other iems which you will encounter in your sewing projects.
15
M »
Fig. 25
Fig. 26
Page 17
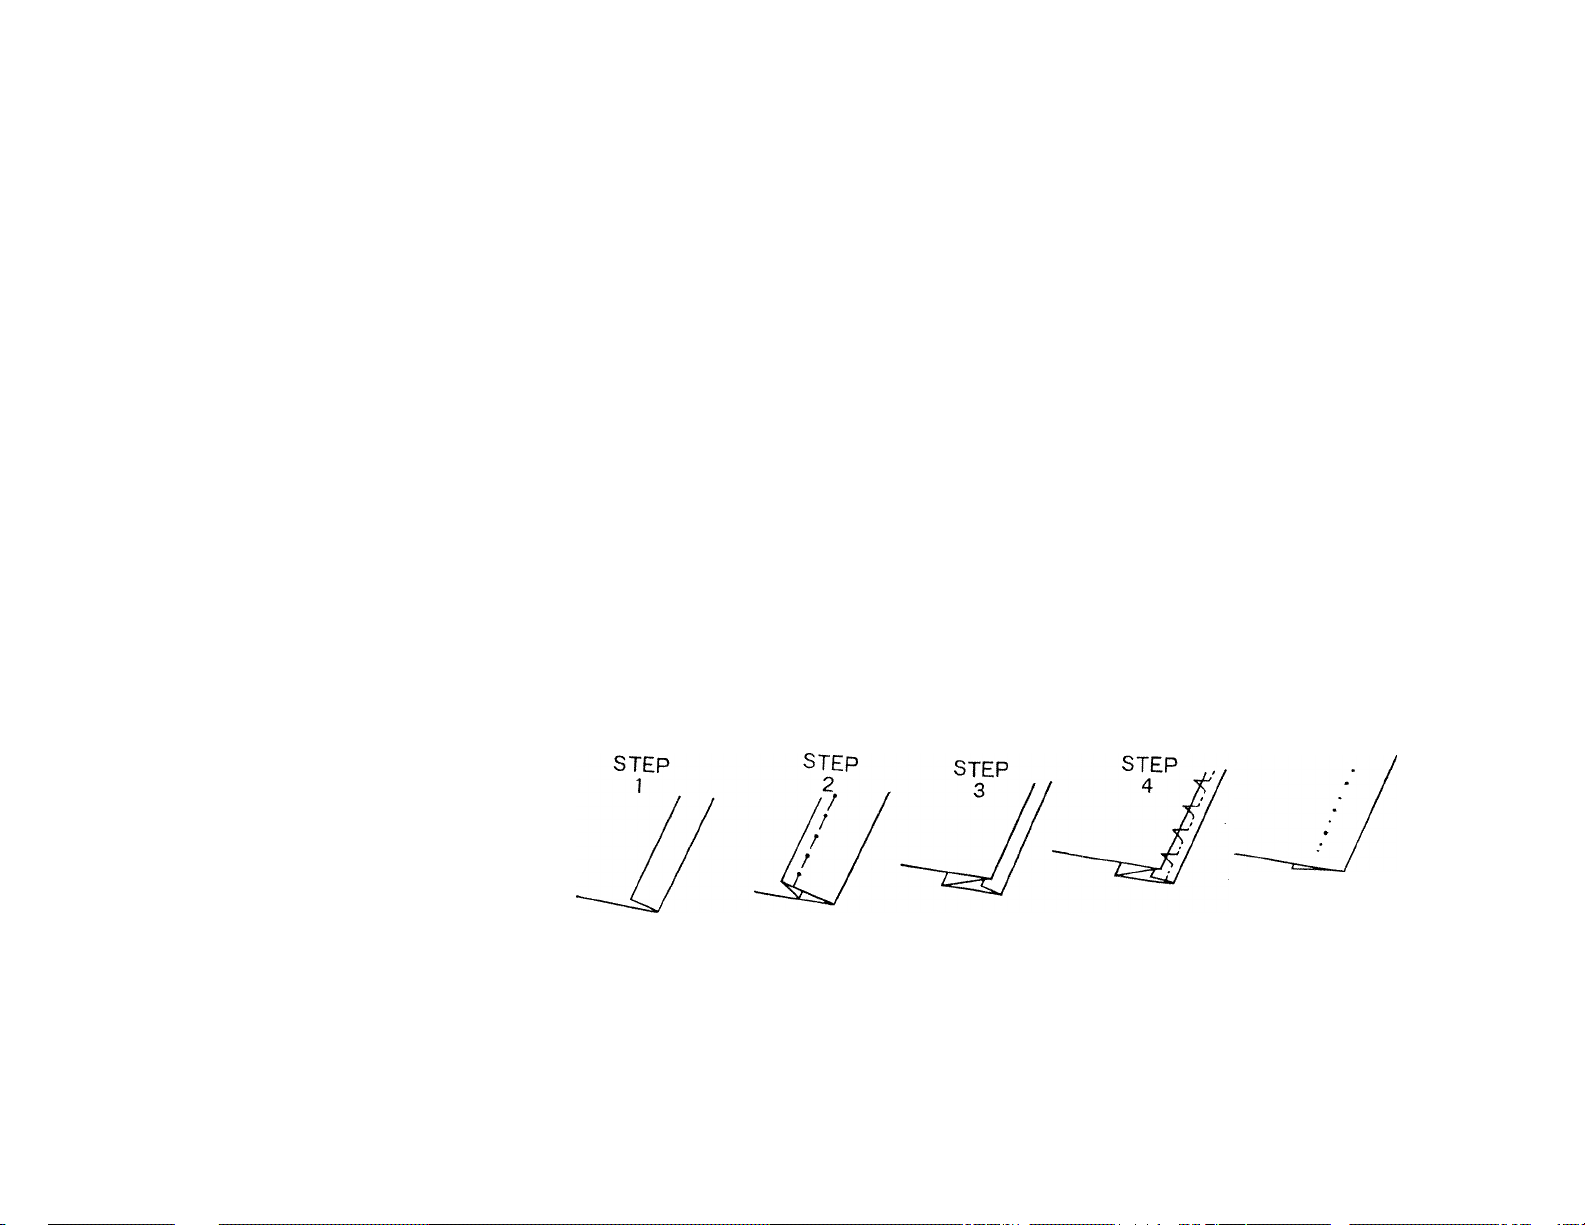
16
BLIND STITCH HEM
(1) Set machine for decorative stitch design number J-1
(2) Set stitch length control at number 3 or 4
(3) Set zigzag stitch width and buttonhole control knobs at 0
Blind stitch hems provide a durable hem finish that is almost invisible and comparable
to hand sewing.
Prepare the garment in the same manner as for hand hemming.
COMPLETED
Fig. 27
Step 1. If hem with folded edge is used, make first fold 3/8” deep.
Step 2. Turn hem the depth desired and baste K” from upper edge. Press into place.
Step 3. Fold hem back toward right side of garment leaving H” extended.
Step 4. Place garment, under 'presser foot and sew blind hem automatically.
Page 18
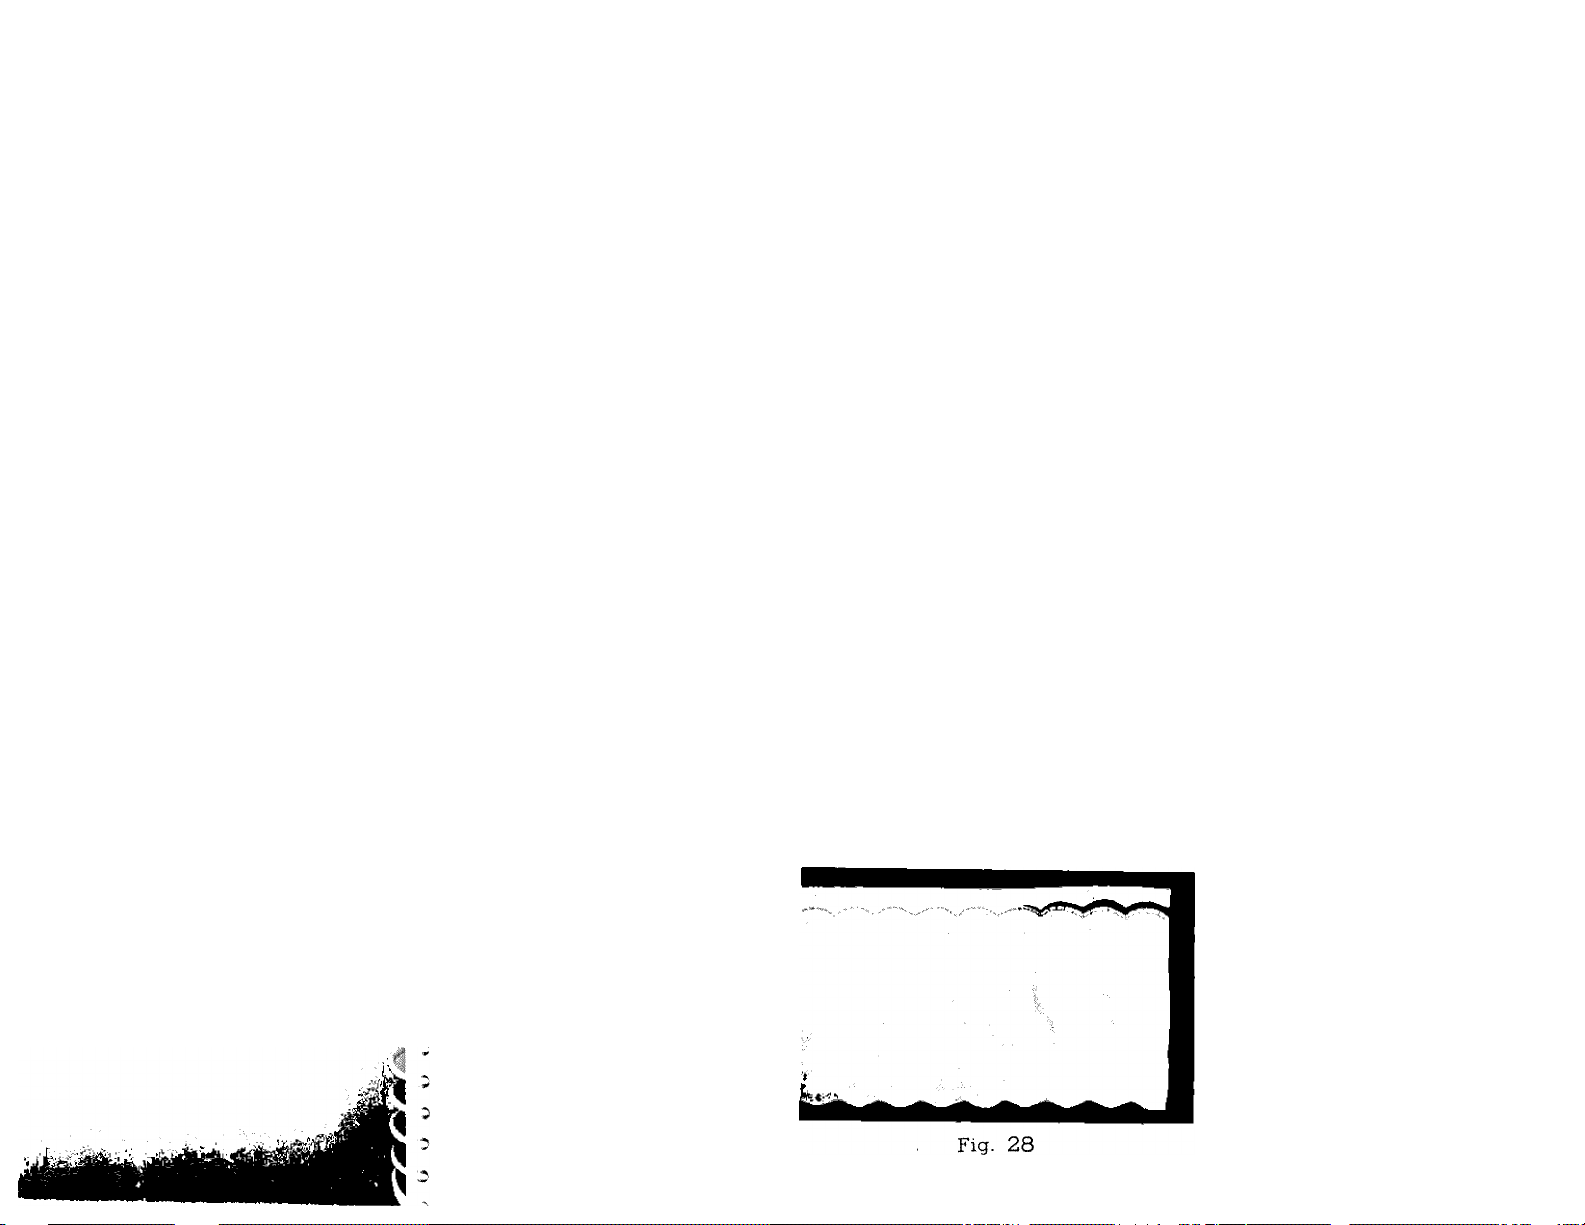
SCALLOPING
Dainty scallops are used extensively as self trimming on blouses, dresses, lingerie
and children,s wear.
Perfectly termed and evenly spaced scallops are produced automatically by just
setting the machine for decorative stitch design number C-1 and zigag stitch width
and buttonhole control knob at 0.
Set the stitch length to suit. The longer the stitch length the longer the scallop.
After stitching, trim seam allowance to less than bg inch and clip into turned
edges. Some fabrics may also need notching for a smooth evenly turned edge.
Turn gently, roll out scallops between fingers and press.
When forming scalloped tucks, add an extra % inch to tuck allowance for seaming.
17
Page 19

18
CREATIVE EMBROIDERY
Be sure zigzag presser
To stitch continuously at one width of zigag stitching, set zigzag stitch width stop
Z (Fig. 23) by turning zigzag width control knob D to desired setting and press.
Lock Z. this will lock the control knob in position.
To release zigzag width control knob D just press lock Z and control kno wi
spring back to 0.
foot and zigzag needle plate are in place.
MH UMU lUlU UiUU tilUl ItiliU UtUl UiUU UlilU lUill
- Set a rhythm for yourself and then proceed. After
awhile you will become quite skillful, varying your de
signs by the speed of the machine, stitch length, and
manipulation of the zigzag control knob.
mmmmmmmmmmmm
SAMPLES OF CREATIVE EMBROIDERY
Fig. 29
A. Sew a few stitches at 5 width, then allow knob
to spring back to 0 for a short period. Count, if necessary,
to establish a rhythm.
B Set stop at 2 then move knob slowly between numbers 2 and 5 rather fast.
C. Set stop at 1. Gradually move knob from 1 to 5, allowing it to snap back quickly.
D. Set zigzag stitch width stop at 4, stitch length at lYz- Do a few zigzag stitches, drop
feed for 3 or 4 stitches, then raise it again. By operating the feed knob rhythmically it is not
necessary to count stitches.
Fig. 29
Page 20
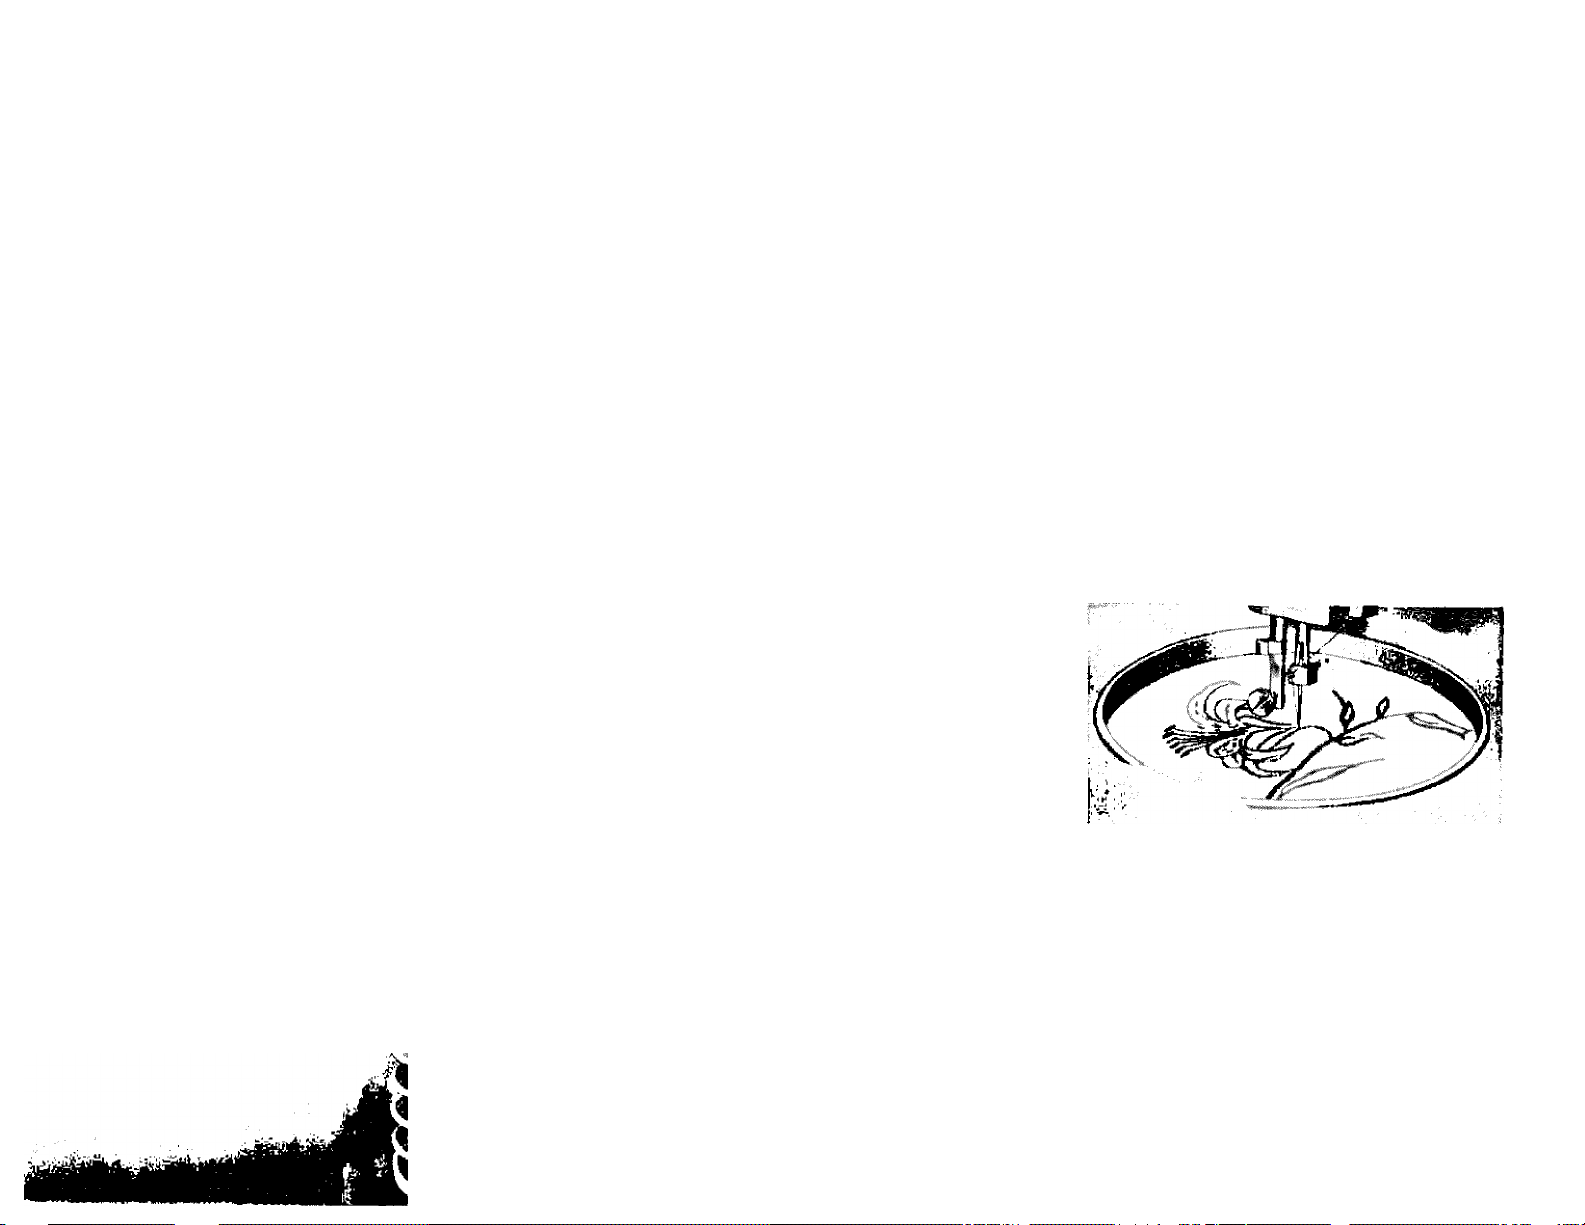
E. Drop feed, set stitch width lock at 5, take 3 or 4 stitches, leave needle in fabric left of
stitches. Pivot fabric on needle to make next daisy petal. Continue until flower design is com
plete. Lock threads by setting stitch width at 0 and taking 3 or 4 stitches in center of design.
EMBROIDERING WITH A HOOP
It is easy to follow a stamped design or to
work free hand when embroidering or monogramming. (See Fig. 30). Release the pressure from
the foot by pressing down the snap lock on the
automatic darner. Push the drop feed button down
all the way.
Stretch the fabric in an embroidery hoop, and
place under the needle after removing the presser
foot. Set the stitch width at the size you prefer
and lower the presser bar lifter. Then operate the
machine at a rather high speed while moving the
hoop slowly with both hands. Work carefully and be sure to keep fingers out of the path of
the needle.
Should you encounter skip stitches, the fabric is not stretched tight enough or a darning spring
is needed (see attachments available from your dealer illustrated in the back of this book.)
fig. 30
19
DARN OR MONOGRAM WITHOUT HOOP
If you wish to darn or monogram without embroidery hoops, leave zigzag presser foot in
place, release all pressure on presser foot, set stitch length at 0, set zigzag stitch width to suit
and leave feed in sewing position. '
When darning or monogramming in this manner the fabric must be held taut or skipped
stitches will be encountered.
Page 21

20
BUTTONHOLES
Buttonholes of various lenghs can be made automatically
by just turning the buttonhole control knob.
lo establish the correct length buttonhole required, add
/8 inch to the cutting space for bar tacks.
To obtain the length of the cutting space, the opening
through which the button passes is measured by adding the
width “A” and thickness “B” of the button (Fig. 31 A)
First mark the beginning and end of the buttonholeon
the fabric with a basting line or tailor’s chalk Make one
or two buttoiihole on scrap fabric (following directions
below) to be sure the machines adjustments are correct.
(1) Set decorative design at number A-1 and zigzag
stitch width control at 0.
(2) Replace presser foot with special purpose buttonhole
foot. It provides maximum visibility and allows
closely spaced stiches to feed evenly (Fig. 31)
t3) Set stitch length knob 12 (Fig. 1) as near 0 as
possible without stopping the feeding action.
(.4) Set buttonhole control knob (Fig. 33) at 0 and
then to the first buttonhole setting, number 1.
This will automatically set the width of the
buttonhole sides.
(5) Lower needle carefully into the mark on the
fabric indicating the start of the buttonhole.
Lower presser foot and sew full length of left
hand side of the buttonhole (Fig. 32, Step 1).
V
' E M
T o'
p s
Fig. 31
Fig. 31A
Sk
S 55
"'ll
si
Fig. 32
Page 22

(6) Set buttonhole control at nuber number 2 position for bar tacking.
Sew four or five stitches, step 2.
(7) Set buttonhole control at number 3 for right hand side of buttonhole.
This will automatically set the machine to sew in reverse. Sew right hand
side of buttole, step 3.
(8) Set buttonhole control at number 4 position for bar tack. Sew four or
five stitches, step 4.
(9) Set buttonhole control at 0 position and take two or three stitches to fasten
bar tack to prevent ravelling.
(10) Cut the buttonhole opening with seam ripper, being careful not to cut the
stitching.
If you plan to make buttonholes on
Fig. 33
z
sheer or soft material, place tarlatan or
paper under fabric which can be torn
away after stitching.
When making additional buttonlioles
be sure to turn the buttonhole control
knob to 0 and back to the number 1
position to put the machine in forward
stitching.
21
Page 23
22
SEWING ON BUTTONS
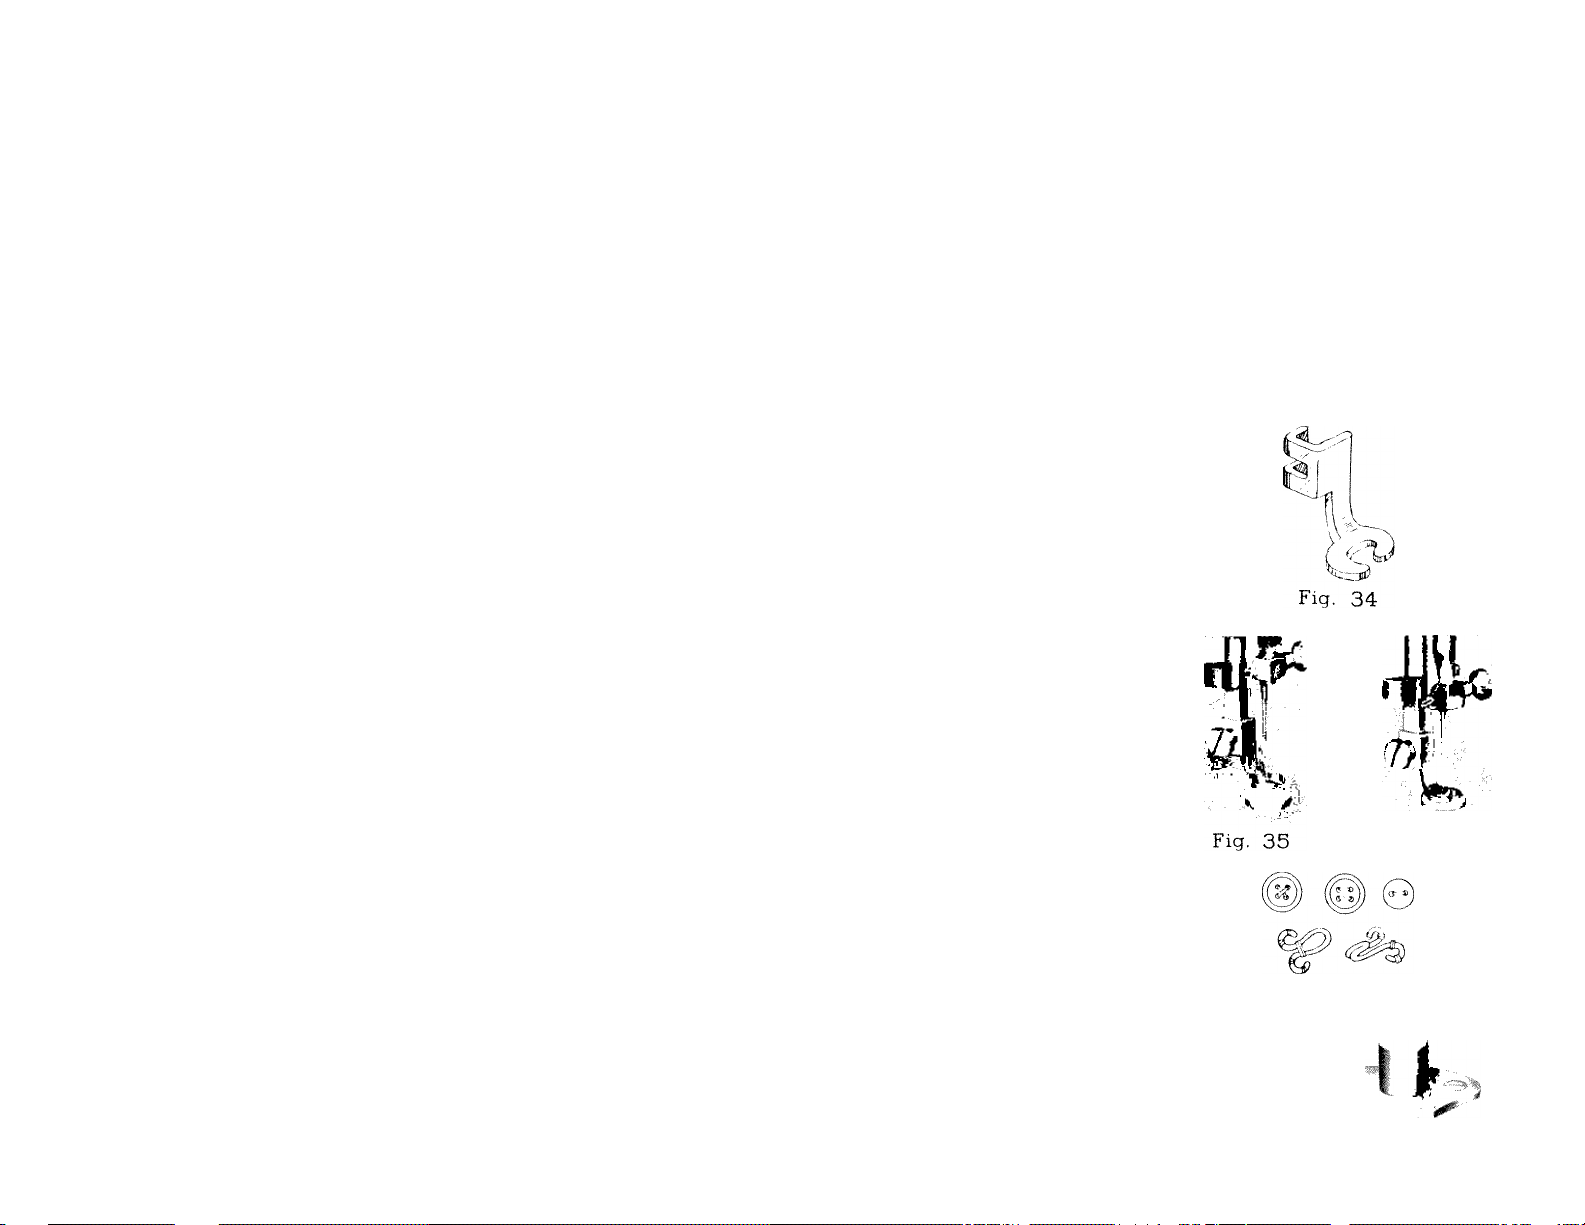
1. Remove hinged presser foot and attach button sewing foot.
See Fig, 34
2. Push drop teed button "DOWN" all the way. Fig. 38
3. Set zigzag stitch width stop at 0. Place the button so
that its left hole comes directly under the needle, then
gently lower the presser foot. Fig. 35
4. Move zigzag stitch width stop until the needle comes
down exactly over the right hand hole in the button.
Fig. 36 and £e^ step.
Turn the hand wheel slowly by hand to be sure the
needle enters both holes in button without deflecting
needle, correct width if necessary.
5. When needle goes into the center of each hole, run the
machine at medium speed, making six or eight stitches,
stopping with the needle in the left hole.
6. To lock the zigzag stitch and prevent ravelling, set the
stitch width at 0, and take a few stitches in the same hole.
If you wish you may place a rounded toothpick over the
button, between the two holes, and sew button to fabric
in regular way.
Remove the toothpick and wind thread under the button,
forming a shank. Fasten.
Apply the above method to sew on buttons with four
holes, hooks and snaps, etc. If a four hole button is to be
sewn, follow the same procedure above for the two hole
button.
Now lift presser foot slightly and move fabric to permit
stitching the remaining two holes. Hooks, snaps, etc., are sewn
to the fabric with the same procedure as for sewing two hole
buttons.
Fig. 36
Fig. 37
Fig. 38
Page 24

,-C
23
ACCESSORIES (Fig. 39}
1, !■
IM ’"It r>
^ li m
II m
# b 3.
I ''' ' £
T 1 4.
‘ * 5.
•fl 1
' ' 1
f
ri
t
n
’
:M a
!i% i
i # f
» 1 1
1 |r| 8.
A
•
9 0 *
•
Fig. 39
Plastic Oiler (Sealed and Filled)
Package of Needles ( 5 )
f 2.
Large Screw Driver
Small Screw Driver
Bobbins (3)
6.
Felt Washers {2) (for spool pins)
7.
Quilter Guide
Cloth Guide
9.
Button Sewing Foot
10.
Buttonhole Foot
Presser Foot for Straight Sewing
Narrow Hemmer
13.
Thumb Screw
14.
Needle Plate for Straight Sewing
(graduated;
Page 25
24
HOW TO USE ACCESSORIES
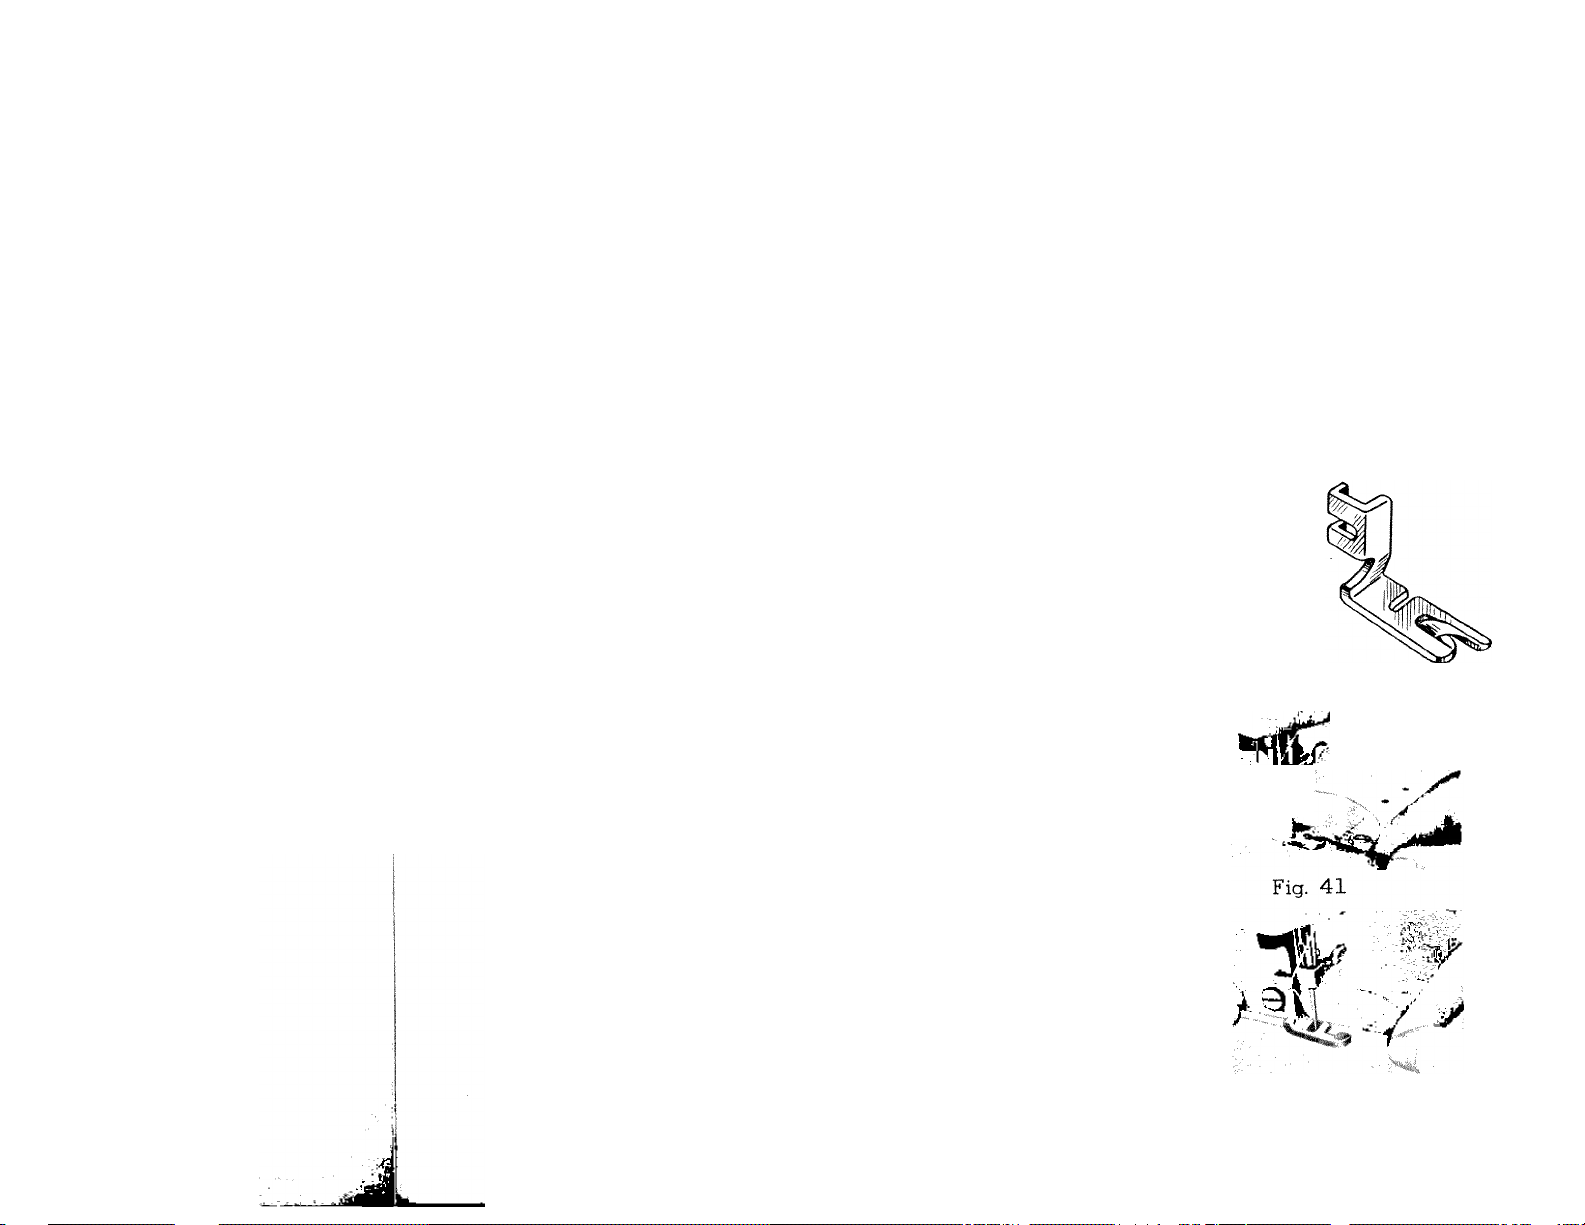
Narrow Hemmer: With needle at its highest position replace regular
presser foot with narrow hemmer (Fig. 40) being sure to tighten it securely
in place. Sat decorative stitch dial at manual position, zigcacj stitch width
control at for straight stitched hem or at number 3 for zigzag stitched hem.
Set stitch length control to suit.
For a plain narrow hem make a 1/8 inch double fold
for about two inches along edge of fabric. Hold each
end of the two inch fold, slip underneath hemmer. Bring
fold up into the scroll of hemmer, draw fabric forward
to end and fasten with point of needle. Lower presser
bar lifter. Gently pull end of thread as you start stitch
ing (Fig. 41 for straight stitched hem-Fig. 42 for zigzag
stitched hem.)
Guide material slightly to left and it will automati
cally take a double turn through scroll.
V
Fig. 40
The narrow hem provides an excellent finish for
edges of ruffles or any other dainty work.
Fig. 42
Page 26

LACE TRIMMED HEM
To sew a narrow hem and attach lace in one stitching,
insert lace m the slot next to needle (Fig. 43) sew hem as
above guiding lace under needle and hem into scroll. Rickrack may be used in the same way.
LACE EDGE WITH INVISIBLE STITCHING
Hold lace 1/8 inch from raw edge on right hand side of
fabric insert both m scroll as for plain narrow hem (Fig. 44i
let hem roll over and sew in lace. When the stitching is
completed the hem is pressed to the wrong side.
FRENCH SEAM
Place material with right sides facing each other and the
top piece of material 1 8 inch from right hand edge of lower
piece. Insert m hemmer scroll allowing hem to roll over
and sew in top fabric making French seam. For cording
effect, use zigzag stitch wide enough to catch both edges of
the narrow rolled hem and
sew with satin stitch. This
can be used for covering
chairs and so forth. Fig. 45
HEMMING ACROSS
A SEAM
To hem across a seam,
cut the seam folds at an
angle so they will lead into the hemmer gradually. Press seam
open. Stitch across the seam at the extreme edge to hold it
together and for added firmness. It may be necessary to pull
the material slightly when hemming over the seam. Fig. 46
Fig. 46
25
Fig. 44
Fig. 45
Page 27
26
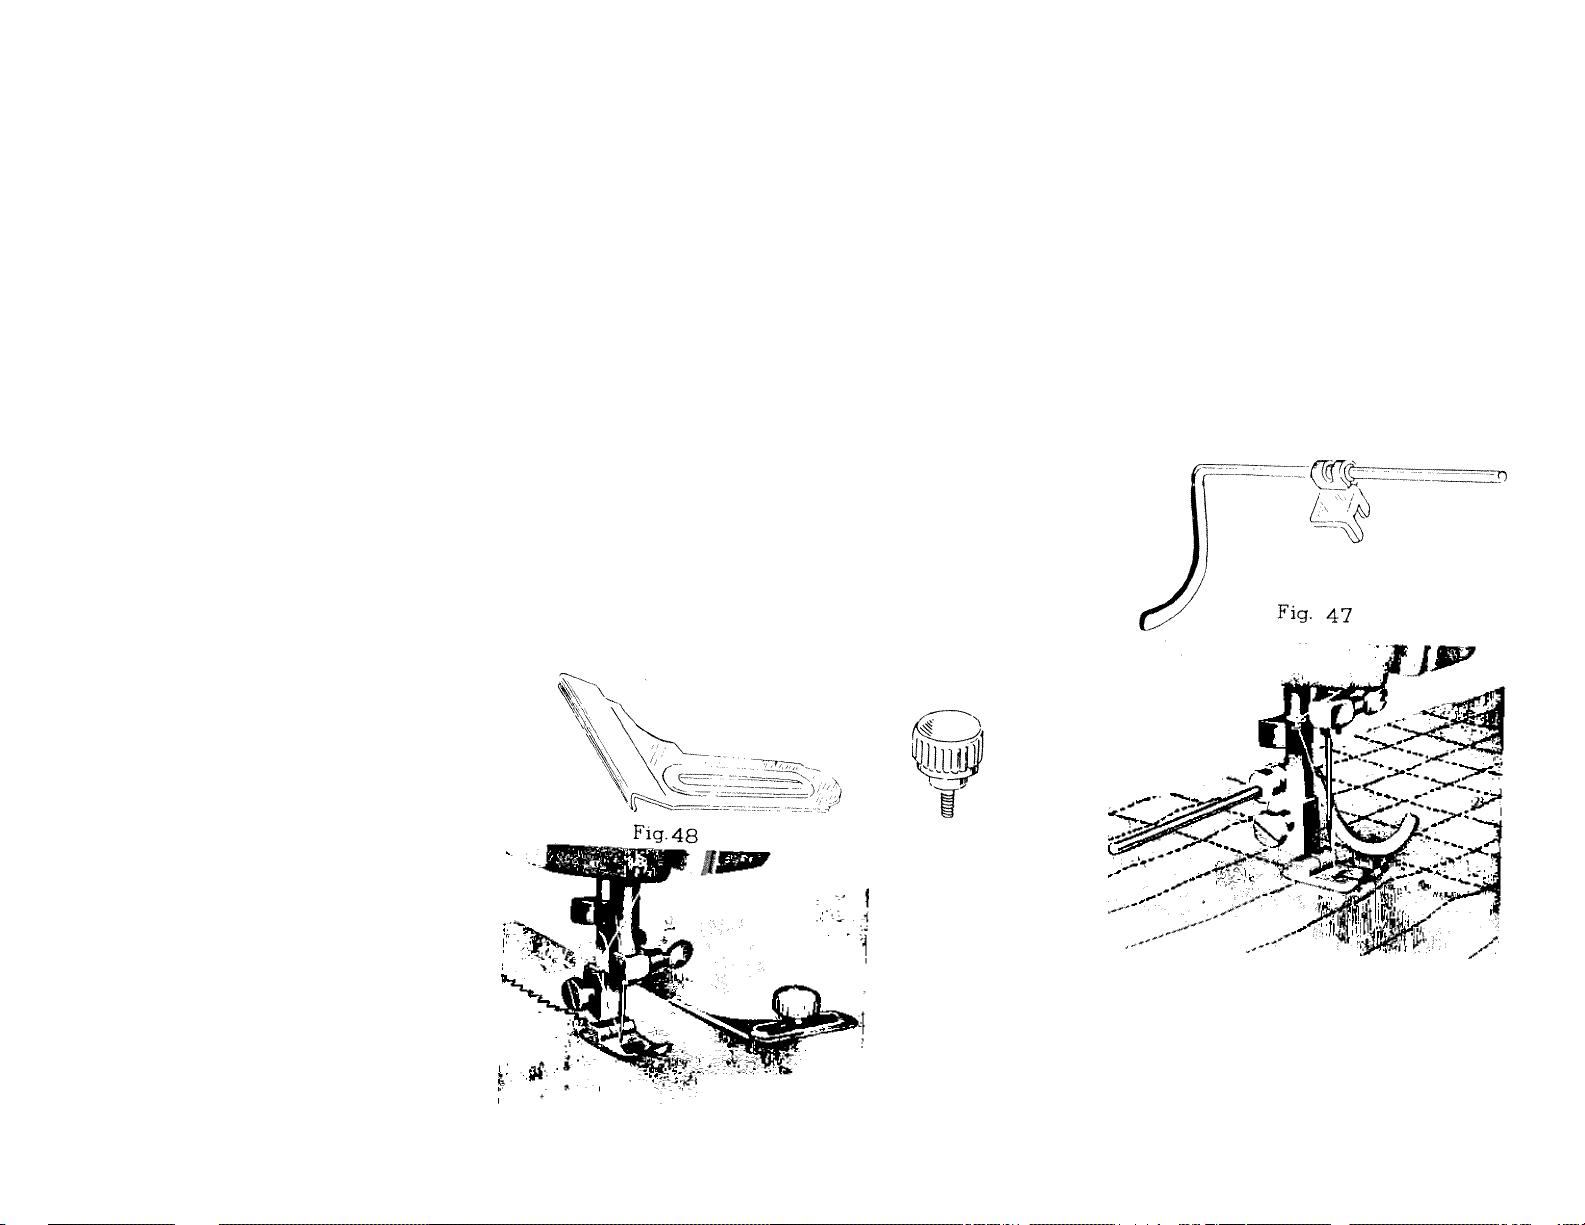
QUILTING GUIDE
straight or decorative stitching. Attach standard
presser foot. Slip U shaped holder on guide under
presser foot thumb screw from the back and
ighten screw (Fig. 47). Adjust the curved bar for
the distance desired between rows of stitches and
set so It presses slightly on the fabric. By lettina
the guide ride on the previous stitching line suc
cessive rows will be an equal distance apart. Fig. 50
making parallel rows of
Fig. 49
SEAM GAUGE OR CLOTH GUIDE
and seams
(Fig. 51) F stitching along edge of fabric.
Fig. 50
Fig. 51
48) with accompanying screw
.0 desS^ “ S“"“"
Page 28
■m M M M
27
Fig. 52
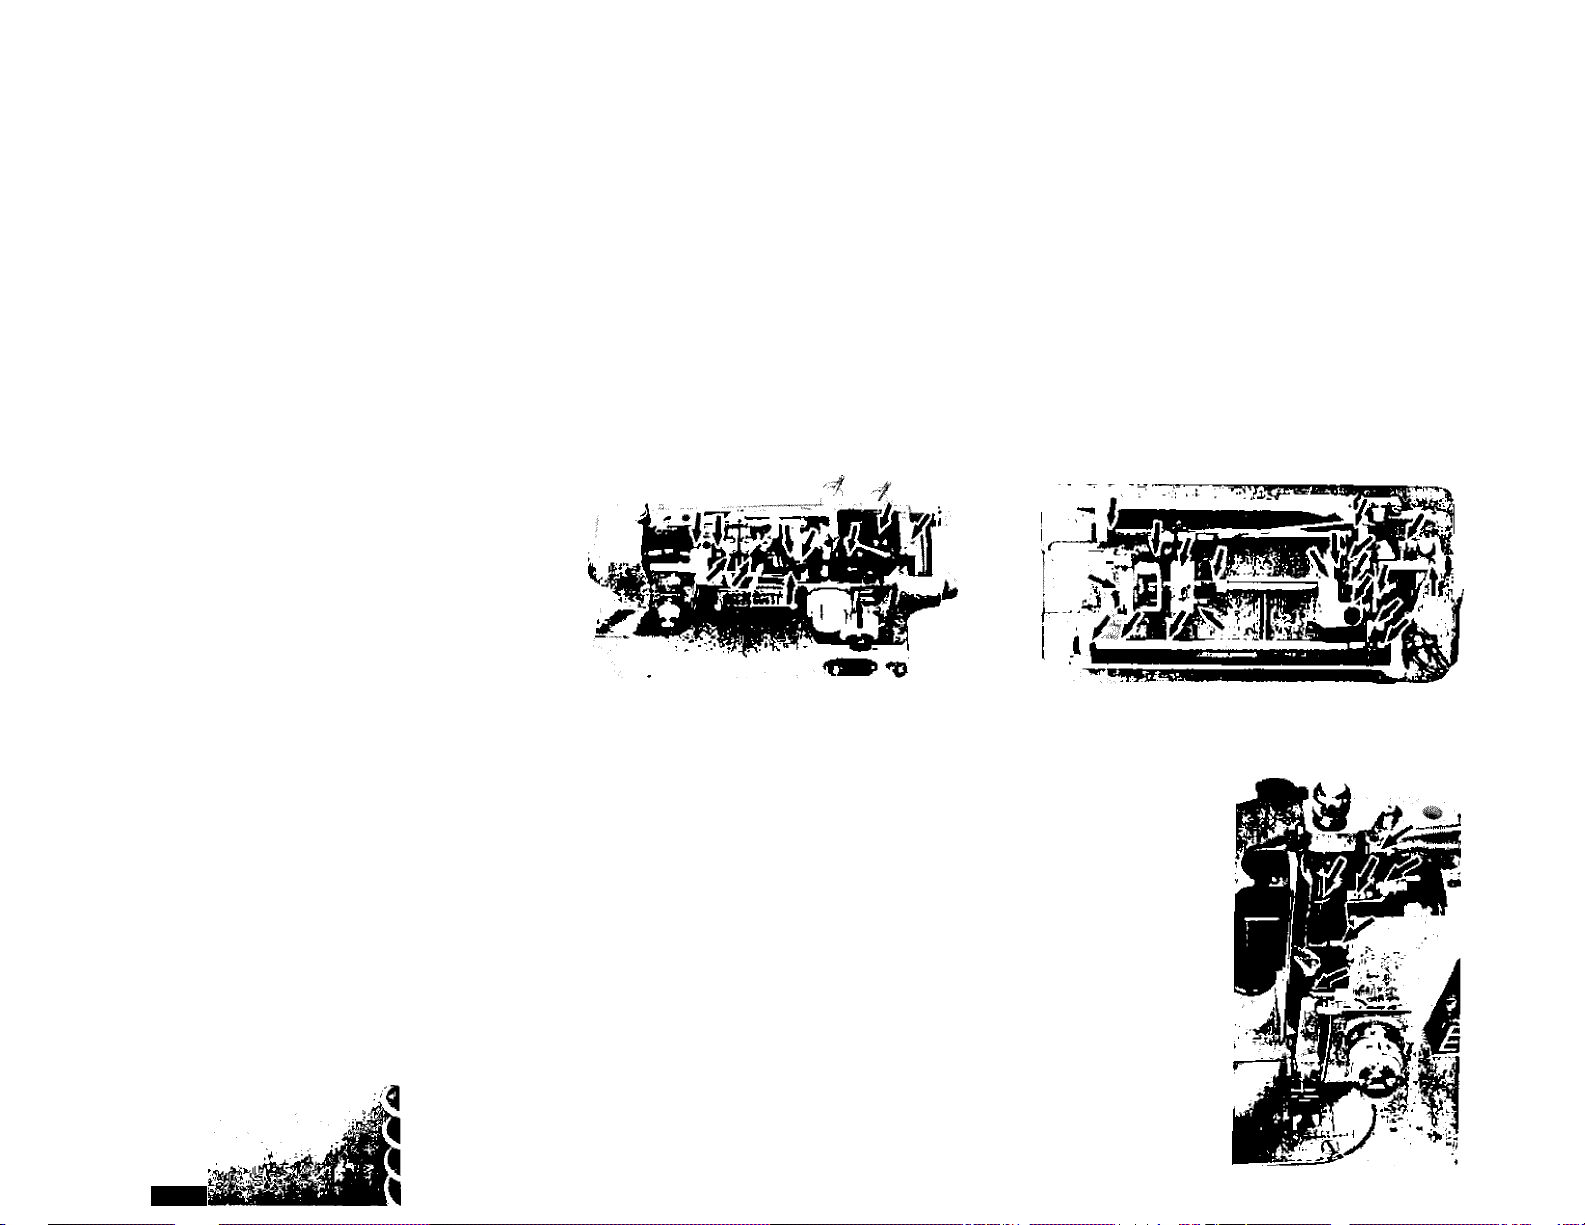
CARE AND MAINTENANCE OF
YOUR MACHINE
HOW TO OIL YOUR MACHINE
Use only a good sewing machine oil, do not use any
common household oils.
Your machine should be oiled occasionally to keep
it operating smoothly-how often depends on the amount
of sewing you do.
Once a year oil your machine thoroughly as indicated
by the arrows on Fig. 52, 53 and 54
Avoid over oiling.
Fig. 53
Fig. 54
Page 29
28
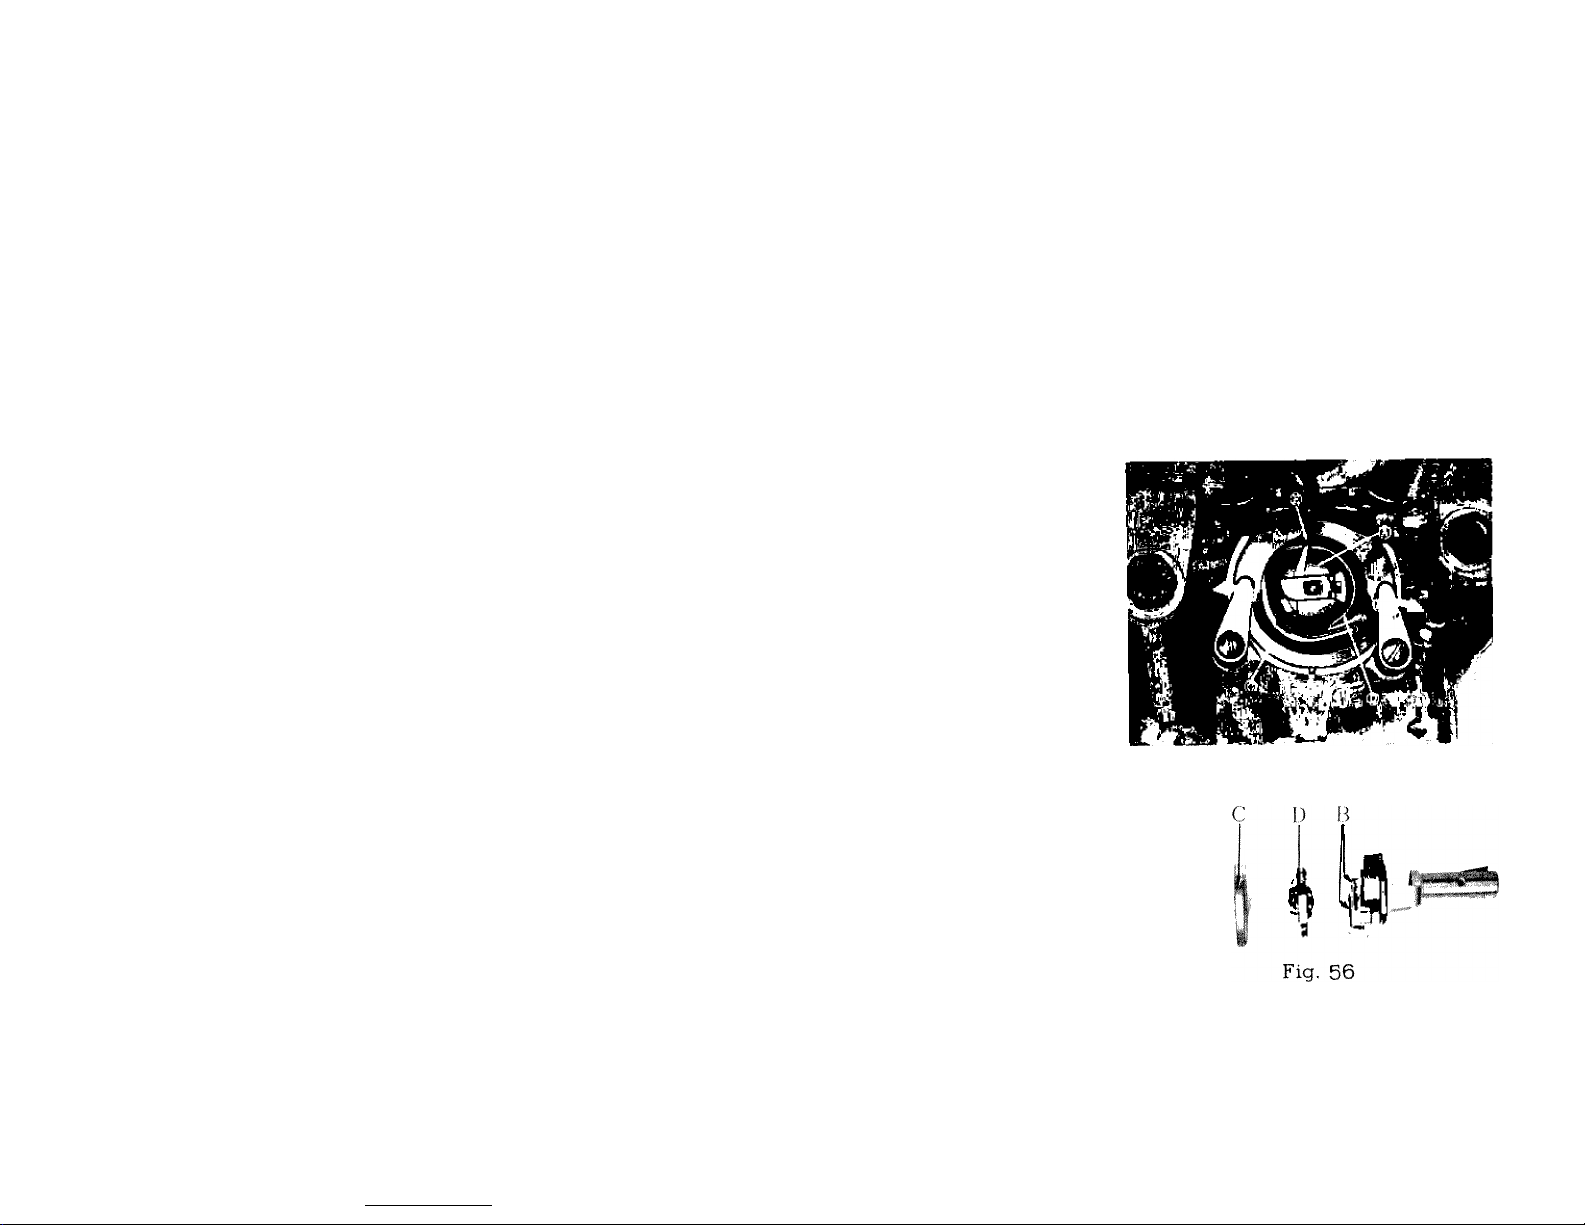
CLEANING AND OILING THE SHUTTLE
(See Fig. 55 and 56)
The stitch forming mechanism occasionally becomes
clogged with loose threads and lint. This will interfere
with the efficient operation of the machine. Cleaning
and removal of the lint will safeguard the performance.
To remove the shuttle assembly, proceed as follows:
1. Turn the balance wheel until the needle reaches its
higest position. Tilt head back on its hinges.
Remove bobbin case.
2.
Turn the two shuttle race cover clamps (B) outward
3.
and remove the shuttle race cover (C) and the shuttle
body (D).
4. Clean the shuttle race, the shuttle, and shuttle
cover by removing all threads, lint, etc.
When the cleaning has been completed, proceed
follows to replace the shuttle assembly :
Turn the balance wheel until the needle reaches its
1.
highest position.
Place shuttle body, (D), in race against shuttle driver and adjust into position.
2.
Replace shuttle race cover, (C), fitting pin at lower edge into notch, and lock into posito
3.
with shuttle race cover clamps, (B), making certain the clamps have been snapped securely
race
as
Fig. 55
A
4
into position.
Put bobbin into bobbin case.
4.
Put the bobbin case into the shuttle, .fitting tongue into notch E of race cover.
5.
I --g-'■ ■ ■ -- - ^
Page 30
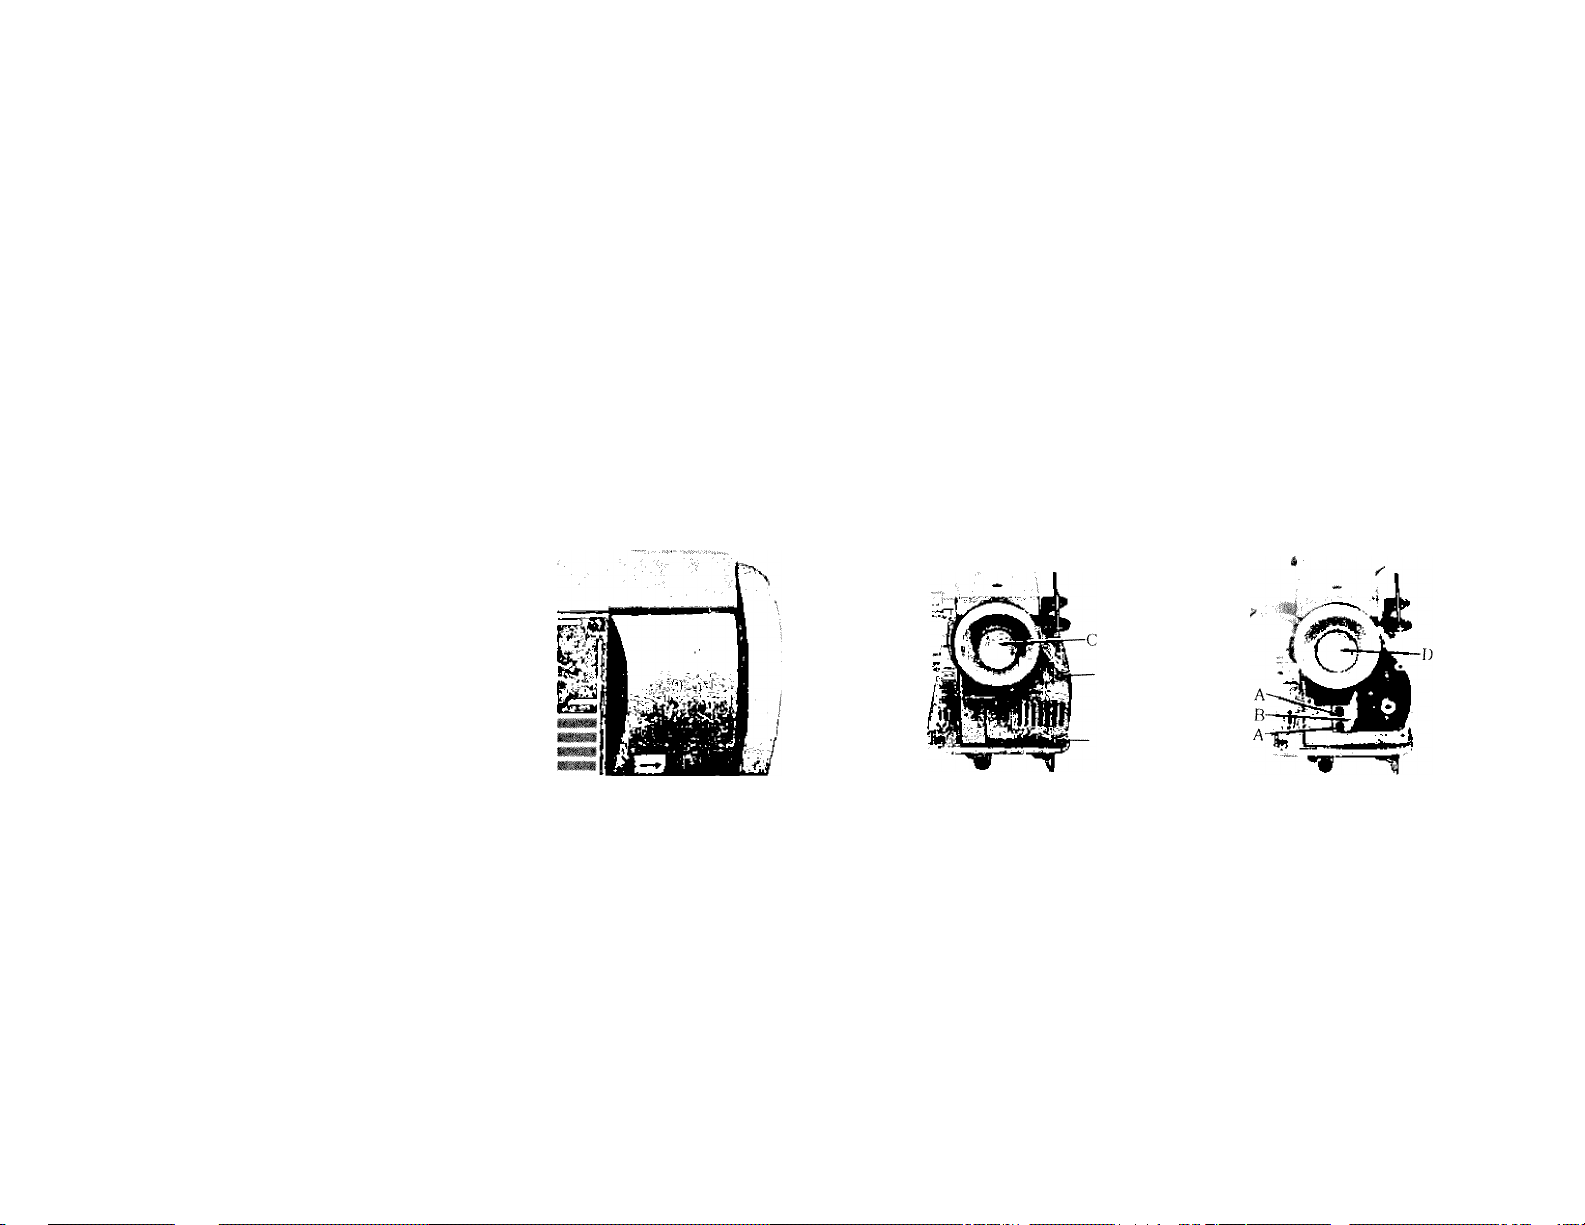
ADJUSTING AND CHANGING "V" BELT
29
Fig. 57
Following are the instructions for adjusting and changing the "V" belt:
(1) Open bobbin winder cover door Fig. 57.
(2) Remove three screws holding rear cover (Fig. 58) by tipping it out at the bottom and
pivoting around the hand wheel away from the front of the machine.
(3) To adjust "Y" belt, loosen screws A, Fig. 59. and move bracket B up to loosen belt and
down to tighten.
(4) To remove "Y" belt:
(A) Remove top cover.
(B) Loosen clutch C, Fig. 58
(C) Loosen screws "A" (Fig. 59) and move bracket "B" to its highest position.
(D) Slip belt off motor pulley and then over hand wheel.
(E) Replace "V" belt by slipping it over hand wheel and then over motor pulley.
(F) Adjust as noted under No. 3.
Fig. 58
Fig. 59
Page 31

30
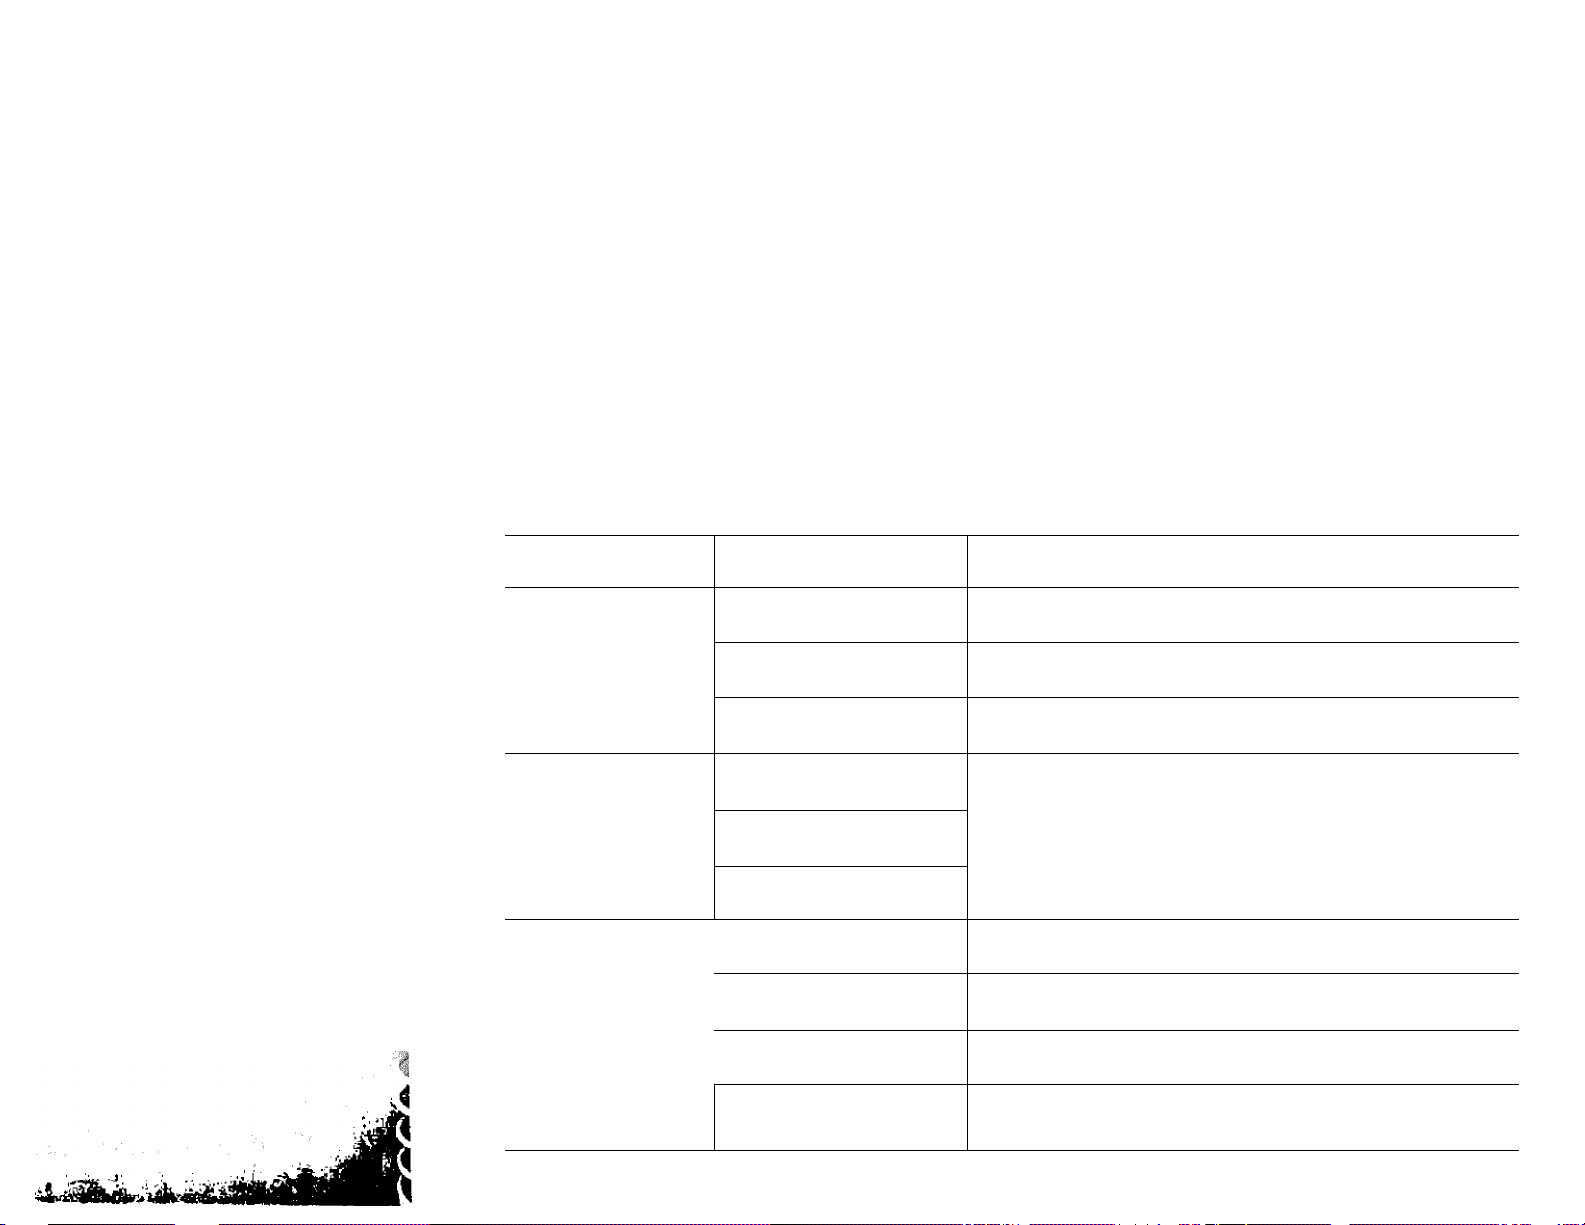
TROUBLE CHART
Trouble
If Machines
Binds
Probable Cause
Thread or lint in
raceway
Correction
1—With take-up lever in highest position, tilt
head back on hinges and remove bobbin case.
BOBBIN
LATCH /
race cover CLAMPS
NOTCH
RACE
2- Turn clamps outward and remove race cover.
3- Remove hook.
4- ^Clean thread and lint from all parts, includ
ing race.
5 -Run a drop of oil along rim of hook.
6—Replace hook, then race cover. Snap clamps
into place.
7..- Grasp threaded bobbin case by latch and re
place, fitting tongue into notch of race cover.
Page 32
31
Trouble
Skipping
Stitches
Irregular
Stitches
Uneven
Stitches
Probable Cause
Bent needle
Needle place in
correctly in clamp
Too fine a needle
for thread being used
Upper thread tension
too loose
Improper threading
Bobbin not wound
even
Pulling or holding
material
i Not enough tension
: on upper thread
! Poor quality thread
Needle too fine for
thread being used
Correction
Discard and replace.
See instruction page No. 6.
See needle and thread chart, page No. 4.
Tighten upper tension.
See threading instruction, page No. 8.
Rewind bobbin.
Avoid pulling or holding material, just guide it.
Increase tension.
Try different thread.
See needle and thread chart, page No. 4.
Page 33

32
Trouble
Upper Thxead
Breaking
Material
Puckering
Probable Cause
Improperly threaded
Too much tension
Starting with take-up
in incorrect position
Improper setting of
needle
Bent or eye of needle
too sharp
Bent or blunt needle
Tensions too tight
..........................
.........................................................................
Dull needle
Stitch length too long
.
-
.
Correction
Refer to threading instructions see page No. 8
and rethread machine
Loosen tension on upper thread by turning
thread tension knob to lower number
Always start sewing with take-up lever in
highest position
Refer to needle setting instruction see page No. 6
Try a new needle
Discard all blunt or bent needles and replace
with new
See tension adjustment page No. 10
..............................-................
..................-...................................................................................................... --
.........
Change needle
Reduce stitch length
-
......
'...---
Page 34

.ft
33
Your sewing macliine comes equipped with the basic set of accessories
described earlier in this book.
The following pages illustrate additional time saving attachments that have
been designed specifically for your machine. They are available at modest
cost from your dealer. If your dealer cannot supply you with these items,
ask him to order them for you by part number. Then you will be assured
of receiving the genuine part designed for best performance with your
machine.
If a sewing machine dealer is not available mail your inquiry directly to :
DOMESTIC SEWING MACHINE CO., INC.
CLEVELAND, OHIO 44111
In Canada :
DOMESTIC SEWING MACHINES
1470 BIRCHMOUNT ROAD
SCARBOROUGH, ONTARIO. CANADA
Page 35
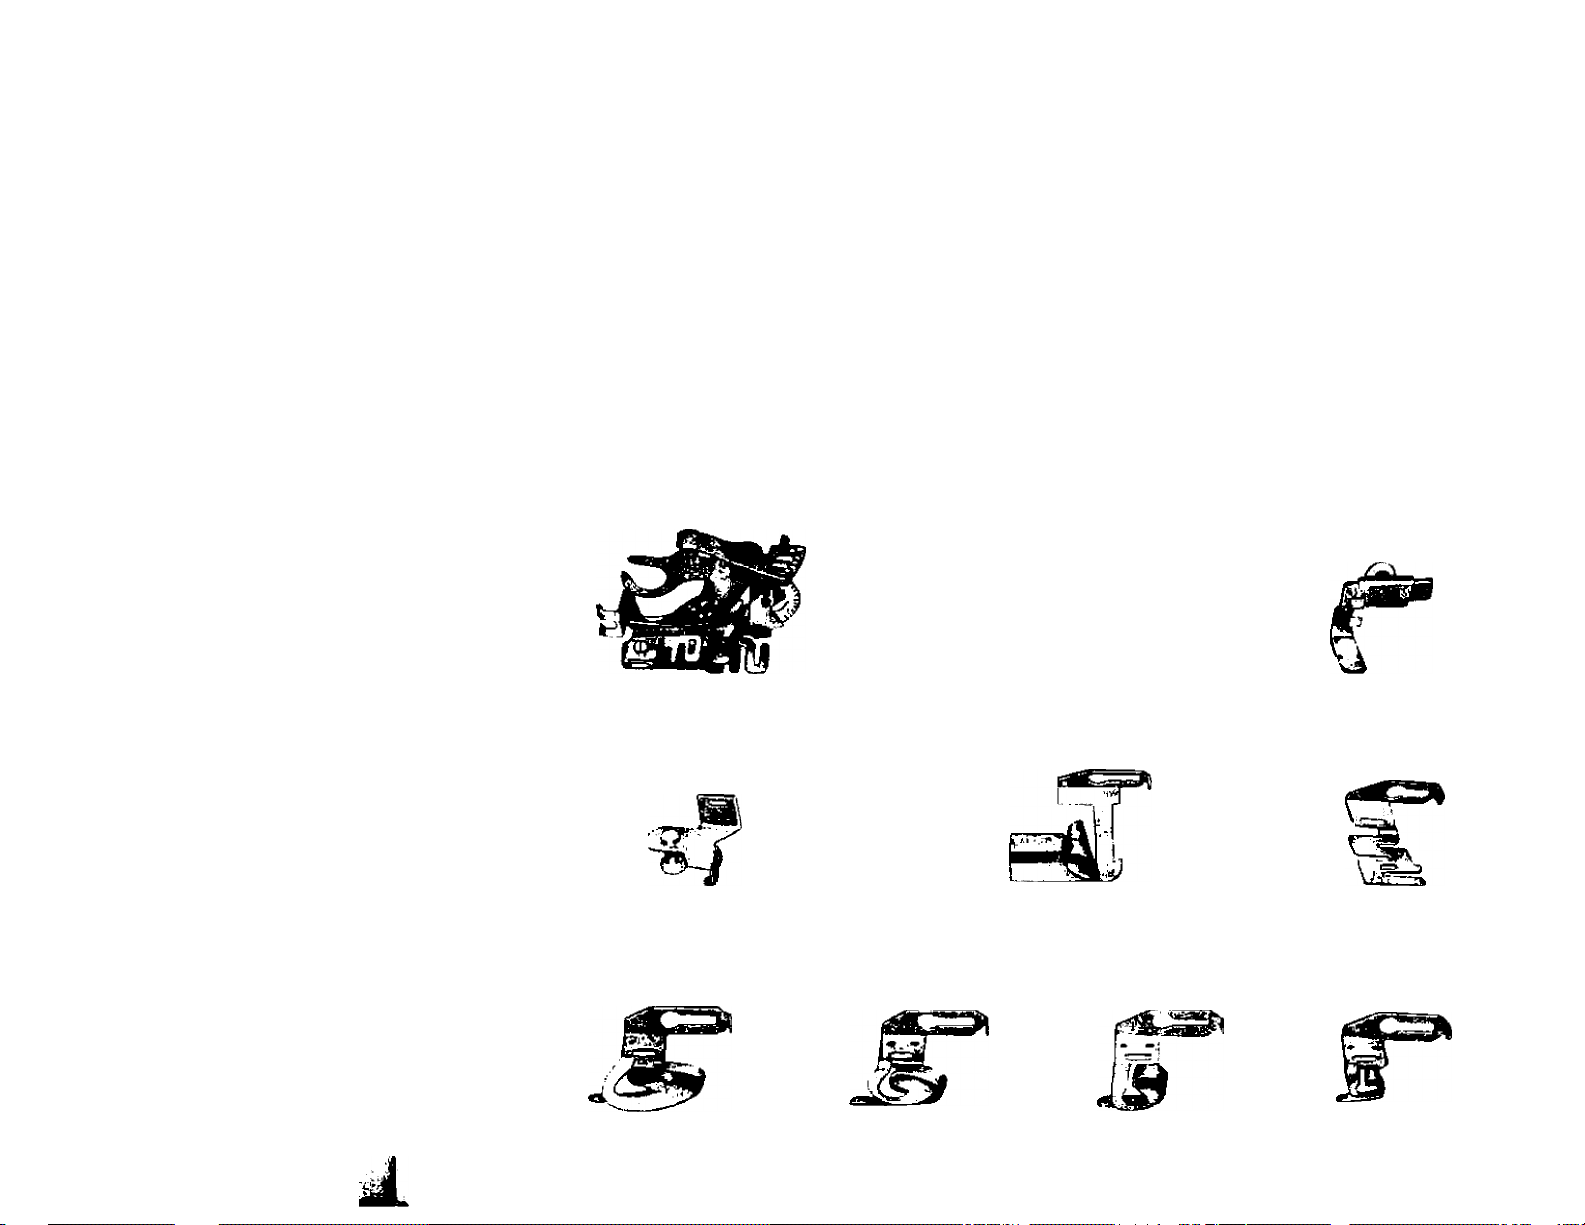
34
SOME OF THE ATTACHMENTS AVAILABLE FOR YOUR MACHINE
PART #1403
Huffier
PART #82528
Attachment Foot
%
PART #76553
%
PART #76552
PART #4990
Darning Spring
PART #74159
Binder
Hemmers
%
PART #76551
PART #1873
Cording Sl Zipper Foot
PART #76554
Edgestitcher
PART #76550
Page 36
ATTACHMENTS
Be sure to set decorative design at number Al
manual position.
ATTACHMENT FOOT
35
Fig. 60
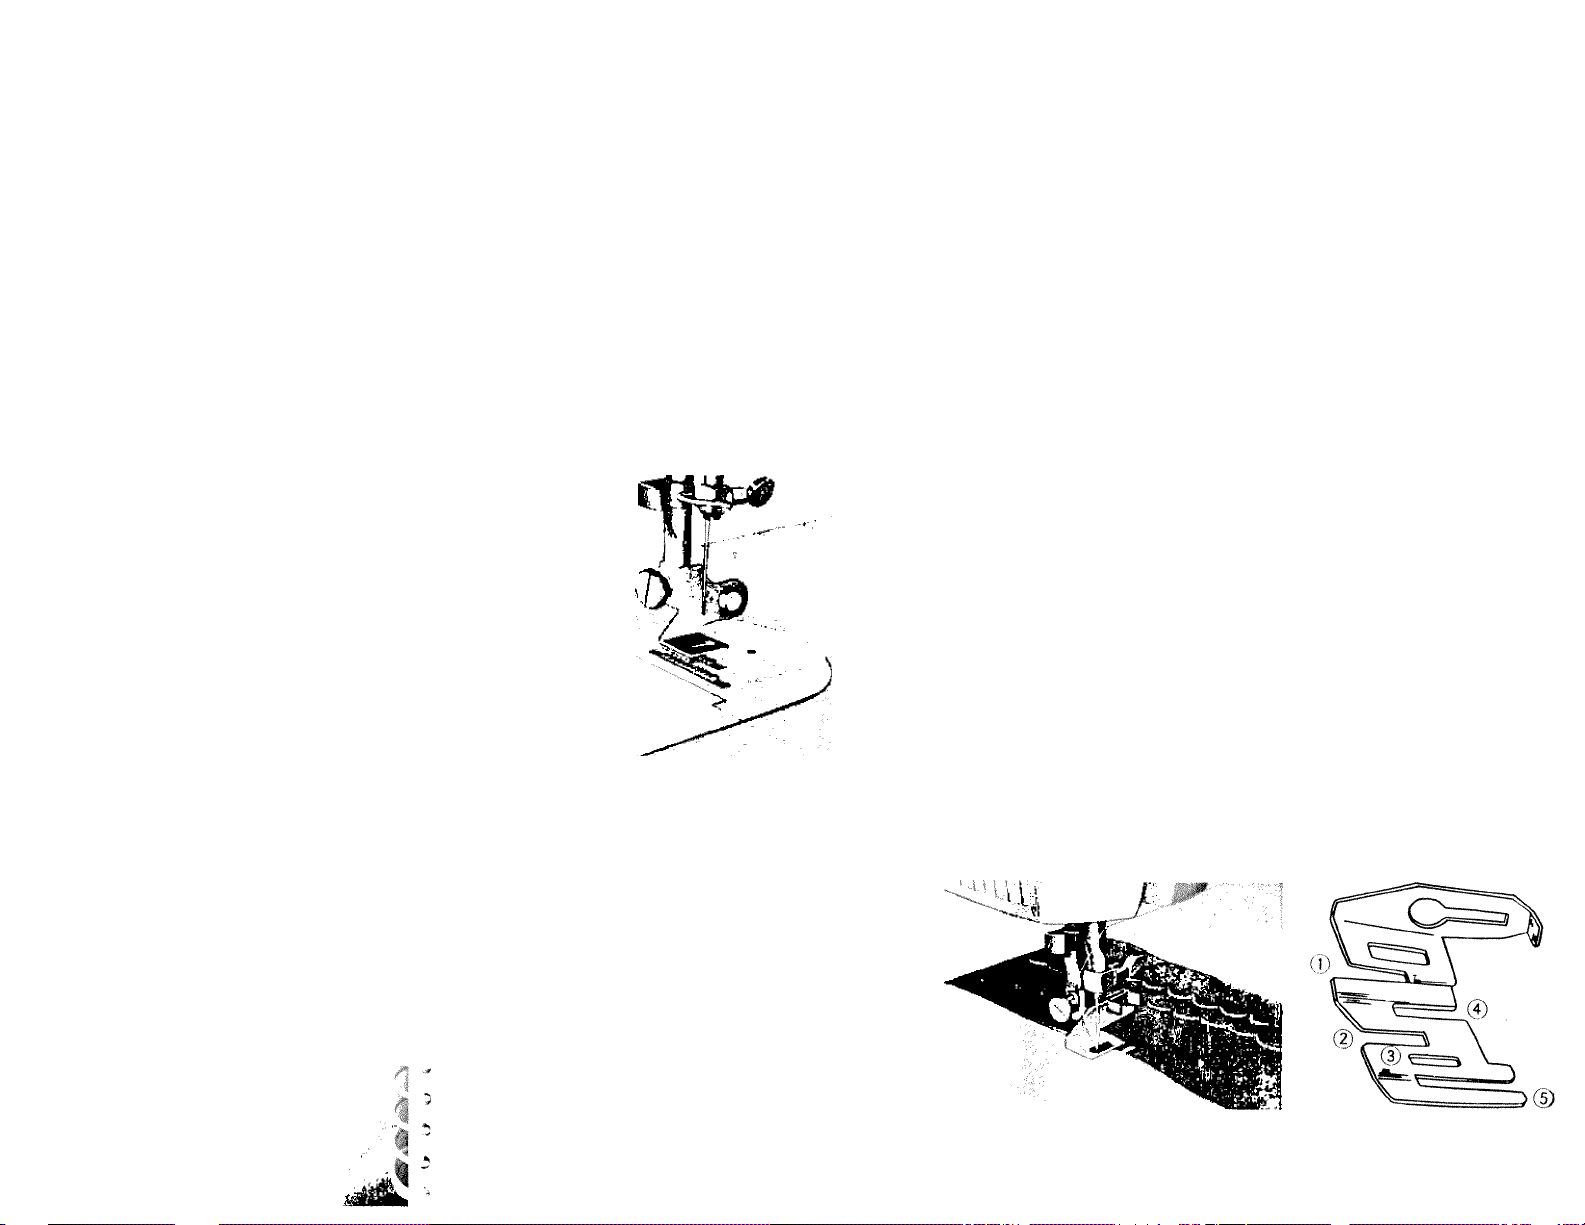
EDGESTITCHER
The edgestitcher is used in mak
ing dainty lace insertions, edgings
and piping.
The slots in the edgestitcher
serve as guides in sewing together
various pieces of material. If you
want to sew lace, lace and embroi
dery, or lace and tucked strips togeth
er, place the piece of material that
will be on top in slot 1 (Fig. 61)
and the lower fabric in slot 4. For
instance, if you are sewing lace edg
ing to a finished edge of fabric place
the fabric in slot 1 and the lace in
slot 4 Fig. 62.
the hernmers, it is necessary to remove the presser
order to attach the binder, edgestitcher and
replace it with the attachment foot. Fig. 60
Mount binder, edgestitcher or hernmers sliding
he attachment to the left as far as possible and
tighten screw..
The mounting slot enables you to sew as close
to or as far away from the edge as desired. Just move
tne attachment to the correct position before tighten
ing the mounting screw.
Fig. 61
Fig. 62
Page 37
36
Be sure to draw the lace and material under the needle and back of the edgestitcher so that
the feed will carry it backward as you stitch. Hold the fabric in the left hand and the lace in
the right, being sure the fabric overlaps the lace slightly.
Rick Rack can be sewn to the edge of the material in the same manner.
To trim with wide piping place the fabric in slot 4, and the fold of the piping to the left
in slct 3, for a narrow piping place fabric in slot 2 and the folded edge of the piping to the
right in slot 3.
Slot 5 may be used as a guide in stitching a French seam.
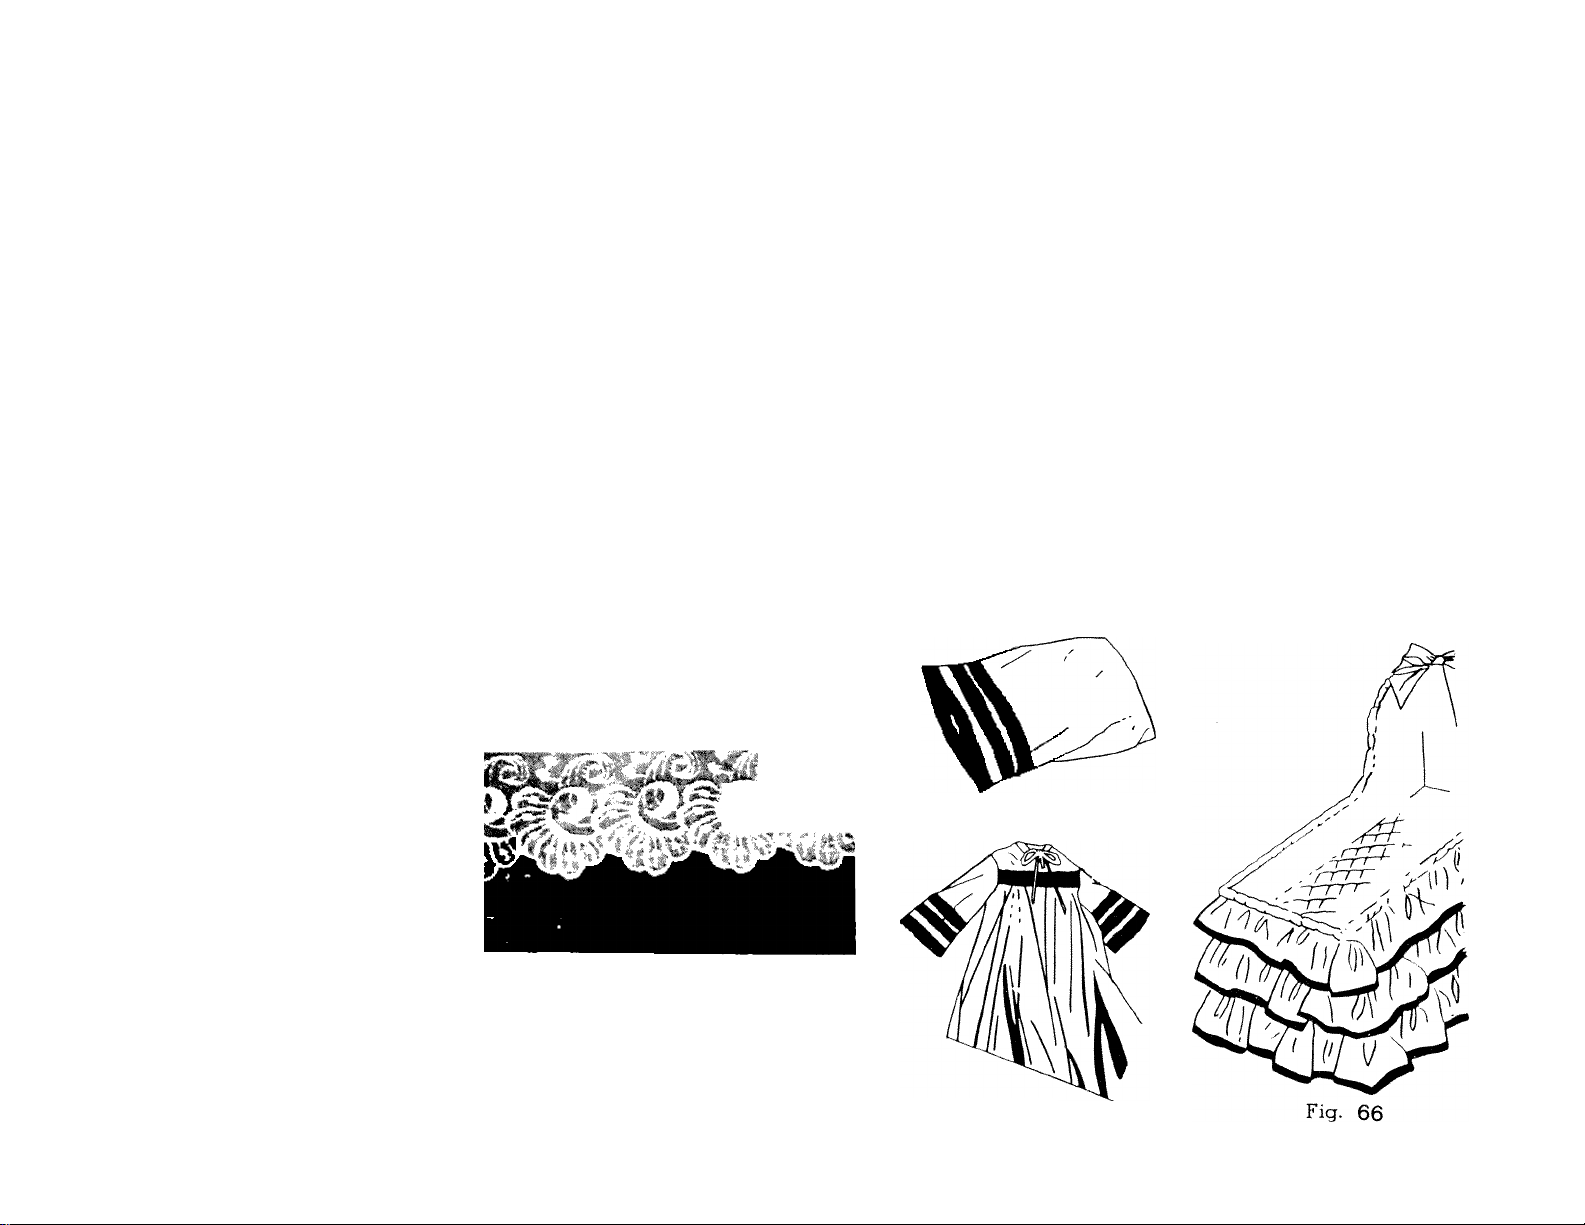
See Fig. 63, 64,65 and 66 for suggestions on how to use the edgestitcher. There are
hundreds of other uses.
Fig. 64
Fig. 63
Fig. 65
mm
Page 38
BINDER
This attachment folds bias binding, applies it to the edge of material in one operation. Slots
on scroll of the binder are for corresponding widths of commercial folded bias binding.
The open mouth of binder scroll is used for unfolded bias strips cut 15/16 inch wide.
FOLDED BINDING (Fig. 69)
Cut a point on folded binding, insert in appropriate
slot. Draw through slot and under binder with strong
pin. Test stitching to be sure it is on the edge. Adjust
by sliding binder to right or left.
TWO-TONE BINDING (Fig. 70)
Two bindings can be sewn on fabric edge also in one
operation. When two are used, always skip one size be
tween widths, inserting each in correct size slot.
HAND-CUT BIAS BINDING (Fig. 69^
Cut 15 16 inch bias binding fold in half for a couple
of inches. Cut binding diagonally toward end, almost to
fold. Slip fold into center of binder. Draw back until
cut opens and binding encircles open end of scroll. Test
stitching to be sure it is on the edge adjust if necessary.
See Fig. 67
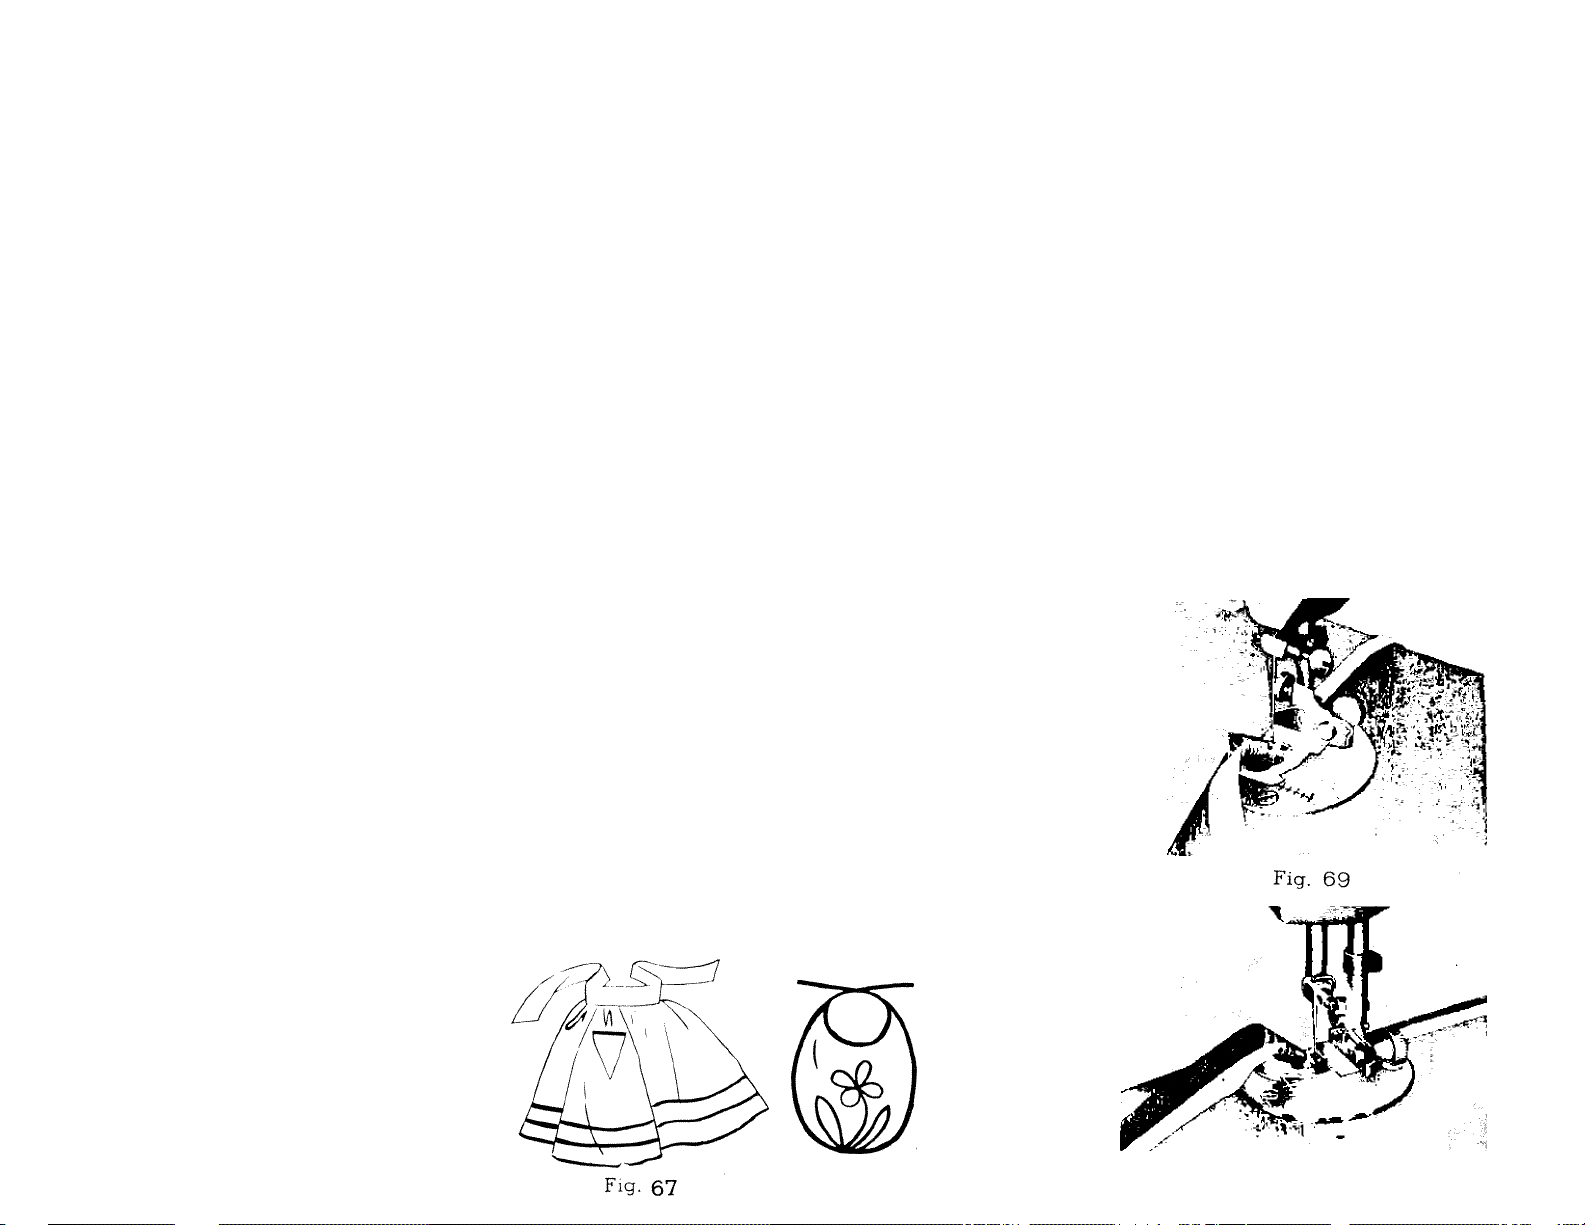
and 68 for
suggestions
on how to use
the binder.
There are
hundreds of
other uses.
37
Fig- 68
Fig, 70
Page 39

38
THE SET OF HEMMERS
Before attaching any of the hemmers. Be sure
bobbin thread is pulled up. Then, with hemmer in
place, hold top thread loosely and turn handwheel one
full turn toward you, making a loop under hemmer.
Grasp bobbin thread with both hands and slip
horizontally under hemmer toward back. Bobbin
thread will catch loop and carry upper thread to back
of hemmer.
Fold material to suit for two inches along edge,
hold at each end of fold. Slip fold into guide and
up over spoon fFig. 71). Fold hem in material back of hemmer.
and fasten with point of needle. Pull on threads gently as you start stitching.
HEMMER SET
Fig.. 71
Draw forward to end of hem
You can make a hem 1/4", 3/3", 5/8" or 7/8" in width, depending upon
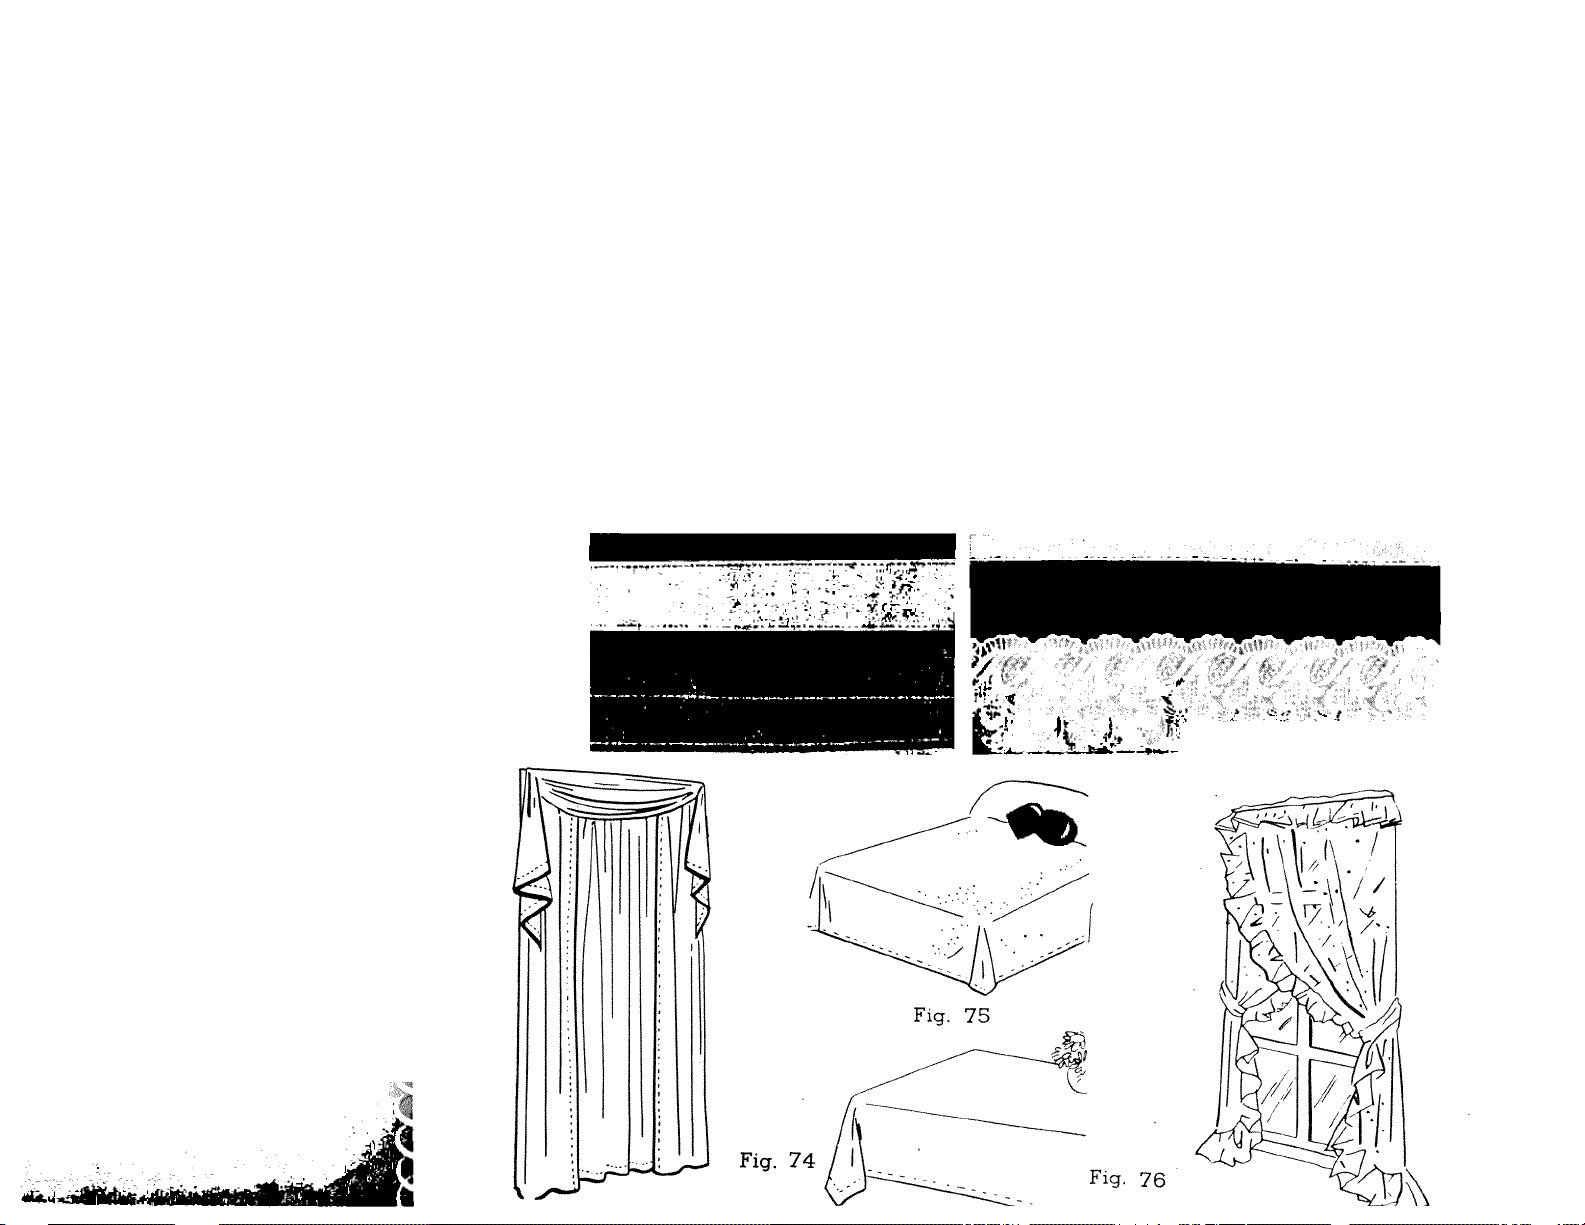
which hemmer you use. For a few of the manv uses see Fig. 72, 73, 74, 75,
76 and 77.
Page 40
^ :
,Й -
i ^
i ^
г; -
Fig. 72
39
L^W&lìkSà^ Fig. 73
Fig. 77
Page 41
40
THE ADJUSTABLE CORDING
and zipper foot
This attachment is used to make
and insert covered cording, and to
sew in zippers. Loosen thumb screw
to slide foot to either right or left
of needle.
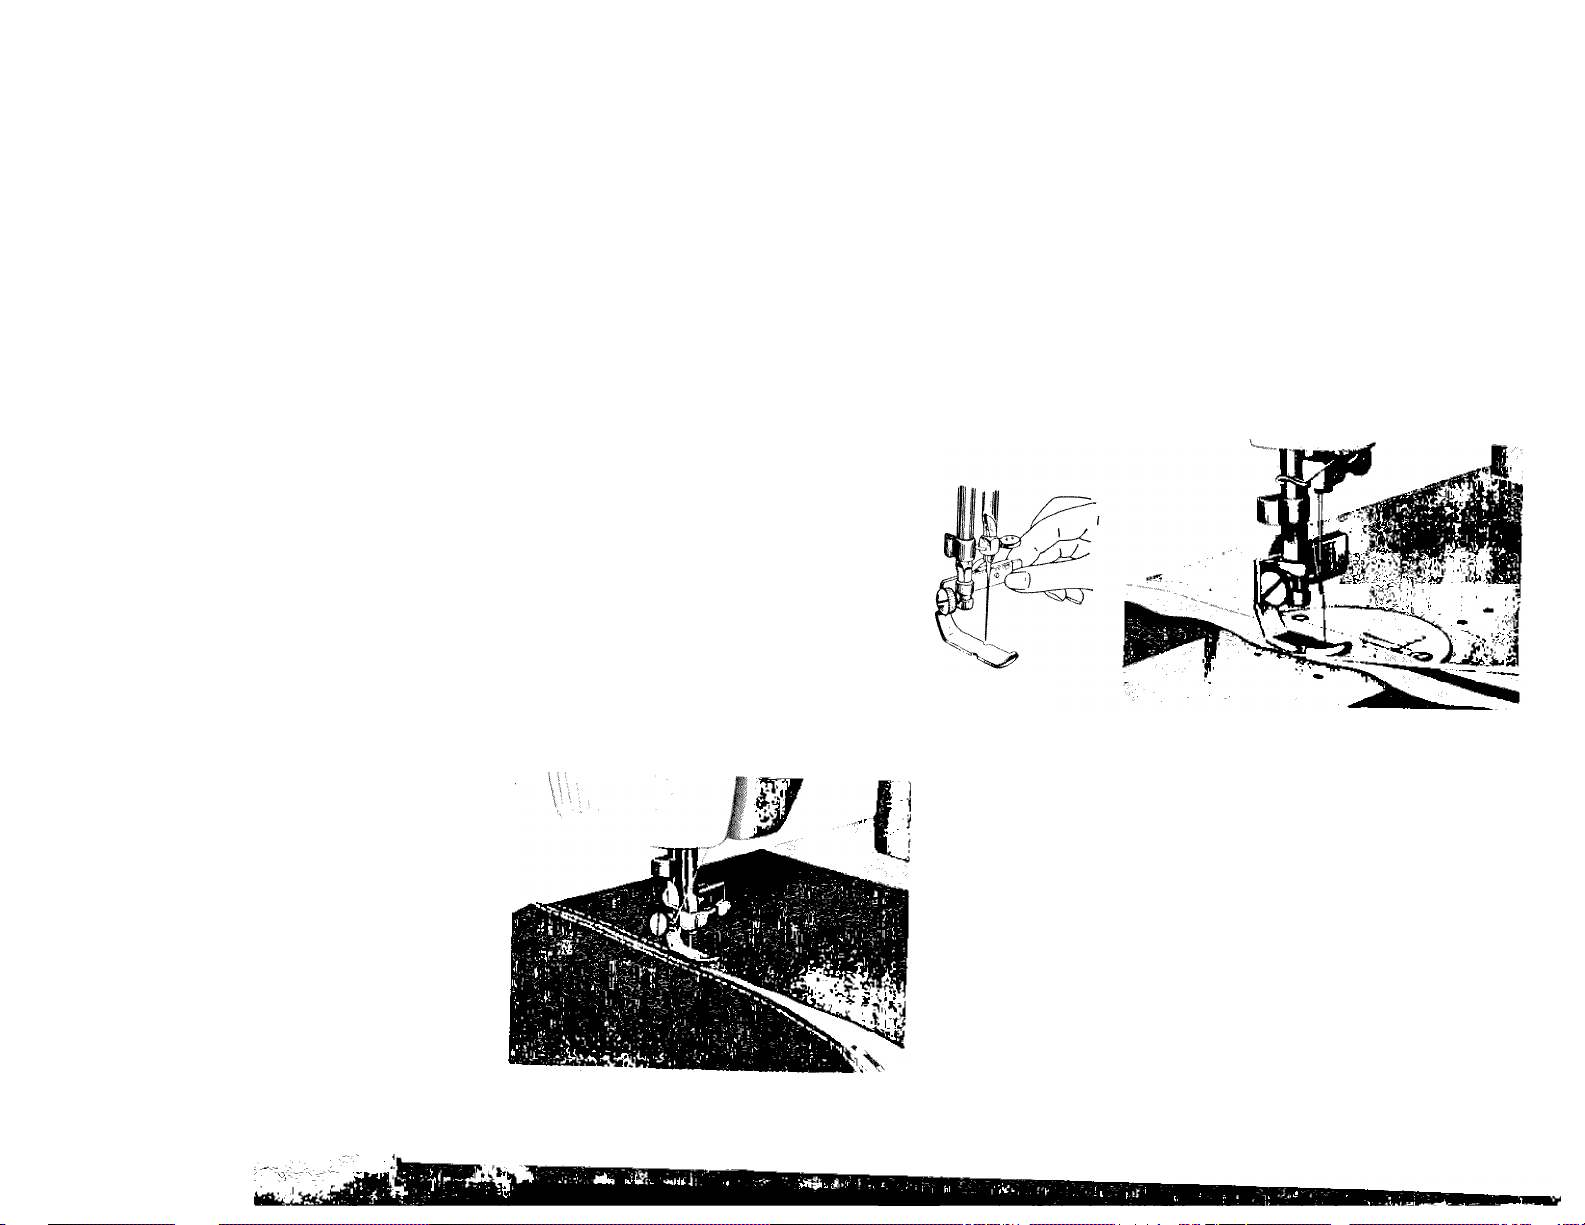
CORDING. Fold bias strip of
fabric over cord. Loosen thumb
screw and set foot so needle is cen
tered in needle hole. Machine baste
cord in place (Fig. 73
Fig. 80
Fig. 78
Fig. •;^g
To sew covered cord to material, reset adjustable
oft:: fTbnn
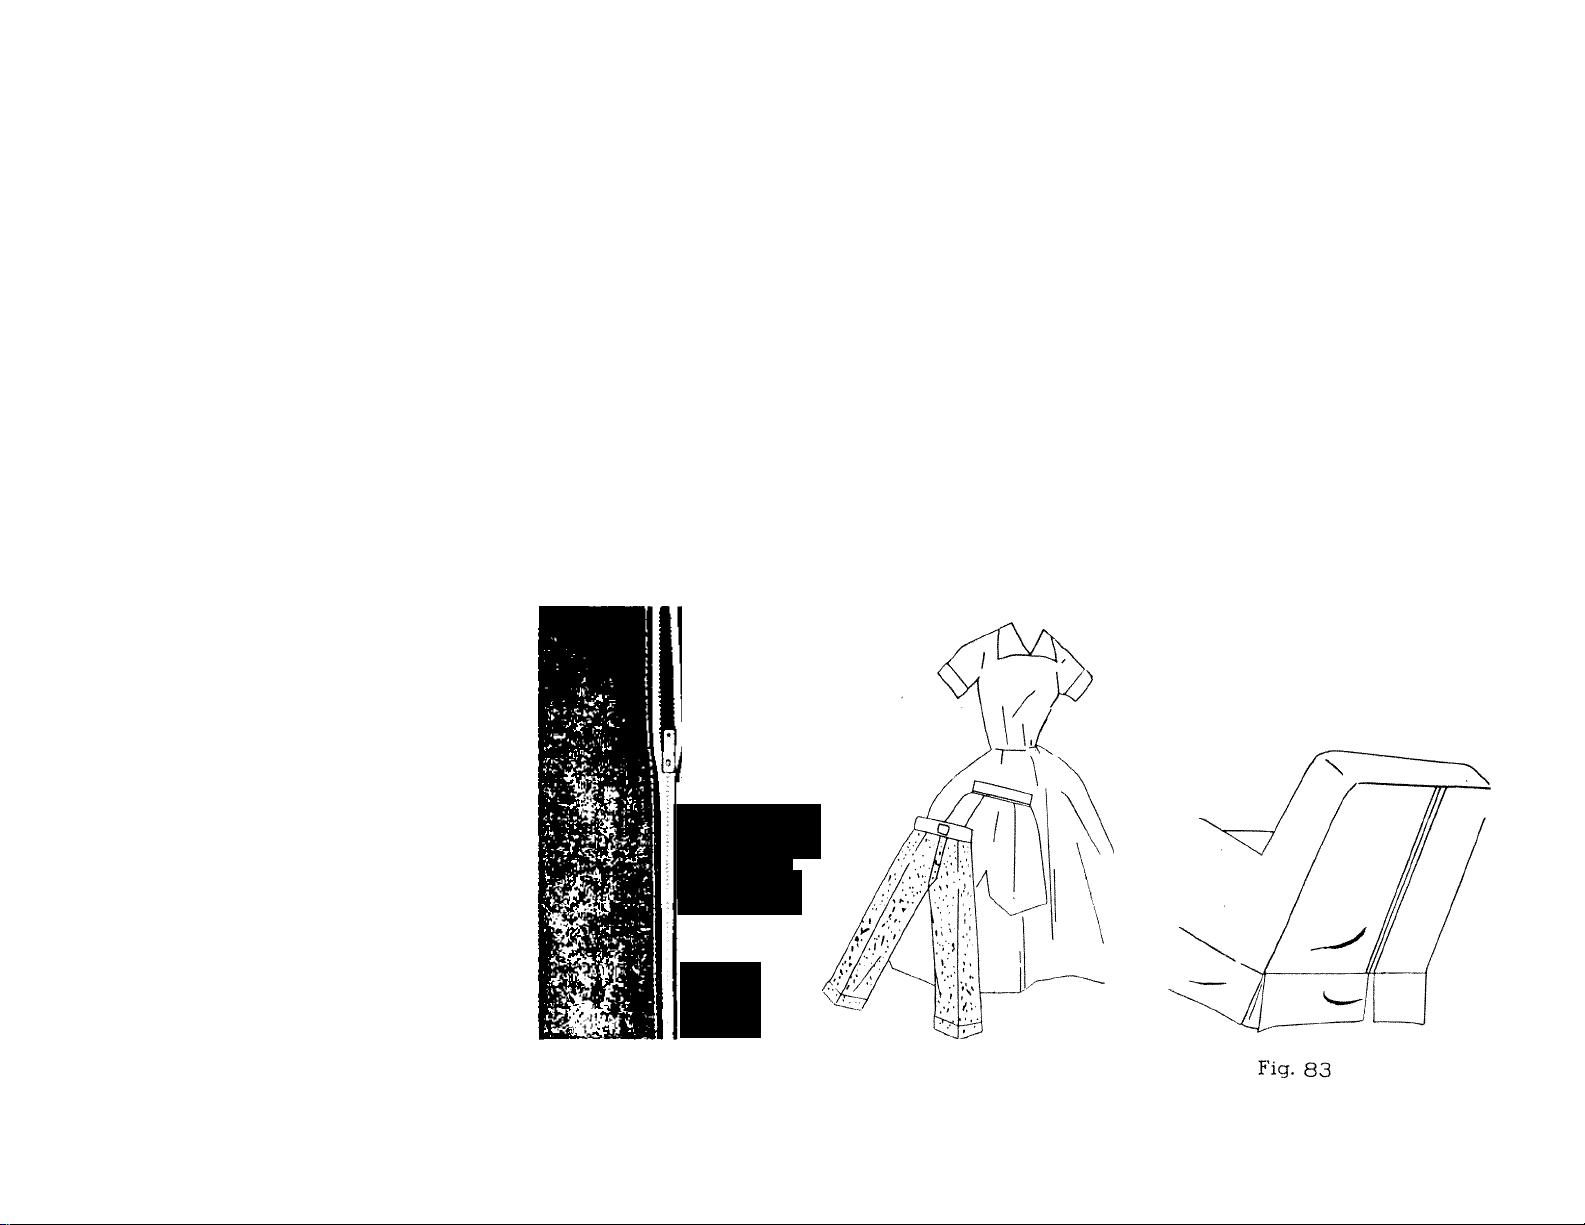
SEWING IN ZIPPER
Loosen thumb screw and slide foot so needle
enters center of needle hole. Guide metal of zipper
aong edge of foot -Fig. 33) Stitching should be
c ose to zipper to allow easy opening and closing.
Adjust to sew from either right or left side, which
ever is more convenient.
Page 42
i ’
4 =
4 "
1 '
i -
41
ADJUSTABLE CORDING AND ZIPPER FOOT
1 ^
'1"
1 ^
1 ^
'■-aiv '"J
4<
" y;- ■, -■■■ '* .
I . i- - 1 ■ 7^' . .'
i;4 Vi:;: ' iV ' ti
-.V> I
.
Fig. 18
:7'
Fig. 82
Page 43
42
RÜFFLER
Fig. 84
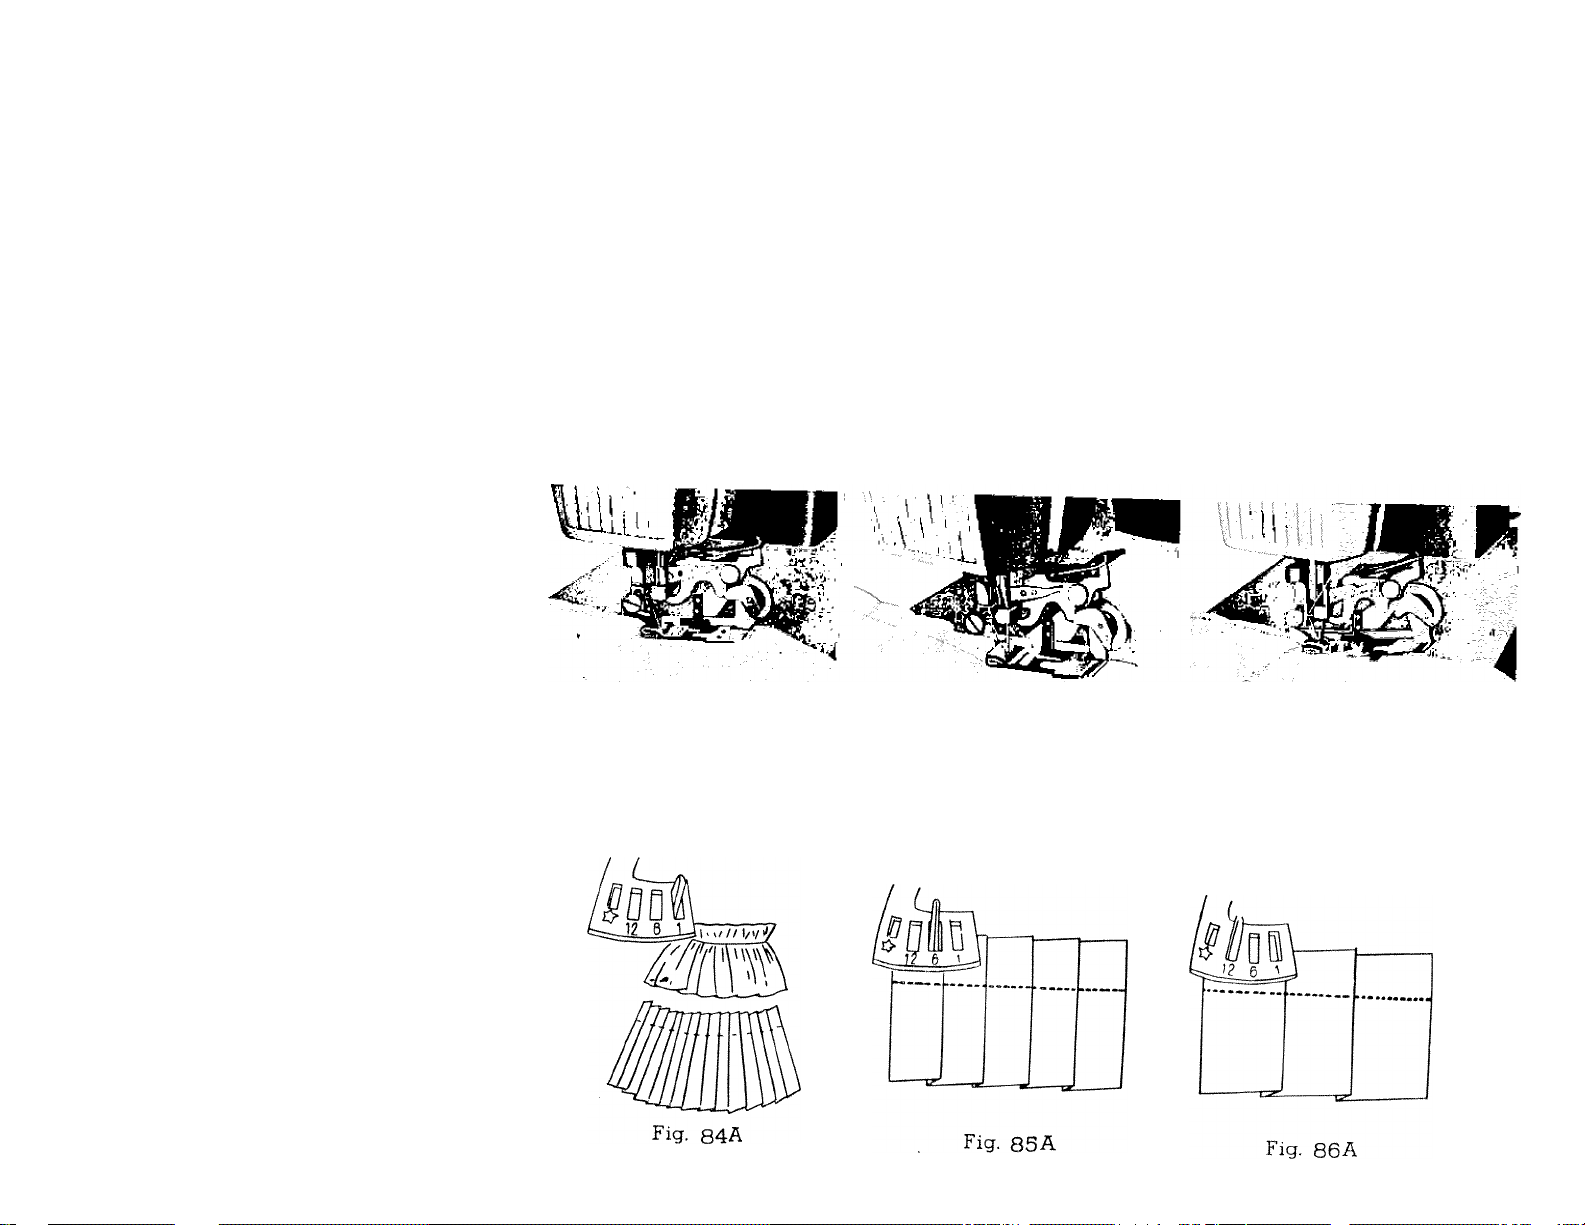
The ruffler will produce yards of delicate ruffling or precision oleatina
h?ghTy%tTatireltf%“'' fabnc\r thlTarne time
a dress and etc " ^^irt, adding fullness to the bodice of
Fig. 85
80
Page 44
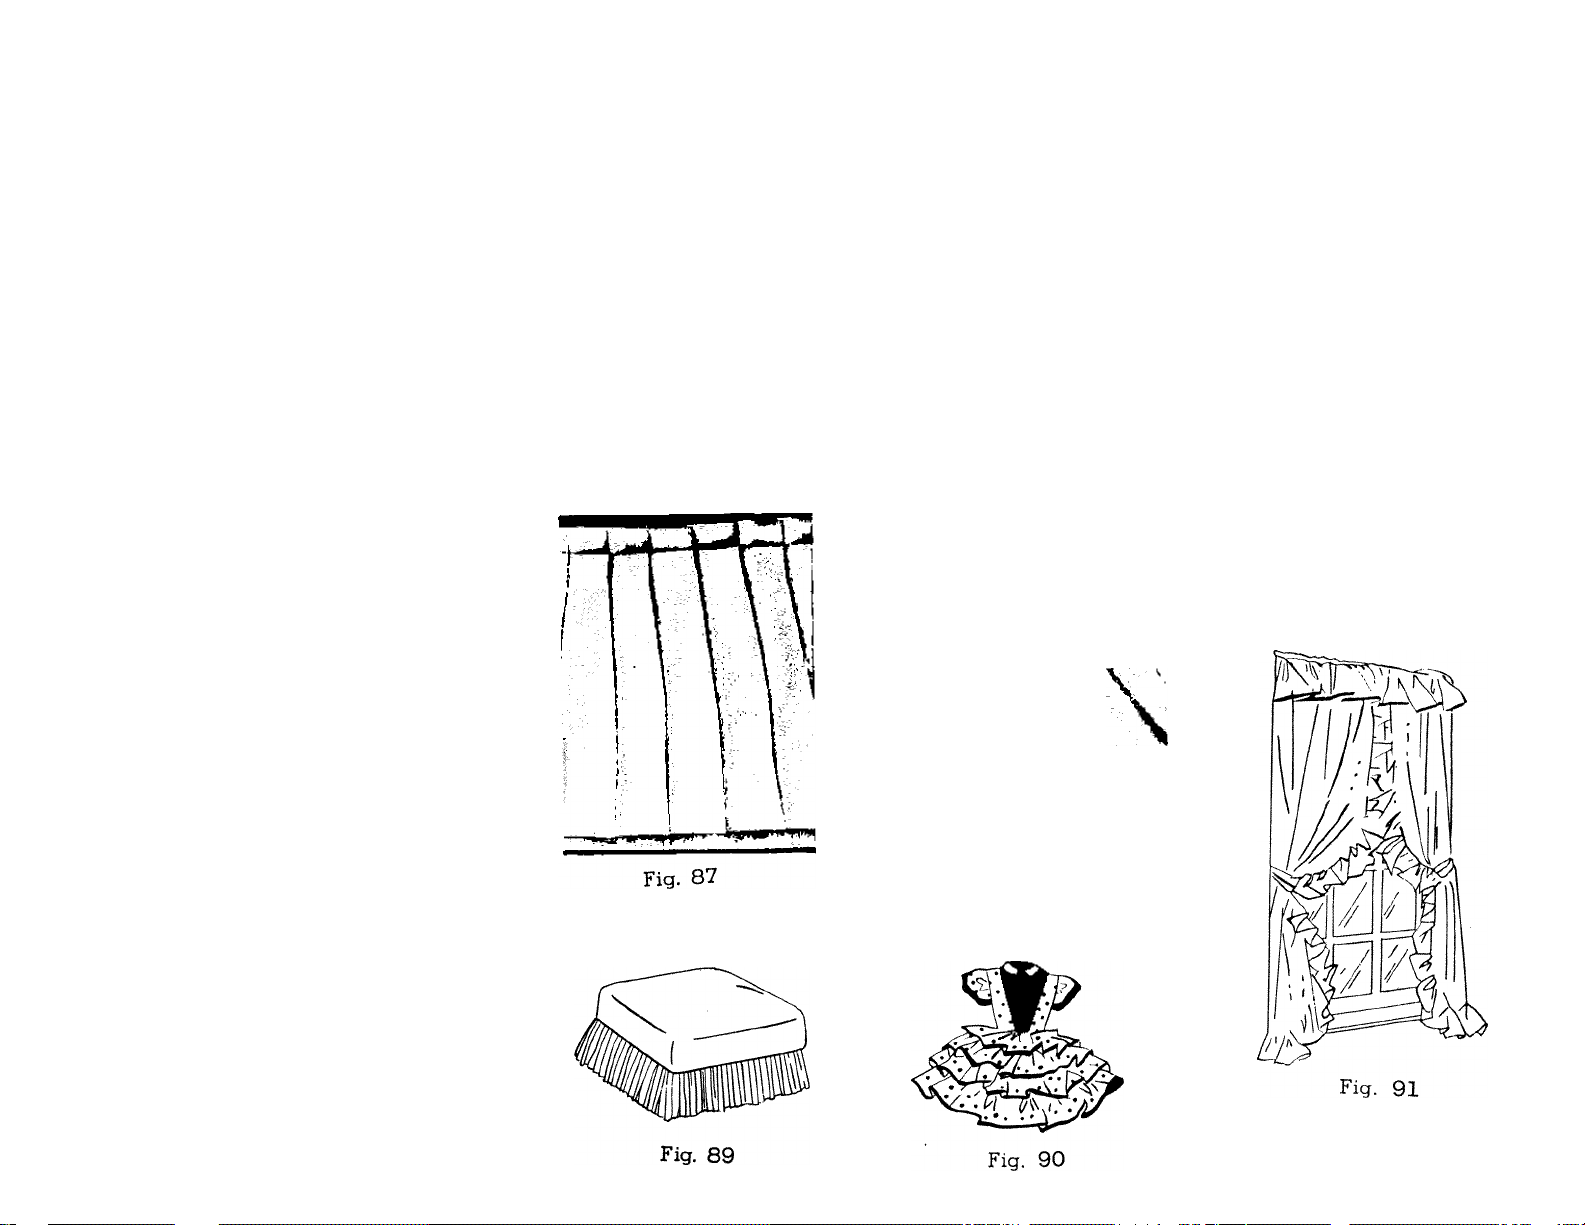
RÜFFLER
Fig. 88
43
1
Page 45
44
SEWING TIPS
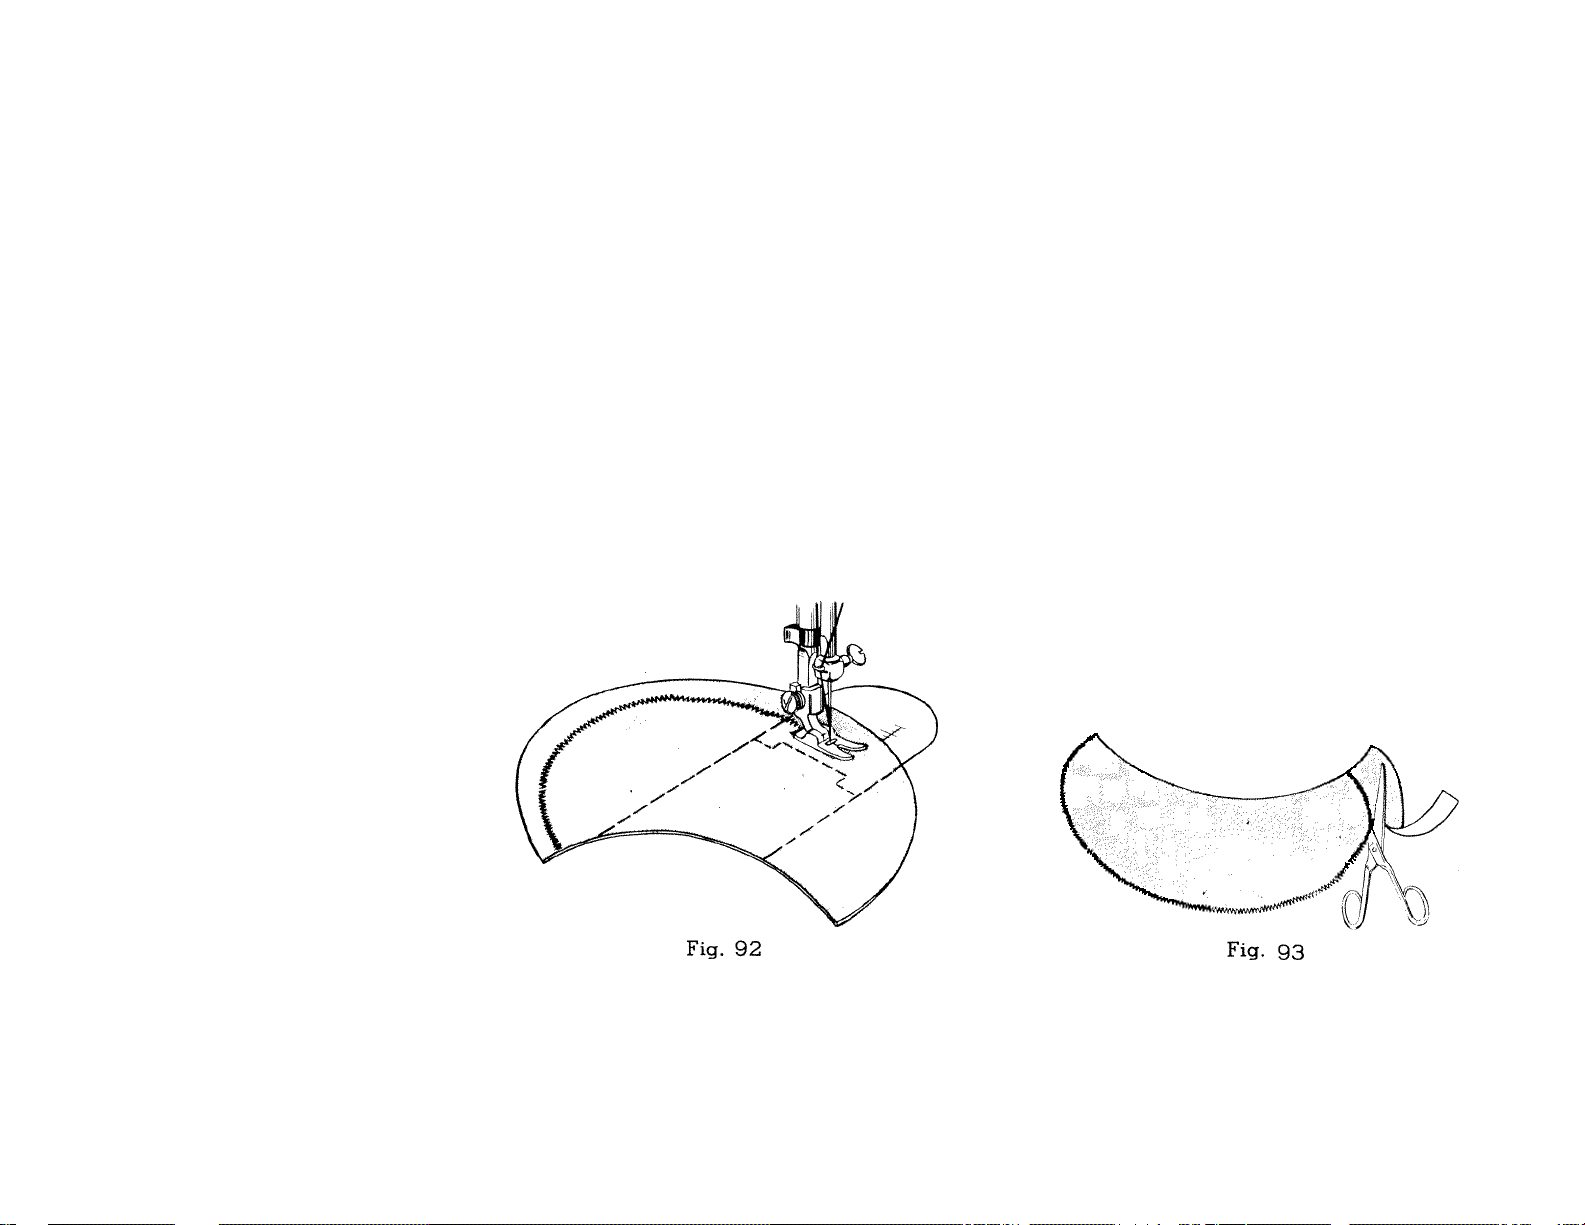
When a dainty hair-line finish is particularly desirable for the inside seams of sheer collars,
facings, and yokes, seam allowance that would ordinarily show through is eliminated by follow
ing the seam outline with a narrow zigzag stitch.
Trim seam allowance close to line of stitching. Turn and press.
EVENLY SPACED BUTTONHOLES
To make a row of buttonholes evenly spaced and accurately stitched, draw the outlines for
the buttonholes on one long strip of tissue paper. Pin this pattern to position on the garment
with fabric strips under each marking. Stitch around the outlines then tear paper away.
1^«
Page 46
,a
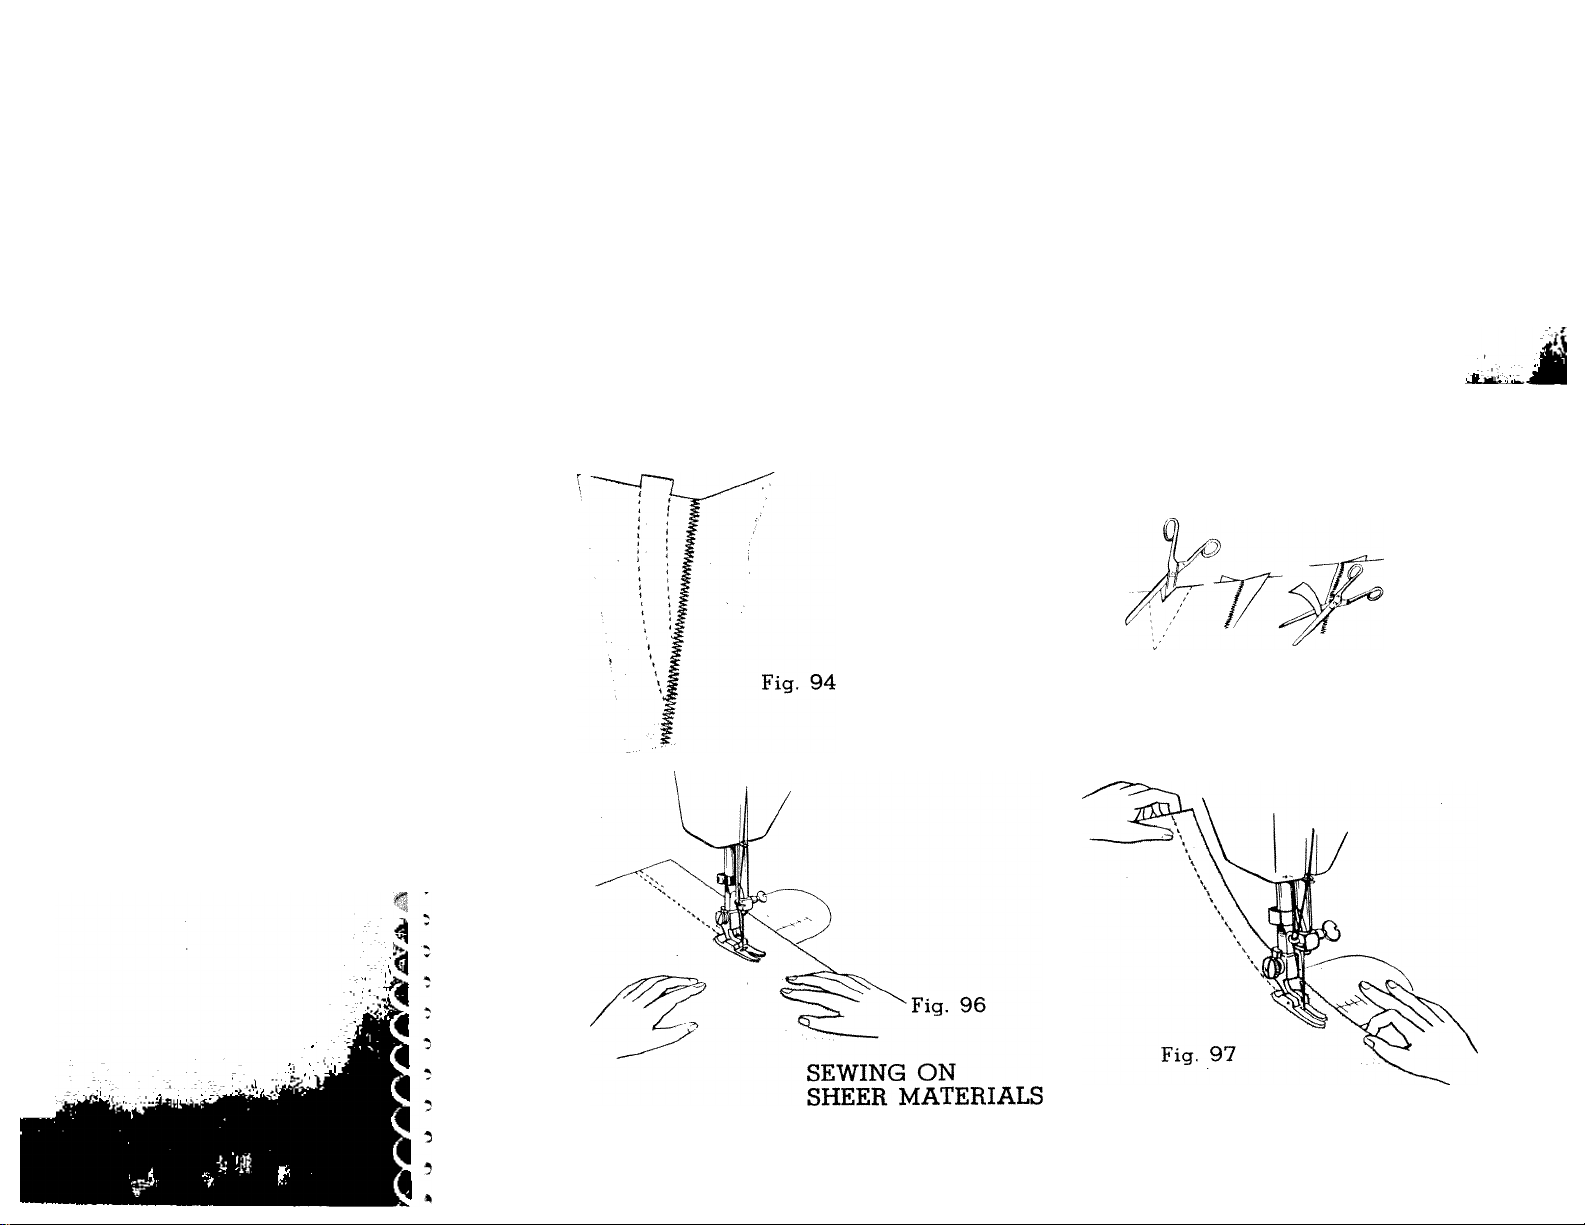
SHAPING DARTS IN INTERFACINGS
3
3-2
Center
Cut interfacing down center between dart lines.
Overlap cut edges, matching dart lines. Zigzag stitch
along marking line from point to wide end of dart.
Trim both raw edges close to stitching.
Fig. 95
45
ijLwJii
Most fabrics need to be guided only in front of the presser foot as shown at le|t. Many
filmy sheers, crepes, knits, tricots, etc., require support while being stitched. For such fabric use
the straight stitch throat plate and presser foot and apply gentle tension by holding seam in
I,«Til- Kaffir ni tbo nrefisser foot as shown at riaht.
Page 47
46
OVERCASTING WORN EDGES
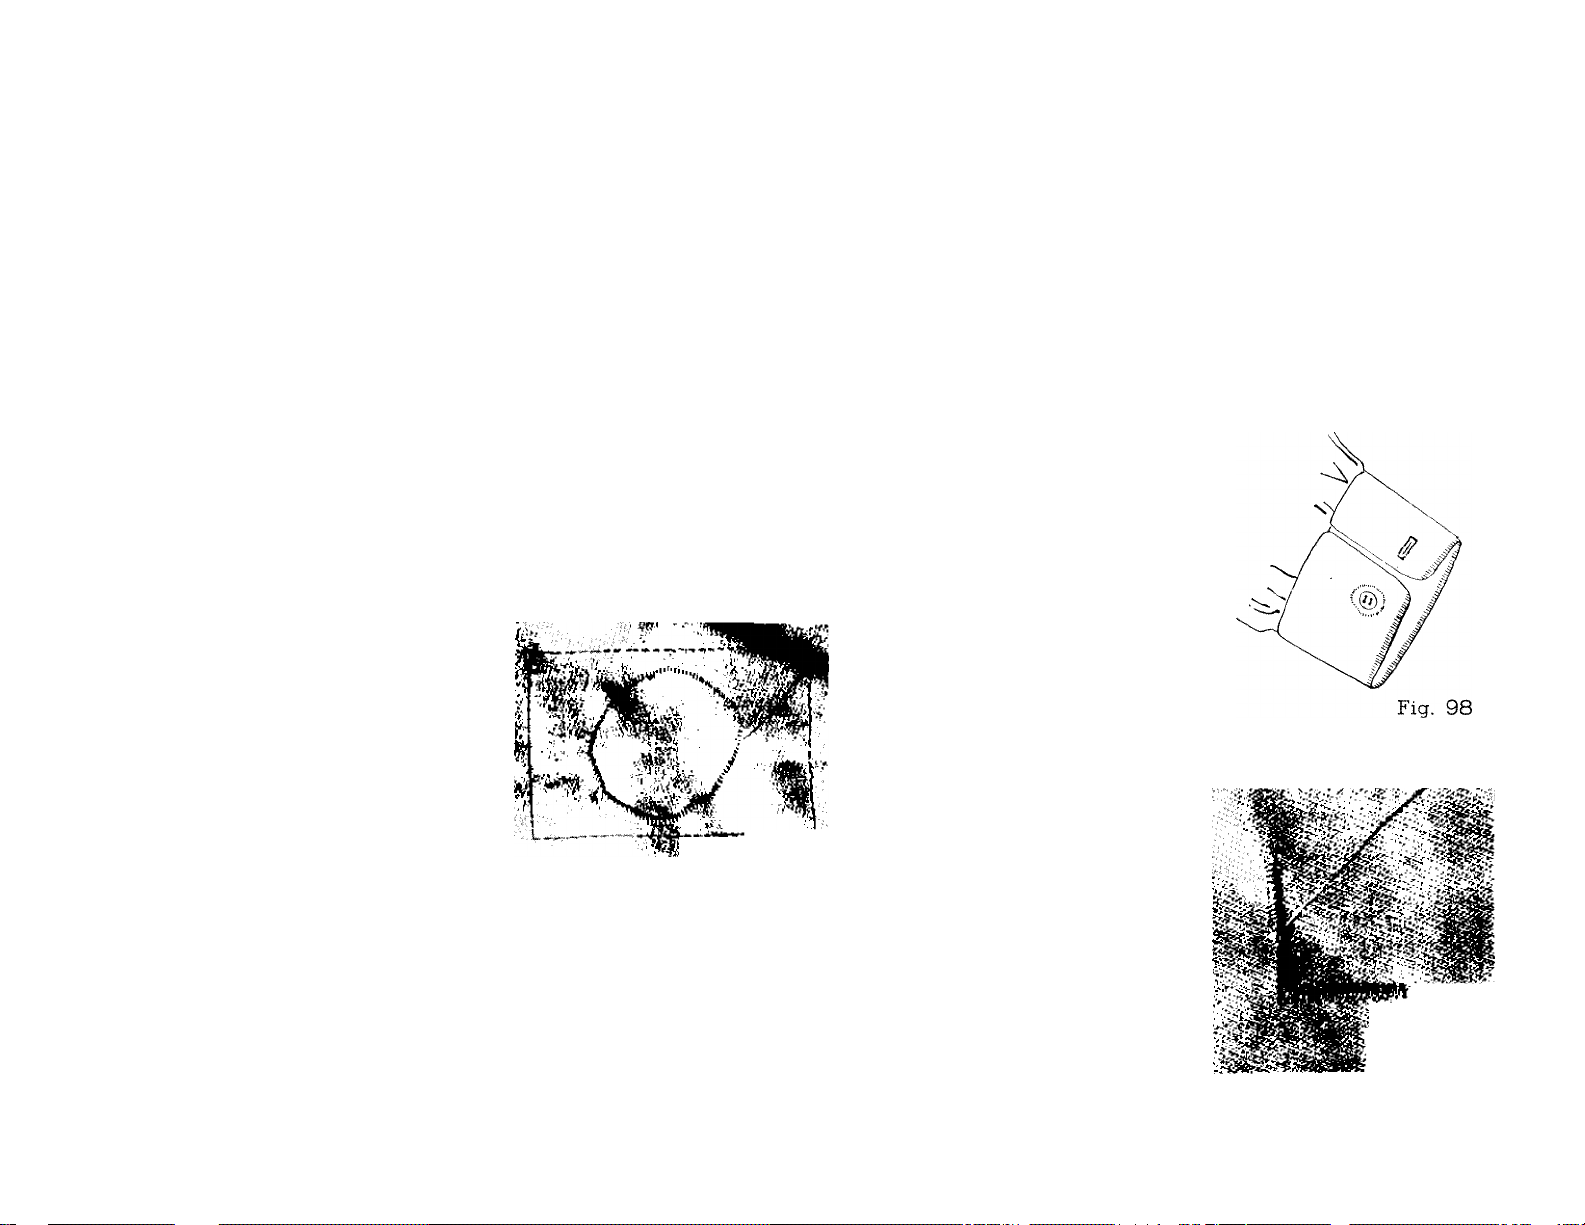
Zigzag stitch along the worn edges, catching the fabric as the
needle swings to the left, and allowing the needle to just passover the edge of the fabric on the right Fig. 98
PATCHING
Machine baste patch into
place under hole or worn area
which has been cut away. Then
zigzag stitch the patch into place
by overcasting around edge of
hole. Fig. 99
Fig 99
STRAIGHT OR THREE CORNERED TEAR
Zigzag stitch along a straight tear catching fabric on left and
right side of tear by swing of needle. Be sure your tensions are
not too tight or puckering will be encountered.
In mending a three cornered tear, zigzag stitch from each end
to center pig. 100
' 'jlV . •’
"¿X'.- ‘-V
Fig. 100
Page 48
PLAIN BOUND BUTTONHOLE
Cut straight or bias strips of fabric 2"
wide and 1" longer than the desired but
tonholes. Place right sides together over
positions for buttonholes. Mark exact length
of each buttonhole in center of each strip; place
a pin through center of the marking. Begin
to stitch at the pin ; marking an oblong box
Vs” above and below the line; Yi" across
each end. Run a few stitches beyond start
ing point to reinforce. View 1,
Slash through the center line of the box
to within of each end, then diagonally
into each corner, View 2. Turn the strip
through the opening, press seams flat across
the ends so the facing will not be visible
from the right side. Told the strip to meet
in the center of the opening. Baste the folds
together across the opening, View 3.
Turn garment back at each end and stitch
across the strip, securing the triangular slash
ed section to the pleated strip and press. View
4. Bring facing of garment to position and
baste around each buttonhole. Insert the
point of a pin through each corner and slash
through the center and into each corner prn
Turn under the raw edges and slipstitch
the facing to the underside of the buttonhole,
View 5. Press the finished buttonhole, View
6.
VIEW 1
VIEWS
VIEW2
VIEW 5
VIEW6
Page 49

48
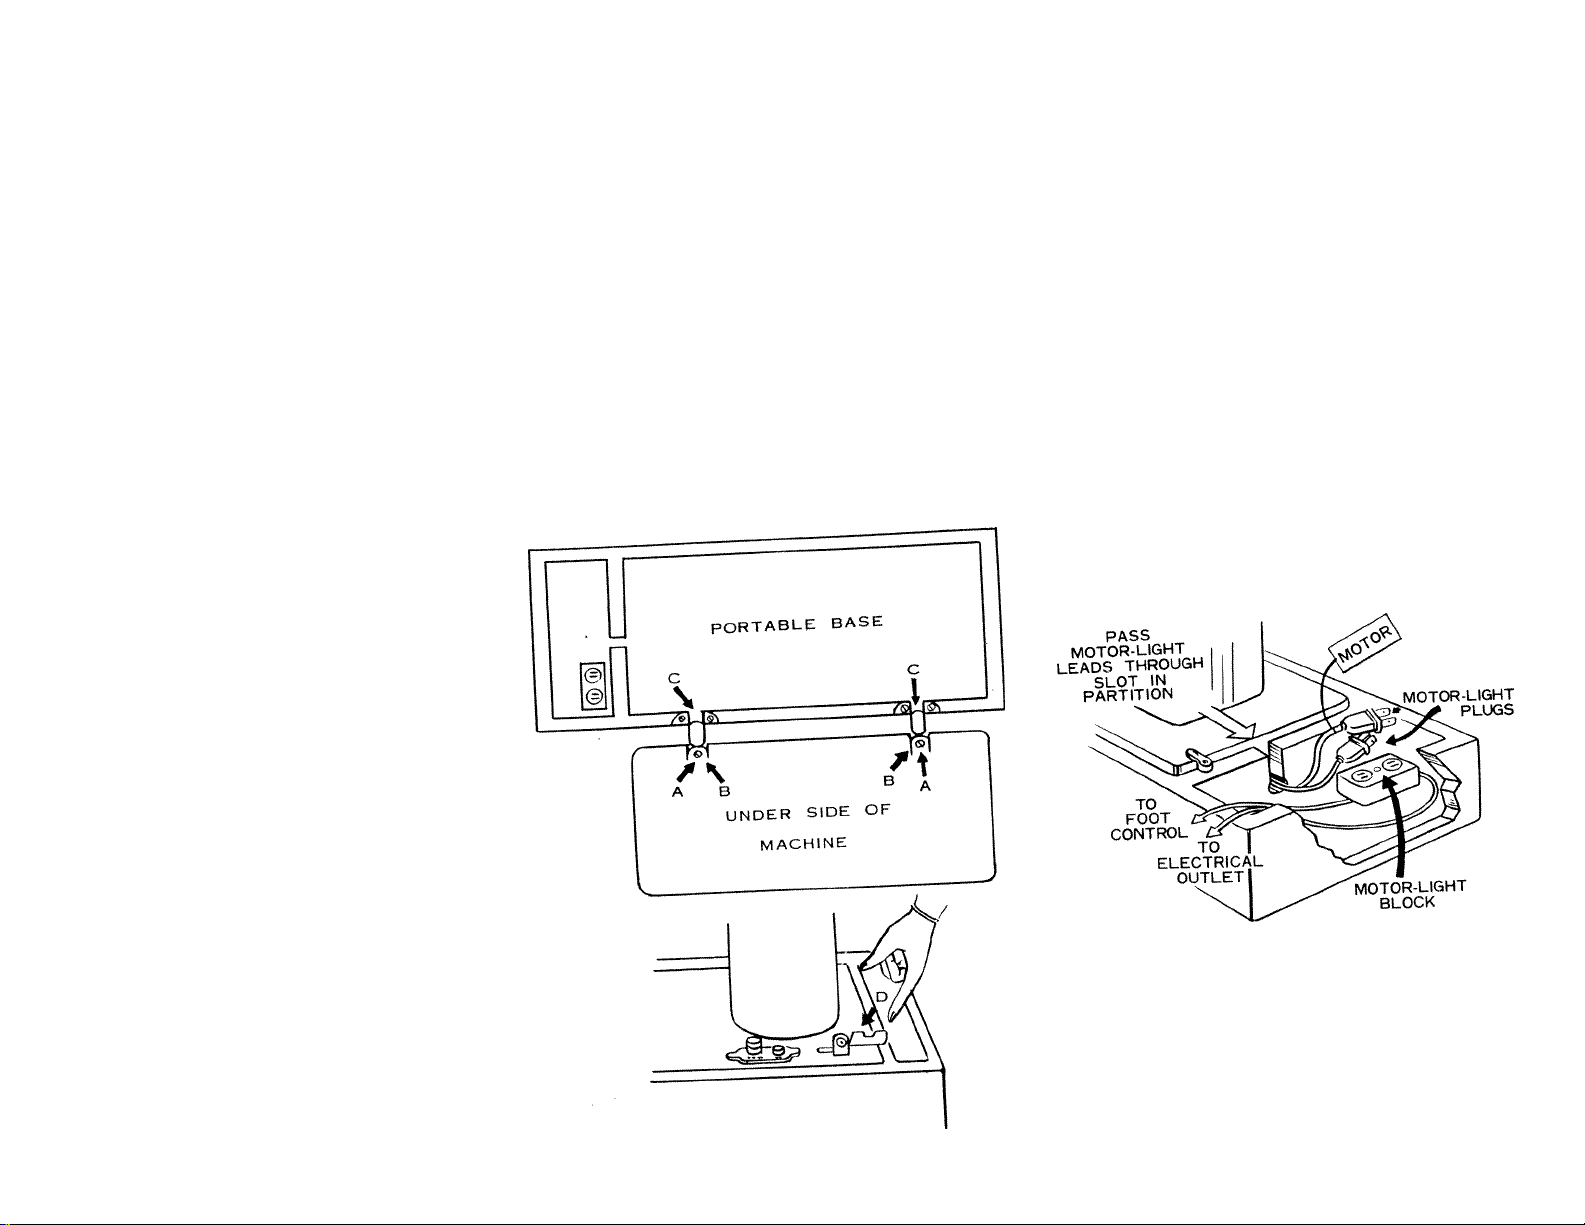
FOR PORTABLE INSTALLATION
Please read these important instructions
which were written to aid you in placing your
new sewing machine on its portable base.
First, remove the nail which holds the foot
control inside the base to avoid damage in
shipping. If a small plastic clamp is fastened
to the back and not to the top of the parti
tion at one end of the base, remove it, too.
After unpacking the sewing machine unit,
being certain to take out the instruction book,
guarantee and accessory box, lay the unit
face down on a table. You will see two
clamping screws A entering head hinge holes
B on the underside of the back.
On the base you will find two head hinges
C which will fit into holes B. Lower the
base onto the sewing machine fitting hinges
C into holes B. Tighten screws A securely
with a screw drivef.
With machine in sewing position attach
plastic clamp D to top of partition with
screw provided so that it may be turned ac
ross the bed of the machine, to hold it down.
(On some bases the clamp may be positioned
in the proper spot).
To make the electrical connection draw
the two wires through the slot in the partition
of the base. Plug the cord labeled "Motor"
into the receptacle marked "Motor" on the
block attached to the outer section of the
base. Then insert the other cord into the
"Light" receptacle.
Place the foot control on the floor, insert
plug into a wall outlet (110-115 volts) and
you are ready to sew. But first read the in
struction book to become familiar with the
threading of the machine, tension adjustments
and all the other features designed to make
sewing a pleasure.
Page 50
49
%
■5
Ч
ч
:4
Page 51
50
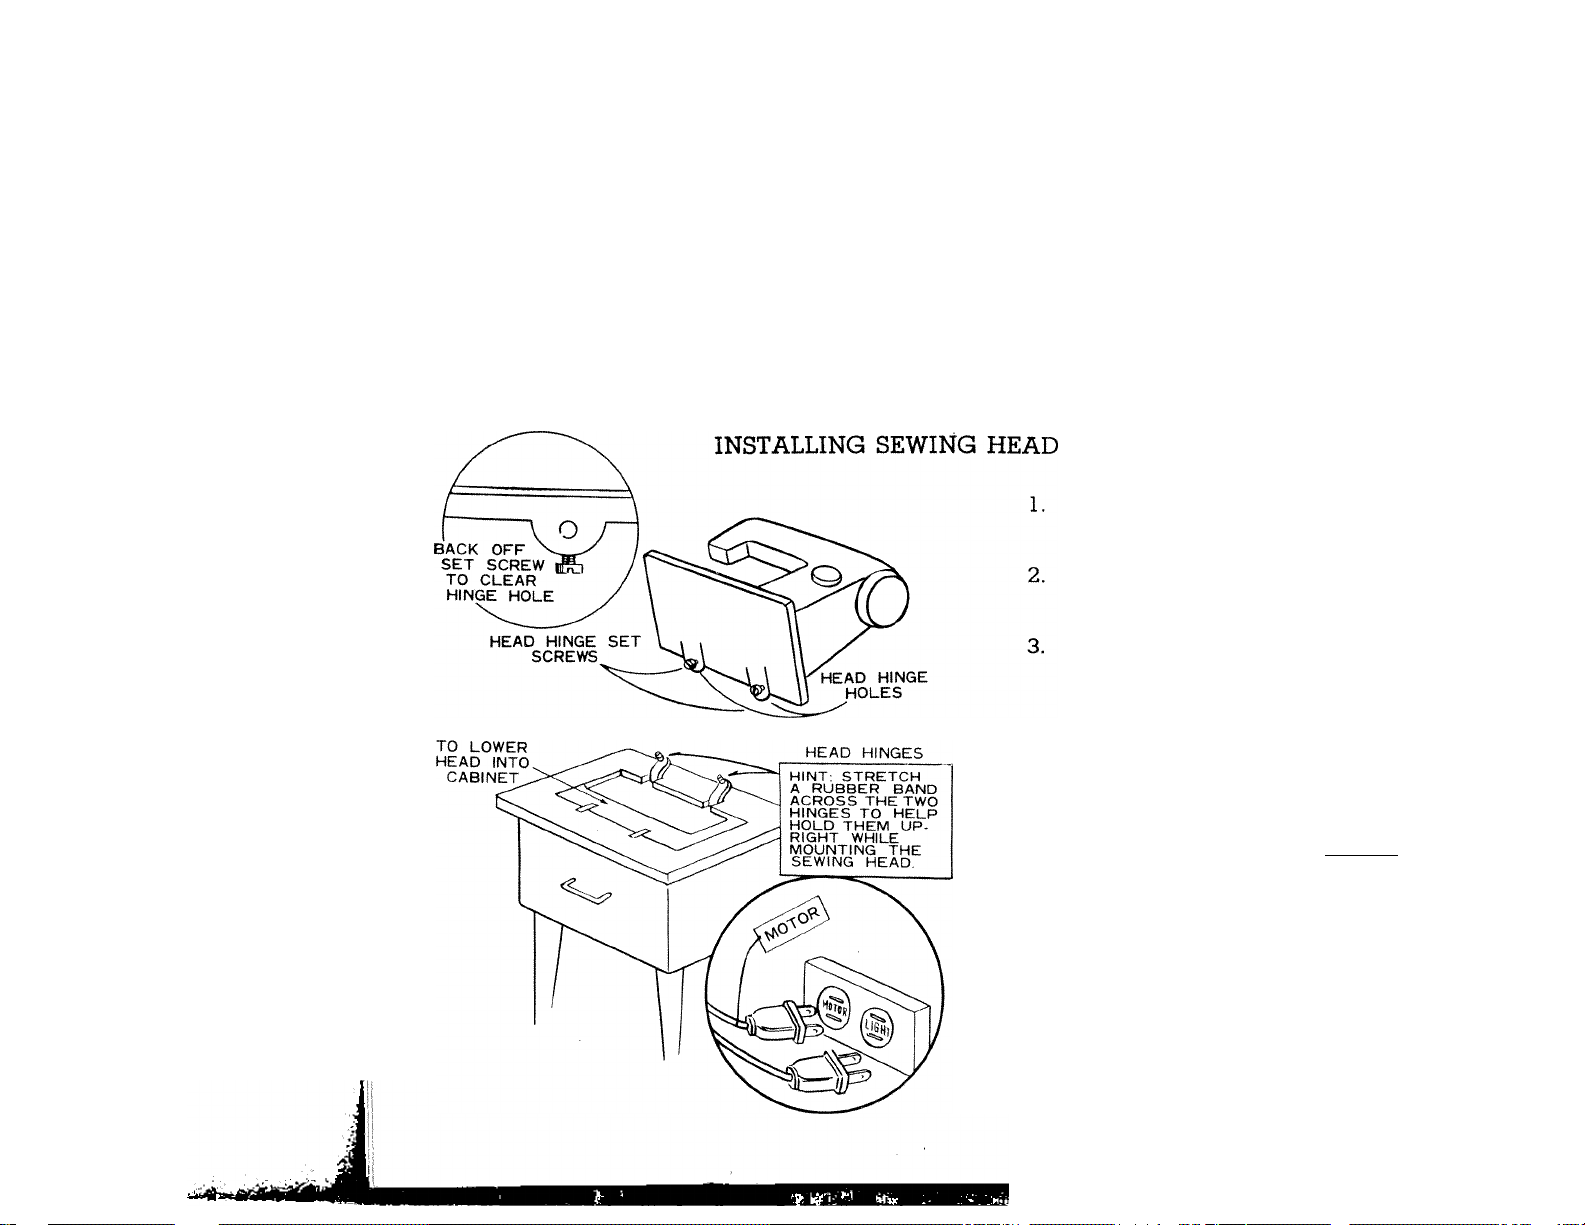
LIFT FLAP
Back oii both head hinge set screws
until head hinge hole is clear.
Tilt head hinge tongues up and back
as far as they will go.
Carefully slip head onto head hinges
- - making sure tongues are inserted
as far as they can go into head hinge
holes.
Allow the head to rest in its tilted-
back position.
Tighten both set screws securely with
screw driver.
Plug electrical leads into sockets lo
cated inside cabinet. Cord identified
with "motor" tag must be plugged
into socket marked "motor". Un
tagged cord goes to "light" socket.
 Loading...